globalscape secure ftp server, v3 · globalscape® secure ftp server, v3 page 8 of 28 the ftp...
TRANSCRIPT
GlobalSCAPE® Secure FTP Server, v3
Quick Start Guide for Interoperability with Cisco Unified Communications Manager

GlobalSCAPE, Inc. (GSB)
Corporate Headquarters
Address: 4500 Lockhill-Selma Road, Suite 150 San Antonio, TX (USA) 78249
Sales: (210) 308-8267
Sales (Toll Free): (800) 290-5054
Technical Support: (210) 366-3993
Web Support: http://www.globalscape.com/support/
© 2008 GlobalSCAPE, Inc. All Rights Reserved
October 16, 2008

Page 3 of 28
Contents
Introduction ................................................................................................................... 4
System Requirements for Secure FTP Server ....................................................................................... 4
Download the Software ................................................................................................. 5
Install, Activate, and Configure Secure FTP Server ................................................... 6
Activate the SFTP Module .................................................................................................................... 17
Configure the SFTP Connection ........................................................................................................... 17
Configure the Cisco Unified Communications Manager for Use with Secure FTP Server .................. 20
Getting Help ................................................................................................................. 21
Windows-Specific Procedures ................................................................................... 22
Creating a Windows User Account ....................................................................................................... 22
Create/Edit Windows Registry Keys for TCP/IP Performance Tuning ................................................. 26

Page 4 of 28
Introduction
The topics below provide instructions for installing and configuring Secure FTP Server and its SFTP
module to interoperate with Cisco Unified Communications Manager versions 5.1.x and 6.1.x.
For the quickest, most error-free installation, have this Quick Start Guide open or printed out so that you
can perform each of the steps in order as described in this guide.
1. Visit GlobalSCAPE's "Cisco-certified" page, http://www.globalscape.com/gsftps/cisco, to order
Secure FTP Server configured for Cisco Unified Communications Manager interoperability or to
request a trial serial number. The serial number and a download link will be sent to you via e-mail.
2. Install the Server and the SFTP module and Activate Secure FTP Server.
3. Activate the SFTP module.
4. Configure the SFTP connection.
5. Configure Cisco Unified Communications Manager to use Secure FTP Server as its SFTP server
System Requirements for Secure FTP Server
Runs on Windows 2000 Professional, Windows XP Professional, Windows Server 2003 or
Windows Server 2003 x64
Super VGA (1,024x768) or higher-resolution video adapter and monitor for the administrator
interface
1 GB of RAM
For more information about Secure FTP Server:
For instructions for adding user accounts and other Secure FTP Server configuration procedures,
refer to the in-application help or the online help at
http://help.globalscape.com/help/secureserver3/.
Request a trial serial number or purchase Secure FTP Server configured for Cisco Unified
Communications Manager interoperability at
http://www.globalscape.com/promo/gsftps_cisco.aspx.
For more information about GlobalSCAPE's Secure FTP Server, refer to
http://www.globalscape.com/gsftps/.

GlobalSCAPE® Secure FTP Server, v3
Page 5 of 28
Download the Software
GlobalSCAPE's "Cisco-certified" page, www.globalscape.com/gsftps/cisco, provides information and links
for requesting a trial serial number or purchasing Secure FTP Server. The executable installs both the
Server and the SFTP module.
If you click Request a Trial, the Try Secure FTP Server page appears:
If you click Purchase, the Purchase Secure FTP Server page appears:
After you complete the purchase or trial form and provide your contact information, the serial number and
download link are emailed to you automatically. Follow the instructions in the email to download the
program, then follow the instructions below to install, activate, and configure Secure FTP Server. Keep
your email handy so that you can copy the serial number from the email and paste it into the serial
number box.
Click Secure FTP Server
(the SSH2 module is included in
the trial)
Click one of the
Secure FTP Server
options
and
one of the
SSH2 Add-on
Module options

GlobalSCAPE® Secure FTP Server, v3
Page 6 of 28
The instructions below are for installing the Server and SFTP module without the Auditing and Reporting
Module (ARM) database and HTTPS module. For detailed instructions for installing the Server with ARM
and/or HTTPS, simply follow the instructions in the wizard or refer to the Secure FTP Server online help
at http://help.globalscape.com/help/secureserver3/.
Install, Activate, and Configure Secure FTP Server
The instructions below are continuous from installing, activating, to configuring. The entire process will
take less than ten minutes.
The screenshots in this document were taken in various versions of Windows. Your interface will differ depending on the version of Windows that you are using.
To install, activate, and configure Secure FTP Server
1. Double-click the executable to start the installer. The Welcome page appears.
2. Click Next. The License Agreement appears.

GlobalSCAPE® Secure FTP Server, v3
Page 7 of 28
3. You must read and then accept the license agreement (click Yes) in order to continue.
4. Click Next. The Destination Location page appears.
5. Specify the folder in which to install Secure FTP Server, then click Next. The Select
Components page appears.

GlobalSCAPE® Secure FTP Server, v3
Page 8 of 28
The FTP Server and Administrator Interface check boxes are selected by default.
FTP Server: This component installs the Server and the modules.
Administrator Interface: This component is the administrative interface for the server. It
must be installed on the server computer and it may be installed on another computer to
provide remote administration over TCP/IP.
If the installer offers the option to install the Auditing and Reporting module and you do not need the database, you can clear the check box and continue with the installation as described below. If you want to install the database, follow the instructions in the installer and/or refer to the Secure FTP Server online help http://help.globalscape.com/help/secureserver3/.
6. Click Next. The Administrator Account Settings page appears.

GlobalSCAPE® Secure FTP Server, v3
Page 9 of 28
7. Create a username and password that you will use to connect to and administer Secure FTP
Server, then click OK.
If the administrator username or password is lost, you will not be able to administer the Server. Resetting the administrator account is possible, but will result in the loss of all user- and group-specific settings.
The programs are installed and the Finished Setup page appears.
8. The Launch Administrator Interface check box is selected by default. Leave it selected so that
you can continue with activation and configuration.
If the Launch Administrator Interface check box is selected, the installation process moves immediately to activation. If you clear the check box, installation of the Secure FTP Server is complete, but you must click the desktop icon or Start menu icon to open the Administrator Interface to configure and activate the Server and SFTP module before you can connect to it.
9. Select the View README file check box if you want to read the release notes, then click
Finished.
At this point, installation is complete. The wizard continues directly into activation and configuration; however, if you need to stop now, you can activate and configure the Server later. Simply open the Administrator interface by clicking its icon on the Start menu or desktop and the wizard will continue from step 11.

GlobalSCAPE® Secure FTP Server, v3
Page 10 of 28
The GlobalSCAPE Secure FTP Server Administrator and Connect to FTP Server dialog box
appear.
10. Provide the administrator Username and Password that you created during installation, then
click Connect. The Welcome dialog box appears.

GlobalSCAPE® Secure FTP Server, v3
Page 11 of 28
11. You are prompted to provide a trial or purchased serial number to continue. Click Enter Trial
Serial Number or Enter Serial Number and follow the instructions.
If you have not yet received a serial number, refer to http://www.globalscape.com/promo/gsftps_cisco.aspx to purchase or request a trial serial number.
The Registration wizard appears.
12. Type or paste your serial number into the Serial Number box, then click Next. The Personal
Details page appears.

GlobalSCAPE® Secure FTP Server, v3
Page 12 of 28
13. GlobalSCAPE Customer Support can use the information on this page to look up your account if
you need to contact Customer Support. Complete the personal details fields, then click Next.
Secure FTP Server contacts the registration server to activate the serial number.
In step 11, if you clicked Enter Serial Number, but provided a trial serial number instead of a
purchased serial number, registration fails and an error message appears. If you clicked Enter
Serial Number in error, you can click Cancel to try again.
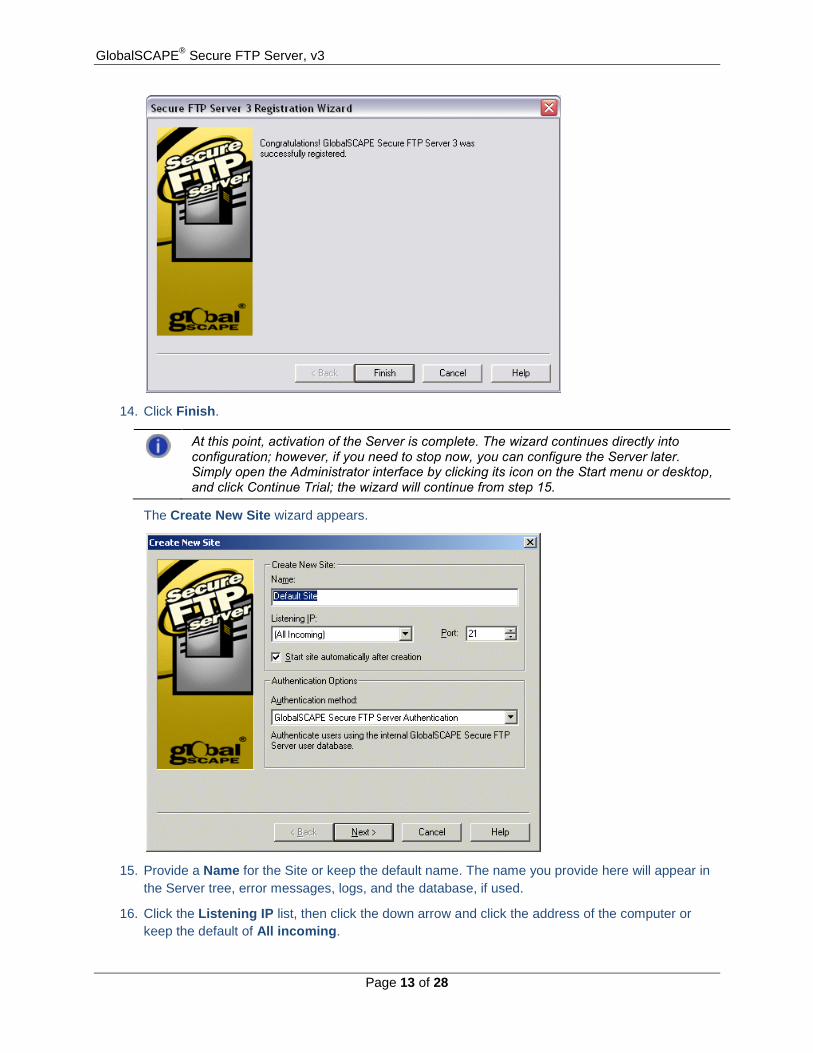
If registration is successful, the Registration Successful page appears.
GlobalSCAPE® Secure FTP Server, v3
Page 13 of 28
14. Click Finish.
At this point, activation of the Server is complete. The wizard continues directly into configuration; however, if you need to stop now, you can configure the Server later. Simply open the Administrator interface by clicking its icon on the Start menu or desktop, and click Continue Trial; the wizard will continue from step 15.
The Create New Site wizard appears.
15. Provide a Name for the Site or keep the default name. The name you provide here will appear in
the Server tree, error messages, logs, and the database, if used.
16. Click the Listening IP list, then click the down arrow and click the address of the computer or
keep the default of All incoming.
GlobalSCAPE® Secure FTP Server, v3
Page 14 of 28
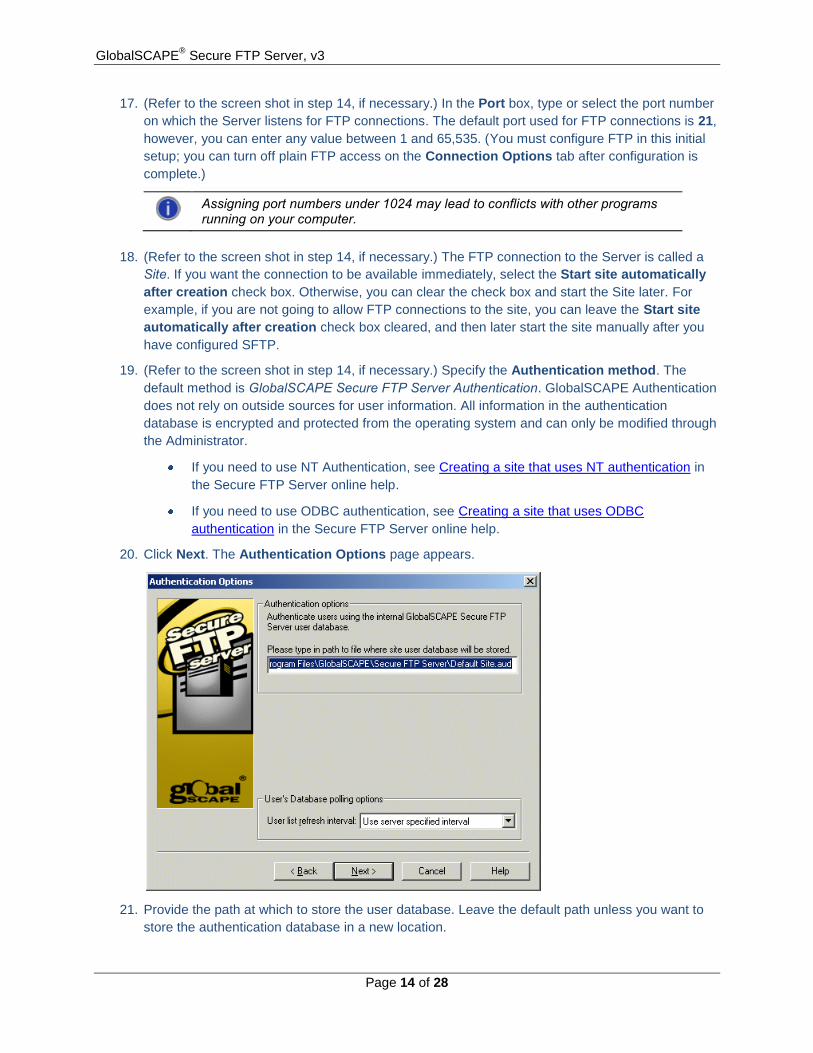
17. (Refer to the screen shot in step 14, if necessary.) In the Port box, type or select the port number
on which the Server listens for FTP connections. The default port used for FTP connections is 21,
however, you can enter any value between 1 and 65,535. (You must configure FTP in this initial
setup; you can turn off plain FTP access on the Connection Options tab after configuration is
complete.)
Assigning port numbers under 1024 may lead to conflicts with other programs running on your computer.
18. (Refer to the screen shot in step 14, if necessary.) The FTP connection to the Server is called a
Site. If you want the connection to be available immediately, select the Start site automatically
after creation check box. Otherwise, you can clear the check box and start the Site later. For
example, if you are not going to allow FTP connections to the site, you can leave the Start site
automatically after creation check box cleared, and then later start the site manually after you
have configured SFTP.
19. (Refer to the screen shot in step 14, if necessary.) Specify the Authentication method. The
default method is GlobalSCAPE Secure FTP Server Authentication. GlobalSCAPE Authentication
does not rely on outside sources for user information. All information in the authentication
database is encrypted and protected from the operating system and can only be modified through
the Administrator.
If you need to use NT Authentication, see Creating a site that uses NT authentication in
the Secure FTP Server online help.
If you need to use ODBC authentication, see Creating a site that uses ODBC
authentication in the Secure FTP Server online help.
20. Click Next. The Authentication Options page appears.
21. Provide the path at which to store the user database. Leave the default path unless you want to
store the authentication database in a new location.

GlobalSCAPE® Secure FTP Server, v3
Page 15 of 28
22. (Refer to the screen shot in step 20, if necessary.) In the User list refresh interval box, specify
how often the Server should check the authentication database for new users (Never, every 5,
15, or 30 minutes, 1, 2, 6, or 12 hours, or once per day).
23. Click Next. The final page of the wizard appears.
24. In the Default FTP Root Folder area, specify a path to the root folder for the site.
25. Select the Create standard subfolders check box to automatically create Bin, Pub, Usr and
Incoming folders with appropriate permissions under the root folder. (This is selected by default,
but is only necessary if you are trying to mimic a typical default *nix Server setup.)
26. Select the Enable anonymous access to the server check box to create an anonymous
account that does not require a password. The account will have limited permissions.
27. Select the Auto assign home folders to site users check box to automatically create a user
folder under \Site Root\Usr\ when a new user is added.
28. Click Finish. If the root folder has not already been created, you are prompted to do so.
29. Click Yes. The folder is created and the Create New Site wizard closes.

GlobalSCAPE® Secure FTP Server, v3
Page 16 of 28
Secure FTP Server is now configured to allow FTP connections at the IP address and port that you
specified. In the next steps, you will configure SFTP access and disable FTP, if necessary.
At this point, the Server is installed and activated and a standard site is created. If you need to stop now, you can configure the Site later. Simply open the Administrator interface by clicking its icon on the Start menu or desktop, and click k; the wizard will continue from step 15.
Next:
Activate the SFTP module so that you can configure it to allow the Site to use SFTP to connect
to Secure FTP Server.

GlobalSCAPE® Secure FTP Server, v3
Page 17 of 28
Activate the SFTP Module
You cannot enable SFTP until you activate the module with either the trial or a purchased serial number.
If you are activating a trial serial number, the SFTP module can be enabled and used during the trial
period without a separate license. That is, you only need to perform this procedure if you purchased a
separate license for the SFTP module.
To activate the module
1. On the main menu, click Help > Enter SFTP Module Serial Number.
The Registration Wizard appears.
2. Follow the instructions in the wizard to activate the module. (Refer to the procedure for activating
the Server, if necessary.)
Configure the SFTP Connection
After you have activated the SFTP module, you must configure the SFTP port, the .pvk file to use for the
SSH2 public/private key pair, the algorithms you want to allow for encrypting SFTP sessions, and
algorithms to use for message authentication.
To configure SFTP
1. In the left pane, click the Site.
2. In the right pane, click the SFTP Settings tab.

GlobalSCAPE® Secure FTP Server, v3
Page 18 of 28
3. Select the Enable SFTP check box.
4. In the SFTP Port box, specify which port to use, if different from the default of port 22.
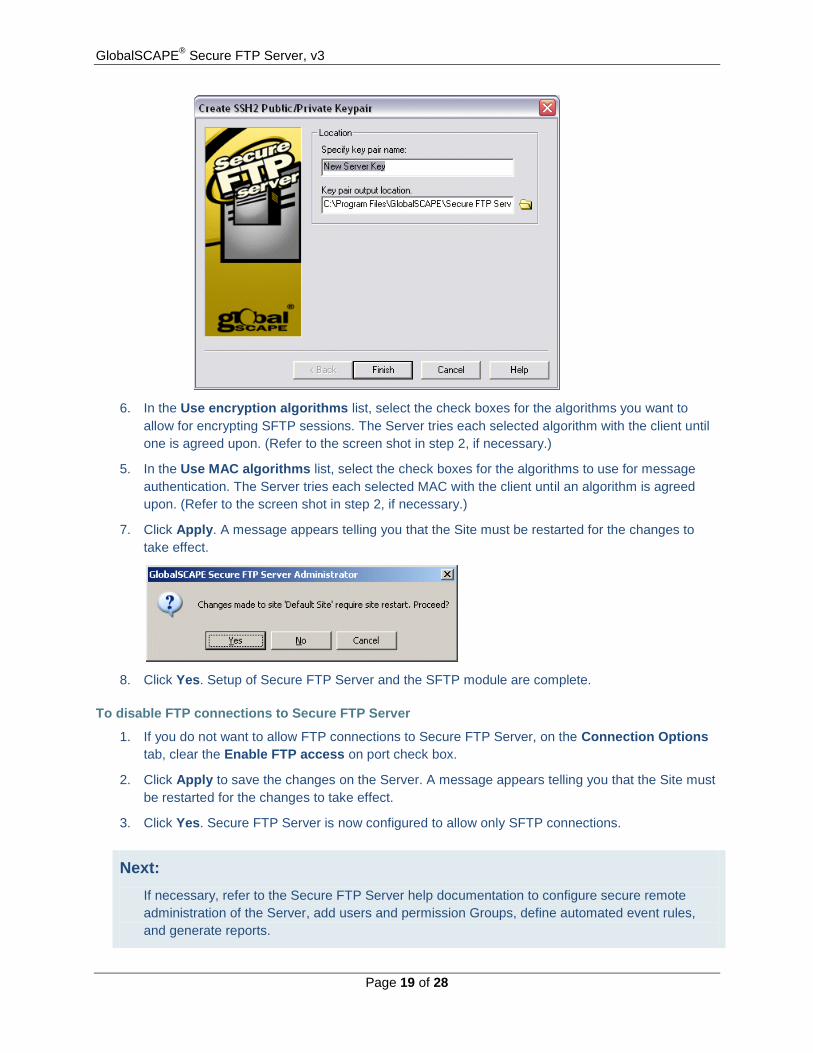
5. In the Site key pair box, provide the path to the .pvk file to use for the SSH2 public/private key
pair. (Refer to the screen shot in step 2, if necessary.)
If you do not yet have a key pair, click Create to create a key pair. The Create SSH2
Public/Private Keypair dialog box appears. Type a name for the key pair and the
location to store it, then click Finish. The Server generates and stores the key pair.
GlobalSCAPE® Secure FTP Server, v3
Page 19 of 28
6. In the Use encryption algorithms list, select the check boxes for the algorithms you want to
allow for encrypting SFTP sessions. The Server tries each selected algorithm with the client until
one is agreed upon. (Refer to the screen shot in step 2, if necessary.)
5. In the Use MAC algorithms list, select the check boxes for the algorithms to use for message
authentication. The Server tries each selected MAC with the client until an algorithm is agreed
upon. (Refer to the screen shot in step 2, if necessary.)
7. Click Apply. A message appears telling you that the Site must be restarted for the changes to
take effect.
8. Click Yes. Setup of Secure FTP Server and the SFTP module are complete.
To disable FTP connections to Secure FTP Server
1. If you do not want to allow FTP connections to Secure FTP Server, on the Connection Options
tab, clear the Enable FTP access on port check box.
2. Click Apply to save the changes on the Server. A message appears telling you that the Site must
be restarted for the changes to take effect.
3. Click Yes. Secure FTP Server is now configured to allow only SFTP connections.
Next:
If necessary, refer to the Secure FTP Server help documentation to configure secure remote
administration of the Server, add users and permission Groups, define automated event rules,
and generate reports.

GlobalSCAPE® Secure FTP Server, v3
Page 20 of 28
Configure the Cisco Unified Communications Manager for Use with Secure FTP
Server
Cisco Unified Communications Manager enables administrators to use SFTP servers for various
functions, including to store system backups, send call detail records (CDRs) and call management
records (CMRs) to 3rd-party billing servers, send trace and log files from a Cisco Unified Communications
Manager server to another server on the network, and to access files during software installation and
upgrades. For information on how to configure SFTP servers in Cisco Unified Communications Manager
applications to perform these functions, refer to the appropriate Cisco Unified Communications Manager
documentation, as described below.
The following documents are available at the following link:
http://www.cisco.com/en/US/products/sw/voicesw/ps556/prod_maintenance_guides_list.html.
Cisco Unified Serviceability Administration Guide—Describes how to send CDRs and CMRs to
3rd-party billing servers.
Disaster Recovery System Administration Guide—Describes how to store system backups.
Cisco Unified Real-Time Monitoring Tool Administration Guide—Describes how to download
trace and log files.
Cisco Unified Communications Operating System Administration Guide—Describes how to
access upgrade file during the upgrade process to newer versions of Cisco Unified
Communications Manager.
The following documents are available at the following link: http://www.cisco.com/en/US/products/sw/voicesw/ps556/prod_installation_guides_list.html.
Installing Cisco Unified Communications Manager—Describes how to access upgrade files during
the installation process.
Upgrading to Cisco Unified Communications Manager from Cisco Unified Communications Manager 4.x Releases—Describes how to access the Data Migration Assistant TAR file and
upgrade files during an upgrade from supported Cisco Unified Communications Manager 4.x
releases

GlobalSCAPE® Secure FTP Server, v3
Page 21 of 28
Getting Help
For fast answers to most questions, please visit the GlobalSCAPE Help Center. Our Customer Service
team can answer your questions about software activation and registration or help with order problems. If
you need technical assistance with your software, please submit your question to the Technical Support
team.
The GlobalSCAPE User Forum is a great place to find information or seek help from the global
community of GlobalSCAPE customers and product experts.
The GlobalSCAPE Knowledge Base (KB) is a dynamic compendium of information on our
products.
Subscribe to the RSS feed to keep abreast of the latest KB articles. Copy and paste this URL
http://kb.globalscape.com/rssfeed.aspx into your RSS feed reader. (See below for examples.)
Subscribe to GlobalSCAPE E-Mail Announcements Sign up for the GlobalSCAPE Newsletter,
press releases, product announcements, and other GlobalSCAPE news.
Recover a Lost Serial Number - If you know the e-mail address you used when you activated the
software, we can send it to you at your new address.
Contact Customer Service by phone or e-mail.
Contact Sales by calling 1-800-290-5054 or 1-210-308-8267, or use the online submission form.
Sales representatives are available 8:00 a.m. to 6:00 p.m. (US Central Time) Monday through
Friday, excluding major US holidays.
Order Status - Complete the online e-mail form to request information about your order.
Support pages provide downloads, documentation, activation instructions, and the latest news
regarding GlobalSCAPE products.

GlobalSCAPE® Secure FTP Server, v3
Page 22 of 28
Windows-Specific Procedures
The information below is provided to assist you with configuring Windows to provide more security on the
computer on which Secure FTP Server is installed. It is not necessary to perform these procedures to use
Secure FTP Server with the Cisco Unified Communications Manager. When discussing with your network
administrator or IT department the best way to secure your system, keep in mind that Secure FTP Server
needs to run as a Local Service, Network Service, or Local System account, and might need access to
network resources.
Creating a Windows User Account
To secure the computer on which the Server is installed, create a Windows user account for the Server
and grant restrictive permissions to that user account. Setting up a user account increases security, but
is not required to run the Server.
To create a user account in Windows XP Professional or Windows 2000
1. After you install the Server, on the Desktop, right-click My Computer, then click Manage.
The Computer Management console appears.
2. Expand the Local users and groups node, right-click Users, then click New User.
The New User dialog box appears.

GlobalSCAPE® Secure FTP Server, v3
Page 23 of 28
3. Create the user account (e.g., GSFTPS), click Create, then click Close.
4. Close the Computer Management console.
5. In Administrative Tools, double-click Local Security Policy. The Local Security Settings
dialog box appears.
6. Expand the Local Policies node, then click User Rights Assignment.
7. In the right pane, in the Policy column, double-click Act as part of the operating system.
The Properties dialog box appears.

GlobalSCAPE® Secure FTP Server, v3
Page 24 of 28
8. Click Add User or Group. The Select Users or Groups dialog box appears.
9. Click Advanced, then click Find Now. The dialog box expands and displays the new user
account that you just created (GSFTPS).

GlobalSCAPE® Secure FTP Server, v3
Page 25 of 28
10. Select the Server's account (e.g., GSFTPS), click OK to collapse the Advanced box, then click
OK to save the changes.
11. Open the Windows Services dialog box (Start > Run > services.msc.)
12. Right-click GlobalSCAPE Secure FTP Server, then click Properties.
13. Click the Log On tab, then follow the Windows operating system procedures for selecting an
account under which the service will run.

GlobalSCAPE® Secure FTP Server, v3
Page 26 of 28
Create/Edit Windows Registry Keys for TCP/IP Performance Tuning
This topic describes how to tune Windows 2000, Windows XP, and Windows 2003 operating systems for
TCP/IP performance. It is not necessary to perform these procedures to use Secure FTP Server with the
Cisco Unified Communications Manager, and only needed in cases of extremely high traffic on the
Server.
To add a key to the registry, you can either edit it directly as described below or create and execute a
.reg file. When you have finished adding or editing these registry keys, you will need to restart the Server.
Configure the following settings or variables below according to your specific tuning needs. If necessary,
refer to the GlobalSCAPE Knowledge Base article Q10411 - HOWTO: Windows Registry Settings, for the
procedure for creating/editing keys and creating a .reg file.
Editing the Windows Registry is for advanced users only. Incorrectly editing the registry can severely damage your system. You should always back up (export a copy of) the registry before you make any changes to it.
TcpTimedWaitDelay
This key determines the time that must elapse before TCP/IP can release a closed connection and reuse
its resources. This interval between closure and release is known as the TIME_WAIT state or twice the
maximum segment lifetime (2MSL) state. During this time, reopening the connection to the client and
server costs less than establishing a new connection. By reducing the value of this entry, TCP/IP can
release closed connections faster and provide more resources for new connections. Adjust this parameter
if the running application requires rapid release, the creation of new connections, or an adjustment
because of a low throughput caused by multiple connections in the TIME_WAIT state.
To activate this feature, create the following key:
Subkey: HKEY_LOCAL_MACHINE\SYSTEM\CurrentControlSet\Services\TCPIP\Parameters
Value name: TcpTimedWaitDelay
Value data: 0x0000001e (Hex 0x0000001e = decimal 30. This value sets the wait time to 30
seconds.)
MaxUserPort
This key determines the highest port number that TCP/IP can assign when an application requests an
available user port from the system.
To activate this feature, create the following key:
Subkey: HKEY_LOCAL_MACHINE\SYSTEM\CurrentControlSet\Services\TCPIP\Parameters
Value name: MaxUserPort
Value data: (minimum) 32768
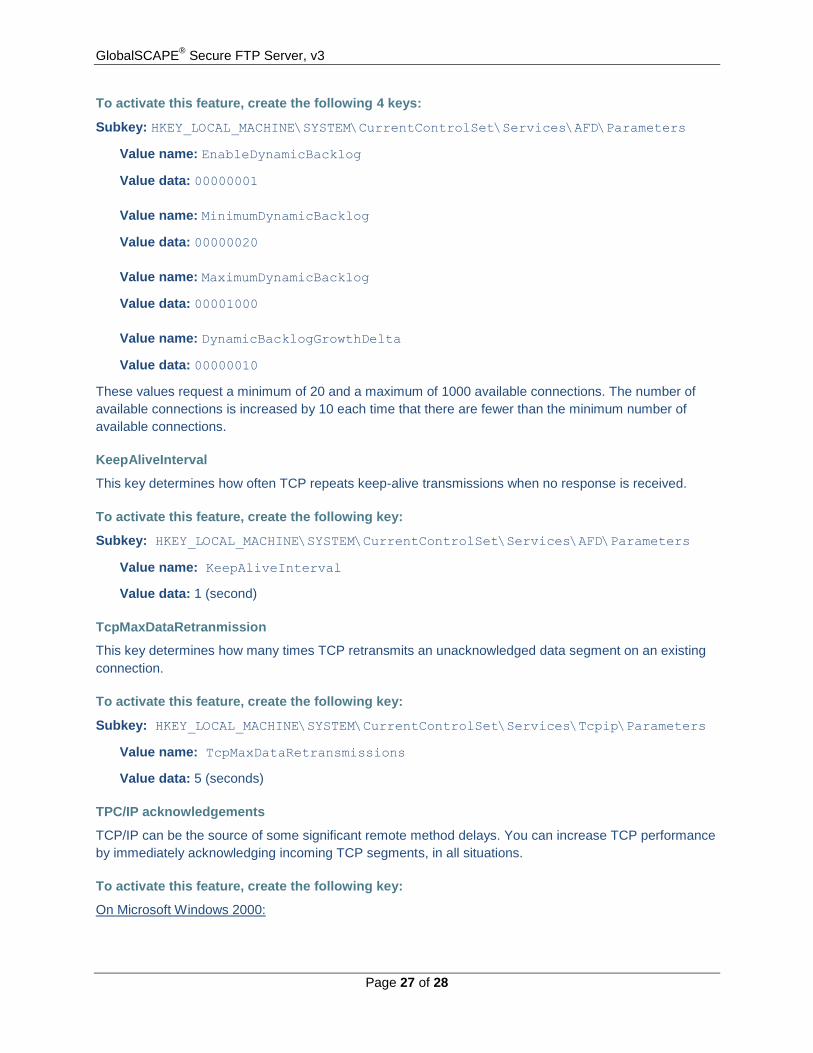
MaxConnect Backlog
These keys, if many connection attempts are received simultaneously, increase the default number of
pending connections that are supported by the operating system.
GlobalSCAPE® Secure FTP Server, v3
Page 27 of 28
To activate this feature, create the following 4 keys:
Subkey: HKEY_LOCAL_MACHINE\SYSTEM\CurrentControlSet\Services\AFD\Parameters
Value name: EnableDynamicBacklog
Value data: 00000001
Value name: MinimumDynamicBacklog
Value data: 00000020
Value name: MaximumDynamicBacklog
Value data: 00001000
Value name: DynamicBacklogGrowthDelta
Value data: 00000010
These values request a minimum of 20 and a maximum of 1000 available connections. The number of
available connections is increased by 10 each time that there are fewer than the minimum number of
available connections.
KeepAliveInterval
This key determines how often TCP repeats keep-alive transmissions when no response is received.
To activate this feature, create the following key:
Subkey: HKEY_LOCAL_MACHINE\SYSTEM\CurrentControlSet\Services\AFD\Parameters
Value name: KeepAliveInterval
Value data: 1 (second)
TcpMaxDataRetranmission
This key determines how many times TCP retransmits an unacknowledged data segment on an existing
connection.
To activate this feature, create the following key:
Subkey: HKEY_LOCAL_MACHINE\SYSTEM\CurrentControlSet\Services\Tcpip\Parameters
Value name: TcpMaxDataRetransmissions
Value data: 5 (seconds)
TPC/IP acknowledgements
TCP/IP can be the source of some significant remote method delays. You can increase TCP performance
by immediately acknowledging incoming TCP segments, in all situations.
To activate this feature, create the following key:
On Microsoft Windows 2000:

GlobalSCAPE® Secure FTP Server, v3
Page 28 of 28
Subkey: HKEY_LOCAL_MACHINE\SYSTEM\CurrentControlSet\Services\Tcpip\Parameters\Interfaces\
Value name: TcpDelAckTicks
Value data: 0
On Microsoft Windows XP or Windows Server 2003:
Subkey: HKEY_LOCAL_MACHINE\SYSTEM\CurrentControlSet\Services\Tcpip\Parameters\Interfaces\
Value name: TcpAckFrequency
Value data: 1