go vest women - patternsbyruni.files.wordpress.com · 5 go vest cut oout all pieces 1 front and 1...
TRANSCRIPT

Go Vest women6 different lengths
WIth or without pockets Eu size 34-54 (US 4-24)
This pattern is copyrighted, with all rights reserved. You may print copies of the PDF for your own use. You may not make duplicate copies of either the printed pattern, or the PDF file to share.
You are not allowed to sell, trade, or share this pattern in any form.Small home based business are allowed to sell finished items made from this pattern.
Made by Runi ©2018

2Made by Runi ©2018
Before you start:Read all instructions before starting project.Seam allowance is NOT included, add that where two pieces are sewn together. Do not add allowance where you’re going to add binding. I usually have a seam allowance of 0.6 cm since I use a serger with a seam that is 0.5cm wide. If you wish to hem add seam allowance for that to the skirt.A stretchy knit fabric is suitable for the dress, use a more steady fabric like wool, fleece or simi-lar for the cowl.Pre-wash all fabrics before sewing to avoid color bleeding and shrinking.Measure the test square on the first page to make sure you printed correctly.It should measure exactly 3x3 cm (or 2x2”)Make sure you are using the most up to date version of Adobe Reader.
You will need:Sewing machineScissorsThreadBallpoint needle (in machine)Wonder clips or pinsFabricMeasuring tapeEyelets(Hood/Cowl) String (Hood/Cowl)
Fabric requirements:The pattern does not include seam allowance. Remember that these measurements are without seam allowance! The illustration below shows the total fabric requirement in cm if your fabric has atleast 150cm of width. You may also need fabric for pockets, arm cuffs and binding. Up to size 48 you can manage to get both the front and back piece on the width of the fabric, sizes above that need the double length of the fabric. On the short vest model you can get all sizes on the width of the fabric. The cross over cowl needs 25cm, cowl 40cm and hoods 55cm, all excluding lining.

3Made by Runi ©2018
Tape the pattern together as shown to the right.Tip: Cut off the top and left edge of each pattern piece.Line up each line so the triangles meet and form a diamond.Do not cut out pattern pieces before taping all of the pages together.
When printing make sure your printer settings are set to “Actual size” and “Auto portrait/land-scape”.The files can be printed on Letter and A4
It is possible to print only certain sizes using the “layers” function in acrobat. Select the “Layers” tab.Unselect the sizes you do not want to print, leave the last layer selected and the size you wish to sew.

4Made by Runi ©2018
More photos of finished dresses and more of my designs are posted regularly on: Instagram: @madebyruni (please tag #madebyruni when you post photos of your creations) Facebook: https://www.facebook.com/madebyruni/ https://www.facebook.com/groups/madebyruni
All my patterns are available for purchase at www.madebyruni.com several of them are also available as physical prints for those who prefere that.
More tutorials and options on: www.patternsbyruni.wordpress.com
European sizes (cm):Storlek 34 36 38 40 42 44 46 48 50 52 54 Brystvidde 80 84 88 93 96 100 104 110 116 122 128 Midjemål 65 69 73 77 81 85 89 95 101 107 113 Stussvidde 88 92 96 100 104 108 112 117 122 127 132
US Sizes (inches):Size 4 6 8 10 12 14 16 18 20 22 24 Bust 31 33 35 37 38 39 41 43 45 48 50 Waist 25,5 27 28,5 30 32 33,5 35 37 39,5 42 44,5 Hip 34,5 36 38 39,5 41 42,5 44 46 48 50 52
If you want a slimmer fit choose a size smaller than your measurements.

5
Go Vest
Cut oout all pieces1 front and 1 back on the foldRibbing for arm openings (optional for neck if skipping hood/cowl) 2 different necklines depending on what size head the child has, always choose Front 1 if you do not want a hood/cowl
Optional2 pockets (mirrored)Cross over cowl (2 main, 2 lining (steadier fabric)) mirrored Cowl (on the fold- 1 main 1 lining) page. 11Hood (2 main, 2 lining) mirroredString for hood/cowl (we do not recommend using a string around the neck for small children)
PocketsMeasure 3 cm from the top off the pocket opening and place a mark. Place the top point of the pocket, rigth side to wrong side off the dress, I recomend using temporary glue here to keep the pocket in place, but you can pin the pocket in placeSew in place from the wrong side of the dress using a stretch stitch or decorative stitch.
Add binding to pocket openingsThis step can be done before sewing the pockets on. For a small tutorial how I do manual edge binding see page 14-15
Made by Runi ©2018
6
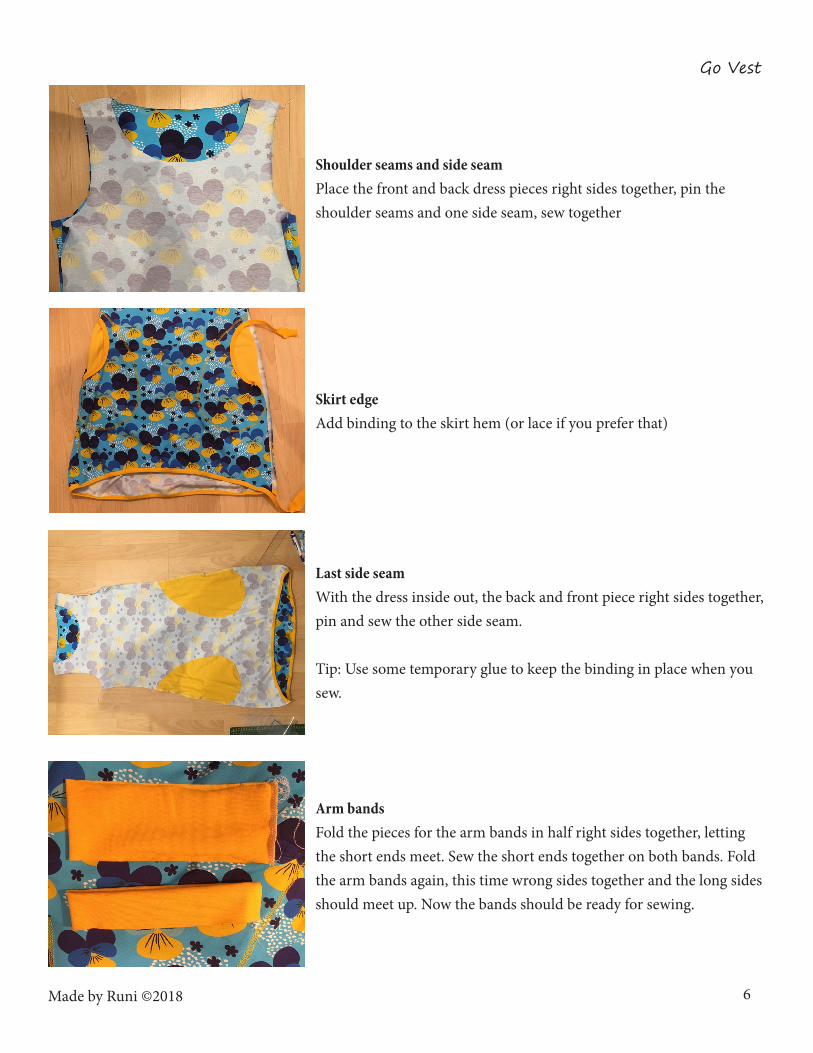
Shoulder seams and side seamPlace the front and back dress pieces right sides together, pin the shoulder seams and one side seam, sew together
Skirt edgeAdd binding to the skirt hem (or lace if you prefer that)
Last side seamWith the dress inside out, the back and front piece right sides together, pin and sew the other side seam.
Tip: Use some temporary glue to keep the binding in place when you sew.
Arm bandsFold the pieces for the arm bands in half right sides together, letting the short ends meet. Sew the short ends together on both bands. Fold the arm bands again, this time wrong sides together and the long sides should meet up. Now the bands should be ready for sewing.
Made by Runi ©2018
Go Vest

7
Go Vest
Attatching arm bandsWith the bands right side together with the bodice, align the seams (I usually choose to align the bands seam to the seam under the arm) and pin in place, repeat for the other side. Tip: Divide both the band and arm opening in 4 and then just line up those spots.
Sew bandsSew around. Make sure to capture all three layers. The band should be slightly stretched evenly around, do not stretch the dress.Put away for now.
Cross over cowlOn the main fabric, mark the eyelet placements. Where the pen is marks the spot for symmetrical eyelets. Mark this on both halfs if you want the symmetrical eyelets. If you want asymetrical ones, only use this marking on one piece.
Asymetrical markingI choose the asymetrical eyelets so I mark that on my other cowl piece.
Made by Runi ©2018
8
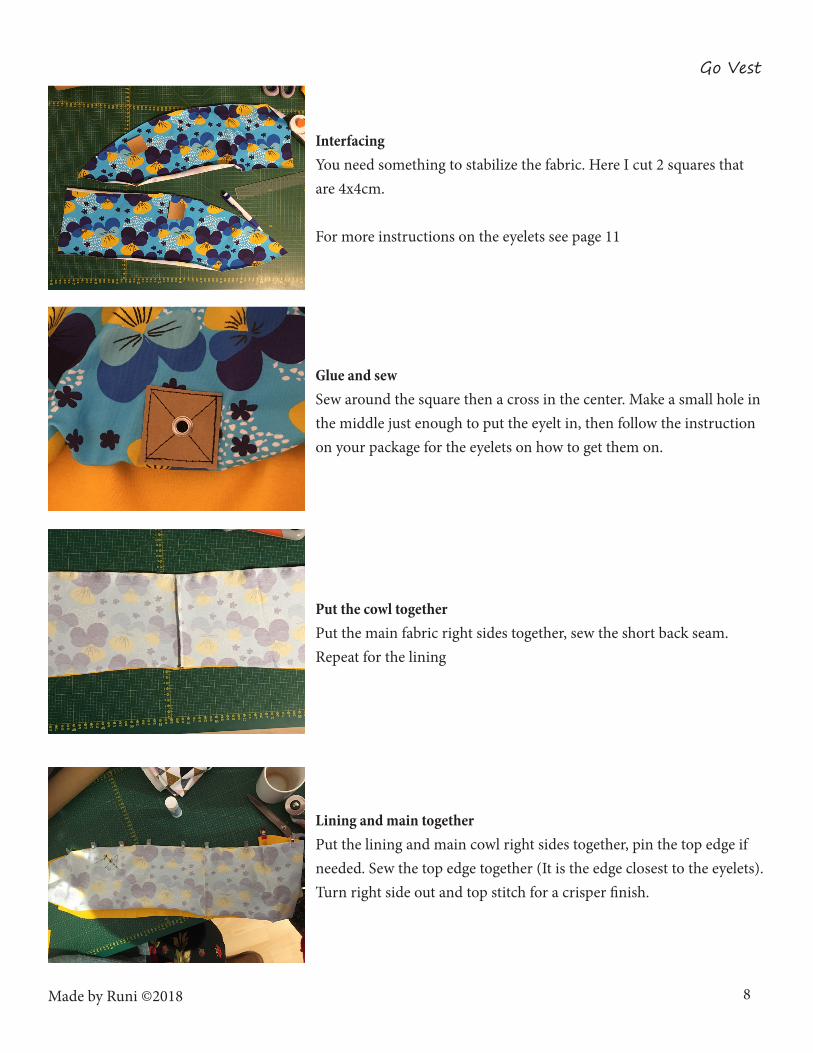
InterfacingYou need something to stabilize the fabric. Here I cut 2 squares that are 4x4cm.
For more instructions on the eyelets see page 11
Glue and sewSew around the square then a cross in the center. Make a small hole in the middle just enough to put the eyelt in, then follow the instruction on your package for the eyelets on how to get them on.
Put the cowl togetherPut the main fabric right sides together, sew the short back seam. Repeat for the lining
Lining and main togetherPut the lining and main cowl right sides together, pin the top edge if needed. Sew the top edge together (It is the edge closest to the eyelets). Turn right side out and top stitch for a crisper finish.
Made by Runi ©2018
Go Vest

9
Go Vest
StringIf you want a string in matching jersey knit just cut ou a 3-4cm wide strip in the length you want.
PullPull in both ends of the fabric strip and it will roll together.
Put in cowlJI prefer to add the string now before I attach the cowl to the dress.. Just put the string between lining and outer fabric of the cowl (on the wrong side) and get the ends out through the eyelets. Tie a knot or two at the ends so the string stays where it is supposed to.
Attach cowl to dressLay the dress with wrong side out. Put the cowl as it should be, but upside down, the raw edge should be away from the dress. Fit the cowl inside the neckopening.
Made by Runi ©2018

10
Pin the cowlStart with pining the center back, right sides together. Pin one side of the cowl, do not stretch anything. Then pin the other side so they over-lap then sew around the neckling, making sure to capture all layers.
Overlap with asymetrical eyeletsNotice here that I have placed the lower eyelet on the top, or on the outer side of the cowl, before I fit it in the neck opening. REMEMBER to pin the side with the lower eyelet first if you have asymetrical eyelets.
Turn right side outThis is what it looks like when the cross over cowl is done.
Done!Ready to be put on and enjoyed :)
Made by Runi ©2018
Go Vest

11
Measure out the placementI usually have them about 3cm appart and about 3-4cm from the top edge, but just follow what you think looks better. Use a ruler if you want to make sure they are evenly placed. If you use interfacing here just iron it all down where you want them. I use temporary glue instead.
Place the squaresHere my squares are glued in place, using temporary glue. If you do not want the squares you just make a marking for the eyelets and skip to page 12.
Sew on the squaresI use a straigth stich with a length of 3,5mm. I firstly sew around the square then make a cross in the middle.
Made by Runi ©2018
Cowl
Cowl with eyeletsAs a nice detail I want small squares where I place my eyelets, this is not neccessary. Start with folding the cowl to find center front. I make a small notch at the top to mark center front when I later place the eyelets.

12
Cowl
Squares all sewn onSomething like this is what you should have after sewing the squares on.
Cut a hole for the eyeletFold the square on the middle, then fold it again, creating a point.Carefully cut the tip of the point, just making a hole big enough for the eyelet to snuggly fit.
The holeYou don’t need much bigger than this, the fabric will stretch.
Woven fabric as stabilizerSince I did not use interfacing I need to stabilize the eyelet with a little piece of woven fabric. Make a small hole and Place this on the wrong side of the fabric before placing the eyelets.
Made by Runi ©2018

13
Eyelets doneInstructions on how to add the eyelts usually comes on the packaging they came in. I prefer 5mm eyelets, but many use 8mm.Time so sew the cowl together.
Back seamWith the main fabric folded right sides together, sew the back seam together. Repeat for the lining.
Attaching lining to outerPut the lining and outer fabric right sides together. Align the back seams and pin if needed. Sew the top seam around.
Turn rigth side outTurn the cowl right side out, topstitch if you want around the top, add string or lace. Then attach to dress as described on page 10.
Made by Runi ©2018
Cowl

14
Classic edge binding.Start with measuring the pocket opening, hem or armhole depending on what you plan to attach binding to.
Do some math.Mine measures 14cm (5.5”)Take your measurement and multiply with 0.8 (or 0.75 if it is a very stretchy fabric)For me I get 14*0.75=10.5cm (size 92/2t)So I cut 2 pieces that are 10.5*4 (length*height) since I am binding pocket openings.
Pin and sew.With right sides together, pin the edges together first then stretch the band to fit and pin where needed. Sew together.
Fold over.This will create a rather thin band, I will show a different way I do when I want a wider band on the next page.Pin in place and sew using a stretch stitch. I like to use a ordinary small zig zag.
Made by Runi ©2018
Binding

15
Clean up.Cut of the excess fabric (or next time remember to cut about 3 cm instead for this one). Check out your awesome handy work and move on to sewing the pockets or side seams.
For a wider band.Before I fold over I just use a straight stitch at the width I want the finished band to be.
Fold over.The result is this after folding over. Sew using a stretch or decorative stitch as before.
Finished!
Made by Runi ©2018
Binding