gps trailmasters table of contents guide.pdfgps trailmasters jan 1, 2016 table of contents...
TRANSCRIPT
GPS Trailmasters Jan 1, 2016
Table of Contents
Installing Your GPS Trailmasters Map 1
Step 1 - Download the Map Files to Your Computer 1
Running the Map Installer for Microsoft Windows 4
Running the Map Installer for Mac OS X 6
Step 2 - Transfer the Map to Your GPS 7
Transfer Map to GPS Using BaseCamp for Windows 7
Transfer Map to GPS Using MapInstall for Mac OS X 12
When Should I Install the Background Map? 17
Selecting the Background Map Using Microsoft Windows 17
Selecting the Background Map Using Mac OS X 19
Windows Installer – Download Warnings 21
Mac OS X Installer– Download Warnings 23
Verify Map is Installed on Your GPS Device 24
Configure Your GPS for Auto-Routing 25
Updating Maps on Your GPS 27
Step 1 – Download the Latest Map Version to Your Computer 27
Step 2 – Transfer the Latest Map Version to Your GPS 27
Updating Map with BaseCamp for Microsoft Windows 27
Updating Map with MapInstall for Mac OS X 30

GPS Trailmasters Jan 1, 2016
Page 1
Installing Your GPS Trailmasters Map When you purchase a trail map from GPS Trailmasters, a map installer is placed into your account.
This guide describes the steps to download the map installer from your GPS Trailmasters account and then transfer the map to your Garmin GPS. A separate X Package Users Guide is copied to your computer for iOS, Android and Google Earth installation instructions.
Installation is done in two easy steps:
1. Download the map files from your account to your computer. 2. Install the map to your GPS using a standard USB cable.
Step 1 must be run even if you purchased the microSD memory card (referred to as a ‘chip’). The GPS Trailmasters’ map installer will:
Provide the Terms and Conditions for using the map. Register the map for future updates. Copy the Garmin map files to your computer so they can be recognized by Garmin BaseCamp
and MapInstall Copy the complete set of X Package files to your computer, including the Android, iOS and
Google Earth formats.
Step 2 transfers the GPS map from your computer to the GPS. For this step you must connect the GPS to your computer using a standard USB cable. If installing to your own microSD card, the card must be in the GPS.
Windows computers use Garmin BaseCamp. Mac OS X computers use Garmin MapInstall.
Step 1 - Download the Map Files to Your Computer
The GPS Trailmasters map files are copied to your computer by downloading and running the map installer. The GPS Trailmasters map installer is downloaded from your customer account on the www.gpstrailmasters.com website. You may download the map installer as many times as desired for a period of 1 year following your purchase. The map installer in your account always contains the latest version of the map. Login to your account by selecting My Account in the top menu of the home page.

GPS Trailmasters Jan 1, 2016
Page 2
The Account screen below will be displayed. Sign in to your account using your Email Address and the Password that you used to purchase the map. Click the Sign In button.
If you forgot your password, click the Forgot your password? link below the Sign In button. A new password will be sent to the email address you specify.
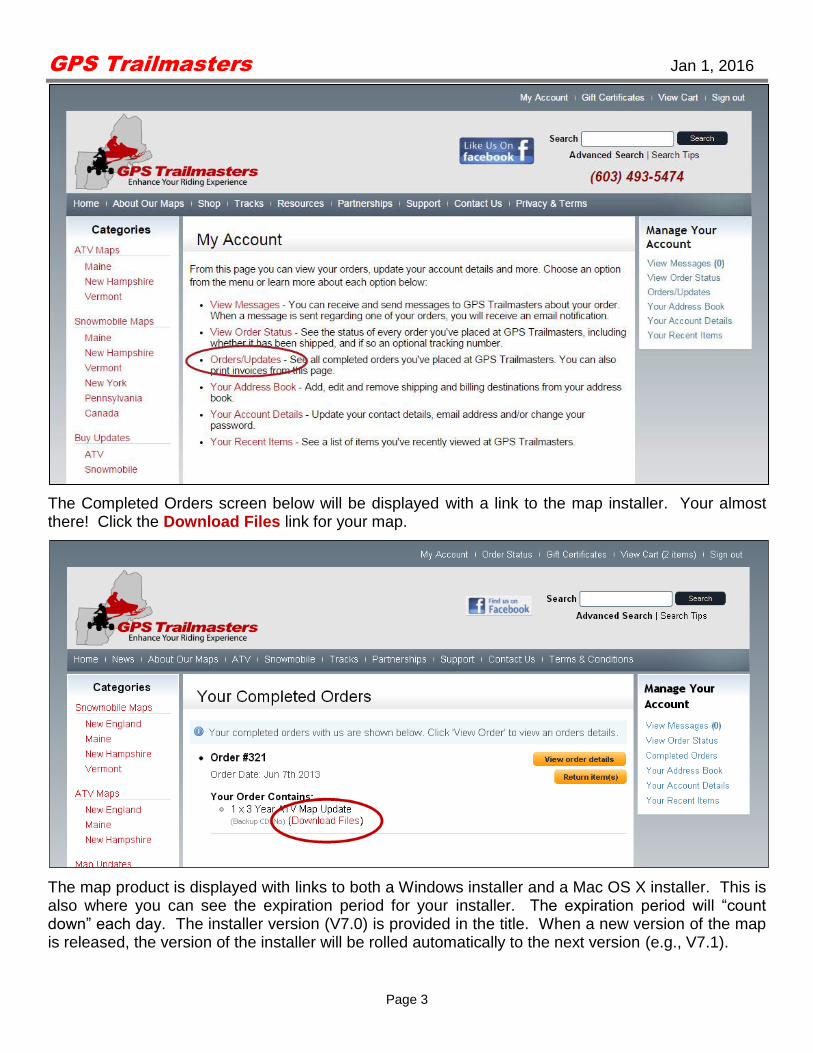
After sign in, the My Account screen below will be displayed with a list of options. This is where you can change your password or email address and see your map purchases. Click the Orders/Updates option.
GPS Trailmasters Jan 1, 2016
Page 3
The Completed Orders screen below will be displayed with a link to the map installer. Your almost there! Click the Download Files link for your map.
The map product is displayed with links to both a Windows installer and a Mac OS X installer. This is also where you can see the expiration period for your installer. The expiration period will “count down” each day. The installer version (V7.0) is provided in the title. When a new version of the map is released, the version of the installer will be rolled automatically to the next version (e.g., V7.1).
GPS Trailmasters Jan 1, 2016
Page 4
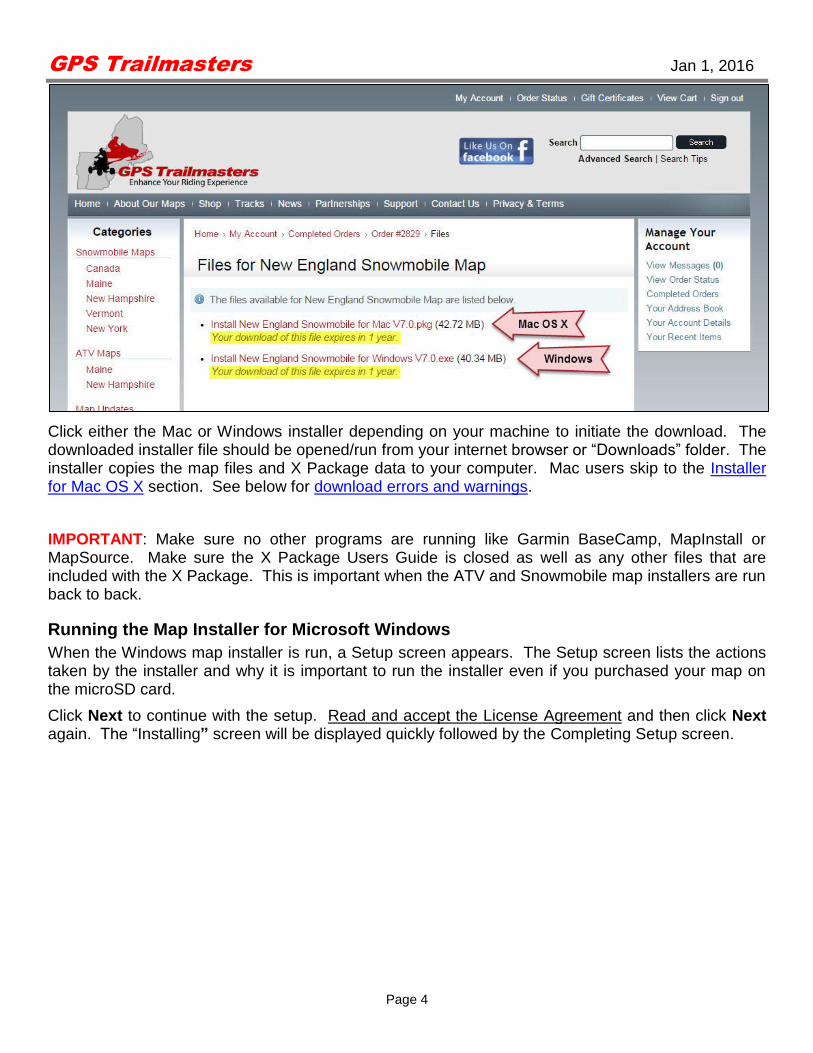
Click either the Mac or Windows installer depending on your machine to initiate the download. The downloaded installer file should be opened/run from your internet browser or “Downloads” folder. The installer copies the map files and X Package data to your computer. Mac users skip to the Installer for Mac OS X section. See below for download errors and warnings.
IMPORTANT: Make sure no other programs are running like Garmin BaseCamp, MapInstall or MapSource. Make sure the X Package Users Guide is closed as well as any other files that are included with the X Package. This is important when the ATV and Snowmobile map installers are run back to back.
Running the Map Installer for Microsoft Windows
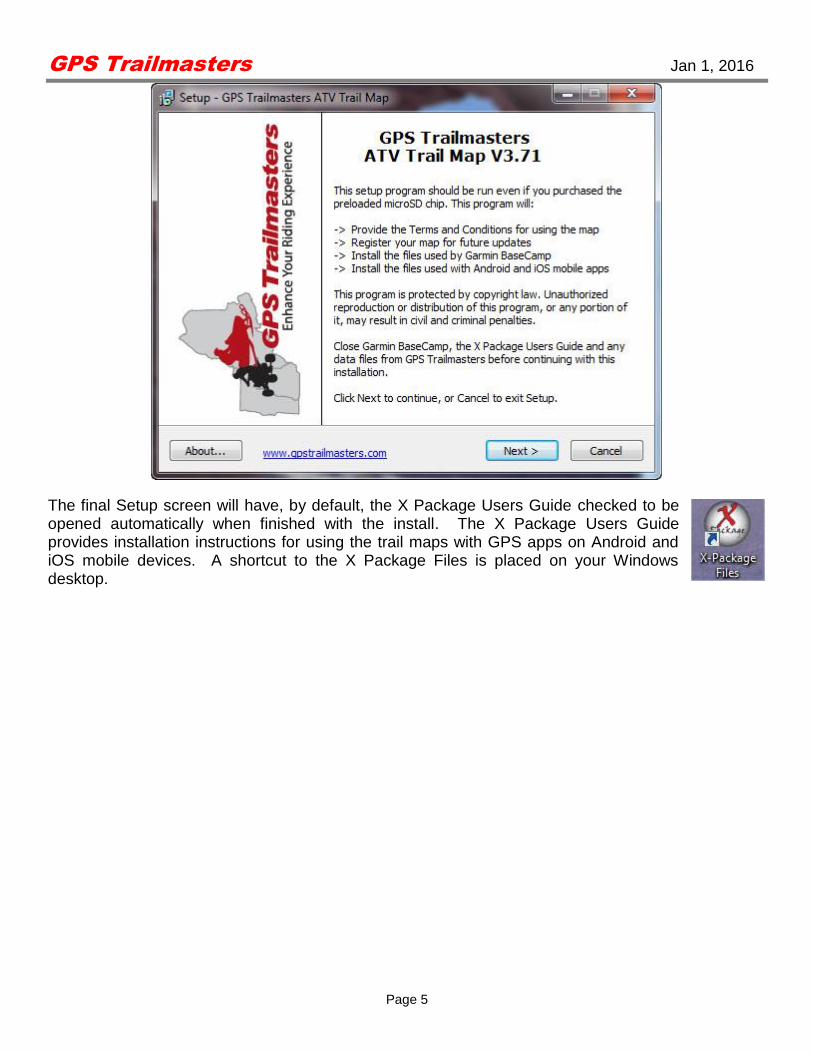
When the Windows map installer is run, a Setup screen appears. The Setup screen lists the actions taken by the installer and why it is important to run the installer even if you purchased your map on the microSD card.
Click Next to continue with the setup. Read and accept the License Agreement and then click Next again. The “Installing” screen will be displayed quickly followed by the Completing Setup screen.
GPS Trailmasters Jan 1, 2016
Page 5
The final Setup screen will have, by default, the X Package Users Guide checked to be opened automatically when finished with the install. The X Package Users Guide provides installation instructions for using the trail maps with GPS apps on Android and iOS mobile devices. A shortcut to the X Package Files is placed on your Windows desktop.
GPS Trailmasters Jan 1, 2016
Page 6
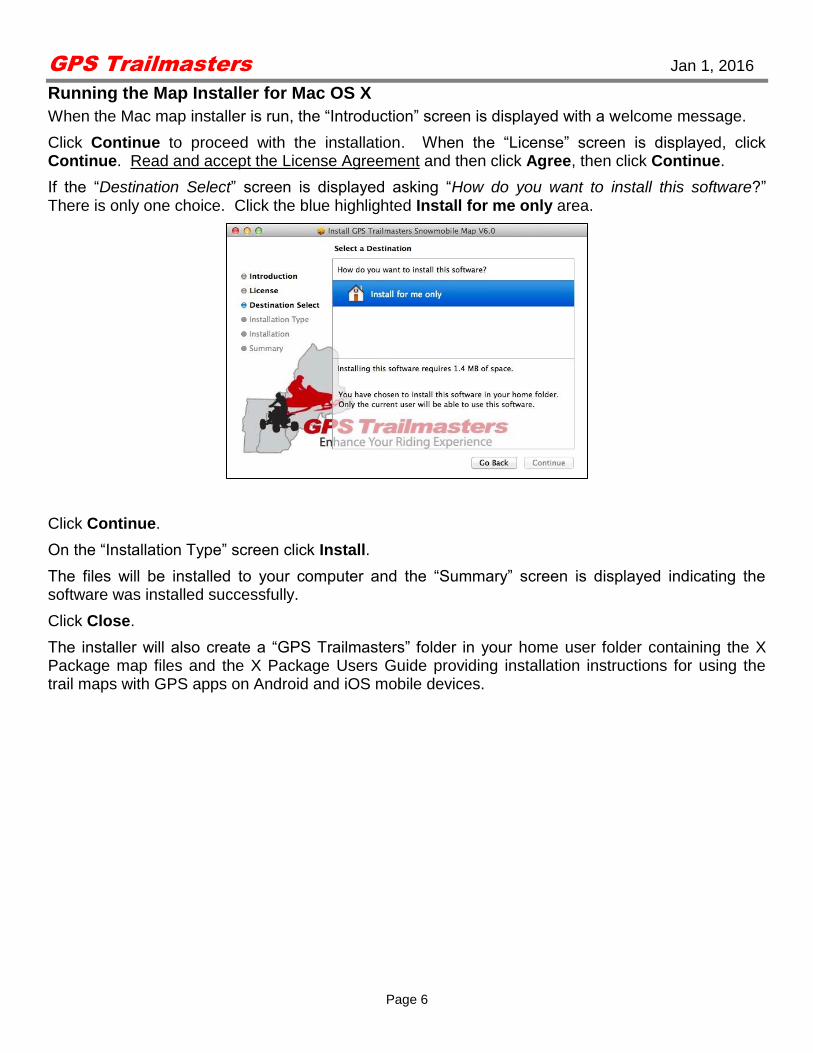
Running the Map Installer for Mac OS X
When the Mac map installer is run, the “Introduction” screen is displayed with a welcome message.
Click Continue to proceed with the installation. When the “License” screen is displayed, click Continue. Read and accept the License Agreement and then click Agree, then click Continue.
If the “Destination Select” screen is displayed asking “How do you want to install this software?” There is only one choice. Click the blue highlighted Install for me only area.
Click Continue.
On the “Installation Type” screen click Install.
The files will be installed to your computer and the “Summary” screen is displayed indicating the software was installed successfully.
Click Close.
The installer will also create a “GPS Trailmasters” folder in your home user folder containing the X Package map files and the X Package Users Guide providing installation instructions for using the trail maps with GPS apps on Android and iOS mobile devices.

GPS Trailmasters Jan 1, 2016
Page 7
Step 2 - Transfer the Map to Your GPS
The map installer copies the map files to your computer. The next step is to transfer the map from your computer to the GPS. The free Garmin mapping programs are used for this step. Mac users skip to the using MapInstall for Mac OS X section.
Transfer Map to GPS Using BaseCamp for Windows
Garmin BaseCamp is Garmin’s free map management program used to transfer maps from your computer to your GPS. It is also used to plan routes on your computer and manage you tracks, waypoints, routes, etc. If BaseCamp is not already installed on your computer, download and install Garmin BaseCamp for Windows from the Garmin website.
Connect your Garmin GPS device to your computer using a USB cable. Open Garmin BaseCamp. Verify your GPS Trailmasters’ trail map was successfully installed on your computer by clicking Maps from the main menu. Each map with the version should be listed under the Maps menu. If you do not see your GPS Trailmasters map listed, close and restart BaseCamp.
Select a map from the Maps menu to see the map. Your GPS Trailmasters map has two map layers; the Background Map with cities, major and secondary highways, lakes, rivers, railroads, etc. used as a reference. The second layer is the Trail Map which consists only of trails. When the Trail Map layer is installed to your GPS, the underlying basemap (e.g., street map or topo map) is visible beneath the trails. The Background Map is provided as a reference for route planning in Garmin BaseCamp but can also be installed on your GPS.
Click the Maps -> Install Maps menu to launch MapInstall.
NOTE: For newer GPS models that include a microSD card “chip”, the SD Card will be added to the Garmin device name as in Figure 1. If an SD card is installed in your GPS, the map installation will default to your SD card. The older devices allow you to select either the GPS internal memory or the SD card as the map install location.

GPS Trailmasters Jan 1, 2016
Page 8
Figure 1 – MapInstall Introductory Screen
The Customize feature of MapInstall is used to install the transparent trail overlay without the background map (roads, lakes, rivers, railroads, etc.) visible in Garmin BaseCamp.
The MapInstall screens have slightly different behavior depending on your GPS model. For newer models such as the Montana, Oregon, Dakota and Nuvi series, the initial screen, shown in Figure 1, has a “Customize” button. For older models such as the Nuvi 500, the initial screen only has a “Continue” button, which takes you directly to the Advanced/Partial Install screen shown in Figure 3.
Click the Customize… button. The map customization screen shown in Figure 2 will be displayed.
NOTE: If you click the Continue button from this screen, you will bypass the customization screens and by default install both the Background Map and the Trail Map to your GPS. For more information see When Should I Install the Background Map section.
The examples used in this guide include both a GPS Trailmasters snowmobile map and an ATV map. The actual screens you see on your computer may be slightly different if you only have one GPS Trailmasters map or if you have other third party maps such as a topo map.

GPS Trailmasters Jan 1, 2016
Page 9
Figure 2 – MapInstall Customization Screen
Click the Advanced/Partial Install… button. You will be taken to the advanced map installation screen shown in Figure 3. This screen has five key sections:
1. The map selection area 2. The zoom/scroll controls for the map selection area 3. The total number maps selected with memory allocations 4. The map selection pull-down with list of all available maps. 5. The name of map currently highlighted with yellow border.
Use the Pan and Zoom controls [2] to center and zoom the map selection area [1] so the entire map is displayed including the text “Trail Map” on the right and “Background Map” at the bottom.
Position your mouse over the text “Trail Map” [1], the trail map area will become highlighted with a yellow border and the word “Trailmap” will be flashed [5] of the screen.
GPS Trailmasters Jan 1, 2016
Page 10
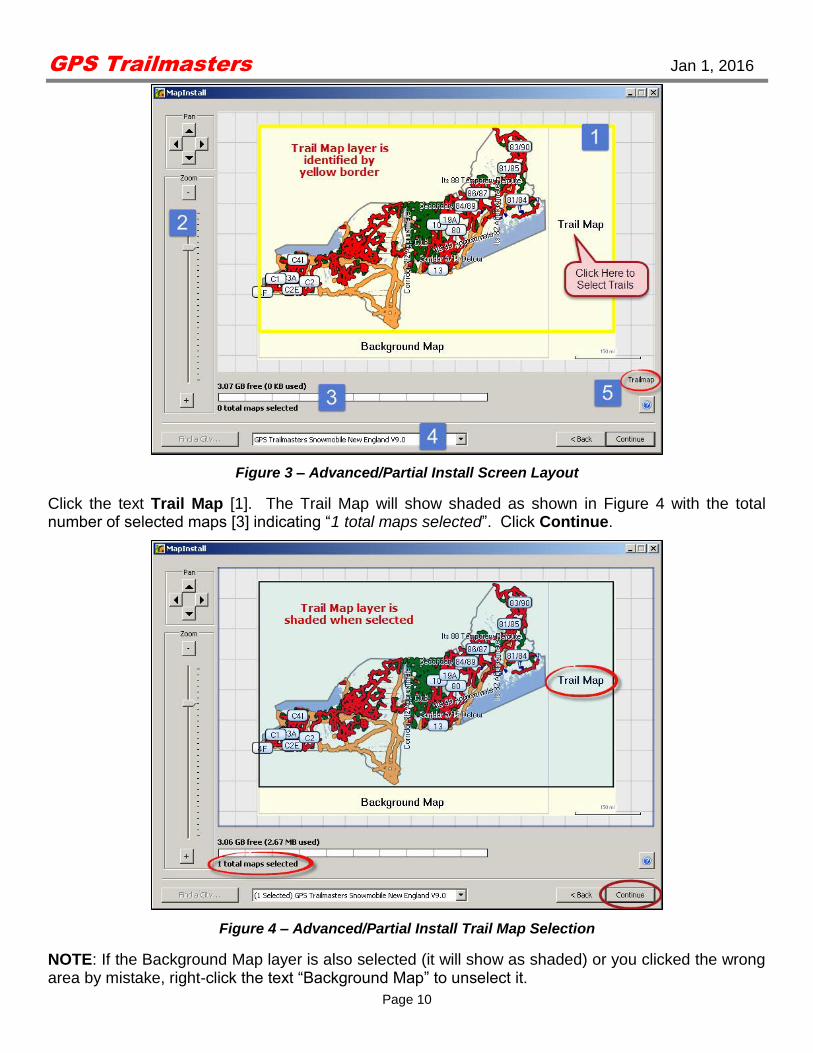
Figure 3 – Advanced/Partial Install Screen Layout
Click the text Trail Map [1]. The Trail Map will show shaded as shown in Figure 4 with the total number of selected maps [3] indicating “1 total maps selected”. Click Continue.
Figure 4 – Advanced/Partial Install Trail Map Selection
NOTE: If the Background Map layer is also selected (it will show as shaded) or you clicked the wrong area by mistake, right-click the text “Background Map” to unselect it.
GPS Trailmasters Jan 1, 2016
Page 11
A confirmation screen will be displayed indicating “Map regions from these products will be installed on your device. This could take hours. Are you sure?” The install will only take seconds. Click Install. After the installation completes click Finish.
Disconnect the GPS from your computer and Verify the map was installed on your GPS.
Before using the GPS for turn by turn directions, configure the GPS for auto-routing.
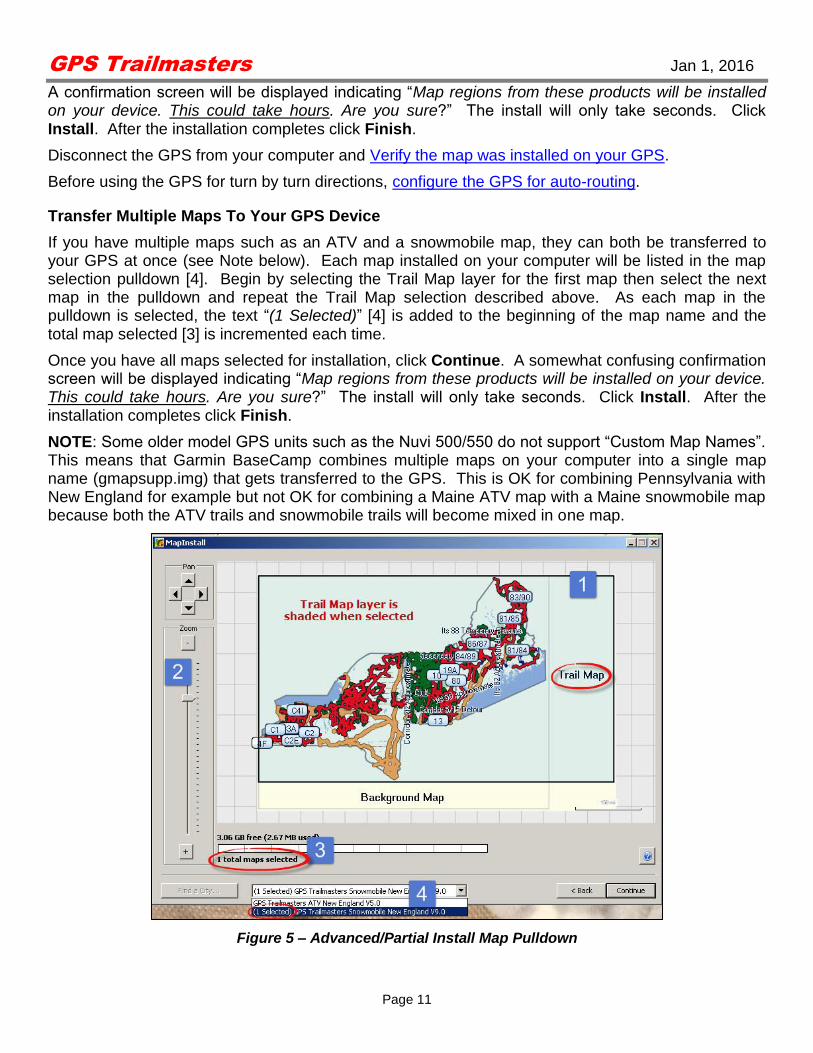
Transfer Multiple Maps To Your GPS Device
If you have multiple maps such as an ATV and a snowmobile map, they can both be transferred to your GPS at once (see Note below). Each map installed on your computer will be listed in the map selection pulldown [4]. Begin by selecting the Trail Map layer for the first map then select the next map in the pulldown and repeat the Trail Map selection described above. As each map in the pulldown is selected, the text “(1 Selected)” [4] is added to the beginning of the map name and the total map selected [3] is incremented each time.
Once you have all maps selected for installation, click Continue. A somewhat confusing confirmation screen will be displayed indicating “Map regions from these products will be installed on your device. This could take hours. Are you sure?” The install will only take seconds. Click Install. After the installation completes click Finish.
NOTE: Some older model GPS units such as the Nuvi 500/550 do not support “Custom Map Names”. This means that Garmin BaseCamp combines multiple maps on your computer into a single map name (gmapsupp.img) that gets transferred to the GPS. This is OK for combining Pennsylvania with New England for example but not OK for combining a Maine ATV map with a Maine snowmobile map because both the ATV trails and snowmobile trails will become mixed in one map.
Figure 5 – Advanced/Partial Install Map Pulldown

GPS Trailmasters Jan 1, 2016
Page 12
Transfer Map to GPS Using MapInstall for Mac OS X
Garmin BaseCamp is Garmin’s free map management program used to plan routes on your computer and manage you tracks, waypoints, routes, etc. If BaseCamp is not already installed on your computer, download and install Garmin BaseCamp for Mac (OS 10.6 or higher) or the Legacy Version for Tiger, Leopard and PPC from the Garmin website.
Open Garmin BaseCamp. Verify your GPS Trailmasters trail map was successfully installed on your computer by clicking Maps from the main menu. Each map with the version should be listed under the Maps menu. If you do not see your GPS Trailmasters map listed, close and restart BaseCamp.
Select a map from the Maps menu to see the map. Your GPS Trailmasters map has two map layers; the Background Map with cities, major and secondary highways, lakes, rivers, railroads, etc. used as a reference. The second layer is the Trail Map which consists only of trails. When the Trail Map layer is installed to your GPS, the underlying basemap (e.g., street map or topo map) is visible beneath the trails. The Background Map is provided as a reference for route planning in Garmin BaseCamp but can also be installed on your GPS.
Garmin MapInstall is required to load the trail map to your Garmin GPS device or microSD card. If not already installed on your computer, download and Install Garmin MapInstall for Mac. Garmin MapInstall is a separate application from BaseCamp on the Mac. While BaseCamp can be used to view your trail map on your computer and plan your trips, MapInstall is the tool to install maps to your Garmin.
Connect your Garmin GPS device to your computer using a USB cable. Open the Garmin MapInstall application on your computer.
NOTE: For newer GPS models that include a microSD card “chip”, the SD Card will be added to the Garmin name as in Figure 6. If an SD card is installed in your GPS, the map installation will default to your SD card. The older devices allow you to select either the GPS internal memory or the SD card as the map install location.

GPS Trailmasters Jan 1, 2016
Page 13
Figure 6 – MapInstall for Mac OS X
The Customize feature of MapInstall is used to install the transparent trail overlay without the background map (roads, lakes, rivers, railroads, etc.) visible in Garmin BaseCamp.
The MapInstall screens have slightly different behavior depending on your GPS model. For newer models such as the Montana, Oregon, Dakota and Nuvi series, the initial screen, shown in Figure 6, has a “Customize” button. For older models such as the Nuvi 500, the initial screen only has a “Continue” button, which takes you directly to the Advanced/Partial Install screen shown in Figure 8.
Click the Customize… button. The map customization screen shown in Figure 7 will be displayed.
NOTE: If you click the Send Maps button from this screen, you will bypass the customization screens and by default install both the Background Map and the Trail Map to your GPS. For more information see When Should I Install the Background Map section.
The examples used in this guide include both a GPS Trailmasters snowmobile map and an ATV map. The actual screens you see on your computer may be slightly different if you only have one GPS Trailmasters map or if you have other third party maps such as a topo map.

GPS Trailmasters Jan 1, 2016
Page 14
Figure 7 – MapInstall Customization Screen
Click the Advanced/Partial Install… button. You will be taken to the advanced map installation screen shown in Figure 8. This screen has four key sections:
1. The map selection area 2. The zoom/scroll controls for the map selection area 3. The total number maps selected with memory allocations 4. The map selection pull-down with list of all available maps.
Use the Pan and Zoom controls [2] to center and zoom the map selection area [1] so the entire map is displayed including the text “Trail Map” on the right and “Background Map” at the bottom.
Position your mouse over the text “Trail Map” [1], the trail map area will become highlighted with a yellow border and light-blue shading.

GPS Trailmasters Jan 1, 2016
Page 15
Figure 8 – Advanced/Partial Install Screen Layout
Click the text Trail Map [1]. The Trail Map will show shaded as shown in Figure 9Figure 13 with the total number of selected maps [3] indicating “1 total maps selected”. Click Send Maps.
Figure 9 – Advanced/Partial Install Trail Map Selection
GPS Trailmasters Jan 1, 2016
Page 16
NOTE: If the Background Map layer is also selected (it will show as shaded) or you clicked the wrong area by mistake, click the text “Background Map” to unselect it.
A confirmation screen will be displayed indicating the “This will install maps to your device. It could take hours. Are you Sure?” The install will only take seconds. Click Confirm. After the installation completes click Done.
Disconnect the GPS from your computer and Verify the map was installed on your GPS.
Before using the GPS for turn by turn directions, configure the GPS for auto-routing.
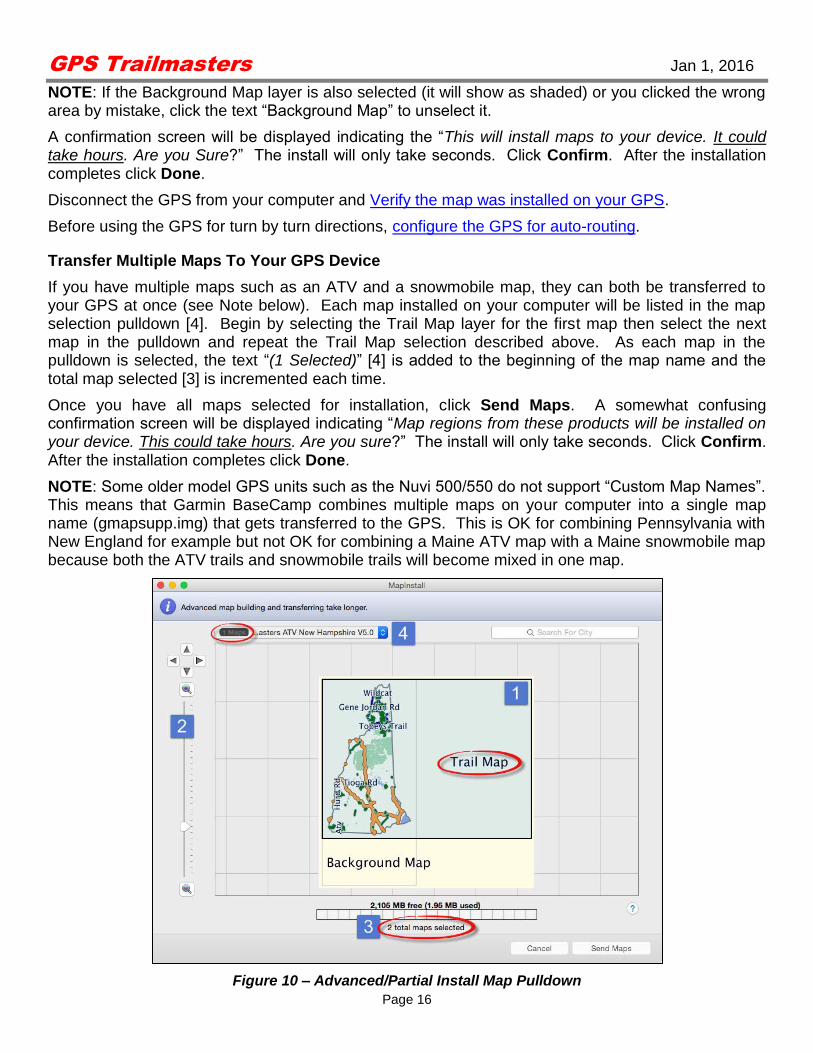
Transfer Multiple Maps To Your GPS Device
If you have multiple maps such as an ATV and a snowmobile map, they can both be transferred to your GPS at once (see Note below). Each map installed on your computer will be listed in the map selection pulldown [4]. Begin by selecting the Trail Map layer for the first map then select the next map in the pulldown and repeat the Trail Map selection described above. As each map in the pulldown is selected, the text “(1 Selected)” [4] is added to the beginning of the map name and the total map selected [3] is incremented each time.
Once you have all maps selected for installation, click Send Maps. A somewhat confusing confirmation screen will be displayed indicating “Map regions from these products will be installed on your device. This could take hours. Are you sure?” The install will only take seconds. Click Confirm. After the installation completes click Done.
NOTE: Some older model GPS units such as the Nuvi 500/550 do not support “Custom Map Names”. This means that Garmin BaseCamp combines multiple maps on your computer into a single map name (gmapsupp.img) that gets transferred to the GPS. This is OK for combining Pennsylvania with New England for example but not OK for combining a Maine ATV map with a Maine snowmobile map because both the ATV trails and snowmobile trails will become mixed in one map.
Figure 10 – Advanced/Partial Install Map Pulldown

GPS Trailmasters Jan 1, 2016
Page 17
When Should I Install the Background Map?
The Background Map can be used if you normally disable your Garmin provided basemap to avoid routing problems but still prefer to have some background information for reference. The Background Map is not a routable map and will not interfere with the routing calculations for the Trail Map.
When installed, the Background Map will display over your Garmin factory street map or topographic map. You can only have one basemap showing at a time. The Background Map consumes much more memory than just the Trail Map layer as indicated on the memory allocation scale [3].
Many GPS models will show the Background Map as a separate map listing in the GPS Map Info menu which means it can be enabled/disabled independently from the Trail Map. Although some GPS models list the Background Map as a separate map it has the exact same name as the Trail Map and therefor it is trial and error to determine which is which.
For those GPS models such as the Montana 600 that combine the Background Map and Trail Map into one listing on the GPS Map Info menu, you cannot disable the Background Map in the field; the entire map must be reinstalled without the Background Map layer if you decide you don’t want to use it.
Selecting the Background Map Using Microsoft Windows
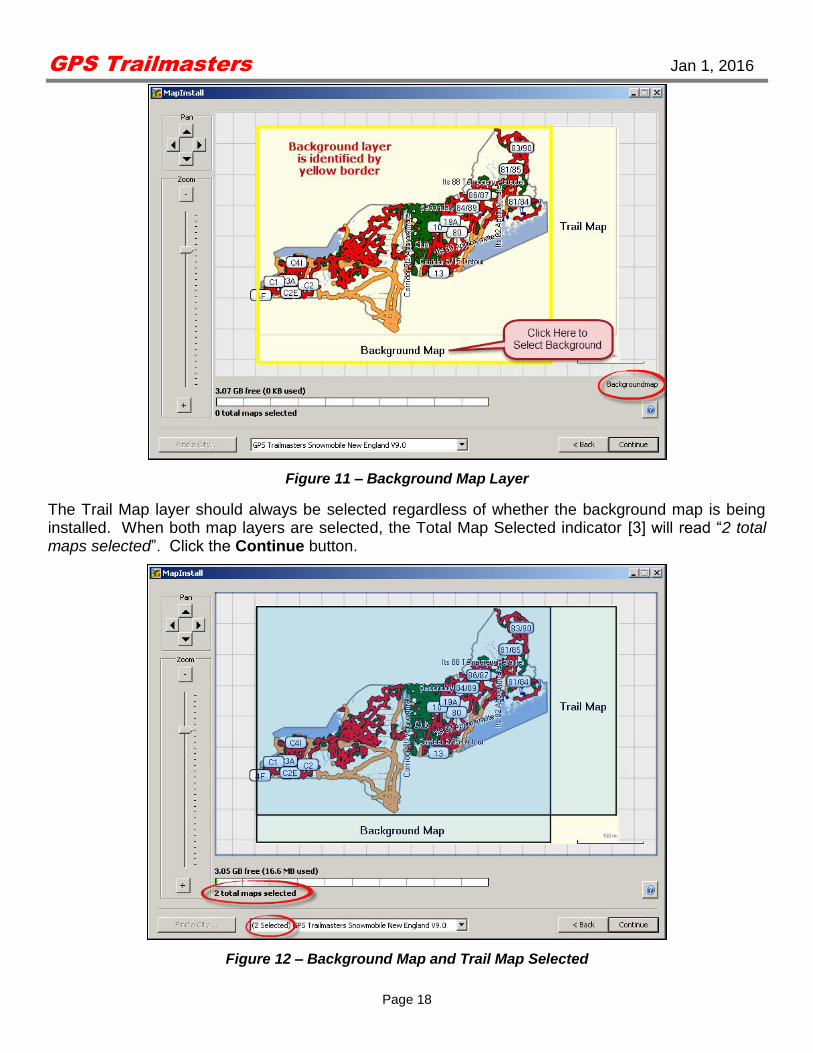
To install the background map, click the mouse on the text that reads “Background Map” to select the background map layer.
GPS Trailmasters Jan 1, 2016
Page 18
Figure 11 – Background Map Layer
The Trail Map layer should always be selected regardless of whether the background map is being installed. When both map layers are selected, the Total Map Selected indicator [3] will read “2 total maps selected”. Click the Continue button.
Figure 12 – Background Map and Trail Map Selected

GPS Trailmasters Jan 1, 2016
Page 19
Selecting the Background Map Using Mac OS X
To install the background map, click the mouse on the text that reads “Background Map” to select the background map layer.
Figure 13 – Background Map Layer
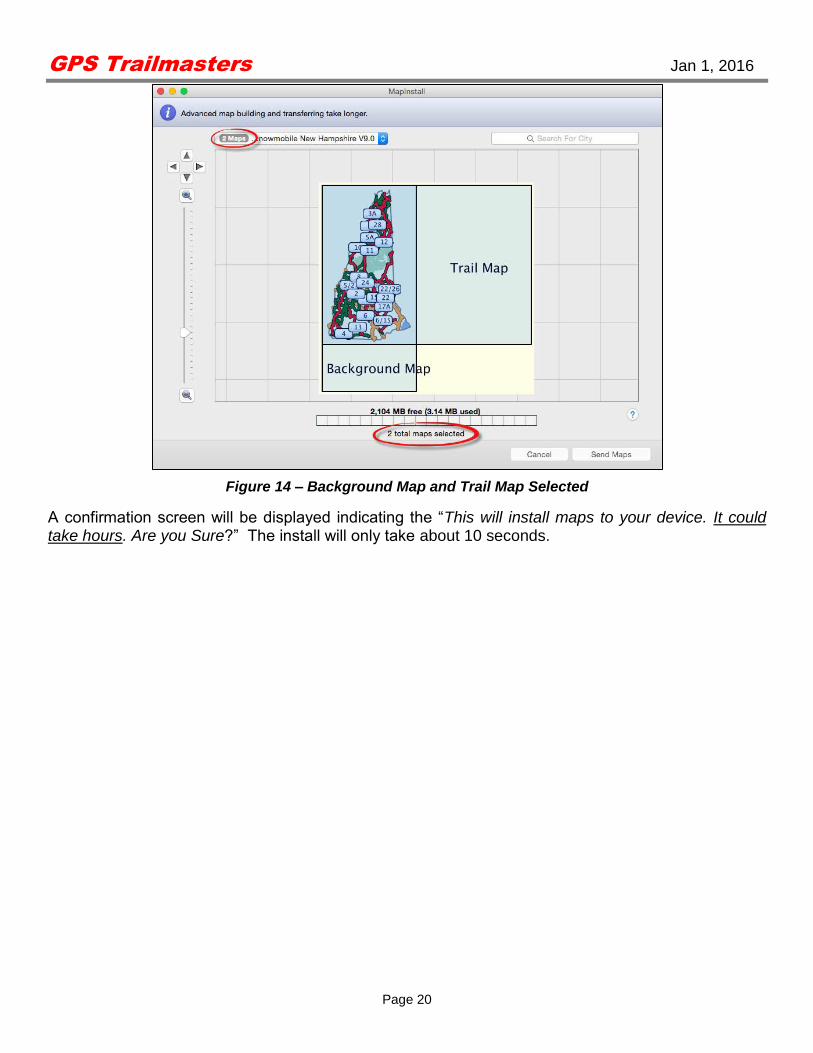
The Trail Map layer should always be selected regardless of whether the background map is being installed. When both map layers are selected, the Total Map Selected indicator [3] will read “2 total maps selected”. Click the Send Maps button.
GPS Trailmasters Jan 1, 2016
Page 20
Figure 14 – Background Map and Trail Map Selected
A confirmation screen will be displayed indicating the “This will install maps to your device. It could take hours. Are you Sure?” The install will only take about 10 seconds.

GPS Trailmasters Jan 1, 2016
Page 21
Windows Installer – Download Warnings
If you use Google Chrome as your Windows browser, you may get a warning in the lower left corner of your browser that the file is not commonly downloaded and could be dangerous. It’s not dangerous. Click the down arrow button and select Keep.
The warning will be removed and the name of the installation program will be displayed. Click the down arrow again and select Open.
The “Open File – Security Warning” dialog is displayed asking “The publisher could not be verified. Are you sure you want to run or save this file?” Click the Run button. Skip to the Running the Map Installer section. Google Chrome automatically stores a copy of the file in your download folder if you want to run the program at a later date.

GPS Trailmasters Jan 1, 2016
Page 22
If you use Internet Explorer as your browser, you will see the download banner below asking if you want to Run or Save the installer file. You may run the installation program without saving it by clicking the Run button. To save the installation program on your computer, click “Save”. Save the file to a known location, this file contains the installation program. Run the installation program by clicking the Run button.
You may see a warning indicating the installer file is not commonly downloaded and could harm your computer. It’s not harmful, click the Actions button.
If the popup dialog below is displayed, click More Options. A new popup dialog will be displayed with the option to Run Anyway. Click Run Anyway.

GPS Trailmasters Jan 1, 2016
Page 23
Mac OS X Installer– Download Warnings
If you use Google Chrome as your browser, you will see the download with the name of the installation program displayed in the bottom left portion of the window. Click the down arrow and select Show in Finder. Double-click the installation file to run the installer.
The first time you run the installer, you will get a warning indicating the app is from an unidentified developer. This is because we have not purchased a certificate from Apple. Click the “?” for more information; it will indicate to override this warning, go to Finder and press the Control key, then click the installation program. Click Open.
The “unidentified developer” dialog is displayed again asking “Are you sure you want to open?” Click Open.
Google Chrome automatically stores a copy of the file in your Download folder if you want to run the program at a later date.

GPS Trailmasters Jan 1, 2016
Page 24
Verify Map is Installed on Your GPS Device Your map installation can be verified in two ways. The first is to simply check the GPS map for red, green and blue trails in your riding area by scrolling and zooming your map display. Consult your Garmin owner’s manual for operating instructions and details about the operation of your GPS.
The examples below are for the Nuvi 500. Power on the GPS and select the map display. Zoom out to about the State level and pan the GPS map to the trail map region. You should see color-coded snowmobile or ATV trails. You can scroll and zoom the display to see additional map detail.
Most Garmin devices provide a list of installed maps by selecting the Tools or Setup menu from the main screen. Your GPS menu and screens may look different depending on model. Consult your Garmin owner’s manual for more information. Select Settings and then select Map. Press the Map Info button on the bottom of the screen.
You should see the “GPS Trailmasters Snowmobile” or ATV with the version displayed. The line below the GPS Trailmasters map with a preceding “[1]” is an indicator of how the Background Map and the Trail Map were combined during the Map Install process. Some GPS models will show two

GPS Trailmasters Jan 1, 2016
Page 25
identical listings for the GPS Trailmasters Snowmobile or ATV map when both the Background Map and the Trail Map were installed by Map Install. One of the entries is the Background Map and the other is the Trail Map. Yet other models will simply repeat the text from the first line into the second line. See our Tips and Tricks video on Custom Map Names to configure the two maps with unique names.
You will also see other maps, including those provided by Garmin listed here. For best performance, all other routable street maps such as City Navigator should be disabled.
Configure Your GPS for Auto-Routing The way your GPS calculates turn-by-turn routes is impacted by the routing settings on your GPS. The Garmin auto-routing algorithm for your trail maps is the same software as that used for your street maps. It is a Garmin developed algorithm residing in your GPS. Most Garmin GPS models have routing settings but they may look slightly different than those shown here and may be under a different menu on your GPS.
The first set of screenshots below show the menus for the Garmin Montana 600 series hand held GPS. Most hand held GPS models will have a similar set of menus as the Montana.
From the Setup menu, select Routing. The most important setting here is the first one, listed as “Activity”, this should be set to an activity that implies use of a vehicle, such as Automobile, Motorcycle or ATV/Off Road Driving. The Direct Routing setting or other walking activity will result in a straight line route “as the crow flies”. The “Calculation Method” should be set to Minimize Distance. The reason for this is our trail maps are very accurate for distance but highly variable for time because everyone rides at different speeds on different trail conditions. The “Avoidances” should all be disabled/turned off so that no road type is checked (avoided) when calculating a route. Lock on Road “snaps” your position to the trail even if you are off it 30 or 40 ft. so I recommend this be set to “No”. The “Off Route Recalculation” set to Automatic will force the routing algorithm to recalculate if you decide to cross a lake or take a different trail from the one calculated initially.
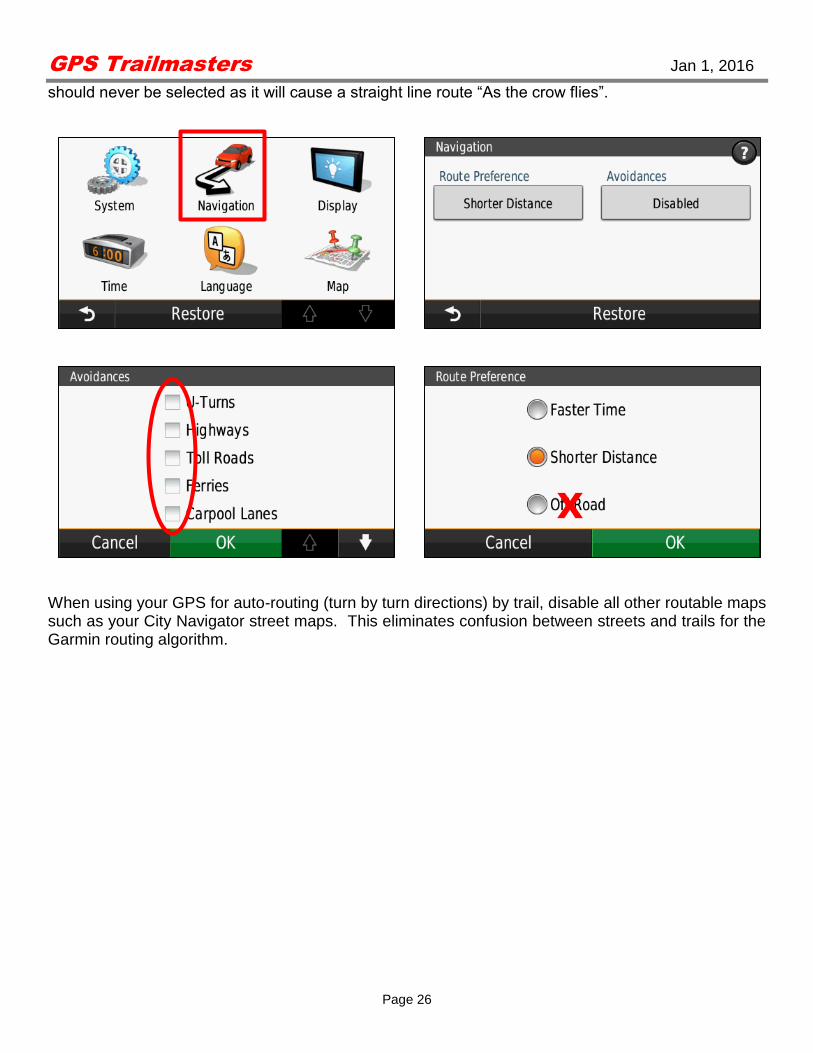
The next set of screenshots show the menus for the Garmin Nuvi 52. You will find more menu variation among the automotive Nuvi because there are a lot more models with a variety of features. On the Nuvi 52, the Off Road activity is listed under the Route Preference. The Off Road setting
X
X
X
?
X
X
?
X
X
?
X
X
GPS Trailmasters Jan 1, 2016
Page 26
should never be selected as it will cause a straight line route “As the crow flies”.
When using your GPS for auto-routing (turn by turn directions) by trail, disable all other routable maps such as your City Navigator street maps. This eliminates confusion between streets and trails for the Garmin routing algorithm.
X
X
GPS Trailmasters Jan 1, 2016
Page 27
Updating Maps on Your GPS Updating your GPS Trailmasters’ map uses the same steps described above for the initial installation.
1. Download the latest map files from your account to your computer. 2. Install the map to your GPS using a standard USB cable.
Step 1 must be run to update the map files on your computer.
Step 2 transfers the GPS map from your computer to the GPS but requires the old version of the map to first be uninstalled off the GPS. NOTE: The Garmin MapInstall software will indicate the latest version of the map even if the version on your GPS is older. For this step you must connect the GPS to your computer using a standard USB cable. If installing to your own microSD card, the card must be in the GPS.
Step 1 – Download the Latest Map Version to Your Computer
Remember, your account always contains the latest version of our map installer. Compare the latest version of the map installer to the version on your computer and GPS.
1. The map installer kept in your account identifies the latest version of the map. 2. The version installed on your computer is shown in Garmin BaseCamp. 3. The version installed on your GPS is shown in the Map Info menu.
Download the latest version of the map installer in the same way as the original download above.
Step 2 – Transfer the Latest Map Version to Your GPS
The map installer copies the map files to your computer. The next step is to transfer the map from your computer to the GPS. The free Garmin mapping programs are used for this step. Mac users skip to the updating with MapInstall for Mac OS X section.
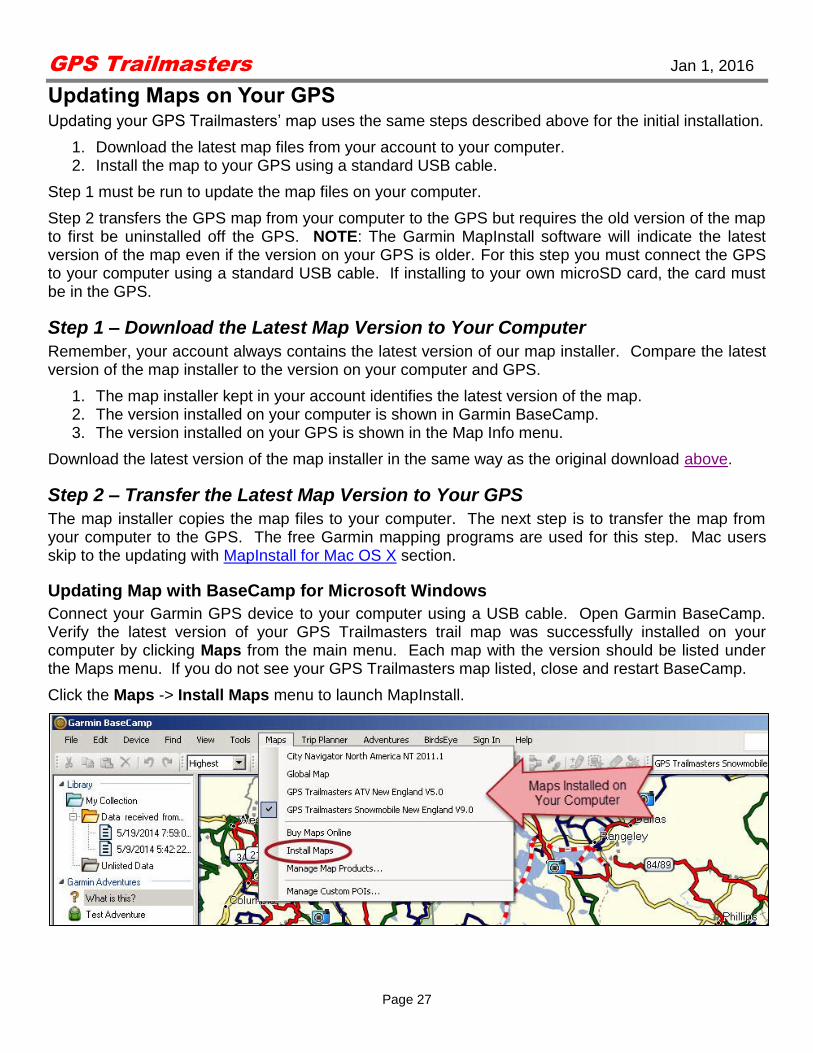
Updating Map with BaseCamp for Microsoft Windows
Connect your Garmin GPS device to your computer using a USB cable. Open Garmin BaseCamp. Verify the latest version of your GPS Trailmasters trail map was successfully installed on your computer by clicking Maps from the main menu. Each map with the version should be listed under the Maps menu. If you do not see your GPS Trailmasters map listed, close and restart BaseCamp.
Click the Maps -> Install Maps menu to launch MapInstall.

GPS Trailmasters Jan 1, 2016
Page 28
Figure 15 – MapInstall Introductory Screen
NOTE: For newer GPS models that include a microSD card “chip”, the SD Card will be added to the Garmin device name as in Figure 15. If an SD card is installed in your GPS, the map installation will default to your SD card. The older devices allow you to select either the GPS internal memory or the SD card as the map install location.
Click the Customize… button. The MapInstall screens will be different depending on whether you originally installed just the Trail Map layer or both the Trail Map and Background Map layers.
Gray shading indicates a Garmin factory installed map that cannot be removed.
Blue shading (ALREADY INSTALLED) indicates the installed GPS Trailmasters map consists of both the trail map and background map layers.
Brownish shading (PARTIAL INSTALL) indicates the installed GPS Trailmasters map consists of only the trail map layer.

GPS Trailmasters Jan 1, 2016
Page 29
Regardless of how the previous map was installed, it needs to be removed so the new version of the map can be installed. If there is a pull down menu, select “Remove” and if there is a checkbox, remove the checkmark. The text below the map will change to “WILL UNINSTALL”. Click the Continue button. NOTE: The Garmin MapInstall software will indicate the latest version of the map even if the version on your GPS is older.
The confirmation screen will display indicating the map will be removed. Click Install. Then click Finish. After the old map is uninstalled, reinstall the new map using the instructions above.
GPS Trailmasters Jan 1, 2016
Page 30
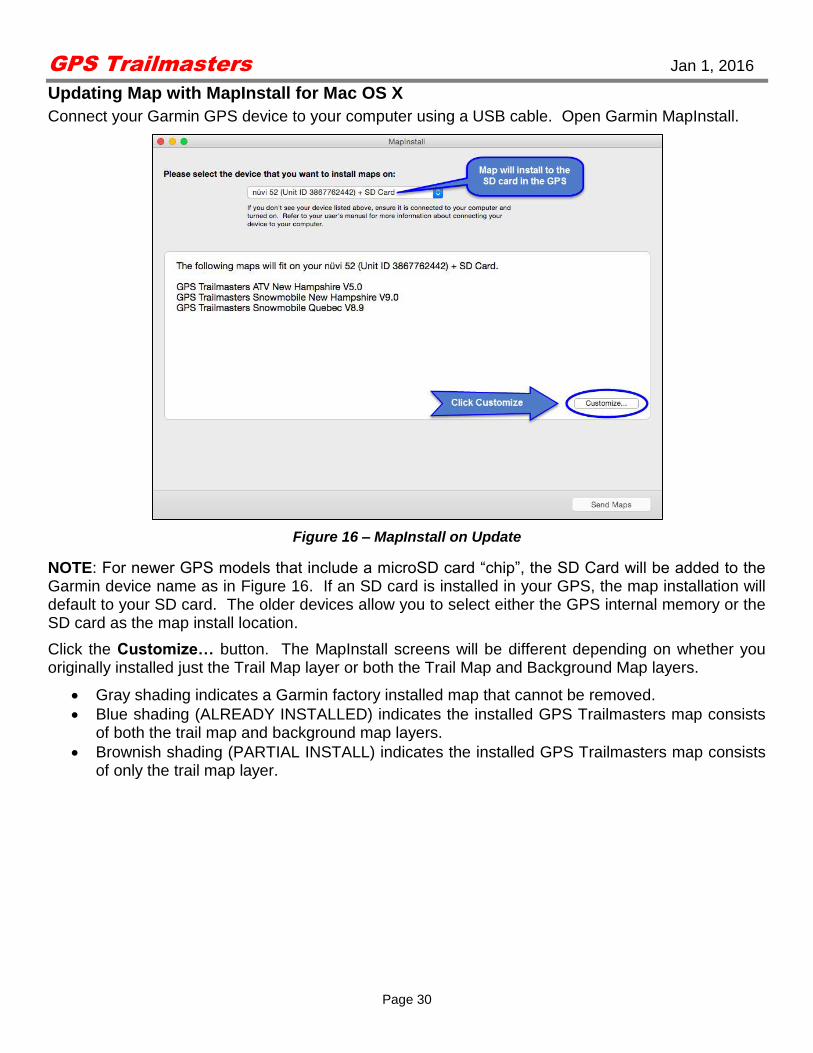
Updating Map with MapInstall for Mac OS X
Connect your Garmin GPS device to your computer using a USB cable. Open Garmin MapInstall.
Figure 16 – MapInstall on Update
NOTE: For newer GPS models that include a microSD card “chip”, the SD Card will be added to the Garmin device name as in Figure 16. If an SD card is installed in your GPS, the map installation will default to your SD card. The older devices allow you to select either the GPS internal memory or the SD card as the map install location.
Click the Customize… button. The MapInstall screens will be different depending on whether you originally installed just the Trail Map layer or both the Trail Map and Background Map layers.
Gray shading indicates a Garmin factory installed map that cannot be removed.
Blue shading (ALREADY INSTALLED) indicates the installed GPS Trailmasters map consists of both the trail map and background map layers.
Brownish shading (PARTIAL INSTALL) indicates the installed GPS Trailmasters map consists of only the trail map layer.

GPS Trailmasters Jan 1, 2016
Page 31
Regardless of how the previous map was installed, it needs to be removed so the new version of the map can be installed. If there is a pull down menu, select “Remove” and if there is a checkbox, remove the checkmark. The text below the map will change to “WILL UNINSTALL”. Click the Send Maps button.
The confirmation screen will display indicating the map will be removed. Click Confirm. Then click Done. After the old map is uninstalled, reinstall the new map using the instructions above.