grade 7-8: science & technology the pressure · pdf filegrade 7-8: science &...
TRANSCRIPT

Purpose: Students will examine how traditional designs of snowshoes made by Métis, Inuit and First Nations People reduces pressure upon the snow by dispersing weight over a larger area. Students will learn how to calculate pressure by converting metric units into international system of units (SI).
Estimated time: 80 minutes
Resources required: o A large thick, sturdy piece of cardboard for each group of
3 to 4 students (large enough for a student to stand on, approximately the size of two snowshoes put side by side) *If cardboard is not available, other possible materials for this activity include snowshoes or a large piece of plywood. Use whatever material you have on hand that provides students with a larger area to stand on than their boots or shoes.
o Graph paper (1 page per student that is large enough to trace their boot or shoe on)
o Students’ own bootso Pencils
Resources included: o Blackline master 1 and 2
Activity:1. Begin the class with a conversation about animals that live
in snowy environments. Discuss how animals adapt to live in these snowy areas. Use the following questions to guide the conversation:a. What animals live in snowy environments?b. What is unique about snowy environments that might affect
these animals?c. How might they have adapted to survive in snowy climates?
Show the following pictures of a lynx, hare and caribou. (Photos and explanations on how the animals’ paws/hooves work can be found on the sites listed in the additional resources section.)
Lynx: 25.media.tumblr.com/tumblr_lv2n60Kd2t1qd4vugo1_500.jpgHare: greenbuzzz.net/wp-content/uploads/2012/01/hare.jpgCaribou:farm9.staticflickr.com/8108/8635393675_800ba76621_z.jpg
2. Ask students:a. What do you notice about their paws/hooves? b. How do their paws/hooves support their ability to walk in
the snow?
3. Explain to students that these animals have physically adapted to walk on snow, but humans designed footwear that help them walk in deep snow. It is believed that snowshoes have been around for more than 6,000 years and were perfected by Métis, Inuit and First Nations People who adapted them to suit the specific snow conditions in their regions.
4. Show students images of the four main designs of snowshoes: Bear Paw, Huron (Algonquin), Alaskan (Pickerel or Yukon) and Ojibwe (Ojibwa) snowshoes. Explain the origin of each name and design based on location and environmental factors.
Bear Paw: www.gvsnowshoes.com/en/snowshoes/file/bear-paw/35In the eastern and far northern regions of Canada, the Bear Paw design helped hunters and trappers to quietly move along the deep snow in dense forested areas.
Huron: www.gvsnowshoes.com/en/snowshoes/file/huron/33The Huron-style snowshoe originates with the Huron people who wore it while hunting, trapping and going on long hikes in the winter. This style was popular with French settlers who came to the area in the early 1600s. The design helps the wearer swiftly move across the top of soft snow while maintaining a straight line.
Alaskan: www.gvsnowshoes.com/en/snowshoes/file/alaskan/32A long shoe used by First Nations People in western Canada and Native Americans who lived in the northern United States, this \snowshoe was designed for long hunting trips in open forest and plains. The elongated shape helps keep the traveller on a straight path during long trips.
Ojibwe: www.gvsnowshoes.com/en/snowshoes/file/ojibwe/34Traditionally used by the Ojibwe who settled along the Great Lakes of Ontario this snowshoe is one of the oldest traditional wooden snowshoe designs. The shape resembles snowshoes found in Siberia, Greenland and Scandinavia from many centuries ago. It is designed for open field and forest use. The narrow lifted toe and long and narrow heel was used in a similar way to modern skis as they allow for gliding downhill and across hard snow.
5. Ask students about how they think snowshoes work. What is it about snowshoes, compared to boots or running shoes, that keep you from sinking into the snow?a. What do you notice about the four designs?
GRADE 7-8: SCIENCE & TECHNOLOGY
THE PRESSURE AND FORCE OF SNOWSHOES
1
ELEMENTARY LESSON
A N I N I T I AT I V E O F I N PA R T N E R S H I P W I T H
b. What do you think would be the benefit of the shorter Bear Paw design?
c. How do you think the tail on the other designs would be beneficial?
6. Review or introduce the terms weight and area. Write each term and definition on the board for students to refer to throughout the lesson.
Weight: measurement of the pull (force) of gravity on an object
Area: measurement of the surface of an object
7. Explain to students that they are going to run a fair test to observe the physics behind how snowshoes work.a. Ask students what they think a fair test is (a test that can
be repeated and has control variables). Ensure students understand the importance of changing/manipulating only one variable at a time while keeping all other variables constant/controlled so they can observe how one variable responds.
b. Hand out the worksheet or have students record their findings in their notebooks.
c. Have students write a hypothesis for their fair test. Model this process by using an example statement, such as: When the weight remains the same, changing the area will _________ (decrease/increase) how far the subject sinks into the snow.
d. Students should record all variables by the following categories:
Controlled: variables that are being kept the same throughout.Manipulated: the one variable that you are changing to see a result.Responding: the one variable that you are measuring or recording.
8. Assemble the class into groups of 3 to 4. Have students record the approximate area of the sole of their boots. Then students should trace one of their boots on the 1 cm squared graph paper.a. Ask students to estimate the approximate area of their
boot sole by counting the squares taken up by their boot.b. Tell students to multiply their answer by 2 to represent
the surface area of the soles of a pair of boots.c. In their groups students should calculate the area of
their shared pieces of cardboard using the formula A=lw (where l = length and w = width)
9. Outside, in their groups, students will run their fair tests and record their observations.a. Instruct each student to step onto the fresh snow with equal
force (no jumping). Measure and record the depth of the imprint.
b. Next, instruct each student to take a turn on fresh snow or sand to step (no jumping) onto the large piece of cardboard. Measure and record the depth of the imprint.
10. Back in class have the groups share their observations. Ask students the following:
a. What differences did you observe when you stood in the snow on your boots compared to standing on the cardboard?
b. Did the larger area prevent you from sinking as far into the snow/sand?
c. How is this possible? Introduce the term and formula for pressure. Write them on the board for students. Option to show the “P019 Pressure spreading weight” video as a review and to introduce the formula.
www.youtube.com/watch?v=fyXBod3_Qrw Pressure: the exertion of a force upon the surface of an object. Pressure = Force/Area (P=F/A)d. Ensure students connect the definition of weight from earlier
in the lesson as the force being exerted.e. Introduce the formula in triangular form and show students
how to use it to solve for pressure.
11. Go through the calculations with students by using the front board to model the formulas. Use a predetermined weight of 50 kg and area of 4000 cm2. a. Explain to students that the conventional unit of area
used for pressure is the square metre, so cm2 need to be converted into m2. 1 m2 = 10,000 cm2, so to convert cm2 into m2, divide the cm2 by 10,000.
Educator’s Note: To make calculations more specific, have students weigh themselves in kilograms. If this is not appropriate for your students, use an estimate average weight for all students as a constant variable.
Educator’s Note: The ideal location for this fair test is in recently fallen snow or a large dry sand box. If you do not have access to either of these items, students can still work out the calculations without running an experiment by skipping step 9 and changing parts a-c of step 10 to hypothetical questions.
Educator’s Note: If using traditional snowshoes or non-rectangular shapes, students will need to estimate area by using graph paper or a combination of area formulas for other shapes. (Circle: A=πr^2 Triangle: A=1/2 bh)
2
ELEMENTARY LESSON
A N I N I T I AT I V E O F I N PA R T N E R S H I P W I T H

b. Write on the board: Step 1: Converting cm2 into m2 to find the area 4,000 cm2 = 4,000 = 0.4 m2 10,000c. Explain that the conventional unit of force used for pressure
is the Newton (N), named after Isaac Newton who figured out the force of gravity. On the earth’s surface 1 kg = 10 N. To convert kg into N, multiply the kg by 10.
d. Write on the board: Step 2: Converting kg into N to find the force 50 kg = 50 x 10 = 500 Ne. Now calculate the pressure P = F/A (Pressure = Force/Area)f. Write on the board: Step 3: Calculating pressure pressure = 500 N = 1,250 N/m2 0.4 m2g. Tell students N/m2 is also known as Pa for Pascal, a French
scientist who helped realize the formula for pressure. One N/m2 = 1 Pa.h. Write on the board: Step 4: Converting N/m2 to Pa pressure = 1,250 N/m2 = 1,250 Pa
12. Now that students know the formulas and process, they will calculate the different pressures exerted on the snow/sand using their calculations from their boots, cardboard and their own weight or the fixed weight of 50kg, whichever is applicable.
13. Students should write a conclusion based on their observations and calculations. Use the following questions to guide the reflection:a. How do snowshoes work? Ensure students use the scientific
terms from the lesson when explaining.b. Write a conclusion sentence, such as: Snowshoes provide a
larger walking area than regular boots. The increased area _________ (decreases/increases) the pressure on the snow, which in turn _________ (decreases/increases) how far the subject sinks in the snow.
14. To ensure students understand diffusion of pressure, close the lesson with a video: “P020 Pressure ballerina versus tank”
www.youtube.com/watch?v=mQYUGQg3QB8.
3
ELEMENTARY LESSON
A N I N I T I AT I V E O F I N PA R T N E R S H I P W I T H

ADDITIONAL RESOURCES
In addition to the lesson plan, share these resources with your students:
Information on animals:
� Lynx: www.ucalgary.ca/GEOG/Virtual/Animals/lynx.html www.animalcorner.co.uk/wildlife/lynx.html animals.nationalgeographic.com/animals/mammals/lynx/?source=A-to-Z
� Snowshow Hare: www.ucalgary.ca/GEOG/Virtual/Animals/hares.html www.animalcorner.co.uk/wildlife/snowshoe.html animals.nationalgeographic.com/animals/mammals/snowshoe-hare/?source=A-to-Z
� Caribou: www.ucalgary.ca/GEOG/Virtual/Animals/caribou.html www.animalcorner.co.uk/wildlife/caribou.html animals.nationalgeographic.com/animals/mammals/caribou/?source=A-to-Z
� Snowshoe styles and history: Huron: www.gvsnowshoes.com/en/snowshoes/file/huron/33 Bear Paw: www.gvsnowshoes.com/en/snowshoes/file/bear-paw/35 Ojibwe: www.gvsnowshoes.com/en/snowshoes/file/ojibwe/34 Alaskan: www.gvsnowshoes.com/en/snowshoes/file/alaskan/32
� Videos: P019 Pressure spreading weight: www.youtube.com/watch?v=fyXBod3_Qrw P020 Pressure ballerina vs tank: www.youtube.com/watch?v=mQYUGQg3QB8
4
ELEMENTARY LESSON
A N I N I T I AT I V E O F I N PA R T N E R S H I P W I T H
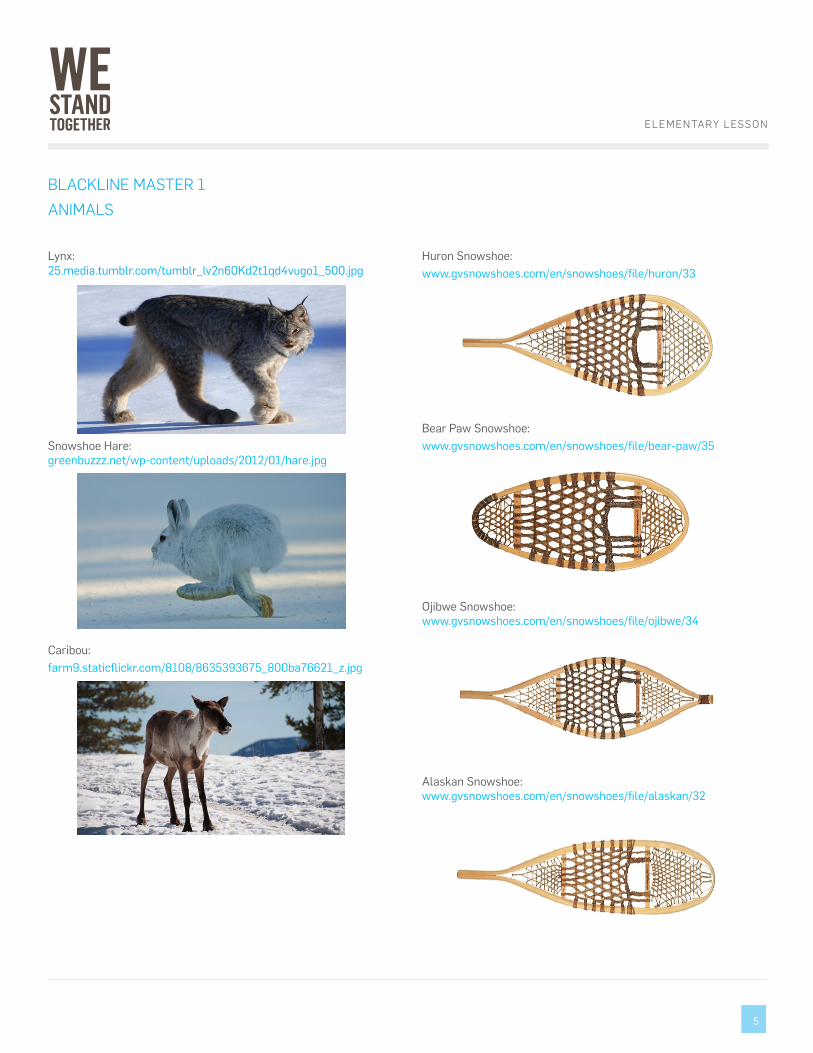
Lynx: 25.media.tumblr.com/tumblr_lv2n60Kd2t1qd4vugo1_500.jpg
Snowshoe Hare: greenbuzzz.net/wp-content/uploads/2012/01/hare.jpg
Caribou: farm9.staticflickr.com/8108/8635393675_800ba76621_z.jpg
Huron Snowshoe: www.gvsnowshoes.com/en/snowshoes/file/huron/33
Bear Paw Snowshoe: www.gvsnowshoes.com/en/snowshoes/file/bear-paw/35
Ojibwe Snowshoe: www.gvsnowshoes.com/en/snowshoes/file/ojibwe/34
Alaskan Snowshoe: www.gvsnowshoes.com/en/snowshoes/file/alaskan/32
BLACKLINE MASTER 1
ANIMALS
5
ELEMENTARY LESSON

BLACKLINE MASTER 2
FAIR TEST EXPERIMENT
Purpose: To discover how snowhoes work.
Hypothesis:
Variables:
Controlled
Manipulated
Responding
Observations:
Area of boot soles
Area of cardboard
Sinking in the snow in boots
Sinking in the snow on cardboard
Calculations:
Pressure standing in boots
Pressure standing on cardboard
Conclusion:
6
ELEMENTARY LESSON