graft-free queen rearing morris ostrofsky - wasba · pdf filegraft-free queen rearing morris...
TRANSCRIPT

Graft-Free Queen Rearing Morris Ostrofsky
1
Many beekeepers reach a point in their
beekeeping experience where they are
comfortable with the basics and are seeking
a new challenge. In an environment in which
beekeepers have to deal with exotic pests
and diseases and are dissatisfied with
commercial queens there are reasons to
raise your own queens. However, for many
beekeepers the idea of grafting and producing their own queens is intimidating. The purpose of this
paper is to offer four simple methods of queen rearing that do not require grafting. I will explain how a
few high quality queens can be raised without special equipment or tools by a beekeeper with just a
few years of beekeeping experience.
To quote Dr. C.L. Farrar, USDA Honey Bee Research Lab Leader, Madison, Wisconsin, “Below average
queens living in a great environment will out perform a great queen living in a poor environment every
time.” It is possible to create a great queen if they are well fed and raised in a clean environment.
In the last few years a common complaint I hear is the poor quality of queens that are available e.g.,
poorly mated. Another frequent complaint is the lack of acceptance. Not only is the acceptance track
record poor but even when the queens are accepted, too many are superceded. The queens you
Photo: Glenn Apiaries
Photo: Glenn Apiaries

Graft-Free Queen Rearing Morris Ostrofsky
2
purchased from half way across the county often do not perform as advertised in your own back yard.
Locally produced queens are well adapted to your environment. To quote Kim Fottum, editor of Bee
Culture magazine, “As Mark Twain might have said, ‘The difference between queens you buy and
queens you raise yourself is almost always the difference between light and lightening’”.
Before describing various methods of graft free queen rearing, I would like to discuss some of the
benefits of raising your own queens. One is genetics. Many beekeepers are wisely looking to genetics
as a means of a long term solution to solving the problems associated with the exotic pests and
diseases. When you raise your own queens, you can select for desirable traits e.g. disease resistance,
hygienic behavior. Usually everyone has a favorite hive or knows a fellow beekeeper that has a hive
with desirable traits. The queens in these hives are the cornerstone of improving an apiary.
Genetics is an excellent foundation. You can build on this foundation by controlling the conditions in
which the queens are raised by selecting the genetic stock, using chemical free comb and ensuring that
they are well fed as they develop.
Finally we all accept the fact the young queens are more productive and less likely to swarm. Having
extra queens readily available means being prepared for emergencies; e.g. accidental death of the
queen. Because of these reasons, many beekeepers want to take charge of the situation and raise
their own queens. Most erroneously assume that grafting is the only way to accomplish this.
Graft-Free Queen Rearing Morris Ostrofsky
3
However, this is not the case. There are multiple methods of graft-free queen rearing. Four methods
are presented: Swarm cell, Nucleus, Miller and Hopkins. The reader can choose the method that best
suits his/her comfort level and the number of queens desired.
Regardless of the method selected there are certain considerations that are common to all. Time of
year is one. Spring and summer are the ideal times to raise queens. Food is available, the
temperatures are correct for virgins to mate, and the bees’ natural inclination to propagate by
producing new queens and swarming takes place. Fall is not the best time to raise new queens. There
is less food available to produce a well fed queen. There are fewer nurse bees. Nor is there time for
new queens to set up a hive with enough winter stores. But more importantly there are fewer drones
available for mating.
Another consideration before venturing into queen rearing is preparation. Populations need to be
strong; a decision needs to be made as to which will be the queen breeder (queen mother) and drone
mother hives, and what additional equipment is needed. An adequate supply of protein supplements
and feeding stimulants should also be on hand. A schedule should be made especially if the Hopkins or
Miller methods are used.
All honey bees are not the same. As Charles Darwin correctly pointed out, “Within any population
there are variations.” Case in point, look at your siblings; unless you have an identical twin, everyone is
different. When selecting which hive(s) is to be used for your source of your breeder queens (AKA
queen mother, queen mother hive), consider traits that are important to you. This one of the areas
Graft-Free Queen Rearing Morris Ostrofsky
4
where you have the most control of the quality of the new queens. There are a number of desirable
traits you may wish to select for: gentleness, honey production, early build up, hygienic behavior,
disease resistance, and good wintering ability. Your experience with your hive(s) will dictate which
colony (colonies) you select as the queen mother hive.
Another decision you have to make is the number of queens you would like to produce. The most
limiting factor in any queen rearing operation is the number of available mating boxes. This is an
appropriate time to define mating box/nuc for the purpose of this paper. While mating boxes vary in
size from as small as 2 full depth frames to 5 full depth frames, I use a standard 5 frame full depth nuc
box with a follower board. Using this configuration means no special equipment is needed whether
the nuc is used as a nuc or a mating box.
Graft free queen rearing requires between one and four hives depending on the method used. Each
will be discussed separately with the corresponding method. At least one mating box/nuc is needed
for every queen produced. Early on it will be necessary to decide the number of desired queens and
prepare the appropriate number of mating box/nucs.
Overcrowding and better fed queen cells go hand in hand. Ideally the hives you raise queen cells in
(cell builder hives) should be overcrowded with lots of young nurse bees. In fact the colony must be on
the verge of swarming. To quote Sue Cobey (researcher at UC Davis), “Overcrowding is the secret of
success”. The objective is numerous and well fed larvae. Feeding is the way to accomplish this
objective. The quantity and quality of feeding greatly influences the quality of queens. This is one

Graft-Free Queen Rearing Morris Ostrofsky
5
important way you can produce higher quality queens than those mass produced. “This is an important
concept and must not be overlooked”. (Sue Cobey at OSBA 2012 conference) According to Sue Cobey
well fed developing queens produce more eggs. Feeding the bees a pollen supplement is added
insurance that the growing queens will have an adequate amount of protein. Use your favorite pollen
supplement. Since you want a population that is booming, start feeding the potential cell builder hives
about 2 months before you start raising queen cells.
A large drone population is needed in the cell builder hive(s) in addition to a large worker population.
Drones do much more than serve as fodder for bee humor. They are an important, yet overlooked,
part of the mating equation. It takes about 12 to 15 drones to mate with a virgin queen. Think of them
as flying gametes.
To build and maintain the population of drone mother hives start feeding them a 1:1 sugar syrup
solution with a feeding stimulant at least one month before starting to raise queen cells. Feeding needs
to continue until the new queen has been mated. If the bees perceive a slow down in nectar flow; e.g.
the feeding, they will stop drone production and also start removing developing drones from the hive.
Drone production needs to continue right up to the time the queen is mated.
An additional method to increase the number of drones is the use of green plastic drone comb frames.
The embossed cells are drone-sized; larger than the worker brood size. When the queen feels the
larger sized cells, she lays an unfertilized egg which becomes a drone. When inserting these frames

Graft-Free Queen Rearing Morris Ostrofsky
6
place them on the edge of the brood area between the pollen frame and the outer most brood frame
at approximately the three or eight positions.
In most cases, two drone producing hives will be necessary for every hive that is producing queen cells.
If there are other hives within a quarter to a half mile of your apiary, extra drone hives are not
necessary. The exception to this is if you trying to improve genetics. In this case the best hives for
producing drones (drone mothers), will be your own. The drone mother hives should be placed a half
mile away from the mating boxes/nucs. The reason for moving your own drone mother hives away
from your apiary is to avoid inbreeding between virgin queens and their brothers. Additionally you
increase the likelihood of matings with selected drone stock. This is because the drones normally form
their congregation areas closer to “home” than a half mile. The virgin queens typically fly further away
from the home apiary and have a better chance to mate with the desired drones.
The Queen Development chart that follows illustrates the biological sequence of a queen’s
development and mating and explains the “why” and “when” specific manipulations are performed.
For example if you were to wait until day 17 to separate the queen cells in a cell builder, you would
end up with a single queen. This is because on day 16 the first queen to emerge would dispatch all of
her sisters. The beekeeper must be aware of the queen’s development sequence to successfully raise
queens. The chart helps to visualize the process and is referenced as the methods are described.

Graft-Free Queen Rearing Morris Ostrofsky
7
Queen Development Chart Stage Day
Egg 1 2 3 Unsealed larva 4 Egg hatches into tiny larva 5 6 Egg fed lavishly on royal jelly during larval stage 7 8.5 +/- .5 day; some variation Capped 8.5 – 9 Note: hive will swarm +/- 1 day of capping Pre-pupa 10 11 12 Pupa 13 The queen pupa is fully formed. Days 13 – 14 are the 14 best times to move cells for distribution 15 Queen emerges 16 Mating flights 20 Egg laying starts 23 – 30
Before any queen rearing project can be started, production activities have to be coordinated with
seasonal and personal calendars. Seasonal conditions set the pace for raising queens. When the
average temperature reaches 69 degrees F, the queen is able to go on her mating flight(s). For example
in the southern Willamette Valley, the average temperature is 70 degrees F on June 1st. This is one
degree warmer than the absolute minimum required for a virgin queen to mate. I use June 1st as the
focal point for activities I schedule before and after this date. The timing of the mating flight(s) is

Graft-Free Queen Rearing Morris Ostrofsky
8
critical and thus set the pace for the rest of the calendar. Because beekeeping is local, the date the
temperature reaches 69 degrees F will vary as will specific calendars.
While most scheduling is flexible, some manipulations are less so. For example once 24-36 hour larvae
are placed into the cell builder, the scheduling becomes more rigid. This is the point to make sure your
personal schedule does not conflict with queen rearing activities. The Miller method, described later,
will include an example of how useful a calendar is in organizing the sequence of steps for this or any
other method.
Now that preparation common to all methods has been described, it is time to look at the specifics of
the four methods of non-graft queen rearing. While raising queens is the objective, each uses a
different approach. Although several of the steps are common to all, each will be presented as a stand
alone process. Review each method and decide which is compatible with your goals and confidence
level.
Swarm cell method:
Ten to 15 quality queens can be produced from swarm cells. While a swarm cell situation can be
created by stimulating a hive, the focus here is the situation where you did not plan for swarm (queen)
cells but discover them during a hive inspection. You see that the workers have already built
numerous, capped queen cells.

Graft-Free Queen Rearing Morris Ostrofsky
9
The Queen Development chart shows that the capped cells you are seeing are at least 8.5 days
+/- .5 day old. How do we know this? This is because queen cells are capped over at about 8.5 days
+/- .5 day. The presence of capped queen cells indicates that the old queen has already left with a
swarm which usually leaves within a day before or after capping. Reduced population is also a clue.
This can be confirmed by observing a reduced worker population in the hive and the fact that no eggs
or very young brood are present.
Although you did not actively work to produce these cells, many of the parameters for producing
quality queens are present in this situation. The swarm cells have been produced in a hive that has
survived winter, is prospering, and has a population that is healthy and vigorous enough to outgrow
their home. These cells are well fed and made in a queen right hive.
Photo: Morris Ostrofsky

Graft-Free Queen Rearing Morris Ostrofsky
10
Now that you have swarm cells, you have to decide how you want to proceed. You can re-queen the
hive, make divisions (nucs) or produce mated queens in mating boxes. If you decide that you have
enough hives and simply want to re-queen the mother hive, simply cut out all but one or two queen
cells. Let the bees raise their own new queen.
To increase hive numbers you will use the queen cells to set up mating boxes/nucs. The goal is two
queen cells per division. Sometimes a queen cell is empty and using two cells increases the likelihood
of success.
The number of divisions or mating boxes will be largely dependent on the strength of the hive and the
number of available queen cells. In an ideal situation you will find a few brood frames with a couple
queen cells each. The frames could be used as is. But more often the queen cells are clustered with
many on a single frame. In this case, the cells will have to be removed and distributed to maintain two
queen cells per mating box/nuc.
Step 1: Decide how many queens/nucs you can produce after evaluating your resources; e.g. amount
of brood, workers to care for the brood, queen cells and availability of mating boxes/nucs.
Step 2: Set up the nucleus hive or mating box using the original hive as the source of materials. If the
resources of the mother (original) hive do not support the number of mating boxes/ nucs you choose
to make, you can supplement using brood and workers from other hives.
Nucleus configuration
Three brood frames of capped brood with some cells that are emerging

Graft-Free Queen Rearing Morris Ostrofsky
11
If the queen cells are located singly or in doubles on brood frames, simply include the
brood frame with the queen cell(s)
If the queen cells have been removed from mother hive frames, provide a space in the
nucleus frames that are to receive the queen cells by cutting out a small portion of
comb. The queen cells can then be placed in the space and fixed in place with a couple
of tooth picks.
one frame of mostly pollen
one frame of mostly honey
enough workers to cover the brood and queen cells
Mating box configuration:
one frame of mostly honey and pollen
one brood frame with emerging brood
2 queen cells.
enough workers to cover the brood and queen cells
Step 3: Leave one or two capped cells and at least a couple brood frames behind in the original hive.
One of these remaining queen cells will become the new queen in the mother hive.
Step 4: Cut out well mottled queen cell(s) from the original hive. These
cells should look roughly like the shell of a Virginia peanut. Remove
some of the surrounding comb along with the queen cell to avoid
damage the developing queen. The extra comb also provides a means
to attach the cell to another frame. (See next photo) These cells will be
Photo: Morris Ostrofsky

Graft-Free Queen Rearing Morris Ostrofsky
12
used to set up the queenless mating boxes/nucs.
This photo illustrates placement of a queen cell in either a nuc or a mating box. Toothpicks were used
to secure the queen cell onto the frame. Note the border of comb that surrounds the queen cell.
Step 5: If the nuc or mating box remains in the same yard as the mother hive, add an equal amount of
bees to the nuc/mating box to compensate for the fact that the field bees will drift back to the original
hive. Be sure the queen is not included when adding the extra bees.
Step 6: Feed and reduce entrance. Before closing up the nuc, add a shim to create some space above
the top bars and then add a protein patty. The nuc’s cover should have a 2 to 3 inch circular hole cut
into the center. Place an inverted mason jar with 1:1 sugar syrup over the hole. The holes in the
Photo: Morris Ostrofsky
Queen cell surrounded by comb border
Toothpicks used to secure queen cell

Graft-Free Queen Rearing Morris Ostrofsky
13
Mason jar lid should be 1/16 inch in diameter. Include a feed
stimulant, such as Honey Bee Healthy, in the syrup. Cover the
feeder with an empty box or bucket to protect the syrup from
sunlight.
Step 7: Continue to feed the bees syrup for about two weeks.
Since there are fewer field bees in the mating box/nuc than in
an established hive, it is important to feed them even during a
nectar flow. Use an entrance reducer to prevent robbing.
Step 8: Wait 3 weeks before opening the mating box/nuc.
Since this method starts with queen cells, the waiting is less than with the nuc method. Waiting is the
hardest part. But why do we wait? The primary reason is you do not want to lose the virgin queen.
Looking at the Queen Development chart you can see that she has not been mated until day 20. Virgin
queens are flighty and may get lost if they loft. I like to give her another 10 days to settle down and
establish a brood pattern.
Step 9: Evaluate the results. You should find a laying queen with a good brood pattern. If this is the
case, transfer the bees into a standard box. If you were not successful, return the frames to the
original hive.
Nucleus method:
The Nucleus method produces a single queen and a new hive at the same time. Because it involves the
fewest steps and can be done with a minimum of beekeeping experience, it is the easiest approach. It
Photo: Morris Ostrofsky
Shim
Shim
Photo: Morris Ostrofsky

Graft-Free Queen Rearing Morris Ostrofsky
14
takes advantage of the bees’ emergency response to the lack of a queen. When the queenless nuc is
set up, the bees will do the rest.
Drones and the weather are important indicators that the conditions are right to raise a queen using
the Nucleus method. Since drones are essential to produce even a single queen, their presence is one
important indicator. When you start seeing drones on the landing board, it is time to start the Nucleus
method. The weather is the second important factor. Virgin queens will not go on a mating flight if it
is less than 69 degrees F. You need to be aware of when this critical temperature is likely to occur in
your area.
I recommend using a five frame nuc box because it works well and is the most efficient use of brood
pollen and honey. While the configuration is similar to that of the Swarm cell method nuc, there two
differences between them. The most important is the use of a brood frame with eggs or 24 hour
larvae. The other difference is that queen cells are not needed.
Step 1: Decide how many queens/nucs you can produce after evaluating your resources; e.g. amount
of brood, workers to care for the brood, queen cells and availability of nuc boxes.
Step 2: Set up the nucleus hive using the original hive as the source of materials. If the resources of
the mother (original) hive do not support the number of nucs you choose to make, you can
supplement using brood and workers from other hives.
Nucleus configuration:
One frame of mostly honey
Two frames of emerging and capped brood

Graft-Free Queen Rearing Morris Ostrofsky
15
One frame with eggs or 24 hour larvae (up to day 4 on Queen Development chart)
one frame of mostly pollen
enough workers to cover the brood and queen cells
Step 3: If the nuc remains in the same bee yard, brush an equal amount of bees into the nuc to
compensate for the field bees drifting back to the original hive. Be sure the queen is not included
when adding the extra bees.
Step 4: Feed and reduce entrance. Before closing up the nuc, add a shim to create some space above
the top bars and then add a protein patty. The nuc’s cover should have a 2 to 3 inch circular hole cut
into the center. Place an inverted mason jar with 1:1 sugar syrup over the hole. The holes in the
Mason jar lid should be 1/16 inch in diameter. Include a feed stimulant, such as Honey Bee Healthy, in
the syrup. Cover the feeder with an empty box or bucket to protect the syrup from sunlight.
Step 5: Continue to feed the bees syrup for about two weeks. Since there are fewer field bees in the
nuc than in an established hive, it is important to feed them even during a nectar flow. Use an
entrance reducer to prevent robbing.
Step 6: Wait at least a month before evaluating the results. Looking at queen development chart you
can see that she has not been mated until day 20. Virgin queens are flighty and may get lost if they loft.
I like to give her another 10 days to settle down and establish a brood pattern. You should find a laying
queen with a good brood pattern. If this is the case, transfer the bees into a standard box. If you were
not successful, return the frames to the original hive.
Graft-Free Queen Rearing Morris Ostrofsky
16
Miller Method This method is named for Dr. C.C. Miller (1831-1920). One interesting fact is that his interest in
beekeeping started after his wife, a complete novice, captured a swarm. Ultimately C. C. Miller gave
up his medical practice and dedicated his life to raising queens. With the Miller method approximately
nine queens can be produced. The following steps describe the Miller method to raise queens. An
example of a calendar for the Miller method follows the steps.
Step 1: Decide how many queens you can produce after evaluating your resources; e.g. amount of
brood, workers to care for the brood, queen cells and availability of mating boxes/nucs.
Step 2: Set up the mating boxes/nucs using the original hive as the source of materials. If the
resources of the mother (original) hive do not support the number of mating boxes/nucs you choose to
make, you can supplement using brood and workers from other hives.
Mating box configuration: (if raising nucs, refer to the Nucleus method for configuration)
one frame of mostly honey and pollen
one brood frame with capped and emerging brood
2 queen cells.
enough workers to cover the brood and
queen cells
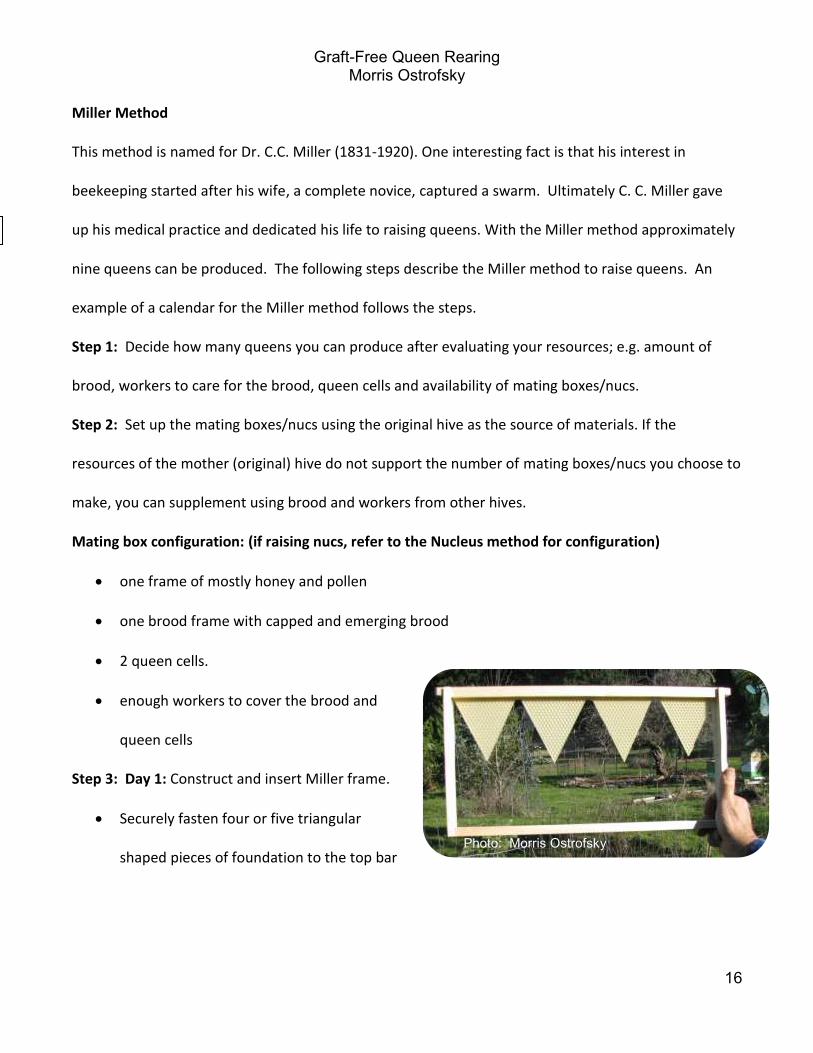
Step 3: Day 1: Construct and insert Miller frame.
Securely fasten four or five triangular
shaped pieces of foundation to the top bar
Photo: Khalil Hamdan
Photo: Morris Ostrofsky

Graft-Free Queen Rearing Morris Ostrofsky
17
of an unwired full depth frame. The triangular shaped sections of foundation should measure
approximately 3 inches wide at the top and taper to a point half way down toward the bottom
bar. This is referred to as the Miller frame.
Make sure the queen mother hive is level. The reason this is important is that bees will be
building natural, unsupported comb. If the hive is not level, the comb will not be built within
the frame.
Re-arrange the frames to create a space in the center of the queen mother brood box. This is
done by removing a little used frame on the outside edge of the brood box.
Place the Miller frame in the created space.
Step 5: Day 7: (Six days after inserting the Miller frame in the queen mother hive.) Remove queen
from the cell builder hive.
The queen must be removed one day before moving the Miller frame from the queen mother hive
to the cell builder hive. This queenless condition creates an emergency response and must exist if
queen cells are to be raised. The bees respond to this emergency by quickly building queen cells.
Store the queen temporarily in a small nuc. She will be returned to the cell builder hive at a later
stage.
Step 6: Day 8: (The next day) Prepare the Miller frame and insert in the cell builder hive.
Carefully remove the Miller frame while brushing off the bees. The frame must be held vertically
because the unsupported comb can break and fall. The foundation will be drawn and a small
amount of new comb will have been added. Young larvae and eggs should be seen at the margins
of the comb. .

Graft-Free Queen Rearing Morris Ostrofsky
18
Place the frame on a flat surface in an area with good lighting, high humidity and out of direct
sunlight. The goal is to trim the comb back to the point of recently hatched larvae between 24-
36 hours old. (see photo) As a source of reference the larvae are close to the size of an un-
hatched egg as per the photo.
Use a warm, sharp knife to trim off the lower margin of the empty comb and eggs.
The yellow line in the photo
below shows what the trim line
might look like. Everything
below it is removed.
Photo: David LaFerney
24 Hour
Trim Line
24 hour

Graft-Free Queen Rearing Morris Ostrofsky
19
.
Destroy two thirds of the future queen cells left along the lower trim margin. This avoids having
too many queen cells too close together. Squash two cells, keep the third, squash two and keep
the third, etc.
Enlarge the remaining
cells containing the larvae by
pushing the lower cell wall
downward into a vertical
position This simulates a
queen cup and encourages
the bees to build queen cells
there.
Photo: David LaFerney
Keep Keep
Keep
Keep
Photo: Morris Ostrofsky
Photo: Morris Ostrofsky Enlarged cells

Graft-Free Queen Rearing Morris Ostrofsky
20
Transfer the prepared Miller frame into the center of the brood area in the now queenless cell
builder hive.
Step 7: Feed and reduce entrance.
Before closing up the nuc, add a shim to create some space above the top bars and then add a protein
patty. The nuc’s cover should have a 2 to 3 inch circular hole cut into the center. Place an inverted
mason jar with 1:1 sugar syrup over the hole. The holes in the Mason jar lid should be 1/16 inch in
diameter. Include a feed stimulant, such as Honey Bee Healthy, in the syrup. Cover the feeder with an
empty box or bucket to protect the syrup from sunlight.
Step 8: Day 18: (Ten days later) Prepare queen
cells for mating boxes/nucs.
Remove queen cells from the Miller frame. These
cells should look roughly like the shell of a Virginia
peanut. Remove some of the surrounding comb
along with the queen cell to avoid damage the developing queen. The extra comb also provides a
means to attach the cell to another frame.
Step 9: Remove the queen cells and insert them into queenless mating boxes/nucs. (See Nucleus
method for more detail.)
Add enough workers to cover the brood and queen cells.
Return the original queen to the cell builder hive or leave one or two queen cells to become the
replacement queen.
Step 10: Feed and reduce entrance. Before closing up the nuc, add a shim to create some space above
the top bars and then add a protein patty. The nuc’s cover should have a 2 to 3 inch circular hole cut
Graphic: Dave Cushman

Graft-Free Queen Rearing Morris Ostrofsky
21
into the center. Place an inverted mason jar with 1:1 sugar syrup over the hole. The holes in the
Mason jar lid should be 1/16 inch in diameter. Include a feed stimulant, such as Honey Bee Healthy, in
the syrup. Cover the feeder with an empty box or bucket to protect the syrup from sunlight.
Step 11: Continue to feed the mating box/nuc for two weeks.
Step: 12: Wait 3 weeks before checking the results. You should find a laying queen with a good brood
pattern. If this is the case, transfer the bees into a standard box. If you were not successful, return the
frames to the original hive.
Because the Miller method involves several steps and critical dates, a calendar is very useful to
organize and coordinate your schedule with the queen rearing schedule. An example of a schedule
follows.

Graft-Free Queen Rearing Morris Ostrofsky
22
Date Step Number Action
4/1 Prep Start feeding cell builder hive(s)
5/1 Prep Start feeding drone mother hive(s), place drone frames in drone
mother hive(s)
5/8 – day 1 #3 Prepare Miller frame and insert into queen mother hive.
5/14 – day 7 #4 Remove the queen from the cell builder hive
5/15 – day 8 #5 Remove the Miller frame from queen hive, prepare it and place
into the cell builder hive.
5/25 – day 18 # 6 Remove queen cells, place into mating boxes/nucs, return original
queen to cell builder hive.
6/1 Target Date Mating flight(s)
6/22 #8 Check results, transfer to standard hive.
Mating flights

Graft-Free Queen Rearing Morris Ostrofsky
23
Hopkins Method
Isaac Hopkins described his method of raising queens in 1911. According to G.W. Hayes, “The Hopkins
Method of Queen Rearing is as good as and probably better for us than when first introduced 80 plus
years ago.” In the same May 1991 edition of The American Bee Journal he noted, “Believe me when I
tell you that you can raise more quality queens than you can probably use yourself with virtually no
specialized equipment or manipulation.” The usual number of queens raised is about 20 using the
Hopkins method.
The Hopkins and Miller methods are similar. The primary difference between them is the orientation
of the frame upon which the queen cells are built. With the Hopkins method the frame is horizontal.
Step 1: Decide how many queens/nucs you can produce after evaluating your resources; e.g. amount
of brood, workers to care for the brood, queen cells and availability of mating boxes/nucs.
Step 2: Set up the mating boxes/nucs using the original hive as the source of materials. If the
resources of the mother (original) hive do not support the number of nucs you choose to make, you
can supplement using brood and workers from other hives.
Nucleus configuration
Three (3) brood frames of capped brood with some cells that are emerging
If the queen cells are located singly or in doubles on brood frames, simply include the
brood frame with the queen cell(s)

Graft-Free Queen Rearing Morris Ostrofsky
24
If the queen cells have been removed from mother hive frames, provide a space in the
nucleus frames that are to receive the queen cells by cutting out a small portion of
comb. The queen cells can then be placed in the space and fixed in place with a couple
of tooth picks.
one (1)frame of mostly pollen
one (1) frame of mostly honey
enough workers to cover the brood and queen cells
Mating box configuration:
one frame of mostly honey and pollen
one brood frame with emerging brood
2 queen cells.
enough workers to cover the brood and queen cells
Step 3: Day 1: Construct the Hopkins frame and place in
queen mother hive.
Build an unwired frame with foundation held in place with
foundation pins. This is the Hopkins frame. Unwired frames need be
used as this will make later queen cell removal easier.
Re-arrange the frames to create a space in the center of the queen
mother brood box. This is done by removing a little used frame on the outside edge of the
brood box. Brush off the bees and place this frame in another hive.
Place the Hopkins frame in the space created in the queen mother hive.
Photos: Brushy Mt. Catalog

Graft-Free Queen Rearing Morris Ostrofsky
25
Step 4: Day 5: Remove queen from the cell builder hive.
The queen must be removed one day before moving the Hopkins frame from the queen mother
hive to the cell builder hive. This queenless condition creates an emergency response and must
exist if queen cells are to be raised. The bees respond to this emergency by quickly building queen
cells.
Store the queen temporarily in a small nuc. She will be returned to the cell builder hive at a later
stage.
Step 5: Day 6:
Evaluate the Hopkins frame and look for the presence of 24-36 hour old larvae.
Look at the Hopkins brood frame from the queen mother hive frame. Since day one the
bees will have drawn out the foundation and the queen should have started laying eggs in
the new comb.
You should see drawn comb, eggs and 24-36 hour larvae. If you do not see larvae of this
age, replace the frame and wait another day or two.
Look at both sides of the Hopkins frame and select
the side containing the most 24 -36 hour old
larvae.
Cull surplus cells in the Hopkins frame.
Place the selected side face up on a work surface in
an area with good lighting, temperature around 80
F, humidity, and NO direct sunlight as this would kill the larvae.
Photo: Ohio Queen Breeders

Graft-Free Queen Rearing Morris Ostrofsky
26
Reduce the number of potential queen cells from developing too close together (as shown)
by destroying two
rows of worker cells
and leaving the
third intact. This
provides space to
keep the finished
queen cells from
being damaged when they are removed from the frame.
Start at the top of the frame. Use a hive tool and scrape the cells from one side of the comb
to the other. Damage the cell clear down to the mid-rib. Within the row of remaining,
intact cells, destroy two cells down to the mid-rib and leave every third intact. The red lines
on the photo indicate the cells to be destroyed.
Place a shim above the brood frames in the now queenless cell builder hive. It acts as support for
the prepared Hopkins frame and provides space for the protein patty and for the bees to build
queen cells.
Divide the protein patty into quarters and place them in the inside corners of the shim and above
the brood frame top bars.
Place the prepared brood frame on top of the shim and close the hive with a telescoping cover.
Place an inverted mason jar with 1:1 sugar syrup over the hole. The holes in the Mason jar lid
should be 1/16 inch in diameter. Include a feed stimulant, such as Honey Bee Healthy, in the syrup.
Cover the feeder with an empty box or bucket to protect the syrup from sunlight.
Red lines indicate cells to be destroyed.
Red lines indicate destroyed cells

Graft-Free Queen Rearing Morris Ostrofsky
27
Step 6: Nine days after placing the Hopkins frame on top of the cell builder (approximately day 15)
prepare and transfer the queen cells to queenless mating boxes/ nucs.
Place the frame in a standing position
with the top bar on top and the
bottom bar resting on a secure
surface. With a sharp, wet knife
carefully cut the comb leaving a half inch border around each queen cell.
Create a cavity the size of the queen cell and border comb in the frame to receive the cell.
Gently press the border comb with the queen cell into this cavity. Do not press on the fragile
queen cell itself. If needed, a tooth pick can be used for additional support. (See Nucleus
method)
Return the original queen to the cell builder hive or place one or two queen cells in the cell builder
to become the replacement queen.
Step 7: Feed and reduce entrance. Before closing up the mating box/nuc, add a shim to create some
space above the top bars and then add a protein patty. The nuc’s cover should have a 2 to 3 inch
circular hole cut into the center. Place an inverted mason jar with 1:1 sugar syrup over the hole. The
holes in the Mason jar lid should be 1/16 inch in diameter. Include a feed stimulant, such as Honey Bee
Healthy, in the syrup. Cover the feeder with an empty box or bucket to protect the syrup from sunlight.
Step 8: Continue to feed the mating box/nuc for a couple weeks.
Step 9: Wait three weeks to check the results. You should find a laying queen with a good brood
pattern. If this is the case, transfer the bees into a standard box. If you were not successful, return the
frames to the original hive.
Finished cells Photo: Mel Desselkoen

Graft-Free Queen Rearing Morris Ostrofsky
28
There are a number of ways to raise queens and to do it well. Four methods have been presented.
While we beekeepers like to believe we are in control, we can not overlook the queen’s influence.
Appropriately we will leave it to her to have the last word.
“…If any old farmer can keep and hive me, Then any old drone may catch and wive me;
I’m sorry for creators who can not pair On a gorgeous day in the upper air, I’m sorry for cows who have to boast Of affairs they’ve had by parcel post,
I’m sorry for man with his plots and guile, His test tube manner, his test tube smile;
I’ll multiple and I’ll increase as I always have- by mere caprice; For I am a queen and I am a bee,
I’m devil-may-care and I’m fancy- free, Love-in-air is the thing for me,
Oh, it’s simply rare In the beautiful air, And I wish to state
That I will always mate with whatever drone I encounter”
“Song of the Queen Bee”
Poems and Sketches of E.B. White reproduced in Queen Rearing and Bee Breeding Harry H. Laidlaw Jr. and Robert E. Page, Jr.

Graft-Free Queen Rearing Morris Ostrofsky
29
References:
Harry H. Laidlaw Jr. & Robert E. Page Jr. (First Edition 1997) Queen Rearing and Bee Breeding, Wicwas Press Larry John Connor (2009) Queen Rearing Essentials, Wicwas Press Kim Flottum (2011) Better Beekeeping, Quarry Books, pgs 81, 92, Mel Disselkoen (2008) I.M.N. System of Queen Rearing, Self published G. W. Hayes Jr. (May 1991) The Hopkins Method of Queen Rearing, American Bee Journal Roy Hendrickson (April 2011) Managing Varroa: Selecting for Resistance & Queen Rearing, American Bee Journal, pg. 349
Yes, as a matter
of fact the world does
revolve around me.