gravityzone - bitdefender cambodia...1. about gravityzone...
TRANSCRIPT

GravityZone
INSTALLATION GUIDE

Bitdefender GravityZoneInstallation Guide
Publication date 2019.03.26
Copyright© 2019 Bitdefender
Legal NoticeAll rights reserved. No part of this book may be reproduced or transmitted in any form or by any means, electronicormechanical, including photocopying, recording, or by any information storage and retrieval system, withoutwrittenpermission from an authorized representative of Bitdefender. The inclusion of brief quotations in reviews may bepossible only with the mention of the quoted source. The content can not be modified in any way.Warning and Disclaimer. This product and its documentation are protected by copyright. The information in thisdocument is provided on an “as is” basis, without warranty. Although every precaution has been taken in thepreparation of this document, the authors will not have any liability to any person or entity with respect to any lossor damage caused or alleged to be caused directly or indirectly by the information contained in this work.This book contains links to third-party Websites that are not under the control of Bitdefender, therefore Bitdefenderis not responsible for the content of any linked site. If you access a third-party website listed in this document, youwill do so at your own risk. Bitdefender provides these links only as a convenience, and the inclusion of the link doesnot imply that Bitdefender endorses or accepts any responsibility for the content of the third-party site.Trademarks. Trademark namesmay appear in this book. All registered and unregistered trademarks in this documentare the sole property of their respective owners, and are respectfully acknowledged.
50340A34392034390AFE02048790BF8082B92FA06FA080BA74BC7CC1AE80BA996CE11D2E80BA74C7E78C2E8082FFB239EA2080FEAAAAAAAABF800006AA3FB00000FBD5EFE73AD5009CF2544B4C3D00A6B67D616B878031FB500EA66D0063567F854DF700E84116D29479001E1671326B0580C5FB204BC43D8067FDFBC34DB780D0D217971C6C00C7917C347B4580254D7859B54800EE712FF15D9700606495D7DC7D00AFBD83E36BFD8058E6B23EC589003A89EEB31DAF00C8C91627818C001FB72BF86BFB803D6ABDBFC000809E5E6C015DFE80A54917860DD200B30202C06377805DE366E8361180DF05ED2359FA00AD5455C690B200A3E97B50FB728034D4AF78869180FFA96A063B6F80D53484FF0C718046A5B3D16B298071D6D5BE608100E375ABE609FE8000DA16331D8A00FEF606A13EAF80825B662EA68800BADF6BE52EFE80BA891646848B00BA9C21A5EE700082CC28DA84E080FEA1EC237E1780

Table of ContentsPreface . . . . . . . . . . . . . . . . . . . . . . . . . . . . . . . . . . . . . . . . . . . . . . . . . . . . . . . . . . . . . . . . . . . . . . . . . . . . . . . v
1. Conventions Used in This Guide . . . . . . . . . . . . . . . . . . . . . . . . . . . . . . . . . . . . . . . . . . . . . . . . . . . . . . . v
1. About GravityZone . . . . . . . . . . . . . . . . . . . . . . . . . . . . . . . . . . . . . . . . . . . . . . . . . . . . . . . . . . . . . . . . . 11.1. GravityZone Security Services . . . . . . . . . . . . . . . . . . . . . . . . . . . . . . . . . . . . . . . . . . . . . . . . . . . . . . 11.2. GravityZone Architecture . . . . . . . . . . . . . . . . . . . . . . . . . . . . . . . . . . . . . . . . . . . . . . . . . . . . . . . . . . . 2
1.2.1. Web Console (GravityZone Control Center) . . . . . . . . . . . . . . . . . . . . . . . . . . . . . . . . . . . . . . . 21.2.2. Security Agents . . . . . . . . . . . . . . . . . . . . . . . . . . . . . . . . . . . . . . . . . . . . . . . . . . . . . . . . . . . . . . 2
2. Requirements . . . . . . . . . . . . . . . . . . . . . . . . . . . . . . . . . . . . . . . . . . . . . . . . . . . . . . . . . . . . . . . . . . . . 102.1. Control Center . . . . . . . . . . . . . . . . . . . . . . . . . . . . . . . . . . . . . . . . . . . . . . . . . . . . . . . . . . . . . . . . . . . 102.2. Endpoint Protection . . . . . . . . . . . . . . . . . . . . . . . . . . . . . . . . . . . . . . . . . . . . . . . . . . . . . . . . . . . . . . 10
2.2.1. Hardware . . . . . . . . . . . . . . . . . . . . . . . . . . . . . . . . . . . . . . . . . . . . . . . . . . . . . . . . . . . . . . . . . . . 112.2.2. Supported Operating Systems . . . . . . . . . . . . . . . . . . . . . . . . . . . . . . . . . . . . . . . . . . . . . . . . . 142.2.3. Supported File Systems . . . . . . . . . . . . . . . . . . . . . . . . . . . . . . . . . . . . . . . . . . . . . . . . . . . . . . 192.2.4. Supported Browsers . . . . . . . . . . . . . . . . . . . . . . . . . . . . . . . . . . . . . . . . . . . . . . . . . . . . . . . . . 192.2.5. Traffic Usage . . . . . . . . . . . . . . . . . . . . . . . . . . . . . . . . . . . . . . . . . . . . . . . . . . . . . . . . . . . . . . . 19
2.3. Full Disk Encryption . . . . . . . . . . . . . . . . . . . . . . . . . . . . . . . . . . . . . . . . . . . . . . . . . . . . . . . . . . . . . . 212.4. GravityZone Communication Ports . . . . . . . . . . . . . . . . . . . . . . . . . . . . . . . . . . . . . . . . . . . . . . . . . 23
3. Installing Protection . . . . . . . . . . . . . . . . . . . . . . . . . . . . . . . . . . . . . . . . . . . . . . . . . . . . . . . . . . . . . 243.1. License Management . . . . . . . . . . . . . . . . . . . . . . . . . . . . . . . . . . . . . . . . . . . . . . . . . . . . . . . . . . . . . 24
3.1.1. Finding a Reseller . . . . . . . . . . . . . . . . . . . . . . . . . . . . . . . . . . . . . . . . . . . . . . . . . . . . . . . . . . . 243.1.2. Activating Your License . . . . . . . . . . . . . . . . . . . . . . . . . . . . . . . . . . . . . . . . . . . . . . . . . . . . . . 253.1.3. Checking Current License Details . . . . . . . . . . . . . . . . . . . . . . . . . . . . . . . . . . . . . . . . . . . . . . 26
3.2. Installing Security Agents . . . . . . . . . . . . . . . . . . . . . . . . . . . . . . . . . . . . . . . . . . . . . . . . . . . . . . . . . 263.2.1. Preparing for Installation . . . . . . . . . . . . . . . . . . . . . . . . . . . . . . . . . . . . . . . . . . . . . . . . . . . . . 273.2.2. Local Installation . . . . . . . . . . . . . . . . . . . . . . . . . . . . . . . . . . . . . . . . . . . . . . . . . . . . . . . . . . . . 293.2.3. Remote Installation . . . . . . . . . . . . . . . . . . . . . . . . . . . . . . . . . . . . . . . . . . . . . . . . . . . . . . . . . . 363.2.4. Preparing Linux Systems for On-access Scanning . . . . . . . . . . . . . . . . . . . . . . . . . . . . . . . 413.2.5. How Network Discovery Works . . . . . . . . . . . . . . . . . . . . . . . . . . . . . . . . . . . . . . . . . . . . . . . . 44
3.3. Installing Full Disk Encryption . . . . . . . . . . . . . . . . . . . . . . . . . . . . . . . . . . . . . . . . . . . . . . . . . . . . . . 473.4. Credentials Manager . . . . . . . . . . . . . . . . . . . . . . . . . . . . . . . . . . . . . . . . . . . . . . . . . . . . . . . . . . . . . . 47
3.4.1. Adding Credentials to the Credentials Manager . . . . . . . . . . . . . . . . . . . . . . . . . . . . . . . . . . 483.4.2. Deleting Credentials from Credentials Manager . . . . . . . . . . . . . . . . . . . . . . . . . . . . . . . . . . 49
4. Integrations . . . . . . . . . . . . . . . . . . . . . . . . . . . . . . . . . . . . . . . . . . . . . . . . . . . . . . . . . . . . . . . . . . . . . . 504.1. Integrating with Amazon EC2 . . . . . . . . . . . . . . . . . . . . . . . . . . . . . . . . . . . . . . . . . . . . . . . . . . . . . . 50
5. Uninstalling Endpoint Protection . . . . . . . . . . . . . . . . . . . . . . . . . . . . . . . . . . . . . . . . . . . . . . . . 51
6. Getting Help . . . . . . . . . . . . . . . . . . . . . . . . . . . . . . . . . . . . . . . . . . . . . . . . . . . . . . . . . . . . . . . . . . . . . 536.1. Bitdefender Support Center . . . . . . . . . . . . . . . . . . . . . . . . . . . . . . . . . . . . . . . . . . . . . . . . . . . . . . . . 536.2. Asking for Assistance . . . . . . . . . . . . . . . . . . . . . . . . . . . . . . . . . . . . . . . . . . . . . . . . . . . . . . . . . . . . . 546.3. Using Support Tool . . . . . . . . . . . . . . . . . . . . . . . . . . . . . . . . . . . . . . . . . . . . . . . . . . . . . . . . . . . . . . . 55
6.3.1. Using Support Tool on Windows Operating Systems . . . . . . . . . . . . . . . . . . . . . . . . . . . . . 556.3.2. Using Support Tool on Linux Operating Systems . . . . . . . . . . . . . . . . . . . . . . . . . . . . . . . . 566.3.3. Using Support Tool on Mac Operating Systems . . . . . . . . . . . . . . . . . . . . . . . . . . . . . . . . . 58
iii

6.4. Contact Information . . . . . . . . . . . . . . . . . . . . . . . . . . . . . . . . . . . . . . . . . . . . . . . . . . . . . . . . . . . . . . 596.4.1. Web Addresses . . . . . . . . . . . . . . . . . . . . . . . . . . . . . . . . . . . . . . . . . . . . . . . . . . . . . . . . . . . . . . 596.4.2. Local Distributors . . . . . . . . . . . . . . . . . . . . . . . . . . . . . . . . . . . . . . . . . . . . . . . . . . . . . . . . . . . . 596.4.3. Bitdefender Offices . . . . . . . . . . . . . . . . . . . . . . . . . . . . . . . . . . . . . . . . . . . . . . . . . . . . . . . . . . 60
A. Appendices . . . . . . . . . . . . . . . . . . . . . . . . . . . . . . . . . . . . . . . . . . . . . . . . . . . . . . . . . . . . . . . . . . . . . . 63A.1. Supported File Types . . . . . . . . . . . . . . . . . . . . . . . . . . . . . . . . . . . . . . . . . . . . . . . . . . . . . . . . . . . . . 63
iv

PrefaceThis guide is intended for IT administrators in chargewith deploying theGravityZoneprotection within their organization's premises. IT managers in search forinformation about GravityZone can find in this guide the GravityZone requirementsand available protection modules.This document aims to explain how to deploy Bitdefender security agents on alltypes of endpoints in your company, and how to configure theGravityZone solution.
1. Conventions Used in This Guide
Typographical ConventionsThis guide uses several text styles for an improved readability. Learn about theiraspect and meaning from the table below.
DescriptionAppearance
Inline command names and syntaxes, pathsand filenames, configuration file outputs,
sample
input text are printed with monospacedcharacters.The URL link is pointing to some externallocation, on http or ftp servers.
http://www.bitdefender.com
E-mail addresses are inserted in the text forcontact information.
This is an internal link, towards somelocation inside the document.
“Preface” (p. v)
All the product options are printed using boldcharacters.
option
Interface options, keywords or shortcuts arehighlighted using bold characters.
keyword
Preface v

AdmonitionsThe admonitions are in-text notes, graphically marked, bringing to your attentionadditional information related to the current paragraph.
NoteThe note is just a short observation. Although you can omit it, the notes can providevaluable information, such as specific feature or a link to some related topic.
ImportantThis requires your attention and is not recommended to skip over it. Usually, it providesnon-critical but significant information.
WarningThis is critical information you should treat with increased caution. Nothing bad willhappen if you follow the indications. You should read and understand it, because itdescribes something extremely risky.
Preface vi

1. ABOUT GRAVITYZONEGravityZone is a business security solution built from ground-up for virtualizationand cloud to deliver security services to physical endpoints and virtual machinesin private and public cloud.GravityZone is one product with a unified management console available in thecloud, hosted by Bitdefender, or as one virtual appliance to be installed oncompany's premises, and it provides a single point for deploying, enforcing andmanaging security policies for any number of endpoints and of any type, in anylocation.GravityZone delivers multiple layers of security for endpoints: antimalware withbehavioral monitoring, zero day threat protection, application blacklisting andsandboxing, firewall, device control and content control.
1.1. GravityZone Security ServicesGravityZone provides the following security services:
● Security for Endpoints
● Security for Virtualized Environments
Security for EndpointsProtects unobtrusively any number ofWindows, Linux andmacOS laptops, desktopsand servers by using top-ranked antimalware technologies. Additionally, Windowssystems benefit of evenmore enhanced security with a two-way firewall, intrusiondetection, web access control and filtering, sensitive data protection, applicationand device control. Low system usage ensures performance improvements, whileintegration with Microsoft Active Directory makes it easy to automatically applyprotection to unmanageddesktops and servers. The solution provides an alternativeto legacy antimalware systems by combining industry-acclaimed securitytechnologieswith simplicity of deployment andmanagement through the powerfulGravityZone Control Center. Proactive heuristics is employed to classifymaliciousprocesses based on their behavior, detecting new threats in real time.
Security for Virtualized EnvironmentsSecurity for Virtualized Environments is the first all-encompassing security solutionfor virtualized datacenters, protecting virtualized servers and desktops onWindows
About GravityZone 1

and Linux systems. Powered by cutting-edge caching technologies, the solutiondrives significant performance gains and boosts server consolidation by up to 30%compared to traditional antimalware.
1.2. GravityZone ArchitectureThe GravityZone solution includes the following components:
● Web Console (Control Center)● Security Agents
1.2.1. Web Console (GravityZone Control Center)Bitdefender security solutions aremanagedwithin GravityZone from a single pointof management, Control Center web console, which provides easier managementand access to overall security posture, global security threats, and control over allsecurity modules protecting virtual or physical desktops and servers. Powered bya Gravity Architecture, Control Center is capable of addressing the needs of eventhe largest organizations.Control Center, a web-based interface, integrates with the existing systemmanagement and monitoring systems to make it simple to apply protection tounmanaged workstations and servers.
1.2.2. Security AgentsTo protect your network with Bitdefender, you must install the appropriateGravityZone security agents on network endpoints.
● Bitdefender Endpoint Security Tools● Bitdefender Endpoint Security Tools for Windows Legacy● Endpoint Security for Mac
Bitdefender Endpoint Security ToolsGravityZone ensures physical and virtual machines protection with BitdefenderEndpoint Security Tools, an intelligent environment-aware security agent whichadapts to the endpoint type. Bitdefender Endpoint Security Tools can be deployedon any machine, either virtual or physical, providing a flexible scanning system,being an ideal choice for mixed environments (physical, virtual and cloud).Bitdefender Endpoint Security Tools uses one single policy template for physicaland virtualmachines, and one installation kit source for any environment (physical
About GravityZone 2
or virtual) running current Windows editions. A separate kit installs on legacyWindows editions. For details, refer to BEST for Windows Legacy.Bitdefender Endpoint Security Tools is also available for Linux physical endpoints(servers).Bitdefender Endpoint Security Tools comprises the following components:
● Scanning Engines
● Protection Modules
● Endpoint Roles
Scanning EnginesThe scanning engines are automatically set during Bitdefender Endpoint SecurityTools packages creation, letting the endpoint agent detect the machine'sconfiguration and adapt the scanning technology accordingly.The administrator can also customize the scan engines, being able to choosebetween several scanning technologies:
1. Local Scan, when the scanning is performed on the local endpoint. The localscanning mode is suited for powerful machines, having all signatures andengines stored locally.
2. Hybrid Scan with Light Engines (Public Cloud), with a medium footprint, usingin-the-cloud scanning and, partially, the local signatures. This scanning modebrings the benefit of better resources consumption, while involving off-premisescanning.
3. Central Scan in Public or Private Cloud, with a small footprint requiring a SecurityServer for scanning. In this case, no signature set is stored locally, and thescanning is offloaded on the Security Server.
NoteThere is a minimum set of engines stored locally, needed to unpack thecompressed files.
4. Central Scan (Public or Private Cloud scanning with Security Server) withfallback* on Local Scan (Full Engines)
5. Central Scan (Public or Private Cloud scanning with Security Server) withfallback* on Hybrid Scan (Public Cloud with Light Engines)
About GravityZone 3

Protection ModulesThe following protectionmodules are available with Bitdefender Endpoint SecurityTools:
● Antimalware● Advanced Threat Control● Firewall● Content Control● Device Control● Power User● Volume Encryption● Patch Management
Antimalware
The antimalware protection module is based on signature scanning and heuristicanalysis (B-HAVE, ATC) against: viruses, worms, trojans, spyware, adware,keyloggers, rootkits and other types of malicious software.Bitdefender's antimalware scanning technology relies on the following protectionlayers:
● First, a traditional scanning method is employed where scanned content ismatched against the signature database. The signature database contains bytepatterns specific to known threats and is regularly updated by Bitdefender. Thisscanning method is effective against confirmed threats that have beenresearched and documented. However, no matter how promptly the signaturedatabase is updated, there is always a vulnerability window between the timewhen a new threat is discovered and when a fix is released.
● Against brand-new, undocumented threats, a second layer of protection isprovided byB-HAVE, Bitdefender's heuristic engine. Heuristic algorithms detectmalware based on behavioral characteristics. B-HAVE runs suspicious files ina virtual environment to test their impact on the system and ensure they poseno threat. If a threat is detected, the program is prevented from running.
Advanced Threat Control
For threats that elude even the heuristic engine, a third layer of protection is presentin the form of Advanced Threat Control (ATC).Advanced Threat Control continuously monitors running processes and gradessuspicious behaviors such as attempts to: disguise the type of process, execute
About GravityZone 4
code in another process's space (hijack process memory for privilege escalation),replicate, drop files, hide from process enumeration applications, etc. Eachsuspicious behavior raises the process rating. When a threshold is reached, analarm is triggered.
ImportantThis module is available only for supported Windows desktop and server operatingsystems.
Firewall
The Firewall controls applications' access to the network and to the Internet. Accessis automatically allowed for a comprehensive database of known, legitimateapplications. Furthermore, the firewall can protect the system against port scans,restrict ICS and warn when new nodes join a Wi-Fi connection.
ImportantThis module is available only for supported Windows workstations. For moreinformation, refer to “Supported Operating Systems” (p. 14).
Content Control
The Content Control module helps enforce company policies for allowed traffic,web access, data protection and applications control. Administrators can definetraffic scan options and exclusions, scheduleweb accesswhile blocking or allowingcertain web categories or URLs, configure data protection rules and definepermissions for the use of specific applications.
ImportantThis module is available only for supported Windows workstations. For moreinformation, refer to “Supported Operating Systems” (p. 14).
Device Control
The Device Control module allows preventing the sensitive data leakage andmalware infections via external devices attached to endpoints by applying blockingrules and exceptions via policy to a vast range of device types (such as USB FlashDrives, Bluetooth Devices, CD/DVD-Players, Storage Devices, etc.).
ImportantThis module is available only for supported Windows desktop and server operatingsystems. For more information, refer to “Supported Operating Systems” (p. 14).
About GravityZone 5

Power User
Control Center administrators can grant Power User rights to endpoint users viapolicy settings. The Power Usermodule enables administration rights at user level,allowing the endpoint user to access and modify security settings via a localconsole. Control Center is being notified when an endpoint is in Power User modeand the Control Center administrator can always overwrite local security settings.
ImportantThis module is available only for supported Windows desktop and server operatingsystems. For more information, refer to “Supported Operating Systems” (p. 14).
Volume Encryption
The Volume Encryption module allows you to provide full disk encryption bymanaging BitLocker onWindowsmachines. You can encrypt and decrypt boot andnon-boot volumes, with just one click, while GravityZone handles the entire process,with minimal intervention from the users. Additionally, GravityZone stores therecovery keys needed to unlock volumes when the users forget their passwords.
NoteThis module is available on certain Windows operating systems. For the VolumeEncryption module requirements, refer to “Full Disk Encryption” (p. 21)
Patch Management
Fully integrated in GravityZone, the Patch Management module keeps operatingsystems and software applications up to date and provides a comprehensive viewon the patch status for your managed Windows endpoints.The GravityZone Patch Management module includes several features, such ason-demand / scheduled patch scanning, automatic / manual patching or missingpatch reporting.You can learnmore about GravityZone PatchManagement supported vendors andproducts from this KB article.
NoteThe Patch Management module is an add-on available with a separate license keyfor all available GravityZone packages.
Endpoint Roles
● Relay Role
About GravityZone 6

● Patch Caching Server Role
Relay Role
Endpoint agents with Bitdefender Endpoint Security Tools Relay role serve ascommunication proxy and update servers for other endpoints in the network.Endpoint agentswith relay role are especially required in organizationswith isolatednetworks, where all traffic is made through a single access point.In companies with distributed networks, relay agents help lowering the bandwidthusage, by preventing protected endpoints to connect directly to GravityZone.Once a Bitdefender Endpoint Security Tools Relay agent is installed in the network,other endpoints can be configured via policy to communicate with Control Centerthrough the relay agent.Bitdefender Endpoint Security Tools Relay agents serve for the following purposes:
● Discovering all unprotected endpoints in the network.This functionality is essential for the security agent deployment in a cloudGravityZone environment.
● Deploying the endpoint agent inside the local network.
● Updating protected endpoints in the network.
● Ensuring the communication betweenControl Center and connected endpoints.
● Acting as proxy server for protected endpoints.
● Optimizing the network traffic during updates, deployments, scanning and otherresource-consuming tasks.
Patch Caching Server Role
Endpoints with Relay role may also act as a Patch Caching Server. With this roleenabled, Relays serve for storing software patches downloaded from vendor'swebsites, and distributing them to target endpoints in your network. Whenever aconnected endpoint has software with missing patches, it takes them from theserver and not from the vendor's website, thus optimizing the traffic generated andthe network bandwidth load.
ImportantThis additional role is available with a registered Patch Management add-on.
About GravityZone 7

Bitdefender Endpoint Security Tools for Windows LegacyAs security technologies move forward, some features in Bitdefender EndpointSecurity Tools are no longer supported on older editions of Windows. BitdefenderEndpoint Security Tools for Windows Legacy is a separate kit designed to protectthese Windows editions without making any compromise for the security of thecurrent ones.BEST for Windows Legacy supports the following protection modules:
● Antimalware● Advanced Threat Control● Exchange Protection
Relay role andPower Usermodule are not availablewith BEST forWindows Legacy.Bitdefender Endpoint Security Tools for Windows Legacy cannot be remotelydeployed from the GravityZone console. The administrators need to install theBEST for Windows Legacy package manually or by using a third-party tool, suchas Microsoft SCCM.
Endpoint Security for MacEndpoint Security for Mac is a security agent designed to protect Intel-basedMacintosh workstations and laptops.Endpoint Security for Mac includes the following modules:
● Antimalware● Content Control● Device Control● Encryption
AntimalwareThe Antimalware module can detect and remove all kinds of malware, includingviruses, spyware, Trojan horses, keyloggers, worms and adware. The scanningtechnology available is Local Scan, with all signatures and engines stored locally.
Content ControlContent Control protects the endpoints against phishing attacks, fraud attemptsand inappropriateweb content. It also includes a comprehensive set of user controlsthat help the network administrator enforce computer and Internet use policies.
About GravityZone 8

ImportantContent Control is available starting with OS X El Capitan (10.11). This functionalityrelies on a macOS kernel extension. The installation of kernel extensions requiresyour approval on macOS High Sierra (10.13.x) and later.
Device ControlDevice Control allows preventing sensitive data leakage and malware infectionsvia external devices attached to endpoints, by applying blocking rules via policy toa vast range of device types (Bluetooth devices, CDROMdevices,modems, printersetc.).
ImportantDevice Control is available starting with OS X El Capitan (10.11). This functionalityrelies on a macOS kernel extension. The installation of kernel extensions requiresyour approval on macOS High Sierra (10.13.x) and later.
EncryptionThe Encryption module allows you to provide full disk encryption by managingFileVault and the diskutil command-line utility, with GravityZone handling the entireprocess.
About GravityZone 9

2. REQUIREMENTSAll of the GravityZone solutions are installed and managed via Control Center.
2.1. Control CenterTo access the Control Center web console, the following are required:
● Internet Explorer 9+,Mozilla Firefox 14+, Google Chrome15+, Safari 5+,MicrosoftEdge 20+, Opera 16+
● Recommended screen resolution: 1280 x 800 or higher
WarningControl Center will not work / display properly in Internet Explorer 9+ with theCompatibility View feature enabled, which is equivalent with using an unsupportedbrowser version.
2.2. Endpoint ProtectionTo protect your networkwith Bitdefender, youmust install the GravityZone securityagents on network endpoints. For this purpose, you need a Control Center userwith administrator privileges over the services you need to install and over thenetwork endpoints under your management.Requirements for the security agent are different, based onwhether has additionalserver roles, such as Relay, Exchange Protection or Patch Caching Server. Formoreinformation on the agent's roles, refer to “Security Agents” (p. 2).
Requirements 10

2.2.1. Hardware
Security Agent Without Roles
CPU
Supported OperatingSystems (OSes)
CPU TypeTargetSystems
Microsoft Windows XP SP332-bit and Windows XP SP2
64-bit
Intel® Pentium compatibleprocessors, 1 GHz or faster
Workstations
MicrosoftWindowsdesktopOSes, except Windows XP
Intel® Pentium compatibleprocessors, 2 GHz or faster
macOSIntel® Core 2 Duo, 2 GHz or fasterMicrosoft Windowsembedded OSes
Intel® Pentium compatibleprocessors, 800 MHZ or faster
SmartDevices
Microsoft Windows ServerOSes and Linux OSes
Minimum: Intel® Pentiumcompatible processors, 2.4 GHz
Servers
12Recommended: Intel® Xeonmulti-core CPU, 1.86 GHz or faster
Free RAM MemoryAt Installation (MB)
SINGLE ENGINE
OS Centralized ScanningHybrid ScanningLocal Scanning
FullOptions
AV OnlyFullOptions
AV OnlyFullOptions
AV Only
40025666051212001024Windows25625651251210241024Linuxn/an/an/an/a10241024macOS
For Daily Usage (MB)*
Requirements 11

Protection ModulesAntivirus (Single Engine)OS Update
ServerPowerUser
ContentControlFirewall
BehavioralScanCentralizedHybridLocal
+80+29+41+17+13305575Windows-----90180200Linux-------300macOS
* The measurements cover the daily endpoint client usage, without taking intoaccount additional tasks, such as on-demand scans or product updates.
Free Disk SpaceAt Installation (MB)
DUAL ENGINESINGLE ENGINE
OS
Centralized +Hybrid
Scanning
Centralized +Local
Scanning
CentralizedScanning
HybridScanning
LocalScanning
FullOptions
AVOnly
FullOptions
AVOnly
FullOptions
AVOnly
FullOptions
AVOnly
FullOptions
AVOnly
7005001200102457035070050012001024Windows9508001450130045030095080014501300Linuxn/an/an/an/an/an/an/an/a10241024macOS
For Daily Usage (MB)*
Protection ModulesAntivirus (Single Engine)OS Update
ServerPowerUser
ContentControlFirewall
BehavioralScanCentralizedHybridLocal
+10+80+60+5+12140190410Windows-----110200500Linux-------1024macOS
Requirements 12

* The measurements cover the daily endpoint client usage, without taking intoaccount additional tasks, such as on-demand scans or product updates.
Security Agent with Relay RoleThe Relay role needs hardware resources additionally to the basic security agent'sconfiguration. These requirements are to support theUpdate Server and installationpackages hosted by the endpoint:
Free disk space forUpdate Server*
RAMCPU to support Update ServerNumber ofconnectedendpoints
10 GB1 GBminimum Intel® Core™ i3 orequivalent processor, 2 vCPU per
core
1-300
10 GB1 GBminimum Intel® Core™ i5 orequivalent processor, 4 vCPU per
core
300-1000
* Relay agents require SSD disks, to support the high amount of read/writeoperations.
ImportantIf you want to save the installation packages and updates to another partition thanthe one where the agent is installed, make sure both partitions have sufficient freedisk space (10 GB), otherwise the agent aborts installation. This is required only atinstallation.
Security Agent With Patch Caching Server RoleThe agent with Patch Caching Server role must meet the following cumulativerequirements:
● All hardware requirements of the simple security agent (without roles)
● All hardware requirements of the Relay role
● Additionally 100 GB of free disk space to store the downloaded patches
Requirements 13

ImportantIf you want to save the patches to another partition than the one where the agent isinstalled,make sure both partitions have sufficient free disk space (100GB), otherwisethe agent aborts installation. This is required only at installation.
2.2.2. Supported Operating Systems
Windows DesktopFull Support
● Windows 10 October 2018 Update (Redstone 5)
● Windows 10 April 2018 Update (Redstone 4)
● Windows 10 Fall Creators Update (Redstone 3)
● Windows 10 Creators Update (Redstone 2)
● Windows 10 Anniversary Update (Redstone 1)
● Windows 10 November Update (Threshold 2)
● Windows 10
● Windows 8.1
● Windows 8
● Windows 7
Limited SupportOn these operating systems, the security agent has only Antimalware andAdvanced Threat Control. Power User and Relay are not supported.
● Windows Vista with Service Pack 1
● Windows XP with Service Pack 2 (64 bit)
● Windows XP with Service Pack 3 (32 bit)
Windows Tablet and EmbeddedFull Support
● Windows 10 IoT Enterprise
● Windows Embedded 8.1 Industry
● Windows Embedded 8 Standard
Requirements 14

● Windows Embedded Standard 7
● Windows Embedded Compact 7
● Windows Embedded POSReady 7
● Windows Embedded Enterprise 7
Limited SupportOn these operating systems, the security agent supports only Antimalwareand Advanced Threat Control. Power User and Relay are not supported.
● Windows Embedded POSReady 2009
● Windows Embedded Standard 2009
● Windows XP Embedded with Service Pack 2(1)
● Windows XP Tablet PC Edition(1)
Warning(1) These specific embedded operating system components must be installed:
● TCP/IP Networking with Client For Microsoft Networks● Base Support Binaries● Filter Manager● DNS Cache Support● Windows Installer● WMI Windows Installer Provider● Workstation Service● WinHTTP● Windows XP Service Pack 2 Resource DLL● Windows Logon (Standard)● Explorer shell● NTFS format
Windows ServerFull Support
● Windows Server 2019
● Windows Server 2016
● Windows Server 2016 Core
● Windows Server 2012 R2
Requirements 15

● Windows Server 2012
● Windows Small Business Server (SBS) 2011
● Windows Server 2008 R2
Limited SupportOn these operating systems, the security agent supports only Antimalwareand Advanced Threat Control. Power User and Relay are not supported.Windows Server 2008 and Windows Small Business Server (SBS) 2008 alsosupport Exchange Protection.
● Windows Server 2008
● Windows Server 2003 R2
● Windows Server 2003
● Windows Small Business Server (SBS) 2008
● Windows Small Business Server (SBS) 2003
● Windows Home Server
ImportantBitdefender Endpoint Security Tools supports the Windows Server FailoverCluster (WSFC) technology.
Linux● Ubuntu 14.04 LTS or higher● Red Hat Enterprise Linux / CentOS 6.0 or higher● SUSE Linux Enterprise Server 11 SP4 or higher● OpenSUSE Leap 42.x● Fedora 25 or higher(1)
● Debian 8.0 or higher● Oracle Linux 6.3 or higher● Amazon Linux AMI 2016.09 or higher
Warning(1) On Fedora 28, Bitdefender Endpoint Security Tools requires manual installationof the libnsl package, by running the following command:
sudo dnf install libnsl -y
Requirements 16

Active Directory PrerequisitesWhen integrating Linux endpoints with an Active Directory domain via the SystemSecurity Services Daemon (SSSD), ensure that the ldbsearch tool is installed.
On-access Scanning SupportOn-access scanning is available for all supported guest operating systems. OnLinux systems, on-access scanning support is provided in the following situations:
On-access RequirementsLinux DistributionsKernelVersions
Fanotify (kernel option) must beenabled.
Red Hat Enterprise Linux /CentOS 6.0 or higher
2.6.38 orhigher*
Ubuntu 14.04 or higherSUSE Linux Enterprise Server11 SP4 or higherOpenSUSE Leap 42.xFedora 25 or higherDebian 9.0 or higherOracle Linux 6.3 or higherAmazon Linux AMI 2016.09 orhigher
Fanotifymust be enabled and setto enforcing mode and then thekernel package must be rebuilt.
Debian 82.6.38 orhigher
For details, refer to this KB article.Bitdefender provides support viaDazukoFS with prebuilt kernelmodules.
CentOS 6.xRed Hat Enterprise Linux 6.x
2.6.32 - 2.6.37
The DazukoFS module must bemanually compiled. For more
All other supported systemsAll otherkernels
details, refer to “Manually compilethe DazukoFS module” (p. 41).
* With certain limitations described below.
Requirements 17

On-access Scanning Limitations
DetailsLinuxDistributions
KernelVersions
On-access scanningmonitorsmounted networkshares only under these conditions:
All supportedsystems
2.6.38 orhigher
● Fanotify is enabled on both remote and localsystems.
● The share is based on the CIFS and NFS filesystems.
NoteOn-access scanning does not scan networkshares mounted using SSH or FTP.
On-access scanning is not supported onsystems with DazukoFS for network shares
All supportedsystems
All kernels
mounted on paths already protected by theOn-access module.
NoteFanotify and DazukoFS enable third-party applications to control file access on Linuxsystems. For more information, refer to:
● Fanotify man pages:http://www.xypron.de/projects/fanotify-manpages/man7/fanotify.7.html.
● Dazuko project website: http://dazuko.dnsalias.org/wiki/index.php/About.
macOS● macOS Mojave (10.14.x)
● macOS High Sierra (10.13.x)
● macOS Sierra (10.12.x)
● OS X El Capitan (10.11.x)
● OS X Yosemite (10.10.5)
● OS X Mavericks (10.9.5)
Requirements 18

NoteOS XMountain Lion (10.8.5) is no longer supported, but the existing installationswillcontinue to receive signature updates.
2.2.3. Supported File SystemsBitdefender installs on and protects the following file systems:AFS, BTRFS, ext2, ext3, ext4, FAT, FAT16, FAT32, VFAT, exFAT, NTFS, UFS, ISO9660 / UDF, NFS, CIFS/SMB, VXFS, XFS.
NoteOn-access scanning support is not provided for NFS and CIFS/SMB.
2.2.4. Supported BrowsersEndpoint browser security is verified to be working with the following browsers:
● Internet Explorer 8+
● Mozilla Firefox 30+
● Google Chrome 34+
● Safari 4+
● Microsoft Edge 20+
● Opera 21+
2.2.5. Traffic Usage● Product updates traffic between endpoint client and update server
Each periodical Bitdefender Endpoint Security Tools product update generatesthe following download traffic on each endpoint client:
– On Windows OS: ~20 MB
– On Linux OS: ~26 MB
– On macOS: ~25 MB
● Downloaded signature updates traffic between endpoint client and UpdateServer (MB / day)
Requirements 19

Scan Engine TypeUpdate Server Type
CentralizedHybridLocal
555865Relay33.53Bitdefender Public Update Server
● Central Scan traffic between endpoint client and Security Server
Upload (MB)Download (MB)Traffic TypeScanned Objects
84127First scanFiles*
38213Cached scanN/A621Web traffic
First scanWebsites**
105054Security ServerN/A654Web traffic
Cached Scan0.50.2Security Server
* The provided data has been measured for 3.49 GB of files (6,658 files), ofwhich 1.16 GB are Portable Executable (PE) files.** The provided data has been measured for the top-ranked 500 websites.
● Hybrid scan traffic between endpoint client and Bitdefender Cloud Services
Upload (MB)Download (MB)Traffic TypeScanned Objects
0.61.7First scanFiles*
0.30.6Cached scanN/A650Web traffic
Web traffic**2.72.6Bitdefender Cloud Services
* The provided data has been measured for 3.49 GB of files (6,658 files), ofwhich 1.16 GB are Portable Executable (PE) files.** The provided data has been measured for the top-ranked 500 websites.
Requirements 20

NoteThe network latency between endpoint client and Bitdefender Cloud Server mustbe under 1 second.
● Signatures download traffic betweenBitdefender Endpoint Security Tools Relayclients and update serverClients with Bitdefender Endpoint Security Tools Relay role download ~16 MB/ day* from update server.* Available with Bitdefender Endpoint Security Tools clients starting from6.2.3.569 version.
● Traffic between endpoint clients and Control Center web consoleAn average traffic of 618 KB / day is generated between endpoint clients andControl Center web console.
2.3. Full Disk EncryptionGravityZone Full Disk Encryption allows you to operate BitLocker on Windowsendpoints and FileVault and the diskutil command-line utility onmacOS endpointsvia Control Center.To ensure data protection, this module provides full disk encryption for boot andnon-boot volumes, on fixed disks, and it stores the recovery keys in case the usersforget their passwords.The Encryption module uses the existing hardware resources in your GravityZoneenvironment.From the software perspective, the requirements are almost the same as forBitLocker and FileVault and the diskutil command-line utility and most of thelimitations refer to these two tools.
On WindowsGravityZone Encryption supports BitLocker, starting with version 1.2, onmachineswith and without a Trusted Platform Module (TPM) chip.GravityZone supports BitLocker on the endpoints with the following operatingsystems:
● Windows 10 Education
● Windows 10 Enterprise
Requirements 21

● Windows 10 Pro
● Windows 8.1 Enterprise
● Windows 8.1 Pro
● Windows 8 Enterprise
● Windows 8 Pro
● Windows 7 Ultimate (with TPM)
● Windows 7 Enterprise (with TPM)
● Windows Server 2019*
● Windows Server 2016*
● Windows Server 2012 R2*
● Windows Server 2012*
● Windows Server 2008 R2* (with TPM)
*BitLocker is not included on these operating systems and must be installedseparately. For more information about deploying BitLocker on Windows Server,refer to these KB articles provided by Microsoft:
● https://technet.microsoft.com/en-us/itpro/bitlocker-how-to-deploy-on-windows-server
● https://technet.microsoft.com/en-us/library/cc732725(v=ws.10).aspx
ImportantGravityZonedoesnot support encryptiononWindows7andWindows2008R2withoutTPM.
For detailed BitLocker requirements, refer to this KB article provided by Microsoft:https://technet.microsoft.com/en-us/library/cc766200(v=ws.10).aspx
On MacGravityZone supports FileVault and diskutil on macOS endpoints running thefollowing operating systems:
● macOS Mojave (10.14)
● macOS High Sierra (10.13)
● macOS Sierra (10.12)
Requirements 22

● OS X El Capitan (10.11)
● OS X Yosemite (10.10)
● OS X Mavericks (10.9)
NoteOn Mac OS X Mountain Lion (10.8), you can install the Bitdefender agent, but theEncryption module will not be available.
2.4. GravityZone Communication PortsGravityZone is a distributed solution, meaning that its components communicatewith each other through the use of the local network or the Internet. Eachcomponent uses a series of ports to communicate with the others. You need tomake sure these ports are open for GravityZone.For detailed information regarding GravityZone ports, refer to this KB article.
Requirements 23

3. INSTALLING PROTECTIONTo protect your networkwith Bitdefender, youmust install the GravityZone securityagents on endpoints.The following table shows the types of endpoints each service is designed toprotect:
EndpointsService
Physical computers (workstations, laptops andservers) running onMicrosoft Windows, Linux andmacOS (previously named OS X)
Security for Endpoints
Microsoft Windows or Linux virtual machinesSecurity for VirtualizedEnvironments
3.1. License ManagementGravityZone is licensed with a single key for all security services, except for FullDisk Encryption, which for yearly license comes with a separate key.You can try GravityZone for free for a period of 30 days. During the trial period allfeatures are fully available and you canuse the service on any number of computers.Before the trial period ends, if you want to continue using the services, you mustopt for a paid subscription plan and make the purchase.To purchase a license, contact a Bitdefender reseller or contact us by email [email protected] subscription is managed by Bitdefender or by the Bitdefender partner whosells you the service. Some Bitdefender partners are security service providers.Depending on your subscription arrangements, GravityZone day-to-day operationmay be handled either internally by your company or externally by the securityservice provider.
3.1.1. Finding a ResellerOur resellers will assist you with all the information you need and help you choosethe best licensing option for you.To find a Bitdefender reseller in your country:
1. Go to the Partner Locator page on Bitdefender website.
Installing Protection 24

2. Select the country you reside in to view contact information of availableBitdefender partners.
3. If you do not find a Bitdefender reseller in your country, feel free to contact usby email at [email protected].
3.1.2. Activating Your LicenseWhen you purchase a paid subscription plan for the first time, a license key isissued for you. The GravityZone subscription is enabled by activating this licensekey.
WarningActivating a license does NOT append its features to the currently active license.Instead, the new license overrides the old one. For example, activating a 10 endpointslicense on top of a 100 endpoints license will NOT result in a subscription for 110endpoints. On the contrary, it will reduce the number of covered endpoints from 100to 10.
The license key is sent to you via email when you purchase it. Depending on yourservice agreement, once your license key is issued, your service provider mayactivate it for you. Alternately, you can activate your licensemanually, by followingthese steps:
1. Log in to Control Center using your account.
2. Click your username in the upper-right corner of the console and choose MyCompany.
3. Check details about the current license in the License section.
4. In the License section, select the License type.
5. In the License Key field, enter your license key.
6. Click theCheck button andwait until Control Center retrieves information aboutthe entered license key.
7. In the Add-on key field, enter the key for a specific add-on, such as Encryption.
8. Click Add. The add-on details appear in a table: type, license key and the optionto remove the key.
9. Click Save.
10. To be able to use the add-on, youmust log out from the Control Center and thenre-log in. This will make the add-on features visible in GravityZone.
Installing Protection 25

3.1.3. Checking Current License DetailsTo view your license details:
1. Log in to Control Center using your email and password received by email.2. Click your username in the upper-right corner of the console and choose My
Company.3. Check details about the current license in the License section. You can also
click the Check button and wait until Control Center retrieves the latestinformation about the current license key.
3.2. Installing Security AgentsTo protect your physical and virtual endpoints, you must install a security agenton each of them. Besides managing protection on the local endpoint, the securityagent also communicates with Control Center to receive the administrator'scommands and to send the results of its actions.To learn about the available security agents, refer to “Security Agents” (p. 2).On Windows and Linux machines, the security agent can have two roles and youcan install it as follows:
1. As a simple security agent for your endpoints.
2. As a Relay, acting as a security agent and also as a communication, proxy andupdate server for other endpoints in the network.
Warning● The first endpoint on which you install protection must have the Relay role,
otherwise you will not be able to remotely install the security agent on otherendpoints in the same network.
● The Relay endpointmust be powered-on and online in order for the connectedagents to communicate with Control Center.
You can install the security agents on physical and virtual endpoints by runninginstallation packages locally or by running installation tasks remotely fromControlCenter.It is very important to carefully read and follow the instructions to prepare forinstallation.
Installing Protection 26

In normal mode, the security agents have a minimal user interface. It only allowsusers to check protection status and run basic security tasks (updates and scans),without providing access to settings.If enabled by the network administrator via installation package and security policy,the security agent can also run in Power User mode onWindows endpoints, lettingthe endpoint user view andmodify policy settings. Nevertheless, the Control Centeradministrator can always control which policy settings apply, overriding the PowerUser mode.By default, the display language of the user interface on protected Windowsendpoints is set at installation time based on the language of your GravityZoneaccount.OnMac, the display language of the user interface is set at installation time basedon the language of the endpoint operating system. On Linux, the security agentdoes not have a localized user interface.To install the user interface in another language on certain Windows endpoints,you can create an installation package and set the preferred language in itsconfiguration options. This option is not available for Mac and Linux endpoints.Formore informationon creating installationpackages, refer to “Creating InstallationPackages” (p. 30).
3.2.1. Preparing for InstallationBefore installation, follow these preparatory steps to make sure it goes smoothly:
1. Make sure the target endpoints meet the minimum system requirements. Forsome endpoints, you may need to install the latest operating system servicepack available or free up disk space. Compile a list of endpoints that do notmeet the necessary requirements so that you can exclude them frommanagement.
2. Uninstall (not just disable) any existing antimalware or Internet security softwarefrom target endpoints. Running the security agent simultaneously with othersecurity software on an endpoint may affect their operation and cause majorproblems with the system.Many of the incompatible security programs are automatically detected andremoved at installation time.To learn more and to check the list of the security software detected byBitdefender Endpoint Security Tools for current Windows operating systems,refer to this KB article.
Installing Protection 27

To check the list of the security software detected by Bitdefender EndpointSecurity Tools for legacy Windows operating systems, refer to this KB article.
ImportantIf youwant to deploy the security agent on a computer with Bitdefender Antivirusfor Mac 5.X, you first must remove the latter manually. For the guiding steps,refer to this KB article.
3. The installation requires administrative privileges and Internet access. If thetarget endpoints are in an Active Directory domain, you should use domainadministrator credentials for remote installation. Otherwise, make sure youhave the necessary credentials at hand for all endpoints.
4. Endpoints must have connectivity to Control Center.5. It is recommended to use a static IP address for the Relay server. If you do not
set a static IP, use the machine's hostname.6. When deploying the agent through a Linux Relay, the following additional
conditions must be met:
● The Relay endpoint must have installed the Samba package (smbclient)version 4.1.0 or above and the net binary/command to deploy Windowsagents.
NoteThe net binary/command is usually delivered with the samba-client and /or samba-common packages. On some Linux distributions (such as CentOS7.4), the net command is only being installed when installing the full Sambasuite (Common + Client + Server). Make sure that your Relay endpoint hasthe net command available.
● Target Windows endpoints must have Administrative Share and NetworkShare enabled.
● Target Linux and Mac endpoints must have SSH enabled.7. Starting with macOS High Sierra (10.13), after installing Endpoint Security for
Mac manually or remotely, users are prompted to approve Bitdefender kernelextensions on their computers. Until the users approve the Bitdefender kernelextensions, some Endpoint Security forMac featureswill not work. To eliminateuser intervention, you can pre-approve the Bitdefender kernel extensions bywhitelisting them using a Mobile Device Management tool.
Installing Protection 28

3.2.2. Local InstallationOne way to install the security agent on an endpoint is to locally run an installationpackage.You can create andmanage installation packages in theNetwork > Packages page.
The Packages page
Warning● The firstmachine onwhich you install protectionmust have Relay role, otherwise
youwill not be able to deploy the security agent on other endpoints in the network.● The Relay machine must be powered-on and online in order for the clients to
communicate with Control Center.
Once the first client has been installed, it will be used to detect other endpoints inthe same network, based on the Network Discovery mechanism. For detailedinformation on network discovery, refer to “HowNetwork DiscoveryWorks” (p. 44).To locally install the security agent on an endpoint, follow the next steps:
1. Create an installation package according to your needs.
NoteThis step is not mandatory if an installation package has already been createdfor the network under your account.
2. Download the installation package on the target endpoint.You can alternately send the installation package download links by email toseveral users in your network.
3. Run the installation package on the target endpoint.
Installing Protection 29
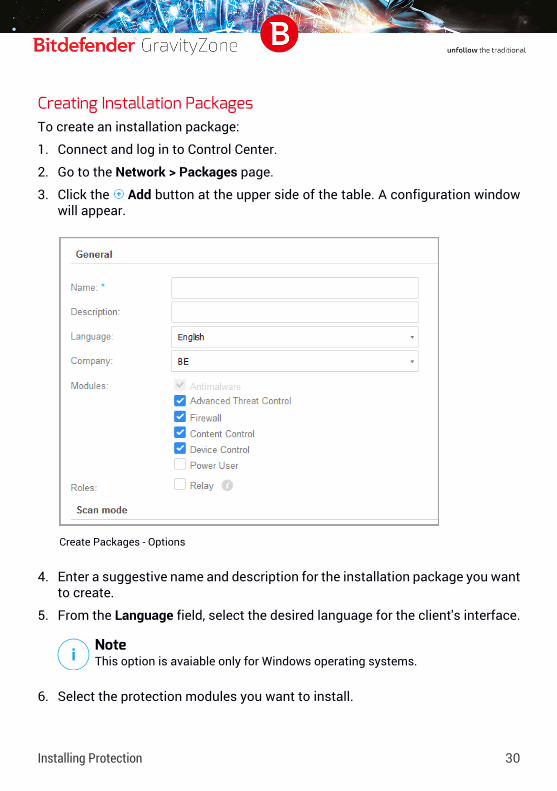
Creating Installation PackagesTo create an installation package:
1. Connect and log in to Control Center.
2. Go to the Network > Packages page.
3. Click the Add button at the upper side of the table. A configuration windowwill appear.
Create Packages - Options
4. Enter a suggestive name and description for the installation package you wantto create.
5. From the Language field, select the desired language for the client's interface.
NoteThis option is avaiable only for Windows operating systems.
6. Select the protection modules you want to install.
Installing Protection 30

NoteOnly the supportedmodules for each operating systemwill be installed. Formoreinformation, refer to “Security Agents” (p. 2).
7. Select the target endpoint role:
● Relay, to create the package for an endpoint with Relay role. For moreinformation, refer to “Relay Role” (p. 7)
WarningRelay role is not supported on legacy operating systems. Formore information,refer to “Supported Operating Systems” (p. 14).
● Patch Management Cache Server, to make the Relay an internal server fordistributing software patches. This role is displayed when Relay role isselected. For more information, refer to “Patch Caching Server Role” (p. 7)
8. Scan Mode. Choose the scanning technology that best suits your networkenvironment and your endpoints' resources. You can define the scan mode bychoosing one of the following types:
● Automatic. In this case, the security agent will automatically detect theendpoint's configuration andwill adapt the scanning technology accordingly:
– Local Scan (with Full Engines) for physical computerswith high hardwareperformance.
NoteLow performance computers are considered to have the CPU frequency lessthan 1.5 GHz, or RAM memory less than 1 GB.
● Custom. In this case, you can configure the scanmode by choosing betweenseveral scanning technologies for physical and virtual machines:
– Hybrid Scan (with Light Engines)
– Local Scan (with Full Engines)The default scan mode for EC2 instances is Local Scan (all signatures arestored on the installed security agent, and the scan is run locally on themachine). If you want to scan your EC2 instances with a Security Server,you need to configure the security agent’s installation package and theapplied policy accordingly.
Installing Protection 31

The default scan mode for Microsoft Azure virtual machines is Local Scan(all signatures are stored on the installed security agent, and the scan is runlocally on the machine). If you want to scan your Microsoft Azure virtualmachines with a Security Server, you need to configure the security agent’sinstallation package and the applied policy accordingly.For more information regarding available scanning technologies, refer to“Scanning Engines” (p. 3)
WarningEndpoint Security (legacy agent) supports only Local Scan.
9. SelectScan before installation if youwant tomake sure themachines are cleanbefore installing the client on them. An in-the cloud quick scanwill be performedon the target machines before starting the installation.
10. On Windows endpoints, Bitdefender Endpoint Security Tools is installed in thedefault installation directory. Select Use custom installation path if you wantto install Bitdefender Endpoint Security Tools in a different location. In thiscase, enter the desiredpath in the corresponding field. UseWindowsconventionswhen entering the path (for example, D:\folder). If the specified folder doesnot exist, it will be created during the installation.
11. If you want to, you can set a password to prevent users from removingprotection. Select Set uninstall password and enter the desired password inthe corresponding fields.
12. If the target endpoints are in Network Inventory under Custom Groups, you canchoose to move them in a specified folder immediately after the security agentdeployment finishes.Select Use custom folder and choose a folder in the corresponding table.
13. Under Deployer section, choose the entity to which the target endpoints willconnect for installing and updating the client:
● Bitdefender Cloud, if youwant to update the clients directly from the Internet.In this case, you can also define the proxy settings, if target endpointsconnect to the Internet via proxy. Select Use proxy for communication andenter the required proxy settings in the fields below.
● Endpoint Security Relay, if you want to connect the endpoints to a Relayclient installed in your network. All machines with Relay role detected in
Installing Protection 32

your network will show-up in the table displayed below. Select the Relaymachine that youwant. Connected endpointswill communicatewith ControlCenter only via the specified Relay.
ImportantPort 7074 must be open for the deployment through Bitdefender EndpointSecurity Tools Relay to work.
14. Click Save.
The newly created package will be added to the list of packages.
NoteThe settings configured within an installation package will apply to endpointsimmediately after installation. As soon as a policy is applied to the client, the settingsconfigured within the policy will be enforced, replacing certain installation packagesettings (such as communication servers or proxy settings).
Downloading Installation PackagesTo download the installation packages of the security agents:
1. Log in to Control Center from the endpoint on which you want to installprotection.
2. Go to the Network > Packages page.
3. Select the installation package you want to download.
4. Click the Download button at the upper side of the table and select the typeof installer you want to use. Two types of installation files are available:
● Downloader. The downloader first downloads the full installation kit fromthe Bitdefender cloud servers and then starts the installation. It is small insize and it can be run both on 32-bit and 64-bit systems (which makes iteasy to distribute). On the downside, it requires an active Internet connection.
● Full Kit. The full installation kits are bigger in size and they have to be runon the specific operating system type.The full kit is to be used to install protection on endpoints with slow or noInternet connection. Download this file to an Internet-connected endpoint,then distribute it to other endpoints using external storage media or anetwork share.
Installing Protection 33

NoteAvailable full kit versions:
– Windows OS: 32-bit and 64-bit systems
– Windows OS Legacy: 32-bit and 64-bit systems
– Linux OS: 32-bit and 64-bit systems
– macOS: only 64-bit systemsMake sure to use the correct version for the system you install on.
5. Save the file to the endpoint.
Warning● The downloader executablemust not be renamed, otherwise it will not be able
to download the installation files from Bitdefender server.
6. Additionally, if you have chosen the Downloader, you can create anMSI packagefor Windows endpoints. For more information, refer to this KB article.
Send Installation Packages Download Links by EmailYoumay need to quickly informother users that an installation package is availableto download. In this case, follow the steps described hereinafter:
1. Go to the Network > Packages page.
2. Select the installation package that you want.
3. Click the Send download links button at the upper side of the table. Aconfiguration window will appear.
4. Enter the email of each user you want to receive the installation packagedownload link. Press Enter after each email.
Please make sure that each entered email address is valid.
5. If you want to view the download links before sending them by email, click theInstallation links button.
6. Click Send. An email containing the installation link is sent to each specifiedemail address.
Installing Protection 34

Running Installation PackagesFor the installation towork, the installation packagemust be run using administratorprivileges.The package installs differently on each operating system as follows:
● On Windows and macOS operating systems:
1. On the target endpoint, download the installation file from Control Centeror copy it from a network share.
2. If you have downloaded the full kit, extract the files from the archive.
3. Run the executable file.
4. Follow the on-screen instructions.
NoteOn macOS, after installing Endpoint Security for Mac, users are prompted toapproveBitdefender kernel extensions on their computers. Until the users approvethe Bitdefender kernel extensions, some features of the security agent will notwork. For details, refer to this KB article.
● On Linux operating systems:
1. Connect and log in to Control Center.
2. Download or copy the installation file to the target endpoint.
3. If you have downloaded the full kit, extract the files from the archive.
4. Gain root privileges by running the sudo su command.
5. Change permissions to the installation file so that you can execute it:
# chmod +x installer
6. Run the installation file:
# ./installer
7. To check that the agent has been installed on the endpoint, run thiscommand:
Installing Protection 35

$ service bd status
Once the security agent has been installed, the endpoint will show up asmanagedin Control Center (Network page) within a few minutes.
ImportantIf using VMwareHorizon ViewPersonaManagement, it is recommended to configureActive Directory GroupPolicy to exclude the followingBitdefender processes (withoutthe full path):
● bdredline.exe● epag.exe● epconsole.exe● epintegrationservice.exe● epprotectedservice.exe● epsecurityservice.exe● epupdateservice.exe● epupdateserver.exe
These exclusions must apply as long as the security agent runs on endpoint. Fordetails, refer to this VMware Horizon documentation page.
3.2.3. Remote InstallationControl Center allows you to remotely install the security agent on endpointsdetected in the network by using installation tasks.Once you have locally installed the first client with Relay role, it may take a fewminutes for the rest of the network endpoints to become visible in the ControlCenter. From this point, you can remotely install the security agent on endpointsunder your management by using installation tasks from Control Center.Bitdefender Endpoint Security Tools includes an automatic network discoverymechanism that allows detecting other endpoints in the same network. Detectedendpoints are displayed as unmanaged in the Network page.To enable network discovery, you must have Bitdefender Endpoint Security Toolsalready installed on at least one endpoint in the network. This endpointwill be usedto scan the network and install Bitdefender Endpoint Security Tools on unprotectedendpoints.
Installing Protection 36

For detailed information on network discovery, refer to “How Network DiscoveryWorks” (p. 44).
Remote Installation RequirementsFor remote installation to work:
● Bitdefender Endpoint Security Tools Relay must be installed in your network.
● On Windows:
– The admin$ administrative share must be enabled. Configure each targetworkstation not to use advanced file sharing.
– Configure User Account Control (UAC) depending on the operating systemrunning on the target endpoints. If the endpoints are in an Active Directorydomain, you can use a group policy to configure User Account Control. Fordetails, refer to this KB article.
– Disable Windows Firewall or configure it to allow traffic through File andPrinter Sharing protocol.
NoteRemote deployment works only on modern operating systems, starting withWindows7 /WindowsServer 2008R2, forwhichBitdefender provides full support.For more information, refer to “Supported Operating Systems” (p. 14).
● On Linux: SSH must be enabled.
● On macOS: remote login and file sharing must be enabled.
Running Remote Installation TasksTo run a remote installation task:
1. Connect and log in to Control Center.
2. Go to the Network page.
3. Select the desired group from the left-side pane. The entities contained in theselected group are displayed in the right-side pane table.
Installing Protection 37

NoteOptionally, you can apply filters to display unmanaged endpoints only. Click theFiltersmenu and select the following options: Unmanaged from the Security taband All items recursively from the Depth tab.
4. Select the entities (endpoints or groups of endpoints) on which you want toinstall protection.
5. Click the Tasks button at the upper side of the table and choose Install.The Install Client wizard is displayed.
Installing Bitdefender Endpoint Security Tools from the Tasks menu
6. Under Options section, configure the installation time:
● Now, to launch the deployment immediately.
● Scheduled, to set up the deployment recurrence interval. In this case, selectthe time interval that you want (hourly, daily or weekly) and configure itaccording to your needs.
NoteFor example, when certain operations are required on the target machinebefore installing the client (such as uninstalling other software and restartingthe OS), you can schedule the deployment task to run every 2 hours. The taskwill start on each target machine every 2 hours until the deployment issuccessful.
Installing Protection 38

7. If you want target endpoints to automatically restart for completing theinstallation, select Automatically reboot (if needed).
8. Under the Credentials Manager section, specify the administrative credentialsrequired for remote authentication on target endpoints. You can add thecredentials by entering the user and password for each target operating system.
ImportantFor Windows 8.1 stations, you need to provide the credentials of the built-inadministrator account or a domain administrator account. To learn more, referto this KB article.
To add the required OS credentials:
a. Enter the user name and password of an administrator account in thecorresponding fields from the table header.If computers are in a domain, it suffices to enter the credentials of the domainadministrator.Use Windows conventions when entering the name of a user account:
● For Active Directory machines use these syntaxes:[email protected] and domain\username. To make sure thatentered credentials will work, add them in both forms([email protected] and domain\username).
● ForWorkgroupmachines, it suffices to enter only the user name, withoutthe workgroup name.
Optionally, you can add a description that will help you identify each accountmore easily.
b. Click the Add button. The account is added to the list of credentials.
NoteSpecified credentials are automatically saved to your Credentials Managerso that you do not have to enter them the next time. To access the CredentialsManager, just point to your username in the upper-right corner of the console.
ImportantIf the provided credentials are invalid, the client deployment will fail on thecorresponding endpoints. Make sure to update the entered OS credentials inthe Credentials Manager when these are changed on the target endpoints.
Installing Protection 39

9. Select the check boxes corresponding to the accounts you want to use.
NoteAwarningmessage is displayed as long as you have not selected any credentials.This step is mandatory to remotely install the security agent on endpoints.
10. Under Deployer section, configure the Relay to which the target endpoints willconnect for installing and updating the client:
● All machines with Relay role detected in your network will show-up in thetable available under the Deployer section. Each new client must beconnected to at least oneRelay client from the samenetwork, thatwill serveas communication and update server. Select the Relay that you want to linkwith the target endpoints. Connected endpoints will communicate withControl Center only via the specified Relay.
ImportantPort 7074must be open, for the deployment through the Relay agent to work.
● If target endpoints communicate with the Relay agent via proxy, you alsoneed to define the proxy settings. In this case, select Use proxy forcommunication and enter the required proxy settings in the fields below.
11. You need to select one installation package for the current deployment. ClicktheUse package list and select the installation package that youwant. You canfind here all the installation packages previously created for your account andalso the default installation package available with Control Center.
Installing Protection 40

12. If needed, you can modify some of the selected installation package's settingsby clicking the button Customize next to the Use package field.The installation package's settings will appear below and you can make thechanges that you need. To find out more about editing installation packages,refer to “Creating Installation Packages” (p. 30).If you want to save the modifications as a new package, select the Save aspackage option placed at the bottom of the package settings list, and enter aname for the new installation package.
13. Click Save. A confirmation message will appear.
You can view and manage the task in the Network > Tasks page.
ImportantIf using VMwareHorizon ViewPersonaManagement, it is recommended to configureActive Directory GroupPolicy to exclude the followingBitdefender processes (withoutthe full path):
● bdredline.exe● epag.exe● epconsole.exe● epintegrationservice.exe● epprotectedservice.exe● epsecurityservice.exe● epupdateservice.exe● epupdateserver.exe
These exclusions must apply as long as the security agent runs on endpoint. Fordetails, refer to this VMware Horizon documentation page.
3.2.4. Preparing Linux Systems for On-access ScanningBitdefender Endpoint Security Tools for Linux includes on-access scanningcapabilities that work with specific Linux distributions and kernel versions. Formore information, refer to system requirements.Next you will learn how to manually compile the DazukoFS module.
Manually compile the DazukoFS moduleFollow the steps below to compile DazukoFS for the system's kernel version andthen load the module:
Installing Protection 41

1. Download the proper kernel headers.
● On Ubuntu systems, run this command:
$ sudo apt-get install linux-headers-`uname -r`
● On RHEL/CentOS systems, run this command:
$ sudo yum install kernel-devel kernel-headers-`uname -r`
2. On Ubuntu systems, you need build-essential:
$ sudo apt-get install build-essential
3. Copy and extract the DazukoFS source code in a preferred directory:
# mkdir temp# cd temp# cp /opt/BitDefender/share/modules/dazukofs/dazukofs-source.tar.gz# tar -xzvf dazukofs-source.tar.gz# cd dazukofs-3.1.4
4. Compile the module:
# make
5. Install and load the module:
# make dazukofs_install
Requirements for using on-access scanning with DazukoFSFor DazukoFS and on-access scanning to work together, a series of conditionsmust be met. Please check if any of the statements below apply to your Linuxsystem and follow the guidelines to avoid issues.
Installing Protection 42

● The SELinux policy must be either disabled or set to permissive. To check andadjust the SELinux policy setting, edit the /etc/selinux/config file.
● Bitdefender Endpoint Security Tools is exclusively compatiblewith theDazukoFSversion included in the installation package. If DazukoFS is already installedon the system, remove it prior to installing Bitdefender Endpoint Security Tools.
● DazukoFS supports certain kernel versions. If the DazukoFS package shippedwith Bitdefender Endpoint Security Tools is not compatible with the system'skernel version, the module will fail to load. In such case, you can either updatethe kernel to the supported version or recompile the DazukoFSmodule for yourkernel version. You can find the DazukoFS package in the Bitdefender EndpointSecurity Tools installation directory:/opt/BitDefender/share/modules/dazukofs/dazukofs-modules.tar.gz
● When sharing files using dedicated servers such as NFS, UNFSv3 or Samba,you have to start the services in the following order:
1. Enable on-access scanning via policy from Control Center.For more information, refer to GravityZone Administrator's Guide.
2. Start the network sharing service.For NFS:
# service nfs start
For UNFSv3:
# service unfs3 start
For Samba:
# service smbd start
ImportantFor the NFS service, DazukoFS is compatible only with NFS User Server.
Installing Protection 43

3.2.5. How Network Discovery WorksBesides integration with Active Directory, GravityZone also includes an automaticnetwork discovery mechanism intended to detect workgroup computers.GravityZone relies on the Microsoft Computer Browser service and NBTscan toolto perform network discovery.The Computer Browser service is a networking technology used byWindows-basedcomputers to maintain updated lists of domains, workgroups, and the computerswithin themand to supply these lists to client computers upon request. Computersdetected in the network by theComputer Browser service can be viewedby runningthe net view command in a command prompt window.
The Net view command
TheNBTscan tool scanscomputer networksusingNetBIOS. It queries eachendpointin the network and retrieves information such as IP address, NetBIOS computername, and MAC address.To enable automatic network discovery, you must have Bitdefender EndpointSecurity Tools Relay already installed on at least one computer in the network.This computer will be used to scan the network.
ImportantControl Center does not use network information from Active Directory or from thenetwork map feature available in Windows Vista and later. Network map relies on adifferent network discovery technology: the Link Layer Topology Discovery (LLTD)protocol.
Control Center is not actively involved in the Computer Browser service operation.Bitdefender Endpoint Security Tools only queries the Computer Browser servicefor the list of workstations and servers currently visible in the network (known asthe browse list) and then sends it to Control Center. Control Center processes the
Installing Protection 44

browse list, appending newly detected computers to its Unmanaged Computerslist. Previously detected computers are not deleted after a new network discoveryquery, so youmust manually exclude & delete computers that are no longer on thenetwork.The initial query for the browse list is carried out by the first Bitdefender EndpointSecurity Tools installed in the network.
● If the Relay is installed on a workgroup computer, only computers from thatworkgroup will be visible in Control Center.
● If the Relay is installed on a domain computer, only computers from that domainwill be visible in Control Center. Computers fromother domains can be detectedif there is a trust relationship with the domain where the Relay is installed.
Subsequent network discovery queries are performed regularly every hour. Foreach newquery, Control Center divides themanaged computers space into visibilityareas and then designates one Relay in each area to perform the task. A visibilityarea is a group of computers that detect each other. Usually, a visibility area isdefined by a workgroup or domain, but this depends on the network topology andconfiguration. In some cases, a visibility area might consist of multiple domainsand workgroups.If a selected Relay fails to perform the query, Control Center waits for the nextscheduled query, without choosing another Relay to try again.For full network visibility, the Relay must be installed on at least one computer ineach workgroup or domain in your network. Ideally, Bitdefender Endpoint SecurityTools should be installed on at least one computer in each subnetwork.
More about the Microsoft Computer Browser ServiceQuick facts about the Computer Browser service:
● Works independent of Active Directory.
● Runs exclusively over IPv4 networks and operates independently within theboundaries of a LAN group (workgroup or domain). A browse list is compiledand maintained for each LAN group.
● Typically uses connectionless server broadcasts to communicate betweennodes.
● Uses NetBIOS over TCP/IP (NetBT).
Installing Protection 45

● Requires NetBIOS name resolution. It is recommended to have a WindowsInternet Name Service (WINS) infrastructure up and running in the network.
● Is not enabled by default in Windows Server 2008 and 2008 R2.
For detailed information on the Computer Browser service, check the ComputerBrowser Service Technical Reference on Microsoft Technet.
Network Discovery RequirementsTo successfully discover all the computers (servers and workstations) that will bemanaged from Control Center, the following are required:
● Computersmust be joined in aworkgroup or domain and connected via an IPv4local network. Computer Browser service does not work over IPv6 networks.
● Several computers in each LAN group (workgroup or domain) must be runningthe Computer Browser service. Primary Domain Controllers must also run theservice.
● NetBIOS over TCP/IP (NetBT) must be enabled on computers. Local firewallmust allow NetBT traffic.
● If using a Linux Relay to discover other Linux orMac endpoints, youmust eitherinstall Samba on target endpoints, or join them in Active Directory and useDHCP. This way, NetBIOS will be automatically configured on them.
● File sharing must be enabled on computers. Local firewall must allow filesharing.
● A Windows Internet Name Service (WINS) infrastructure must be set up andworking properly.
● For Windows Vista and later, network discovery must be turned on (ControlPanel > Network and Sharing Center > Change Advanced Sharing Settings).To be able to turn on this feature, the following services must first be started:– DNS Client– Function Discovery Resource Publication– SSDP Discovery– UPnP Device Host
● In environments with multiple domains, it is recommended to set up trustrelationships between domains so that computers can access browse listsfrom other domains.
Installing Protection 46

Computers from which Bitdefender Endpoint Security Tools queries the ComputerBrowser service must be able to resolve NetBIOS names.
NoteThe network discovery mechanism works for all supported operating systems,including Windows Embedded versions, provided the requirements are met.
3.3. Installing Full Disk EncryptionFull Disk Encryption requires activation based on license key.For detailed information about license keys, refer to “License Management” (p.24).The Bitdefender security agents support Full Disk Encryption starting with version6.2.22.916 on Windows and 4.0.0173876 on Mac. To make sure that the agentsare fully compatible with this module, you have two options:
● Install the security agents with the Encryption module included.
● Use the Reconfigure task.
For detailed information about using Full Disk Encryptionwithin your network, referto the Security Policies > Encryption chapter in the GravityZone Administrator’sGuide.
3.4. Credentials ManagerThe Credentials Manager helps you define the credentials required for remoteauthentication on different operating systems in your network.To open the Credentials Manager, click your username in the upper-right corner ofthe page and choose Credentials Manager.
The Credentials Manager menu
Installing Protection 47

3.4.1. Adding Credentials to the Credentials ManagerWith the Credentials Manager you can manage the administrator credentialsrequired for remote authentication during installation tasks sent to computers andvirtual machines in your network.To add a set of credentials:
Credentials Manager
1. Enter the user name and password of an administrator account for each targetoperating system in the corresponding fields at the upper side of the tableheading. Optionally, you can add a description that will help you identify eachaccount more easily. If computers are in a domain, it suffices to enter thecredentials of the domain administrator.Use Windows conventions when entering the name of a user account:
● For ActiveDirectorymachines use these syntaxes:[email protected] domain\username. To make sure that entered credentials will work,add them in both forms ([email protected]\username).
● For Workgroup machines, it suffices to enter only the user name, withoutthe workgroup name.
2. Click the Add button at the right side of the table. The new set of credentialsis added to the table.
NoteIf you have not specified the authentication credentials, you will be required toenter themwhen you run installation tasks. Specified credentials are automatically
Installing Protection 48

saved to your Credentials Manager so that you do not have to enter them thenext time.
3.4.2. Deleting Credentials from Credentials ManagerTo delete obsolete credentials from the Credentials Manager:
1. Point to the row in the table containing the credentials you want to delete.
2. Click the Delete button at the right side of the corresponding table row. Theselected account will be deleted.
Installing Protection 49

4. INTEGRATIONSGravityZone provides the possibility to integrate Control Center with third partysolutions.You can configure your third-party solutions integration in the Integrations page,which you can access by pointing to your username in the upper-right corner ofthe console and choosing Integrations.
From this page, you can add, edit or remove the integrations according to yourneeds.
4.1. Integrating with Amazon EC2If your company has a Bitdefender Security for AWS service license, or you arerunning a trial Bitdefender Security for AWS subscription, you can configure theintegration with this service from GravityZone Control Center and centrally deploy,manage and monitor Bitdefender security on their instance inventory. Proprietaryscanning servers are hosted by Bitdefender in the AWS Cloud to ensure an optimalfootprint on the protected instances and to eliminate the scanning overheadoccurring with traditional security software.For complete information about the Bitdefender Security for AWS architecture,prerequisites, subscription mode, creating and managing the integration withAmazon EC2, refer to the Amazon EC2 integration guide.
Integrations 50

5. UNINSTALLING ENDPOINT PROTECTIONYou have two options to uninstall the security agents:
● Remotely in Control Center
● Manually on the target machine
WarningThe security agents and are essential for keeping the endpoints safe from any kindof threats, thus uninstalling them may put the entire network in danger.
Remote UninstallationTo uninstall Bitdefender protection from any managed endpoint remotely:
1. Go to Network page.
2. Select the container you want from the left-side pane. All computers from theselected container are displayed in the right-side pane table.
3. Select the endpoints fromwhich you want to uninstall the Bitdefender securityagent.
4. Click Tasks at the upper-side of the table and choose Uninstall client. Aconfiguration window is displayed.
5. In the Uninstall agent task window you can choose whether to keep thequarantined files on the endpoint or to delete them.
6. Click Save to create the task. A confirmation message appears.
You can view and manage the task in Network > Tasks.If you want to reinstall security agents, refer to “Installing Security Agents” (p. 26).
Local UninstallationTo manually uninstall the Bitdefender security agent from a Windows machine:
1. Depending on your operating system:
● In Windows 7, go to Start > Control Panel > Uninstall a program underPrograms category.
● In Windows 8, go to Settings > Control Panel > Uninstall a program underProgram category.
Uninstalling Endpoint Protection 51

● In Windows 8.1, right-click on Start button, then choose Control Panel >Programs & features.
● In Windows 10, go to Start > Settings > System > Apps & features.
2. Select the Bitdefender agent from the programs list.
3. Click Uninstall.
4. Enter the Bitdefender password, if enabled in the security policy. Duringuninstallation, you can view the progress of the task.
To manually uninstall the Bitdefender security agent from a Linux machine:
1. Open the terminal.
2. Gain root access using the su or sudo su commands.
3. Navigate using the cd command to the following path:/opt/BitDefender/bin
4. Run the script:
# ./remove-sve-client
5. Enter the Bitdefender password to continue, if enabled in the security policy.
To manually uninstall the Bitdefender agent from a Mac:
1. Go to Finder > Applications.
2. Open the Bitdefender folder.
3. Double-click Bitdefender Mac Uninstall.
4. In the confirmation window, click both Check and Uninstall to continue.
If you want to reinstall security agents, refer to “Installing Security Agents” (p. 26).
Uninstalling Endpoint Protection 52

6. GETTING HELPBitdefender strives to provide its customers with an unparalleled level of fast andaccurate support. If you experience any issue with or if you have any questionabout your Bitdefender product, go to our online Support Center. It provides severalresources that you can use to quickly find a solution or an answer. Or, if you prefer,you can contact the Bitdefender Customer Care team. Our support representativeswill answer your questions in a timely manner and they will provide you with theassistance you need.
NoteYou can find out information about the support services we provide and our supportpolicy at the Support Center.
6.1. Bitdefender Support CenterBitdefender Support Center is the place where you will find all the assistance youneed with your Bitdefender product.You can use several resources to quickly find a solution or an answer:
● Knowledge Base Articles
● Bitdefender Support Forum
● Product Documentation
You can also use your favorite search engine to find out more information aboutcomputer security, the Bitdefender products and the company.
Knowledge Base ArticlesThe Bitdefender Knowledge Base is an online repository of information about theBitdefender products. It stores, in an easily accessible format, reports on the resultsof the ongoing technical support and bugfixing activities of the Bitdefender supportand development teams, along with more general articles about virus prevention,the management of Bitdefender solutions with detailed explanations, and manyother articles.The Bitdefender Knowledge Base is open to the public and freely searchable. Theextensive information it contains is yet another means of providing Bitdefendercustomers with the technical knowledge and insight they need. All valid requestsfor information or bug reports coming fromBitdefender clients eventually find their
Getting Help 53

way into the Bitdefender Knowledge Base, as bugfix reports, workaroundcheatsheets or informational articles to supplement product helpfiles.The Bitdefender Knowledge Base for business products is available any time athttp://www.bitdefender.com/support/business.html.
Bitdefender Support ForumThe Bitdefender Support Forum provides Bitdefender users with an easy way toget help and to help others. You can post any problem or question related to yourBitdefender product.Bitdefender support techniciansmonitor the forum for new posts in order to assistyou. Youmay also get an answer or a solution fromamore experiencedBitdefenderuser.Before posting your problem or question, please search the forum for a similar orrelated topic.The Bitdefender Support Forum is available at http://forum.bitdefender.com, in 5different languages: English, German, French, Spanish and Romanian. Click theBusiness Protection link to access the section dedicated to business products.
Product DocumentationProduct documentation is the most complete source of information about yourproduct.The easiest way to reach the documentation is from the Help & Support page ofControl Center. Click your username in the upper-right corner of the console, chooseHelp & Support and then the link of the guide you are interested in. The guide willopen in a new tab of your browser.You can also check and download the documentation at Support Center, in theDocumentation section available on each product support page.
6.2. Asking for AssistanceYou can ask for assistance through our online Support Center. Fill in the contactform and submit it.
Getting Help 54

6.3. Using Support ToolThe GravityZone Support Tool is designed to help users and support technicianseasily obtain the information needed for troubleshooting. Run the Support Tool onaffected computers and send the resulting archive with the troubleshootinginformation to the Bitdefender support representative.
6.3.1. Using Support Tool on Windows Operating Systems
Running the Support Tool applicationTo generate the log on the affected computer, use one of these methods:
● Command-line
● GUI wizard
If BEST has not installed on the computer, use BEST Support Tool executable file.
Command-line method
1. Open Command Prompt with administrative privileges.
2. Go to the product installation folder. The default path is:C:\Program Files\Bitdefender\Endpoint Security
3. Collect and save the logs by running this command:
Product.Support.Tool.exe collect
The logs are saved by default to C:\Windows\Temp.
Optionally, if you want to save the Support Tool log in a custom location, usethe option path:
Product.Support.Tool.exe collect [path="<path-to-file>"]
Example:
Product.Support.Tool.exe collect path="D:\Test"
While the command is executing, you can notice a progress bar on the screen.
Getting Help 55

When the process is complete, the output displays the name of the archivecontaining the logs and its location.
GUI Wizard method
1. Download BEST Support Tool from the corresponding links below:
● For 32-bit Windows operating system click here.
● For 64-bit Windows operating system click here.
2. Follow the on-screen instructions to run the Support Tool.You can find the output file on the Desktop, as an archive with the followingname: BDST_[computername]_[currentdate].
Submit the log fileTo submit the Support Tool log, depending on the method used, follow the nextsteps:If you have used command-line:
1. Go to C:\Windows\Temp and find the archive file, namedST_[computername]_[currentdate].
2. Inside the archive open the problem.txt file.
3. Fill in the file with the necessary data.
4. Attach the archive to your support ticket for further troubleshooting.
If you have used GUI wizard:
1. Go to Desktop and f ind the archive f i le , namedBDST_[computername]_[currentdate].
2. Attach the archive to your support ticket for further troubleshooting.
6.3.2. Using Support Tool on Linux Operating SystemsFor Linux operating systems, the Support Tool is integrated with the Bitdefendersecurity agent.To gather Linux system information usingSupport Tool, run the following command:
# /opt/BitDefender/bin/bdconfigure
Getting Help 56

using the following available options:
● --help to list all Support Tool commands
● enablelogs to enable product and communication module logs (all serviceswill be automatically restarted)
● disablelogs to disable product and communicationmodule logs (all serviceswill be automatically restarted)
● deliverall to create:– Anarchive containing the product and communicationmodule logs, delivered
to the /tmp f o l de r i n t he fo l l ow ing fo rma t :bitdefender_machineName_timeStamp.tar.gz.
After the archive is created:
1. You will be prompted if you want to disable logs. If needed, the services areautomatically restarted.
2. You will be prompted if you want to delete logs.
● deliverall -default delivers the same information as with the previousoption, but default actionswill be taken on logs, without the user to be prompted(the logs are disabled and deleted).
You can also run the /bdconfigure command right from the BEST package (fullor downloader) without having the product installed.To report a GravityZone issue affecting your Linux systems, follow the next steps,using the options previously described:
1. Enable product and communication module logs.
2. Try to reproduce the issue.
3. Disable logs.
4. Create the logs archive.
5. Open an email support ticket using the form available on the Help & Supportpage of Control Center, with a description of the issue and having the logsarchive attached.
The Support Tool for Linux delivers the following information:
Getting Help 57

● The etc, var/log, /var/crash (if available) and var/epag folders from/opt/BitDefender, containing the Bitdefender logs and settings
● The /var/log/BitDefender/bdinstall.log file, containing installationinformation
● The network.txt file, containing network settings / machine connectivityinformation
● The product.txt file, including the content of all update.txt files from/opt/BitDefender/var/lib/scan and a recursive full listing of all filesfrom /opt/BitDefender
● The system.txt file, containing general system information (distribution andkernel versions, available RAM and free hard-disk space)
● The users.txt file, containing user information
● Other information concerning the product related to the system, such as externalconnections of processes and CPU usage
● System logs
6.3.3. Using Support Tool on Mac Operating SystemsWhen sumbitting a request to the Bitdefender Technical Support Team, you needto provide the following:
● A detailed description of the issue you are encountering.
● A screenshot (if applicable) of the exact error message that appears.
● The Support Tool log.
To gather Mac system information using Support Tool:
1. Download the ZIP archive containing the Support Tool.
2. Extract the BDProfiler.tool file from the archive.
3. Open a Terminal window.
4. Navigate to the location of the BDProfiler.tool file.For example:
cd /Users/Bitdefender/Desktop;
Getting Help 58

5. Add execute permissions to the file:
chmod +x BDProfiler.tool;
6. Run the tool.For example:
/Users/Bitdefender/Desktop/BDProfiler.tool;
7. Press Y and enter the password when asked to provide the administratorpassword.Wait for a couple of minutes until the tool finishes generating the log. You willfind the resulted archive file (Bitdefenderprofile_output.zip) on your Desktop.
6.4. Contact InformationEfficient communication is the key to a successful business. During the past 15years Bitdefender has established an unquestionable reputation by constantlystriving for better communication so as to exceed the expectations of our clientsand partners. Should you have any questions, do not hesitate to contact us.
6.4.1. Web AddressesSales Department: [email protected] Center: http://www.bitdefender.com/support/business.htmlDocumentation: [email protected] Distributors: http://www.bitdefender.com/partnersPartner Program: [email protected] Relations: [email protected] Submissions: [email protected] Submissions: [email protected] Abuse: [email protected]: http://www.bitdefender.com
6.4.2. Local DistributorsThe Bitdefender local distributors are ready to respond to any inquiries regardingtheir areas of operation, both in commercial and in general matters.
Getting Help 59

To find a Bitdefender distributor in your country:
1. Go to http://www.bitdefender.com/partners.
2. Go to Partner Locator.
3. The contact information of theBitdefender local distributors should be displayedautomatically. If this does not happen, select the country you reside in to viewthe information.
4. If you do not find a Bitdefender distributor in your country, feel free to contactus by email at [email protected].
6.4.3. Bitdefender OfficesThe Bitdefender offices are ready to respond to any inquiries regarding their areasof operation, both in commercial and in generalmatters. Their respective addressesand contacts are listed below.
United StatesBitdefender, LLCPO Box 667588Pompano Beach, Fl 33066United StatesPhone (sales&technical support): 1-954-776-6262Sales: [email protected]: http://www.bitdefender.comSupport Center: http://www.bitdefender.com/support/business.html
FranceBitdefender49, Rue de la Vanne92120 MontrougeFax: +33 (0)1 47 35 07 09Phone: +33 (0)1 47 35 72 73Email: [email protected]: http://www.bitdefender.frSupport Center: http://www.bitdefender.fr/support/business.html
Getting Help 60

SpainBitdefender España, S.L.U.Avda. Diagonal, 357, 1º 1ª08037 BarcelonaEspañaFax: (+34) 93 217 91 28Phone (office&sales): (+34) 93 218 96 15Phone (technical support): (+34) 93 502 69 10Sales: [email protected]: http://www.bitdefender.esSupport Center: http://www.bitdefender.es/support/business.html
GermanyBitdefender GmbHTechnologiezentrum SchwerteLohbachstrasse 12D-58239 SchwerteDeutschlandPhone (office&sales): +49 (0) 2304 94 51 60Phone (technical support): +49 (0) 231 98 92 80 16Sales: [email protected]: http://www.bitdefender.deSupport Center: http://www.bitdefender.de/support/business.html
UK and IrelandGenesis Centre Innovation WayStoke-on-Trent, StaffordshireST6 4BFUKPhone (sales&technical support): (+44) 203 695 3415Email: [email protected]: [email protected]: http://www.bitdefender.co.ukSupport Center: http://www.bitdefender.co.uk/support/business.html
RomaniaBITDEFENDER SRL
Getting Help 61

rsOrhideea Towe15A Orhideelor Street060071 Bucharest, Sector 6Fax: +40 21 2641799Phone (sales&technical support): +40 21 2063470Sales: [email protected]: http://www.bitdefender.roSupport Center: http://www.bitdefender.ro/support/business.html
United Arab EmiratesBitdefender FZ-LLCDubai Internet City, Building 17Office # 160Dubai, UAEPhone (sales&technical support): 00971-4-4588935 / 00971-4-4589186Fax: 00971-4-44565047Sales: [email protected]: http://www.bitdefender.comSupport Center: http://www.bitdefender.com/support/business.html
Getting Help 62

A. Appendices
A.1. Supported File TypesThe antimalware scanning engines included in the Bitdefender security solutionscan scan all types of files that may contain threats. The list below includes themost common types of files that are being analyzed.{*; 386; 3g2; 3gg; 7z; a6p; ac; accda; accdb; accdc; accde;accdr; accdt; accdu; acl; acm; acr; action; ade; adp; ain;air; app; ar; arc; arj; as; asd; asf; asp; au; avi; awk; ax;bas; bat; bin; bmp; boo; bz; bz2; bzip2; cab; cal; cgi; chm;cla; class; cmd; cnv; com; cpio; cpl; cru; crush; csc; csh;dat; dcx; deb (with gzip, bzip2, xz); dek; dld; dll; dmg (withHFS); doc; docm; docx; dot; dotm; dotx; drv; drw; ds; ds4;dtd; ebm; emf; eml; eps; esh; exe; ezs; fky; frs; fxp; gadget;gif; grv; gx2; gz; gzip; hap; hlp; hms; hta; htm; html; htt;iaf; icd; ico; img; inf; ini; inx; ipf; iso; isu; jar; jfif;jpe; jpeg; jpg; js; jse; jsx; kix; laccdb; lha; lzh; lnk; maf;mam; maq; mar; mat; mcr; mda; mdb; mde; mdt; mdw; mem; mhtml;mid; mmf; mov; mp3; mpd; mpeg; mpg; mpp; mpt; mpx; ms; msg;msi; mso; msp; mst; msu; nws; oab; obd; obi; obs; obt; ocx;odt; oft; ogg; ole; one; onepkg; osci; ost; ovl; pa; paf; pak;pat; pci; pcx; pdf; pex; pfd; pgm; php; pif; pip; png; pot;potm; potx; ppa; ppam; pps; ppsm; ppsx; ppt; pptm; pptx; ppz;prc; prf; prg; ps1; psd; psp; pst; pub; puz; pvd; pwc; pwz;py; pyc; pyo; qpx; qt; qxd; ra; ram; rar; rbx; rgb; rgs; rm;rox; rpj; rpm (with cpio, gzip, bzip2, xz); rtf; scar; scr;script; sct; sdr; sh3; shb; shs; shw; sit; sldm; sldx; smm;snp; snt; spr; src; svd; swf; sym; sys; tar; tar.z; tb2; tbz2;td0; tgz; thmx; tif; tiff; tlb; tms; tsp; tt6; u3p; udf; ufa;url; vb; vbe; vbs; vbscript; vwp; vxd; wav; wbk; wbt; wcm;wdm; wiz; wks; wll; wmf; wml; wpc; wpf; wpg; wpk; wpl; ws;ws2; wsc; wsf; wsh; xar; xl; xla; xlam; xlb; xlc; xll; xlm;
Appendices 63

xls; xlsb; xlsm; xlsx; xlt; xltm; xltx; xlw; xml; xqt; xsf;xsn; xtp; xz; z; zip; zl?; zoo
Appendices 64