green house data · e-mail services guide green house data built right. just for you....
TRANSCRIPT

E-Mail Services Guide
GREENHOUSEDATA
Built right. Just for you.
g r e e n h o u s e d a t a . c o m
G r e e n H o u s e D a t a3 4 0 P r o g r e s s C i r c l e C h e y e n n e , W Y 8 2 0 0 7
1
Table of Contents
Getting Started on Business Class Email
Getting Started with Green House Data Hosted Microsoft Exchange
using Mac OS X Mail
Green House Data Business Class Email Anti-Spam Customization
How to Access eDiscovery Search Results with Outlook 2010
How to Configure ActiveSync on an iPhone or iPad
How to Configure ActiveSync on an Android Phone or Tablet
How to use Email Archiving with Outlook 2010
How to use Email Archiving with Outlook Web App
Resetting Passwords for Green House Data Cloud-Hosted Services
Business Class Email - Microsoft Exchange FAQs
3
11
12
16
26
28
30
35
40
2
44

R1111
© 2015 Green House Data. Specifications are subject to change without notice.
Getting Started on Business Class Email
Thank you for purchasing Green House Data’s Hosted Microsoft Exchange. We have put together this
guide to help you get started with accessing and using our Hosted Exchange with the Microsoft
Outlook 2010 client on your laptop or desktop computer. This guide will show you how to use the
Microsoft Outlook client and get started on using your email.
Once you are finished, reading this document you will know how to:
1) Find and setup the Microsoft Outlook Client
2) Configure the Outlook Client to access your Green House Data Email Account
3) Send and receive email, use other features of Outlook with your Green House Data Email Account
Step-by-Step Instructions
1. If you don’t have Microsoft Outlook client or need to update your existing client then go to:
http://outlook.fchosted.com
2. Based on whether your computer has a 64 or 32-bit processor choose the version of Outlook 2010
to download. Based upon the speed of your connection this can take some time.
3. Choose a folder and extract the files for your Outlook client.
3

R1111
© 2015 Green House Data. Specifications are subject to change without notice.
4. Open the Outlook2010 Folder and double click setup, and click Install Now.
5. Wait for Outlook 2010 to install, once installed you can launch it on your computer.
6. Click Start and Enter Outlook.exe in the field and press enter.
7. Outlook will start for the first time and enter the startup wizard to setup your mail.
4

R1111
© 2015 Green House Data. Specifications are subject to change without notice.
8. Click next in the lower right.
5

R1111
© 2015 Green House Data. Specifications are subject to change without notice.
9. Enter your name, email, and password matching what is on your welcome letter. Hit next to
continue.
10. You will see a progress screen; this may take up to five minutes.
6

R1111
© 2015 Green House Data. Specifications are subject to change without notice.
11. A window may pop up asking your permission to allow a website to configure your settings, please
allow this and check the box “Don’t ask me about this website again”.
12. The progress will continue.
7

R1111
© 2015 Green House Data. Specifications are subject to change without notice.
13. Type in your email address and password matching those on the welcome form.
8
R1111
© 2015 Green House Data. Specifications are subject to change without notice.
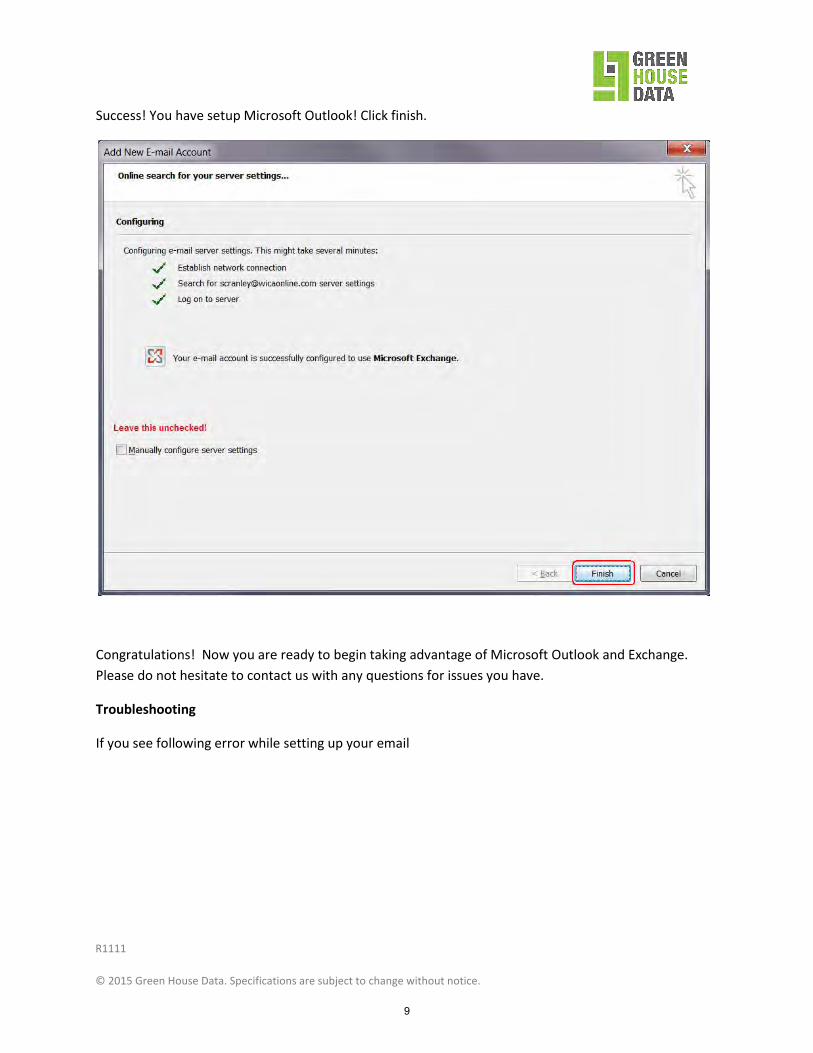
Success! You have setup Microsoft Outlook! Click finish.
Congratulations! Now you are ready to begin taking advantage of Microsoft Outlook and Exchange.
Please do not hesitate to contact us with any questions for issues you have.
Troubleshooting
If you see following error while setting up your email
9

R1111
© 2015 Green House Data. Specifications are subject to change without notice.
Do not attempt an unencrypted connection. Contact us at
10
R1011
© 2015 Green House Data. Specifications are subject to change without notice.
Getting Started with Green House Data Hosted
Microsoft Exchange using Mac OS X Mail
Thank you for signing up for Green House Data’s Hosted Microsoft Exchange service. This document is
to help you use Green House Data’s Microsoft Exchange Email on your Apple computer using Mac OS X
Mail. You must be currently signed up for our Hosted Microsoft Exchange and ActiveSync in order to
use this service and have Mac OS X Snow Leopard (10.6) or newer on your computer. If you are not a
current customer for of these services or run into any problems following these instructions you can
contact us for assistance.
To set up your account, you will need your account information and credentials from the welcome
letter. If you do not have your welcome letter contact us at [email protected]
1) Open the Mail application (you will find it in the dock or in the Applications folder).
2) Go to the Mail menu and choose Preferences.
3) Choose and click on Accounts in the toolbar.
4) Next you add your account by clicking on the “+” icon. The "Add Account" now appears on your
screen.
5) Enter your name, email address and password provided in your welcome letter. The "Incoming
Mail Server" dialog will now appear
6) Select Exchange 2007 from the Account Type drop-down menu then enter the incoming mail the
server address, your user name, and password from your welcome letter.
7) Select "Address Book contacts" and/or "iCal calendars" if you would like to automatically
configure iCal and Address Book for use with your Exchange mailbox as well.
8) Click Continue. The "Account Summary" information appears.
9) Review the information in the summary. If it appears to be correct, click Create. If you need to
make changes, click Go Back.
Note: Select "Take account online" if you want to take this account online immediately.
You are now ready to send and receive email with your Green House Data Hosted Exchange mailbox.
If you encountered any problems with setting up Hosted Exchange or have questions, please open
a trouble ticket with [email protected].
11

R0912
© 2015 Green House Data. Specifications are subject to change without notice.
Green House Data Business Class Email Anti-Spam Customization
Green House Data Business Class Email includes anti-spam and anti-virus protection. Our team
manages infrastructure, keeping it up to date and managing the configuration settings. They can
work with you to address any specific requirements you might have for protecting your email and for
what is spam. This document informs you about what information our team can change for you.
Whitelists Whitelists allow specified mail to bypass our filters. You can provide us your own whitelist of
addresses, domains and IPs you wish to have delivered to your mailboxes.
If you send us a whitelist, the list must contain a listing of one IP address or address group,
domain or email address per line.
Anti-spam settings
We can configure the ability to change how spam emails are handled for your company/domain.
This can be done both for your whole company and also for specific mailboxes
Quarantine the message (Green House Data default): This will allow you to store the
messages on the server. You may also send digest messages to the end user for any spam
that they receive, or you can simply leave it on the server for a specified number of days to
sort through if any user notices missing mail.
Add "X-MailFoundry: Spam" header: The destination server or end user’s email client can
then filter this out.
Redirect spam messages to an e-mail address: This will allow you to maintain a repository
of all the caught spam in one user's email account. This may be useful if you want to sort
through the spam.
Tag the subject line: This will allow the end users to quickly see that a message has been
tagged as spam. This can also be easily filtered out by either the destination server or the
end user's email client.
Delete the spam messages.
Quarantine Settings
Quarantine the message. This will allow you to store the messages on the server. You may also send
digest messages to the end user for any spam that they receive, or you can simply leave it on the
server for a specified number of days to sort through if any user notices missing mail. Messages will
be retained in the quarantine for 7 days before being deleted. If messages have been quarantined
12

by our system, we can configure the various settings for how the end user is notified of messages
that are being held.
Digest messages come in three flavors:
Delta (Green House Data default): This digest will only list new messages that have been
quarantined since the user last received a digest message.
Sync with default system behavior: This will essentially remove any existing overrides that may
have been in place for a particular domain or user and sync with whatever is in place for the
system.
Do not send the Digest: The user will not receive a digest message, but the mail will stay on the
server for the administrator to search through and release if necessary.
Full Digest: This digest will list all messages that are currently quarantined for a user.
If you wish to include some additional instructions for the users to follow, we can input your text
into the custom message portion. This will be included at the top of every digest message.
Digest frequency:
By default, we can configure the system to send a daily digest when they have messages
identified as spam at 8AM Pacific time. Users only get the digest when messages are identified as
spam. We can configure for your company/domain to have these sent hourly, daily (excluding
weekends), daily (including weekends) or weekly.
We can configure specific email addresses to have their own frequency and digest format.
Also available for customization are digest redirects. This allows a particular user to receive the
digest message for another email address. For example, if you have an alias set up for sales that
goes to five end users, you can have one person set up to receive the digest messages for sales
instead of all five of the end users.
Domain Filters
Domain filters are applied at the company/domain level. Custom filters allow our system to
filter on any part of a message including the keywords, subject, to field, from address, sender
address, sender domain, header and the name of the attachment. We can configure the
system to support your corporate policy by blocking certain attachment types or messages from
certain domains from being delivered.
Our team can configure the system to quarantine, reject, and delete redirect to an email
address.
R0912
© 2015 Green House Data. Specifications are subject to change without notice. 13
R0912
© 2015 Green House Data. Specifications are subject to change without notice.
Address filters are applied to specific email addresses of yours. Custom filters allow our system
to filter on any part of a message including the keywords, subject, to field, from address, sender
address, sender domain, header and the name of the attachment. We can configure the
system to support your corporate policy by blocking certain attachment types or messages from
certain domains from being delivered.
Our team can configure the system to quarantine, reject, and delete redirect to an email
address
Anti-virus settings
We can configure the way identified viruses will be processed. The various options are as
follows.
Clean and quarantine (Green House Data default): This will allow you to store the
messages on the server. You may also send digest messages to the end user for any spam
that they receive, or you can simply leave it on the server for a specified number of days to
sort through when any user notices missing mail. Only cleaned messages are kept in the
quarantine.
Clean and add "X-MailFoundry Virus" header: This can then be filtered out by either the
destination server or by the end user's email client.
Clean and tag the subject line: This will allow the end users to quickly see that a message
has been tagged as a virus. This can also be easily filtered out either by the destination
server or by the end user's email client. Only cleaned messages will be delivered to the end
user.
Return to sender: This option will return the message to the sender. However, with the
way that many of the viruses spoof the sender’s address, the message will probably be
returned to the wrong user or simply stick around in the outgoing mail queue.
Delete the virus messages. Two additional options include sending notifications. They are:
Notify sender if their message contained a virus: However, since many of the viruses are
spoofing the "From" address, the notification usually is delivered to the wrong user.
Notify user if someone tried to send them a virus: This is useful in case the user needs to
check a certain folder for the cleaned messages. spam profiles.
Honey Pots
Honey Pot addresses are addresses that are no longer valid on your system, or addresses that get
nothing but spam. By putting the address into the list below, the system will automatically forward
Address Filters
14

R0912
© 2015 Green House Data. Specifications are subject to change without notice.
all mail bound for that address to our team who will examine the mail and create new spam profiles.
You can give us an address or list of addresses to be used.
Message Footers
Message footers consist of text added to the end of the message. You can provide us the text to be
included. Footers are usually added by client email programs or originating mail servers. The
system can make a best attempt to add one. Some email clients may not reproduce the footer
correctly, in which case they should be disabled and the client’s email program or originating email
server should insert footers instead. Footers can be applied based on the various destinations of the
message:
The Incoming footer is added to messages coming in through our system, destined for local
addresses.
The Outgoing footer is added to messages sent out by our system (if enabled).
The Internal footer is added to messages sent out by our system and destined for a local
address, where both the source and the recipient domains are both handled by our system.
Changes to the footers may take up to 5 minutes to be recognized by the SMTP server.
If you have any problems or questions, please do not hesitate to contact us at (866) 995-3282 or [email protected]
15

R0613
© 2015 Green House Data. Specifications are subject to change without notice.
How to Access eDiscovery Search Results with Outlook 2010 Thank you for purchasing Green House Data Email Archiving. This guide is designed to help
customers access and use eDiscovery Search results with the Outlook 2010 client.
Once you’ve read and completed this document you will know how to:
Access your Discovery Mailbox
Review your search results
Export your search results to a PST file.
Step-by-Step Instructions
Once you have submitted your eDiscovery search request to Green House Data, you will be notified
when the results are available.
Create your Discovery Mailbox in Outlook 2010
1) Launch the Outlook 2010 Client.
2) If prompted, enter your username and password.
3) Under the File Menu go to Info and click “Account Settings”.
16
R0613
© 2015 Green House Data. Specifications are subject to change without notice.
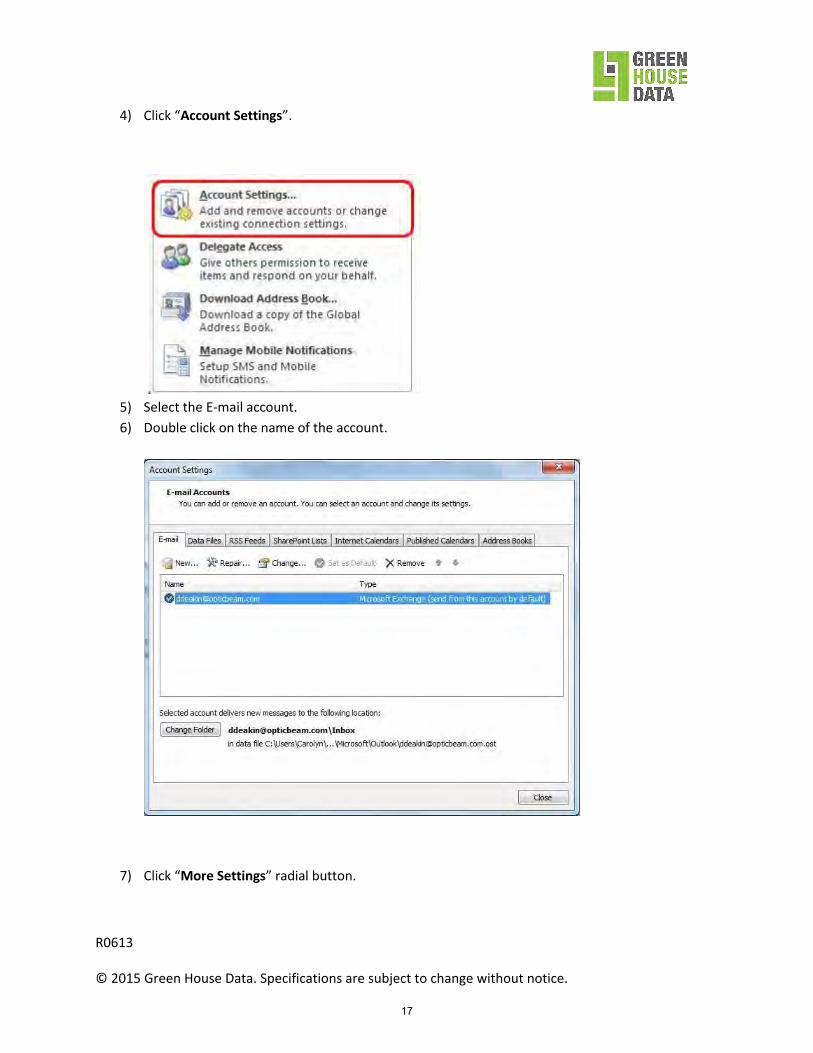
4) Click “Account Settings”.
5) Select the E-mail account.
6) Double click on the name of the account.
7) Click “More Settings” radial button.
17

R0613
© 2015 Green House Data. Specifications are subject to change without notice.
8) Select the “Advanced” tab.
18
R0613
© 2015 Green House Data. Specifications are subject to change without notice.
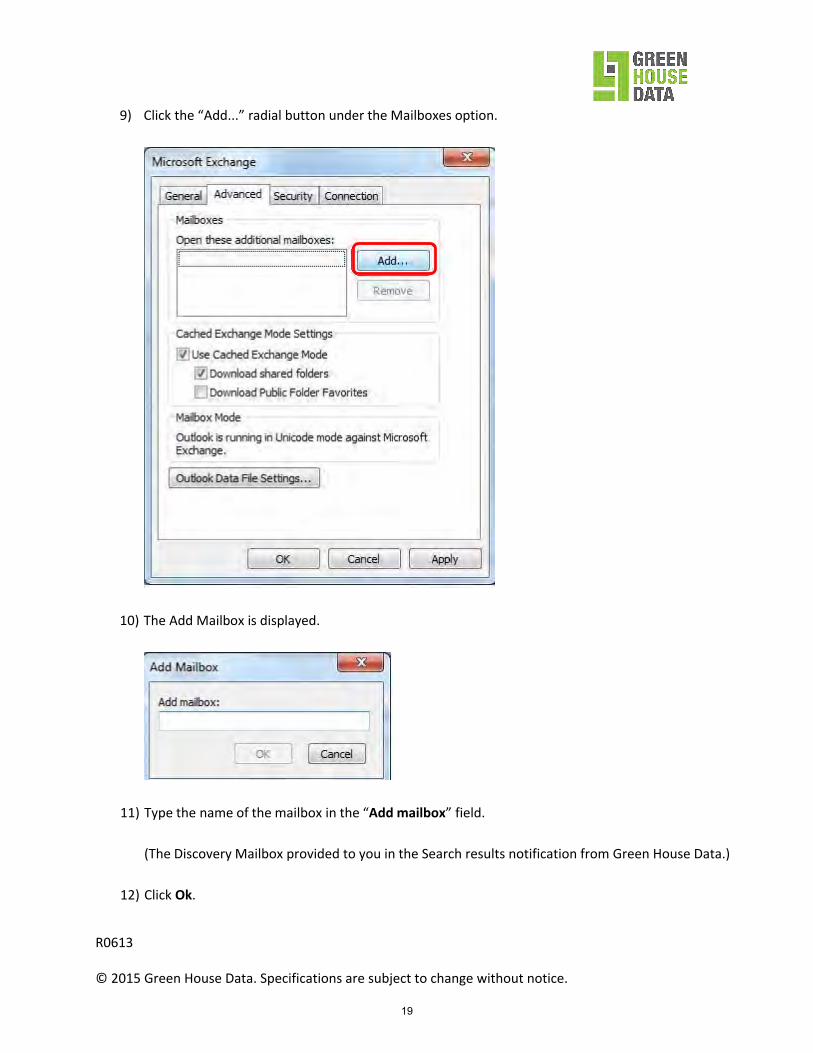
9) Click the “Add...” radial button under the Mailboxes option.
10) The Add Mailbox is displayed.
11) Type the name of the mailbox in the “Add mailbox” field.
(The Discovery Mailbox provided to you in the Search results notification from Green House Data.)
12) Click Ok.
19

R0613
© 2015 Green House Data. Specifications are subject to change
without notice.
13) Click OK.
20

R0613
© 2015 Green House Data. Specifications are subject to change without notice.
Search results for each search will be available in the Discovery Mailbox.
To export search results into PST format
Create a PST file in Outlook 2010 by Account settings/data files/add name the PST file.
1) Go to Account Settings in Outlook 2010.
2) Under the File Menu, click Info and click “Account Settings”.
3) Select “Account Settings”.
21

R0613
© 2015 Green House Data. Specifications are subject to change without notice.
4) Click the “Data Files” Tab.
5) Click “Add” button.
22

R0613
© 2015 Green House Data. Specifications are subject to change without notice.
6) You will be prompted to select the name and location of the PST file.
7) Type the File name.
8) Click OK.
23

R0613
© 2015 Green House Data. Specifications are subject to change without notice.
9) Copy the search results into the PST file.
10) Select your search results folder.
11) Right-click the search results folder and select “Copy Folder”.
12) Select the PST File you created and click “OK”.
13) The search results are now in the PST file.
14) To find the actual PST File, right-click on the PST file folder you created above and select “Open
File Location”.
24

R0613
© 2015 Green House Data. Specifications are subject to change without notice.
15) This will open the location of the PST file in a Windows Explorer Window.
If you have any problems or questions, please don’t hesitate to contact us at (866) 995-3282or [email protected].
25

R0514
© 2014 Green House Data. Specifications are subject to change without notice.
How to Configure ActiveSync on an iPhone or iPad
Thank you for signing up for Green House Data’s Business Class Email. You must currently have
ActiveSync enabled for your Business Class Email mailbox in order to use this service. If you need
assistance, please contact us.
1) Open Settings from your main screen.
2) Select Mail, Contacts, Calendars, then Add account.
3) Select Microsoft Exchange
26

R0514
© 2014 Green House Data. Specifications are subject to change without notice.
4) You will be prompted to enter your account information and credentials from the Service
Activation Letter. The Description field is optional.
5) Touch the switches on the categories you desire to sync with your device. Tap "Save".
6) ActiveSync is now enabled and you are able to use your device with your mailbox.
27

R0514
© 2014 Green House Data. Specifications are subject to change without notice.
How to Configure ActiveSync on an Android Phone or Tablet
Thank you for signing up for Green House Data’s Business Class Email. You must have ActiveSync
enabled for your Business Class Email mailbox in order to use this service. If you need assistance,
please contact us.
Android phones and tablets run the Android operating system, which is often customized by device
manufacturers, which means that ActiveSync setup steps may vary from device to device.
We recommend the following:
1) Obtain instructions/documentation from your carrier or device manufacturer to ensure you
have the exact instructions for your device.
2) You will need the information from your Service Activation Letter available when you set up
your phone:
Username (your full email address)
Password
Server – mail.fchosted.com
Domain
Below are general Android device instructions. If these do not apply to your device, please refer to your
carrier or device manufacturer.
1) Go to the “Applications” or "Settings" and select “Email” or “Mail”.
2) Tap "Add Account". Some devices may show Microsoft Exchange ActiveSync, tap that option
to proceed.
3) Enter your full email address and password. Select “Next”.
4) Select “Exchange account” or “Exchange Active Sync” or “Corporate Email” (this will vary from
device to device).
5) Configure your Exchange account. Based on your device you will see either:
“Domain\Username” Enter your email address from your welcome letter in this
field.
If “Domain” and “Username” are separate spaces for your Android device, then
leave the “Domain” field empty and enter your email address in the
“Username” space.
Note: Some devices will require you enter your email address in the
“Domain\Username” field (i.e. [email protected]).
6) Tap “Next”
7) Your phone will then verify the server settings.
8) Once your phone verifies the server settings, you can then configure “Account Options”. Note
these are optional steps and may vary device.
Frequency - Email checking frequency defaults to “Automatic” (aka push). This
means that email messages will be sent to your Android device as they arrive
28

R0514
© 2014 Green House Data. Specifications are subject to change without notice.
to your mailbox. We recommend you only use this option if you have an
unlimited data plan.
Amount to synchronize – This determines the amount of mail kept on your
phone or tablet. You can choose which option you prefer including one day,
three days or one week.
Notify me when mail arrives – Use this option if you want to be notified when
each new message arrives.
Sync contacts from this account – use this option if you wish to have your
contacts synchronized between your Android device and Exchange mailbox.
9) Next, your newly set-up Email will begin downloading email messages and you can begin using
it to send and receive messages with your new account.
If you encountered any problems or have questions, please contact us at [email protected].
29

R0613
© 2015 Green House Data. Specifications are subject to change without notice.
How to use Email Archiving with Outlook 2010 Thank you for purchasing Green House Data Email Archiving. This guide is designed to help
customers access and use Email Archiving with the Outlook 2010 client.
Once you’ve read and completed this document you will know how to:
Access your Archive mailbox
Move items between your Archive mailbox and primary mailbox
Search your Archive mailbox
Filter your search results
Step-by-Step Instructions
Access your Archive mailbox
When Email Archiving is enabled with your Business Class Email account, you will see your Archive
Mailbox when you sign on to Outlook 2010.
1) Launch the Outlook 2010 Client.
2) If prompted, enter your username and password.
3) Once you sign in to your account, you will see your primary mailbox.
4) Below you will see the Archive mailbox.
30

R0613
© 2015 Green House Data. Specifications are subject to change without notice.
5) Click on the Archive mailbox to view messages in your archive.
To move items to and from the Archive mailbox
Note: Your Company will have a retention policy to automatically move emails from your primary
mailbox to the archive mailbox after a certain amount of time.
1) Select the email message(s) you wish to move to your archive and then drag it over to your
Archive mailbox. Your message will now appear in the archive mailbox and no longer in
your primary mailbox.
31
R0613
© 2015 Green House Data. Specifications are subject to change without notice.
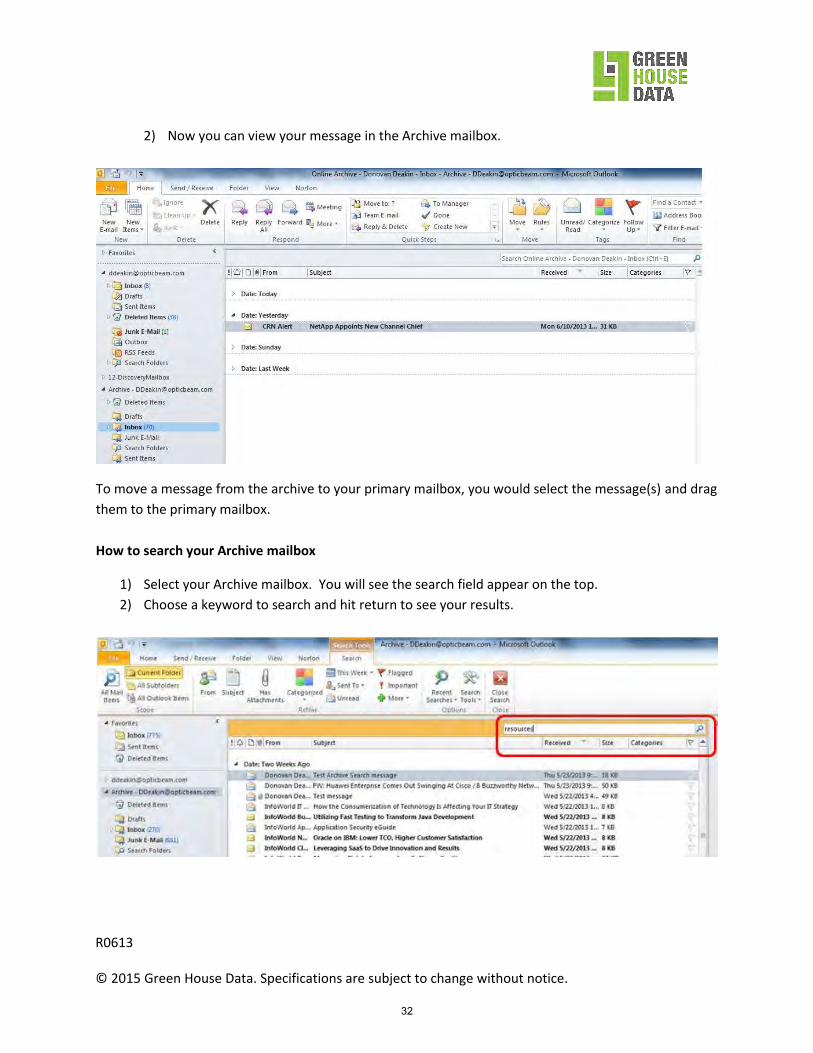
2) Now you can view your message in the Archive mailbox.
To move a message from the archive to your primary mailbox, you would select the message(s) and drag
them to the primary mailbox.
How to search your Archive mailbox
1) Select your Archive mailbox. You will see the search field appear on the top.
2) Choose a keyword to search and hit return to see your results.
32

R0613
© 2015 Green House Data. Specifications are subject to change without notice.
3) Your search results will then display. See the example below.
To filter your search results
1) To filter your search results go under Search Tools and under Search choose which filter(s)
to apply to your search.
2) In this example, the filter is set for messages sent to me. I select “Sent To: Me or CC: Me”.
You will then see the filtered results.
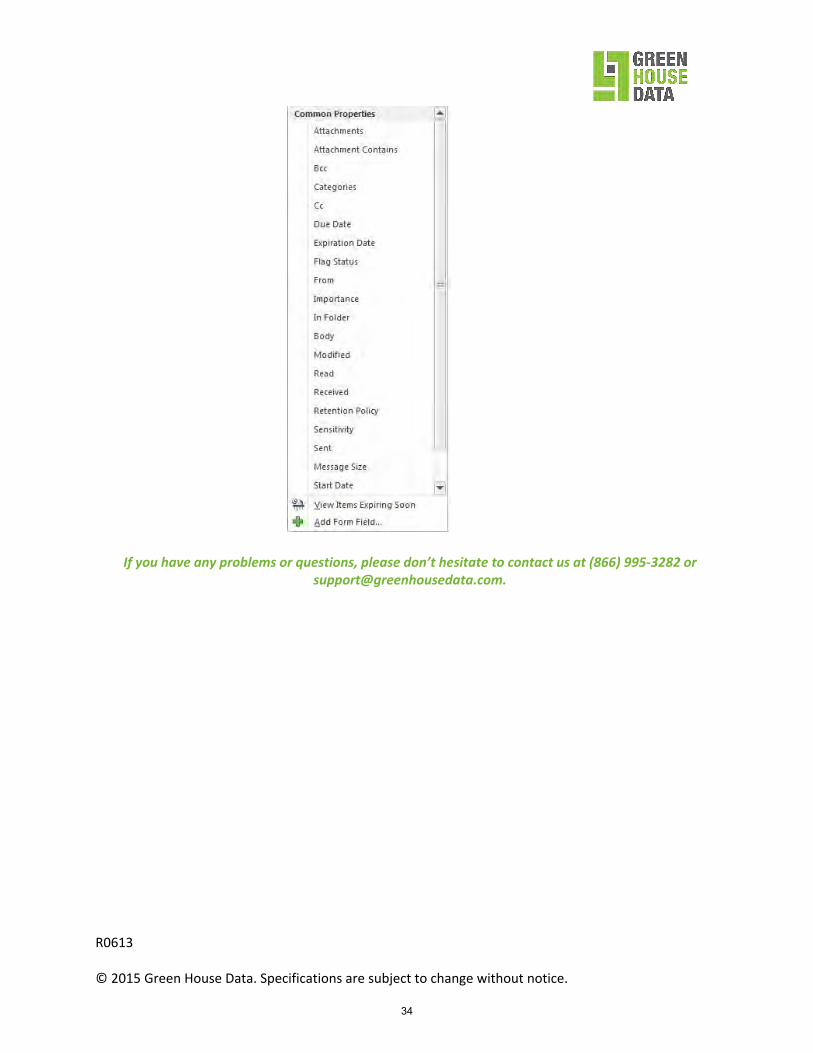
3) Additional search filters may be applied using the following properties by selecting “More”.
33
R0613
© 2015 Green House Data. Specifications are subject to change without notice.
If you have any problems or questions, please don’t hesitate to contact us at (866) 995-3282 or [email protected].
34

R0613
© 2015 Green House Data. Specifications are subject to change without notice.
How to use Email Archiving with Outlook Web App Thank you for purchasing Green House Data’s Email Archiving product. This guide is designed to help
customers access and use Email Archiving with the Outlook Web App (OWA) client.
Once you’ve read and completed this document you will know how to:
Login to Outlook Web App
Access your Online Archive
Move items between your Online Archive and primary mailbox
Search your Online Archive
Filter your search results
Step-by-Step Instructions
Access your Archive mailbox
When Email Archiving is enabled with your Business Class Email account, you will see your Online
Archive when you sign on to Outlook Web App.
1) From your web browser, go to https://mail.fchosted/owa
2) Login using your username and password.
3) Once you sign in to your account, you will see your primary mailbox.
35

R0613
© 2015 Green House Data. Specifications are subject to change without notice.
4) The Online Archive folder will appear below the primary mailbox.
5) Click on the Online Archive folder to view messages in your archive folder.
To move items to and from the Online Archive
1) Select the email message(s) you wish to archive and drag it over to your Online Archive folder. Your
message will now appear in the archive mailbox and will no longer be in your primary mailbox.
2) Now you can view your message.
36

R0613
© 2015 Green House Data. Specifications are subject to change without notice.
To move a message from the archive folder to your primary mailbox, you would select the message(s)
and drag them to the primary mailbox.
How to search your Online Archive
1) Select your Online Archive folder. You will see the search field appear on the top right.
37

R0613
© 2015 Green House Data. Specifications are subject to change without notice.
2) Choose a keyword to search and press the Enter key to see your results.
To filter your search results
1) To filter your search results click Filter. There are numerous menu options to choose from. In
this example below, the filter is set for messages “Sent to me”.
2) Once you have selected a filter(s) click “Apply”.
38

R0613
© 2015 Green House Data. Specifications are subject to change without notice.
3) The filtered results now appear, I can choose to apply more filters, search within the results or clear
the filter(s).
39

R0112
© 2015Green House Data. Specifications are subject to change without notice.
Resetting Passwords for Green House Data Cloud-Hosted ServicesThank you for signing up for Green House Data’s Cloud-Hosted services. This document is to help you reset or change your password for our Business Class Email & Messaging, Microsoft SharePoint and Green House Data Online Backup products. If you are not a current customer for this service or run into any problems following these instructions you can contact us for assistance.
Microsoft Exchange Email, SharePoint and Green House Data Online Backup:
To reset/change your password, Exchange 2010 provides you with Outlook Web App (OWA) to make the changes.
Access OWA by logging on and input your username and password.
Depending on how your company administrator has set up your company account with Green House Data, you will either go to https://mail.fchosted.com/owa or https://mail.yourcompanydomain.com/owa. If you are not sure, please contact your company administrator or [email protected].
40

R0112
© 2015Green House Data. Specifications are subject to change without notice.
After you log on, go to the top right corner of the screen click on the Options tab.
On the Options menu, click “Change Your Password”
41

R0112
© 2015Green House Data. Specifications are subject to change without notice.
Once you click Save your password will be changed. You will see this confirmation message. Use your new password the next time you sign on.
Enter your old and new password and click save at the top of the screen. You will then get a message to log back in using your newpassword.
42

R0112
© 2015Green House Data. Specifications are subject to change without notice.
Important Password Selection Information:
When selecting a password do not select a password that simulates or contains your username. Passwords cannot contain or simulate a user name.
Default Passwords are 8 characters; a symbol, capital letter and lower case letters and numbers, e.g. @adV9876.
You can only change your password once in a 24-hour period.
Note: If you have forgotten your password, please contact your company’s administrator or [email protected]
Expired Passwords:
Green House Data’s default password expiration is set at 6 months. When your password expires, you will see a dialog box that your password has expired when you log on. Once you see this pop up screen, you must go to your Outlook Web App email and change your password there.
Access your OWA by logging on and input your username and password. Depending on how your company administrator has set up your company account with Green House Data, you will either go to https://mail.fchosted.com/owa or https://mail.yourcompanydomain/owa. If you are not sure, please contact your company administrator or [email protected]
Follow the “how to change your password” instructions above to change your expired password.
43

R1011
© 2015 Green House Data. Specifications are subject to change without notice.
Business Class Email - Microsoft Exchange FAQs
Q: What are the minimum system requirements for Hosted Microsoft Exchange Business Class Email and Messaging?
A: The minimum system requirements:
PC
Windows 7, Vista, XP SP3
Outlook 2007 or 2003
512 MB of RAM
1GB available disk space
DSL or higher connection
MAC
Intel Processor
Mac OS X 10.6 Snow Leopard
Microsoft Outlook 2015 or Mac OS X
Mail 512 MB of RAM
1GB available disk space
DSL or higher connection
Q: What is the maximum size file I can send using my Hosted Exchange Email?
A: You will be able to send up to a 50MB size file.
Q: What happens when I have files 50MB or larger that I need to send to other people?
A: We have a product that allows you to transfer and share large files securely. It is easy to use and does not require using FTP. For more information please contact us at [email protected].
Q: How do I check the size of my email box?
A: You will receive a warning email when a user approaches 90% of the mailbox capacity. Your incoming and outgoing emails will be restricted when your mailbox reaches capacity.
Viewing Your Mailbox Size in Microsoft Outlook: You can view the size of your mailbox and subfolders from the Outlook client software.
1. In the Outlook folder view right-click at the folder that says "Mailbox – Your Name” and click on
Properties.
2. On the General Tab, click on Folder Size
44

You may view the total size of your mailbox and all of its subfolders. Click on the server data tab to see
how much email is stored for your mailbox.
Q: Can I access my email using the Internet?
A: You can securely check email from any Internet connection as if you were at your office computer. Simply access in your standard way and input your user name and password.
Q: Can I use my current Outlook email client, with Green House Data Hosted Exchange?
A: You can use Microsoft Outlook 2010 access our Hosted Exchange environment.
Q: Does remote access require a VPN connection?
A: It is not necessary to use a VPN connection to securely check mail from a remote connection. Outlook 2010 uses an encrypted session (RPC over HTTPS) for secure two-way synchronization. There also eliminates the need to use nonstandard ports for accessing your company.
Q: How do I migrate my mail onto the Green House Data Hosted Exchange?
A: Contact our Client Services team for assistance on migrating email.
Q: If I have my own domain name, can I keep it?
A: Yes
Q: Do you have Email Archiving available?
A: Yes, we provide optional email archiving for individual mailboxes. Please contact your account manager or [email protected].
Q: Will I be able to use my iPhone, iPad Android device with my Green House Data Hosted Exchangeemail?
A: Yes, we have an option for ActiveSync which allows you to use our Hosted Exchange with your iPhone or iPad.
R1011 © 2015 Green House Data. Specifications are subject to change without notice.
45