growing guide: tomatoes - tower garden: grow food … · growing guide: tomatoes ... there are two...
TRANSCRIPT
Is there anything that says summer like a fresh, juicy, sweet tomato?Not only are they super-tasty, tomatoes are a perfect crop for beginning gardeners because for just a little bit of effort, they deliver a whole lot of reward. And of course, growing tomatoes in a Tower Garden® is even easier than growing them in the ground. No kneeling, no bending, no tilling, no dirt!Of course, there are some tips and tricks you should know about for growing abundant, flavorful tomatoes in a Tower Garden®. Read on to learn how to: choose your tomato varieties, sow seeds, transplant seedlings, pinch and prune, set up a tomato cage, manually pollinate, maintain the health of your plants, and know when to harvest. Get ready … get set … grow!
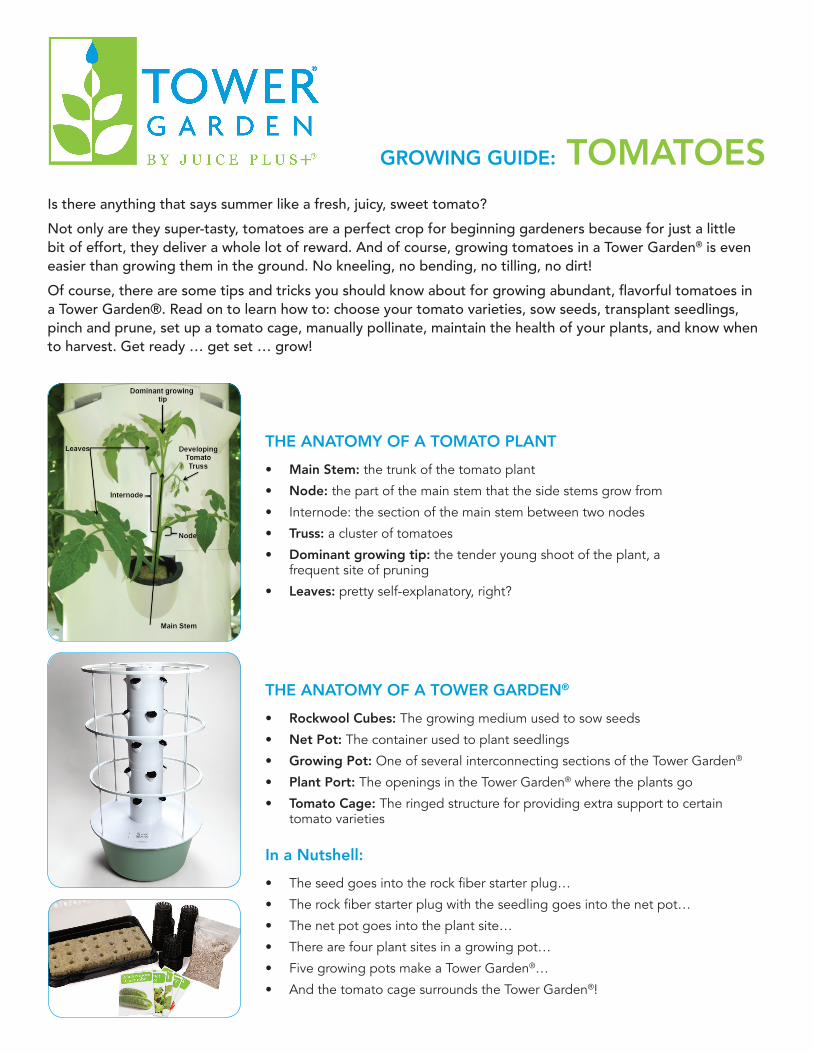
The AnATomy of A TomATo PlAnT• main Stem: the trunk of the tomato plant
• node: the part of the main stem that the side stems grow from
• Internode: the section of the main stem between two nodes
• Truss: a cluster of tomatoes
• Dominant growing tip: the tender young shoot of the plant, a frequent site of pruning
• leaves: pretty self-explanatory, right?
GrowinG GuiDe: TomAToeS
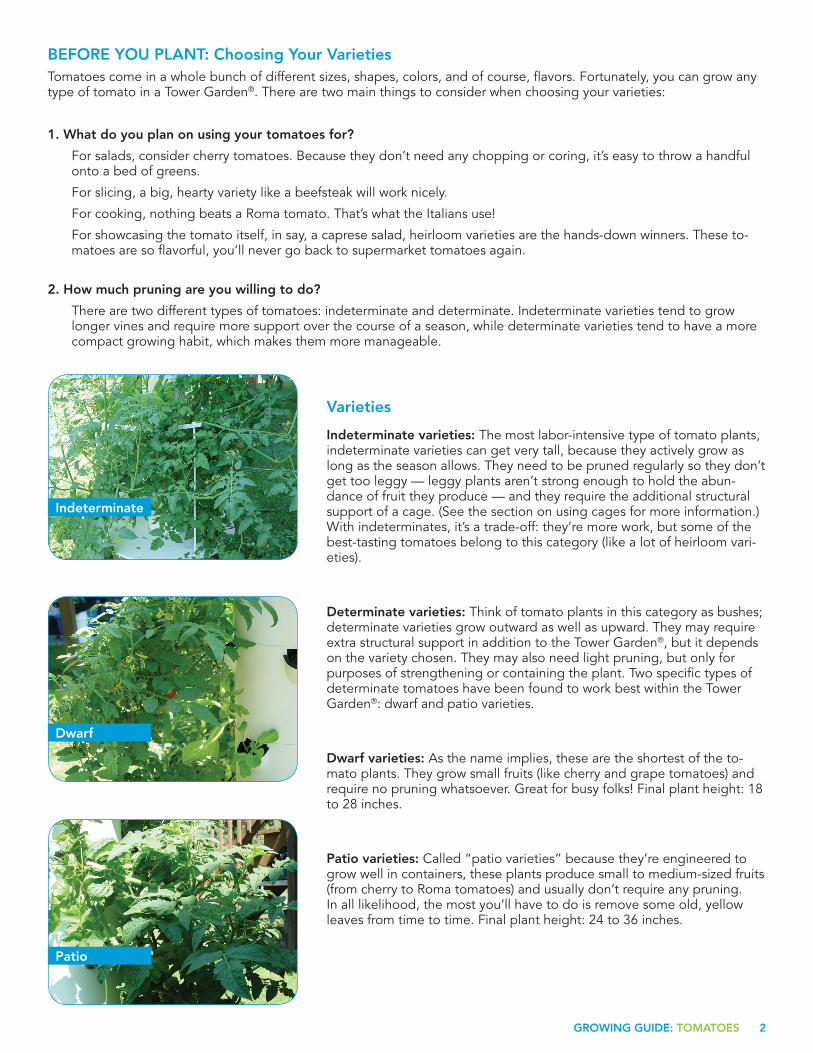
The AnATomy of A Tower GArDen®
• rockwool Cubes: The growing medium used to sow seeds
• net Pot: The container used to plant seedlings
• Growing Pot: One of several interconnecting sections of the Tower Garden®
• Plant Port: The openings in the Tower Garden® where the plants go
• Tomato Cage: The ringed structure for providing extra support to certain tomato varieties
in a nutshell:• Theseedgoesintotherockfiberstarterplug…
• Therockfiberstarterplugwiththeseedlinggoesintothenetpot…
• Thenetpotgoesintotheplantsite…
• Therearefourplantsitesinagrowingpot…
• Five growing pots make a Tower Garden®…
• And the tomato cage surrounds the Tower Garden®!
2GrowinG GuiDe: TomAToeS
Before you PlAnT: Choosing your VarietiesTomatoes come in a whole bunch of different sizes, shapes, colors, and of course, flavors. Fortunately, you can grow any type of tomato in a Tower Garden®. There are two main things to consider when choosing your varieties:
1. what do you plan on using your tomatoes for?
For salads, consider cherry tomatoes. Because they don’t need any chopping or coring, it’s easy to throw a handful onto a bed of greens.
For slicing, a big, hearty variety like a beefsteak will work nicely.
For cooking, nothing beats a Roma tomato. That’s what the Italians use!
For showcasing the tomato itself, in say, a caprese salad, heirloom varieties are the hands-down winners. These to-matoes are so flavorful, you’ll never go back to supermarket tomatoes again.
2. how much pruning are you willing to do?
There are two different types of tomatoes: indeterminate and determinate. Indeterminate varieties tend to grow longer vines and require more support over the course of a season, while determinate varieties tend to have a more compact growing habit, which makes them more manageable.
Varieties
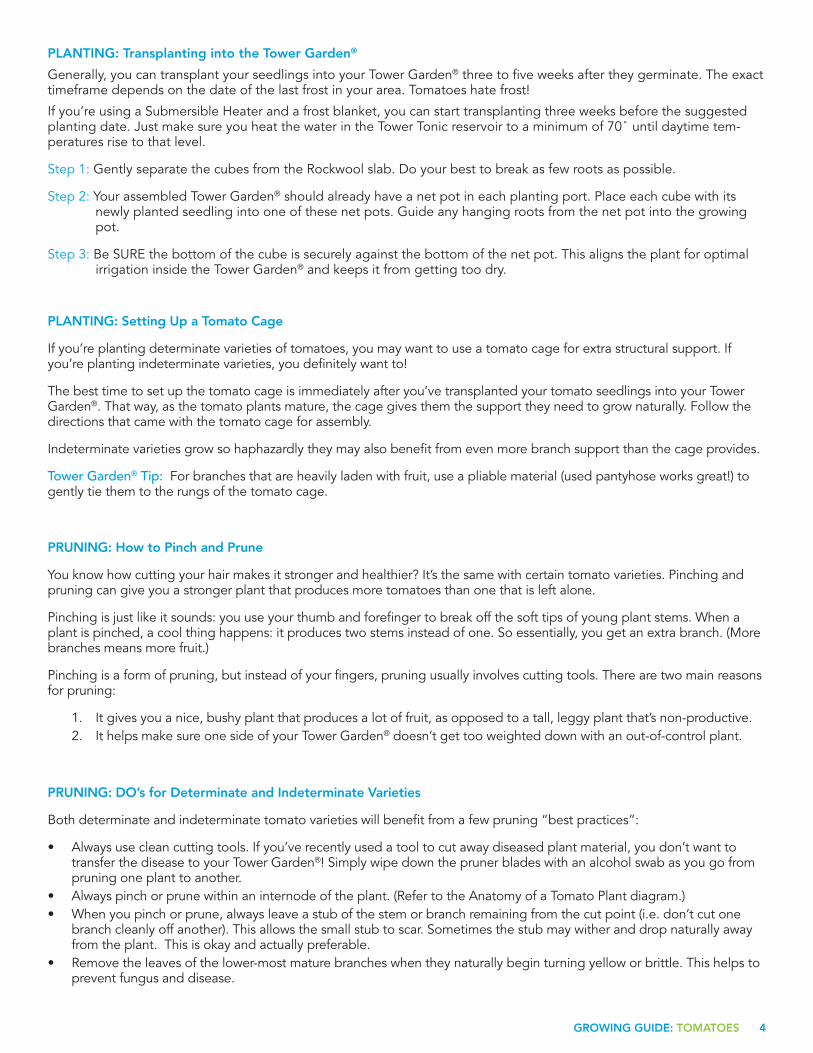
indeterminate varieties: The most labor-intensive type of tomato plants, indeterminate varieties can get very tall, because they actively grow as long as the season allows. They need to be pruned regularly so they don’t get too leggy — leggy plants aren’t strong enough to hold the abun-dance of fruit they produce — and they require the additional structural support of a cage. (See the section on using cages for more information.) With indeterminates, it’s a trade-off: they’re more work, but some of the best-tasting tomatoes belong to this category (like a lot of heirloom vari-eties).
Determinate varieties: Think of tomato plants in this category as bushes; determinate varieties grow outward as well as upward. They may require extra structural support in addition to the Tower Garden®, but it depends on the variety chosen. They may also need light pruning, but only for purposes of strengthening or containing the plant. Two specific types of determinate tomatoes have been found to work best within the Tower Garden®: dwarf and patio varieties.
Dwarf varieties: As the name implies, these are the shortest of the to-mato plants. They grow small fruits (like cherry and grape tomatoes) and require no pruning whatsoever. Great for busy folks! Final plant height: 18 to 28 inches.
Patio varieties: Called “patio varieties” because they’re engineered to grow well in containers, these plants produce small to medium-sized fruits (from cherry to Roma tomatoes) and usually don’t require any pruning. In all likelihood, the most you’ll have to do is remove some old, yellow leaves from time to time. Final plant height: 24 to 36 inches.
indeterminate
Dwarf
Patio

3GrowinG GuiDe: TomAToeS
Before you PlAnT: Deciding when to Plant
The good news is, if you’re using the Submersible Heater and a frost blanket, you can start your tomatoes three weeks before the suggested planting date.
Tower Garden® Tip: http://www.almanac.com/gardening/planting-dates
How long ‘til you can eat ‘em? In general, most tomatoes take 70-80 days to produce fruit from the day they germinate (or sprout). However, there are some tomato varieties that are much speedier. The Early Girl variety, for example, matures in as little as 50 days.
PlAnTinG: Seed Sowing and Germination
Your Tower Garden® Kit comes with everything you need to get started growing tomatoes.
Remember: tomato seeds need to be kept at daytime temperatures of at least 70˚ in order to sprout.
Step 1: Locate the slab of Rockwool cubes and place in the seed starter tray.
Step 2: Thoroughly wet the Rockwool cubes by completely submerging the slab for 30 minutes in half-strength Tower Tonic nutrient solution (Please reference the Tower Garden® Instruction Manual for more information). This will stabilize the pH of your cubes. After 30 minutes, thoroughly flush cubes with fresh water.
Important: Because the Rockwool repels water, you can’t get away with just spraying it. You really need to soak it!
Step 3: Drain all excess water from the seed starter tray.
Step 4: Sow 2 seeds per cube.
Step 5: Lightly cover the seeds in the cube with coarse vermiculite, which will help retain the right amount of moisture, and gently sprinkle a little water over each hole to wet the vermiculite. .
Step 6: After seeding, put a little water into the bottom of the container. If possible, use filtered water without chlorine. Do not close the lid.
Step 7: Place seed starter tray outside in the shade (a bench or table will do nicely) until the seeds have germinated. Always keep about 1/8” to 1/4” of fresh water in the bottom of the tray.
Step 8: Once the seeds have germinated (about 7-14 days), remove the weakest seedlings in each cube by snipping it with scissors. Resist the temptation to pull it out. You don’t want to disturb the tender, immature roots of the remaining seedling.
Step 9: Make sure your sprouted seeds have 1/4” of fresh water in the bottom of the tray each morning so your seed-lings won’t dry out during the day. Add Tower Garden® fertilizer solution every other morning in place of fresh water.
Step 10: After three to five weeks, and once the fear of frost has passed, your seedlings should be ready to transplant into the Tower Garden®!
Remember: tomatoes like heat! Their growth can slow down if temperatures dip below 60˚ on any given day, and it might take a few days afterwards for them to start growing normally again. If a tomato plant experiences repeated spikes in temperature below 60˚, they can stop growing altogether, staying in a sort of tomato holding pattern.
For most areas, the best time to plant tomatoes is after the fear of frost has passed (which can be as late as mid-May or early June, depending on where you’re located) and when daytime temperatures reach 70˚- 90˚ throughout the crop’s season.
4GrowinG GuiDe: TomAToeS
PlAnTinG: Transplanting into the Tower Garden®
Generally, you can transplant your seedlings into your Tower Garden® three to five weeks after they germinate. The exact timeframe depends on the date of the last frost in your area. Tomatoes hate frost!
Step 1: Gently separate the cubes from the Rockwool slab. Do your best to break as few roots as possible.
Step 2: Your assembled Tower Garden® should already have a net pot in each planting port. Place each cube with its newly planted seedling into one of these net pots. Guide any hanging roots from the net pot into the growing pot.
Step 3: Be SURE the bottom of the cube is securely against the bottom of the net pot. This aligns the plant for optimal irrigation inside the Tower Garden® and keeps it from getting too dry.
PlAnTinG: Setting up a Tomato Cage
If you’re planting determinate varieties of tomatoes, you may want to use a tomato cage for extra structural support. If you’re planting indeterminate varieties, you definitely want to!
The best time to set up the tomato cage is immediately after you’ve transplanted your tomato seedlings into your Tower Garden®. That way, as the tomato plants mature, the cage gives them the support they need to grow naturally. Follow the directions that came with the tomato cage for assembly.
Indeterminate varieties grow so haphazardly they may also benefit from even more branch support than the cage provides.
Tower Garden® Tip: For branches that are heavily laden with fruit, use a pliable material (used pantyhose works great!) to gently tie them to the rungs of the tomato cage.
PruninG: how to Pinch and Prune
You know how cutting your hair makes it stronger and healthier? It’s the same with certain tomato varieties. Pinching and pruning can give you a stronger plant that produces more tomatoes than one that is left alone.
Pinching is just like it sounds: you use your thumb and forefinger to break off the soft tips of young plant stems. When a plant is pinched, a cool thing happens: it produces two stems instead of one. So essentially, you get an extra branch. (More branches means more fruit.)
Pinching is a form of pruning, but instead of your fingers, pruning usually involves cutting tools. There are two main reasons for pruning:
1. It gives you a nice, bushy plant that produces a lot of fruit, as opposed to a tall, leggy plant that’s non-productive.2. It helps make sure one side of your Tower Garden® doesn’t get too weighted down with an out-of-control plant.
PruninG: Do’s for Determinate and indeterminate Varieties
Both determinate and indeterminate tomato varieties will benefit from a few pruning “best practices”:
• Always use clean cutting tools. If you’ve recently used a tool to cut away diseased plant material, you don’t want to transfer the disease to your Tower Garden®! Simply wipe down the pruner blades with an alcohol swab as you go from pruning one plant to another.
• Always pinch or prune within an internode of the plant. (Refer to the Anatomy of a Tomato Plant diagram.)• When you pinch or prune, always leave a stub of the stem or branch remaining from the cut point (i.e. don’t cut one
branch cleanly off another). This allows the small stub to scar. Sometimes the stub may wither and drop naturally away from the plant. This is okay and actually preferable.
• Remove the leaves of the lower-most mature branches when they naturally begin turning yellow or brittle. This helps to prevent fungus and disease.
If you’re using a Submersible Heater and a frost blanket, you can start transplanting three weeks before the suggested planting date. Just make sure you heat the water in the Tower Tonic reservoir to a minimum of 70˚ until daytime tem-peratures rise to that level.
5GrowinG GuiDe: TomAToeS
PruninG: Dos for indeterminate Varieties only
Indeterminate tomato varieties are a bit like an unruly child: they need constant structure and redirection in order to be-come focused and productive. You need to prune indeterminate varieties throughout the growing season to keep them contained and build plant strength, which allows them to handle the ongoing fruit harvest.
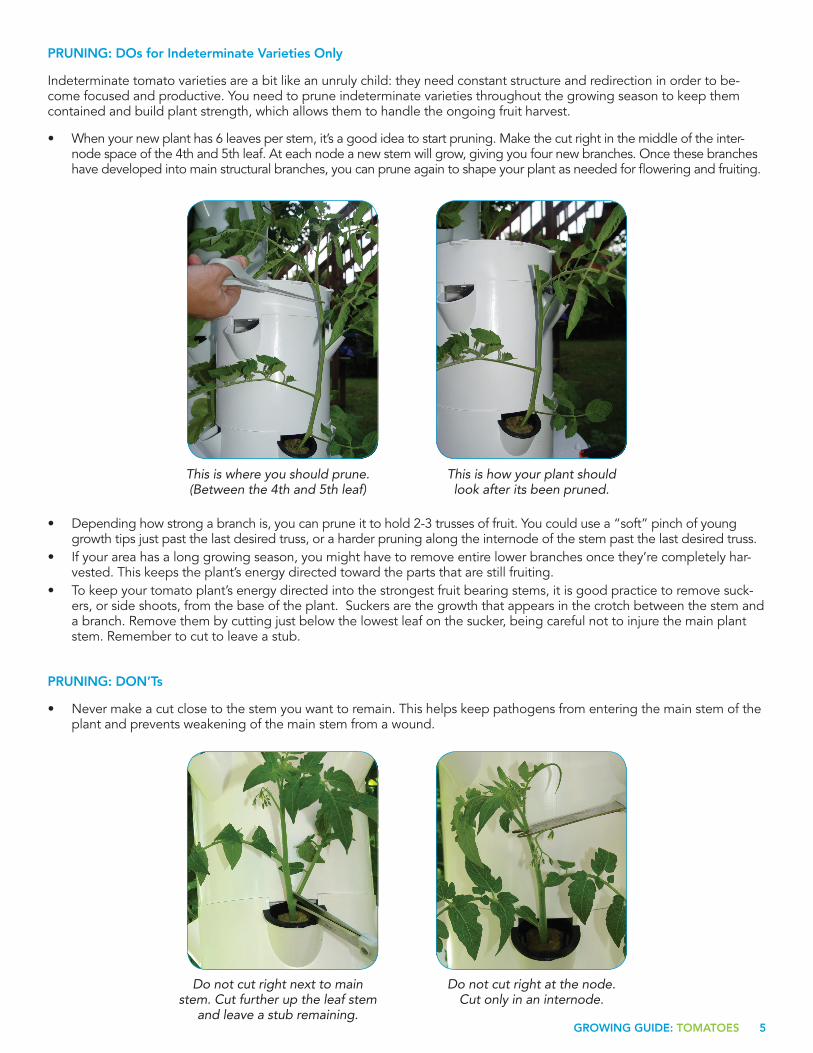
• When your new plant has 6 leaves per stem, it’s a good idea to start pruning. Make the cut right in the middle of the inter-node space of the 4th and 5th leaf. At each node a new stem will grow, giving you four new branches. Once these branches have developed into main structural branches, you can prune again to shape your plant as needed for flowering and fruiting.
• Depending how strong a branch is, you can prune it to hold 2-3 trusses of fruit. You could use a “soft” pinch of young growth tips just past the last desired truss, or a harder pruning along the internode of the stem past the last desired truss.
• If your area has a long growing season, you might have to remove entire lower branches once they’re completely har-vested. This keeps the plant’s energy directed toward the parts that are still fruiting.
• To keep your tomato plant’s energy directed into the strongest fruit bearing stems, it is good practice to remove suck-ers, or side shoots, from the base of the plant. Suckers are the growth that appears in the crotch between the stem and a branch. Remove them by cutting just below the lowest leaf on the sucker, being careful not to injure the main plant stem. Remember to cut to leave a stub.
This is where you should prune. (Between the 4th and 5th leaf)
This is how your plant should look after its been pruned.
PruninG: Don’Ts
• Never make a cut close to the stem you want to remain. This helps keep pathogens from entering the main stem of the plant and prevents weakening of the main stem from a wound.
Do not cut right next to main stem. Cut further up the leaf stem
and leave a stub remaining.
Do not cut right at the node. Cut only in an internode.
6GrowinG GuiDe: TomAToeS
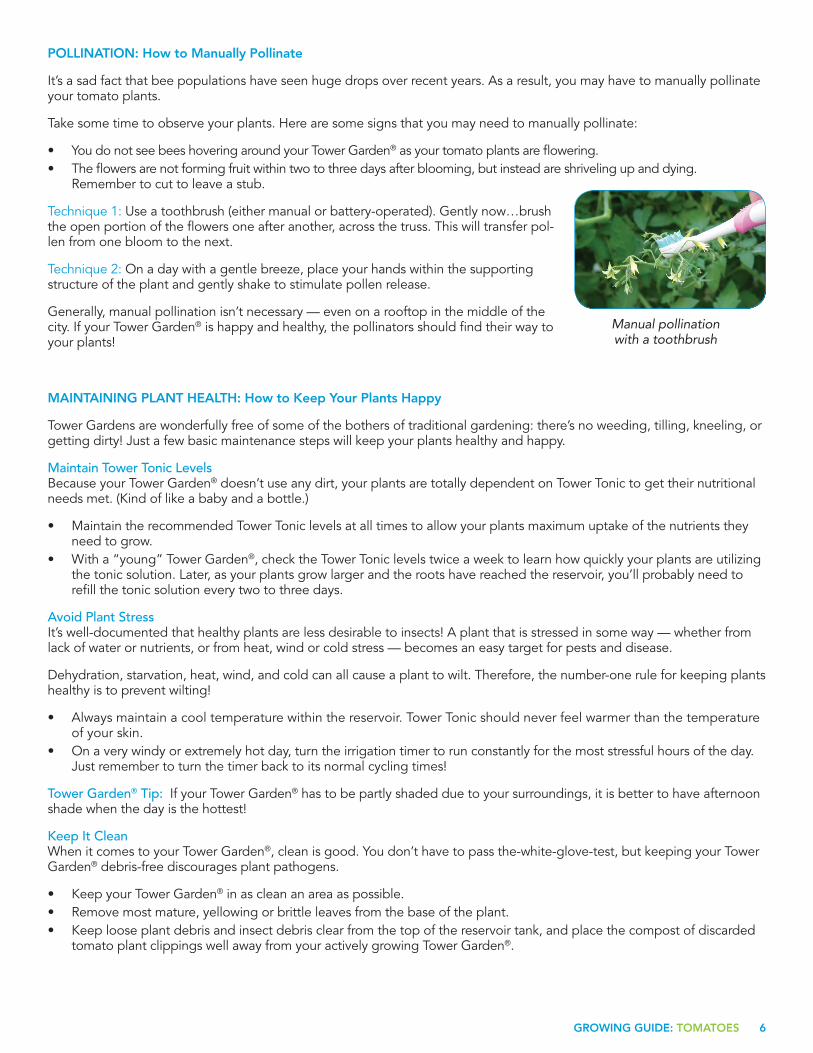
PollinATion: how to manually Pollinate
It’s a sad fact that bee populations have seen huge drops over recent years. As a result, you may have to manually pollinate your tomato plants.
Take some time to observe your plants. Here are some signs that you may need to manually pollinate:
• You do not see bees hovering around your Tower Garden® as your tomato plants are flowering.• The flowers are not forming fruit within two to three days after blooming, but instead are shriveling up and dying.
Remember to cut to leave a stub.
Technique 1: Use a toothbrush (either manual or battery-operated). Gently now…brush the open portion of the flowers one after another, across the truss. This will transfer pol-len from one bloom to the next.
Technique 2: On a day with a gentle breeze, place your hands within the supporting structure of the plant and gently shake to stimulate pollen release.
Generally, manual pollination isn’t necessary — even on a rooftop in the middle of the city. If your Tower Garden® is happy and healthy, the pollinators should find their way to your plants!
Manual pollination with a toothbrush
mAinTAininG PlAnT heAlTh: how to Keep your Plants happy
Tower Gardens are wonderfully free of some of the bothers of traditional gardening: there’s no weeding, tilling, kneeling, or getting dirty! Just a few basic maintenance steps will keep your plants healthy and happy.
Maintain Tower Tonic Levels Because your Tower Garden® doesn’t use any dirt, your plants are totally dependent on Tower Tonic to get their nutritional needs met. (Kind of like a baby and a bottle.)
• Maintain the recommended Tower Tonic levels at all times to allow your plants maximum uptake of the nutrients they need to grow.
• With a “young” Tower Garden®, check the Tower Tonic levels twice a week to learn how quickly your plants are utilizing the tonic solution. Later, as your plants grow larger and the roots have reached the reservoir, you’ll probably need to refill the tonic solution every two to three days.
Avoid Plant Stress It’s well-documented that healthy plants are less desirable to insects! A plant that is stressed in some way — whether from lack of water or nutrients, or from heat, wind or cold stress — becomes an easy target for pests and disease.
Dehydration, starvation, heat, wind, and cold can all cause a plant to wilt. Therefore, the number-one rule for keeping plants healthy is to prevent wilting!
• Always maintain a cool temperature within the reservoir. Tower Tonic should never feel warmer than the temperature of your skin.
• On a very windy or extremely hot day, turn the irrigation timer to run constantly for the most stressful hours of the day. Just remember to turn the timer back to its normal cycling times!
Tower Garden® Tip: If your Tower Garden® has to be partly shaded due to your surroundings, it is better to have afternoon shade when the day is the hottest!
Keep It Clean When it comes to your Tower Garden®, clean is good. You don’t have to pass the-white-glove-test, but keeping your Tower Garden® debris-free discourages plant pathogens.
• Keep your Tower Garden® in as clean an area as possible. • Remove most mature, yellowing or brittle leaves from the base of the plant. • Keep loose plant debris and insect debris clear from the top of the reservoir tank, and place the compost of discarded
tomato plant clippings well away from your actively growing Tower Garden®.

7GrowinG GuiDe: TomAToeS
mAinTAininG PlAnT heAlTh: Pests
Like most crops, tomatoes are vulnerable to pests. These vary by region and time of year. Fortunately, growing plants off the ground in a Tower Garden® is one of the best ways to avoid pests! Following are the most common pests affecting tomatoes.
Aphids Aphids are small, soft-bodied insects that are most commonly green and black in color, but may also be gray, brown, pink, red, yellow, or lavender. They tend to feed on tender, young growth causing it to appear puckered or deformed. Though they are visible to the naked eye, they also leave behind an excretion known as honey dew, which is another method of identification.
What to do if you have them: There are numerous methods of aphid control, including botanical sprays such as insecticidal soap, pyrethrum, rotenone and horticultural oils. Beneficial insects such as ladybugs will also help to eradicate the pest.
White Fly Sap-sucking insects that are visible to the naked eye, whiteflies have slender white bodies and wings and tend to congregate on the undersides of leaves to feed. They are one of the most seri-ous pests in the agricultural industry, affecting both field and greenhouse growers.
What to do if you have them: Reach for your botanical sprays such as pyrethrum, rotenone and horticultural oil sprays.
Tomato Fruitworm You can best identify the presence of this pest through holes in the fruit and flower buds. Fruit-worms in their early stages appear cream colored or yellowish-green with few markings, while later stages are green, reddish, or brown with pale stripes and scattered black spots.
What to do if you have them: You can control fruitworms through biological sprays of Bacillus thuringiensis and the Entrust formulation of spinosad, which are acceptable for use on organically certified produce. Naturally occurring beneficial insects are very important in the biological control of tomato fruitworm and these include Trichogramma spp. egg parasites, the larval parasite Hy-posoter exiguae, and predators such as big-eyed bug and minute pirate bug.
For more information For additional information on how to handle crop pests, consult your local office of the Cooperative Extension System, a nationwide, governmental educational network that provides useful information on agricultural practices: http://www.csrees.usda.gov/Extension/
8GrowinG GuiDe: TomAToeS
mAinTAininG PlAnT heAlTh: managing Disease
Not all plant problems are caused by pests; some are caused by disease. Here are the ones most likely to affect tomatoes.
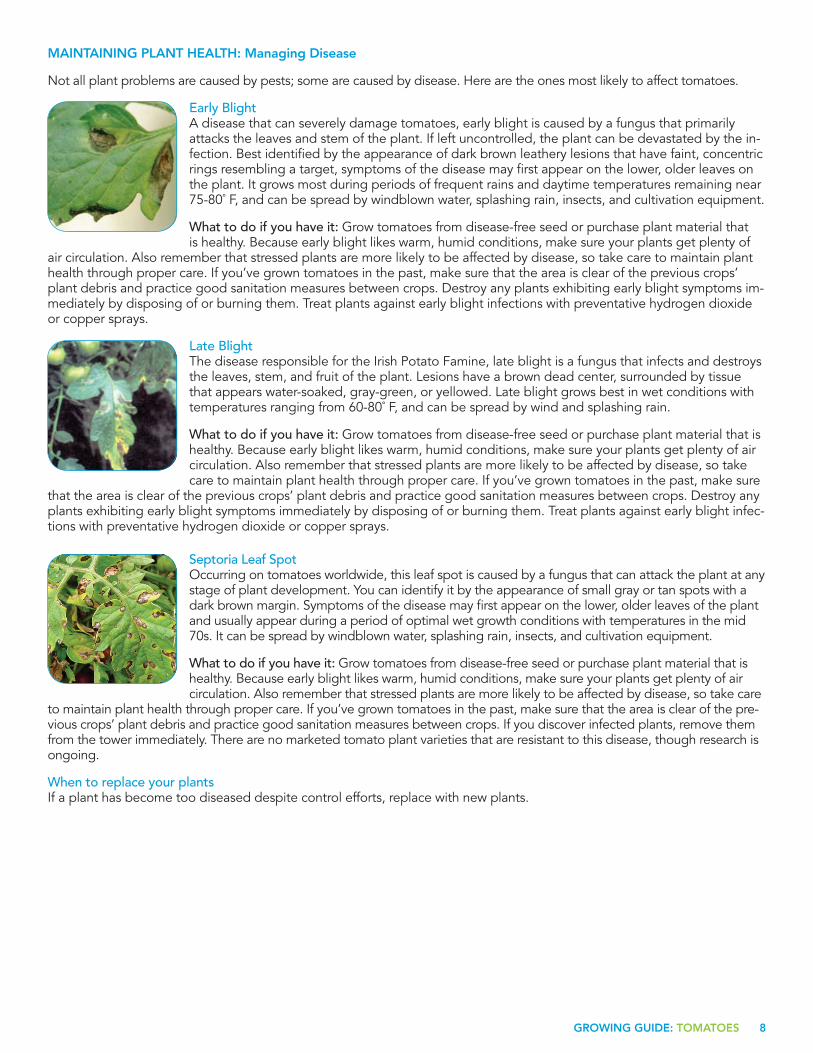
Early Blight A disease that can severely damage tomatoes, early blight is caused by a fungus that primarily attacks the leaves and stem of the plant. If left uncontrolled, the plant can be devastated by the in-fection. Best identified by the appearance of dark brown leathery lesions that have faint, concentric rings resembling a target, symptoms of the disease may first appear on the lower, older leaves on the plant. It grows most during periods of frequent rains and daytime temperatures remaining near 75-80˚ F, and can be spread by windblown water, splashing rain, insects, and cultivation equipment.
What to do if you have it: Grow tomatoes from disease-free seed or purchase plant material that is healthy. Because early blight likes warm, humid conditions, make sure your plants get plenty of
air circulation. Also remember that stressed plants are more likely to be affected by disease, so take care to maintain plant health through proper care. If you’ve grown tomatoes in the past, make sure that the area is clear of the previous crops’ plant debris and practice good sanitation measures between crops. Destroy any plants exhibiting early blight symptoms im-mediately by disposing of or burning them. Treat plants against early blight infections with preventative hydrogen dioxide or copper sprays.
Late Blight The disease responsible for the Irish Potato Famine, late blight is a fungus that infects and destroys the leaves, stem, and fruit of the plant. Lesions have a brown dead center, surrounded by tissue that appears water-soaked, gray-green, or yellowed. Late blight grows best in wet conditions with temperatures ranging from 60-80˚ F, and can be spread by wind and splashing rain.
What to do if you have it: Grow tomatoes from disease-free seed or purchase plant material that is healthy. Because early blight likes warm, humid conditions, make sure your plants get plenty of air circulation. Also remember that stressed plants are more likely to be affected by disease, so take care to maintain plant health through proper care. If you’ve grown tomatoes in the past, make sure
that the area is clear of the previous crops’ plant debris and practice good sanitation measures between crops. Destroy any plants exhibiting early blight symptoms immediately by disposing of or burning them. Treat plants against early blight infec-tions with preventative hydrogen dioxide or copper sprays.
Septoria Leaf Spot Occurring on tomatoes worldwide, this leaf spot is caused by a fungus that can attack the plant at any stage of plant development. You can identify it by the appearance of small gray or tan spots with a dark brown margin. Symptoms of the disease may first appear on the lower, older leaves of the plant and usually appear during a period of optimal wet growth conditions with temperatures in the mid 70s. It can be spread by windblown water, splashing rain, insects, and cultivation equipment.
What to do if you have it: Grow tomatoes from disease-free seed or purchase plant material that is healthy. Because early blight likes warm, humid conditions, make sure your plants get plenty of air circulation. Also remember that stressed plants are more likely to be affected by disease, so take care
to maintain plant health through proper care. If you’ve grown tomatoes in the past, make sure that the area is clear of the pre-vious crops’ plant debris and practice good sanitation measures between crops. If you discover infected plants, remove them from the tower immediately. There are no marketed tomato plant varieties that are resistant to this disease, though research is ongoing.
When to replace your plants If a plant has become too diseased despite control efforts, replace with new plants.

9GrowinG GuiDe: TomAToeS
hArVeSTinG
Now for the moment of anticipation! It’s time to pick those ripe, delicious tomatoes! Keep these things in mind when harvesting:
• Fruit will always mature in the order that the tomatoes appear on the truss. The fruit closest to the branch stem will mature first.
• Your first clue that a tomato is ripe is its color: It should be a deep red, yellow, or purple depending on the variety.
• Your second clue that a tomato is ripe is its hardness: the riper it gets, the softer it will become. A perfectly ripe to-mato has some give but is not mushy.
• The final clue that a tomato is ripe is that it should easily “pop” off the truss when it’s ready to harvest.
• If you like, you can harvest the entire truss by cutting the stem attaching it to the branch just behind the first pe-duncle (the flower stalk that supports either a cluster or a solitary flower) or by snipping the small peduncle to its individual fruit.