gsa ebuy buyer’s tutorial this basic tutorial will take buyers step by step through the rfq...
TRANSCRIPT
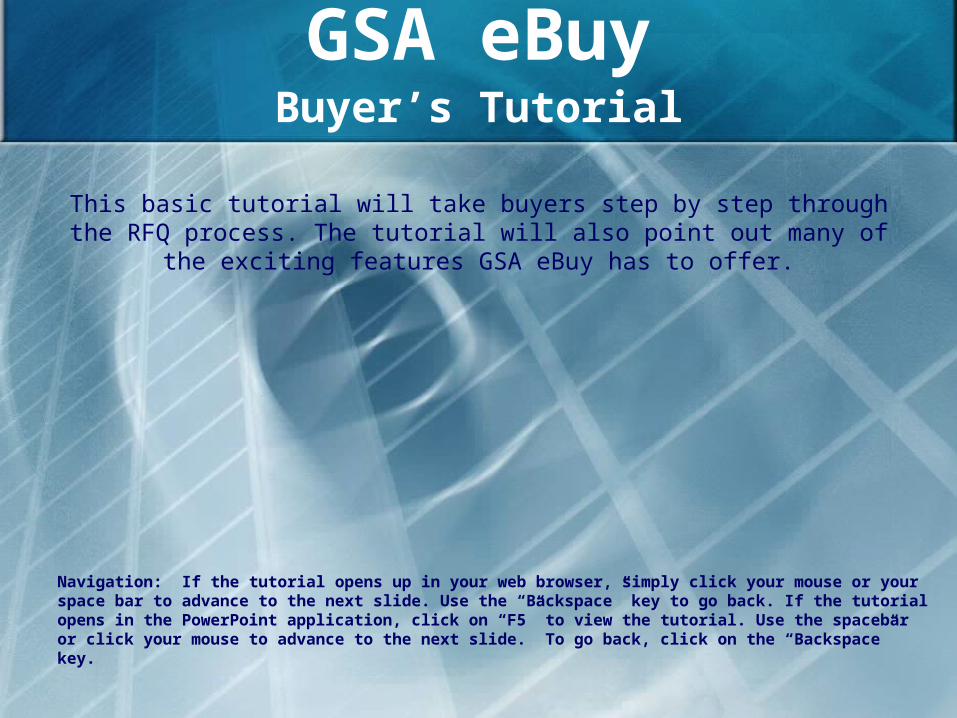
GSA eBuyBuyer’s Tutorial
This basic tutorial will take buyers step by step through the RFQ process. The tutorial will also point out many of the exciting features
GSA eBuy has to offer.
Navigation: If the tutorial opens up in your web browser, simply click your mouse or your space bar to advance to the next slide. Use the “Backspace” key to go back. If the tutorial opens in the PowerPoint application, click on “F5” to view the tutorial. Use the spacebar or click your mouse to advance to the next slide. To go back, click on the “Backspace” key.
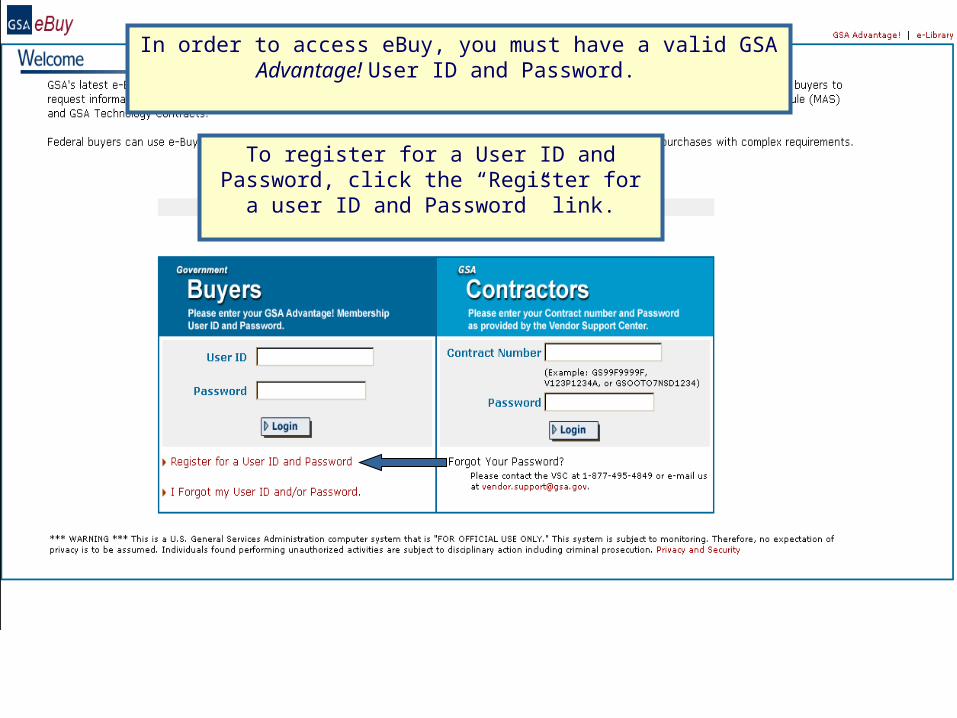
In order to access eBuy, you must have a valid GSA Advantage! User ID and Password.
To register for a User ID and Password, click the “Register for a user ID and
Password” link.

Buyer’s Homepage.
On the left is the message center which displays alerts of recent activity concerning your RFQs.
The first step of the RFQ process is to find sources for the product or service needed. There are three ways to conduct a search.
Search Option # 3. Type in a Keyword, Contract number, Contractor, Manufacturer name,
Schedule, SIN or GWAC number.
For this example, search option #1, the category guide, was used to search for “Security Guard Services”. The category that was selected was
“ Law Enforcement, Fire & Security”.
Search Option # 1. Click on a category in the category guide.
Search Option #2. Click on “View Schedule listing”, to view the complete list of the Multiple Award Schedules or click “View Technology Contracts” to view the complete list of IT,GWAC
and Network Services Telecommunications Contracts.

Schedule 84 is the most logical choice to find “security guards services”.

All the SINs in the selected Schedule are now displayed in the “Category” column.
In this example," Category” 246 52 was selected.
When choosing a “Category”, please review each of the descriptions, to determine which “Category” most closely
matches your requirements.
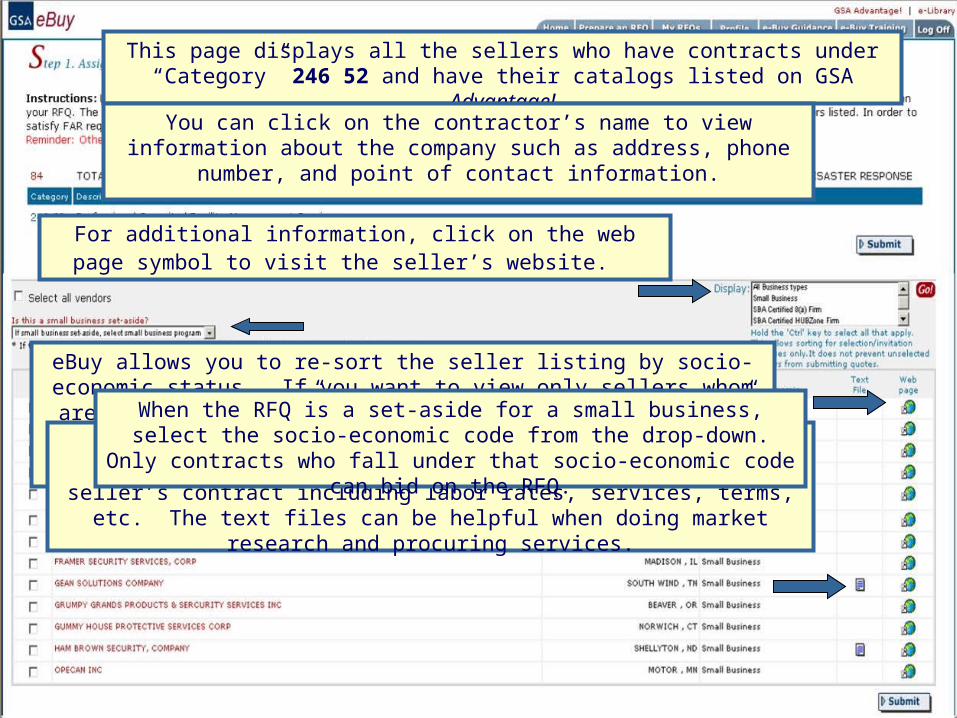
This page displays all the sellers who have contracts under “Category” 246 52 and have their catalogs listed on GSA Advantage!
eBuy allows you to re-sort the seller listing by socio-economic status. If you want to view only sellers whom are “Small Business”,
highlight it, and click the “Go” button. The page will refresh and only “Small Business” concerns will be displayed. Multiple
selections can be made by holding down “Ctrl”.
You can click on the contractor’s name to view information about the company such as address, phone number, and point
of contact information.
For additional information, click on the web page symbol to visit the seller’s website.
eBuy has incorporated the seller text files from GSA Advantage!. These files contain information about the seller’s contract including labor rates, services, terms, etc. The text files can be helpful when
doing market research and procuring services.
When the RFQ is a set-aside for a small business, select the socio-economic code from the drop-down. Only contracts who
fall under that socio-economic code can bid on the RFQ.
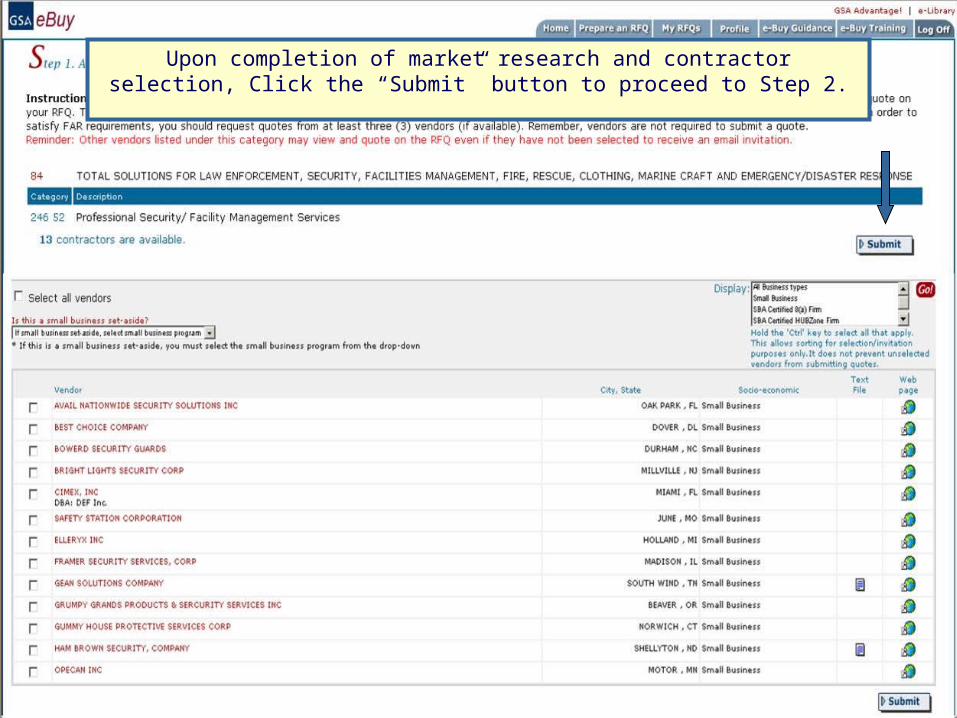
Upon completion of market research and contractor selection, Click the “Submit” button to proceed to Step 2.

You will repeat step one and select the vendor(s) of your choice. Click the “Submit” button.

Upon completion of market research and contractor selection, Click the “Submit” button to proceed to Step 2.

The requirements for the RFQ are entered on the “Step 2. RFQ Information" page.
If you are only requesting information or seeking sources, this box should be checked. This indicates to the sellers that this is a request for information
only.
The selected “category” will be displayed underneath “Categories Selected”. If requirements are covered by more than one “category”, additional categories can be added to the RFQ by clicking “Add Category” button.
If you are procuring services or products using funds from the American Recovery & Reinvestment Act of 2009, this box should be checked. This is
used to inform the seller and for your documentation.
You must enter a title for the RFQ. The title will help both the you and seller identify the RFQ.
The reference number input box is located here. This box was designed to assist customers, such as those who are using the FTS ITSS system, to add their tracking number to the RFQ. It may also be used to add an
internal agency reference number.

Delivery Terms
When looking for products, specify the number of days after the receipt of order the seller is expected to deliver the products.
If the requirements are for a service, but the exact period of performance has not been indentified, this option should be selected.
When you are seeking services, and know what the period of performance will be, the dates should be specified on this line.

If products will be included in the RFQ, information about them should be entered in the Line Items area.
Each line item can have a different shipping address, but the quantity of a line item can not be split between addresses.
Additional information that needs to be provided to the sellers can be typed into the Description field. You may include
information about simple services or indicate that additional documents will be attached for complex services.
If you already have prepared documents such as a statement of work, drawing, spreadsheet, etc., eBuy
allows you to easily attach it to the RFQ.

A document can be attached to the RFQ by clicking on the “Browse” button in Step 1.

Select the documents from your hard drive and attach them directly to the quote. You may attach as many documents as necessary; however,
each document must be less than 5 megabytes in size.
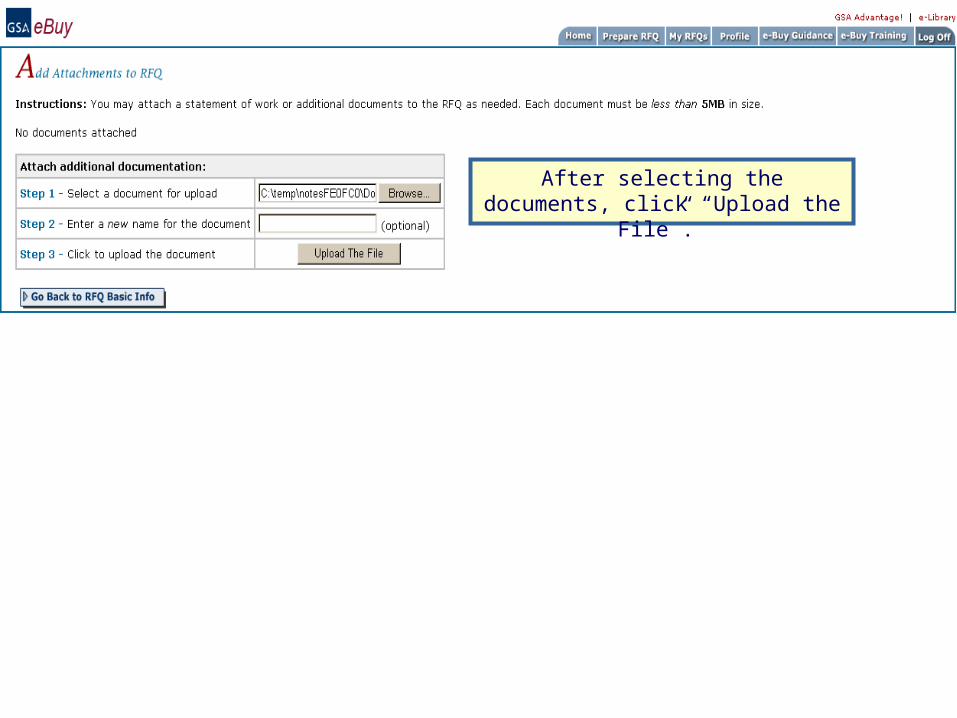
After selecting the documents, click “Upload the File”.

All documents attached will be listed in the “Documents attached to RFQ” box. Click on the link to review the file.
To remove a document from the RFQ click the “x” button.
When finished, click “Go Back to the RFQ Basic Info” button.

You can verify the files were successfully uploaded by looking in the “Attached Documents” area.
The shipping address should also be verified. This address is taken from your GSA Advantage! profile. You
can make changes by clicking on “Edit Shipping Address”.
After all information has been entered and verified, click on the “Continue” button.
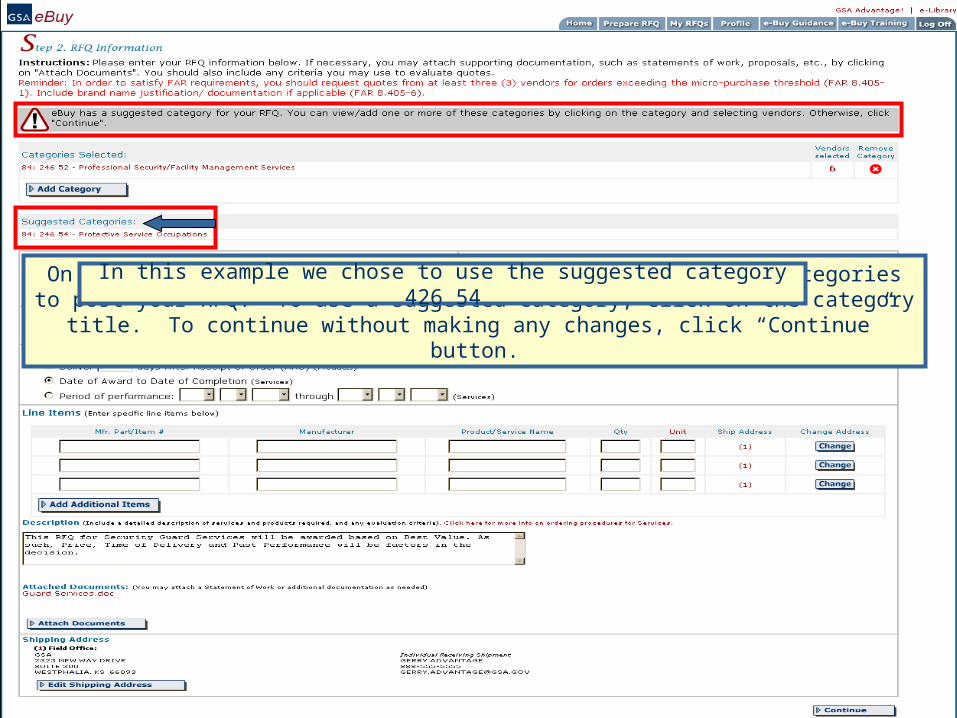
On occasions, eBuy may suggest additional or alternative categories to post your RFQ. To use a suggested category, click on the category title. To continue
without making any changes, click “Continue” button.
In this example we chose to use the suggested category 426 54

You will repeat step one and select the vendor(s) of your choice. Click the “Submit” button.

The RFQ has been updated to reflect the new category.
After all of the information has be reviewed, click on the “Continue” button.

On the review page, you must specify when the RFQ will close. The minimum requirement for an RFQ to be open is 2 days; but the default is 5 days. Be sure to
allow the contractors sufficient time to submit a quote.
You can specify the RFQs exact closing time in hour increments here. The closing times should be based on the eastern time zone.
After selecting a closing date, make sure to review all information entered. If you need to make changes, click on the “Back” button which
will return you to the requirements information page.
If the RFQ is not immediately ready to submit, it can be “Saved to Draft”. The RFQ will be saved, but will not be issued until it is retrieved and submitted.
When the RFQ is completely finished and ready to be submitted, click the “Submit RFQ” button.

At this point, the RFQ has been submitted and the clock begins to tick. All sellers, whom were selected, will now receive an email notification about the RFQ. In addition, the RFQ will be posted for viewing by all
sellers under that specific SIN. To access your RFQs click on “My RFQs” at the top of the page.

The “My Active RFQs” page contains a single line summary of each active RFQ.
To view the RFQ details, simply click on the RFQ ID. All the activity for the RFQ will be displayed.

At any time, while the RFQ is “Open”, you may modify the contents of the RFQ. To modify, click
“Modify RFQ” link
At any time while the RFQ is “Open”, if you need to answer questions that should be shared with all vendors, you can click the “Send Q&As” link to
attach applicable files.
If you do not have the authority to make an award, eBuy provides the option of forwarding the RFQ to another person in the office. This can be done by
clicking on the “Forward RFQ” link.
The “RFQ Detail” page provides a summary of all RFQ activity.
The “Quote ID” is a unique three letter identifier assigned to each seller’s quote. To review a quote, click on the “Quote ID” number.

The seller’s contact information, total quote price, quote good until date, prompt pay, socio-economic status, DUNS #,and
shipping information is displayed on this page.Review all comments and attached documents submitted by the seller.
We have added the ability for you to add notes to each quote. These notes will be visible only to you and can be viewed from the “RFQ Detail” page. Type in
your notes here and click “Save Note”. Please remember that once saved, these notes will become a part of the RFQ file.
Vendor Quote Page
The quote pricing is broken down and totaled at the bottom of this page. The “Total Quote” includes any line items, transportation costs, and
pricing included within the attached documents.

When you have reviewed all quotes and are ready make an award decision, you can click on the “Award-Notify Vendor” button or “Do
Not Award-Notify Vendor” button.
If you chose not to award a seller, click the “Do Not Award-Notify Vendor” button.
To award a vendor click on the “Award-Notify Vendor” button. Clicking this button generates an email message to the seller,
alerting them of the award decision.
NOTE: Selecting this button does not obligate funds. You may generate a purchase order online using eBuy or go offline and
use your agency’s order and payment system.

When you select “Award-Notify Vendor” an award confirmation screen will appear, allowing you to confirm the award decision or go back to
the “Vendor Quote” page.

For the vendor(s) who were not awarded you can request eBuy to send “No Award” email notices to the remaining sellers who did not receive an award. You
must check the “Send No Award” notices box to initiate the emails.
You can use the text box to give the reasoning for your award
decision to the sellers not awarded.

The “RFQ Detail” page now reflects the award decision.
Thanks for using eBuy!!!
eBuy will electronically store all information about each of your RFQs. The information will be stored for seven (7) years.