gtd2000-tx instruction manual - · pdf filegtd2000-tx instruction manual revision: 1 please...
TRANSCRIPT

Design, development, production, installation, and servicing of Gas Dectector GTD2000-Tx
Instruction Manual Revision: 1
Please read this manual carefully for proper use of the device

This page intentionally left blank

Note
• Inspection and calibration are recommended at least once every 3 months to ensure accurate operation of the Gas detector using calibration gas depending on the type of gas.
• Negligence of periodic inspection and calibration may cause malfunction of the device due to the aging of the Sensor.
• Only qualified personnel with professional skills on Gas detector may disassemble the unit if necessary.
• For further information on Gas detector inspection and correction, please contact us at our technical department, e-mail or web site.

1. Overview GTD2000-Tx toxic gas detector was developed in order to prevent accident by detecting gas leaking in industrial fields such as various toxic gases that are generated in plants manufacturing or using toxic gas, gas storage, or in the manufacturing process. GTD2000-Tx toxic gas leak detector is installed in areas of risk of leakage; constantly and continuously detects gas leak; displays the measured value in the liquid crystal display (LCD) installed in the detector; and provides DC4-20mA standard output signal. In addition, the Cable Connection Length of DC4 ~ 20mA standard output signal between sensor element and receiver extends up to 2,500m (When Cable CVVS or CVVSB 1.5sq or equivalent is used). This GTD2000-Tx toxic gas detector should be used at an elevation of less than 1000M. 2. Structure The body of GTD2000-Tx is made of aluminum alloy, and completely explosion-proof (Ex d IIC T6). The product may be installed anywhere risky of combustible gas leak and explosion, displaying the gas leak status in the installation site on the built-in liquid crystal display (LCD) within the sensing unit. The internal structure is composed of a liquid crystal display unit displaying the measurement; a terminal unit sending the measured value (DC4-20mA) to outside; and a PCB Board. A magnet bar is installed outside, so maintenance work is convenient because calibration is possible from outside using this magnet-bar.

3. Specification I T E M S S P E C I F I C A T I O N Measuring Type Diffusion Measuring Value Display Local Digital LCD or OLED Display Means Value Display Back light, 2-line/8-Characters LCD or OLED Approval Ex d IIC T6 Detectible Gas Toxic Gas Measuring Method Electro-Chemical Cell Heated-semiconductor Cell Measuring Range Refer to appendix. Response Time 90% of full Scale in less than 45 sec Accuracy ± 3% / Full Scale Zero Drift Less than 2% full Scale Operating Temp. -20 to 60℃ Operating Humidity 5 to 99% RH (Non-condensing) Signal Output Measuring Output: 4 – 20mA.DC / Full Scale Test Output: 3mA Calibration Output: 3mA Fault Output: 2mA HART® Interface HART REV7 / Optional Board (Note 1) Calibration Work Magnetic interface to configure Alarm Cable Connection Length Max. 2,500m : 4-20mA Signal Power Supply 18 - 31V DC (24V DC / 60mA) With alarm device (24V DC / 110mA) Conduit Connection 1/2” or 3/4”PF, NPT(Standard : 3/4” PF) Signal Cable Connection (CVVS or CVVSB 1.5sq↑×3 wires) + Shield Option HART® Interface Board GTL-100( Explosion-proof Warning Light ) Rain Cover Dimensions 136(W) × 166(H) × 110 (D) mm Weight App. 1.5kg [Table 1. GTD2000-Tx Specification] Note 1) For HART, refer to GTD2000 HART® Field Device Specification

4. Name of Components and Main features 4.1. Components
RESET
1 23 46
78 910 1114
13151216
SERIAL No.
DATE
G:LEDOM xT0002-DT
RO
TC
ET
ED
S RO
KN
IE
DA
AE
M
AG
CO . , LTD.GAS TRON
U PTFIL
P R E S S
LU P
TFI
PR E S S
51513
[Figure 1. GTD2000-Tx Components] No. Name No. Name 1 Detector housing body 9 Reset Switch 2 Detector housing cover 10 ↑(up) Switch 3 AMP(main) PCB 11 ↓(Down) Switch 4 Display parts 12 External Earth Ground( Min 1.5sq Cable) 5 Power/Signal Terminal 13 Mount Holes(ø7) 6 Sensor Terminal 14 Sensor 7 Power LED 15 Conduit Connection 8 Function Switch 16 Internal Ground [Table 2. Components Reference Table]

4.2. Description of components No. Name Description 1. Detector Housing Body Protects Sensor and built-in PCB Board from external environment and shock. 2. Detector Housing Cover Is assembled with Detector Housing Body, and has a circular glass top through which LCD displayed Measuring Value can be seen. 3. AMP PCB Amplifies the tiny Output generated by Sensor Element, converts it to 4-20mA.DC by converting a standard Output, and transmits the Data to the Display unit. 4. Display PCB Displays the Data from AMP / Terminal (Transmitter) PCB to LCD display (Measuring Value), and indicates the power status with the Power Lamp. 5. Power/Signal Terminal CN9 is composed of DC18V ~ 31V power supply and a DC 4 ~ 20mA standard Output Connection terminal (VISO, +24V, mA, GND). 6. Sensor Terminal CN8 is Sensor Connection Terminal. 7. Power LED This Lamp is ON when Power is supplied. 8. Function Switch In Measuring Mode, touching this Switch for 2 sec with Magnet-Bar will enter to Function Setting Mode; or will store changed Data in Function Setting Mode. 9. Reset Switch Touching this Switch once with Magnet-Bar will cancel the Parameter setting, or return to the previous condition. (Every touch will return the Mode one previous step). 10. ↑(UP) Switch Touching this Switch once with Magnet-Bar will convert one step or increase the displayed value in Mode conversion or number change. 11. ↓(DOWN) Switch Touching this Switch once with Magnet-Bar will convert one step or decrease the displayed value in Mode conversion or number change. 12. External Earth Ground The outside of the Detector should be grounded to protect the circuit from external Noise or strong electric field. 13. Mount Hole (ø7×2ea) This Hole is used to secure the Gas Detector on exterior walls and other installation places. 14. Sensor Actually detects the gas leak, which is converted to electric signal and transmitted AMP PCB. 15. Conduit Connection This is provided for the inlet for power supply and Measuring Output signal. Cable connector has 3/4 ", 1/2" PF or NPT (Default spec. is PF 3/4".)

16. Internal Ground The inside of the Detector should be grounded to protect the circuit from external Noise or strong electric field. [Table 3. Components details table] 5. Terminal wiring diagram
Warning Never install, uncover, or manipulate the Detector other than authorized personnel or installation/repair service person from Gastron, or serious loss of life and property damage such as fire or explosion may occur. In addition, check around for explosive Gas or flammable substances, followed by turning OFF before any work. 5.1. Separation of Detector Body and Cover The Gas Detector Cover can be removed by turning the Cover fastening Slotted Set Screw (M4 x 1ea) three to four rotations anti-clockwise using hex wrench (M2), followed by turning the Cover counterclockwise by hand. After the separation of Cover, the LCD indicator appears.
[Figure 2. Slotted Set Screw] After the Cover removal, remove the Display Part as follows.
Slotted Set Screw (M4)

[Figure 3. Display Part removal ]
① Click the left and right retainer rings on the front of the LCD display inwards at the same time. ② While holding, pull the Display Part forward to separate from the Gas detector Body. ③ With the Display Part removed, the Main PCB is shown under the Detector Body. 5.2. Main PCB configuration
5.2.1. Main PCB configuration With the Display Part removed, the Main PCB terminal arrangement is shown as the following Figure. [Figure 4. Main PCB terminal arrangement] No Name Description 1 CN9 Power & Output Signal Terminal 2 J1 4~20mA Source / Sink selection jumper ( ON: Source Type, OFF: Sink Type ) 3 CN1 Display LCD Connector 4 CN8 Sensor Connector 5 CN6 Program download Connector 6 D1 Status LED ( blinks every second in normal operation ) 7 CN2,CN3,CN5 HART Option Board Connector 8 CN4 Warning Light (GTL-100) Interface Connector [Table 4. Main PCB main Parts Description]

5.2.2. HART Board configuration HART Board consists of Option Board, and is connected using CN5, CN6, CN7 terminals of Main PCB and the HART Board Screw at the top left.
[Figure 5. HART Board constituting Main PCB] No Name Description 1 HART Board Screw Constructed using 3Ø Screw 2 Blank Hole Reserve Hole 3 HART Board Option Board for HART Interface [Table 5. HART Board main Parts description]
HART BOARD

5.3. Main PCB terminal description and wiring method If you remove the Display Part, there is the Terminal Block under the Main PCB as shown in the following Figure 6. The Terminal Block can be removed from Main PCB by holding and pulling upward by hand. Unscrew the 5 terminal set screws above the separated Terminal Block CN9 (VIS, +, mA, -, ETH) Connector counter-clockwise with a Θ screwdriver; connect DC18-24V power to +, -; connect Signal Cable to mA; tighten the terminal set screws clockwise to keep the terminals in place; and insert it like before the removal.
[Figure 6. CN9 Terminal structure] No PCB Silk Pin Name Description 4~20mA Source Drive (J1 Jumper ON) 4~20mA Sink Drive (J1 Jumper OFF) 1 VISO VIS N.C 4~20mA Sink In(+) 2 +24V + +24V / POWER (+) 3 mA mA 4~20mA Source Out 4~20mA Sink Out(-) 4 GND - GND / POWER (-) 5 ETH ET EARTH [Table 6. CN9 connector description] Note1) Be sure to use CVVS or CVVSB 1.5sq↑ Shield Cable before Terminal construction.

Note2) Fasten Terminals based on +24V of 2Pin to connect the 4Pin Terminal of existing conventional GTD2000-Tx. 5.3.1. 4~20mA Source drive type wiring method Connect 4-20mA Signal Terminal of PLC to ‘mA’ of GTD2000-Tx. GND Terminal is used in common with the power. Turn J1 Jumper ON. ※ HART Communicator can be used only in models utilizing HART Option Board. [Figure 7. Analog 4~20mA Source Configuration]

5.3.2. 4~20mA Sink drive type wiring method Connect 4-20mA Sink Output (+) Terminal of PLC to VISO Terminal; and (-) Terminal to ‘mA’ Terminal. Turn J1 Jumper OFF. ※ HART Communicator can be used only in models utilizing HART Option Board. [Figure 8. Analog 4~20mA Sink Configuration]

6. Standard Type outside view and Dimensions

113
2535110
1101201364263
176 2-Ø7RESET
SERIAL No.
DATE
FUNC
[Figure 9. GTD2000-Tx outside view]

7. Raincover type: Outside view and Dimensions
244.75
177.41
217.5
RESET
SERIAL No.
DATE
FUNC
[Figure 10. GTD2000-Tx Raincover type outside view]

8. Menu Configuration Table Level1 Level2 DEFAULT NAME PARAMETER PROGRAM MODE GAS TYPE (Gas Type) [DEFIN./USER] DEFIN. GAS SEL (Gas Select) See Table 8 COMB. UNIT SEL (Unit Select) %/%LEL/PPM/PPB %LEL D-POINT (Decimal Point) 0.100/1.00/10.0/100 100 HIGH SCL (High Scale) 1~10000 100 PASSWORD 00~99 00 CALIBRA. MODE (Calibration Mode)
CALIBRA. [ZERO] (Calibration Zero) ZERO CAL [NO,YES] [NO] ZERO GAS [ 0] ZERO >>>> [SUCCESS / FAIL] CAL. DATA [ 0/ FAIL]
CALIBRA. [SPAN] (Calibration Span) SPAN CAL [NO , YES] [NO] SPAN GAS [ 0] SPAN SET [ 50/ FAIL] 50 SPAN >>>> [SUCCESS / FAIL ] CAL. DATA [ 0]
ALARM MODE ALM USED (Alarm Used) [OFF / ON] OFF AL LATCH (Alarm Latch) [OFF / ON] OFF A1 LEVEL (Alarm-1 Level) [1 ~ 9999] 20 A1 TYPE (Alarm-1 Type) [INC / DEC] INC A1 DBAND (Alarm-1 Dead Band) [0.0 ~ 10.0%F] 1.0 A1 TIME (Alarm-1 Time) [0~ 60]SEC 1 A2 LEVEL (Alarm-2 Level) [1 ~ 9999] 40 A2 TYPE (Alarm-2 Type) [INC / DEC] INC A2 DBAND (Alarm-2 Dead Band) [0.0 ~ 10.0%F] 1.0 A2 TIME (Alarm-2 Time) [0~ 60]SEC 1 SENSOR MODE SEN. OUT (Sensor Output) [ X.X mV ] - SEN. S/T (Sensor sensitivity) [ X.X ] - MZ / MS (Manual Zero/Span) X.X / XX.X 1.0 / -100.0 AZ / AS (Auto Zero / Auto Span) X.X / XX.X 1.0 / -100.0

Level1 Level2 DEFAULT NAME PARAMETER SENSOR MODE ZR / SR (Zero Rate / Span Rate) XX.X % / XX.X % 49.9% / 60.0% SEN GAIN (Sensor Gain) [X.X] x G 1.0 SEN BIAS (Sensor BIAS) [ X.XX V ] - TEMP. (Temperature) [ XX ‘C ] - CURRENT(Sensor Current) [ XXX mA] - 24V VIN(GTD2000 Input Power) [ XX.X V ] -
MAINTEN. MODE (Maintenance Mode) CRO-SENS. (Cross Sensitivity) [1.00] X G , 0.01~5.0 Adj 1.00 Z- SKIP (Zero Skip) [0~10%F] 0.0 ODT (Operation Delay Time) [0 ~ 60 SEC] 0 AUTO – Z (Auto Zero) [ON / OFF] ON AZ MIN. (AutoZero Minimum) [1.0~4.0] %F 2.0 BASE – Z (Base Zero) [ON / OFF] ON BZ MAX. (BaseZero Maximum) [0.5~2.0] %F 2.0 SP. HOLD (Span Hold) [ON / OFF] ON UNDER EN (Under Enable) [ON / OFF] OFF SEN CHK. (Sensor Check) [ON / OFF] OFF SEN-DIR (Sensor Direction) [INC / DEC] DEC ENG MOD. (Engineer Mode) [OFF / ON] OFF W/L TYPE (Warning Light Type) [STEADY / BLINK.] STEADY M.-LEVEL (Maintenance Level) [0 ~ Full Scale] 0 EMC T/O (Emergency Time Out) [ON / OFF] OFF
DEVICE MODE HART B/D (Hart Board) [CHECK / EMPTY] - PADD / mA (Polling Address) X / (ON/OFF) - DEV-CODE (Device Code) [0xE1C3] 0xE1C3 FIX CUR (Fix Current) [DISABLE / XX.XXmA] - SERIA.NO (Serial Number) *XXXXXXXX - TAG GTD-XXXX GTD-0001 LONG TAG GTD-XXXX-LT GTD-0001-LT DESCRIP. (Descriptor) [ GASTRON GTD2000 ] [ GASTRO > MESSAGE [ COMBUSTIBLE ] [ COMBUS > VERSION MODE F/W REV (Soft Ware) [REV 6] - E/X H/W (Hard Ware) [REV 2] - HART DEV (Hart Device) [REV 1] - HART REV (Hart Revision) [REV 7] - TEST MODE mA OUT [ON / OFF] OFF TEST [ 0~Full scale ] 0 [Table 7. Menu Configuration Table] ※ Gas name Reference Table

No Gas name No Gas name No Gas name 00 AN 32 DMDS 64 POCl3 01 AsH3 33 EDA 65 SI2H6 02 B2H6 34 EDC 66 SiCl4 03 BCl3 35 EtsH 67 SiF4 04 BF3 36 F2 68 SiH2. 05 C2H2 37 GeH4 69 SiH4 06 C2H4 38 H2 70 SO2 07 C2H4O 39 H2S 71 SO3 08 C2H6 40 H2Se 72 TBM 09 C3H6 41 HBr 73 TCS 10 C3H6O 42 HC 74 TEOS 11 C3H8 43 HCHO 75 THC 12 C4H8O 44 HCl 76 THF 13 C5H10 45 HCN 77 THT 14 C5H12 46 HF 78 TMP 15 C6H14 47 LNG 79 TOLU 16 C6H6 48 LPG 80 WF6 17 C6H6O 49 MCS 81 OTHER 18 C7H8 50 MeCHO 19 C7H8O 51 MEK 20 CH3CL 52 N2H4 21 CH3OH 53 NF3 22 CH4 54 NG 23 CiF3 55 NH3 24 CL2 56 NMP 25 CLF3 57 NO 26 CO 58 NO2 27 CO2 59 O2 28 COCL2 60 O3 29 COMB. 61 PCL3 30 DCS 62 PH3 31 DMC 63 PhoH [Table 8. Gas name table]

9. Detector activation Flow and KEY operation 9.1. Sensor activation Flow - Timeout of Level1 and Level2 is 10 seconds, and 1 hour in the Calibration and Test Mode of Level2.
[Figure 11. Sensor workflow] 9.2. Sensor KEY configuration and description Item Name Description FUNC Function Key Sensor Mode entry function (more than 2 seconds of touch with Magnet-bar in Measuring Mode). Entry to the next step of Level2 and storage of setting value. RESET Reset Key Moving back to the previous step before the entered LEVEL ↑ Up Key Change to the next step after LEVEL1, and plus change of Level2 setting. ↓ Down Key Change to previous step before LEVEL1; minus change of Level2 setting. ※ Sensor Power ON followed by simultaneous input of Reset Key and Function Key will result in Factory Set in internal setting.

10. Initial status and Menu description 10.1. Initial operation status (Power On) After wiring of and power supplying to Power Terminal on MAIN PCB board, the following information will be displayed on the LCD display. About 30 minutes of stabilization time is required about 30 minutes’ stabilization time is required; normal operation begins after full stabilization. � After the Power ON, the model name and product firmware Revision number is displayed on LCD (OLED). � Self test runs for one minute, and the '>' character in second row indicates the progress. 10.2. Gas measuring status (Measuring Mode) configuration
� Operation is as follows in Normal state. � In the first row, Measuring GAS NAME and Measuring GAS Unit are displayed alternately every second; in the second row, current Measuring Value is displayed. � Touching ‘Func’ Key with Magnet-bar for 2 seconds in current screen will change to Setting Mode. ※ During HART communications, '*' character is displayed on the left side of the 1st row. ※ When ENG. Mode is ON, '<' character is marked on the left side of the 2nd row. � The operation is as follows when 1st or 2nd Alarm has occurred (ALARM EN item of Maintenacne Mode must be ON to enable the operation). � The 1st row is operated the same as in Normal mode; in the 2nd row, ALARM messages and Gas Measuring Value are displayed alternately every 1 second. � When GTL100 Explosion-proof Warning Light is installed, the red LED and Buzzer are blinking every second in the 1st Alarm; no flashing occurrs in the 2nd Alarm. � Alarm condition continues unless it was released using Reset key if the Latch is on during Alarm function. � If the entered Gas Measuring Valueis more than 10% higher than set High Scale, the word “OVER” is displayed blinking every 1 second. � At this time 4~20mA is operated as 21.6mA. � If the entered Gas Measuring Valueis less than 10% lower, the word “UNDER” is displayed blinking every 1 second; 4 ~ 20mA is operated below 2mA. ※ This feature is operated only when UNDER button is ON. � If there is any problem with the device, the Fault number and message will be displayed. � At this time, the 4 ~ 20mA is operated below 2mA. � The left Mode is displayed when Fault1 sensor is not equipped. [FAULT1][FAULT1][FAULT1][FAULT1] SEN EMPTSEN EMPTSEN EMPTSEN EMPT
[ %LEL][ %LEL][ %LEL][ %LEL] [ UNDER ][ UNDER ][ UNDER ][ UNDER ] [ %LEL][ %LEL][ %LEL][ %LEL] [ OVER ][ OVER ][ OVER ][ OVER ]
[ %LEL][ %LEL][ %LEL][ %LEL] [[[[ AL AR M1AL AR M1AL AR M1AL AR M1 ]]]] [ %LEL][ %LEL][ %LEL][ %LEL] [ [ [ [ [ COMB.][ COMB.][ COMB.][ COMB.] [ 0.0][ 0.0][ 0.0][ 0.0] [ %LEL][ %LEL][ %LEL][ %LEL] [ 0.0][ 0.0][ 0.0][ 0.0] SELF TESTSELF TESTSELF TESTSELF TEST [[[[ >>>>>>>>>>>>>>>>>>>>>>>>>>>>>>>>]]]] GTDGTDGTDGTD----2000 2000 2000 2000 [ REV 6][ REV 6][ REV 6][ REV 6]
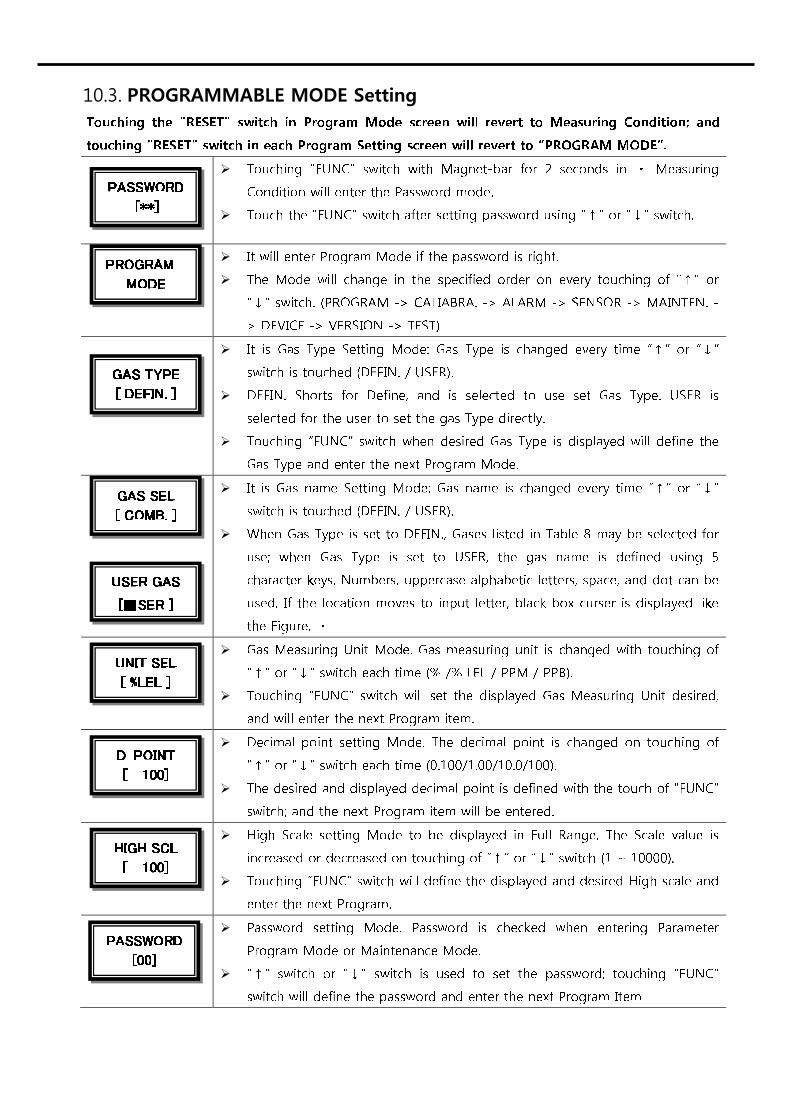
10.3. PROGRAMMABLE MODE Setting Touching the "RESET" switch in Program Mode screen will revert to Measuring Condition; and touching "RESET" switch in each Program Setting screen will revert to “PROGRAM MODE”. � Touching "FUNC" switch with Magnet-bar for 2 seconds in Measuring Condition will enter the Password mode. � Touch the "FUNC" switch after setting password using "↑" or "↓" switch.
� It will enter Program Mode if the password is right. � The Mode will change in the specified order on every touching of "↑" or "↓" switch. (PROGRAM -> CALIABRA. -> ALARM -> SENSOR -> MAINTEN. -> DEVICE -> VERSION -> TEST) � It is Gas Type Setting Mode: Gas Type is changed every time “↑” or “↓” switch is touched (DEFIN. / USER). � DEFIN. Shorts for Define, and is selected to use set Gas Type. USER is selected for the user to set the gas Type directly. � Touching “FUNC” switch when desired Gas Type is displayed will define the Gas Type and enter the next Program Mode. � It is Gas name Setting Mode: Gas name is changed every time “↑” or “↓” switch is touched (DEFIN. / USER). � When Gas Type is set to DEFIN., Gases listed in Table 8 may be selected for use; when Gas Type is set to USER, the gas name is defined using 5 character keys. Numbers, uppercase alphabetic letters, space, and dot can be used. If the location moves to input letter, black box curser is displayed like the Figure. � Gas Measuring Unit Mode. Gas measuring unit is changed with touching of "↑" or "↓" switch each time (% /% LEL / PPM / PPB). � Touching "FUNC" switch will set the displayed Gas Measuring Unit desired, and will enter the next Program item. � Decimal point setting Mode. The decimal point is changed on touching of "↑" or "↓" switch each time (0.100/1.00/10.0/100). � The desired and displayed decimal point is defined with the touch of "FUNC" switch; and the next Program item will be entered. � High Scale setting Mode to be displayed in Full Range. The Scale value is increased or decreased on touching of “↑” or “↓” switch (1 ~ 10000). � Touching “FUNC” switch will define the displayed and desired High scale and enter the next Program. � Password setting Mode. Password is checked when entering Parameter Program Mode or Maintenance Mode. � "↑" switch or "↓" switch is used to set the password; touching "FUNC" switch will define the password and enter the next Program Item PASSWORDPASSWORDPASSWORDPASSWORD [00][00][00][00]
HIGH SCLHIGH SCLHIGH SCLHIGH SCL [ 100][ 100][ 100][ 100] DDDD----POINTPOINTPOINTPOINT [ 100][ 100][ 100][ 100] UNIT SELUNIT SELUNIT SELUNIT SEL [ %LEL ][ %LEL ][ %LEL ][ %LEL ] USER GASUSER GASUSER GASUSER GAS [[[[■SER SER SER SER ]]]] GAS SELGAS SELGAS SELGAS SEL [ COMB. ][ COMB. ][ COMB. ][ COMB. ]
GAS TYPEGAS TYPEGAS TYPEGAS TYPE [ DEFIN. ][ DEFIN. ][ DEFIN. ][ DEFIN. ] PROGRAMPROGRAMPROGRAMPROGRAM MODEMODEMODEMODE PASSWORDPASSWORDPASSWORDPASSWORD [**][**][**][**]

10.4. CALIBRATION MODE Operation Due to the nature of the Gas detector, stabilization time of at least 30 minutes is required after power supply; management criteria may vary depending on the field condition. 10.4.1. Zero Calibration � Touching "FUNC" switch with Magnet-bar for 2 seconds in Measuring Condition will enter the Password mode.
� Touch the "FUNC" switch after setting password using "↑" or "↓" switch. � Select “CALIBRA. MODE” by touching "↑" or "↓" switch. � Touching “FUNC” switch when “CALIBRA. MODE” is displayed will enter Calibration Mode. � Measuring Condition will return on touching “RESET” switch. � Touching “FUNC” switch when “CALIBRA. MODE” is displayed will select Calibration Mode. � Select [ZERO] by touching "↑" or "↓" switch. Now, touch “FUNC” switch to enter Zero Calibration mode. � Select [YES] by touching "↑" or "↓" switch. Now, touch “FUNC” switch to carry out Zero Calibration. � Inject clean air or 100% nitrogen gas into the sensor using a calibration device at 1000mL/min for a minute; touch “FUNC" Switch when Measuring Value was stabilized to carry out Zero calibration automatically. � After a successful Zero calibration, "ZERO SUCCESS" will be displayed on LCD Display for 2 seconds, and the mode will switch to "CALIBRATION DATA" Mode. � When Zero Calibration does not succeed, "ZERO FAIL" is displayed for two seconds, and it will switch to "CALIBRATION DATA" Mode. � ZERO FAIL happens when sensor input exceeds 70% of ADC input range. � It’s the Mode displaying Measuring Value after Calibration and the function to check if the calibration was performed normally. � If Failed, FAIL Text and current Measuring Value will be displayed at 1-second intervals. � "CALIBRATION MODE" returns on touching “RESET" Switch.
CAL.DATACAL.DATACAL.DATACAL.DATA [ 0][ 0][ 0][ 0] ZERO >>ZERO >>ZERO >>ZERO >> [ FAIL ][ FAIL ][ FAIL ][ FAIL ] ZERO >>ZERO >>ZERO >>ZERO >> [SUCESS][SUCESS][SUCESS][SUCESS]
ZERO GASZERO GASZERO GASZERO GAS [ 0][ 0][ 0][ 0] ZERO CALZERO CALZERO CALZERO CAL [ NO][ NO][ NO][ NO] CALIBRA.CALIBRA.CALIBRA.CALIBRA. [ZERO][ZERO][ZERO][ZERO] CALIBRA.CALIBRA.CALIBRA.CALIBRA. MODEMODEMODEMODE
PASSWORDPASSWORDPASSWORDPASSWORD [**][**][**][**]

10.4.2. Span Calibration ※ Entering Calibration Mode is same as Zero Calibration. � Select “CALIBRA. MODE” by touching "↑" or "↓" switch. � Touching “FUNC” switch when “CALIBRA. MODE” is displayed will enter Calibration Mode. � Measuring Condition will return on touching “RESET” switch. � Select [SPAN] by touching "↑" or "↓" switch. Now, touch “FUNC” switch to enter Span Calibration mode. � Select [YES] by touching "↑" or "↓" switch. Now, touch “FUNC” switch to carry out Span Calibration. � Inject standard gas into the Sensor using a calibration device at 500mL/min for 90 sec; touch “FUNC" Switch when Measuring Value was stabilized to enter the next Mode. � When HOLD function of Maintenance Mode is ON, the maximum value of the current SPAN gas is HOLD, and the HOLD value is displayed in the 1st row. � In the 2nd row is the current Measuring Value displayed. � It’s the Mode to set the standard gas value, which is set by touching "↑" Switch or "↓" Switch if there’s no Fail message. � Fail message is displayed as follows when injected standard gas value is not normal. Fail message and Span set value are displayed alternately. ① "LOW FAIL" occurs when the difference of injected Gas value and ZERO Calibration value is less than 1%. ② "HIGH FAIL" occurs when injected Gas value is greater than 95% of the entire ADC input range. ③ "RNG FAIL" occurs when injected Gas value is operating as currently set SPAN value and exceeds more than 95% of the ADC's input range. The FAIL message is lifted when the normal operation resumes through SPAN value adjustment. � SPAN calibration is performed after setting standard gas value and touching “FUNC" Switch. If the automatic SPAN calibration is successful, "SPAN SUCCESS” is displayed on LCD Display for 2 sec, and the mode is converted to “CAL DATA” Mode. � When Zero Calibration does not succeed, "SPAN FAIL" is displayed for two seconds, and it will switch to "CAL DATA" Mode. � It’s the Mode displaying Measuring Value after Calibration and the function to check if the calibration was performed normally. � "CALIBRATION MODE" returns on touching “RESET" Switch. CAL.DATACAL.DATACAL.DATACAL.DATA [ 0][ 0][ 0][ 0]
SPAN >>SPAN >>SPAN >>SPAN >> [ FAIL ][ FAIL ][ FAIL ][ FAIL ] SPAN >>SPAN >>SPAN >>SPAN >> [SUCESS][SUCESS][SUCESS][SUCESS]
SPAN SETSPAN SETSPAN SETSPAN SET HIGH FAILHIGH FAILHIGH FAILHIGH FAIL SPAN SETSPAN SETSPAN SETSPAN SET LOW FAILLOW FAILLOW FAILLOW FAIL SPAN SETSPAN SETSPAN SETSPAN SET [ 50][ 50][ 50][ 50]
[ 50][ 50][ 50][ 50] [ 50][ 50][ 50][ 50] SPAN GASSPAN GASSPAN GASSPAN GAS [ 50][ 50][ 50][ 50] SPAN CALSPAN CALSPAN CALSPAN CAL [ NO[ NO[ NO[ NO]]]] CALIBRA.CALIBRA.CALIBRA.CALIBRA. [SPAN][SPAN][SPAN][SPAN] CALIBRACALIBRACALIBRACALIBRA.... MODEMODEMODEMODE

10.5. ALARM mode setting � Touching "FUNC" switch with Magnet-bar for 2 seconds in Measuring Condition will enter the Password mode. � Touch the "FUNC" switch after setting password using "↑" or "↓" switch. � Select “ALARM MODE” by touching "↑" or "↓" switch. � Touching “FUNC” switch when “ALARM MODE” is displayed will enter Alarm setting Mode. � Measuring Condition will return on touching “RESET” switch. � An item that turns ON / OFF Alarm Mode setting. � Changes ON / OFF status by touching "↑" Switch or "↓" Switch. When it’s ON, Alarm function and Alarm Mode can be set. � When it’s ON only, the GTL100 Explosion-proof Warning Light can be used. � "FUNC" Switch shall be touched to enter into the next mode. � It’s a Mode setting Reset method after Alarm1 action; touching the ↑ "Switch or" ↓ "Switch toggles” ON "and" OFF ". � "OFF" setting automatically resets Alarm; "ON" setting resets Alarm only when Reset Switch is ON. � When the desired MODE is played, it is set by touching "FUNC" Switch; and the next Alarm setting item is entered. � Alarm1 level setting Mode. The Alarm1 level is increased or decreased on touching of “↑” or “↓” switch (1 ~ 10000). � Touching “FUNC” switch will define the Alarm1 level when desired Alarm1 level is displayed. � This MODE sets the direction of Alarm1 Mode; touching the "↑" Switch or "↓" Switch toggles the display of "INC" or "DEC". � "INC" Mode is operating when Alarm value is greater than or equal to Alarm setting value; "DEC" Mode is operating when Alarm value is less than or equal to Alarm setting value; � The desired Mode is set by touching "FUNC" Switch when the desired Mode is displayed; and the next item is entered. � The Mode sets Dead band where Alarm1 operates; the value is set using "↑" or "↓" key. � Alarm1 is operated at Alarm1 level plus Dead band value or greater; Alarm1 is released at Alarm1 level minus Dead band value or less. � Touching the "FUNC" Switch will set Alarm1 value when desired Dead band is displayed. The next item will be entered.
A1 DBANDA1 DBANDA1 DBANDA1 DBAND [ 1.0]%F[ 1.0]%F[ 1.0]%F[ 1.0]%F A1 TYPEA1 TYPEA1 TYPEA1 TYPE [DEC][DEC][DEC][DEC] A1 TYPEA1 TYPEA1 TYPEA1 TYPE [INC][INC][INC][INC] A1 LEVELA1 LEVELA1 LEVELA1 LEVEL [ 20][ 20][ 20][ 20] AL LATCHAL LATCHAL LATCHAL LATCH [OFF][OFF][OFF][OFF] ALM USEDALM USEDALM USEDALM USED [ OFF][ OFF][ OFF][ OFF]
ALARMALARMALARMALARM MODEMODEMODEMODE PASSWORDPASSWORDPASSWORDPASSWORD [**][**][**][**]

� It’s the function to prevent the transient malfunction of Alarm1 due to external shock and noise. Time can be set within the range of 0 ~ 60sec. � Alarm1 delay is increased or decreased by 1 sec at every push of "↑" or "↓" key. � When the desired Alarm1 delay time is displayed, press the "FUNC" key to set the Alarm1 delay time and to enter next item. � Example) At alarm set value=20%, and LEL / Delay time=5 Sec, an alarm occurs when the Measuring Value exists 5 sec more than the alarm setting value based on 20% LEL. No alarm will occur less than 5 sec. � Alarm2 level setting Mode. The Alarm2 level is increased or decreased on touching of “↑” or “↓” switch. � Touching “FUNC” switch will define the Alarm2 level when desired Alarm2 level is displayed. � This MODE sets the direction of Alarm2 Mode; touching the "↑" Switch or "↓" Switch toggles the display of "INC" or "DEC". � "INC" Mode is operating when Alarm value is greater than or equal to Alarm setting value; "DEC" Mode is operating when Alarm value is less than or equal to Alarm setting value; � The desired Mode is set by touching "FUNC" Switch when the desired Mode is displayed; and the next item is entered. � The Mode sets Dead band where Alarm2 operates; the value is set using "↑" or "↓" key. � Alarm2 is operated at Alarm2 level plus Dead band value or greater; Alarm2 is released at Alarm2 level minus Dead band value or less. � Touching the "FUNC" Switch will set Alarm2 value when desired Dead band is displayed. The next item will be entered. � It’s the function to prevent the transient malfunction of Alarm2 due to external shock and noise. Time can be set within the range of 0 ~ 60sec. � Alarm2 delay is increased or decreased by 1 sec at every push of "↑" or "↓" key. � When the desired Alarm2 delay time is displayed, press the "FUNC" key to set the Alarm2 delay time and to enter next item. � Example) At alarm set value : 20%, and LEL / Delay time : 5 Sec, an alarm occurs when the Measuring Value exists 5 sec more than the alarm setting value based on 20% LEL. No alarm will occur less than 5 sec.
A2 TIMEA2 TIMEA2 TIMEA2 TIME 1 SEC1 SEC1 SEC1 SEC A2 DBANDA2 DBANDA2 DBANDA2 DBAND [ 1.0]%F[ 1.0]%F[ 1.0]%F[ 1.0]%F A2 TYPEA2 TYPEA2 TYPEA2 TYPE [DEC][DEC][DEC][DEC] A2 TYPEA2 TYPEA2 TYPEA2 TYPE [INC][INC][INC][INC] A2 LEVELA2 LEVELA2 LEVELA2 LEVEL [ 40][ 40][ 40][ 40]
A1 TIMEA1 TIMEA1 TIMEA1 TIME 1 SEC1 SEC1 SEC1 SEC

10.6. SENSOR DATA MODE configuration It’s the Mode displaying current Sensor value and Calibration condition. Setting is not possible. � Touching "FUNC" switch with Magnet-bar for 2 seconds in Measuring Condition will enter the Password mode. � Touch the "FUNC" switch after setting password using "↑" or "↓" switch. � Select “SENSOR MODE” by touching "↑" or "↓" switch. � Touching “FUNC” switch when “SENSOR MODE” is displayed will enter Alarm setting Mode. � Measuring Condition will return on touching “RESET” switch. � Displays sensor voltage value being currently measured. � Touching "FUNC" Switch will enter the next item. � It displays the difference of current Sensor Measuring Value and ZERO Calibrated Measuring Value. � The unit of the displayed value is mV. � Touching "FUNC" Switch will enter the next item. � It displays the normal Calibration ZERO and SPAN Measuring Value. � The unit of the displayed value is mV. � Touching "FUNC" Switch will enter the next item. � It displays the automatic Calibration ZERO and SPAN Measuring Value. � The corresponding values are automatically updated in Regular Calibration. � The unit of the displayed value is mV. � Touching "FUNC" Switch will enter the next item. � This Mode displays the percentage variation of current Calibration voltage and Sensor ADC maximum voltage. � Touching "FUNC" Switch will enter the next item. � Output Mode of Sensor Output values multiplied by the corresponding setting value. � The range of Setting is from 0.1 to 5.0. � This Mode displays the sensor bias applied to the sensor. � Touching "FUNC" Switch will enter the next item. � This Mode displays the temperature measured in the Sensor. � Touching "FUNC" Switch will enter the next item. � This Mode measures the current consumption in the Sensor. � Touching "FUNC" Switch will enter the next item. � It measures the Sensor input 24V power supply. � SENSOR MODE will return on touching of “FUNC” Switch. 24V VIN24V VIN24V VIN24V VIN [24.0V][24.0V][24.0V][24.0V]
CURRENTCURRENTCURRENTCURRENT [176mA][176mA][176mA][176mA] TEMPTEMPTEMPTEMPERERERER [ 25[ 25[ 25[ 25’’’’C ]C ]C ]C ] SEN BIASSEN BIASSEN BIASSEN BIAS [ 3.18V ][ 3.18V ][ 3.18V ][ 3.18V ]
SEN GAINSEN GAINSEN GAINSEN GAIN [ 1.0 ] x G[ 1.0 ] x G[ 1.0 ] x G[ 1.0 ] x G ZRZRZRZR 49.9%49.9%49.9%49.9% SR 60.0%SR 60.0%SR 60.0%SR 60.0% AZ 1.0AZ 1.0AZ 1.0AZ 1.0 AS AS AS AS ----100.0100.0100.0100.0 MZ 1.0MZ 1.0MZ 1.0MZ 1.0 MS MS MS MS ----100.0100.0100.0100.0
SEN. S/TSEN. S/TSEN. S/TSEN. S/T 0.1mV0.1mV0.1mV0.1mV SEN. OUTSEN. OUTSEN. OUTSEN. OUT 10.0mV10.0mV10.0mV10.0mV SENSORSENSORSENSORSENSOR MODEMODEMODEMODE
PASSWORDPASSWORDPASSWORDPASSWORD [**][**][**][**]

10.7. Maintenance Mode setting ※ Only authorized personnel are allowed to perform these settings. � Touching "FUNC" switch with Magnet-bar for 2 seconds in Measuring Condition will enter the Password mode. � Touch the "FUNC" switch after setting password using "↑" or "↓" switch. � Select “Maintenance MODE” by touching "↑" or "↓" switch. � Touching “FUNC” switch when “MAINTEN. MODE” is displayed will enter Maintenance setting Mode. � Measuring Condition will return on touching “RESET” switch. � It sets the Cross sensitivity (0.1 ~ 5.0) of the sensor. � Value setting is done by touching "↑" Switch or "↓" Switch by 0.01 units. � Touching "FUNC" Switch will enter the next item. � It sets the Zero region sensitivity of the sensor. � Value setting is done by touching "↑" Switch or "↓" Switch by 1 unit. � The gas value less than corresponding setting is considered as 0; the setting is possible up to 10% of the High Scale. � Touching "FUNC" Switch will enter the next item. � It sets the Measuring Value delay depending on the set time. � It sets whether to use Auto Zero function. � Touching the “↑ “or “↓ “Switch toggles” ON "and" OFF ". Auto zero function operates if it is ON (default is ON). � If Auto Zero is ON, automatic Zero Calibration is performed when the value is maintained over 10 minutes less than 0.5% of variation within the values from Auto Zero minimum to 5% of the High Scale. � It sets the minimum value of Auto Zero. � This Mode sets the percentage of High Scale in the range of 1.0%~4.0%. � Touching "FUNC" Switch will enter the next item. � It sets whether to use Base Zero function. � Touching the “↑ “or “↓ “Switch toggles” ON "and" OFF ". Base zero function operates if it is ON (default is ON). � If Base Zero is ON, automatic Zero Calibration is performed when the value is maintained over 10 minutes from 0.02% of the High Scale to Base Zero maximum. � Touching "FUNC" Switch will enter the next item.
BASEBASEBASEBASE----ZZZZ [ ON][ ON][ ON][ ON] AZ MIN.AZ MIN.AZ MIN.AZ MIN. [2.0]%F[2.0]%F[2.0]%F[2.0]%F AUTOAUTOAUTOAUTO----ZZZZ [ ON][ ON][ ON][ ON]
ZZZZ----SKIPSKIPSKIPSKIP [ 0.0]%F[ 0.0]%F[ 0.0]%F[ 0.0]%F CROCROCROCRO----SEN.SEN.SEN.SEN. [1.00]xG[1.00]xG[1.00]xG[1.00]xG MAINTEN.MAINTEN.MAINTEN.MAINTEN. MODEMODEMODEMODE
PASSWORDPASSWORDPASSWORDPASSWORD [**][**][**][**]
ODTODTODTODT [ 0]SEC[ 0]SEC[ 0]SEC[ 0]SEC

� It sets the minimum value of Base Zero. � This Mode sets the percentage of High Scale in the range of 0.5%~2.0%. � Touching "FUNC" Switch will enter the next item. � It sets whether to use the function to HOLD the maximum value during SPAN Calibration. � Touching the “↑ “or “↓ “Switch toggles” ON "and" OFF ". Measuring Value HOLD function operates during Span Calibration if it is ON. � Touching "FUNC" Switch will enter the next item. � It turns ON/OFF the Under Mode setting. � Touching the “↑ “or “↓ “Switch toggles” ON "and" OFF ". Under Mode is set when less than -10% of gas is measured if it is ON. � If it is OFF, values under -10% will be processed as 0. � Touching "FUNC" Switch will enter the next item. � It sets whether to perform Combustible sensor check. � Touching the “↑ “or “↓ “Switch toggles” ON "and" OFF ". Whether the sensor is installed is automatically checked if it is ON. If it does not detect a sensor, Fault will be indicated. � If it is OFF, sensor check is disabled. � Touching "FUNC" Switch will enter the next item. � This item sets the direction of Sensor operation. � Touching the "↑" Switch or "↓" Switch toggles the display of "INC" or "DEC". On INC, the Sensor operates to the direction of voltage/current increase; on DEC, to the direction of decrease. � Touching "FUNC" Switch will enter the next item. � This item sets the display function of negative values of Gas Measuring Value. � Touching the "↑" Switch or "↓" Switch toggles the ON/OFF status, If it is ON, negative value of Gas Measuring Value is displayed; OVER and UNDER Mode is not indicated; leftmost character in the 2nd row is expressed as ‘<’. � MAINTENANCE MODE returns on touch of “FUNC” Switch. � This item is for setting the lighting method of the Warning Light in Normal condition. � Green light is on with “STEADY”; green light will flash at 1 second interval with “BLINK.” � This item is for setting the current Output in Test Mode.
� This item is for setting whether to set time in Test Mode. � If it is ON, Test Mode is activated for 30 minutes only; if it is OFF, it is operated without restriction. EMC T/OEMC T/OEMC T/OEMC T/O [ OFF ][ OFF ][ OFF ][ OFF ]
M.M.M.M.---- LEVELLEVELLEVELLEVEL [ 0 ][ 0 ][ 0 ][ 0 ] W / L TYPEW / L TYPEW / L TYPEW / L TYPE [STEADY ][STEADY ][STEADY ][STEADY ] ENG MOD.ENG MOD.ENG MOD.ENG MOD. [OFF][OFF][OFF][OFF]
SSSS----DIRDIRDIRDIR [DEC][DEC][DEC][DEC] SSSS----DIRDIRDIRDIR [INC][INC][INC][INC]
SEN CHK.SEN CHK.SEN CHK.SEN CHK. [OFF][OFF][OFF][OFF] UNDER ENUNDER ENUNDER ENUNDER EN [OFF][OFF][OFF][OFF] SP. HOLDSP. HOLDSP. HOLDSP. HOLD [ ON][ ON][ ON][ ON] BZ MAX.BZ MAX.BZ MAX.BZ MAX. [2.0]%[2.0]%[2.0]%[2.0]%FFFF

10.8. Device Mode setting ※ Only authorized personnel are allowed to perform these settings. � Touching "FUNC" switch with Magnet-bar for 2 seconds in Measuring Condition will enter the Password mode. � Touch the "FUNC" switch after setting password using "↑" or "↓" switch. � Select “DEVICE MODE” by touching "↑" or "↓" switch. � Touching “FUNC” switch when “DEVICE MODE” is displayed will enter DEVICE setting Mode. � Measuring Condition will return on touching “RESET” switch. � This item is to check the connection status of HART BOARD. � CHECK is displayed if connected; EMPTY if not. � This item is to check the Polling Address of HART device. � This item is to check the Unique ID of the HART device. � Sensor ID cannot be changed since it is a unique ID of the product itself. � This item is to check the Fixed Current Mode of the HART device. � It is the Mode to check the Serial Number of the product. � This item is to check the Tag of the HART device. � Modification is not possible in the Sensor. � This Mode is to check the Long Tag of the HART device. � It is possible to check by shifting the string using "↑" Switch or "↓" Switch. � Modification is not possible in the Sensor. � This Mode is to check the Descriptor of the HART device. � Modification is not possible in the Sensor. � This Mode is to check the Message of the HART device. � Modification is not possible in the Sensor. MESSAGEMESSAGEMESSAGEMESSAGE [GASTRO>[GASTRO>[GASTRO>[GASTRO>
DESCRIP.DESCRIP.DESCRIP.DESCRIP. [GASTRO>[GASTRO>[GASTRO>[GASTRO> LONG TAGLONG TAGLONG TAGLONG TAG [GTD[GTD[GTD[GTD----00>00>00>00>
TAGTAGTAGTAG GTDGTDGTDGTD----0001000100010001 SERIA.NOSERIA.NOSERIA.NOSERIA.NO *XXXXXXX*XXXXXXX*XXXXXXX*XXXXXXX FIX CURFIX CURFIX CURFIX CUR DISABLEDISABLEDISABLEDISABLE
DEVDEVDEVDEV----CODECODECODECODE [0xE1C3][0xE1C3][0xE1C3][0xE1C3] PADD / mAPADD / mAPADD / mAPADD / mA 0 / EN.0 / EN.0 / EN.0 / EN. HART B/DHART B/DHART B/DHART B/D [ CHECK][ CHECK][ CHECK][ CHECK] DEVICE.DEVICE.DEVICE.DEVICE. MODEMODEMODEMODE
PASSWORDPASSWORDPASSWORDPASSWORD [**][**][**][**]

10.9. Version mode configuration This Mode is to display the important revision information of the interior of the equipment. � Touching "FUNC" switch with Magnet-bar for 2 seconds in Measuring Condition will enter the Password mode. � Touch the "FUNC" switch after setting password using "↑" or "↓" switch. � Select “VERSION MODE” by touching "↑" or "↓" switch. � Touching “FUNC” switch when “VERSION MODE” is displayed will enter VERSION setting Mode. � Measuring Condition will return on touching “RESET” switch. � It indicates the current version of the F/W. � It indicates the version of the H/W. � It indicates the version of the employed HART Device. � It indicates the version of the employed HART Protocol. � VERSION MODE will return on touching “FUNC” switch.
HART REVHART REVHART REVHART REV [REV 7][REV 7][REV 7][REV 7] HART DEVHART DEVHART DEVHART DEV [REV 1][REV 1][REV 1][REV 1]
EX H/WEX H/WEX H/WEX H/W [REV 2][REV 2][REV 2][REV 2] FW REVFW REVFW REVFW REV [REV 6][REV 6][REV 6][REV 6] VERSIONVERSIONVERSIONVERSION MODEMODEMODEMODE
PASSWORDPASSWORDPASSWORDPASSWORD [**][**][**][**]

10.10. Test mode configuration � Touching "FUNC" switch with Magnet-bar for 2 seconds in Measuring Condition will enter the Password mode. � Touch the "FUNC" switch after setting password using "↑" or "↓" switch. � Select “TEST MODE” by touching "↑" or "↓" switch. � Touching “FUNC” switch when “TEST MODE” is displayed will enter TEST setting Mode. � Measuring Condition will return on touching “RESET” switch. � This item sets whether to include mA Output during the TEST. � Touching the “↑” or “↓” Switch will toggle the ON/OFF status; if it is ON, mA will be output by the setting value during TEST. � This item performs the TEST. � Test Gas value is set by touching “↑” or “↓” Switch; if the mA Output is ON, the mA Output is displayed coupled with Test Gas value. � TEST MODE will return on touching “FUNC” switch.
[ TEST ][ TEST ][ TEST ][ TEST ] [ 0][ 0][ 0][ 0] mA OUTmA OUTmA OUTmA OUT [OFF][OFF][OFF][OFF] TESTTESTTESTTEST MODEMODEMODEMODE
PASSWORDPASSWORDPASSWORDPASSWORD [**][**][**][**]

10.11. Inspection mode use This Mode is used for the inspector to identify the Sensor status and Fault details without affecting the equipment operated in emergency. Only authorized personnel are allowed to use this Mode. � Press and hold the "↓" Switch for at least 3 seconds while Means value display gas concentrations in the display. Press and hold the "↓" Switch for at least 3 seconds to exit again. � Entering Inspection Mode, '#' mark will flash at the first place in the second row. � You can enter M/L item from Maintenance Mode to set Output value.
10.12. Data initialization Only authorized personnel are allowed to conduct this Mode because it will initialize all the values to the data set in the factory before shipping. � Turn the power ON while holding "FUNC" Key and "UP" Key. � When "ALL - INIT" is displayed on the Display window, select "YES" to carry out the data initialization.
10.13. Correction data initialization Only authorized personnel is allowed to conduct the initialization because this Mode initializes to the value of Calibration data set in the factory before shipping. This Mode is used for the inspector to initialize only the Calibration value among setting values. � Turn the power ON while holding "FUNC" Key and "UP" Key. � When "CAL - INIT" is displayed on the Display window, select "YES" to carry out the normal initialization of Calibration data. CAL CAL CAL CAL ---- INITINITINITINIT [ YES ][ YES ][ YES ][ YES ]
ALL ALL ALL ALL ---- INITINITINITINIT [ YES ][ YES ][ YES ][ YES ]
[ %L[ %L[ %L[ %LEL]EL]EL]EL] # 0 ]# 0 ]# 0 ]# 0 ]

11. Troubleshooting Fault code / Output Message Description & Condition Recovery FAULT1 “SEN EMPT” Occurs when Combustible sensor module is not connected. sensor module connect fault FAULT2 “SEN HIGH” When Combustible sensor Output is over the maximum ADC value. sensor module fault or transmitter Board ADC fault FAULT3 “SEN LOW” When Combustible sensor Output is under the minimum ADC value. sensor module fault or transmitter Board ADC fault FAULT4 “EROM ERR” transmitter EEPROM Checksum fault transmitter Board EEPROM fault FAULT5 “+24V LOW” Occurs when 24V main power input is less than 10V. Power supply input voltage confirm & transmitter ADC fault FAULT6 “ADC FAIL” transmitter ADC fault transmitter ADC fault FAULT7 “H/W REV” H/W version error Check transmitter ADC resistance

12. Caution before installation 12.1. Selection of installation location (Occupational Safety and
Health Law) The Gas leak detection alarm system shall be installed in such place as follows. : 1) Near chemical accessory equipment installed inside/outside of a building and susceptible of gas leak such as compressors, valves, reactors, and piping connections, etc. dealing with combustible and toxic materials. 2) Locations risky of remaining gas near manufacturing equipments with ignition source like heaters. 3) Around connections of filling equipments of combustible and toxic substances. 4) Substations, distribution panel rooms, control rooms, etc. near explosion-proof area. 5) Other special gas-friendly places. 12.2. Selection of installation location (High Pressure Gas Safety
Management Regulations) The Gas detector of the Gas leak detection alarm system shall be installed close to risky area of gas leakage. However, if the direct gas leaks are not expected, but gas residence is vulnerable, it should be installed in such places as follows. 1) A gas leak detection alarm outside of a building shall be installed in a risky place of gas residence considering the wind direction, wind speed, and the gravity of the gas. 2) A gas leak detection alarm inside of a building shall be installed in the lower part of the building if the gas is lighter than the air, and upper part or near the vent of the building. 3) The alarm of the Gas leak detection alarm system shall be installed near Gas detector or in places where workers usually are.

12.3. Precaution before installation Rainwater shall be avoided because it can be an electrical hindrance, and accessibility should be considered for periodic maintenance before installation. Vibration or shock shall be avoided since it may affect the output value, and the sensor shall face the direction of gravity when installed.
� This device has high pressure explosion-proof structure; belongs to GROUP II targeting gas and steam from general workplaces and chemical plants; and can be used in hazardous places of ZONE 1 (ONE) –class 1 and ZONE 2 (TWO) –class 2. � Allowable temperature belongs to 85 ℃ or lower, which corresponds to T6. � The ambient temperature shall be in the range of -20 ℃ ~ 60 ℃. � Installation elevation: less than 1,000 M above sea level � Relative Humidity: 5-99% � Installation place: indoors or outdoors � Explosive ignition temperature of the gases or vapors used: Ex d IIC T6 � The wire conduit shall be sealed to prevent the gas moving or the explosion flame propagation through the conduit under 45cm when the explosion-proof cable gland is used at the cable inlet or when metal conduit is used in wiring works. � At least 5 screw threads must be used for connection of this device and the conduit. � Other standards should be met in this work such as: [Standards on the selection, installation and maintenance of wiring for workplace explosion-proof structural electrical mechanism]. � Only qualified materials shall be used in cable entry including CABLE GLAND and SEALING FITTING; and used in the closure of unused incoming part.
[Figure 12. Pressure packing type ]
[Figure 13. Y Sealing Compound ]

13. Ordering Information GAS NAME
MESURING
RANGE TLV-TWA
Acetic Acid CH3COOH 0 ~ 30 ppm 10 ppm
Ammonia NH3 0 ~ 75 ppm 25 ppm
Antimony Pentachloride SbCℓ5 0 ~ 15 ppm 5 ppm
Arsetic Tafluoride AsF3 0 ~ 9 ppm 3 ppm
Arsetic Pentafluoride AsF5 0 ~ 9 ppm 3 ppm Arsenic Tfichloride AsCl3 0 ~ 15 ppm 5 ppm Arsenic Pentachloride AsCl5 0 ~ 15 ppm 5 ppm
Arsine AsH3 0 ~ 0.3 ppm 0.05 ppm
Boron Trichloride BCℓ3 0 ~ 15 ppm 5 ppm
Boron Tribromide BBr3 0 ~ 9 ppm 3 ppm
Boron Trifluoride BF3 0 ~ 9 ppm 3 ppm
Bromine Br2 0 ~ 1 ppm 0.1 ppm
Chlorine Cℓ2 0 ~ 3 ppm 1 ppm
Carbon Tetrachloride CCℓ4 0 ~ 30 ppm 5 ppm
Carbon Monoxide CO 0 ~ 150 ppm 25 ppm
Chlorine Tetrafluoride CℓF3 0 ~ 1 ppm 0.1 ppm
Diborane B2F6 0 ~ 0.3 ppm 0.1 ppm
Dichlorosilane SiH2Cℓ2 0 ~ 15 ppm 5 ppm
DIsilane Si2H6 0 ~ 15 ppm 5 ppm
Ethylene Oxide C2H4O 0~30ppm 1ppm
Fluorine F2 0 ~ 3 ppm 1 ppm
Germane GeH4 0 ~ 2 ppm 0.2 ppm
Germanium Tetrachloride GeCl4 0 ~ 15 ppm 5 ppm
Hydrazine N2H4 0 ~ 10 ppm 0.01 ppm
Hydrogen H2 0 ~ 2000 ppm LEL=4%VOL
Hydrogen Bromide HBr 0 ~ 9 ppm 3 ppm
Hydrogen Chloride HCℓ 0 ~ 15 ppm 5 ppm
Hydrogen Cyanide HCN 0 ~ 30 ppm 10 ppm
Hydrogen Fluoride HF 0 ~ 9 ppm 3 ppm
Hydrogen Iodine Hi 0 ~ 5 ppm 2 ppm
Hydrogen Selenide H2Se 0 ~ 0.2 ppm 0.05 ppm
Hydrogen Sulfide H2S 0 ~ 30 ppm 10 ppm
Iodine I2 0 ~ 1 ppm 0.1 ppm
Isopropyl Alcohol(IPA) CH3CHOHCH3 0 ~ 2000 ppm 400 ppm
Molybdenum Fluoride MoF6 0 ~ 9 ppm 3 ppm
Nitric Acid HNO3 0 ~ 20 ppm 2 ppm
Nitrogen Monoxide NO 0 ~ 100 ppm 25 ppm
Nitrogen Dioxide NO2 0 ~ 15 ppm 3 ppm
Nitrogen Trifluoride NF3 0 ~ 30 ppm 10 ppm
Nitrogen Tetraoxide N2O4 0 ~ 15 ppm 3 ppm
Oxygen O2 0 ~ 25% Volume -
Ozone O3 0 ~ 1 ppm 0.1 ppm

GAS NAME
MESURING
RANGE TLV-TWA
Phosgene COCℓ2 0 ~ 0.3 ppm 0.1 ppm
Phosphine PH3 0 ~ 1 ppm 0.3 ppm
Phosphorus Oxychloride POCℓ3 0 ~ 15 ppm 5 ppm
PhosPhorus Pentafluoride PF5 0 ~ 9 ppm 3 ppm
Phosphorus Trichloride PCℓ3 0 ~ 15 ppm 5 ppm
Silane SiH4 0 ~ 15 ppm 5 ppm
Silicon Tetrachloride SiCℓ4 0 ~ 15 ppm 5 ppm
Silicon Tetrafluoride SiF4 0 ~ 9 ppm 3 ppm
Sulfur Dioxide SO2 0 ~ 10 ppm 2 ppm
Sulfur Tetrafluoride SF4 0 ~ 9 ppm 3 ppm
Sulfur Hexafluoride SF6 0 ~ 2000 ppm
Tantalum Fluoride TaF5 0 ~ 9 ppm 3 ppm
Tetraethyl Orthosilicate TEOS 0 ~ 15 ppm 10 ppm
Tin Tetrachloride SnCℓ4 0 ~ 15 ppm 5 ppm
Titanium Fluoride TiF4 0 ~ 9 ppm 3 ppm
Titanium Tetrachloride TiCℓ4 0 ~ 15 ppm 5 ppm
Trichlorosilane SiHCℓ3 0 ~ 15 ppm 5 ppm
Trimetoxy Phosphate P(OCH3)3 0 ~ 15 ppm 2 ppm
Tungsten Hexafluoride WF6 0 ~ 9 ppm 3 ppm

14. Revision history Contents Date 0 * Initial revision of the Manual JUL. 31 , 2012 1 * Spec. revised(Added power consumption), Revised company address. JAN 23, 2013 Version This product and instruction manual are subject to change without prior notice for the improvement of product performance and ease of use.
24 Baretta Rd. Wangara24 Baretta Rd. Wangara24 Baretta Rd. Wangara24 Baretta Rd. Wangara, WA, 6065, WA, 6065, WA, 6065, WA, 6065
www.gastech.com.auwww.gastech.com.auwww.gastech.com.auwww.gastech.com.au
+61 8 6108 0015+61 8 6108 0015+61 8 6108 0015+61 8 6108 0015