guía del usuario - m-audio3. suivez les instructions à l’écran pour installer les pilotes....
TRANSCRIPT

1
User Guide English ( 3 – 6 )
Guía del usuario Español ( 7 – 10 )
Guide d’utilisation Français ( 11 – 14 )
Guida per l’uso Italiano ( 15 – 18 )
Benutzerhandbuch Deutsch ( 19 – 22 )
Appendix English ( 23 )

2

3
User Guide (English) Introduction Box Contents AIR Hub
Power Adapter
USB-C to USB-C Cable
USB-C to USB-A Cable
Software Download Cards
User Guide
Safety & Warranty Manual
Support For the latest information about this product (system requirements, compatibility information, etc.) and product registration, visit m-audio.com.
For additional product support, visit m-audio.com/support.
Quick Start Windows users: Before connecting AIR Hub to your computer, install the drivers:
1. Go to m-audio.com/drivers and download the latest AIR Hub driver for your operating system.
2. Open the file you downloaded and double-click the driver installer file.
3. Follow the on-screen instructions to install the drivers. Software: We've included Pro Tools | First M-Audio Edition with your AIR Hub so you can get started making music with professional software right out of the box. Register your AIR Hub on m-audio.com, and follow the Pro Tools | First M-Audio Edition install instructions in your User Account. Virtual Instruments: Follow the instructions on the software download card for installing the included virtual instrument plugins. After installation, most DAWs will not load virtual instrument plugins automatically. In order to access the virtual instrument plugins with Pro Tools | First M-Audio Edition, you will need to choose the plugin folder for the software to scan:
Pro Tools | First M-Audio Edition (AAX) plugin folders: Windows (32-bit): C:\Program Files (x86)\Common Files\Avid\Audio\Plug-Ins
Windows (64-bit): C:\Program Files\Common Files\Avid\Audio\Plug-Ins
macOS: Macintosh HD/Library/Application Support/Avid/Audio/Plug-Ins
4
USB Flash Drive Power
External MIDI Devices
USB Flash Drive
Monitors Computer
Power
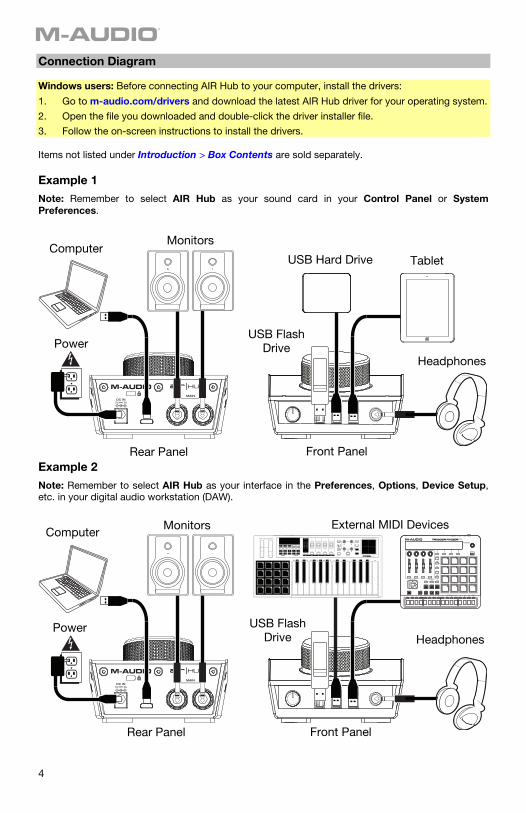
Connection Diagram Windows users: Before connecting AIR Hub to your computer, install the drivers:
1. Go to m-audio.com/drivers and download the latest AIR Hub driver for your operating system.
2. Open the file you downloaded and double-click the driver installer file.
3. Follow the on-screen instructions to install the drivers. Items not listed under Introduction > Box Contents are sold separately. Example 1 Note: Remember to select AIR Hub as your sound card in your Control Panel or System Preferences.
Example 2 Note: Remember to select AIR Hub as your interface in the Preferences, Options, Device Setup, etc. in your digital audio workstation (DAW).
USB Hard Drive Tablet
Headphones
MonitorsComputer
Headphones
Rear Panel Front Panel
Rear Panel Front Panel
5
Setting Up AIR Hub with Pro Tools | First M-Audio Edition 1. Use the included USB cable to connect the AIR Hub to your computer.
2. Open Pro Tools | First M-Audio Edition.
3. Go to Setup > Playback Engine….
4. Open the Playback Engine dropdown menu and select M-Audio AIR Hub.
Note: You may need to save and restart your project.
5. Select your Sample Rate and then click OK to close the Setup window.
6. Go to the Setup > I/O and select M-Audio AIR Hub as the Output device. You can now add tracks and stream recorded audio back through the AIR Hub outputs. Features Rear Panel
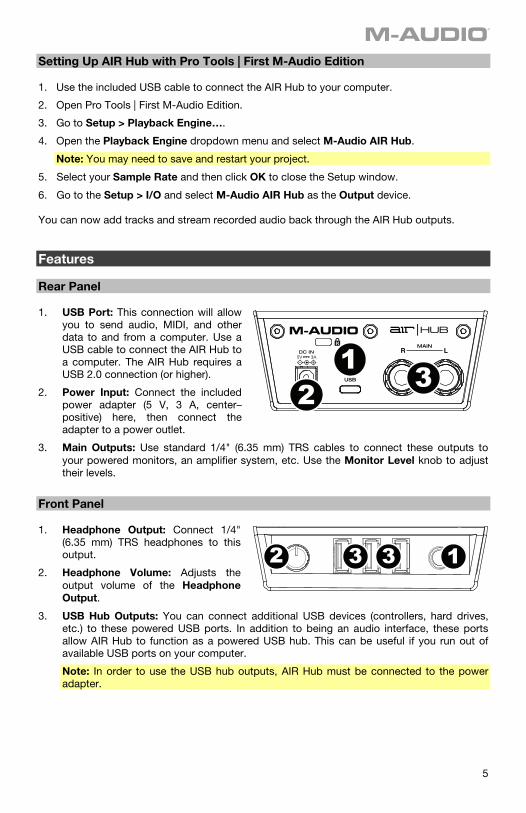
1. USB Port: This connection will allow
you to send audio, MIDI, and other data to and from a computer. Use a USB cable to connect the AIR Hub to a computer. The AIR Hub requires a USB 2.0 connection (or higher).
2. Power Input: Connect the included power adapter (5 V, 3 A, center–positive) here, then connect the adapter to a power outlet.
3. Main Outputs: Use standard 1/4" (6.35 mm) TRS cables to connect these outputs to your powered monitors, an amplifier system, etc. Use the Monitor Level knob to adjust their levels.
Front Panel 1. Headphone Output: Connect 1/4"
(6.35 mm) TRS headphones to this output.
2. Headphone Volume: Adjusts the output volume of the Headphone Output.
3. USB Hub Outputs: You can connect additional USB devices (controllers, hard drives, etc.) to these powered USB ports. In addition to being an audio interface, these ports allow AIR Hub to function as a powered USB hub. This can be useful if you run out of available USB ports on your computer.
Note: In order to use the USB hub outputs, AIR Hub must be connected to the power adapter.
12 3 3
12 3
6
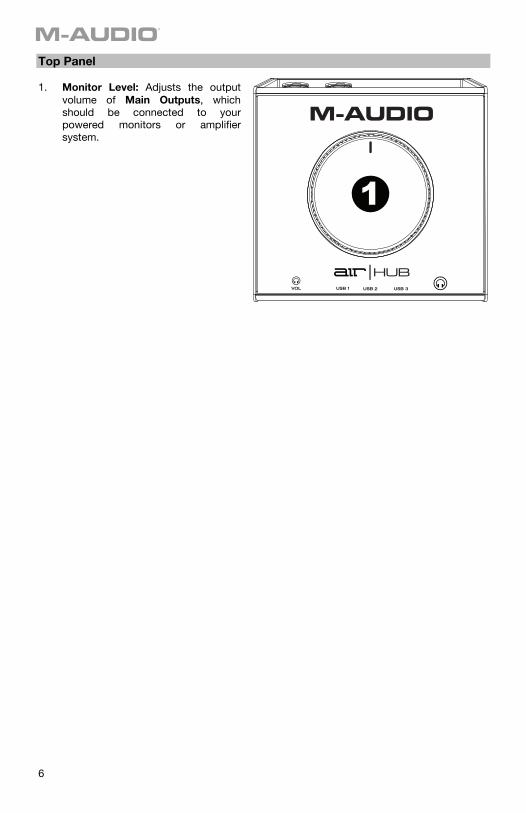
Top Panel 1. Monitor Level: Adjusts the output
volume of Main Outputs, which should be connected to your powered monitors or amplifier system.
1

7
Guía del usuario (Español) Introducción Contenido de la caja AIR Hub
Adaptador de alimentación
Cable USB-C-a-USB-C
Cable USB-C-a-USB-A
Tarjetas de descarga de software
Guía del usuario
Manual sobre la seguridad y garantía
Soporte Para obtener la información más completa acerca de este product (los requisitos del sistema, compatibilidad, etc) y registro del producto, visite m-audio.com.
Para soporte adicional del producto, visite m-audio.com/support.
Conexión rápida Usuarios de Windows: Antes de conectar el AIR Hub a su computadora, instale los drivers:
1. Vaya a m-audio.com/drivers y descargue el driver AIR Hub más reciente para su sistema operativo.
2. Abra el archivo que descargó y haga doble clic en el archivo instalador del driver.
3. Siga las instrucciones de la pantalla para instalar los drivers. Software: Hemos incluido Pro Tools | First M-Audio Edition con su AIR Hub de modo que puede comenzar a hacer música con software profesional en cuanto lo saca de la caja. Registre su AIR Hub en m-audio.com y siga las instrucciones de instalación en su Cuenta de usuario. Instrumentos virtuales: Siga las instrucciones de la tarjeta de descarga de software para instalar los plugins de instrumentos virtuales incluidos. Tras la instalación, muchos DAW no cargarán plugins de instrumentos virtuales de forma automática. A fin de acceder a los plugins de instrumentos virtuales con Pro Tools | First M-Audio Edition, deberá seleccionar la carpeta con plugins para que el software explore:
Carpetas de plugins de Pro Tools | First M-Audio Edition (AAX):
Windows (32-bit): C:\Program Files (x86)\Common Files\Avid\Audio\Plug-Ins
Windows (64-bit): C:\Program Files\Common Files\Avid\Audio\Plug-Ins
macOS: Macintosh HD/Library/Application Support/Avid/Audio/Plug-Ins

8
Computadora
Alimentación
Monitores alimentados
Monitores alimentadosComputadora
Alimentación
Panel trasero Panel frontal
Panel trasero Panel frontal
Dispositivos MIDI externo
Tableta
Unidad flash USB
Unidad flash USB
Disco duro USB
Diagrama de instalación Usuarios de Windows: Antes de conectar el AIR Hub a su computadora, instale los drivers: 1. Vaya a m-audio.com/drivers y descargue el driver AIR Hub más reciente para su sistema
operativo. 2. Abra el archivo que descargó y haga doble clic en el archivo instalador del driver. 3. Siga las instrucciones de la pantalla para instalar los drivers. Los elementos que no se enumeran en Introducción > Contenido de la caja se venden por separado.
Ejemplo 1 Nota: Recuerde seleccionar AIR Hub como su tarjeta de sonido en las Control Panel (panel de control) o System Preferences (sistema preferencias).
Ejemplo 2 Nota: Recuerde seleccionar AIR Hub como su interfaz en las Preferences (Preferencias), Options (Opciones), Device Setup (Configuración de dispositivo), etc. de su estación de audio digital (DAW).
Auriculares
Auriculares
9
Para configurar el AIR Hub con Pro Tools | First M-Audio Edition 1. Use el cable USB incluido para conectar el AIR Hub a su ordenador.
2. Abra Pro Tools | First M-Audio Edition.
3. Vaya a Setup > Playback Engine… (Configuración > Motor de reproducción).
4. Abra el menú desplegable Playback Engine y seleccione M-Audio AIR Hub.
Nota: Es posible que tenga que guardar y reiniciar su proyecto.
5. Seleccione su Sample Rate (Tasa de muestreo) y luego haga clic en OK para cerrar la ventana de configuración.
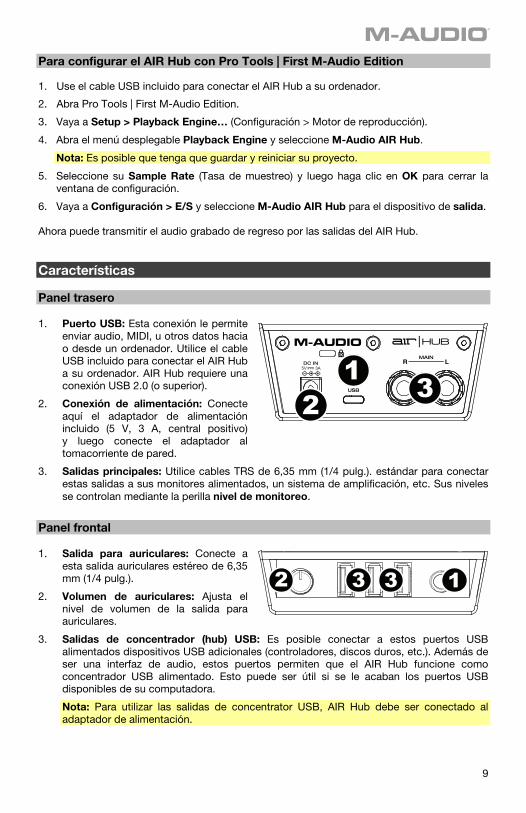
6. Vaya a Configuración > E/S y seleccione M-Audio AIR Hub para el dispositivo de salida. Ahora puede transmitir el audio grabado de regreso por las salidas del AIR Hub. Características Panel trasero 1. Puerto USB: Esta conexión le permite
enviar audio, MIDI, u otros datos hacia o desde un ordenador. Utilice el cable USB incluido para conectar el AIR Hub a su ordenador. AIR Hub requiere una conexión USB 2.0 (o superior).
2. Conexión de alimentación: Conecte aquí el adaptador de alimentación incluido (5 V, 3 A, central positivo) y luego conecte el adaptador al tomacorriente de pared.
3. Salidas principales: Utilice cables TRS de 6,35 mm (1/4 pulg.). estándar para conectar estas salidas a sus monitores alimentados, un sistema de amplificación, etc. Sus niveles se controlan mediante la perilla nivel de monitoreo.
Panel frontal 1. Salida para auriculares: Conecte a
esta salida auriculares estéreo de 6,35 mm (1/4 pulg.).
2. Volumen de auriculares: Ajusta el nivel de volumen de la salida para auriculares.
3. Salidas de concentrador (hub) USB: Es posible conectar a estos puertos USB alimentados dispositivos USB adicionales (controladores, discos duros, etc.). Además de ser una interfaz de audio, estos puertos permiten que el AIR Hub funcione como concentrador USB alimentado. Esto puede ser útil si se le acaban los puertos USB disponibles de su computadora.
Nota: Para utilizar las salidas de concentrator USB, AIR Hub debe ser conectado al adaptador de alimentación.
12 3 3
12 3

10
Panel superior 1. Nivel de monitoreo: Ajusta el volumen
de salida de las salidas Main Outputs (salidas principales izquierda y derecha), las cuales deberían estar conectadas a monitores alimentados o a un sistema de amplificación.
1

11
Guide d’utilisation (Français) Présentation Contenu de la boîte AIR Hub
Adaptateur d’alimentation
Câble USB-C-à-USB-C
Câble USB-C-à-USB-A
Cartes de téléchargement de logiciel
Guide d’utilisation
Consignes de sécurité et informations concernant la garantie
Assistance Pour les dernières informations concernant ce produit (la configuration système minimale requise, la compatibilité, etc) et l’enregistrement du produit, veuillez visitez le site m-audio.com.
Pour toute assistance supplémentaire, veuillez visiter le site m-audio.com/support.
Utilisation rapide Utilisateurs de Windows : Avant de brancher l'AIR Hub à votre ordinateur pour la première fois, vous devez installer les pilotes :
1. Veuillez visiter m-audio.com/drivers et télécharger le dernier pilote AIR Hub pour votre système d'exploitation.
2. Ouvrez le fichier téléchargé, puis double-cliquez sur le fichier d'installation du pilote.
3. Suivez les instructions à l’écran pour installer les pilotes. Logiciel : Nous avons inclus l’application Pro Tools | First M-Audio Edition avec l'AIR Hub afin que vous puissiez commencer à créer de la musique avec un logiciel de qualité professionnelle aussitôt que vous le sortez de la boîte. Veuillez enregistrer l'AIR Hub sur le site m-audio.com et suivre les instructions d’installation à partir de votre compte utilisateur. Instruments virtuels : Veuillez suivre les instructions sur la carte de téléchargement de logiciel afin d’installer les plug-ins d'instruments virtuels. La plupart des logiciels audionumériques ne chargent pas automatiquement les plug-ins d'instruments virtuels après l’installation. Afin d’accéder aux plug-ins d'instruments virtuels à partir de Pro Tools | First M-Audio Edition, vous devez sélectionner le dossier des plug-ins afin que le logiciel puisse y accéder :
Dossiers des plug-ins Pro Tools | First M-Audio Edition (AAX) :
Windows (32 bits) : C:\Fichiers de programme (x86)\Fichiers communs\Avid\Audio\Plug-ins
Windows (64 bits) : C:\Fichiers de programme\Fichiers communs\Avid\Audio\Plug-ins
macOS : Macintosh HD/Bibliothèque/Application Support/Avid/Audio/Plug-ins
12
Schéma de connexion Utilisateurs de Windows : Avant de brancher l'AIR Hub à votre ordinateur pour la première fois, vous devez installer les pilotes : 1. Veuillez visiter m-audio.com/drivers et télécharger le dernier pilote AIR Hub pour votre
système d'exploitation. 2. Ouvrez le fichier téléchargé, puis double-cliquez sur le fichier d'installation du pilote. 3. Suivez les instructions à l’écran pour installer les pilotes. Les éléments qui ne figurent pas dans la section Présentation > Contenu de la boîte sont vendus séparément.
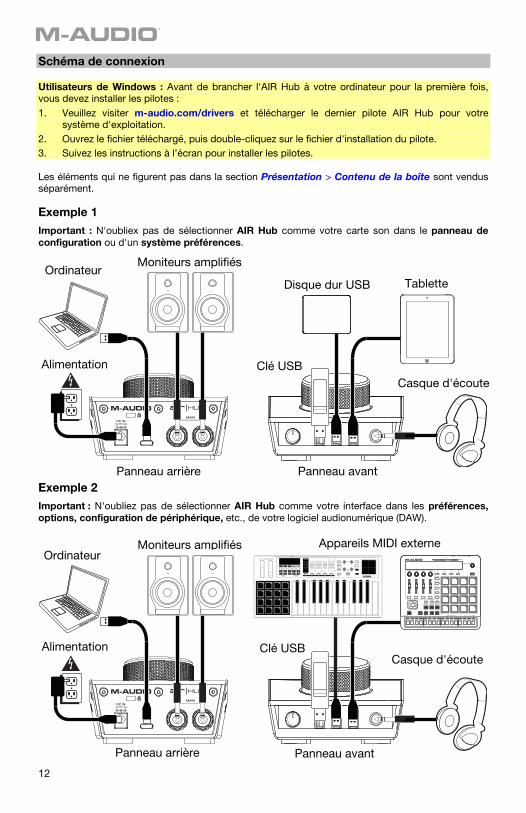
Exemple 1 Important : N'oubliex pas de sélectionner AIR Hub comme votre carte son dans le panneau de configuration ou d'un système préférences.
Exemple 2 Important : N'oubliez pas de sélectionner AIR Hub comme votre interface dans les préférences, options, configuration de périphérique, etc., de votre logiciel audionumérique (DAW).
Ordinateur Moniteurs amplifiés
Casque d'écoute
Moniteurs amplifiésOrdinateur
Casque d'écoute
Alimentation
Alimentation
Panneau arrière Panneau avant
Panneau arrière Panneau avant
Appareils MIDI externe
Tablette
Clé USB
Clé USB
Disque dur USB
13
Pour configurer l'AIR Hub pour Pro Tools | First M-Audio Edition 1. Utilisez le câble USB fourni pour brancher l'AIR Hub à votre ordinateur.
2. Lancez le logiciel Pro Tools | First M-Audio Edition.
3. Ouvrez le menu Setup > Playback Engine….
4. Ouvrez le menu déroulant Playback Engine et sélectionnez M-Audio AIR Hub.
Remarque : Il se peut que vous ayez à sauvegarder et à relancer votre projet.
5. Sélectionnez la fréquence d'échantillonnage, puis cliquez sur OK pour fermer la fenêtre Setup.
6. Accédez au menu Setup > I/O et sélectionnez M-Audio AIR Hub pour le périphérique de sortie.
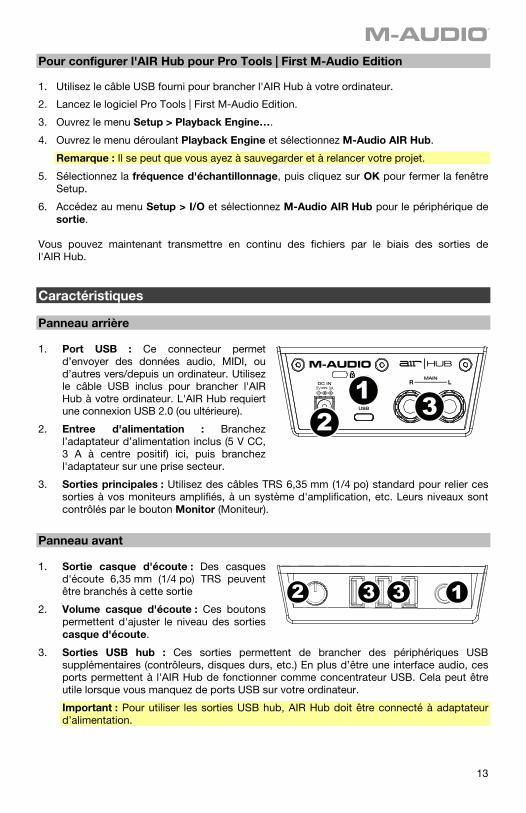
Vous pouvez maintenant transmettre en continu des fichiers par le biais des sorties de l'AIR Hub. Caractéristiques Panneau arrière 1. Port USB : Ce connecteur permet
d’envoyer des données audio, MIDI, ou d’autres vers/depuis un ordinateur. Utilisez le câble USB inclus pour brancher l'AIR Hub à votre ordinateur. L'AIR Hub requiert une connexion USB 2.0 (ou ultérieure).
2. Entree d'alimentation : Branchez l’adaptateur d’alimentation inclus (5 V CC, 3 A à centre positif) ici, puis branchez l'adaptateur sur une prise secteur.
3. Sorties principales : Utilisez des câbles TRS 6,35 mm (1/4 po) standard pour relier ces sorties à vos moniteurs amplifiés, à un système d'amplification, etc. Leurs niveaux sont contrôlés par le bouton Monitor (Moniteur).
Panneau avant 1. Sortie casque d'écoute : Des casques
d'écoute 6,35 mm (1/4 po) TRS peuvent être branchés à cette sortie
2. Volume casque d'écoute : Ces boutons permettent d'ajuster le niveau des sorties casque d'écoute.
3. Sorties USB hub : Ces sorties permettent de brancher des périphériques USB supplémentaires (contrôleurs, disques durs, etc.) En plus d’être une interface audio, ces ports permettent à l'AIR Hub de fonctionner comme concentrateur USB. Cela peut être utile lorsque vous manquez de ports USB sur votre ordinateur.
Important : Pour utiliser les sorties USB hub, AIR Hub doit être connecté à adaptateur d’alimentation.
12 3 3
12 3
14
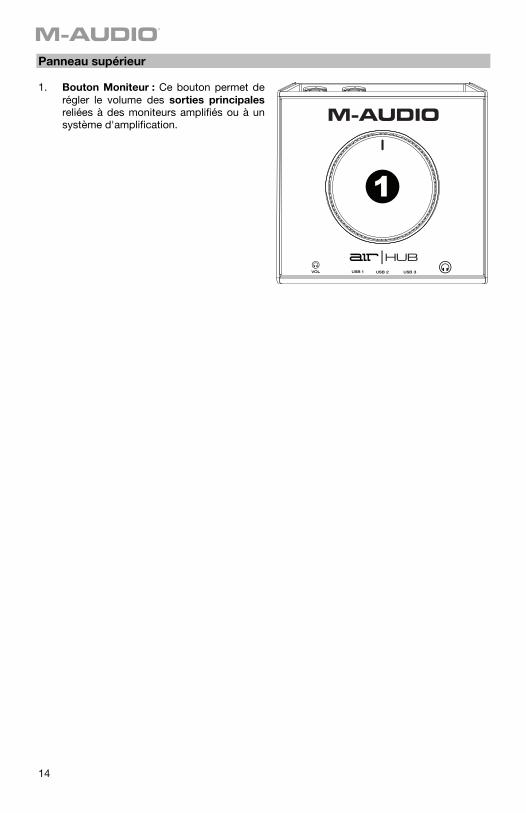
Panneau supérieur 1. Bouton Moniteur : Ce bouton permet de
régler le volume des sorties principales reliées à des moniteurs amplifiés ou à un système d'amplification.
1
15
Guida per l’uso (Italiano) Introduzione Contenuti della confezione AIR Hub
Adattatore di alimentazione
Cavo USB-C-a-USB-C
Cavo USB-C-a-USB-A
Schede di download del software
Guida per l’uso
Istruzioni di sicurezza e garanzia Assistenza Per conoscere le ultime informazioni in merito a questo prodotto (i requisiti di sistema complete, compatibilità, ecc) e per la registrazione del prodotto, recarsi alla pagina m-audio.com.
Per ulteriore assistenza, recarsi alla pagina m-audio.com/support. Inizio rapido Utenti Windows: Prima di collegare l'AIR Hub computer, installare i driver:
1. Recarsi alla pagina m-audio.com/drivers e scaricare i più recenti driver del AIR Hub per il proprio sistema operativo.
2. Aprire il file scaricato e fare doppio clic sul file di installazione dei driver.
3. Seguire le istruzioni su schermo per installare i driver. Software: Con l'AIR Hub abbiamo incluso il Pro Tools | First M-Audio Edition in modo da consentirvi di iniziare immediatamente a fare musica con software professionale. Registrare l’AIR Hub su m-audio.com, e seguire le istruzioni di installazione nel proprio Account utente. Virtual Instruments: seguire le istruzioni presenti nella scheda di download del software per installare i plugin Virtual Instrument in dotazione. Dopo l’installazione, la maggior parte dei DAW non caricherà i plugin Virtual Instrument automaticamente. Per accedere ai plugin Virtual Instrument con Pro Tools | First M-Audio Edition, bisogna scegliere la cartella plugin per il software da scansionare:
Pro Tools | First M-Audio Edition (AAX) cartelle plugin:
Windows (32-bit): C:\Program Files (x86)\Common Files\Avid\Audio\Plug-Ins
Windows (64-bit): C:\Program Files\Common Files\Avid\Audio\Plug-Ins
macOS: Macintosh HD/Library/Application Support/Avid/Audio/Plug-Ins

16
Schema dei collegamenti Utenti Windows: Prima di collegare l'AIR Hub computer, installare i driver: 1. Recarsi alla pagina m-audio.com/drivers e scaricare i più recenti driver del AIR Hub per il
proprio sistema operativo. 2. Aprire il file scaricato e fare doppio clic sul file di installazione dei driver. 3. Seguire le istruzioni su schermo per installare i driver. Elementi non elencati sotto Introduzione > Contenuti della confezione sono venduti separatamente. Esempio 1 Importante: Ricordarsi di selezionare AIR Hub come la scheda audio nel Pannello di controllo, o di Preferenze di sistema.
Esempio 2 Importante: Ricordarsi di selezionare l'AIR Hub come interfaccia sotto Preferiti, Opzioni, Configurazione dispositivo, ecc. nel proprio DAW.
Computer Monitor
Cuffie
Alimentazione
Alimentazione
Computer Monitor
Cuffie
Pannello posteriore Pannello anteriore
Pannello posteriore Pannello anteriore
Dispositivi MIDI esterni
Tablet USB Hard Drive
USBFlash Drive
USBFlash Drive
17
Per configurare l’AIR Hub con Pro Tools | First M-Audio Edition 1. Servirsi del cavo USB in dotazione per collegare l’AIR Hub al computer.
2. Aprire Pro Tools | First M-Audio Edition.
3. Recarsi su Setup > Playback Engine….
4. Aprire il menu a discesa Playback Engine e selezionare M-Audio AIR Hub.
Nota bene: può essere necessario salvare e riavviare il progetto.
5. Selezionare la Frequenza di campionamento e cliccare su OK per chiudere la finestra di configurazione (Setup).
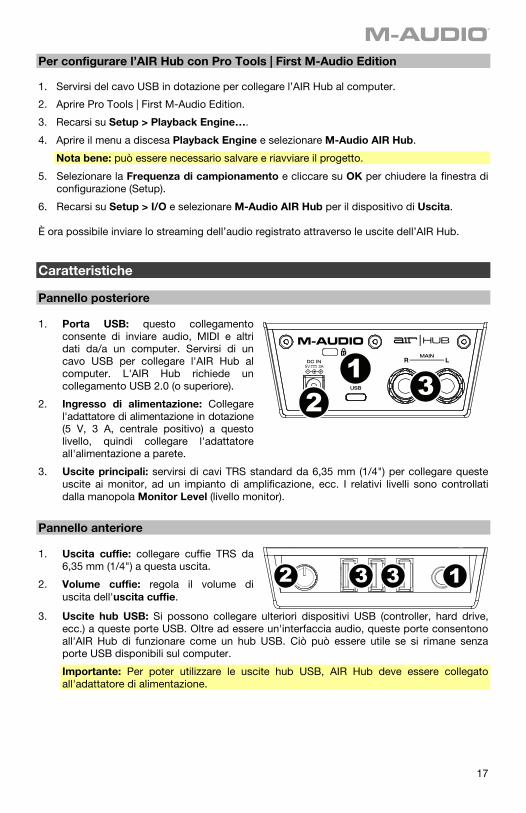
6. Recarsi su Setup > I/O e selezionare M-Audio AIR Hub per il dispositivo di Uscita. È ora possibile inviare lo streaming dell’audio registrato attraverso le uscite dell’AIR Hub. Caratteristiche Pannello posteriore 1. Porta USB: questo collegamento
consente di inviare audio, MIDI e altri dati da/a un computer. Servirsi di un cavo USB per collegare l'AIR Hub al computer. L'AIR Hub richiede un collegamento USB 2.0 (o superiore).
2. Ingresso di alimentazione: Collegare l'adattatore di alimentazione in dotazione (5 V, 3 A, centrale positivo) a questo livello, quindi collegare l'adattatore all'alimentazione a parete.
3. Uscite principali: servirsi di cavi TRS standard da 6,35 mm (1/4") per collegare queste uscite ai monitor, ad un impianto di amplificazione, ecc. I relativi livelli sono controllati dalla manopola Monitor Level (livello monitor).
Pannello anteriore 1. Uscita cuffie: collegare cuffie TRS da
6,35 mm (1/4") a questa uscita.
2. Volume cuffie: regola il volume di uscita dell'uscita cuffie.
3. Uscite hub USB: Si possono collegare ulteriori dispositivi USB (controller, hard drive, ecc.) a queste porte USB. Oltre ad essere un'interfaccia audio, queste porte consentono all'AIR Hub di funzionare come un hub USB. Ciò può essere utile se si rimane senza porte USB disponibili sul computer.
Importante: Per poter utilizzare le uscite hub USB, AIR Hub deve essere collegato all'adattatore di alimentazione.
12 3 3
12 3
18
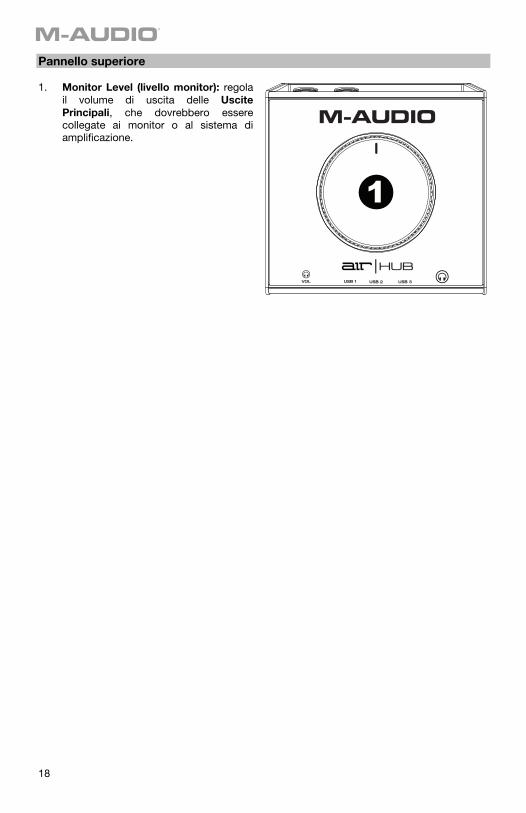
Pannello superiore 1. Monitor Level (livello monitor): regola
il volume di uscita delle Uscite Principali, che dovrebbero essere collegate ai monitor o al sistema di amplificazione.
1
19
Benutzerhandbuch (Deutsch)
Einführung Lieferumfang AIR Hub
Netzteil
USB-C-zu-USB-C Kabel
USB-C-zu-USB-A Kabel
Software Download-Karten
Benutzerhandbuch
Sicherheitshinweise und Garantieinformationen
Kundendienst Für aktuelle Informationen zu diesem Produkt (Systemanforderungen, Informationen zur Kompatibilität etc.) und zur Produktregistrierung besuchen Sie m-audio.com.
Um weitere Unterstützung zu Ihrem Produkt zu erhalten, besuchen Sie m-audio.com/support.
Schnellstart Windows Anwender: Installieren Sie die Treiber bevor Sie AIR Hub mit Ihrem Computer verbinden:
1. Besuchen Sie m-audio.com/drivers und laden Sie die neuesten AIR Hub-Treiber für Ihr Betriebssystem herunter.
2. Öffnen Sie die heruntergeladene Datei und doppelklicken Sie auf die Treiber-Installationsdatei.
3. Befolgen Sie die Anweisungen am Bildschirm, um die Treiber zu installieren.
Software: Wir liefern AIR Hub mit Pro Tools | First M-Audio Edition aus, damit Sie Ihre Musikproduktion gleich mit professioneller Software starten können. Registrieren Sie Ihren AIR Hub zuerst auf m-audio.com und folgen den Installationsanweisungen in Ihrem Benutzerkonto.
Virtuelle Instrumente: Folgen Sie den Anweisungen auf der Software-Download-Karte für die Installation der mitgelieferten Virtual Instrument Plugins. Nach der Installation werden die meisten DAWs die Virtual Instrument Plugins nicht automatisch laden. Um über Pro Tools | First M-Audio Edition auf die Virtual Instrument Plugins zuzugreifen, müssen Sie den Plugin-Ordner für die zu scannende Software auswählen:
Pro Tools | First M-Audio Edition (AAX) Plugin-Ordner:
Windows (32-bit): C:\Programme (x86)\Gemeinsame Dateien\Avid\Audio\Plug-Ins
Windows (64-bit): C:\Programme\Gemeinsame Dateien\Avid\Audio\Plug-Ins
macOS: Macintosh HD/Library/Application Support/Avid/Audio/Plug-Ins

20
Anschlussdiagramm Windows Anwender: Installieren Sie die Treiber bevor Sie AIR Hub mit Ihrem Computer verbinden: 1. Besuchen Sie m-audio.com/drivers und laden Sie die neuesten AIR Hub-Treiber für Ihr
Betriebssystem herunter. 2. Öffnen Sie die heruntergeladene Datei und doppelklicken Sie auf die Treiber-Installationsdatei. 3. Befolgen Sie die Anweisungen am Bildschirm, um die Treiber zu installieren. Teile, die nicht unter Einführung > Lieferumfang angegeben sind, sind separat erhältlich. Beispiel 1 Wichtig: Denken Sie daran, AIR Hub als Soundkarte in den Ihrem Systemsteuerung oder im Systemeinstellungen auswählen.
Beispiel 2 Wichtig: Denken Sie daran, AIR Hub als Schnittstelle in den Einstellungen, Optionen oder im Geräte-Setup etc. in Ihrer Digital Audio Workstation (DAW) auszuwählen.
AktivemonitoreComputer
Kopfhörer
Computer Aktivemonitore
Kopfhörer
Steckdose
Steckdose
Rückseite Vorderseite
Rückseite Vorderseite
Externe MIDI-Geräte
Tablet
USB-Stick
USB-Stick
USB-Festplatte
21
So richten Sie den AIR Hub mit Pro Tools | First M-Audio Edition 1. Schließen Sie Ihr AIR Hub mit dem mitgelieferten USB-Kabel an Ihren Computer an.
2. Öffnen Sie Pro Tools | First M-Audio Edition.
3. Navigieren Sie zu Setup > Playback-Engine….
4. Öffnen Sie das Dropdown-Menü der Playback-Engine und wählen Sie M-Audio AIR Hub.
Hinweis: Möglicherweise müssen Sie Ihr Projekt speichern und neu starten.
5. Wählen Sie Ihre Abtastrate aus und klicken Sie auf OK, um das Setup-Fenster zu schließen.
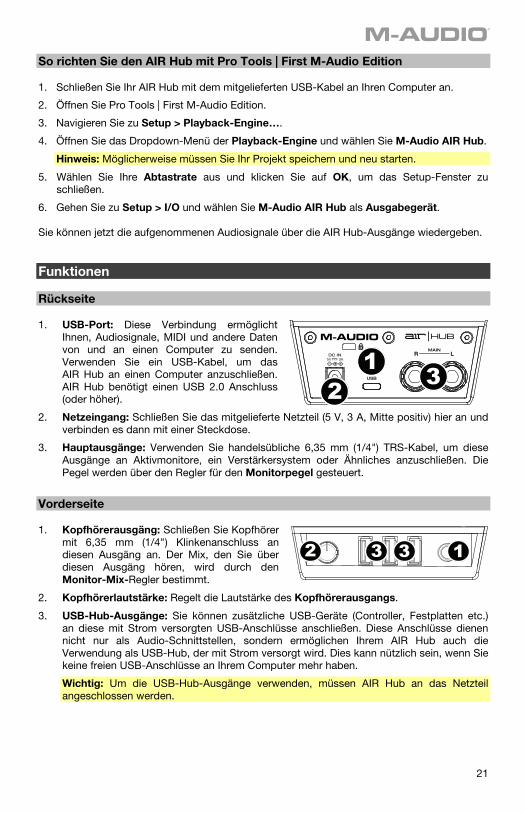
6. Gehen Sie zu Setup > I/O und wählen Sie M-Audio AIR Hub als Ausgabegerät. Sie können jetzt die aufgenommenen Audiosignale über die AIR Hub-Ausgänge wiedergeben. Funktionen Rückseite 1. USB-Port: Diese Verbindung ermöglicht
Ihnen, Audiosignale, MIDI und andere Daten von und an einen Computer zu senden. Verwenden Sie ein USB-Kabel, um das AIR Hub an einen Computer anzuschließen. AIR Hub benötigt einen USB 2.0 Anschluss (oder höher).
2. Netzeingang: Schließen Sie das mitgelieferte Netzteil (5 V, 3 A, Mitte positiv) hier an und verbinden es dann mit einer Steckdose.
3. Hauptausgänge: Verwenden Sie handelsübliche 6,35 mm (1/4") TRS-Kabel, um diese Ausgänge an Aktivmonitore, ein Verstärkersystem oder Ähnliches anzuschließen. Die Pegel werden über den Regler für den Monitorpegel gesteuert.
Vorderseite 1. Kopfhörerausgäng: Schließen Sie Kopfhörer
mit 6,35 mm (1/4") Klinkenanschluss an diesen Ausgäng an. Der Mix, den Sie über diesen Ausgäng hören, wird durch den Monitor-Mix-Regler bestimmt.
2. Kopfhörerlautstärke: Regelt die Lautstärke des Kopfhörerausgangs.
3. USB-Hub-Ausgänge: Sie können zusätzliche USB-Geräte (Controller, Festplatten etc.) an diese mit Strom versorgten USB-Anschlüsse anschließen. Diese Anschlüsse dienen nicht nur als Audio-Schnittstellen, sondern ermöglichen Ihrem AIR Hub auch die Verwendung als USB-Hub, der mit Strom versorgt wird. Dies kann nützlich sein, wenn Sie keine freien USB-Anschlüsse an Ihrem Computer mehr haben.
Wichtig: Um die USB-Hub-Ausgänge verwenden, müssen AIR Hub an das Netzteil angeschlossen werden.
12 3 3
12 3
22
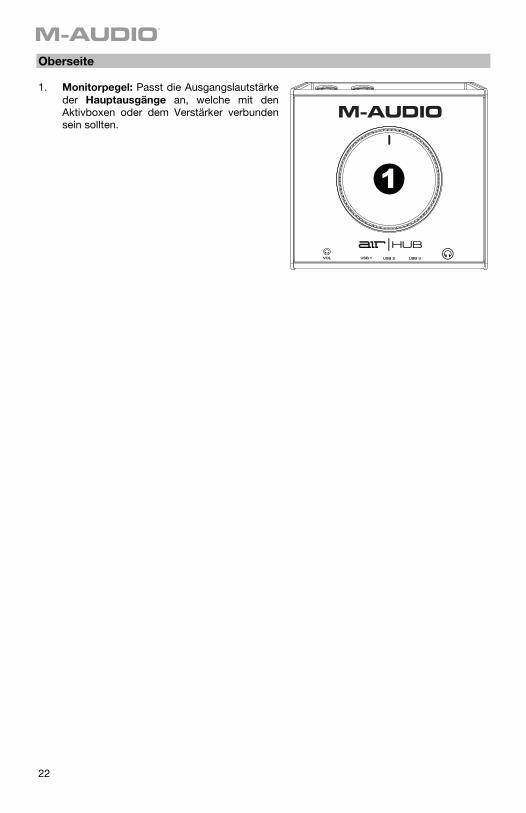
Oberseite 1. Monitorpegel: Passt die Ausgangslautstärke
der Hauptausgänge an, welche mit den Aktivboxen oder dem Verstärker verbunden sein sollten.
1
23
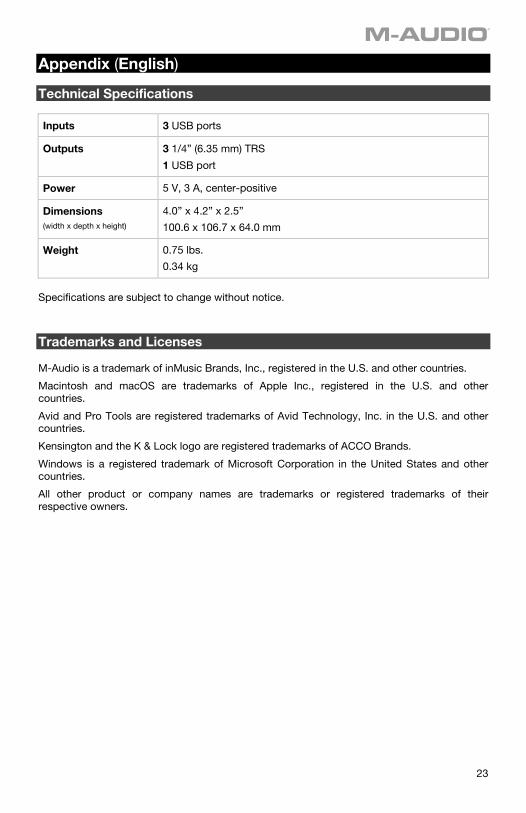
Appendix (English) Technical Specifications
Inputs 3 USB ports
Outputs
3 1/4” (6.35 mm) TRS
1 USB port
Power 5 V, 3 A, center-positive
Dimensions (width x depth x height)
4.0” x 4.2” x 2.5”
100.6 x 106.7 x 64.0 mm
Weight 0.75 lbs.
0.34 kg
Specifications are subject to change without notice.
Trademarks and Licenses M-Audio is a trademark of inMusic Brands, Inc., registered in the U.S. and other countries.
Macintosh and macOS are trademarks of Apple Inc., registered in the U.S. and other countries.
Avid and Pro Tools are registered trademarks of Avid Technology, Inc. in the U.S. and other countries.
Kensington and the K & Lock logo are registered trademarks of ACCO Brands.
Windows is a registered trademark of Microsoft Corporation in the United States and other countries.
All other product or company names are trademarks or registered trademarks of their respective owners.