guidance on installation and use of a travel aid for garmin gps
TRANSCRIPT

Guidance On Installation And Use Of A Travel Aid For Garmin GPS Receivers
Background - The published Motor Vehicle Use
Map (MVUM) is the official document-of-record
that designates roads, trails, and areas open to
public motorized use on the Santa Fe National
Forest. An example is illustrated at right.
The MVUM contains important information about
road, trail, and area designations that motorists
should always have close at hand. However, the
MVUM’s large size could make it difficult to
handle, or refer to, while travelling, and some
motorists have found that the MVUM’s small map
scale and spare design make it difficult to locate
themselves with confidence along the roads and
trails that it portrays.
In response to these issues, Santa Fe National Forest has developed
a Travel Aid for Garmin GPS receivers (example at left) that is
designed to help motorists locate their position:
• Along designated roads or trails,
• Within areas open to motorized cross-country travel,
• Relative to motorized dispersed camping corridors, and
• With respect to seasonally open routes.
(GPSmap 60CSx)
Install the Travel Aid– Follow these steps to install the Travel Aid
1. Keep this document handy, as it provides guidance on installation of the Travel Aid.
2. Refer to Appendix A to see a list of supported Garmin GPS receivers Click Start – Control
Panel – Add or Remove Programs on the Windows PC (2000, XP, Vista, or 7) that will be used to perform the installation, and determine if a Garmin USB Drivers entry is present. If not, the drivers must be installed on the PC before proceeding. Garmin USB drivers can be obtained from these sources:
a. CD shipped with a new Garmin GPS receiver, b. Garmin MapSource or BaseCamp software CD or installation package, or c. Garmin website at
http://www8.garmin.com/support/download_details.jsp?id=591.
3. Save the Garmin Installer package file (~5 MB) to the PC – (SantaFe NF_Garmin_TravelAid2014.exe)
4. Turn on the Garmin GPS receiver, and connect it to the PC with its USB cable.
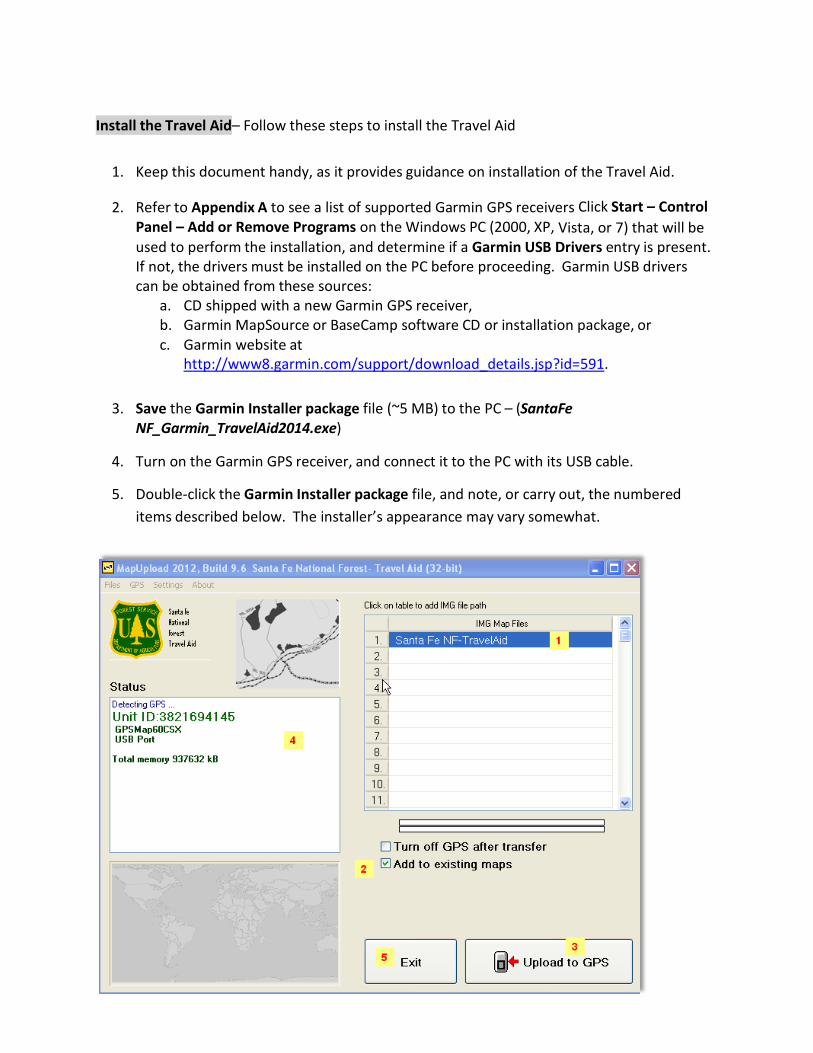
5. Double-click the Garmin Installer package file, and note, or carry out, the numbered
items described below. The installer’s appearance may vary somewhat.

• Item 1 – The Travel Aid’s map is already pre-loaded. No further action is required.
• Item 2 – Check this box to merge Travel Aid map content with the receiver’s existing
supplemental maps. If this box is not checked, existing supplemental map content
in the gmapsupp.img file will be permanently over-written! The default base
map and City Navigator map (gmapbmap.img and gmapprom.img) are not
affected. An alternative would be to install the Travel Aid on a separate micro-SD
card, and swap cards as needed. NOTE: Merging the Travel Aid map with a large
supplemental mapset, like MapSource data, can be extremely time-consuming!
• Item 3 – Click the Upload to GPS button to install the Travel Aid’s map content. • Item 4 - Note the status messages, and wait for the “Transfer complete” message
before proceeding. Do not operate the GPS receiver during the Travel Aid’s
installation. Travel Aid map content totals only about 2 MB.
• Item 5 – Click Exit to complete the Travel Aid’s installation.
Use the Travel Aid – These topics describe general operation and use of the Travel Aid.
Establish GPS reception - Turn the GPS receiver on outdoors, and wait for it to establish a
position fix before using the Travel Aid. Receivers vary, but most provide an indication that GPS
reception has been established, or that the receiver is ready for navigation.
Map page - Display the Map page (left) by cycling through the
receiver’s page sequence, or by opening it from the receiver’s menu.
Feature display – Refer to Appendix B for an example of the symbols
used to represent the Travel Aid’s features.
If it is not already so, change the map’s Detail setting to “Most” in
the receiver’s map setup section. The map’s color scheme was
designed for daytime use, so it is recommended that users manually
change their receiver’s Display Mode to the “Daytime” setting. The
map may be easier to interpret if its Orientation is set to “track up” (for more setup recommendations see Appendix B).
(GPSMap 62sc)
Position and direction of travel - The receiver’s current position will be indicated by an
arrowhead pointing in the direction of travel.

Feature identification – Use the receiver’s Map Pointer to identify unlabeled features.
Zoom levels – Different feature types will appear at different zoom levels. When zooming in,
for instance, roads designated for highway-legal vehicles will be visible prior to the appearance
of roads designated for all vehicles. The map may be viewed at any convenient zoom level, but
the 0.2-mile through 0.5-mile zoom levels are typically preferred for general use.
Hide the map – Users can hide the Travel Aid’s map by un-checking
its “Show” entry in the receiver’s Map Setup section, as at right.
Travel Aid limitations – Unfortunately, the Travel Aid is not a perfect
solution. The following topics describe some of its limitations.
Map visibility – Certain lighting conditions, and limited screen
size/resolution, can impair map visibility. Zoom in, show “most”
detail, and increase screen backlight to improve map visibility.
(GPSmap 60csx)
Feature display - Different Garmin GPS receiver models display feature symbols differently, and
at different zoom levels, depending upon their version of installed firmware.
Road and trail labels – Some receivers display fewer labels, and may drop labels altogether as
they zoom in. Also the map set up properties affect which labels appear (see Appendix B for
map setup recommendations. The images below are from GPSmap 60csx)

Roads and trails are not “routable” – Unlike commercial map content for the Garmin Nüvi, Tom
Tom, Magellan RoadMate, and so on, the Travel Aid’s roads and trails are not “routable”.
Windows compatibility only – The Travel Aid’s installer package is compatible only with PCs
running Windows 2000, Windows XP, Windows Vista, or Windows 7.
Pink or green screen – See Appendix C if a pink or green screen appears instead of the map.
Un-install the Travel Aid – Unfortunately, the Travel Aid’s installer package does not include
an un-install utility. Follow these steps to remove the Travel Aid from a Garmin GPS receiver
(this is only necessary on the older Garmin models).
1. Download and install the Mapwel Demo software (http://www.mapwel.net/down.htm)
on a Windows PC.
2. Turn on the Garmin GPS receiver, and connect it to the PC with its USB cable.
3. Start the Mapwel Demo software, click No when prompted to register, and:
a. In Mapwel, click GPS – Erase Specific
Maps, b. Click Get Map List From GPS,
c. Select the Motorized_routes map,
and d. Click Erase.

KMZ for newer Garmin Units Another product that has been provided is a KMZ (SantaFe_GarminRaster_TravelAid2014.kmz) which is just a tiled image picture of the Motor Vehicle Use Map (MVUM). It will look just like the paper Motor Vehicle Use Map but you won’t be able to query any of it with your cursor. This travel aid will only work with the newer Garmin Units which you can interact with using
file explorer (i.e the Oregon, Montana, GPSMap 62, and GPSMap 78 series).
To add the map, just drag the KMZ into the “CustomMaps” folder of the Garmin unit.

Appendix A – List of supported Garmin GPS receivers The Travel Aid should be installed only on Garmin GPS receivers that are supported by the
Travel Aid’s development software, as listed below. Unfortunately, “supported” is a relative term, as these receivers may display feature symbols differently, and at different zoom levels, depending upon their version of installed firmware.
Garmin ® Nuvifone M20 ™
Garmin ® Mobile XT ™ Garmin
® Aera ™
Garmin ® Oregon ™
Garmin ® Dakota ™
Garmin ® Colorado ™
Garmin ® Montana ™
Garmin ® Astro ™
Garmin ® Nuvi and Zumo (all models) ™
Garmin ® Edge 605, 705, 800 ™
Garmin ® iQue M3, M4, M5 ™
Garmin ® eTrex 20, 30 ™ Garmin
® eTrex Summit HC ™
Garmin ® eTrex Venture Cx, HC ™
Garmin ® eTrex Legend C, Cx, HCx ™
Garmin ® eTrex Vista, C, Cx, HCx ™
Garmin ® Rino 120, 130, 520, 530, 520HCx, 530HCx ™
Garmin ® GPS V ™
Garmin ® GPSMAP 60C, 60CS, 60Cx, 60CSx, 62, 62s, 62st ™
Garmin ® GPSMAP 76, 76S, 76C, 76CS, 76Cx, 76CSx, 78, 78s, 78sc ™
Garmin ® GPSMAP 176, 176C, 276C, 376C, 378, 478C ™
Garmin ® GPSMAP 96, 96C, 196, 296, 396, 496 ™
Garmin ® GPSMAP 620 - only routing maps in automotive mode ™
Garmin ® Quest, Quest 2 ™
Garmin ® Street Pilot i2, i3, i5 ™
Garmin ® Street Pilot c320, c330, c340 ™
Garmin ® Street Pilot c530, c550, 580 ™
Garmin ® Street Pilot 2610, 2620, 2650, 2660 ™
*Disclaimer: This travel aid has not been verified on all these devices, but in principle it should work. Similar travel aids from other forests have worked on these devices.

Appendix B – Travel Aid feature legend for older and newer models of Garmin GPS receiver This table displays the typical symbol set for the Travel Aid. Unfortunately, different Garmin
GPS receiver models may display feature symbols differently, and at different zoom levels,
depending upon their version of installed firmware.
Map Setup Options- Suggested configuration for older units (i.e. GPSMap 60 series):
General Tab: Detail=Most, Auto Zoom= On, Lock on Road= On
Points Tab: Map Points Max Zoom= 1.2km, (the rest AUTO)
Text Tab: All set to ‘small’ or ‘medium’ (certain labels will not appear if these are
set to ‘none’)
Information Tab: Have the Travel Aid map be the only one checked, other maps
might interfere with symbology. Contour/Topo maps should be fine
Map Setup Options- Suggested configuration for newer units (i.e. GPSMap 62s series):
Advanced Map Setup:
Zoom Levels: Land Cover= 120km (the rest AUTO), Text Size: All Small,
Detail: Most, Shaded Relief: Show if Available
Map Information: Disable all maps except the MVUM. The default Worldwide
DEM can be left on to provide hill-shade, or a contour map can be left on-
the contour lines should show through.
Feature Symbol
Public road or highway
Road open to highway-legal vehicles only
Road open to all vehicles
Motorized trail open to motorcycles only
Motorized trail open to vehicles 50 inches, or less, in width
Campground
Picnic area Information site
Seasonal Routes
Corridors open to motorized off-road dispersed camping
Area open to motorized cross-country travel
Wilderness area
Water body

Appendix C – Solutions for the Travel Aid appearing as a solid pink or green screen Issue – Many Garmin receivers will initially display a solid pink or
green screen instead of the Travel Aid’s map. To change this you may
need to disable the Base Map.
Solution for older models (non GPX-based) – For example, receivers
in this category might include the eTrex HC series, or the GPSMap 76C
series.
The solution for this category of receiver is to “hide” the receiver’s
built-in base map. Receiver firmware varies, but equivalent
functionality should be available for most models.
1. Press Page until the receiver’s Map page is displayed.
2. Press Menu, select Setup Map, select the Information tab
(the red circle above right), and press Menu again.
3. Select Hide Basemap (the yellow highlight above right), and
press Enter
Solution for newer (GPX-based) handheld receivers – For example,
receivers in this category might include the Oregon series, or the
GPSMap 62 series.
The solution for this category of receiver is to “disable” the
receiver’s built-in base map. Receiver firmware varies, but
equivalent functionality should be available for most models. The
solution described here is based on a GPSMap 62sc.
1. Press Page until the receiver’s Map page is displayed.
2. Press Menu, select Setup Map, and then press Enter.
3. Select the Map Information Select Map section, and press
Enter.
4. Select the Basemap, press Enter, select Disable, and press Enter again.
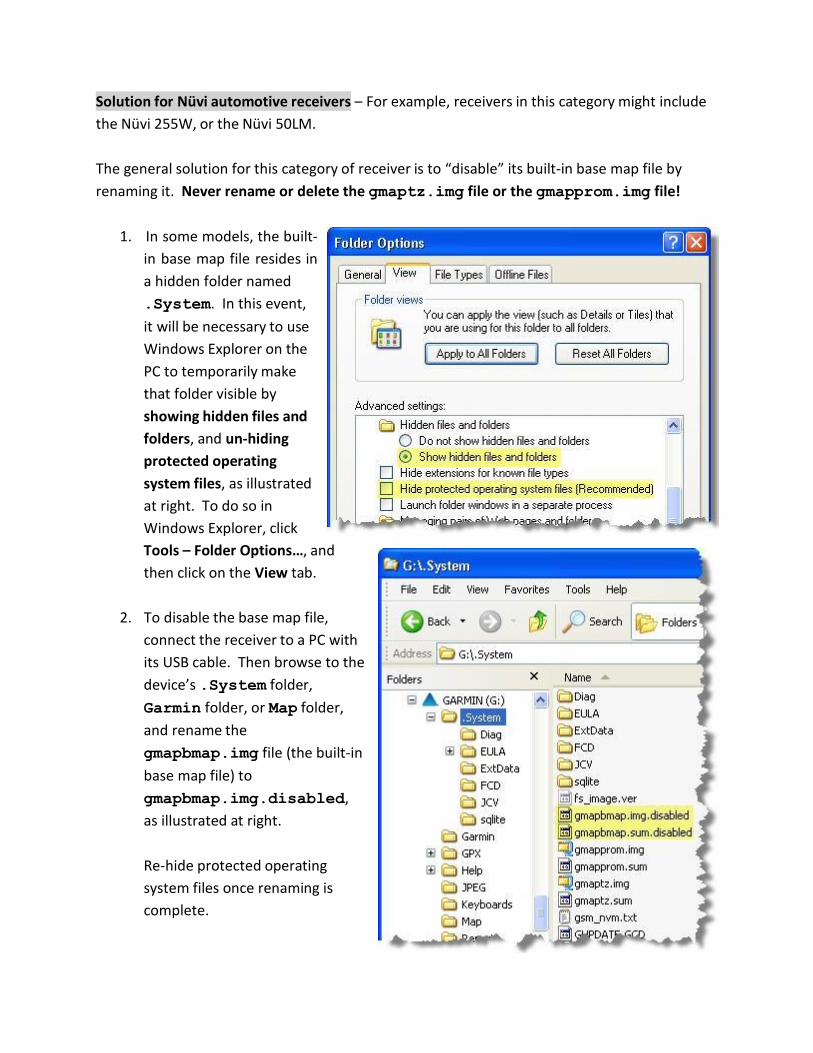
Solution for Nüvi automotive receivers – For example, receivers in this category might include
the Nüvi 255W, or the Nüvi 50LM.
The general solution for this category of receiver is to “disable” its built-in base map file by
renaming it. Never rename or delete the gmaptz.img file or the gmapprom.img file!
1. In some models, the built-
in base map file resides in
a hidden folder named
.System. In this event,
it will be necessary to use
Windows Explorer on the
PC to temporarily make
that folder visible by
showing hidden files and
folders, and un-hiding
protected operating
system files, as illustrated
at right. To do so in
Windows Explorer, click
Tools – Folder Options…, and
then click on the View tab.
2. To disable the base map file,
connect the receiver to a PC with
its USB cable. Then browse to the
device’s .System folder,
Garmin folder, or Map folder,
and rename the
gmapbmap.img file (the built-in
base map file) to
gmapbmap.img.disabled,
as illustrated at right.
Re-hide protected operating
system files once renaming is
complete.
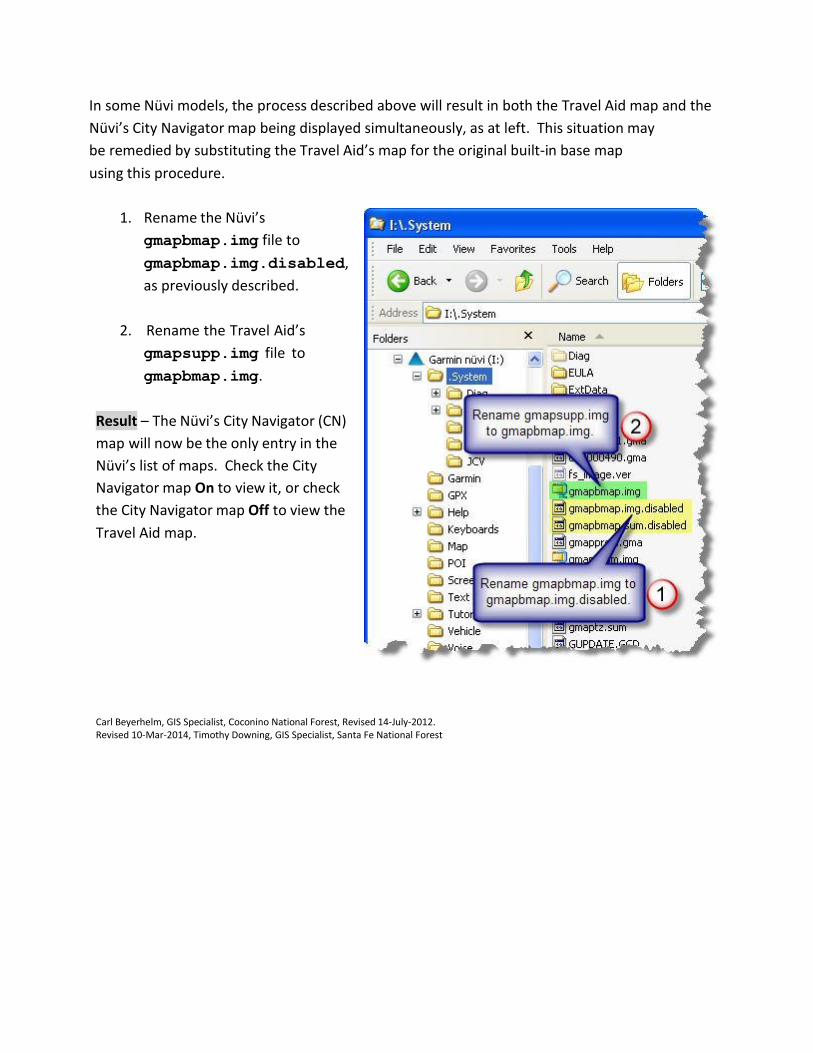
In some Nüvi models, the process described above will result in both the Travel Aid map and the
Nüvi’s City Navigator map being displayed simultaneously, as at left. This situation may
be remedied by substituting the Travel Aid’s map for the original built-in base map
using this procedure.
1. Rename the Nüvi’s
gmapbmap.img file to
gmapbmap.img.disabled,
as previously described.
2. Rename the Travel Aid’s
gmapsupp.img file to
gmapbmap.img.
Result – The Nüvi’s City Navigator (CN)
map will now be the only entry in the
Nüvi’s list of maps. Check the City
Navigator map On to view it, or check
the City Navigator map Off to view the
Travel Aid map.
Carl Beyerhelm, GIS Specialist, Coconino National Forest, Revised 14-July-2012. Revised 10-Mar-2014, Timothy Downing, GIS Specialist, Santa Fe National Forest