guide how to prepare a fronius-inverter for installation ... · the fronius inverter can be...
TRANSCRIPT

Guide how to prepare a Fronius-Inverter for installation to an Energy
Manager
The Fronius inverter can be connected to the internet with the help of a Fronius Data Manager.
Using the IP address of the inverter, the production values of the PV system can be configured with
the Energy Manager.
There are a couple of different ways how to connect the Fronius to the internet. The following steps
are recommended by the Fronius Team.
Setting up the Data Manager Card
On the Data Manager-Card you will find a little switch as indicated in the picture number (1). It
needs to move to position. This enables the card to be on an extraditable state. To configure an unit
using the LAN settings, then the switch must be set to position A.

Activate the WIFI Access Point directly on the Fronius Inverter.
Go to the ‘SETUP’ menu – ‘WiFi Access Point’ – ‘Activate WiFi AP?’
Configuring the system using the interface
Connect to the Access-Point with your laptop using the WIFI-password: 12345678
Open a web browser and to enter the Data Manager by the entering the IP 192.168.250.181

Once the
page has
loaded,
start the
SOLAR.WEB Wizard. (Please note: you don’t need the “Technician wizard” unless you want to
activate the
Dynamic feed-in
reduction)

Enter a System Name (will be the host name as well). Feed-in tariff and grid supply tariff is obligatory
and is just used for the local monitoring system with the inverter.
In the section “Inverter” it is mandatory to enter the device-name and the installed power.

In the section “Network setup” you can choose between 3 different connection modes.
a) Local Network via Access-Point – This should be just used if you don’t have any internet and
the customer wants to track the inverter with a direct connection from his device
b) WIFI – Using the Client’s WIFI connection
c) LAN – Using a direct LAN cable connection
Recommendation: Deselect Fronius Solar. Web so you won’t be asked to open a SOLAR.WEB-
account later on.

Pressing the button “configure WLAN IP” will let you choose between static or dynamic IP

Note - Using Solar.web via LAN will let you choose between static or dynamic IP directly.
Press connect to connect the Data Manager will to the network.

Once the connection is successful the screen below will appear. Once this has been done, you will
have to connect to the WIFI network of the customer again. By doing this, the IP-Address of the
Fronius unit can be found.
If this doesn’t work, then please check following:
• Has the WIFI Access-Point of the inverter deactivated automatically? If not, follow the same
procedures to deactivate the setting.
• Check the switch on the data manager-card. It must be on position B
• The inverter might already be connected to the network but it is not stated. Search for the IP
Address of the inverter

Once connected to the customer network again enter the data manager settings of the Fronius
inverter using the IP 192.168.250.181 -
Once connected, you will be at the Solar.web wizard in the section “Network status”.
Finish the setup with the entering a password. Please note that if you forget the password you’ll
have to call Fronius to get a new one.

Once the setup is complete, you can click on “Homepage” and you’ll be forwarded to the local
configuration page.
Note: if the option “Send data to the Fronius Solar.web” hasn’t been deselected, a login or Register
to Solar.web will appear. This can be skipped by entering the IP-Address in the Address-bar.
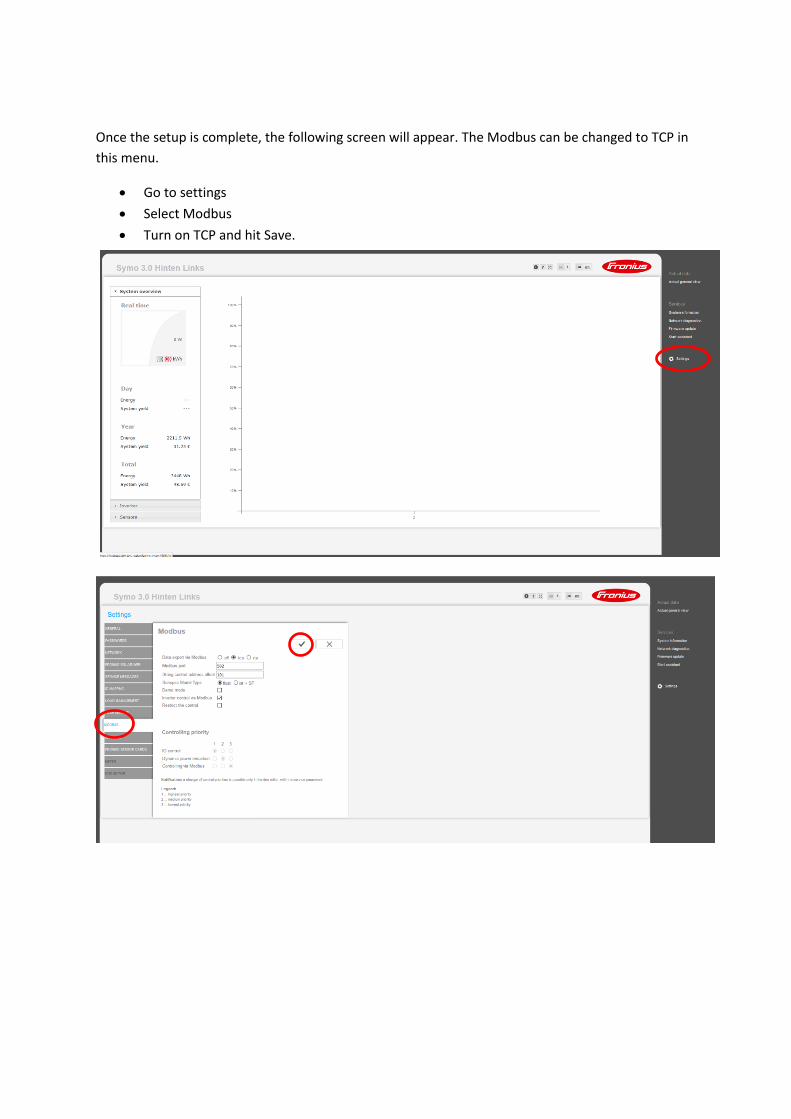
Once the setup is complete, the following screen will appear. The Modbus can be changed to TCP in
this menu.
• Go to settings
• Select Modbus
• Turn on TCP and hit Save.

To add the inverter to the EnergyManager
Add the Inverter to the devices within the EnergyManager
Get on the Energy Manager.
Settings
Interfaces/Drivers
Ethernet
Activate Sunpec [Fronius]
Settings
Enter Fronius IP
Devices
Press + to install the inverter to the manager
Note:
The Fronius inverter shuts down itself every night after PV stops working. This includes the Data
Manager. To reconnect with the inverter the Energy Manager will look for the same host-name
forwarded by the router of the customer.
Some routers do not forward the host name. In such cases, you will only see the IP address of the
unit. In this scenario, the Energy Manager will not reconnect when there is a change in IP. In this
case, a Static IP has to be assigned to the inverter and this will resolve this issue.