guide to better powerpoint · pdf fileslide show presentation: a slide show presentation can...
TRANSCRIPT

Guide to Better PowerPoint Presentations November 2009

About PowerPoint Overview
PowerPoint is the presentation graphics program bundled with Microsoft Office (along with Word and Excel) that lets you build, print, and deliver presentations. A PowerPoint presentation only needs to be created once, but can be delivered in several ways: • Slide Show Presentation: A slide show presentation can
utilize the special effects available in PowerPoint including slide transitions, animations, sounds, timings, and other on-screen features.
• Online Presentation: A slide show presentation can be
saved as a Web page and published on the Internet. • Supplemental Materials: Handouts, Notes Pages, and
Outline Views can be printed and distributed to an audience to support the PowerPoint presentation.
• Overhead Transparencies: A presentation can be printed
directly on to transparencies using the same options as paper printouts.
1

PowerPoint Slide Layout Opening PowerPoint: default slide view
1. Click the button (lower right corner of screen), select Programs » Microsoft Office » Microsoft PowerPoint. By default, the PowerPoint window will open in the Home tab view. The PowerPoint window can be divided into the following areas:
Microsoft Office button Performs many of the functions that were located in the File menu of older versions of PowerPoint. This button allows you to create a new presentation, open an existing presentation, save and save as, print, send, or close. Quick Access Toolbar
A customizable toolbar which contains several of the most used buttons in Office applications – Save, Undo, Redo, Print and Print Preview. You can customize this toolbar by adding and removing as many Quick Access button choices as you wish to display.
Quick Access
Ribbon
Tabs
Microsoft Office button
Slide and Outline tabs
Presentation window
Notes Pane
Status bar
2

Tabs and Ribbons
Tabs are similar to the Drop Down Menu choices in previous versions of PowerPoint. Each tab displays what Microsoft calls a Ribbon, which are PowerPoint commands related to a particular tab’s activity. The Ribbon is designed to help you quickly find the commands that you need to complete a task. The standard tabs include:
• Home: formatting, editing and layout of slides. PowerPoint always opens in the Home tab.
• Insert: insert shapes, more slides, tables, text,
movie and sound clips or anything else.
• Design: page orientation, add themes, change background colors or arrangement of objects
• Animations: Add movement to slides or slide objects
here.
• Slide Show: Look here for anything to do with a slide show ‐ rehearsals, custom shows, record narrations, hide slides
• Review: More editing options‐ spell check, translate
text, editor's comments and markups can be added.
• View: show notes, slide sorter as well as the slide masters, open more than one view of the same document.
Slide and Outline Tabs
The default setting is for Slides. This shows thumbnail views of the slides in your presentation.
Clicking on the Outline tab, will show a text outline of each slide in your presentation. You can edit text here as well.
3

Notes Pane
In this area you can type “speaker notes” for each slide, which you can print out and refer to during your presentation.
Status Bar Located at the bottom of the screen, the Status bar contains the following:
Information about the presentation including slide number and design theme.
View Buttons to change between Normal view, Slider Sorter view, and the Slide Show view
Zoom Control to shrink tor enlarge slides.
To customize the Status Bar, right click on the bar. A list of options will appear
Choosing slide background and text
PowerPoint’s default presentation screen uses a white background with black text.
However, a white background can be harsh on the eyes, especially in a dark room.
Color selections for background and text
Colors can be divided into two different types: warm and cool. Warm colors—reds, yellows, and oranges—stand out more to the eyes and work well for text. Cool colors—blues, greens, and violets—are more soothing and work well as background colors.
Slide Design
4

PowerPoint has several built-in themes that you can use.
1. Click the Design tab
2. Click on the Themes dropdown menu
3. Roll your mouse over the different themes and the presentation window will change to the new theme.
One of the advantages of using a PowerPoint theme is that the color combinations work well together. One of the disadvantages is that most of the themes have design features that look attractive but that can restrict the amount of available space for text and images. Rather than use one of PowerPoint’s theme, let’s simply change the color of our default background to blue
Themes menu
5
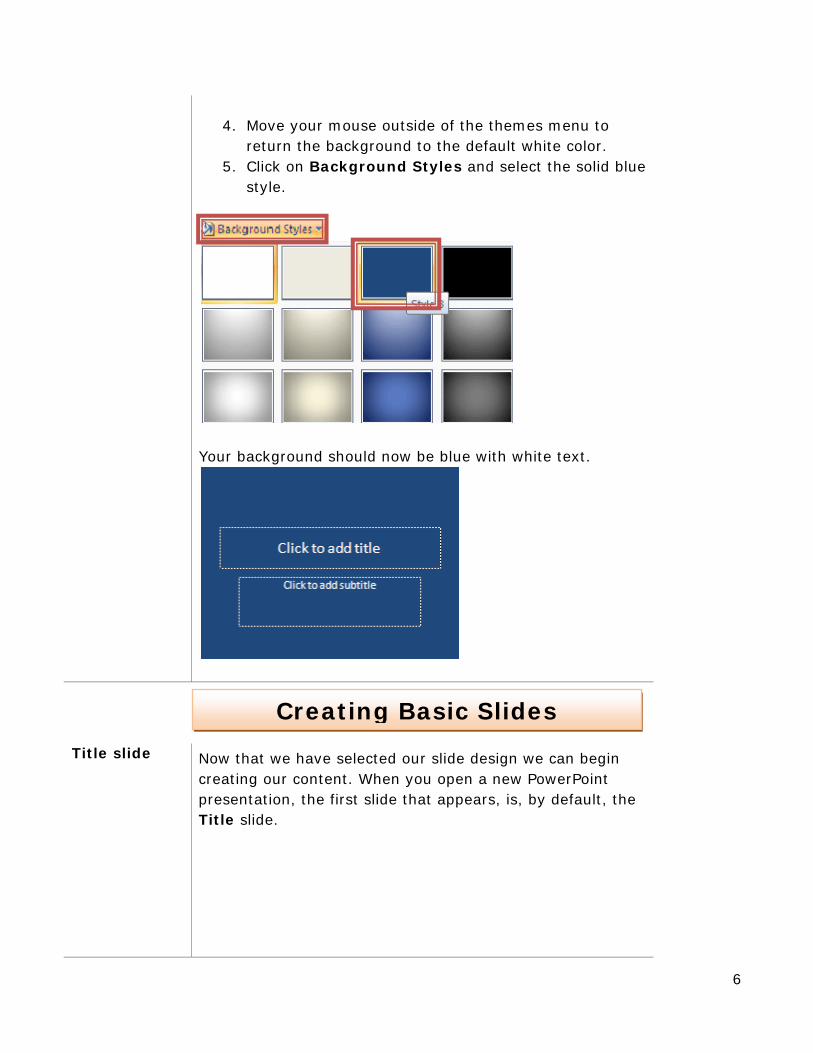
4. Move your mouse outside of the themes menu to
return the background to the default white color. 5. Click on Background Styles and select the solid blue
style.
Your background should now be blue with white text.
Creating Basic Slides Title slide Now that we have selected our slide design we can begin
creating our content. When you open a new PowerPoint presentation, the first slide that appears, is, by default, the Title slide.
6

1. Place your mouse cursor in the “Click to add title” box and type in the following:
People v. David Smith.
2. Click in the subtitle box and type in the name of your county.
Slide 2: Title and Content slide
1. To add the next slide, click on the upper portion of the New Slide icon under the Home tab
By default, the second slide (and every slide thereafter ) is a title and content slide. Bullets are automatically added to each new line of content.
Type the following for the title:
People Involved in this Trial
2. Type the following for the text:
• Defendant - David Smith
• Defense Attorney - Chad Jones
• Prosecutor - Stephen Gallop
Slide 3: Two Column Slide
In this slide we want to have two columns of text.
1. Click on the lower portion of the New Slide icon.
2. Click on the Two Content slide from the layout options.
Two Contentlayout
Slide layout options
New Slide default layout
7
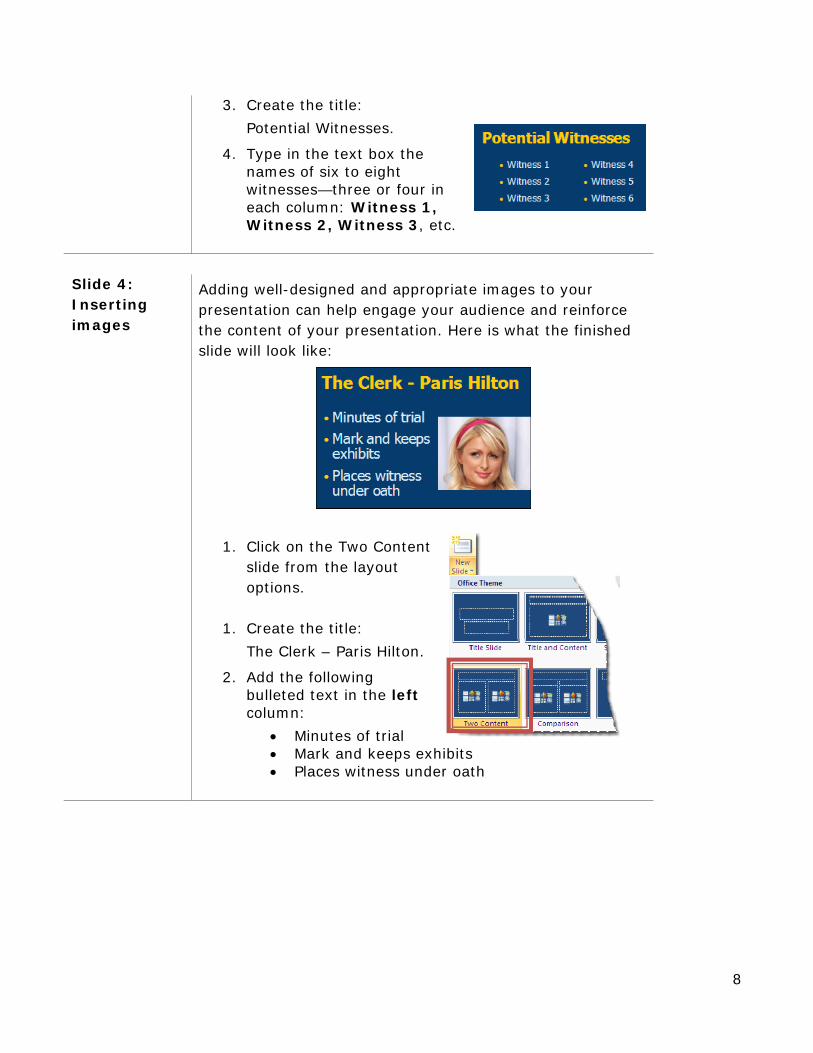
3. Create the title:
Potential Witnesses.
4. Type in the text box the names of six to eight witnesses—three or four in each column: Witness 1, Witness 2, Witness 3, etc.
Slide 4: Inserting images
Adding well-designed and appropriate images to your presentation can help engage your audience and reinforce the content of your presentation. Here is what the finished slide will look like:
1. Click on the Two Content
slide from the layout options.
1. Create the title:
The Clerk – Paris Hilton.
2. Add the following bulleted text in the left column:
• Minutes of trial • Mark and keeps exhibits • Places witness under oath
8

3. In the right column, click on the Insert Picture
from File icon.
4. Locate and open the folder containing the image to be inserted.
5. Double-click the image file.
The image is inserted into the middle of the slide and has handles around it (eight small circles around the outside of the image area).
• To move the image within the slide, point
anywhere within the handles, and when the mouse pointer turns into a four-sided arrow
you can click and drag the image to any location on the slide.
Insert Picture from File
9

• To proportionally resize the image, place the mouse pointer on one of the four corner handles, and when it turns into a two-side
arrow click and drag the pointer.
• To rotate the image, place the mouse pointer on the small green handle at the top of the image, and when it turns into a circular arrow
click and rotate the pointer.
6. Resize and position the image where you want it to appear on the slide.
Shapes Inserting Shapes
Select Insert Shapes to display a number of different types of shapes that can be inserted into your slides to help illustrate your points.
Once inserted, if you double-click the shape, the Format ribbon opens, enabling you to add different effects to the shape. For example, the arrow to the left is the default color and style. To the right is the modified arrow with a different color along with 3-D effect.
10

Inserting a picture inside a shape
1. Go to Insert Shapes and insert a circle into your slide:
2. Right-click on circle which opens this dialog box:
3. Click Format Sand select Fill
Picture or texture.
hape
4. Locate the picture on your computer or network by
clicking on Insert from: File.
11

5. Double-click the image and it will be inserted into your shape.
Eddie, Beaver, and Wally
For circle shapes, if you hold the Shift key while resizing, the circle will retain it’s circular shape.
Overview PowerPoint’s animation effects fall into two categories: slide
transitions and slide animations. Both types of
animations are set from the Animations tab on the
PowerPoint ribbon.
A slide transition is how PowerPoint gets from one slide to the next during a slide show. By default, PowerPoint’s way to move from slide to slide is simply to cut to the new slide. PowerPoint has dozens of slide transition effects, including having slides fade out, dissolve into each other, open up like Venetian blinds, or spin in like spokes on a wheel. You can control the speed of each slide transition effect, and even add sound.
Animation Effects
12

Many of the transition effects look like they would be fun to add, but can end up being distracting to your audience, which is why we recommend that you stick to the default slide transition. Slide animations focus on the content within the slides. Instead of the information on each slide appearing all at one once on the screen, preset animation schemes use special effects to make text, images, or other PowerPoint objects appear in some sort of action, such as "flying" or "dissolving in" on to the screen. These effects can help focus attention to important points in you presentation.
Animating bullet lists
Probably the most popular animation to add to your slides show is having each bullet point appear one at a time. This helps keep your audience focused on the particular topic you are addressing.
Let’s add this animation effect to a previous bullet point slide.
1. Click on the Animation tab to display the ribbon. 2. Click on Custom Animation ribbon.
The Custom Animation pane is now displayed on the right.
3. Open slide: People Involved in this Trial 4. Click anywhere inside the bulleted text so that the
text box is highlighted (a dotted line border should appear around the text box).
5. Click the Add Effect button.
Add Effect button
13

There are different types of animation effects you can add:
• To make the text or object enter with an effect, select Entrance, and then click an effect.
• To add an effect, such as a spin effect, to text or an object that is already visible on the slide, select Emphasis, and then click an effect.
• To add an effect that makes text or an object leave the slide at some point, select Exit, and then click an effect.
• To add an effect that makes text or an object move in a specified pattern, select Motion Paths, and then click a path.
We want the bullet points to enter on a mouse click, which means that the animation will be an Entrance effect.
6. Click Entrance >> More Effects…
7. Select an effect from the Basic or Subtle categories.
like: Appear, Fade, or Dissolve In.
14

Once the Entrance effect is added, the Custom Animation pane displays how the animation will play:
• The numbers by each bullet point show the order that the bullets will enter the screen.
• The animation will start on a mouse click • The animations will enter at a very fast speed
Any of these effects can be modified using the animation pane.
Play Slide 1. From the Status bar at the bottom of the screen, click
the Slide Show icon. This will play the presentation from this slide forward.
You can also do this by selecting the Slide Show tab Current Slide.
2. Use the mouse, or the right or up arrow keys on the keyboard to trigger the animation effect.
Each click of the mouse or arrow key will bring up the next bullet point.
3. Hit the Escape key to end the slide show and return to the editing screen.
Order
Speed
Start Trigger
Order
15

Animating sub-bullet list
1. Click on slide: Stages of the Trial 2. Click anywhere inside the bulleted text so that the
text box is highlighted (a dotted line border should appear around the text box).
3. Click the Add Effect button. 4. Select Entrance Dissolve in (or another basic or
subtle effect).
Similar to the previous slide you will now see numbers by each bullet indicating the order of appearance. Let’s play this slide:
1. From the Status bar at the bottom of the screen, click
the Slide Show icon. 2. Hit the Esc key to return to the editing screen.
Since the second bullet point and its sub-bullets all had the same number, they entered at the same time. What if we also wanted each sub-bullet to enter separately? Let’s take a look at how to accomplish this.
1. Click on the number (1) box to the left of the text: Jury Selection.
Click here
16

This will highlight the animation effect for that text line in the Modify section of the custom animation pane. Notice that the effect will start on a mouse click
1. Click the number (2) box: Presentation of the Case.
Or… Click the text line in the modify section of the animation pane.
This text effect will also start on a mouse click.
2. Click the second number (2) box for the text: Opening Statements.
Notice that this effect will start With Previous.
The remain number 2’s will also start with previous.
Start on click
Start with previous
17

In order to have the three sub-bullets enter separately we need to change how they start.
1. Click the first sub-bullet: Opening Statements. 2. Click on the dropdown menu from the Start window. 3. Select On Click.
The order number for Opening Statements should now say 3.
4. Repeat this process for the remaining two sub-bullets
The finished animation scheme should now look like this.
First sub-bullet
Select On Click
18

On your own…
Do an entrance effect for slide: Potential Witnesses. This is what the animation sequence should look like:
Rather than have each of the witness names appear after a mouse click, we want to have all the names from column one enter after a mouse click, and all the names in column two enter after a mouse click.
The first bullet text in each column should enter On Click. The remaining bullet points in each column should enter With Previous.
Play presentation
Let’s play our presentation from the beginning.
1. Click the F5 key on the top row of your keyboard.
This is the quickest way to play your presentation from the beginning. You can also select the Slide Show tab and click the From Beginning icon.
2. When finished, hit the Escape key to return to the editing screen.
19
Overview To really engage participants your PowerPoint presentations
need to go beyond simply presenting information. One way to do this is use slides that contain thought-provoking images in place of text-heavy bullet lists. Another way is by creating games that require participants to interact with the presenter as well as each another. A game like Jeopardy can also help reinforce critical information. The game allows for adaptation of the questions to any content area and levels of awards based on the difficulty of the question answered.
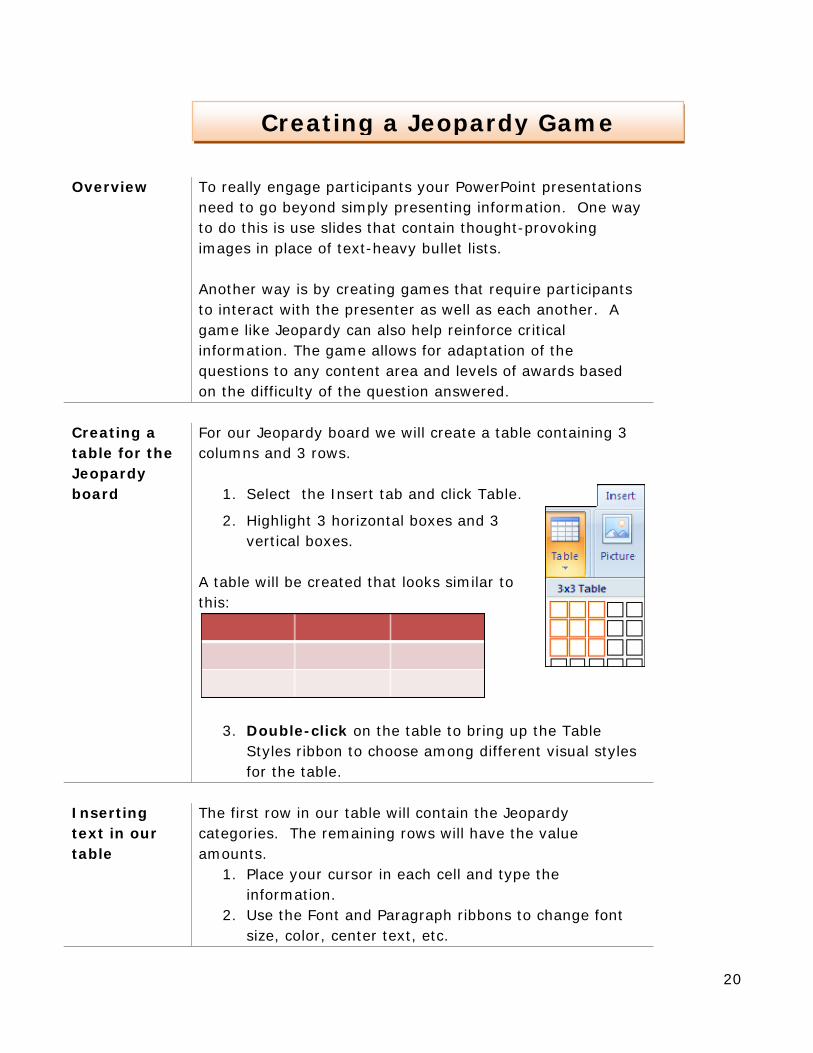
Creating a table for the Jeopardy board
For our Jeopardy board we will create a table containing 3 columns and 3 rows.
1. Select the Insert tab and click Table.
2. Highlight 3 horizontal boxes and 3 vertical boxes.
A table will be created that looks similar to this:
3. Double-click on the table to bring up the Table Styles ribbon to choose among different visual styles for the table.
Creating a Jeopardy Game
Inserting text in our table
The first row in our table will contain the Jeopardy categories. The remaining rows will have the value amounts.
1. Place your cursor in each cell and type the information.
2. Use the Font and Paragraph ribbons to change font size, color, center text, etc.
20

Creating clue and answer slides.
We need to create two slides for each question: the clue slide and the answer slide (in the form of a question). Here’s an example of a clue slide:
Here’s the corresponding answer slide:
Hyperlink the game board categories to the clue slides
The next step involves creating hyperlinks in which a mouse click automatically take you to the appropriate slide.
1. Highlight the first cell number under the first category.
21

2. Go to Insert Hyperlink
In the Hyperlink edit screen which opens, you want to do the following:
1. Select Place in this Document from the Link to menu on the left.
2. Select the clue slide title to be linked to. 3. Click OK.
The game board clue will become blue in color and be underlined, indicated that a link has been established.
4. Repeat the linking procedures for the remaining game board clues.
22

Hyperlink the clue slides
When we click on one of the category values from the game board the hyperlinks we created should now take us to the appropriate clue. To do this we will add images that will act as hyperlink buttons for both the clue and answer slides.
1. Go to the first clue slide:
2. Go to Insert Clipart.
3. The Clipart pane opens w
available images.
ith
lide.
4. Type “question” in the search box, and select one of the question mark images by double-clicking it.
5. Move the image to the
lower right side of the s
23

6. Click the image to highlight it.
7. Go to Insert Hyperlink
8. elect Place in this Document from the Link to
We could have also chosen to select the specific
Smenu on the left.
9. Select Next Slide. 10.Click OK.
slide titl
e as the link. However, by selecting Next Slide, we
can copy and paste this button in the remaining clue slides,knowing that the link will automatically go to the next slide, the answer slide.
Click button image to highlight it
24

Hyperlink the nswer
d the answer we want to be able to automatically return to the game board to choose the next
o Insert Clipart.
2. Type “home” or “back” in the search box, and select e image you would like to use as the button to link
k
In the Hyperlink edit screen which opens, you want to do
e following:
the left. ed
the image and hyperlinks to the rest of the es
Once we’ve revieweAslides category.
1. Go t
thback to the game board.
3. Click the image to highlight it. 4. Go to Insert Hyperlin
th5. Select Place in this Document from the Link to
menu on6. Select the opening game board slide title to be link
to. 7. Click OK. 8. Add
answer slid
25

Printing Options Overview A variety of item rPoint:
• Slides. Prints one slide per page, with all the bulleted items present. This is the default setting.
e page.
s can be printed through Powe
• Handouts. Prints small versions of the slides with multiple slides per page. You may select 2, 3, 4, 6 or 9 slides per page and the slide layout on th
• Notes Pages. Prints the notes with the slides for speaker notes or as a reference for the audience.
• Outline View. Prints an outline just as it appears onyour screen
Print Dialog box
alog box: 1. Click the Microsoft Office button 2. Click Print.
To open the print di
Microsoft Office button
Print button
26

Upper
ortion of rint Dialog
The upper portion of the Print Dialog box contains the following options:
• The Printer Name lets you select from the various printers installed on your computer network. It is set to your default printer.
e
r range of slides. To print a
be collated.
pP box
• The Print Range section allows you to print all of thslides in your presentation (default), just the current slide, or a specific slide orange of slides, type the beginning number, a hyphen, and the ending number (e.g., to print pages seven through twelve, type 7-12). To print non-consecutive slides, type their numbers separated by commas (e.g., to print pages seven and twelve, type 7,12).
• The third section, Copies, allows you to indicate the number of copies, and for multiple copies, if they should
Printer name
Printer range Copies
27

Lower
ortion of rint Dialog
In the lower portion of the Print dialog box you can select what it is you wish to print from a variety of options.
The Print what drop-down box lists the following print formatting choices:
• Slides
View
s, the 3 slides per page option is
pPbox
• Handouts • Notes Pages • Outline
For handoutparticularly useful because it displays small versions of your slides on the left half of the page, and leaves space for your participants to take notes on the right side of the page.
Color/Grayscale is set to Grayscale by default. This option allows you to print your slides quickly by displaying your text in black and white, and your images in shades of gray.
If selected, the Frame Slides option adds a thin frame e
The Pure Black and White This option also allows for rapid printing and may help your images to become clearer. Colors do not always translate well into grayscale, so the Pure black and white option will display them, and all other components of your slides, in black and white.
If selected, the Scale to fit paper option automatically sizes slides to fit the paper loaded in the printer.
around the border of every slide, except when the OutlinView is printed.
Once you have made your selections, click OK to print.
28

eyboard hortcuts
Advance to th
E DOWN, RIGHT
SPACEBAR (or click the mouse)
KS
e next slide N, ENTER, PAGARROW, DOWN ARROW, or the
Return to the previous slide
P, PAGE UP, LEFT ARROW, UP ARROW, or BACKSPACE
ESC or HYPHEN End a slide show
Stop or restart an automatic slide show
S or PLUS SIGN
Go to slide <number> R <number>+ENTE
Display a black screen, or return to the slide show from a black screen
B or PERIOD
Display a white screen, or return to the slide show from a white screen
W or COMMA
Hide the pointer CTRL+H
Redisplay hidden pointer and/or change the pointer
TRL+A
to an arrow
C
For quick access to keyboard shortcuts during your PowerPoint slide show, press F1 (or SHIFT+?)
Tips and Tricks
29
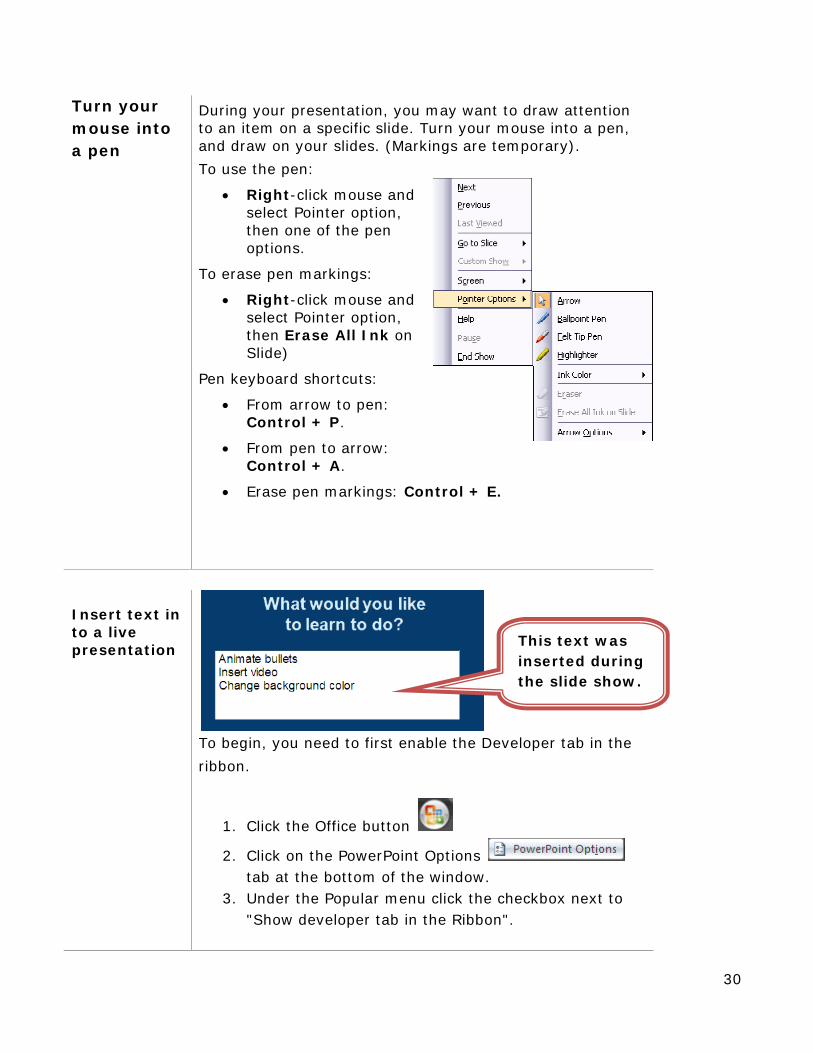
Turn your ouse into
pen
During your presentation, you may want to draw attention to an item on a specific slide. Turn your mouse into a pen, and draw on your slides. (Markings are temporary).
f the pen
nd n, on
kings: Control + E.
ma
To use the pen:
• Right-click mouse and select Pointer option, then one ooptions.
To erase pen markings:
• Right-click mouse aselect Pointer optiothen Erase All InkSlide)
Pen keyboard shortcuts:
• From arrow to pen: Control + P.
• From pen to arrow:Control + A.
• Erase pen mar
Insert text in to a live presentation
To begin, you need to first enable the Developer tab in the
ribbon.
1. Click the Office button
2. Click on the PowerPoint Options tab at the bottom of the window.
3. Under the Popular menu click the checkbox next to "Show developer tab in the Ribbon".
This text was inserted during the slide show.
30

4. Click "OK" when you are done to get back to the
PowerPoint interface, which will shows the Developer Tab added to the Ribbon.
Now, create a new PowerPoint slide and follow these steps:
1. Click the Developer tab.
2. Click on 3. Click and drag a box into the text area of the active
slide. Start in the upper left-hand corner and drag to the right and down.
4. Right click the newly created box and select "Properties".
5. Set the following property values: o Enter Key Behavior--True
o Font--at least 28 (Click Arial and then the "..."
button to change the font size)
o Multiline--True
o Scroll bars--2 for vertical scroll bars
6. to the Close the Properties window and go backPowerPoint slide.
7. Go to the Slide Show view and test slide by typing in enough text so you can see the scroll bar.
8. During Slide Show: when you are finished typing in the slide, click outside of the text box to move to the next slide.
9. Note: Data typed during the slide show will be saved with the presentation. Text typed in a "live" slide can be deleted in Slide Show view. You can also right click on the text box in Normal view and select "Text Box Object" then "Edit".
31

ntroduction methods can greatly enhance the effectiveness of a presentation. Simple visuals heighten interest and focus
on.
r effectiveness of PowerPoint in a
resentation
Guidelines for Effective Presentations
Using a combination of oral and visual communication I audience attention on the main points of the presentati
The right visuals help the audience to listen to the presenter’s explanation, and ultimately, the presenter’s point of view. What follows are some basic, recommended guidelines fomaximizing thep
lide layout 7 x 6 Rule. No more than 7 words per bullet point. No more than 6 bullet points to a slide (4 if presenting to the Judicial Council).
“excess” information. Less information means less e
y lose
istically diverse versus s
les same way a punch line supports a joke.
S
Only critical information should be included in each slide. PowerPoint presentations are most effective with less
distraction. Never try to answer every question visually, thscreen becomes too cluttered. The audience will quicklinterest and become bored.
Prune unnecessary text. Show only key words to reinforce the narrative. But, be careful to keep context intact (e.g., California is linguCalifornia is linguistically diverse - over 224 languagespoken).
Use emphatic headlines.
Concluding slide needs to be strong. Restate the “sapitch,” the
32

Typefaces: style and ize
As a general guide, select fonts from the Sans Serif family of fonts. These are fonts that do not have the little feet or curls at the bottom of letters. Examples include Arial, sHelvetica, Geneva, Verdana, Tahoma, and Avant-Garde.
Sans serif fonts are easier to read on-screen and from a distance, which makes them best used for body text onslide so that the viewer can quickly read the points and
a
return their attention to the speaker.
Serif fonts are those with feet on the letters. Typical serif fonts include Times New Roman, Bookman, Courier, Palatino, Century Schoolbook, and Garamond.
The feet on Serif fonts help make the letters flow together. This makes them easier to read on the printed page, especially when text is small and tight. The eye takes longer to read a serif font, so it is best used as a title font on a slide so that the viewer spends a little more time reading the title to understand the topic of the slide. You may want to use a serif font for your notes pages.
Typefaces and fonts affect the eye movement of the audience. Use upper case and lower case. All caps leave no room for emphasis. For example:
MORE THAN SEVEN CONSECUTIVE UPPER CASE WORDS WILL FORCE THE AUDIENCE TO READ AGAIN.
versus
More than seven consecutive UPPER CASE words will force the audience to read again.
With body text, u
You should try to use at it is easy to read. Som for font sizes are as follows:
and 26
size 2 points for every foot of viewing distance
se only one typeface per slide.
as large a font as possible so the guidelines
• Title Font – between 40 and 44 point • Main Body Font – between 32 and 38 point • First Level Sub-Point Font – between 28 and 30
point • Second Level Sub-Point Font – between 24
point
Increase fontfrom screen, starting with 12 point at 1 foot.
33
34
Color es the ttention span of the audience. But, use color with restraint.
Most readable color combinations: Dark blue background
topics, policy decisions may
olive, teal).
Incorporating color into a presentation increasa
with yellow or white text.
Meanings commonly associated with background colors:
Green
Stimulates interaction, good for education ormanagementbecome more visually effective (forest green,
C d onveys neutrality, lack of commitment, anGray frees presenter from determining audience
r rcoal/dark gray). Introductory esponse (chavisuals between sections: charcoal dark gray.
Stimulates and motivates the audience to action (dark red, maroon, crimson tone).
Red
Conveys finality, no room for emotional Black influence, control. Use as an end slide (fade
through black) to return audience attention to the speaker.
T g a c
Avoid the fo
• Red/Green
• Blue/Purple
ry usin hange of color for a change of topic.
llowing background/text combinations:
• Brown/Green • Blue/Black
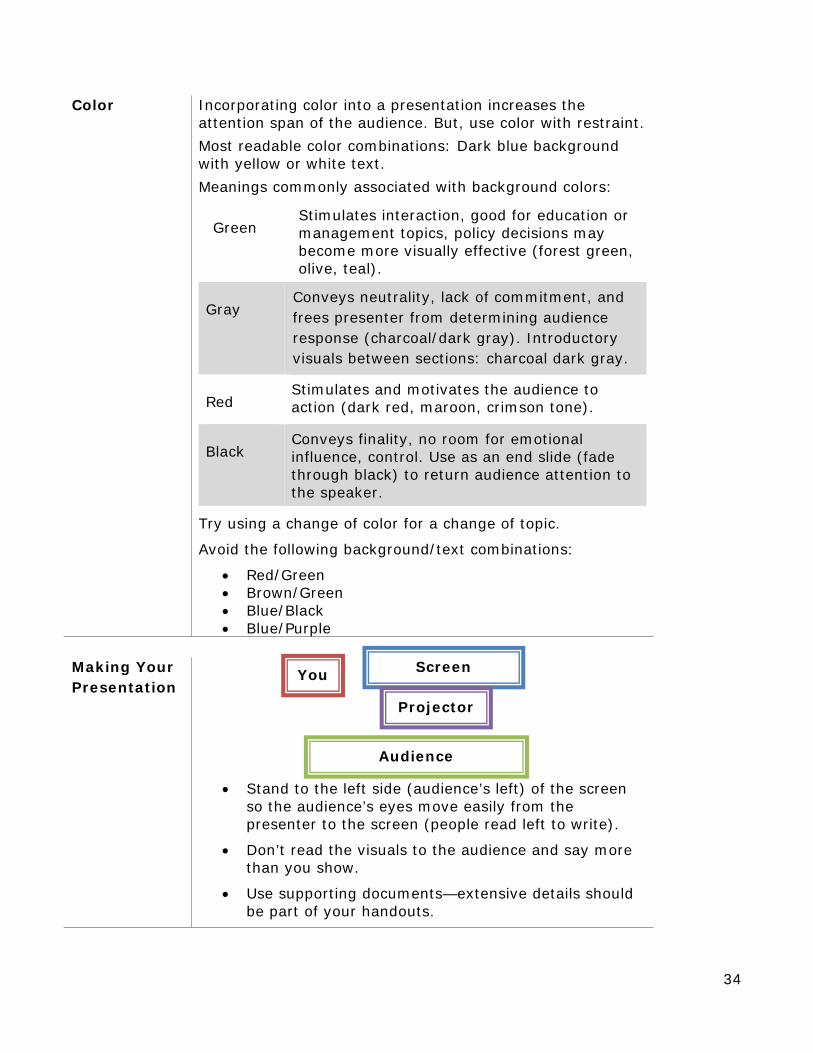
Making Your Presentation
Stand to the left side (audience’s left) of the screen so the audience’s eyes move easily from the presenter to the s le read left to write).
•
creen (peop
• Don’t read the visuals to the audience and say more than you show.
• Use supporting documents—extensive details shouldbe part of your handouts.
Screen You
Projector
Audience