guide to completing your basic payment scheme application online · 2020-04-23 · contents: page...
TRANSCRIPT

1
Guide to Completing your Basic Payment Scheme Application Online

2
Contents: Page How to Register 4 How to Login 5 Direct Payments Homepage 6 Starting Your BPS Application 7 Applicant Details Screen 7 I do not have Land Changes 9 I have Land Changes 11 Delete Parcel 12 Adding a Parcel 13 Adding a New Plot 17 Drawing a Plot 18 Sub Dividing a Parcel 20 Sub Divide a parcel in a Transformed County 24 Requesting a change to MEA 27 Warning Messages 28 Greening 29 Application Summary 30

3
Contents: Page Preliminary Checks 33 Correspondence 34 GLAS 35 GLAS Actions 36 Organics 40 Who to Contact 44

4
How to Register for Online Services
First time users please go to www.agfood.ie and click on the button in order to
create an account.
You will need your PPSN number to Register.
Once you click the button you will need to complete some personal details. The next
step is to create a Username.
You must then create a Password, this must contain between 6 and 12 letters, a number and
a symbol.
Retype your chosen password in the “Confirm Password” field.
Answer the 2 security questions and retain your answers.
Click on the Button.
Your PAC (Personal Access Code) will issue to you in the post once Registration has been
submitted.
Please retain your Username, PAC and Password as these will be required each time you
log on.

5
How to Log in
Once you receive your PAC, (Personal Access Code) in the Post, you will be able to Login to the
Agfood Online system at www.agfood.ie
Step 1. Enter your Username
Step 2. Enter the 3 requested digits of the 7 digits of your PAC (Personal Access Code)
Step 3. Enter your Password
Step 4. Click
Once you have logged in, you will be presented with the screen below. You are invited to select from
a range of Department schemes and services.
Please click on the link in order to start your BPS application.

6
Direct Payments Homepage
You are now in your Direct Payments Homepage - There are five boxes on this page
Applications – This is where you will start your BPS application
Correspondence – You can view all BPS Correspondence and previous years SPS Correspondence
News – This is an active News reel to keep you up to date on all the latest Scheme news, click on the
‘View’ button to read the news in full.
Greening- This will display your Greening status and alert you to your obligations under Greening if
you are not in the “Greening By Definition” Category
Entitlements – Displays your current Entitlement Position

7
Starting your BPS Application
To start your BPS application –click ‘Start Application’
Applicant details screen
The Applicant Details page is pre-filled with your personal details which can be updated by clicking
on the email link provided.
This page also provides options to tick boxes if you wish to avail of other schemes – e.g. ANC.
Your latest entitlements are also displayed

8
Click Buttons to choose type of application you wish to submit i.e. No Land Changes or I have Land
Changes
Where an AREA OF NATURAL CONSTRAINTS (ANC) payee in 2019 does not tick the checkbox for
ANC, a warning appears and you will be given the option to apply again here by selecting ‘I want
to apply for ANC’ or selecting ‘I do not want to apply for ANC’
Similarly, for Young Farmer Scheme (YFS), an existing YFS applicant who does not tick to continue
in the scheme for 2020 will receive the warning message below.
If you have ticked the boxes to apply for ANC or YFS, the warnings will not appear.
If you select to continue in YFS the below important information appears, please read the message
and click OK if you agree with the YFS terms and conditions.

9
No land changes application
If you do not wish to make any changes to your application you can click on the “I do not have land
changes” button at the bottom of the Applicant Details page and you can proceed to a Summary of
your land which you must review carefully.
PORTLAOISE

10
You should ensure all land farmed by you is claimed and that the Claimed areas and Crop types are
also correct. Please ensure no land parcels are missing from your application.
The system will also inform you if your application is displaying less land than entitlements. This warning does not stop you from proceeding with your application, it is simply a reminder to
review your land carefully and make sure it is all present before you Submit.
If you need to make changes you can click the “Cancel” button which will return you to the Applicant
Details page where you can select the “I have Land Changes” button
If you are happy to proceed you should click on the Button. After you click Submit, you are
prompted to agree that you have read and accept the Terms & Conditions. Click OK to submit your
application
Your application has now been successfully submitted and you will receive the following
confirmation

11
I Have Land Changes
If you have changes to make to your application, you should click the below button on the Applicant
details screen:
This will bring you into the Land Details screen.
The Land Details screen is pre-filled with details based on your previous year’s application.
This is where you make your claim for payment, by declaring your crops etc.
This screen will display the following columns, some of which are editable if you need to make
amendments.
Townland - The townland name where the parcel is located (Non-Editable)
Parcel/Plot Number - A unique Land Parcel Identification System (LPIS) number identifying that
parcel (Non-Editable)
Commonage Fraction(Where applicable) - The fraction of the Commonage you are claiming
(Non-Editable)
Digitised area - the total area within the parcel as determined by the Department (Non-Editable)
MEA- Maximum Eligible Area as determined by the Department (see below) – (Non-Editable but
you may request a change to this area if you have cleared out scrub etc. To request a review of
this area, tick the “Request Change to MEA” box. This will provide you with a dialogue box where
you can explain the reason for requesting the change to MEA)
Claimed Area - The area you wish to claim for payment under BPS, If the claimed area is
incorrect you may amend it here (Editable)
Ownership Status - You must select from the dropdown menu here to state if the parcel is
Owned, Rented or Leased (Editable)
Parcel Use - Select your crop from the dropdown menu that applies to that particular parcel. If
the parcel use displayed has not changed, there is no need to amend (Editable)

12
How To Delete A Parcel
Clicking on the “Delete Parcel” icon will turn the line Grey and put a line through all the details
for that parcel.
You may need to use this option if a parcel you Rented/Leased in previous years is no longer
available to you.
If you wish to reinstate the parcel you may do so by clicking on the “Undo” icon

13
Adding a Parcel
If you have rented new land, you will need to add this to your BPS application. To do so, click on
the button. There are two ways of adding a New Parcel to your application.
Option 1 - If you know the LPIS number of the parcel you can input it into the ‘Parcel Search’
box and click on “Search”

14
This will return the parcel information to you and you will only have to input the Claimed
Area, the Ownership status and Parcel use as appropriate. Please see screenshot below.
Click on the “Next” button and the parcel will be added to your parcel list on the Land Details page.
Please note, you cannot click the “Next” button until you have completed all 3 boxes.

15
Option 2 - If you do not know the LPIS number you can search for a parcel using the 2nd option.
Select a County from the dropdown menu
Select a Townland from the dropdown menu
Click on the “Open Map” button
Once you are presented with the map you can select a parcel from the chosen Townland by clicking
on the “Select Feature” link on the left-hand side of the page
Double-Click on the parcel you wish to claim, and the boundary and parcel number will highlight in
red.

16
The details of the parcel will be presented to you on the right-hand side of the page.
If you have selected the wrong parcel you can click on the button and start again.
If you wish to claim this parcel you can do so by clicking on the button.
Clicking on the button will return the parcel information to you and you will only have to
input the Claimed Area, the Ownership status and Parcel use. Please see screenshot below.
Once you have completed the details click on “Next” and the parcel will display on your land details
page. Please note, you cannot click the “Next” button until you have completed all 3 boxes.

17
Adding a New Plot
If you wish to claim a new Plot you must click on the button. This will present you with
the box displayed. You might do this if you are renting part, but not all of a LPIS number.
1. From the dropdown menu select the County. 2. Select the relevant Townland. 3. Add the Plot Reference e.g. Plot 1. 4. From the dropdown menu, select whether the plot is 'Owned', 'Rented In', or 'Leased'. 5. In the Claimed Area box, declare the net area, in hectares, that you wish to claim for this plot. 6. From the dropdown menu, select the Plot Use for 2020. 7. If the plot is part of a Commonage, Tick the Commonage Plot box and enter the commonage
fraction share in the boxes that appear after you tick. 8. Select from the options listed how you would like to submit the map for the plot. 9. Click next. 10. When you select the “ Map Online” and click” Next” it will bring you to the map and to the
centre of the Townland selected where you can draw your Plot.
When you select the “ Map Online” and click” Next” it will bring you to the map and to the centre of the Townland selected where you can draw your Plot
18
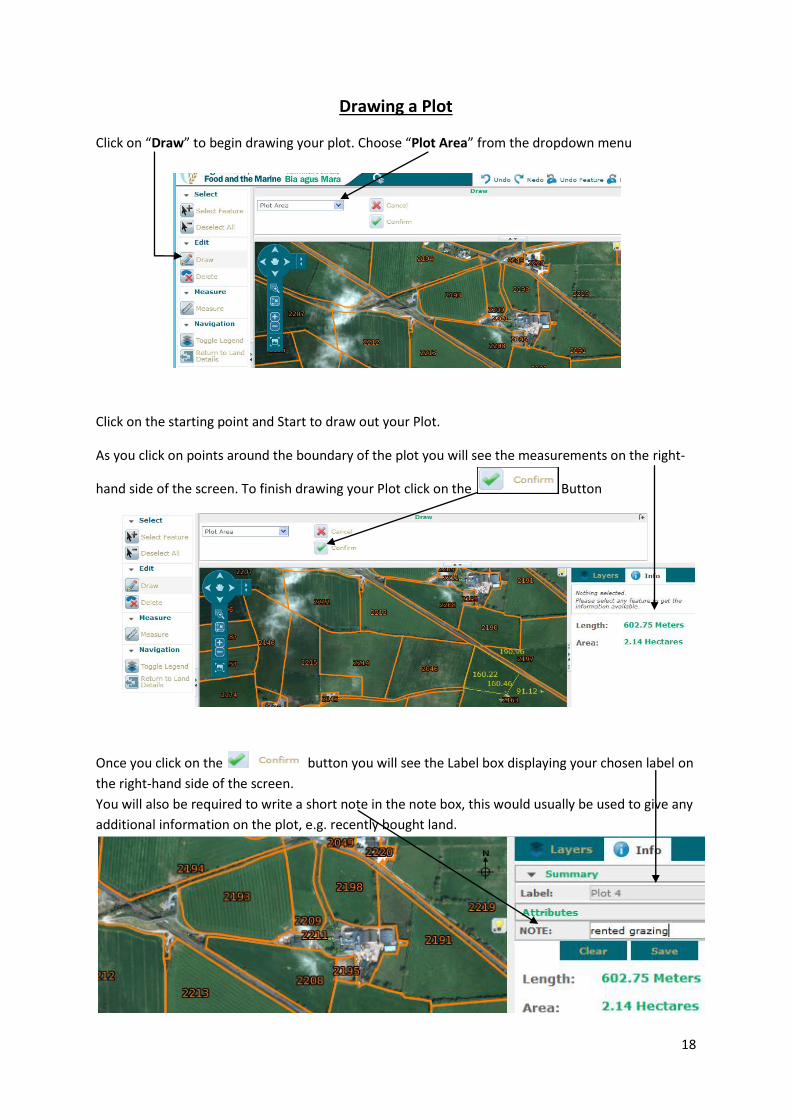
Drawing a Plot
Click on “Draw” to begin drawing your plot. Choose “Plot Area” from the dropdown menu
Click on the starting point and Start to draw out your Plot.
As you click on points around the boundary of the plot you will see the measurements on the right-
hand side of the screen. To finish drawing your Plot click on the Button
Once you click on the button you will see the Label box displaying your chosen label on
the right-hand side of the screen.
You will also be required to write a short note in the note box, this would usually be used to give any
additional information on the plot, e.g. recently bought land.

19
If you are not satisfied with the drawing you can click on the button and start the
process again.
If you are happy with your drawing you can click on the button on the right-hand side of
the page.
To return to the Land Details page click on the link on the left-hand side of the page.
Your Plot will be displayed on the bottom of the Land Details page. You may have more than one
page of Parcels/Plots.
If you return to the Land details page from the map and you failed to save your drawing you will see
the “No Map Drawn” warning message on the plot line

20
Sub Dividing a Parcel
To Sub Divide a parcel Click on the icon for that parcel at the end of the row.
You will be brought directly to the Map for that parcel where you can draw your sub division.
Start by clicking on the “Draw” button on the left-hand side of the page. You are now ready to draw
the sub dividing lines on the parcel
Firstly click outside the parcel boundary and drag your mouse across the parcel to click outside the
boundary on the other side of the parcel thus dividing the parcel. You will need to draw 4 points on
the map, all outside the boundary.

21
Once you have completed the 4 points and you click on the button the lines will snap
back to the boundaries.
You will then be presented with a text box on the right-hand side of the page where you will be
required to select the parcel use for “Part A”. Beneath this you should input the Claimed Area
considering any exclusions on the sub-division.
You will also be given the opportunity to add a note should you need to clarify what you have drawn.
Clicking on will allow you to complete the Parcel use for part B.
Once you have completed part B you have the option to if you are not satisfied with the
drawing. Click on if you wish to divide the parcel into more than just 2 parts or click on
to complete the sub dividing process.

22
Once you click on you will see your sub division drawn on the map. Click on “Return to
Land Details” on the left-hand side of the page to go back to the Land details page.
Example below shows three Sub-Divisions.

23
Once you have completed your Sub-Division, click on “Return to Land Details” on the left-hand side
of the page to be brought back to the land details page.
You will notice the original parcel is greyed out and there is a line through the parcel details. The
parcel displays in its sub divided state on the bottom of the page. (Please note there may be more
than one page of parcels and the sub divided parcels will be on the last Land Details page)
If you wish to delete a sub division you can click on the “Delete” icon which will display on the parcel
for the last part of the sub division.

24
Sub-Divide a parcel in a Transformed County
To sub-divide a parcel click on the icon on the end of the parcel row.
This will bring you to the map for that parcel.
Click on the “Draw” button on the right-hand side of the map.
You are now ready to draw the sub dividing lines on the parcel.
Firstly, click outside the parcel boundary and drag your mouse across the parcel to click outside the
boundary on the other side of the parcel thus dividing the parcel. You will need to draw 4 points on
the map, all outside the boundary. Once you have completed the 4 points and you click on the
“Confirm” button the lines will snap back to the boundaries.
You will be required to add a note, you may input the crop type for this part of the parcel.
Once you have input the note, click on the “Confirm” button

25
You will then be required to input a note for part “B” of the parcel. Input the crop type and click on
the “Confirm” button
The parcel has now been divided into A & B. If you wish to divide the parcel further click on the
“Divide B” button.
If you wish to delete the drawings click on the “Clear All” button.
Click on “Return to Land Details” to proceed with your application.

26
When you return to the land details page the sub-divided parcel will appear at the end of your parcel
list. The original parcel line will be greyed out with a line drawn through the details.
Parts A & B will display in red until you input the parcel use

27
Requesting Change to MEA
MEA- Maximum Eligible Area as determined by the Department – It is not possible to amend the
MEA but you may request a change to this area if, for example, you have cleared out scrub and want
to increase your eligible area or if you have taken out a site for a house and want to decrease your
eligible area.
To request a review of this area, tick the “Request Change to MEA” box which is located in the
centre of each parcel row. This will provide you with a dialogue box where you can explain the
reason for requesting the change to MEA.
You can also click on the “Edit Map” button and draw out the area you have cleared on the map.

28
Warning Messages
One of the benefits of applying Online is that the system will warn you if you are missing any
information or if you are Overclaiming on any parcels, thus reducing the risk of penalties.
Additionally, if you leave any of the fields blank on the Land Details page you will be presented with
a warning message stating that you are “Missing Mandatory Information” and the parcel line in
question will turn pink as per screenshot below.
If you enter a claimed area that is greater than the MEA (Maximum Eligible Area) you will be given a
warning message to say that you are over claiming on that parcel and the parcel line in question will
turn yellow as per screenshot below. This can help avoid penalties occurring.

29
Greening
There are three pages within the Greening section – Crop Diversification, EFA and Greening
Summary.
If you are Greening by Definition, no further information is required, and you will be brought
directly to the Greening summary page.
If you have an obligation under Greening, please see Help video on the Department’s website.
Once you are compliant under Crop Diversification and EFA you can proceed by clicking to
the Application Summary page.

30
Application Summary
The Application Summary is the last stage of your BPS application
Check that all personal details are correct
Check that all Land Details and Totals are correct – make sure all your land is claimed
Add notes to your application

31
Pre- Submission Checklist box.
- If you had selected to Edit a map online but failed to draw the plot you will be given a
warning message requesting you to return to the Land Details page to draw your plot or you
can change your map submission method here to “Upload map” or” Post map”. See
screenshot below
Once you are satisfied with your application you must tick the box to accept the Terms & Conditions.
The button will not activate until you have ticked the Terms and Conditions.

32
You will be presented with the message below. Click on to proceed or
to go back and further review your application:
Click on the button
You will then be presented with the Confirmation page
You can now make “Amendments” if necessary

33
Preliminary Checks
Log on before 12th June to reduce your risk of penalties.
Preliminary checks alert you to over claims, overlaps and dual claims and allows you amend certain
errors thus reducing your risk of penalties
Further information is available on the Department’s website, www.agriculture.gov.ie. and on
www.agfood.ie. A step by step outline is available to guide farmers and advisors through the process
of responding.

34
Correspondence
You can check for Correspondence at any point throughout the year by clicking on the
“Correspondence” button on the top green banner on your homepage.
To respond to a query letter, click on the radio button beside the letter in question and then click on
“View”
You will then be given the option to “Respond” to the query

35
GLAS
If you are a GLAS applicant please read the GLAS information carefully before starting you BPS
application.
Click on the button to complete your BPS details. You will notice that all parcels that are
listed on your GLAS plan have a tick in the GLAS column.
GLAS Warnings
If you try to change the Parcel use of a GLAS parcel you will receive a warning message alerting you
that you are making an amendment that may affect your GLAS payment.
If you try to Sub divide you will see a warning message alerting you that you are splitting a GLAS
parcel and it may affect your GLAS payment.
Once you have completed your Land details you can click on the button to review your
GLAS actions.

36
GLAS ACTIONS
The first GLAS page displays your Area actions. If you have made any changes to GLAS parcels on the
Land Details page you will see a warning message here.
You must follow instructions on these warning in order to proceed.
If you change the GLAS claimed area to an area greater than the GLAS Max Claim you will recieve the
warning message displayed below alerting to to an over claim.

37
Linear Actions page

38
Numerical Action Page
Whole Farm Actions
Commonage Actions

39
Catch Crops

40
Organics
If you participate in the Organic Farming Scheme you will need to tick a box on the Applicant details
page at the start of your application.
As you will need to supply the Organic status for each parcel the “I do not have land changes”
button will not be available to you. You must click on the “I have land changes” button to proceed.
You must declare the organic status of every parcel in your application by selecting 'Conventional',
'Organic - In Conversion' or 'Organic - Converted' from the dropdown menu on every parcel.
You will notice that each line will display in pink with a warning message to tell you that you are
missing Mandatory information until you select the Organic status for each parcel.

41
As you select a status for each parcel the line will change from pink to white.
When selecting the Ownership status for each Organic parcel you will notice a warning message if
you select “Rented in”. This is because Rented land is not eligible under the Organics scheme.
Similarly, if the parcel is a Commonage Parcel you will see a warning message notifying you that
Commonage parcels are not eligible for the Organic Farming Scheme
If your Organic parcels are on Leased land you will be prompted to input a lease end date once you
have selected “Leased In” from the dropdown menu.

42
The button at the bottom of the page allows you to save any changes you have made,
and you can return to the application at a later stage.
When all parcels are updated on the Land Details page, click on to progress to the next
stage which is your Organics page.
All parcels that were given an Organic status of Organic- In Conversion or Organic – Converted on
the Land details will carry across to this page.
You can amend the Reference Claimed Area. If you claim an area greater than the Reference area a
warning message will display alerting you to the over claim.

43
Who to Contact
Contact Details
If you have forgotten your PAC, Password, or are having any difficulties logging on, you can e-mail the Department at
Lo-call 0761 064424
You can also write to:
Online Services HelpDesk, Department of Agriculture, Food & The Marine, Government Offices, Farnham Street, Cavan, Co Cavan. H12 D459
0761 064424 for queries on Registering for Online Services or queries relating to logging in to your
Online account.
For assistance on completing your BPS application online help videos are available on
www.youtube.ie and www.agfood.ie or you can speak to one of our officers who can guide you
through the process on 0761 064420.