guide to guitar recording
TRANSCRIPT

THE CM GUIDE TO RECORDING ELECTRIC (AND ACOUSTIC) GUITAR I. INTRO: Okay, so you consider yourself to be a pretty good guitarist. You’re in a band, you’ve got a few decent guitars, a good amp, some effects pedals, etc. You and your band rehearse a few days a week and dream of stardom with all the goodies that go along with it - money, travel, videos, girls (or boys), and fame. However, before you can achieve that world famous status, you’ve got to get your music played where everybody can hear it. You need a recording! But you don’t have a lot of money or a big time producer. Wait a minute...you do have that pretty good computer sitting there that you use to download songs and instant message your friends. But how do you get your music into that box? Well, that’s a question that requires more than one issue to answer. For this issue, however, we’re going to examine how to record your GUITAR into that computer. This article will deal with exactly you’ll need for that - what equipment, what software, what kind of cables, plugins, effects, etc. A one-stop guide to recording your guitars - both electrics and acoustics - into the computer. Back in the “old days”, recording your guitar meant having to have expensive tape recorders, expensive microphones, a lot of effects, and a big room. Not any more. Thanks to the wonders of modern technology, there are software versions of every type of guitar amp and effect. There are even programs you can buy that will play the guitar parts for you if your level of musicianship if more of the “beginner” type. Don’t have any high-end mics? No sweat - there is software available that will make your cheapo mic sound like a very expensive Neuman U87, long considered the ‘prima donna’ of recording microphones. Don’t have a pedal board? Who needs one? There are software packages that have every kind of fuzz, overdrive, chorus, flange, eq, delay, and wah-wah available right inside your computer. And most of these wonder softwares are not expensive at all. You are extremely fortunate to be living in an age where the playing field is truly level. Money is not the great divider between those that can make a great recording of their guitars and those that can’t. The only thing that hasn’t changed is that you still have to have some idea of the music you want to create inside of your head. There isn’t a software available yet that will do that. But if you know what type of music you like, we will show you how to make a professional sounding recording with a minimum of fuss and muss. Sit back, change your strings, and get ready to make some noise!
II. WHAT YOU NEED AND WHY: First off, you’ll need a decent guitar. No matter what other equipment you get, that is the single most important item. Whether you’re recording an electric or acoustic guitar, make sure it has strings on it that aren’t as old as the editor of this magazine (we’re talking really OLD here…). It should be in decent condition hardware-wise. The pickups should be decent, the tuning pegs should turn smoothly, and there should be no scratching noises when you turn the volume or tone knobs. If it’s an acoustic, there should be no buzzes or noises coming from inside the guitar. There are amazing values in Chinese made guitars nowadays. You can get a Les-Paul or Strat type guitar that sounds and plays as good as the name brand models. So if your instrument is a piece of $#!!!#, get a new one as soon as possible. Skip a few lunches, a few movies, and that new Playstation game, and you’ll even have change left over. Let’s start with what the basic essentials are for recording an ELECTRIC guitar: 1. Effects Pedals: (Distortion, Flangers, Phasers, Chorus, Delays, Wah-Wahs, Envelope Filters, Volume, Reverb, Compressors) - EVERY guitarist needs at least a few of these. (photo #8) It’s really hard to play that great part if you can’t hear the effect as you‘re playing. You need to adjust your playing style to match the attack of the distortion pedal or the speed of the delay pedal. b. Preamps: In order to get your guitar signal recorded at a good level you’ll need a Preamp. You can either use a standalone model (photo #7) or the preamps included on your mix desk if you’re using one. Mackie boards are known for having excellent preamps built in. Standalone preamps are a very subjective subject - you can spend as little as as $100.00 or as much as $5,000.00 on one. It depends on your budget and whether you can actually hear the difference. If they all sound the same to you, save your money and get the inexpensive one. c. Microphones: You’ll definitely need one of these if you’re mic’ing your acoustic or your electric guitar amp. Although there are acoustic guitars with pickups built in (photo #2), there is a definite difference in sound with a real mic. The pickups in acoustic guitars tend to make the guitar more “electric sounding”. (In a live performance, these are better because they are easier to be heard over the drums, etc.). If you have a decent acoustic guitar, whether it’s a steel or nylon stringed model, a good mic will give a rich sound, complete with the much wanted sound of the pick strumming across the strings. One of the most beautiful sounds from an acoustic guitar. Placing a mic in front of your amp’s speaker (photo # 6) will also give you a more natural sound as opposed to using one of the amp simulator recording pedals. However, not all of us have dedicated studio setups, and that amp pedal will definitely help you keep the noise factor down at night, and keep Mr. Landlord and the Police away from your front door. d. Hardware Guitar Processors: These are a fantastic innovation in recording guitars. The M-Audio Black Box (photo #4) gives you all the effects you need in one convenient box, plus a built in preamp, USB connection to the computer, and a drum machine with a 100 drum patterns for practicing. It even mounts on a mic stand for easy access. There are other models like the Line 6 Tone Port or the Roger Linn AdrenaLinn. They have a lot of great effects built in, and can conveniently recall your favorite combination presets. e. Sound Card Interface: The way your guitar signal actually gets into the computer. There are many choices available at many different price points. There are cards like the RME 9652, a

PCI card that install directly inside your computer, and there are Firewire and USB interfaces like the ones from M-Audio. The quality of all these cards is excellent. However, the ones from M-Audio include a few extra guitar-friendly features like a guitar plug/preamp jack right on the front. That allows you to simply plug in and go, which is very handy. The other higher-end cards require you to get an additional interface/preamp for plugging in your guitar or mic. Also, make sure the model you are considering has phantom power if you’re going to be plugging a condenser mic into it. f. Software: Well, you have to record your guitar ONTO something, right? There are computer software packages available today that include great effects for guitarists right out of the box. Steinberg’s Cubase, Cakewalk’s Sonar, and Apple’s Logic include amp simulators, distortion effects, chorus, flangers, delays, filters, reverbs, compressors, enhancers, etc. at no extra cost to the user. Even the industry champ ProTools now includes many guitar friendly effects. There are also third-party effects you can add to your recording software. These come in formats like VST, DirectX (slowly being phased out), RTAS, and AudioUnits. You can purchase plugins that let you simulate any amplifier, effects pedal, or guitar type. Some of the manufacturers who sell these include Native Instruments, with their excellent “Guitar Rig”. If you have enough computer power and a low latency sound card, you can actually hear the effects on your guitar as you record, which as we mentioned helps you get a better performance than adding the effects later on. g. Accessories: Ahh, it’s so easy to forget the little things. Things like guitar cables, connecting cables for pedals, mic cables, jacks, mic stands, holders, headphones, etc. Every sound card interface has an input, but some of them are ¼” phone plugs and some are RCA mini, and some are smaller than mini. Be prepared for anything - have an assortment of adapters on hand. Very important - DO NOT cut back on cable quality!!! Get the best ones you can. They actually do help the signal get into the computer. There’s nothing worse than a cable giving out as you play the best solo of your life. You’ll need some sort of headphone box if you want to record with someone else at the same time. If you want to record your entire band together, you’re going to need a higher end box like the Behringer PowerPlay (photo #13), which has separate volumes and tone controls for up to 8 pairs of phones. Also, do not forget a Guitar Tuner. Probably the most important item after the actual guitar. h. Computer: a subject that fills up twelve issues of this mag a year. Needless to say, get the best one you can afford or build. Whether it’s a Windows PC or an Apple Mac, you don’t want anything on there except for your recording software, and possibly an Internet connection. Leave off the games. Your machine will work a lot better if it’s devoted solely to recording. If you want to use those cool guitar effects plugins in real time (as you play), you’ll need a lot of processing power. Build a second machine and dedicate it to “Doom”. WHAT YOU NEED…BOXOUT #1: “Distortion” - regardless of the type of music you play, this type of effect is essential. There various types and names used for this - fuzz, overdrive, etc. but they all mean the same thing -

a “not clean” sound. Ever wonder why Billie Joe Armstrong or Tom Morello’s guitar sounds different than yours when you simply plug it into your amp? Well this is one reason. It makes your guitar chords fat and crunchy. It makes the single note solos you play sustain longer than normal and with more of a “singing tone”. In heavy metal music, you’ll need a bunch of tracks of “power chords” to make your music have some serious punch. From Jimi Hendrix to Led Zeppelin to Green Day to Audioslave to Garth Brooks to Snoop Dogg, you’ll find overdriven guitars throughout. In Link Wray’s classic song “Rumble”, he created this sound by slashing the speakers of his amp with a knife. On the old Temptations hit “Papa Was A Rolling Stone”, they recorded Dennis Coffey’s guitar amp so loudly through the recording console to achieve this distorted effect. Cranking up a Marshall amp to 11 ala “Spinal Tap” will also achieve a great sounding distorted sound. You don’t have to do that anymore. A good Distortion pedal will easily allow you to select what type and how much distortion you want. You can go from a soft slightly distorted sound to a full blown Limp Bizkit crunch with the turn of a knob. The Boss line of pedals is one of the oldest and best sounding around - their “Distortion Plus” is a good place to start, although there are many other manufacturers who make excellent distortion pedals.
(10. Amp Simulator/Distortion Pedal) WHAT YOU NEED…BOXOUT #2: “Chorus”, “Flange”, Phaser” - you’ll definitely need one or more of these modulation-type pedals whether you want that chorused rock guitar sound from “U2“ or “The Police” or a flanged funk guitar. They are all basically variations on a type of very short delay circuit with a modulation effect added. They come in stereo or mono models. The mono one would be more likely used for plugging straight into your amp, the stereo models would be used for recording directly into the computer. Don’t be afraid to “layer” your pedals. Sending the output of a chorus pedal into a flanger might just be what is needed to achieve that “sound” you’ve been looking for. You can also try putting the phaser in front of your distortion pedal and then outputting that into your chorus pedal. There’s no right or wrong way to do it. Also try mixing different brands of pedals, don’t feel you have to use models only from one manufacturer in your setup. There are many other types of pedals like the old Mutron “Biphase” (still used on guitars and in lots of dance music), the Electro Harmonix “Small Stone” (has a funky sound all it’s own), Octave Dividers (which add one or two octaves of extra notes to your solos), Wah-Wah’s (chukka-wah, chukka-wah rhtythms and Jimi Hendrix/Clapton slow filtered guitar solos), and Envelope Filters (which give you that auto-wah type sound). Also, don’t forget about an
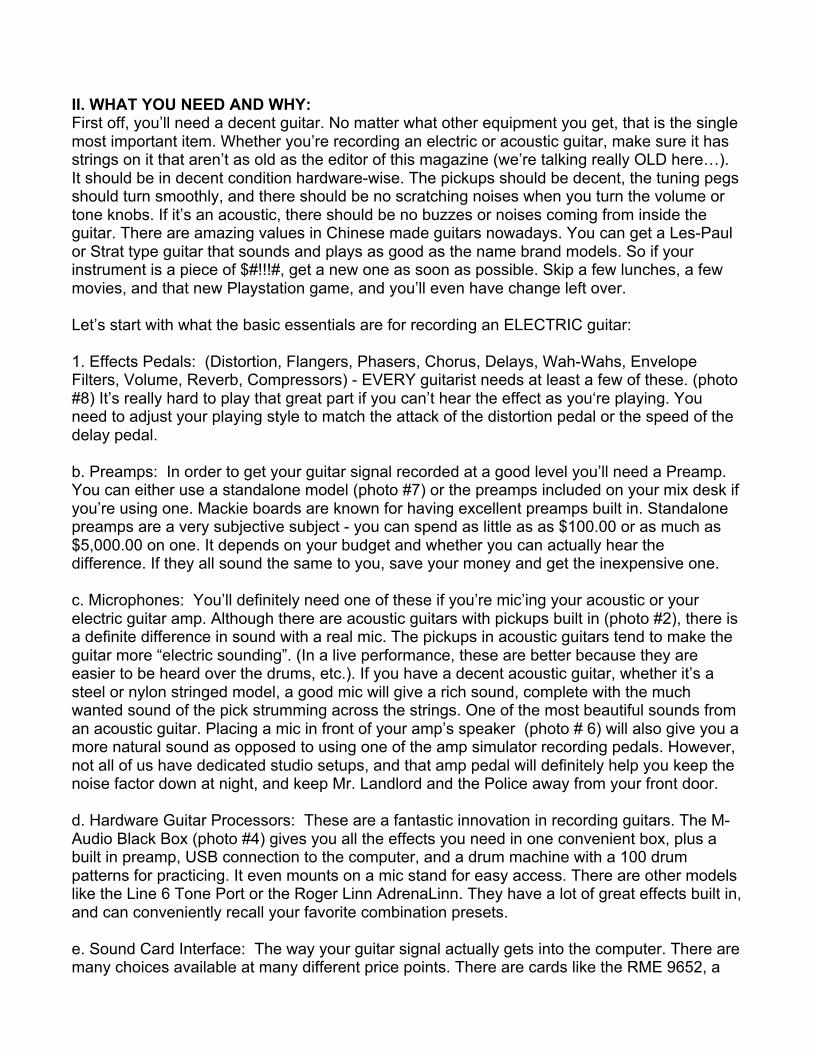
Equalizer pedal (photo #12), to help maintain your sound clarity after passing through all those pedals and circuits.
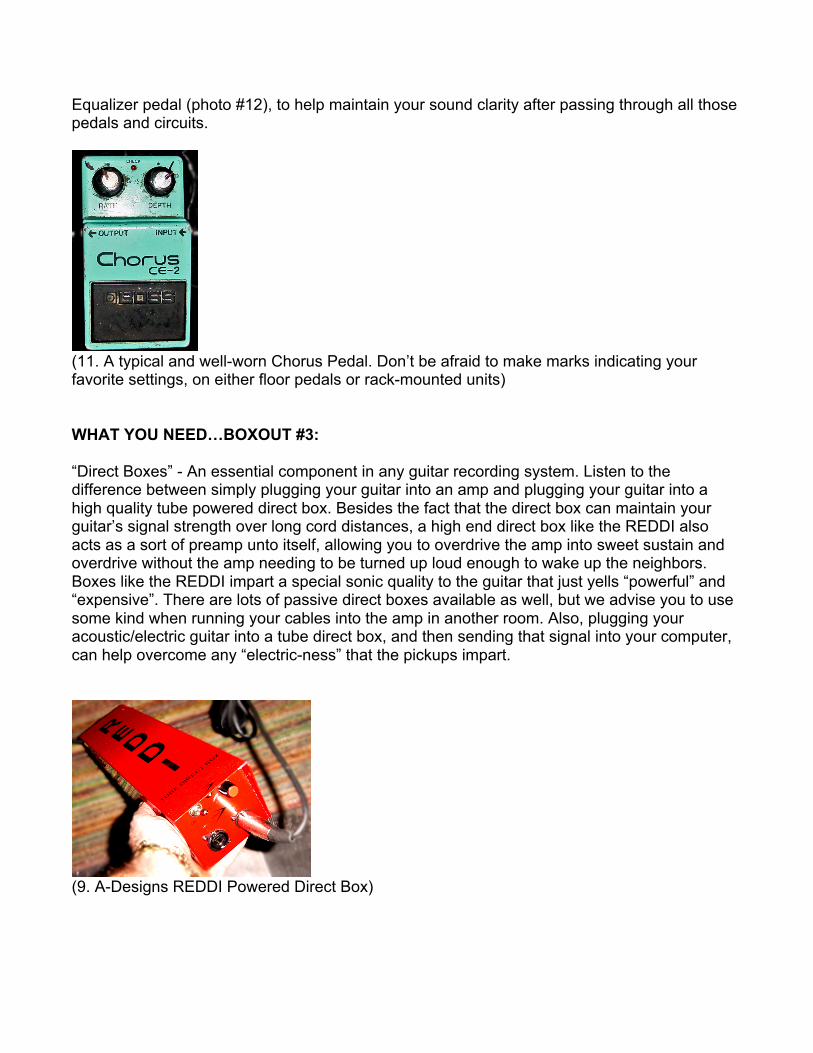
(11. A typical and well-worn Chorus Pedal. Don’t be afraid to make marks indicating your favorite settings, on either floor pedals or rack-mounted units) WHAT YOU NEED…BOXOUT #3: “Direct Boxes” - An essential component in any guitar recording system. Listen to the difference between simply plugging your guitar into an amp and plugging your guitar into a high quality tube powered direct box. Besides the fact that the direct box can maintain your guitar’s signal strength over long cord distances, a high end direct box like the REDDI also acts as a sort of preamp unto itself, allowing you to overdrive the amp into sweet sustain and overdrive without the amp needing to be turned up loud enough to wake up the neighbors. Boxes like the REDDI impart a special sonic quality to the guitar that just yells “powerful” and “expensive”. There are lots of passive direct boxes available as well, but we advise you to use some kind when running your cables into the amp in another room. Also, plugging your acoustic/electric guitar into a tube direct box, and then sending that signal into your computer, can help overcome any “electric-ness” that the pickups impart.
(9. A-Designs REDDI Powered Direct Box)

III. RECORDING - THE FUNDAMENTALS Once we get the signal inside the computer the techniques are similar, but actually recording each type of guitar is obviously very different. A. Recording an Electric Guitar: Step #1: Plug the guitar into whatever effects pedals you think you might need. It’s standard procedure to go from a distortion pedal into a chorus, flange, etc., and then into a delay. Don’t put too many delay effects on if possible - there are much better sounding ones inside the computer that sync the delay repeats exactly to the tempo. Remember, if you record with the effect, you’re stuck with the effect. Step #2: Run the cable into your preamp. Set the preamp so that the meter doesn’t go into the red overload zone when you play the guitar REALLY LOUD! But make sure the level is high enough when you’re playing softly as well. If you’re using an amp, plug the cable into the amp, and then plug the mic from the amp into the preamp. Step #3: If you’re using a hardware compressor (photo #03), here is where it gets hooked up. Run the output of your preamp into your compressor. Some preamps have an insert jack, which lets you insert the compressor using a stereo in/out jack. If you’re using a mix desk, it will have an insert point as well, where you can access the compressor. Step #4: Plug the cable from your desk or compressor into your sound card. If your card has a zero latency option, then you’ll be able to monitor directly from there, However, if your card does not have this option, we recommend routing the signal via a y-cord back to the mix desk for monitoring in real time. Some of the Firewire Interfaces have a monitor out with zero latency built in.

Step #5: Set up your software to receive the guitar signal. If you have a guitar recording software package, this is where you would insert it as a plugin on the input channel. Remember, your computer has to be fast enough to handle input monitoring with effects at low latency, otherwise you’re going to hear your guitar late with a terrible delay, which makes playing very difficult. Step #6: If you do not have a hardware compressor, you’ll want to compress the signal on the input channel as well. Recording your guitar without at least a little compression will result in an uneven signal, which will require much more work at mix time to make it fit nicely into the track. Step #7: Some engineers like to roll off some of the signal at around 80khz to eliminate room noise, air conditioners, etc. This is where you’d insert a high pass filter or an eq to do that - on your input channel. Your hardware preamp or mix desk would also likely include this filter. Step #8: Reverb and/or delay are very important when monitoring your signal. Especially when recording solos. If you’re using a mix desk, you’d add the reverb there solely for monitoring, but you would NOT record the effect. If you’re going directly into the computer without a mix desk, you’d insert a “send” on the input channel and rout that to a reverb unit, which would only be heard but not recorded. Step #9: Once you get your guitar recorded onto a track, make sure you label that track. Indicate exactly what type of guitar part it is - a rhythm, lead, solo harmony, power chords, etc. It’s very important to stay organized. When you’re recorded your eighth guitar track, and none of them are labeled, you’re going to waste a lot of time soloing them to find out which is which. Write everything down. It’s also a good idea to record your effects pedal settings, in case you have to go back at another time and add to or fix one of your tracks. B. Recording an Acoustic Guitar: If you’re using a mic, place the mic between the sound hole and the 12th fret. (photo #1) A small diaphragm mic will usually yield the best sound. You’ll have to use headphones to listen to the drums, click, already recorded tracks, etc. Try to eliminate as much room noise as possible. Stay away from the computer, especially if your computer is a multi-fan noisy model. Turn off the ringer on your cell phone. Take off your watch and any jewelry that rattles. If you are recording with an acoustic guitar that has built in pickups, you can follow the same steps as for recording an electric guitar. The rest of the process for acoustic guitars is the same as steps #3 to #9 for electric guitars. Important note: You’ll need some way to punch in when you are recording your guitars by yourself. If you use something like the Mackie Control (photo #5) or Frontier’s new “TranzPort” (a fantastic new, and very affordable box that lets you control your computer from the other room where the amp is), they have a jack for hooking up a punch-in pedal. If you don’t have a remote control unit, you can set the punch in and out points manually on your software. Or you can ask your girlfriend or boyfriend to push the red button when you nod your head. Any method is acceptable.

GUITAR RECORDING TIPS: 01. Set Up Reverbs, FX, Delays, etc. Ahead Of Time: Have your guitar channels ready with anything you like to listen to playback with, so you can simply enable them as you record. It’s a drag to have to stop and start inserting plugins while you’re at the peak of a creative flow. Do everything you can to keep the creative juices flowing. 02. Have Your Amp Already Miked: When it’s time to play, you don’t want to start running wires and trying out mics or amps. Take care of that ahead of time. Find what mic sounds the best on your amp and leave it there. All you’ll have to do is patch the mic into your recording card and start picking. 03. Keep Capos, Picks, Strings, Extra Cables, etc. Nearby: Treat your recording process like a business, and you’ll get professional results. It’s tacky to break a string and have everybody waiting around while you empty guitar cases looking for extra strings. Cable breaks - reach next to you, and change it. And if you use a capo, have various types within reach - capos for 12 string, nylon string, steel string acoustic, electric, mandolin, etc. 04. Write Down Tunings & Effects Chains: You’ll feel pretty stupid if you have to go back a week after a session and punch in on that guitar solo, and you can’t remember what effects settings you used to get THE sound all your band mates are raving about. As you crawl around on the floor trying different combinations all you’ll be able to mumble is what Homer Simpson says - “D’oh!”. Same for tunings - who can remember that strange open tuning of D-G#-D#-G-B-F? (a horrible sound, by the way - don’t try it by yourself <grin>) 05. Double Parts With A Different Guitar: After you record the first rhythm part, try doubling it with a completely different sounding guitar. For example - if you use a Fender Stratocaster for the first track, double it with a Les Paul. 06. Fake Banjo - If you need a quick banjo sound, and you don’t own one, place a piece of paper under the strings by the neck. Fold the paper so it doesn’t fall out. If you play the guitar with a banjo rhythm and eq out the low mids and bottom frequency eq’s, it’ll sound pretty authentic. 08. Two Acoustics With One Mic: If you have another guitar player besides yourself, this is a great sound. Set your mic to omni or figure eight, and each of you sit on opposite sides of the mic. Work out a rhythm acoustic part between you two that is complimentary, and start recording. Each part will bleed into the other and if the parts are played well it will sound like the coolest chorus fx was added in. Pan it off to the side, and it will really stand out. If you’re into a Phil Spector “1000 Guitars” type sound, go ahead and double the part and pan it to the opposite side. Sometimes “more” really is “more”… 09. Keep ALL Takes - Do not edit yourself as you are recording until after you have played the entire song down a few times. What you’re recording may not sound great to you as you’re playing it, but when you listen back you’ll hear it with different ears. Don’t stop after 3 bars, because you’ll never get a good feel for the song.

10. Use Direct and Amped Sounds: You don’t have to choose between the two - use them both. Split the signal from the direct box - one goes to the amp and one goes directly to your computer. The sound from the amp will be distorted if the amp is cranked up, but the direct sound will be clean. Combining them can result in a more musical sounding power chord track than just the amp. IV. EDITING - GETTING CREATIVE Once you’ve got your guitar parts recorded, you can start having some real fun. After all, there’s no rule in the book that says your guitars have to continue sounding like guitars… 01. Doubling: After you lay a guitar track down, “doubling” is when you go back and play the exact same part again. It’s a very common effect used for all types of guitars in all styles of music. Doubled power chords are almost required for any decent rock record. Panning the two tracks either hard left and right or panning one at 9:00 and the other at 3:00 gives a very powerful effect. 02. Electronic Doubling: If you haven’t been recording or playing for very long, you might find it difficult to play the same part twice. Here’s where the magic of your computer come in handy. Simply copy the track you want to double to another track. Then offset/delay the copy by about 20-30 ticks, depending on what ppq your sequencer is set to. Try some settings until you get one you like. If it’s too far away from the original it will sound out of sync, if it’s too close it will sound as if it’s phasing. Experiment until it sounds like you actually played both tracks. 03. Filtering: Some of the coolest effects can be obtained with one of the Auto Filter-type plugins. If you take a simple guitar harmonic, and put it into an auto filter sync’ed to your software’s tempo, it can turn into the coolest sounding synth-ish part that just might be the signature sound for your track. A rhythm guitar part played with an auto filter can sweep with the filtering opening and closing in tempo for dance floor thumping effect. 04. Reverse Reverb: Record the reverb from your guitar part to a separate track, and then use the “reverse” feature to flip the reverb around. This will let the reverb effect start before the guitar part. A sort of oooom-bop sounding effect that takes the most ordinary guitar part and makes it special. Simply reversing an entire guitar solo sounds great in some situations as well (see “Hendrix, Jimi”) 05. Chop It Up: Want to get those great trance-type effects remix master BT uses on some of his tracks? Take a section of your guitar track, and splice it into pieces that fall on every 16th note in the bar. Make the length of the splices as short as it takes to get that “da-da-da-da-da” type effect. Try getting really crazy and make the splices on every 32nd note or even on every 64th note triplet. You can even take the resulting machine gun rat-a-tat-tat and throw it into an autofilter - swooping machine guns! You are the master of your universe!

06. Doubling Samples: Sampling a guitar part from commercially released recordings can cost you a pretty penny in licensing fees. But…and this is an old school hip hop trick… if you double the sampled parts with YOUR guitar, it sounds like something new. And then if you change the order of the notes in your new part, it starts to sound different again. Now try adding some distortion or filtering or flanging to it, and it starts to sound like an entirely new musical part. No fees to pay, and you’re a budding guitar editing genius. EDITING-GETTING CREATIVE…BOXOUT #1: Flying Your Guitar Parts: Okay, you played the first chorus like you were channeling Eric Clapton - good for you! However, there’s a good chance that Eric’s spirit may not be upon you by the time the second chorus comes around. No problem - you can copy and paste the first chorus performance to the second chorus - a technique known as “flying”. First, you have to find exactly where your guitar part starts in relationship to the first chorus. Often, it’s sounds more natural if you include the little noises that precede your attack on the guitar strings. To be safe, select the tracks starting one bar before the chorus starts, and then select from there to the end of the chorus. All programs have techniques for maintaining the relative position of a part copied from one place to another. In Cubase, for example, you simply set the GRID to “relative” on the top menu, select “Bar” for what position you want to sync to, (make sure there are no hit points starting before the downbeat of your audio piece), and simply drag copy the audio to the bar before the second chorus. In Logic, make sure you select the option to maintain “relative position”. It’s a similar process in Digital Performer, Traktion, ProTools, and Sonar. (EDITING) NINE STEP WALK THROUGH: Step #1: We’re going to take a guitar track that was played great at the second chorus and move it to the first chorus, which wasn’t played so wonderfully. First thing we need to do is make a copy of the entire guitar track, just in case we mess things up. Duplicate the track, and then mute the original. (Screenshot #1) Step #2: It’s a good possibility that the guitar parts start slightly before the downbeat of the second chorus, so we need to solo the actual audio file and see where it really begins. (Screenshot #2) Step #3: Once we find the beginning, we make a cut slightly before. Make sure you have the “snap” function off, or Cubase will move the cut point to where you have the quantize set to. (1/4 note, beat, bar, etc.) (Screenshot #3) Step #4: We go to the end of the second chorus and do the same thing - find the actual end, and then make a cut slightly after. (Screenshot #4) Step #5: Duplicate the guitar track (again). Then erase the data on that new track, We’ll use this empty track as a work track for this or any further edits we need to do. (Screenshot #5)

Step #6: Turn SNAP “on”. Drag and copy the 2nd chorus piece you’ve made down to our work track, making sure you maintain the exact original position of the audio. In Cubase, you hold down the “Cntrl” key as you drag the audio to keep its position from changing. (Screenshot #6) Step #7: Set the Grid to “Grid Relative” and the grid type to “Bar”. Click on the audio and make sure there are no hit points (blue “start” line) before the beginning of the audio. If there are any, drag them all the way to the left, which will make them fall exactly on the downbeat, which is where we want them. (Screenshot #7) Step #8: Drag the audio piece back to the first chorus. It should line up exactly where it was relative to the second chorus at the first chorus position. (Screenshot #8) Step #9: Set SNAP to “use quantize”. Make a cut at the beginning and the end of the old first chorus track as close to the size of our new audio piece sitting below it. Delete the first chorus’ guitar part. Drag the new audio up into the original track, keeping it’s position exactly the same. Finally, adjust the edges of the audio so that our new piece is allowed to play in its entirety. It should now sound exactly the same as the second chorus. If you need to copy it to any other sections, follow the above steps. (Screenshots #9 and #10) V. MIXING You’ve recorded all the guitar parts, and it’s time to mix. But how do you make those tracks sound like the CD’s you listen to? How do you get the parts to jump out and grab the listener? Here’s a few tips: 01. Compression: The first stop for any mix. You should apply a compressor plugin as an INSERT to every guitar track you have recorded. Even though you might have used a hardware compressor when you recorded the original parts, insert another one of every channel. It won’t hurt - instead it will let the guitars maintain their own space in the sound scheme. Apply as mush or little as the style of music requires. Lots of heavy-duty compression for power chords (5:1 ratio, fast attack, slow release as a start point), light compression for country steel string acoustic guitars, medium compression for that nylon string solo. 02. Delay: Set up at least one long delay and one short delay as master guitar effects. Use them as SENDS on your guitar tracks. The long delays are great for solos, the short ones are cool for rhythm parts and acoustic guitars. You can also send the delay return from one into the input of another delay, depending on what bussing schemes are included with your software. 03. Reverb: Essential to ANY mix. However, it’s up to you how and where you use reverb which is probably the most overused and abused of all the types of effects. Don’t be tempted to douse your power chord tracks with long verb, try a short, medium sized room with a gate on the verb to make sure it stops when you want it to. Your guitars will keep their crunch rhythm and still sound huge. Reverbs are usually set as master effects because it saves lots of CPU power, but you might try a short reverb as an insert on that guitar solo, before you send it to the longer one. Also, try sending the output of a delay to the input of a reverb - it’s great!
04. Chorus/Flange: These can help make your guitar sound “wider”. Instead of keeping that mono rhythm guitar panned in the center, pan it slightly to the left (around 10:00), and then send it to a mono Chorus or Flange effect that you have panned slightly to the right (around 2:00). It will almost sound like a doubled part, but different. If you use a stereo chorus, plce the guitar a little more to the center, and keep the chorus/flange return very wide and stereo. 05. Distortion: Even though you may have recorded your guitars with a distortion pedal through a distorted guitar amp, sometimes it’s just not enough distortion for your track. It’s time to use one of the distortion plugins in your software. But instead of using it as an insert on the channel, use it as a MASTER effect and send all the power chord tracks to this extra distortion. Insert a compressor on this effect if you can, and squash the entire power chord mix to the n’th degree. It’s powerful enough to lift a 747 jet into the sky! 06. Bit Rate: Wow, that guitar track is so clean pristine. However, the lyrics to the song are talking about beating up your friend’s dog. Okay - there’s a few plugins available that can lower the sampled bit rate. This technique can instantly turn your tracks from hi-fi into lo-fi. It also works when you want to make your tracks sound like they were sampled from an old vinyl record. You can even add scratchy record noise with some plugins. Or just add a track of “record noise”, and blend it in with your tracks. 07. Back Into The Amp: Yep, you heard right. Send the signal from your guitar solo back into a guitar amp, and then mic and record it all over again. Change the amp from the one you originally recorded with, and you might get a great effect. Or it might be such a lousy sounding effect that it works with your track. Sometimes something can sound so bad that it sounds…great. 08. Doubling, Tripling: We discussed how to double your tracks earlier, but sometimes when you’re mixing you need a bit more. Add another copy of the original, but make sure it gets moved to a distance slightly greater than the amount you moved the first track by, or it will sound phased. Pan the original track to dead center, and pan the two electronically doubled tracks to the left and the right. Make the volume of the original track lower than the other two. Add a distortion effect to the original, but add a chorus and delay to the others. Experiment - there’s nothing that’s ever ‘wrong’ as long as it adds to the mix. And don’t make everything stereo. A mono track with no effect whatsoever can sometimes stand out in the mix in it’s own space, especially if it’s a special part you want to feature. 09. Make Those Acoustics Ring: If you want those acoustic guitars to have that sheen and gloss like they get down in Nashville, try using an exciter or enhancer plugin instead of eq. Compress it slightly, and then try rolling off all the low mids and bottom end of the eq bands. It will sound very high end-ey and thin, but if you place it in the mix opposite the high hat and at a low volume, the strumming will almost sound like another percussion instrument, and make the high hat almost sound doubled, but with more harmonic content. If you want to hear more of the actual acoustic sound, bring back the low mid eq that you turned down. 10. Mulitband Compressors: Place one of these on a MASTER effects bus for your rhythm guitars. Play with the various bands to bring out the frequency that gives you track a lift. Even though you have compressed the individual tracks, this will add a definite lift to all the guitars.

(MIXING) NINE STEP WALK THROUGH: Step #1: Let’s make a killer power chord sound for our rock track. If you have already doubled the track, great!. If not, make a copy of the track and offset it by about 25 ticks. (SS#1) Step #2: Pan the first guitar to about 10:00, and the doubled track to about 2:00. Like with any good recipe, adjust to taste. (SS#2) Step #3: Make a sub buss master labeled “Power Chords”, and assign both tracks to it. (SS#3) Step #4: Insert a compressor, eq, bass enhancer, and exciter on the sub buss master. (SS#4) Step #5: Create three master FX - a delay, reverb, and chorus. (SS#5) Step #6: Start with setting the compression to about 3:1, with a medium attack and slow release. Set the eq so that you are boosting around 250hz, cutting at around 1khz, and boosting at around 2-3khz. Add some low end with the bass enhancer (but be careful not to make it too boomy). Use the exciter very sparingly to add a little high end sizzle. (SS#6) Step #7: Set your delay to about 250ms, with a feedback rate of about 25%. Set the chorus to a medium setting, and the reverb to about 1 sec, with a sharp cutoff on the tail. (SS#7) Step #8: Start with the Chorus first, and adjust the amount of send until the guitars get bigger and fatter. Then add some delay, but not enough to throw off the rhythm of the guitars. Then finally add the reverb. The amount and length of the reverb depends totally on the song and what else is happening, especially with the drums. (SS#8) Step #9: If your software allows it, send the output of the delay into the reverb for a totally outrageous sound. Save this entire channel setup so that you can recall it easily at a later time for another mix. (SS#9)

PHOTOS:
01. Acoustic Guitar With Mic: The proper way to mic an acoustic guitar. Note the small diaphragm mic pointed directly at the guitar between the sound hole and the 12th fret. If you wanted to record in stereo, you would add a second mic (preferably a large diaphragm model) pointed more towards the lower body of the guitar. Be careful of phasing issues when using two mics.
02. Acoustic-Electric Guitar: An Acoustic-Electric guitar. This type of guitar has a built in pickup, preamp, and equalizer system. It can either be recorded with a cable or with a mic. Sometimes using both methods at the same time works great.
03. Daking Compressor & Joe Meek Twin Channel: Two great tools for recording guitars - the bottom unit is a dedicated high-end hand made Daking compressor, the top unit is a mid-priced channel-type interface, which includes two channels of preamps, equalizers, compression, and enhancement.

04. M-Audio Black Box: M-Audio’s brilliant new dedicated guitar recording system. It includes a USB computer interface, mic and guitar inputs, multiple combination guitar effects, and even a drum machine with 100 patterns. A guitarists’ dream interface, and very affordable.
05. Mackie Remote Control: One of the best and feature-laden remote control units available for guitarists. Includes a jack on the rear for connecting a punch-in/out pedal, so you can initiate recording with your feet while your hands are busy playing the guitar.
06. Mic (ADK A51tl) On Guitar Amp: An example of how to best place the mic in front of a single speaker guitar amp. Note the small mic stand made specifically for this purpose. You can also add a second mic further away from the amp to get more of the room sound.

07. MP1 Preamp - Meek Preamp+Compressor - A Designs Pacifica Preamp: Some excellent hardware tools for recording guitars - the A Designs MP1 tube preamp for that “vintage” sound - an older Joe Meek single channel unit with preamp, compressor, eq, and enhancer - and the new A Designs Pacifica dual channel preamp, a reissue of the legendary Quad8 board channel strip that rocks on electric and acoustic guitars.
08. Pedal Board: A basic pedal board, including (from bottom left): an Octave Divider, a Chorus, an Amp Simulator/Distortion pedal, a Volume Pedal and (from top left): an Equalizer, an Envelope Filter, and a Digital Delay. Note the Guitar Tuner on the upper right, a definite necessity.
14. Guitars and More Guitars: You can never have enough different types of guitars, because you never know what is going to give you that special “sound”.

15. A Great Preamp Can Really Help Your Sound: A great preamp like these new A Designs modules for the API Lunchbox can really help bring out your guitar’s sound. This new module pack is so portable you can “take your sound with you” to the studio.

SCREENSHOTS:
01. Guitar Part before Doubling: Notice that the track for the doubled part to be copied to has already been labeled and the output and panning assigned. Also notice the start time, because we’ll need to know how far to move the new doubled part.
02. Guitar with new doubled track: Notice that the start time is now 25 ticks away from the original part. Try smaller or larger distances until it sounds good to YOU. You can also make echoes of certain phrases by moving them a further distance apart from the original.
03. Guitar Part to be “flown” (copied) to a different place. Notice that the grid is set to “Relative position”, and we are using a “bar” as a sync reference.

04. Guitar part AFTER flying to new position. Notice that the start time is EXACTLY the same as the original, except the bar is different. If your new part is not set the same, your new copied part will be out of sync.
05. Guitar Solo Automation: the volume automation on a guitar solo. Notice that the middle section is completely turned off, but re-enters shortly after.
06. Guitar Solo Channel Inserts: Typical insert plugins for a screaming rock guitar solo - an Antares Auto-Tune to fix any pitch inconsistencies, a UAD-1 LA2a compressor, a URS equaliser, a PSP Mix Treble enhancer, and a Super Camel Phatt distortion enhancer. Try different orders of plugins for different effects.

07. Guitar Solo Master Sends: The effects send setup for the guitar solo - a UAD-1 Plate Reverb, a Cubase Stereo Delay, and a Roland CE-1 Chorus.
08. Live and Virtual Guitar Tracks: The top two Nylon Guitar tracks have been played live by a musician. The third track down is a midi track triggering a Steinberg “Virtual Electric Guitarist” VST instrument. The fourth track at the bottom is a midi track triggering Telecaster guitar samples on an external sampler.
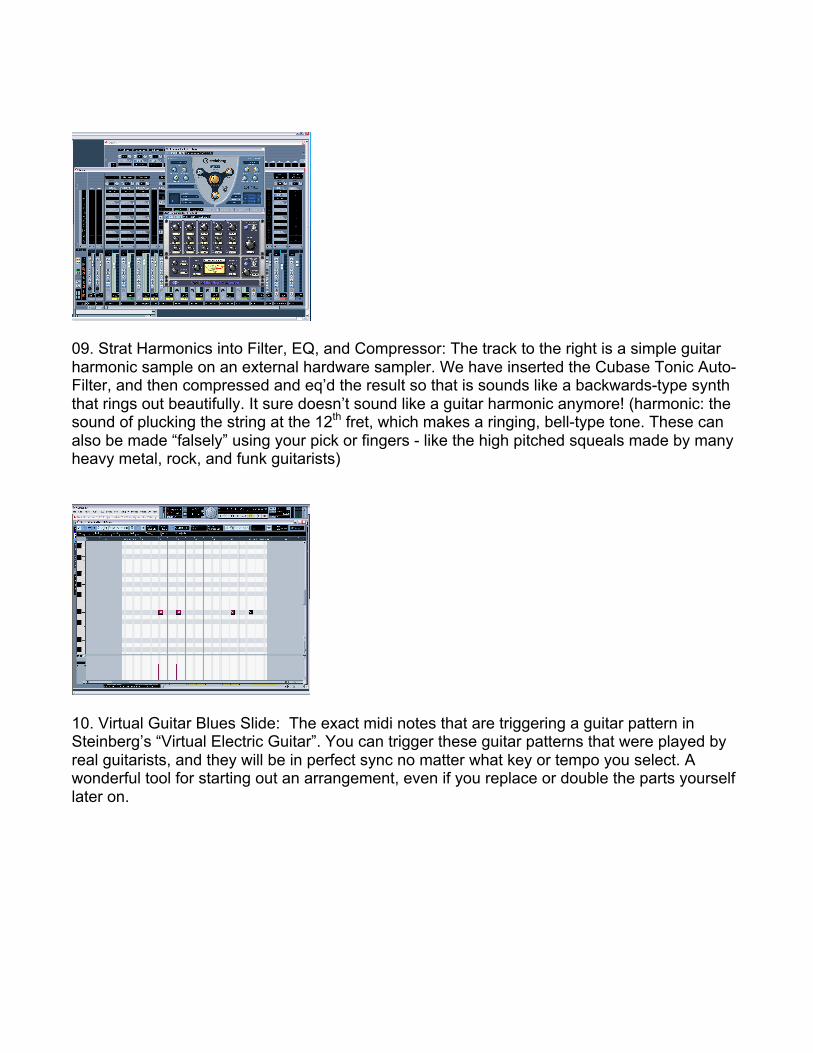
09. Strat Harmonics into Filter, EQ, and Compressor: The track to the right is a simple guitar harmonic sample on an external hardware sampler. We have inserted the Cubase Tonic Auto-Filter, and then compressed and eq’d the result so that is sounds like a backwards-type synth that rings out beautifully. It sure doesn’t sound like a guitar harmonic anymore! (harmonic: the sound of plucking the string at the 12th fret, which makes a ringing, bell-type tone. These can also be made “falsely” using your pick or fingers - like the high pitched squeals made by many heavy metal, rock, and funk guitarists)
10. Virtual Guitar Blues Slide: The exact midi notes that are triggering a guitar pattern in Steinberg’s “Virtual Electric Guitar”. You can trigger these guitar patterns that were played by real guitarists, and they will be in perfect sync no matter what key or tempo you select. A wonderful tool for starting out an arrangement, even if you replace or double the parts yourself later on.