guit-a-long - harp kit · guit-a-long guitar 1 - set assembly instructions wood parts: a - neck b -...
TRANSCRIPT

GUIT-A-LONG guitar
Musicmaker’s Kits (Hwy 36 behind Joseph’s Restaurant)
P.O. Box 2117 Stillwater, MN 55082
(651) 439 9120
[email protected] harpkit.com

© 2008 Musicmakers 2
GUIT-A-LONG GUITAR 1 - Set Assembly Instructions Wood Parts: a - Neck b - Sides c - Soundboard, with hole d - Soundboard Scrap e - Back, without hole f - Fretboard g - Bridge h - Tailpiece i - Tail Block j - Inner Brace 2 - Small dowels, 1/8” X 1” Hardware Parts: 6 - Geared Tuners with screws 1 - Set of 6 Guitar Strings, steel 1 - Truss Rod (installed in neck) 1 - Allen Wrench, 5 mm 4 Ft. Medium Fretwire 1 - Black Plastic Nut 1 - Truss Rod Cover with 3 screws
A NOTE ABOUT GLUE
DO NOT ASSEMBLE THIS PROJECT WITH EPOXY OR SUPERGLUE OR HOT MELT GLUE! Find a good woodworking glue. Many luthiers (guitar & violin makers) still use the natural hide glues that have been around for centuries, carrying on a fine old tradition, but that does not mean that you must do the same. We build this instrument with modern woodworking adhesives (such as Elmer's Carpenter's Wood Glue or Titebond) because they hold the parts even more securely than the old hide glues. The few advantages that some people claim with hide glue are more than offset by the strength, durability, ease of application, and availability of the modern woodworking adhesives. When gluing parts together, be sure to put enough glue on the joint to wet the entire surfaces to be joined. A good sign of proper gluing is that a little excess will squeeze out around the joint when clamping pressure is applied. Too little glue may cause the parts to separate later, whereas too much glue makes things messy. We always keep a damp rag handy for quick cleanup, as necessary. It is especially helpful to keep your fingers clean while gluing, because gluey fingerprints have the embarrassing tendency to appear on the finished product in places you never expected. Most woodworking adhesives "set" sufficiently after 30 minutes of clamping to allow you to proceed. Check your dispenser for recommended drying times.

© 2008 Musicmakers 3
BEFORE YOU BEGIN
Please take the time to check over the parts of our kit now, to make sure everything is there. If you discover a problem, call us right away so we can rectify it quickly without causing you much delay in your project. We also suggest skimming through the entire directions before beginning, just to get an overview of the project. You may decide that you need to gather more tools or purchase a few optional decorations or accessories to enhance the finished instrument. Now is a good time to decide so you can avoid delays when you reach those steps of construction.
ASSEMBLY INSTRUCTIONS
ASSEMBLING THE MAIN BODY _____1. Insert the TRUSS ROD into the long slot in the, as shown. MAKE SURE THE TRUSS ROD ADJUSTMENT NUT IS LOOSE SO THE ROD REMAINS STRAIGHT*. The TRUSS ROD should fit snugly in its slot, with the flat side facing up, to be effective later on for correcting any future warping of the NECK. If necessary, you may put masking tape along one or both sides of the TRUSS ROD in order to make it fit more snugly in its slot.
Push the SOUNDBOARD SCRAP over the top of the TRUSS ROD to fill the gap in the slot, as shown. This scrap piece is simply there to provide a level gluing surface for the FRETBOARD.
_____2. Test fit the SIDES to the NECK, taking care to place both parts with the front surface facing down on a flat work surface.
*POINT OF INTEREST Many people ask how this Truss Rod operates. It is a self-contained unit that bends when it is tightened. You may test this by gripping the square channel and tightening the barrel nut with an Allen wrench. When tightened up, you’ll be able to see a curve in the channel.
© 2008 Musicmakers 4
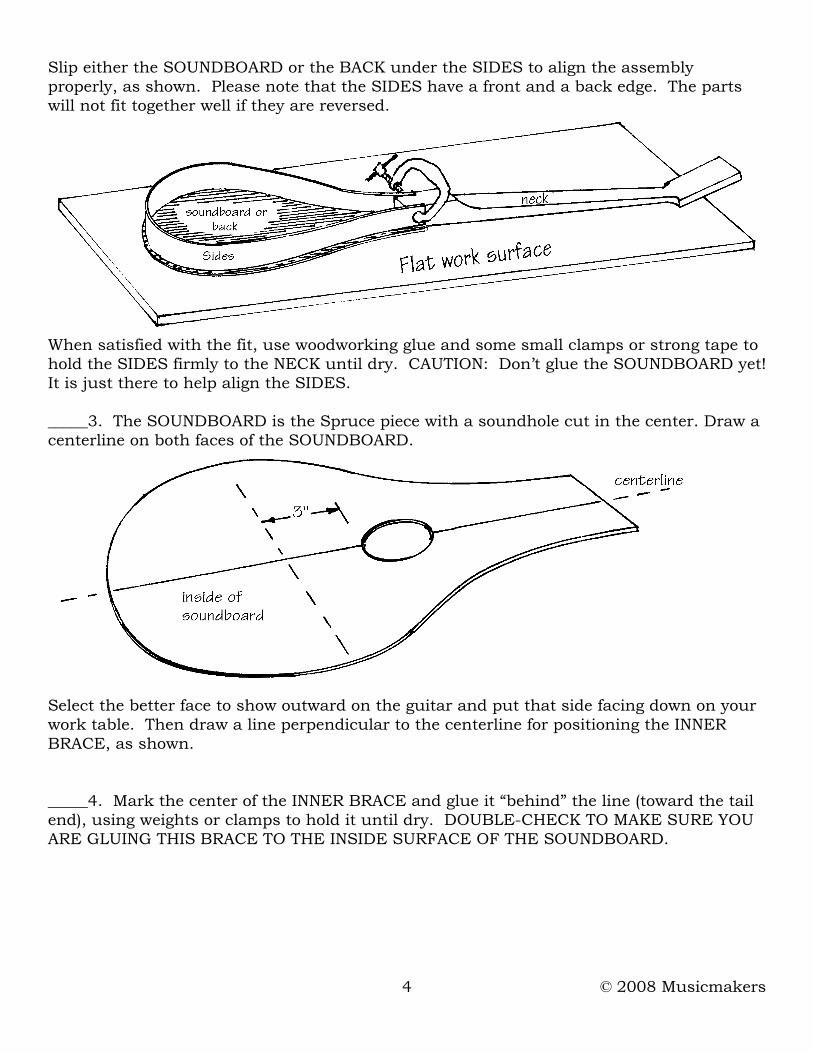
Slip either the SOUNDBOARD or the BACK under the SIDES to align the assembly properly, as shown. Please note that the SIDES have a front and a back edge. The parts will not fit together well if they are reversed.
When satisfied with the fit, use woodworking glue and some small clamps or strong tape to hold the SIDES firmly to the NECK until dry. CAUTION: Don’t glue the SOUNDBOARD yet! It is just there to help align the SIDES. _____3. The SOUNDBOARD is the Spruce piece with a soundhole cut in the center. Draw a centerline on both faces of the SOUNDBOARD.
Select the better face to show outward on the guitar and put that side facing down on your work table. Then draw a line perpendicular to the centerline for positioning the INNER BRACE, as shown. _____4. Mark the center of the INNER BRACE and glue it “behind” the line (toward the tail end), using weights or clamps to hold it until dry. DOUBLE-CHECK TO MAKE SURE YOU ARE GLUING THIS BRACE TO THE INSIDE SURFACE OF THE SOUNDBOARD.

© 2008 Musicmakers 5
POINT OF INTEREST Many people ask why we use laminated spruce instead of solid. The reason for this is that we get much more strength from laminated wood than from solid, and much less trouble with cracking. This spruce is laminated especially for us at considerable trouble and expense, and we find that it is well worth it all. Every layer is Sitka Spruce, so there is no compromise in materials, and the strength allows us to use a thinner soundboard than if we were to use solid wood, so we get remarkable sound from such a small soundchamber. You may show either face of the soundboard outward on the guitar.
The SOUNDBOARD has been cut slightly oversize, and you will be trimming it to match the shape of the guitar after it is glued on. _____5. Place the guitar frame assembly on the SOUNDBOARD to test the fit. The SOUNDBOARD should reach all the way to the end of the ledge cut in the NECK, so it covers the lower end of the TRUSS ROD and meets the SCRAP piece that you installed in step #1.
When you have the SIDES held symmetrically in place, trace around them with a pencil so you can easily re-position them when gluing. Put glue on the edge of the sides, and on the shallow ledge of the NECK where the SOUNDBOARD will make contact, and press the SOUNDBOARD back into place, using clamps, weights, and/or tape to hold the parts together firmly until dry. Look very carefully all around the circumference of the body to make sure there are no gaps. You want a good tight fit between the SOUNDBOARD and SIDES. Add more clamps, weights, or tape as necessary. _____6. Glue and clamp the TAIL BLOCK to the end of the body, as shown. It is not quite tall enough to touch both the SOUNDBOARD and the BACK, so we just glue it to the inside of the SOUNDBOARD and to the SIDES.
You may test the symmetry of the body by making a few pencil marks at equal distances from the centerline of the SOUNDBOARD to help align the SIDES of the guitar. You may need to push the SIDES into alignment as you glue the soundboard in place.

© 2008 Musicmakers 6
_____7. Test fit the BACK in the same way you did the SOUNDBOARD. You may wish to sign and date your project on the inside surface of the BACK so your autograph can be seen through the soundhole. When satisfied with the fit, glue the BACK in place the same as you did the SOUNDBOARD. _____8. Well, you’re guitin’ right along now! This is a good time to trim the SOUNDBOARD and BACK flush to the shape of the guitar SIDES. A flush-trimming bit on a router makes quick work of this task, but you can also accomplish it with coarse (80-grit) sandpaper for the rough work and medium (120-grit) for smoothing and cleaning up excess glue.
OPTIONAL INLAID DECORATIONS Some kit-makers enjoy decorating their projects to make them more customized. If you are not interested in taking the time for these options, and would rather just guit-a-long with the basic assembly, you may skip ahead to step #9 right away and disregard all this fussy stuff.
INLAY BANDING _____A. (OPTIONAL) You may add some decorative binding to the edges of the guitar body, around both the top and back, if you have access to a router. Binding adds significantly to the appearance (thus, the value) of the finished instrument. You may use wooden inlay banding or plastic edge binding, depending on your preferences (we offer both types in our MUSICMAKER'S CATALOG). You'll need nearly 72 inches of decoration to reach around the circumference of the SOUNDBOARD and up both sides of the NECK. Add another 48” if you wish to trim around the BACK too. NOTE: If you decide to put inlay binding along the NECK, take some time now to make sure it is the width that you like for your finished guitar. It would be a shame to decorate it nicely only to sand it narrower later, thus destroying your inlays!. The average steel-string guitar is 1-3/4” wide at the NUT end (nearest the PEGHEAD) and widens to about 2-1/8” at the body, but you may make it narrower, if you prefer. Do that before proceeding with decorative inlay work. IMPORTANT: Double check to make sure that the NECK and the FRETBOARD are the same width. Whichever one is wider must be sanded to match the narrower one. Inlay banding is not such a difficult operation if you have a router and a sharp straight router bit (with carbide tips). You can make a simple jig to clamp right to your router base to guide the bit cleanly around the curves of the guitar.
CAUTION: CHECK YOUR ROUTER BASE AND TABLE FOR ANY FOREIGN MATTER THAT MIGHT SCRATCH UP YOUR HANDIWORK.

© 2008 Musicmakers 7
Make your jig from a scrap of plywood, as shown, and clamp it to the base of your router so the "finger" hangs over the bit, as shown. Set the cutting depth of the bit to match the width of the binding, and adjust the position of the "finger" to allow a cutting depth to match the thickness of the binding.
NOTE: You will be cutting with the side of the router bit, not the end. It may take a minute of study for you to see how this will work. Test your cut on scrap wood first and make adjustments as necessary so the binding fits nicely into the groove. BE CAREFUL TO SET THE GUIDE “FINGER” SO IT WILL NOT CUT TOO DEEPLY. It is better to sand the Inlay Strip down level with the SIDES than to sand the SIDES down to match the Inlays.
CAUTION: When you cut the grooves on the guitar, we recommend pushing the router in a clockwise direction around the circumference. This is opposite the normal direction, which would be to move the router against the spin of the bit. By moving the router with the spin of the bit, you eliminate any chance of splintering the veneers as you cut. It may sound odd, or even unsafe, but it works beautifully, and does not cause a safety problem with such a small cut. Go ahead and rout the groove, and then take a good look at it to see if it is cut to full depth and width all the way around. We usually run the router at least twice around the guitar to ensure a complete cut. You need not worry about cutting too deeply -- the guide "finger" prevents that.

© 2008 Musicmakers 8
NOTE: You’ll probably need to use a sharp chisel to finish cutting the ends of the grooves wherever you stop the router cut. Make clean square ends to your grooves. _____b. If you are installing plastic binding, you'll need some model airplane cement to glue the binding into place. We use "Sig" brand, but any other should work fine if it is for plastic and wood. If you are installing wood inlay strips, then Elmer's glue is all you need. Be sure to have plenty of masking tape on hand for holding the binding in place while the glue is drying.
Place the end of binding into the groove and use short pieces of masking tape about one inch apart to hold it securely in place. Work your way around the perimeter, squirting glue into the groove as you go. If you need to make a joint in the binding, use a razor knife to cut the parts cleanly at a logical part of the pattern where the joint will not be noticeable. When you get within 8 or 12 inches of the other end of the groove, cut the binding carefully to fit before squirting glue in that last section. Leave the tape on for at least 12 hours for plastic binding, or one hour for wood inlay. _____c. When the binding glue is dry, remove all the masking tape and sand (or scrape) the edges of the guitar to remove excess glue and to level the binding with the wood.
FRET MARKING DOTS _____d. (OPTIONAL) You may decorate the FRETBOARD with pearl inlay marking dots at certain positions. This is a simple and attractive option, requiring only an electric hand drill. Mark the position of each dot with an awl or sharp nail to punch a depression to guide your drill bit. A standard Drill shallow holes of the size to match your marking dots (1/4" diameter is normal). The depth of the hole is not too critical, as you will see next. Here are the typical positions for fret marking dots on guitars:
Squirt a bead of glue along 12" of the groove at a time, beginning at the neck end of the body. Don't apply glue all the way around the guitar at once -- it'll be dry before you get all the binding wrapped around.

© 2008 Musicmakers 9
Mix up some "5-Minute Epoxy" and use a nail to put some into each hole, nearly filling the cavity. Push a marking dot into each hole until it comes nearly flush with the wood surface, but still stands slightly high. (You may need to tap the dots in with a hammer.) The dots need not rest on the bottom of the holes -- they may "float" in the epoxy so as to stick up a little above the surface of the FRETBOARD. When the epoxy is hard, sand the dots flush with the surface of the FRETBOARD. ______e Another fun option is to cut a fancy shape at the wider end of the FRETBOARD, rather than just leaving it square. Here are a couple of options:
_____9. Now you can shape the PEGHEAD to your liking. Use the full-size pattern here as a template, or make up your own custom shape.
Drill six holes, 1/4” diameter, for the GEARED TUNERS. If you choose to alter the shape of this part of the instrument, take care to locate the six holes to allow for good operation of the tuners.

© 2008 Musicmakers 10
_____10. Test-fit the FRETBOARD to the NECK of the guitar. The narrow end should measure 20-1/4" from the nearest edge of the soundhole.
Check the width of the NECK and FRETBOARD when they are in proper position. Whichever piece is wider must be sanded to match the narrower one. This is most easily done now, before the frets are installed. Take care to make this shaping smooth and gradual, because this is the "playing" area of the instrument where your hand will be sliding back and forth. NOTE: This is your opportunity to make the NECK and FRETBOARD narrower, if you prefer. If you own another guitar and want to match the width of the FINGERBOARD to that instrument, you may do that. _____11. It is best to install the frets into the fretboard BEFORE gluing the fretboard onto the instrument. Place your FRETBOARD on a good firm surface for this operation. A flimsy table top will not do. Better to work on a concrete floor or a cement block. Otherwise, your wood will just bounce around as you try to pound the frets into place. a) Begin by placing the length of fretwire over one of the slots cut in the fretboard, so the end hangs over the edge of the wood just 1/16" or so. b) Position the fretwire so that the "tang" will be driven down into the fret slots. (See diagram) c) Use a hammer to lightly tap the fretwire into the slot, until the "crown" of the fret contacts the wood surface.

© 2008 Musicmakers 11
d) When the fretwire is securely held by the wood, use a wire cutter to clip off the excess, as close to the wood as possible. e) Proceed to the next fret slot in the same way, and so on until all frets are installed. f) If your neighbor criticizes the way you’re installing these frets, just tell him to guit-a-long now and mind his own business.
_____12. After the frets are all installed, we like to look them over very carefully to make sure each one fits all the way down against the wood. If one fret stands higher than another, it may cause buzzing problems later when playing the instrument. Try to tap it down fully into the slot. Do your best to get them all held down firmly. After the FRETBOARD is glued down, you'll have one more opportunity to level the tops of the frets with a file. _____13. File (or sand) the ragged ends of the frets down until they are smooth andflush with the sides of the FRETBOARD. If you happen to have access to a belt sander, you'll find it to be a useful tool for this part of the project. Fretwire is soft metal that can easily be sanded. _____14. File (or sand) a 45 degree bevel at the ends of the frets, as shown, working the file in a downward motion only, to avoid lifting the frets up. _____15. Special care must be taken as you prepare to glue the FRETBOARD to the NECK. Read this entire step before proceeding: a) First check the top surface of the entire guitar with a straight-edge. You will need to sand the top absolutely flat in order to end up with a guitar that plays easily. b) Find or cut a thick piece of scrap wood about 2" square and 18" long to use as a clamping block. IMPORTANT: THIS SCRAP MUST HAVE ONE PERFECTLY FLAT SURFACE. Test it with your straight-edge.
HINT: Tap one end of the wire in first, then the other end, and finally give one or two taps in the middle, checking to see that it is fully seated. Try not to overwork this wire. Too much pounding in the middle may cause the ends to curl up. When you get the hang of it, 3 or 4 taps is all it should take to set each fret.
NOTE: Some experts prefer to glue the frets in place, using 5-minute epoxy. This can be especially helpful if you have trouble with one or two frets that are overworked or slot that become enlarged so they no longer hold the wire firmly. Use a c-clamp and a scrap of wood to hold the errant fret in place while the epoxy sets. Then clean off excess adhesive with a sharp knife.

© 2008 Musicmakers 12
c) Gather the clamps or strong tape needed to hold the FRETBOARD in place while the glue dries.
d) Now apply glue to the FRETBOARD and position it on the NECK, beginning at your mark 20-1/4” from the sound hole. Clamp it firmly against the flat surface of your clamping block so the FRETBOARD is completely flattened to the NECK under pressure.
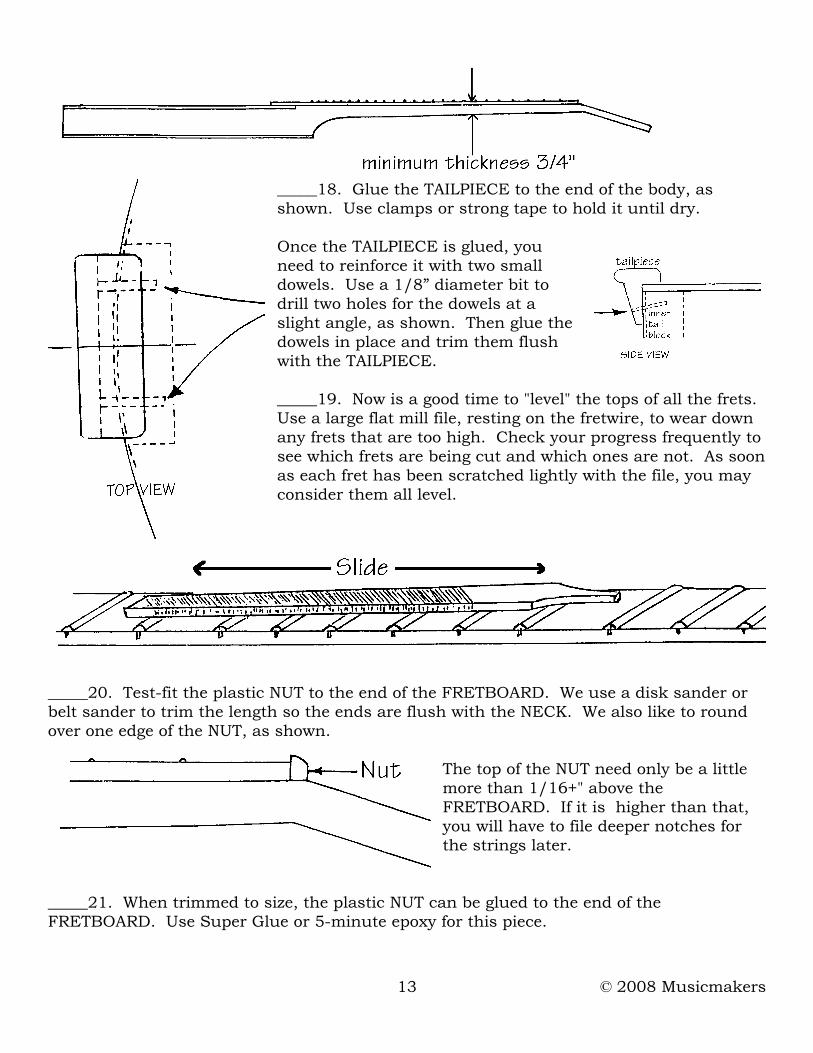
DOUBLE-CHECK TO SEE THAT THE FRETBOARD DOES NOT SLIDE OUT OF PLACE AFTER THE CLAMPS HAVE BEEN APPLIED. Also look for any gaps in the joint. Apply more clamps or tape, as needed. _____16. When dry, remove the clamps and sand the edges of the NECK and FRETBOARD to remove dried glue and to smooth off the corners. Also, clean up any excess glue that shows on the soundboard at either side of the fretboard. We use a sharp chisel or knife for that. _____17. OK, you’re guittin’ a-long just fine. Now is the time to shape the backside of the NECK to fit your grip. We have only roughed out this shape, so you may be fairly aggressive in removing thickness and in rounding over the corners. The minimum thickness, including the FRETBOARD is about 3/4". If you cut deeper than that, you may expose the TRUSS ROD inside.
© 2008 Musicmakers 13
_____18. Glue the TAILPIECE to the end of the body, as shown. Use clamps or strong tape to hold it until dry. Once the TAILPIECE is glued, you need to reinforce it with two small dowels. Use a 1/8” diameter bit to drill two holes for the dowels at a slight angle, as shown. Then glue the dowels in place and trim them flush with the TAILPIECE. _____19. Now is a good time to "level" the tops of all the frets. Use a large flat mill file, resting on the fretwire, to wear down any frets that are too high. Check your progress frequently to see which frets are being cut and which ones are not. As soon as each fret has been scratched lightly with the file, you may consider them all level.
_____20. Test-fit the plastic NUT to the end of the FRETBOARD. We use a disk sander or belt sander to trim the length so the ends are flush with the NECK. We also like to round over one edge of the NUT, as shown.
The top of the NUT need only be a little more than 1/16+" above the FRETBOARD. If it is higher than that, you will have to file deeper notches for the strings later.
_____21. When trimmed to size, the plastic NUT can be glued to the end of the FRETBOARD. Use Super Glue or 5-minute epoxy for this piece.

© 2008 Musicmakers 14
_____22. Clean up any glue residue around the entire guitar. Nothing points to an amateur woodworker more than dried glue blobs and hazy fingerprints or smudges on the surface. They are difficult to see now, but will stand out prominently after applying the finish. We recommend wiping the guitar with a clean damp rag to help locate them. Use sandpaper, a sharp chisel, knife, or scraper to remove all glue residue. _____23. Sand the entire instrument with about 180-220 grit abrasive to smooth out all surfaces so they feel good in your hands. Be sure to work the sandpaper in the direction of the grain. We like to lightly round over all the sharp corners of the guitar using this grit sandpaper. _____24. (OPTIONAL) We offer precision cut WOODEN ROSETTES that can be glued over the soundhole to decorate the instrument. It is easiest to glue such a decoration in place before varnishing, using regular wood glue, although you can glue it to the finished instrument later with a few drops of superglue. Choose one of the more open designs (such as the Daisy or the Celtic Knot) so as to avoid diminishing the sound of the instrument. VOILA! YOUR GUITAR IS READY FOR THE FINISH. HERE ARE A FEW SUGGESTIONS FOR SELECTING A NICE-LOOKING COAT TO PROTECT YOUR HANDIWORK AND TO ENHANCE THE BEAUTY OF THE WOOD. STAIN -- STAINS are coloring agents and should only be used if you dislike the natural color of the wood. We usually do not apply stains to our projects, especially when they are made with naturally beautiful hardwoods such as cherry or walnut. These woods look very nice with just a clear finish. But, if you want to color the wood differently, your staining should be accomplished before applying a surface finish such as oil, varnish, or lacquer. We like ANILINE DYES for darkening the wood without osbcuring the grain. Our 3-color powdered dyes (code FINI-40) can be mixed with denatured alcohol to the desired shade. The advantage of these dyes are quick drying time, deep colors, even penetration, and the opportunity to create a "sunburst" shading effect. OIL -- An oil finish will give your wood a low luster appearance, bringing out the natural color of the grain, but it tends soak into the wood and appear dry and "thirsty" after awhile. The principal advantage of an oil finish is that it can be applied and wiped dry immediately, so you can proceed to installing hardware (and strings) right away. The disadvantages of oil are that it usually does not give much surface protection or sheen, although there are some brands that include waxes and/or varnishes to give more surface build-up and luster. VARNISH -- Any regular varnish will work fine on this project, but we recommend our wipe-on polyurethane called MUSICMAKER'S INSTRUMENT FINISH. Our complete finishing kit (code FINI-20) includes detailed instructions, sandpaper sheets, tack cloth, foam applicator, and lint-free wiping cloth, along with a 1/2 pint can of semi-gloss polyurethane varnish. The advantages of finish are its simple application, durability, and deep, soft luster. It also works well for protecting Heat Transfer decorations. LACQUER -- Many professional instrument makers still use lacquer for their finish. The most readily available lacquer is called Deft Clear Wood Finish. It is best to purchase a can of liquid to brush on as a sealer coat first, and then use an aerosol can of the same product to spray on the final coats. The advantage of this finish is its quick drying time, but the disadvantage is the strong odor of the toxic lacquer fumes. CAUTION: Lacquer finish will not work over Heat Transfer decorations -- it dissolves the toner. _____25. We recommend masking off the FRETBOARD to avoid getting varnish or lacquer on the playing surface because it can become gummy under your fingers as you play. Guit a-long now and apply finish to the entire guitar except for the top of the FRETBOARD (which can be lightly oiled later). DON'T FORGET TO APPLY FINISH TO THE BRIDGE AND TRUSS ROD COVER TOO!

© 2008 Musicmakers 15
We also suggest stuffing some newspaper into the soundhole to catch any drips or spray that might get into the inside of the guitar body. No sense letting this thing look sloppy.... Sand between coats with fine (320-400 grit) sandpaper or steel wool. Consult instructions on the can for proper drying time. _____26. If you want to change the sheen of the finish after it dries, you can dull it slightly by rubbing with 0000 steel wool or with a Scotchbright scrubber. We often follow this procedure with a coat or two of paste wax (the same product that you would use on a wood floor) to bring out a nice shine. _____27. Now you can remove the masking tape from the fretboard and coat it lightly with some oil. We use either linseed oil, Tung oil, or a Danish oil. _____28. Install the individual GEARED TUNERS to the PEGHEAD, as shown. Note that some are meant for the right side and some for the left. Drill 1/16" pilot holes for the tiny screws, taking care not to drill all the way through the PEGHEAD.
_____29. Use a triangle file to cut notches in the NUT and BRIDGE for the strings, as shown. _____30. Install the strings as follows (reverse the string order if making a left-hand instrument): a) Thread the thin end of the
heaviest "E" (6th) string through the first hole in the TAILPIECE (on the left side) and pull the string until the "ball end" contacts the wood. b) Thread the same end of the string through the hole in the first geared tuner (closest to the "nut" on the left side) and turn the button to wind the string until the slack is taken up. Note that we like to have all the strings pass to the inside edge of the tuning posts, as shown.

© 2008 Musicmakers 16
c) Place the BRIDGE under the string at its approximate location (25-1/2" from the NUT), and tighten the string until it makes a clear sound.
d) Check the height of this string above the frets. Initially, you should set up the strings so they clear the frets by about 1/16" at the first fret (near the PEGHEAD), and about 3/16" at the 12th fret.
e) Sight down the FRETBOARD to make sure it has no bow to it. You can adjust that by tightening or loosening the TRUSS ROD, using the Allen wrench provided. Tightening the rod pulls the PEGHEAD backward, loosening the rod allows the string tension to pull the PEGHEAD forward (although it may take some time for the strings to accomplish this). f) Once the FRETBOARD is straight, you can adjust the 1st fret clearance more precisely by filing down the groove in the NUT where the string rests, but be careful not to file too far. The only way to raise the string at that position is to remove the nut and glue a shim underneath it.

© 2008 Musicmakers 17
g) You can adjust the height of the string over the 12th fret by filing deeper notches in the BRIDGE. If you go too deep, you can raise it by shimming the bottom of the BRIDGE or by gluing a tiny scrap of wood into the notch with superglue and then filing the notch again. Your style of playing will dictate how low to adjust the string action. Heavy strumming requires rather high action to avoid excessive buzzing or rattling, whereas light finger picking is easier with low action. Most people find the guitar easier to play with low action, so we set the final height to about 1/64" (thickness of matchbook cover) above the first fret, and about 1/8" above the 12th fret. h) When you are satisfied with the height of that first string, go ahead and install the other five strings in the same way. Tune them to the pitches shown. _____31. Install the TRUSS ROD COVER with three tiny screws. You will need to drill 1/16" pilot holes in the PEGHEAD for these screws. Be careful not to tighten them too much -- the TRUSS ROD COVER is fragile. _____32. There may still be some fine adjustments needed to make your guitar work its best. Test each string by plucking it with one hand while you press it down at each playing position (fret) along the neck. Here is what to check for: A. If the string is difficult to push all the way to the fretboard, it is too high. Filing the grooves deeper in the NUT will lower the string at the head end, and filing deeper in the BRIDGE will lower the strings near the middle of the guitar. B. If a string buzzes when plucked in the OPEN POSITION ONLY (when not held down to a fret), then the notch in the NUT is too deep -- the string is probably buzzing against the first fret. You’ll need to loosen the strings, knock the NUT loose and glue it back with a thin shim under it (even just gluing it back again will raise it a little because of the additional layer of glue build-up). C. If your strings buzz and rattle in general as you play, sight down the FRETBOARD first. Some seasonal changes may cause it to bend backward. Loosen the TRUSS ROD to allow the strings to pull the NECK forward. You may also shim up the entire BRIDGE to raise the strings a little higher, or change to heavier gauge strings to exert greater tension on the NECK.
D. If a string rattles or buzzes at just one or two positions (frets), or if you discover that two or three frets all give the same pitch, then look for a fret that stands up higher than its neighbors. You will need to either tap that fret back down into its slot in the fretboard or use the long flat file to level the tops of the frets some more. Just loosen the strings, lift them out of the grooves in the nut, and hold them along either side of the fingerboard as you work the file lengthwise along the tops of the frets. You can easily see which frets are the highest, as they are the ones that receive the most filing.

© 2008 Musicmakers 18
OPTIONAL ACCESSORIES _____33. If you wish to attach a strap to your guitar, you can install mounting buttons in the locations shown here. Use a 3/32" drill bit for pilot holes for the mounting screws.
CONGRATULATIONS! We hope you’ve enjoyed the building process and that you receive many years of musical pleasure from the finished product. Don't hesitate to contact us for any further help that you may need. We also appreciate hearing suggestions and hints that you think might help a future kit-builder guit a-long even better. Thank you, and guit a-long now, start playin’ this thang!
MUSICMAKER'S KITS, INC. (Hwy 36 behind Joseph’s Restaurant)
PO BOX 2117 Stillwater, MN 55082-3117
(651) 439-9120 [email protected]
ACCESSORIES AVAILABLE FOR GUITAR FINISHKIT Musicmaker's finishing kit GUITSTRG Spare set of 6 steel strings STRAP-2 Guitar strap with 2 mounting buttons GUITBAG Padded carrying bag for Guit-a-long guitar