guitar combos manual english
TRANSCRIPT
GUITAR COMBOS
Operation Manual
The information in this document is subject to change without notice and does not represent a commitment on the part of Native Instruments Software Synthesis GmbH. The software described by this document is subject to a License Agreement and may not be copied to other media. No part of this publication may be copied, reproduced or otherwise transmitted or recorded, for any purpose, without prior written permission by Native Instruments Software Synthesis GmbH. All product and company names are trademarks of their respective owners.
And also, if you’re reading this, it means you bought the software rather than stole it. It’s because of people like you that we can continue to create great tools and update them. So, thank you very much.
Users Guide written by Craig Anderton and Sascha Kubiak. NI would also like to thank the outstanding Beta Test Team, whose participants were invaluable not just in tracking down bugs, but in making this a better product.
© Native Instruments Software Synthesis GmbH, 2005. All rights reserved. GUITAR COMBOS is a trademark of Native Instruments Software Synthesis.
Germany USA
Native Instruments GmbH Native Instruments USA, Inc.Schlesische Str. 28 5631 A Hollywood BoulevardD-10997 Berlin Los Angeles, CA 90028Germany [email protected] [email protected] www.native-instruments.com
GUITAR COMBOS – III
Table of ContentsWecome to GUITAR COMBOS ........................................................................7
Product Authorization ..................................................................................9What is the Product Authorization? .................................................... 9Conducting the Product Authorization ...............................................10Method A: GUITAR COMBOS computer has direct access to the internet .11Method B: Internet Connection on another computer ..........................13Method C: No Internet Connection available ......................................16Registration support .......................................................................18
Installation under Windows XP .................................................................. 19System Requirements and Recommendations ....................................19Software Installation .......................................................................19VST plug-in Installation ...................................................................19DXi 2 plug-in Setup ....................................................................... 20RTAS plug-in installation ................................................................ 20
Installation under MacOS X .......................................................................21System Requirements and Recommendations ....................................21Installing GUITAR COMBOS OS X ...................................................21MacOS Audio Unit plug-in Installation ..............................................21RTAS plug-in installation .................................................................21
Audio Interfaces ........................................................................................22Stand-alone Application ................................................................. 22Interface Details ............................................................................ 23Plug-In Details ...............................................................................24More About Latency ...................................................................... 25
GUITAR COMBOS as Standalone .................................................................26Soundcard (Audio Interface) ........................................................... 26Routing ........................................................................................ 27MIDI ............................................................................................ 29
GUITAR COMBOS as Plug-In .......................................................................30VST 2.0 Plug-in ............................................................................ 30DXi 2 PlugIn ..................................................................................31Audio Units Plug-In ....................................................................... 32RTAS Plug-in ................................................................................ 35
IV – GUITAR COMBOS
Instant Gratification ...................................................................................36Please read this before you start ..................................................... 36Computer Setup for GUITAR COMBOS .............................................37Is it working? .................................................................................41Check out the presets .................................................................... 42Basic Preset Tweaking ................................................................... 43
GUITAR COMBOS Features ..........................................................................44The Tuner ..................................................................................... 44The View Menu ............................................................................. 45The Demo Player ........................................................................... 46
AC BOX COMBO PARAMETERS ....................................................................47Input Level Meter ...........................................................................47Noise Gate On/Off (Button) .............................................................47Input Volume (Knob) ..................................................................... 48Treble Booster On/Off (Button) ....................................................... 48Treble Booster Boost (Knob) ........................................................... 48Treble Booster Bright (Knob) ...........................................................49AC Box Volume (Knob) ....................................................................49AC Box Treble (Knob) .....................................................................49AC Box Bass (Knob) .......................................................................49AC Box Tone Cut (Knob) ................................................................ 50Tremolo On/Off (Button) ................................................................ 50Tremolo Intensity (Knob) ................................................................ 50Tremolo Rate (Knob) .......................................................................51Spring Reverb On/Off (Button) .........................................................51Spring Reverb Reverb (Knob) ...........................................................51Spring Reverb Time (Knob) ............................................................ 52Output Volume (Knob) ................................................................... 52Output Level Meter ........................................................................ 52
TWANG COMBO PARAMETERS ....................................................................53Input Level Meter .......................................................................... 53Noise Gate On/Off (Button) ............................................................ 53Input Volume (Knob) ..................................................................... 54Skreamer On/Off (Button) .............................................................. 54Skreamer Volume (Knob) ............................................................... 54Skreamer Tone (Knob) ................................................................... 55Skreamer Drive (Knob) ................................................................... 55Chorus On/Off (Button) .................................................................. 55Chorus Intensity (Knob) ................................................................. 55Twang Volume (Knob) .................................................................... 56
GUITAR COMBOS – V
Twang Treble (Knob) ...................................................................... 56Twang Mid (Knob) ......................................................................... 56Twang Bass (Knob) ........................................................................ 56Bright (Switch) .............................................................................. 57Vibrato On/Off (Button) ................................................................. 57Vibrato Amount (Knob) .................................................................. 57Vibrato Speed (Knob) .................................................................... 58Reverb On/Off (Button) .................................................................. 58Reverb Amount (Knob) ................................................................... 58Reverb Time (Knob) ....................................................................... 59Output Volume (Knob) ................................................................... 59Output Level Meter ........................................................................ 59
PLEXI COMBO PARAMETERS ......................................................................60Input Level Meter .......................................................................... 60Noise Gate On/Off (Button) ............................................................ 60Input Volume (Knob) ......................................................................61Big Fuzz On/Off (Button) ................................................................61Big Fuzz Volume (Knob) ..................................................................61Big Fuzz Sustain (Knob) ................................................................. 62Big Fuzz Tone (Knob) .................................................................... 62Cat On/Off (Button) ....................................................................... 62Cat Volume (Knob) ........................................................................ 63Cat Distortion (Knob) ..................................................................... 63Cat Filter (Knob) ........................................................................... 63Plexi Volume (Knob) ...................................................................... 64Plexi Bass (Knob) .......................................................................... 64Plexi Middle (Knob) ....................................................................... 64Plexi Treble (Knob) ........................................................................ 65Plexi Presence (Knob) ................................................................... 65Delay On/Off (Button) .................................................................... 65Delay Dry-Wet (Knob) .................................................................... 66Delay Time (Knob) ........................................................................ 66Delay Feedback (Knob) .................................................................. 66Delay Reverse (Switch) .................................................................. 67Output Volume (Knob) ................................................................... 67Output Level Meter ........................................................................ 67
Preset management ...................................................................................68
MIDI Control .............................................................................................72
Using GUITAR COMBOS with a Host Program ..............................................76
VI – GUITAR COMBOS
Automating Plug-In Parameters .................................................................79A Typical Automation Application .................................................... 79
NI Bonus Features .....................................................................................84
Troubleshooting ........................................................................................85
Appendix A: Setup Details .........................................................................87Audio Interface Hardware ............................................................... 87Internal vs. External Audio Interfaces .............................................. 89Choosing the right Audio Driver ....................................................... 89Optimizing your system .................................................................. 92
Appendix B: About MIDI .............................................................................94
Appendix C: Build a BUFFER BOARD ............................................................97
Index ......................................................................................................100
GUITAR COMBOS – 7
Wecome to GUITAR COMBOS
The GUITAR COMBOSs series includes three virtual guitar amps, each targeted toward specific musical genres:
• Twang Combo is ideal for blues, pop, country, and soft rock. Its authentic “crunch” adds just the right amount of character to your guitar’s natural sound.
• AC Box provides the classic sounds of British pop and alternative music. The bright, distinctive character of this amp has powered hit music since the 60s.
• Plexi is a rock and roll machine for metal, psychedelic, hard rock, and other musical styles that demand powerful, “high-definition” distortion.
Best of all, GUITAR COMBOSs have the “feel” of the real thing, including accurate effects modeling – close your eyes, and it’s hard to believe you’re playing through a virtual amp.
Each member of the GUITAR COMBOS results from painstaking analysis of the distinctive sonic characteristics of speakers, tubes, transformers, com-ponents, cabinets, and more. The same love of the guitar and its seemingly infinite potential that drove us to create the acclaimed Guitar Rig system has gone into the GUITAR COMBOSs series. We thank you for your support, and hope you enjoy playing through these amps as much as we do!
— Your Native Instruments Team

8 – GUITAR COMBOS
GUITAR COMBOS – 9
Product AuthorizationPart of the GUITAR COMBOS installation is a Product Authorization which has to be fullfilled in order to make permanent use of the software. We recommend that you take notice of this chapter first, then proceed with the software installation as described in the following chapters and finally return to this chapter.
What is the Product Authorization?The Product Authorization includes a full registration. After having completed the authorization, you can make use of all online services related to the regis-tered product. On the Native Instruments website you can read online tutorials, get technical support, participate in the NI forums and download updates.GUITAR COMBOS requires the Product Authorization in order to use the software permanently. You can run GUITAR COMBOS for 30 days without any limitations. As long as the software runs unauthorized a message at every program start reminds you that the authorization has not been completed yet and indicates how many more days the software is running without an authorization.The Product Authorization is performed by a small application called Reg-istration Tool. The Registration Tool generates a so called System ID which serves as request code for receiving an Authorization Key. The System ID is based on some hardware components of your computer system, the operat-ing system version and the serial number you have entered at the GUITAR COMBOS installation.
Note: Exchanging your audio card, MIDI interface or external equipment will not start the request for a new Authorization Key. Only exchanging a basic hardware component in your computer or installing a new operat-ing system might produce a new Product Authorization request. In this case the Registration Tool will reflect the change by displaying a new System ID and you have to repeat the Product Authorization.
The System ID has to be sent to Native Instruments in order to receive the Authorization Key which allows the permanent use of GUITAR COMBOS. Since the Product Authorization is part of the license agreement GUITAR COMBOS will stop launching after 30 days if it was not authorized until then. Of course, it is also possible to complete the Product Authorization after 30 days. In this case the software will launch again as soon as the Product Authorization has been completed.
10 – GUITAR COMBOS
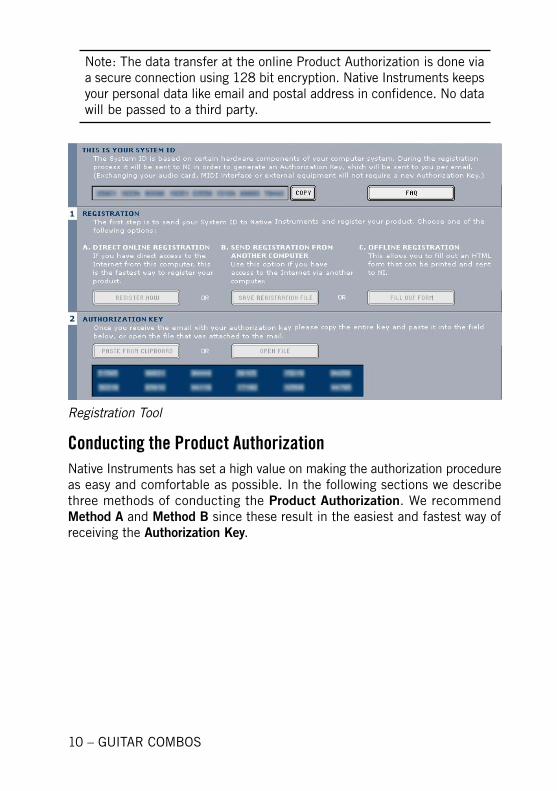
Note: The data transfer at the online Product Authorization is done via a secure connection using 128 bit encryption. Native Instruments keeps your personal data like email and postal address in confidence. No data will be passed to a third party.
Registration Tool
Conducting the Product AuthorizationNative Instruments has set a high value on making the authorization procedure as easy and comfortable as possible. In the following sections we describe three methods of conducting the Product Authorization. We recommend Method A and Method B since these result in the easiest and fastest way of receiving the Authorization Key.
GUITAR COMBOS – 11
Method A: GUITAR COMBOS computer has direct access to the internet
Important: This method requires a valid email address to complete the Product Authorization, since the registration code will be sent to you by email.
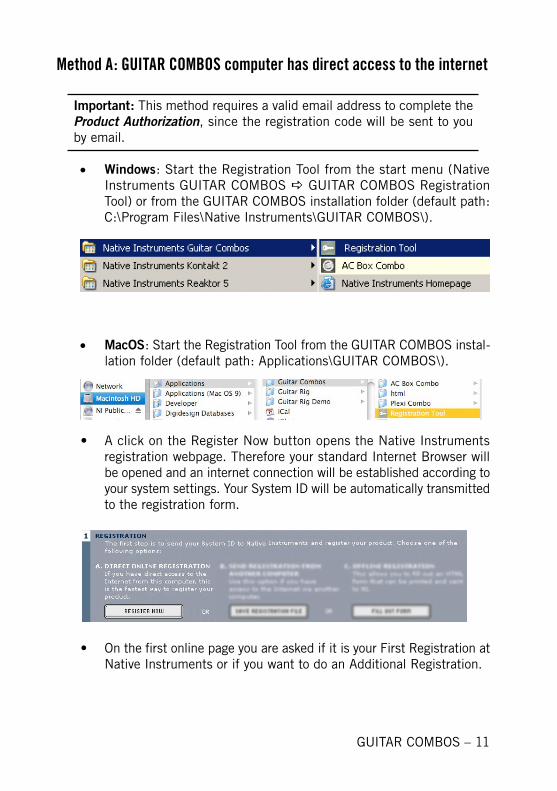
• Windows: Start the Registration Tool from the start menu (Native Instruments GUITAR COMBOS GUITAR COMBOS Registration Tool) or from the GUITAR COMBOS installation folder (default path: C:\Program Files\Native Instruments\GUITAR COMBOS\).
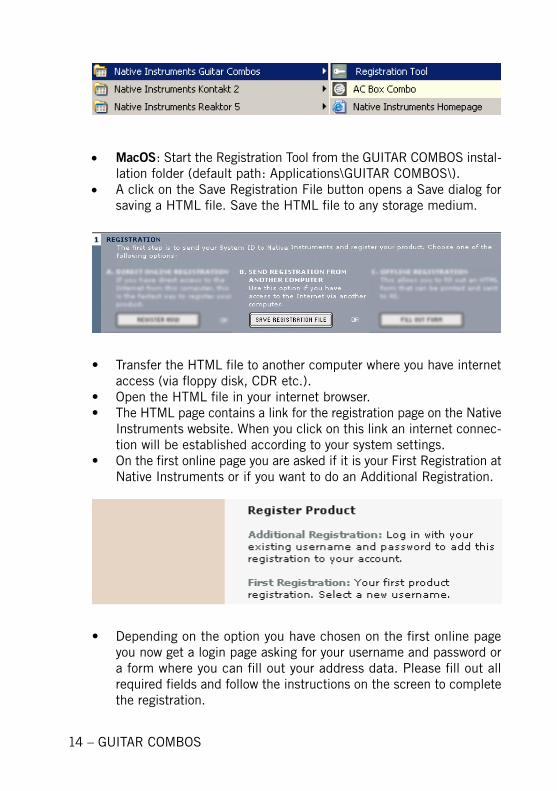
• MacOS: Start the Registration Tool from the GUITAR COMBOS instal-lation folder (default path: Applications\GUITAR COMBOS\).
• A click on the Register Now button opens the Native Instruments registration webpage. Therefore your standard Internet Browser will be opened and an internet connection will be established according to your system settings. Your System ID will be automatically transmitted to the registration form.
• On the first online page you are asked if it is your First Registration at Native Instruments or if you want to do an Additional Registration.
12 – GUITAR COMBOS
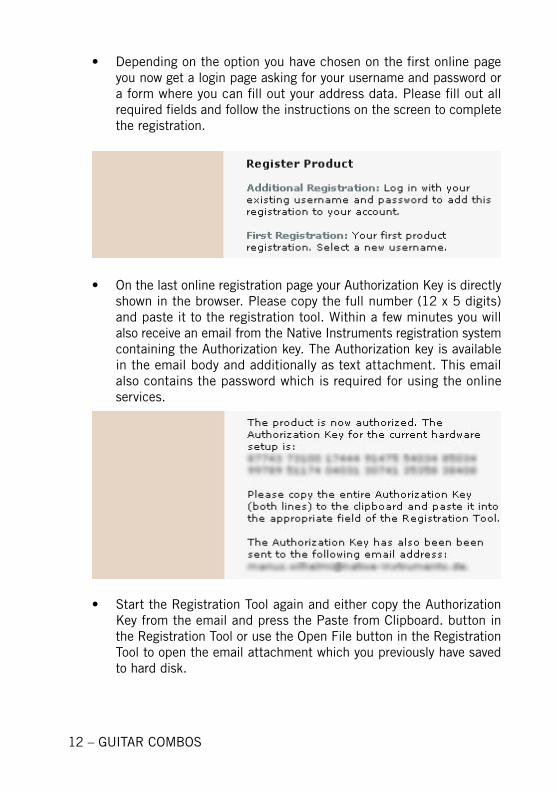
• Depending on the option you have chosen on the first online page you now get a login page asking for your username and password or a form where you can fill out your address data. Please fill out all required fields and follow the instructions on the screen to complete the registration.
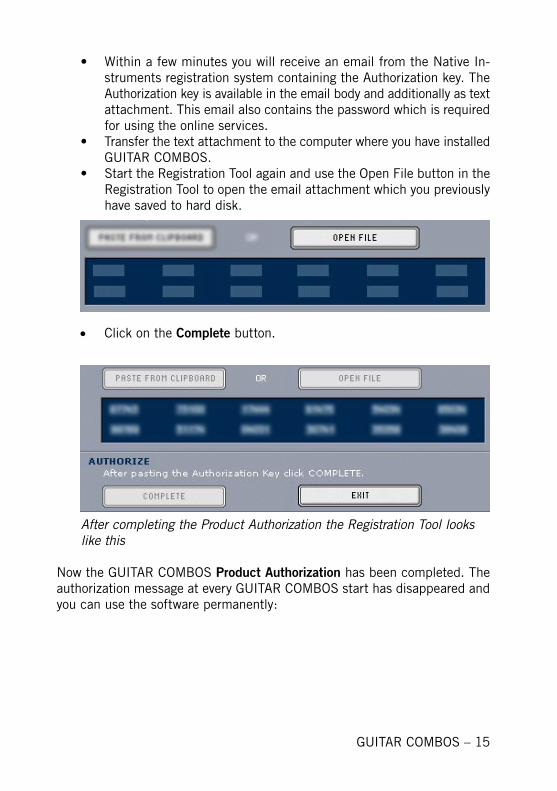
• On the last online registration page your Authorization Key is directly shown in the browser. Please copy the full number (12 x 5 digits) and paste it to the registration tool. Within a few minutes you will also receive an email from the Native Instruments registration system containing the Authorization key. The Authorization key is available in the email body and additionally as text attachment. This email also contains the password which is required for using the online services.
• Start the Registration Tool again and either copy the Authorization Key from the email and press the Paste from Clipboard. button in the Registration Tool or use the Open File button in the Registration Tool to open the email attachment which you previously have saved to hard disk.
GUITAR COMBOS – 13
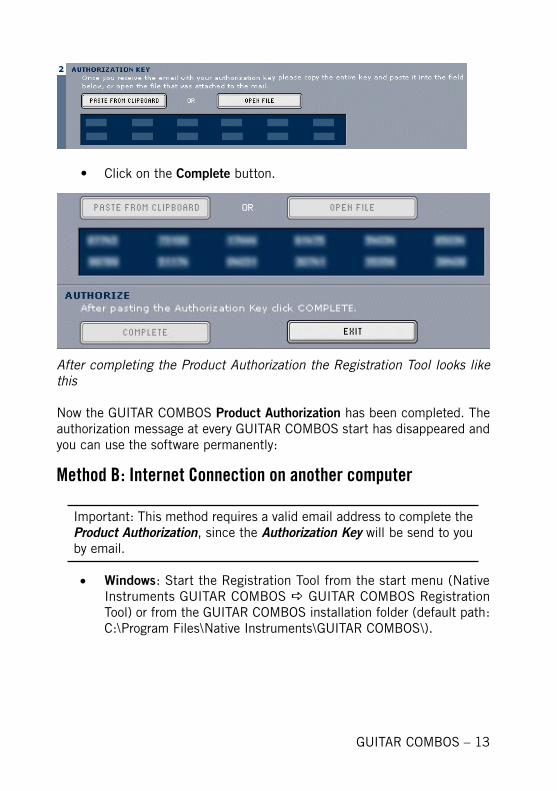
• Click on the Complete button.
After completing the Product Authorization the Registration Tool looks like this
Now the GUITAR COMBOS Product Authorization has been completed. The authorization message at every GUITAR COMBOS start has disappeared and you can use the software permanently:
Method B: Internet Connection on another computer
Important: This method requires a valid email address to complete the Product Authorization, since the Authorization Key will be send to you by email.
• Windows: Start the Registration Tool from the start menu (Native Instruments GUITAR COMBOS GUITAR COMBOS Registration Tool) or from the GUITAR COMBOS installation folder (default path: C:\Program Files\Native Instruments\GUITAR COMBOS\).
14 – GUITAR COMBOS
• MacOS: Start the Registration Tool from the GUITAR COMBOS instal-lation folder (default path: Applications\GUITAR COMBOS\).
• A click on the Save Registration File button opens a Save dialog for saving a HTML file. Save the HTML file to any storage medium.
• Transfer the HTML file to another computer where you have internet access (via floppy disk, CDR etc.).
• Open the HTML file in your internet browser.• The HTML page contains a link for the registration page on the Native
Instruments website. When you click on this link an internet connec-tion will be established according to your system settings.
• On the first online page you are asked if it is your First Registration at Native Instruments or if you want to do an Additional Registration.
• Depending on the option you have chosen on the first online page you now get a login page asking for your username and password or a form where you can fill out your address data. Please fill out all required fields and follow the instructions on the screen to complete the registration.
GUITAR COMBOS – 15
• Within a few minutes you will receive an email from the Native In-struments registration system containing the Authorization key. The Authorization key is available in the email body and additionally as text attachment. This email also contains the password which is required for using the online services.
• Transfer the text attachment to the computer where you have installed GUITAR COMBOS.
• Start the Registration Tool again and use the Open File button in the Registration Tool to open the email attachment which you previously have saved to hard disk.
• Click on the Complete button.
After completing the Product Authorization the Registration Tool looks like this
Now the GUITAR COMBOS Product Authorization has been completed. The authorization message at every GUITAR COMBOS start has disappeared and you can use the software permanently:
16 – GUITAR COMBOS
Method C: No Internet Connection available
Important: Following this method you will have to fill in a form which you send to Native Instruments. You will receive the Authorization Key either by email (recommended), by postal mail or by fax. If you do not provide Native Instruments with a valid email address in the form, be prepared to type in the Authorization Key manually (about 60 digits).
If you do not have access to the internet or if you do not have a working email address, the Product Authorization can also be done via postal mail or fax. Although Native Instruments goes after a fast handling of your authorization requests, it is generally recommended that you prefer Method A or Method B for shortest return times and most comfortable operation. Please note the following instructions to fullfill the Product Authorization:
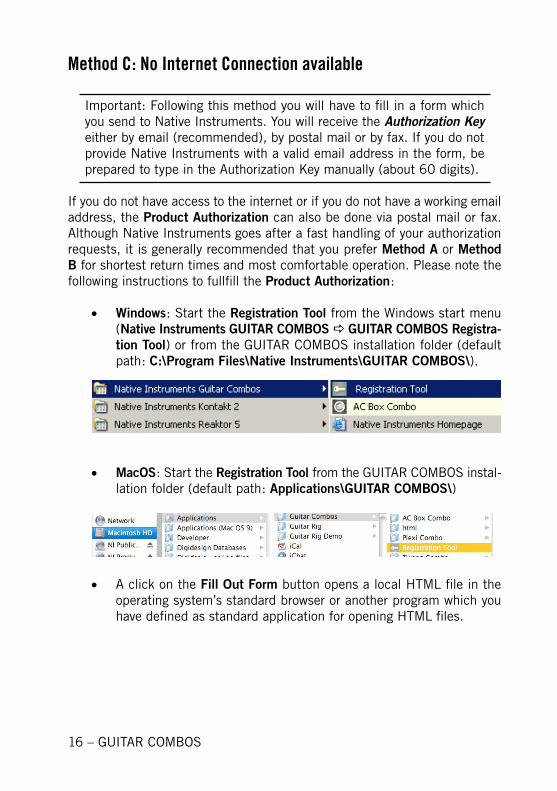
• Windows: Start the Registration Tool from the Windows start menu (Native Instruments GUITAR COMBOS GUITAR COMBOS Registra-tion Tool) or from the GUITAR COMBOS installation folder (default path: C:\Program Files\Native Instruments\GUITAR COMBOS\).
• MacOS: Start the Registration Tool from the GUITAR COMBOS instal-lation folder (default path: Applications\GUITAR COMBOS\)
• A click on the Fill Out Form button opens a local HTML file in the operating system’s standard browser or another program which you have defined as standard application for opening HTML files.
GUITAR COMBOS – 17
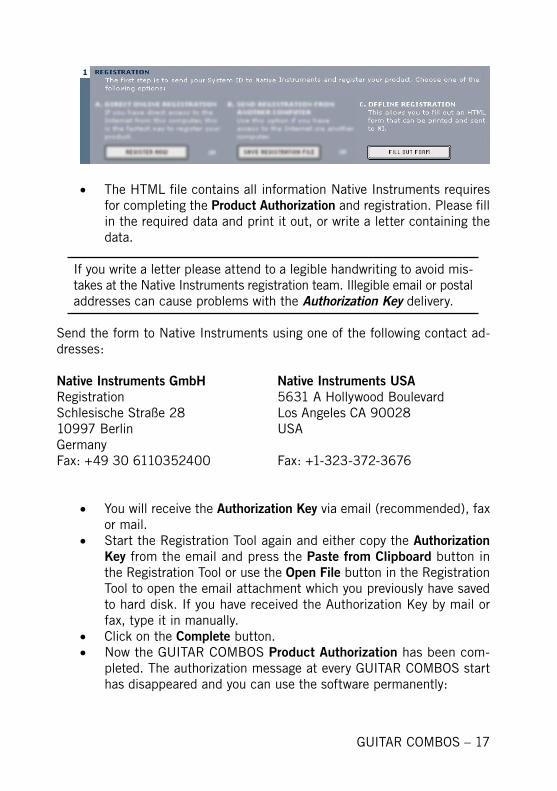
• The HTML file contains all information Native Instruments requires for completing the Product Authorization and registration. Please fill in the required data and print it out, or write a letter containing the data.
If you write a letter please attend to a legible handwriting to avoid mis-takes at the Native Instruments registration team. Illegible email or postal addresses can cause problems with the Authorization Key delivery.
Send the form to Native Instruments using one of the following contact ad-dresses:
Native Instruments GmbH Native Instruments USARegistration 5631 A Hollywood BoulevardSchlesische Straße 28 Los Angeles CA 9002810997 Berlin USAGermany Fax: +49 30 6110352400 Fax: +1-323-372-3676
• You will receive the Authorization Key via email (recommended), fax or mail.
• Start the Registration Tool again and either copy the Authorization Key from the email and press the Paste from Clipboard button in the Registration Tool or use the Open File button in the Registration Tool to open the email attachment which you previously have saved to hard disk. If you have received the Authorization Key by mail or fax, type it in manually.
• Click on the Complete button.• Now the GUITAR COMBOS Product Authorization has been com-
pleted. The authorization message at every GUITAR COMBOS start has disappeared and you can use the software permanently:
18 – GUITAR COMBOS
Registration supportIf you run into problems during the Product Authorization the Native Instru-ments registration support team will be happy to help you. In this case send a support request on the NI website using the following URL:http://www.native-instruments.com/registersupport.info Please describe the occurred problem as accurate as possible and provide the registration support team with the necessary details to solve the problem.
GUITAR COMBOS – 19
Installation under Windows XP
System Requirements and RecommendationsTo use the GUITAR COMBOS software, you need a computer with the follow-ing minimum specifications:
Hardware• Pentium III 700 MHz/ Athlon XP 1333 MHz.• 256 MB RAM
Software• Windows XP
Software Installation• Insert the GUITAR COMBOS CD into the CD drive.• Use the Windows Explorer to view the contents of the CD.• Start the installation by double-clicking GUITAR COMBOS Setup.exe.• The setup program will suggest C:\Program Files\Native Instruments\
GUITAR COMBOS\ as the path for the destination folder. You may also choose another folder if you wish.
Installed Folders, Files, and LinksThe setup program creates a new folder called GUITAR COMBOS\ in the instal-lation directory (Program Files\Native Instruments). This folder contains the files required to operate the software. If you do not choose a different program group during the installation, links to GUITAR COMBOS and a ReadMe file are added to the Start menu under Programs/Native Instruments.
VST plug-in Installation• Insert the Installation CD into the CD drive.• Use the Windows Explorer to view the contents of the CD. To start,
double-click the GUITAR COMBOS Setup.exe file.• When the choice is given by the installer, select VST plug-in from the
list of components to install.• You can now choose to automatically search for the VST plug-in folder
or manually select the VST plug-in folder of your choice. Please select the option that best suits your installation requirements.
20 – GUITAR COMBOS
Note: If more than one host program for VST 2.0 plug-ins is installed on your computer, the installer lets you install to multiple VST-folders by shift-clicking them. If you decide to install them at a later date, simply copy the “GUITAR COMBOS VST.dll” file into the VST plug-ins folders of these programs. Windows: If the VST plug-in files are not visible in the Windows Explorer, select the Show All Files option. This option is located in the Explorer menu View Folder Options... on the View tab below Hidden Files. Optionally, you can set up your programs so that they all use the same VST plug-ins folder.
DXi 2 plug-in SetupDXi 2 is a plug-in interface for software synthesizers and instruments based on Microsoft DXi technology. Sonar from Cakewalk and Fruity Loops are the most well known host sequencers that support DXi.
Installation• Insert the Installation CD into the CD drive of your computer.• Use the Windows Explorer to view the contents of the CD and double-
click the GUITAR COMBOS Setup.exe file to start the installation.• Continue the GUITAR COMBOS installation until you come to the
Choose plug-ins page. Tick the checkbox DXi plug-in.
The installation program copies the GUITAR COMBOS plug-in to your hard disk and registers it as a DXi 2 plug-in for use in DXi 2-compatible host pro-grams. After the installation, GUITAR COMBOS appears as a plug-in in the host program.
RTAS plug-in installation• Launch the GUITAR COMBOS Installer from the CD. • Select the Custom installation type. • Select only RTAS from the list of components to install.

GUITAR COMBOS – 21
Installation under MacOS X
System Requirements and RecommendationsTo use the GUITAR COMBOS software, you need a computer with the follow-ing minimum specifications:
Hardware• Apple PowerMac G4 733 MHz or faster • 256 MB RAM
Software• MacOS 10.2.6
Installing GUITAR COMBOS OS X • Insert the Installation CD into the CD drive of your computer.• Double-click the installation program Install GUITAR COMBOS to
start it.• The start screen appears first. After clicking Continue and confirm-
ing the license agreement, a dialog opens where you can select the installation location and the destination folder.
The installation program suggests a path for the GUITAR COMBOS folder; if you do not select a different destination, the GUITAR COMBOS folder is cre-ated on the first hard disk. You can choose between Easy Install, where both the stand-alone and plug-in versions are installed, or Custom Install, where you can select which versions you want to install.
MacOS Audio Unit plug-in Installation• Launch the GUITAR COMBOS Installer from the CD• Select the Custom installation type.• Select only Audio Unit from the list of components to install.
RTAS plug-in installation• Launch the GUITAR COMBOS Install er from the CD • Select the Custom installation type. • Select only RTAS from the list of components to install.
22 – GUITAR COMBOS
Audio InterfacesAudio interfaces, which include software routines called drivers, allow GUITAR COMBOS (and other programs you have installed, if present) to communicate with your computer’s audio hardware. This section describes how to use vari-ous audio interfaces with GUITAR COMBOS.There are two main ways to implement GUITAR COMBOS:As a “stand-alone” device that requires no host software. GUITAR COMBOS’s audio and MIDI connections interact directly with your computer’s audio/MIDI hardware interface.As a plug-in that works in conjunction with a “host” program, such as se-quencing or hard disk recording software. In this case, the host program interacts directly with the computer’s hardware interface. GUITAR COMBOS connects to the host program via “virtual patch cords.” GUITAR COMBOS’s audio outputs appear as signals in the host’s mixer, and the host passes MIDI data to GUITAR COMBOS. We’ll describe each mode in detail, but first let’s look at the various inter-face drivers and plug-in formats used by different operating systems and programs.
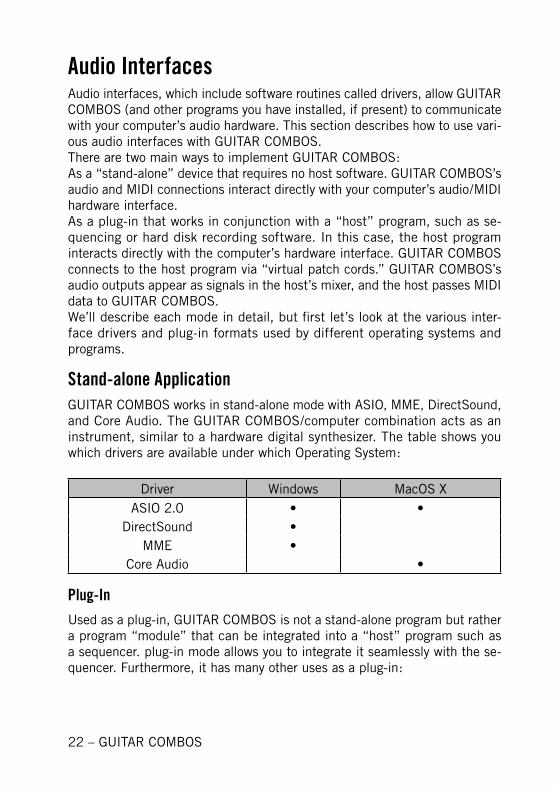
Stand-alone ApplicationGUITAR COMBOS works in stand-alone mode with ASIO, MME, DirectSound, and Core Audio. The GUITAR COMBOS/computer combination acts as an instrument, similar to a hardware digital synthesizer. The table shows you which drivers are available under which Operating System:
Driver Windows MacOS XASIO 2.0 • •
DirectSound •MME •
Core Audio •
Plug-InUsed as a plug-in, GUITAR COMBOS is not a stand-alone program but rather a program “module” that can be integrated into a “host” program such as a sequencer. plug-in mode allows you to integrate it seamlessly with the se-quencer. Furthermore, it has many other uses as a plug-in:
GUITAR COMBOS – 23
• MIDI sequencing of GUITAR COMBOS and audio mix-down of the MIDI tracks within a single program
• Comfortable automation of GUITAR COMBOS parameters in the se-quencer
• Further processing of GUITAR COMBOS signals using additional plug-ins
• Sample-accurate timing with MIDI controllers (when used as VST 2.0 plug-in)
• Restoring of all plug-in settings when the host document (such as a song file of the sequencer) is loaded
• Integration with other instruments into a “virtual studio”
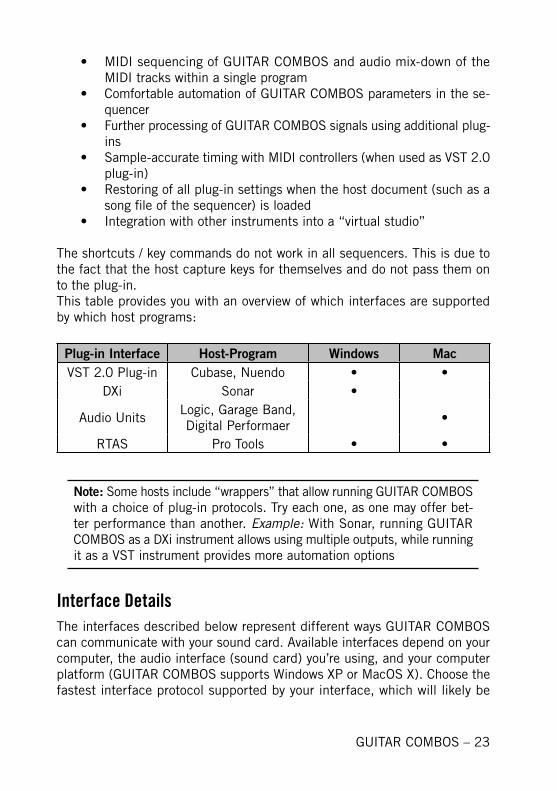
The shortcuts / key commands do not work in all sequencers. This is due to the fact that the host capture keys for themselves and do not pass them on to the plug-in. This table provides you with an overview of which interfaces are supported by which host programs:
Plug-in Interface Host-Program Windows MacVST 2.0 Plug-in Cubase, Nuendo • •
DXi Sonar •
Audio UnitsLogic, Garage Band, Digital Performaer
•
RTAS Pro Tools • •
Note: Some hosts include “wrappers” that allow running GUITAR COMBOS with a choice of plug-in protocols. Try each one, as one may offer bet-ter performance than another. Example: With Sonar, running GUITAR COMBOS as a DXi instrument allows using multiple outputs, while running it as a VST instrument provides more automation options
Interface DetailsThe interfaces described below represent different ways GUITAR COMBOS can communicate with your sound card. Available interfaces depend on your computer, the audio interface (sound card) you’re using, and your computer platform (GUITAR COMBOS supports Windows XP or MacOS X). Choose the fastest interface protocol supported by your interface, which will likely be
24 – GUITAR COMBOS
ASIO with Windows, or Core Audio for Mac. For Windows, you can also use DirectSound and Multimedia (also called MME), but expect a significant delay (called latency) between the time you play a note and the time you hear it.
ASIO (Audio Streaming Input Output): This cross-platform plug-in protocol was developed by Steinberg. It is highly recommended for its low latency, multi-channel audio card support, and high performance.
DirectSound: Developed by Microsoft, this is a is a component of DirectX 5.0 or higher for Windows. How well DirectX works well depends on your sound card. If you adjust the interface for an acceptable amount of latency, you may hear glitches and clicks in the audio output that can only be fixed if you increase latency. MME (Multi Media Extension): This is the standard Windows audio driver. Most sound cards support this interface and work with it quite well. However, MME is even less suitable than DirectSound for real-time applications due to its comparatively high latency.
Core Audio: This audio interface for MacOS X is integrated tightly into the operating system, and works with external audio hardware as well as the Mac’s integrated audio output.
Plug-In DetailsVST (Virtual Studio Technology): Like ASIO, this cross-platform plug-in tech-nology was developed by Steinberg. It is the most common plug-in format, and many programs are optimized to work with VST plug-ins.
DXi2 (DirectX Instrument 2): Based on Microsoft DirectX technology, this plug-in interface for software synthesizers and instruments is designed for low latency and high performance on the Windows platform. Cakewalk Sonar and Image Line FL Studio are the most well-known hosts that support DXi.
RTAS (Real Time Audio Suite): This interface protocol from Digidesign allows using plug-ins with ProTools (or other Digidesign-compatible software). Un-like traditional TDM effects that depend on using Digidesign hardware, RTAS plug-ins are “native;” the host processor performs all computations needed for the plug-in.
GUITAR COMBOS – 25
AU (Audio Units): This plug-in format is exclusively for the Macintosh OS X platform, and is tied in closely with the operating system.
More About LatencyAs with any digital device (including hardware signal processors) that convert audio to data and back again, a computer adds a certain amount of delay (“latency”) when processing audio signals. Fortunately, with today’s computers and low-latency sound card drivers, this delay can be so small that you can’t hear it (e.g., under 3 milliseconds, which is about the same delay caused by moving your head one meter further away from a speaker). However, typical computers are generally not set up for low latency; attempting to play in real time through GUITAR COMBOS will probably be unsatisfying because of the delay.If your computer is already configured for low-latency operation, keep reading. Otherwise, before installing GUITAR COMBOS, please turn to Appendix A on “Optimizing System Response” for information about obtaining the lowest possible system latency.
26 – GUITAR COMBOS
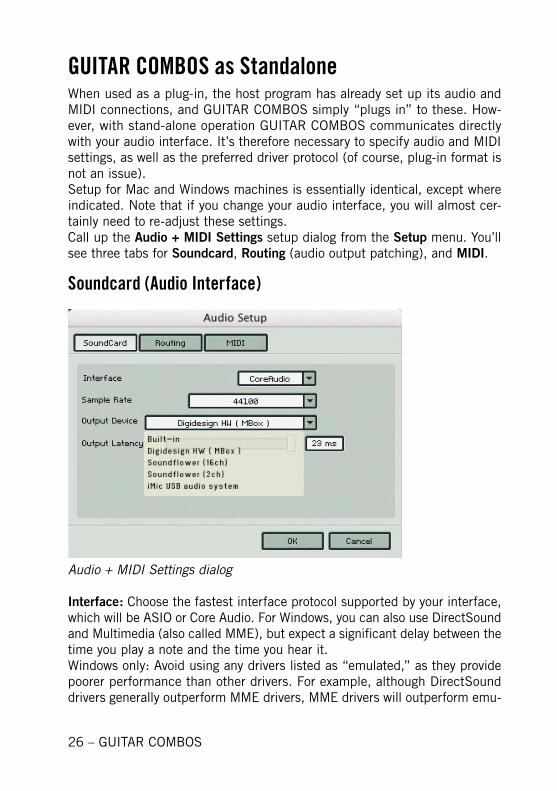
GUITAR COMBOS as StandaloneWhen used as a plug-in, the host program has already set up its audio and MIDI connections, and GUITAR COMBOS simply “plugs in” to these. How-ever, with stand-alone operation GUITAR COMBOS communicates directly with your audio interface. It’s therefore necessary to specify audio and MIDI settings, as well as the preferred driver protocol (of course, plug-in format is not an issue).Setup for Mac and Windows machines is essentially identical, except where indicated. Note that if you change your audio interface, you will almost cer-tainly need to re-adjust these settings.Call up the Audio + MIDI Settings setup dialog from the Setup menu. You’ll see three tabs for Soundcard, Routing (audio output patching), and MIDI.
Soundcard (Audio Interface)
Audio + MIDI Settings dialog
Interface: Choose the fastest interface protocol supported by your interface, which will be ASIO or Core Audio. For Windows, you can also use DirectSound and Multimedia (also called MME), but expect a significant delay between the time you play a note and the time you hear it.Windows only: Avoid using any drivers listed as “emulated,” as they provide poorer performance than other drivers. For example, although DirectSound drivers generally outperform MME drivers, MME drivers will outperform emu-
GUITAR COMBOS – 27
lated DirectSound drivers.Sample rate: The drop-down menu will display compatible sample rates for your audio interface. 44.1kHz is the same sample rate used for CDs, and is the most “universal” choice. However, some audio interfaces offer 48kHz and 96kHz (GUITAR COMBOS accepts up to 96kHz sample rates). These higher rates stress your computer more, but offer somewhat better high frequency response. If you are using GUITAR COMBOS standalone, choose whichever rate you prefer. When used as a plug-in with a host program (e.g., Cubase, Digital Performer, Logic, Sonar, etc.), the host will determine the sample rate.Output Device: Use ASIO written specifically for your audio interface (not “ASIO DirectX” or “ASIO Multimedia,” unless no other choices are available), or for the Mac, Core Audio.Output Latency: This field displays the output latency. For some drivers you can adjust the latency individually using a fader.Adjust latency for the fastest possible setting that gives consistent audio per-formance. The CPU may not be able to keep up with fast settings, resulting in possible crackles or pops in the audio. Slower settings will give more consistent audio performance, but the amount of delay may be musically unsatisfying. Experiment with the latency setting until you find the best compromise be-tween consistent audio performance and fast response. A quick way to adjust latency is as follows:Select any instrument and play it while moving the Latency slider.Move the Latency slider to the left until you start to hear clicks in the audio output.Now move the slider to the right until the clicks disappear. This is the opti-mum setting.
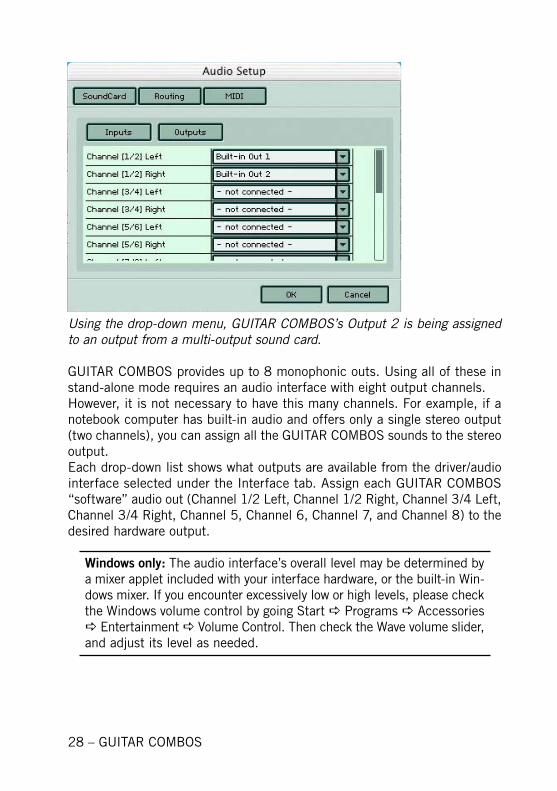
RoutingIf your sound card offers multiple inputs and outputs, you can choose which ones connect to GUITAR COMBOS. Click on Inputs to choose the desired inputs from the drop-down menus, and click on Outputs to select the outputs, also from drop-down menus. Note that the right and left channels are independent and can be assigned to any inputs/outputs – not just stereo pairs – as well as disconnected from audio ins and outs.
28 – GUITAR COMBOS
Using the drop-down menu, GUITAR COMBOS’s Output 2 is being assigned to an output from a multi-output sound card.
GUITAR COMBOS provides up to 8 monophonic outs. Using all of these in stand-alone mode requires an audio interface with eight output channels.However, it is not necessary to have this many channels. For example, if a notebook computer has built-in audio and offers only a single stereo output (two channels), you can assign all the GUITAR COMBOS sounds to the stereo output.Each drop-down list shows what outputs are available from the driver/audio interface selected under the Interface tab. Assign each GUITAR COMBOS “software” audio out (Channel 1/2 Left, Channel 1/2 Right, Channel 3/4 Left, Channel 3/4 Right, Channel 5, Channel 6, Channel 7, and Channel 8) to the desired hardware output.
Windows only: The audio interface’s overall level may be determined by a mixer applet included with your interface hardware, or the built-in Win-dows mixer. If you encounter excessively low or high levels, please check the Windows volume control by going Start Programs Accessories Entertainment Volume Control. Then check the Wave volume slider, and adjust its level as needed.
GUITAR COMBOS – 29
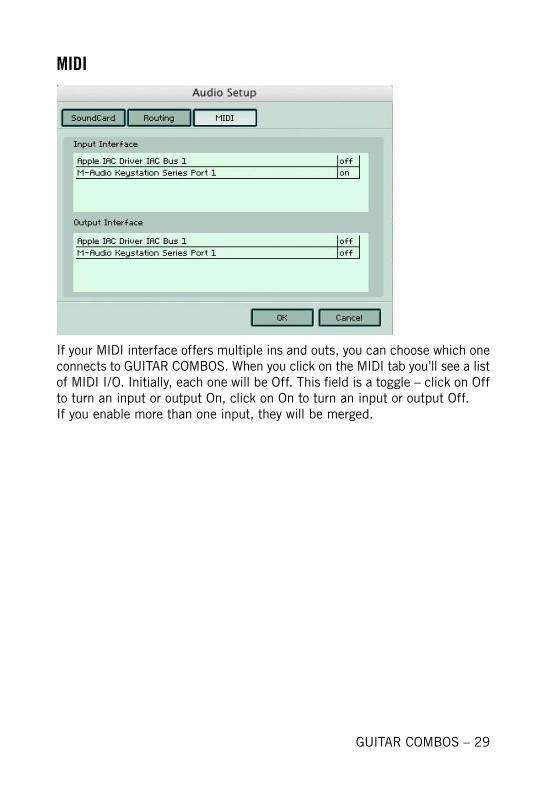
MIDI
If your MIDI interface offers multiple ins and outs, you can choose which one connects to GUITAR COMBOS. When you click on the MIDI tab you’ll see a list of MIDI I/O. Initially, each one will be Off. This field is a toggle – click on Off to turn an input or output On, click on On to turn an input or output Off. If you enable more than one input, they will be merged.
30 – GUITAR COMBOS
GUITAR COMBOS as Plug-In
VST 2.0 Plug-inIn addition to the stand-alone version, GUITAR COMBOS can also be used as a VST Audio Effect plug-in. The advantages of the VST 2.0 format allow us to provide you with a powerful plug-in.For more information on the VST 2.0 format, refer to the user guide provided with your VST host program.
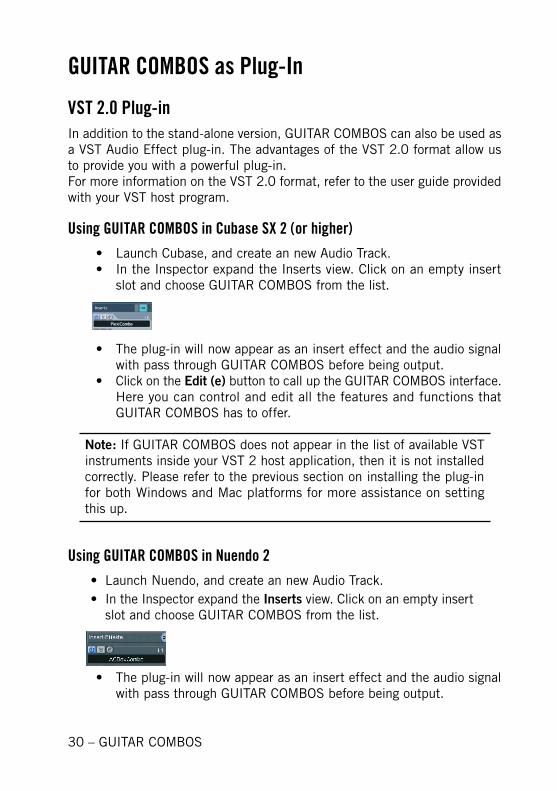
Using GUITAR COMBOS in Cubase SX 2 (or higher) • Launch Cubase, and create an new Audio Track. • In the Inspector expand the Inserts view. Click on an empty insert
slot and choose GUITAR COMBOS from the list.
• The plug-in will now appear as an insert effect and the audio signal with pass through GUITAR COMBOS before being output.
• Click on the Edit (e) button to call up the GUITAR COMBOS interface. Here you can control and edit all the features and functions that GUITAR COMBOS has to offer.
Note: If GUITAR COMBOS does not appear in the list of available VST instruments inside your VST 2 host application, then it is not installed correctly. Please refer to the previous section on installing the plug-in for both Windows and Mac platforms for more assistance on setting this up.
Using GUITAR COMBOS in Nuendo 2 • Launch Nuendo, and create an new Audio Track. • In the Inspector expand the Inserts view. Click on an empty insert
slot and choose GUITAR COMBOS from the list.
• The plug-in will now appear as an insert effect and the audio signal with pass through GUITAR COMBOS before being output.
GUITAR COMBOS – 31
• Click on the Edit (e) button to call up the GUITAR COMBOS interface. Here you can control and edit all the features and functions that GUITAR COMBOS has to offer.
Note: If GUITAR COMBOS does not appear in the list of available VST instruments inside your VST 2 host application, then it is not installed correctly. Please refer to the previous section on installing the plug-in for both Windows and Mac platforms for more assistance on setting this up.
If the plug-in does not receive MIDI or generate audio, then make sure to check the following two areas:
• Make sure “MIDI thru” is enabled in Nuendo. • The MIDI channel of your MIDI track must correspond to the receive
channel of the loaded instrument. • Make sure that you have properly configured your sound card for use
with Nuendo • Please refer to your Nuendo manual for more information.
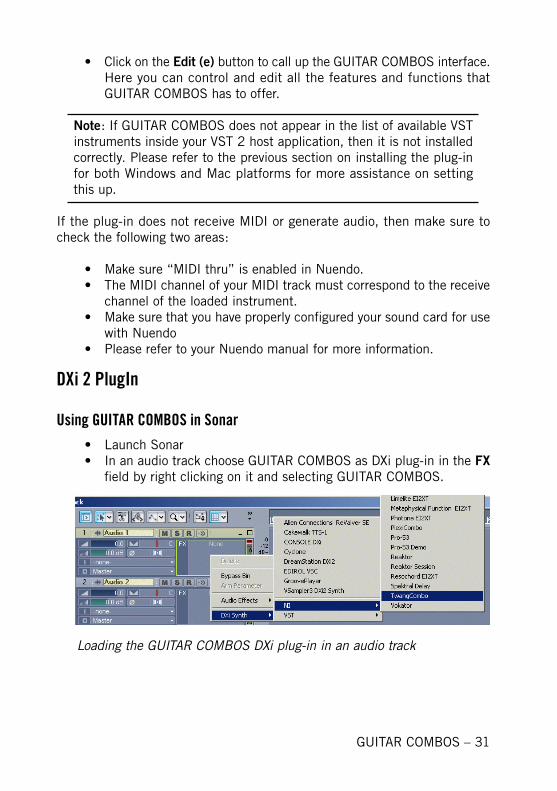
DXi 2 PlugIn
Using GUITAR COMBOS in Sonar • Launch Sonar • In an audio track choose GUITAR COMBOS as DXi plug-in in the FX
field by right clicking on it and selecting GUITAR COMBOS.
Loading the GUITAR COMBOS DXi plug-in in an audio track
32 – GUITAR COMBOS
Audio Units Plug-In
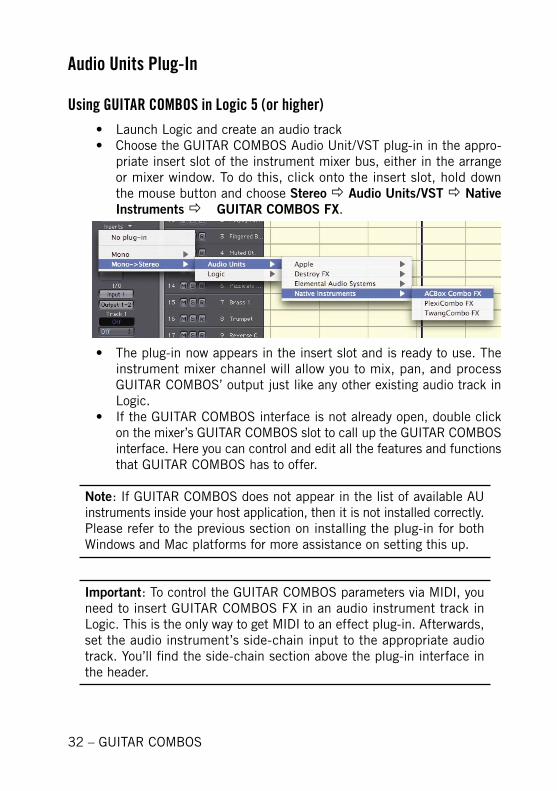
Using GUITAR COMBOS in Logic 5 (or higher)
• Launch Logic and create an audio track • Choose the GUITAR COMBOS Audio Unit/VST plug-in in the appro-
priate insert slot of the instrument mixer bus, either in the arrange or mixer window. To do this, click onto the insert slot, hold down the mouse button and choose Stereo Audio Units/VST Native Instruments GUITAR COMBOS FX.
• The plug-in now appears in the insert slot and is ready to use. The instrument mixer channel will allow you to mix, pan, and process GUITAR COMBOS’ output just like any other existing audio track in Logic.
• If the GUITAR COMBOS interface is not already open, double click on the mixer’s GUITAR COMBOS slot to call up the GUITAR COMBOS interface. Here you can control and edit all the features and functions that GUITAR COMBOS has to offer.
Note: If GUITAR COMBOS does not appear in the list of available AU instruments inside your host application, then it is not installed correctly. Please refer to the previous section on installing the plug-in for both Windows and Mac platforms for more assistance on setting this up.
Important: To control the GUITAR COMBOS parameters via MIDI, you need to insert GUITAR COMBOS FX in an audio instrument track in Logic. This is the only way to get MIDI to an effect plug-in. Afterwards, set the audio instrument’s side-chain input to the appropriate audio track. You’ll find the side-chain section above the plug-in interface in the header.
GUITAR COMBOS – 33
After having loaded an instrument from the library you should be able to trigger it via MIDI using a keyboard controller. GUITAR COMBOS’s sound will generate through the VST mixer and directly to your sound card. If the plug-in does not receive MIDI or generate audio, then make sure to check the following two areas:
• Make sure “MIDI thru” is enabled in Logic. • The MIDI channel of your MIDI track must correspond to the receive
channel of the loaded instrument. • Make sure that you have properly configured your sound card for use
with Logic.• Please refer to your Logic manual for more information.
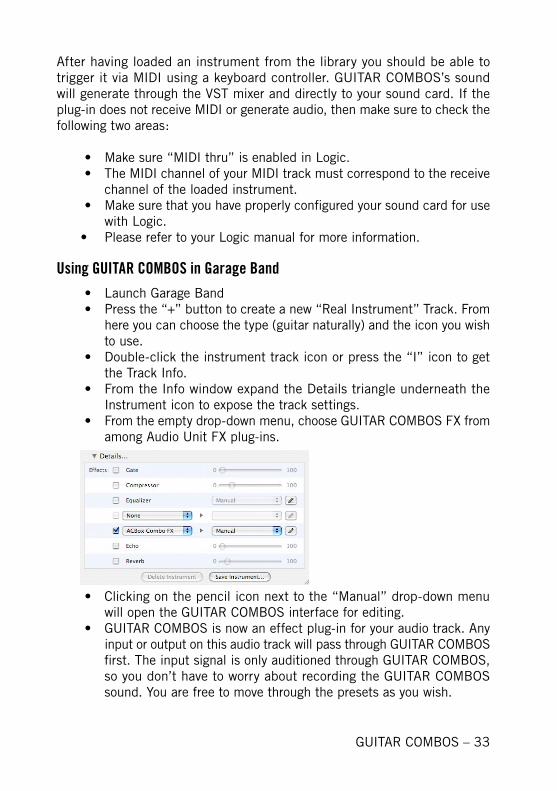
Using GUITAR COMBOS in Garage Band • Launch Garage Band • Press the “+” button to create a new “Real Instrument” Track. From
here you can choose the type (guitar naturally) and the icon you wish to use.
• Double-click the instrument track icon or press the “I” icon to get the Track Info.
• From the Info window expand the Details triangle underneath the Instrument icon to expose the track settings.
• From the empty drop-down menu, choose GUITAR COMBOS FX from among Audio Unit FX plug-ins.
• Clicking on the pencil icon next to the “Manual” drop-down menu will open the GUITAR COMBOS interface for editing.
• GUITAR COMBOS is now an effect plug-in for your audio track. Any input or output on this audio track will pass through GUITAR COMBOS first. The input signal is only auditioned through GUITAR COMBOS, so you don’t have to worry about recording the GUITAR COMBOS sound. You are free to move through the presets as you wish.
34 – GUITAR COMBOS
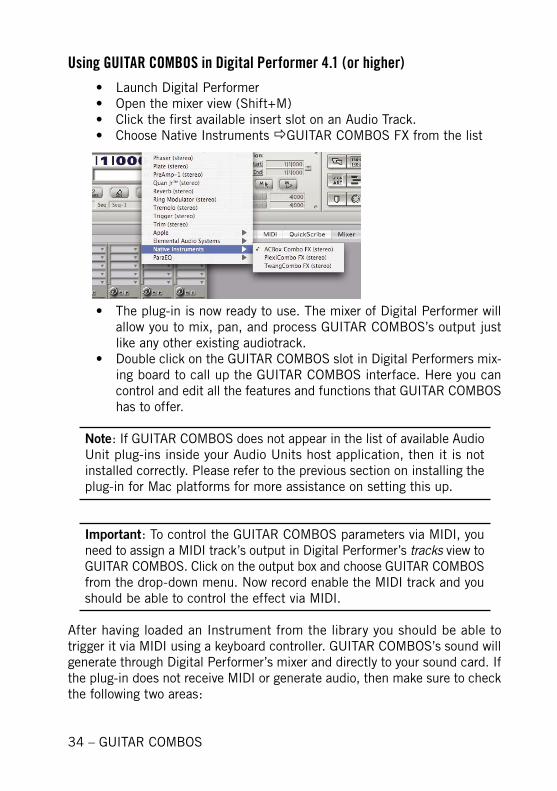
Using GUITAR COMBOS in Digital Performer 4.1 (or higher) • Launch Digital Performer • Open the mixer view (Shift+M) • Click the first available insert slot on an Audio Track. • Choose Native Instruments GUITAR COMBOS FX from the list
• The plug-in is now ready to use. The mixer of Digital Performer will allow you to mix, pan, and process GUITAR COMBOS’s output just like any other existing audiotrack.
• Double click on the GUITAR COMBOS slot in Digital Performers mix-ing board to call up the GUITAR COMBOS interface. Here you can control and edit all the features and functions that GUITAR COMBOS has to offer.
Note: If GUITAR COMBOS does not appear in the list of available Audio Unit plug-ins inside your Audio Units host application, then it is not installed correctly. Please refer to the previous section on installing the plug-in for Mac platforms for more assistance on setting this up.
Important: To control the GUITAR COMBOS parameters via MIDI, you need to assign a MIDI track’s output in Digital Performer’s tracks view to GUITAR COMBOS. Click on the output box and choose GUITAR COMBOS from the drop-down menu. Now record enable the MIDI track and you should be able to control the effect via MIDI.
After having loaded an Instrument from the library you should be able to trigger it via MIDI using a keyboard controller. GUITAR COMBOS’s sound will generate through Digital Performer’s mixer and directly to your sound card. If the plug-in does not receive MIDI or generate audio, then make sure to check the following two areas:
GUITAR COMBOS – 35
• Make sure Midi Patch Through is enabled in the Studio menu of Digital Performer.
• The MIDI channel of your MIDI track must correspond to the receive channel of the loaded instrument.
• Make sure that the instruments track output is correctly set. • Make sure that you have properly configured your sound card for use
with Digital Performer. • Please refer to your Digital Performer manual for more information.
RTAS Plug-in
Using GUITAR COMBOS in Pro Tools 6The RTAS format is an interface protocol for Mac OS and Windows that allows you to use plug-ins with ProTools independently from additional TDM hardware, while nonetheless offering the widest range of features. In this case, the host processor alone performs all of the computations for the plug-in.
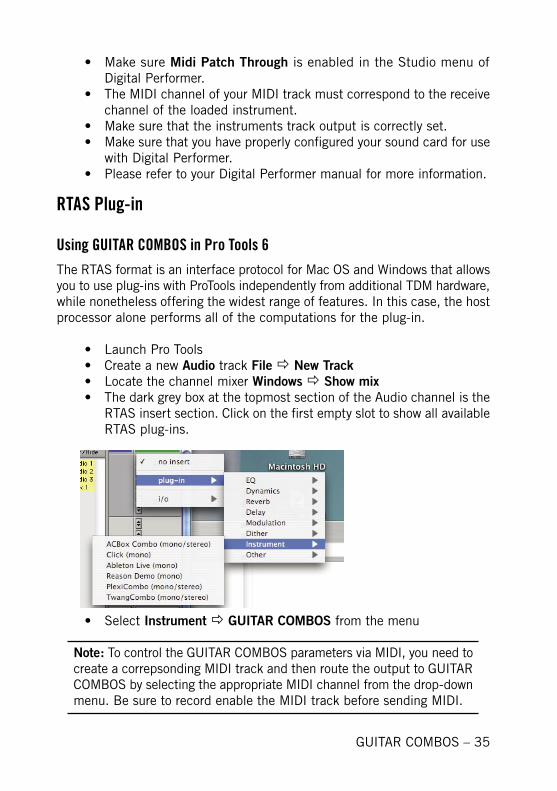
• Launch Pro Tools • Create a new Audio track File New Track • Locate the channel mixer Windows Show mix • The dark grey box at the topmost section of the Audio channel is the
RTAS insert section. Click on the first empty slot to show all available RTAS plug-ins.
• Select Instrument GUITAR COMBOS from the menu
Note: To control the GUITAR COMBOS parameters via MIDI, you need to create a correpsonding MIDI track and then route the output to GUITAR COMBOS by selecting the appropriate MIDI channel from the drop-down menu. Be sure to record enable the MIDI track before sending MIDI.
36 – GUITAR COMBOS
Instant GratificationYou don’t want to read a manual. You want to start making cool sounds, so let’s start. We’ll fill in the details later.
• To simplify matters we’ll use GUITAR COMBOS in stand-alone mode, not as a plug-in with a host program.
• The screen shots show the Windows version, but Mac fans will have no trouble figuring out how to do these steps on a Mac.
Please read this before you startThe following gives vital information on getting optimum results with GUITAR COMBOSs. If you need more detailed information about these concepts, please refer to Appendix A: Setup Details.
• You cannot plug a guitar into a standard sound card or computer audio interface input and obtain acceptable results. Use a high-quality, low latency audio interface (ASIO, Core Audio) with an Instrument input especially designed for guitar. For an overview of suitable products, check out www.ni-guitar-combos.com. You can also patch a guitar-oriented DI (direct injection) box or preamp between your guitar and a standard audio interface input.
• We recommend audio interfaces with 24-bit A/D converters. This is vital for minimum noise.
• If your interface has a direct monitoring option, turn it off. You’ll find this option in any “mixer-type” application that came with your in-terface. Otherwise GUITAR COMBOS will not be in the signal path.
• Patch your interface output into a suitable monitoring system (or use headphones) and make sure the volume is turned down for now. GUITAR COMBOS has a lot of gain, and may blast your ears if the volume is up initially.
• GUITAR COMBOS is designed to feed a flat frequency response amplification system, like a PA system, mixer, recorder, etc. It is not designed to feed into a guitar amp, because it already includes guitar amp and cabinet characteristics.
GUITAR COMBOS – 37
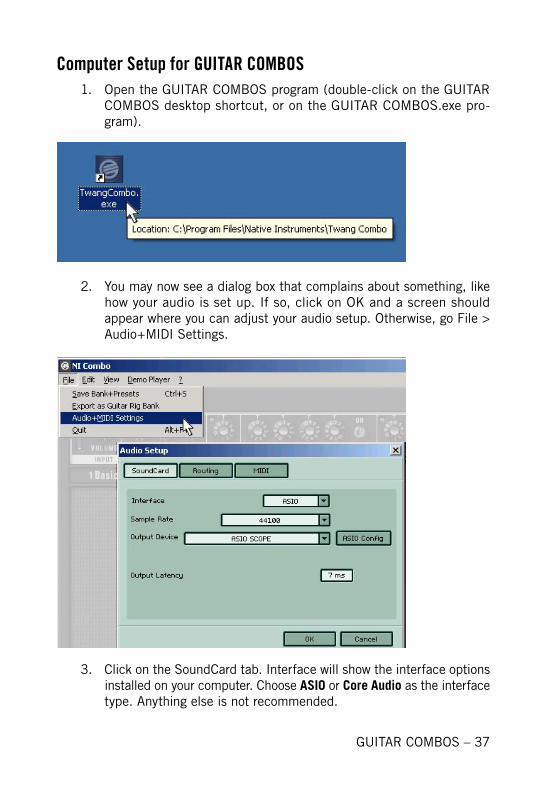
Computer Setup for GUITAR COMBOS1. Open the GUITAR COMBOS program (double-click on the GUITAR
COMBOS desktop shortcut, or on the GUITAR COMBOS.exe pro-gram).
2. You may now see a dialog box that complains about something, like how your audio is set up. If so, click on OK and a screen should appear where you can adjust your audio setup. Otherwise, go File > Audio+MIDI Settings.
3. Click on the SoundCard tab. Interface will show the interface options installed on your computer. Choose ASIO or Core Audio as the interface type. Anything else is not recommended.
38 – GUITAR COMBOS
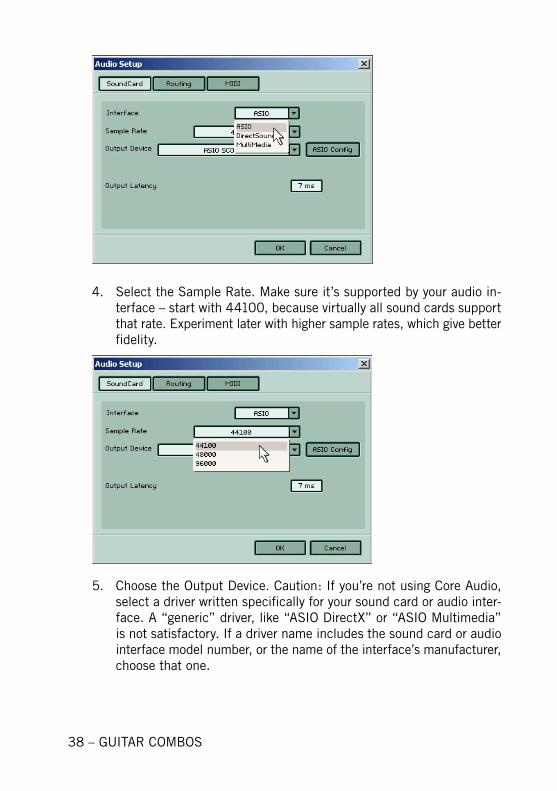
4. Select the Sample Rate. Make sure it’s supported by your audio in-terface – start with 44100, because virtually all sound cards support that rate. Experiment later with higher sample rates, which give better fidelity.
5. Choose the Output Device. Caution: If you’re not using Core Audio, select a driver written specifically for your sound card or audio inter-face. A “generic” driver, like “ASIO DirectX” or “ASIO Multimedia” is not satisfactory. If a driver name includes the sound card or audio interface model number, or the name of the interface’s manufacturer, choose that one.
GUITAR COMBOS – 39
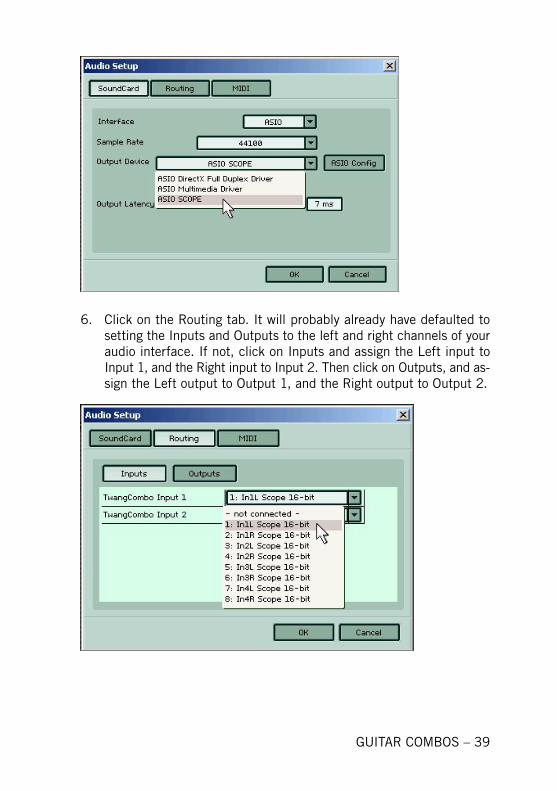
6. Click on the Routing tab. It will probably already have defaulted to setting the Inputs and Outputs to the left and right channels of your audio interface. If not, click on Inputs and assign the Left input to Input 1, and the Right input to Input 2. Then click on Outputs, and as-sign the Left output to Output 1, and the Right output to Output 2.
40 – GUITAR COMBOS
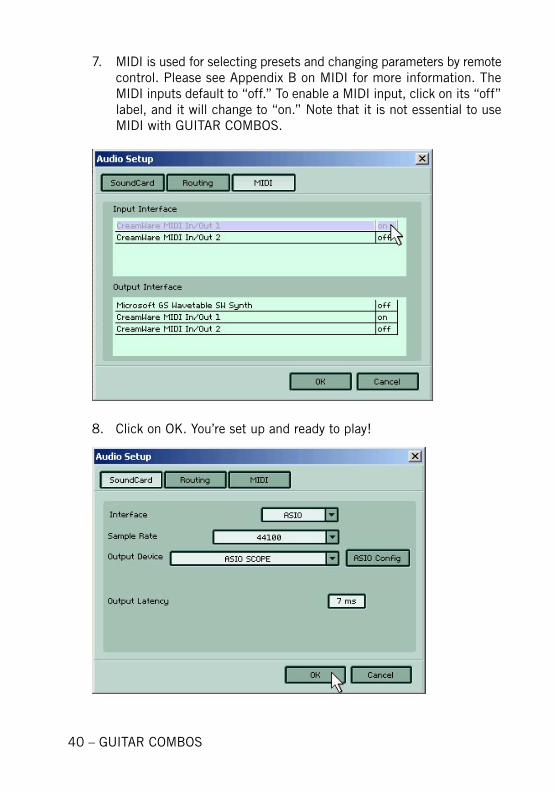
7. MIDI is used for selecting presets and changing parameters by remote control. Please see Appendix B on MIDI for more information. The MIDI inputs default to “off.” To enable a MIDI input, click on its “off” label, and it will change to “on.” Note that it is not essential to use MIDI with GUITAR COMBOS.
8. Click on OK. You’re set up and ready to play!
GUITAR COMBOS – 41
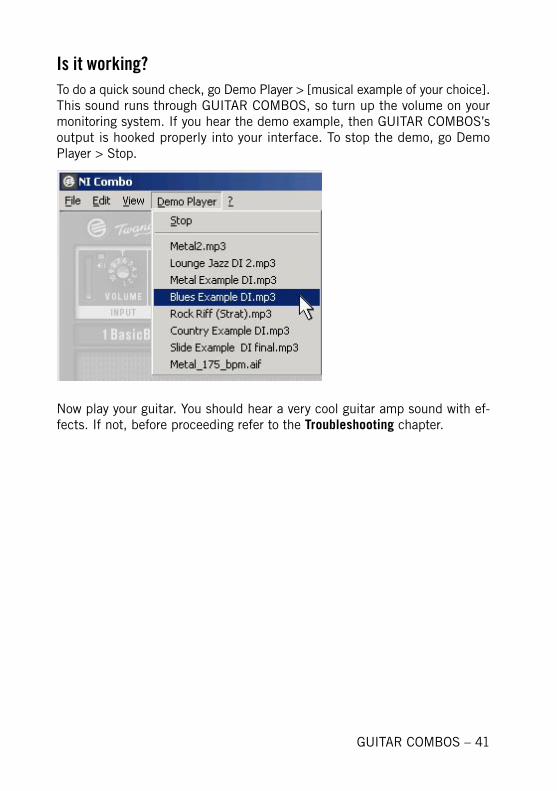
Is it working?To do a quick sound check, go Demo Player > [musical example of your choice]. This sound runs through GUITAR COMBOS, so turn up the volume on your monitoring system. If you hear the demo example, then GUITAR COMBOS’s output is hooked properly into your interface. To stop the demo, go Demo Player > Stop.
Now play your guitar. You should hear a very cool guitar amp sound with ef-fects. If not, before proceeding refer to the Troubleshooting chapter.
42 – GUITAR COMBOS
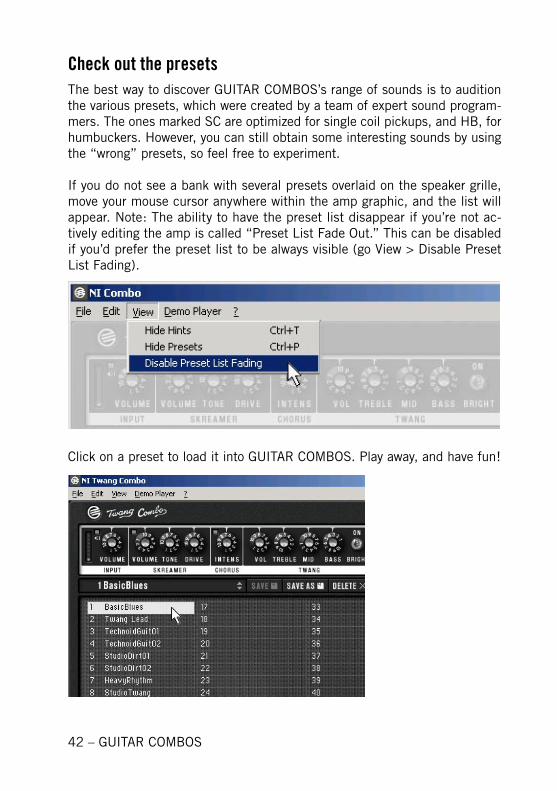
Check out the presetsThe best way to discover GUITAR COMBOS’s range of sounds is to audition the various presets, which were created by a team of expert sound program-mers. The ones marked SC are optimized for single coil pickups, and HB, for humbuckers. However, you can still obtain some interesting sounds by using the “wrong” presets, so feel free to experiment.
If you do not see a bank with several presets overlaid on the speaker grille, move your mouse cursor anywhere within the amp graphic, and the list will appear. Note: The ability to have the preset list disappear if you’re not ac-tively editing the amp is called “Preset List Fade Out.” This can be disabled if you’d prefer the preset list to be always visible (go View > Disable Preset List Fading).
Click on a preset to load it into GUITAR COMBOS. Play away, and have fun!
GUITAR COMBOS – 43
Other preset selection methods include:
• A MIDI controller that sends program changes can select individual presets directly.
• Use your computer keyboard’s Up/Down arrow cursors to browse through the list or presets (note: this doesn’t work with some sequenc-ers).
• (Advanced) Sending a MIDI Continuous Controller 10 message chooses the next higher-numbered preset. Sending a MIDI Continuous Control-ler 11 message chooses the next lower-numbered preset.
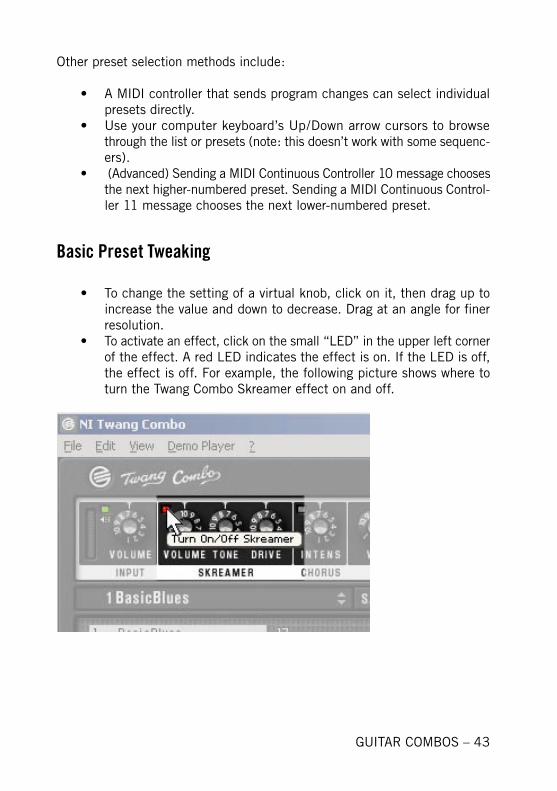
Basic Preset Tweaking
• To change the setting of a virtual knob, click on it, then drag up to increase the value and down to decrease. Drag at an angle for finer resolution.
• To activate an effect, click on the small “LED” in the upper left corner of the effect. A red LED indicates the effect is on. If the LED is off, the effect is off. For example, the following picture shows where to turn the Twang Combo Skreamer effect on and off.
44 – GUITAR COMBOS
GUITAR COMBOS FeaturesThis chapter covers GUITAR COMBOS features except for editing the amp and effects parameters, which is in the next chapter.
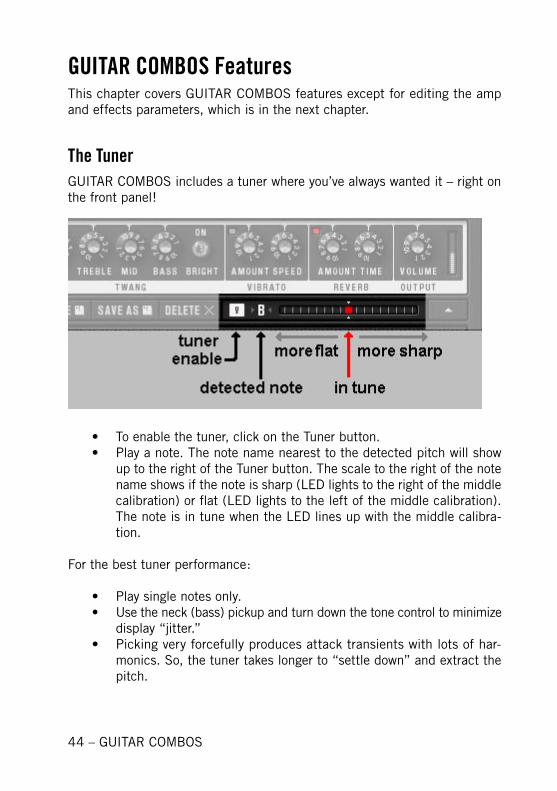
The TunerGUITAR COMBOS includes a tuner where you’ve always wanted it – right on the front panel!
• To enable the tuner, click on the Tuner button.• Play a note. The note name nearest to the detected pitch will show
up to the right of the Tuner button. The scale to the right of the note name shows if the note is sharp (LED lights to the right of the middle calibration) or flat (LED lights to the left of the middle calibration). The note is in tune when the LED lines up with the middle calibra-tion.
For the best tuner performance:
• Play single notes only. • Use the neck (bass) pickup and turn down the tone control to minimize
display “jitter.”• Picking very forcefully produces attack transients with lots of har-
monics. So, the tuner takes longer to “settle down” and extract the pitch.
GUITAR COMBOS – 45
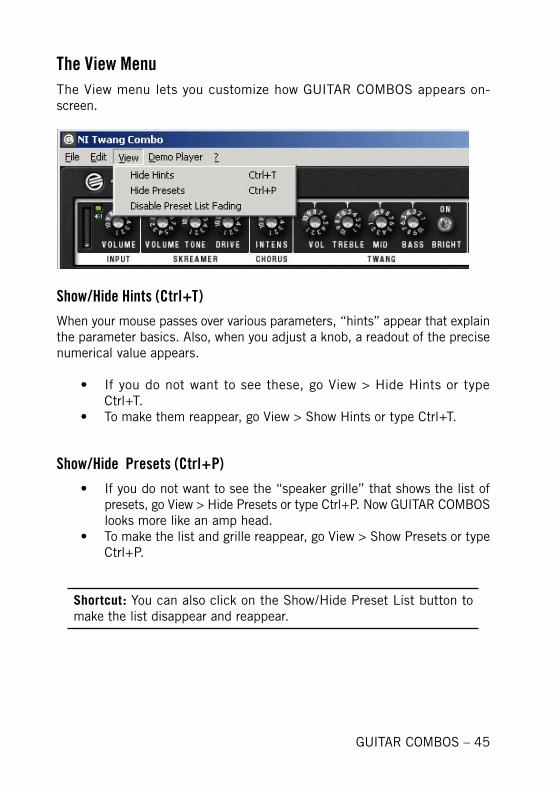
The View MenuThe View menu lets you customize how GUITAR COMBOS appears on-screen.
Show/Hide Hints (Ctrl+T)When your mouse passes over various parameters, “hints” appear that explain the parameter basics. Also, when you adjust a knob, a readout of the precise numerical value appears.
• If you do not want to see these, go View > Hide Hints or type Ctrl+T.
• To make them reappear, go View > Show Hints or type Ctrl+T.
Show/Hide Presets (Ctrl+P)• If you do not want to see the “speaker grille” that shows the list of
presets, go View > Hide Presets or type Ctrl+P. Now GUITAR COMBOS looks more like an amp head.
• To make the list and grille reappear, go View > Show Presets or type Ctrl+P.
Shortcut: You can also click on the Show/Hide Preset List button to make the list disappear and reappear.
46 – GUITAR COMBOS
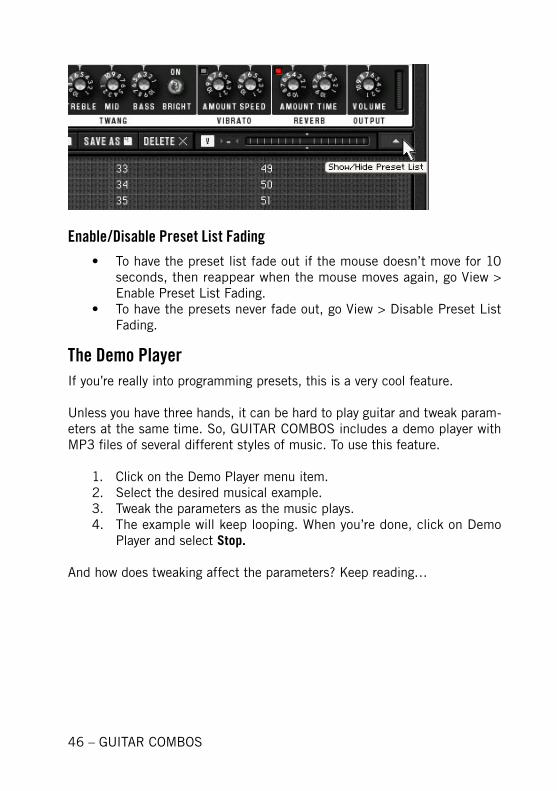
Enable/Disable Preset List Fading• To have the preset list fade out if the mouse doesn’t move for 10
seconds, then reappear when the mouse moves again, go View > Enable Preset List Fading.
• To have the presets never fade out, go View > Disable Preset List Fading.
The Demo PlayerIf you’re really into programming presets, this is a very cool feature.
Unless you have three hands, it can be hard to play guitar and tweak param-eters at the same time. So, GUITAR COMBOS includes a demo player with MP3 files of several different styles of music. To use this feature.
1. Click on the Demo Player menu item.2. Select the desired musical example.3. Tweak the parameters as the music plays.4. The example will keep looping. When you’re done, click on Demo
Player and select Stop.
And how does tweaking affect the parameters? Keep reading…
GUITAR COMBOS – 47
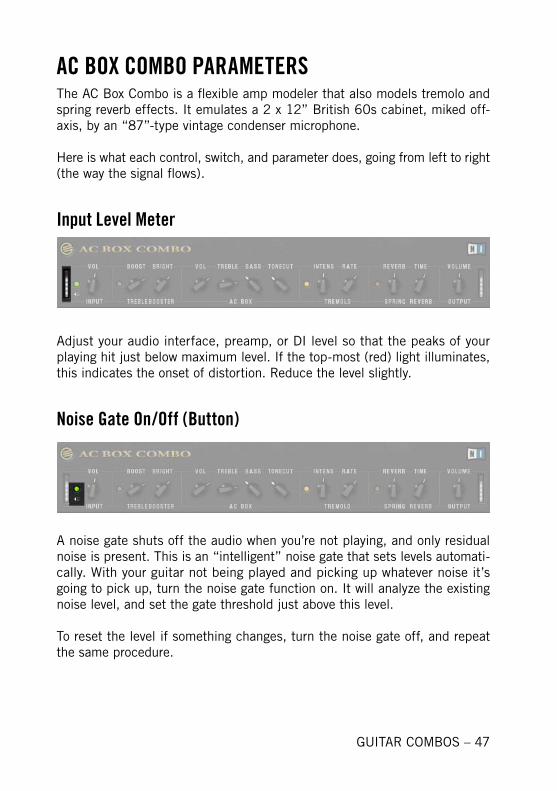
AC BOX COMBO PARAMETERSThe AC Box Combo is a flexible amp modeler that also models tremolo and spring reverb effects. It emulates a 2 x 12” British 60s cabinet, miked off-axis, by an “87”-type vintage condenser microphone.
Here is what each control, switch, and parameter does, going from left to right (the way the signal flows).
Input Level Meter
Adjust your audio interface, preamp, or DI level so that the peaks of your playing hit just below maximum level. If the top-most (red) light illuminates, this indicates the onset of distortion. Reduce the level slightly.
Noise Gate On/Off (Button)
A noise gate shuts off the audio when you’re not playing, and only residual noise is present. This is an “intelligent” noise gate that sets levels automati-cally. With your guitar not being played and picking up whatever noise it’s going to pick up, turn the noise gate function on. It will analyze the existing noise level, and set the gate threshold just above this level.
To reset the level if something changes, turn the noise gate off, and repeat the same procedure.
48 – GUITAR COMBOS
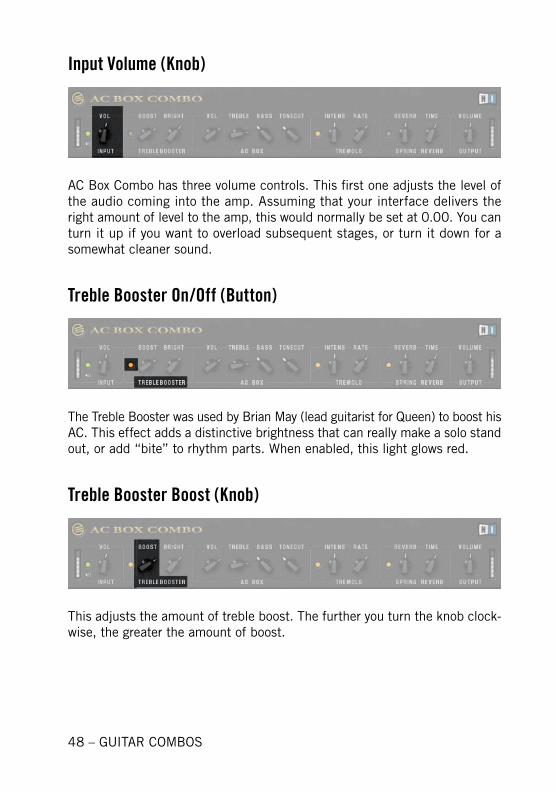
Input Volume (Knob)
AC Box Combo has three volume controls. This first one adjusts the level of the audio coming into the amp. Assuming that your interface delivers the right amount of level to the amp, this would normally be set at 0.00. You can turn it up if you want to overload subsequent stages, or turn it down for a somewhat cleaner sound.
Treble Booster On/Off (Button)
The Treble Booster was used by Brian May (lead guitarist for Queen) to boost his AC. This effect adds a distinctive brightness that can really make a solo stand out, or add “bite” to rhythm parts. When enabled, this light glows red.
Treble Booster Boost (Knob)
This adjusts the amount of treble boost. The further you turn the knob clock-wise, the greater the amount of boost.
GUITAR COMBOS – 49
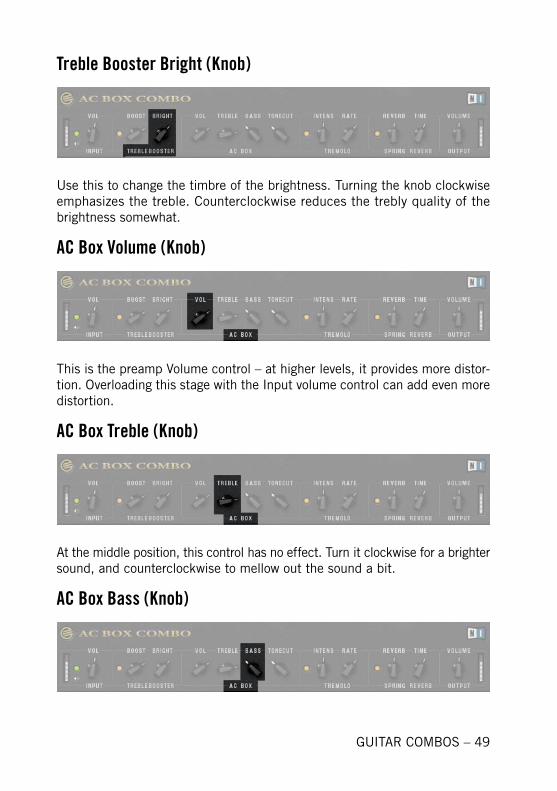
Treble Booster Bright (Knob)
Use this to change the timbre of the brightness. Turning the knob clockwise emphasizes the treble. Counterclockwise reduces the trebly quality of the brightness somewhat.
AC Box Volume (Knob)
This is the preamp Volume control – at higher levels, it provides more distor-tion. Overloading this stage with the Input volume control can add even more distortion.
AC Box Treble (Knob)
At the middle position, this control has no effect. Turn it clockwise for a brighter sound, and counterclockwise to mellow out the sound a bit.
AC Box Bass (Knob)
50 – GUITAR COMBOS
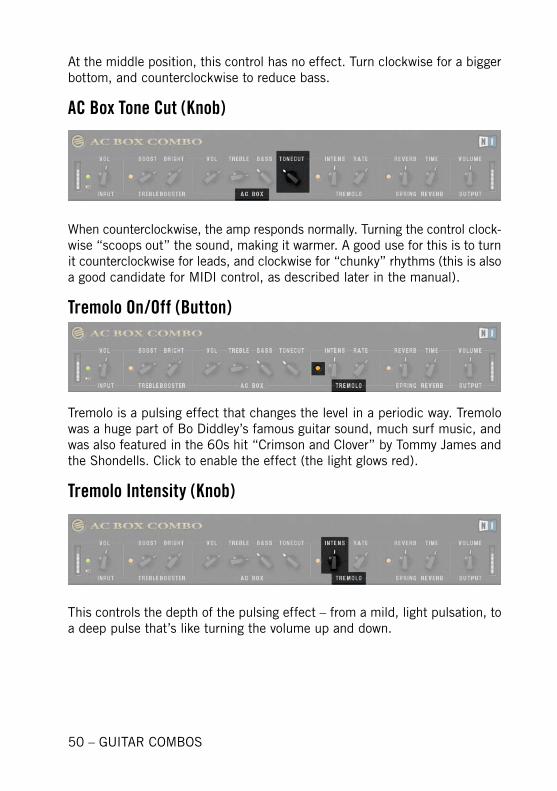
At the middle position, this control has no effect. Turn clockwise for a bigger bottom, and counterclockwise to reduce bass.
AC Box Tone Cut (Knob)
When counterclockwise, the amp responds normally. Turning the control clock-wise “scoops out” the sound, making it warmer. A good use for this is to turn it counterclockwise for leads, and clockwise for “chunky” rhythms (this is also a good candidate for MIDI control, as described later in the manual).
Tremolo On/Off (Button)
Tremolo is a pulsing effect that changes the level in a periodic way. Tremolo was a huge part of Bo Diddley’s famous guitar sound, much surf music, and was also featured in the 60s hit “Crimson and Clover” by Tommy James and the Shondells. Click to enable the effect (the light glows red).
Tremolo Intensity (Knob)
This controls the depth of the pulsing effect – from a mild, light pulsation, to a deep pulse that’s like turning the volume up and down.
GUITAR COMBOS – 51
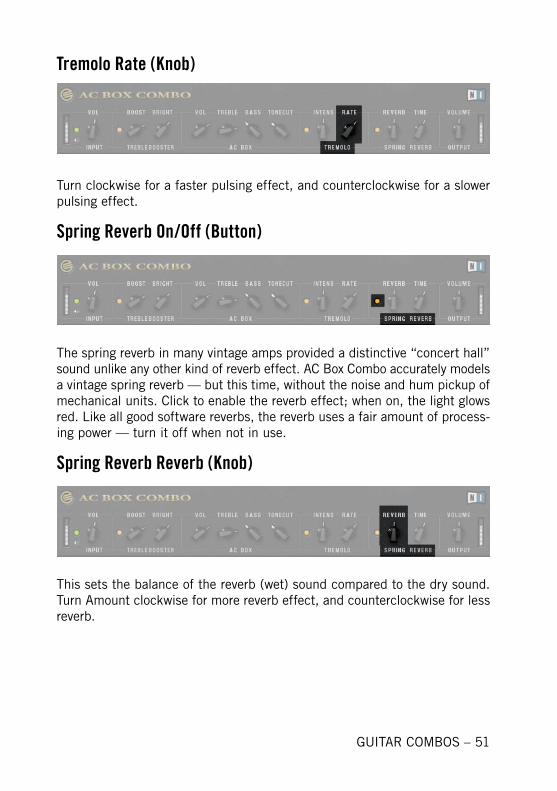
Tremolo Rate (Knob)
Turn clockwise for a faster pulsing effect, and counterclockwise for a slower pulsing effect.
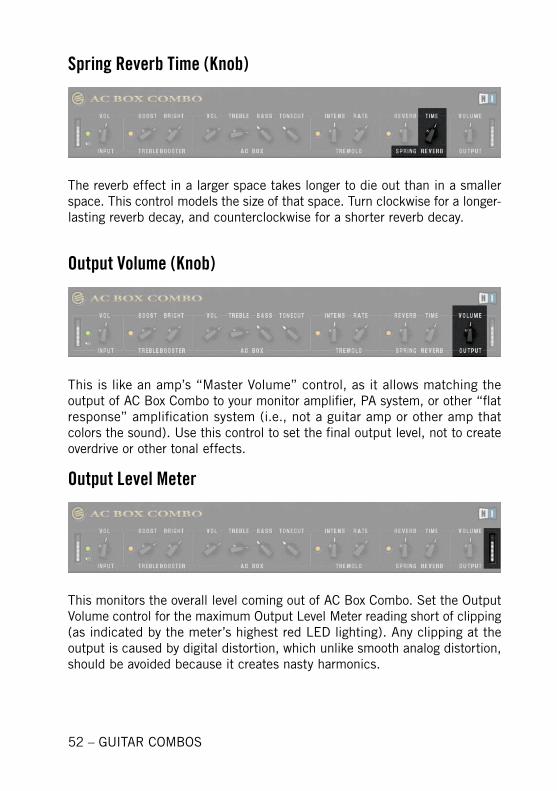
Spring Reverb On/Off (Button)
The spring reverb in many vintage amps provided a distinctive “concert hall” sound unlike any other kind of reverb effect. AC Box Combo accurately models a vintage spring reverb — but this time, without the noise and hum pickup of mechanical units. Click to enable the reverb effect; when on, the light glows red. Like all good software reverbs, the reverb uses a fair amount of process-ing power — turn it off when not in use.
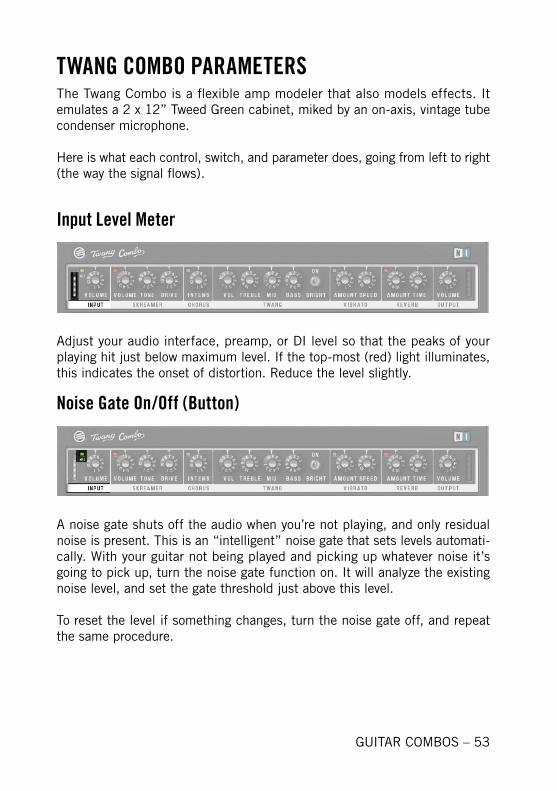
Spring Reverb Reverb (Knob)
This sets the balance of the reverb (wet) sound compared to the dry sound. Turn Amount clockwise for more reverb effect, and counterclockwise for less reverb.
52 – GUITAR COMBOS
Spring Reverb Time (Knob)
The reverb effect in a larger space takes longer to die out than in a smaller space. This control models the size of that space. Turn clockwise for a longer-lasting reverb decay, and counterclockwise for a shorter reverb decay.
Output Volume (Knob)
This is like an amp’s “Master Volume” control, as it allows matching the output of AC Box Combo to your monitor amplifier, PA system, or other “flat response” amplification system (i.e., not a guitar amp or other amp that colors the sound). Use this control to set the final output level, not to create overdrive or other tonal effects.
Output Level Meter
This monitors the overall level coming out of AC Box Combo. Set the Output Volume control for the maximum Output Level Meter reading short of clipping (as indicated by the meter’s highest red LED lighting). Any clipping at the output is caused by digital distortion, which unlike smooth analog distortion, should be avoided because it creates nasty harmonics.
GUITAR COMBOS – 53
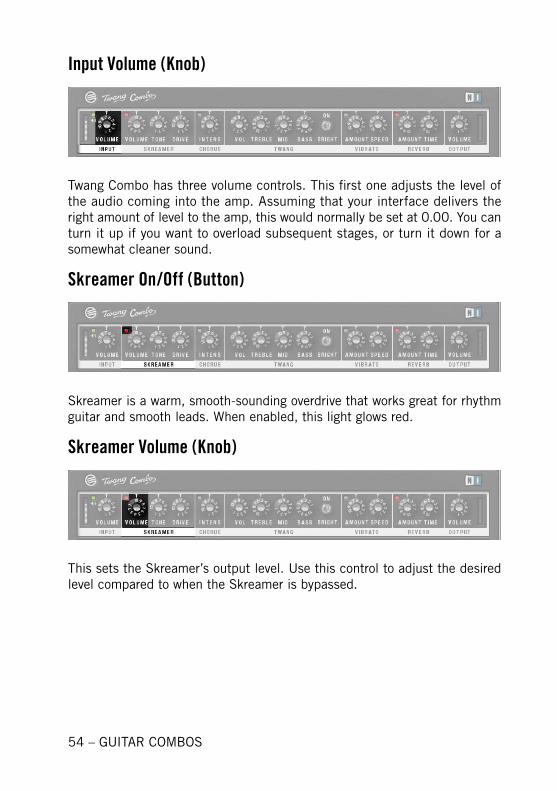
TWANG COMBO PARAMETERSThe Twang Combo is a flexible amp modeler that also models effects. It emulates a 2 x 12” Tweed Green cabinet, miked by an on-axis, vintage tube condenser microphone.
Here is what each control, switch, and parameter does, going from left to right (the way the signal flows).
Input Level Meter
Adjust your audio interface, preamp, or DI level so that the peaks of your playing hit just below maximum level. If the top-most (red) light illuminates, this indicates the onset of distortion. Reduce the level slightly.
Noise Gate On/Off (Button)
A noise gate shuts off the audio when you’re not playing, and only residual noise is present. This is an “intelligent” noise gate that sets levels automati-cally. With your guitar not being played and picking up whatever noise it’s going to pick up, turn the noise gate function on. It will analyze the existing noise level, and set the gate threshold just above this level.
To reset the level if something changes, turn the noise gate off, and repeat the same procedure.
54 – GUITAR COMBOS
Input Volume (Knob)
Twang Combo has three volume controls. This first one adjusts the level of the audio coming into the amp. Assuming that your interface delivers the right amount of level to the amp, this would normally be set at 0.00. You can turn it up if you want to overload subsequent stages, or turn it down for a somewhat cleaner sound.
Skreamer On/Off (Button)
Skreamer is a warm, smooth-sounding overdrive that works great for rhythm guitar and smooth leads. When enabled, this light glows red.
Skreamer Volume (Knob)
This sets the Skreamer’s output level. Use this control to adjust the desired level compared to when the Skreamer is bypassed.
GUITAR COMBOS – 55
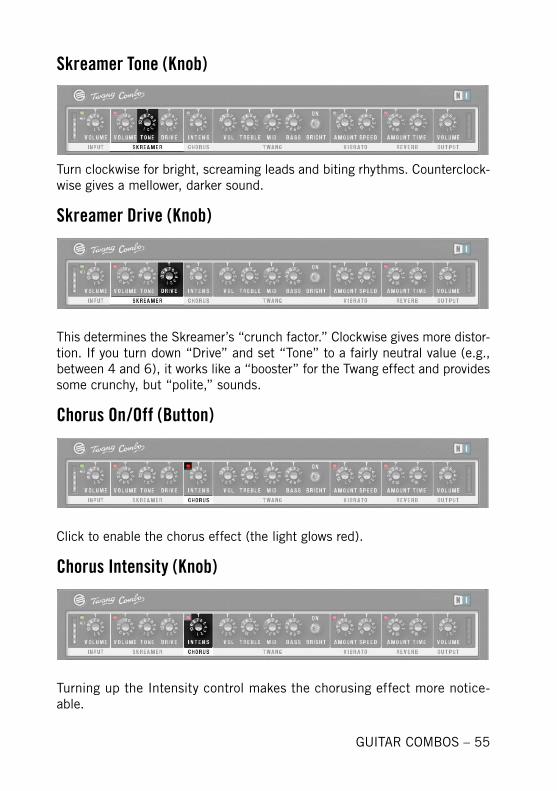
Skreamer Tone (Knob)
Turn clockwise for bright, screaming leads and biting rhythms. Counterclock-wise gives a mellower, darker sound.
Skreamer Drive (Knob)
This determines the Skreamer’s “crunch factor.” Clockwise gives more distor-tion. If you turn down “Drive” and set “Tone” to a fairly neutral value (e.g., between 4 and 6), it works like a “booster” for the Twang effect and provides some crunchy, but “polite,” sounds.
Chorus On/Off (Button)
Click to enable the chorus effect (the light glows red).
Chorus Intensity (Knob)
Turning up the Intensity control makes the chorusing effect more notice-able.
56 – GUITAR COMBOS
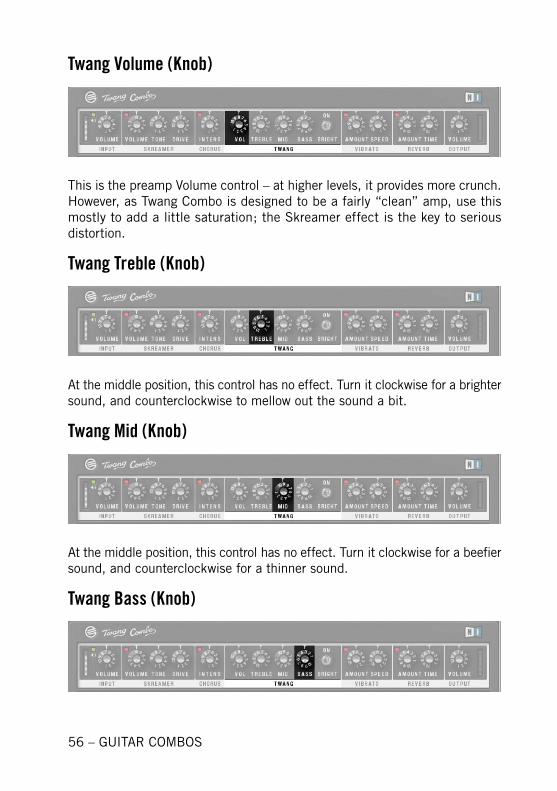
Twang Volume (Knob)
This is the preamp Volume control – at higher levels, it provides more crunch. However, as Twang Combo is designed to be a fairly “clean” amp, use this mostly to add a little saturation; the Skreamer effect is the key to serious distortion.
Twang Treble (Knob)
At the middle position, this control has no effect. Turn it clockwise for a brighter sound, and counterclockwise to mellow out the sound a bit.
Twang Mid (Knob)
At the middle position, this control has no effect. Turn it clockwise for a beefier sound, and counterclockwise for a thinner sound.
Twang Bass (Knob)
GUITAR COMBOS – 57
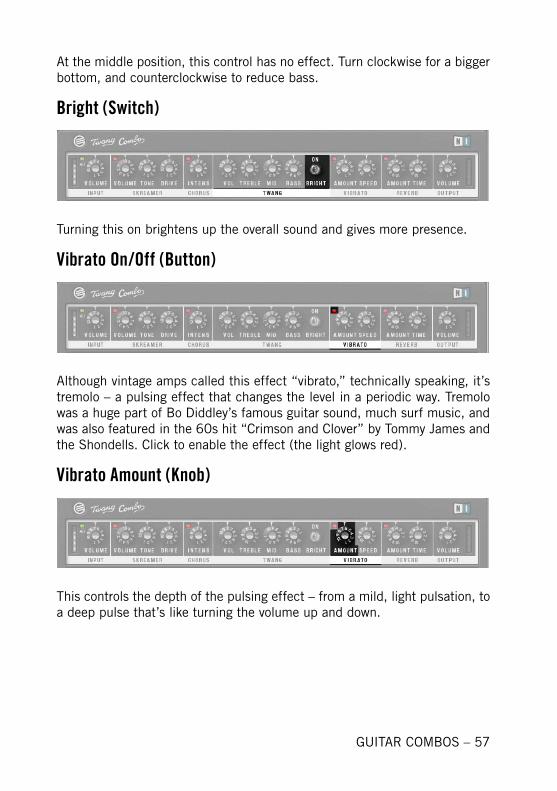
At the middle position, this control has no effect. Turn clockwise for a bigger bottom, and counterclockwise to reduce bass.
Bright (Switch)
Turning this on brightens up the overall sound and gives more presence.
Vibrato On/Off (Button)
Although vintage amps called this effect “vibrato,” technically speaking, it’s tremolo – a pulsing effect that changes the level in a periodic way. Tremolo was a huge part of Bo Diddley’s famous guitar sound, much surf music, and was also featured in the 60s hit “Crimson and Clover” by Tommy James and the Shondells. Click to enable the effect (the light glows red).
Vibrato Amount (Knob)
This controls the depth of the pulsing effect – from a mild, light pulsation, to a deep pulse that’s like turning the volume up and down.
58 – GUITAR COMBOS
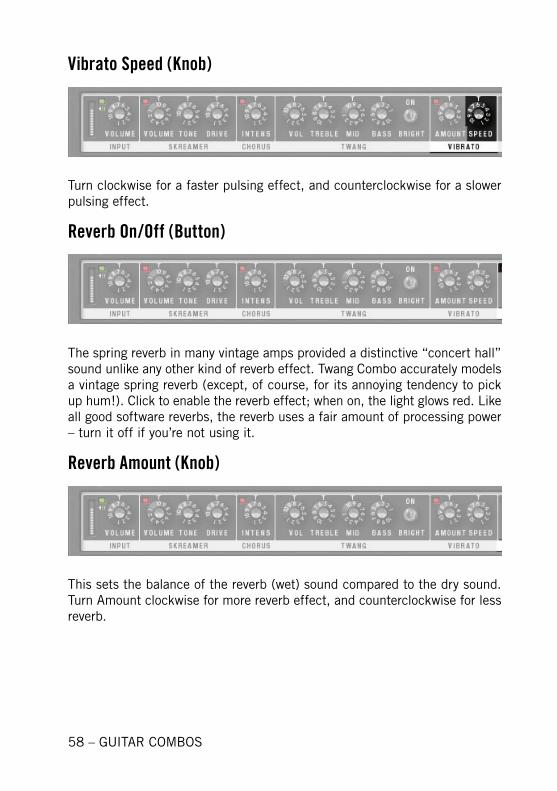
Vibrato Speed (Knob)
Turn clockwise for a faster pulsing effect, and counterclockwise for a slower pulsing effect.
Reverb On/Off (Button)
The spring reverb in many vintage amps provided a distinctive “concert hall” sound unlike any other kind of reverb effect. Twang Combo accurately models a vintage spring reverb (except, of course, for its annoying tendency to pick up hum!). Click to enable the reverb effect; when on, the light glows red. Like all good software reverbs, the reverb uses a fair amount of processing power – turn it off if you’re not using it.
Reverb Amount (Knob)
This sets the balance of the reverb (wet) sound compared to the dry sound. Turn Amount clockwise for more reverb effect, and counterclockwise for less reverb.
GUITAR COMBOS – 59
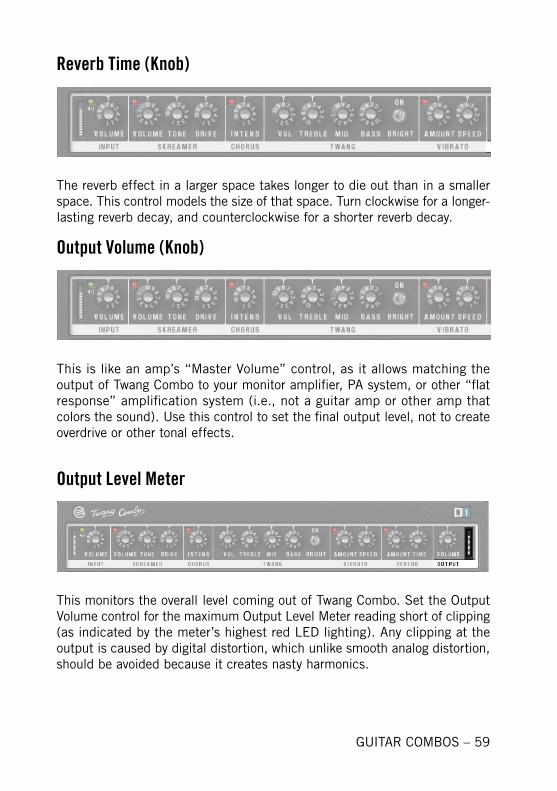
Reverb Time (Knob)
The reverb effect in a larger space takes longer to die out than in a smaller space. This control models the size of that space. Turn clockwise for a longer-lasting reverb decay, and counterclockwise for a shorter reverb decay.
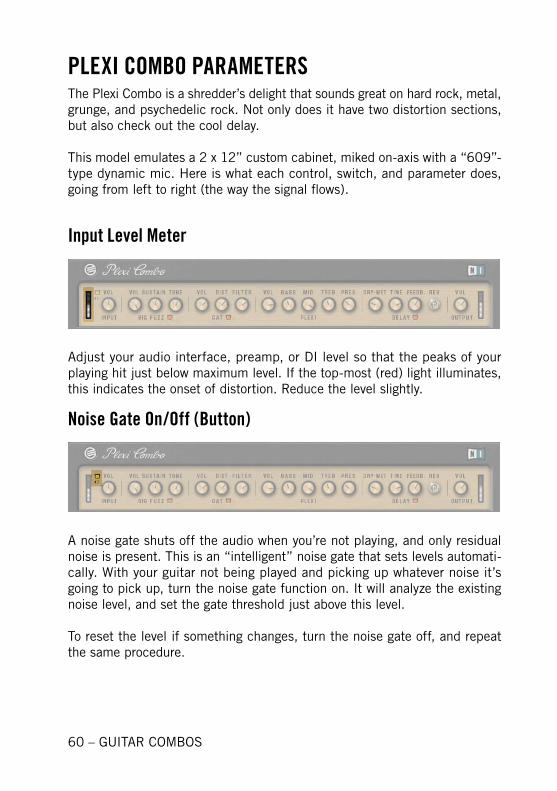
Output Volume (Knob)
This is like an amp’s “Master Volume” control, as it allows matching the output of Twang Combo to your monitor amplifier, PA system, or other “flat response” amplification system (i.e., not a guitar amp or other amp that colors the sound). Use this control to set the final output level, not to create overdrive or other tonal effects.
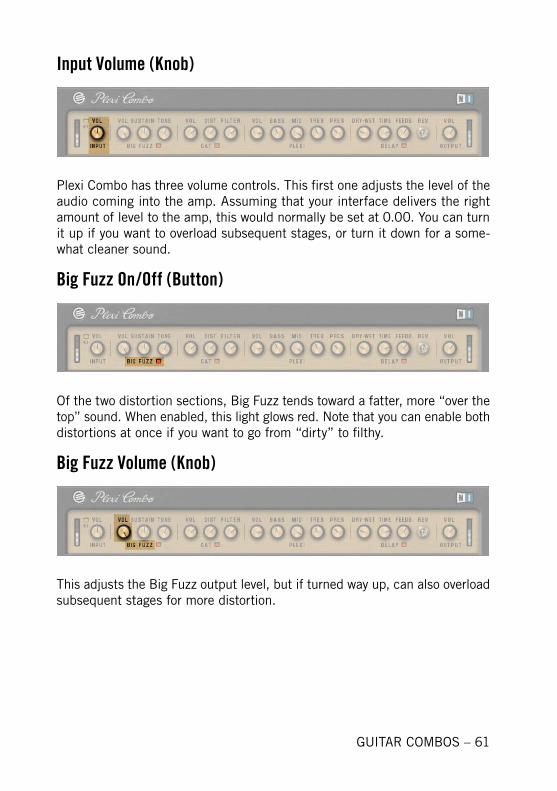
Output Level Meter
This monitors the overall level coming out of Twang Combo. Set the Output Volume control for the maximum Output Level Meter reading short of clipping (as indicated by the meter’s highest red LED lighting). Any clipping at the output is caused by digital distortion, which unlike smooth analog distortion, should be avoided because it creates nasty harmonics.
60 – GUITAR COMBOS
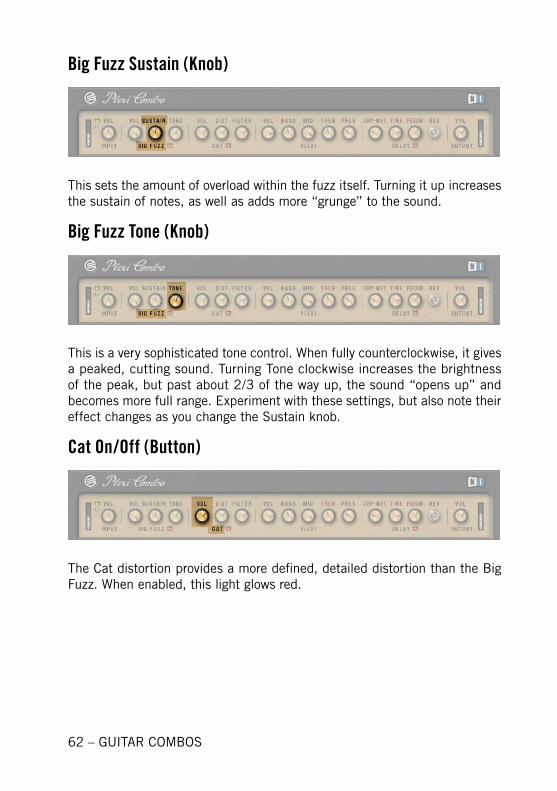
PLEXI COMBO PARAMETERSThe Plexi Combo is a shredder’s delight that sounds great on hard rock, metal, grunge, and psychedelic rock. Not only does it have two distortion sections, but also check out the cool delay.
This model emulates a 2 x 12” custom cabinet, miked on-axis with a “609”-type dynamic mic. Here is what each control, switch, and parameter does, going from left to right (the way the signal flows).
Input Level Meter
Adjust your audio interface, preamp, or DI level so that the peaks of your playing hit just below maximum level. If the top-most (red) light illuminates, this indicates the onset of distortion. Reduce the level slightly.
Noise Gate On/Off (Button)
A noise gate shuts off the audio when you’re not playing, and only residual noise is present. This is an “intelligent” noise gate that sets levels automati-cally. With your guitar not being played and picking up whatever noise it’s going to pick up, turn the noise gate function on. It will analyze the existing noise level, and set the gate threshold just above this level.
To reset the level if something changes, turn the noise gate off, and repeat the same procedure.
GUITAR COMBOS – 61
Input Volume (Knob)
Plexi Combo has three volume controls. This first one adjusts the level of the audio coming into the amp. Assuming that your interface delivers the right amount of level to the amp, this would normally be set at 0.00. You can turn it up if you want to overload subsequent stages, or turn it down for a some-what cleaner sound.
Big Fuzz On/Off (Button)
Of the two distortion sections, Big Fuzz tends toward a fatter, more “over the top” sound. When enabled, this light glows red. Note that you can enable both distortions at once if you want to go from “dirty” to filthy.
Big Fuzz Volume (Knob)
This adjusts the Big Fuzz output level, but if turned way up, can also overload subsequent stages for more distortion.
62 – GUITAR COMBOS
Big Fuzz Sustain (Knob)
This sets the amount of overload within the fuzz itself. Turning it up increases the sustain of notes, as well as adds more “grunge” to the sound.
Big Fuzz Tone (Knob)
This is a very sophisticated tone control. When fully counterclockwise, it gives a peaked, cutting sound. Turning Tone clockwise increases the brightness of the peak, but past about 2/3 of the way up, the sound “opens up” and becomes more full range. Experiment with these settings, but also note their effect changes as you change the Sustain knob.
Cat On/Off (Button)
The Cat distortion provides a more defined, detailed distortion than the Big Fuzz. When enabled, this light glows red.
GUITAR COMBOS – 63
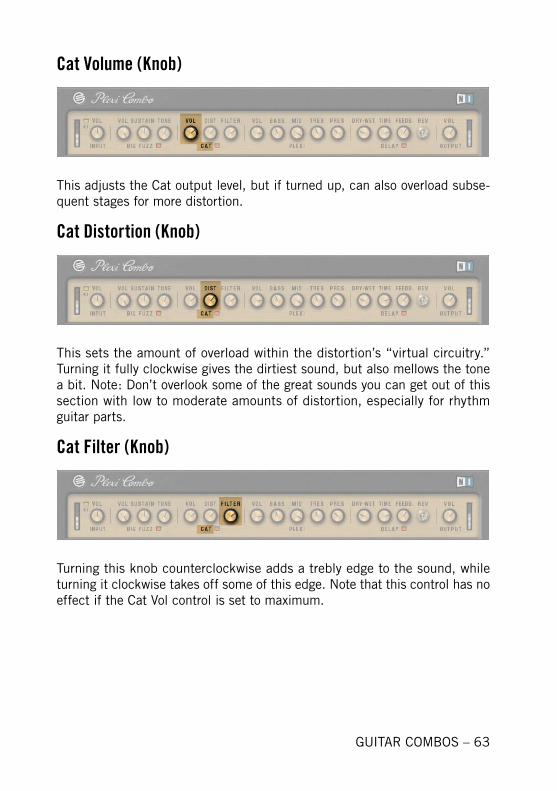
Cat Volume (Knob)
This adjusts the Cat output level, but if turned up, can also overload subse-quent stages for more distortion.
Cat Distortion (Knob)
This sets the amount of overload within the distortion’s “virtual circuitry.” Turning it fully clockwise gives the dirtiest sound, but also mellows the tone a bit. Note: Don’t overlook some of the great sounds you can get out of this section with low to moderate amounts of distortion, especially for rhythm guitar parts.
Cat Filter (Knob)
Turning this knob counterclockwise adds a trebly edge to the sound, while turning it clockwise takes off some of this edge. Note that this control has no effect if the Cat Vol control is set to maximum.
64 – GUITAR COMBOS
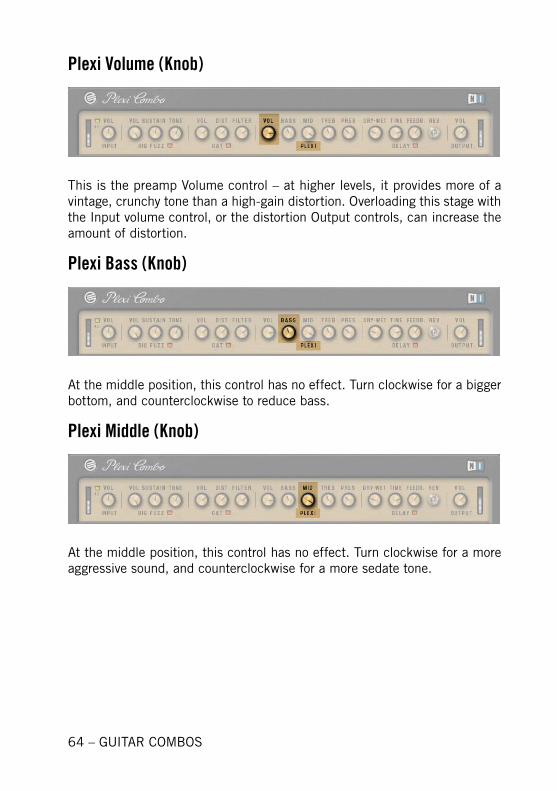
Plexi Volume (Knob)
This is the preamp Volume control – at higher levels, it provides more of a vintage, crunchy tone than a high-gain distortion. Overloading this stage with the Input volume control, or the distortion Output controls, can increase the amount of distortion.
Plexi Bass (Knob)
At the middle position, this control has no effect. Turn clockwise for a bigger bottom, and counterclockwise to reduce bass.
Plexi Middle (Knob)
At the middle position, this control has no effect. Turn clockwise for a more aggressive sound, and counterclockwise for a more sedate tone.
GUITAR COMBOS – 65
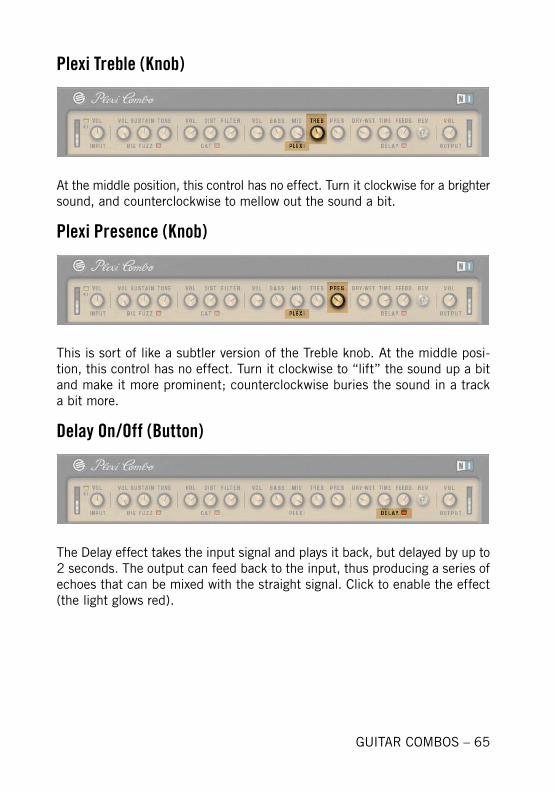
Plexi Treble (Knob)
At the middle position, this control has no effect. Turn it clockwise for a brighter sound, and counterclockwise to mellow out the sound a bit.
Plexi Presence (Knob)
This is sort of like a subtler version of the Treble knob. At the middle posi-tion, this control has no effect. Turn it clockwise to “lift” the sound up a bit and make it more prominent; counterclockwise buries the sound in a track a bit more.
Delay On/Off (Button)
The Delay effect takes the input signal and plays it back, but delayed by up to 2 seconds. The output can feed back to the input, thus producing a series of echoes that can be mixed with the straight signal. Click to enable the effect (the light glows red).
66 – GUITAR COMBOS
Delay Dry-Wet (Knob)
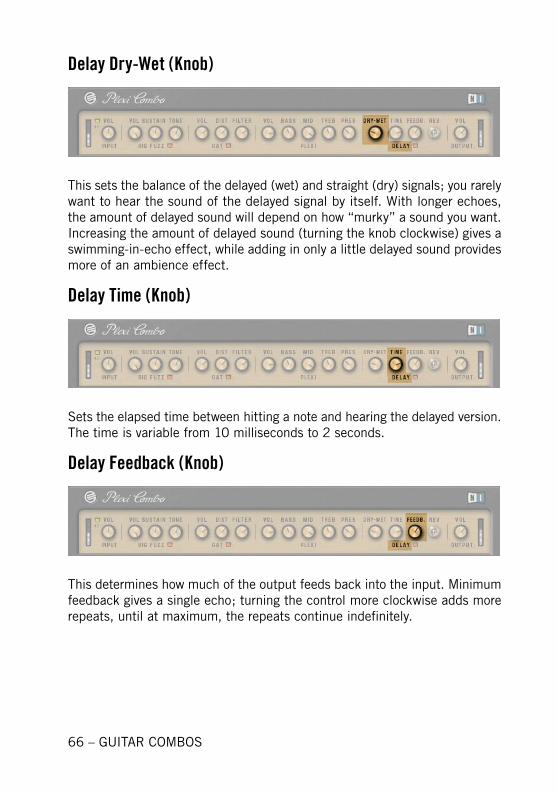
This sets the balance of the delayed (wet) and straight (dry) signals; you rarely want to hear the sound of the delayed signal by itself. With longer echoes, the amount of delayed sound will depend on how “murky” a sound you want. Increasing the amount of delayed sound (turning the knob clockwise) gives a swimming-in-echo effect, while adding in only a little delayed sound provides more of an ambience effect.
Delay Time (Knob)
Sets the elapsed time between hitting a note and hearing the delayed version. The time is variable from 10 milliseconds to 2 seconds.
Delay Feedback (Knob)
This determines how much of the output feeds back into the input. Minimum feedback gives a single echo; turning the control more clockwise adds more repeats, until at maximum, the repeats continue indefinitely.
GUITAR COMBOS – 67
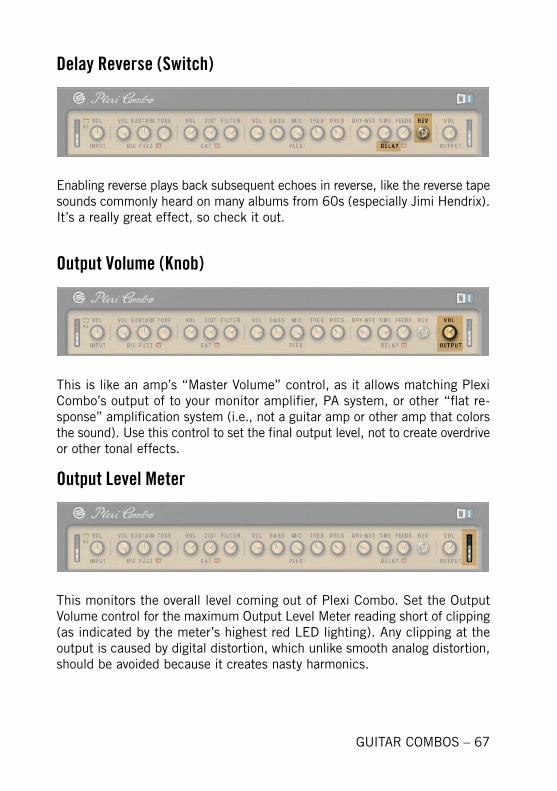
Delay Reverse (Switch)
Enabling reverse plays back subsequent echoes in reverse, like the reverse tape sounds commonly heard on many albums from 60s (especially Jimi Hendrix). It’s a really great effect, so check it out.
Output Volume (Knob)
This is like an amp’s “Master Volume” control, as it allows matching Plexi Combo’s output of to your monitor amplifier, PA system, or other “flat re-sponse” amplification system (i.e., not a guitar amp or other amp that colors the sound). Use this control to set the final output level, not to create overdrive or other tonal effects.
Output Level Meter
This monitors the overall level coming out of Plexi Combo. Set the Output Volume control for the maximum Output Level Meter reading short of clipping (as indicated by the meter’s highest red LED lighting). Any clipping at the output is caused by digital distortion, which unlike smooth analog distortion, should be avoided because it creates nasty harmonics.
68 – GUITAR COMBOS
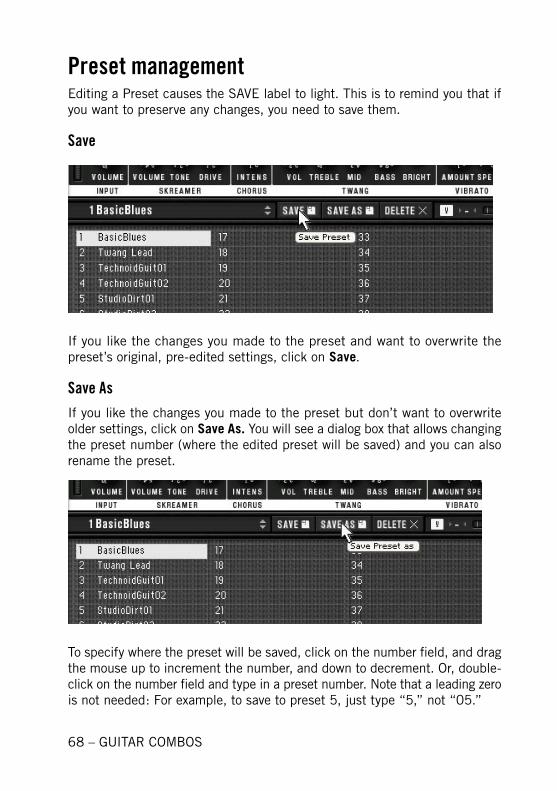
Preset managementEditing a Preset causes the SAVE label to light. This is to remind you that if you want to preserve any changes, you need to save them.
Save
If you like the changes you made to the preset and want to overwrite the preset’s original, pre-edited settings, click on Save.
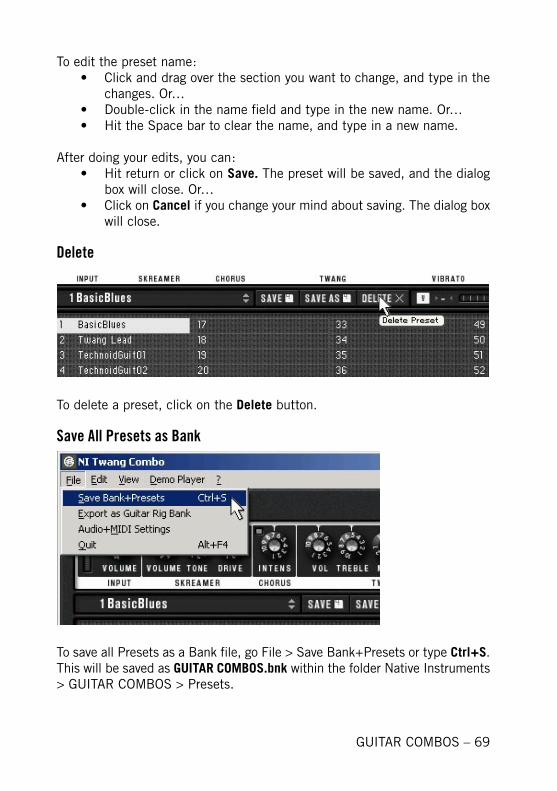
Save AsIf you like the changes you made to the preset but don’t want to overwrite older settings, click on Save As. You will see a dialog box that allows changing the preset number (where the edited preset will be saved) and you can also rename the preset.
To specify where the preset will be saved, click on the number field, and drag the mouse up to increment the number, and down to decrement. Or, double-click on the number field and type in a preset number. Note that a leading zero is not needed: For example, to save to preset 5, just type “5,” not “05.”
GUITAR COMBOS – 69
To edit the preset name:• Click and drag over the section you want to change, and type in the
changes. Or…• Double-click in the name field and type in the new name. Or…• Hit the Space bar to clear the name, and type in a new name.
After doing your edits, you can:• Hit return or click on Save. The preset will be saved, and the dialog
box will close. Or…• Click on Cancel if you change your mind about saving. The dialog box
will close.
Delete
To delete a preset, click on the Delete button.
Save All Presets as Bank
To save all Presets as a Bank file, go File > Save Bank+Presets or type Ctrl+S. This will be saved as GUITAR COMBOS.bnk within the folder Native Instruments > GUITAR COMBOS > Presets.
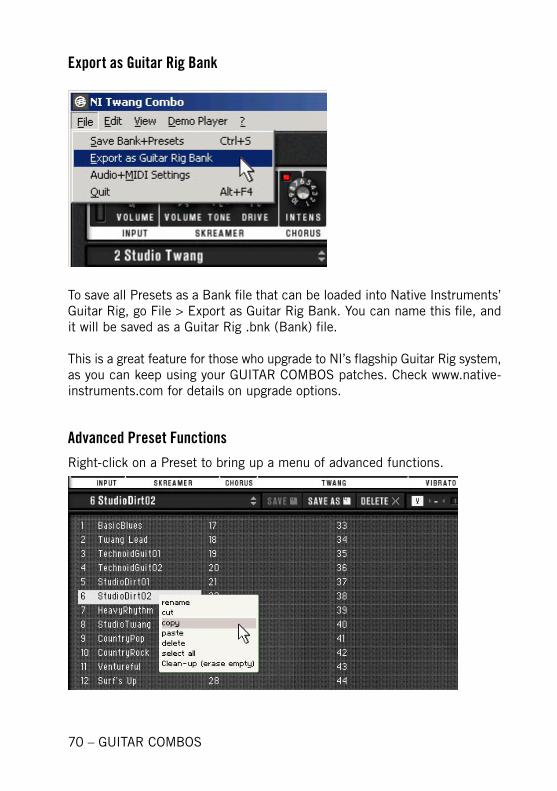
70 – GUITAR COMBOS
Export as Guitar Rig Bank
To save all Presets as a Bank file that can be loaded into Native Instruments’ Guitar Rig, go File > Export as Guitar Rig Bank. You can name this file, and it will be saved as a Guitar Rig .bnk (Bank) file.
This is a great feature for those who upgrade to NI’s flagship Guitar Rig system, as you can keep using your GUITAR COMBOS patches. Check www.native-instruments.com for details on upgrade options.
Advanced Preset FunctionsRight-click on a Preset to bring up a menu of advanced functions.
GUITAR COMBOS – 71
Please note: In the list below, functions marked with an asterisk (*) can also be accessed from the Edit menu.
• Rename. Start typing to clear the existing name and enter the new name, or click and drag over the section you want to change, and type in the changes. You can also hit the Space bar or double-click to clear the name before typing in a new one. Hit return when you’re done, or click on another preset.
• Cut. Removes the preset data and stores it on the clipboard. You can then paste this data into a different preset location. This is handy when you want to rearrange the preset order.
• Copy. Copies the preset data to the clipboard and leaves the original preset data intact.
• Paste. Pastes the clipboard data to the preset,• Delete. Removes the preset data, but does not store it to the clipboard.
Deleted data cannot be pasted or retrieved.• Select All. Selects all non-empty presets.• Clean-Up. “Closes up” presets so there are no empty presets in be-
tween other presets. Example: If you have presets in slots 1, 2, 3, 5, 7, 8, and 9 (no preset in slots 4 or 6), and select Clean-Up, the preset in slot 5 will move down into slot 4, and the presets in slots 7, 8, and 9 will move down to occupy slots 5, 6, 7. Now all presets are located in slots 1-7.
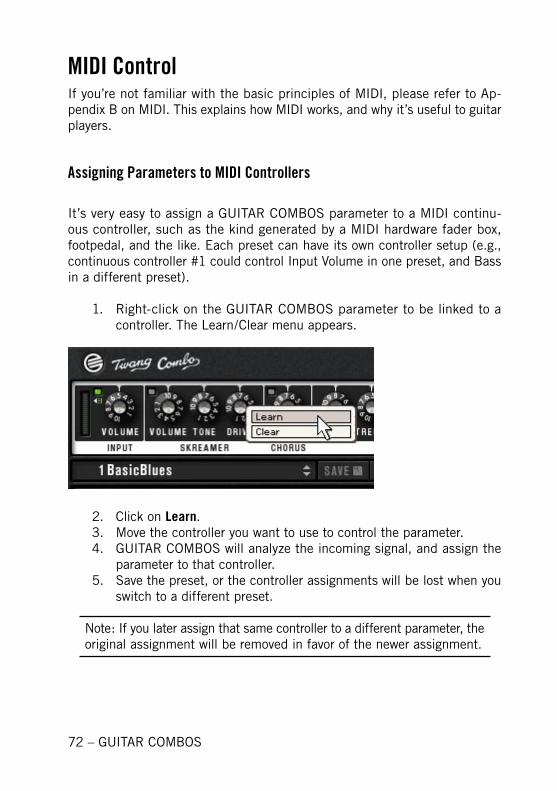
72 – GUITAR COMBOS
MIDI Control If you’re not familiar with the basic principles of MIDI, please refer to Ap-pendix B on MIDI. This explains how MIDI works, and why it’s useful to guitar players.
Assigning Parameters to MIDI Controllers
It’s very easy to assign a GUITAR COMBOS parameter to a MIDI continu-ous controller, such as the kind generated by a MIDI hardware fader box, footpedal, and the like. Each preset can have its own controller setup (e.g., continuous controller #1 could control Input Volume in one preset, and Bass in a different preset).
1. Right-click on the GUITAR COMBOS parameter to be linked to a controller. The Learn/Clear menu appears.
2. Click on Learn.3. Move the controller you want to use to control the parameter. 4. GUITAR COMBOS will analyze the incoming signal, and assign the
parameter to that controller.5. Save the preset, or the controller assignments will be lost when you
switch to a different preset.
Note: If you later assign that same controller to a different parameter, the original assignment will be removed in favor of the newer assignment.
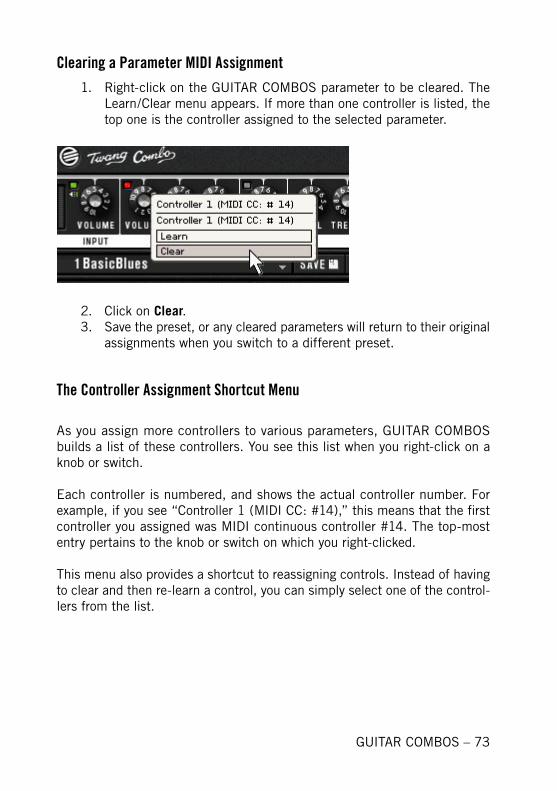
GUITAR COMBOS – 73
Clearing a Parameter MIDI Assignment1. Right-click on the GUITAR COMBOS parameter to be cleared. The
Learn/Clear menu appears. If more than one controller is listed, the top one is the controller assigned to the selected parameter.
2. Click on Clear.3. Save the preset, or any cleared parameters will return to their original
assignments when you switch to a different preset.
The Controller Assignment Shortcut Menu
As you assign more controllers to various parameters, GUITAR COMBOS builds a list of these controllers. You see this list when you right-click on a knob or switch.
Each controller is numbered, and shows the actual controller number. For example, if you see “Controller 1 (MIDI CC: #14),” this means that the first controller you assigned was MIDI continuous controller #14. The top-most entry pertains to the knob or switch on which you right-clicked.
This menu also provides a shortcut to reassigning controls. Instead of having to clear and then re-learn a control, you can simply select one of the control-lers from the list.

74 – GUITAR COMBOS
In the following example, the Twang Combo Skreamer Drive control has been right-clicked. The top entry of the controller list shows that it is currently assigned to Controller 3 (MIDI CC: #77). However, it is being reassigned to Controller 4 (MIDI CC: #78), as shown by the cursor clicking on it.
GUITAR COMBOS – 75
Assigning Parameters to MIDI NotesIn addition to responding to continuous controllers, GUITAR COMBOS param-eters can also respond to MIDI notes. This is an obvious control choice for parameters with two states (e.g., on/off) as “note up” means off and “note down” means on. However, notes can also be used with controls where key up selects the control’s minimum value, and key down selects the maximum value.
1. Right-click on the parameter to be linked to a MIDI controller.2. Click on Learn.3. Play the note you want to use to control the parameter.4. GUITAR COMBOS will analyze the incoming signal, and assign the
parameter to that note or switch.5. Save the preset, or any assignments will be lost when you switch to
a different preset.
Assigning Programs to Program Change CommandsIt is not necessary to do anything. GUITAR COMBOS’s 64 presets are “hard wired” to 64 MIDI program change commands (e.g., Program Change com-mand 15 will call up GUITAR COMBOS Preset 15).
76 – GUITAR COMBOS
Using GUITAR COMBOS with a Host ProgramAlthough GUITAR COMBOS works just fine in standalone mode, its power is multiplied when used with a multitrack host program like Pro Tools, Cubase, Sonar, Digital Performer, Logic, etc. Part of this is because GUITAR COMBOS allows you to change the fundamental sound of your guitar part at any time, right up until the final mixdown, through a process called “virtual re-amping.” First, though, let’s discuss how to insert it into a track.
Installing GUITAR COMBOS as an EffectAlthough some programs let you install GUITAR COMBOS as an instrument because it works with both audio and MIDI, you will want to install it as a signal processing plug-in.
For example, with Sonar, GUITAR COMBOS is classified as a DXi instrument because it works with audio but also accepts MIDI and tempo information. However, do not use the Insert > DXi Synth option to insert GUITAR COMBOS. Instead, treat it like a signal processor:
1. Right-click in an audio track’s FX field and go DXi Synth > NI > GUI-TAR COMBOS.
2. If you want to control GUITAR COMBOS via MIDI, also create a MIDI track and assign its output to GUITAR COMBOS.
As another example, in Cubase SX you would install GUITAR COMBOS in almost exactly the same way: Click on an audio track’s “e” button to bring up the VST Audio Channel Settings, and insert GUITAR COMBOS as a plug-in. Then, create a MIDI track and assign its output to GUITAR COMBOS.
About Re-AmpingIn the early days of recording, once you recorded a guitar part there was little you could do to modify the basic sound other than add processing during mixdown. Then people got the idea to record just the straight guitar sound on tape, and on playback, send this through a variety of amps and cabinets to find the perfect sound. This process is commonly called “re-amping.”
Low-latency sound cards, sophisticated hard disk recording software, and plug-ins have made re-amping possible in our “virtual” world. But it’s much
GUITAR COMBOS – 77
easier than re-amping with hardware. For starters, you don’t have to string any cables around, or set up mics.
The basic procedure is to insert GUITAR COMBOS as a plug-in, and moni-tor your playing through the plug-in (which is why low sound card latency is important; you don’t want to hear a delay while you’re playing). This way you can hear the sound of the amp and other processors as you play.
But note that the program itself will record your straight guitar sound – the one hitting the sound card input before GUITAR COMBOS processes it. Therefore, to re-amp, all you need to do is try different parameter settings within GUITAR COMBOS while the track plays back. For example, if you thought recording without the spring reverb was a good idea but later wished you’d added it, you don’t have to re-record the track; just enable the reverb on playback.
Avoid “Zero-Latency” Monitoring Options!As mentioned earlier (we can’t stress this enough!), avoid zero-latency (“di-rect monitoring”) options or you won’t hear your guitar being processed by GUITAR COMBOS.
Total RecallWhen using GUITAR COMBOS with a host program, when you save a host’s project, it captures whatever is in GUITAR COMBOS’s buffer. So, if you have modified a preset compared to how it was when you started, no problem – when you recall the project, the preset will be recalled exactly as you left it.
Typical ExamplesHere are some examples of how to record through hosts so you can hear your playing though the plug-in, as well as record your guitar if desired. These as-sume your audio interface has been hooked up correctly, and is recognized by the host program.
78 – GUITAR COMBOS
Playing Live Through Cubase SX1. Create an audio track.2. Go Devices > VST Connections and make sure the input(s) being fed
by the guitar are enabled.3. Click on the track’s Record and Monitor (Speaker icon) buttons so
that the track is record-ready and in monitor mode.4. You have a choice of several monitoring modes; go File > Preferences
then click on VST. Click on the arrow in the Auto Monitoring field. Tapemachine Style is generally best, as this automatically enables input monitoring while stopped and recording, but monitors the recorded track on playback. After making your selection, click on OK.
5. Play your guitar and check the track’s meter to verify that it’s receiving the input source.
6. Open up the track’s VST Channel Settings window by clicking on the “e” button.
7. Add GUITAR COMBOS as an Insert Effect.8. You should now hear your input source being processed by GUITAR
COMBOS. If you start recording, Cubase will record the unprocessed input source.
Playing Live Through Sonar1. Make sure there is no feedback loop from the host output back to
the input. Until you know everything is working properly, keep your monitor speaker volume low.
2. In Sonar, go Audio Options > Drivers, and make sure the driver for the hardware input you want to use is enabled.
3. Choose the track into which you want to record. Right-click on its FX field and go DXi Synth > NI > GUITAR COMBOS.
4. Enable recording on the GUITAR COMBOS audio track, and make sure the appropriate hardware input is selected in the track’s I (Input) field.
5. Turn on the Input Echo function (in the Track view, click on the button to the right of the track’s Record button). It will glow green and you should hear your input source.
6. Enable the GUITAR COMBOS audio track’s Record button, and go!
GUITAR COMBOS – 79
Automating Plug-In ParametersAutomation techniques for various sequencer hosts depends on the host; refer to its documentation for details. However, your basic automation options will likely be as follows:
• Create and edit automation envelopes within the host that drive GUI-TAR COMBOS parameters
• Manipulating GUITAR COMBOS controls in real time, and recording the movements as envelopes or other automation data
• Controlling GUITAR COMBOS parameters via MIDI, and recording the MIDI data in a MIDI track that feeds the GUITAR COMBOS.
A Typical Automation ApplicationThe following example shows how to automate GUITAR COMBOS within Cake-walk’s Sonar. However, even if you don’t have Sonar, the same principles apply to most other hosts. The reason for choosing Sonar is that it accommodates all three automation methods mentioned above, so you can likely translate the procedure into something that works for your host program of choice. We’ll also discuss VST automation techniques.
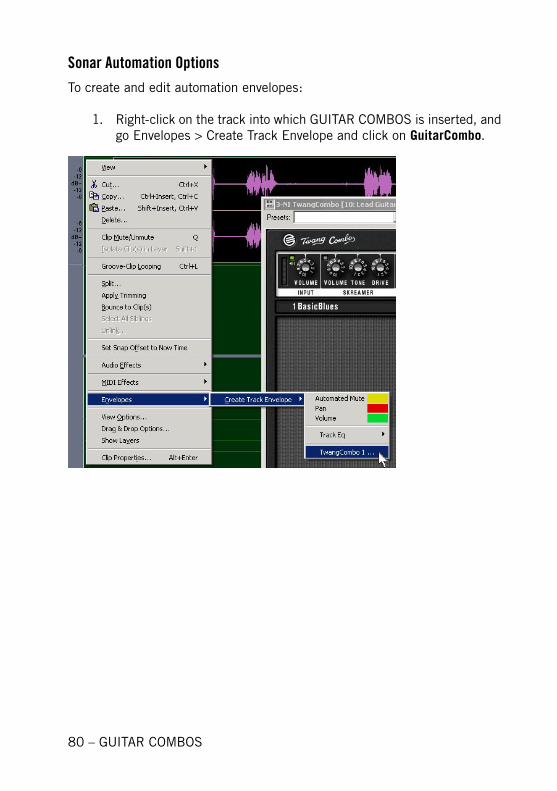
80 – GUITAR COMBOS
Sonar Automation OptionsTo create and edit automation envelopes:
1. Right-click on the track into which GUITAR COMBOS is inserted, and go Envelopes > Create Track Envelope and click on GuitarCombo.
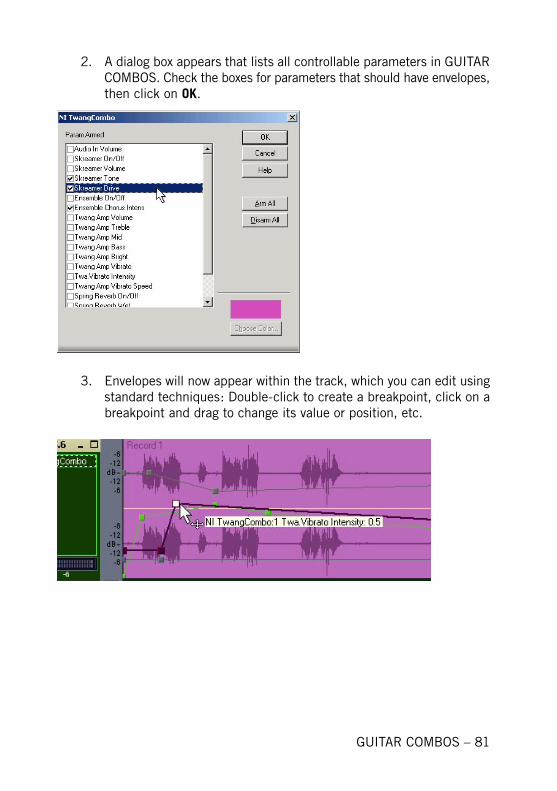
GUITAR COMBOS – 81
2. A dialog box appears that lists all controllable parameters in GUITAR COMBOS. Check the boxes for parameters that should have envelopes, then click on OK.
3. Envelopes will now appear within the track, which you can edit using standard techniques: Double-click to create a breakpoint, click on a breakpoint and drag to change its value or position, etc.
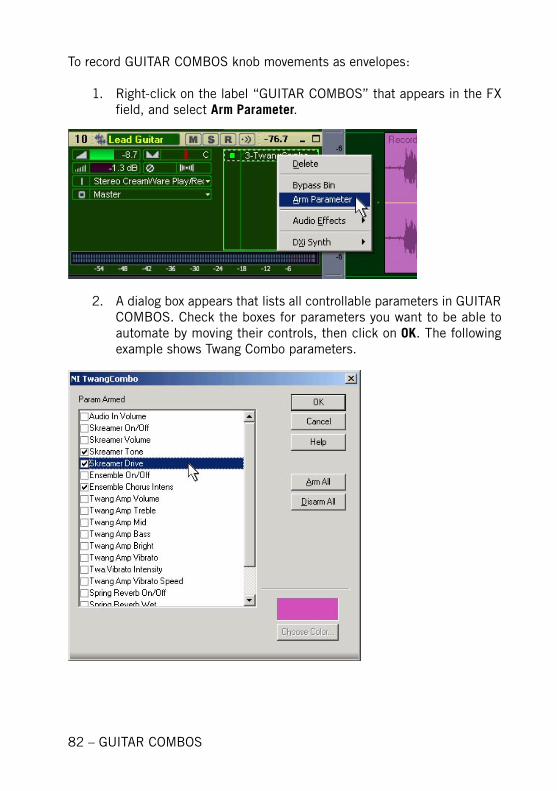
82 – GUITAR COMBOS
To record GUITAR COMBOS knob movements as envelopes:
1. Right-click on the label “GUITAR COMBOS” that appears in the FX field, and select Arm Parameter.
2. A dialog box appears that lists all controllable parameters in GUITAR COMBOS. Check the boxes for parameters you want to be able to automate by moving their controls, then click on OK. The following example shows Twang Combo parameters.
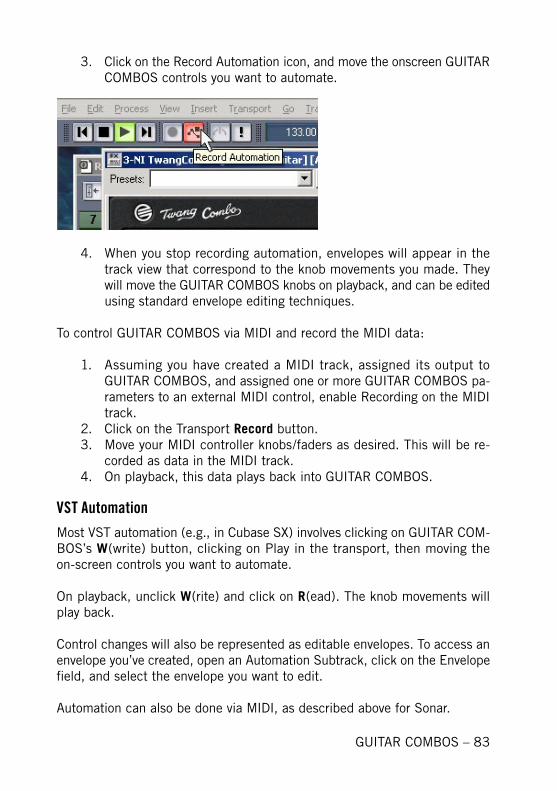
GUITAR COMBOS – 83
3. Click on the Record Automation icon, and move the onscreen GUITAR COMBOS controls you want to automate.
4. When you stop recording automation, envelopes will appear in the track view that correspond to the knob movements you made. They will move the GUITAR COMBOS knobs on playback, and can be edited using standard envelope editing techniques.
To control GUITAR COMBOS via MIDI and record the MIDI data:
1. Assuming you have created a MIDI track, assigned its output to GUITAR COMBOS, and assigned one or more GUITAR COMBOS pa-rameters to an external MIDI control, enable Recording on the MIDI track.
2. Click on the Transport Record button.3. Move your MIDI controller knobs/faders as desired. This will be re-
corded as data in the MIDI track.4. On playback, this data plays back into GUITAR COMBOS.
VST AutomationMost VST automation (e.g., in Cubase SX) involves clicking on GUITAR COM-BOS’s W(write) button, clicking on Play in the transport, then moving the on-screen controls you want to automate.
On playback, unclick W(rite) and click on R(ead). The knob movements will play back.
Control changes will also be represented as editable envelopes. To access an envelope you’ve created, open an Automation Subtrack, click on the Envelope field, and select the envelope you want to edit.
Automation can also be done via MIDI, as described above for Sonar.
84 – GUITAR COMBOS
NI Bonus FeaturesClick on the NI logo in the amp’s upper right hand corner to bring up the About NI GUITAR COMBOS screen. It has several functions, which are particularly relevant if your computer is connected to the Internet.
About TabThis shows a list of the dedicated mad scientists, musicians, and consultants who gave up nights and weekends to bring you this really cool guitar amp simulator. It also shows your program’s version number in the upper left corner and serial number in the lower left corner.
Update TabIf your computer is connected to the net, click on Update and GUITAR COM-BOS will check the NI web site for any available updates.You can also click on NI Website to go directly to the web site and check for news, find out about special promotions, manage your authorizations, and so on.
Support TabNative Instruments is proud to continue its tradition of offering free techni-cal support to registered users. Of course, you’ve read the manual, so you’re probably not having any problems with GUITAR COMBOS anyway. But if you ever do have problems, click on Knowledge Base to connect to a database of common questions and answers, or Support to request online support.
Various TabHere is where you can access:
Tutorials to help you become better at your art.
The Forum where you can discuss GUITAR COMBOS and computer music with other users.An Events calendar to find out about NI-related events such as trade shows, workshops, live events, and movie premieres (okay, we’re just kidding about the movie premieres).
The Artists section, with interviews of famous NI product users and collec-tions of artist-related links.
GUITAR COMBOS – 85
TroubleshootingProblem: The guitar sounds like it’s playing through a delay set to delayed sound only.
• Solution #1: A low-latency driver is not selected. Go File > Audio+MIDI Setup > SoundCard tab, and select ASIO or Core Audio as the Inter-face.
• Solution #2: The wrong driver is selected. Go File > Audio+MIDI Setup > SoundCard tab, and look at the options under Output Device. Choose the one that’s written specifically for your interface (usually the last one on the list, but in any event, not “ASIO DirectX Full Duplex Driver” or “ASIO Multimedia Driver.”
• Solution #3: You have selected a low-latency interface and driver, but the interface latency adjustment is not set correctly. Go File > Audio+MIDI Setup > SoundCard tab, and click on ASIO Config. This should take you to a control panel where you can adjust latency. If this does not take you to a suitable control panel, then there is prob-ably a separate application that was installed on your computer when you installed the audio interface. Wherever you end up adjusting the latency, set it for 10ms or less, or 256 samples or less.
• Solution #4: Your audio interface does not support a low-latency driver, or a low-latency driver is not installed. Check the manufacturer’s web site for an updated driver. If there isn’t any, re-install the interface drivers using the ones that came with the product. If no low-latency driver is available, you need a new interface (which you would need for any modern music program anyway).
Problem: There is dry sound only – no amp or effects sounds.
• Solution: Turn off direct monitoring for your audio interface. This option will be found in any “mixer-type” application that’s included with your audio interface.
Problem: The sound is very noisy, especially with distortion.
• Solution #1: Make sure your audio interface has 24-bit A/D converters. 16-bit converters generate noise that gets amplified by the GUITAR COMBOS’s high gain.
• Solution #2: Your pickups may be picking up noise. Re-orient your
86 – GUITAR COMBOS
guitar and see if that reduces the noise. Note that LCD monitors generate less noise than CRT types, and guitars with piezo pickups do not pick up electromagnetic interference.
• Solution #3: You are using a guitar with active pickups and the preamp is generating noise. If possible, use a guitar with standard passive pickups, or at least activate the GUITAR COMBOS’s noise gate func-tion.
Problem: I hear the amp and effects okay, but there are crackles, pops, or audio dropouts.
• Solution #1: The latency is set too low, and your computer is not fast enough to handle it. Go File > Audio+MIDI Setup > SoundCard tab, and click on ASIO Config. This should take you to a control panel where you can adjust latency. If this does not take you to a suitable control panel, then there is probably a separate application that was installed on your computer when you installed the audio interface. In either case, increase the amount of latency to the lowest amount possible that does not produce audio problems.
• Solution #2: If the audio quality is good only if the latency has to be so high that the amount of delay is unacceptable, first refer to the troubleshooting question “The guitar sounds like it’s playing through a delay” for a possible solution. If changing the Interface and/or Output Device does not solve the problem, you will need either a newer interface that supports low-latency operation or, if you have a suitable interface, then you need to treat yourself to a faster computer (e.g., at least a G4 or Pentium III). High-performance computers are essential for programs with extensive real-time processing.
Problem: The guitar sounds muffled, like there aren’t any high frequencies.
• Solution #1: Check your amp settings to make sure that the Treble control is not turned down accidentally, and also make sure the tone control on your guitar is turned all the way up.
• Solution #2: There is an impedance mismatch between your guitar and audio interface. If your interface does not have a special input designed to accept guitar, you will need to patch a DI box or preamp designed to handle guitar signals between the guitar output and audio interface input.
GUITAR COMBOS – 87
Appendix A: Setup DetailsGetting a software guitar amp to work is like a combination lock. If the follow-ing three elements are in place, you’ll have a great experience. If not, you’ll miss out on what makes plug-ins so much fun.
Software: The GUITAR COMBOS software is the one part you don’t have to worry about, because the engineers at NI have tweaked them for guitar applica-tions. Just check the NI web site periodically for any performance-enhancing updates; even better, subscribe to NI’s product newsletter to receive emails regarding the GUITAR COMBOS software.
Hardware: This is the audio interface (also called “sound card”) that connects your guitar’s audio to your computer. A standard sound card will not deliver satisfactory results, but we’ll present several possible solutions shortly.
Audio Driver: This is the software that shuttles data from the audio interface to your computer, and is provided with the interface. Well-engineered ASIO and Core Audio drivers make a tight connection, where it feels like you’re really playing through an amp. Substandard drivers, like MME and DirectSound, are not recommended because they create a significant delay (called “latency”) be-tween the time you play a string and when you hear it – definitely not cool.
Let’s look at the hardware and drivers in detail.
Audio Interface HardwareA guitar with standard pickups generates a weak signal. Most sound cards have line level inputs that accept strong signals (e.g., CD players, synthesizers, etc.). Plugging a guitar into a line input will give a very low level sound, and will lack high frequencies because of an impedance mismatch. We don’t need to cover impedance in detail – just note that a guitar should feed an input with an impedance of 100kΩ or more (as listed in an interface’s spec sheet).
Some sound cards have mic level inputs, which you don’t want to use either. They are too sensitive, so a guitar will overload it, and mic inputs also tend to be noisy.
Here are four solutions to properly interface guitar or bass with your com-puter.
88 – GUITAR COMBOS
Audio Interface with Guitar (Instrument) InputSome audio interfaces include a special “Guitar” or “Instrument” input. This provides gain and presents a high input impedance to preserve frequency response. This is the easiest way to interface guitar properly with your com-puter and is highly recommended. Check www.ni-guitar-combos.com for an overview of audio interfaces with instrument inputs.
External DI or PreampThere are DI (Direct Injection) and Preamp devices designed to interface gui-tar with standard mixers. These also provide gain and impedance matching. Inserting this type of box between your guitar and your audio interface’s line level will match your guitar to the audio interface.
Guitar Stomp BoxA guitar “stomp box” that doesn’t color the sound much, like a compressor set for minimum compression or a preamp, can also patch between your guitar and an interface’s line level input. You will need to make sure its circuitry is active, not bypassed. This is not as good as the previous two solutions but will usually work.
Do It Yourself “Buffer Board”If you are handy with a soldering iron or know someone who is, a small “buffer” circuit can be built that provides some gain and impedance matching for your guitar. Appendix B includes a simple schematic for this type of device.

GUITAR COMBOS – 89
Internal vs. External Audio InterfacesInternal interfaces use a PCI card, PC-Card, or PCMCIA card. Audio connectors either mount directly to these cards, or are in a “breakout box” that connects to the card by a multiconductor cable. In general, internal interfaces provide the lowest latencies.
External interfaces attach to the computer via USB or FireWire. While gener-ally a tiny bit slower than internal interfaces, they still provide acceptable performance.
Choosing the right Audio DriverAudio Drivers are pieces of code that handle communications between your computer and audio interface. Your audio interface will probably come with several drivers. Please note:
• Interfaces often provide several drivers, and you need to choose the right one – some give far better performance than others.
• Drivers are often updated to improve performance. Check the audio interface manufacturer’s web site periodically to check for updated drivers.
About Low-Latency Audio DriversGUITAR COMBOSs work with two low-latency audio driver types:
• ASIO (Advanced Streaming Input Output, for Mac or Windows). This was originally developed by Steinberg.
• Core Audio (Mac only). This low-latency protocol was created by Apple for the Macintosh, starting with OS X.
Although other audio drivers may work with the GUITAR COMBOSs, this is not recommended as you will experience unacceptable latency.
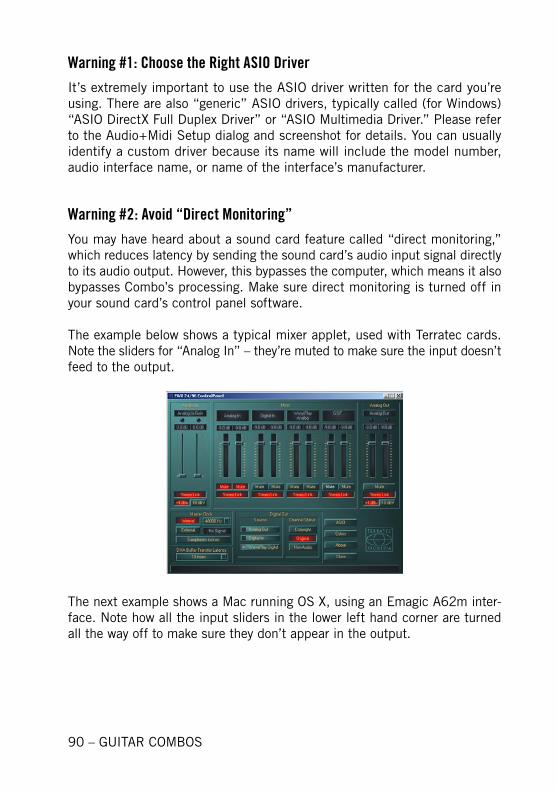
90 – GUITAR COMBOS
Warning #1: Choose the Right ASIO DriverIt’s extremely important to use the ASIO driver written for the card you’re using. There are also “generic” ASIO drivers, typically called (for Windows) “ASIO DirectX Full Duplex Driver” or “ASIO Multimedia Driver.” Please refer to the Audio+Midi Setup dialog and screenshot for details. You can usually identify a custom driver because its name will include the model number, audio interface name, or name of the interface’s manufacturer.
Warning #2: Avoid “Direct Monitoring”You may have heard about a sound card feature called “direct monitoring,” which reduces latency by sending the sound card’s audio input signal directly to its audio output. However, this bypasses the computer, which means it also bypasses Combo’s processing. Make sure direct monitoring is turned off in your sound card’s control panel software.
The example below shows a typical mixer applet, used with Terratec cards. Note the sliders for “Analog In” – they’re muted to make sure the input doesn’t feed to the output.
The next example shows a Mac running OS X, using an Emagic A62m inter-face. Note how all the input sliders in the lower left hand corner are turned all the way off to make sure they don’t appear in the output.
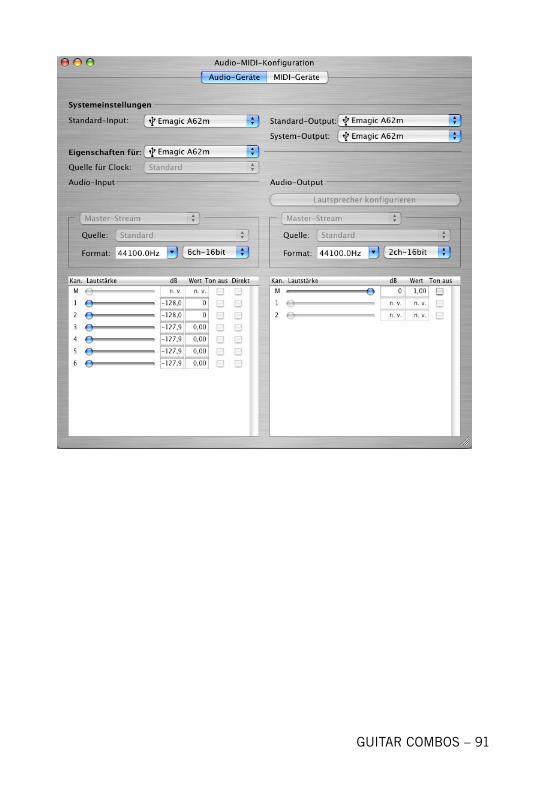
GUITAR COMBOS – 91
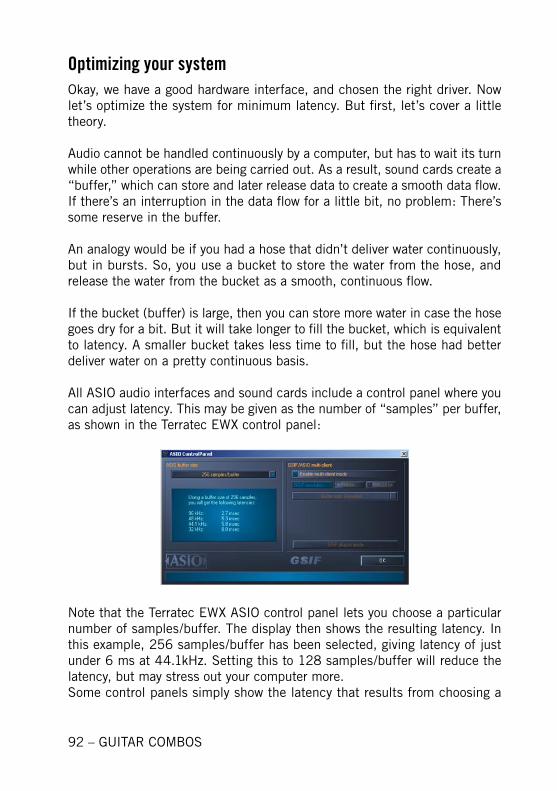
92 – GUITAR COMBOS
Optimizing your systemOkay, we have a good hardware interface, and chosen the right driver. Now let’s optimize the system for minimum latency. But first, let’s cover a little theory.
Audio cannot be handled continuously by a computer, but has to wait its turn while other operations are being carried out. As a result, sound cards create a “buffer,” which can store and later release data to create a smooth data flow. If there’s an interruption in the data flow for a little bit, no problem: There’s some reserve in the buffer.
An analogy would be if you had a hose that didn’t deliver water continuously, but in bursts. So, you use a bucket to store the water from the hose, and release the water from the bucket as a smooth, continuous flow.
If the bucket (buffer) is large, then you can store more water in case the hose goes dry for a bit. But it will take longer to fill the bucket, which is equivalent to latency. A smaller bucket takes less time to fill, but the hose had better deliver water on a pretty continuous basis.
All ASIO audio interfaces and sound cards include a control panel where you can adjust latency. This may be given as the number of “samples” per buffer, as shown in the Terratec EWX control panel:
Note that the Terratec EWX ASIO control panel lets you choose a particular number of samples/buffer. The display then shows the resulting latency. In this example, 256 samples/buffer has been selected, giving latency of just under 6 ms at 44.1kHz. Setting this to 128 samples/buffer will reduce the latency, but may stress out your computer more.Some control panels simply show the latency that results from choosing a
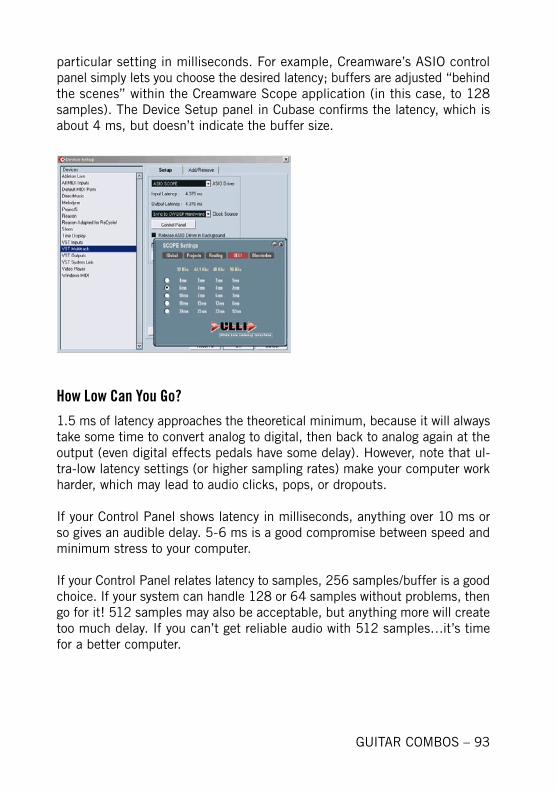
GUITAR COMBOS – 93
particular setting in milliseconds. For example, Creamware’s ASIO control panel simply lets you choose the desired latency; buffers are adjusted “behind the scenes” within the Creamware Scope application (in this case, to 128 samples). The Device Setup panel in Cubase confirms the latency, which is about 4 ms, but doesn’t indicate the buffer size.
How Low Can You Go?1.5 ms of latency approaches the theoretical minimum, because it will always take some time to convert analog to digital, then back to analog again at the output (even digital effects pedals have some delay). However, note that ul-tra-low latency settings (or higher sampling rates) make your computer work harder, which may lead to audio clicks, pops, or dropouts.
If your Control Panel shows latency in milliseconds, anything over 10 ms or so gives an audible delay. 5-6 ms is a good compromise between speed and minimum stress to your computer.
If your Control Panel relates latency to samples, 256 samples/buffer is a good choice. If your system can handle 128 or 64 samples without problems, then go for it! 512 samples may also be acceptable, but anything more will create too much delay. If you can’t get reliable audio with 512 samples…it’s time for a better computer.
94 – GUITAR COMBOS
Appendix B: About MIDIMany musicians think that MIDI (Musical Instrument Digital Interface) is just for keyboard players, However, GUITAR COMBOS makes good use of MIDI control and offer many options to adventurous guitarists.
The complete MIDI spec is fairly “deep” and complex. Fortunately for MIDI-phobes, there are only a few parts of the spec that relate to multieffects control, so there’s not really that much to learn. Let’s start with MIDI basics.
MIDI BasicsA MIDI system requires something that sends MIDI messages (such as a foot-pedal or footswitch that says “make the instrument louder,” “select this effect,” “add more echo,” etc.) and something that receives these messages and acts on them, like GUITAR COMBOS. Of course, this assumes your computer has a MIDI input so that your GUITAR COMBOS can receive MIDI messages.
Basically, MIDI is a catch-all name for the process of sending control mes-sages from one device (e.g., a footswitch) to another device (e.g., GUITAR COMBOS) over a MIDI cable. Host sequencers also use MIDI data to provide automation for GUITAR COMBOS when it’s serving as a plug-in.
There are many different kinds of MIDI messages, most of which relate to keyboards, sequencers, drum machines, lighting controllers, tape recorders, and other gear we can ignore. With GUITAR COMBOS, you need to know about only two kinds of MIDI messages: program changes (which call up different Presets) and continuous controller messages (which alter effects parameters in real time).
MIDI ConnectionsYour computer’s sound card probably has a MIDI in jack (receives MIDI mes-sage) and MIDI out jack that transmits MIDI messages. There may also be a MIDI thru jack, which provides a duplicate of the signal at the MIDI in jack.
GUITAR COMBOS – 95
About Program ChangesTo understand the need for program changes, consider the early days of ef-fects when guitarists started connecting lots of boxes – compressors, phase shifters, echo units, wah-wahs, etc. – with patch cords. The more processors you had, the more difficult it became to bring in multiple effects simultane-ously; you had to hit a bunch of footswitches at once, so fancy tap dancing became a necessity.
MIDI program changes solved that by being able to send a single message that would cause all these boxes to jump to the same program number. With GUITAR COMBOS, each of the 64 presets can be called up by 64 program change commands. Several “MIDI footswitches” generate program change messages. The only caution is that some start their numbering at 0, and some at 1. If the former, then sending (for example) program change 10 will actu-ally call up program 11 on GUITAR COMBOS because it starts its program numbering at 1.
About Continuous ControllersChanging from one program to another is a good start, but sometimes you’d like to vary a particular parameter within an individual program (volume, vibrato amount, chorus intensity, etc.).
When you call up a program’s parameter, you usually change its value by turning a knob. The idea of continuous controllers came about because synthesizers and effects have pedals, knobs, levers, and other physical “controllers” that alter some aspect of the sound over a continuous range of values (this is why they’re called continuous controllers, as opposed to a controller such as an on-off switch, which only selects between two possible values).
Unlike a program change, which is a single event, continuous controllers gener-ate a series of events, such as a volume fade-in (each event raises the volume a bit more than the previous event), or change in some other parameter (e.g., increasing chorus intensity).
Like program changes, continuous controller messages are transmitted over a MIDI output and received by a MIDI input. The transmitter usually digitizes the physical controller motion into 128 discrete values (0-127). For example, pulling the controller’s pedal all the way back generates a value of 0. Pushing

96 – GUITAR COMBOS
down on the pedal increases the value until at midpoint, the pedal generates a value of 64. Continuing to push on the pedal until it’s all the way down generates a value of 127.
Note that continuous controller transmitters only send messages reflecting a change; for example, leaving a pedal in one position doesn’t transmit any messages until you change the pedal’s physical position.
Continuous Controller NumbersMIDI “tags” each continuous controller message with an ID from 0 to 127. However, GUITAR COMBOS doesn’t have that many controllable parameters, so you’ll typically use only a few controllers at a time.
When controlling GUITAR COMBOS with continuous controllers, the basic idea is to assign a particular parameter (volume, bass, reverb amount, etc.) to a particular continuous controller number. With GUITAR COMBOS, this is particularly easy thanks to the Learn function.
At the receiving end, the parameter being controlled changes in response to incoming message values. For example, if you’re controlling Twang Volume and it receives a value of 0, volume is at minimum. When it receives a value of 64, the volume is halfway up and upon receiving a value of 127, the volume is up all the way.
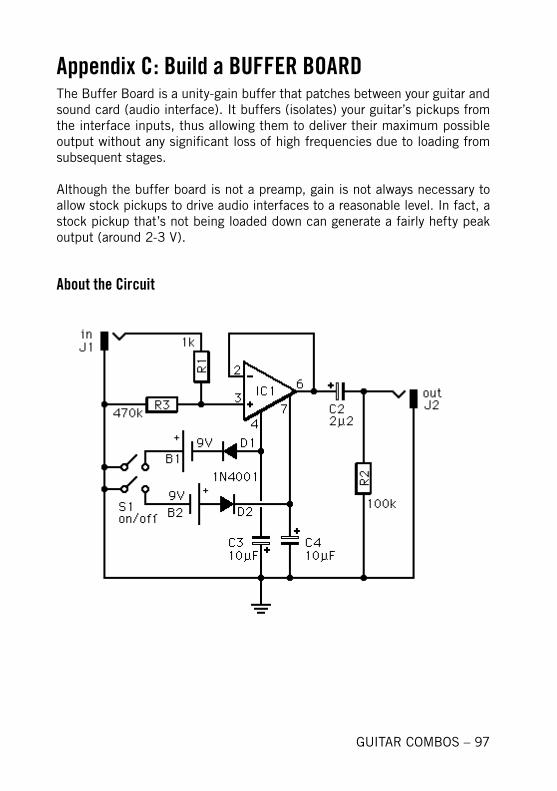
GUITAR COMBOS – 97
Appendix C: Build a BUFFER BOARDThe Buffer Board is a unity-gain buffer that patches between your guitar and sound card (audio interface). It buffers (isolates) your guitar’s pickups from the interface inputs, thus allowing them to deliver their maximum possible output without any significant loss of high frequencies due to loading from subsequent stages.
Although the buffer board is not a preamp, gain is not always necessary to allow stock pickups to drive audio interfaces to a reasonable level. In fact, a stock pickup that’s not being loaded down can generate a fairly hefty peak output (around 2-3 V).
About the Circuit
98 – GUITAR COMBOS
IC1 can be an LF351, TL071 (for extra-low noise), or TL081 op amp. If you have a favorite “designer” op amp you like to use, pretty much anything works as long as it’s internally compensated for unity gain.
R1 protects the op amp from static electricity, which can be a problem if you walk across a carpet on a dry day then touch the end of a cord plugged into one of the inputs. R2 prevents capacitor C2 from building up a charge. This eliminates “popping” when you plug into the output.
The power supply uses two 9V batteries, but you can also use two 9V DC adapters or a ±9V to ±15V bipolar power supply (such as project #12 in the book “Do It Yourself Projects for Guitarists,” published by Backbeat books). The power supply capacitor values (C3 and C4) are non-critical; anything from 5µF to 100µF will work. If using two AC adapters creates hum, increase C3 and C4 to 220µF. On-off switch S1 can be DPST or DPDT. Diodes D1 and D2 provide two functions: they protect against improper battery polarity, and also, help filter out hum when using wall-powered DC adapters.
Using the Buffer BoardPatch the Buffer Board between your guitar output and audio interface input. If you encounter any radio frequency interference, add a 10pF capacitor in parallel with resistor R3. This shunts frequencies above 30 kHz to ground.
The Buffer Board has applications other than using it with GUITAR COMBOS. It can help preserve your sound when going into mixers, feeding long cables, or doing direct injection into a stand-alone recorder.
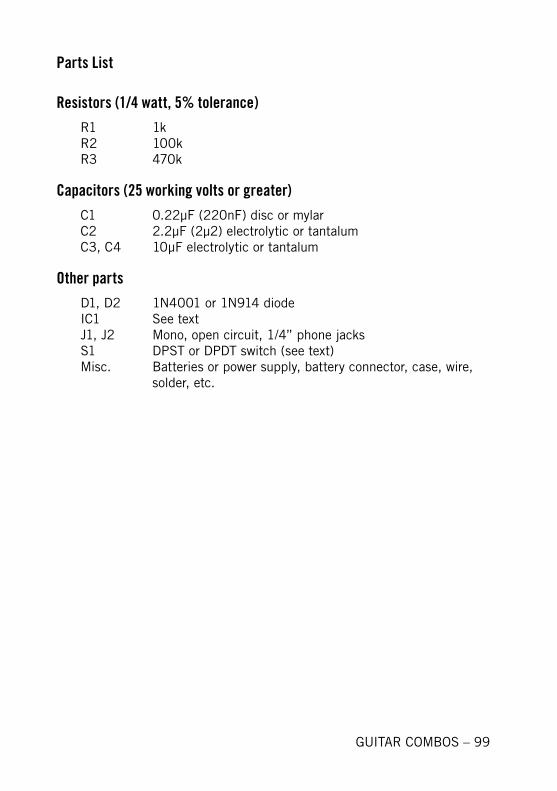
GUITAR COMBOS – 99
Parts List
Resistors (1/4 watt, 5% tolerance)R1 1kR2 100kR3 470k
Capacitors (25 working volts or greater)C1 0.22µF (220nF) disc or mylarC2 2.2µF (2µ2) electrolytic or tantalumC3, C4 10µF electrolytic or tantalum
Other partsD1, D2 1N4001 or 1N914 diodeIC1 See textJ1, J2 Mono, open circuit, 1/4” phone jacksS1 DPST or DPDT switch (see text)Misc. Batteries or power supply, battery connector, case, wire, solder, etc.
100 – GUITAR COMBOS
Index
Symbole24-bit ................................ 37, 86
AA/D converter ..................... 37, 86Advanced Functions (Presets) ..... 71ASIO ........................... 23, 25, 38Assign ..................................... 73Assignments, Shortcut menu ...... 74Assignments, Storing ................. 73AU .......................................... 26Audio+MIDI Settings ................. 38Audio Interface ......................... 27Audio Interfaces ....................... 23Audio Units .............................. 26Audio Units Plug-In ................... 33Audio Unit plug-in Installation .... 21Authorization .............................. 9Authorization Key ........................ 9Automatable Parameters ............80Automating Plug-In Parameters ..80Automation ..............................80
BBank ................................. 43, 70Breakout Box ............................90Buffer .......................... 78, 89, 93Buffer, edit ............................... 93Buffer Board ...................... 89, 98
CCakewalk Sonar ........................ 20Clean-Up (Preset) ..................... 72Clear ................................. 73, 74Clear Controller ......................... 74
Complete button ....................... 13Configuration ............................ 27Continuous Controllers ............... 96Core Audio ............................... 25Cubase .................................... 31Cubase SX 2 ............................ 31
DDemo Player ............................. 47DI ......................................37, 89Digidesign ................................ 25Digital Performer ...................... 35DirectSound ............................. 25DirectX Full Duplex Driver .... 86, 91Direct Injection ....................37, 87Direct Monitoring .......... 78, 86, 91DI box ..................................... 87Drivers ............................... 23, 90Dropouts ............................ 87, 94DXi .......................................... 36DXi2 ........................................ 25DXi 2 plug-in Setup ................... 20DXi 2 PlugIn ............................. 32
EEnvelope ..................................80Export as Guitar Rig Bank .......... 71
FFader Box ................................ 73Fill Out Form button .................. 16FireWire ...................................90Footpedal ................................. 73Footswitch ............................... 95
GGarage Band ............................ 34Guitar Stomp Box ...................... 89
GUITAR COMBOS – 101
HHarmonics ............. 45, 53, 60, 68Hints .......................................46Host Program ........................... 77Humbucker ..............................43
IInsert Effect ............................. 79Installation under Windows XP .... 19Interface .................................. 27Internet ..............................11, 16In Jack .................................... 95
LLatency ................................... 26Leading Zero ............................ 69Learn, MIDI .............................. 73Learn Controller ........................ 73List Fading ............................... 47Logic ....................................... 33
MManagement (Preset) ................ 69Messages, MIDI ........................ 95MIDI
Controllers ............................. 73Fader Box .............................. 73Footswitch ............................. 95In Jack .................................. 95Learn .................................... 73Messages .............................. 95Notes Assigning to Parameters 73Out Jack ............................... 95Program Change ..................... 76Thru Jack .............................. 95
MME ....................................... 25Monitoring .......................... 78, 91MP3 ........................................ 47Multimedia Driver ................ 86, 91
NNoise Gate ................... 48, 54, 61Nuendo .................................... 31Nuendo 2.0 .............................. 31
OOpen File button ....................... 15Optimizing Your System ............. 93Output Device .......................... 28Output Latency ......................... 28Out Jack .................................. 95Overwrite ................................. 69
PParameters, automatable ...........80Parameters, automating .............80PC-Card ...................................90PCI card ..................................90PCMCIA card ............................90Pickup ............. 43, 45, 86, 88, 98Piezo Pickups ........................... 87Plug-In .............................. 23, 31Plug-In Parameters, automating ..80Preamp .............................. 87, 89Presets .................................... 69Product Authorization .................. 9Program Change ....................... 76Pro Tools ............................ 25, 36
RRe-Amping ............................... 77Record ..................................... 78Register Now ............................ 11Registration support .................. 18Registration Tool ......................... 9Routing .................................... 28RTAS ............................25, 27, 36RTAS Plug-in ............................ 36RTAS plug-in installation ...... 20, 22
102 – GUITAR COMBOS
SSamples/Buffer ........................ 93Sample rate .............................. 28Save Registration File ................ 14Select All ................................. 72Shortcut menu, Controller Assignment .......... 74Single Coil ...............................43Sonar ...................................... 32Soundcard ............................... 27SoundCard tab ......................... 38Space bar .......................... 70, 72Spring Reverb ........................... 52Stand-alone Application ............. 23Standalone ............................... 27Stomp Box ............................... 89Subtrack ..................................84Support ............................. 18, 85System ID .................................. 9System Requirements .......... 19, 21
TThru Jack ................................. 95Total Recall .............................. 78Track ....................................... 77Troubleshooting ........................86Tuner ....................................... 45
UUpdate Tab .............................. 85USB ........................................90
VVST ......................................... 25VST 2.0 Plug-in .................. 31, 32VST plug-in Installation .............. 19
WWhat is the Product Authorization? 9
ZZero-Latency ............................ 78