gx microscopes upright microscopes manual -...
TRANSCRIPT
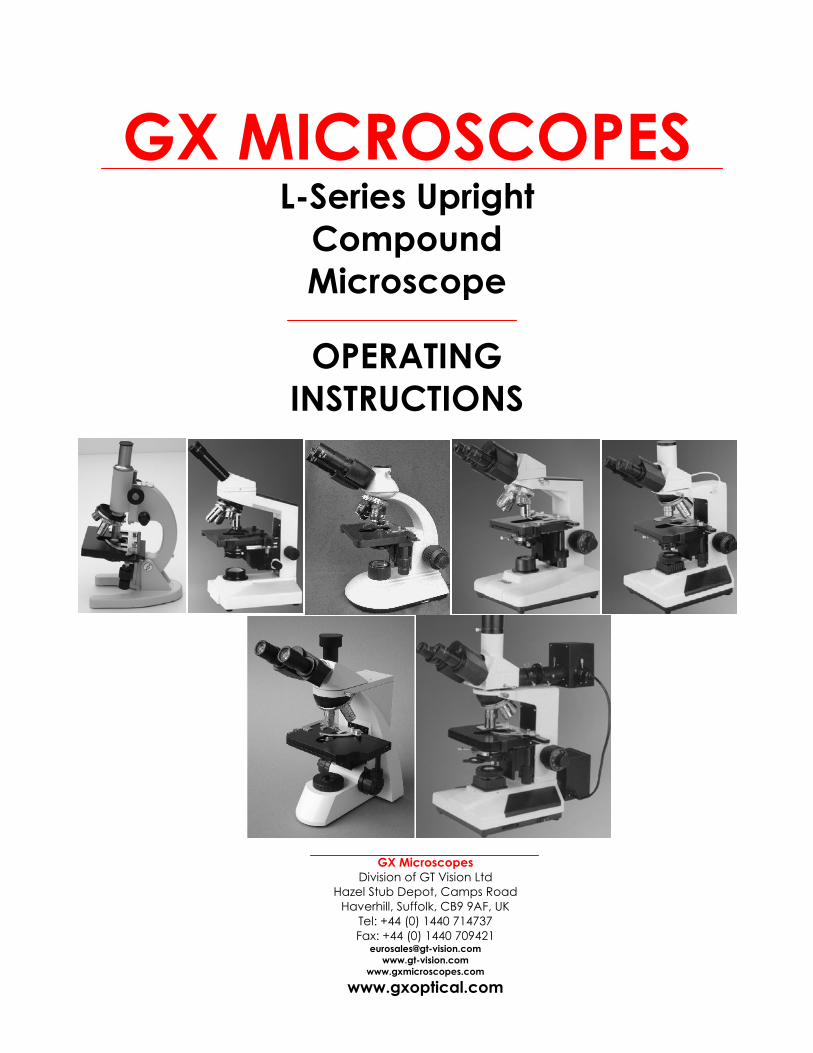
GX MICROSCOPES L-Series Upright
Compound Microscope
OPERATING
INSTRUCTIONS
GX Microscopes Division of GT Vision Ltd
Hazel Stub Depot, Camps Road Haverhill, Suffolk, CB9 9AF, UK
Tel: +44 (0) 1440 714737 Fax: +44 (0) 1440 709421
[email protected] www.gt-vision.com
www.gxmicroscopes.com
www.gxoptical.com
GX Microscopes Introduction to Microscopes
Introduction to Microscopes
Thank you for purchasing a GX Microscope. GX Microscopes and our associated companies have a wealth of experience in the design manufacture and supply of fine quality optical instruments our including telescopes, microscopes and binoculars. This
section of the manual provides an overview of this subject. If you need further help please contact GX Microscopes direct or one of our regional distributors, we will be
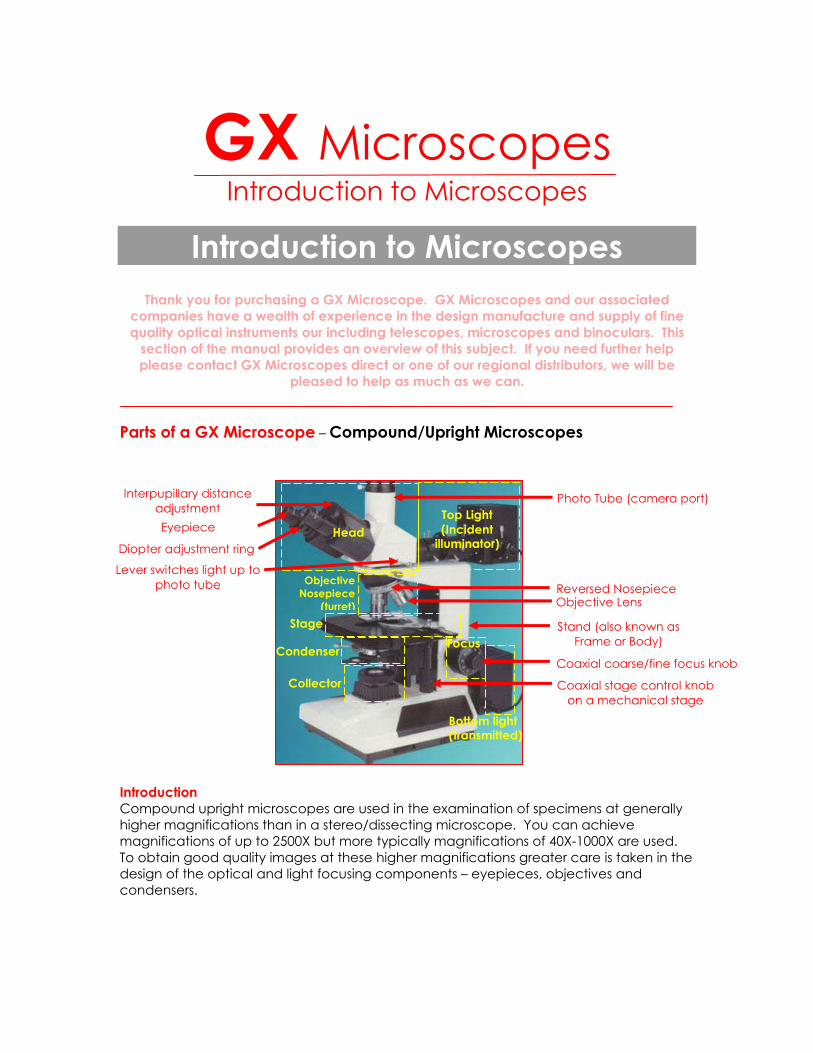
pleased to help as much as we can. Parts of a GX Microscope – Compound/Upright Microscopes Introduction Compound upright microscopes are used in the examination of specimens at generally higher magnifications than in a stereo/dissecting microscope. You can achieve magnifications of up to 2500X but more typically magnifications of 40X-1000X are used. To obtain good quality images at these higher magnifications greater care is taken in the design of the optical and light focusing components – eyepieces, objectives and condensers.
Head Top Light (Incident
illuminator)
Objective Nosepiece
(turret)
Bottom light (transmitted)
Focus Condenser
Stage
Collector
Photo Tube (camera port)
Eyepiece
Interpupillary distance adjustment
Diopter adjustment ring
Reversed Nosepiece Objective Lens
Stand (also known as Frame or Body)
Lever switches light up to photo tube
Coaxial stage control knob on a mechanical stage
Coaxial coarse/fine focus knob
Types of Compound Upright Microscopes There are three basic types of these microscopes, biological, materials and polarising.
Biological The most common type, by far, is the biological microscope. Nearly all biological microscopes of this type are generally used to observe slide mounted specimens at high magnifications. Illumination is from the bottom with the exception of fluorescence microscopes which provide incident (top) fluorescence illumination as well as normal white light (brightfield) transmitted (bottom) illumination. Examples of this type of microscope in the GX Microscopes range include: XSP-53, SX-AL, L301, L500, L800, L1000, L1180, L1500, L1600, L1800, L2000, L2080, L2001, L3000, L3001
Materials Materials microscopes have incident (top) illumination and are used for looking at reflective surfaces of materials such as polished metal sections. Examples of this type of microscope in the GX Microscopes range include: XJL-101, XJL-201, GXMMB-1/2, L2003, L2020 Polarising Microscopes Polarising microscopes are used for looking at materials such as rock, plastics, and crystals. They generally have a rotating stage and a polarising filter in the microscope head and another polarising filter near the light source. By rotating one of the polarisers with no sample present until the image goes black you achieve what is called extinction. When a specimen is then placed onto the stage only light that is scattered or diffracted can be observed. With a set of inserts different refractive index materials can be made to appear in different colours to aid identification. Examples of this type of microscope in the GX Microscopes range include: GXPT-7, JPL1350, GXP-501, GXP-1
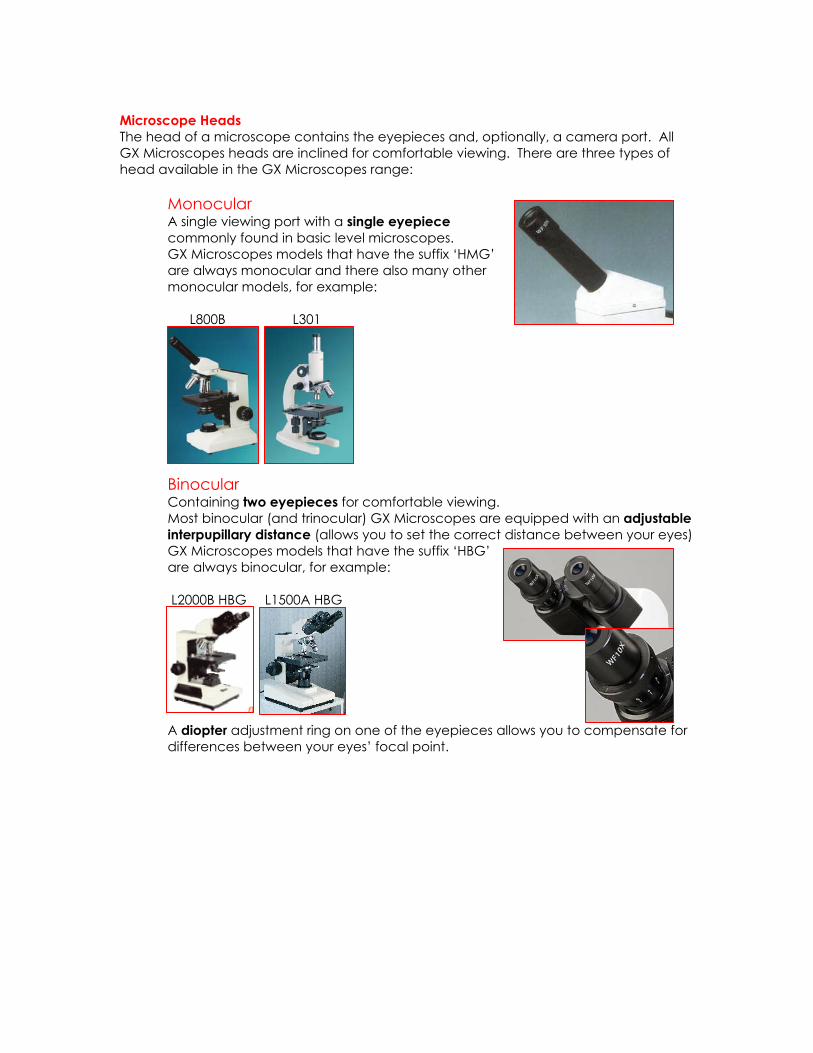
Microscope Heads The head of a microscope contains the eyepieces and, optionally, a camera port. All GX Microscopes heads are inclined for comfortable viewing. There are three types of head available in the GX Microscopes range:
Monocular A single viewing port with a single eyepiece commonly found in basic level microscopes. GX Microscopes models that have the suffix ‘HMG’ are always monocular and there also many other monocular models, for example:
L800B L301
Binocular Containing two eyepieces for comfortable viewing. Most binocular (and trinocular) GX Microscopes are equipped with an adjustable interpupillary distance (allows you to set the correct distance between your eyes) GX Microscopes models that have the suffix ‘HBG’ are always binocular, for example: L2000B HBG L1500A HBG
A diopter adjustment ring on one of the eyepieces allows you to compensate for differences between your eyes’ focal point.

Trinocular A trinocular head is a binocular head with a prism which diverts some or all the light to an additional ‘photo tube’ so images can be captured using a camera. GX Microscopes models that have the suffix ‘HTG’ are always trinocular other models are only available with a trinocular head, for example: L2000B HTG XJL-210

Eyepieces and Reticules There are a wide range of eyepieces (oculars) available with a variety of magnifications, tube lengths, diameters and fields of view. Some eyepieces can be dismantled so that a reticule can be inserted, some can be supplied with a reticule pre-inserted and those with reticules can sometimes be supplied as a focusing eyepiece to ensure the reticule is in focus at the same time as the specimen.
Reticules These are pieces of glass with marks on them such as cross-hairs and scales which help with measurements and counting tasks such as particle sizing and fibre counting. A wide range of reticules are available from GX Microscopes.
Huygens Eyepieces used in basic microscopes (and telescopes)
High quality widefield eyepieces used in most GX
compound microscopes
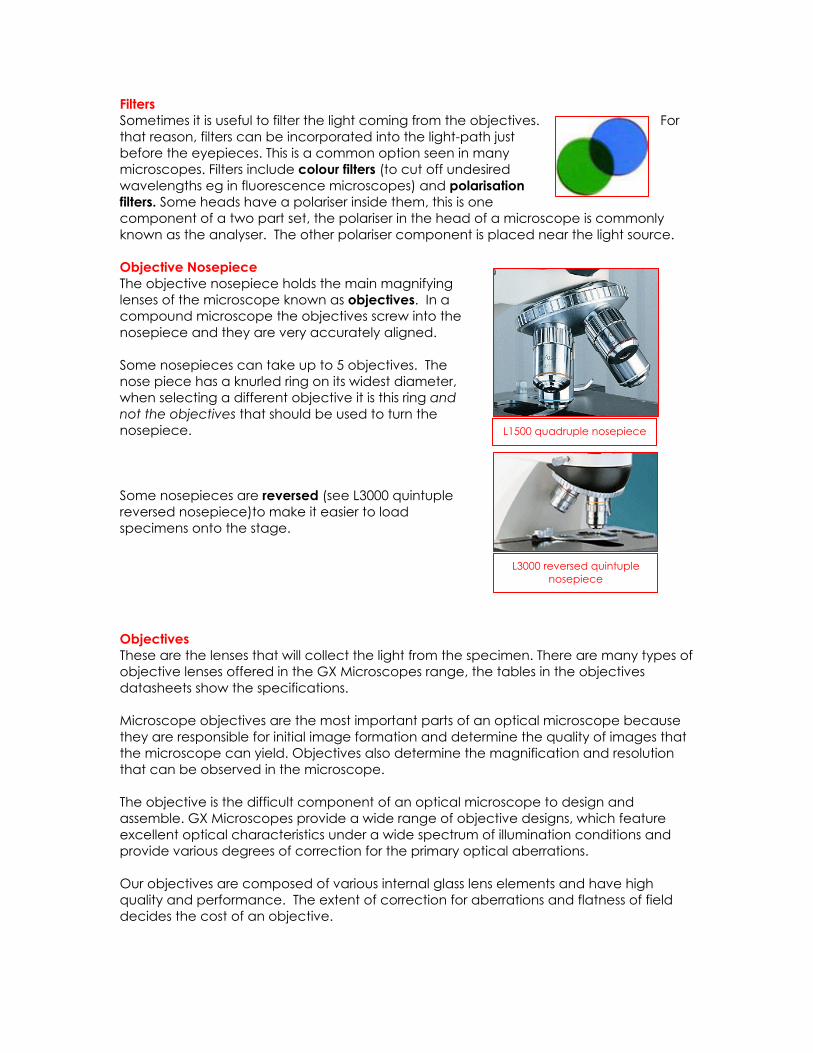
Filters Sometimes it is useful to filter the light coming from the objectives. For that reason, filters can be incorporated into the light-path just before the eyepieces. This is a common option seen in many microscopes. Filters include colour filters (to cut off undesired wavelengths eg in fluorescence microscopes) and polarisation filters. Some heads have a polariser inside them, this is one component of a two part set, the polariser in the head of a microscope is commonly known as the analyser. The other polariser component is placed near the light source. Objective Nosepiece The objective nosepiece holds the main magnifying lenses of the microscope known as objectives. In a compound microscope the objectives screw into the nosepiece and they are very accurately aligned. Some nosepieces can take up to 5 objectives. The nose piece has a knurled ring on its widest diameter, when selecting a different objective it is this ring and not the objectives that should be used to turn the nosepiece. Some nosepieces are reversed (see L3000 quintuple reversed nosepiece)to make it easier to load specimens onto the stage.
Objectives These are the lenses that will collect the light from the specimen. There are many types of objective lenses offered in the GX Microscopes range, the tables in the objectives datasheets show the specifications. Microscope objectives are the most important parts of an optical microscope because they are responsible for initial image formation and determine the quality of images that the microscope can yield. Objectives also determine the magnification and resolution that can be observed in the microscope. The objective is the difficult component of an optical microscope to design and assemble. GX Microscopes provide a wide range of objective designs, which feature excellent optical characteristics under a wide spectrum of illumination conditions and provide various degrees of correction for the primary optical aberrations. Our objectives are composed of various internal glass lens elements and have high quality and performance. The extent of correction for aberrations and flatness of field decides the cost of an objective.
L3000 reversed quintuple nosepiece
L1500 quadruple nosepiece
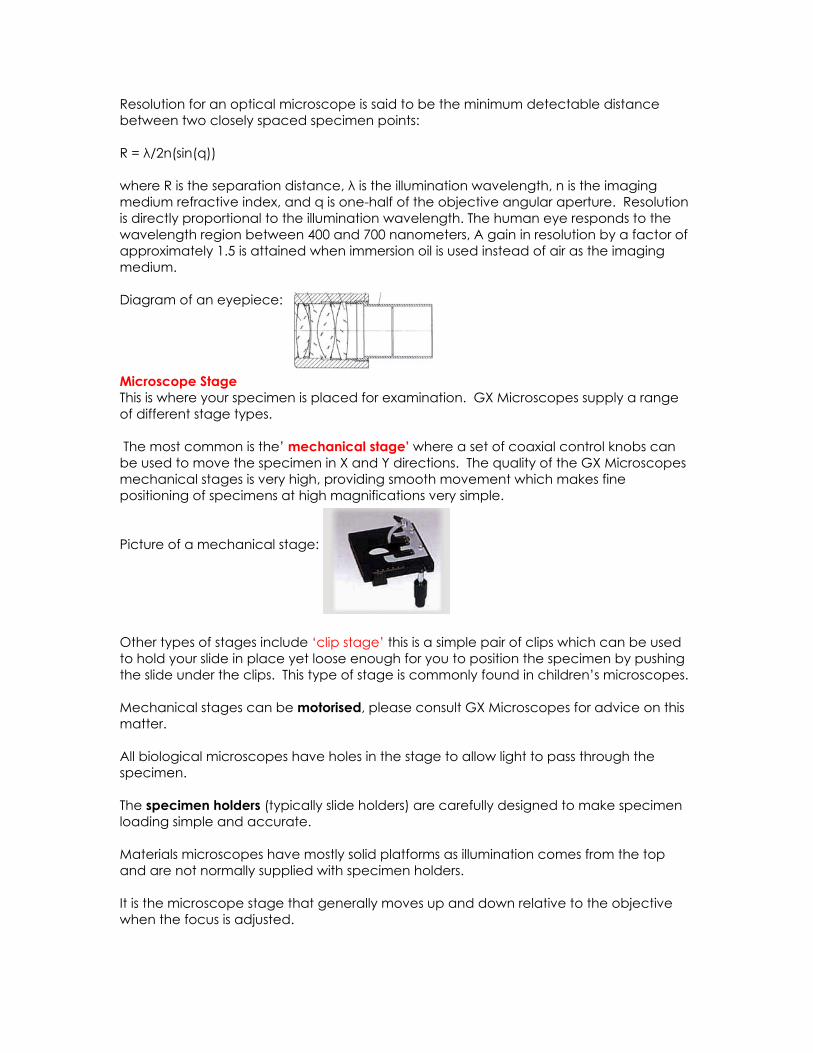
Resolution for an optical microscope is said to be the minimum detectable distance between two closely spaced specimen points: R = λ/2n(sin(q)) where R is the separation distance, λ is the illumination wavelength, n is the imaging medium refractive index, and q is one-half of the objective angular aperture. Resolution is directly proportional to the illumination wavelength. The human eye responds to the wavelength region between 400 and 700 nanometers, A gain in resolution by a factor of approximately 1.5 is attained when immersion oil is used instead of air as the imaging medium. Diagram of an eyepiece: Microscope Stage This is where your specimen is placed for examination. GX Microscopes supply a range of different stage types. The most common is the’ mechanical stage’ where a set of coaxial control knobs can be used to move the specimen in X and Y directions. The quality of the GX Microscopes mechanical stages is very high, providing smooth movement which makes fine positioning of specimens at high magnifications very simple. Picture of a mechanical stage: Other types of stages include ‘clip stage’ this is a simple pair of clips which can be used to hold your slide in place yet loose enough for you to position the specimen by pushing the slide under the clips. This type of stage is commonly found in children’s microscopes. Mechanical stages can be motorised, please consult GX Microscopes for advice on this matter. All biological microscopes have holes in the stage to allow light to pass through the specimen. The specimen holders (typically slide holders) are carefully designed to make specimen loading simple and accurate. Materials microscopes have mostly solid platforms as illumination comes from the top and are not normally supplied with specimen holders. It is the microscope stage that generally moves up and down relative to the objective when the focus is adjusted.

Focus There are three basic types of focusing mechanisms available with GX Microscopes. The simplest form is a single coarse focus knob which has a high gearing ratio moving the stage (or stereo microscope head) relatively rapidly. The next type provides two separate knobs, a coarse and a fine focus knob, this type of microscope is less common and generally found in schools ranges. Separate focusing knobs: The most common type found in compound microscopes is the coaxial focus knob which has two knobs built into one, with an outer coarse and inner fine focus knob. This type is the most convenient to use. Coaxial focusing knobs: Many GX Microscopes have a tension adjustment ring and a focus limit lever which prevents damage to your objectives.
Coarse
Fine
Coarse Fine
Focus Limit Lever
Tension Adjustment
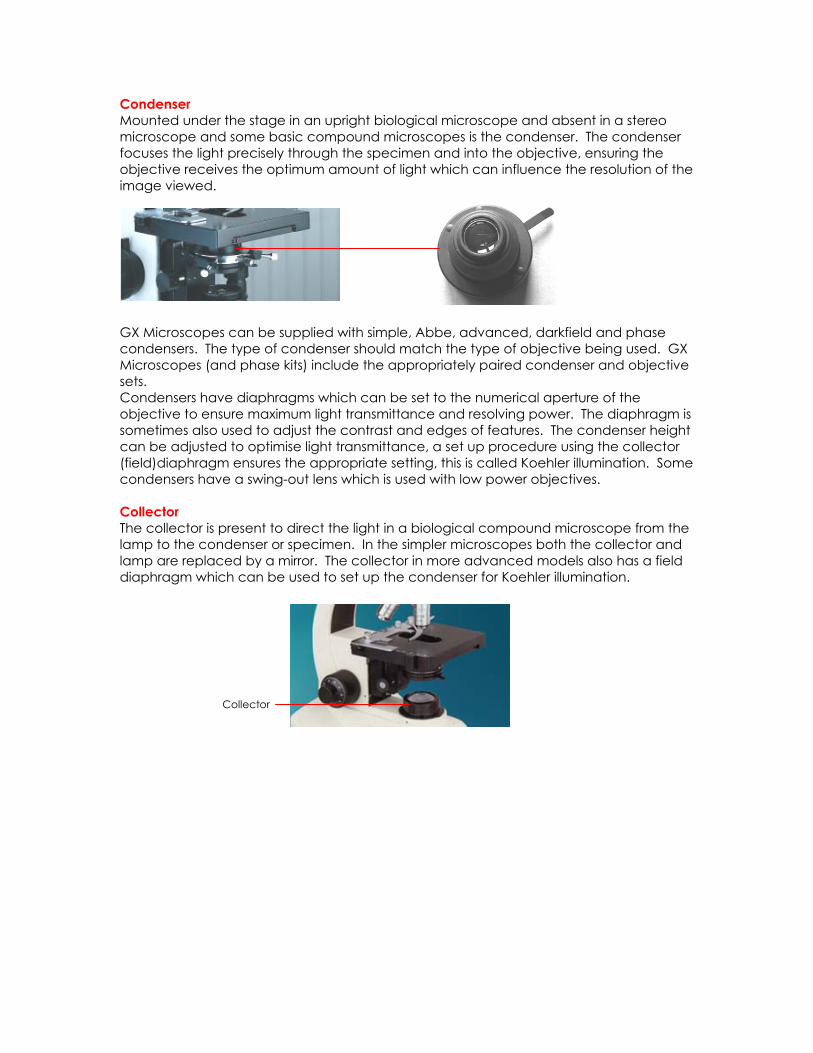
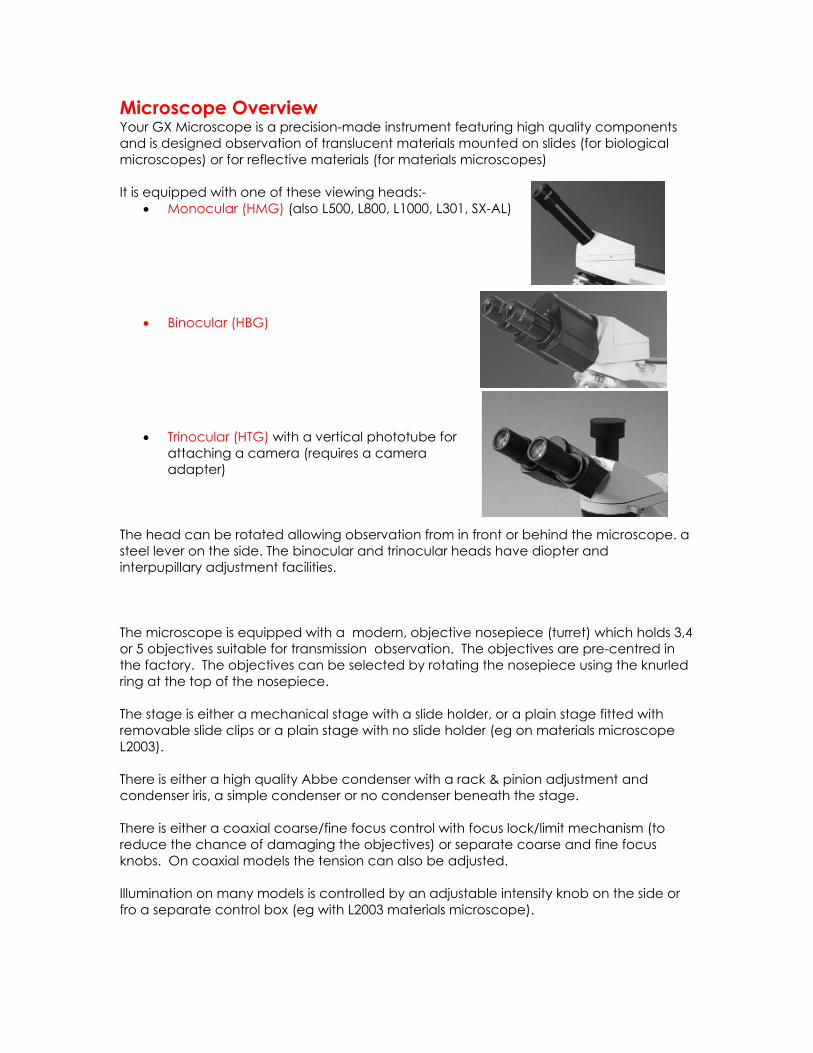
Condenser Mounted under the stage in an upright biological microscope and absent in a stereo microscope and some basic compound microscopes is the condenser. The condenser focuses the light precisely through the specimen and into the objective, ensuring the objective receives the optimum amount of light which can influence the resolution of the image viewed. GX Microscopes can be supplied with simple, Abbe, advanced, darkfield and phase condensers. The type of condenser should match the type of objective being used. GX Microscopes (and phase kits) include the appropriately paired condenser and objective sets. Condensers have diaphragms which can be set to the numerical aperture of the objective to ensure maximum light transmittance and resolving power. The diaphragm is sometimes also used to adjust the contrast and edges of features. The condenser height can be adjusted to optimise light transmittance, a set up procedure using the collector (field)diaphragm ensures the appropriate setting, this is called Koehler illumination. Some condensers have a swing-out lens which is used with low power objectives. Collector The collector is present to direct the light in a biological compound microscope from the lamp to the condenser or specimen. In the simpler microscopes both the collector and lamp are replaced by a mirror. The collector in more advanced models also has a field diaphragm which can be used to set up the condenser for Koehler illumination.
Collector
Microscope Overview Your GX Microscope is a precision-made instrument featuring high quality components and is designed observation of translucent materials mounted on slides (for biological microscopes) or for reflective materials (for materials microscopes) It is equipped with one of these viewing heads:-
• Monocular (HMG) (also L500, L800, L1000, L301, SX-AL)
• Binocular (HBG)
• Trinocular (HTG) with a vertical phototube for attaching a camera (requires a camera adapter)
The head can be rotated allowing observation from in front or behind the microscope. a steel lever on the side. The binocular and trinocular heads have diopter and interpupillary adjustment facilities. The microscope is equipped with a modern, objective nosepiece (turret) which holds 3,4 or 5 objectives suitable for transmission observation. The objectives are pre-centred in the factory. The objectives can be selected by rotating the nosepiece using the knurled ring at the top of the nosepiece. The stage is either a mechanical stage with a slide holder, or a plain stage fitted with removable slide clips or a plain stage with no slide holder (eg on materials microscope L2003). There is either a high quality Abbe condenser with a rack & pinion adjustment and condenser iris, a simple condenser or no condenser beneath the stage. There is either a coaxial coarse/fine focus control with focus lock/limit mechanism (to reduce the chance of damaging the objectives) or separate coarse and fine focus knobs. On coaxial models the tension can also be adjusted. Illumination on many models is controlled by an adjustable intensity knob on the side or fro a separate control box (eg with L2003 materials microscope).
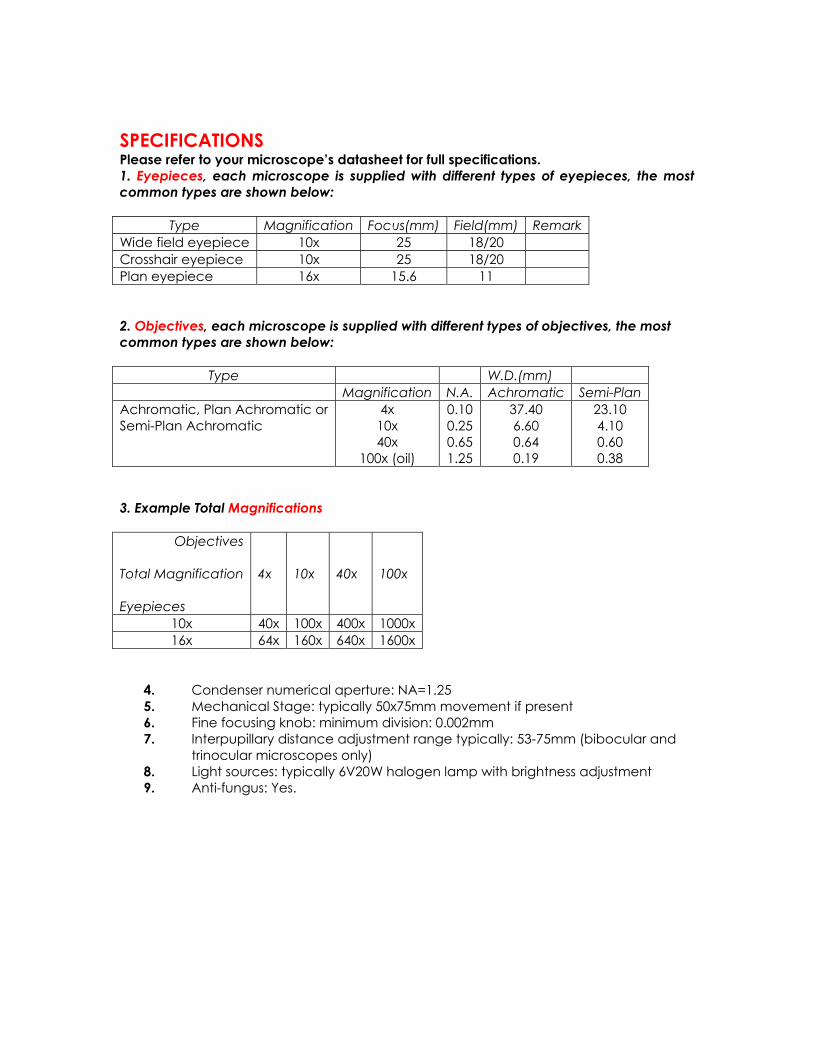
SPECIFICATIONS Please refer to your microscope’s datasheet for full specifications. 1. Eyepieces, each microscope is supplied with different types of eyepieces, the most common types are shown below:
Type Magnification Focus(mm) Field(mm) Remark Wide field eyepiece 10x 25 18/20 Crosshair eyepiece 10x 25 18/20 Plan eyepiece 16x 15.6 11 2. Objectives, each microscope is supplied with different types of objectives, the most common types are shown below:
Type W.D.(mm) Magnification N.A. Achromatic Semi-Plan Achromatic, Plan Achromatic or Semi-Plan Achromatic
4x 10x 40x
100x (oil)
0.10 0.25 0.65 1.25
37.40 6.60 0.64 0.19
23.10 4.10 0.60 0.38
3. Example Total Magnifications
Objectives
Total Magnification Eyepieces
4x
10x
40x
100x
10x 40x 100x 400x 1000x 16x 64x 160x 640x 1600x
4. Condenser numerical aperture: NA=1.25 5. Mechanical Stage: typically 50x75mm movement if present 6. Fine focusing knob: minimum division: 0.002mm 7. Interpupillary distance adjustment range typically: 53-75mm (bibocular and
trinocular microscopes only) 8. Light sources: typically 6V20W halogen lamp with brightness adjustment 9. Anti-fungus: Yes.
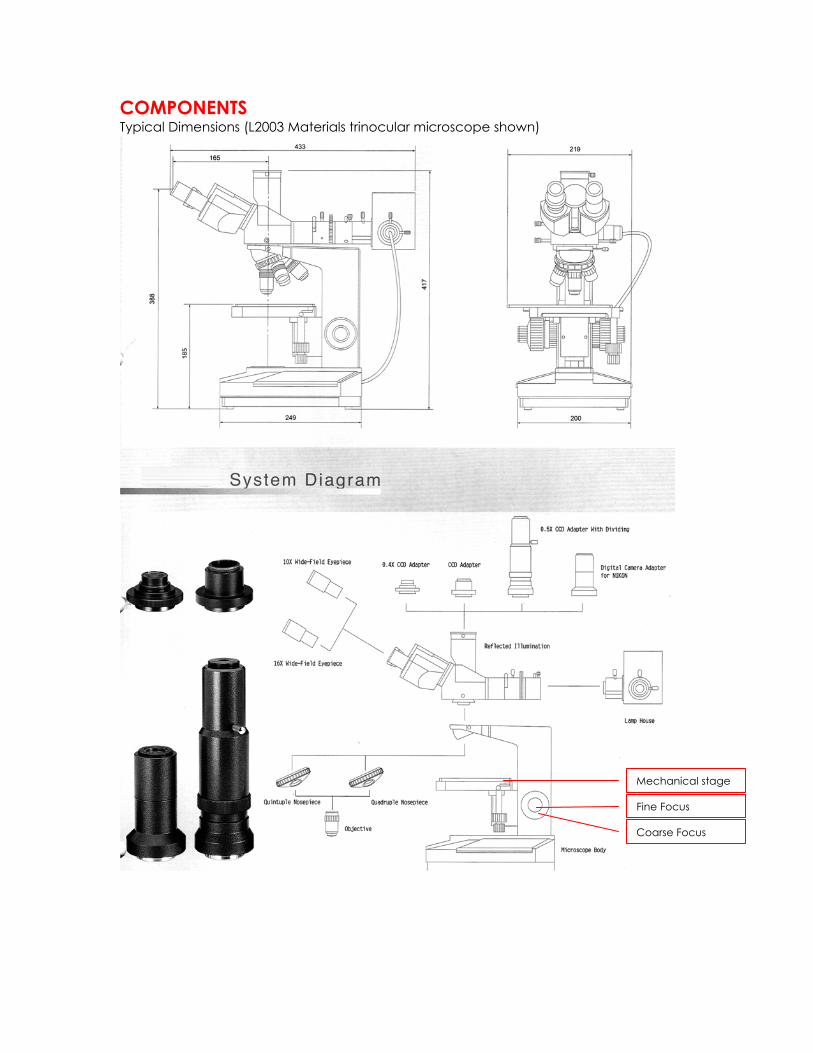
COMPONENTS Typical Dimensions (L2003 Materials trinocular microscope shown)
Mechanical stage
Fine Focus
Coarse Focus
Unpacking & Installation
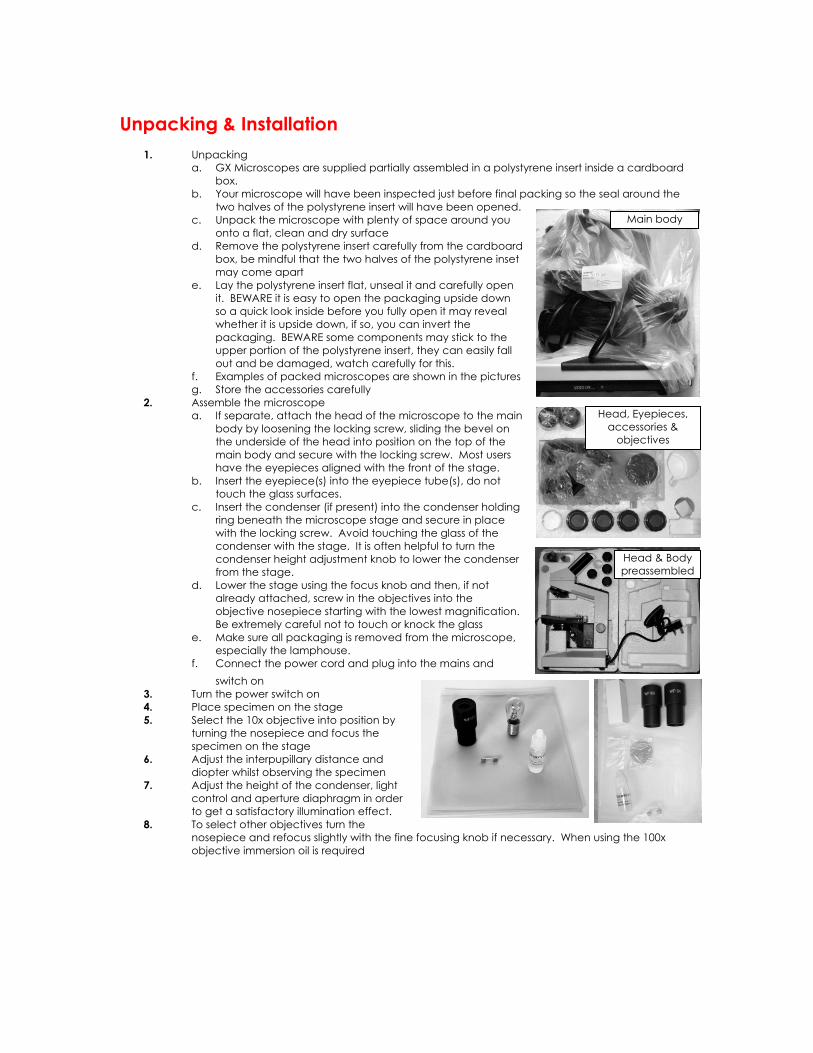
1. Unpacking a. GX Microscopes are supplied partially assembled in a polystyrene insert inside a cardboard
box. b. Your microscope will have been inspected just before final packing so the seal around the
two halves of the polystyrene insert will have been opened. c. Unpack the microscope with plenty of space around you
onto a flat, clean and dry surface d. Remove the polystyrene insert carefully from the cardboard
box, be mindful that the two halves of the polystyrene inset may come apart
e. Lay the polystyrene insert flat, unseal it and carefully open it. BEWARE it is easy to open the packaging upside down so a quick look inside before you fully open it may reveal whether it is upside down, if so, you can invert the packaging. BEWARE some components may stick to the upper portion of the polystyrene insert, they can easily fall out and be damaged, watch carefully for this.
f. Examples of packed microscopes are shown in the pictures g. Store the accessories carefully
2. Assemble the microscope a. If separate, attach the head of the microscope to the main
body by loosening the locking screw, sliding the bevel on the underside of the head into position on the top of the main body and secure with the locking screw. Most users have the eyepieces aligned with the front of the stage.
b. Insert the eyepiece(s) into the eyepiece tube(s), do not touch the glass surfaces.
c. Insert the condenser (if present) into the condenser holding ring beneath the microscope stage and secure in place with the locking screw. Avoid touching the glass of the condenser with the stage. It is often helpful to turn the condenser height adjustment knob to lower the condenser from the stage.
d. Lower the stage using the focus knob and then, if not already attached, screw in the objectives into the objective nosepiece starting with the lowest magnification. Be extremely careful not to touch or knock the glass
e. Make sure all packaging is removed from the microscope, especially the lamphouse.
f. Connect the power cord and plug into the mains and switch on
3. Turn the power switch on 4. Place specimen on the stage 5. Select the 10x objective into position by
turning the nosepiece and focus the specimen on the stage
6. Adjust the interpupillary distance and diopter whilst observing the specimen
7. Adjust the height of the condenser, light control and aperture diaphragm in order to get a satisfactory illumination effect.
8. To select other objectives turn the nosepiece and refocus slightly with the fine focusing knob if necessary. When using the 100x objective immersion oil is required
Main body
Head, Eyepieces, accessories &
objectives
Head & Body preassembled
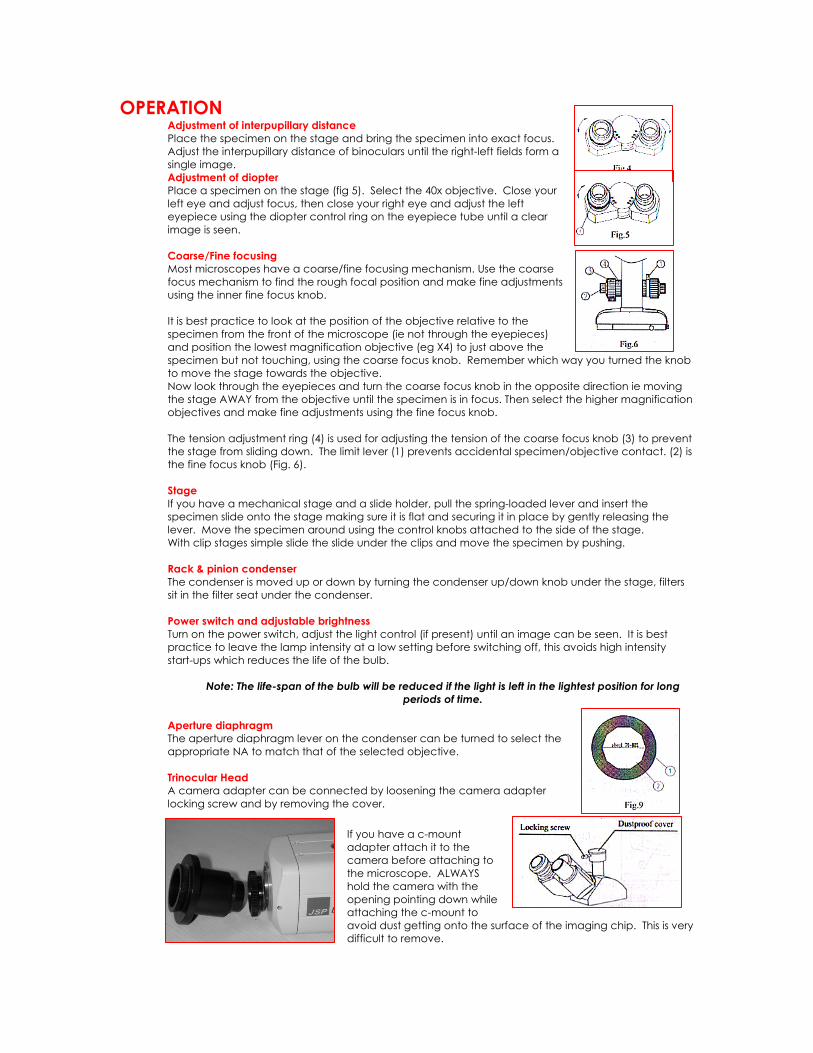
OPERATION Adjustment of interpupillary distance Place the specimen on the stage and bring the specimen into exact focus. Adjust the interpupillary distance of binoculars until the right-left fields form a single image. Adjustment of diopter Place a specimen on the stage (fig 5). Select the 40x objective. Close your left eye and adjust focus, then close your right eye and adjust the left eyepiece using the diopter control ring on the eyepiece tube until a clear image is seen.
Coarse/Fine focusing Most microscopes have a coarse/fine focusing mechanism. Use the coarse focus mechanism to find the rough focal position and make fine adjustments using the inner fine focus knob. It is best practice to look at the position of the objective relative to the specimen from the front of the microscope (ie not through the eyepieces) and position the lowest magnification objective (eg X4) to just above the specimen but not touching, using the coarse focus knob. Remember which way you turned the knob to move the stage towards the objective. Now look through the eyepieces and turn the coarse focus knob in the opposite direction ie moving the stage AWAY from the objective until the specimen is in focus. Then select the higher magnification objectives and make fine adjustments using the fine focus knob. The tension adjustment ring (4) is used for adjusting the tension of the coarse focus knob (3) to prevent the stage from sliding down. The limit lever (1) prevents accidental specimen/objective contact. (2) is the fine focus knob (Fig. 6).
Stage If you have a mechanical stage and a slide holder, pull the spring-loaded lever and insert the specimen slide onto the stage making sure it is flat and securing it in place by gently releasing the lever. Move the specimen around using the control knobs attached to the side of the stage. With clip stages simple slide the slide under the clips and move the specimen by pushing. Rack & pinion condenser The condenser is moved up or down by turning the condenser up/down knob under the stage, filters sit in the filter seat under the condenser.
Power switch and adjustable brightness Turn on the power switch, adjust the light control (if present) until an image can be seen. It is best practice to leave the lamp intensity at a low setting before switching off, this avoids high intensity start-ups which reduces the life of the bulb.
Note: The life-span of the bulb will be reduced if the light is left in the lightest position for long
periods of time.
Aperture diaphragm The aperture diaphragm lever on the condenser can be turned to select the appropriate NA to match that of the selected objective.
Trinocular Head A camera adapter can be connected by loosening the camera adapter locking screw and by removing the cover.
If you have a c-mount adapter attach it to the camera before attaching to the microscope. ALWAYS hold the camera with the opening pointing down while attaching the c-mount to avoid dust getting onto the surface of the imaging chip. This is very difficult to remove.
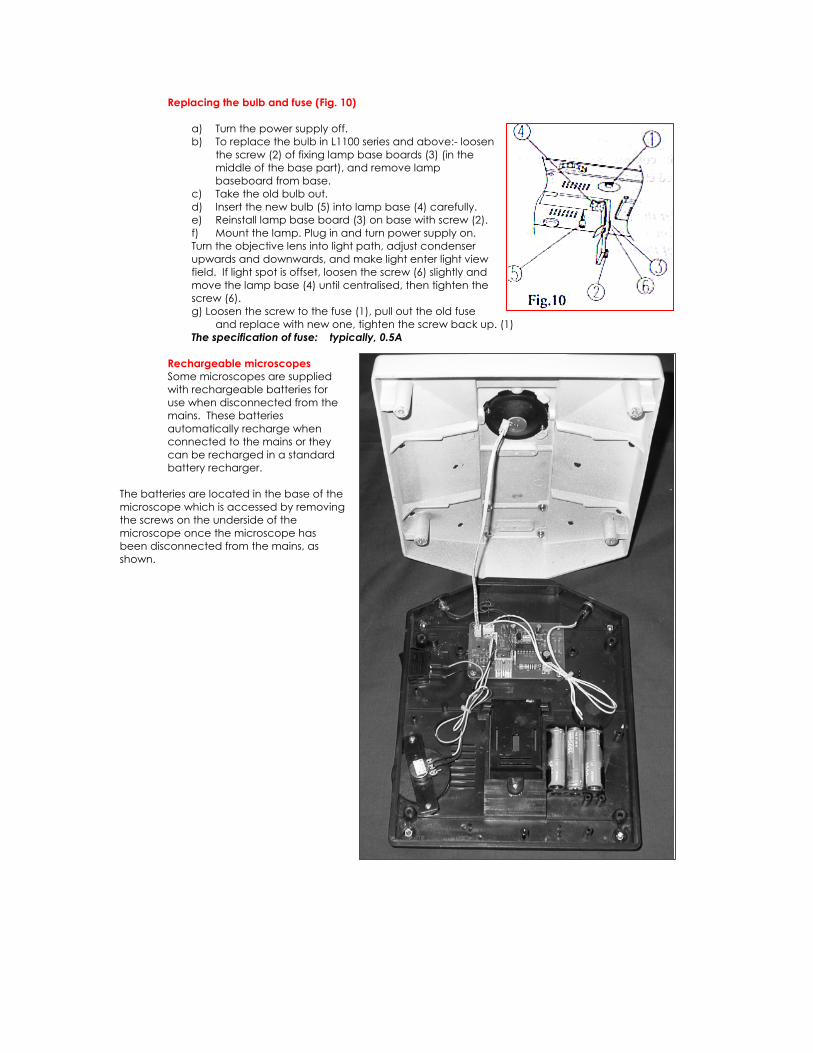
Replacing the bulb and fuse (Fig. 10)
a) Turn the power supply off. b) To replace the bulb in L1100 series and above:- loosen
the screw (2) of fixing lamp base boards (3) (in the middle of the base part), and remove lamp baseboard from base.
c) Take the old bulb out. d) Insert the new bulb (5) into lamp base (4) carefully. e) Reinstall lamp base board (3) on base with screw (2). f) Mount the lamp. Plug in and turn power supply on. Turn the objective lens into light path, adjust condenser upwards and downwards, and make light enter light view field. If light spot is offset, loosen the screw (6) slightly and move the lamp base (4) until centralised, then tighten the screw (6). g) Loosen the screw to the fuse (1), pull out the old fuse
and replace with new one, tighten the screw back up. (1) The specification of fuse: typically, 0.5A
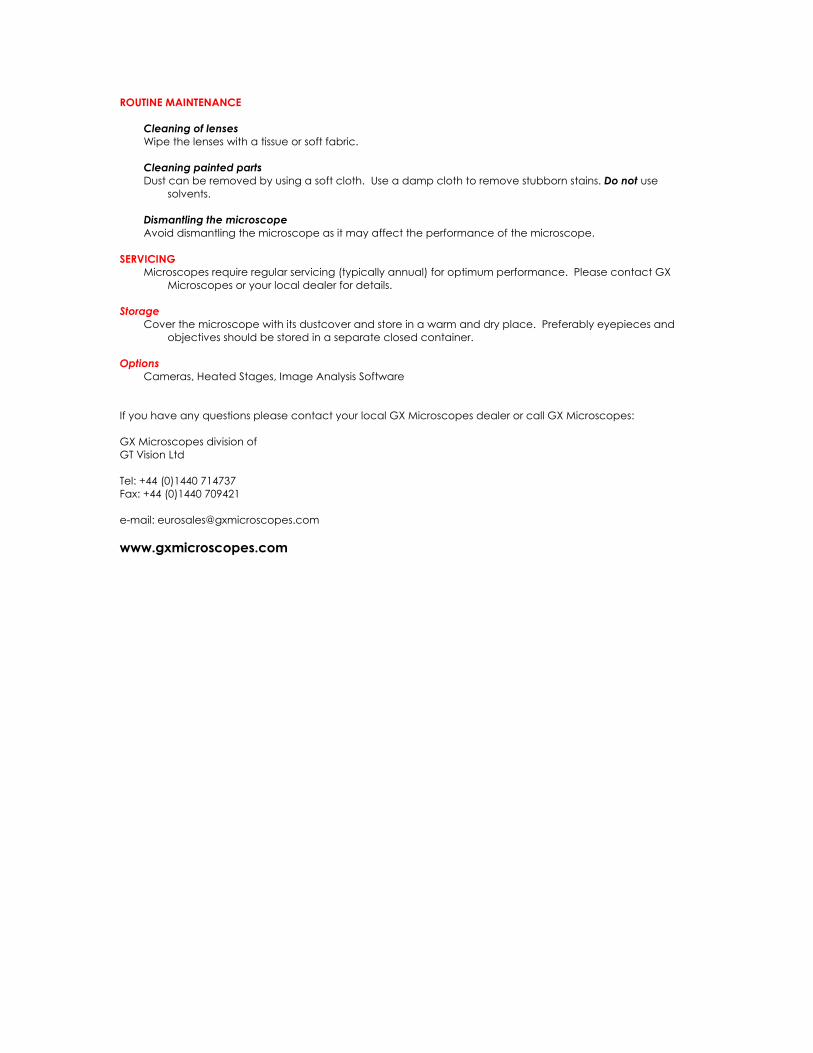
Rechargeable microscopes Some microscopes are supplied with rechargeable batteries for use when disconnected from the mains. These batteries automatically recharge when connected to the mains or they can be recharged in a standard battery recharger.
The batteries are located in the base of the microscope which is accessed by removing the screws on the underside of the microscope once the microscope has been disconnected from the mains, as shown.
ROUTINE MAINTENANCE
Cleaning of lenses Wipe the lenses with a tissue or soft fabric. Cleaning painted parts Dust can be removed by using a soft cloth. Use a damp cloth to remove stubborn stains. Do not use
solvents. Dismantling the microscope Avoid dismantling the microscope as it may affect the performance of the microscope.
SERVICING Microscopes require regular servicing (typically annual) for optimum performance. Please contact GX
Microscopes or your local dealer for details.
Storage Cover the microscope with its dustcover and store in a warm and dry place. Preferably eyepieces and
objectives should be stored in a separate closed container.
Options Cameras, Heated Stages, Image Analysis Software
If you have any questions please contact your local GX Microscopes dealer or call GX Microscopes: GX Microscopes division of GT Vision Ltd Tel: +44 (0)1440 714737 Fax: +44 (0)1440 709421 e-mail: [email protected] www.gxmicroscopes.com