haematology job aids
TRANSCRIPT
7/28/2019 Haematology Job Aids
http://slidepdf.com/reader/full/haematology-job-aids 1/24
These materials were supported by CoAg PS001285 from the CDC.
Haematology Job Aids
Standard Operating Policy and Procedures
PROCEDURE: Manual WBC Cell Count
1. PURPOSE: Manual cell counts are performed when a parameter is below the automatedinstrument’s linearity to verify a doubtful result flagged by the instrument or when smear findings don’t agree with the automated result. Manual cell counts may be used as a
primary reference method for WBC.2. SPECIMEN REQUIREMENTS: EDTA whole blood3. REAGENTS: Turk’s Fluid (lyses RBCs and stains nucleus of WBCs)4. EQUIPMENT: Manual WBC counts are performed with the use of a haemocytometer and
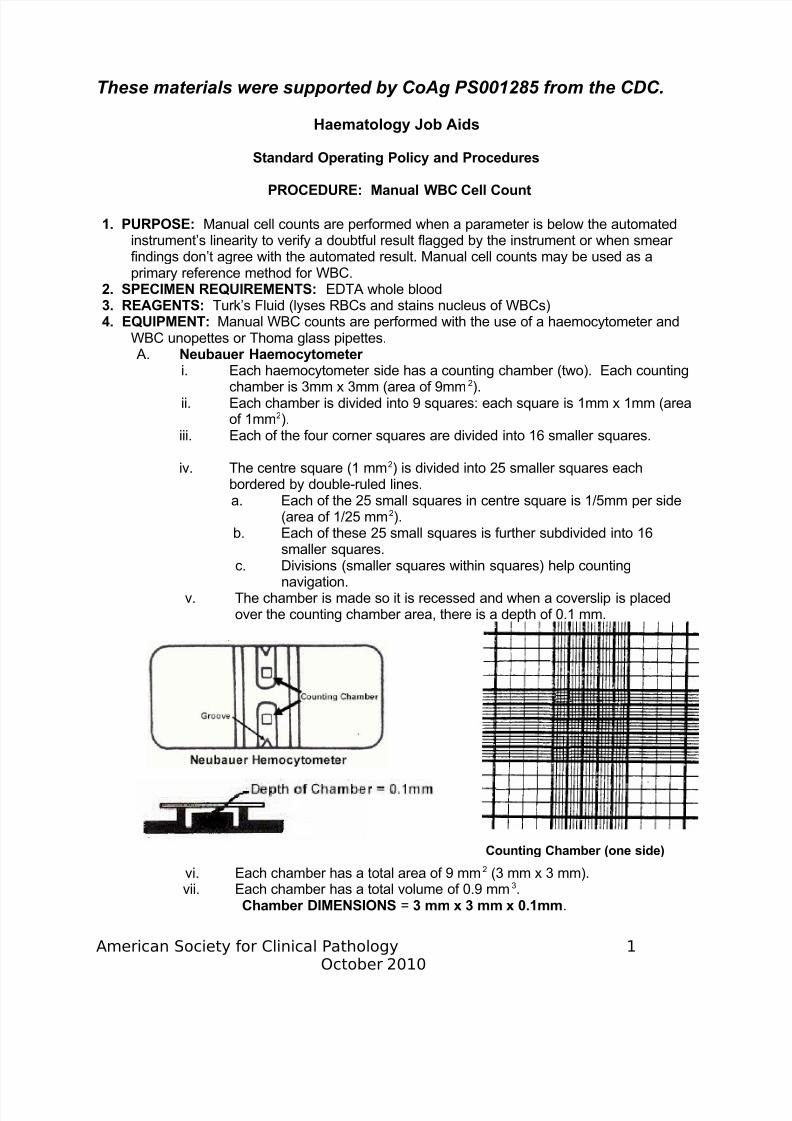
WBC unopettes or Thoma glass pipettes. A. Neubauer Haemocytometer
i. Each haemocytometer side has a counting chamber (two). Each countingchamber is 3mm x 3mm (area of 9mm2).
ii. Each chamber is divided into 9 squares: each square is 1mm x 1mm (area
of 1mm2).iii. Each of the four corner squares are divided into 16 smaller squares.
iv. The centre square (1 mm2) is divided into 25 smaller squares eachbordered by double-ruled lines.a. Each of the 25 small squares in centre square is 1/5mm per side
(area of 1/25 mm2).b. Each of these 25 small squares is further subdivided into 16
smaller squares.c. Divisions (smaller squares within squares) help counting
navigation.v. The chamber is made so it is recessed and when a coverslip is placed
7/28/2019 Haematology Job Aids
http://slidepdf.com/reader/full/haematology-job-aids 2/24
th ti h b th i d th f 0 1
viii. When cells are numerous, the cell dilution is big and the area counted issmall (i.e. RBC's); fewer cells require a lesser dilution and a greater number of squares are counted (i.e. WBCs).
5. SUPPLIES: Glass capillary tubes6. SPECIAL SAFETY PRECAUTIONS: N/A7. EQUIPMENT CALIBRATION AND MAINTENANCE: Microscope must be maintained to
assure clean objectives and a clear image. Neubauer chambers need to be free of scratches with intact standardised coverslips.
8. QUALITY CONTROL/ASSURANCE: Cell counts are performed in duplicate using twopipettes and counting both sides of the haemocytometer. Additional squares should becounted if the cell count is low.
9. PROCEDURE:
i. MIX EDTA blood sample well before obtaining aliquot of blood. Tilt to mix.iii. Fill 2 WBC Thoma pipettes to the 0.5 mark with blood by capillary action.
There must be NO BUBBLES IN PIPETTES and excess blood must be wipedfrom outside of pipette.
iv. Pipette WBC diluent to the top mark on the pipettes. Place pipettes on pipetteshaker for at least 2 minutes.
v. CLEAN chambers with alcohol and dry well; place coverslip onhaemocytometer.
vi. Invert pipette several times to mix blood with diluent before plating onhaemocytometer chamber. Clean haemocytometer and put on coverslip.vii. Discard a few drops from the pipette and plate one dilution on each side of
haemocytometer. Fill chamber smoothly and don’t overfill; there should be nobubbles.
viii. Allow cells to settle for 3 minutes in a petri dish with a damp cotton ball beforecounting.
v. Use 10x (low power) objective and LOW light.ix. Focus on chamber groove when focusing, then move in to counting area;
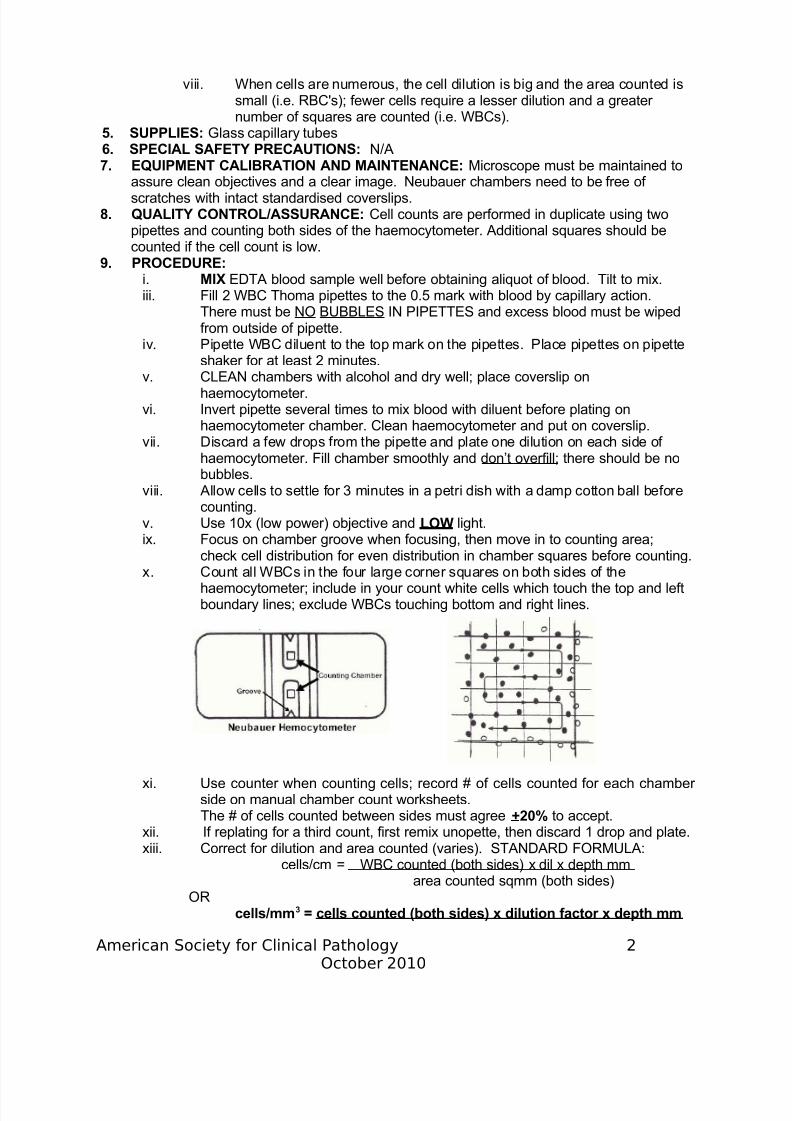
check cell distribution for even distribution in chamber squares before counting.x. Count all WBCs in the four large corner squares on both sides of the
haemocytometer; include in your count white cells which touch the top and leftboundary lines; exclude WBCs touching bottom and right lines.
7/28/2019 Haematology Job Aids
http://slidepdf.com/reader/full/haematology-job-aids 3/24
area counted sqmm (both sides)
Report WBC counts to nearest hundred or nearest tenth, depending on units.
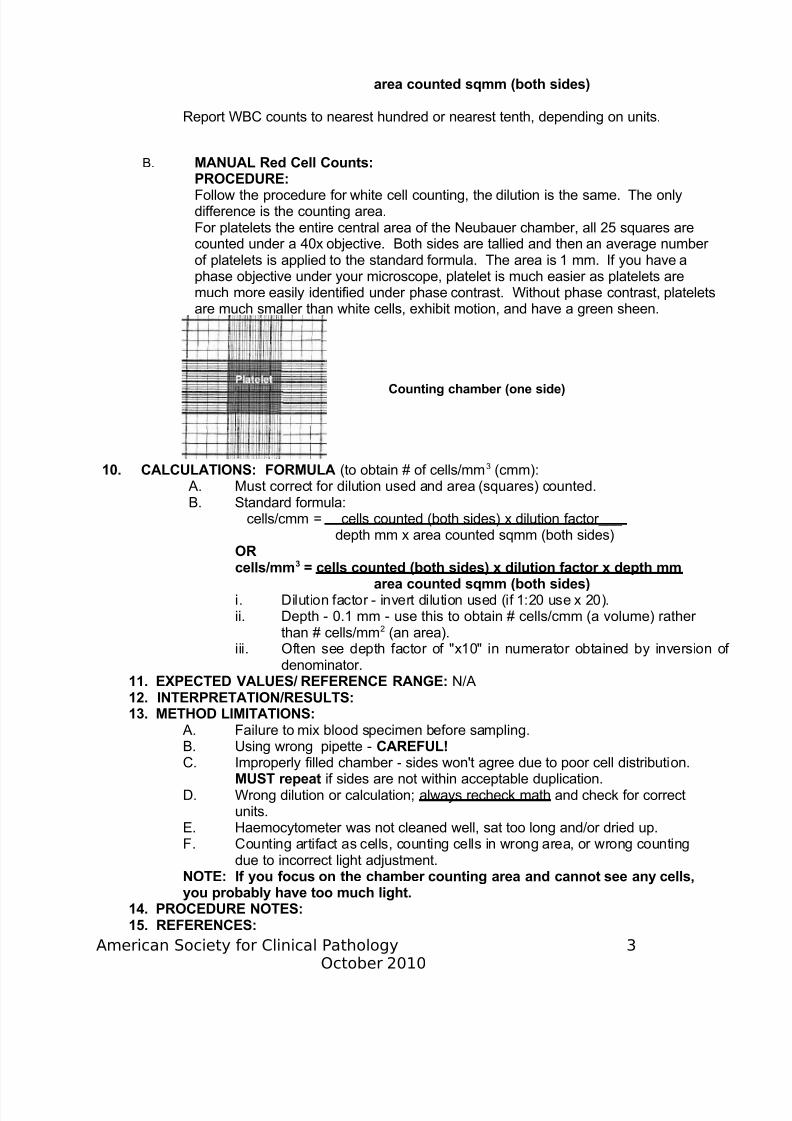
B. MANUAL Red Cell Counts:PROCEDURE:Follow the procedure for white cell counting, the dilution is the same. The onlydifference is the counting area.For platelets the entire central area of the Neubauer chamber, all 25 squares arecounted under a 40x objective. Both sides are tallied and then an average number of platelets is applied to the standard formula. The area is 1 mm. If you have a
phase objective under your microscope, platelet is much easier as platelets aremuch more easily identified under phase contrast. Without phase contrast, plateletsare much smaller than white cells, exhibit motion, and have a green sheen.
10. CALCULATIONS: FORMULA (to obtain # of cells/mm3 (cmm): A. Must correct for dilution used and area (squares) counted.B. Standard formula:
cells/cmm = cells counted (both sides) x dilution factor___ depth mm x area counted sqmm (both sides)
ORcells/mm3 = cells counted (both sides) x dilution factor x depth mm
area counted sqmm (both sides)i. Dilution factor - invert dilution used (if 1:20 use x 20).
Counting chamber (one side)
7/28/2019 Haematology Job Aids
http://slidepdf.com/reader/full/haematology-job-aids 4/24
16. RELATED DOCUMENTS: N/A17. AUTHOR:18. APPROVAL SIGNATURES: Laboratory Director
Standard Operating Policy and Procedures
PROCEDURE: HEMOCUEPHOTOMETERFORHAEMOGLOBINMEASUREMENT
1. PURPOSE: The haemoglobin concentration in a fresh capillary or anticoagulated bloodsample (EDTA preferred) is determined photometrically using a dry reagent system. The
red cells are lysed and haemoglobin is converted to azidemethaemoglobin by sodiumnitrite and sodium azide. This method of HGB measurement is a widely used point-of-care test.
2. SPECIMEN REQUIREMENTS: Capillary Blood or EDTA Whole Blood3. REAGENTS: Insert4. EQUIPMENT: HemoCue photometer 5. SUPPLIES: HemoCue cuvette, puncture device, alcohol, cotton.6. SPECIAL SAFETY PRECAUTIONS: N/A
7. EQUIPMENT CALIBRATION AND MAINTENANCE: Perform an instrument
calibration check prior to use. The red control cuvette should read within + 0.3 gm/dl of the assigned value for the specific instrument to assure proper function. Document thecalibration check result on the proper instrument sheet.
8. QUALITY CONTROL: A haemoglobin normal control sample must be run once per day.The control must read within the assayed range to run the HemoCue for patienthaemoglobins. Check that the HGB control value obtained reads on the QC chart anddocument the control result on the daily lab sheet. Repeat the control if not withinestablished control limits.
9. PROCEDURE: A. HemoCue Operation:i. Turn the HemoCue on using the switch in the back. The display screen
should read "Hb". Pull the black cuvette holder out to the insertion position.Aft b t 6 d th h ld d "READY"
7/28/2019 Haematology Job Aids
http://slidepdf.com/reader/full/haematology-job-aids 5/24
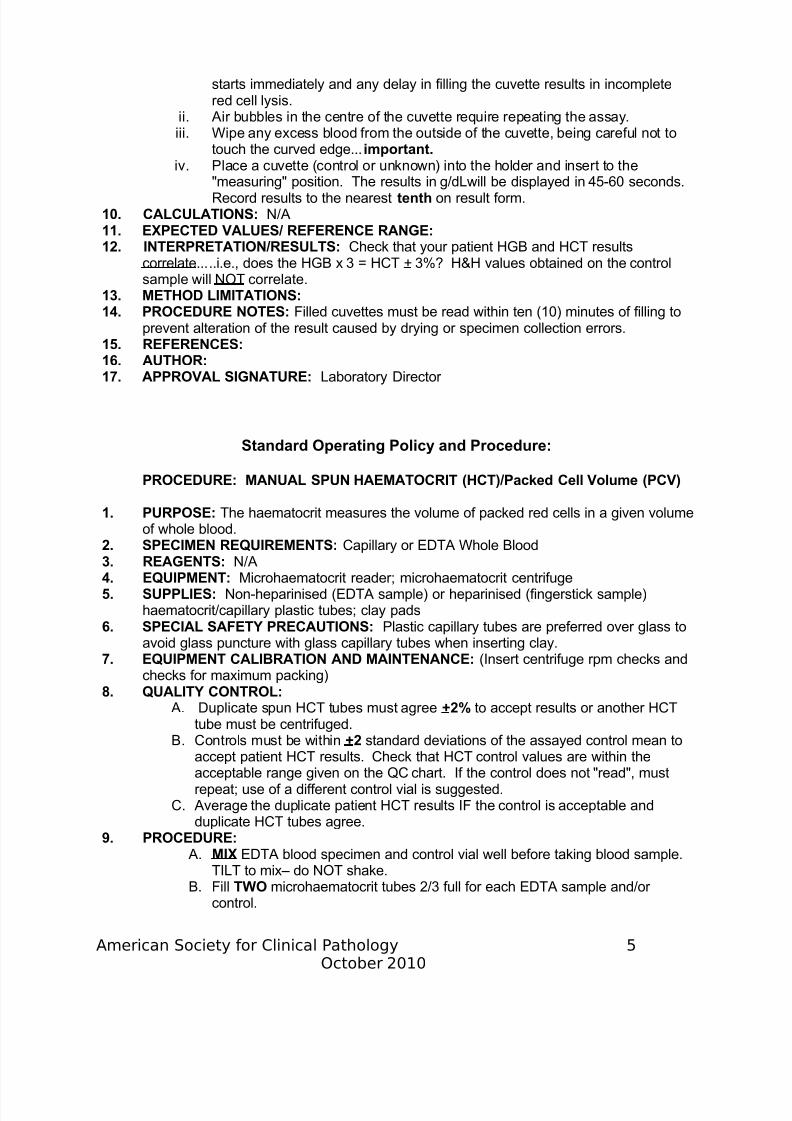
starts immediately and any delay in filling the cuvette results in incompletered cell lysis.
ii. Air bubbles in the centre of the cuvette require repeating the assay.
iii. Wipe any excess blood from the outside of the cuvette, being careful not totouch the curved edge...important.iv. Place a cuvette (control or unknown) into the holder and insert to the
"measuring" position. The results in g/dLwill be displayed in 45-60 seconds.Record results to the nearest tenth on result form.
10. CALCULATIONS: N/A11. EXPECTED VALUES/ REFERENCE RANGE:12. INTERPRETATION/RESULTS: Check that your patient HGB and HCT results
correlate.....i.e., does the HGB x 3 = HCT + 3%? H&H values obtained on the control
sample will NOT correlate.13. METHOD LIMITATIONS: 14. PROCEDURE NOTES: Filled cuvettes must be read within ten (10) minutes of filling to
prevent alteration of the result caused by drying or specimen collection errors.15. REFERENCES: 16. AUTHOR:17. APPROVAL SIGNATURE: Laboratory Director
Standard Operating Policy and Procedure:
PROCEDURE: MANUAL SPUN HAEMATOCRIT (HCT)/Packed Cell Volume (PCV)
1. PURPOSE: The haematocrit measures the volume of packed red cells in a given volumeof whole blood.
2. SPECIMEN REQUIREMENTS: Capillary or EDTA Whole Blood3. REAGENTS: N/A4. EQUIPMENT: Microhaematocrit reader; microhaematocrit centrifuge5. SUPPLIES: Non-heparinised (EDTA sample) or heparinised (fingerstick sample)
haematocrit/capillary plastic tubes; clay pads

7/28/2019 Haematology Job Aids
http://slidepdf.com/reader/full/haematology-job-aids 6/24
C. Insert clay into the dry end of each tube, put tubes in holes in sheet of paper,and label the sheet with patient name.
D. Balance tubes in centrifuge, PUT ON LID, and centrifuge 5 mins. Record
centrifuge # and groove #'s used on result sheet.E. After centrifugation, use HCT reader to set 0 and 100, then read and recordthe HCT% obtained for each tube on the result sheet. Be sure to read onlythe red cell layer and exclude the buffy coat layer. Report manual haematocritresults to the nearest 0.5%. Refer to the diagram below of layers present in aspun haematocrit tube.
10. CALCULATIONS: N/A11. EXPECTED VALUES/ REFERENCE RANGE:12. INTERPRETATION/RESULTS: Check that your patient HGB and HCT results correlate
HGB x 3 = HCT + 3%. H&H values obtained on the control will NOT correlate.13. METHOD LIMITATIONS: Sources of error include collection errors (i.e., clotted sample
or EDTA tube less than half full), inadequate mixing or centrifugation, poor duplication of results, or improper use of the HCT reader (i.e., including buffy coat in HCT reading).
14. PROCEDURE NOTES: Acceptable alternatives to clay include ________________
15. REFERENCES: 16. AUTHOR:17. APPROVAL SIGNATURES: Laboratory Director
7/28/2019 Haematology Job Aids
http://slidepdf.com/reader/full/haematology-job-aids 7/24
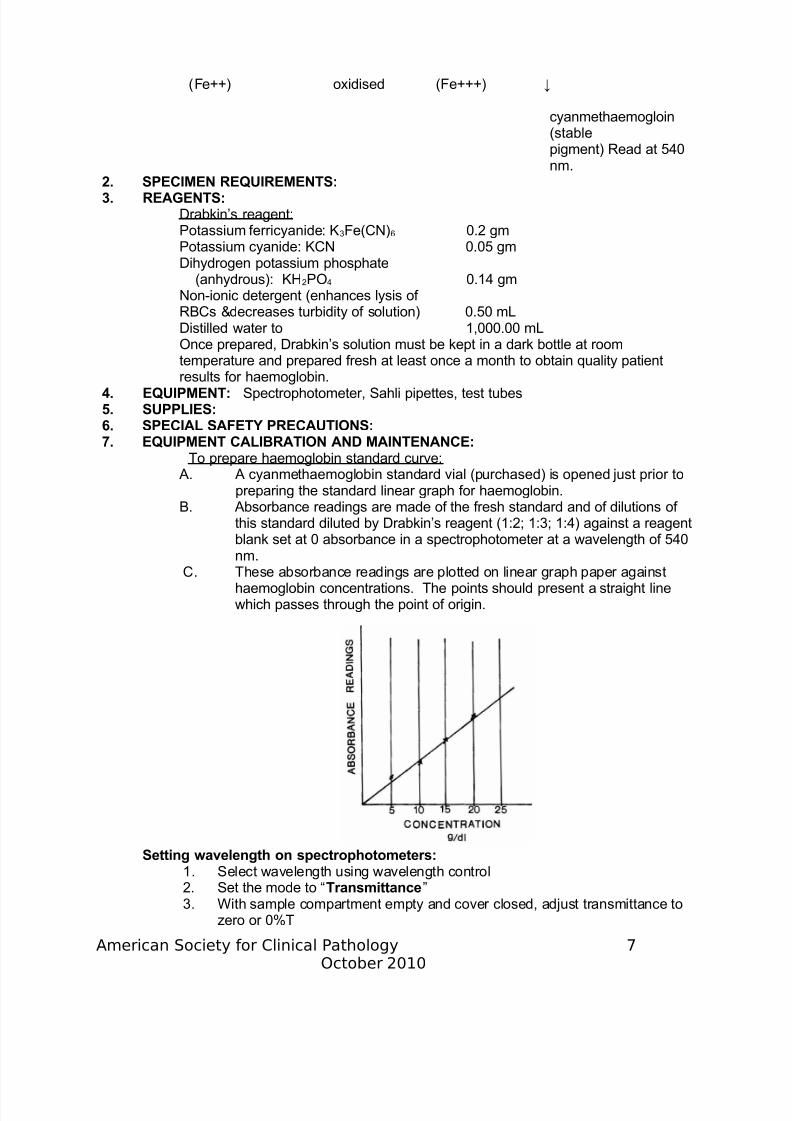
(Fe++) oxidised (Fe+++) ↓
cyanmethaemogloin
(stablepigment) Read at 540nm.
2. SPECIMEN REQUIREMENTS:3. REAGENTS:
Drabkin’s reagent:Potassium ferricyanide: K3Fe(CN)6 0.2 gmPotassium cyanide: KCN 0.05 gmDihydrogen potassium phosphate
(anhydrous): KH2PO4 0.14 gmNon-ionic detergent (enhances lysis of RBCs &decreases turbidity of solution) 0.50 mLDistilled water to 1,000.00 mLOnce prepared, Drabkin’s solution must be kept in a dark bottle at roomtemperature and prepared fresh at least once a month to obtain quality patientresults for haemoglobin.
4. EQUIPMENT: Spectrophotometer, Sahli pipettes, test tubes
5. SUPPLIES:6. SPECIAL SAFETY PRECAUTIONS:7. EQUIPMENT CALIBRATION AND MAINTENANCE:
To prepare haemoglobin standard curve: A. A cyanmethaemoglobin standard vial (purchased) is opened just prior to
preparing the standard linear graph for haemoglobin.B. Absorbance readings are made of the fresh standard and of dilutions of
this standard diluted by Drabkin’s reagent (1:2; 1:3; 1:4) against a reagentblank set at 0 absorbance in a spectrophotometer at a wavelength of 540
nm.C. These absorbance readings are plotted on linear graph paper against
haemoglobin concentrations. The points should present a straight linewhich passes through the point of origin.
7/28/2019 Haematology Job Aids
http://slidepdf.com/reader/full/haematology-job-aids 8/24
4. Select the “Absorbance” mode5. Insert a reference blank into the sample compartment and set 100%T or
0.0A
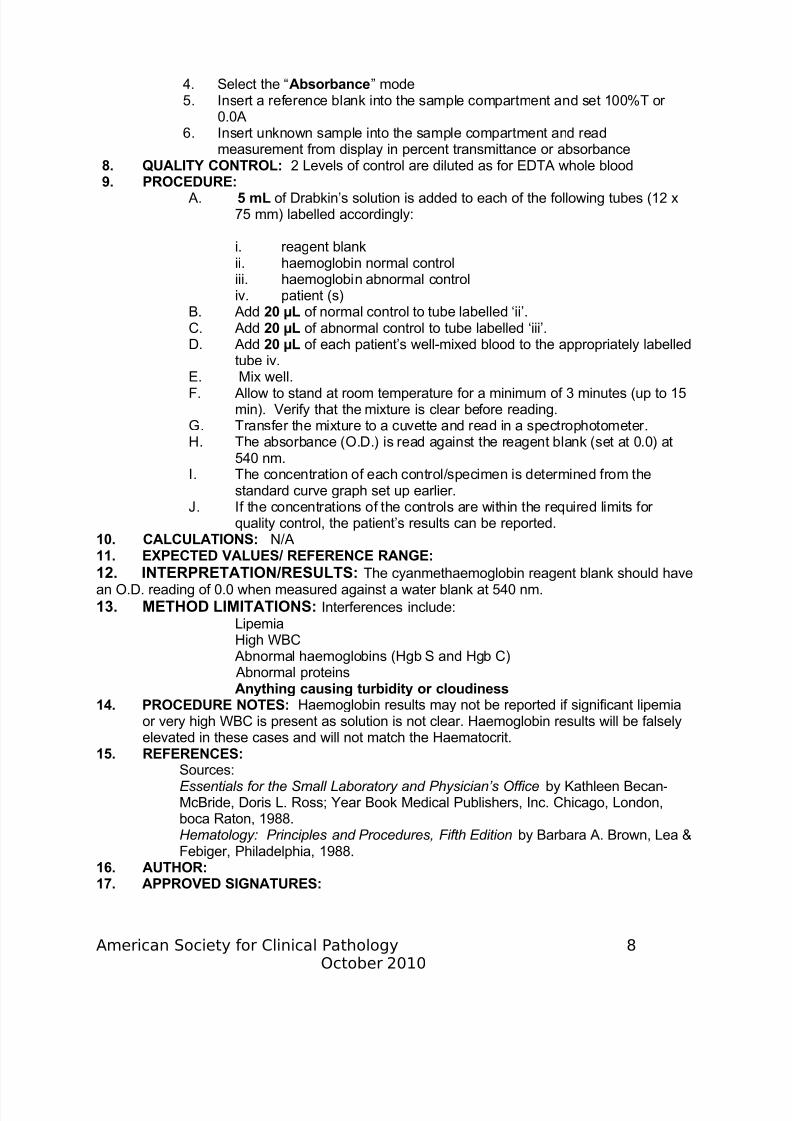
6. Insert unknown sample into the sample compartment and readmeasurement from display in percent transmittance or absorbance8. QUALITY CONTROL: 2 Levels of control are diluted as for EDTA whole blood9. PROCEDURE:
A. 5 mL of Drabkin’s solution is added to each of the following tubes (12 x75 mm) labelled accordingly:
i. reagent blankii. haemoglobin normal control
iii. haemoglobin abnormal controliv. patient (s)
B. Add 20 µL of normal control to tube labelled ‘ii’.C. Add 20 µL of abnormal control to tube labelled ‘iii’.D. Add 20 µL of each patient’s well-mixed blood to the appropriately labelled
tube iv.E. Mix well.F. Allow to stand at room temperature for a minimum of 3 minutes (up to 15
min). Verify that the mixture is clear before reading.G. Transfer the mixture to a cuvette and read in a spectrophotometer.H. The absorbance (O.D.) is read against the reagent blank (set at 0.0) at
540 nm.I. The concentration of each control/specimen is determined from the
standard curve graph set up earlier.J. If the concentrations of the controls are within the required limits for
quality control, the patient’s results can be reported.10. CALCULATIONS: N/A
11. EXPECTED VALUES/ REFERENCE RANGE:12. INTERPRETATION/RESULTS: The cyanmethaemoglobin reagent blank should havean O.D. reading of 0.0 when measured against a water blank at 540 nm.
13 METHOD LIMITATIONS: Interferences include:
7/28/2019 Haematology Job Aids
http://slidepdf.com/reader/full/haematology-job-aids 9/24
Standard Operating Policy and Procedures
PROCEDURE: PH METER, ORION - 420A PLUS
1. PURPOSE: A. The pH measurement system consists of a measuring electrode capable
of detecting hydrogen ions, as well as the reference electrode. The pHelectrode is a glass electrode, which develops a potential difference whenthe pH of the sample differs from the pH of the electrode fill solution.
B. The reference electrode is a silver/silver chloride electrode filled withsaturated KCl, separated from the sample by a cellulose membrane. Adiffusion potential across the cellulose reference membrane is createdbetween sample and saturated KCl in the reference electrode. Thispotential does not vary with the sample providing a constant potential for the electrochemical cell. The potential difference that develops betweenthe measuring electrodes and the reference electrode varies with the ionactivity in the sample.
C. This Triode pH electode also has a built in thermistor for ATC (AutomaticTemperature Correction) to 25ºC.
2. SPECIMEN: A. Specimen must be aqueous. If the specimen is mucoid or has sediment
in it, then centrifuge specimen before analysis.B. 2.0 ml is the minimum volume. The conical plastic tubes used for urine
analysis work well for minimal volume specimens.3. REAGENTS:
A. pH Electrode Storage Solution, 475 mL (Orion #910001)B. pH 4.0 Buffer Solution
C. pH 7.0 Buffer SolutionD. pH 10.0 Buffer SolutionE. pH Cleaning solution A (Orion # 900021)F. pH Cleaning Solution B (Orion #900022)

7/28/2019 Haematology Job Aids
http://slidepdf.com/reader/full/haematology-job-aids 10/24
G. When READY is displayed next to the reading, indicating electrodestability, the reading will flash. Press yes. The buffer value is stored andmeter display freezes for three seconds. The meter automatically switches
to buffer two, indicated by the “P2” on the display.H. Remove electrode from first buffer. Rinse with deionised water.I.Place electrode into second buffer.J. When “READY” is displayed beside the reading, indicating electrode
stability, the reading will flash. Press yes. The buffer value is stored andmeter display freezes for three seconds.
K. After the second buffer value has been entered, press measure. Theelectrode slope will be displayed. SLP appears in the lower field while theactual electrode slope, in percent appears in the main field. A slope
between 92% and 102% is acceptable.The meter automatically advances to the MEASURE mode. MEASURE isdisplayed above the main field.
8. QUALITY CONTROL: A. 2 levels of QC are analysed with each run.B. Refer to the quality control products list for storage and handling instructions
for the control materials. The worksheet will state which quality control torun.
C. Acceptable: The run is acceptable when both controls are within theestablished range.D. Unacceptable: The run is unacceptable when one or more controls are not
within the established range. Perform one or more of the following anddocument in Meditech under corrective action taken.i Repeat the Control.ii Repeat the fresh Control.iii Perform 2 Buffer Calibration.iv Clean electrode
v Contact Lead Tech or Supervisor.vi Contact Manufacturer.
9. PROCEDURE: A. After the above calibration procedure if performed; proceed with next step.
7/28/2019 Haematology Job Aids
http://slidepdf.com/reader/full/haematology-job-aids 11/24
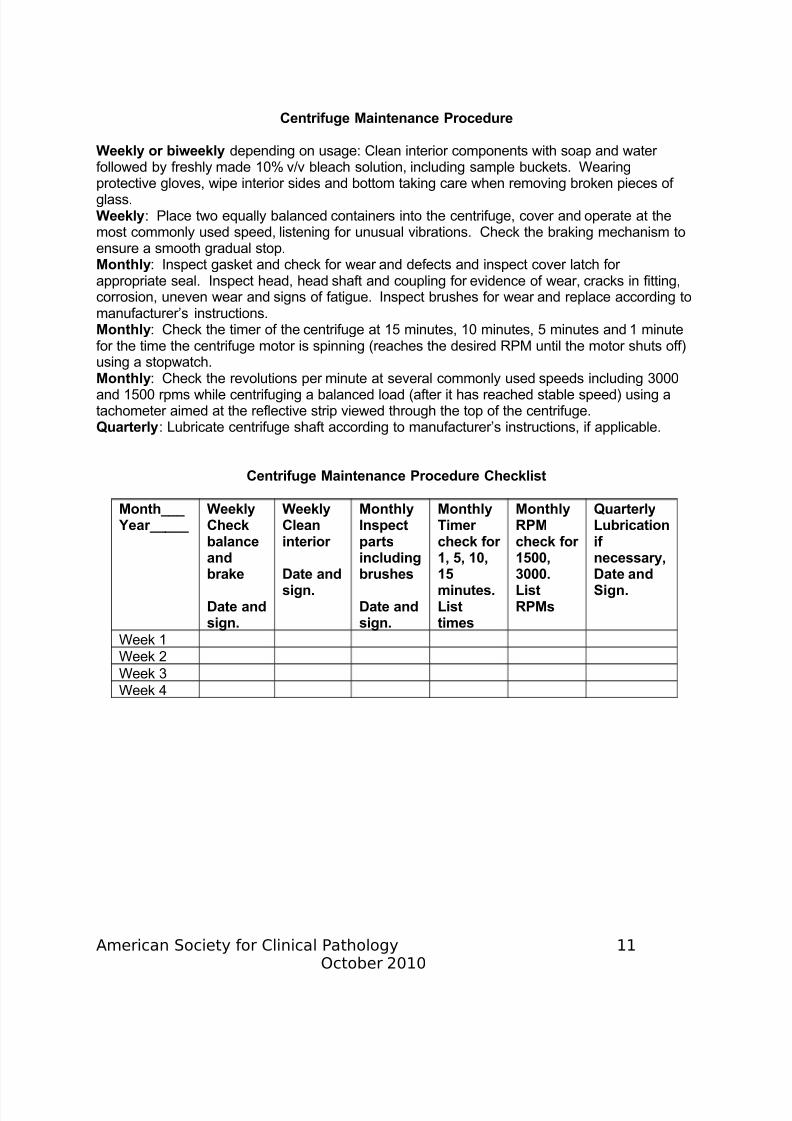
Centrifuge Maintenance Procedure
Weekly or biweekly depending on usage: Clean interior components with soap and water followed by freshly made 10% v/v bleach solution, including sample buckets. Wearingprotective gloves, wipe interior sides and bottom taking care when removing broken pieces of glass.Weekly: Place two equally balanced containers into the centrifuge, cover and operate at themost commonly used speed, listening for unusual vibrations. Check the braking mechanism toensure a smooth gradual stop.Monthly: Inspect gasket and check for wear and defects and inspect cover latch for
appropriate seal. Inspect head, head shaft and coupling for evidence of wear, cracks in fitting,corrosion, uneven wear and signs of fatigue. Inspect brushes for wear and replace according tomanufacturer’s instructions.Monthly: Check the timer of the centrifuge at 15 minutes, 10 minutes, 5 minutes and 1 minutefor the time the centrifuge motor is spinning (reaches the desired RPM until the motor shuts off)using a stopwatch.Monthly: Check the revolutions per minute at several commonly used speeds including 3000and 1500 rpms while centrifuging a balanced load (after it has reached stable speed) using a
tachometer aimed at the reflective strip viewed through the top of the centrifuge.Quarterly: Lubricate centrifuge shaft according to manufacturer’s instructions, if applicable.
Centrifuge Maintenance Procedure Checklist
Month___ Year_____
WeeklyCheckbalance
andbrake
Date and
WeeklyCleaninterior
Date andsign.
MonthlyInspectparts
includingbrushes
Date and
MonthlyTimer check for
1, 5, 10,15minutes.List
MonthlyRPMcheck for
1500,3000.ListRPMs
QuarterlyLubricationif
necessary,Date andSign.
7/28/2019 Haematology Job Aids
http://slidepdf.com/reader/full/haematology-job-aids 12/24
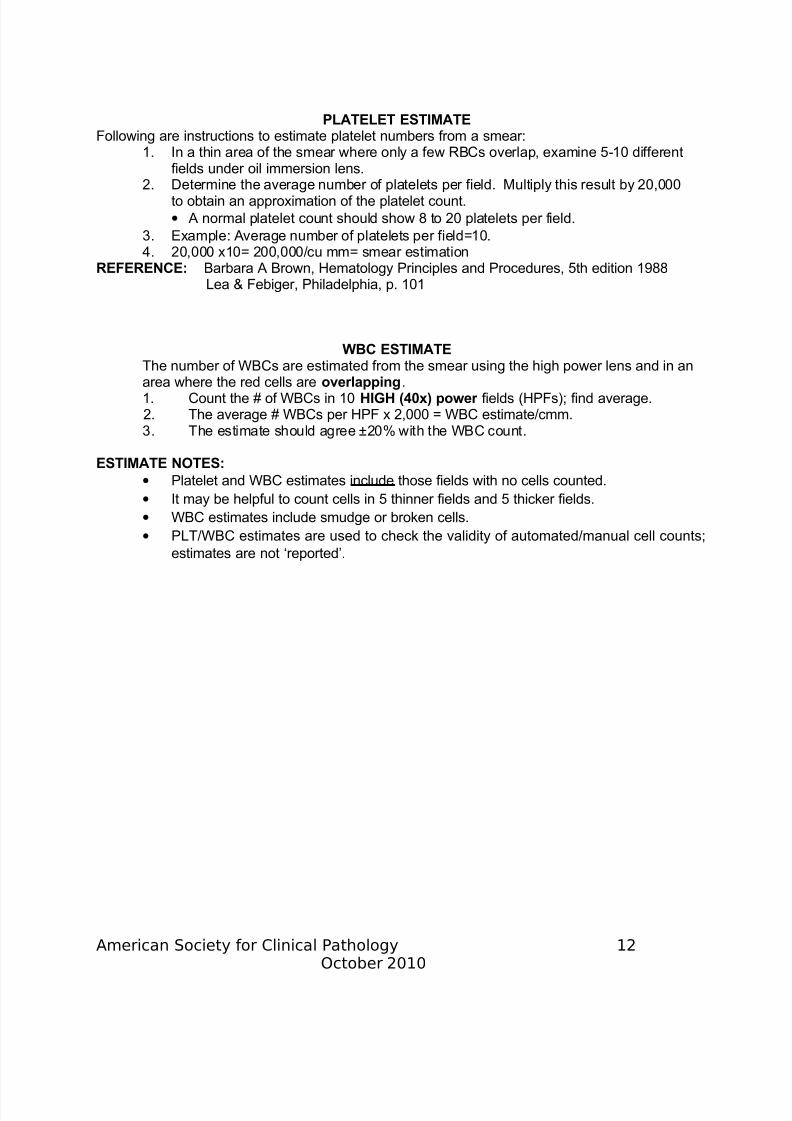
PLATELET ESTIMATE
Following are instructions to estimate platelet numbers from a smear:1. In a thin area of the smear where only a few RBCs overlap, examine 5-10 different
fields under oil immersion lens.2. Determine the average number of platelets per field. Multiply this result by 20,000
to obtain an approximation of the platelet count.
• A normal platelet count should show 8 to 20 platelets per field.
3. Example: Average number of platelets per field=10.4. 20,000 x10= 200,000/cu mm= smear estimation
REFERENCE: Barbara A Brown, Hematology Principles and Procedures, 5th edition 1988Lea & Febiger, Philadelphia, p. 101
WBC ESTIMATEThe number of WBCs are estimated from the smear using the high power lens and in anarea where the red cells are overlapping.1. Count the # of WBCs in 10 HIGH (40x) power fields (HPFs); find average.
2. The average # WBCs per HPF x 2,000 = WBC estimate/cmm.3. The estimate should agree ±20% with the WBC count.
ESTIMATE NOTES:
• Platelet and WBC estimates include those fields with no cells counted.
• It may be helpful to count cells in 5 thinner fields and 5 thicker fields.
• WBC estimates include smudge or broken cells.
• PLT/WBC estimates are used to check the validity of automated/manual cell counts;
estimates are not ‘reported’.
7/28/2019 Haematology Job Aids
http://slidepdf.com/reader/full/haematology-job-aids 13/24
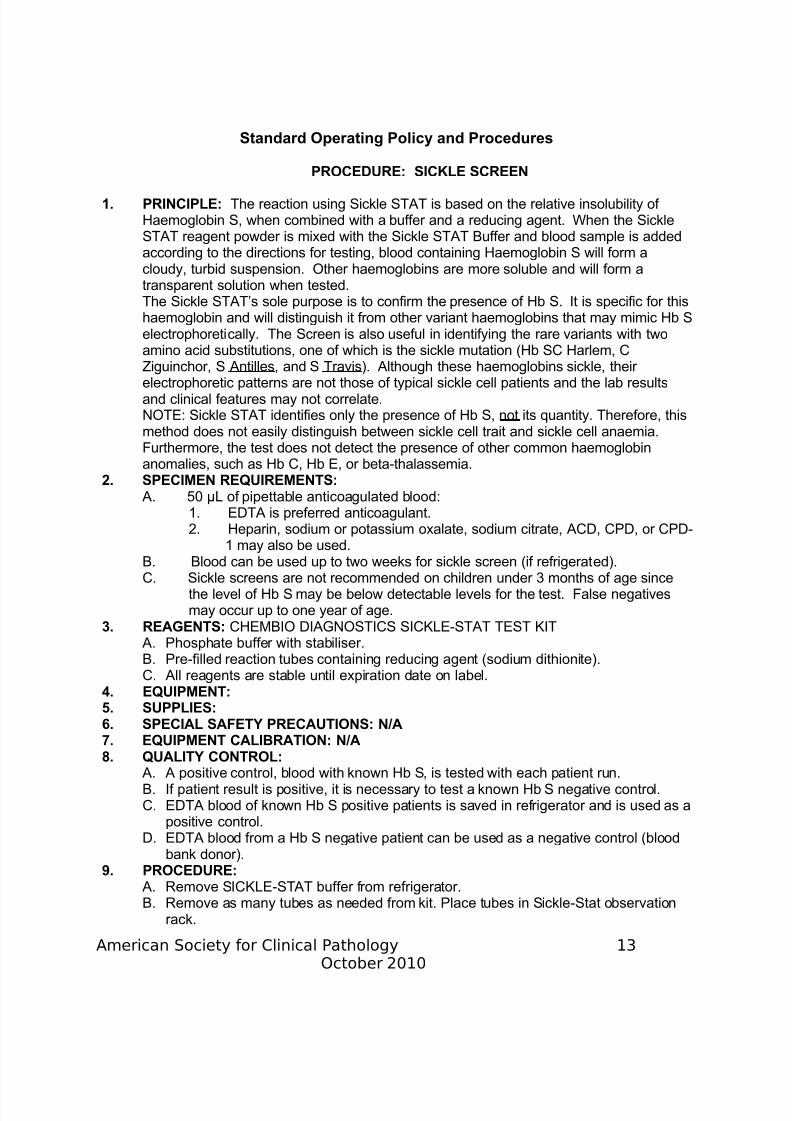
Standard Operating Policy and Procedures
PROCEDURE: SICKLE SCREEN
1. PRINCIPLE: The reaction using Sickle STAT is based on the relative insolubility of Haemoglobin S, when combined with a buffer and a reducing agent. When the SickleSTAT reagent powder is mixed with the Sickle STAT Buffer and blood sample is addedaccording to the directions for testing, blood containing Haemoglobin S will form acloudy, turbid suspension. Other haemoglobins are more soluble and will form atransparent solution when tested.The Sickle STAT’s sole purpose is to confirm the presence of Hb S. It is specific for thishaemoglobin and will distinguish it from other variant haemoglobins that may mimic Hb Selectrophoretically. The Screen is also useful in identifying the rare variants with twoamino acid substitutions, one of which is the sickle mutation (Hb SC Harlem, CZiguinchor, S Antilles, and S Travis). Although these haemoglobins sickle, their electrophoretic patterns are not those of typical sickle cell patients and the lab resultsand clinical features may not correlate.
NOTE: Sickle STAT identifies only the presence of Hb S, not its quantity. Therefore, thismethod does not easily distinguish between sickle cell trait and sickle cell anaemia.Furthermore, the test does not detect the presence of other common haemoglobinanomalies, such as Hb C, Hb E, or beta-thalassemia.
2. SPECIMEN REQUIREMENTS: A. 50 µL of pipettable anticoagulated blood:
1. EDTA is preferred anticoagulant.2. Heparin, sodium or potassium oxalate, sodium citrate, ACD, CPD, or CPD-
1 may also be used.B. Blood can be used up to two weeks for sickle screen (if refrigerated).C. Sickle screens are not recommended on children under 3 months of age since
the level of Hb S may be below detectable levels for the test. False negativesmay occur up to one year of age
7/28/2019 Haematology Job Aids
http://slidepdf.com/reader/full/haematology-job-aids 14/24
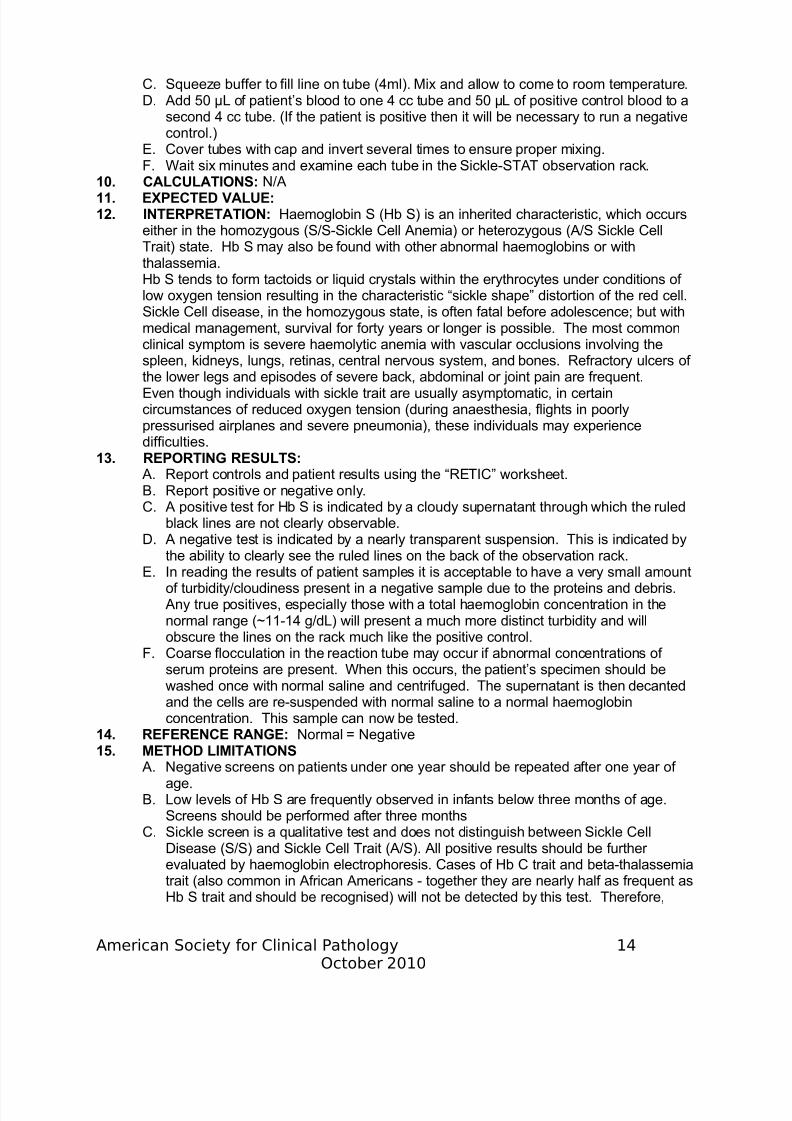
C. Squeeze buffer to fill line on tube (4ml). Mix and allow to come to room temperature.D. Add 50 µL of patient’s blood to one 4 cc tube and 50 µL of positive control blood to a
second 4 cc tube. (If the patient is positive then it will be necessary to run a negative
control.)E. Cover tubes with cap and invert several times to ensure proper mixing.F. Wait six minutes and examine each tube in the Sickle-STAT observation rack.
10. CALCULATIONS: N/A11. EXPECTED VALUE:12. INTERPRETATION: Haemoglobin S (Hb S) is an inherited characteristic, which occurs
either in the homozygous (S/S-Sickle Cell Anemia) or heterozygous (A/S Sickle CellTrait) state. Hb S may also be found with other abnormal haemoglobins or withthalassemia.
Hb S tends to form tactoids or liquid crystals within the erythrocytes under conditions of low oxygen tension resulting in the characteristic “sickle shape” distortion of the red cell.Sickle Cell disease, in the homozygous state, is often fatal before adolescence; but withmedical management, survival for forty years or longer is possible. The most commonclinical symptom is severe haemolytic anemia with vascular occlusions involving thespleen, kidneys, lungs, retinas, central nervous system, and bones. Refractory ulcers of the lower legs and episodes of severe back, abdominal or joint pain are frequent.Even though individuals with sickle trait are usually asymptomatic, in certain
circumstances of reduced oxygen tension (during anaesthesia, flights in poorlypressurised airplanes and severe pneumonia), these individuals may experiencedifficulties.
13. REPORTING RESULTS: A. Report controls and patient results using the “RETIC” worksheet.B. Report positive or negative only.C. A positive test for Hb S is indicated by a cloudy supernatant through which the ruled
black lines are not clearly observable.D. A negative test is indicated by a nearly transparent suspension. This is indicated by
the ability to clearly see the ruled lines on the back of the observation rack.E. In reading the results of patient samples it is acceptable to have a very small amount
of turbidity/cloudiness present in a negative sample due to the proteins and debris.Any true positives, especially those with a total haemoglobin concentration in the
7/28/2019 Haematology Job Aids
http://slidepdf.com/reader/full/haematology-job-aids 15/24
specimens that are negative by sickle stat may still need Hgb Eletrophoresis if clinically warranted.
16. PROCEDURE NOTES: Haemoglobin levels under 5.0 grams can cause a false
negative result. Double the sample volume in these instances.17. REFERENCES:Lehmann, Saunder’s Manual of Clinical Laboratory Science, pg. 893-895, 1998.Lee, Bithell, etc, Wintrobe’s Clinical Hematology, pg 1068-1084, 1993.Steine-Martin, et al, Clinical Hematology, pg. 95-96, 196-197, 201-203, 1998.Chembio diagnostics SICKLE-STAT TEST KIT package insert.
18. AUTHOR:19. APPROVAL SIGNATURES: Laboratory Director
Standard Operating Policy and Procedures
PROCEDURE: MANUAL BLOOD SMEAR PREPARATION
1. PURPOSE: Examination of the well prepared and well-stained blood smear is one of the most efficient and important initial laboratory tests in the evaluation of a patient withan abnormal blood count. In addition, in some instances, despite a normal blood count,
the blood smear can be very helpful in the diagnosis and follow-up of manyhaematologic, infectious, inflammatory, metabolic, and immunologic disorders.Examination of a peripheral blood smear for red blood cell morphology and number,appearance of platelets, and performance of a leukocyte differential count is routinelyused.The correct interpretation of changes in any of the blood components on a peripheralblood smear depends on the quality of the blood smear and it’s staining
2. REAGENTS: Romanowsky type stain such as Wright-Giemsa; buffer solution3. EQUIPMENT: Microscope
4. SUPPLIES: New, clean 25 mm x 75 mm X 1 mm, glass microscope slides of goodquality that are pre-cleaned before use. The slides should be of high quality glass andhave smooth ground edges. Applicator sticks/or glass rod /pipette
5 SPECIMEN: Whole blood (lavender top tube with EDTA anticoagulant)
7/28/2019 Haematology Job Aids
http://slidepdf.com/reader/full/haematology-job-aids 16/24
A. Place a small to medium (approximately 2-mm diameter) drop of capillary needleblood or well-mixed EDTA anticoagulated blood in the centre of a 1" by 3" cleanglass slide, about 2" in from the end of a clear slide with a" from the frosted area
of a frosted slide. The slide should be on a flat surface and held fixed by one or two fingers of one hand. Use the applicator stick or glass rod/pipette to make adrop.
B. Hold spreader slide between the thumb and middle finger of the other hand withthe index finger at the top centre to provide slight weight and stability.
C. Completely back the spreader slide into the blood drop, which will run along therear edge to the side edges of the spread slide.
D. Hold the spreader slide at a 30-degree angle for best distribution.E. When the blood reaches the side edges, quickly move the spreader slide to the
opposite end with an even motion.F. Allow the smear to air dry. Do not blow on it.
10. INTERPRETATION/RESULTS: Perform manual differential (See procedure).11. CALCULATIONS: N/A12. EXPECTED VALUES/ REFERENCE RANGE: N/A13. METHOD LIMITATIONS:
A. Excessive amounts of EDTA will create artifacts that make red blood cellmorphology difficult to interpret. The artifacts of red blood cell morphology seen
in blood smears prepared from EDTA anticoagulated blood include the following:i. Spiculated red blood cellsii. Target cellsiii. Rouleauxiv. Spherocytesv. Stomatocytesvi. Punched-out red blood cells
B. In general, the longer that blood is exposed to EDTA in an evacuated tube, themore marked will be the artifactual changes.
14. PROCEDURE NOTES: A. Failure to keep the spreader slide at a 30o angle with the flat slide results in the
following:i. A higher angle produces a thick smear.
7/28/2019 Haematology Job Aids
http://slidepdf.com/reader/full/haematology-job-aids 17/24
H. Heat should never be used to dry blood films rapidly because it will causeshrinking of the blood cells and make their identification difficult.
I. Common causes of a poor blood smear:
i. Drop of blood too large or too small.ii. Spreader slide pushed across the slide in a jerky manner.
iii. Failure to keep the entire edge of the spreader slide against the slide whilemaking the smear.
iv. Failure to keep the spreader at 30 degree angle with the slide.v. Failure to push the spreader blade completely across the slide.
15. REFERENCES: Henry, J.B. Clinical Diagnosis & Management by Laboratory Methods, 20th Edition.
WB Saunders, 2001McKenzie, B.Sherlyn. Textbook of Hematology, 2nd edition. William and Wilkins,1996Diff-Safe Blood dispenser, current package insert. Alpha Scientific Corporation,Southeaster, Pa.
16. PREPARED BY: Marian Cavagnaro, Memorial Regional Hospital17. APPROVAL: Laboratory Director
Standard Operating Policy and Procedures
PROCEDURE: SODIUMCITRATEFORPLATELETCLUMPING
1. PURPOSE: Ethelenediaminetetraacetic acid (EDTA) is the anticoagulant of choicewhen performing platelet counts or an evaluation of platelet morphology on a Wright-
stained peripheral blood smear. However, EDTA may also induce nonspecific plateletclumping or platelet satellitosis (pseudothrombocytopenia). In platelet satellitosis,platelets cling to the outer edges of leukocytes. In both platelet clumping and plateletsatellitosis, the total platelet count may be falsely decreased. A review of the stainedbl d i 10 40 bj i ill fi h f i h l l
7/28/2019 Haematology Job Aids
http://slidepdf.com/reader/full/haematology-job-aids 18/24
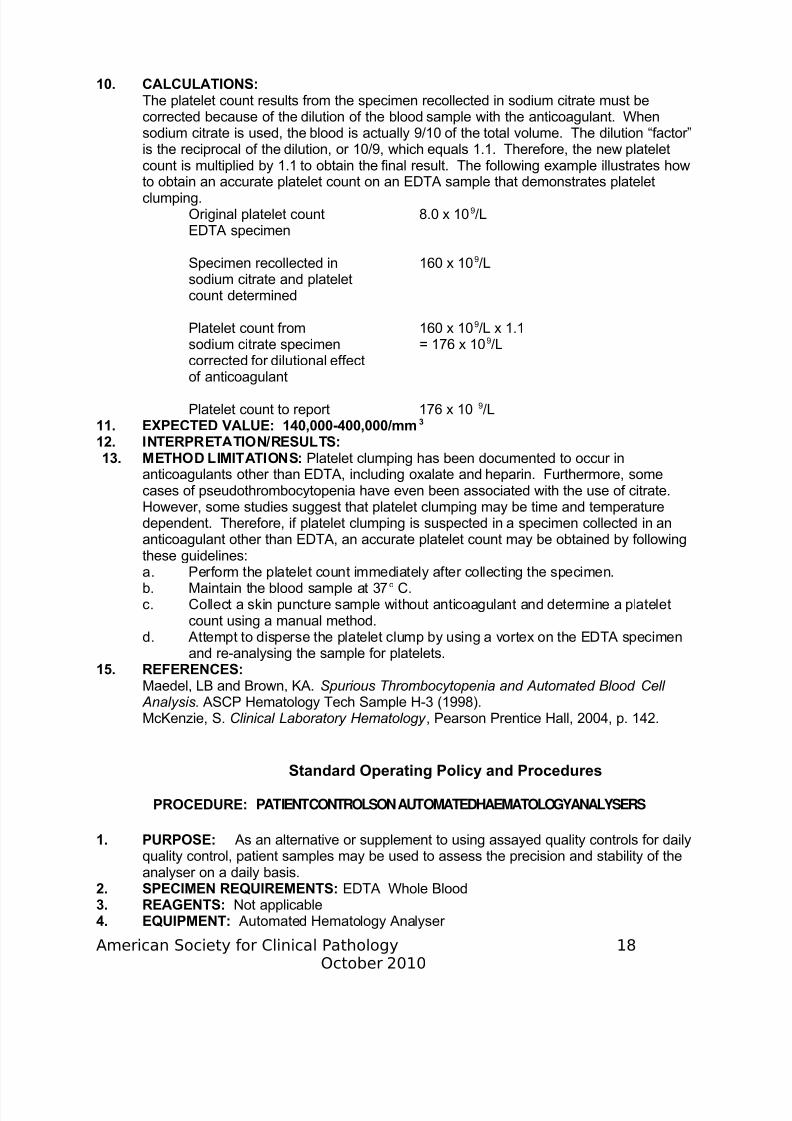
10. CALCULATIONS:The platelet count results from the specimen recollected in sodium citrate must becorrected because of the dilution of the blood sample with the anticoagulant. When
sodium citrate is used, the blood is actually 9/10 of the total volume. The dilution “factor”is the reciprocal of the dilution, or 10/9, which equals 1.1. Therefore, the new plateletcount is multiplied by 1.1 to obtain the final result. The following example illustrates howto obtain an accurate platelet count on an EDTA sample that demonstrates plateletclumping.
Original platelet count 8.0 x 10⁹/LEDTA specimen
Specimen recollected in 160 x 109/L
sodium citrate and plateletcount determined
Platelet count from 160 x 109/L x 1.1sodium citrate specimen = 176 x 109/Lcorrected for dilutional effectof anticoagulant
Platelet count to report 176 x 10
9
/L11. EXPECTED VALUE: 140,000-400,000/mm3
12. INTERPRETATION/RESULTS:13. METHOD LIMITATIONS: Platelet clumping has been documented to occur in
anticoagulants other than EDTA, including oxalate and heparin. Furthermore, somecases of pseudothrombocytopenia have even been associated with the use of citrate.However, some studies suggest that platelet clumping may be time and temperaturedependent. Therefore, if platelet clumping is suspected in a specimen collected in ananticoagulant other than EDTA, an accurate platelet count may be obtained by following
these guidelines:a. Perform the platelet count immediately after collecting the specimen.b. Maintain the blood sample at 37o C.c. Collect a skin puncture sample without anticoagulant and determine a platelet
7/28/2019 Haematology Job Aids
http://slidepdf.com/reader/full/haematology-job-aids 19/24
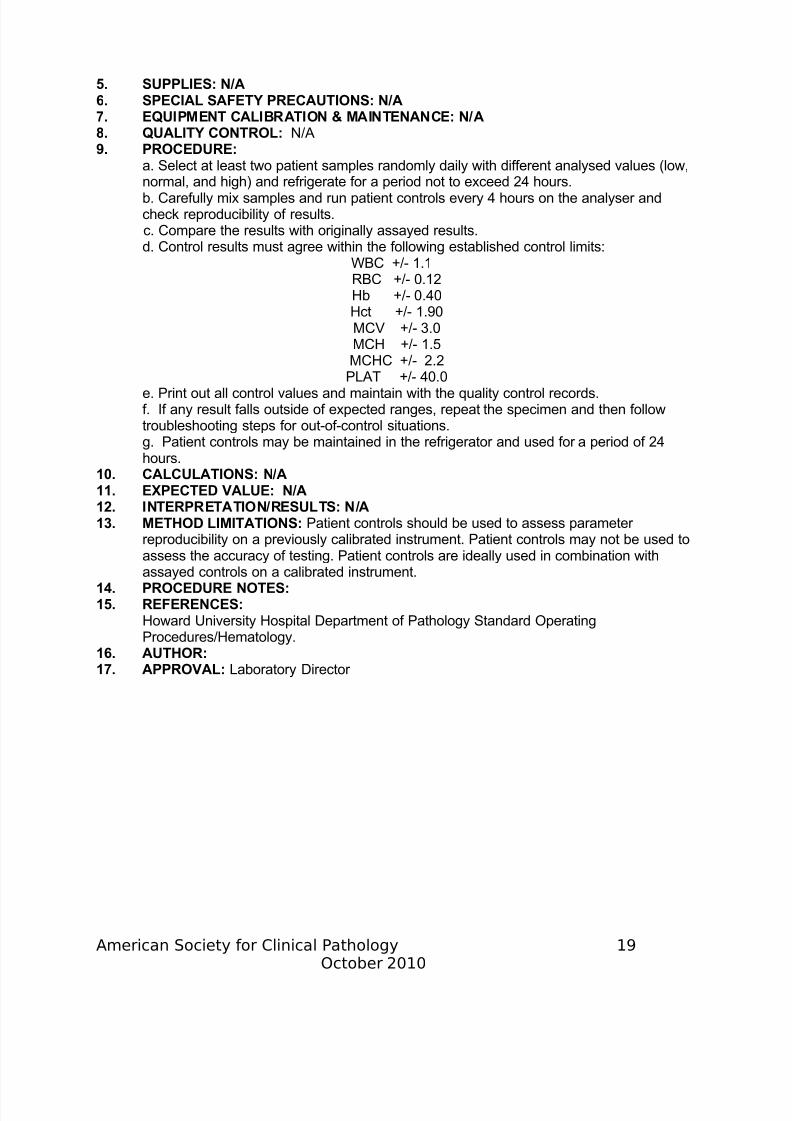
5. SUPPLIES: N/A6. SPECIAL SAFETY PRECAUTIONS: N/A7. EQUIPMENT CALIBRATION & MAINTENANCE: N/A8. QUALITY CONTROL: N/A9. PROCEDURE:
a. Select at least two patient samples randomly daily with different analysed values (low,normal, and high) and refrigerate for a period not to exceed 24 hours.b. Carefully mix samples and run patient controls every 4 hours on the analyser andcheck reproducibility of results.c. Compare the results with originally assayed results.d. Control results must agree within the following established control limits:
WBC +/- 1.1
RBC +/- 0.12Hb +/- 0.40Hct +/- 1.90MCV +/- 3.0MCH +/- 1.5MCHC +/- 2.2PLAT +/- 40.0
e. Print out all control values and maintain with the quality control records.
f. If any result falls outside of expected ranges, repeat the specimen and then followtroubleshooting steps for out-of-control situations.g. Patient controls may be maintained in the refrigerator and used for a period of 24hours.
10. CALCULATIONS: N/A11. EXPECTED VALUE: N/A12. INTERPRETATION/RESULTS: N/A13. METHOD LIMITATIONS: Patient controls should be used to assess parameter
reproducibility on a previously calibrated instrument. Patient controls may not be used to
assess the accuracy of testing. Patient controls are ideally used in combination withassayed controls on a calibrated instrument.
14. PROCEDURE NOTES:15. REFERENCES:
7/28/2019 Haematology Job Aids
http://slidepdf.com/reader/full/haematology-job-aids 20/24
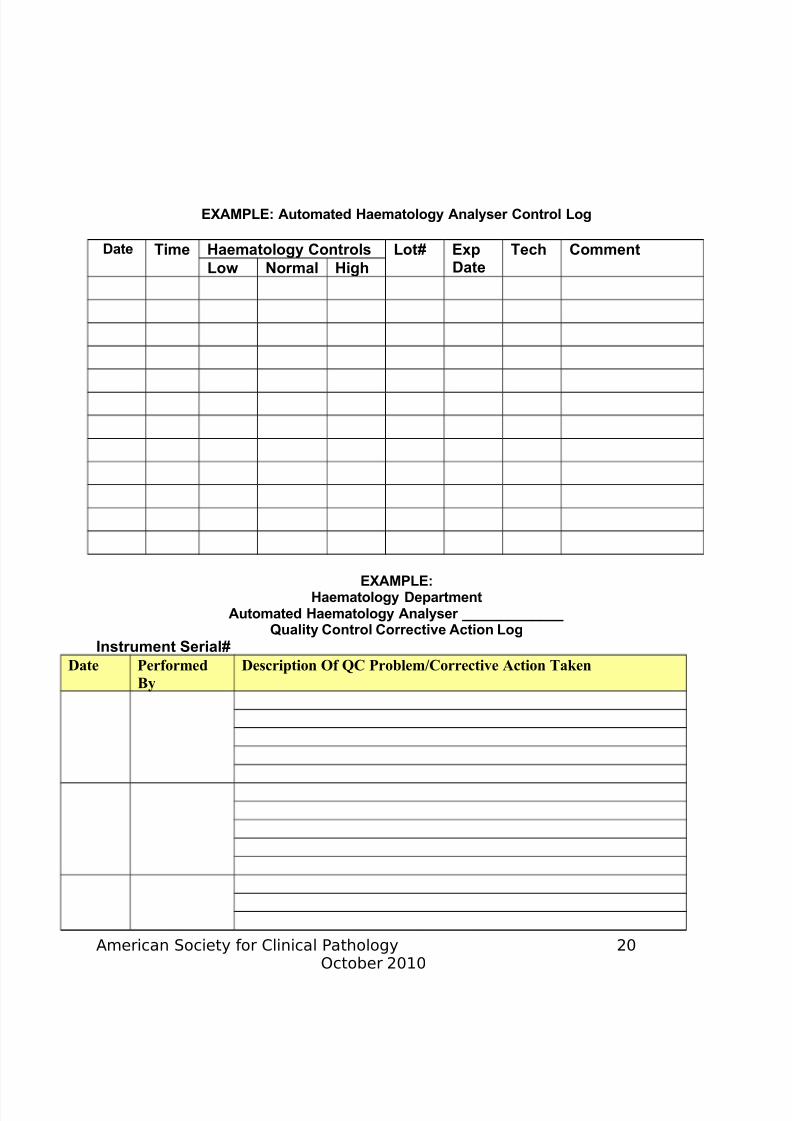
EXAMPLE: Automated Haematology Analyser Control Log
Date Time Haematology Controls Lot# ExpDate
Tech Comment
Low Normal High
EXAMPLE:Haematology Department
A d H l A l
7/28/2019 Haematology Job Aids
http://slidepdf.com/reader/full/haematology-job-aids 21/24
7/28/2019 Haematology Job Aids
http://slidepdf.com/reader/full/haematology-job-aids 22/24
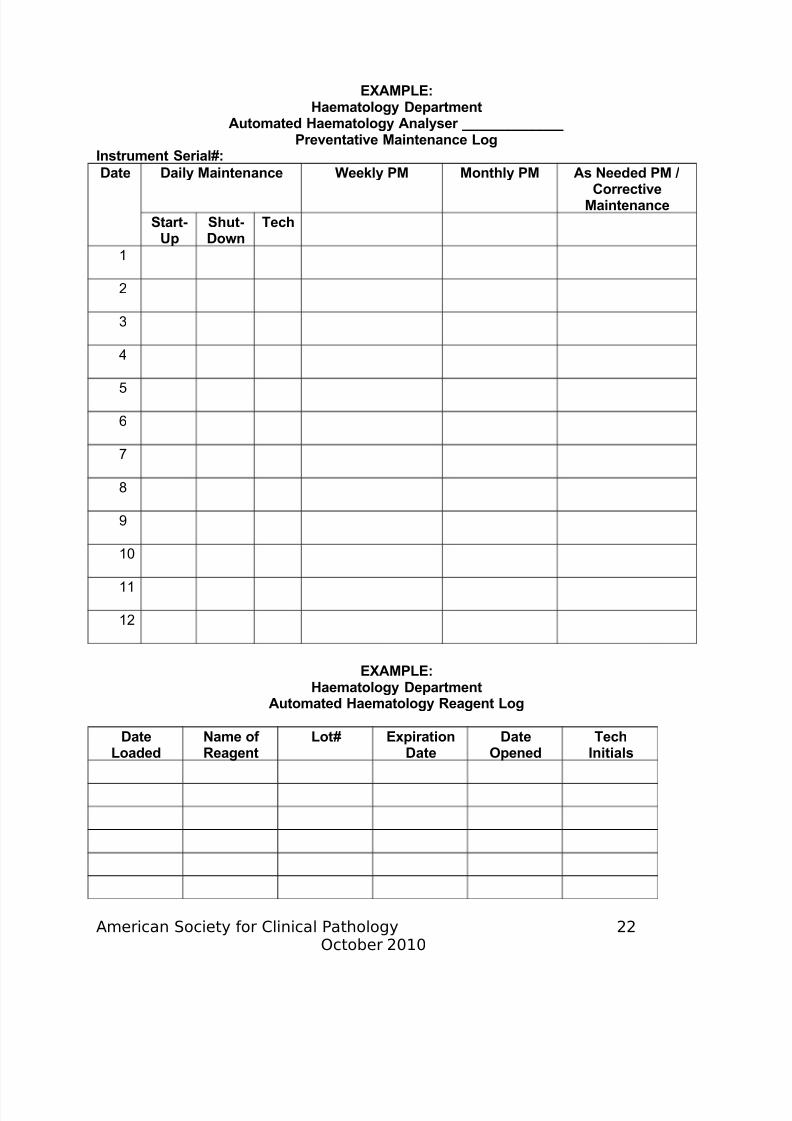
EXAMPLE:Haematology Department
Automated Haematology Analyser _____________
Preventative Maintenance LogInstrument Serial#:
Date Daily Maintenance Weekly PM Monthly PM As Needed PM /Corrective
Maintenance
Start-Up
Shut-Down
Tech
1
2
3
4
5
6
7
8
9
10
11
7/28/2019 Haematology Job Aids
http://slidepdf.com/reader/full/haematology-job-aids 23/24
7/28/2019 Haematology Job Aids
http://slidepdf.com/reader/full/haematology-job-aids 24/24
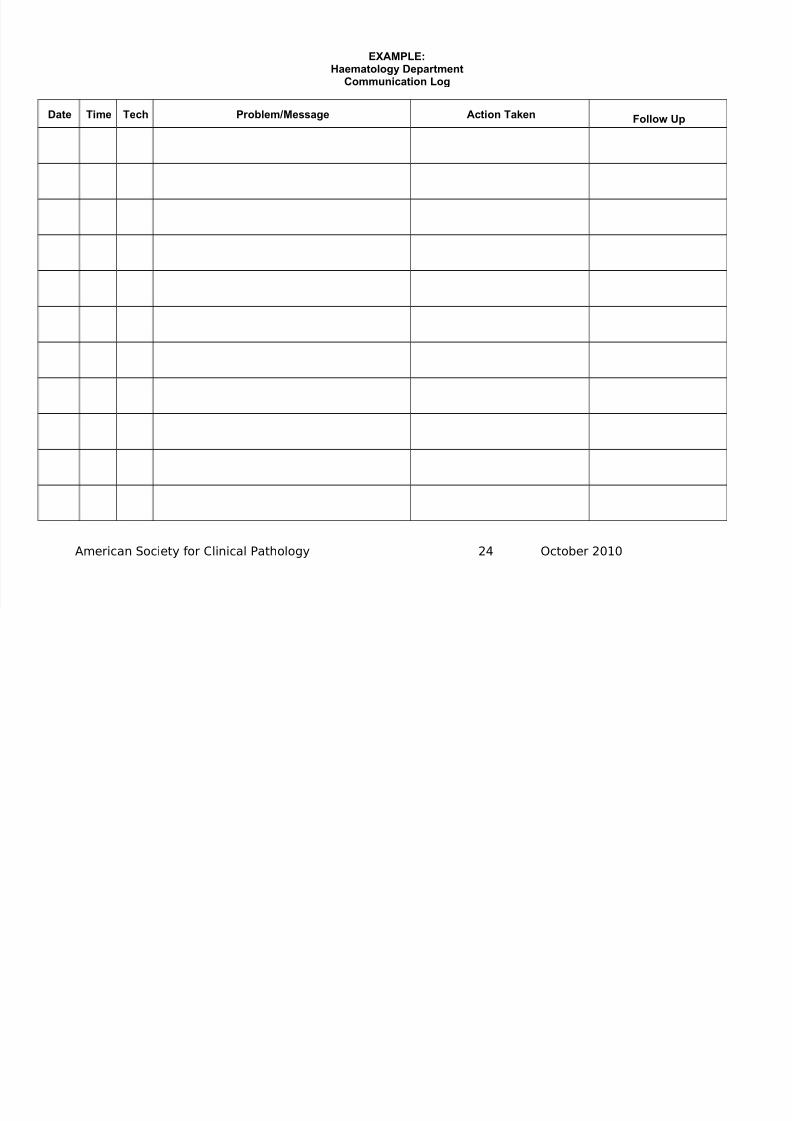
EXAMPLE:Haematology Department
Communication Log
Date Time Tech Problem/Message Action Taken Follow Up
American Society for Clinical Pathology 24 October 2010