hahn-louvre windows manual · hahn-louvre window manual booklet rev.09 / jan 2014 4 of 48 1....
TRANSCRIPT
HAHN-Louvre Window Manual booklet Rev.09 / Jan 2014 1 of 48
mx.de
HAHN-Louvre Windows
Manual
Transport / Handling / Storage of goods
Installation / Maintenance / Repairing
Cleaning/ Operation / Safety

HAHN-Louvre Window Manual booklet Rev.09 / Jan 2014 2 of 48

HAHN-Louvre Window Manual booklet Rev.09 / Jan 2014 3 of 48
Content:
1. Introduction
2. Area of application
3. Application according to regulations
4. Misuse of Louvre Windows
5. Remaining Risks
6. Power-operated windows, minimize of risks
7. Preventive action
8. Operation instruction
9. Product description
10. Functional principe
11. Window types / characteristics / identification
12. Product attributes / dimensions / materials
13. Advice for choice of glass
14. NSHEV (Natural Smoke and Heat Exhaust Ventilators)
15. Control types
16. Receipt of goods / Preparation for installation
16.1. Unloading and interim storage
16.2. Transport damages
16.3. Unpacking of goods
16.4. Disposal / Dangerous substances
16.5. Handling on site
17. Installation
17.1. Correct support
17.2. Alignment
17.3. Fixation of windows
17.3.1. Fixation by screwing through frames
17.3.2. Fixation by using fixing brackets
17.3.3. Fixation into glazing flange
17.4. Coupling of units beside each other
17.5. Coupling of units on top of each other
17.6. Additional instructions for installation according to RC2 (S9-iVt-05)
17.7. Installation of single louvre blades into mounted window frame (S9)
17.8. Installation of single louvre blades into mounted window frame (NACO)
17.9. Installation of TAIRMO louvre blades into mounted window frame
17.10. Louvre windows type INTEGRAL – frame cover
17.11. Removal of actuator in case of emergency
17.12. Final testing and start of operation
17.13. Setup of a LAH 61 (24V/230V) mid mullion motor
18. Replacement of LAH actuators
19. Requirements for longevity
20. Maintenance
21. Preventive maintenance
22. Repairing
HAHN-Louvre Window Manual booklet Rev.09 / Jan 2014 4 of 48
1. Introduction
This manual is intended to enable you to operate the Hahn Louvre Windows safe and use all their admissible opportunities. The use of this manual helps you to:
� Getting familiar to Louvre Windows
� Avoiding interferences due to improper use
The observance of these manual: � Helps to avoid dangers
� Increases reliability and durability of Louvre Windows
� Reduces maintenance costs and downtime
Please read this manual carefully in advance and make it accessible to all persons involved on a suitable and appropriate place. We point out that not observing the instructions in this document may affects the warranty. If you should not understand this manual or individual parts/chapters of it, please do not hesitate to ask us before you start with any corresponding activity. GLASBAU HAHN is not liable for the safe and proper function of Louvre Windows: � At any handling which is not according to common use You have no warranty claims for: � Operating errors
� Lack of maintenance
� other use of units which is not stated in this manual
Signs and symbols in this manual The signs and symbols used in this manual will help you to use the manual and the Louvre Window quickly and safely. Warning of a general risk This symbol is used for tasks where multiple causes can lead to danger/risks 2. Area of application This manual is valid for 8 listed louvre window types. Type of window can be identified by checking order- and delivery documents.
3. Application according to regulations
HAHN Louvre windows are NSHEV-units (Natural Smoke and Heat Exhaust Ventilators), furthermore suitable for day-to-day-ventilation; made from aluminium extrusions (depending on unit type either thermal- or non thermal broken) with single- or insulated glazing. Units are produced for vertical installation. HAHN Louvre windows can be used wherever optimal ventilation, good use of daylight at best use of space is required. Due to its elegant optics HAHN Louvre windows are suitable for appealingly architectural design. Examples for use of louvre windows are façade constructions, schools, child day care centres, office buildings, winter gardens, staircases and many more.

HAHN-Louvre Window Manual booklet Rev.09 / Jan 2014 5 of 48
4. Misuse of Louvre Windows
At reasonably foreseeable misuse of Louvre Windows the producers’s warranty deed expires, the sole responsibility is then passed to the user. Reasonably foreseeable misuse is:
� Holding head or extremities between opened louvre blades
� Using Louvre Window as ladder, shelf or shoring
� Jump or drop against the opened or closed Louvre Window
� Removal of safety barriers
� Not keeping the maintenance interval
� Deferred maintenance
� Deferred replacement of wear parts
� Faulty or inaccurate done maintenance or reparation
5. Remaining risks Residual risks that, despite the measures for the integration of safety in the design, despite the safety precautions and despite the additional protection measures still remain jamming in the area of the exposed engine and in the opening areas of the lamella. Existing residual risks are noted in the operating instructions. Existing residual risks to be avoided by: � Special warning notice at Louvre Winodws
� Consideration of general safety instructions and warnings in this instruction
Risk of death / injury to persons on the louvre windows can be caused by: � Misuse
� Improper Handling
� Transport
� Lack of protective devices
� Defective or damaged components
Damage to the machine may results from � Improper Handling
� Not keeping the instructions of use and maintenance
� Unsuitable operating materials
6. Power-operated windows, minimize of risks Depending on location of units in the building, considering the use of rooms and furthermore on control of units, a risk analysis based on the European directive on machinery has to be done proving whether further preventive action has to be taken at the Louvre Windows. We refer to information sheet no. 3 of the „ZVEI Fachverband Sicherheitssysteme, 60596 Frankfurt/Main“

HAHN-Louvre Window Manual booklet Rev.09 / Jan 2014 6 of 48
Checklist for determination of Safety class
All necessary preventive actions have been taken YES No
Risikoanalyse
Risk Analysis Installation location E ____ Purpose of building N ____ Control S ____ Safety class ______
Project
Project: ______________________ Street: _______________________ Post Code / Location: ___________ State: _______________________ Project number: _______________
Client Name: ________________________ Street: ________________________ Post Code / Location: ____________ State: ________________________ Contact person: ________________ Tel/Fax Office: _________________ E-Mail: _______________________
Installation details Installation location: _____________ Installation height: _______________ Window name: _________________ Window identification number: _____
Producer of window system Client _________________________ _________________________ Stamp/Date/Signature Stamp/Date/Signature
Notes

HAHN-Louvre Window Manual booklet Rev.09 / Jan 2014 7 of 48
Risk Analysis
Case-study installation situation Risk Risk classification parameters
E1
a) Installation height of the bottom edge of the sash a minimum of 2.5 m above floor level or permanent access level b) Permanently installed devices in front of the window preventing access c) Window ledges or soffits preventing unhindered access to the window for the user
Low Risk
Installation height of the bottom edge of the sash above floor level or access level below 2.5 m with clear access to the window
High Risk
E2
Type of use of the premises Risk Risk classification parameters
a) Commercial premises, the users of which have been instructed in the use of the technical equipment (e.g. offices, industrial premises)
Low Risk
N1
Medium Risk
N2
b) Residential premises, the occupants of which have been instructed in the use of the technical equipment. c) Premises in which the users/visitors are capable of gauging the risk or are supervised.
d) Premises intended for regular use by persons who cannot be instructed in the safe and reliable use of the technical equipment (e.g. retail outlets, places of assembly, etc.).
High Risk
N3
e) Premises intended for regular use by persons requiring protection or who are unable to reason (such as nurseries, schools and hospitals, etc.).
Very high risk
N4
Control system or method of operation Risk Risk classification parameters
Manual operation without lock (dead man‘s controller) with visual monitoring of all windows (e.g. use of a keylock switch)
Very Low Risk
S0
Manual operation with lock with visual monitoring of all windows
Low Risk
S1
Automatic operation (e.g. wind and rain based control system, building management system equipment) or manual operation without visual contact with all windows
High Risk
S2

HAHN-Louvre Window Manual booklet Rev.09 / Jan 2014 8 of 48
Classification of protective measures
Classifiction Examples of protective measures
Protection class 0 No protective measures required
Protection class 1 Warning signs
Protection class 2
Access safeguards in the form of constructional measures or Rounded, padded edges; closing forces of 80 to 150 N, no shearing effect or Acoustic warning signals or Warning lamps or EMERGENCY OFF switch on the window or Moveable devices in front of the window to prevent access
Protection class 3
Dead man‘s controller without higher level central control system or Movement stops 25 mm before the end position over 10 s; tripped by an optical or acoustic signal; further movement with signal up to the end position or Slow window sash movement of max. 5 mm/s or Access width less than 8 mm or Rounded, padded edges; low closing forces of less than 80 N, no shearing effect
Protection class 4
Safeguard in the form of contact-based protection devices, e.g. contact strips, contact sensors or Safeguard in the form of electro-sensitive protective equipment, e.g. light barriers, light grilles or Dead man‘s controller with authorized operation for each window without higher level central control (e.g. keylock switch) or Access width less than 4 mm or Access safeguards in the form of constructional measures

HAHN-Louvre Window Manual booklet Rev.09 / Jan 2014 9 of 48
7. Preventive action
Preventive and protective action to avoid squeezing or other injuries:
� Louvre Windows are installed higher than 2.5 mtr
� Windows to be opened and closed from instructed persons only
� Install safeguards to avoid people getting direct access to the units
� Louvre Windows can be equipped with sensors which can prevent inadvertently closing of units
� If any errors are noted, do not try to fix them by yourself but inform a qualified contractor
� Safety gloves have to be worn for glazing of S9 units to avoid cutting injuries
� Before the Louvre Window is put into operation, it must be examined to see if there are any
external damages
� It has to be checked again by an electrician if incoming power and motor voltage are identically
8. Operating instructions
HAHN Louvre Windows have movable blades. The side mounted, horizontally rotating blades are to be
operated by hand or by motor power. The following instructions must be observed:
� The operation may only be done by instructed persons
� It must be ensured that a quarter rotation of the blades about the central axis is possible.
The turning and closing range of louvre window is permanently kept free of any obstructions and objects
� Louvre Windows are not suitable to hang on any objects.
They should not be used as a stepladder or for supporting the body weight
� After breaking the window glass must not be used or moved. The splitter must be carefully removed.
It is to point out the potential dangers and to take necessary measures in acute danger.
A professional company should be consulted as soon as possible.
� Permanent movement cycles must be avoided to prevent thermal and mechanical overload of the motor
� At mechanical actuation by hand lever, make sure that it moves only in the plane of rotation.
If resistance or stiffness is felt, the opening or closing operation must be stopped
� At any malfunction on the Louvre window GLASBAU HAHN must be informed immediately.
When trying to repair the damage himself, the warranty can be omitted and there is a risk
to injury such as bruises, electrical shock ...

HAHN-Louvre Window Manual booklet Rev.09 / Jan 2014 10 of 48
9. Product description
HAHN Louvre Windows are made of high quality materials and are designed for longevity. All windows will be
tested and adjusted in the factory according to the customer specification, matching the required regulations
(according to DIN EN 14351-1, DIN EN 12101-2; RC2 or others like ball protection) depending on their
purpose. They are 100% functionally tested and are ready for use.
The single glazed louvre window types NACO and S9 are – unless otherwise agreed – delivered unglazed
with glass coming in separate crates. Information about individual window details (according to EN 14351-1
air permeability, water tightness, wind resistance, heat and sound insulation etc. or acc. DIN EN 12101-2
(standard for natural smoke and heat exhaust ventilators)) is provided in a separate document accompanying
the delivery.
10. Functional principle
HAHN Louvre windows have moveable blades. The side mounted blades with centric pivot, horizontally
rotating louvres can be moved either manually or by electrical actuators. Synchronous synchronization is
achieved by internal linkage mechanisms which give direct transmission of force to the pivot bearings.
11. Window types / characteristics / identification
Use the following photos and product characteristics for easy identification of vent types.
S9-iVt-05
Characteristics Insulated glass, thermal broken, aluminium framed louvre blades, Frame depth 47mm
S9-iVt-05 Allglass
Characteristics Insulated glass, thermal broken, flush glazed look outside, Frame depth 47 or 50,4mm
Tairmo
Characteristics Insulated glass, thermal broken, aluminium framed louvre blades, Frame depth 66mm
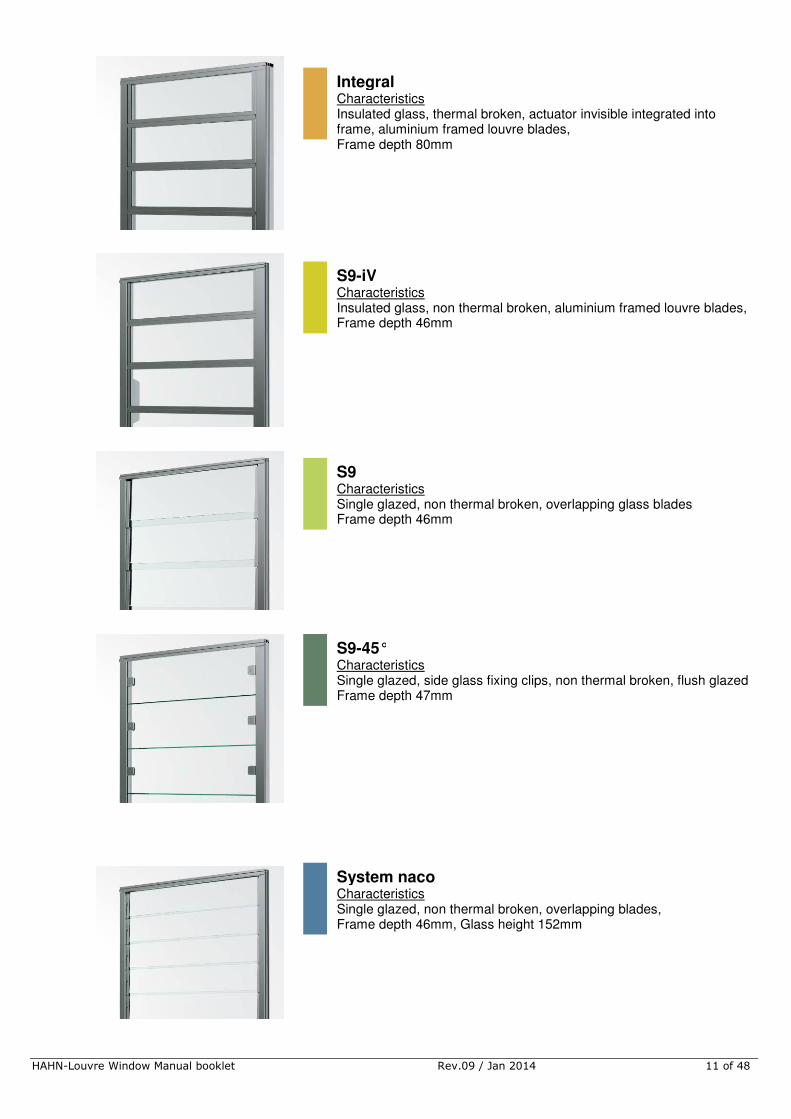
HAHN-Louvre Window Manual booklet Rev.09 / Jan 2014 11 of 48
Integral Characteristics Insulated glass, thermal broken, actuator invisible integrated into frame, aluminium framed louvre blades, Frame depth 80mm
S9-iV
Characteristics Insulated glass, non thermal broken, aluminium framed louvre blades, Frame depth 46mm
S9
Characteristics Single glazed, non thermal broken, overlapping glass blades Frame depth 46mm
S9-45°
Characteristics Single glazed, side glass fixing clips, non thermal broken, flush glazed Frame depth 47mm
System naco
Characteristics Single glazed, non thermal broken, overlapping blades, Frame depth 46mm, Glass height 152mm
HAHN-Louvre Window Manual booklet Rev.09 / Jan 2014 12 of 48
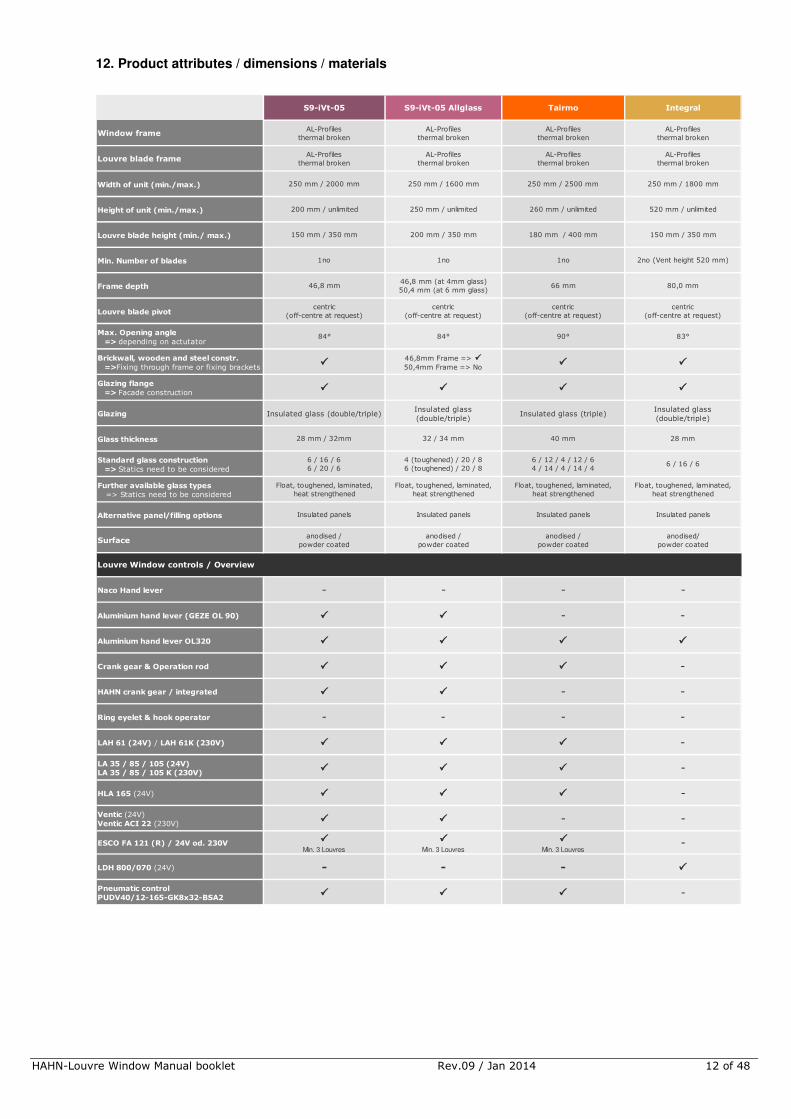
12. Product attributes / dimensions / materials
S9-iVt-05 S9-iVt-05 Allglass Tairmo Integral
Window frameAL-Profiles
thermal broken
AL-Profiles
thermal broken
AL-Profiles
thermal broken
AL-Profiles
thermal broken
Louvre blade frameAL-Profiles
thermal broken
AL-Profiles
thermal broken
AL-Profiles
thermal broken
AL-Profiles
thermal broken
Width of unit (min./max.) 250 mm / 2000 mm 250 mm / 1600 mm 250 mm / 2500 mm 250 mm / 1800 mm
Height of unit (min./max.) 200 mm / unlimited 250 mm / unlimited 260 mm / unlimited 520 mm / unlimited
Louvre blade height (min./ max.) 150 mm / 350 mm 200 mm / 350 mm 180 mm / 400 mm 150 mm / 350 mm
Min. Number of blades 1no 1no 1no 2no (Vent height 520 mm)
Frame depth 46,8 mm46,8 mm (at 4mm glass)
50,4 mm (at 6 mm glass)66 mm 80,0 mm
Louvre blade pivotcentric
(off-centre at request)
centric
(off-centre at request)
centric
(off-centre at request)
centric
(off-centre at request)
Max. Opening angle
=> depending on actutator84° 84° 90° 83°
Brickwall, wooden and steel constr.
=>Fixing through frame or fixing brackets����
46,8mm Frame => ����50,4mm Frame => No
���� ����
Glazing flange
=> Facade construction���� ���� ���� ����
Glazing Insulated glass (double/triple)Insulated glass
(double/triple)Insulated glass (triple)
Insulated glass
(double/triple)
Glass thickness 28 mm / 32mm 32 / 34 mm 40 mm 28 mm
Standard glass construction
=> Statics need to be considered
6 / 16 / 6
6 / 20 / 6
4 (toughened) / 20 / 8
6 (toughened) / 20 / 8
6 / 12 / 4 / 12 / 6
4 / 14 / 4 / 14 / 46 / 16 / 6
Further available glass types
=> Statics need to be considered
Float, toughened, laminated,
heat strengthened
Float, toughened, laminated,
heat strengthened
Float, toughened, laminated,
heat strengthened
Float, toughened, laminated,
heat strengthened
Alternative panel/filling options Insulated panels Insulated panels Insulated panels Insulated panels
Surfaceanodised /
powder coated
anodised /
powder coated
anodised /
powder coated
anodised/
powder coated
Naco Hand lever - - - -
Aluminium hand lever (GEZE OL 90) ���� ���� - -
Aluminium hand lever OL320 ���� ���� ���� ����
Crank gear & Operation rod ���� ���� ���� -
HAHN crank gear / integrated ���� ���� - -
Ring eyelet & hook operator - - - -
LAH 61 (24V) / LAH 61K (230V) ���� ���� ���� -
LA 35 / 85 / 105 (24V)
LA 35 / 85 / 105 K (230V)���� ���� ���� -
HLA 165 (24V) ���� ���� ���� -
Ventic (24V)
Ventic ACI 22 (230V)���� ���� - -
ESCO FA 121 (R) / 24V od. 230V ����Min. 3 Louvres
����Min. 3 Louvres
����Min. 3 Louvres
-
LDH 800/070 (24V) - - - ����
Pneumatic control
PUDV40/12-165-GK8x32-BSA2���� ���� ���� -
Louvre Window controls / Overview
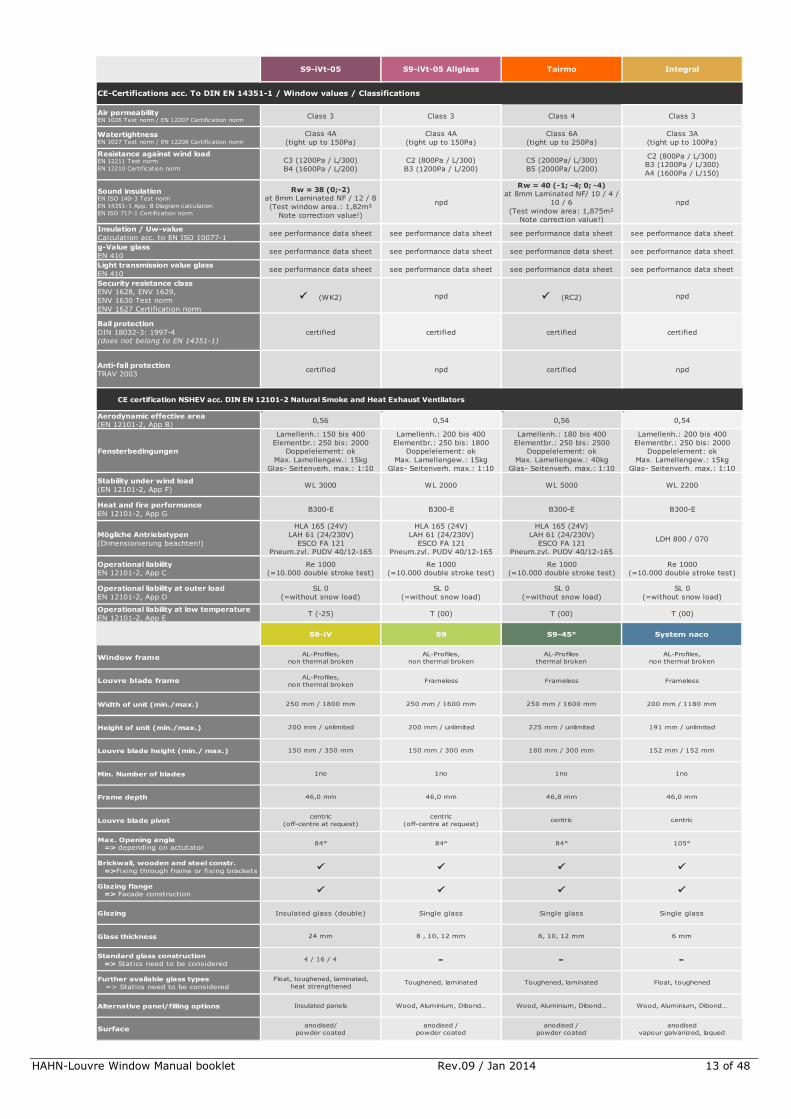
HAHN-Louvre Window Manual booklet Rev.09 / Jan 2014 13 of 48
S9-iVt-05 S9-iVt-05 Allglass Tairmo Integral
Air permeabilityEN 1026 Test norm / EN 12207 Certification norm
Class 3 Class 3 Class 4 Class 3
WatertightnessEN 1027 Test norm / EN 12208 Certification norm
Class 4A
(tight up to 150Pa)
Class 4A
(tight up to 150Pa)
Class 6A
(tight up to 250Pa)
Class 3A
(tight up to 100Pa)
Resistance against wind loadEN 12211 Test norm
EN 12210 Certification norm
C3 (1200Pa / L/300)
B4 (1600Pa / L/200)
C2 (800Pa / L/300)
B3 (1200Pa / L/200)
C5 (2000Pa/ L/300)
B5 (2000Pa/ L/200)
C2 (800Pa / L/300)
B3 (1200Pa / L/300)
A4 (1600Pa / L/150)
Sound insulationEN ISO 140-3 Test norm
EN 14351-1 App. B Diagram calculation
EN ISO 717-1 Certification norm
Rw = 38 (0;-2)
at 8mm Laminated NF / 12 / 8
(Test window area.: 1,82m²
Note correction value!)
npd
Rw = 40 (-1; -4; 0; -4)
at 8mm Laminated NF/ 10 / 4 /
10 / 6
(Test window area: 1,875m²
Note correction value!)
npd
Insulation / Uw-value
Calculation acc. to EN ISO 10077-1see performance data sheet see performance data sheet see performance data sheet see performance data sheet
g-Value glass
EN 410see performance data sheet see performance data sheet see performance data sheet see performance data sheet
Light transmission value glass
EN 410see performance data sheet see performance data sheet see performance data sheet see performance data sheet
Security resistance class
ENV 1628, ENV 1629,
ENV 1630 Test norm
ENV 1627 Certification norm
� � � � (WK2) npd � � � � (RC2) npd
Ball protection
DIN 18032-3: 1997-4
(does not belong to EN 14351-1)
certified certified certified certified
Anti-fall protection
TRAV 2003certified npd certified npd
Aerodynamic effective area
(EN 12101-2, App B)0,56 0,54 0,56 0,54
Fensterbedingungen
Lamellenh.: 150 bis 400
Elementbr.: 250 bis: 2000
Doppelelement: ok
Max. Lamellengew.: 15kg
Glas- Seitenverh. max.: 1:10
Lamellenh.: 200 bis 400
Elementbr.: 250 bis: 1800
Doppelelement: ok
Max. Lamellengew.: 15kg
Glas- Seitenverh. max.: 1:10
Lamellenh.: 180 bis 400
Elementbr.: 250 bis: 2500
Doppelelement: ok
Max. Lamellengew.: 40kg
Glas- Seitenverh. max.: 1:10
Lamellenh.: 200 bis 400
Elementbr.: 250 bis: 2000
Doppelelement: ok
Max. Lamellengew.: 15kg
Glas- Seitenverh. max.: 1:10
Stability under wind load
(EN 12101-2, App F)WL 3000 WL 2000 WL 5000 WL 2200
Heat and fire performance
EN 12101-2, App GB300-E B300-E B300-E B300-E
Mögliche Antriebstypen
(Dimensionierung beachten!)
HLA 165 (24V)
LAH 61 (24/230V)
ESCO FA 121
Pneum.zyl. PUDV 40/12-165
HLA 165 (24V)
LAH 61 (24/230V)
ESCO FA 121
Pneum.zyl. PUDV 40/12-165
HLA 165 (24V)
LAH 61 (24/230V)
ESCO FA 121
Pneum.zyl. PUDV 40/12-165
LDH 800 / 070
Operational liability
EN 12101-2, App C
Re 1000
(=10.000 double stroke test)
Re 1000
(=10.000 double stroke test)
Re 1000
(=10.000 double stroke test)
Re 1000
(=10.000 double stroke test)
Operational liability at outer load
EN 12101-2, App D
SL 0
(=without snow load)
SL 0
(=without snow load)
SL 0
(=without snow load)
SL 0
(=without snow load)
Operational liability at low temperature
EN 12101-2, App ET (-25) T (00) T (00) T (00)
CE-Certifications acc. To DIN EN 14351-1 / Window values / Classifications
CE certification NSHEV acc. DIN EN 12101-2 Natural Smoke and Heat Exhaust Ventilators
S9-iV S9 S9-45° System naco
Window frameAL-Profiles,
non thermal broken
AL-Profiles,
non thermal broken
AL-Profiles
thermal broken
AL-Profiles,
non thermal broken
Louvre blade frameAL-Profiles,
non thermal brokenFrameless Frameless Frameless
Width of unit (min./max.) 250 mm / 1800 mm 250 mm / 1600 mm 250 mm / 1600 mm 200 mm / 1180 mm
Height of unit (min./max.) 200 mm / unlimited 200 mm / unlimited 225 mm / unlimited 191 mm / unlimited
Louvre blade height (min./ max.) 150 mm / 350 mm 150 mm / 300 mm 180 mm / 300 mm 152 mm / 152 mm
Min. Number of blades 1no 1no 1no 1no
Frame depth 46,0 mm 46,0 mm 46,8 mm 46,0 mm
Louvre blade pivotcentric
(off-centre at request)
centric
(off-centre at request)centric centric
Max. Opening angle
=> depending on actutator84° 84° 84° 105°
Brickwall, wooden and steel constr.
=>Fixing through frame or fixing brackets���� ���� ���� ����
Glazing flange
=> Facade construction���� ���� ���� ����
Glazing Insulated glass (double) Single glass Single glass Single glass
Glass thickness 24 mm 8 , 10, 12 mm 8, 10, 12 mm 6 mm
Standard glass construction
=> Statics need to be considered4 / 16 / 4 - - -
Further available glass types
=> Statics need to be considered
Float, toughened, laminated,
heat strengthenedToughened, laminated Toughened, laminated Float, toughened
Alternative panel/filling options Insulated panels Wood, Aluminium, Dibond… Wood, Aluminium, Dibond… Wood, Aluminium, Dibond…
Surfaceanodised/
powder coated
anodised /
powder coated
anodised /
powder coated
anodised
vapour galvanized, laqued

HAHN-Louvre Window Manual booklet Rev.09 / Jan 2014 14 of 48
S9-iV S9 S9-45° System naco
Naco Hand lever - - - ����
Aluminium hand lever (GEZE OL 90) ���� ���� ���� -
Aluminium hand lever OL320 ���� ���� ���� -
Crank gear & Operation rod ���� ���� ���� ����
HAHN crank gear / integrated ���� ���� ���� -
Ring eyelet & hook operator - - - ����
LAH 61 (24V) / LAH 61K (230V) ���� ���� ���� -
LA 35 / 85 / 105 (24V)
LA 35 / 85 / 105 K (230V)���� ���� ���� ����
LA 85 (24V) / LA 81K (230V) ���� ���� ���� ����
LA 105 (24V) / LA 105K (230V) ���� ���� ���� ����
HLA 165 (24V) ���� ���� ���� ����
Ventic (24V)
Ventic ACI 22 (230V)���� ���� ���� -
ESCO FA 121 (R) / 24V od. 230V ����Min. 3 Louvres
����Min. 3 Louvres
����Min. 3 Louvres
-
LDH 800/070 (24V) - - - -
Pneumatic control
PUDV40/12-165-GK8x32-BSA2���� ���� ���� ����
Air permeabilityEN 1026 Test norm / EN 12207 Certification norm
Class 2 Class 2 Class 2 npd
WatertightnessEN 1027 Test norm / EN 12208 Certification norm
Class 3A
(tight up to 100Pa)
Class 3A
(tight up to 100Pa)
Class 1A
(tight without pressure)npd
Resistance against wind loadEN 12211 Test norm
EN 12210 Certification norm
C1 (400Pa / L300)
B2 (800Pa / L/200)
C2 (800Pa / L/300)
B3 (1200Pa / L/300)
A4 (1600Pa / L/150)
B4 (1600Pa / L/200)
A5 (2000Pa / L/150)npd
Sound insulationEN ISO 140-3 Test norm
EN 14351-1 App. B Diagram calculation
EN ISO 717-1 Certification norm
npd npd
Rw = 26 (0;-1)
at 12mm Laminated (0,76 PVB)
(Test window area: 1,82m²
=> Note correction value!)
npd
Insulation / Uw-value
Calculation acc. to EN ISO 10077-1see performance data sheet npd npd npd
g-Value glass
EN 410see performance data sheet see performance data sheet see performance data sheet see performance data sheet
Light transmission value glass
EN 410see performance data sheet see performance data sheet see performance data sheet see performance data sheet
Security resistance class
ENV 1628, ENV 1629,
ENV 1630 Test norm
ENV 1627 Certification norm
npd npd npd npd
Ball protection
DIN 18032-3: 1997-4
(does not belong to EN 14351-1)
npd npd npd npd
Anti-fall protection
TRAV 2003npd npd npd npd
Aerodynamic effective area
(EN 12101-2, App B)0,59 0,65
Fensterbedingungen
Lamellenh.: 150 bis 400
Elementbr.: 250 bis: 2000
Doppelelement: ok
Max. Lamellengew.: 12kg
Glas- Seitenverh. max.: 1:10
Lamellenh.: 150 bis 400
Elementbr.: 250 bis: 1800
Doppelelement: ok
Max. Lamellengew.: 12kg
Glas- Seitenverh. max.: 1:10
Stability under wind load
(EN 12101-2, App F)WL 2200 WL 2600
Heat and fire performance
EN 12101-2, App GB300-E B300-E
Mögliche Antriebstypen
(Dimensionierung beachten!)
HLA 165 (24V)
LAH 61 (24/230V)
ESCO FA 121
Pneum.zyl. PUDV 40/12-165
HLA 165 (24V)
LAH 61 (24/230V)
ESCO FA 121
Pneum.zyl. PUDV 40/12-165
Operational liability
EN 12101-2, App C
Re 1000
(=10.000 double stroke test)
Re 1000
(=10.000 double stroke test)
Operational liability at outer load
EN 12101-2, App D
SL 0
(=without snow load)
SL 0
(=without snow load)
Operational liability at low temperature
EN 12101-2, App ET (-25) T (-25)
npd npd
CE-Certifications acc. To DIN EN 14351-1 / Window values / Classifications
CE certification NSHEV acc. DIN EN 12101-2 Natural Smoke and Heat Exhaust Ventilators
Louvre Window controls / Overview
HAHN-Louvre Window Manual booklet Rev.09 / Jan 2014 15 of 48
13. Advice for choice of glass
Depending on purpose of units and statically requirements HAHN Louvre Windows are either glazed with
float, toughened, laminated or a combination of these glasses. Toughened glass is a single pane safety glass
with increased thermal shock resistance and nominal bending strength. When pane gets broken, it results in a
close meshed net out of small glass parts contrary to broken standard float glass which gives razor-sharp
splitter and glass fragments. We recommend using heat soak tested toughened glass to avoid spontaneous
breaking of glass due to inclusion of nickel sulfide. We hereby point out that use of non heat soak tested
toughened glass is allowed in Germany but only at premises when installation high is less than 4 mtrs and
when it can be ensured that no persons can step underneath the window.
Laminated safety glass does consist of two or more layers of glass, full-faced connected by pressure and heat
with an elastic, tearproof synthetic sheet to prevent glass getting broken uncontrolled. Furthermore laminated
glass gives some remaining lift capacity when broken.
14. NSHEV (Natural Smoke and Heat Exhaust Ventilators)
Preventive fire protection belongs to the most important items on planning of buildings. It serves to protect live
and health. This risk can be handled by controlled removal of smoke out of the building, especially at floors
and staircases used as escape routes.
HAHN Louvre Windows are suitable ideally for this purpose due to the high flow efficiency, short opening
times, big opening areas and in addition due to the fact that no escape routes get blocked by any window
frames.
HAHN Louvre Window types S9, S9-iV, S9-iVt-05, S9-iVt-05 Allglass, Integral and Tairmo are certified
according to DIN EN 12101-2 for use as natural smoke and heat exhaust ventilator. Please mention with your
enquiry/order when NSHEV units are required.
HAHN-Louvre Window Manual booklet Rev.09 / Jan 2014 16 of 48
15. Control types
There are two options for operation of HAHN Louvre Windows:
� Manual operation by hand lever, window winder, hook operator, crank gear in direct or extended control
� Power operated via electric actuator (24V or 230V) or pneumatic control
A data sheet will be provided separately with power operated actuators. When actuators are provided by
clients, a data sheet will have to be provided from the producer of actuators as well. Any risks will be stated
there. As most actuators do not have finger trapping protection the danger of squeezing fingers or other body
parts is very high. In the following all actuators from the Glasbau Hahn product range are stated.
Valid for all actuators: Danger of finger trapping / -squeezing in area of actuator (except of LAH 61 and LDH
800) as well as on the louvre blades itself.
Beikirch M9 Technical values/information see data sheet
Belimo Spring return actuator Technical values/information see data sheet
D+H LA_ZA Technical values/information see data sheet
ESCO FA 121 R Technical values/information see data sheet
D+H LAH 61 Technical values/information see data sheet
Pneumatic control Double-acting cylinder PUDV40/12-165-GK8x32-BSA2
D+H Ventic Technical values/information see data sheet
D+H LAH 61 Technical values/information see data sheet (finger trapping protection)
LDH 800 Technical values/information see data sheet (finger trapping protection)
Supplied windows are equipped with ready assembled and tested actuators.
� Special HAHN Louvre Window actuators, LAH 61 and LDH 800, have been developed for infinite
electrical operation with integrated finger trapping protection. These actuators are particularly
characterised by low running noise, high efficiency and long life. By a PC bus interface details like
opening angle, cut-off forces and speed of actuators can be adjusted object-specific. To reduce risk
and danger of squeezing, travel speed in closing direction and closing force in easily accessible
areas.
� Information to performance of electrical actuators, power supply, power consumption and wiring can
be found in the data sheet for this actuator.
Data sheets can be downloaded at www.glasbau-hahn.de
HAHN-Louvre Window Manual booklet Rev.09 / Jan 2014 17 of 48
16. Receipt of goods / Preparations for installation
16.1 Unloading and interim storage
The supplied HAHN Louvre Windows are packed vertically into wooden transport crates. These crates have
to be off-loaded by suitable means, for instance by a fork lift with sufficient support to match weight of units.
Transport crates need to be brought down carefully to ground level. Transport crates should never be
stacked. Where packing cases are left on site there is the danger of condensate water entering the actuators
which needs to be avoided at all costs.
16.2 Transport damages
The next step is to check for any damages. If there is any damage or loss this needs to be reported
immediately to the transport company.
For damage that is observed only once the units have been unpacked:
1. Keep the consignment as it was when it arrived
2. Inform GLASBAU HAHN immediately in writing preferably including photos
about the type and volume of the damage
The damage note has to be sent to GLASBAU HAHN at latest:
• Within 24 hours when delivered by parcel service or post
• Within 24 hours when delivered by railway
• Within 7 days when delivered by haulage company
Where the goods have been sent by post, the damage has to be reported to the local Post Office.
For damages observed only once the goods have been unpacked, please report damage to your Post Office
providing them the damaged goods as well as the packing material.
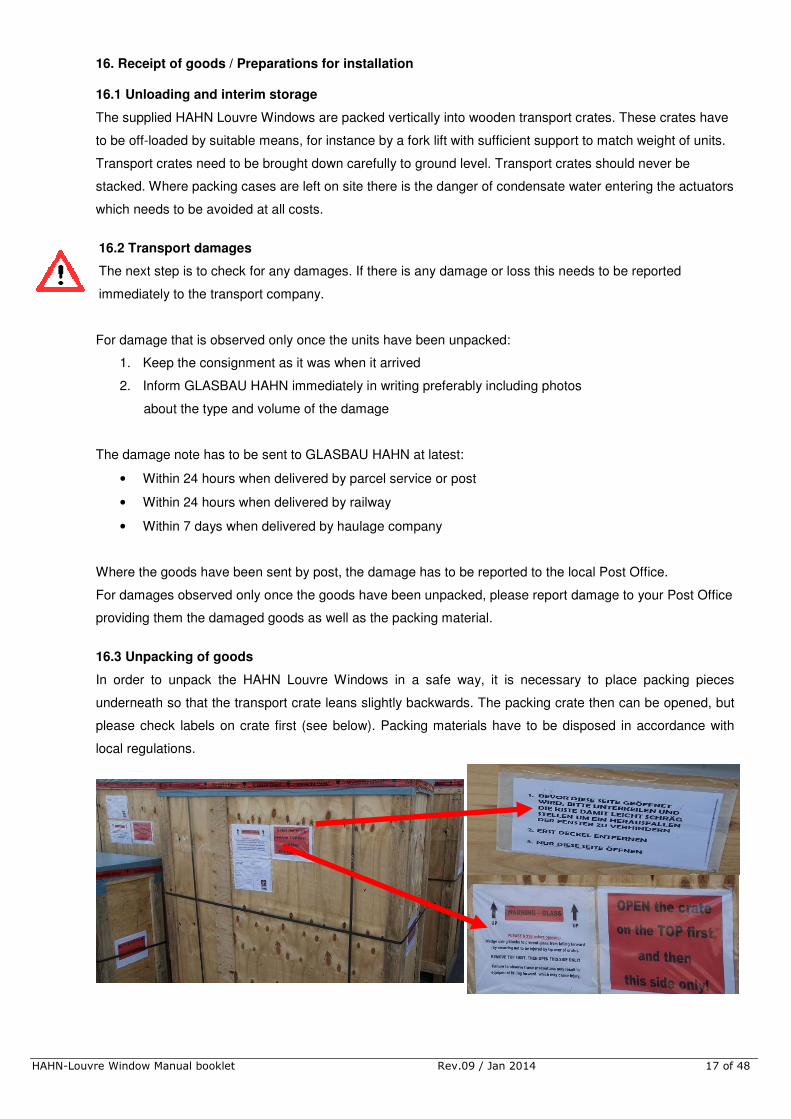
16.3 Unpacking of goods
In order to unpack the HAHN Louvre Windows in a safe way, it is necessary to place packing pieces
underneath so that the transport crate leans slightly backwards. The packing crate then can be opened, but
please check labels on crate first (see below). Packing materials have to be disposed in accordance with
local regulations.
HAHN-Louvre Window Manual booklet Rev.09 / Jan 2014 18 of 48
16.4 Disposal / Dangerous substances
Packaging material, detergent and used or remaining lubricants have to be recycled according to the local regulations for environmental protection. The protection of natural resources is one of the most important duties. Correct disposal avoids negative effects to persons and environment and ensures recycling of useful raw materials. At production of HAHN Louvre Windows stainless steel, aluminium, silicone, TPE, EPDM PA 66 (thermal barrier) and glass are used. These materials do not contain any toxins, they are no contaminated materials. Disposal should be in accordance with requirements of the destination. Lubricants Lubricants will have to be disposed depending on their specification and the valid local regulations. Materials (Metal, Plastic) Materials have to be correctly sorted for proper disposal. Clean material from any adherent foreign materials. Dispose material according to the valid local regulations. Electric components The electrical/electronical components are not subject to the WEEE directive 2002/96/EG and their respective regional laws (in Germany eg ElektroG). The electrical / electronical components have to be disposed directly to a specialised recycling company.
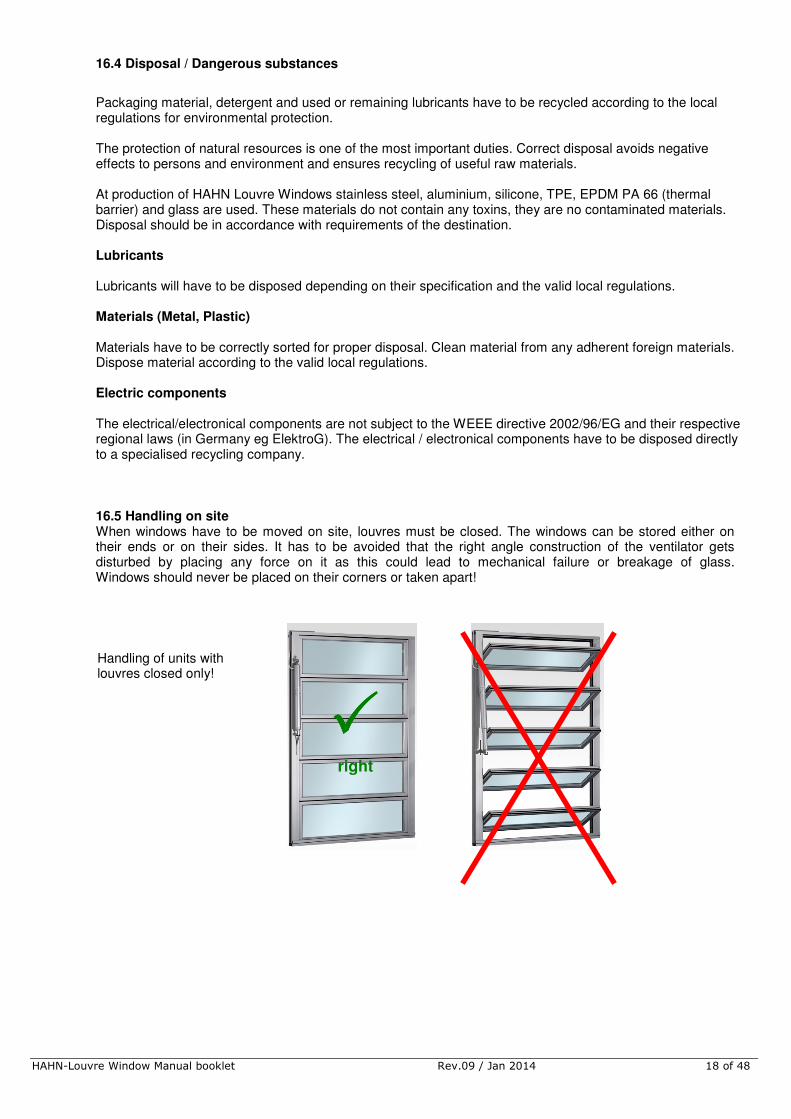
16.5 Handling on site When windows have to be moved on site, louvres must be closed. The windows can be stored either on their ends or on their sides. It has to be avoided that the right angle construction of the ventilator gets disturbed by placing any force on it as this could lead to mechanical failure or breakage of glass. Windows should never be placed on their corners or taken apart!
Handling of units with louvres closed only!
���� right

HAHN-Louvre Window Manual booklet Rev.09 / Jan 2014 19 of 48
Do not take apart!
Transport vertically or horizontally only!
Do not place or transport on the corner!
���� right ����
right

HAHN-Louvre Window Manual booklet Rev.09 / Jan 2014 20 of 48
17.0 Installation
Units should be fixed according to the following instructions by qualified personnel so as to avoid any damage
through incorrect installation. Motor types LAH 61 and LAH 61 K may only be uninstalled once you have
checked with GLASBAU HAHN.
17.1 Correct support
Before the window is actually installed into the opening, it is necessary to check that it will fit in, that is to say
there is sufficient clearance around the ventilator so that the window can function and keep weather out in a
correct manner.
The Louvre Window has to be exactly positioned and packing pieces have to be set. Packing pieces have to
be placed on the most important and correct places as shown on drawings A and B. Pads need to be placed
right underneath the vertical profiles and not in the middle in order to avoid these profiles bending, which
would result in one of the louvres not being able to open. Drawing C shows the necessary positioning of
packing pieces for double breasted units.
Drawing A Drawing B
Drawing C
���� right
���� right
���� right

HAHN-Louvre Window Manual booklet Rev.09 / Jan 2014 21 of 48
17.2 Allignment
It is necessary to align the window horizontally and vertically accurately to achieve correct function and
tightness. The Louvre Window frames must be exactly parallel to each other. This is achieved by side
mounted packing pieces. Once the unit has been fixed provisionally it is necessary to check the angles and
make sure vent is perpendicular to all sides.
Inaccurate installation can be seen at different gaps between louvre and vertical brush sealing of side frame
(Drawing B). The individual louvres ought to be able to move about in the horizontal plane 1-2 mm when
open. Widths and heights of this gap need to be the same for every part of the unit.
Drawing B
���� right
90°
90°
���� right
wrong
���� wrong
Drawing A
After installation, support and alignment of units the white distance shims will have to be removed so you can open the unit.

HAHN-Louvre Window Manual booklet Rev.09 / Jan 2014 22 of 48
17.3 Fixation of GLASBAU HAHN Louvre Windows
17.3.1 Fixation by screwing through window frame
Only use boreholes in from GLASBAU HAHN already made into the side frame profile (drawing below)
Method of fixing:
� Point of origin: HAHN Louvre Window is installed, packing pieces are fitted and window is secured
� Open the unit to a maximum of 70° (this avoids linkage mechanism being damaged).
Note: Actuator types LAH 61 and LAH 61K may only be removed once GLASBAU HAHN has approved
this
� Remove screws (Fig. A) :
- at installation into wooden construction: All screws
- at installation into steel / brickwall: up to 250 mm Louvre height: Every 2nd screw
from 250 mm Louvre height: All screws
� Drill through window frame (�5 mm impact dowel). Do spot-drill substructure only (Caution: Pay
attention to diameter of screw and use correct boring head size)
� Make core drill hole for � 4.8 mm countersunk screw into substructure (Fig. B)
� At fixation into brick wall HAHN Louvre Window has to be removed again or tend slightly out of opening
� Enlarge countersink holes into inner side frame suitable to anchor
� Drill countersink screw � 4.8 mm into window frame, but do not yet tighten screw
� Pad all screwed joints between Louvre Window and construction pressure-resistant to avoid bending of
frame
� Tighten screws
Example shown at S9-iVt-05

HAHN-Louvre Window Manual booklet Rev.09 / Jan 2014 23 of 48
Fixation through vent frame especially for Tairmo
Use only the already existing boreholes (prepared by GLASBAU HAHN) inside the linkage profiles.
Method of fixing:
� Point of origin: HAHN Louvre Window is installed, packing pieces are fitted and window is secured
� Open the unit to a maximum of 45° (this avoids linkage mechanism being damaged).
Note: Actuator types LAH 61 and LAH 61K may only be removed once GLASBAU HAHN has approved this
� Drill through window frame (� 10 mm impact dowel).
At frame dowel: Do spot-drill substructure only (Caution: Pay attention to diameter of screw and use
correct boring head size)
At impact dowel: Make tapping drill hole for 10 mm dowel into construction
� At frame dowel: When fixing into brickwall opening, windos has to be removed or bended slightly
from opening to install dowels
� At impact dowel: Insert and fix directly
� Enlarge borehole in linkage profile suitable for screw head size (screw fitting to dowel)
� Insert screw but do not yet tighten
� Pad all screw connections between window and wall pressure-resistant
(this is necessary to avoid window frame does bend)
� Tighten screws

HAHN-Louvre Window Manual booklet Rev.09 / Jan 2014 24 of 48
17.3.2 Fixation by using fixing brackets
This type of fixing is used when fixing to brickwork. Plates are intended to be attached to the vertical frames
with a spacing of 40-70 cm, depending on wind load.
Preparation of fixing:
� Turn fixing brackets over through 90° (Fig A) and secure with second screw
� Have rawplug ready (not included into the delivery by GLASBAU HAHN)
(Choice of rawplug has to be made during the planning process and depends on building situation, type
of wall, wind loads etc. – necessary clearance between ventilator frame and opening depends again on
the size of rawplug)
Method of fixing:
� Point of origin: HAHN Louvre Window is installed, packing pieces are fitted and window is secured
� Drill through borehole of fixing bracket into the wall
� Fix rawplug according to manufacturer’s information
� Pad fixing bracket underneath rawplug position (Fig B and C)
� Tighten rawplug
Legend:
a.) 2x Lens head screw each bracket �4,2 (V2A) b.) Bracket 30x2x130 standard dimensions / V2A c.) Rawplug (not included into the delivery by GLASBAU HAHN) d.) Pad (not included into the delivery by GLASBAU HAHN)
HAHN-Louvre Window Manual booklet Rev.09 / Jan 2014 25 of 48
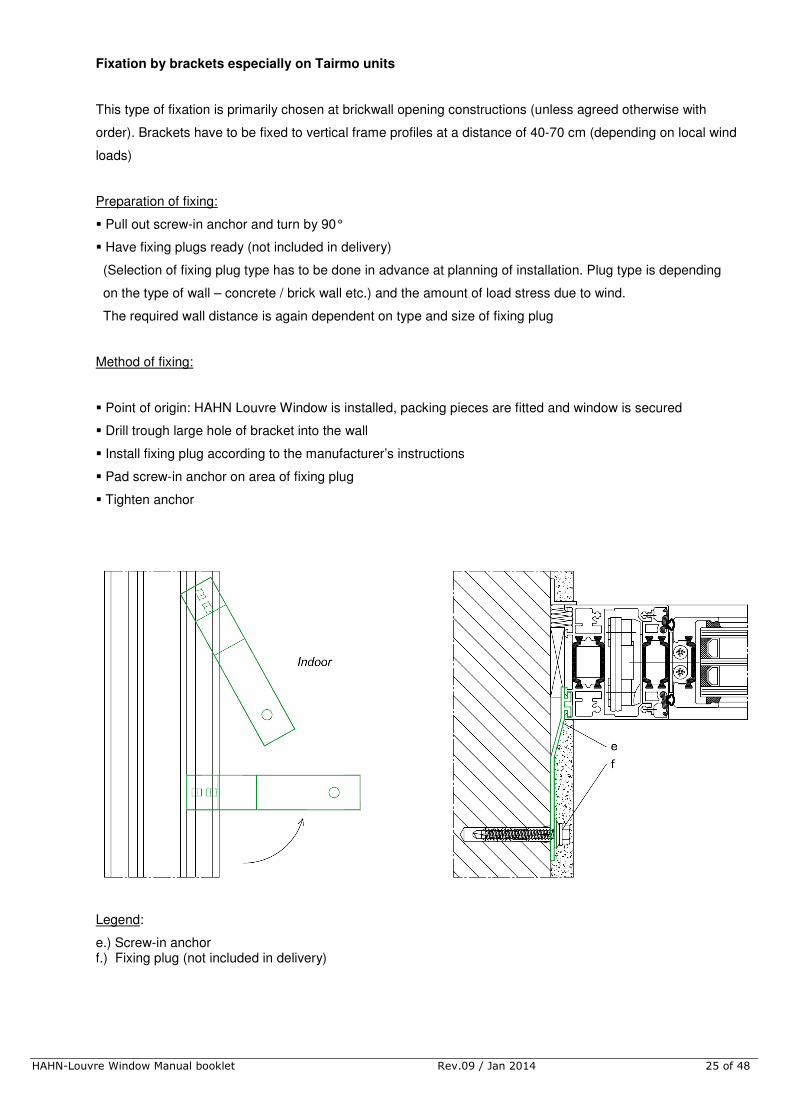
Fixation by brackets especially on Tairmo units
This type of fixation is primarily chosen at brickwall opening constructions (unless agreed otherwise with
order). Brackets have to be fixed to vertical frame profiles at a distance of 40-70 cm (depending on local wind
loads)
Preparation of fixing:
� Pull out screw-in anchor and turn by 90°
� Have fixing plugs ready (not included in delivery)
(Selection of fixing plug type has to be done in advance at planning of installation. Plug type is depending
on the type of wall – concrete / brick wall etc.) and the amount of load stress due to wind.
The required wall distance is again dependent on type and size of fixing plug
Method of fixing:
� Point of origin: HAHN Louvre Window is installed, packing pieces are fitted and window is secured
� Drill trough large hole of bracket into the wall
� Install fixing plug according to the manufacturer’s instructions
� Pad screw-in anchor on area of fixing plug
� Tighten anchor
Legend:
e.) Screw-in anchor f.) Fixing plug (not included in delivery)
HAHN-Louvre Window Manual booklet Rev.09 / Jan 2014 26 of 48
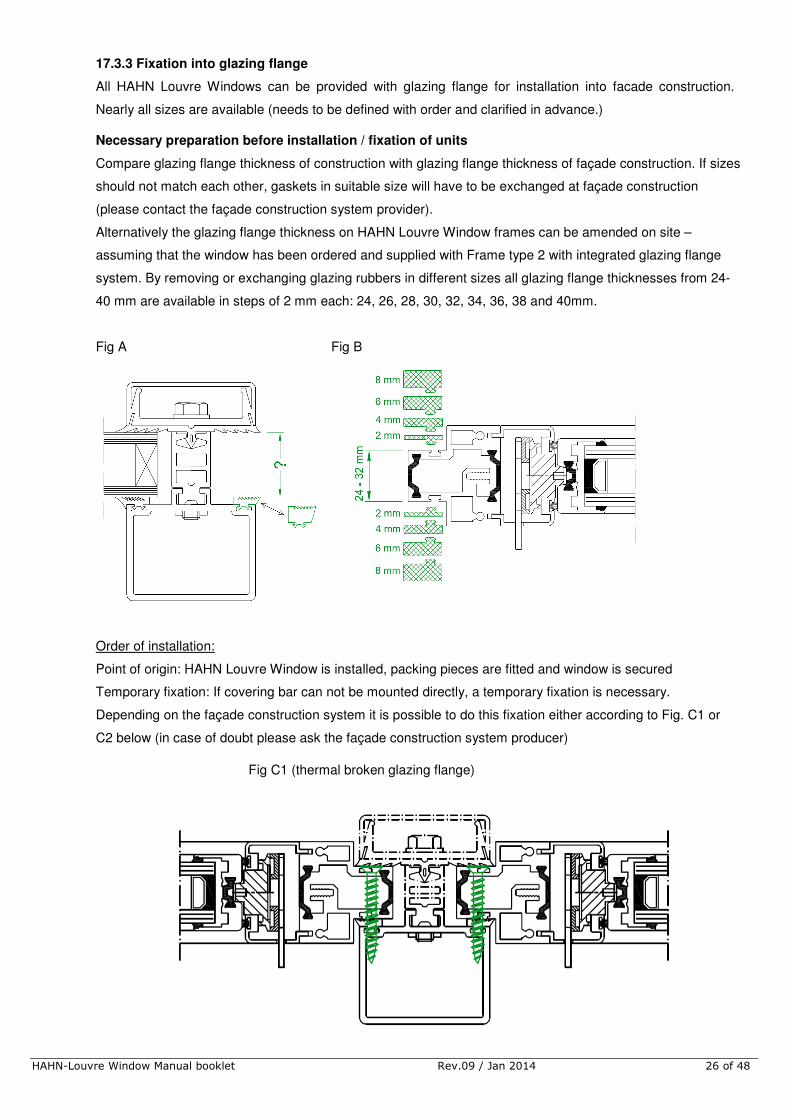
17.3.3 Fixation into glazing flange
All HAHN Louvre Windows can be provided with glazing flange for installation into facade construction.
Nearly all sizes are available (needs to be defined with order and clarified in advance.)
Necessary preparation before installation / fixation of units
Compare glazing flange thickness of construction with glazing flange thickness of façade construction. If sizes
should not match each other, gaskets in suitable size will have to be exchanged at façade construction
(please contact the façade construction system provider).
Alternatively the glazing flange thickness on HAHN Louvre Window frames can be amended on site –
assuming that the window has been ordered and supplied with Frame type 2 with integrated glazing flange
system. By removing or exchanging glazing rubbers in different sizes all glazing flange thicknesses from 24-
40 mm are available in steps of 2 mm each: 24, 26, 28, 30, 32, 34, 36, 38 and 40mm.
Fig A Fig B
Order of installation:
Point of origin: HAHN Louvre Window is installed, packing pieces are fitted and window is secured
Temporary fixation: If covering bar can not be mounted directly, a temporary fixation is necessary.
Depending on the façade construction system it is possible to do this fixation either according to Fig. C1 or
C2 below (in case of doubt please ask the façade construction system producer)
Fig C1 (thermal broken glazing flange)

HAHN-Louvre Window Manual booklet Rev.09 / Jan 2014 27 of 48
Fig C2 (non thermal broken glazing flange)
� Fix glazing flange of façade system and fix it according to the façade construction supplier’s instruction
Installation information for fixation into polygonal façade construction
At installation into polygonal façade construction unit has to be padded on side frames to make sure vertical
running frame profiles are parallel to each other
HAHN-Louvre Window Manual booklet Rev.09 / Jan 2014 28 of 48
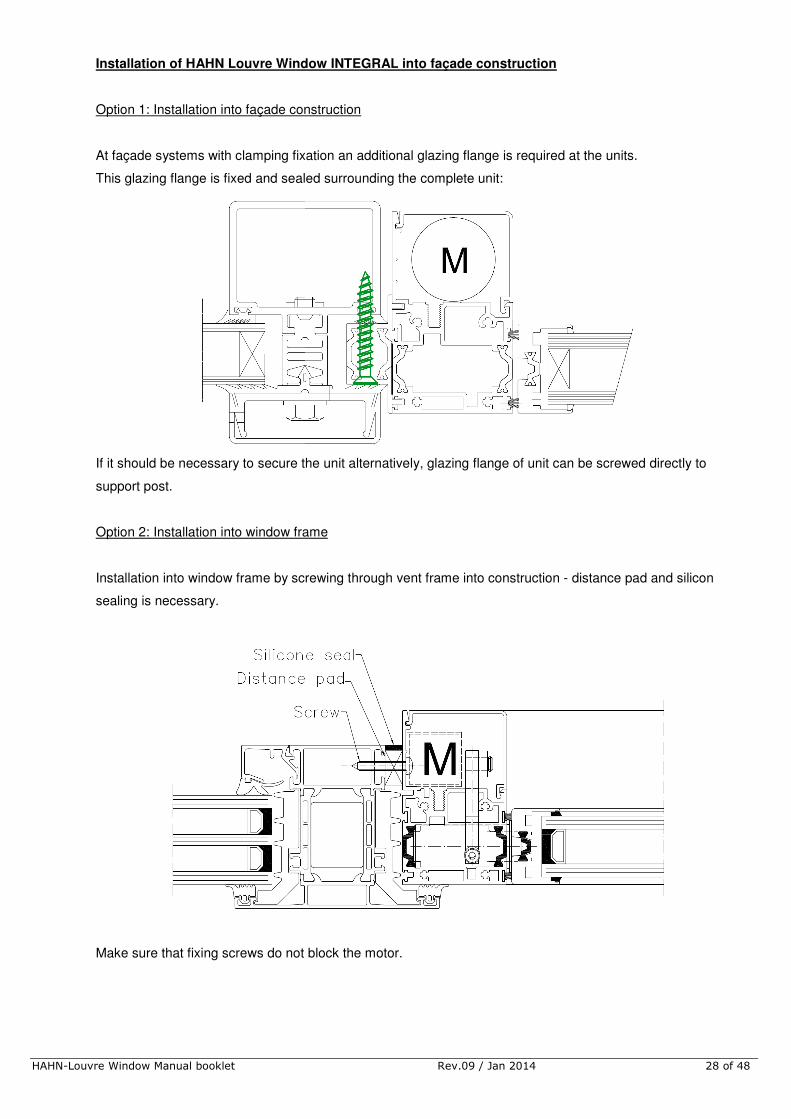
Installation of HAHN Louvre Window INTEGRAL into façade construction
Option 1: Installation into façade construction
At façade systems with clamping fixation an additional glazing flange is required at the units.
This glazing flange is fixed and sealed surrounding the complete unit:
If it should be necessary to secure the unit alternatively, glazing flange of unit can be screwed directly to
support post.
Option 2: Installation into window frame
Installation into window frame by screwing through vent frame into construction - distance pad and silicon
sealing is necessary.
Make sure that fixing screws do not block the motor.

HAHN-Louvre Window Manual booklet Rev.09 / Jan 2014 29 of 48
17.4 Coupling of units besides each other
If HAHN Louvre Windows have to be installed beside each other, vertical frames have to be screwed together.
Only use boreholes in from GLASBAU HAHN already made into the side frame profile (drawing below)
� Point of origin: HAHN Louvre Window is installed, packing pieces are fitted and window is secured
� Open the unit to a maximum of 70° (this avoids linkage mechanism being damaged).
Note: Actuator types LAH 61 and LAH 61K may only be removed once GLASBAU HAHN has approved
this
� Remove screws (Fig. A) :
- up to 250 mm Louvre height: Every 2nd screw / from 250 mm Louvre height: All screws
� Drill through both window frames (�5 mm impact dowel for frame 1, �4.2 mm for frame 2 ).
� Make core drill hole for � 4.8 mm countersunk screw (Fig. B)
� Drill countersink screw � 4.8 mm (Stainless steel A2 DIN 7982) into window frame and tighten screw
(Fig. C)
� Fig D1 = S9-iVt 05, S9-iVt-05 Allglass, S9-45°
� Fig D2 = S9 and S9-iV with big (30 mm) frame profile
� Fig D3 = S9 and S9-iV with small (19 mm) frame profile

HAHN-Louvre Window Manual booklet Rev.09 / Jan 2014 30 of 48
17.5 Coupling of units on top of each other
Some units are provided separately so as to reduce weight and make handling on site easier.
These units have to be coupled on site.
Method of fixing:
� Install the bottom-most unit, fit packing pieces and secure window (Figure A) – see instructions above
� Remove transport bracket (wooden strip) (Figure B)
� Apply silicone to top surface (Figure C)
� Remove transport bracket from upper part of the ventilator (Figure C)
� Bring upper unit on top of the bottom unit. Coupling pieces will help to provide an exact fit. (Figure D)
� Install upper unit – see instructions above (Figure E)
Figure A Figure B Figure C Figure D Figure E
a.) Transport bracket b.) Coupling piece

HAHN-Louvre Window Manual booklet Rev.09 / Jan 2014 31 of 48
17.6 Additional installation instructions for RC2 windows (Louvre Window S9-iVt-05)
If the HAHN Louvre Window type S9-iVt-05 has been ordered according to classification “RC 2” to
DIN V ENV1627 – must be specified with order – additional installation instruction guidelines
must be followed.
� Installation into façade construction
At least on every second louvre a pressure-resistant backing with a plastic block material of min. 70 mm
length is necessarily required (Fig A)
Fig A
� Installation into brickwall opening
The louvre windows must be bolted at least every second blade through the vertical frame and back-filled
with a pressure-resistant plastic block material (no impact dowel or similar).
Use already existing boreholes by GLASBAU HAHN only (see point 8.3.1. to check order of assembly)
RC2 Requirements to brickwall opening:
� Brickwall opening acc. to DIN 1053-1
- Min. nominal thickness: 115mm
- Compressive strength class of stones: Min. class 12
- Mortar group: Min. 2
� Reinforced concrete acc. to DIN 1045
- Min. nominal thickness: 100mm
- Strength classification B15

HAHN-Louvre Window Manual booklet Rev.09 / Jan 2014 32 of 48
17.7 Installation of single glass louvre blades into mounted S9 window frame
Unless otherwise agreed, HAHN Louvre Windows Type S9 will be supplied unglazed.
Glazing has to be made after installation of units from inside of the building.
� Point of origin: HAHN Louvre Window S9 is installed, packing pieces are fitted and window is secured
� Open the unit (Fig. A)
Actuator types LAH 61 and LAH 61K may only be removed once GLASBAU HAHN has approved this
� Spray glass cleaner on installed glazing rubbers (Fig. A)
� Wear work gloves during glazing of units to avoid injuries
� Sort and arrange glass panes
(Note: On some units top and/or bottom pane sizes differ to remaining panes)
� Install and adjust glass panes into fixing clips (Fig. B)
� Spray glass cleaner on rubber gaskets supplied with units and insert gasket into glass fixing clip (Fig. C)
� Insert gasket until it locks into place (D1-D3 Detail X)
� Close window
� Adjust glass fixing clips – clearance on complete unit 1.5 mm to 2 mm at complete unit
� Test run

HAHN-Louvre Window Manual booklet Rev.09 / Jan 2014 33 of 48
17.8 Installation of single glass louvre blades into mounted NACO window frame
HAHN Louvre Windows Type NACO will be supplied unglazed.
Glazing has to be made after installation of units from inside of the building.
� Point of origin: HAHN Louvre Window NACO is installed, packing pieces are fitted and window is
secured
� Open the unit (Fig. A)
� Wear work gloves during glazing of units to avoid injuries
� Install and adjust glass panes into fixing clips (Fig. B)
� Bend fixing clip to the bottom of each louvre (Fig C and detail)
This installation step can be eased when using a small wooden pad between bending edge and glass.
� Close window
� Test run
Fig A Fig B Fig C Detail

HAHN-Louvre Window Manual booklet Rev.09 / Jan 2014 34 of 48
17.9 Installation of single louvre blades into mounted TAIRMO window frame
� Point of Origin: Louvre window frame is installed, packing pieces are fitted and window is secured
� Open unit to max. 45° (this avoids linkage mechanisms being damaged)
Actuator types LAH 61 and LAH 61K may only be removed once GLASBAU HAHN has approved this
Insert black pastic cap (Photo A)
Photo A
� Insert louvres simultaneously (with 2 engineers) into louvre pivot once black pastic caps are fixed
onto the pivot bearings. Louvre blades are numbered, necessarily follow the order
� As soon as TAIRMO louvre blade has been insert correctly, it can not slide downwards
Pay attention that sealing on side does not get damaged during this process
right wrong
HAHN-Louvre Window Manual booklet Rev.09 / Jan 2014 35 of 48
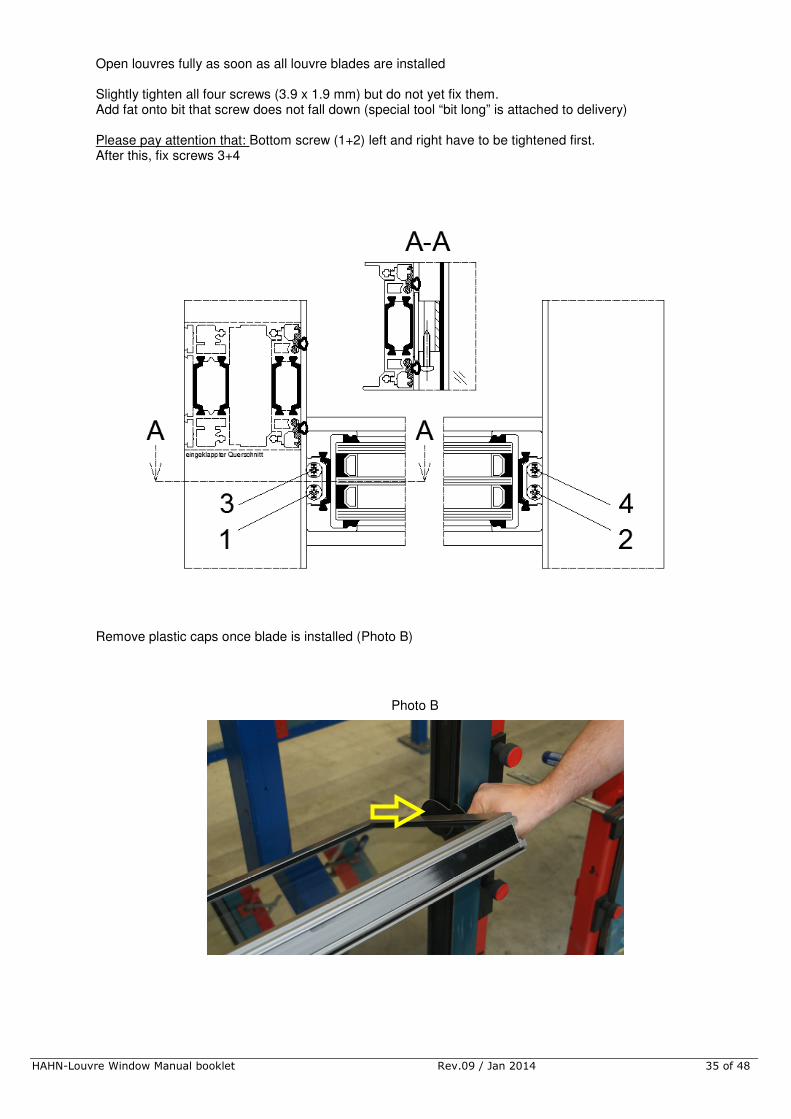
Open louvres fully as soon as all louvre blades are installed Slightly tighten all four screws (3.9 x 1.9 mm) but do not yet fix them. Add fat onto bit that screw does not fall down (special tool “bit long” is attached to delivery) Please pay attention that: Bottom screw (1+2) left and right have to be tightened first. After this, fix screws 3+4
Remove plastic caps once blade is installed (Photo B)
Photo B
HAHN-Louvre Window Manual booklet Rev.09 / Jan 2014 36 of 48
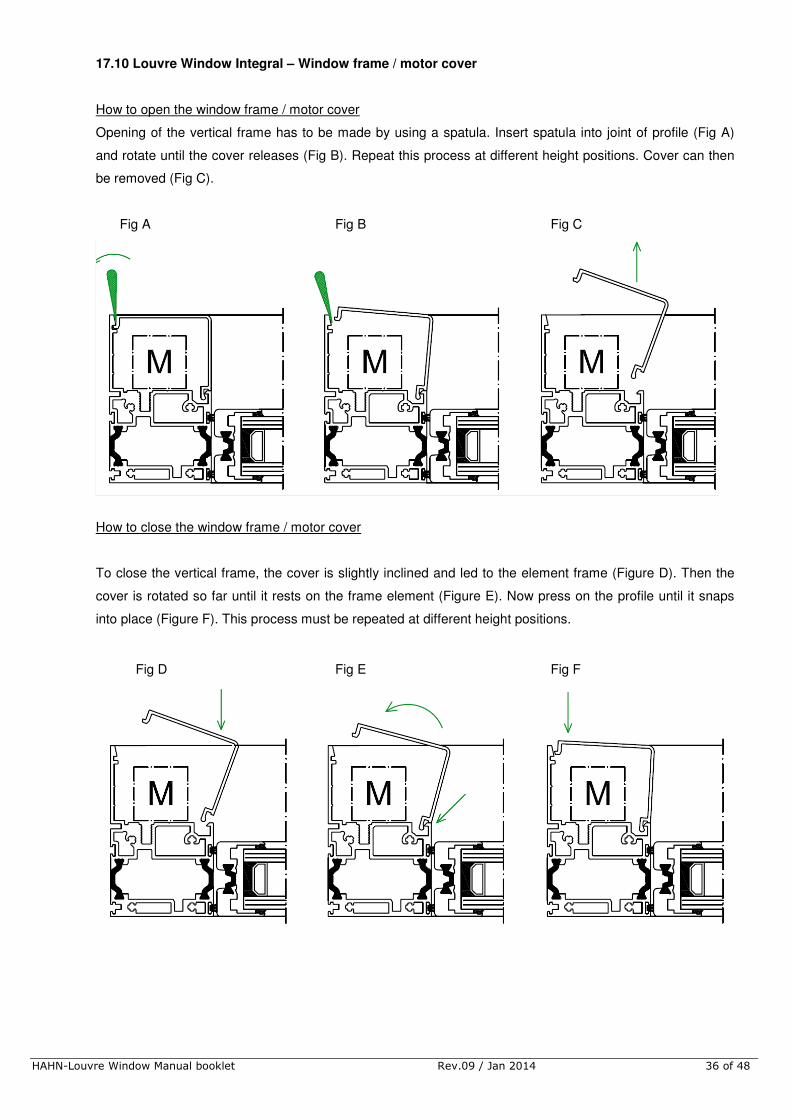
17.10 Louvre Window Integral – Window frame / motor cover
How to open the window frame / motor cover
Opening of the vertical frame has to be made by using a spatula. Insert spatula into joint of profile (Fig A)
and rotate until the cover releases (Fig B). Repeat this process at different height positions. Cover can then
be removed (Fig C).
Fig A Fig B Fig C
How to close the window frame / motor cover
To close the vertical frame, the cover is slightly inclined and led to the element frame (Figure D). Then the
cover is rotated so far until it rests on the frame element (Figure E). Now press on the profile until it snaps
into place (Figure F). This process must be repeated at different height positions.
Fig D Fig E Fig F
HAHN-Louvre Window Manual booklet Rev.09 / Jan 2014 37 of 48
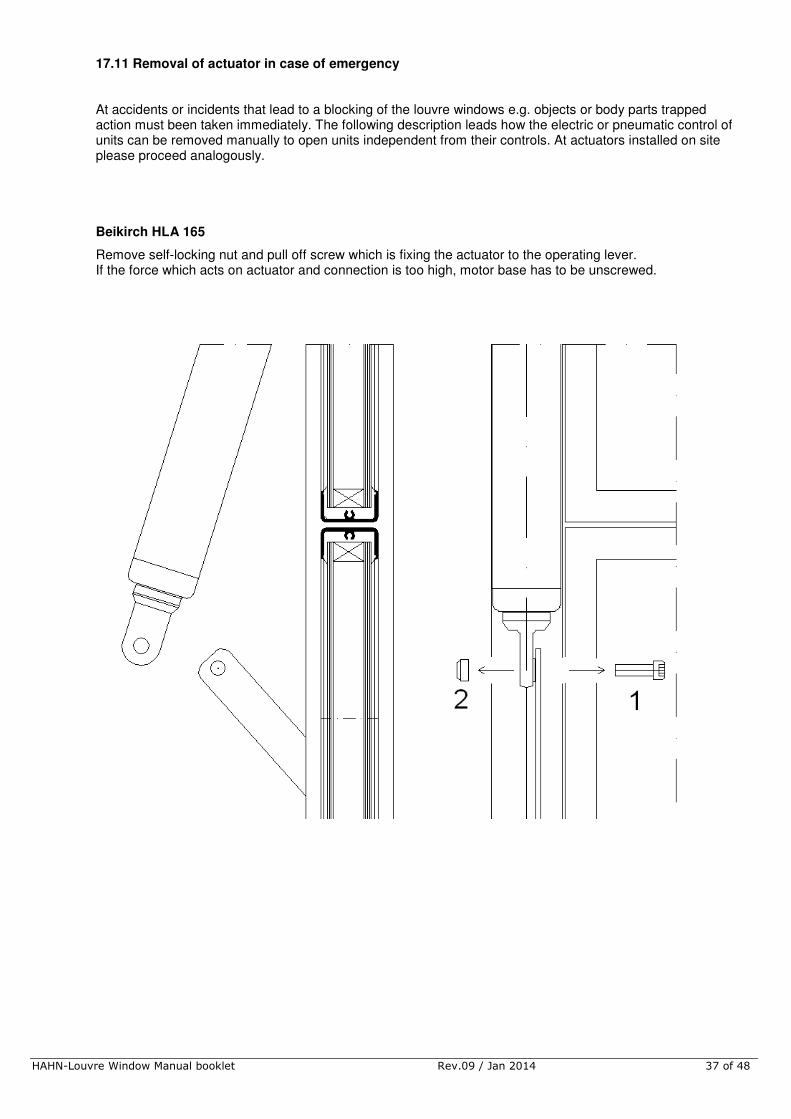
17.11 Removal of actuator in case of emergency At accidents or incidents that lead to a blocking of the louvre windows e.g. objects or body parts trapped action must been taken immediately. The following description leads how the electric or pneumatic control of units can be removed manually to open units independent from their controls. At actuators installed on site please proceed analogously.
Beikirch HLA 165
Remove self-locking nut and pull off screw which is fixing the actuator to the operating lever. If the force which acts on actuator and connection is too high, motor base has to be unscrewed.
HAHN-Louvre Window Manual booklet Rev.09 / Jan 2014 38 of 48
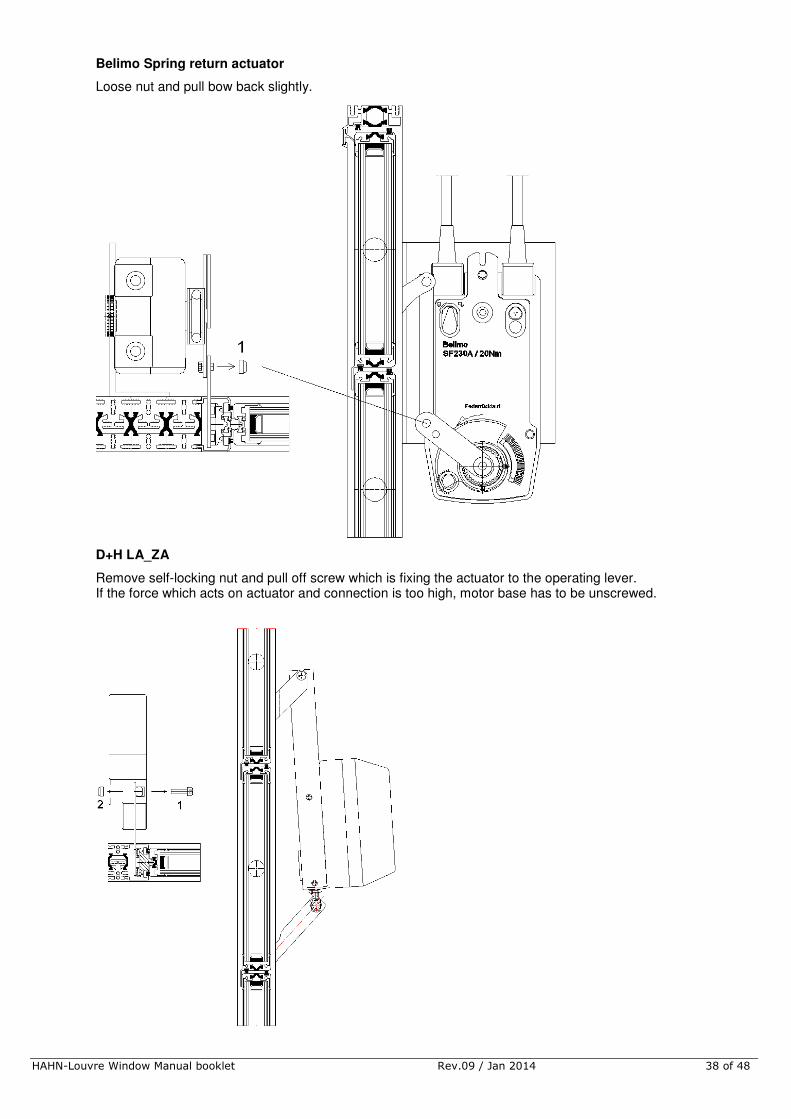
Belimo Spring return actuator
Loose nut and pull bow back slightly.
D+H LA_ZA
Remove self-locking nut and pull off screw which is fixing the actuator to the operating lever. If the force which acts on actuator and connection is too high, motor base has to be unscrewed.

HAHN-Louvre Window Manual booklet Rev.09 / Jan 2014 39 of 48
ESCO FA 121 R
Remove linkage cover, loose grub screw from operation lever. Operation lever can now be moved at
external linkage and louvre blades can be opened.
D+H LAH 61
Remove the 4no Torx screws (T20) on top and bottom of actuator to disassemble it from the unit
HAHN-Louvre Window Manual booklet Rev.09 / Jan 2014 40 of 48
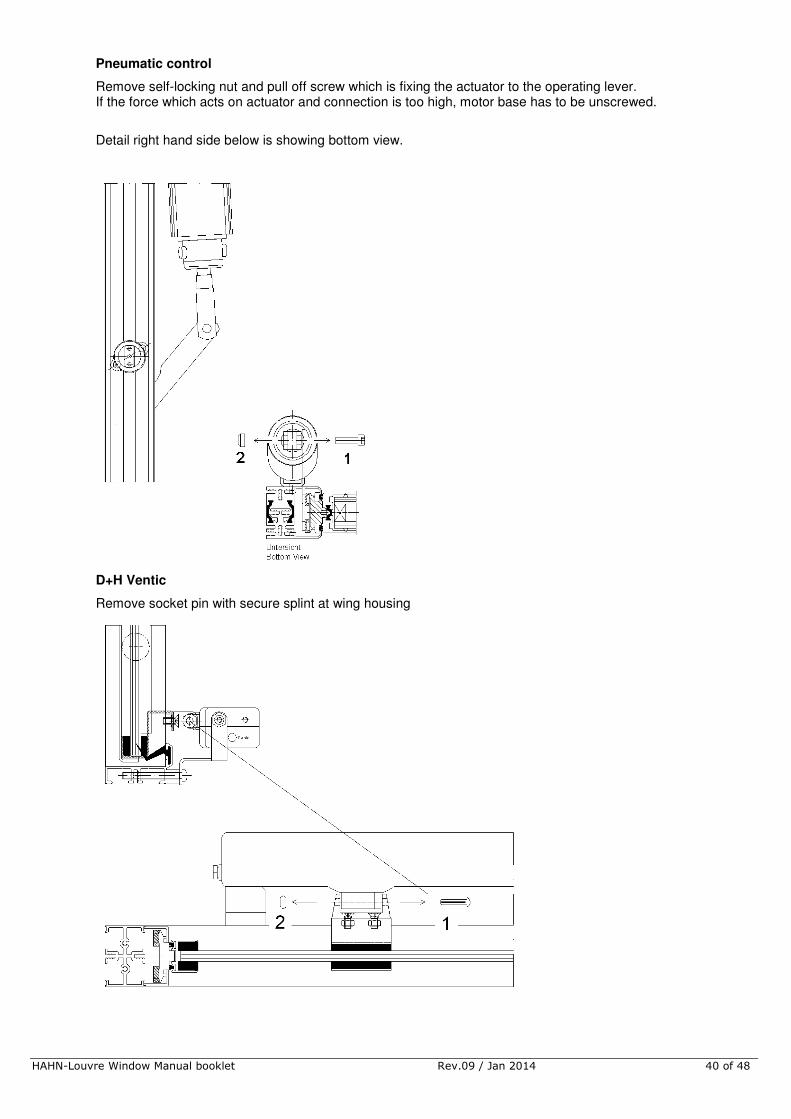
Pneumatic control
Remove self-locking nut and pull off screw which is fixing the actuator to the operating lever. If the force which acts on actuator and connection is too high, motor base has to be unscrewed.
Detail right hand side below is showing bottom view.
D+H Ventic
Remove socket pin with secure splint at wing housing
HAHN-Louvre Window Manual booklet Rev.09 / Jan 2014 41 of 48
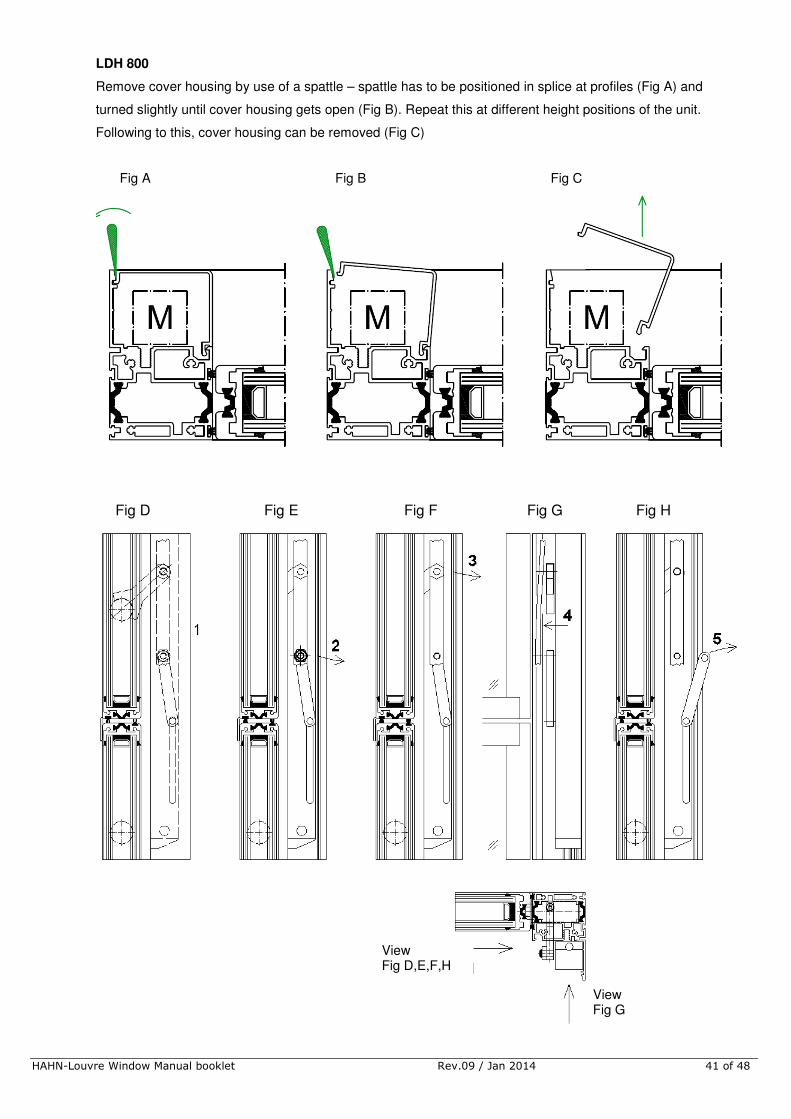
LDH 800
Remove cover housing by use of a spattle – spattle has to be positioned in splice at profiles (Fig A) and
turned slightly until cover housing gets open (Fig B). Repeat this at different height positions of the unit.
Following to this, cover housing can be removed (Fig C)
Fig A Fig B Fig C
Fig D Fig E Fig F Fig G Fig H
View Fig D,E,F,H
View Fig G
HAHN-Louvre Window Manual booklet Rev.09 / Jan 2014 42 of 48
17.12 Final testing and start of operation
A function test has to be made after the window has been installed correctly. The actuator has to be
connected to the appropriate power supply (according to wiring diagram available at www.glasbau-HAHN.de)
only by an electrically qualified person and opened and closed at least once.
Should the window open or close improperly, check if installation has been made correctly.
Correspondingly, this also applies to mechanical drives / manual actuators.
Actuating of Louvre Window may be effected only through the power levers provided. An adjustment of items
by pressing against the blades contrary to force of motor mechanism can damage rotation inventory and
mechanics. A proper function and tightness of louvre blades is then not longer ensured. Opening area of
louvre blades has to kept free of any obstacles. Opened louvres may not be used to bear any objects.
Cables, pipes or else may not run through opened louvres.
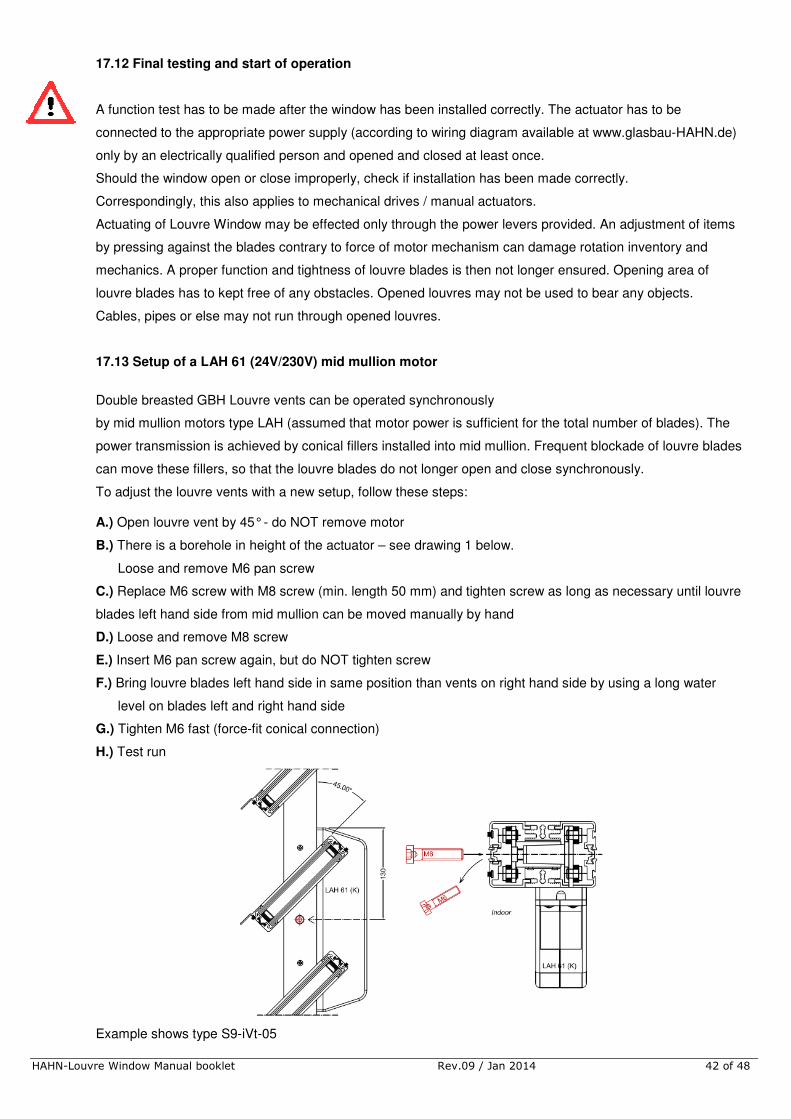
17.13 Setup of a LAH 61 (24V/230V) mid mullion motor
Double breasted GBH Louvre vents can be operated synchronously
by mid mullion motors type LAH (assumed that motor power is sufficient for the total number of blades). The
power transmission is achieved by conical fillers installed into mid mullion. Frequent blockade of louvre blades
can move these fillers, so that the louvre blades do not longer open and close synchronously.
To adjust the louvre vents with a new setup, follow these steps: A.) Open louvre vent by 45° - do NOT remove motor
B.) There is a borehole in height of the actuator – see drawing 1 below.
Loose and remove M6 pan screw
C.) Replace M6 screw with M8 screw (min. length 50 mm) and tighten screw as long as necessary until louvre
blades left hand side from mid mullion can be moved manually by hand
D.) Loose and remove M8 screw
E.) Insert M6 pan screw again, but do NOT tighten screw
F.) Bring louvre blades left hand side in same position than vents on right hand side by using a long water
level on blades left and right hand side
G.) Tighten M6 fast (force-fit conical connection)
H.) Test run
Example shows type S9-iVt-05
[Gebe

HAHN-Louvre Window Manual booklet Rev.09 / Jan 2014 43 of 48
18. Replacement of LAH actuators
DO NOT REMOVE AND/OR REPLACE ANY ACTUATORS WITHOUT APPROVAL OF GBH.
Otherwise warranty gets lost.
Check motor setup on label of the originally installed actuator. DIP-switches may have to be placed in position.
Remove the 4no Torx screws (T20) on top and bottom of actuator to disassemble it from the unit

HAHN-Louvre Window Manual booklet Rev.09 / Jan 2014 44 of 48
Check cable entry once actuator has been removed:
LAH 61 (24V) top entry LAH 61 (24V) bottom entry
LAH 61 K 230 V top entry
LAH 61K 230 V bottom entry
Window has to be closed when installing a new actuator. Motor has to be pressed fix to already installed motor bracket and fixed again by tightening the screws. When finger trapping protection is to be activated, unit has to be opened and closed one time. To check whether function is activated, close unit and hold a finger thick object between (12-15 mm) the closing blades. Motor does register blocking of closing and opens to about 60° opening angle. After a 5 second stop louvre will close again. Electric power has to be steady during complete test run.

HAHN-Louvre Window Manual booklet Rev.09 / Jan 2014 45 of 48
19. Requirements for longevity Windows have to be cleaned and require maintenance in a periodical cycle to achieve longevity. Furthermore
the correct installation of windows will have to be checked before beginning of operation. Most important is:
� Check whether Louvre Window has any outer damages
� Check whether window is perpendicular to all sides (take diagonal values)
� See if window frames are installed parallel to each other:
- Take width of unit on top and bottom frame as well to middle of unit (tolerance +/- 1mm)
- Take height of unit on right and left frame as well to middle of unit (tolerance +/-1 mm)
- Check gaps between vertical frame profile and louvre (between 1.5-2.5 mm on complete height)
� Check if window is running smoothly (do not remove actuator!)
� Check if windows are running parallel and if they close properly
� All Louvre Window edges have to be clear of obstructions at any time!
20. Maintenance
HAHN Louvre Windows at use in exterior walls are exposed to weather and environmental conditions,
therefore they are subject to unavoidable contamination. To keep the decorative appearance and function,
HAHN Louvre Windows have to be cleaned and maintained at least once a year, at rough environmental
conditions even more often, according to the maintenance manual.
In the following instructions, we have limited ourselves to the main points for optimal care and cleaning:
� Use clear water only which may contains small additives of neutral or weakly alkaline detergent (pH 5-8)
� Do not use steam- or high pressure cleaners
� Use soft cloths or sponges only
� Surface temperature during cleaning may not exceed 25°C (detergent also may also have max. of 25°C)
when window frames are colour coated
� Do not use scratching or abrasive cleaners
� Do not use acid or strong alkaline cleaning detergents
� Do not use any organic solvents which contain esters, ketones, alcohols, aromates, glycol ethers,
halogenated hydrocarbons or similar ingredients.
� Do not use any detergents with unknown mixture
� When cleaning coated surfaces, please do a test application on a hidden surface making sure the paint
does neither get mechanically nor chemically damages first
� To clean the brush seals, open the units and clean them with a coarse scrubbing brush in dry condition.
At very persistent dirt please mouisturise the brush or use a neutral detergent

HAHN-Louvre Window Manual booklet Rev.09 / Jan 2014 46 of 48
For more detailed instructions for properly cleaning of aluminum components, please contact:
� Aluminium-Zentrale Beratungsstelle- und Informationsdienst
GER-40003 Düsseldorf (Leaflet A5)
� Gütegemeinschaft für die Reinigung von Metallfassaden e.V. (GRM)
GER-90402 Nürnberg
� American Architectural Manufacturers Association
USA (AAMA 610-1979 Cleaning Procedures)
� Regulations and notes of the powder producer, e.g.
www.Tiger-coatings.com / Leaflet 1090
21. Preventive maintenance
HAHN-Louvre Windows are virtually maintenance free. To keep the blades running smoothly, the following
points should be noted:
� Regular cleaning of windows, especially seals and brush seals (intact seals are fundamental
condition for a tight Louvre Window. Though all materials used are UV and weather resistant,
a conditional exchange [due to frequent use, improper cleaning or high age] could make sense)
� Check running smoothness of Louvre Window regularly (once a year)
� Add Teflon spray to pivot bearings if needed
� Setting of manual remote controls should be reviewed annually prior to the period of bad weather and
readjusted if necessary
� Electronic control type LAH 61 and LAH 61-K may be removed by GLASBAU HAHN or from
GLASBAU HAHN authorized specialized companies only
We basically recommend a maintenance contract with a specialized company or GLASBAU HAHN
directly.
22. Repairing
Necessary repairs should be done by GLASBAU HAHN or from GLASBAU HAHN authorized specialized
companies only. Any preventive action in case of an emergency are excluded.
When repairing or remodelling only use original GLASBAU HAHN spare parts. Please check in advance
which parts are necessary.
At the following points you can check whether a repairing is necessary:
� Broken glass or other deformations on profiles, linkages or controls
� Louvres which are operated by one actuator do not run parallel to each other or do not run at all
� Electric control does not work (here please first check the electric wiring, the control panel and any
additional accessories like wind- and rain sensors by an electrician).
� Louvre blade has moved out of position (please secure louvre blade – window may not be operated!)
� Operating lever on window frame damaged or not in correct position

HAHN-Louvre Window Manual booklet Rev.09 / Jan 2014 47 of 48
Notes
_____________________________________________________
_____________________________________________________
_____________________________________________________
_____________________________________________________
_____________________________________________________
_____________________________________________________
_____________________________________________________
_____________________________________________________
_____________________________________________________
_____________________________________________________
_____________________________________________________
_____________________________________________________
_____________________________________________________
_____________________________________________________
_____________________________________________________
_____________________________________________________
_____________________________________________________
_____________________________________________________
_____________________________________________________
_____________________________________________________
_____________________________________________________
_____________________________________________________
_____________________________________________________
HAHN-Louvre Window Manual booklet Rev.09 / Jan 2014 48 of 48
Hafenstraße 5 – 7
63811 Stockstadt
Telefon +49 (0) 6027 / 41 62 20
Fax +49 (0) 6027 / 41 62 99
www.glasbau-HAHN.de