hahnstraße 43d 60528 frankfurt am main, deutschland · hahnstraße 43d 60528 frankfurt am main,...
TRANSCRIPT

Version 3.1, February 2018
T-Systems International GmbH
Hahnstraße 43d
60528 Frankfurt am Main, Deutschland
- subsequently named „Telekom“ -

Customer Documentation Dynamic Services for Infrastructure with vCloud (DSI vCloud)
Seite 2 / 47
1. Table of Contents
1. TABLE OF CONTENTS .................................................................................................................................................. 2
2. LIST OF FIGURES.......................................................................................................................................................... 3
3. LIST OF TABLES ........................................................................................................................................................... 5
4. INTRODUCTION ............................................................................................................................................................ 6
5. SELF-SERVICE PORTAL ................................................................................................................................................ 6
6. TEMPLATE MECHANISMS ............................................................................................................................................. 7
7. MANAGED OS ............................................................................................................................................................. 8
7.1 INITIAL LOGIN ............................................................................................................................................................... 9
7.2 TEMPORARY PRIVILEGED ACCESS (“ROOT ACCESS”) ............................................................................................... 10
7.3 USER MANAGEMENT ................................................................................................................................................. 14
7.4 PATCH MANAGEMENT ............................................................................................................................................... 15
7.5 ADDITIONAL RECOMMENDATIONS AND REGULATIONS .............................................................................................. 16
7.6 FAQ ......................................................................................................................................................................... 16
8. SELF-MANAGED OS ................................................................................................................................................. 17
8.1 DEPLOYMENT PROCESS ........................................................................................................................................... 17
8.2 PATCH MANAGEMENT AND LICENSE ACTIVATION ...................................................................................................... 17
8.3 USER MANAGEMENT ................................................................................................................................................. 18
8.4 ADDITIONAL RECOMMENDATIONS AND REGULATIONS .............................................................................................. 18
9. VM BACKUP AND RESTORATION / DATA PROTECTION .............................................................................................. 18
9.1 CORE FUNCTIONALITIES ........................................................................................................................................... 22
10. CENTRAL LOGGING................................................................................................................................................... 25
10.1 PRE-DEFINED LOG/NAT CONFIGURATION .............................................................................................................. 25
11. HOW TO SECTION ..................................................................................................................................................... 26
11.1 HOW TO SUBSTITUTE A CLIENT INTEGRATION PLUGIN BY A NEWER VERSION ............................................................ 26
11.2 HOW TO VERIFY THE VMWARE TOOLS / OPEN-VM TOOLS VERSION .......................................................................... 27
11.3 HOW TO INSTALL THE VMWARE TOOLS / OPEN-VM TOOLS ...................................................................................... 28
11.4 HOW TO ACCESS THE EDGE SERVICE GATEWAY SYSLOG EVENTS ............................................................................. 29
11.5 HOW TO MODIFY THE STORAGE CAPACITY OF A VM WHICH WAS CREATED FROM A STANDARD TEMPLATE ............... 30
11.6 HOW TO IDENTIFY THE EXTERNAL INTERNET FACING IP ADDRESSES ......................................................................... 32
11.7 HOW TO CONFIGURE APPROPRIATE NAT AND FIREWALL RULES IN ORDER TO USE INTERNET ACCESS ..................... 32
11.8 HOW TO INITIATE A L2VPN CONNECTION ................................................................................................................ 35
11.9 HOW TO INITIATE A SSLVPN CONNECTION .............................................................................................................. 38
11.10 HOW TO UP-&DOWNLOAD TEMPLATES (E.G. OVA, OVF AND ISO) VIA COMMAND LINE INTERFACE ............................. 42
11.11 HOW TO REQUEST A CUSTOMER DRIVEN PENETRATION TEST ................................................................................. 44
11.12 HOW TO SOLVE PERFORMANCE ISSUES .................................................................................................................... 44
12. GENERAL DSI VCLOUD LIMITATIONS AND CONFIGURATION REQUIREMENTS .............................................................. 44
13. FURTHER SUPPORT AND CONSULTING..................................................................................................................... 45
14. DSI VCLOUD GLOSSAR ............................................................................................................................................ 46

Customer Documentation Dynamic Services for Infrastructure with vCloud (DSI vCloud)
Seite 3 / 47
2. List of Figures
Figure 1: Example of the public catalogue provided within the vCloud Director portal .................................... 8
Figure 2: Example configuration of the LAN interfaces during the deployment ................................................ 9
Figure 3: Example of the progress information of the managed OS backend integration ............................... 9
Figure 4: Screenshots of the request process - Windows Managed OS VMs .................................................. 10
Figure 5: Screenshots of the request process - Linux Managed OS VMs......................................................... 13
Figure 6: Example usage of the user management shell script ......................................................................... 15
Figure 7: Example usage of the license/subscription shell script...................................................................... 18
Figure 8: Schematic backup design ....................................................................................................................... 19
Figure 9: BaaS Customer Dashboard ..................................................................................................................... 20
Figure 10: Protect machine and Backup now on vApp level .............................................................................. 20
Figure 11: Protect machine and Backup now on VM level ................................................................................. 21
Figure 12: Restore VM ............................................................................................................................................... 21
Figure 13: Backup reporting .................................................................................................................................... 23
Figure 14: Overview of backup profiles within the self-service portal ............................................................... 24
Figure 15: LOG/NAT configuration on the vShield Edge Device ....................................................................... 25
Figure 16: Example of an unsupported connection from the DMZ to the Telekom Admin-LAN .................. 26
Figure 17: Install VMware Tools via vCloud Director ............................................................................................ 28
Figure 18: Example of the pre-configured vShield Edge syslog IP addresses and networks ....................... 29
Figure 19: Add vApp from Catalog .......................................................................................................................... 30
Figure 20: Template ................................................................................................................................................... 30
Figure 21: Customize Hardware .............................................................................................................................. 31
Figure 22: Disk resize ................................................................................................................................................ 31
Figure 23: Identification of the assigned internet facing IP addresses ............................................................. 32
Figure 24: Example of a vOrg VDC Network .......................................................................................................... 33
Figure 25: DHCP configuration example ............................................................................................................... 33
Figure 26: Example of a SNAT rule ......................................................................................................................... 34
Figure 27: Example of a DNAT rule ......................................................................................................................... 34
Figure 28: Example of firewall rules ........................................................................................................................ 35
Figure 29: Create vOrg network ............................................................................................................................... 35
Figure 30: Configure network settings ................................................................................................................... 36
Figure 31: define client settings ............................................................................................................................... 36
Figure 32: Statistics .................................................................................................................................................... 37
Figure 33: L2VPN server configuration 1 ............................................................................................................... 37
Figure 34: L2VPN server configuration 2 ............................................................................................................... 38
Figure 35: SSL VPN general configuration ............................................................................................................ 38
Figure 36: SSL VPN client configuration ................................................................................................................ 39
Figure 37: SSL VPN user configuration .................................................................................................................. 39
Figure 38: SSL VPN IP Pools .................................................................................................................................... 39
Figure 39: SSL VPN Installation Packages ............................................................................................................ 40

Customer Documentation Dynamic Services for Infrastructure with vCloud (DSI vCloud)
Seite 4 / 47
Figure 40: SSL VPN Private Network ...................................................................................................................... 40
Figure 41: SSL VPN Server Settings ....................................................................................................................... 41
Figure 42: SSL VPN Authentication Settings 1 ..................................................................................................... 41
Figure 43: SSL VPN Authentication Settings 2 ..................................................................................................... 42

Customer Documentation Dynamic Services for Infrastructure with vCloud (DSI vCloud)
Seite 5 / 47
3. List of Tables
Table 1 Overview of VIPs FFM ..................................................................................................................................... 6
Table 2 Overview of VIPs HOU .................................................................................................................................... 6
Table 3 General limits ................................................................................................................................................ 44
Table 4 Glossar ........................................................................................................................................................... 47

Version 3.1, February 2018
4. Introduction
DSI vCloud is based on the standard VMware functionality. Comprehensive technical trainings, manuals, administrator guides, tutorials and further detailed information is provided by VMware and is publicly available: https://www.vmware.com/support/pubs/vcd_sp_pubs.html
Contractually relevant information in regard to DSI vCloud is solely included in the service specifications and further contract documents but is not part of this manual. This document shall provide the customer additional information in regard to Telekom specific configurations, circumstances, restrictions and options as well as answer to the most frequently asked questions when using the DSI vCloud service.
It is assumed that the reader of this document has deep technical knowledge of the usage of VMware’s vCloud, of virtualization and network technology and of the usage and administration of Windows Server, SuSE and RedHat Linux operating systems.
5. Self-Service Portal
Note: The following information are needed for the DSI vCloud Private platforms only. There is no need to change anything in order to access the portal of DSI vCloud Hybrid.
DSI vCloud Private portal VIP (Virtual IP address) pools
As the portal of DSI vCloud Private is reachable via private address ranges only, the following VIPs (Virtual IP addresses) and SNAT ranges are used.
Data Centre Location Frankfurt am Main
The Virtual IP address of the vCloud Portal & API 217.150.159.1
The Virtual IP address of the vCloud Console 217.150.159.2
The Virtual IP address of the BaaS Portal 217.150.159.3
Table 1 Overview of VIPs FFM
Data Centre Location Houston
The Virtual IP address of the vCloud Portal & API 217.150.159.8
The Virtual IP address of the vCloud Console 217.150.159.9
The Virtual IP address of the BaaS Portal 217.150.159.10
Table 2 Overview of VIPs HOU
DSI vCloud Private portal Links for Frankfurt am Main:
vCloud (vCloud Director) Portal
Link (URL): https://vcloud-ffm-private.t-systems.de/cloud/org/[customer vOrg]/ Link (IP): https://217.150.159.1/cloud/org/[customer vOrg]/
BaaS Portal
Link (URL): https://baas-ffm-private.t-systems.de Link (IP): https://217.150.159.3

Customer Documentation Dynamic Services for Infrastructure with vCloud (DSI vCloud)
Seite 7 / 47
DSI vCloud Private portal Links for Houston:
vCloud (vCloud Director) Portal
Link (URL): https://vcloud-hou-private.t-systems.com/cloud/org/[customer vOrg]/ Link (IP): https://217.150.159.8/cloud/org/[customer vOrg]/
BaaS Portal
Link (URL): https://baas-hou-private.t-systems.com Link (IP): https://217.150.159.10
Important note: The customer specific information like the individual URLs and users are shared within the welcome e-mail. For the communication via the URL, the customer has to create a local DNS entry within his customer DNS. As an alternative, the customer can create entries in the local host file: (These URLs should also be added to the Trusted Zone when using the Internet Explorer)
Frankfurt am Main
217.150.159.1 vcloud-ffm-private.t-systems.de
217.150.159.2 vcloudcon-ffm-private.t-systems.de
217.150.159.3 baas-ffm-private.t-systems.de
Houston
217.150.159.8 vcloud-hou-private.t-systems.com
217.150.159.9 vcloudcon-hou-private.t-systems.com
217.150.159.10 baas-hou-private.t-systems.com
In order to access the vCloud portal, some pre-requisites must be fulfilled. In advance to the Flash Player and Client Integration Plugin installation, the complete vCloud portal server’s certificate hierarchy of the “vcloud-ffm-private.t-systems.de” certificate should be imported (root-certificate, intermediate certificate and URL certificate). Additionally the VMware specific browser configuration, as outlined in the vCloud Director user manual, should be considered.
6. Template mechanisms
Within the vCloud Director portal Telekom provides a public catalogue which includes standard vApp templates for Windows Server, RedHat and SuSE operating systems. These vApp templates are, in addition to the different operating systems, divided into two categories of vApp templates (Screen shot below):
“MANAGED” : The operating systems are managed by Telekom (Managed OS) including monitoring and incident management, antivirus protection for Windows operating systems and more (Details about the Managed OS key features can be found in the service descriptions).
“SELFMANAGED” : The operating systems are solely managed by the Customer (Self-Managed OS).
Note: A catalogue can be mounted within the same data center only. You can’t mount a catalogue from data centre A in data centre B.

Customer Documentation Dynamic Services for Infrastructure with vCloud (DSI vCloud)
Seite 8 / 47
Figure 1: Example of the public catalogue provided within the vCloud Director portal
7. Managed OS
Initial deployment – mandatory Admin LAN configuration
In order to enable Telekom to integrate the Managed OS VMs into the necessary backend systems and to connect to the central management infrastructure (e.g. Monitoring systems), it is mandatory to attach a “Admin LAN Interface” as NIC 0 to the virtual machine (see screenshot below):
As soon as the step “network configuration” is reached, the first NIC (NIC 0) of the virtual machine must be configured with the “TSY-AdminLAN Interface”. The enhanced network configuration checkbox must be activated. DHCP must be selected for the IP assignment. The second NIC (NIC 1) must be configured as “CustomerNetwork” with an static or dynamic IP-Pool and set as Primary NIC.

Customer Documentation Dynamic Services for Infrastructure with vCloud (DSI vCloud)
Seite 9 / 47
Figure 2: Example configuration of the LAN interfaces during the deployment
Important note: In case the customer doesn’t configure the Admin LAN and Customer LAN interface as described above, the deployment process will fail with a network configuration error, the virtual machine can’t be started and the operating systems won’t be managed by Telekom.
Please take also note, that managed OS systems can be deployed on Backup Integrated Disk Storage (BIS) only in order to ensure daily automated backups, which can be used by Telekom to recover the operating system in case of failure.
The public catalogue is available for vCloud Director Users with the role “vApp-Author (Public Catalog Access)” only. If the customer would like to restrict access to the customer specific catalogue for some users, the standard role “vApp-Author” can be assigned and these users won’t be able to use the public catalogue.
Deployment process
After the virtual machine is initially deployed, several Telekom specific background tasks are started in order to integrate the virtual machine into the Telekom backend infrastructure (e.g. Monitoring, Antivirus protection and more). The progress of the backend integration is shown in the overview of virtual machines within the accordant vApp.
Figure 3: Example of the progress information of the managed OS backend integration
Important note: The customer mustn’t log-on to the virtual machine until the backend integration is finished and the virtual machine reached the final status “powered-on”.
7.1 Initial login
Telekom provides a default user for each Managed OS.

Customer Documentation Dynamic Services for Infrastructure with vCloud (DSI vCloud)
Seite 10 / 47
Windows
Username: dsi
Password: qZ!ZwZo?
Linux
Username: dsi
Password: R?FY+oKO
Important note: The customer is asked to change the initial password as soon as the system is deployed and ready for use.
7.2 Temporary privileged access (“rooT access”)
Important note: The duration for the root access is 14 days. The console input and output will be logged in order to retrace the changes in case of failure.
How to request administrative access:
Windows
Within the Windows Managed OS VMs, the customer can request temporary administrative access by using the desktop icon.
After console login, double click “Request Privileged Access”
Accept the disclaimer about conditions while using administrative rights on a Windows Managed OS
Define the user for which administrative rights shall be granted. Optionally – but preferred - please enter a short description of the intended activities / changes while administrative access is granted.
Wait while the request is queried and one of 3 possible status messages is shown.
Figure 4: Screenshots of the request process - Windows Managed OS VMs

Customer Documentation Dynamic Services for Infrastructure with vCloud (DSI vCloud)
Seite 11 / 47
Important note: The customer mustn’t configure/create additional local users with administrative rights.
Active Revoke Option
Linux
Within the Linux Managed OS VMs, the customer can request temporary administrative access by executing the Shell-Script “tsy-dsi_request-root.sh”. In order to do so, the default user (“dsi”) is in a special group called “dsi_request_rootsh”.
After console login, execute tsy-dsi_request-root.sh
Accept the disclaimer about conditions while using administrative rights on a Linux Managed OS
Define the user for which administrative rights shall be granted. Optionally – but preferred - please enter a short description of the intended activities / changes while administrative access is granted.
Wait while the request is queried and the user is included in the local sudoers file.

Customer Documentation Dynamic Services for Infrastructure with vCloud (DSI vCloud)
Seite 12 / 47
Following commands are equivalent, whereas the first one needs interactive input for Username, Comment and Mail. Force option (-f) will auto-accept the agreement.
Important note: Users using the vCloud WebMKS console and an English keyboard layout must enter the "(at)" character for the email address instead of the "@" character.

Customer Documentation Dynamic Services for Infrastructure with vCloud (DSI vCloud)
Seite 13 / 47
Figure 5: Screenshots of the request process - Linux Managed OS VMs
Important note: The customer mustn’t configure/create additional local users with administrative rights. The customer must ensure that the local administrator account (used by Telekom’ for support matters) is not altered in any way and also system management service accounts must not be changed by the customer in any way.
RE-Request Root Access
If a user has already root rights on this system, running tsy-dsi_request-root.sh again will lead to following output:
Active Revoke Option
Before the root rights are revoked automatically after 14 days, the user with root rights or user dsi can revoke the root rights actively:

Customer Documentation Dynamic Services for Infrastructure with vCloud (DSI vCloud)
Seite 14 / 47
7.3 User management
In addition to the initial default user, the customer is able to administrate additional customer specific users.
Windows
The customer has two possibilities to establish the customer specific user management. Either local users are created as needed, or the Managed OS VM is joined to the customer active directory domain. Both options can be configured with the temporary privileged access (For details please refer to the section “Temporary privileged access (“Root Access”)”. In case local users shall be created the customer can optionally get in contact with the Telekom support to get the local users administrated. It is not allowed to configure/create additional local users with administrative rights.
Important note: For the customer to add a Managed OS Windows VM to their own Active Directory, an Organisational Unit (OU) must be created for all Managed OS VMs with “block inherited rights” set at the root as well as “block GPO inheritance” to be set. The customer must ensure that the local administrator account (used by Telekom’ for support matters) is not overruled or restricted by any OU policies. System management service accounts must not be changed by customer policies in any way.
Linux
The default user (“dsi”) is in a special group “dsi-usermanager”, which allows the customer to administrate local customer specific users. In order to do so, the customer can execute the Shell-Script “tsy-dsi_usermanagement”.

Customer Documentation Dynamic Services for Infrastructure with vCloud (DSI vCloud)
Seite 15 / 47
Figure 6: Example usage of the user management shell script
Important note: In order to allow specific users specific rights, these users should be added to the following groups as needed:
All users in dsi_request_rootsh are allowed to execute tsy-dsi_request-root.sh via sudo. All users in dsi_usermanager are allowed to execute tsy-dsi-usermanagement.sh via sudo. All users in dsi_patchmanager are allowed to execute tsy-update-os.sh via sudo. All users in dsi_allow_cstssh are allowed to connect via ssh to the customer interface.
7.4 Patch management
How to get the current patch status and how to install according updates:
Windows
As soon as the customer logs on to the console, the customer will be informed about the availability of new patches via the Microsoft Windows notification service. The message includes a link to the related assistant to apply the patch bundle via standard Microsoft tools.
Linux
As soon as the customer logs on to the console with the default user (“dsi”) or any other user which is in the group “dsi_patchmanager”, the customer will be informed about the availability of new patches and the information how to install them (Patches can be installed by using the command “sudo tsy-update-os.sh start” if the accordant user is in the necessary group as described in the section “User Management”.).

Customer Documentation Dynamic Services for Infrastructure with vCloud (DSI vCloud)
Seite 16 / 47
7.5 Additional recommendations and regulations
In order to reduce complexity as far as possible, there are some recommendation in regard to the configuration of local disks within a Managed OS.
Windows
The common way to add additional storage for applications is the provisioning of new virtual disks for the related Managed OS VM. The disk needs to be configured within the operating system and the file system must be NTFS, following the Telekom security standard. The new disk should be assigned with the next drive letter to the primary operating system disk (usually D:\).
In some cases it can be necessary to enlarge existing file systems or mount a new storage partition underneath an existing folder structure. This is supported in general but not recommended as it adds complexity.
Important Note: Customer own applications should be only installed on a additional storage drive (usually D:\). The only exception is a Microsoft SharePoint installation.
Linux
The common way to add additional storage for applications is the provisioning of new virtual disks for the related Managed OS VM and it should be configured using the logical volume manager (LVM) in order to be flexible in case of necessary file system extensions for example. It is mandatory to use a separate volume group with own disks for customer own application installations. The customer is free to decide on appropriate names within any volume manager object.
The default file system is depending on the selected Linux distribution and it is recommended to use it in order to reduce complexity and ensure as fast as possible fault resolution processes. (Nevertheless also other file systems are supported of course.). The default file systems of the current Linux operating systems distributions are:
SuSE Linux Enterprise Server 11: ext3 RedHat Enterprise Linux 6: ext4
Important note: The SSH for managed operating systems is defined as port 10022.
7.6 FAQ
Q: How long does it take for the request to being processed?
A: Normal processing takes 1-3 minutes. If the process takes longer than 15 minutes, the user will be informed.
Q: How many users can be privileged?
A: Only 1 user can have privileged access at one time. If another user needs to have admin rights the currently granted privileged access must be revoked first.
Q: Is there a time when the rights will be revoked automatically?
A: Yes. The rights will automatically be revoked after 14 days.

Customer Documentation Dynamic Services for Infrastructure with vCloud (DSI vCloud)
Seite 17 / 47
8. Self-Managed OS
8.1 Deployment process
After the virtual machine is initially deployed, the operating system is configured finally and the virtual machine is rebooted once again.
Important note: The customer shouldn’t log-on to the virtual machine before the final reboot finished. Otherwise it might be the case that changes are lost during the reboot.
8.2 Patch management and license activation
Important note: The Telekom infrastructure systems are available as soon as the VMs are connected to a vOrg network and vShield Edge. The routing to the accordant Telekom network is configured by default.
Windows
If Telekom licenses are used, the Self-Managed OS must be activated at the central KMS server. The updates (security updates only) can be reached via the central WSUS server and installed by using standard Microsoft tools and procedures. Actual information for both systems (KMS and WSUS) are provided up to date on the desktop of each Windows VM. The customer can retrieve the information by clicking on the desktop icon “vCloud Customer Information”.
Patch Management (WSUS)
Below are the list of the Windows Update Server
Location IPv4 address IPv6 address
Munich (DE) 6.204.32.132 (Managed OS)
6.204.72.17 (Selfmanaged OS)
2a00:da9:6:1::2077:7410
Frankfurt (DE) 6.204.128.132 (Managed OS)
6.204.72.17 (Selfmanaged OS)
2a00:da9:6:2101:00ee:0:2104:1607
Singapore (SG) 6.204.120.132 (Managed OS)
6.204.72.17 (Selfmanaged OS)
2a00:da9:6:4101:00ee:0:2112:5566
Houston (US) 6.204.112.132 (Managed OS)
6.204.72.17 (Selfmanaged OS)
2a00:da9:6:1101:00ee:0:2120:7776
London (UK) 6.208.128.132 (Managed OS
6.204.72.17 (Selfmanaged OS)
2a00:da9:6:5001:ff34::2204:9326
Linux
The Linux patch management of the Self-Managed OS is configured automatically and updates can be installed by using Linux standard tools and procedures.
In case the customer is using own SLES 11, RHEL6 or 7 images (Non T-Systems self-managed or managed images) the subscriptions for those unmanaged VMs can be activated by using the following shell scripts:
wget http://6.204.72.10/pub/unmanaged/tsy-dsi_unmanaged.sh
chmod +x tsy-dsi_unmanaged.sh bash tsy-dsi_unmanaged.sh

Customer Documentation Dynamic Services for Infrastructure with vCloud (DSI vCloud)
Seite 18 / 47
Figure 7: Example usage of the license/subscription shell script
8.3 User management
Windows
Credentials for the administrator must be configured in the guest customization section of the VM properties in the vCloud Director.
Linux
Username: dsi
Password: BwN!9D$G
Important note: The customer is asked to change the initial password as soon as the system is deployed and ready for use.
8.4 Additional recommendations and regulations
In order to fully utilize the self-service functionalities, Self-Managed OS VMs should not be deployed on Backup Integrated Disk Storage (BIS) as a restore is only possible via the Telekom support. Self-Managed systems are recommended to be deployed on online (non-BIS) storage and the backup and restore should be done via the self-service portal of the Backup as a Service solution. For Backup as a Service a granular reporting is included but such a reporting is not available for BIS.
9. VM backup and restoration / data protection
The customer of DSI vCloud has multiple options to cover Data Protection.
It is possible to use the VMware snapshot function to create an online copy of a VM that is then stored as a template in the catalog and/or can be copied to the backup catalog. To ensure that the backup locations are separated here, the customer must use two vDCs, one must be ordered in data center A and the other in data center B. In this case, VMs from data center A should be backed up into a catalog in data center B, and vice versa.
- Usage of Backup-integrated-Storage (BIS) . This storage includes the build-in lowlevel snapshots which are invisible for the vCloud UI, API and VMs above. Here it’s also possible to restore a VM from the filer's snapshot, however this is a manual task that needs to be performed by the Telekom operating team. Therefore it’s not recommended for daily restore needs, but rather a fallback solution.
- Optionally the customer has the possibility to use Backup-as-a-Service, which offers policy based and fully automated backups and restores in customer repsonsibility (self-service).

Customer Documentation Dynamic Services for Infrastructure with vCloud (DSI vCloud)
Seite 19 / 47
- The customer can also use his own backup solution, with backup services either located on DSI vCloud or backup data shipped to an environment outside of DSI vCloud. E.g., via the private customer network directly to a backup infrastructure in the customer data center.
- Use application or database build-in features for data protection / replication, and dump the data to a backup store of his choice. E.g. another system on another Datacenter. This case is similar to the previous one.
Figure 8: Schematic backup design
The customer should proceed carefully when copying and re-providing existing VMs. In some cases IPs or system names/IDs may be duplicated with such activities, for example. This may cause problems on the other systems or applications. With regard to this difficult task, DSI vCloud provides the customer with the following options:
Implementation of VMs in so-called "isolated" networks that either are not connected to the surrounding environment or are shielded behind a virtual firewall with NAT functionality.
Changing of the system identity (e.g., name or ID) before provisioning.
Scripting execution before and after system provisioning in order to adjust the VM configuration.
Backup-as-a-Service (BaaS) Access to BaaS is granted via a separate self-service portal (available in up to 20 different languages) with an own user management, which offers the customer an overview of his configured backups for his DSI vCloud workloads. The fully independent self-service portal with own user management offers customers the possibility to keep their organizational separation of online and backup administrators in order to avoid concurrent deletion of online and backup data by accident.

Customer Documentation Dynamic Services for Infrastructure with vCloud (DSI vCloud)
Seite 20 / 47
Figure 9: BaaS Customer Dashboard
Within DSI vCloud Hybrid the self-service portal is available via the Internet, whereas within DSI vCloud Private the self-service portal is only available via the customer Intranet (private network).
Besides one-time backups (backup now) and individual restores, the BaaS offers the possibility to shedule policy-based and fully automated backups for single VMs, vApps and even whole vDCs.
Figure 10: Protect machine and Backup now on vApp level

Customer Documentation Dynamic Services for Infrastructure with vCloud (DSI vCloud)
Seite 21 / 47
Figure 11: Protect machine and Backup now on VM level
Figure 12: Restore VM
The backup solution doesn’t need any installation of agents within the VMs and backups the data via the backend -infrastructure, without having any influence on the performance of VMs. Crash consistency is reached by using VADP in combination with the VMware tools that should be installed within the guest operating system of each VM. To reduce storage volumes the backups are done per default with blocklevel incrementall copies. Backups are stored on a separate backend infrastructure within the same physical twin-core data center as the customer vCloud based VMs are hosted. They are subsequently mirrored to the other physical data center of the twin core.

Customer Documentation Dynamic Services for Infrastructure with vCloud (DSI vCloud)
Seite 22 / 47
Note: The maximum disk size for VMs that can be backed up with BaaS is limited according to the following rules. For VM sizes not following this rules a proper backup can’t be ensured.
SL01 to SL06 and SL16 to SL21: maximum disk size attached to a VM in total is limited to 1 TB.
SL07 to SL15: maximum disk size attached to a VM in total is limited to 4 TB.
9.1 Core Functionalities
Backup Now (one-time): With this functionality it is possible to process an one-time backup of a VM, vAPP or vDC within a few steps. The retention time can be chosen based on pre-configured profiles (2 weeks, 1 month, 2 months, 3 months, 6 months,12 months)
Protect Machine (regular): This functionality offers the customer the possibility to configure regulare, rule-based and fully automated backups for VMs, vApps or vDCs. Based on pre-configured profiles it is possible to decide on backup frequency, as well as the retention period. After the first full backup of an object is done all further backups are done block-level incrementell.
Restore VM: With this functionality the customer is able to restore a single VM including meta data based on an backup done before. It is possible to restore the VM into the original vApp or to decide to restore into a different vApp, which was deployed especially for this restore for exemple.
Attention: Once the option “overwrite” is chosen, the VMs is restored to its original location and the original VM (for the case it is still up and running) will be irrevocably deleted. If a VM is restored into a different vApp it is recommended to enable guest customization to avoid e.g. doubled SIDs, system names, IP-addresses and therefore negative influence on existing application landscapes. In general the restrictions and recommendations of the software products used within a VM have to be considered. Telekom recommends the customer to develop his own backup and restore concept and to test properly.
Unprotect Machine: This enables the customer to deconfigure the rule-based backups for his VMs, vApps and vDCs.
Attention: The backup data for previously protected machines remains in the system according to the selected retention and will therefore expire over time. The remaining backup data will be charged as long as the retention time has not expired. Same is valid for deleted VMs within the vCloud Director.
Request Monitoring / Auditing: For every customer initiated request (e.g. initiated backup-now), it is possible to get an detailed overview on the current status. After a manual backup or restore process was started the customer can optionally decide to be informed on the status via e-mail.
Backup reporting: Detailed backup reportings are available for download as PDFs in this area and via the Usage tab

Customer Documentation Dynamic Services for Infrastructure with vCloud (DSI vCloud)
Seite 23 / 47
Figure 13: Backup reporting
Usage: This function shows the usage in GB for the selected month. This information is only technical without any commercial impact or relevance. The following relationship exists for each row in the table:
Current = Previous + New – Expired
Current= Backup volume of the current period
New = New Backup volume of the current period
Expired = Backup volume which expired during the current period
Previous = Backup volume of the previous period
Average = Average Backup volume of the current period. The average size is calculated as total backup space for the month divided by the number of days in the respective month (1-31).
The refresh cycle for this reporting is at present once per day (per default at 7:30 a.m. local time) and the statistics reflect the values collected up to the refresh cycle. In case the backup for a particular VM was in progress whily the refresh was ongoing, these additional volumes won’t be reflected in here (only completed backups).
An export of the information is possible to a .txt file via the export usage link.
Note: The information under the usage tab is only relevant from a capacity perspective. If virtual machines where backed up with a previous version of BaaS, without the usage tab in the portal, then the utilization calculation is repeated to include data from the past. But this update functionality has limitations as the utilization of new, already deleted or expired virtual machines can’t be updated.
User management: Customer can managed existing users (e.g. password resets) and create new backup users.

Customer Documentation Dynamic Services for Infrastructure with vCloud (DSI vCloud)
Seite 24 / 47
Available backup profiles:
Backup as a Service offers different profiles for the regular backup functionality, that differ in backup frequency and retention period. The current backup profiles as well as the information about current starting times of scheduled backups are listed in the self-service portal. Telekom reserves the right to change existing backup profiles especially the backup start window to be able to manage capacity in the backend infrastructure.
Note: All your full backups of the policies SL01 – SL06 are stored one period longer as described in the policy.
This enables you to restore from all your incremental backups until the latest full backup of this period expired.
All vApps which are additional copied with the same name in a private catalogue will be automaticly backed up.
Please set a new name for the catalog to secure the consistency of the backups.
Figure 14: Overview of backup profiles within the self-service portal
Customer API and vendor documentation:
Please check the API documentation and the vendor documentation under following link:
https://www.veritas.com/support/en_US/article.000024782

Customer Documentation Dynamic Services for Infrastructure with vCloud (DSI vCloud)
Seite 25 / 47
10. Central logging
10.1 Pre-defined LOG/NAT configuration
Important note: The customer mustn’t change the LOG/NAT settings on the vShield Edge device as the central logging will be disabled in case of a wrong configuration. How to enable the logging which is usable by the customer is described below.
Figure 15: LOG/NAT configuration on the vShield Edge Device
In addition the customer mustn’t use the Telekom Admin-LAN. Any change in regard to the Telekom Admin-LAN is not supported and will be deleted.

Customer Documentation Dynamic Services for Infrastructure with vCloud (DSI vCloud)
Seite 26 / 47
Figure 16: Example of an unsupported connection from the DMZ to the Telekom Admin-LAN
11. How to section
11.1 How to substitute a client integration plugin by a newer version
In case a new vCloud Director version comes along with a new Client Integration Plugin (used to access the virtual machine consoles) the old plugin of previous vCloud director versions must be de-installed and the new plugin must be installed. Below you can find a short instruction how to clean up the old installation and upgrade to the new plugin:
1. Remove any previously created ovftool configuration file: Windows: Delete “ovftool.cfg” from "C:\Users\<username>\AppData\Roaming\VMware"
Linux: Delete ".ovftool" from the user's home directory (also for the user root)
2. Delete the file .csp_ovftool_settings.js from the user's home directory: Windows: C:\user\<username>
Linux: /<home directory path>/<username> (also for the user root)
3. Remove any previously created ovftool settings file: Windows: Delete “.csp_ovftool_settings” from “C:\Users\<username>\AppData\Roaming\VMware"
Linux: Delete ".csp_ovftool_settings" from the user's home directory (also for the user root)
4. Uninstall the previously installed Client Integration Plugin: Windows: Uninstall VMware Client Integration Plug-in 5.5.0 from Control Panel via “add/remove programs”.
Linux: Execute "<Client Integration Plugin Directory>/VMware-ClientInegrationPlugin-<version>.x86_64.bundle --uninstall-component=vmware-cip-<version>" on 64bit machines

Customer Documentation Dynamic Services for Infrastructure with vCloud (DSI vCloud)
Seite 27 / 47
or "<Client Integration Plugin Directory>/VMware-ClientInegrationPlugin-<version>.i386.bundle --uninstall-component=vmware-cip-<version>" on 32bit machines
5. Open the vCloud Director URL and download the new Client Integration Plugin: Either click on a virtual machine to open a VM console or upload/download a catalog template
6. Follow the instructions in the portal and install the Client Integration Plugin.
11.2 How to verify the vmware tools / Open-VM tools version
In order to verify the current version of the installed VMware tools, please follow the steps below:
- Login to the vCloud Director and open the relevant vApp - List the existing VMs of that vApp - Open the properties by right clicking on the VM and selecting “properties”

Customer Documentation Dynamic Services for Infrastructure with vCloud (DSI vCloud)
Seite 28 / 47
- Check the version of the VMware Tools
- In case of out-dated versions, follow the install guideline in the next chapter
11.3 How to install the vmware tools / Open-VM tools
Important note: It is very important that you install VMware Tools (in case of Linux, optionally the Open-VM tools which are provided by the respective Linux vendor) within the guest operating system of the VM as it contains a series of utilities to improves the performance and management of the VM. As an example the tools contain driver for the virtual hardware and support the optimization of the underlying infrastructure and hardening in case of outages (e.g. configuration of mandatory 180 seconds time out values for the disks). Without the tools, it’s not possible for T-Systems to identify if a virtual machine needs further support after infrastructure incidents (e.g. VM reboot necessary as the disks are mounted read-only). The T-Systems MANAGED OSs are pre-installed with the tools already. You mustn’t de-install the tools in that case. In case you are using SELF-MANGED OSs the tools must be installed timely after the initial deployment. The installers for VMware Tools for Linux and Windows guest operating systems are built into vCloud as ISO image files and appear as CR-ROM to your guest OS as soon as you selected the installation via the vCloud Director (e.g. A CD-ROM is shown within the Windows Explorer). Below you can find a short instruction how to proceed: - Select the installation of VMware tools by right clicking on the virtual machine in vCloud Director:
Figure 17: Install VMware Tools via vCloud Director
(In case you want to install the Open-VM tools for your Linux guest OS, you can obtain the installation sources from the respective Linux vendor.)

Customer Documentation Dynamic Services for Infrastructure with vCloud (DSI vCloud)
Seite 29 / 47
- The ISO image will be provided automatically to your guest OS - Logon to the virtual machine and start the installation process of the VMware tools The installation process does then vary, depending on which operating system you are using. More details about the installation of VMware tools can also be found online in different VMware Channels like
https://www.youtube.com/user/VMwareKB or https://www.youtube.com/user/vmwaretv
11.4 How to access the Edge service gateway syslog events
In order to enable the customer to retrieve syslog events of the vShield Edge Gateways, the vShield Edge is logging to two IP addresses per default. One IP address out of the Telekom network and one IP address reachable from the customer network (Syslog-Server 2). The information can be found within the syslog server tab of the vShield Edge.
Figure 18: Example of the pre-configured vShield Edge syslog IP addresses and networks
The customer can retrieve the logging events via a self-managed syslog server:
Create a routed vOrg network, with the IP address of the “Syslog-Server 2”.
Deploy a virtual machine which should be used as syslog server (e.g. „TSY_RHEL6_SELFMANAGED*“) and assign the “Syslog-Server 2” IP address.
Configure syslog within the syslog server (e.g. the standard rsyslog within the RedHat machine).
Allow the network connection from the vShield Edge Gateway to the syslog server via UDP Port 514. (e.g. IPtables within the RedHat VM).
Important note: In order to retrieve all logging events all the time, multiple syslog server must be configured per vShield Edge and per routed vOrg network. Alternatively one syslog server can be deployed and as soon as an analysis of syslog events of a specific vShield Edge Device is required, the syslog server is attached to the respective network.

Customer Documentation Dynamic Services for Infrastructure with vCloud (DSI vCloud)
Seite 30 / 47
11.5 How to modify the storage capacity of a VM which was created from a standard template
If this option is used please keep in mind that the disk storage which will be defined during the VM creation process must be changed.
Log-on to the vCloud Director.
Create a new vApp from the public catalog by clicking on “Add vApp from Catalog”.
Figure 19: Add vApp from Catalog
Choose one template out of the “Public Catalog”. For example: “TSY_RHEL_SELFMANAGED_2014-02.2” and click “Next”.
Figure 20: Template
The customer can define CPU, RAM and hard disk parameter under „Customize Hardware“.

Customer Documentation Dynamic Services for Infrastructure with vCloud (DSI vCloud)
Seite 31 / 47
Figure 21: Customize Hardware
- Please change the disk size from 40 GB to 50 GB. If the hard disk size is changed during this step it is possible to change the size individually after the deployment of the VM.
Important Note: If the disk size is not changed during this step it won’t be possible to change the size for this disk later on. The customer can add new disks but isn’t able change the sizes anymore.
Figure 22: Disk resize
Customer Documentation Dynamic Services for Infrastructure with vCloud (DSI vCloud)
Seite 32 / 47
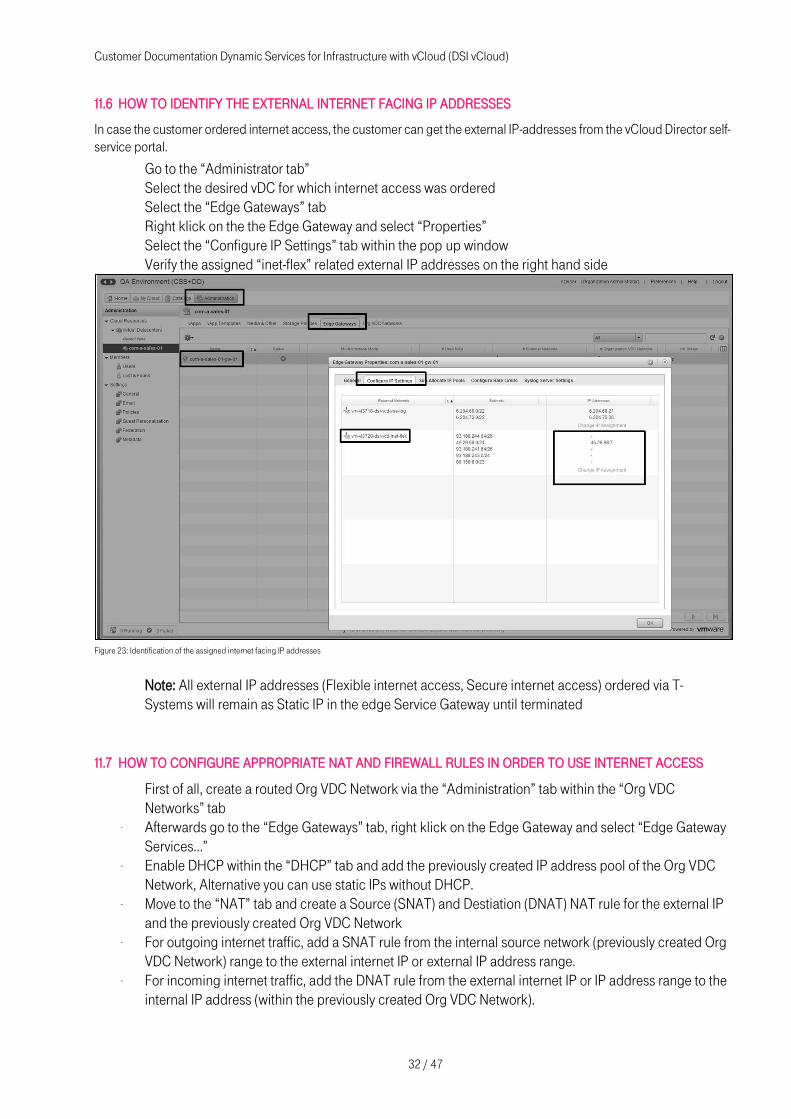
11.6 How to identify the external internet facing ip addresses
In case the customer ordered internet access, the customer can get the external IP-addresses from the vCloud Director self-service portal.
Go to the “Administrator tab”
Select the desired vDC for which internet access was ordered
Select the “Edge Gateways” tab
Right klick on the the Edge Gateway and select “Properties”
Select the “Configure IP Settings” tab within the pop up window
Verify the assigned “inet-flex” related external IP addresses on the right hand side
Figure 23: Identification of the assigned internet facing IP addresses
Note: All external IP addresses (Flexible internet access, Secure internet access) ordered via T-Systems will remain as Static IP in the edge Service Gateway until terminated
11.7 How to configure appropriate NAT and Firewall rules in order to use internet access
First of all, create a routed Org VDC Network via the “Administration” tab within the “Org VDC Networks” tab
- Afterwards go to the “Edge Gateways” tab, right klick on the Edge Gateway and select “Edge Gateway
Services…”
- Enable DHCP within the “DHCP” tab and add the previously created IP address pool of the Org VDC Network, Alternative you can use static IPs without DHCP.
- Move to the “NAT” tab and create a Source (SNAT) and Destiation (DNAT) NAT rule for the external IP and the previously created Org VDC Network
- For outgoing internet traffic, add a SNAT rule from the internal source network (previously created Org VDC Network) range to the external internet IP or external IP address range.
- For incoming internet traffic, add the DNAT rule from the external internet IP or IP address range to the internal IP address (within the previously created Org VDC Network).

Customer Documentation Dynamic Services for Infrastructure with vCloud (DSI vCloud)
Seite 33 / 47
- Go to the “Firewall” tab and create the desired firewall rules for the incoming connections (e.g. allow port 80 for HTTP to the internet IP address) as well as the outgoing connections (e.g. from all internal to all external IP addresses).
- Afterwards the customer can deploy a virtual machine within the Internet Access enabled vOrg VDC Network and user outbount internet access, respectively configure appropriate internet facing services within the virtual machine.
Figure 24: Example of a vOrg VDC Network
Figure 25: DHCP configuration example

Customer Documentation Dynamic Services for Infrastructure with vCloud (DSI vCloud)
Seite 34 / 47
Figure 26: Example of a SNAT rule
Figure 27: Example of a DNAT rule

Customer Documentation Dynamic Services for Infrastructure with vCloud (DSI vCloud)
Seite 35 / 47
Figure 28: Example of firewall rules
11.8 How to initiate a L2VPN connection
1. Create a vOrg network as "Create as subinterface"
Create a new vOrg network which should be extended to the vCloud. It is important to select the item "Create as sub-interface" so that the network appears later in the VPN configuration.
- Set network parameters
Note: The gateway address may not be the same as the gateway address on the customer side.
Figure 29: Create vOrg network

Customer Documentation Dynamic Services for Infrastructure with vCloud (DSI vCloud)
Seite 36 / 47
2. Tenant portal client configuration
Select VPN and L2-VPN in the Tenant Portal and enter the following parameters. If vCloud was defined as a client.
- Select client - Enter server address (external IP of the gateway on the customer side) - Enter the service port defined on the customer side. - Select encryption algorithm defined on the customer side. - Select subinterface (referenced on the Orgnetz, which was defined in the first step) - Enter the user and password defined on the customer side. - Apply all settings
Figure 30: Configure network settings
Figure 31: define client settings

Customer Documentation Dynamic Services for Infrastructure with vCloud (DSI vCloud)
Seite 37 / 47
The “statistic” tab shows the status of the tunnel.
3. Tenant portal server configuration
If vCloud has been defined as a server define the following parameters:
- Select external IP (Listener IP) - Define listener port - Define encryption
Figure 32: Statistics
Figure 33: L2VPN server configuration 1

Customer Documentation Dynamic Services for Infrastructure with vCloud (DSI vCloud)
Seite 38 / 47
Add server site configuration:
- Set name - Define user and password - Select sub interface -
After the configuration has been completed, the tunnel must be given the status "UP". For communication between the VMs, you may need to define firewall rules on both sides.
Note: This knowledge base article shows you the VMware supported L2VPN versions
11.9 How to initiate a SSLVPN connection
SSL VPN is one-way client communication (roadwarrior) to vCloud (connection from server to client not possible). In the edge service gateway, you can create an SSL VPN in self-service. You can reach this function under the tab SSL VPN Plus.
1. Set the following general Settings
Figure 34: L2VPN server configuration 2
Figure 35: SSL VPN general configuration

Customer Documentation Dynamic Services for Infrastructure with vCloud (DSI vCloud)
Seite 39 / 47
2. Setup of the Tunneling mode
The Tunneling Mode refers always to the client. It defines whether everything should be routed via VPN or only the traffic to the connected network.
3. Create a user (note that this is not a user but a user for the VPN client). Please check the example user in the screen below: vpnuser.
4. Create an IP pool for the VPN client. Note: Do not use the same network as the destination network.
Figure 36: SSL VPN client configuration
Figure 37: SSL VPN user configuration
Figure 38: SSL VPN IP Pools

Customer Documentation Dynamic Services for Infrastructure with vCloud (DSI vCloud)
Seite 40 / 47
5. Create a client package
The Gateway IP address is the external IP of the Edge Gateway Service + Port which must also be used in the server configuration.
6. Specify the internal vOrg network or IP on which the VPN client should be granted access
Figure 39: SSL VPN Installation Packages
Figure 40: SSL VPN Private Network

Customer Documentation Dynamic Services for Infrastructure with vCloud (DSI vCloud)
Seite 41 / 47
7. Create server configuration
Select ext IP of the Edge Gateway service and define port (a firewall rule will automatically be created).
8. Configuration of the authentication server
Navigate to the Authentication tab and set the following configurations.
Figure 41: SSL VPN Server Settings
Figure 42: SSL VPN Authentication Settings 1

Customer Documentation Dynamic Services for Infrastructure with vCloud (DSI vCloud)
Seite 42 / 47
9. Download the VPN client
- Use the external IP address + Port of the Edge Service Gateway which was previously selected.
For example https://46.x.x.x: 8001
- Log in with the defined vpnuser
- download VPN client and install.
- The client is installed under C: \ Program Files (x86) \ VMware \ SSL VPN-Plus Client. - Connect via icon in the tray (start bar)
Note: The Firewall rules for the SSL VPN is created automatically on the Edge Service Gateway.
11.10 How to Up-&download templates (e.g. ova, ovf and iso) via command line interface
In addition to the up- and download functionality via the self-service portal it is also possible to use the VMware ovftool on command line. This tools is automatically installed as part of the client integration plug-in and can be found in a respective sub-folder named “ovftool”.
VMware regularly releases new versions of the ovftool on their website. If you are facing issues we recommend to update to the latest version from the VMware homepage.
For detailed information on how to use the ovftool please have a look at the VMware user guide https://www.vmware.com/support/developer/ovf/
Note: When uploading larger files (more than 500 MB), we recommend uploading with the Command Line Interface.
Figure 43: SSL VPN Authentication Settings 2
Customer Documentation Dynamic Services for Infrastructure with vCloud (DSI vCloud)
Seite 43 / 47
Examples:
Upload a local ISO-file to vCloud catalog:
ovftool –sourceType=”ISO” --X:logToConsole –X:logLevel=verbose file “vcloud://username:[email protected]:443?org=vOrg-name&vdc=vDC-name&media=media-name&catalog=catalog-name”
Upload a local OVF-files to vCloud catalog:
ovftool --X:logToConsole –X:logLevel=verbose file “vcloud://username:[email protected]:443?org=vOrg-name&vdc=vDC-name&vappTemplate=template-name&catalog=catalog-name”
Download a template from vCloud catalog as OVF-files:
ovftool --acceptAllEulas --X:logToConsole –X:logLevel=verbose “vcloud://username:[email protected]:443?org=vOrg-name&vdc=vDC-name&vappTemplate=template-name&catalog=catalog-name” file
Downloads are done in a two step approach: 1. Export, conversion and compression of the vAPP vCloud internally to a transfer share
2. Download of the OVF file over the external network
Depending on the vApp size the export can take several hours and the ovftool might run into a time out.
Therefore we recommend to set the following time out parameters within the ovftool command. The parameters set the time out values to 24 hours: --X:vCloudTimeout=86400
--X:vCloudKeepAliveTimeout=1440
Uploads are also done in a two steps approach:
1. Upload to transfer share
2. Import in vCloud
After the upload of each file (e.g. VMDKs) the SHA1-checksum is calculated and verified against the manifest file (.mf). For large files this checksum calculation may take very long and therefore lead to a timeout situation and error message in the ovftool.
Therefore we recommend to set the following parameter within the ovftool command if larger files should be uploaded:
--X:skipManifestCheck
Remarks
-- = two hyphens, without a blank in between. file = path and name of file, e.g. c:\xxx\centOS.iso or c:\xxx\centOS.ova
username = vCloud username, e.g. administrator
password = vCloud password for respective user
vOrg-name = vORG, e.g. xxx_10000876
vDC-name = vDC-name, e.g. com-a-xxx_10000876-01
media-name = name that should be used within the catalog for that file. Name must not exist for upload.
template-name = name that should be used within the catalog for that template. Name must not exist for upload.
catalog-name = name of catalog within vCloud, where the file should be stored or downloaded from. Catalog has to exist.

Customer Documentation Dynamic Services for Infrastructure with vCloud (DSI vCloud)
Seite 44 / 47
11.11 How To Request a customer driven Penetration Test
A penetration test carried out by the customer must be officially displayed at T-Systems at least 4 weeks before the execution. T-Systems checks this requirement and reserves the right to refuse the test.
Please send your request for further instructions to: FMB DD-Cloud-SDM
11.12 How To solve performance issues
If you are facing performance issues with a single VM or a vAPP, please check the following parameters, before opening a support ticket:
1. Ensure that latest version of VMware tools or OpenVM tools is installed within the guest operating system. 2. Ensure that your VM is running on the latest virtual hardware version that is offered from the plattform. 3. Ensure that you have the latest updates for your guest operating system installed. 4. Check that you have enough PU, RAM and storage capacity within your vDC available, if you are using
Committed or Dedicated vDCs. Capacity should be sized to also allow peaks (burst). 5. Check performance statistics within the guest operating system and add additional vCPUs, RAM or storage to
your VM if necessary. 6. If you are facing storage performance issues, ensure that your disk layout is set up according VMware best
practices – e.g. using dynamic disks in Windows is not recommended as it is known to cause performance issues in viruatlized environments.
7. If you are facing network performance issues, ensure that your network adapters are configured according the VMware best practices, e.g. use network adapter typ VMXNET3.
12. General dsi vcloud limitations and configuration requirements
Please consider the following limits within DSI vCloud:
Max number of vCPUs per VM 40
Max RAM per VM For Basic / Committed vDC: 326 GB RAM
Max storage size of a VM 10 TB
Max storage size of a VM to be backed up with BaaS 4 TB
Max number of disks displayed in the BIOS* 8
Min virtual HW version ** Currently version 10 (As of December 2016)
Min SCSI time out value *** 180 seconds
Table 3 General limits
* If you have more than 8 disks, some disks will not be visible in the BIOS and your boot drive may jump to last in the list and become “invisible” in the BIOS. In these cases, the only way to set the correct boot order is to manually force the correct drive in VMware configuration files.
** It is recommended to upgrade all existing virtual machines to the actual virtual HW version.
*** In order to cope with potential storage time outs (e.g. during failover) the SCSI time out values must be adjusted to 180 seconds. By installing and using the native VMware Tools, the value is adjusted automatically. When using Open VM-Tools, the value must be adjusted manually in the appropriate udev rules. More details can be found in the following VMware knowledgebase article.

Customer Documentation Dynamic Services for Infrastructure with vCloud (DSI vCloud)
Seite 45 / 47
13. Further Support and Consulting
If the customer needs further assistance, Telekom offers the required consulting services on a hourly basis. For further information the customer is advised to either get in contact with their Service Delivery Manager or lookup the available information online:
https://cloud.telekom.de/

Version 3.1, February 2018
14. DSI vCloud Glossar
Abbreviation Explanation
API Application Programming Interface
BaaS Backup as a Service
BIS Backup Integrated Disk Storage
BYOL Bring your own license
CPU Central Processor Unit
DHCP Dynamic Host Configuration Protocol
DMTF Distributed Management Task Force
DNS Domain Name System
DR Disaster Recovery
DSI Dynamic Services For Infrastructure
EXT3 third extended filesystem
EXT4 fourth extended filesystem
FFM Frankfurt am Main
FQDN Fully Qualified Domain Name
GB Gigabyte
Ghz Gigahertz
GPO Group Policy Object
GUI Graphical User Interface
HTML Hypertext Mark-up Language
ID Identifier
IP Internet Protocol
KMS Key Management Service
LAN Local Area Network
LDAP Lightweight Directory Access Protocol
LVM Logical Volume Manager
NAT Network Adress Translation
NIC Network Interface Card
NTFS New Technology File System
OS Operating Systems
OU Organizational Unit
OVF/OVA Open Virtualization Format
PU Performance Unit
RAM Random Access Memory
REST Representational State Transfer
RHEL RedHat Enterprise Linux

Customer Documentation Dynamic Services for Infrastructure with vCloud (DSI vCloud)
Seite 47 / 47
SAML Secure Assertion Markup Language
SNAT Secure Network Adress Translation
SSH Secure Shell
SSL Secure Socket Layer
TCP Transmission Control Protocol
tpmC Transactions Per Minute, Type C
UDP User Datagram Protocol
URL Uniform Resource Locator
vApp Virtual Application
vCC vCloud Connector
vDC Virtual Data Centre
VIP Virtual IP address
VM Virtual Machine
VMDK Virtual Machine Disk
VMRC VM Remote Console
vOrg virtual Organisation
VxLAN Virtual Extensible Local Area Network
WSUS Windows Server Update Service
vOrg virtual Organisation
Table 4 Glossar