hand held programmer - national shower spares
TRANSCRIPT

1
IMPORTANT
Installer: This manual is the property of the customer andmust be retained with the product formaintenance and operational purposes.
PRODUCT MANUAL
HAND HELD PROGRAMMER
2
TABLE OF CONTENTSpage
INTRODUCTION 3
DESCRIPTION 3
SPECIFICATION 3
PACK CONTENTS 4
DIMENSIONS 4
INSTALLATION 5
MAINTENANCE 5
OPERATION 6
NOTES 22
CONTACTS 23
CUSTOMER CARE Back Cover
3
INTRODUCTION
DESCRIPTION
The Rada Pulse range of electronic products combine together to produce a controlledwashroom environment offering a high degree of energy and water conservation.
The Rada Pulse Hand Held Programmer is a hand held unit which enables you toprogram the Rada Pulse Control Box. The programmer has an extendable lead whichplugs into a socket in the top of the Control Box.
The programmer has a two line (alpha numeric) backlit display and push buttonswhich allow the user to navigate through the menu choices and set the configurationdata. This will allow the user to set the parameters such as activation time, delaytime and post flush waiting time etc. for each outlet.
The controller is multilingual and the user can select the appropriate language viathe menu system.
SPECIFICATION
Rada Pulse Hand Held ControllerMaterial - ABS plastic.
Operating voltage -12V D.C (power supplied from the Rada Pulse Control Box).
4
DIMENSIONS
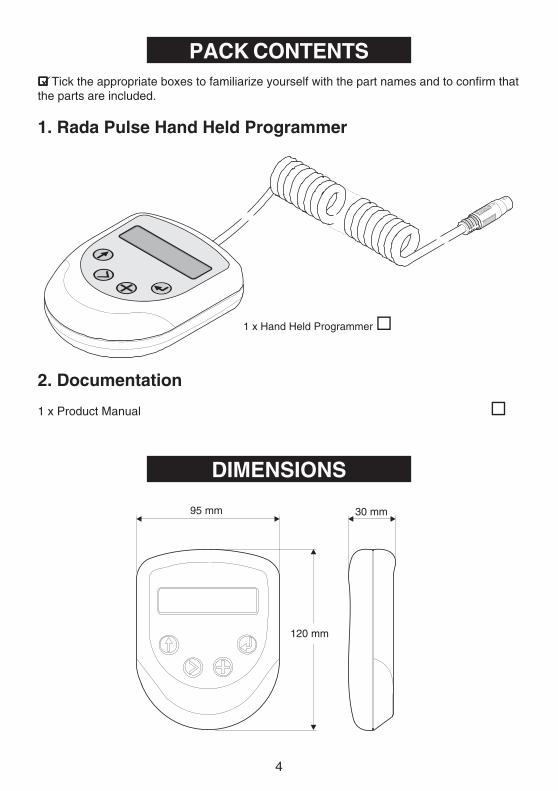
PACK CONTENTS Tick the appropriate boxes to familiarize yourself with the part names and to confirm that
the parts are included.
2. Documentation
1 x Product Manual
1 x Hand Held Programmer
1. Rada Pulse Hand Held Programmer
95 mm 30 mm
120 mm
5
INSTALLATION
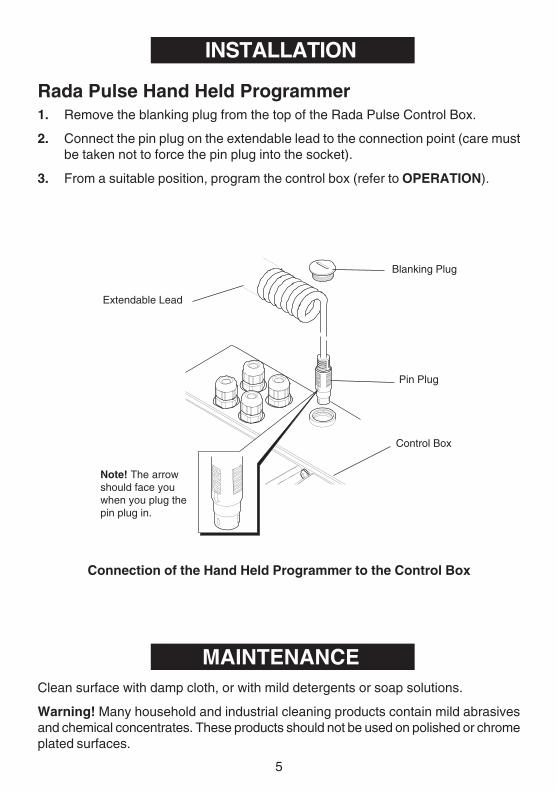
Rada Pulse Hand Held Programmer1. Remove the blanking plug from the top of the Rada Pulse Control Box.
2. Connect the pin plug on the extendable lead to the connection point (care mustbe taken not to force the pin plug into the socket).
3. From a suitable position, program the control box (refer to OPERATION).
MAINTENANCEClean surface with damp cloth, or with mild detergents or soap solutions.
Warning! Many household and industrial cleaning products contain mild abrasivesand chemical concentrates. These products should not be used on polished or chromeplated surfaces.
Blanking Plug
Control Box
Pin Plug
Extendable Lead
Connection of the Hand Held Programmer to the Control Box
Note! The arrowshould face youwhen you plug thepin plug in.
6
OPERATION
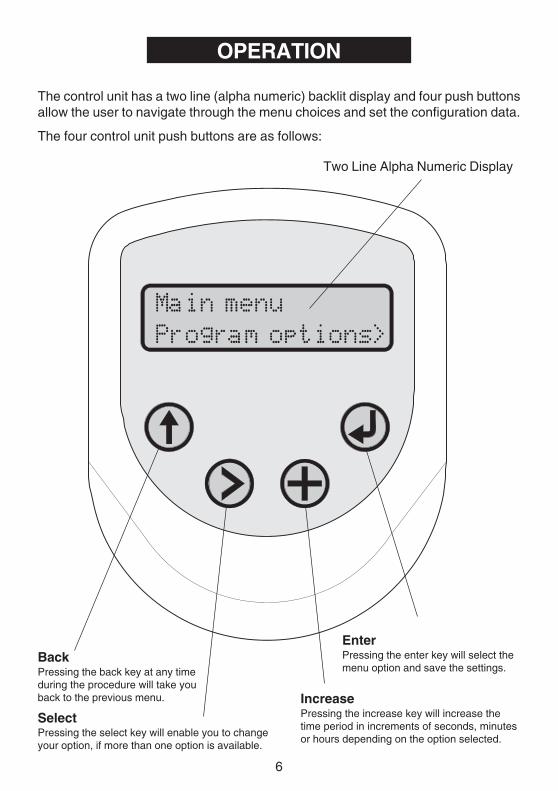
The control unit has a two line (alpha numeric) backlit display and four push buttonsallow the user to navigate through the menu choices and set the configuration data.
The four control unit push buttons are as follows:
BackPressing the back key at any timeduring the procedure will take youback to the previous menu.
EnterPressing the enter key will select themenu option and save the settings.
SelectPressing the select key will enable you to changeyour option, if more than one option is available.
IncreasePressing the increase key will increase thetime period in increments of seconds, minutesor hours depending on the option selected.
Two Line Alpha Numeric Display
7
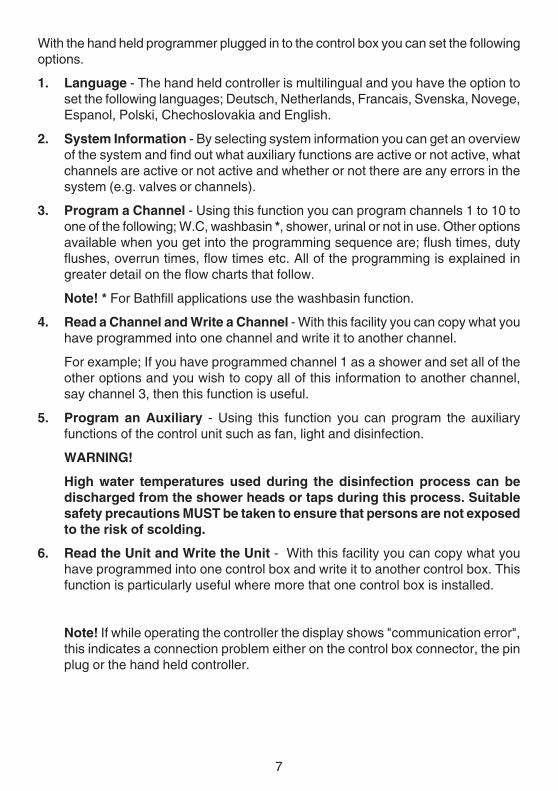
With the hand held programmer plugged in to the control box you can set the followingoptions.
1. Language - The hand held controller is multilingual and you have the option toset the following languages; Deutsch, Netherlands, Francais, Svenska, Novege,Espanol, Polski, Chechoslovakia and English.
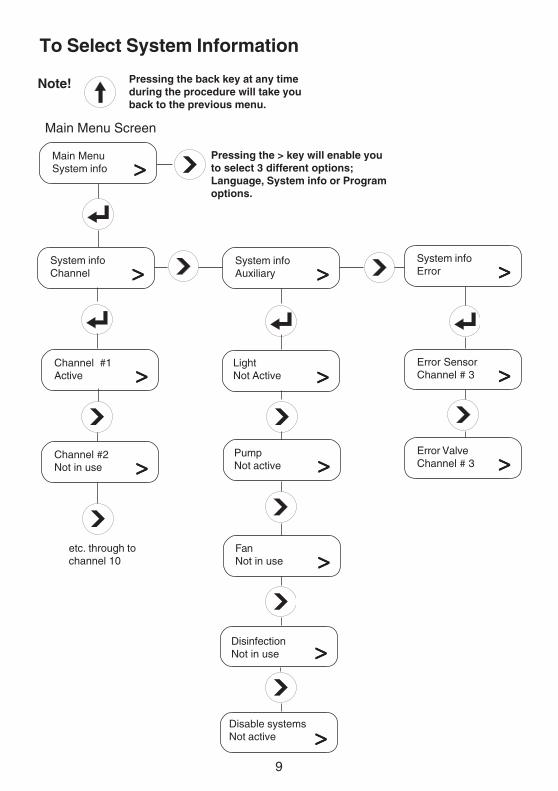
2. System Information - By selecting system information you can get an overviewof the system and find out what auxiliary functions are active or not active, whatchannels are active or not active and whether or not there are any errors in thesystem (e.g. valves or channels).
3. Program a Channel - Using this function you can program channels 1 to 10 toone of the following; W.C, washbasin *, shower, urinal or not in use. Other optionsavailable when you get into the programming sequence are; flush times, dutyflushes, overrun times, flow times etc. All of the programming is explained ingreater detail on the flow charts that follow.
Note! * For Bathfill applications use the washbasin function.
4. Read a Channel and Write a Channel - With this facility you can copy what youhave programmed into one channel and write it to another channel.
For example; If you have programmed channel 1 as a shower and set all of theother options and you wish to copy all of this information to another channel,say channel 3, then this function is useful.
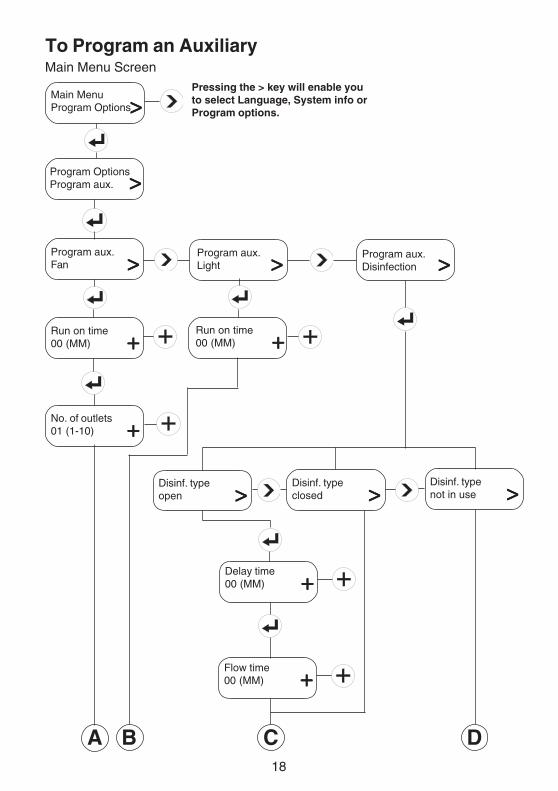
5. Program an Auxiliary - Using this function you can program the auxiliaryfunctions of the control unit such as fan, light and disinfection.
WARNING!
High water temperatures used during the disinfection process can bedischarged from the shower heads or taps during this process. Suitablesafety precautions MUST be taken to ensure that persons are not exposedto the risk of scolding.
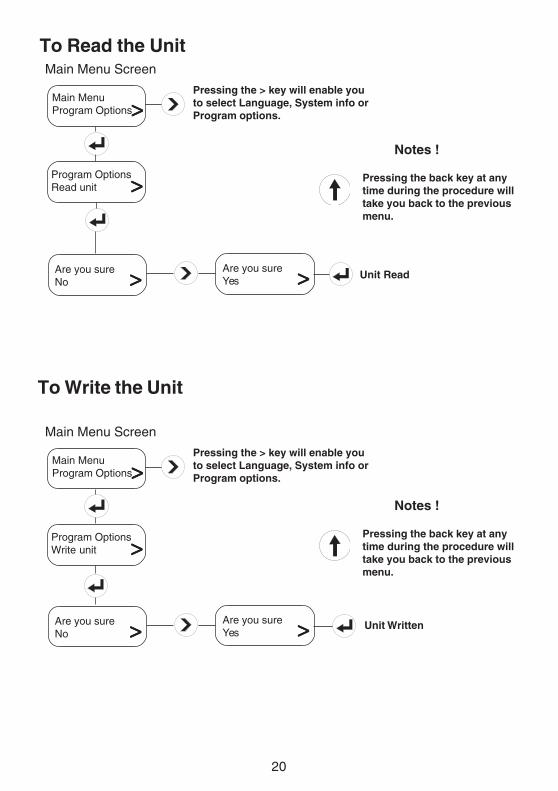
6. Read the Unit and Write the Unit - With this facility you can copy what youhave programmed into one control box and write it to another control box. Thisfunction is particularly useful where more that one control box is installed.
Note! If while operating the controller the display shows "communication error",this indicates a connection problem either on the control box connector, the pinplug or the hand held controller.
8
Main MenuLanguage
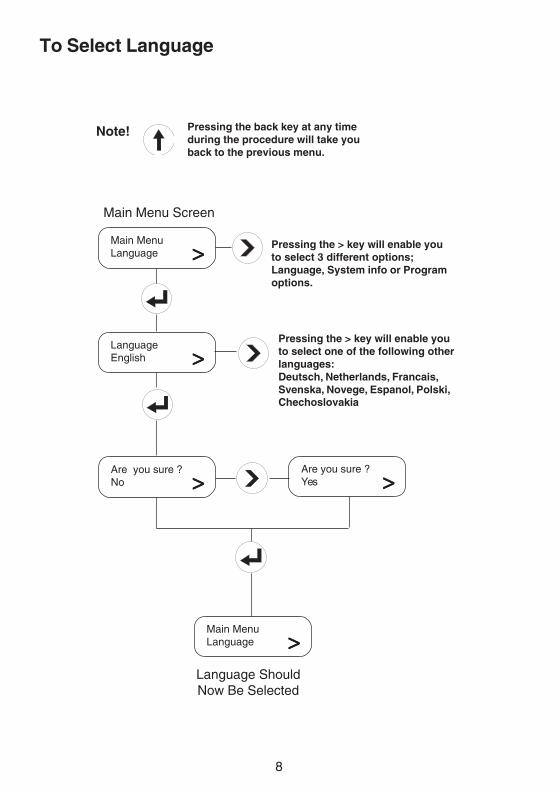
To Select Language
>>>>>
LanguageEnglish >>>>>
Main MenuLanguage >>>>>
Are you sure ?No >>>>>
Are you sure ?Yes >>>>>
Main Menu Screen
Language ShouldNow Be Selected
Pressing the > key will enable youto select 3 different options;Language, System info or Programoptions.
Pressing the back key at any timeduring the procedure will take youback to the previous menu.
Note!
Pressing the > key will enable youto select one of the following otherlanguages:Deutsch, Netherlands, Francais,Svenska, Novege, Espanol, Polski,Chechoslovakia
9
Main MenuSystem info >>>>>
Error ValveChannel # 3 >>>>>
Error SensorChannel # 3 >>>>>
Channel #1Active >>>>>
Main Menu Screen
To Select System Information
System infoError >>>>>
Channel #2Not in use >>>>>
Pressing the back key at any timeduring the procedure will take youback to the previous menu.
Note!
Pressing the > key will enable youto select 3 different options;Language, System info or Programoptions.
System infoChannel >>>>>
System infoAuxiliary >>>>>
>>>>>LightNot Active
>>>>>PumpNot active
>>>>>FanNot in use
>>>>>DisinfectionNot in use
>>>>>Disable systemsNot active
etc. through tochannel 10
10
Main MenuProgram Options>>>>>
Program OptionsProgram Channel
Program ChannelChannel # 1 >>>>>
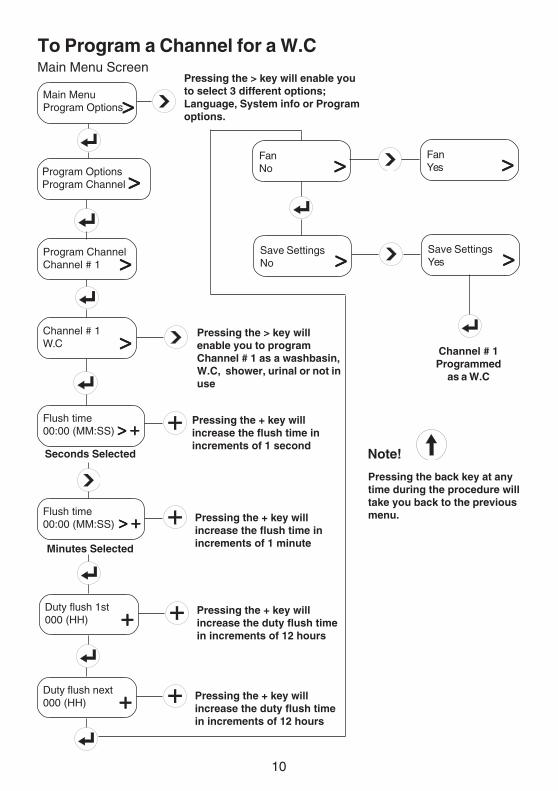
Main Menu Screen
To Program a Channel for a W.C
Channel # 1W.C >>>>>
Flush time00:00 (MM:SS) > +> +> +> +> +
Pressing the + key willincrease the flush time inincrements of 1 second
Flush time00:00 (MM:SS)
SMinutes Selected
Pressing the + key willincrease the flush time inincrements of 1 minute
Duty flush 1st000 (HH) +++++ Pressing the + key will
increase the duty flush timein increments of 12 hours
>>>>>FanNo >>>>>Fan
Yes
>>>>>Save SettingsNo >>>>>Save Settings
Yes
Pressing the > key willenable you to programChannel # 1 as a washbasin,W.C, shower, urinal or not inuse
Pressing the back key at anytime during the procedure willtake you back to the previousmenu.
Note!
Channel # 1Programmed
as a W.C
Pressing the > key will enable youto select 3 different options;Language, System info or Programoptions.
> +> +> +> +> +
Duty flush next000 (HH) +++++ Pressing the + key will
increase the duty flush timein increments of 12 hours
SSeconds Selected
>>>>>
11
Main MenuProgram Options>>>>>
Program OptionsProgram Channel >>>>>
Program ChannelChannel # 1 >>>>>
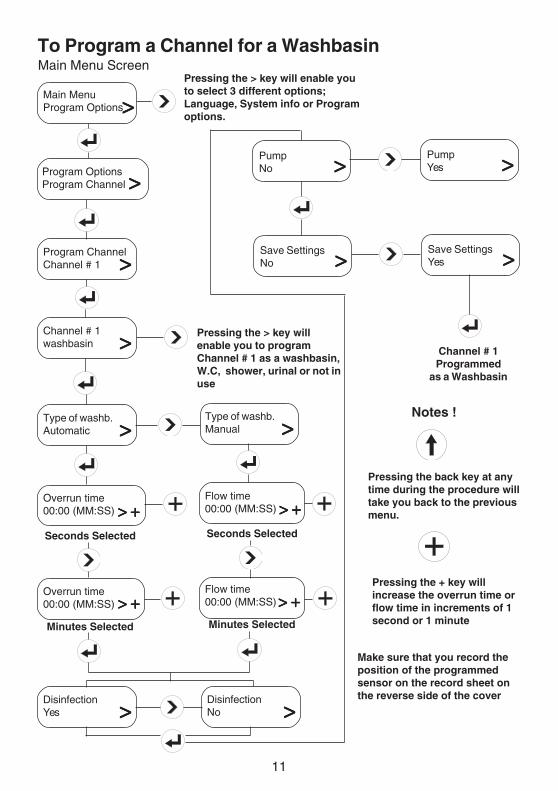
Main Menu ScreenTo Program a Channel for a Washbasin
Channel # 1washbasin >>>>>
Overrun time00:00 (MM:SS)
SSeconds Selected
Overrun time00:00 (MM:SS)
SMinutes Selected
>>>>>PumpNo >>>>>Pump
Yes
>>>>>Save SettingsNo >>>>>Save Settings
Yes
Pressing the > key willenable you to programChannel # 1 as a washbasin,W.C, shower, urinal or not inuse
Pressing the back key at anytime during the procedure willtake you back to the previousmenu.
Notes !
Channel # 1Programmed
as a Washbasin
Pressing the > key will enable youto select 3 different options;Language, System info or Programoptions.
Type of washb.Automatic >>>>>
Type of washb.Manual >>>>>
DisinfectionYes >>>>>
Flow time00:00 (MM:SS)
SSeconds Selected
Flow time00:00 (MM:SS)
SMinutes Selected
DisinfectionNo >>>>>
Pressing the + key willincrease the overrun time orflow time in increments of 1second or 1 minute
> +> +> +> +> + > +> +> +> +> +
> +> +> +> +> + > +> +> +> +> +
Make sure that you record theposition of the programmedsensor on the record sheet onthe reverse side of the cover
12
Main MenuProgram Options>>>>>
Program OptionsProgram Channel >>>>>
Program ChannelChannel # 1 >>>>>
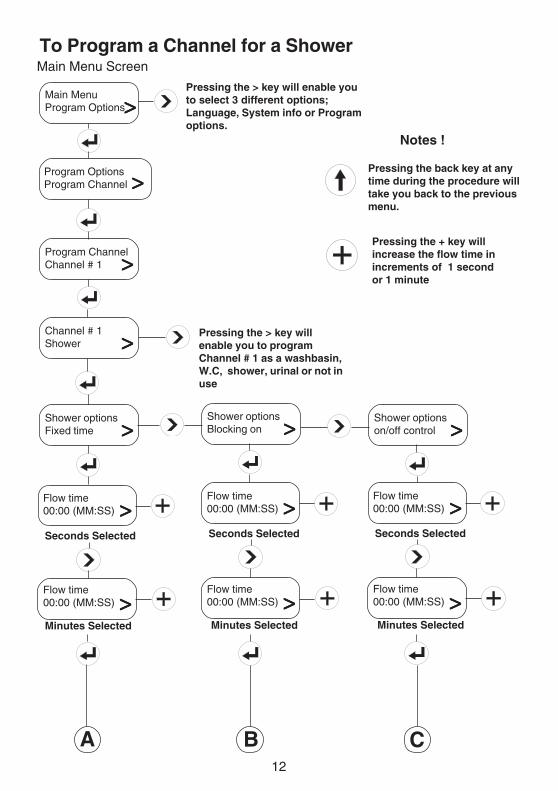
Main Menu ScreenTo Program a Channel for a Shower
Channel # 1Shower >>>>> Pressing the > key will
enable you to programChannel # 1 as a washbasin,W.C, shower, urinal or not inuse
Pressing the back key at anytime during the procedure willtake you back to the previousmenu.
Pressing the > key will enable youto select 3 different options;Language, System info or Programoptions.
Shower optionsFixed time >>>>>
Shower optionsBlocking on >>>>>
Flow time00:00 (MM:SS) >>>>>
SSeconds Selected
Flow time00:00 (MM:SS) >>>>>
SMinutes Selected
Pressing the + key willincrease the flow time inincrements of 1 secondor 1 minute
Shower optionson/off control >>>>>
Flow time00:00 (MM:SS) >>>>>
SSeconds Selected
Flow time00:00 (MM:SS) >>>>>
SMinutes Selected
A CB
Flow time00:00 (MM:SS) >>>>>
SSeconds Selected
Flow time00:00 (MM:SS) >>>>>SMinutes Selected
Notes !
13
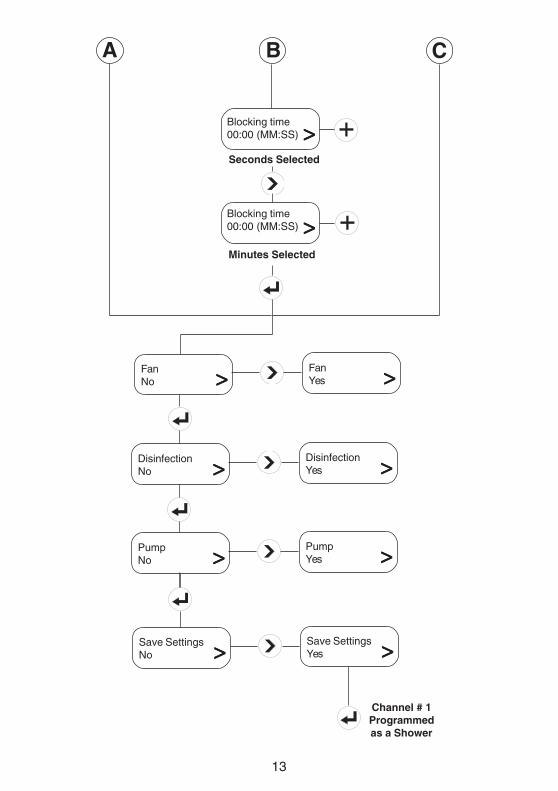
>>>>>PumpNo >>>>>Pump
Yes
>>>>>Save SettingsNo >>>>>Save Settings
Yes
A CB
SMinutes Selected
Blocking time00:00 (MM:SS) >>>>>
SSeconds Selected
Blocking time00:00 (MM:SS) >>>>>
>>>>>FanNo >>>>>Fan
Yes
>>>>>DisinfectionNo >>>>>Disinfection
Yes
Channel # 1Programmedas a Shower
14
Main MenuProgram Options >>>>>
Program OptionsProgram Channel >>>>>
Program ChannelChannel # 1 >>>>>
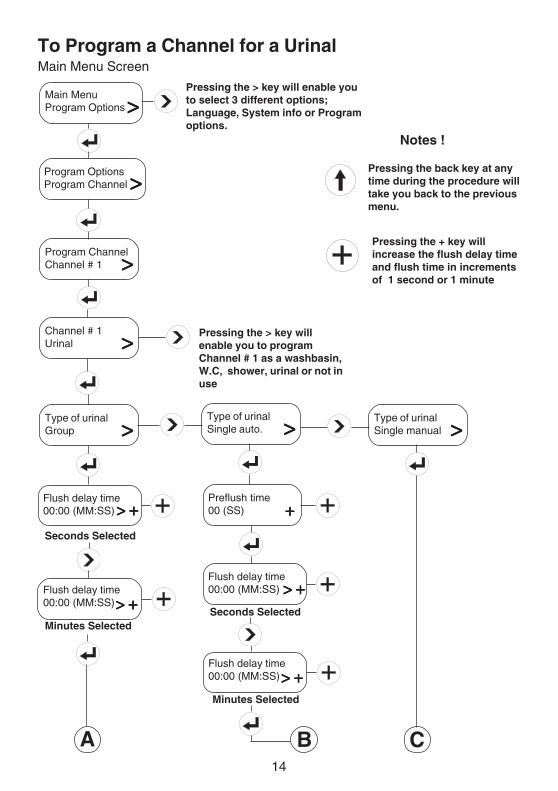
Main Menu ScreenTo Program a Channel for a Urinal
Channel # 1Urinal >>>>> Pressing the > key will
enable you to programChannel # 1 as a washbasin,W.C, shower, urinal or not inuse
Pressing the back key at anytime during the procedure willtake you back to the previousmenu.
Pressing the > key will enable youto select 3 different options;Language, System info or Programoptions.
Type of urinalGroup >>>>>
Type of urinalSingle auto. >>>>>
Flush delay time00:00 (MM:SS)
SSeconds Selected
Flush delay time00:00 (MM:SS)
SMinutes Selected
Pressing the + key willincrease the flush delay timeand flush time in incrementsof 1 second or 1 minute
Type of urinalSingle manual >>>>>
Flush delay time00:00 (MM:SS)
SSeconds Selected
Flush delay time00:00 (MM:SS)
SMinutes Selected
A CB
Notes !
Preflush time00 (SS)> +> +> +> +> +
> +> +> +> +> +
+ + + + +
> +> +> +> +> +
> +> +> +> +> +
15
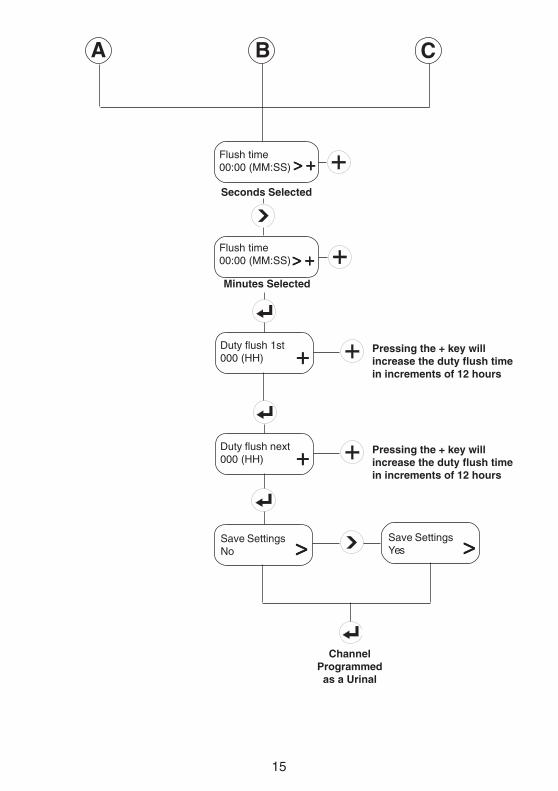
>>>>>Save SettingsNo >>>>>Save Settings
Yes
A CB
ChannelProgrammedas a Urinal
Flush time00:00 (MM:SS)
SSeconds Selected
Flush time00:00 (MM:SS)
SMinutes Selected
Duty flush 1st000 (HH) +++++ Pressing the + key will
increase the duty flush timein increments of 12 hours
> +> +> +> +> +
> +> +> +> +> +
Duty flush next000 (HH) +++++ Pressing the + key will
increase the duty flush timein increments of 12 hours
16
Main MenuProgram Options >>>>>
Program OptionsProgram Channel >>>>>
Program ChannelChannel # 1 >>>>>
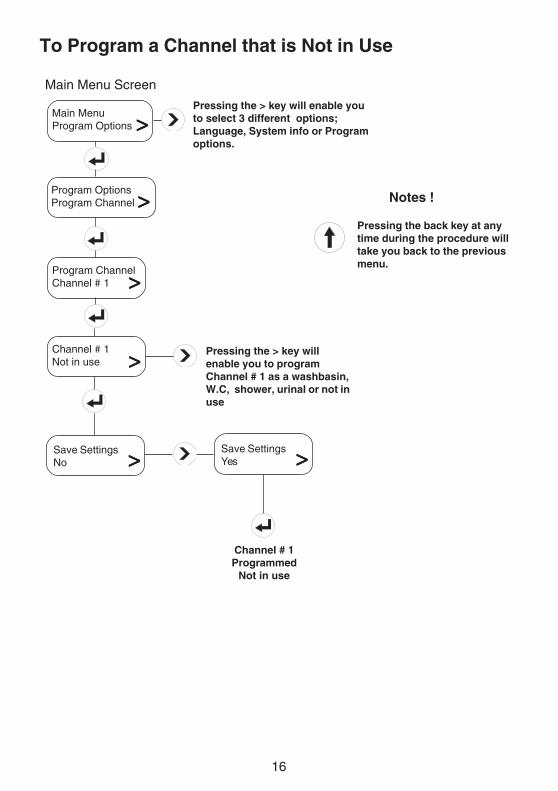
Main Menu Screen
To Program a Channel that is Not in Use
Channel # 1Not in use >>>>> Pressing the > key will
enable you to programChannel # 1 as a washbasin,W.C, shower, urinal or not inuse
Pressing the back key at anytime during the procedure willtake you back to the previousmenu.
Pressing the > key will enable youto select 3 different options;Language, System info or Programoptions.
Notes !
>>>>>Save SettingsNo >>>>>Save Settings
Yes
Channel # 1Programmed
Not in use
17
Main MenuProgram Options >>>>>
Program OptionsRead channel >>>>>
Read channelChannel # 1 >>>>>
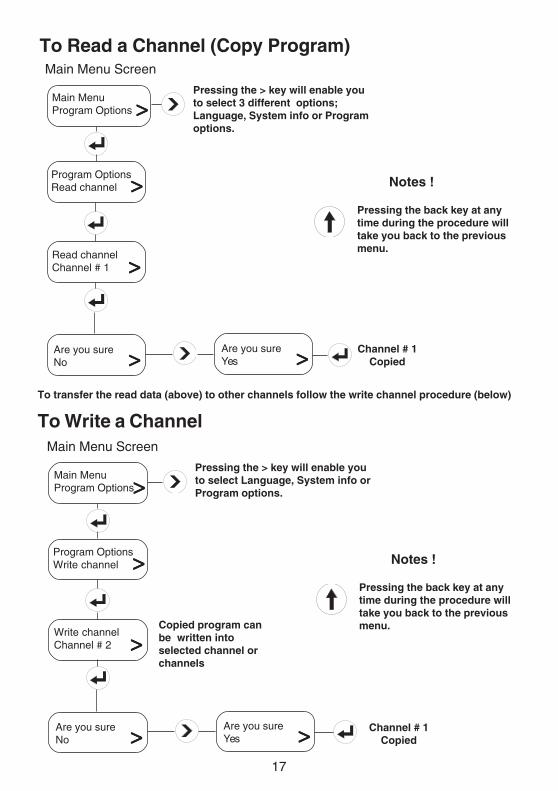
Main Menu Screen
To Read a Channel (Copy Program)
Pressing the back key at anytime during the procedure willtake you back to the previousmenu.
Pressing the > key will enable youto select 3 different options;Language, System info or Programoptions.
Notes !
>>>>>Are you sureNo >>>>>Are you sure
YesChannel # 1
Copied
Main MenuProgram Options>>>>>
Program OptionsWrite channel >>>>>
Write channelChannel # 2 >>>>>
Main Menu Screen
To Write a Channel
Pressing the back key at anytime during the procedure willtake you back to the previousmenu.
Pressing the > key will enable youto select Language, System info orProgram options.
Notes !
>>>>>Are you sureNo >>>>>Are you sure
YesChannel # 1
Copied
Copied program canbe written intoselected channel orchannels
To transfer the read data (above) to other channels follow the write channel procedure (below)
18
Main MenuProgram Options>>>>>
Program OptionsProgram aux. >>>>>
Program aux.Fan >>>>>
Main Menu Screen
To Program an Auxiliary
Run on time00 (MM) +++++
No. of outlets01 (1-10) +++++
Pressing the > key will enable youto select Language, System info orProgram options.
>>>>> >>>>>Program aux.Light
Program aux.Disinfection
Run on time00 (MM) +++++
Disinf. typeopen >>>>>
Disinf. typeclosed >>>>>
Delay time00 (MM) +++++
Disinf. typenot in use >>>>>
Flow time00 (MM) +++++
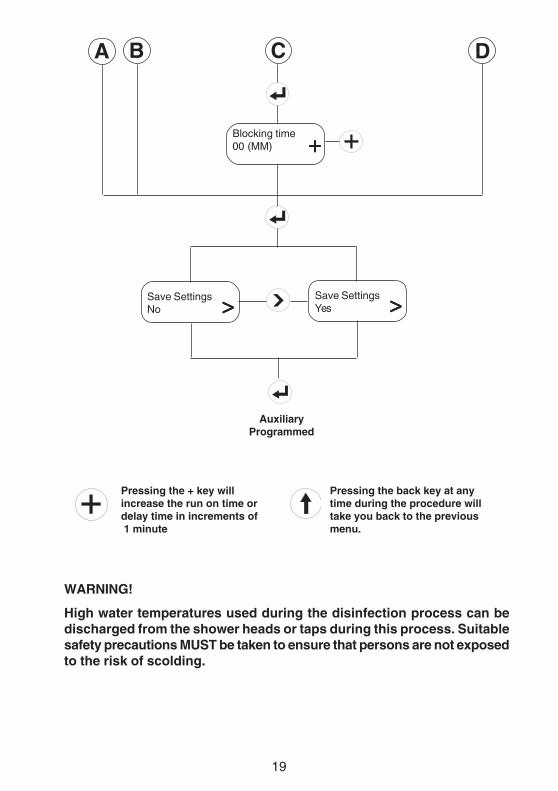
A CB D
19
Pressing the back key at anytime during the procedure willtake you back to the previousmenu.
>>>>>Save SettingsNo >>>>>Save Settings
Yes
AuxiliaryProgrammed
Blocking time00 (MM) +++++
CB
Pressing the + key willincrease the run on time ordelay time in increments of 1 minute
DA
WARNING!
High water temperatures used during the disinfection process can bedischarged from the shower heads or taps during this process. Suitablesafety precautions MUST be taken to ensure that persons are not exposedto the risk of scolding.
20
Main MenuProgram Options>>>>>
Program OptionsRead unit >>>>>
Main Menu Screen
To Read the Unit
Pressing the back key at anytime during the procedure willtake you back to the previousmenu.
Pressing the > key will enable youto select Language, System info orProgram options.
Notes !
>>>>>Are you sureNo >>>>>Are you sure
YesUnit Read
Main MenuProgram Options>>>>>
Program OptionsWrite unit >>>>>
Main Menu Screen
To Write the Unit
Pressing the back key at anytime during the procedure willtake you back to the previousmenu.
Pressing the > key will enable youto select Language, System info orProgram options.
Notes !
>>>>>Are you sureNo >>>>>Are you sure
YesUnit Written

21
NOTES

22
NOTES

23
CONTACTSH. G. Thornthwaite Pty Ltd.
PO Box 560Willoughby 2068
New South Wales, AUSTRALIATel: (0061) 2 941 74466 Fax: (0061) 2 9417 5231
NV De Melker Belgium SABeukenlei 50, 2960 St. Job-in-'t-Goor,
BELGIUMTel: (03) 633 2150 Fax: (03) 633 2103
Rada Mechnical Products Ltd.3993 Stouffville Road
StouffvilleOntario, L4A 7X5, CANADA
Tel: (001) 905 640 0538 Fax: (001) 905 640 9079
Multico Building Products Pte Ltd22A Lim Teck Boo Road
Henley Industrial Building 01-01C/02-04Singapore 537002
SINGAPORETel: (00) 65 283 8888
Fax: (00) 65 283 8138
Pamtec OyPO Box 13, Vantaa 01741 FINLAND
Tel: (00) 358 989 55061 Fax: (00) 358 989 0980
Les Robinets Presto4 Rue Lavoisier Boite Postale 74
17110 Saint Georges De Diclonne, FRANCETel: (00) 33 146 123456 Telex: 632 923F
Fax: (00) 33 149 020012
Rada Armaturen GmbHAn der Trift 65d,
Dreieich 63303,GERMANYTel: (00) 49 6103 98040 Fax: (00) 49 6103 980490
James Wong & Co., Ltd.Room1504 Westlands Centre,
20 Westlands Road,Quarry Bay, HONG KONG
Tel: (00) 852 2811 5868 Fax: (00) 852 2811 5740
Bocchi S.r.l.Corso Plebisciti 13, Milano 20129,
ITALYTel: (00) 3902 7012 3756 Fax: (00) 390 2738 0001
Japan Leonard DistributorsNo.2 10-3, Hama, Toyonaka City,
Osaka 561-0817, JAPANTel: (00) 81 66 336 0321 Fax: (00) 81 66 336 1529
De Melker B.V.De Schutterij 20, Postbus 65,
3900 AB - Veenendaal,THE NETHERLANDS
Tel: (0031) 318 524800 Fax: (0031) 318 52 5035
A L Byrne & Son Ltd.24 Gundry Street, Newton,Auckland, NEW ZEALAND
Tel: (0064) 937 96885Fax: (0064) 930 92720
Walker Crosweller (Pty) Ltd.P.O. Box 1018, Bromhof 2154
SOUTH AFRICATel: (0027) 1179 31031 Fax: (0027) 1179 31092
Armstrong-Lynnwood Inc.221 Armstrong Boulevard, Three Rivers,
Michigan 49093USA
Tel: (001) 616 278 1413Fax: (001) 616 279 3130
Peter Hiltpold AGTumigerstrasse 42, Greifensee CH-8606,
SWITZERLANDTel: (00) 41 1940 60 56 Fax: (00) 41 194 089 40
Heno Trading ABPO Box 168, 16212 Stockholm,
SWEDENTel: (00) 468 151175 Fax: (00) 468 167529
Comercial Sanitarios Presto SAPrincipie de Vergara 13,28001 Madrid, SPAIN
Tel: (0034) 91676 8248 Fax: (0034) 91676 5541
Fluid Control Systemsul. Dobrogniewa 1G,
01 - 438 Warszawa, POLANDTel: (0048) 22 836 4353 Fax: (0048) 22 836 1528
Koncept LimitedLetohradska 54,
17000 PRAGUE 7CZECH REPUBLIC
Tel: (00) 42 022 057 1696Fax: (00) 42 022 057 1697
24P3286/1 (K76A) © Kohler Mira Limited, April 2002
Rada ControlsKohler Mira LimitedCromwell Road,Cheltenham, England,GL52 5EP, UK.
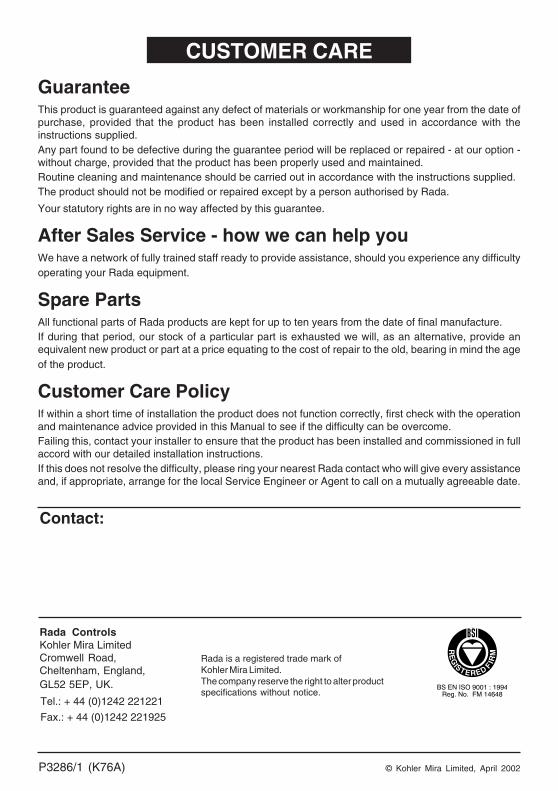
CUSTOMER CARE
BS EN ISO 9001 : 1994Reg. No. FM 14648
GuaranteeThis product is guaranteed against any defect of materials or workmanship for one year from the date ofpurchase, provided that the product has been installed correctly and used in accordance with theinstructions supplied.Any part found to be defective during the guarantee period will be replaced or repaired - at our option -without charge, provided that the product has been properly used and maintained.Routine cleaning and maintenance should be carried out in accordance with the instructions supplied.The product should not be modified or repaired except by a person authorised by Rada.
Your statutory rights are in no way affected by this guarantee.
After Sales Service - how we can help youWe have a network of fully trained staff ready to provide assistance, should you experience any difficultyoperating your Rada equipment.
Spare PartsAll functional parts of Rada products are kept for up to ten years from the date of final manufacture.If during that period, our stock of a particular part is exhausted we will, as an alternative, provide anequivalent new product or part at a price equating to the cost of repair to the old, bearing in mind the ageof the product.
Customer Care PolicyIf within a short time of installation the product does not function correctly, first check with the operationand maintenance advice provided in this Manual to see if the difficulty can be overcome.Failing this, contact your installer to ensure that the product has been installed and commissioned in fullaccord with our detailed installation instructions.If this does not resolve the difficulty, please ring your nearest Rada contact who will give every assistanceand, if appropriate, arrange for the local Service Engineer or Agent to call on a mutually agreeable date.
Contact:
Tel.: + 44 (0)1242 221221
Fax.: + 44 (0)1242 221925
Rada is a registered trade mark ofKohler Mira Limited.The company reserve the right to alter productspecifications without notice.