handbook on central venous catheterisation-21-3-2011 · catheters allow for monitoring and...
TRANSCRIPT

- 1 - - Revised: 25/02/13
ICU
Medical Officers Handbook
on Central Venous Catheterisation
Developed by; Tim Spencer
Clinical Nurse Consultant Central Venous Access & Parenteral Nutrition
Dept. of Intensive Care Liverpool Hospital

2
Aims 1. To assist medical officers to possess competencies in the insertion, care and
management of patients with central venous catheters (CVC).
2. To enhance the medical officers knowledge and skills in the management of
patients with a CVC.
3. To develop the medical officers skills in choosing the appropriate type of central venous catheter for the types of therapies required.
4. To perform central venous catheterisation utilising imaging technology to provide safe and efficient clinical practice with improved patient outcomes.
Objectives At the end of the programme, it is anticipated that the medical officers should be better able to: 1. Differentiate between the types of catheters in terms of their characteristics and
use.
2. Identify situations where the need for a CVC is indicated.
3. Compare and contrast the different sites of insertion of a CVC and its associated
complications.
4. Identify the usage of the different lumens of a CVC.
5. Compare appropriate measurements to prevent complications associated with
CVC’s.
6. Identify possible complications of a CVC in the hospitalised patient.
7. Utilise appropriate principles and guidelines in the care and maintenance of the
CVC including the following;
* Dressing techniques
* Skin preparation/antiseptic solutions/maximal barrier precautions
* Troubleshooting of problems during insertion
* Infection control guidelines
* Catheter removal
* Documentation

3
Types of Catheters Single Lumen Catheters (SLC) - can be capped and used for intermittent or
continuous infusions of medication or fluids. CVC placement with a single lumen
catheter is indicated when there is no peripheral venous access, when a viscous or
hyperosmolar infusion is prescribed. This type of line may be used within the general
or critical care setting or for long term access to a central vein for antibiotics or
chemotherapy, where only one lumen is required – this helps reduces risk of infection
by placing a device with less numbers of lumens.
Triple/Multi Lumen Catheters (TLC/MLC) - a MLC multiplies the advantages of a
SLC. The number of lumens within a MLC may vary from 2 to 4 and allows for many
treatments to be performed through one venous access site. Therapy may be
intermittent or continuous. The multiple ports allow for the administration of
medications, blood products, fluid replacement and venous sampling. Some
catheters allow for monitoring and visualisation of cardiovascular anatomy. Also, the
risk of infection increases with the more lumens available.
Peripherally Inserted Central Catheters (PICC) - are inserted in the arm using
Ultrasound (US) via the basilic or cephalic vein and are advanced until the tip of the
catheter is located in the Superior Vena Cava (SVC) or cavo-atrial junction. The
catheter may contain 1 or 2 lumens and can be used to deliver continuous or
intermittent therapy. PICC’s may be used in the general or critical care setting, but
have been most popular as a long-term venous access for nutritional support,
chemotherapy and antibiotic therapies. Like any central line, PICC placement is
checked by an erect CXR.
Implantable Catheters - when there is a need for a prolonged therapy, the central
venous catheter of choice are those that are implantable under the skin. The
tunnelled lines have 1 or 2 lumens and are sutured into a subcutaneous pocket on
the chest or arm and constitute a completely closed system. Both catheter types may
be used for the long-term infusions of antibiotics, TPN, chemotherapy, or other fluids
and medications.
4
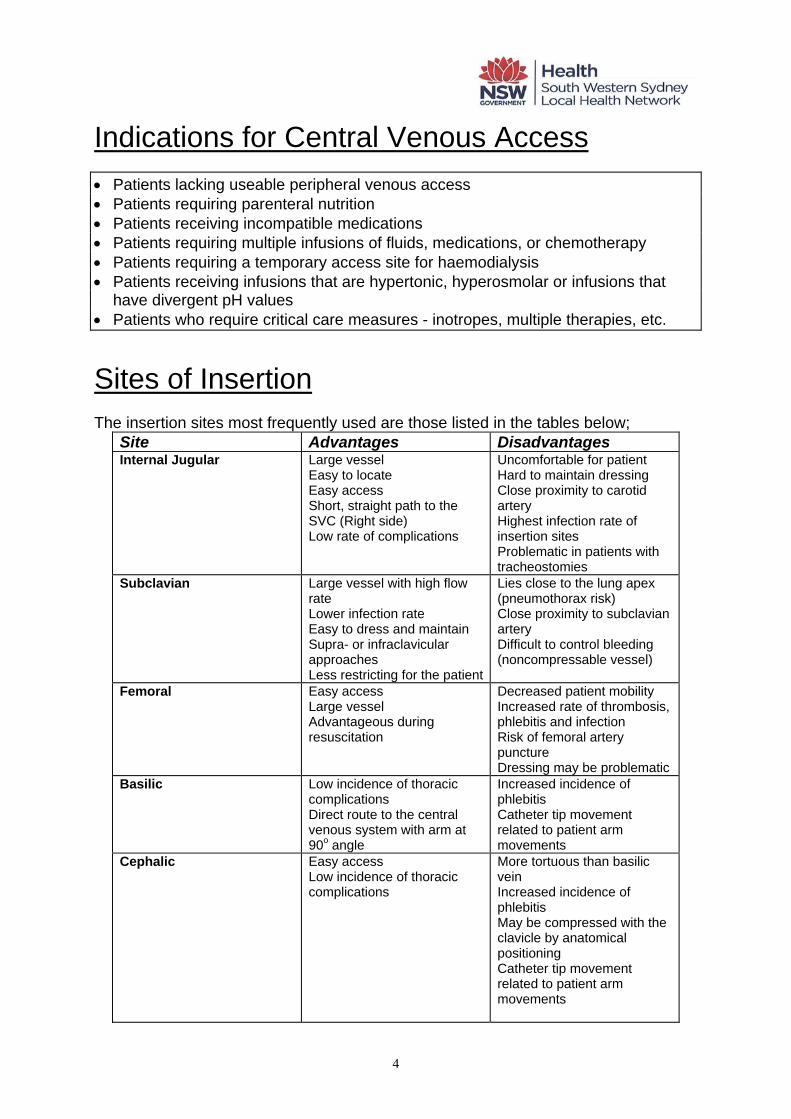
Indications for Central Venous Access • Patients lacking useable peripheral venous access • Patients requiring parenteral nutrition • Patients receiving incompatible medications • Patients requiring multiple infusions of fluids, medications, or chemotherapy • Patients requiring a temporary access site for haemodialysis • Patients receiving infusions that are hypertonic, hyperosmolar or infusions that
have divergent pH values • Patients who require critical care measures - inotropes, multiple therapies, etc.
Sites of Insertion The insertion sites most frequently used are those listed in the tables below;
Site Advantages Disadvantages Internal Jugular Large vessel
Easy to locate Easy access Short, straight path to the SVC (Right side) Low rate of complications
Uncomfortable for patient Hard to maintain dressing Close proximity to carotid artery Highest infection rate of insertion sites Problematic in patients with tracheostomies
Subclavian Large vessel with high flow rate Lower infection rate Easy to dress and maintain Supra- or infraclavicular approaches Less restricting for the patient
Lies close to the lung apex (pneumothorax risk) Close proximity to subclavian artery Difficult to control bleeding (noncompressable vessel)
Femoral Easy access Large vessel Advantageous during resuscitation
Decreased patient mobility Increased rate of thrombosis, phlebitis and infection Risk of femoral artery puncture Dressing may be problematic
Basilic Low incidence of thoracic complications Direct route to the central venous system with arm at 90o angle
Increased incidence of phlebitis Catheter tip movement related to patient arm movements
Cephalic Easy access Low incidence of thoracic complications
More tortuous than basilic vein Increased incidence of phlebitis May be compressed with the clavicle by anatomical positioning Catheter tip movement related to patient arm movements

5

6

7
Complications It is estimated that approximately 10% of patients who have a central line placed will
experience complications secondary to catheter insertion or use. Whether or not
complications occur depends upon a number of factors including the experience of
the inserting personnel, anatomical distortion at the potential insertion site, and the
patients' condition. Each site used, e.g subclavian v’s internal jugular v’s femoral, has
certain risks involved due to the normal anatomy of that particular area.
Other individual patient factors are also important, such as underlying disease,
tolerance of Trendelenburg position, laboratory levels associated with bleeding, and
the patients mental or emotional status.
The complications are generally divided into two groups, immediate or delayed,
dependant upon the time they appear in relation to the catheter insertion.
Immediate complications are usually associated with catheter placement; however,
some may develop later under certain circumstances. Delayed complications are
usually manifested after the catheter has been indwelling for a period of time.
Only the most frequently encountered complications will be included.
Immediate Delayed
Venous embolism Catheter-related infections
Cardiac tamponade Catheter-related
thrombosis
Catheter embolus/rupture Vessel erosion
Arterial puncture Pneumothorax,
haemothorax,
hydrothorax
Cardiac arrhythmias Catheter malposition
Nerve injury
Catheter malposition
Pneumothorax, haemothorax

8
All ICU doctors inserting CVCs must transduce the cannulating needle/cannula with a pressure transducer and confirm that there is NO arterial waveform prior to guidewire and dilator introduction into
the vessel if ultrasound (US) is NOT used.
If unsure, call a Senior ICU Registrar or CNC/CNS for Central Venous Access.
Skin Preparation Central venous catheters are invasive devices that predispose the patient to
complications that are costly in financial terms as well as in patient morbidity and
mortality. Methods used in the care and maintenance of the catheter during insertion
and while indwelling can have a significant effect upon the incidence of catheter-
related complications. It is vital that health care personnel be knowledgable and
experienced in the care of central venous catheters, and that policies, procedures
and protocols be based upon available scientific studies that support the methods
chosen for that care.
Each time an insertion site is chosen for catheterisation, the surrounding area where
the catheter entrance point and anchoring points should be treated with antiseptic
solution (tinted Chlorhexidine 2% in 70% isopropyl alcohol). The purpose of using an
antiseptic solution is to reduce the number of skin organisms at the insertion site.
Chlorhexidine has more recently been shown to also be a more effective agent than
Providone Iodine and, unlike others, promotes a longer residual antimicrobial effect
after drying.
Defatting the skin- (non-standard practice) The practice is under scrutiny due to patient discomfort and the loss of the proposed
anti-microbial effects of the free fatty acids on the skin.
NB: Acetone, alcohol and ether have been shown to weaken polyurethane and
silicone materials. Defatting the skin is not recommended.
If skin is dirty, clean the skin with soap and water prior to inserting the CVC/PICC.

9
Skin Preparation Guidelines • cleanse the area around the catheter including the hub(s)
• cleansing should be performed using a circular motion moving in concentric
circles from the site outwards (see diagram) - gentle pressure on the skin should
be used.
• Prepare an area the size greater than that of the final dressing (approx 12cm x
12cm).
• Use the antiseptic of choice properly to achieve the maximum benefits. • An alcoholic chlorhexidine solution will dry slightly quicker, depending how much
solution is used, but wait until solution is almost dry before starting procedure. Dressings The placement of a dressing over the catheter insertion site serves a number of
purposes.
• It must be occlusive and water-repellent to protect the area from extrinsic
contamination and to keep the site clean of any secretions or drainage from
surrounding of anatomical sites.

10
• The dressing also helps to stabilise the catheter and aids in the protection of the
catheter body close to the insertion site. Sterile supplies must be used to prevent
the introduction of pathogenic microorganisms at the time the dressing is applied.
Catheter Securement CVCs can be secured with a small stitch close to the insertion site to prevent
pistoning at the site (movement of catheter body back and forth through the insertion
site). This can often lead to site-related inflammation/infection. Se picture below.
A Statlok is also placed on the suture/securement wing of the catheter. As shown
below, it is placed away from the insertion site but still covered by the dressing (which
helps stabilise the catheter also). Place a slight curve in the catheter body to reduce
any tension that may cause movement at insertion site. The Steristrip must also be
used to help secure the catheter (see images below)
R) IJV with low approach

11
L) Axillary CVC with large Biopatch
L) Basilic PICC with Biopatch

12
Maintaining Patency When a catheter lumen is no longer used for continuous infusion, it can be capped
and “locked” in preparation for intermittent or future use. To “lock” a catheter lumen a
solution must be instilled to fill the entire space of the lumen and the injection cap.
Theoretically, this prevents a backflow of blood that would cause clotting within the
catheter.
A controversy still exists concerning which solution is appropriate; heparinised-saline
or saline alone.
Heparinised saline has been primarily used due to the anti-thrombolytic properties of
heparin. Heparin inhibits clot formation by inactivating thrombin and other coagulation
factors. HITTS is mostly associated with continuous IV heparin infusion, but has also
occurred with intermittent subcutaneous and lushing/locking administration. HITTS
occurs in approximately 5-30% of persons receiving heparin.
Two clinical types of HITTS have been identified. One is a mild form characterised by
a transient decrease in platelets that usually occurs around the second or third day of
therapy. This is the most frequent presentation. The other type is believed to be an
immune response to heparin and occurs 6 to 12 days after therapy is started. It is
characterised by a severe decrease in platelets that may be accompanied by
thrombosis, the result of platelet aggregation. The clots may form in arteries or veins
and affect any portion of the body including organs. The clotting phase of the disease
has also been called “white clot syndrome” due to the colour of the clots, which
consist of platelets and fibrin.
Another aspect of the procedure that is not standardised is the frequency with which
the IV device is flushed. A regime used frequently is to flush at the time of medication
administration using the SASH method and at least every 8 hours or once per shift.
The SASH method consists of a flush of saline, followed by the medication, another
saline flush and finally, heparin to lock the device.
This prevents the interaction of heparin with other medications. Without heparin an
SAS regime is used.

13
SASH Method SAS Method Saline Saline
Administer medication Administer medication
Saline Saline
Heparin lock
Infection Control Due to the threat of exposure to blood to health care workers during central venous
catheterisation and certain aspects of catheter care, all involved personnel must
comply with the safety measures provided by using Standard Precautions. Protective
garb and needlestick prevention measures should be utilised based on the task and
amount of blood exposure that is anticipated. Needle free systems and needle
containment devices have been developed the further reduce personnel exposure to
needles during the admixture and administration of injectable medications.
Routine measures can be taken to reduce the risk of local and systemic catheter-
related infections. They include;
• Hand washing Site evaluation
• Site preparation Minimal handling
• Catheter stabilisation Occlusive dressings
• Inserter expertise In addition, advances designed to provide additional protection against catheter-
related infections have been made in IV technology e.g antiseptic-impregnated
catheter materials, silver-impregnated collagen cuffs and antibiotic-coated catheters.
The action of these products is directed toward preventing the migration of skin
microorganisms down the catheter track.
The antiseptic surface consists of a combination of silver sulfadiazine and
chlorhexidine that is impregnated into the polyurethane surface of the catheter. The
agents act synergistically to prevent replication of microorganisms. The process

14
involves alteration of the cell wall of the organism by chlorhexidine, which then allows
entry of the silver ions into the cell. The silver ions bind to the DNA helix and prevent
the cell from replicating. Both agents are active against gram-positive and gram-
negative bacteria as well as yeast. The agents are released slowly over a period of
time, up to 15 days, after which the release is reduced significantly. By using a
multiple lumen catheter made with an antiseptic surface, the benfits will include a
longer catheter dwell time, decreased patient morbidity and mortality and cost
effectiveness.
BIOPATCH – is a chlorhexidine-impregnated foam disc that is placed over the
insertion site at catheter insertion, providing sustained CHG release for 7 days. The
disk can hold up to 4 times its weight in fluid/blood and will continue to provide
effective antiseptic action at the insertion site while insitu. There are 2 sizes.
Below shows an image of a R) IJ Vascath secured with a large Biopatch insitu.

15
Catheter Removal When a catheter is removed, precautions must be taken to prevent associated
complications. During removal Universal Precautions must be employed to protect
the healthcare worker from potential exposure to bloodborne pathogens. Aseptic
technique must be used at the insertion site. To increase intra-thoracic pressure, the
patient should be placed in the Trendelenburg position, if tolerated, or flat in bed and
should be instructed to hold their breath or perform the Valsava manoeuvre. If the
patient cannot cooperate with these instructions, the catheter should be removed
during expiration.
After the catheter is removed pressure must be maintained with sterile gauze at the
site until haemostasis is achieved. A totally air occlusive dressing must be applied
over the insertion site to prevent an air embolism caused by air entering the body
through the residual subcutaneous catheter track. The dressing must remain in place
for approximately 24-72 hours depending on the length of time the catheter was
indwelling.
During the time following the catheter removal the patient should be observed closely
for signs and symptoms of complications, especially bleeding, air embolism or
infection at the insertion site.
Documentation The following information should be included in the patients clinical progress notes; • Date of insertion, • Inserter - Name, designation • Anatomical location of catheter • Documentation of non-arterial waveform/ABG analysis • Inserted catheter depth according to catheter reference markings • X-Ray confirmation of catheter tip location • Site assessment, patient condition • Complications during insertion • Ongoing assessment documentation whilst catheter insitu

16
CVC/PICC insertion competency assessment
To be completed by all Registrars during ICU training.
Retain one copy and give a copy to Dr Parr.
Name:
Satisfactory assessment
by: Date:
Internal Jugular
Subclavian
Femoral
PICC
Other:

17
References
Arrow Multi-Lumen Central Venous Catheter Nursing Care Guidelines, Arrow
International, 1994.
Guidelines for Prevention of Intravascular Device-Related Infections, Pearson, M.L,
1996, Infection Control and Epidemiology, Vol. 17, No. 7, pp. 438-473.
Liverpool Health Service General Nursing Policy and Procedure Manual, 1996,
Liverpool Health Service
Rosen, M Latto, P NG, S (1992) Handbook of Percutaneous Central Venous
Catheterisation, 2nd Edition, WB Saunders, London
BIOPATCH – Johnson & Johnson Best Practice Publication

18
COMPETENCY ASSESSMENT CHECKLIST – Central Venous Cannulation
The following criteria must be successfully achieved during assessment on 5 separate occasions (exception: staff granted RPL are to complete only 2 assessments).
Unsuccessful attempts must also be recorded and assessed.
Criteria
Assessor’s Name: ___________________________________
Achieved a or r (or n/a)
Re-assessment (if required) &/or Comments
Procedure
Explains procedure to patient and obtains consent – if applicable Organises equipment (ensure sharps container available) Identifies patient and performs timeout and safety checklist Checks for patient allergies – drugs, dressings, antiseptics Assesses and selects suitable vessel for cannulation with ultrasound Prepares equipment and accessories for catheter insertion Position’s patient to maximise access to desired area of insertion i.e. Trendelenberg position if required
Attaches monitoring (ECG or SpO2) if available Applies personal protective equipment (PPE) (gloves, mask & eyewear or face shield) as per standard precautions policy
Washes hands using sterile hand-wash technique (2 mins) Prepares skin area appropriately (with antiseptic solution) Drapes patient with full body sterile drapes to maximise sterile barrier Inspects catheter and equipment to ensure it is not damaged/remains intact & checks that the guidewire mechanism is working
Flush/prime each lumen with 0.9% normal saline Palpates anatomical landmarks correctly/ positions ultrasound probe and visualises the correct vessel to be cannulated
Correctly anaesthetises skin and deeper tissue with local anaesthetic under ultrasound guidance
Inserts cannula/needle with bevel facing upwards, advancing slowly while maintaining slight negative pressure with syringe, ensuring visualisation of needle tip under ultrasound guidance at all times
Once accessed the vessel, stabilise needle and check for aspirate and then advance guidewire through needle to desired length – do not pull wire back through needle while insitu in patient. Remove needle once guidewire in place
Dilates skin and vessel with vessel dilator – do not cut the skin with scalpel
Inserts catheter over guidewire to desired or measured length whilst maintaining grip on guidewire at all times
Removes guidewire & connects transducer line. Checks & acknowledges for NON-ARTERIAL waveform on monitor.
Secures catheter at insertion site appropriately and applies sterile transparent occlusive dressing to insertion site e.g. IV3000™ or Tegaderm. Date & time must be recorded on dressing at insertion
Dispose of all sharps material in sharps container Removes drapes and accessories from patient/workspace Correctly dispose of general/contaminated waste materials Remove protective equipment and perform hand hygiene Document procedure in patients’ health care record on SMR.090.200
Date: / / Assessor’s Name: Assessor’s Signature: Assessment Decision (Please Circle): Successful Unsuccessful

19
This triplicate copy form must be completed at insertion and filed in the patient’s clinical records as it is a mandatory Ministry of Health document.

20

21
BIOPATCH – How to apply