hands-on experience os: centos 5.7 cloud software: eucalyptus 2.0.3 opensource hypervisor: kvm cloud...
TRANSCRIPT

Hands-on Experience
OS:• CentOS 5.7
Cloud Software: • Eucalyptus 2.0.3 OpenSource
Hypervisor: • KVM
Cloud Managed Interface: • Hybridfox
Demo Project: • USGS-GMU Silvacarbon Portal

1. Hybridfox Installation
1. Download hybridfox add-on 1.7 from:http://code.google.com/p/hybridfox/

2. Using Firefox to open the hybridfox-1.7.000177.xpi

2. Hybridfox Setting
3. Open Hybridfox from tools->Hybridfox
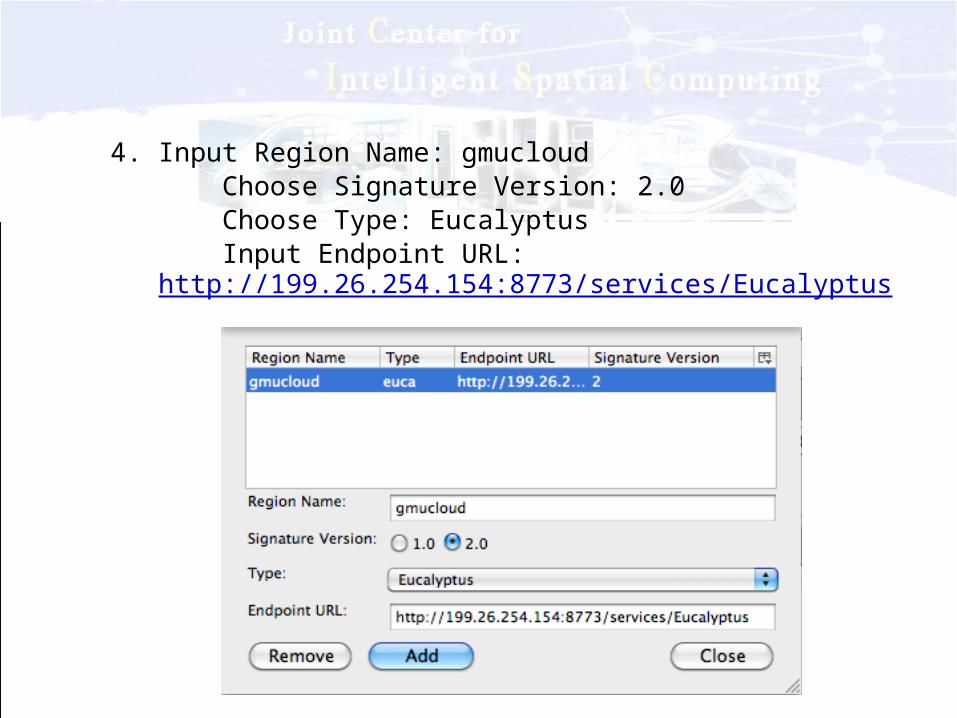
4. Input Region Name: gmucloud Choose Signature Version: 2.0 Choose Type: Eucalyptus Input Endpoint URL:
http://199.26.254.154:8773/services/Eucalyptus

5. Open a new Firfox Window to open gmu cloud url: https://199.26.254.154:8443 Login with username: esip password: test11

6. In the Credentials page, click on “show keys”: There are two keys here:
1) Query ID2) Secret Key

7. Set the Credentials in Hybridfox Click on “Credentials” in Hybridfox

8. Input Accout Name: esip Copy “Query ID” in step 6 to AWS Access Key Copy “Secret Key” in step 6 to AWS Secret Access Key Select Preferred Region: gmucloud

3. Eucalyptus Usage
9. Create “Keypair” Click on KeyPairs tab in Hybridfox Create a new Keypair using Input name: YOUR_KEYPAIR_NAME ( Different host choose
different name) Store the Keypair

10. Click on “Images” tab in Hybridfox

11. Launch Instances Choose Image: ID: emi-491719A2 Manifest: silvacarbon.kvm.v1/……

Select Your Keypair
Select Type

11. Check the Instance status Click on “Instances” tab in Hybridfox

12. Visit the esip testbed Copy the “Public DNS” from “Instances” tab as yoururl Input http://xxx.xxx.xxx.xxx/silvacarbon

4. Silvacarbon Usage

View Information
Switch different tabs
View content in the page

Visualization
Select Country: “All Countries”Select Category: “Gabon DEM” under “Elevation”Download data by clicking

Member Only Content
Create and manage content after login

5. Login to the Instance
If you are using Mac OS• Locate the keypair and use SSH to loginssh –i YOURKEY_PATH [email protected]

If you are using Windows OS• Download Puttygen.exe and Putty.exewww.chiark.greenend.org.uk/~sgtatham/putty/download.html• Using puttygen to convert OpenSSH key (.pem) to private key
(.ppk)

Load OpenSSH key (.pem)Choose All Files (*.*) in file type dropbox

Click "Save Private Key" to save the key to .ppk

Using Putty to login to the instance

Select the .ppk• Click Connection->SSH->Auth• Selete the .ppk

Input the login name: root