hands on - getting to know the pinnacle 16 user interface
TRANSCRIPT

Page 1 of 21
HANDS ON - Getting to know the Pinnacle 16 User Interface and the Solaris 11 Desktop.
Introduction Part 1 of this Hands On exercise on will provide an overview of the improvements to the Pinnacle Graphical User Interface introduced in the Pinnacle 16 release. Part 2 will introduce the new Desktop environment that is supported for all servers running Solaris 11. Overview of changes in Patient Select Screen
1. All Pinnacle windows can be scaled to full screen using standard windows icons
2. The ‘Copy Plan to Image’ button has been re-named ‘Dynamic Planning’
3. The ‘Sort By’ button from previous Pinnacle versions (see below) that was used to sort the
patient list has been removed
Lists sorted by clicking on table header
Scalable column widths
Automatic Patient selection by typing Last Name
Dynamic Planning Replaces ‘Copy Plan to Image’
Page 2 of 21
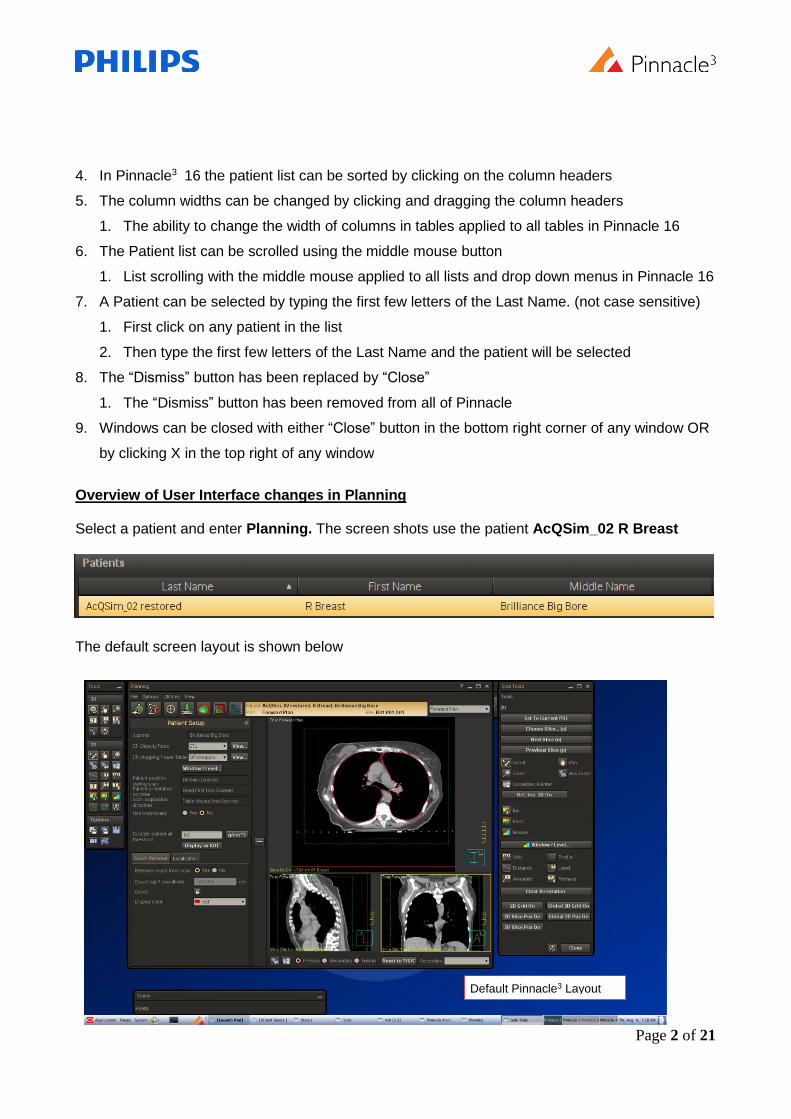
4. In Pinnacle3 16 the patient list can be sorted by clicking on the column headers
5. The column widths can be changed by clicking and dragging the column headers
1. The ability to change the width of columns in tables applied to all tables in Pinnacle 16
6. The Patient list can be scrolled using the middle mouse button
1. List scrolling with the middle mouse applied to all lists and drop down menus in Pinnacle 16
7. A Patient can be selected by typing the first few letters of the Last Name. (not case sensitive)
1. First click on any patient in the list
2. Then type the first few letters of the Last Name and the patient will be selected
8. The “Dismiss” button has been replaced by “Close”
1. The “Dismiss” button has been removed from all of Pinnacle
9. Windows can be closed with either “Close” button in the bottom right corner of any window OR
by clicking X in the top right of any window
Overview of User Interface changes in Planning Select a patient and enter Planning. The screen shots use the patient AcQSim_02 R Breast
The default screen layout is shown below
Default Pinnacle3 Layout

Page 3 of 21
The main Planning window can be expanded to full screen There are two methods to expand the main Planning window to full screen 1. Clicking on the standard expand/minimise symbols in the top right of the window
2. Double clicking on the top banner of the window to expand to full screen. Double clicking again will return to the default window layout.
General Window manipulation in Pinnacle3 16 All Pinnacle3 windows are scalable and have standard tools for maximize/minimize, close (with the X) and minimise in the top right hand corner in addition to a ‘?’ icon to access help. Any list or pull down menu can be scrolled with the middle mouse wheel. Middle mouse wheel will work for scrolling in all controls (or widgets) and areas that have a slider (tables, lists, panels, drop-down control or widget like color choice control etc.) Note, at the time of writing the following windows have not been converted to the new user interface.
Physics tools
Backup/Restore
Beams Spreadsheet & Treatment Navigator in Planning
If a user script creates a window then the created window will be in the old Pinnacle3 UI.
Page 4 of 21
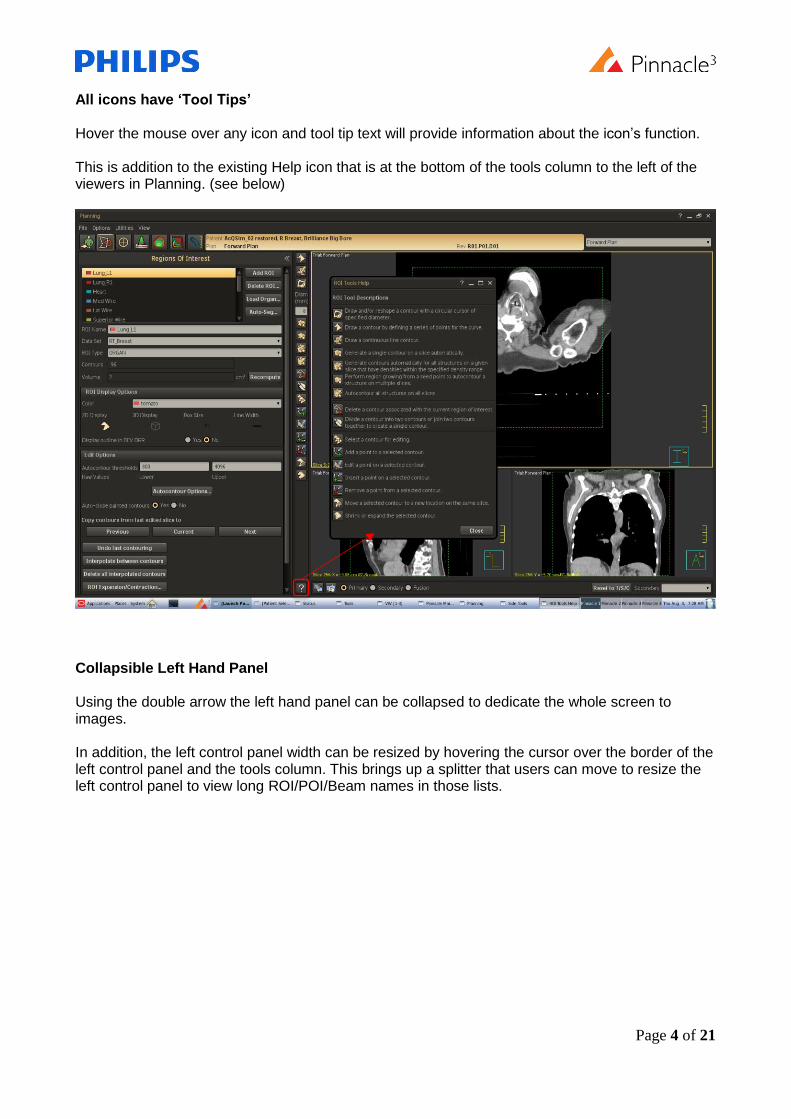
All icons have ‘Tool Tips’ Hover the mouse over any icon and tool tip text will provide information about the icon’s function. This is addition to the existing Help icon that is at the bottom of the tools column to the left of the viewers in Planning. (see below)
Collapsible Left Hand Panel Using the double arrow the left hand panel can be collapsed to dedicate the whole screen to images. In addition, the left control panel width can be resized by hovering the cursor over the border of the left control panel and the tools column. This brings up a splitter that users can move to resize the left control panel to view long ROI/POI/Beam names in those lists.

Page 5 of 21
Double arrow to collapse Left Panel
Double Arrow to expand Left panel
Click & drag here to re-size left panel
Page 6 of 21
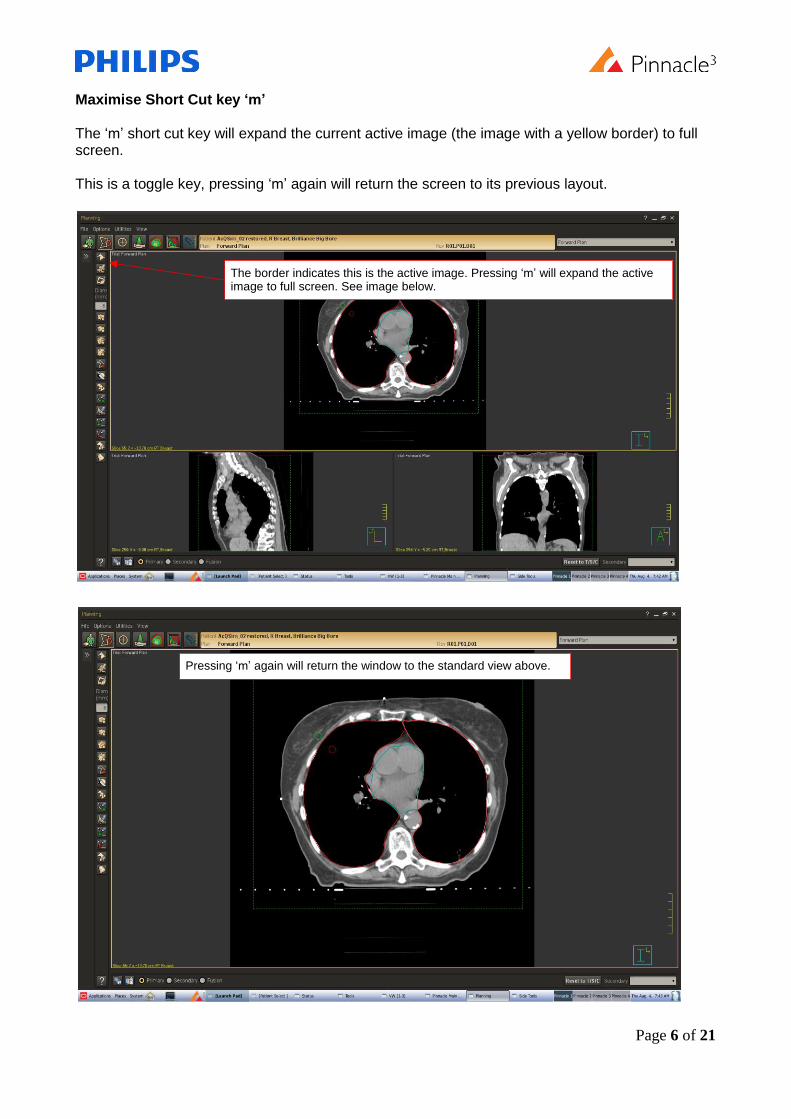
Maximise Short Cut key ‘m’ The ‘m’ short cut key will expand the current active image (the image with a yellow border) to full screen. This is a toggle key, pressing ‘m’ again will return the screen to its previous layout.
The border indicates this is the active image. Pressing ‘m’ will expand the active image to full screen. See image below.
Pressing ‘m’ again will return the window to the standard view above.
Page 7 of 21
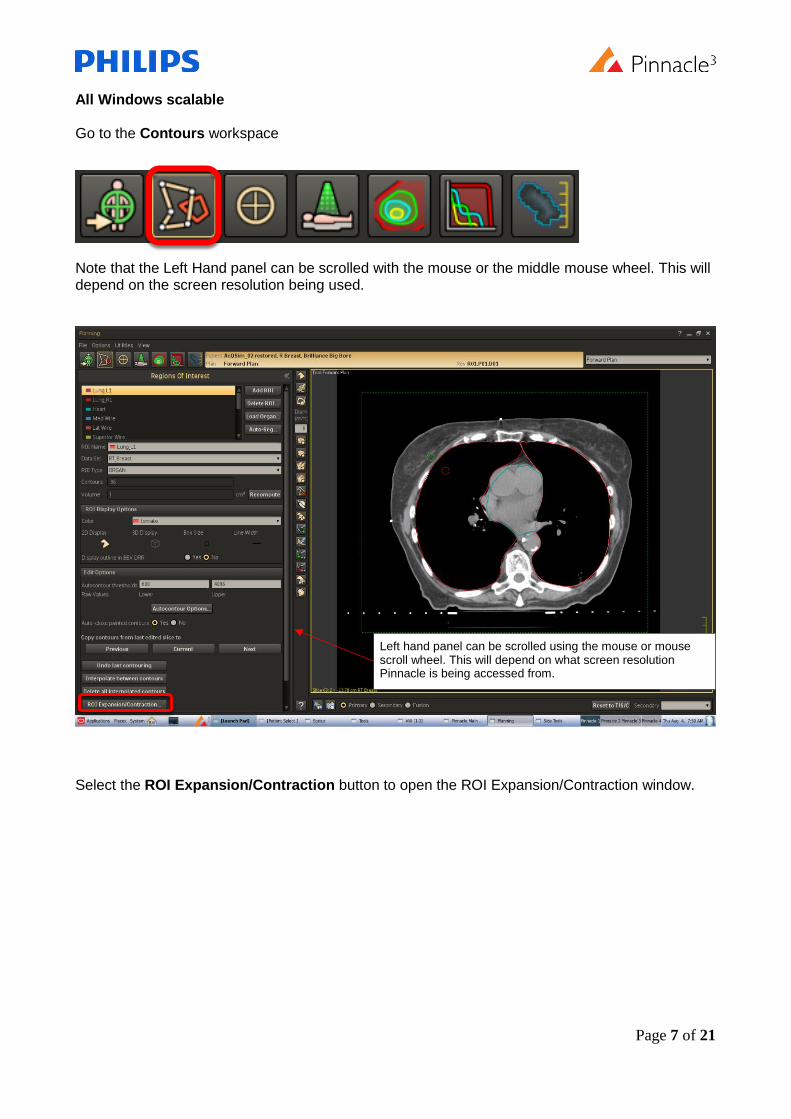
All Windows scalable Go to the Contours workspace
Note that the Left Hand panel can be scrolled with the mouse or the middle mouse wheel. This will depend on the screen resolution being used.
Select the ROI Expansion/Contraction button to open the ROI Expansion/Contraction window.
Left hand panel can be scrolled using the mouse or mouse scroll wheel. This will depend on what screen resolution Pinnacle is being accessed from.

Page 8 of 21
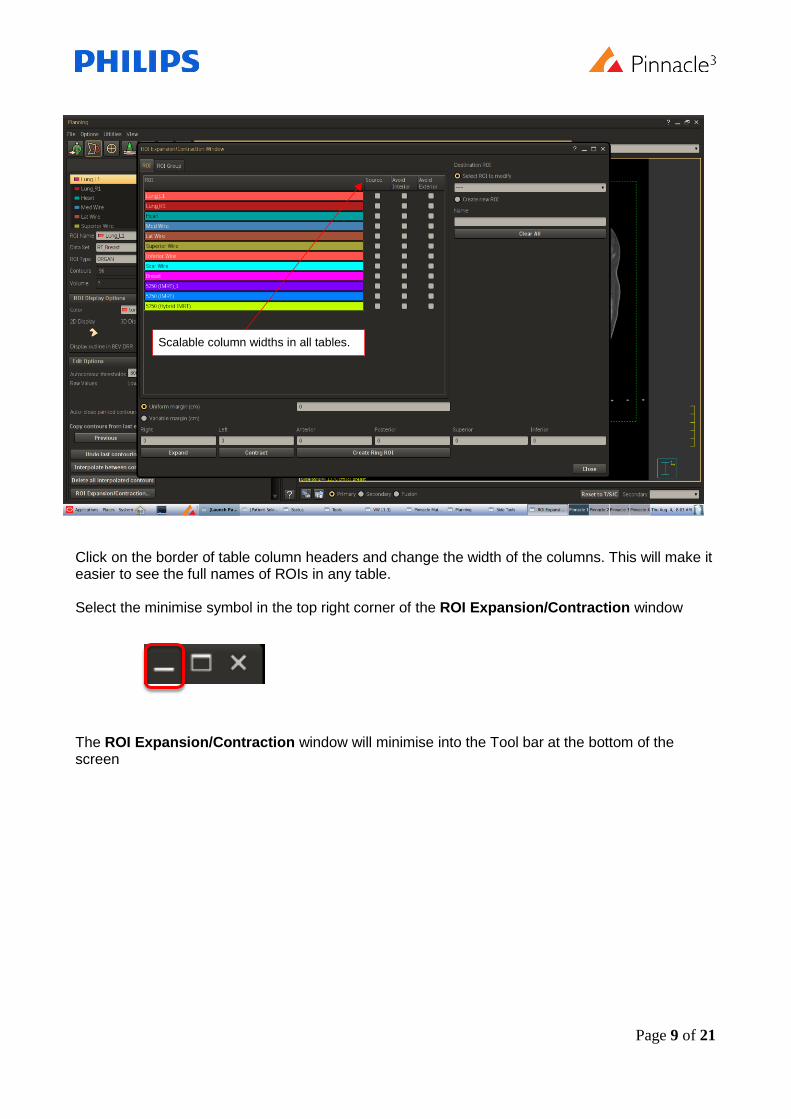
Hover the mouse over the edge of the ROI Expansion/Contraction window and the cursor will become arrows. Left Click and drag on the edge of the window to re-scale the window as shown below.
Page 9 of 21
Click on the border of table column headers and change the width of the columns. This will make it easier to see the full names of ROIs in any table. Select the minimise symbol in the top right corner of the ROI Expansion/Contraction window The ROI Expansion/Contraction window will minimise into the Tool bar at the bottom of the screen
Scalable column widths in all tables.
Page 10 of 21
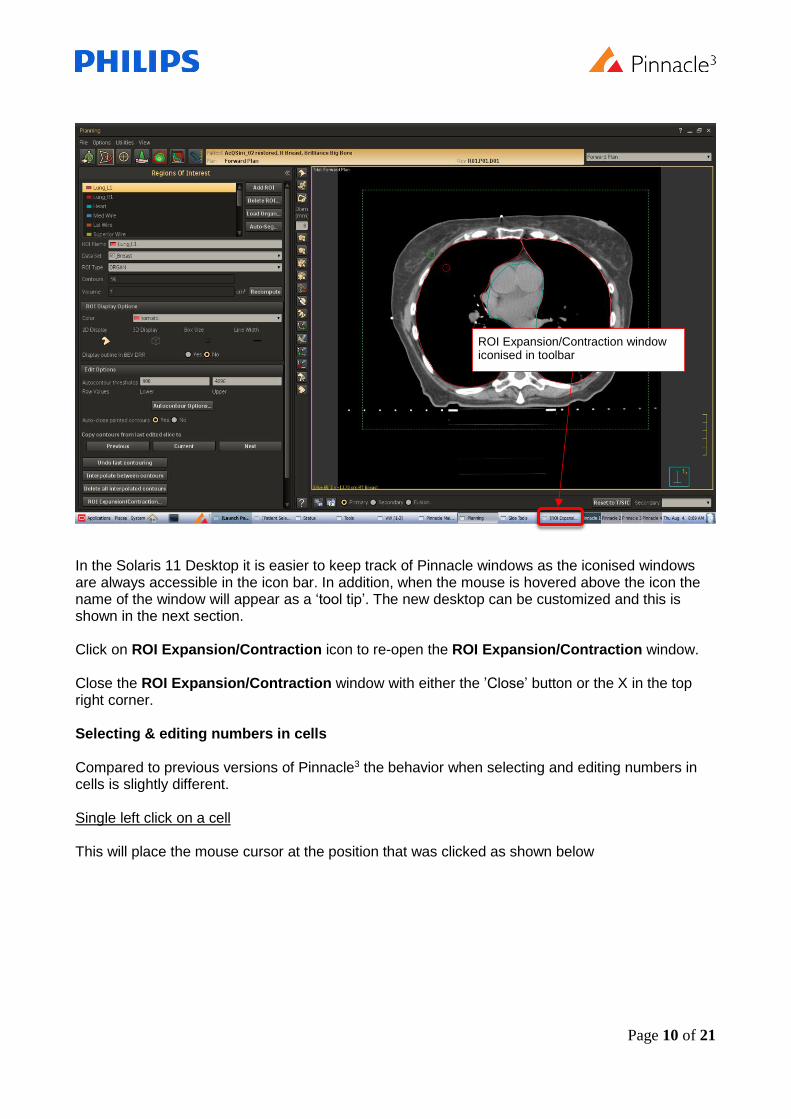
In the Solaris 11 Desktop it is easier to keep track of Pinnacle windows as the iconised windows are always accessible in the icon bar. In addition, when the mouse is hovered above the icon the name of the window will appear as a ‘tool tip’. The new desktop can be customized and this is shown in the next section. Click on ROI Expansion/Contraction icon to re-open the ROI Expansion/Contraction window. Close the ROI Expansion/Contraction window with either the ’Close’ button or the X in the top right corner. Selecting & editing numbers in cells Compared to previous versions of Pinnacle3 the behavior when selecting and editing numbers in cells is slightly different. Single left click on a cell This will place the mouse cursor at the position that was clicked as shown below
ROI Expansion/Contraction window iconised in toolbar

Page 11 of 21
Double Left click on a cell This will highlight all of the numbers on the side of the decimal point that was double clicked. These numbers can be overwritten by typing.
Triple Left click on a cell This will highlight the whole number in the cell so the whole cell entry can be overwritten by typing.
In addition to the above users can use the mouse to drag and select desired numbers or text in a cell. The behavior described above is similar to MicroSoft Word ad Mac OSX, a single click positions the cursor, a double click highlights the selected work and a triple click highlights the whole sentence. Dragging Windows so they are partially off the screen In Solaris 11 to drag the windows partially off-screen, hold down the Alt key and then drag the window, see screen shot below.

Page 12 of 21

Page 13 of 21
Getting to know the Solaris 11 Desktop In 2016 Philips started shipping a new Application server, the X5-2. As well as enhanced speed and performance the X5-2 also runs a newer version of the Solaris Operating system, Solaris 11. All the previous Pinnacle servers run Solaris 10. Solaris 11 introduces a new Desktop for Pinnacle. The new Desktop enhances the usability of Pinnacle and reduces the need to use Unix commands for system administration tasks. Solaris 11 Tool bar The horizontal tool bar at the bottom of the Desktop is more like a familiar Windows tool bar. There are three menus, Applications, Places & System. The Pinnacle icon starts Pinnacle. We will review the main features of each section below
Applications Menu Applications can be launched from this menu though Pinnacle is still launched from the usual Pinnacle icon ran There are some useful features under System Tools accessed from Applications. Under System tools select Performance Monitor The four tabs provide useful performance information without the need for using Unix commands The Processes tab list all the running Processes, their status, CPU & memory use like ‘Task Manager’ in Windows
System Menus Terminal Pinnacle Launcher Workspaces Trash Space for minimised windows

Page 14 of 21
The Resources tab provides information on CPU, RAM and Network usage. Note, the colors are arbitrary. Note, the Resources tab only shows information about the Application Server that you are currently working on. (No information on Cluster nodes, other Application servers or connected devices)
Page 15 of 21
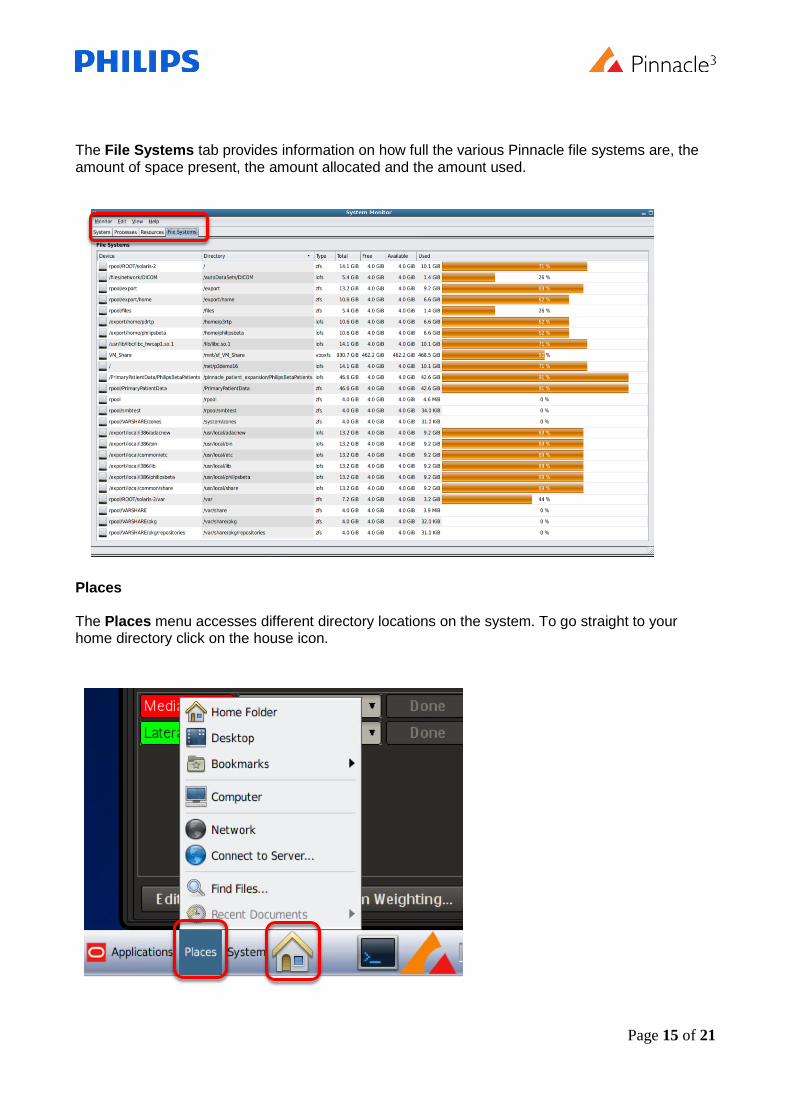
The File Systems tab provides information on how full the various Pinnacle file systems are, the amount of space present, the amount allocated and the amount used.
Places The Places menu accesses different directory locations on the system. To go straight to your home directory click on the house icon.

Page 16 of 21
System This is where you can logout (note, a shutdown icon will not usually be available)
Customising the tool bar
All Pinnacle windows will show as an icon in the tool bar highlighted in red above.
Page 17 of 21
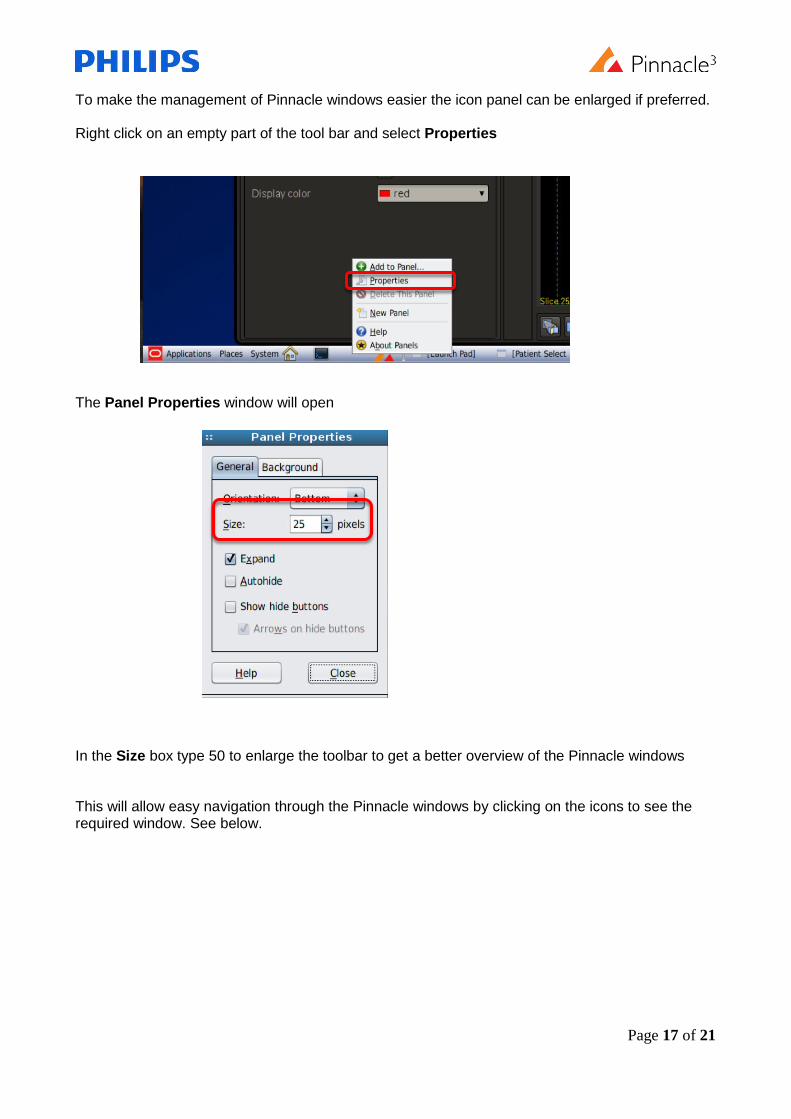
To make the management of Pinnacle windows easier the icon panel can be enlarged if preferred. Right click on an empty part of the tool bar and select Properties The Panel Properties window will open In the Size box type 50 to enlarge the toolbar to get a better overview of the Pinnacle windows This will allow easy navigation through the Pinnacle windows by clicking on the icons to see the required window. See below.

Page 18 of 21
The toolbar can be set to any size to suit personal taste, the screen shot below shows the Toolbar set to 100

Page 19 of 21
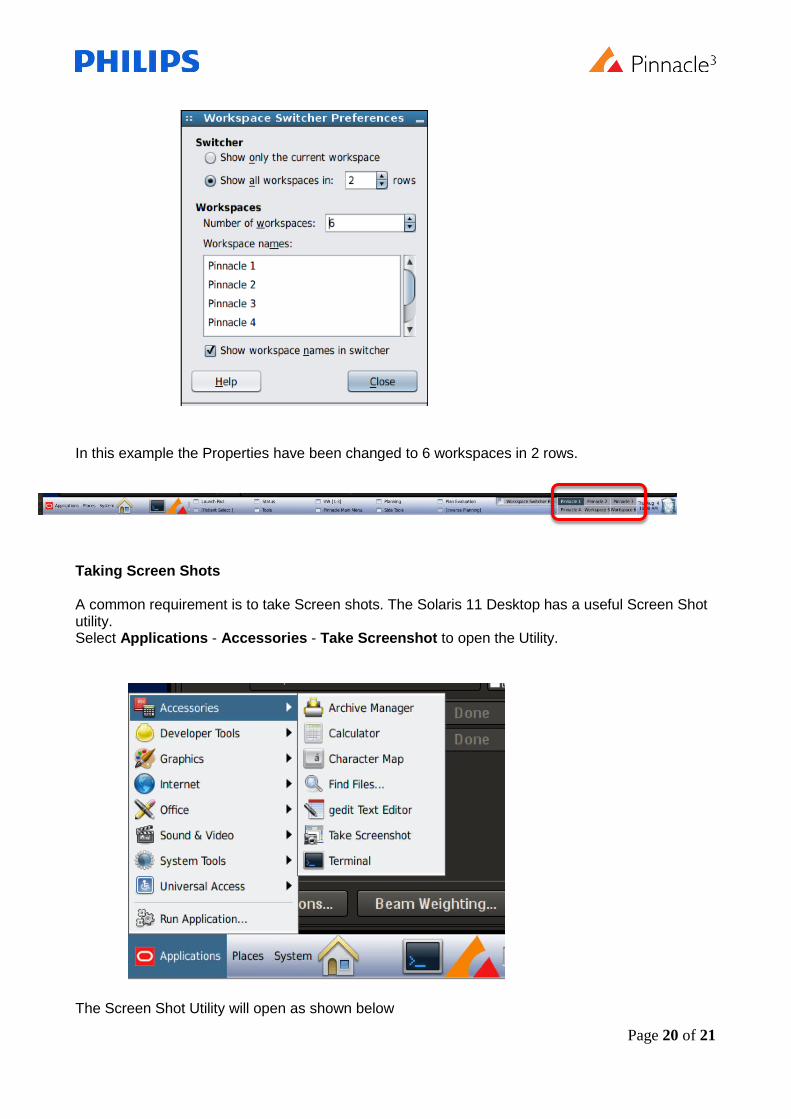
Customising the Pinnacle Workspaces Right click on the Pinnacle workspaces and select Preferences The Preferences window below controls the number of workspaces, the names of each workspace and how the workspaces are arranged in the toolbar.
Page 20 of 21
In this example the Properties have been changed to 6 workspaces in 2 rows.
Taking Screen Shots A common requirement is to take Screen shots. The Solaris 11 Desktop has a useful Screen Shot utility. Select Applications - Accessories - Take Screenshot to open the Utility. The Screen Shot Utility will open as shown below

Page 21 of 21
Changing the screen resolution Often Pinnacle is accessed from standard laptops with lower resolution displays. If using a display with a resolution lower than the Pinnacle3 application it is easy in the Solaris 11 Desktop to change the resolution settings so the whole Pinnacle3 desktop can be displayed Right click on the Desktop to open the pull down menu and select Screen Resolution.
This will open the Monitor Preferences window where the resolution can be changed to match the display in use.