hd pvr overview installing the hd pvr gaming editionthe hauppauge hd pvr gaming edition records...
TRANSCRIPT

HD PVRGaming Edition
Xbox 360 and PS3 HD Video Recorder forWindows
Quick Installation Guide
© 2011, 2012 Hauppauge Computer Works, Inc.QI-HDPVR_GamingEdition-V4.0-ENG Jan. 12, 2012
Hauppauge Computer Works, Inc. Telephone: 631-434-160091 Cabot Court Fax: 631-434-3198 Hauppauge, NY 11788 Tech Support: 631-434-3197 Hours: M-F 9:00AM to 6:30PM EST
Hauppauge Computer Works, Ltd Telephone:0207-378-1997Crown House Fax:0207-357-9171Home Gardens, Dartford, Kent, DA1 1DZ Tech Support:0207-378-0202
Internet addresses: Sales: [email protected] | Tech Support: [email protected]
Included with HD PVR Gaming Edition:• HD PVR Gaming Edition recorder H.264 high definition video recorder, USB
• Combination Xbox and PS3 Component Video gaming cable
• Component Video and audio cable set, 1 meter, to connect HD PVR to your HD TV set
• USB 2.0 cable
• 5v 2 amp power supply
• HD PVR Installation CD, with HD PVR drivers for Windows and Arcsort ShowBiz
OverviewThe Hauppauge HD PVR Gaming Edition records video in HD from a video game console. The softwarewhich comes with HD PVR only runs on Windows PCs, but there are third party software applications whichrun on the Mac or Linux. Please see our website for information on these third party applications.
HD PVR recordings are made onto a computer’s hard drive in a compressed H.264 format. HD PVR usesComponent Video (also called YPrPb), S-Video or composite video, and will record at resolutions from stan-dard definition (480i) up to high definition (1080i), at datarates from 1Mbit/sec up to 13Mbits/sec.
Note: if you are connecting HD PVR to an Xbox360, PS3 or other game console, make surethe Component Video output of the game console is set to 1080i or 720p.
For more information, please see the Hauppauge HD PVR support page:http://www.hauppauge.com/site/support/support_hdpvr.html
Audio can be supplied to the HD PVR from stereo audio or via optical SPDIF. The optical audio input to theHD PVR can be in either a 2 channel stereo audio format or a 2 or 5.1 channel AC-3 format.
The recording format used by HD PVR is H.264 with AC-3 audio. HD PVR recordings can be played back tothe PC screen or can be converted “on the fly” to a Blu-ray format AVCHD file for making Blu-ray discs.
There are three types of HD PVR record formats which can be selected:
TS: the native H.264 format with 2 or 5.1 channel audio. You create this format when you click AVCHDin ArcSoft Capture.
M2TS: this is an H.264 format which can be played on a Sony Playstation3. You create this formatwhen you click on Playstation3 in ArcSoft Capture.
MP4: this is an H.264 format which can be played on an XBox360. You create this format when youclick on XBox 360 in ArcSoft Capture.
HD PVR comes bundled with ArcSoft’s ShowBiz. ShowBiz is used to record videos, upload your videorecordings to YouTube, play back the recorded videos to your PC screen, plus can burn your video record-ings for playback on a Blu-ray player using conventional DVD discs.
Installing the HD PVRStep 1: Set your game console to 1080i or 720p
With the Xbox 360 or the Playstation 3, you need to set the Display Settings to Component Video and either720p or 1080i.
- turn the power off on your game console
- disconnect the HDMI cable from your game console to your TV set.
- connect the Hauppauge Component Video Gaming cable from your game console to your TV set.
- on your TV set, set the Source to Component Video. There should be a Source button on your TV setremote control which is used to select the TV source.
Then:
Xbox 360:
Turn on your Xbox. You should see the Xbox video on your TV set. If you do not, check your TV set to makesure it is set to the Component Video source connected to your Xbox.
Once you can see Xbox video on your TV set, go to System Settings / Console Settings / Display /HDTV Settings and choose either 720p or 1080i. Then click “Yes, keep these settings”.
PS3:
Push and hold the Power button on the front of your PS3. If you have a Power switch on the back or yourPS3, turn it off, wait two seconds and then turn it on. Then let the Power button on the front of your PS3 go.
You should see the PS3 video on your TV set. If you do not, check your TV set to make sure it is set to theComponent Video source connected to your PS3.
Once you can see PS3 video on your TV set, go to Settings / Display Settings / Video Output Settingsand choose either 720p or 1080i. Then click “Yes, keep these settings”.
Step 2: Connect the HD PVR cables
USB connection
Plug one end (the square end) of the supplied USB cable into the HD PVR’s USB cable connector. HD PVRis compatible with USB 2.0 (high speed) only. Plug the other end into your Windows PC. HD PVR works withlaptops or desktop PCs with Windows XP, Windows Vista or Windows 7. For use with a Mac, you will needsoftware not supplied by Hauppauge. Go to http://www.hdpvrcapture.com for more information.
Connect video from your game console to HD PVR
From your game console, there are three different ways to connect video to the HD PVR. Component Video isthe highest quality and is the only video mode which can be used with No Delay Pass Through, but any oneof the three ways will work:
a.) Component Video: use the supplied Component Video gaming cable from your game console to theComponent video inputs on the rear of the HD PVR (see diagram below).
Note: if you have an HDMI cable connected between your game console and your TV set, - disconnect it. Instead, use the Pass Through video connection (see No Delay Video Pass
Through below).
b.) S-Video: connect the game console S-Video output to the S-Video input on the front of the HD PVR.
PC
HD PVR
audio
video
gameconsole
HDMI
TV
PC
HD PVR
USB
gameconsole TV
c.) Composite video: connect the composite video output from your game console (the yellow RCAconnector) to the yellow composite video input on the front of HD PVR.
No Delay Video Pass Through
To watch live video from your game console on a TV set without any delay, connect the Component Videooutput from the HD PVR to the Component Video input on your TV set.
The first time No Delay Video Pass Through is used, you need to go into Arcosft Showbiz (see step 4below) and in the Arcsoft Capture Module, under Source select YPrPb. This will enable No Delay PassThrough.
Note: your HD PVR needs to be powered on for Pass Through Video Output to operate. Ifthe HD PVR is powered on, Pass Through will operate even if your PC is turned off.
Audio connection
Audio from the game console is connected where you have connected the video input: either to the opticalaudio in (rear), RCA audio in (rear) or RCA audio in (front). Optical audio is connected on the rear panel.
Step 3: Boot your PC
Step 4: Plug the power supply into HD PVR
After your PC has booted to Windows, plug the supplied Power Supply into the Power input on HD PVR.
PC
HD PVR
audio
video
gameconsole
video
HDMI
TVaudio
The power supply is 5VDC@ 2amps.
Step 5: Install the HD PVR Windows driver and Arcsoft Showbiz
Note: the HD PVR needs to be powered up in this step and plugged into your PC while theWindows drivers are installed.
Turn on your PC, and boot into Windows.
If a 'Found New Hardware' wizardappears, please cancel it and allow win-dows to load fully before proceeding.
Insert the WinTV Installation CD-ROM inyour PC’s CD-ROM drive.
Note: if the CD does notautorun, navigate to the CD
and run the 'Setup.exe' file.
“Hauppauge WinTV Installation CD-ROM” window will appear on the screen.
Install the HD PVR driver
Click the button labeled Step 1: InstallDrivers.
A blue screen will open and begin installing the drivers for your HD PVR.
Once the drivers have installed, click on the Finish bar to exit.
Install the HD PVR application
Click the button labeled Step 2: Install software
Choose a language, and click next, click Install.
The ArcSoft ShowBiz application will be installed.
Once comp lete, click OK then Exit.
Note: the latest HD PVR driver updates are available at: www.hauppauge.com in the Support section.
Page 1 Page 2 Page 3
Page 4 Page 5 Page 6
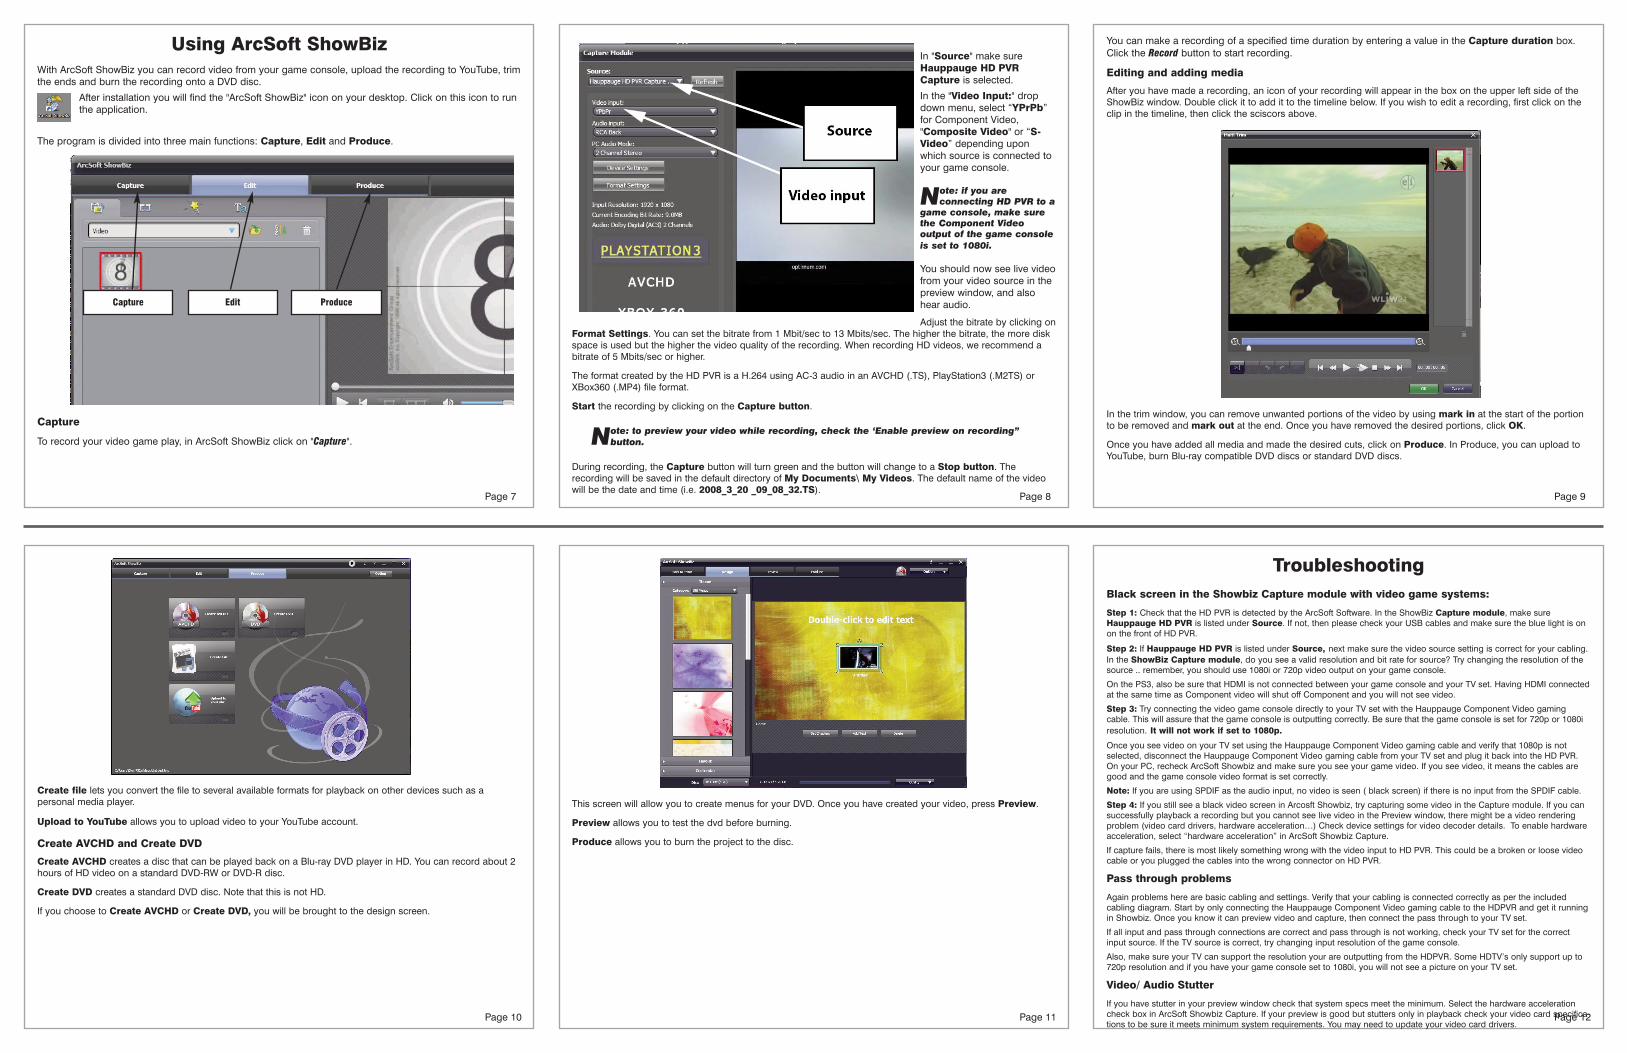
Using ArcSoft ShowBizWith ArcSoft ShowBiz you can record video from your game console, upload the recording to YouTube, trimthe ends and burn the recording onto a DVD disc.
After installation you will find the "ArcSoft ShowBiz" icon on your desktop. Click on this icon to runthe application.
The program is divided into three main functions: Capture, Edit and Produce.
Capture
To record your video game play, in ArcSoft ShowBiz click on "Capture".
In "Source" make sureHauppauge HD PVRCapture is selected.
In the "Video Input:" dropdown menu, select “YPrPb”for Component Video,"Composite Video" or “S-Video” depending uponwhich source is connected toyour game console.
Note: if you areconnecting HD PVR to a
game console, make surethe Component Videooutput of the game consoleis set to 1080i.
You should now see live videofrom your video source in thepreview window, and alsohear audio.
Adjust the bitrate by clicking onFormat Settings. You can set the bitrate from 1 Mbit/sec to 13 Mbits/sec. The higher the bitrate, the more diskspace is used but the higher the video quality of the recording. When recording HD videos, we recommend abitrate of 5 Mbits/sec or higher.
The format created by the HD PVR is a H.264 using AC-3 audio in an AVCHD (.TS), PlayStation3 (.M2TS) orXBox360 (.MP4) file format.
Start the recording by clicking on the Capture button.
Note: to preview your video while recording, check the ‘Enable preview on recording”button.
During recording, the Capture button will turn green and the button will change to a Stop button. Therecording will be saved in the default directory of My Documents\ My Videos. The default name of the videowill be the date and time (i.e. 2008_3_20 _09_08_32.TS).
You can make a recording of a specified time duration by entering a value in the Capture duration box.Click the Record button to start recording.
Editing and adding media
After you have made a recording, an icon of your recording will appear in the box on the upper left side of theShowBiz window. Double click it to add it to the timeline below. If you wish to edit a recording, first click on theclip in the timeline, then click the sciscors above.
In the trim window, you can remove unwanted portions of the video by using mark in at the start of the portionto be removed and mark out at the end. Once you have removed the desired portions, click OK.
Once you have added all media and made the desired cuts, click on Produce. In Produce, you can upload toYouTube, burn Blu-ray compatible DVD discs or standard DVD discs.
Create file lets you convert the file to several available formats for playback on other devices such as apersonal media player.
Upload to YouTube allows you to upload video to your YouTube account.
Create AVCHD and Create DVD
Create AVCHD creates a disc that can be played back on a Blu-ray DVD player in HD. You can record about 2hours of HD video on a standard DVD-RW or DVD-R disc.
Create DVD creates a standard DVD disc. Note that this is not HD.
If you choose to Create AVCHD or Create DVD, you will be brought to the design screen.
This screen will allow you to create menus for your DVD. Once you have created your video, press Preview.
Preview allows you to test the dvd before burning.
Produce allows you to burn the project to the disc .
TroubleshootingBlack screen in the Showbiz Capture module with video game systems:
Step 1: Check that the HD PVR is detected by the ArcSoft Software. In the ShowBiz Capture module, make sureHauppauge HD PVR is listed under Source. If not, then please check your USB cables and make sure the blue light is onon the front of HD PVR.
Step 2: If Hauppauge HD PVR is listed under Source, next make sure the video source setting is correct for your cabling.In the ShowBiz Capture module, do you see a valid resolution and bit rate for source? Try changing the resolution of thesource .. remember, you should use 1080i or 720p video output on your game console.
On the PS3, also be sure that HDMI is not connected between your game console and your TV set. Having HDMI connectedat the same time as Component video will shut off Component and you will not see video.
Step 3: Try connecting the video game console directly to your TV set with the Hauppauge Component Video gamingcable. This will assure that the game console is outputting correctly. Be sure that the game console is set for 720p or 1080iresolution. It will not work if set to 1080p.
Once you see video on your TV set using the Hauppauge Component Video gaming cable and verify that 1080p is notselected, disconnect the Hauppauge Component Video gaming cable from your TV set and plug it back into the HD PVR.On your PC, recheck ArcSoft Showbiz and make sure you see your game video. If you see video, it means the cables aregood and the game console video format is set correctly.
Note: If you are using SPDIF as the audio input, no video is seen ( black screen) if there is no input from the SPDIF cable.
Step 4: If you still see a black video screen in Arcosft Showbiz, try capturing some video in the Capture module. If you cansuccessfully playback a recording but you cannot see live video in the Preview window, there might be a video renderingproblem (video card drivers, hardware acceleration…) Check device settings for video decoder details. To enable hardwareacceleration, select “hardware acceleration” in ArcSoft Showbiz Capture.
If capture fails, there is most likely something wrong with the video input to HD PVR. This could be a broken or loose videocable or you plugged the cables into the wrong connector on HD PVR.
Pass through problems
Again problems here are basic cabling and settings. Verify that your cabling is connected correctly as per the includedcabling diagram. Start by only connecting the Hauppauge Component Video gaming cable to the HDPVR and get it runningin Showbiz. Once you know it can preview video and capture, then connect the pass through to your TV set.
If all input and pass through connections are correct and pass through is not working, check your TV set for the correctinput source. If the TV source is correct, try changing input resolution of the game console.
Also, make sure your TV can support the resolution your are outputting from the HDPVR. Some HDTV’s only support up to720p resolution and if you have your game console set to 1080i, you will not see a picture on your TV set.
Video/ Audio Stutter
If you have stutter in your preview window check that system specs meet the minimum. Select the hardware accelerationcheck box in ArcSoft Showbiz Capture. If your preview is good but stutters only in playback check your video card specifica-tions to be sure it meets minimum system requirements. You may need to update your video card drivers.
Page 7 Page 8 Page 9
Page 10 Page 11 Page 12
Capture Edit Produce