hd9040 - additional baking information - philips · setting up the baking rack ... - 1tsp salt -...
TRANSCRIPT
HD9040 - Additional Baking Information

2
3
1 2 3 4
5 6 7 8
9 10 11
1 Hr.
12
13 14 15 16
17 18 19 20

4

HD
9040
- A
ddit
iona
l Bak
ing
Info
rmat
ion
EnglIsH 6ItAlIAno 18
6
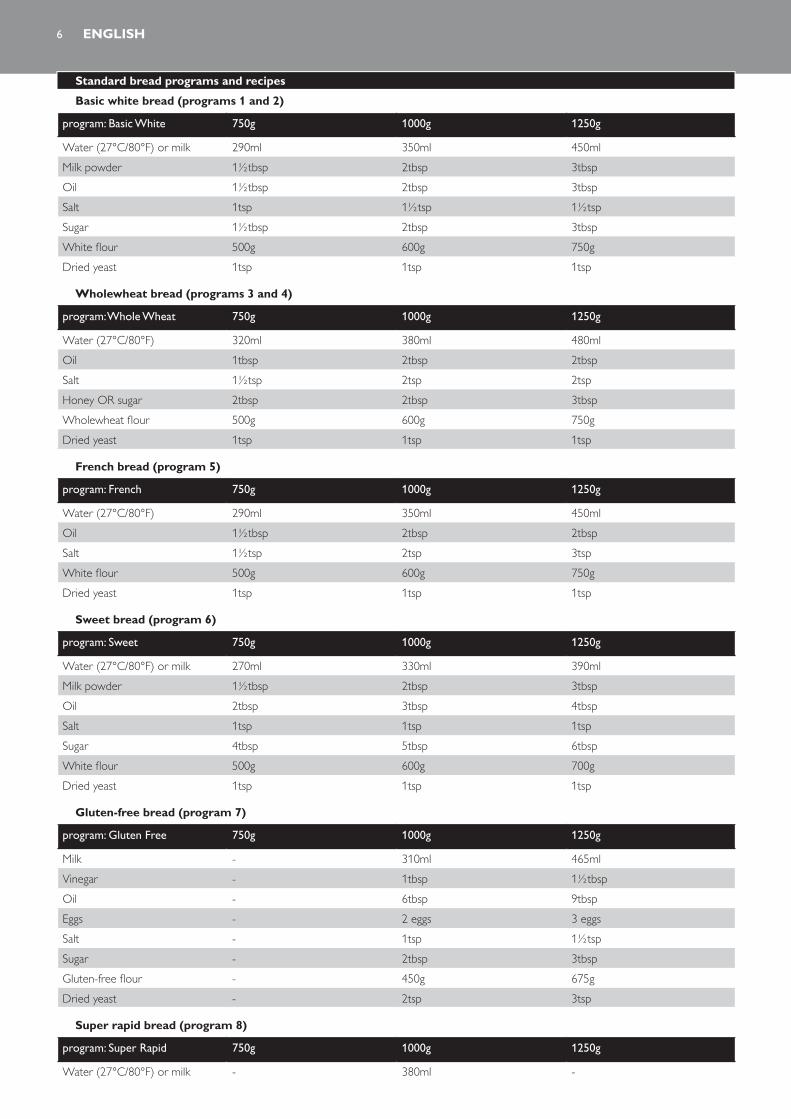
standard bread programs and recipesBasic white bread (programs 1 and 2)
program: Basic White 750g 1000g 1250g
Water (27°C/80°F) or milk 290ml 350ml 450ml
Milk powder 1½tbsp 2tbsp 3tbsp
Oil 1½tbsp 2tbsp 3tbsp
Salt 1tsp 1½tsp 1½tsp
Sugar 1½tbsp 2tbsp 3tbsp
White flour 500g 600g 750g
Dried yeast 1tsp 1tsp 1tsp
Wholewheat bread (programs 3 and 4)
program: Whole Wheat 750g 1000g 1250g
Water (27°C/80°F) 320ml 380ml 480ml
Oil 1tbsp 2tbsp 2tbsp
Salt 1½tsp 2tsp 2tsp
Honey OR sugar 2tbsp 2tbsp 3tbsp
Wholewheat flour 500g 600g 750g
Dried yeast 1tsp 1tsp 1tsp
French bread (program 5)
program: French 750g 1000g 1250g
Water (27°C/80°F) 290ml 350ml 450ml
Oil 1½tbsp 2tbsp 2tbsp
Salt 1½tsp 2tsp 3tsp
White flour 500g 600g 750g
Dried yeast 1tsp 1tsp 1tsp
sweet bread (program 6)
program: Sweet 750g 1000g 1250g
Water (27°C/80°F) or milk 270ml 330ml 390ml
Milk powder 1½tbsp 2tbsp 3tbsp
Oil 2tbsp 3tbsp 4tbsp
Salt 1tsp 1tsp 1tsp
Sugar 4tbsp 5tbsp 6tbsp
White flour 500g 600g 700g
Dried yeast 1tsp 1tsp 1tsp
gluten-free bread (program 7)
program: Gluten Free 750g 1000g 1250g
Milk - 310ml 465ml
Vinegar - 1tbsp 1½tbsp
Oil - 6tbsp 9tbsp
Eggs - 2 eggs 3 eggs
Salt - 1tsp 1½tsp
Sugar - 2tbsp 3tbsp
Gluten-free flour - 450g 675g
Dried yeast - 2tsp 3tsp
super rapid bread (program 8)
program: Super Rapid 750g 1000g 1250g
Water (27°C/80°F) or milk - 380ml -
EnglIsH

program: Super Rapid 750g 1000g 1250g
Milk powder - 2tbsp -
Oil - 2tbsp -
Salt - 1tsp -
Sugar - 2tbsp -
White flour - 600g -
Dried yeast - 4tsp -
Dough/pizza dough (program 9)
program: Dough 750g 1000g 1000g
Water (27°C/80°F) or milk - 340ml
Milk powder - 2tbsp
Oil - ¼ cup
Salt - 2tsp
Sugar - 2tbsp
White flour - 600g
Dried yeast - 2tsp
strawberry or blackberry jam (program 12)
Program: Jam
Fresh or frozen (thawed) fruit 2 cups
Sugar 1.5 cups
Conversion table
tsp/tbsp/cup ml
¼tsp 1ml
½tsp 2ml
1tsp 5ml
1tbsp 15ml
¼ cup 50ml
1/3 cup 75ml
½ cup 125ml
2/3 cup 150ml
3/4 cup 175ml
1 cup 250ml
Multi Bread shaper programs and recipesThe Multi Bread Shaper programs (13 and 14) enable you to make your own variety of bread shapes. From small and big buns to baguettes and free shapes. These programs have two stages: - First stage: kneading and rising of the dough - Second stage: baking
Kneading and rising of the dough 1 Remove the bread pan from the appliance (see chapter ‘Using the appliance’ in the user manual). 2 Assemble the kneading blades (see chapter ‘Using the appliance’ in the user manual). 3 Measure and put the ingredients in the bread pan (see chapter ‘Using the appliance’ in the user manual). 4 Put the bread pan back in the breadmaker (see chapter ‘Using the appliance’ in the user manual). 5 Plug in the breadmaker. 6 Press the program selector and select program 13 or 14. 7 If desired, press the crust colour selector one or more times to select the appropriate crust colour. For programs 13 and 14, the preset crust colour is medium.
8 Press the start/stop/cancel button to start the dough kneading cycle, which is followed by the rising cycle. 9 When the first stage of the program is finished, the appliance goes into standby. , The appliance beeps to tell you that the kneading and rising of the dough is finished.
Note: The two cycles (kneading and rising of the dough) take place automatically and last 1 hour and 21 minutes, i.e. 26 minutes of kneading followed 55 minutes of rising.
EnglIsH 7

Note: It is normal for the dough not to be evenly blended during kneading.When the first stage of the program is finished, the dough must be baked within one hour. After one hour, the appliance resets itself and the Multi Bread Shaper program is lost.
shaping and baking 1 Shape your bread as desired and put it in the baking trays (see section ‘Multi Bread Shaper recipes’ below). 2 Set up the baking rack (see section ‘Setting up the baking rack’ below). 3 Put the baking rack with the baking trays in the breadmaker.Note: You have to remove the bread pan before you can use the baking rack. 4 Close the lid and press the stop/start/cancel button to start the baking cycle.
setting up the baking rackThe breadmaker comes with a baking rack specially intended for Multi Bread Shaper recipes (programs 13 and 14). The baking rack comes with two baking trays. With the two long separators and the four short separators you can divide the baking trays to bake baguettes, rolls, buns or free-shape bread.
1 To bake two long baguettes or other breads, place the long separator in the baking tray. Press the separator down to fix it. 2 To bake short baguettes or other short breads, place two short separators across the baking tray and push them into place. 3 To bake rolls or buns, first place the long separator and then fit the slots in the short separators into the slots in the long separator. 4 To bake free-shape bread, leave out all separators.
Multi Bread shaper recipesFor these recipes you need the baking rack, the baking trays, the separators for the baking trays, the slitter and the brush.
BaguettesThis recipe makes 4 baguettes of 100g each.The required crust colour setting is medium.Ingredients: - 150ml water - 1tsp salt - 260g bread flour - 1½tsp dry yeast
Note: To give your baguettes a springier texture, add 1 tbsp oil to the ingredients. If you want to give the 4 baguettes more colour, add 2 tsp sugar to the ingredients.To shape the baguettes:
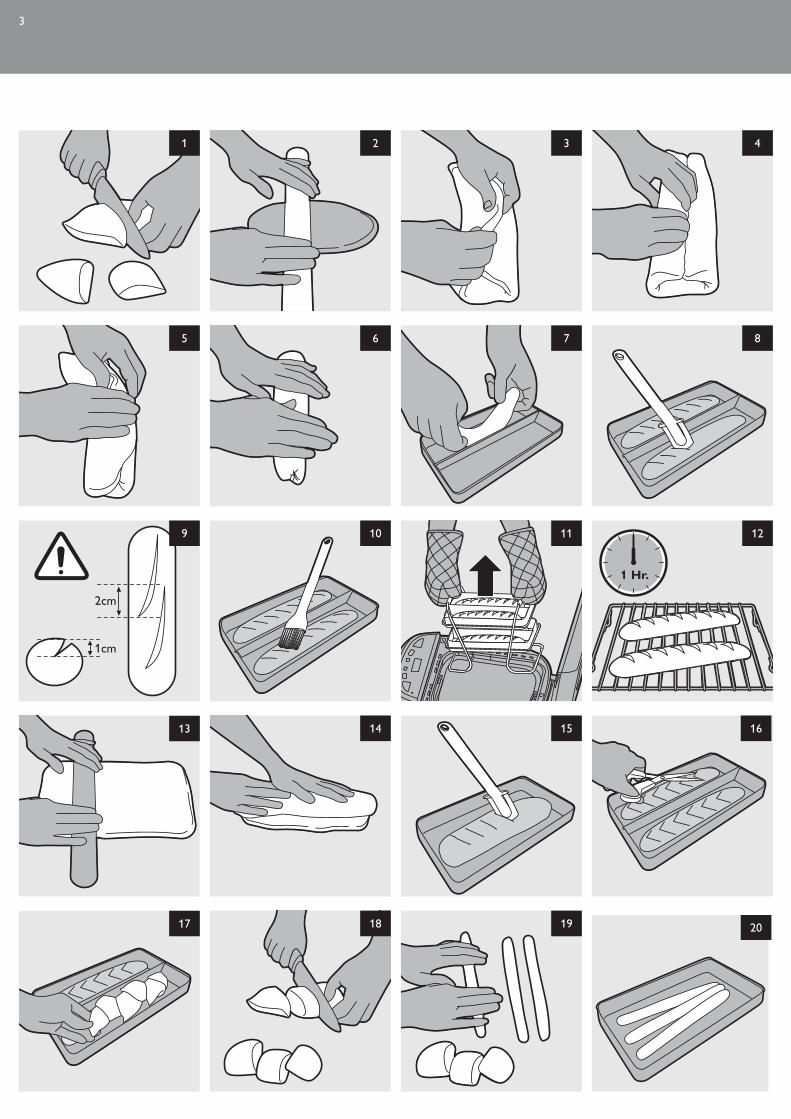
1 Sprinkle some flour on the work surface. 2 Remove the bread pan from the appliance and take the dough out of the bread pan. 3 Roll the dough into a ball and divide the ball into four lumps with a knife (Fig. 1).Note: Make sure the lumps have the same weight.Tip: To make the baguettes lighter and more airy, leave the dough balls to rest for 5 minutes before you shape them. 4 Flatten each dough lump on the floured work surface with the palm of your hand or by gently rolling it with a rolling pin (Fig. 2). 5 Grasp the long side of the sheet of dough and fold it inwards. Then grasp the other long side of the sheet and fold it inwards on top of
the folded-in side (Fig. 3). 6 Push your fingers into the centre of the folded dough across its entire length to create a long cavity (Fig. 4). 7 Close the cavity by pulling the front half of the dough up and across the cavity and place it on top of the other half of the dough. Then
seal the seam (Fig. 5). 8 Put the dough on the work surface with the seam pointing down and roll it back and forth with your hands. Start in the centre and
move your hands outwards along the length of the dough while rolling it in order to stretch it to the desired length. (Fig. 6) 9 Roll the dough with your hands without pressing too much to get a regular shape. The thickness and width of the dough must remain
even.Note: The dough must have the same length as the baking tray (approx. 18cm).Tip: To vary the flavour of the baguettes, you can add ingredients such as sesame or poppy seeds during this stage. 10 Assemble the long separators in the two baking trays and place the dough shapes in each section of the baking trays (Fig. 7). 11 For optimal results, make diagonal 1cm long slits in the top of the shaped dough with the slitter supplied or with a serrated knife (Fig. 8).Note: Make sure the slits are not more than 1cm deep and 2cm apart (Fig. 9). 12 Use the brush to dampen the top of the dough shapes with water (Fig. 10).Note: Make sure no water is left behind in the baking tray. 13 Put the baking rack with the baking trays in the breadmaker. 14 Press the stop/start/cancel button to start the baking cycle. 15 Unplug the appliance at the end of the baking cycle. 16 Lift the baking rack out of the appliance (Fig. 11).
EnglIsH8

Be careful, the baking rack, the baking trays and the breads are hot. 17 Take the baguettes from the baking trays and leave them to cool on a wire cooling rack (Fig. 12).
BloomerBloomer refers to a bread shape that is cylindrical, but flat on the bottom with several diagonal slashes across the top.
1 Use the ingredients and follow steps 1 to 3 under ‘Baguettes’ above. 2 Roll out each of the four dough lumps with a rolling pin into a 18cm-long and approx. 1.5cm-thick rectangular sheets with round
corners (Fig. 13). 3 Grasp the long side of each sheet of dough and roll it up into a 5cm wide roll. Tuck in the ends and smooth them (Fig. 14). 4 Place the long separators in the baking trays and place the dough shapes in each section. 5 Cut diagonal slashes across the top approx. 1.5cm apart (usually about 6 slashes per dough shape) with the slitter supplied or a serrated
knife (Fig. 15). 6 Use the brush to dampen the top of the dough shapes with water.Note: Make sure no water is left behind in the baking tray. 7 Put the baking rack with the baking trays in the breadmaker. 8 Press the stop/start/cancel button to start the baking cycle. 9 Unplug the appliance at the end of the baking cycle. 10 Lift the baking rack out of the appliance.Be careful, the baking rack, the baking trays and the breads are hot. 11 Take the bloomers from the baking trays and leave them to cool on a wire cooling rack.
Epi French breadEpi French bread is a French bread made of baguette dough and shaped like an ear of corn (‘epi’ is French for ear of corn).
1 Use the ingredients under ‘Baguettes’ above and shape the baguettes by following steps 1 to 9. 2 Place the long separators in the baking trays and place the dough shapes in each section. 3 Use a pair of scissors to slash the top of the dough shape at 2 to 2.5cm intervals across its full length to create flaps in the top of the
dough shape (Fig. 16).Note: The length of the cuts has to be about two-thirds of the height of the dough shape. 4 Put the flaps of dough to the right and to the left in turns (Fig. 17). 5 Use the brush to dampen the top of the dough shapes with water.Note: Make sure no water is left behind in the baking tray. 6 Put the baking rack with the baking trays in the breadmaker. 7 Press the stop/start/cancel button to start the baking cycle. 8 Unplug the appliance at the end of the baking cycle. 9 Lift the baking rack out of the appliance.Be careful, the baking rack, the baking trays and the breads are hot. 10 Take the epi French breads from the baking trays and leave them to cool on a wire cooling rack.Tip: The flaps of the baked epi French breads can be easily broken off as individual serving.
Braided breadThis is a recipe for one of the most common type of braided bread, i.e. three-strand braided bread.Ingredients: - ¼ cup milk - ½ large egg - 1 1/6 cup flour - 1tbsp sugar - ¼ tsp salt - 1/8 cup butter - ¾tsp dry yeast
To shape the braided bread:
1 Sprinkle some flour on the work surface. 2 Remove the bread pan from the appliance and take the dough out of the bread pan. 3 Roll the dough into a ball and divide the ball into six lumps with a knife (Fig. 18).Note: Make sure the lumps have the same weight. 4 Place three lumps on the floured work surface and roll each lump back and forth with your hands. Start in the centre and move your
hands outwards along the length of the dough while rolling it in order to stretch it to the desired length (Fig. 19).Note: Make sure the dough strands keep a consistent diameter. The dough strands must be rolled until they have the same length as the baking tray (approx. 18cm). 5 Place the three dough strands next to each other on the baking tray (Fig. 20).
EnglIsH 9

6 Start braiding the dough strands in the centre. Lift the right strand and pass it over the centre strand. Then pass the left strand over the right strand, the centre strand over the left strand. Continue braiding until you reach the end of the strands. Then braid from the centre towards the other end (Fig. 21).
7 Wet the ends, pinch them together and tuck them under (Fig. 22). 8 Use the brush to dampen the top of the dough shapes with water.Note: Make sure no water is left behind in the baking tray. 9 Follow steps 4 to 8 for the other three strands. 10 Put the baking rack with the baking trays in the breadmaker. 11 Press the stop/start/cancel button to start the baking cycle. 12 Unplug the appliance at the end of the baking cycle. 13 Lift the baking rack out of the appliance.Be careful, the baking rack, the baking trays and the breads are hot. 14 Take the braided breads from the baking trays and leave them to cool on a wire cooling rack.
RollsThis recipe makes 12 rolls.Ingredients: - 150ml water - 1tsp salt - 260g bread flour - 1½tsp dry yeast
To shape the rolls:
1 Sprinkle some flour on the work surface. 2 Remove the bread pan from the appliance and take the dough out of the bread pan. 3 Roll the dough into a ball and divide the ball into 12 lumps with a knife (Fig. 23).Note: Make sure the lumps have the same weight. 4 Shape each lump into a roll and place the shaped dough on the baking tray (Fig. 24). 5 Slash the dough down the centre with the slitter to create a deep score that divides the dough into halves (Fig. 25). 6 Slash the dough again perpendicular to the first score to divide the dough into quarters (Fig. 26). 7 Use a brush to dampen the top of the dough shapes with water.Note: Make sure no water is left behind in the baking tray. 8 Put the baking rack with the baking trays in the breadmaker. 9 Press the stop/start/cancel button to start the baking cycle. 10 Unplug the appliance at the end of the baking cycle. 11 Lift the baking rack out of the appliance.Be careful, the baking rack, the baking trays and the rolls are hot. 12 Take the rolls from the baking trays and leave them to cool on a wire cooling rack.
Cinnamon bunsIngredients: - ¼ cup milk - ½ large egg - 1 1/6 cup bread flour - 1tbsp sugar - ¼tsp salt - 1/8 cup butter - ¾tsp dry yeast
Filling: - 1tbsp granulated sugar - ½tsp cinnamon - 1/8 cup raisins - Mix the filling ingredients well before adding them to the dough.
Glazing: - ½ large egg, beaten - 2tsp water
To shape the cinnamon buns:
1 Sprinkle some flour on the work surface. 2 Remove the bread pan from the appliance and take the dough out of the bread pan. 3 Roll the dough into a ball with your hands and cut the ball in two equal halves (Fig. 27). 4 Roll the half dough balls out into rectangular shapes (Fig. 28). 5 Place an equal amount of filling on ¾ of each shape (Fig. 29). 6 Roll up the dough shapes and seal the end firmly (Fig. 30).
EnglIsH10
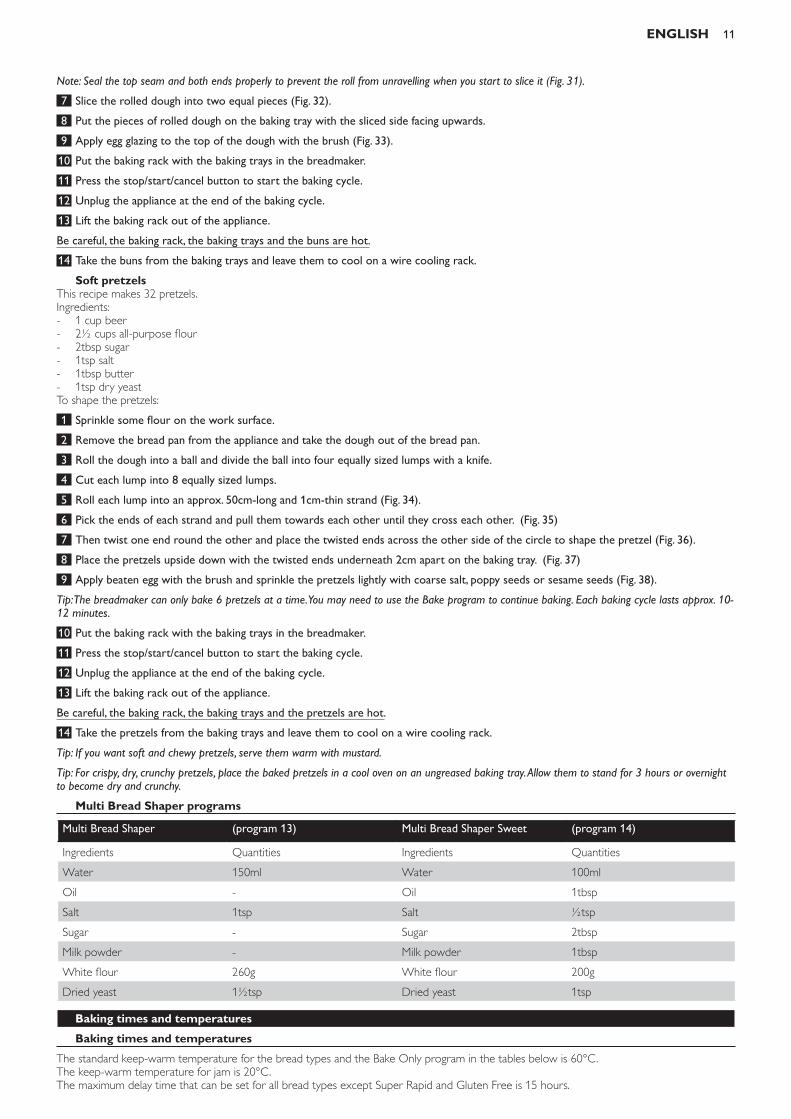
Note: Seal the top seam and both ends properly to prevent the roll from unravelling when you start to slice it (Fig. 31). 7 Slice the rolled dough into two equal pieces (Fig. 32). 8 Put the pieces of rolled dough on the baking tray with the sliced side facing upwards. 9 Apply egg glazing to the top of the dough with the brush (Fig. 33). 10 Put the baking rack with the baking trays in the breadmaker. 11 Press the stop/start/cancel button to start the baking cycle. 12 Unplug the appliance at the end of the baking cycle. 13 Lift the baking rack out of the appliance.Be careful, the baking rack, the baking trays and the buns are hot. 14 Take the buns from the baking trays and leave them to cool on a wire cooling rack.
soft pretzelsThis recipe makes 32 pretzels.Ingredients: - 1 cup beer - 2½ cups all-purpose flour - 2tbsp sugar - 1tsp salt - 1tbsp butter - 1tsp dry yeast
To shape the pretzels:
1 Sprinkle some flour on the work surface. 2 Remove the bread pan from the appliance and take the dough out of the bread pan. 3 Roll the dough into a ball and divide the ball into four equally sized lumps with a knife. 4 Cut each lump into 8 equally sized lumps. 5 Roll each lump into an approx. 50cm-long and 1cm-thin strand (Fig. 34). 6 Pick the ends of each strand and pull them towards each other until they cross each other. (Fig. 35) 7 Then twist one end round the other and place the twisted ends across the other side of the circle to shape the pretzel (Fig. 36). 8 Place the pretzels upside down with the twisted ends underneath 2cm apart on the baking tray. (Fig. 37) 9 Apply beaten egg with the brush and sprinkle the pretzels lightly with coarse salt, poppy seeds or sesame seeds (Fig. 38).Tip: The breadmaker can only bake 6 pretzels at a time. You may need to use the Bake program to continue baking. Each baking cycle lasts approx. 10-12 minutes. 10 Put the baking rack with the baking trays in the breadmaker. 11 Press the stop/start/cancel button to start the baking cycle. 12 Unplug the appliance at the end of the baking cycle. 13 Lift the baking rack out of the appliance.Be careful, the baking rack, the baking trays and the pretzels are hot. 14 Take the pretzels from the baking trays and leave them to cool on a wire cooling rack.Tip: If you want soft and chewy pretzels, serve them warm with mustard.Tip: For crispy, dry, crunchy pretzels, place the baked pretzels in a cool oven on an ungreased baking tray. Allow them to stand for 3 hours or overnight to become dry and crunchy.
Multi Bread shaper programs
Multi Bread Shaper (program 13) Multi Bread Shaper Sweet (program 14)
Ingredients Quantities Ingredients Quantities
Water 150ml Water 100ml
Oil - Oil 1tbsp
Salt 1tsp Salt ½tsp
Sugar - Sugar 2tbsp
Milk powder - Milk powder 1tbsp
White flour 260g White flour 200g
Dried yeast 1½tsp Dried yeast 1tsp
Baking times and temperaturesBaking times and temperatures
The standard keep-warm temperature for the bread types and the Bake Only program in the tables below is 60°C.The keep-warm temperature for jam is 20°C.The maximum delay time that can be set for all bread types except Super Rapid and Gluten Free is 15 hours.
EnglIsH 11
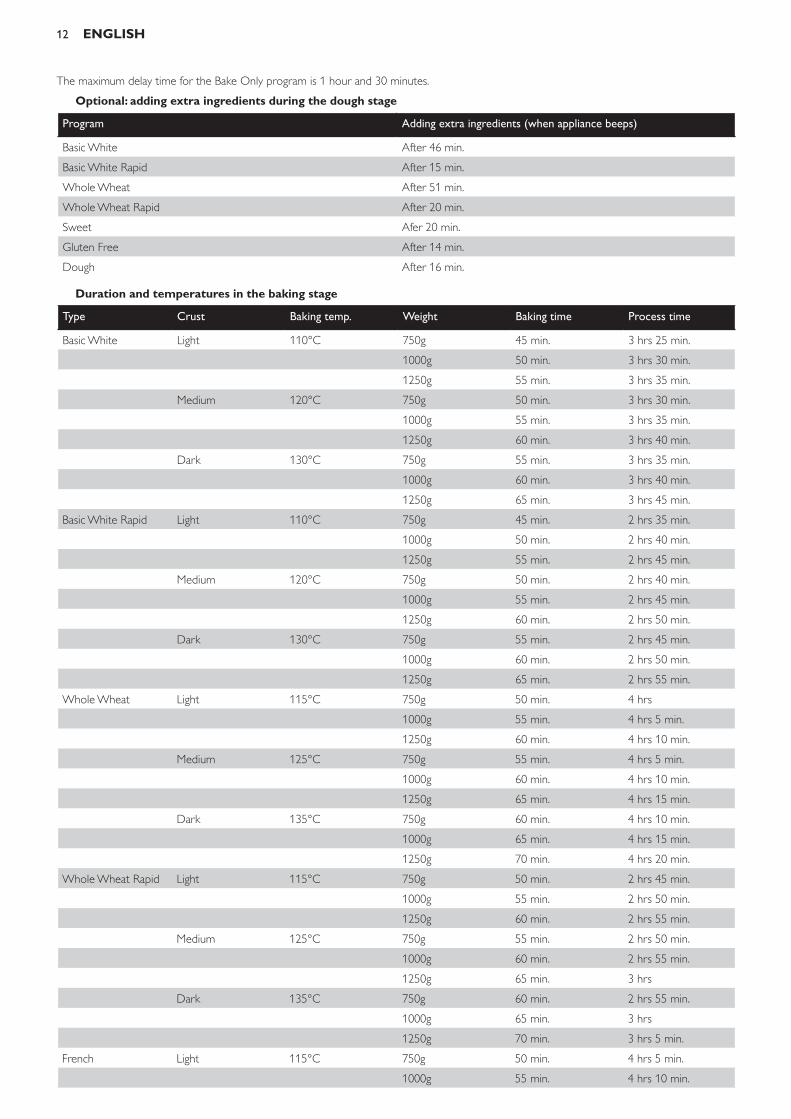
The maximum delay time for the Bake Only program is 1 hour and 30 minutes.
optional: adding extra ingredients during the dough stage
Program Adding extra ingredients (when appliance beeps)
Basic White After 46 min.
Basic White Rapid After 15 min.
Whole Wheat After 51 min.
Whole Wheat Rapid After 20 min.
Sweet Afer 20 min.
Gluten Free After 14 min.
Dough After 16 min.
Duration and temperatures in the baking stage
Type Crust Baking temp. Weight Baking time Process time
Basic White Light 110°C 750g 45 min. 3 hrs 25 min.
1000g 50 min. 3 hrs 30 min.
1250g 55 min. 3 hrs 35 min.
Medium 120°C 750g 50 min. 3 hrs 30 min.
1000g 55 min. 3 hrs 35 min.
1250g 60 min. 3 hrs 40 min.
Dark 130°C 750g 55 min. 3 hrs 35 min.
1000g 60 min. 3 hrs 40 min.
1250g 65 min. 3 hrs 45 min.
Basic White Rapid Light 110°C 750g 45 min. 2 hrs 35 min.
1000g 50 min. 2 hrs 40 min.
1250g 55 min. 2 hrs 45 min.
Medium 120°C 750g 50 min. 2 hrs 40 min.
1000g 55 min. 2 hrs 45 min.
1250g 60 min. 2 hrs 50 min.
Dark 130°C 750g 55 min. 2 hrs 45 min.
1000g 60 min. 2 hrs 50 min.
1250g 65 min. 2 hrs 55 min.
Whole Wheat Light 115°C 750g 50 min. 4 hrs
1000g 55 min. 4 hrs 5 min.
1250g 60 min. 4 hrs 10 min.
Medium 125°C 750g 55 min. 4 hrs 5 min.
1000g 60 min. 4 hrs 10 min.
1250g 65 min. 4 hrs 15 min.
Dark 135°C 750g 60 min. 4 hrs 10 min.
1000g 65 min. 4 hrs 15 min.
1250g 70 min. 4 hrs 20 min.
Whole Wheat Rapid Light 115°C 750g 50 min. 2 hrs 45 min.
1000g 55 min. 2 hrs 50 min.
1250g 60 min. 2 hrs 55 min.
Medium 125°C 750g 55 min. 2 hrs 50 min.
1000g 60 min. 2 hrs 55 min.
1250g 65 min. 3 hrs
Dark 135°C 750g 60 min. 2 hrs 55 min.
1000g 65 min. 3 hrs
1250g 70 min. 3 hrs 5 min.
French Light 115°C 750g 50 min. 4 hrs 5 min.
1000g 55 min. 4 hrs 10 min.
EnglIsH12

Type Crust Baking temp. Weight Baking time Process time
1250g 60 min. 4 hrs 15 min.
Medium 125°C 750g 55 min. 4 hrs 10 min.
1000g 60 min. 4 hrs 15 min.
1250g 65 min. 4 hrs 20 min.
Dark 135°C 750g 65 min. 4 hrs 20 min.
1000g 70 min. 4 hrs 25 min.
1250g 75 min. 4 hrs 30 min.
Sweet Light 110°C 750g 52 min. 3 hrs 17 min.
1000g 54 min. 3 hrs 19 min.
1250g 56 min. 3 hrs 21 min.
Medium 115°C 750g 54 min. 3 hrs 19 min.
1000g 57 min. 3 hrs 22 min.
1250g 60 min. 3 hrs 25 min.
Dark 125°C 750g 58 min. 3 hrs 23 min.
1000g 61 min. 3 hrs 26 min.
1250g 64 min. 3 hrs 29 min.
Gluten Free Medium 115°C 1000g/1250g 95 min. 2 hrs 54 min.
Super Rapid Medium 135°C 1000g 50 min. 1 hrs 25 min.
Dough N/A N/A N/A 0 min. 1 hr 30 min.
Bake Only N/A 120°C N/A 10 min. N/A
Pasta Dough N/A N/A N/A 0 min. 14 min.
Jam N/A 115°C N/A 45 min. 1 hr
Multi Bread Shaper Light 120°C 750g 65 min. 2 hrs 50 min.
Medium 130°C 750g 65 min. 2 hrs 50 min.
Dark 140°C 750g 65 min. 2 hrs 50 min.
Multi Bread Shaper Sweet
Light 110°C 750g 35 min. 2 hrs 20 min.
Medium 120°C 750g 35 min. 2 hrs 20 min.
Dark 130°C 750g 35 min. 2 hrs 20 min.
Ingredients and toolsThis chapter describes a number of ingredients and tools used for baking bread. Each ingredient has a special purpose. It is important to purchase high-quality ingredients and use them in the exact amounts specified in the recipes. While some ingredients are interchangeable, others will produce poor results in bread.
IngredientsWhite flour
White flour contains enough protein (gluten) to give a lot of volume and texture to bread. It is gluten that forms the cell wall structure, traps and holds the air bubbles and allows the bread to rise. Most flour is bleached. This does not affect the baking performance or the shelf life.
Wholewheat flourWholewheat flour is a coarsely ground type of flour milled from the entire wheat kernel - brand, germ and endosperm. The brand and germ provide the brown colour and nutty flavour while increasing fibre. Baking with wholewheat flour results in shorter, denser loaves.
Rye flourRye flour is made by finely grinding rye kernels. Only flours made from wheat and rye contain gluten-forming proteins. The gluten in rye flour is not very elastic, therefore rye flour must be used in combination with wheat flour.
Cereals, grains and seedsCereals, grains and seeds provide variety in texture, flavour and appearance of breads. They increase fibre content. Three, five, seven or twelve-grain cereals can be substituted in a recipe for any multi-grain cereal. Cracked wheat is the wholewheat kernel that is cracked into particles of different sizes from coarse to fine. Bulgur is the wheat kernel with the bran removed, which is steamed, dried and ground. Natural bran, both wheat and oats, cuts the gluten strands. Therefore do not use more bran than is stated in the recipe.
gluten-free flourGluten is present in many cereals, such as wheat, rye, barley, oats, etc. Gluten-free bread is to be made exclusively from gluten-free flour or gluten-free bread mixes.
semolina flourSemolina, a creamy yellow coarsely ground flour milled from hard durum wheat, is high in protein. It is used to make fresh pasta. Pasta dough made of semolina is easier to knead and holds its shape better during baking than pasta dough made with all-purpose flour. You can replace part of the all-purpose or wholewheat flour by semolina.
EnglIsH 13

FatsFats tenderise, add flavour and extend shelf life of bread by retaining moisture. Shortening, margarine, butter or oil can be interchanged in recipes. Loaves baked with these fats will vary slightly. Avoid low-calorie soft margarine as the higher water content can greatly affect loaf size and texture.
saltSalt controls the action of the yeast and adds flavour. Never omit salt from the dough. The amounts used are small but necessary. Without salt, the bread may overrise or collapse.
sugarsSugars provide food for the yeast as well as sweetness for the loaf and colour for the crust. Unless indicated in the recipe, use granulated white sugar. Honey, brown sugar and molasses give bread a unique flavour and colour. Substituting one for the other may affect the final result. Aspartame-based (not saccharin-based) granular sugar substitutes can be used. Substitute equal amounts for sugar in the recipe.
liquidsLiquids blend with the flour to produce an elastic dough. Milk gives a tender texture while water results in a crisper crust. Skimmed milk powder and buttermilk powder increase the nutritional value while softening the texture. There is no need to reconstitute skimmed milk powder or buttermilk powder. The use of these powders increases the number of recipes that may be used in combination with the timer function. Do not use the timer function for recipes that require fresh milk. Buttermilk powder tends to blend better when added after the flour. If you use milk instead of water and milk powder, use the same amount as the water. Homogenised, 2%, 1% or skimmed milk can be used in recipes that require milk. Unsweetened fruit and vegetable juices can be used in amounts stated in the recipes. Read the labels of these juices to make sure they do not contain added salt, sugar or sweeteners.
EggsEggs add colour, richness and flavour. Always use large-size eggs fresh from the refrigerator. Do not use the timer function for recipes that require fresh eggs.
CheeseDo not press cheese into the measuring spoon when you measure it. Low-fat cheeses may affect the loaf height and shape. Do not use the timer function for recipes that require cheese
YeastYeast, a tiny single-celled living organism, feeds on the carbohydrates in flour and sugar to produce carbon dioxide gas that makes bread rise. Mixed with water and sugar, yeast wakes up during the kneading process and fills the dough with tiny bubbles that make it rise. Initial baking causes the dough to rise higher until the yeast is inactivated. Exposure to air, heat and humidity decreases yeast activity. Always use yeast before the expiry date. After opening, store yeast in the refrigerator in its original container, and use it within 6-8 weeks. There are 3 types of yeast available - active dry, instant, and breadmaker yeast. Breadmaker yeast is a particularly active strain of yeast with increased levels of ascorbic acid (vitamin C). It was developed specifically for use in breadmakers. To substitute active dry yeast or instant yeast for breadmaker yeast, increase the amount stated in the recipe by ¼ teaspoon. For the best results, use the type of yeast specified in the recipe. Heat kills yeast. When you prepare fillings, it is important that you let ingredients such as melted butter cool down before you use them. Keep yeast away from liquids, fats and salt as they slow the activity. Do not increase the amount of yeast stated in the recipe.
Cinnamon and garlic both inhibit rising. If you use these ingredients, add them at the corner of the bread pan to make sure they do not touch the yeast.
testing yeast activityDissolve 1 tsp sugar into ½ cup lukewarm water in a measuring cup. Sprinkle 2 tsp yeast over the surface. Stir gently. Let the mixture sit undisturbed for 10 minutes. The mixture should be foamy with a strong smell of yeast. If not, purchase new yeast.
Bread mixBread mixes are available in many stores. Bread mix already includes flour, salt, sugar and yeast in the right amounts, so it is convenient to use. It also comes in many different flavours and varieties. In most cases you just have to put water or milk and butter or oil in the bread pan as indicated in the instructions on the bread mix package, and then add the bread mix.
Measuring ingredientsPerfect loaves depend on the correct amount of each ingredient. Therefore it is important that you measure ingredients correctly. Even 1 or 2 incorrectly measured tablespoons (either to much or too little) make a big difference for the end result. Never measure ingredients over the bread pan, as you may spill excess ingredients into the bread pan.
Tip: When you have to add e.g. 280ml water, add 1 cup (250ml)of water using the measuring cup and then add 2tbsp (30ml) of water using the measuring spoon.
storageStore flour in an airtight container in a cool, dry place. Exposed to heat or moisture, flour loses its strength and ability to rise. Flour absorbs flavours quickly, so store it away from onions or garlic. Store bread, sealed tightly in a plastic bag or other airtight container, at room temperature for 1 to 2 days. French-style breads should be stored in a paper bag or exposed to the air to retain their crisp crust. They are best eaten the same day as baked
toolsMeasuring spoon
- You can use the measuring spoon supplied to measure yeast, sugar, salt, milk powder and spices. - Do not use measuring spoons to scoop up dry ingredients. Spoon dry ingredients lightly into the measuring spoon (Fig. 39). - Heap the spoon, and then level it with the edge of a metal spatula or the straight edge of a knife. Do not press the ingredients into the
spoon, nor shake the spoon to level it (Fig. 40). - The only ingredient that should be pressed into the measuring spoon is brown sugar. Press onto the sugar until it has the shape of the
measuring spoon.
Measuring cup - Use a graduated transparent measuring cup for all liquids. Place the measuring cup on a flat surface and read the graduation at eye level. If
necessary, add or remove some liquid (Fig. 41).
Brush - The brush can for instance be used to dampen the top of multi-shaper bread with water or to apply beaten egg to the top of buns.
EnglIsH14

- It can also be used to remove excess water from the baking tray or the dough.
slitter - The slitter can be used to cut the dough and make slits in the top of the shaped dough of multi-shape bread.
Be careful when you handle the slitter. Its blade is very sharp.Put the sheath back on the slitter after use and store the slitter in a safe place.
troubleshootingThis chapter summarises the most common problems you could encounter with the appliance. If you are unable to solve the problem with the information below, contact the Consumer Care Centre in your country.
Problems with standard recipes and possible solutions
Water or milk
Salt Sugar or honey
Flour Yeast Other
Loaf rises, then falls Decrease 1-2tbsp, use colder liquid
Increase ¼tsp
Increase 1-2tbsp, use fresher flour, use right type of flour
Decrease 1/8-¼tsp, use fresh yeast, use right type of yeast at right setting
Check power supply
Loaf rises too high Decrease 1-2tbsp, use colder liquid
Increase 1/4tsp
Decrease ½tsp
Decrease 1-2tbsp Decrease 1/8-¼tsp, use right type of yeast at right setting
Loaf does not rise enough
Increase 1-2tbsp
Decrease 1/4tsp
Increase ½tsp
Use fresher flour, use right type of flour
Increase 1/8-¼tsp, use fresh yeast, use right type of yeast at right setting
Loaf is short and heavy
Use fresher flour, use right type of flour
Add yeast, use fresh yeast, use right type of yeast at right setting
Check power supply
Crust too light Increase ½tsp
Select correct settings
Loaf is uncooked Check power supply, select correct settings
Loaf is overcooked Decrease ½tsp
Select correct settings
Bread mixture is unmixed
Place bread pan properly, push kneading blade correctly onto shaft in bread pan
Smoke comes out of vents
Clean heating element
High altitude adjustment
Decrease 1-2tbsp
Decrease ½tsp
Decrease 1/8-¼tsp
Note: When you make corrections to amounts of ingredients, first change the amount of yeast. If the result is still not satisfactory, make adjustments to liquids and then to dry ingredients.
Problems with Multi Bread shaper recipes
Problem Cause Solution
When shaping Multi Bread Shaper breads, the dough has a different shape than described and shown.
The dough you started out with did not have a rectangular shape and did not have a uniform thickness
Flatten out the dough properly with a rolling pin to create a rectangular shape with a constant thickness.
The dough tears easily and falls apart (e.g. because it is lumpy) and it is hard to shape.
You have not added enough water to the mixture.
The dough was not properly prepared. Make sure you follow the recipes.
You have worked on the dough too long Knead the dough into a ball again and leave it to rest for 10 minutes. Then start shaping the dough from the beginning.
Knead the dough in two stages, with a 5-minute break in between.
The dough is sticky and is difficult to shape
You have added too much water to the mixture or the water you added was too warm.
Put some flour on your hands, but NOT on the dough or the work surface. Then continue to knead the dough. Put some more flour on your hands and continue until the dough is less sticky.
EnglIsH 15
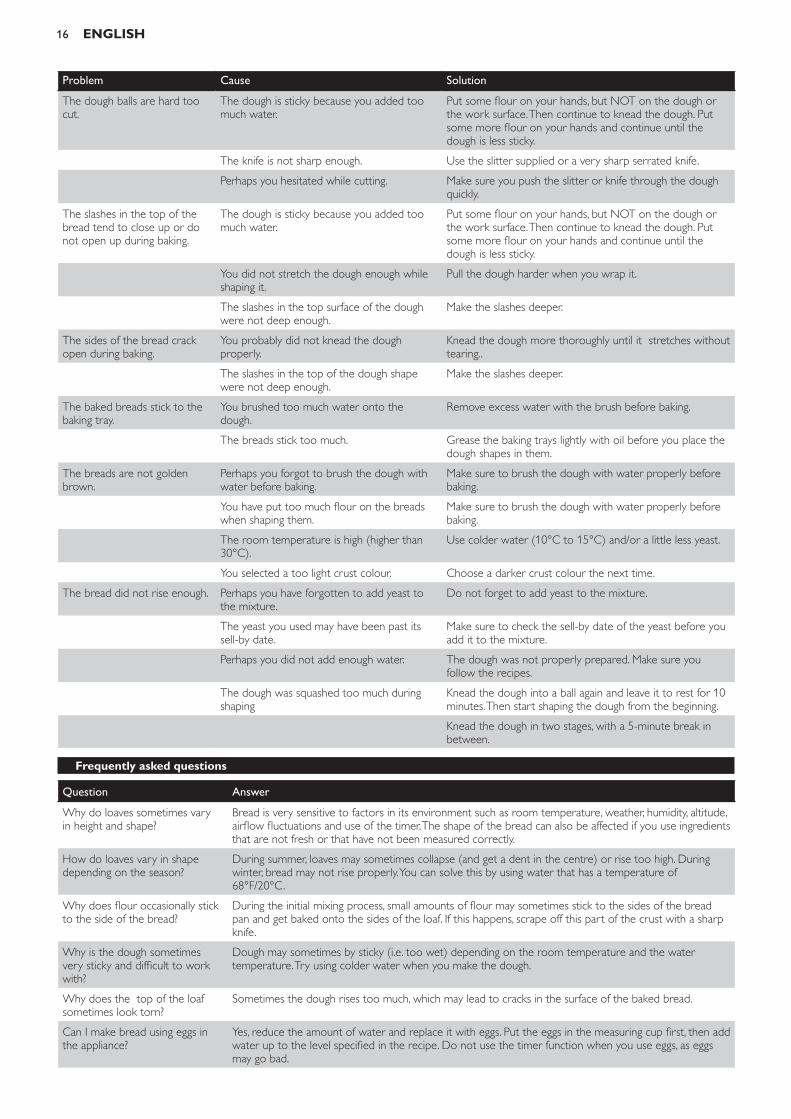
Problem Cause Solution
The dough balls are hard too cut.
The dough is sticky because you added too much water.
Put some flour on your hands, but NOT on the dough or the work surface. Then continue to knead the dough. Put some more flour on your hands and continue until the dough is less sticky.
The knife is not sharp enough. Use the slitter supplied or a very sharp serrated knife.
Perhaps you hesitated while cutting. Make sure you push the slitter or knife through the dough quickly.
The slashes in the top of the bread tend to close up or do not open up during baking.
The dough is sticky because you added too much water.
Put some flour on your hands, but NOT on the dough or the work surface. Then continue to knead the dough. Put some more flour on your hands and continue until the dough is less sticky.
You did not stretch the dough enough while shaping it.
Pull the dough harder when you wrap it.
The slashes in the top surface of the dough were not deep enough.
Make the slashes deeper.
The sides of the bread crack open during baking.
You probably did not knead the dough properly.
Knead the dough more thoroughly until it stretches without tearing..
The slashes in the top of the dough shape were not deep enough.
Make the slashes deeper.
The baked breads stick to the baking tray.
You brushed too much water onto the dough.
Remove excess water with the brush before baking.
The breads stick too much. Grease the baking trays lightly with oil before you place the dough shapes in them.
The breads are not golden brown.
Perhaps you forgot to brush the dough with water before baking.
Make sure to brush the dough with water properly before baking.
You have put too much flour on the breads when shaping them.
Make sure to brush the dough with water properly before baking.
The room temperature is high (higher than 30°C).
Use colder water (10°C to 15°C) and/or a little less yeast.
You selected a too light crust colour. Choose a darker crust colour the next time.
The bread did not rise enough. Perhaps you have forgotten to add yeast to the mixture.
Do not forget to add yeast to the mixture.
The yeast you used may have been past its sell-by date.
Make sure to check the sell-by date of the yeast before you add it to the mixture.
Perhaps you did not add enough water. The dough was not properly prepared. Make sure you follow the recipes.
The dough was squashed too much during shaping
Knead the dough into a ball again and leave it to rest for 10 minutes. Then start shaping the dough from the beginning.
Knead the dough in two stages, with a 5-minute break in between.
Frequently asked questions
Question Answer
Why do loaves sometimes vary in height and shape?
Bread is very sensitive to factors in its environment such as room temperature, weather, humidity, altitude, airflow fluctuations and use of the timer. The shape of the bread can also be affected if you use ingredients that are not fresh or that have not been measured correctly.
How do loaves vary in shape depending on the season?
During summer, loaves may sometimes collapse (and get a dent in the centre) or rise too high. During winter, bread may not rise properly. You can solve this by using water that has a temperature of 68°F/20°C.
Why does flour occasionally stick to the side of the bread?
During the initial mixing process, small amounts of flour may sometimes stick to the sides of the bread pan and get baked onto the sides of the loaf. If this happens, scrape off this part of the crust with a sharp knife.
Why is the dough sometimes very sticky and difficult to work with?
Dough may sometimes by sticky (i.e. too wet) depending on the room temperature and the water temperature. Try using colder water when you make the dough.
Why does the top of the loaf sometimes look torn?
Sometimes the dough rises too much, which may lead to cracks in the surface of the baked bread.
Can I make bread using eggs in the appliance?
Yes, reduce the amount of water and replace it with eggs. Put the eggs in the measuring cup first, then add water up to the level specified in the recipe. Do not use the timer function when you use eggs, as eggs may go bad.
EnglIsH16

Question Answer
Can I use this breadmaker to prepare recipes found in other cookery books?
Yes. However, the recipes in this booklet have been specially created for this appliance and results may vary when you use other recipes. If you experience problems with other recipes, please consult chapter Troubleshooting.
Why does the bread sometimes have a strange odour?
Too much active dry yeast or ingredients that are not fresh (especially flour and water) may cause the bread to have a strange odour. Always measure ingredients carefully and use fresh ingredients for the best results.
Can I use home-ground or home-milled flour?
Depending on how coarsely ground the flour is, the baking results may not be satisfactory. We recommend that you mix home-ground flour with regular flour for the best results.
Why are the multi-shape breads not properly baked?
The dough shape was probably too big. Reduce the size of the dough shape. The dough should only cover half the surface of the baking tray. If further browning is desired, use program 10
Why is the multi-shape bread overbaked?
The dough shape was probably too small. Put a larger dough shape on the baking tray. The dough should cover half the surface of the baking tray. If less browning is desired, change the crust colour to light.
Why is the baking result of multi-shape breads uneven?
The size of the dough shapes may be uneven. Make sure you divide the dough in equally sized lumps.
EnglIsH 17

18
Ricette e programmi standard per il panePane bianco base (programmi 1 e 2)
programma: Bianco base 750 g 1000 g 1250 g
Acqua (27°C/80°F) o latte 290 ml 350 ml 450 ml
Latte in polvere 1½ cucchiaio 2 cucchiai 3 cucchiai
Oil 1½ cucchiaio 2 cucchiai 3 cucchiai
Sale 1 cucchiaino da tè 1½ cucchiaino da tè 1½ cucchiaino da tè
Zucchero 1½ cucchiaio 2 cucchiai 3 cucchiai
Farina bianca 500 g 600 g 750 g
Lievito secco 1 cucchiaino da tè 1 cucchiaino da tè 1 cucchiaino da tè
Pane integrale (programmi 3 e 4)
programma: Integrale 750 g 1000 g 1250 g
Acqua (27°C/80°F) 320 ml 380 ml 480 ml
Oil 1 cucchiaio 2 cucchiai 2 cucchiai
Sale 1½ cucchiaino da tè 2 cucchiaini da tè 2 cucchiaini da tè
Miele O zucchero 2 cucchiai 2 cucchiai 3 cucchiai
Farina integrale 500 g 600 g 750 g
Lievito secco 1 cucchiaino da tè 1 cucchiaino da tè 1 cucchiaino da tè
Pane francese (programma 5)
programma: Francese 750 g 1000 g 1250 g
Acqua (27°C/80°F) 290 ml 350 ml 450 ml
Oil 1½ cucchiaio 2 cucchiai 2 cucchiai
Sale 1½ cucchiaino da tè 2 cucchiaini da tè 3 cucchiaini da tè
Farina bianca 500 g 600 g 750 g
Lievito secco 1 cucchiaino da tè 1 cucchiaino da tè 1 cucchiaino da tè
Pane dolce (programma 6)
programma: Dolce 750 g 1000 g 1250 g
Acqua (27°C/80°F) o latte 270 ml 330 ml 390 ml
Latte in polvere 1½ cucchiaio 2 cucchiai 3 cucchiai
Oil 2 cucchiai 3 cucchiai 4 cucchiai
Sale 1 cucchiaino da tè 1 cucchiaino da tè 1 cucchiaino da tè
Zucchero 4 cucchiai 5 cucchiai 6 cucchiai
Farina bianca 500 g 600 g 700 g
Lievito secco 1 cucchiaino da tè 1 cucchiaino da tè 1 cucchiaino da tè
Pane senza glutine (programma 7)
programma: Senza glutine 750 g 1000 g 1250 g
Latte - 310 ml 465 ml
Aceto - 1 cucchiaio 1½ cucchiaio
Oil - 6 cucchiai 9 cucchiai
Uova - 2 uova 3 uova
Sale - 1 cucchiaino da tè 1½ cucchiaino da tè
Zucchero - 2 cucchiai 3 cucchiai
Farina senza glutine - 450 g 675 g
Lievito secco - 2 cucchiaini da tè 3 cucchiaini da tè
Pane super rapido (programma 8)
programma: Super rapido 750 g 1000 g 1250 g
Acqua (27°C/80°F) o latte - 380 ml -
ItAlIAno
programma: Super rapido 750 g 1000 g 1250 g
Latte in polvere - 2 cucchiai -
Oil - 2 cucchiai -
Sale - 1 cucchiaino da tè -
Zucchero - 2 cucchiai -
Farina bianca - 600 g -
Lievito secco - 4 cucchiaini da tè -
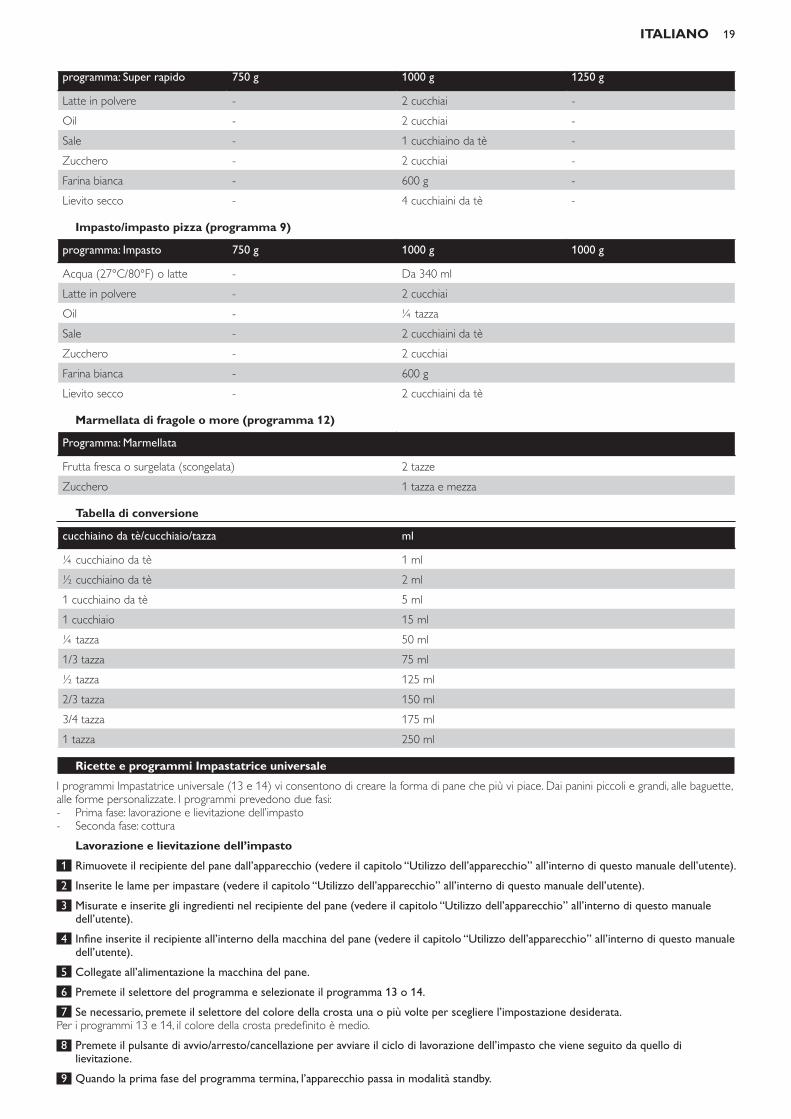
Impasto/impasto pizza (programma 9)
programma: Impasto 750 g 1000 g 1000 g
Acqua (27°C/80°F) o latte - Da 340 ml
Latte in polvere - 2 cucchiai
Oil - ¼ tazza
Sale - 2 cucchiaini da tè
Zucchero - 2 cucchiai
Farina bianca - 600 g
Lievito secco - 2 cucchiaini da tè
Marmellata di fragole o more (programma 12)
Programma: Marmellata
Frutta fresca o surgelata (scongelata) 2 tazze
Zucchero 1 tazza e mezza
tabella di conversione
cucchiaino da tè/cucchiaio/tazza ml
¼ cucchiaino da tè 1 ml
½ cucchiaino da tè 2 ml
1 cucchiaino da tè 5 ml
1 cucchiaio 15 ml
¼ tazza 50 ml
1/3 tazza 75 ml
½ tazza 125 ml
2/3 tazza 150 ml
3/4 tazza 175 ml
1 tazza 250 ml
Ricette e programmi Impastatrice universaleI programmi Impastatrice universale (13 e 14) vi consentono di creare la forma di pane che più vi piace. Dai panini piccoli e grandi, alle baguette, alle forme personalizzate. I programmi prevedono due fasi: - Prima fase: lavorazione e lievitazione dell’impasto - Seconda fase: cottura
lavorazione e lievitazione dell’impasto 1 Rimuovete il recipiente del pane dall’apparecchio (vedere il capitolo “Utilizzo dell’apparecchio” all’interno di questo manuale dell’utente). 2 Inserite le lame per impastare (vedere il capitolo “Utilizzo dell’apparecchio” all’interno di questo manuale dell’utente). 3 Misurate e inserite gli ingredienti nel recipiente del pane (vedere il capitolo “Utilizzo dell’apparecchio” all’interno di questo manuale
dell’utente). 4 Infine inserite il recipiente all’interno della macchina del pane (vedere il capitolo “Utilizzo dell’apparecchio” all’interno di questo manuale
dell’utente). 5 Collegate all’alimentazione la macchina del pane. 6 Premete il selettore del programma e selezionate il programma 13 o 14. 7 Se necessario, premete il selettore del colore della crosta una o più volte per scegliere l’impostazione desiderata. Per i programmi 13 e 14, il colore della crosta predefinito è medio.
8 Premete il pulsante di avvio/arresto/cancellazione per avviare il ciclo di lavorazione dell’impasto che viene seguito da quello di lievitazione.
9 Quando la prima fase del programma termina, l’apparecchio passa in modalità standby.
ItAlIAno 19

, L’apparecchio emette un segnale acustico che segnala che i processi di lavorazione e lievitazione sono terminati.Nota I due cicli (lavorazione e lievitazione dell’impasto) vengono avviati automaticamente e hanno una durata di 1 ora e 21 minuti (26 minuti di lavorazione seguiti da 55 minuti di lievitazione).Nota È normale che l’impasto non venga amalgamato uniformemente durante la lavorazione.Una volta terminata la prima fase del programma, l’impasto deve essere cotto entro un’ora. Una volta trascorso questo lasso di tempo l’apparecchio si reimposta e il programma Impastatrice universale non può più essere ripreso.
Forma e cottura 1 Date la forma desiderata al pane e inseritelo nei vassoi da forno (vedere la sezione “Ricette per il programma Impastatrice
universale” riportata di seguito). 2 Inserite la griglia da forno (vedere la sezione “Utilizzo della griglia da forno” riportata di seguito). 3 Inserite la griglia da forno con i vassoi all’interno della macchina del pane.Nota Prima di utilizzare la griglia da forno è necessario rimuovere il recipiente del pane. 4 Chiudete il coperchio e premete il pulsante di avvio/arresto/cancellazione per avviare il ciclo di cottura.
Utilizzo della griglia da fornoLa macchina del pane è dotata di una griglia da forno ideata specificamente per la modalità Impastatrice universale (programmi 13 e 14). Questa griglia è accompagnata da due vassoi da forno. Grazie ai due separatori lunghi e ai quattro separatori piccoli è possibile dividere i vassoi per cuocere baguette, panini o pane di qualsiasi forma.
1 Per cuocere due baguette o altri tipi di pane dalla forma lunga, posizionate il separatore lungo nel vassoio da forno. Spingete il separatore verso il basso per fissarlo.
2 Per cuocere baguette o altri tipi di pane più corti, inserite due separatori corti nel vassoio da forno e spingeteli in posizione. 3 Per cuocere dei panini, per prima cosa posizionate il separatore lungo, quindi inserite le guide dei separatori corti in quelle del
separatore lungo. 4 Per cuocere del pane senza una forma specifica, non inserite alcun separatore.
Ricette per il programma Impastatrice universalePer queste ricette è necessario utilizzare la griglia da forno, i vassoi da forno, i separatori dei vassoi da forno, la lama e il pennello.
BaguetteRicetta per 4 baguette di 100 g ciascuna.Colore della crosta medio.Ingredienti: - 150 ml di acqua - 1 cucchiaino da tè di sale - 260 g di farina per pane - 1½ cucchiaino di lievito secco
Nota Per rendere l’impasto della baguette più elastico, aggiungete un cucchiaio di olio. Per un colore più vivace, aggiungete 2 cucchiaini da tè di zucchero all’impasto.Per dare la forma alle baguette:
1 Spolverate la superficie da lavoro con della farina. 2 Rimuovete il recipiente del pane dall’apparecchio ed estraete l’impasto. 3 Date all’impasto la forma di una palla e dividetela in quattro con un coltello (fig. 1).Nota Assicuratevi che le parti ricavate abbiano lo stesso peso.Consiglio Per rendere più leggere le baguette, lasciate che le parti lievitino per 5 minuti prima di dare loro la forma. 4 Spianate ciascuna delle 4 parti sulla superficie da lavoro infarinata con il palmo della mano o servendovi di un mattarello (fig. 2). 5 Afferrate la parte lunga dell’impasto e ripiegatela verso l’interno. Prendete l’altro lato lungo e fate la stessa cosa sulla parte
precedentemente ripiegata (fig. 3). 6 Premete le dita al centro dell’impasto ripiegato per tutta la sua lunghezza al fine di creare una cavità lunga (fig. 4). 7 Chiudete la cavità tirando la metà anteriore vero l’alto, quindi lungo la cavità stessa per poi adagiarla sull’altra metà. Infine sigillate il
risvolto (fig. 5). 8 Posizionate l’impasto sulla superficie di lavoro con il risvolto verso il basso e arrotolate il tutto avanti e indietro con le mani. Iniziate dal
centro per poi spostarvi verso l’esterno al fine di raggiungere la lunghezza desiderata. (fig. 6) 9 Arrotolate l’impasto con le mani senza premere troppo al fine di ottenere una forma regolare. Lo spessore e la larghezza devono essere
uguali.Nota L’impasto deve essere della stessa lunghezza del vassoio da forno (circa 18 cm).Consiglio Per variare il sapore delle baguette, è possibile aggiungere ingredienti come semi di sesamo o di papavero in questa fase. 10 Inserite i separatori lunghi nei due vassoi da forno e posizionate gli impasti formati in ciascuna sezione dei vassoi (fig. 7). 11 Per risultati ottimali, effettuate delle incisioni diagonali di 1 cm sulla superficie dell’impasto servendovi della lama in dotazione o di un
coltello seghettato (fig. 8).Nota Assicuratevi che le incisioni non siano più lunghe di un 1 cm e si trovino alla distanza di 2 cm le une dalle altre (fig. 9). 12 Utilizzate il pennello per bagnare con acqua la superficie delle forme di impasto (fig. 10).
ItAlIAno20

Nota Assicuratevi che nel vassoio da forno non rimanga acqua. 13 Inserite la griglia da forno con i vassoi all’interno della macchina del pane. 14 Premete il pulsante di arresto/avvio/cancellazione per avviare il ciclo di cottura. 15 Al termine del processo di cottura scollegate l’apparecchio. 16 Sollevate il vassoio da forno dall’apparecchio (fig. 11).Prestate attenzione poiché la griglia, i vassoi e il pane sono caldi. 17 Togliete le baguette dai vassoi e lasciatele raffreddare su una griglia forata (fig. 12).
Filoncino a spigaSi tratta di un pane a forma cilindrica, piatto sul fondo e con diverse incisioni diagonali sulla superficie.
1 Utilizzate gli ingredienti e la procedura dal passaggio 1 al passaggio 3 della sezione “Baguette” riportata sopra. 2 Spianate ciascuna delle quattro parti con un mattarello formando dei rettangoli di 18 cm di lunghezza e di circa 1,5 cm di spessore con
gli angoli smussati (fig. 13). 3 Afferrate la parte lunga di ciascun rettangolo arrotolandola fino a formare un rotolo di 5 cm di larghezza. Fate rientrare le estremità e
smussatele (fig. 14). 4 Posizionate i separatori lunghi nei vassoi da forno e inserite le forme di pane in ciascuna sezione. 5 Effettuate delle incisioni diagonali sulla superficie a circa 1,5 cm le une dalle altre (circa 6 per ogni forma) servendovi della lama in
dotazione o di un coltello seghettato (fig. 15). 6 Utilizzate il pennello per bagnare con acqua la superficie delle forme di impasto.Nota Assicuratevi che nel vassoio da forno non rimanga acqua. 7 Inserite la griglia da forno con i vassoi all’interno della macchina del pane. 8 Premete il pulsante di arresto/avvio/cancellazione per avviare il ciclo di cottura. 9 Al termine del processo di cottura scollegate l’apparecchio. 10 Sollevate il vassoio da forno dall’apparecchio.Prestate attenzione poiché la griglia, i vassoi e il pane sono caldi. 11 Togliete i filoncini dai vassoi e lasciateli raffreddare su una griglia forata.
Pane francese “epi”Il pane “epi” è un pane francese composto dall’impasto della baguette e con la forma di una pannocchia (“epi” in francese significa spiga).
1 Utilizzate gli stessi ingredienti della ricetta per le baguette riportata sopra e date all’impasto la forma seguendo i passaggi da 1 a 9 indicati sotto.
2 Posizionate i separatori lunghi nei vassoi da forno e inserite le forme di pane in ciascuna sezione. 3 Utilizzate un paio di forbici per incidere la parte superiore dell’impasto alla distanza di 2-2,5 cm lungo tutta la lunghezza e creare delle
“alette” (fig. 16).Nota La lunghezza delle incisioni deve essere di circa due terzi dello spessore della forma dell’impasto. 4 Spostate le “alette” di impasto verso destra e sinistra in maniera alternata (fig. 17). 5 Utilizzate il pennello per bagnare con acqua la superficie delle forme di impasto.Nota Assicuratevi che nel vassoio da forno non rimanga acqua. 6 Inserite la griglia da forno con i vassoi all’interno della macchina del pane. 7 Premete il pulsante di arresto/avvio/cancellazione per avviare il ciclo di cottura. 8 Al termine del processo di cottura scollegate l’apparecchio. 9 Sollevate il vassoio da forno dall’apparecchio.Prestate attenzione poiché la griglia, i vassoi e il pane sono caldi. 10 Togliete le forme di pane francese “epi” e lasciatele raffreddare su una griglia forata.Consiglio Le “alette” del pane cotto possono essere rotte facilmente per ottenere delle porzioni individuali.
spiga di paneQuesta è la ricetta per uno dei tipi di pane a forma di spiga più comuni: il pane a treccia tripla.Ingredienti: - ¼ di tazza di latte - ½ uovo grande - 1 tazza e 1/6 di farina - 1 cucchiaio di zucchero - ¼ di cucchiaino da tè di sale - 1/8 di tazza di burro - ¾ di cucchiaino da tè di lievito secco
Per dare la forma alla spiga di pane:
1 Spolverate la superficie da lavoro con della farina. 2 Rimuovete il recipiente del pane dall’apparecchio ed estraete l’impasto. 3 Date all’impasto la forma di una palla e dividetela in sei con un coltello (fig. 18).
ItAlIAno 21

Nota Assicuratevi che le parti ricavate abbiano lo stesso peso. 4 Posizionate tre parti dell’impasto sulla superficie di lavoro infarinata e arrotolate ciascuna di esse avanti e indietro con le mani. Iniziate
dal centro per poi spostarvi verso l’esterno al fine di raggiungere la lunghezza desiderata (fig. 19).Nota Assicuratevi che le trecce di impasto abbiano tutte un diametro uguale e che siano più o meno della lunghezza del vassoio da forno (circa 18 cm). 5 Posizionate le tre trecce una accanto all’altra sul vassoio da forno (fig. 20). 6 Cominciate ad alternare le tre trecce verso il centro. Alzate quella di destra e passatela su quella centrale. Successivamente passate
quella di sinistra su quella di destra e quella centrale su quella di sinistra. Continuate a intrecciare fino alla fine, quindi intrecciate dal centro verso l’altra estremità (fig. 21).
7 Inumidite le parti terminali, fissatele con le dita e ripiegatele verso il basso (fig. 22). 8 Utilizzate il pennello per bagnare con acqua la superficie delle forme di impasto.Nota Assicuratevi che nel vassoio da forno non rimanga acqua. 9 Seguite i passaggi da 4 a 8 per le altre tre trecce. 10 Inserite la griglia da forno con i vassoi all’interno della macchina del pane. 11 Premete il pulsante di arresto/avvio/cancellazione per avviare il ciclo di cottura. 12 Al termine del processo di cottura scollegate l’apparecchio. 13 Sollevate il vassoio da forno dall’apparecchio.Prestate attenzione poiché la griglia, i vassoi e il pane sono caldi. 14 Togliete le spighe di pane dai vassoi da forno e lasciatele raffreddare su una griglia forata.
PaniniRicetta per 12 panini.Ingredienti: - 150 ml di acqua - 1 cucchiaino da tè di sale - 260 g di farina per pane - 1½ cucchiaino di lievito secco
Per dare la forma ai panini:
1 Spolverate la superficie da lavoro con della farina. 2 Rimuovete il recipiente del pane dall’apparecchio ed estraete l’impasto. 3 Date all’impasto la forma di una palla e dividetela in 12 con un coltello (fig. 23).Nota Assicuratevi che le parti ricavate abbiano lo stesso peso. 4 Formate 12 panini e posizionateli sul vassoio da forno (fig. 24). 5 Effettuate delle incisioni nel centro con la lama in modo da creare un taglio profondo che divide l’impasto a metà (fig. 25). 6 Tagliate nuovamente l’impasto perpendicolarmente alla prima incisione per dividere la forma in quarti (fig. 26). 7 Utilizzate il pennello per bagnare con acqua la superficie delle forme di impasto.Nota Assicuratevi che nel vassoio da forno non rimanga acqua. 8 Inserite la griglia da forno con i vassoi all’interno della macchina del pane. 9 Premete il pulsante di arresto/avvio/cancellazione per avviare il ciclo di cottura. 10 Al termine del processo di cottura scollegate l’apparecchio. 11 Sollevate il vassoio da forno dall’apparecchio.Prestate attenzione poiché la griglia, i vassoi e i panini sono caldi. 12 Togliete i panini dai vassoi da forno e lasciateli raffreddare su una griglia forata.
Ciambelle alla cannellaIngredienti: - ¼ di tazza di latte - ½ uovo grande - 1 tazza e 1/6 di farina per pane - 1 cucchiaio di zucchero - ¼ di cucchiaino da tè di sale - 1/8 di tazza di burro - ¾ di cucchiaino da tè di lievito secco
Ripieno: - 1 cucchiaio da tè di zucchero semolato - ½ di cucchiaino da tè di cannella - 1/8 di tazza di uvetta - Mescolate accuratamente gli ingredienti prima di aggiungerli all’impasto.
Per la glassa: - ½ uovo grande sbattuto - 2 cucchiaini da tè di acqua
Per dare la forma alle ciambelle:
ItAlIAno22

1 Spolverate la superficie da lavoro con della farina. 2 Rimuovete il recipiente del pane dall’apparecchio ed estraete l’impasto. 3 Formate una palla con le mani e tagliatela in due metà uguali (fig. 27). 4 Formate dei rettangoli con ciascuna delle due metà (fig. 28). 5 Mettete la stessa quantità di ripieno su ¾ di ciascun rettangolo (fig. 29). 6 Arrotolate l’impasto e sigillate accuratamente le estremità (fig. 30).Nota Sigillate il risvolto superiore ed entrambe le estremità accuratamente per fare in modo che la ciambella non si apra quando iniziate a tagliarla (fig. 31). 7 Tagliate l’impasto arrotolato in due metà uguali (fig. 32). 8 Adagiate le due metà sul vassoio da forno con il lato tagliato rivolto verso l’alto. 9 Applicate la glassa all’uovo sulla superficie con il pennello (fig. 33). 10 Inserite la griglia da forno con i vassoi all’interno della macchina del pane. 11 Premete il pulsante di arresto/avvio/cancellazione per avviare il ciclo di cottura. 12 Al termine del processo di cottura scollegate l’apparecchio. 13 Sollevate il vassoio da forno dall’apparecchio.Prestate attenzione poiché la griglia, i vassoi e le ciambelle sono caldi. 14 Togliete le ciambelle dai vassoi da forno e lasciatele raffreddare su una griglia forata.
Pretzel morbidiRicetta per 32 pretzel.Ingredienti: - 1 tazza di birra - 2 tazze e ½ di farina milleusi - 2 cucchiai di zucchero - 1 cucchiaino da tè di sale - 1 cucchiaio di burro - 1 cucchiaino da tè di lievito secco
Per dare la forma ai pretzel:
1 Spolverate la superficie da lavoro con della farina. 2 Rimuovete il recipiente del pane dall’apparecchio ed estraete l’impasto. 3 Date all’impasto la forma di una palla e dividetela in quattro parti uguali con un coltello. 4 Tagliate ciascuna parte a sua volta in 8. 5 Arrotolate ciascuna parte in trecce della lunghezza di circa 50 cm e dello spessore di circa 1 cm (fig. 34). 6 Prendete le estremità di ciascuna treccia e incrociatele. (fig. 35) 7 Quindi arrotolate una estremità attorno all’altra e posizionatele entrambe sull’altro lato del cerchio per dare la forma al pretzel (fig. 36). 8 Posizionate i pretzel a faccia in giù con le estremità arrotolate sotto a 2 cm di distanza gli uni dagli altri sul vassoio da forno. (fig. 37) 9 Cospargeteli con uovo sbattuto servendovi del pennello e salateli leggermente con del sale grosso, semi di papavero o sesamo (fig. 38).Consiglio La macchina del pane può cuocere solo 6 pretzel alla volta. Per preparare anche gli altri potrebbe essere necessario utilizzare il programma Cottura. Ciascun ciclo di cottura dura circa 10-12 minuti. 10 Inserite la griglia da forno con i vassoi all’interno della macchina del pane. 11 Premete il pulsante di arresto/avvio/cancellazione per avviare il ciclo di cottura. 12 Al termine del processo di cottura scollegate l’apparecchio. 13 Sollevate il vassoio da forno dall’apparecchio.Prestate attenzione poiché la griglia, i vassoi e i pretzel sono caldi. 14 Togliete i pretzel dai vassoi da forno e lasciateli raffreddare su una griglia forata.Consiglio Per pretzel morbidi e dalla consistenza elastica, serviteli caldi con della senape.Consiglio Per pretzel croccanti e asciutti, posizionateli appena cotti in un forno freddo sopra a una teglia da forno non imburrata. Fateli freddare per 3 ore o tutta la notte in modo che rimangano asciutti e croccanti.
Programmi Impastatrice universale
Impastatrice universale (programma 13) Impastatrice universale dolce (programma 14)
Ingredienti Quantità Ingredienti Quantità
Acqua 150 ml Acqua 100 ml
Oil - Oil 1 cucchiaio
Sale 1 cucchiaino da tè Sale ½ cucchiaino da tè
Zucchero - Zucchero 2 cucchiai
ItAlIAno 23

Impastatrice universale (programma 13) Impastatrice universale dolce (programma 14)
Latte in polvere - Latte in polvere 1 cucchiaio
Farina bianca 260 g Farina bianca 200 g
Lievito secco 1½ cucchiaino da tè Lievito secco 1 cucchiaino da tè
temperature e tempi di cotturatemperature e tempi di cottura
Nelle tabelle sottostanti, la temperatura standard di mantenimento del calore per i tipi di pane e la modalità Solo Cottura è 60 °C.La temperatura di mantenimento del calore per la marmellata è 20 °C.Il tempo di programmazione massimo che può essere impostato per tutti i tipi di pane tranne il Super rapido e il Senza glutine è 15 ore.Il tempo di programmazione massimo per la modalità Solo cottura è 1 ora e 30 minuti.
opzionale: se si aggiungono ingredienti extra all’impasto
Programma Aggiunta di ingredienti extra (quando l’apparecchio emette un bip)
Bianco base Dopo 46 min.
Bianco base rapido Dopo 15 min.
Integrale Dopo 51 min.
Integrale rapido Dopo 20 min.
Dolce Dopo 20 min.
Senza glutine Dopo 14 min.
Impasto Dopo 16 min.
Durata e temperature nella fase di cottura
Tipo Crosta Temp. di cottura Peso Tempo di cottura Tempo di lavorazione
Bianco base Forma Piccola 110 °C 750 g 45 min. 3 ore 25 min.
1000 g 50 min. 3 ore e 30 min.
1250 g 55 min. 3 ore e 35 min.
Forma Media 120 °C 750 g 50 min. 3 ore e 30 min.
1000 g 55 min. 3 ore e 35 min.
1250 g 60 min. 3 ore e 40 min.
Scura 130 °C 750 g 55 min. 3 ore e 35 min.
1000 g 60 min. 3 ore e 40 min.
1250 g 65 min. 3 ore 45 min.
Bianco base rapido Forma Piccola 110 °C 750 g 45 min. 2 h e 35 min.
1000 g 50 min. 2 ore 40 min.
1250 g 55 min. 2 ore 45 min.
Forma Media 120 °C 750 g 50 min. 2 ore 40 min.
1000 g 55 min. 2 ore 45 min.
1250 g 60 min. 2 ore 50 min.
Scura 130 °C 750 g 55 min. 2 ore 45 min.
1000 g 60 min. 2 ore 50 min.
1250 g 65 min. 2 ore 55 min.
Integrale Forma Piccola 115 °C 750 g 50 min. 4 ore
1000 g 55 min. 4 ore 5 min.
1250 g 60 min. 4 ore 10 min.
Forma Media 125 °C 750 g 55 min. 4 ore 5 min.
1000 g 60 min. 4 ore 10 min.
1250 g 65 min. 4 ore 15 min.
Scura 135 °C 750 g 60 min. 4 ore 10 min.
1000 g 65 min. 4 ore 15 min.
1250 g 70 min. 4 ore e 20 min.
Integrale rapido Forma Piccola 115 °C 750 g 50 min. 2 ore 45 min.
1000 g 55 min. 2 ore 50 min.
ItAlIAno24

Tipo Crosta Temp. di cottura Peso Tempo di cottura Tempo di lavorazione
1250 g 60 min. 2 ore 55 min.
Forma Media 125 °C 750 g 55 min. 2 ore 50 min.
1000 g 60 min. 2 ore 55 min.
1250 g 65 min. 3 ore
Scura 135 °C 750 g 60 min. 2 ore 55 min.
1000 g 65 min. 3 ore
1250 g 70 min. 3 ore e 5 min.
Francese Forma Piccola 115 °C 750 g 50 min. 4 ore 5 min.
1000 g 55 min. 4 ore 10 min.
1250 g 60 min. 4 ore 15 min.
Forma Media 125 °C 750 g 55 min. 4 ore 10 min.
1000 g 60 min. 4 ore 15 min.
1250 g 65 min. 4 ore e 20 min.
Scura 135 °C 750 g 65 min. 4 ore e 20 min.
1000 g 70 min. 4 h e 25 min.
1250 g 75 min. 4 h e 30 min.
Dolce Forma Piccola 110 °C 750 g 52 min. 3 ore e 17 min.
1000 g 54 min. 3 ore 19 min.
1250 g 56 min. 3 ore e 21 min.
Forma Media 115 °C 750 g 54 min. 3 ore 19 min.
1000 g 57 min. 3 ore 22 min.
1250 g 60 min. 3 ore 25 min.
Scura 125 °C 750 g 58 min. 3 ore 23 min.
1000 g 61 min. 3 ore 26 min.
1250 g 64 min. 3 ore 29 min.
Senza glutine Forma Media 115 °C 1000 g/1250 g 95 min. 2 ore 54 min.
Super rapido Forma Media 135 °C 1000 g 50 min. 1 ora e 25 min.
Impasto nd nd nd 0 min. 1 ora 30 min.
Solo cottura nd 120 °C nd 10 min. nd
Impasto pasta nd nd nd 0 min. 14 min.
Marmellata nd 115 °C nd 45 min. 1 ora
Impastatrice universale
Forma Piccola 120 °C 750 g 65 min. 2 ore 50 min.
Forma Media 130 °C 750 g 65 min. 2 ore 50 min.
Scura 140 °C 750 g 65 min. 2 ore 50 min.
Impastatrice universale dolce
Forma Piccola 110 °C 750 g 35 min. 2 h e 20 min.
Forma Media 120 °C 750 g 35 min. 2 h e 20 min.
Scura 130 °C 750 g 35 min. 2 h e 20 min.
Ingredienti e strumentiIn questo capitolo vengono descritti gli ingredienti e gli strumenti necessari per la preparazione del pane. Ogni ingrediente è destinato ad un uso particolare. È importante acquistare ingredienti di alta qualità e utilizzarli nelle quantità specificate nelle ricette. Mentre alcuni ingredienti sono intercambiabili, altri sono indispensabili per ottenere un buon risultato.
IngredientiFarina bianca
Le proteine (glutine) contenute nella farina bianca conferiscono al pane volume e consistenza. Il glutine forma la struttura cellulare, intrappola e trattiene l’aria che consente al pane di lievitare. La maggior parte della farina viene sottoposta a un processo di sbiancamento che tuttavia non compromette né la cottura finale né la conservazione.
Farina integraleLa farina integrale si ottiene macinando grossolanamente il chicco di grano intero che comprende crusca, germe ed endosperma. La crusca e il germe conferiscono il colore scuro e il sapore di nocciole oltre all’elevato contenuto di fibre. Utilizzando la farina integrale si ottengono forme di pane più piccole e compatte.
ItAlIAno 25

Farina di segaleLa farina di segale si ottiene macinando finemente i chicchi di segale. Solo le farine derivate dal grano e dalla segale contengono proteine in grado di formare il glutine. Il glutine contenuto nella farina di segale non è molto elastico, pertanto questo tipo di farina deve essere abbinato alla farina di grano.
Cereali, granaglie e semiCereali, granaglie e semi conferiscono ai vari tipi di pane una molteplicità di consistenze, sapori e caratteristiche. Aumentano il contenuto di fibre. Nelle ricette i cereali multigrano possono essere sostituiti con qualsiasi cereale a tre, cinque, sette o dodici grani. Il grano schiacciato si ottiene dal chicco di grano intero che viene ridotto in frammenti di dimensioni diverse, da grandi a piccole. Il bulgur si ottiene dal chicco di grano che viene privato della crusca, quindi cotto a vapore, essiccato e macinato. La crusca naturale, sia di grano che di avena, riduce il contenuto di glutine, pertanto è consigliabile non usarne una quantità superiore a quella indicata nella ricetta.
Farina senza glutineIl glutine è presente in molti cereali come grano, segale, orzo, avena, ecc... Il pane senza glutine deve essere fatto solo con farine senza glutine o con miscele per pane senza glutine.
Farina di semolaLa farina di semola si ottiene dalla macinatura grossolana del grano duro, è caratterizzata da una consistenza gialla e cremosa ed è ricca di proteine. Solitamente viene utilizzata per fare la pasta. L’impasto preparato con la farina di semola è più facile da lavorare e plasmare rispetto a un impasto preparato utilizzando la farina comune. Questo tipo di farina o quella integrale possono essere sostituite in parte dalla farina di semola.
grassiI grassi ammorbidiscono l’impasto, aggiungono sapore e prolungano la durata del pane trattenendo l’umidità. Il grasso per pasticceria, la margarina, il burro o l’olio possono essere utilizzati in modo intercambiabile nelle ricette. Il pane avrà caratteristiche diverse a seconda del grasso utilizzato. Consigliamo di evitare la margarina light poiché l’elevato contenuto di acqua può compromettere le dimensioni e la consistenza del pane.
saleIl sale controlla l’azione del lievito e aggiunge sapore. Non dimenticate mai di aggiungerlo all’impasto. Le quantità utilizzate sono piccole ma necessarie. Senza il sale, il pane può gonfiarsi troppo o sgonfiarsi.
ZuccheriGli zuccheri forniscono nutrimento al lievito, oltre a conferire il sapore dolce al pane e il colore alla crosta. Tranne in caso di istruzioni precise, utilizzate lo zucchero semolato bianco. Il miele, lo zucchero di canna e la melassa aggiungono al pane un sapore e un colore unici. Cambiare il tipo di zucchero influisce sul risultato finale. Possono essere utilizzati dolcificanti a base di aspartame (non a base di saccarina). Sostituite lo zucchero con le stesse quantità di dolcificante.
liquidiI liquidi si amalgamano con la farina per creare un impasto elastico. Il latte conferisce al pane una maggiore morbidezza rispetto all’acqua che invece permette di ottenere una crosta più croccante. Il latte scremato e il latticello in polvere aumentano il valore nutritivo e contemporaneamente ammorbidiscono il pane. Non è necessario ricostituire il latte scremato o il latticello in polvere. L’uso di questi ingredienti in polvere aumenta il numero di ricette che è possibile realizzare con la funzione timer. Non utilizzate il timer per preparare ricette che richiedono il latte fresco. Il latticello in polvere si miscela meglio se aggiunto dopo la farina. Se sostituite il latte con acqua e latte scremato in polvere, utilizzate la stessa quantità prevista per l’acqua. Il latte omogeneizzato o scremato (totalmente o parzialmente) può essere utilizzato nelle ricette che prevedono il latte. Succhi di frutta e verdura non dolcificati possono essere utilizzati nelle quantità indicate nelle ricette. Leggete le etichette per essere sicuri che non contengano sale, zucchero o dolcificanti aggiunti.
UovaLe uova aggiungono colore, consistenza e sapore. Utilizzate sempre uova fresche e grandi appena estratte dal frigorifero. Non utilizzate la funzione timer per ricette che prevedono l’impiego di uova fresche.
FormaggioNon utilizzate una quantità di formaggio superiore a quella indicata. I formaggi light possono influire sull’altezza e la forma del pane. Non utilizzate la funzione timer per ricette che richiedono il formaggio.
lievitoIl lievito, un organismo vivente unicellulare, si nutre dei carboidrati della farina e dello zucchero per produrre l’anidride carbonica che consente al pane di lievitare. Miscelato con acqua e zucchero, il lievito si “risveglia” durante l’impasto e produce piccole bolle d’aria che ne aumentano il volume. Durante la prima fase della cottura l’impasto si gonfia maggiormente fino a quando il lievito è inattivo. L’esposizione all’aria, al calore e all’umidità riducono l’effetto del lievito. Il lievito deve essere utilizzato sempre prima della data di scadenza. Una volta aperto, deve essere conservato in frigorifero nella confezione originale e consumato entro 6-8 settimane. Esistono tre tipi di lievito: attivo secco, istantaneo e un tipo specifico per le macchine del pane. Quest’ultimo tipo è una specie di lievito particolarmente attivo con livelli elevati di acido ascorbico (vitamina C). È stato appositamente creato per le macchine del pane. Per sostituire il lievito attivo secco o istantaneo con il lievito specifico per le macchine del pane, aumentate la quantità indicata di ¼ di cucchiaio da tè. Per risultati ottimali, utilizzate il tipo di lievito indicato nella ricetta. Il calore uccide il lievito. Quando preparate le farciture, è importante lasciare raffreddare gli ingredienti, ad esempio il burro fuso, prima di utilizzarli. Tenete il lievito lontano da liquidi, grassi e sale poiché rallentano la sua azione. Non aumentate la quantità di lievito indicato nella ricetta.
Aglio e cannella impediscono all’impasto di gonfiare. Se utilizzate questi ingredienti aggiungeteli in un angolo del recipiente del pane per essere sicuri che non vengano a contatto con il lievito.
testare l’azione del lievitoSciogliete 1 cucchiaino da tè di zucchero in mezza tazza di acqua tiepida. Distribuite a pioggia 2 cucchiaini da tè sulla superficie. Mescolate delicatamente. Lasciate la soluzione a riposo per 10 minuti. La miscela dovrebbe produrre una schiuma dal forte odore di lievito. Se ciò non accade, è necessario acquistare altro lievito.
Miscela per paneLe miscele per pane sono disponibili in molti negozi. Queste miscele contengono già farina, sale, zucchero e lievito nelle giuste dosi, per una praticità totale. Inoltre, sono disponibili in numerosi gusti e varietà. Nella maggior parte dei casi è sufficiente versare acqua o latte e burro o olio nella macchina del pane come indicato nelle istruzioni sulla confezione, quindi aggiungere la miscela.
ItAlIAno26
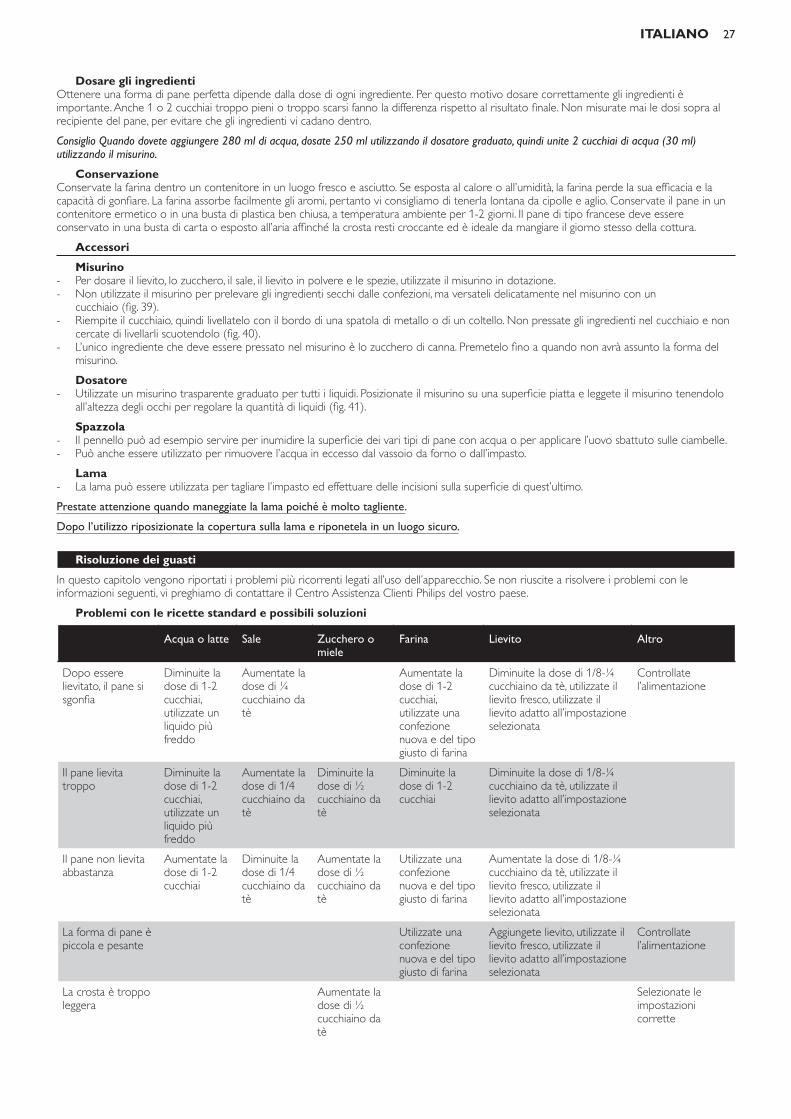
Dosare gli ingredientiOttenere una forma di pane perfetta dipende dalla dose di ogni ingrediente. Per questo motivo dosare correttamente gli ingredienti è importante. Anche 1 o 2 cucchiai troppo pieni o troppo scarsi fanno la differenza rispetto al risultato finale. Non misurate mai le dosi sopra al recipiente del pane, per evitare che gli ingredienti vi cadano dentro.
Consiglio Quando dovete aggiungere 280 ml di acqua, dosate 250 ml utilizzando il dosatore graduato, quindi unite 2 cucchiai di acqua (30 ml) utilizzando il misurino.
ConservazioneConservate la farina dentro un contenitore in un luogo fresco e asciutto. Se esposta al calore o all’umidità, la farina perde la sua efficacia e la capacità di gonfiare. La farina assorbe facilmente gli aromi, pertanto vi consigliamo di tenerla lontana da cipolle e aglio. Conservate il pane in un contenitore ermetico o in una busta di plastica ben chiusa, a temperatura ambiente per 1-2 giorni. Il pane di tipo francese deve essere conservato in una busta di carta o esposto all’aria affinché la crosta resti croccante ed è ideale da mangiare il giorno stesso della cottura.
AccessoriMisurino
- Per dosare il lievito, lo zucchero, il sale, il lievito in polvere e le spezie, utilizzate il misurino in dotazione. - Non utilizzate il misurino per prelevare gli ingredienti secchi dalle confezioni, ma versateli delicatamente nel misurino con un
cucchiaio (fig. 39). - Riempite il cucchiaio, quindi livellatelo con il bordo di una spatola di metallo o di un coltello. Non pressate gli ingredienti nel cucchiaio e non
cercate di livellarli scuotendolo (fig. 40). - L’unico ingrediente che deve essere pressato nel misurino è lo zucchero di canna. Premetelo fino a quando non avrà assunto la forma del
misurino.
Dosatore - Utilizzate un misurino trasparente graduato per tutti i liquidi. Posizionate il misurino su una superficie piatta e leggete il misurino tenendolo
all’altezza degli occhi per regolare la quantità di liquidi (fig. 41).
spazzola - Il pennello può ad esempio servire per inumidire la superficie dei vari tipi di pane con acqua o per applicare l’uovo sbattuto sulle ciambelle. - Può anche essere utilizzato per rimuovere l’acqua in eccesso dal vassoio da forno o dall’impasto.
lama - La lama può essere utilizzata per tagliare l’impasto ed effettuare delle incisioni sulla superficie di quest’ultimo.
Prestate attenzione quando maneggiate la lama poiché è molto tagliente.Dopo l’utilizzo riposizionate la copertura sulla lama e riponetela in un luogo sicuro.
Risoluzione dei guastiIn questo capitolo vengono riportati i problemi più ricorrenti legati all’uso dell’apparecchio. Se non riuscite a risolvere i problemi con le informazioni seguenti, vi preghiamo di contattare il Centro Assistenza Clienti Philips del vostro paese.
Problemi con le ricette standard e possibili soluzioni
Acqua o latte Sale Zucchero o miele
Farina Lievito Altro
Dopo essere lievitato, il pane si sgonfia
Diminuite la dose di 1-2 cucchiai, utilizzate un liquido più freddo
Aumentate la dose di ¼ cucchiaino da tè
Aumentate la dose di 1-2 cucchiai, utilizzate una confezione nuova e del tipo giusto di farina
Diminuite la dose di 1/8-¼ cucchiaino da tè, utilizzate il lievito fresco, utilizzate il lievito adatto all’impostazione selezionata
Controllate l’alimentazione
Il pane lievita troppo
Diminuite la dose di 1-2 cucchiai, utilizzate un liquido più freddo
Aumentate la dose di 1/4 cucchiaino da tè
Diminuite la dose di ½ cucchiaino da tè
Diminuite la dose di 1-2 cucchiai
Diminuite la dose di 1/8-¼ cucchiaino da tè, utilizzate il lievito adatto all’impostazione selezionata
Il pane non lievita abbastanza
Aumentate la dose di 1-2 cucchiai
Diminuite la dose di 1/4 cucchiaino da tè
Aumentate la dose di ½ cucchiaino da tè
Utilizzate una confezione nuova e del tipo giusto di farina
Aumentate la dose di 1/8-¼ cucchiaino da tè, utilizzate il lievito fresco, utilizzate il lievito adatto all’impostazione selezionata
La forma di pane è piccola e pesante
Utilizzate una confezione nuova e del tipo giusto di farina
Aggiungete lievito, utilizzate il lievito fresco, utilizzate il lievito adatto all’impostazione selezionata
Controllate l’alimentazione
La crosta è troppo leggera
Aumentate la dose di ½ cucchiaino da tè
Selezionate le impostazioni corrette
ItAlIAno 27

Acqua o latte Sale Zucchero o miele
Farina Lievito Altro
La forma di pane non è ben cotta
Controllate l’alimentazione, selezionate le impostazioni corrette
La forma di pane è troppo cotta
Diminuite la dose di ½ cucchiaino da tè
Selezionate le impostazioni corrette
La miscela per il pane non è amalgamata
Montate correttamente il recipiente del pane, inserite la lama per impastare sul braccio girevole all’interno del recipiente
Dai fori di ventilazione esce del fumo
Pulite la resistenza
Regolazione in caso di altitudine elevata
Diminuite la dose di 1-2 cucchiai
Diminuite la dose di ½ cucchiaino da tè
Diminuite la dose di 1/8-¼ cucchiaino da tè
Nota Quando apportate variazioni alle quantità degli ingredienti, modificate prima di tutto la dose del lievito. Se il risultato non è ancora soddisfacente, modificate prima i liquidi e dopo gli ingredienti secchi.
Problemi con le ricette per il programma Impastatrice universale
Problema Causa Soluzione
Quando si dà la forma al pane dopo aver utilizzato il programma Impastatrice universale, l’impasto risulta avere una forma diversa rispetto a quella descritta/mostrata.
L’impasto iniziale non aveva una forma rettangolare e uno spessore uniforme
Stendete l’impasto correttamente con un mattarello per creare una forma rettangolare con uno spessore uniforme.
L’impasto si rompe facilmente (ad esempio a causa dei grumi) e non è facile dargli una forma.
Non è stata aggiunta abbastanza acqua all’impasto.
L’impasto non è stato preparato correttamente. Seguite la ricetta.
L’impasto è stato lavorato troppo a lungo Formate nuovamente una palla con l’impasto e lasciatelo riposare per 10 minuti, quindi ridategli ancora una volta la forma.
Lavorate l’impasto in due fasi, con una pausa di 5 minuti tra una e l’altra.
L’impasto è appiccicoso e non è facile dargli una forma
È stata aggiunta troppa acqua all’impasto oppure l’acqua è troppo calda.
Spolverate le vostre mani con della farina (NON sull’impasto o sulla superficie da lavoro). Continuate quindi a lavorare l’impasto. Mettete della farina sulle mani e continuate fino a che l’impasto non risulta meno appiccicoso.
Le palle di impasto sono troppo dure da tagliare.
L’impasto è appiccicoso perché avete aggiunto troppa acqua.
Spolverate le vostre mani con della farina (NON sull’impasto o sulla superficie da lavoro). Continuate quindi a lavorare l’impasto. Mettete della farina sulle mani e continuate fino a che l’impasto non risulta meno appiccicoso.
Il coltello non è sufficientemente affilato. Utilizzate la lama in dotazione o un coltello seghettato molto affilato.
Forse durante il taglio avete avuto delle esitazioni.
Assicuratevi di affondare rapidamente la lama o il coltello nell’impasto.
Le incisioni sulla parte superiore del pane tendono a chiudersi o non si aprono durante la cottura.
L’impasto è appiccicoso perché avete aggiunto troppa acqua.
Spolverate le vostre mani con della farina (NON sull’impasto o sulla superficie da lavoro). Continuate quindi a lavorare l’impasto. Mettete della farina sulle mani e continuate fino a che l’impasto non risulta meno appiccicoso.
L’impasto non è stato steso sufficientemente mentre gli stavate dando la forma.
Tirate di più l’impasto quando lo ripiegate.
ItAlIAno28

Problema Causa Soluzione
Le incisioni sulla parte superiore dell’impasto non erano abbastanza profonde.
Effettuate delle incisioni più profonde.
I lati del pane si aprono durante la cottura.
L’impasto non è stato lavorato correttamente.
Lavorate meglio l’impasto fino a che non si stende senza rompersi.
Le incisioni sulla parte superiore dell’impasto non erano abbastanza profonde.
Effettuate delle incisioni più profonde.
Il pane cotto si attacca al vassoio da forno.
Sull’impasto è stata messa troppa acqua con il pennello.
Rimuovete l’acqua in eccesso con il pennello prima di avviare la cottura.
Il pane si attacca troppo. Imburrate leggermente i vassoi da forno prima di mettervi sopra l’impasto.
Il pane non diventa dorato. Forse non avete spennellato la superficie dell’impasto con dell’acqua prima della cottura.
Prima di avviare la cottura, spennellate dell’acqua sull’impasto.
Sul pane è stata messa troppa farina mentre gli avete dato la forma.
Prima di avviare la cottura, spennellate dell’acqua sull’impasto.
La temperatura ambiente è alta (superiore a 30 °C).
Utilizzate dell’acqua più fredda (da 10 °C a 15 °C) e/o un po’ meno di lievito.
L’impostazione del colore della crosta è troppo leggera.
Scegliete un colore più intenso la prossima volta.
Il pane non è lievitato abbastanza.
Forse non vi siete ricordati di aggiungere il lievito al composto.
Non scordatevi di aggiungere il lievito all’impasto.
Il lievito utilizzato potrebbe essere scaduto. Prima di aggiungere il lievito al composto, controllate la data di scadenza.
La quantità di acqua potrebbe non essere sufficiente.
L’impasto non è stato preparato correttamente. Seguite la ricetta.
Durante la lavorazione all’impasto potrebbe essere stata data la forma in maniera troppo energica
Formate nuovamente una palla con l’impasto e lasciatelo riposare per 10 minuti, quindi ridategli ancora una volta la forma.
Lavorate l’impasto in due fasi, con una pausa di 5 minuti tra una e l’altra.
Domande frequenti
Domanda Risposta
Perché le forme di pane variano in forma e altezza?
Il pane è molto sensibile a fattori esterni come temperatura dell’aria, condizioni meteo, umidità, altitudine, cambiamenti del flusso d’aria e uso del timer. La forma del pane può dipendere anche da ingredienti poco freschi o dosi sbagliate.
Come varia la forma del pane in base alle stagioni?
In estate, le forme di pane possono a volte sgonfiarsi (e creare un vuoto nella parte centrale) o lievitare troppo. In inverno, il pane potrebbe non lievitare bene. Potete risolvere questo problema utilizzando acqua alla temperatura di 68 °F/20 °C.
Perché la farina a volte si appiccica ai lati del pane?
Durante la fase iniziale, piccole quantità di farina possono attaccarsi ai lati del recipiente del pane e cuocersi. Se ciò accade, togliete questa parte della crosta raschiandola con un coltello affilato.
Perché a volte l’impasto è molto appiccicoso e difficile da lavorare?
L’impasto a volte può risultare troppo appiccicoso (ad esempio troppo umido), a seconda della temperatura ambiente e dell’acqua. Provate ad utilizzare acqua più fredda per l’impasto.
Perché a volte la superficie del pane si rompe?
Quando l’impasto lievita troppo, si creano delle crepe sulla superficie del pane cotto.
È possibile fare il pane utilizzando uova fresche all’interno dell’apparecchio?
Sì, riducete la quantità di acqua e sostituitela con le uova. Mettete innanzitutto le uova nel misurino, quindi aggiungete l’acqua fino al livello specificato dal recipiente. Non utilizzate la funzione timer con le uova, per evitare che si deteriorino.
È possibile utilizzare questa macchina del pane per preparare ricette trovate in altri libri di cucina?
Sì. Tuttavia, le ricette contenute in questo ricettario sono state appositamente create per il presente apparecchio, se utilizzato con altre ricette i risultati finali possono variare. In caso di problemi nell’uso dell’apparecchio con altre ricette, consultate il capitolo “Risoluzione dei problemi”.
Perché il pane a volte ha un odore strano?
Una quantità eccessiva di lievito secco attivo o di ingredienti non proprio freschi (soprattutto farina e acqua) possono conferire al pane un odore strano. Dosate sempre attentamente gli ingredienti e utilizzate ingredienti freschi per un risultato ottimale.
È possibile utilizzare farina macinata in casa?
A seconda della consistenza della farina, il risultato finale potrebbe non essere soddisfacente. Vi consigliamo di mischiare la farina macinata in casa con quella normale per risultati ottimali.
Perché il pane con la forma personalizzata non viene cotto correttamente?
La forma dell’impasto potrebbe essere troppo grande. Riducete la grandezza della forma dell’impasto. Quest’ultimo dovrebbe solo coprire la metà della superficie del vassoio da forno. Per una doratura maggiore, utilizzate il programma 10
ItAlIAno 29

Domanda Risposta
Perché il pane con la forma personalizzata è troppo cotto?
La forma dell’impasto potrebbe essere troppo piccola. Adagiate sul vassoio da forno un impasto di grandezza superiore. Quest’ultimo dovrebbe solo coprire la metà della superficie del vassoio. Per una doratura più leggera, impostate un colore della crosta più leggero.
Perché la cottura del pane con la forma personalizzata non è uniforme?
La forma dell’impasto potrebbe non essere uniforme. Dividete l’impasto in parti uguali.
ItAlIAno30

31

32

33

34
21 22 23 24
25 26 27 28
29 30 31 32
33
50 cm
1 cm
34 35 36
37 38 39 40

35
41

4222.200.0461.1