hdr darkroom 2 user manual
TRANSCRIPT

HDR Darkroom 2 User Manual
Everimaging Ltd. 1 / 22 www.everimaging.com
HDR Darkroom 2
User Manual

HDR Darkroom 2 User Manual
Everimaging Ltd. 2 / 22 www.everimaging.com
Cotent:
1. Introduction ................................................................................................... 3
1.1 A Brief Introduction to HDR Photography .................................................. 3
1.2 Introduction to HDR Darkroom 2 ............................................................. 5
2. HDR Darkroom 2 Workflow .............................................................................. 9
2.1 HDR Composition Workflow ..................................................................... 9
2.2 RAW File Converter Workflow ................................................................ 17
3. Batch Processing........................................................................................... 21
3.1 Batch merging bracketed photos into HDR images .................................. 21
3.2 Batch converting single 16-bit RAW files to 8-bit images .......................... 22
HDR Darkroom 2 User Manual
Everimaging Ltd. 3 / 22 www.everimaging.com
1. Introduction
1.1 A Brief Introduction to HDR Photography
HDR stands for High Dynamic Range, and HDR photography utilizes technology
that allows you to capture a much wider range of lighting, colors and details than is
possible with a standard camera alone.
What are the benefits and uses of HDR photography?
By using three or more differently exposed photos of the same scene, HDR software
combines them into a single photo that accurately captures the details and vivid colors
of the world as it is seen through your eyes. The advantage of HDR technology is that
it retains details that are lost with standard digital cameras and it reproduces vivid
colors in both the light and dark areas of a photo simultaneously.
What is Tone Mapping?
Usually, the first step of HDR software is to merge photos with different exposures into
a digital HDR negative, which is also called a 32-bit float pointing radiance map.
Compared with conventional 8-bit image formats like JPEG or BMP, the 32-bit float
pointing format has the capability to record a much wider range of values, and can
thus more accurately capture the full dynamic range of the real world. However, a
32-bit float pointing value cannot be displayed or printed on current 8-bit monitors or
printers. Therefore, although a 32-bit float pointing radiance map records extremely
accurate values, at this stage they are just meaningless numbers from the user's
perspective because the results cannot be seen. "Tone Mapping" is the technology
used to convert a 32-bit float pointing format to 8-bit images for display or print. Since
32-bit float pointing radiance map is also referred to as the digital HDR negative, Tone
Mapping can be regarded as a kind of photo development, but for digital photos.

HDR Darkroom 2 User Manual
Everimaging Ltd. 4 / 22 www.everimaging.com
A brief introduction to making HDR photos:
Take three photos of the same scene with different exposure values (like the photos
above) and import these photos into HDR software. These photos will be merged into
a single radiance map (i.e. HDR negative). Then Tone Mapping is used to convert the
digital HDR negative into a displayable HDR image (the merged photo with richer
details and colors is shown below). Our HDR Darkroom 2 is an innovative HDR
software that uses the above-mentioned technology to help you to create gorgeous
HDR photos with minimal effort.

HDR Darkroom 2 User Manual
Everimaging Ltd. 5 / 22 www.everimaging.com
1.2 Introduction to HDR Darkroom 2
Easy creation of stunning HDR images at lightning speed.
Sophisticated HDR Technology:
HDR Darkroom 2 includes a range of advanced HDR technologies, including Alignment
technology, Ghost Reduction technology, Noise Reduction, and Local/Global Tone
Mapping technology to help you easily produce spectacular images at the fastest
speeds available today.
User-friendly Interface:
By working with professional photographers to understand their workflow, we
designed HDR Darkroom 2 specifically for ease of use, but without compromising on
control.

HDR Darkroom 2 User Manual
Everimaging Ltd. 6 / 22 www.everimaging.com
Cutting-edge Local/Global Tone Mapping Technology:
Using our Local / Global Tone Mapping technology, you will produce the most
spectacular photo-realistic results in seconds. We offer three types of Tone Mapping
technology to suit your needs.
Local Global
Alignment Technology
Our powerful Alignment technology corrects problems with misalignment when your
camera moves slightly between the bracketed frames.
Before After
HDR Darkroom 2 User Manual
Everimaging Ltd. 7 / 22 www.everimaging.com
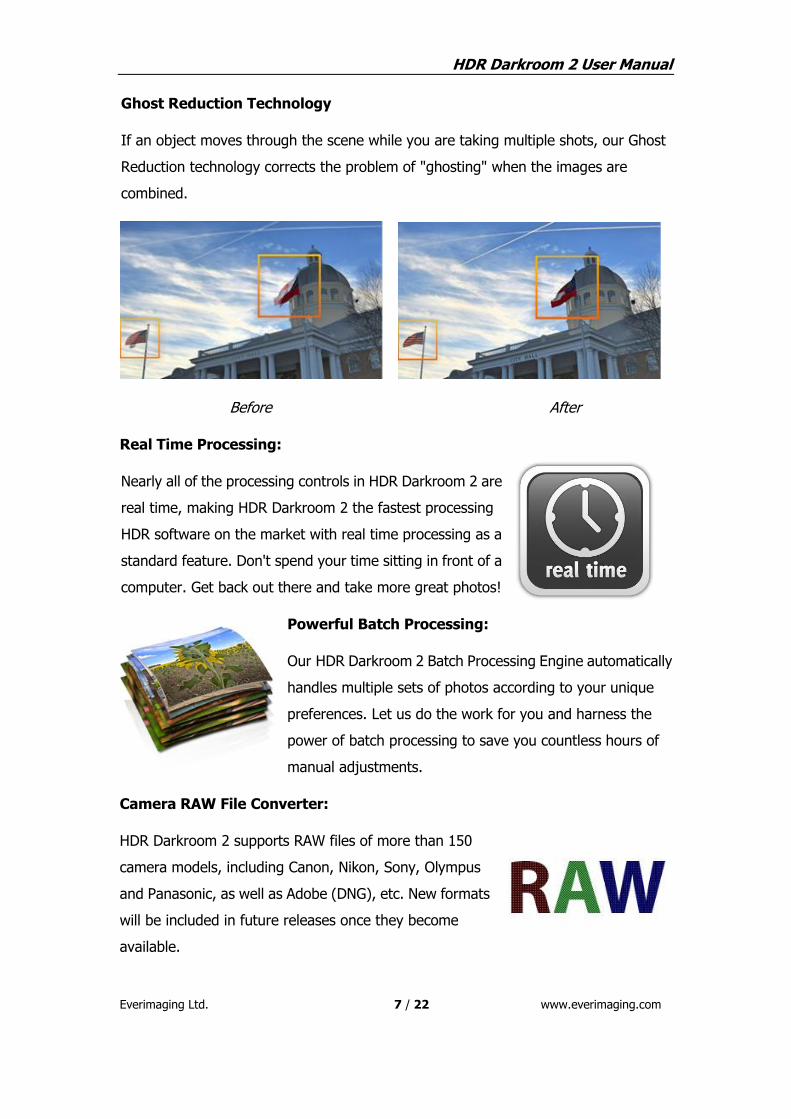
Ghost Reduction Technology
If an object moves through the scene while you are taking multiple shots, our Ghost
Reduction technology corrects the problem of "ghosting" when the images are
combined.
Before After
Real Time Processing:
Nearly all of the processing controls in HDR Darkroom 2 are
real time, making HDR Darkroom 2 the fastest processing
HDR software on the market with real time processing as a
standard feature. Don't spend your time sitting in front of a
computer. Get back out there and take more great photos!
Powerful Batch Processing:
Our HDR Darkroom 2 Batch Processing Engine automatically
handles multiple sets of photos according to your unique
preferences. Let us do the work for you and harness the
power of batch processing to save you countless hours of
manual adjustments.
Camera RAW File Converter:
HDR Darkroom 2 supports RAW files of more than 150
camera models, including Canon, Nikon, Sony, Olympus
and Panasonic, as well as Adobe (DNG), etc. New formats
will be included in future releases once they become
available.

HDR Darkroom 2 User Manual
Everimaging Ltd. 8 / 22 www.everimaging.com
Supported Operating Systems:
HDR Darkroom 2 is currently available for both
Windows (XP, Vista, Win 7 x32/x64) and Mac
(OS X v10.6 and above).
Export to Social Media:
We've made it easy for you to share your
amazing HDR images on all the popular
social media and photo sharing websites like
Facebook, Twitter and Flickr. With a single
click you can upload your photos for all of
your friends and family to see, or put
yourself out there and share your work with
an even bigger audience.

HDR Darkroom 2 User Manual
Everimaging Ltd. 9 / 22 www.everimaging.com
2. HDR Darkroom 2 Workflow
2.1 HDR Composition Workflow
Step 1: Taking HDR photos of a scene
In order to create the best HDR images, be sure to take enough photos (at least 2)
with different exposures. Taking 3-5 differently exposed photos will ensure that you
cover the full dynamic range of the scene.
Most digital cameras on the market offer an Auto-Exposure Bracketing (AEB) function,
which makes capturing HDR photos easy. Our HDR Darkroom 2 software enables you
to align images if the camera moves slightly between frames, but it is best to use a
tripod if possible.
Step 2: Open your HDR Darkroom 2 workspace
Enter the workspace of HDR Darkroom 2 on your computer by double-clicking on the
application's desktop icon, or enter through the Start menu and select HDR Darkroom
2 from the list of installed programs. The workspace of HDR Darkroom 2 is shown
below.
Step 3: Import bracketed photos into your workspace
HDR Darkroom 2 User Manual
Everimaging Ltd. 10 / 22 www.everimaging.com
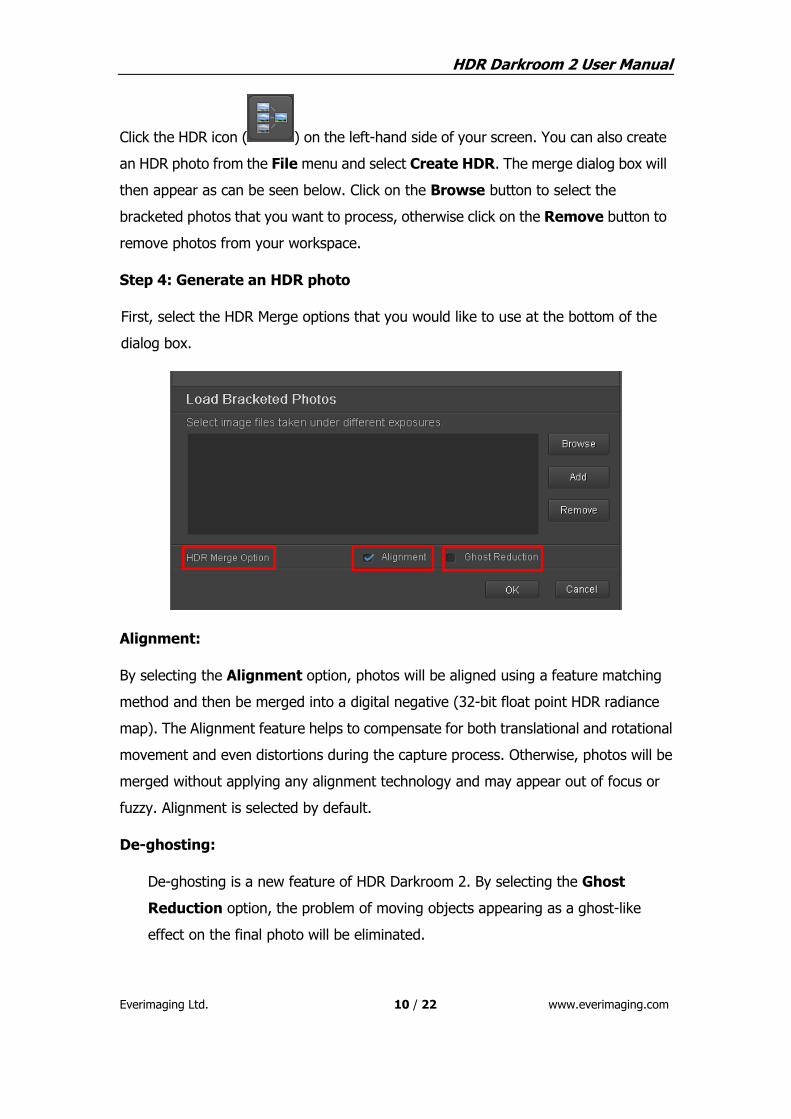
Click the HDR icon ( ) on the left-hand side of your screen. You can also create
an HDR photo from the File menu and select Create HDR. The merge dialog box will
then appear as can be seen below. Click on the Browse button to select the
bracketed photos that you want to process, otherwise click on the Remove button to
remove photos from your workspace.
Step 4: Generate an HDR photo
First, select the HDR Merge options that you would like to use at the bottom of the
dialog box.
Alignment:
By selecting the Alignment option, photos will be aligned using a feature matching
method and then be merged into a digital negative (32-bit float point HDR radiance
map). The Alignment feature helps to compensate for both translational and rotational
movement and even distortions during the capture process. Otherwise, photos will be
merged without applying any alignment technology and may appear out of focus or
fuzzy. Alignment is selected by default.
De-ghosting:
De-ghosting is a new feature of HDR Darkroom 2. By selecting the Ghost
Reduction option, the problem of moving objects appearing as a ghost-like
effect on the final photo will be eliminated.

HDR Darkroom 2 User Manual
Everimaging Ltd. 11 / 22 www.everimaging.com
Once you have specified your preferences, click OK to continue.
HDR Darkroom 2 will then process the selected photos and merge them into an HDR
photo. Note that the Tone Balancer mapping engine is applied as the default setting
at this stage. In the next step you can specify the tone mapping settings you prefer.
Step 5: The magic of Tone Mapping
In order to obtain the highest quality HDR image, adjust the tone mapping settings to
suit your needs. You can find three different tone mapping options in the Tone
Mapping area on the right hand side of your workspace.
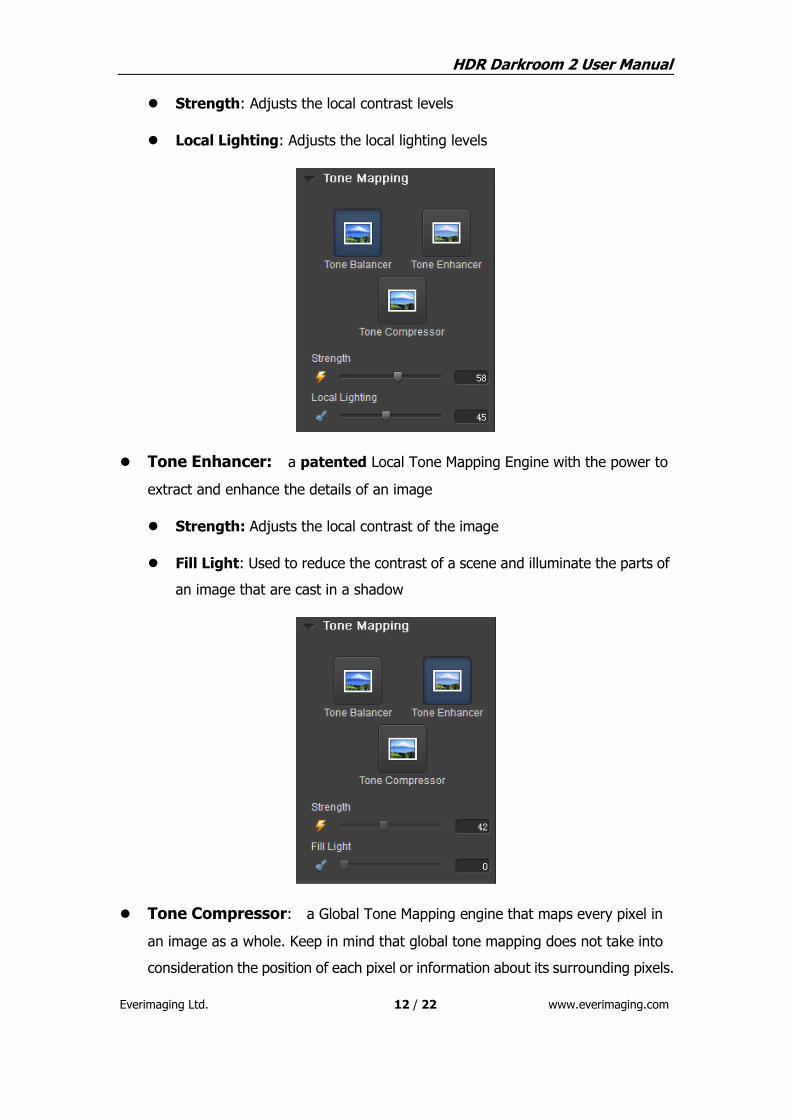
Tone Balancer: a patented Local Tone Mapping Engine aimed at balancing
tones and revealing both the shadows and highlights of an image
HDR Darkroom 2 User Manual
Everimaging Ltd. 12 / 22 www.everimaging.com
Strength: Adjusts the local contrast levels
Local Lighting: Adjusts the local lighting levels
Tone Enhancer: a patented Local Tone Mapping Engine with the power to
extract and enhance the details of an image
Strength: Adjusts the local contrast of the image
Fill Light: Used to reduce the contrast of a scene and illuminate the parts of
an image that are cast in a shadow
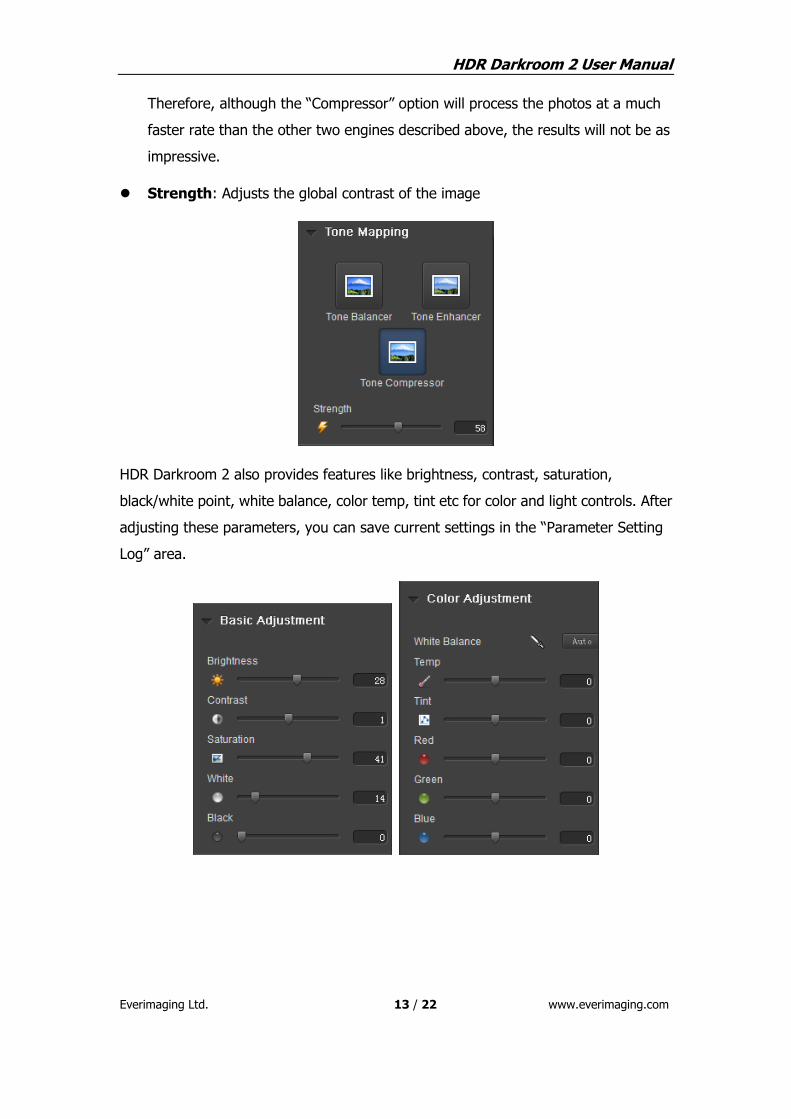
Tone Compressor: a Global Tone Mapping engine that maps every pixel in
an image as a whole. Keep in mind that global tone mapping does not take into
consideration the position of each pixel or information about its surrounding pixels.
HDR Darkroom 2 User Manual
Everimaging Ltd. 13 / 22 www.everimaging.com
Therefore, although the “Compressor” option will process the photos at a much
faster rate than the other two engines described above, the results will not be as
impressive.
Strength: Adjusts the global contrast of the image
HDR Darkroom 2 also provides features like brightness, contrast, saturation,
black/white point, white balance, color temp, tint etc for color and light controls. After
adjusting these parameters, you can save current settings in the “Parameter Setting
Log” area.

HDR Darkroom 2 User Manual
Everimaging Ltd. 14 / 22 www.everimaging.com
Crop feature is also integrated into the latest HDR Darkroom 2, which can be tailored
to suit your needs. The following screenshots demonstrate how to use the Crop
feature.
a. Click the ( ) at the bottom of your workspace, and the Crop box will pop up
immediately.
b. Preset ratios will appear in the right-hand corner. You can select a preset cropping
ratio here, or customize a ratio based on your preferences. For instance, select the
preset ratio 1:1, and then apply cropping by clicking on the “Crop” button that
appears at the bottom of the photo.

HDR Darkroom 2 User Manual
Everimaging Ltd. 15 / 22 www.everimaging.com
After the boundaries of the photo are exactly where you would like them to be, click on
the “OK” button to complete the process.
c. You may then view the cropped image before saving and sharing.

HDR Darkroom 2 User Manual
Everimaging Ltd. 16 / 22 www.everimaging.com
Once you are satisfied with your creation, click on the Save button ( ) to save
current image or Save as button ( ) to save the image in any number of
formats. You can also click on the Share button ( ) to upload your edited
photos to popular social network sites, such as Facebook, Twitter, and Flickr (sign in to
your accounts before uploading).
HDR Darkroom 2 User Manual
Everimaging Ltd. 17 / 22 www.everimaging.com
2.2 RAW File Converter Workflow
HDR Darkroom 2 can be used for 16-bit Camera Raw Conversion with our innovative
HDR tone mapping technologies.
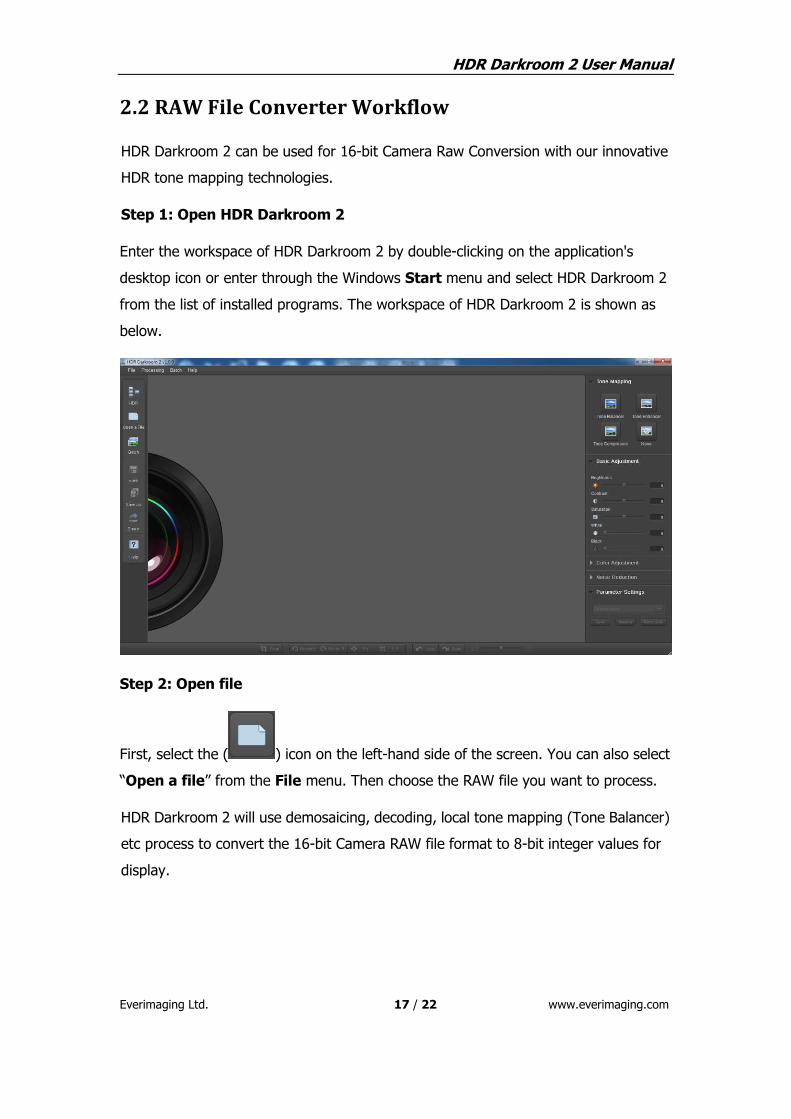
Step 1: Open HDR Darkroom 2
Enter the workspace of HDR Darkroom 2 by double-clicking on the application's
desktop icon or enter through the Windows Start menu and select HDR Darkroom 2
from the list of installed programs. The workspace of HDR Darkroom 2 is shown as
below.
Step 2: Open file
First, select the ( ) icon on the left-hand side of the screen. You can also select
“Open a file” from the File menu. Then choose the RAW file you want to process.
HDR Darkroom 2 will use demosaicing, decoding, local tone mapping (Tone Balancer)
etc process to convert the 16-bit Camera RAW file format to 8-bit integer values for
display.
HDR Darkroom 2 User Manual
Everimaging Ltd. 18 / 22 www.everimaging.com
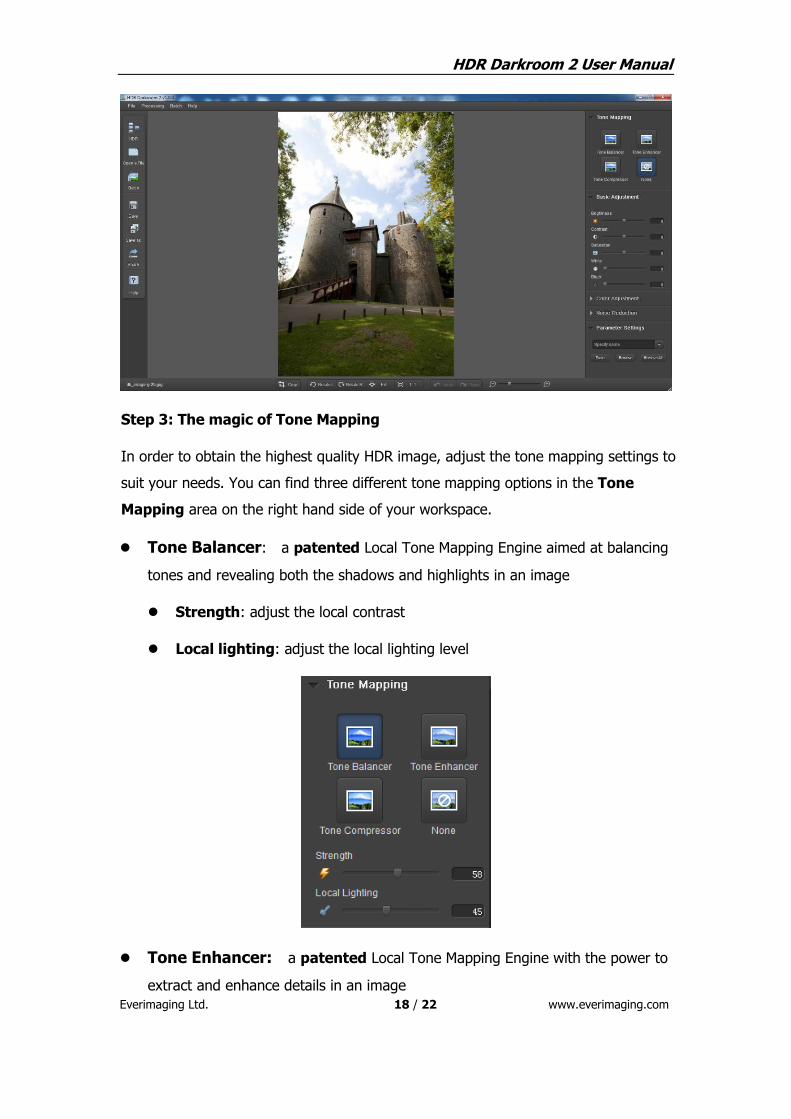
Step 3: The magic of Tone Mapping
In order to obtain the highest quality HDR image, adjust the tone mapping settings to
suit your needs. You can find three different tone mapping options in the Tone
Mapping area on the right hand side of your workspace.
Tone Balancer: a patented Local Tone Mapping Engine aimed at balancing
tones and revealing both the shadows and highlights in an image
Strength: adjust the local contrast
Local lighting: adjust the local lighting level
Tone Enhancer: a patented Local Tone Mapping Engine with the power to
extract and enhance details in an image

HDR Darkroom 2 User Manual
Everimaging Ltd. 19 / 22 www.everimaging.com
Strength: adjust the local contrast
Fill Light: reduce the contrast of a scene and illuminate the parts of an
image that are cast in a shadow
Tone Compressor: a Global Tone Mapping engine that maps all of the pixels in
an image as a whole. Keep in mind that global tone mapping does not take into
consideration the position of each pixel or information about its surrounding pixels.
Therefore, although the “Tone Compressor” option will process the photos at a
much faster rate than the other two engines described above, the results will not
be as impressive.
Strength: adjust the local contrast

HDR Darkroom 2 User Manual
Everimaging Ltd. 20 / 22 www.everimaging.com
For post processing a RAW file, you can also use Basic Adjustment, Color
Adjustment and Noise Reduction features. Once you are satisfied with your
settings, click ( ) to save, or click ( ) to share.

HDR Darkroom 2 User Manual
Everimaging Ltd. 21 / 22 www.everimaging.com
3. Batch Processing
3.1 Batch merging bracketed photos into HDR images
If you have a large amount of photos to be processed, you can use our batch
processing mode. This feature allows you to process large quantities of images without
the need to make manual adjustments for each new set.
Step 1: Open the Batch Processing tool
To use the batch processing mode, click the ( ) icon on the left hand side of the
screen, or select Batch from the menu at the top of the workspace. The following
window will be displayed:
Step 2: Select photos for batch processing
For the “Input” field, select “Browse” to locate the folder with the images you would
like to batch process. Then, select the number of images per set
Important Note:
You must specify the number of photos for each set. If you merge 3 photos to
produce a single HDR photo in the first set for example, there must be only 3
photos for each set in the batch. Let’s say you have two sets of photos. The first
set consists of A1, A2, and A3 and the second set consists of B1, B2, B3. You
HDR Darkroom 2 User Manual
Everimaging Ltd. 22 / 22 www.everimaging.com
can then place both sets in the same folder as Input and indicate that you would
like to select 3 images at a time for batch processing. Each set of photos that are
processed within the same batch must consist of the same number of photos.
You cannot for example place one set of photos consisting of four differently
exposed photos and another set of photos consisting of five differently exposed
photos in the Input folder to be processed in the same batch.
Step 3: Select the file location for processed photos
For the “Output” field, select “Browse” to locate the folder where you would like your
processed photos to be saved. Then, select the format you would like to use. “Save
as JPG” in order to view the processed photos on any device, for printing photos and
to share your photos with friends. “Save as radiance map (.hdr) format” for further
editing on any HDR software.
Step 4: Specify alignment, ghost reduction and tone mapping preferences
For further explanation of these tools, please see HDR Darkroom 2 Workflow in
section 2 of the user guide.
Step 5: Run batch processing
After you have specified your preferences, click Run to start batch processing. There
may be a delay before processing begins depending on the number of photos you have
input.
3.2 Batch converting single 16-bit RAW files to 8-bit
images
You can also use batch processing to convert the 16-bit Camera RAW file format to
8-bit integer values that can be displayed on your monitor. Select 1 in the “Bracketed
image number” field to indicate that you will “Input” only 1 photo per set. Then, select
"No Alignment" and “No Ghost Reduction” from the menu options at the bottom
of the dialog box. Because there is only a single picture per set, there is no need to use
these tools. Lastly, indicate which tone mapping method you would like to use and
then run the batch.