health cloud implementation guide - salesforce.com · health cloud implementation guide salesforce,...
TRANSCRIPT

Health Cloud ImplementationGuide
Salesforce, Spring ’16
@salesforcedocsLast updated: April 28, 2016

© Copyright 2000–2016 salesforce.com, inc. All rights reserved. Salesforce is a registered trademark of salesforce.com, inc.,as are other names and marks. Other marks appearing herein may be trademarks of their respective owners.
CONTENTS
WELCOME TO HEALTH CLOUD . . . . . . . . . . . . . . . . . . . . . . . . . . . . . . . . . . . . . . 1Deliver Collaborative, Connected Patient Care with Health Cloud . . . . . . . . . . . . . . . . . . . . . . 1Get to Know the Health Cloud Data Model . . . . . . . . . . . . . . . . . . . . . . . . . . . . . . . . . . . . . 1
LET'S GET STARTED . . . . . . . . . . . . . . . . . . . . . . . . . . . . . . . . . . . . . . . . . . . . . . . . 4The Big Picture for Setting Up Health Cloud . . . . . . . . . . . . . . . . . . . . . . . . . . . . . . . . . . . . . 4Verify That Shared Contacts is Enabled . . . . . . . . . . . . . . . . . . . . . . . . . . . . . . . . . . . . . . . 5Install the Health Cloud Package in Your Org . . . . . . . . . . . . . . . . . . . . . . . . . . . . . . . . . . . 5Define Your Health Cloud Domain Name . . . . . . . . . . . . . . . . . . . . . . . . . . . . . . . . . . . . . . 5Switch On Salesforce Communities (Optional) . . . . . . . . . . . . . . . . . . . . . . . . . . . . . . . . . . . 6
Community Setup Overview . . . . . . . . . . . . . . . . . . . . . . . . . . . . . . . . . . . . . . . . . . . 7Configure the Health Cloud Admin Profile . . . . . . . . . . . . . . . . . . . . . . . . . . . . . . . . . . . . . 8Configure the Health Cloud Profile . . . . . . . . . . . . . . . . . . . . . . . . . . . . . . . . . . . . . . . . . . 9Add New Internal Users . . . . . . . . . . . . . . . . . . . . . . . . . . . . . . . . . . . . . . . . . . . . . . . . . 9Control User Access with Permission Sets . . . . . . . . . . . . . . . . . . . . . . . . . . . . . . . . . . . . . 10Set Field Access Using Permission Sets . . . . . . . . . . . . . . . . . . . . . . . . . . . . . . . . . . . . . . . 11Control Access to Patient Lists . . . . . . . . . . . . . . . . . . . . . . . . . . . . . . . . . . . . . . . . . . . . . 13Control User Access with Profiles . . . . . . . . . . . . . . . . . . . . . . . . . . . . . . . . . . . . . . . . . . . 14Create Roles for Care Team Members . . . . . . . . . . . . . . . . . . . . . . . . . . . . . . . . . . . . . . . 15Provide Easy Access to Protocols and Articles . . . . . . . . . . . . . . . . . . . . . . . . . . . . . . . . . . 16
Enable Knowledge Users . . . . . . . . . . . . . . . . . . . . . . . . . . . . . . . . . . . . . . . . . . . . 17Create Article Types . . . . . . . . . . . . . . . . . . . . . . . . . . . . . . . . . . . . . . . . . . . . . . . . 17Enable Salesforce Knowledge . . . . . . . . . . . . . . . . . . . . . . . . . . . . . . . . . . . . . . . . . 19Create Protocols and Articles . . . . . . . . . . . . . . . . . . . . . . . . . . . . . . . . . . . . . . . . . 20
Customize the Health Cloud Apps . . . . . . . . . . . . . . . . . . . . . . . . . . . . . . . . . . . . . . . . . . 21
CUSTOMIZE THE CARE CONSOLE . . . . . . . . . . . . . . . . . . . . . . . . . . . . . . . . . . 23Health Cloud Custom Tabs . . . . . . . . . . . . . . . . . . . . . . . . . . . . . . . . . . . . . . . . . . . . . . 23Customize the Patient Card . . . . . . . . . . . . . . . . . . . . . . . . . . . . . . . . . . . . . . . . . . . . . . 23
Add Items to the Patient Card Navigation Menu . . . . . . . . . . . . . . . . . . . . . . . . . . . . . 25Add Fields to the Patient Card . . . . . . . . . . . . . . . . . . . . . . . . . . . . . . . . . . . . . . . . . 27
Configure Health Cloud Custom Metadata Settings . . . . . . . . . . . . . . . . . . . . . . . . . . . . . . 29Override Custom Labels . . . . . . . . . . . . . . . . . . . . . . . . . . . . . . . . . . . . . . . . . . . . . . . . 29Customize Problems and Goals . . . . . . . . . . . . . . . . . . . . . . . . . . . . . . . . . . . . . . . . . . . 30
Enable Custom Fields Sets . . . . . . . . . . . . . . . . . . . . . . . . . . . . . . . . . . . . . . . . . . . . 31Customize Tasks . . . . . . . . . . . . . . . . . . . . . . . . . . . . . . . . . . . . . . . . . . . . . . . . . . . . . 31
Add Custom Task Types . . . . . . . . . . . . . . . . . . . . . . . . . . . . . . . . . . . . . . . . . . . . . 31Add or Edit Task Priority Values . . . . . . . . . . . . . . . . . . . . . . . . . . . . . . . . . . . . . . . . 32Add or Edit Task Status Values . . . . . . . . . . . . . . . . . . . . . . . . . . . . . . . . . . . . . . . . 32

Customize the Create External Member Fields . . . . . . . . . . . . . . . . . . . . . . . . . . . . . . . . . 32Customize the Candidate Patient List View . . . . . . . . . . . . . . . . . . . . . . . . . . . . . . . . . . . . 33Configure the Timeline View . . . . . . . . . . . . . . . . . . . . . . . . . . . . . . . . . . . . . . . . . . . . . 33
Upload Timeline View Icons . . . . . . . . . . . . . . . . . . . . . . . . . . . . . . . . . . . . . . . . . . 35Add Cross-Object Relationships to Customize Patient List Filter Options . . . . . . . . . . . . . . . . . 35Dashboards Give Your Users Access to the Big Picture . . . . . . . . . . . . . . . . . . . . . . . . . . . . 36
CREATE PATIENTS . . . . . . . . . . . . . . . . . . . . . . . . . . . . . . . . . . . . . . . . . . . . . . . . 38A Behind-the-Scenes Look at Patient Creation . . . . . . . . . . . . . . . . . . . . . . . . . . . . . . . . . . 38Create Patients from Imported Records . . . . . . . . . . . . . . . . . . . . . . . . . . . . . . . . . . . . . . 38
HEALTH CLOUD LIMITATIONS . . . . . . . . . . . . . . . . . . . . . . . . . . . . . . . . . . . . . . 41
APPENDIX . . . . . . . . . . . . . . . . . . . . . . . . . . . . . . . . . . . . . . . . . . . . . . . . . . . . . . . 42Migrating More Data in the Patient Creation Job Flow . . . . . . . . . . . . . . . . . . . . . . . . . . . . 42Create a Custom Apex Class for the Patient Creation Job Flow . . . . . . . . . . . . . . . . . . . . . . 44Customize the Patient Conversion Process . . . . . . . . . . . . . . . . . . . . . . . . . . . . . . . . . . . . 47
Override the Health Cloud Job Flows . . . . . . . . . . . . . . . . . . . . . . . . . . . . . . . . . . . . 48Add Your Job to the Patient Creation Job Flow . . . . . . . . . . . . . . . . . . . . . . . . . . . . . . 49Data Mapping to Health Cloud Objects . . . . . . . . . . . . . . . . . . . . . . . . . . . . . . . . . . 50
Contents

WELCOME TO HEALTH CLOUD
Deliver Collaborative, Connected Patient Care with Health Cloud
EDITIONS
Health Cloud is available inSalesforce Classic
Available in: Enterprise,Performance, andUnlimited Editions
Delivering outstanding patient care means more than simply managing the information and eventsthat involve your patients. Health Cloud reinvents the way that care coordinators engage withpatients. The Health Cloud Console gives you a consolidated view of critical patient records, accessto the patient’s care team, and the tools to bring it all together to improve healthcare outcomes.You create a strong, collaborative relationship with the patient and caregivers to assist the patienton his or her journey to better health.
Excellent care requires a complete picture of the data coming from electronic health record (EHR)systems to guide smart and efficient decisions regarding the patient. With Salesforce Health Cloud,you have all the tools to manage your patients with greater efficiency. The Health Cloud consoleincludes:
• Comprehensive snapshot of vital patient data from EHRs
• Working view of your prioritized tasks related to all your patients
• Care timeline that lets you see a representation of patient history events, like appointments, prescriptions, conditions, and othercare-related encounters
• Customized care plans that set measurable goals with tasks that can be assigned to the patient
When you configure Salesforce Communities, you also have a private patient community that unites professional and personal caregiversin a collaborative network that drives care plan compliance. You can assign ownership of health tasks to members of the care team,including other health professionals, patients, and family members. You can exchange secure, private messaging between you, thepatient, and members of the community—and they can access those messages on any device.
Get to Know the Health Cloud Data Model
EDITIONS
Health Cloud is available inSalesforce Classic
Available in: Enterprise,Performance, andUnlimited Editions
Health Cloud supports the standard Salesforce data model. You can map clinical data from a sourceEHR system to Health Cloud objects and fields that hold patient and engagement data.
Patient and Individual Data ModelHealth Cloud uses the individual model to address the different roles a person can have in relationto an organization. In one context, an individual is a patient; in another, a caregiver; and in another,an employee. The Health Cloud patient and individual data model is based on a unified object viewconsisting of fields and attributes from two standard Salesforce business objects: Account andContact. Both objects are a part of the standard Salesforce data model, and within Health Cloudthey are connected through a common field: Individual ID. When a patient is created in the system, both an account and acontact record are created and linked through the Individual ID field.
The Account object supports the transactions through the Case object to manage the care plan, its tasks, and the care team that supportsthe patient. The Contact object supports the communication between the patient, the coordinator, and the care team when Communitiesis enabled.
1

All patient-specific information, including patient medical records, is tied to the account record. Because the contact record doesn’tcontain clinical information, a patient can collaborate with the external care team without them seeing the patient’s medical records.Together, the account and contact records comprise the information that supports the patient, and are connected to the care plan, EHRdata, and the members of the entire care team.
Health Cloud uses the following standard and custom objects to manage patient data.
• Account—In Health Cloud, the account record represents people instead of a business or an organization. Through the individualrecord type, it is also linked to the contact records. Accounts supports the transactions that occur related to the patient. So not onlyis the patient contact record connected through the Individual ID, but the contacts and users that represent caregivers or externalhealthcare providers are associated with the account through the patient care plan (case record).
• Contact—In the Salesforce data model, contacts are the people associated with the patient, such as family members and specialistswho are outside of your organization. A contact must be related to an account. When you set up and use Salesforce Communities,the Contact object supports communication within the private patient community. Care team members are added as either externalcontacts without community access or as community users and contacts, which gives them community access.
• User—Health Cloud includes internal Salesforce users and community users. Each user type has different access to records andfunctions. Internal users have access to patient data, when granted. Community users don’t have access to patient data.
• Case Team Member—The Case Team Membership object represents a patient care team member who is part of the team thatworks on tasks in the patient’s care plan. In Health Cloud, care team members can be family members and healthcare providers fromoutside of your organization. They can also be internal Salesforce users, like the primary care physician. When Salesforce Communitiesis enabled, care team members with access to the community use Case Feed to collaborate around the patient and the care plan.Care team members who are only contacts can’t log in to Salesforce, so they don’t have access to Chatter in the case feed or to thepatient care plan.
• Case Team Role—The Case Team Role object represents a role for a member of the patient care team, such as Caregiver orPhysiotherapist. Care coordinators assign roles when they add a member to the private patient community. The case team role alsocontrols access to the case and the care plan, and controls visibility of the user in the community.
2
Get to Know the Health Cloud Data ModelWelcome to Health Cloud

• Case— In Health Cloud, the care plan is associated with the case record. The case permission controls access to the elements of thecare plan, to the care team (Case Team), and to the communication within the patient’s community. All care team members areassociated with the patient’s contact record through the Case object.
• Problems—Each care plan has a list of clinical or non-clinical health issues that must be addressed. The conditions, problems,concerns, and diagnoses that are managed and mitigated by this plan are represented in the Care Plan Problem custom object.
• Goals—Represents the intended objectives of carrying out a care plan.
• Task—Represents an activity, such as making a phone call, completing a survey, attending a medical appointment, or other to-doitems. Tasks can be directly related to a goal on the care plan, or they can be unrelated to a specific problem or goal.
• EHR Clinical Data Objects—The custom objects that hold patient data that comes from the EHR system of record. For example,EhrCondition__c represents detailed information about conditions, problems, and diagnoses recognized by a clinician.
Clinical Data ModelClinical data that comes from EHR or other clinical systems is critical to the planning, execution, and management of coordinated careplans for patients. Clinical data can be integrated with Salesforce using several standard APIs, to map messages from EHR systems intoHealth Cloud objects and fields. These objects and fields closely resemble the HL7® FHIR® standard.
Because the Health Cloud clinical data model is similar to FHIR® standard, it enables easier and more straightforward clinical dataintegration from other source systems. When devising an implementation strategy, you or your integration partner map messages fromthe EHR system to the correct Health Cloud object. Data is replicated into the clinical data model with read-only access. Data thatoriginates in the EHR or other clinical systems, Health Cloud is view-only, so the source system remains the system of record.
You can take a deep dive into the Health Cloud data model by using Schema Builder. Schema Builder provides details, such as the fieldvalues, required fields, and how objects are related, by displaying lookup and master-detail relationships. You can view the fields andrelationships for both standard and custom objects. Schema Builder is enabled by default and lets you add the following to your schema:
• Custom objects
• Lookup relationships
• Master-detail relationships
• All custom fields, except geolocation
To access Schema Builder, from Setup, enter schema in the Quick Find box.
3
Get to Know the Health Cloud Data ModelWelcome to Health Cloud

LET'S GET STARTED
The Big Picture for Setting Up Health Cloud
EDITIONS
Health Cloud is available inSalesforce Classic
Available in: Enterprise,Performance, andUnlimited Editions
It’s time to get rolling! This guide shows you how to quickly set up the Health Cloud console thatlets care coordinators manage their patients and provide excellent care.
Health Cloud is a managed package, installed on top of Salesforce Enterprise Edition, Performance,or Unlimited editions.
Note: Salesforce Communities provides the collaboration support for Health Cloud. Someof the collaborative features aren’t available until you enable Salesforce Communities andcreate a private patient community.
1. Verify that the Shared Contacts feature is enabled.
2. Install the Health Cloud managed package from the AppExchange.
3. Define a domain name.
4. Optionally, set up your patient community.
5. Configure the System Administrator profile on page 8.
6. Create profiles and assign permission sets for internal users and for care team members.
7. Control user access with profiles.
8. Assign record types to profiles.
9. Set field access with permission sets.
10. Control access to patient lists.
11. Create roles for care team members.
12. Set up Salesforce Knowledge so that you can use it to create protocols for care coordinators and educational articles for patientsand community users.
To set up Salesforce Knowledge, you need to:
a. Enable Knowledge users in your organization.
b. Create the article types that are used for protocols and educational articles.
c. Enable Salesforce Knowledge.
d. Enable the Knowledge articles widget so that articles can be accessed from the console.
e. Create the different content types that care coordinators and community members will use.
13. Customize the Health Cloud Apps.
Note: Make sure to assign the Health Cloud - Admin app to the user profile of the Health Cloud admin.
4

Verify That Shared Contacts is Enabled
The Shared Contacts feature must be enabled to support the Health Cloud data model.
1. From Setup, enter Accounts in the Quick Find box.
2. Verify that the Setup menu under Accounts includes Contact Roles on Accounts and Contact Relationships.
If you see the options, then Shared Contacts is enabled in your org.
3. If you don’t see these items, enter Account Settings in the Quick Find box, then select Account Settings.
4. If Enable Sharing Contacts with Multiple Accounts is not selected, enable it.
If the checkbox is selected, try disabling it, and then reselect it.
5. Then check the Setup menu again for Contact Roles on Account and Contact Relationships.
Install the Health Cloud Package in Your Org
EDITIONS
Health Cloud is available inSalesforce Classic
Available in: Enterprise,Performance, andUnlimited Editions
USER PERMISSIONS
To install packages:• “Download
AppExchangePackages”
Install the Health Cloud managed package in your org so that you can begin implementing HealthCloud for your care coordinators.
1. Log into your org as a system administrator.
2. Paste the URL for the Health Cloud package into the browser navigation bar and press Enter.
3. Enter the password you received from Salesforce.
4. Click Install. You’ll see a message that describes the progress and a confirmation message afterthe installation is complete.
Define Your Health Cloud Domain Name
Sign up for your organization’s custom domain name.
Start setting up your custom domain name by finding a domain name unique to your organizationand signing up for it.
1. From Setup, enter My Domain in the Quick Find box, then select My Domain.
5
Verify That Shared Contacts is EnabledLet's Get Started

2. Enter the subdomain name you want to use within the sample URL. For example, a company called Universal Containers wants touse the subdomain universalcontainers. The company’s login URL would behttps://universalcontainers.my.salesforce.com/. You can use up to 40 characters.
You can’t use these reserved words for subdomains:
• www
• salesforce
• heroku
And, you can’t start the domain name with:
• root
• status
3. Click Check Availability. If your name is already taken, choose a different one.
4. Click Terms and Conditions to review your agreement, then select the checkbox.
5. Click Register Domain.
6. You receive an email when your domain name is ready for testing. (It can take from 30 seconds to 24 hours.)
Your domain isn’t rolled out until you’ve tested and deployed it.
SEE ALSO:
Salesforce Help: Test and Deploy Your New Domain Name
Switch On Salesforce Communities (Optional)
If you’re extending the Health Cloud console with Communities, the first step in setting up a private community is to flip the switch toenable Salesforce Communities.
Note: Salesforce Communities provides the collaboration support for Health Cloud. Some of the collaborative features aren’tavailable until you enable Salesforce Communities and create a private patient community.
Salesforce Communities lets care coordinators, patients, and care team members collaborate in the private community. Although allHealth Cloud users share the same Community, access to information is restricted through the security that surrounds each individualcare plan. So a patient can only see information or communication related to his or her specific care plan.
Note: Once you enable Communities, you can’t turn it off.
1. From Setup, enter Communities Settings in the Quick Find box, then select Communities Settings.
2. Select Enable Communities.
3. Enter a unique value to use as your domain name. Click Check Availability to make sure it’s not being used by someone else.
It’s a good idea to use something recognizable to your users, such as your company name. Although the domain name is the samefor all communities, you create a unique URL for each community during the creation process.
Note: Keep in mind that you can’t change the domain name after you save it. You’ll have to call Salesforce to change it.
4. Click Save, and make sure you click OK on the confirmation message page to enable the community.
For more information on setting up communities, see Getting Started with Salesforce Communities.
6
Switch On Salesforce Communities (Optional)Let's Get Started

Community Setup OverviewThe private patient community is the heart of collaborative patient care. Communities provide care coordinators, physicians, patients,and caregivers an easy way to interact with each other whenever and wherever they are. You can set up private patient communityusing Salesforce Community Builder with the Napili template.
This topic provides a high-level outline of the steps needed to get your community up and running. Refer to the following guides forthe detailed steps to get your community launched in no time at all.
• Using Templates to Build Communities
• Getting Started with Communities
Note: Remember that external care team members require at least a Customer Community Plus license to become communitymembers and collaborate around the patient care plan.
Health Cloud SetupPerform the following steps when setting up Health Cloud in the Salesforce Setup menu:
• Create a Health Cloud Community user profile.
To update the profile from Setup, enter Profile in the Quick Find box, then select Profiles. Clone the existing CustomerCommunity Plus user profile and modify it, as needed. Add Read access to Accounts, Contacts, Solutions, Cases, Documents, Problems,and Goals. Update field level security to make all fields visible for Problems and Goals. Verify that the Chatter tab is enabled.
• Create a Health Cloud Admin profile.
Add the Patient Card Configuration tab to the profile.
• Create users.
When you create community users manually, assign your Health Cloud Community profile to them and clear the Salesforce1 checkbox.
• Configure sharing settings for cases.
To update the setting from Setup, enter Sharing in the Quick Find box, then select Sharing Settings. Make sure that youselect Enable External Sharing Model and set external case sharing to Private. That way, users can collaborate only with the careteams they are members of. Care plan access is restricted by membership in the community, as well.
• Update the CommunityProfileName custom setting with the value Health Cloud - Community.
From Setup, enter Custom in the Quick Find box, then select Custom Settings. Click Manage next to CommunityProfileName,and then click New to add the name and the value for the community.
Community SetupPerform the following setup tasks from the Community node in Setup:
• Select the Napili template.
In the Community Creation wizard, select the Napili template to start building your community. Napili is powerful, responsivetemplate that gives users the same visual and functional experience whether they use a tablet, a mobile device, or their desktop.
• Enable the global header.
The global header lets users switch between their communities and the internal organization. Users must be assigned the “ViewGlobal Header” permission either by selecting it on standard profiles, creating custom profiles, or by creating a permission set.
• Customize community properties.
From the Community Management page, select Administration > Members to customize the properties of the community.
7
Community Setup OverviewLet's Get Started

• Enable private messages.
From the Community Management page, select Administration > Preferences to customize the properties of the community.
Community BuilderPerform the following setup tasks using Community Builder. From Setup, enter All Communities in the Quick Find box,then select All Communities. Then click Manage next to the community name.
• Brand your community.
Add your logo and use Community Builder’s enhanced Branding Editor to efficiently apply color and style to your community.
• Edit community pages and components.
Remove unwanted default pages from the Napili template and create more pages, as needed. Make sure to update the navigationmenu to access the new pages you create.
• Update component properties.
Review and update the properties for the User Profile Header, the Search Publisher, and any other components that you use.
• Configure page layouts.
Configure page layouts in the Page Editor for objects using the Record Information component.
• Preview, test, and publish your community.
Take a look at your community in a desktop browser window and on mobile devices. When you’re happy with your changes, clickPublish in the toolbar to publish your changes.
Configure the Health Cloud Admin Profile
To be able to set up the Health Cloud, the System Administrator must make a few additions to the Health Cloud Admin profile.
Note: If the System Administrator needs access to features in the Health Cloud console, these items must be included in thatprofile, as well.
1. From Setup, enter Profiles in the Quick Find box, then select Profiles.
2. Select the Health Cloud Admin profile.
3. Add or enable the following items for the profile.
NameProfile Page Section
Account, Case, Contact, and TaskPage Layouts
Account: Business, Household, Individual (Default)Record Types
Cases: CarePlan
Contacts: Business, Individual (Default)
Tasks: Care Plan Task
“Customize Application” and “Manage Translation”Administrative Permissions
Note: Manage Translation only appears in the profileafter you enable the translation workbench.
8
Configure the Health Cloud Admin ProfileLet's Get Started

4. Click Save.
SEE ALSO:
Salesforce Help: Assign Record Types to Profiles in the Original Profile User Interface
Salesforce Help: Enable and Disable the Translation Workbench
Configure the Health Cloud Profile
Assign the required record types to the Health Cloud profile.
1. From Setup, enter Profiles in the Quick Find box, then select Profiles.
2. Select the Health Cloud profile.
3. Click Edit.
4. Scroll to the Record Type Settings section and add the following record types to the profile.
Record TypeRecord
Business, Household, Individual (Default)Accounts
CarePlan (Default)Cases
Individual (Default)Contacts
Care Plan Task (Default)Task
5. Click Save.
SEE ALSO:
Salesforce Help: Assign Record Types to Profiles in the Original Profile User Interface
Add New Internal Users
You can add internal Salesforce users one at a time or in batches of up to 10 users.
1. From Setup, enter Users in the Quick Find box, then select Users.
2. Click New User to add a single user or click Multiple Users to add up to 10 users at a time.
3. If multiple user license types are available in your organization, select the user license to associate with the users you plan to create.
The user license determines the available profiles.
4. Specify the information for each user, including Role and Profile.
Users who need access to the Health Cloud must have Service Cloud User enabled. If you’re using Salesforce Knowledgearticles to manage protocols, enable Knowledge User for every user needing access to articles.
9
Configure the Health Cloud ProfileLet's Get Started
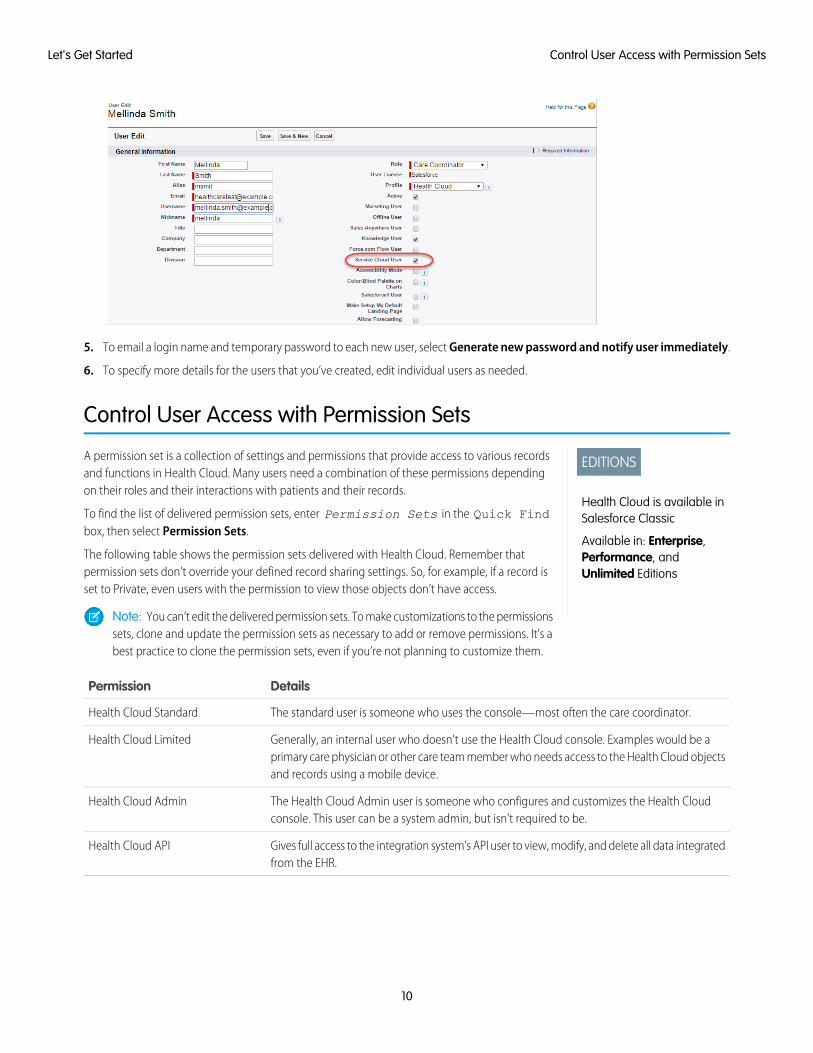
5. To email a login name and temporary password to each new user, select Generate new password and notify user immediately.
6. To specify more details for the users that you’ve created, edit individual users as needed.
Control User Access with Permission Sets
EDITIONS
Health Cloud is available inSalesforce Classic
Available in: Enterprise,Performance, andUnlimited Editions
A permission set is a collection of settings and permissions that provide access to various recordsand functions in Health Cloud. Many users need a combination of these permissions dependingon their roles and their interactions with patients and their records.
To find the list of delivered permission sets, enter Permission Sets in the Quick Findbox, then select Permission Sets.
The following table shows the permission sets delivered with Health Cloud. Remember thatpermission sets don’t override your defined record sharing settings. So, for example, if a record isset to Private, even users with the permission to view those objects don’t have access.
Note: You can’t edit the delivered permission sets. To make customizations to the permissionssets, clone and update the permission sets as necessary to add or remove permissions. It’s abest practice to clone the permission sets, even if you’re not planning to customize them.
DetailsPermission
The standard user is someone who uses the console—most often the care coordinator.Health Cloud Standard
Generally, an internal user who doesn’t use the Health Cloud console. Examples would be aprimary care physician or other care team member who needs access to the Health Cloud objectsand records using a mobile device.
Health Cloud Limited
The Health Cloud Admin user is someone who configures and customizes the Health Cloudconsole. This user can be a system admin, but isn’t required to be.
Health Cloud Admin
Gives full access to the integration system’s API user to view, modify, and delete all data integratedfrom the EHR.
Health Cloud API
10
Control User Access with Permission SetsLet's Get Started

Example: The following samples show permission set assignments a typical organization might use:
FunctionPermissionUser
Because they are responsible for creating and managing care plans,care coordinators can view and update the care plan and associatedrecords, including problems and goals.
Health Cloud StandardCare Coordinator
Generally, the primary care physician uses the source EHR to create andmodify patient records, read-only access to the records in the console
Health Cloud LimitedPrimary Care Physician
is sufficient. In this organization, the physician isn’t making updates tothe care plan but requests changes through the care coordinator.
Nurses play various roles in different organizations. In someorganizations, nurses establish relationships with patients and caregivers
Health Cloud Standard orHealth CloudLimited
Nurse
to increase the likelihood that the patient stay on the care planestablished by the doctor. If nurses work with the care coordinators tocreate problems and goals in the care plan, they can also update records,which would require Health Cloud Standard permissions.
In other organizations, nurses use the source electronic health systemto create and modify patient records, and don’t create items in the careplan. So read-only access to the console is sufficient, which only requiresHealth Cloud Limited permissions.
The person who sets up and customizes Health Cloud, needs access toalmost everything. Whether the person in this role is a system
Health Cloud AdminSystem Administrator orCare CoordinatorSupervisor administrator or someone who manages care coordinators, they need
to modify the application to make it useful for the way your organizationworks.
The integration system needs full access to the API user to view, modify,and delete all data.
EHR Integration APIIntegration System
Set Field Access Using Permission Sets
Field permissions specify the access level for each field in an object. Health Cloud comes with four preconfigured permission sets thatyou can clone and customize to meet your needs.
1. Enter Permission Sets in the Quick Find box, then select Permission Sets.
2. Find the permission set you want to customize, and click Clone.
Note: The default Health Cloud permission sets can’t be edited. To make changes, clone the permission set and then makeyour changes.
3. Enter a new label and description for the cloned permission set.
4. Select the permission set that you’re working on.
5. In the Apps section, click Object Settings.
11
Set Field Access Using Permission SetsLet's Get Started

6. In the Find Settings... box, enter the name of the object you want and select it from the list. Click Edit, then scroll to the FieldPermissions section
7. Make sure that the following fields have Edit permission:
Field LabelObject
Accounts • Account Name
• Care Plan
• Source System ID
• Individual ID
• Source System Id
• Primary Contact
• Record Type
• Account Owner
Contacts • Name
• Birthdate
• Mailing Address
• Source System Id
• Phone
Tasks • Name
• Public
• Related To
• Due Date
• Goal
• Problem
• Priority
• Recurrence Interval
• Repeate This Task
• Status
• Task Type
• Task Subtype
• Task Record Type
Cases • Status
• Priority
• Contact Name
• Account Name
• Status
• Priority
12
Set Field Access Using Permission SetsLet's Get Started
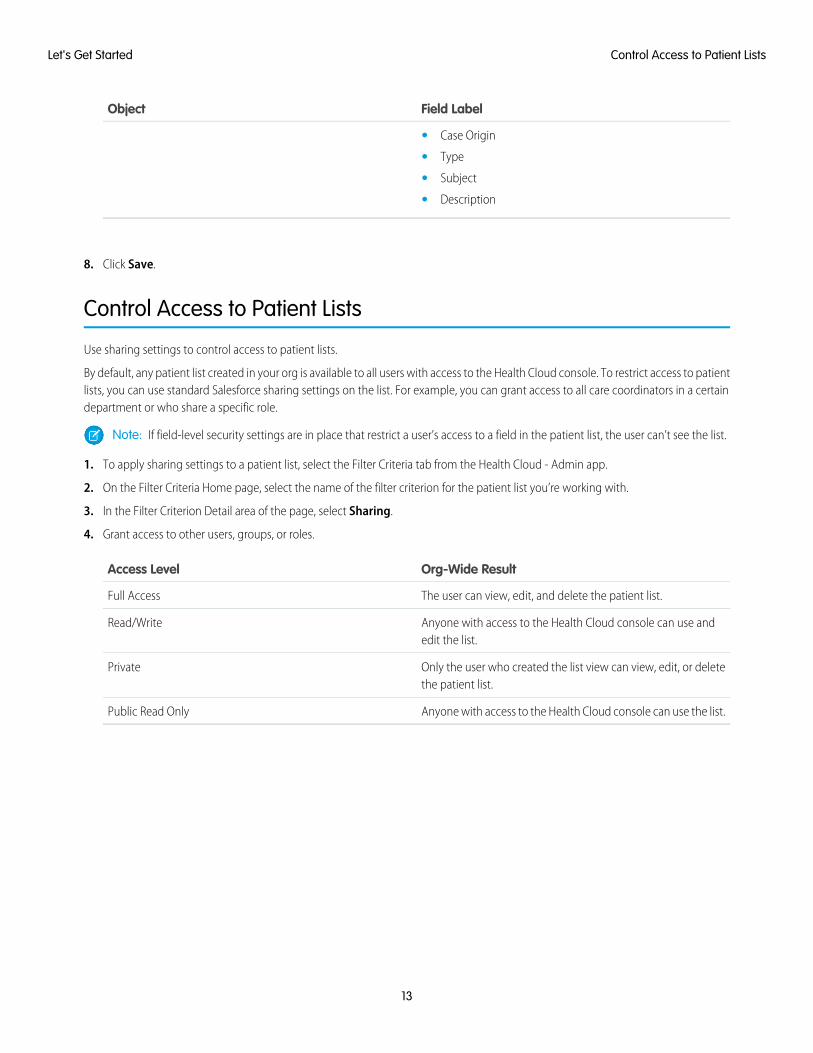
Field LabelObject
• Case Origin
• Type
• Subject
• Description
8. Click Save.
Control Access to Patient Lists
Use sharing settings to control access to patient lists.
By default, any patient list created in your org is available to all users with access to the Health Cloud console. To restrict access to patientlists, you can use standard Salesforce sharing settings on the list. For example, you can grant access to all care coordinators in a certaindepartment or who share a specific role.
Note: If field-level security settings are in place that restrict a user’s access to a field in the patient list, the user can’t see the list.
1. To apply sharing settings to a patient list, select the Filter Criteria tab from the Health Cloud - Admin app.
2. On the Filter Criteria Home page, select the name of the filter criterion for the patient list you’re working with.
3. In the Filter Criterion Detail area of the page, select Sharing.
4. Grant access to other users, groups, or roles.
Org-Wide ResultAccess Level
The user can view, edit, and delete the patient list.Full Access
Anyone with access to the Health Cloud console can use andedit the list.
Read/Write
Only the user who created the list view can view, edit, or deletethe patient list.
Private
Anyone with access to the Health Cloud console can use the list.Public Read Only
13
Control Access to Patient ListsLet's Get Started

SEE ALSO:
Salesforce Help: Sharing Settings
Control User Access with Profiles
The delivered Health Cloud profiles define how users access objects and data, and what they can do within the application.
The delivered Health Cloud profiles can’t be modified, but can be cloned and edited to meet your organization’s needs. You can findthe list of profiles by entering Profile in the Quick Find box, then select Profiles.
Note: If you create a custom Health Cloud profile for your org, make sure that the Account Name field in the Account objectis set to Visible and that the Read Only checkbox isn’t selected.
DetailsPermission
This profile is for someone who uses the console—most often the care coordinator.Health Cloud
This profile is for users who don’t have access to the console and are members of the carecommunity.
Health Cloud Community
The Health Cloud Admin user is someone who configures and customizes the Health Cloudconsole. This user can be a system admin, but isn’t required to be.
Health Cloud Admin
SEE ALSO:
Salesforce Help: Clone Profiles
14
Control User Access with ProfilesLet's Get Started

Create Roles for Care Team Members
EDITIONS
Health Cloud is available inSalesforce Classic
Available in: Enterprise,Performance, andUnlimited Editions
USER PERMISSIONS
To set up case teams forcare teams:• “Customize Application”
AND
“Manage Users”
To add team members:• “Edit” on cases
Care team member roles define the access that members have to information in the care plan.
Note: Salesforce Communities provides the collaboration support for Health Cloud. Someof the collaborative features aren’t available until you enable Salesforce Communities andcreate a private patient community.
Every member has a unique role to play in caring for the patient, such as primary care physician,caregiver, or case manager. Roles determine access to patient information, like read only or read/writeaccess.
Note: Salesforce offers a user role hierarchy that you can use together with sharing settingsto determine the levels of access users have to your organization’s data. Roles within thehierarchy affect access on key components like records and reports. Unlike standard Salesforceroles, the access you provide with care team roles applies only to Case records. When aninternal user who is a member of the care team already has a standard Salesforce role, theyretain access that comes with their standard role.
When you set up roles for care team membership, you can include internal users who are alreadyin your organization, and external contacts. (Contacts are the people associated with the patientsuch as family members or specialists outside of your organization.) For each contact, you can storevarious kinds of information, such as phone numbers, addresses, titles, and roles. In addition, ifyou’ve set up Communities, you can make the contact a community user and add them to thepatient community. That way, they can see the care plan and collaborate in the feed, if given access.
1. From Setup, enter Case Team Roles in the Quick Find box, then select Case Team Roles.
2. Click New.
3. Enter a name for the role.
Note: At a minimum, create one role entitled Care Coordinator and one role entitled Patient.
4. From the Case Access picklist, select the role's level of access to cases. The possible access levels are:
DescriptionAccess Level
User can view and edit the record and add associated records,notes, and attachments to it.
Read/Write
User can view the record and add associated records to it. Theuser can’t edit the record or add notes or attachments.
Read Only
User can’t access the record.Private
5. Click Save. Alternatively, click Save & New to save the role and begin creating another role.
6. Select Visible in Customer Portal to make care team members with this role visible to community members.
SEE ALSO:
Salesforce Help: Create Case Team Roles
15
Create Roles for Care Team MembersLet's Get Started

Provide Easy Access to Protocols and Articles
Salesforce Knowledge lets you easily create and manage content and make it available to other healthcare professionals and to thepatient and care team members.
An article can contain the protocols you use to manage conditions or can hold educational materials you send to patients. When youset up Salesforce Knowledge, you give your care coordinators access to your organization’s library of articles and protocols. After youset up Salesforce Knowledge in your organization, users with Knowledge licenses can write, edit, publish, and archive articles using theArticles Management tab or find and view published articles using the Articles tab.
By setting up the Knowledge One widget, you give care coordinators the ability to search, send, and create articles, all without leavingthe Health Cloud console. Make sure that you’ve added Knowledge One to all the profiles that have access to the console.
Using the Knowledge One widget, articles can be accessed from the console footer, care coordinators can:
• Search for and find relevant articles or protocols
• Attach a published article to a care plan in one click
• Email an article as a PDF, if shared on a public channel
• Create and manage articles, when the user has permission and the correct license.
16
Provide Easy Access to Protocols and ArticlesLet's Get Started

Enable Knowledge Users
EDITIONS
Health Cloud is available inSalesforce Classic
Available in: Enterprise,Performance, andUnlimited Editions
USER PERMISSIONS
To set up SalesforceKnowledge, and createarticle types:• “Customize Application”
AND “ManageSalesforce Knowledge”
Before you can set up all the great features of Salesforce Knowledge, make sure that you’re aSalesforce Knowledge user.
1. From My Settings, select Personal Settings, enter Advanced User Details in theQuick Find box, then select Advanced User Details.
2. Click Edit.
3. Select Knowledge User.
4. Click Save.
Create Article Types
EDITIONS
Health Cloud is available inSalesforce Classic
Available in: Enterprise,Performance, andUnlimited Editions
USER PERMISSIONS
To create, edit, or deletearticle types:• “Customize Application”
AND “ManageSalesforce Knowledge”
Articles types are the first step in creating the articles used to display protocols. An article typedefines the structure and the types of content an author can add to an article or a protocol.
Health Cloud uses the power of Salesforce Knowledge to let you author and manage the articletypes that you use for protocols or educational articles.
Note: You can’t enable Salesforce Knowledge until at least one article type is created.
When creating the article that contains a protocol, the author begins by selecting an article type.Article types, such as protocols, FAQs, and tutorials, provide the format and structure to controlhow an article displays for each audience, known as a channel. For each article type you can createcustom fields, customize the layout by adding or removing sections and fields, and choose a templatefor each channel. You can also create workflow rules and approval processes to help yourorganization track and manage article creation and publication.
1. From Setup, enter Article Types in the Quick Find box, then select KnowledgeArticle Types.
2. Click New Article Type or edit an existing article type.
3. Enter the information for the following fields:
DescriptionField
A name used to refer to the article type in any user interfacepages.
Label
The plural name of the object. If you create a tab for this object,this name is used for the tab.
Plural Label
17
Enable Knowledge UsersLet's Get Started

DescriptionField
If it is appropriate for your organization’s default language, specifythe gender of the label. This field appears if the organization-wide
Gender
default language expects gender. Your personal languagepreference setting does not affect whether the field appears. Forexample, if the organization’s default language is English andyour personal language is French, you are not prompted forgender when creating an article type.
If it is appropriate for your organization’s default language, checkif your label must be preceded by "an" instead of "a".
Starts with a vowel sound
(Read only) A unique name used to refer to the article type whenusing the API. The Object Name field can contain only
Object Name
underscores and alphanumeric characters. It must be unique,begin with a letter, not include spaces, not end with anunderscore, and not contain two consecutive underscores.
An optional description of the article type. A meaningfuldescription helps you remember the differences between yourarticle types when you are viewing them in a list.
Description
(Optional) Select this option to track the full history of an articleand its versions. The system records and displays field updates,
Track Field History
publishing workflow events, and language versions for the masterarticle and any translations.
Indicates whether the article type is visible outside Setup. InDevelopment means that article managers can’t choose this
Deployment Status
article type when creating articles. Only select Deployed afteryou are done creating the article type.
4. Click Save.
5. In the Fields section of the Article Type definition, click New.
6. On the New Custom Field page, select Text Area (Rich).
The Rich Text Area field lets authors enter formatted text, add images, videos, and links. The fields hold up to 131,072 characters onseparate lines.
7. Click Next.
8. Enter a field label. The field name is populated based on the field label you enter. Ensure that the custom field name is not identicalto any standard field name for that object.
9. Enter any field attributes, such as Description, and click Next to continue.
10. Set the field-level security to determine whether the field is visible and editable or read only for specific profiles, and click Next.Field-level security allows you to control which fields are visible in different channels.
11. Ensure that the field Yes, add this custom field to the layout is selected so that the rich text field is includedin the page layout.
12. Click Save to finish or Save & New to create more custom fields.
18
Create Article TypesLet's Get Started
13. Optionally, rearrange your custom fields on the article-type layout.
Note: Don’t forget to grant article type permissions for each user profile needing access to protocols and articles.
Enable Salesforce Knowledge
EDITIONS
Health Cloud is available inSalesforce Classic
Available in: Enterprise,Performance, andUnlimited Editions
USER PERMISSIONS
To enable SalesforceKnowledge:• “Customize Application”
Before you can set up Knowledge, you must enable it in the organization.
1. From Setup, enter Knowledge in the Quick Find box, then select Knowledge Settings.
2. Confirm that you understand the impact of enabling Salesforce Knowledge and click EnableSalesforce Knowledge and click OK in the dialog box.
3. Click Edit to select your general settings.
a. Select Allow users to create and edit articles from theArticles tab to enable care coordinators and internal users to edit articles withoutgoing to the Article Management tab.
b. Select Activate Validation Status field to add a Validation Status fieldto all articles.
This way, users can attach approved articles to questions instead of ones that haven’t gonethrough an approval process.
c. Select Allow users to add external multimedia content to HTMLin the standard editor to allow <iframe> elements in the standard editor toembed multimedia content from Dailymotion, Vimeo, and YouTube.
4. Select Internal App and Customer to show article summaries to customers and internal community members in the articlelist view.
5. Accept the default settings for Knowledge One options.
6. Choose the Default Knowledge Base Language. This is the language your authors will use to write most of the articles. Werecommend that your default knowledge base language and your organization's language be the same.
Note: Current multi-language users can still use Communities. The Salesforce Help provides more details on multi-languageorganizations.
7. Select Single Language.
8. Optionally, select Allow users to create an article from a case to let users create a draft article that isattached to the case.
9. Select the option to let users with correct privileges use the standard editor when they create articles. This lets them add links,formatting, and videos to articles.
10. Select a default article type.
11. Optionally, select the options to use profiles to create PDF files on cases and for users to share articles with public URLs.
12. Optinally, select the option to Allow agents to create an article from a reply.
This lets users turn a particularly helpful answer into an article.
a. Select the default article type.
b. Select an internal user to assign the article to so that it can be evaluated for accuracy.
13. Skip the steps to set up Chatter Questions and Knowledge Statistics.
19
Enable Salesforce KnowledgeLet's Get Started

14. Click Save.
For more information on setting up Salesforce Knowledge, see the Salesforce Knowledge Implementation Guide or search the SalesforceHelp.
Create Protocols and Articles
EDITIONS
Health Cloud is available inSalesforce Classic
Available in: Enterprise,Performance, andUnlimited Editions
USER PERMISSIONS
To create articles:• “Manage Articles”
AND
“Create” and “Read” onthe article type
To edit draft articles:• “Manage Articles”
AND
“Read” and “Edit” on thearticle type
To edit published orarchived articles:• “Manage Articles”
AND
“Create,” “Read,” and“Edit” on the article type
Salesforce Knowledge lets you easily create and manage content and make it available to otherhealthcare professionals and to the patient and care team members. An article can contain theprotocols you use to manage conditions or can hold educational materials you send to patients.You can write, edit, publish, and archive articles using the Articles Management tab or find andview published articles using the Articles tab.
Authors create articles by selecting an article type, writing content, and selecting where it shouldbe published. You create both articles and protocols from the Article Management tab, but youselect a different article type depending on the content you want to create.
Note: It’s possible that not everyone in your organization will have the license type orpermissions to create articles and protocols for your patients and care coordinators. Contactyour Salesforce administrator for access to the Article Management tab.
1. On the Article Management tab, click New.
2. If your organization supports multiple languages, choose the language for the article.
3. Choose an article type, enter the article title, and click OK.
4. Edit the article's fields, and select a validation status. If your article contains a rich text area field,you can add some formatting such as bulleted lists, links, and images.
5. Optionally, if your organization uses data categories, select the categories to associate withyour article:
• Click Edit next to a category group to open the category selection dialog box.
• In the Available Categories list, expand the category hierarchy to select acategory.
• Click Add to move a selected category to the Selected Categories list.
Note: You can’t add both a category and its child categories to the SelectedCategories list. When you add a category to an article:
– Child categories in the Available Categories list are unavailable unlessyou remove the parent from the Selected Categories list.
– Child categories in the Selected Categories list disappear from that list.
Users searching for articles can find them by selecting an exact category or by selectinga parent or child category.
• Click OK.
6. Select the audience you want to publish the article to:
• Internal App: Salesforce communities users can access articles in the Articles tab depending on their role visibility.
• Customer: Customers can access articles if the Articles tab is available in a community.. Customer users inherit the role visibilityof the manager on the account. In a community, the article is available only to users with Customer Community licenses orCustomer Community Plus licenses.
20
Create Protocols and ArticlesLet's Get Started

• Partner: Partners can access articles if the Articles tab is available in a community. Partner users inherit the role visibility of themanager on the account. In a community, the article is available only to users with Partner Community licenses.
• Public Knowledge Base: Articles can be made available to anonymous users by creating a public knowledge base using theSample Public Knowledge Base for Salesforce Knowledge app from the AppExchange.
• Your own website. Articles can be made available to users through your company website.
7. Click Quick Save to save your changes and remain on this page. Alternatively, click Save to save your changes, close the article, andgo to the Article Management tab.
8. Click Publish... when the content is ready to be published.
9. Select Publish article(s) now or Schedule publication on to choose the date to publish the article.
10. If the article has previously been published, select the Flag as new version checkbox to make the new article icon ( )display next to your article in the selected channels. Users from these channels can see that this article has been modified since thelast time they’ve read it. This checkbox is not available when you publish an article for the first time, as the icon displays by defaultfor new articles.
11. Click OK.
Articles you scheduled for publication at a later date continue to appear in the Draft Articles filter, now with the pending icon ( )next to the article title. Hover over the icon to see the publication date.
SEE ALSO:
Salesforce Help: Publish Articles and Translations
Customize the Health Cloud Apps
EDITIONS
Health Cloud is available inSalesforce Classic
Available in: Enterprise,Performance, andUnlimited Editions
USER PERMISSIONS
To view apps:• “View Setup and
Configuration”
To manage apps:• “Customize Application”
You can change some of the properties of the Health Cloud Apps in your organization. For example,you can add the Knowledge widget so that care coordinators can see articles and protocols fromthe console footer. You can also do things like add your company’s logo, change the color of pageelements, and enable keyboard shortcuts in the Health Cloud console.
Note: Make sure to assign the Health Cloud - Admin app to the user profile of the HealthCloud admin.
1. From Setup, enter Apps in the Quick Find box, then select Apps.
2. Click Edit next to the app you want to modify.
Select Health Cloud - Admin, Health Cloud - Worklist, or HealthCloud - Console.
Note: The only modification that the Health Cloud - Admin app requires is to select thetabs you want to display as an admin.
The Today page is designed to be used in the Health Cloud - Console app only. Addingit to the Health Cloud - Worklist app will cause the Today page to display incorrectly.
3. Specify a label for the app. The label can have a maximum of 40 characters, including spaces.This label is the app’s name in the app menu.
4. Optionally, specify a custom logo for the app. Click Insert an image and choose an image file from the document library.
Consider these requirements when choosing a custom app logo from the document library:
21
Customize the Health Cloud AppsLet's Get Started
• The image must be in GIF or JPEG format and less than 20 KB.
• If the image is larger than 300 pixels wide by 55 pixels high, then it is scaled to fit.
• For the best on-screen display, we recommend that you use an image with a transparent background.
• The Externally Available checkbox must be selected on the document’s properties so that users can view the image.
5. Optionally, to change the color of the app’s page elements, enter the hex code beginning with #.
6. Ensure that Patients, Candidate Patients, and Today are selected as navigation tabs and that they’re configured todisplay as a primary tabs in the Choose How Records Display selection.
If you create your own custom apps, such as a Dashboards tab, select it to display in the Health Cloud app and configure how itdisplays in the console.
7. Optionally, select how the list is placed in the console.
8. In Choose Console Components, add Knowledge One to Selected Items.
When the Knowledge One widget is enabled, care coordinators can access articles and protocols from the console footer.
9. In Align Custom Console Component, choose whether the component appears in the footer’s right or left side.
10. To let care coordinators perform actions using key combinations instead of the mouse, click the Customize KeyboardShortcuts.
11. Make sure that Save User Sessions, Enable Multi-Monitor Components, Pin Tabs, and ResponsiveLists are all selected.
12. Select the Visible option for every profile that needs access to the app.
13. Select the Default box to set the app as that profile’s default app.
14. Click Save.
22
Customize the Health Cloud AppsLet's Get Started

CUSTOMIZE THE CARE CONSOLE
Health Cloud Custom Tabs
We’ve delivered a set of custom tabs to help you customize the Health Cloud Console to align with how your company works withpatients.
DescriptionTab Name
Cross-object relationships control which objects and fields appearin the filter selection options when creating patient lists.
Cross Object Relationships
These tables contain data from the source record system relatedto things like prescriptions, conditions, patients, and immunizations.
EHR Custom Objects
(EHR Patients, EHR Encounters, and so on)
Edit the patient card view to add or remove information from EHRor other records.
Patient Card Configurations
Add or remove healthcare events from the timeline to provide carecoordinators with the information they need to be more effectivein managing patients.
Timeline View Configurations
Customize the Patient Card
You can add fields to the patient card and provide care coordinators with the information they need about a patient’s contact information,conditions, prescriptions, appointments, and other information from their medical records.
23
The patient card is made up of three different components:
• The patient card navigation menu (1) that lets care coordinators navigate to the pages they need without leaving the patient card.You can customize the items that appear in the tab navigation list on the patient card using custom settings. So you can add a newnavigation item to one of the default menu categories, or you can add a category with new child navigation options to what youalready have.
• The patient card header (2) that provides basic information on the patient as well as a thumbnail photo, if available.
The patient card header shows identification information for the patient. The following table shows the source of the informationthat is displayed for each patient. Fields from the patient card header aren’t available for editing or other customizations.
SourceField
Chatter profile photoThumbnail photo
Contact recordPatient name
Formula field based on fields from the contact recordDate of birth and age
Gender Label field on EHR Patient recordGender
• Patient contact and medical record fields (3) that you can add to the patient card. You can customize the patient card and add fieldsfrom the source record system so that care coordinators have the information they need to manage patients. Each field displays upto 200 characters, after which users can click Show More to expand the section and view the remaining text. There is no upperlimit to the number of fields you can add to the patient card, but we recommend no more than 15-20 fields to ensure optimalperformance.
24
Customize the Patient CardCustomize the Care Console
Add Items to the Patient Card Navigation Menu
EDITIONS
Health Cloud is available inSalesforce Classic
Available in: Enterprise,Performance, andUnlimited Editions
USER PERMISSIONS
To customize the patientcard navigation menu:• “Manage Profiles and
Permission Sets” AND“Customize Application”
You can make it quick and easy for care coordinators to navigate to the pages they need withoutleaving the patient card.
Care coordinators need quick access to the different tabs and pages that give a complete pictureof a patient’s records. You can configure the tab navigation menu on the patient card to openstandard and custom pages or URLs as either primary or secondary tabs. Clicking an item in themenu opens a new tab or subtab related to that patient’s records.
You can customize the items that appear in the tab navigation list on the patient card using custom settings. So you can add a newnavigation item to one of the default menu categories, or you can add a category with new child navigation options to what you alreadyhave. For example, you can create your own Visualforce page and add it to the navigation list or you can add a URL to another frequentlyused page.
Note: All navigation menu elements appear in alphabetical order. Categories are listed in alphabetical order, as are the subcategoriesbeneath them.
1. From Setup, enter Custom Settings in the Quick Find box, then select Custom Settings.
2. In the list of custom settings, click Manage next to the CardView Dropdown custom settings.
3. Click New and complete the following fields:
DetailsField
Description of the menu navigation item for internal purposes. This textdoesn’t appear on the menu or the page.
Menu Option Name
Name of the parent category that contains child menu navigation items.The category name is just a heading and isn’t a clickable navigation link.
Category Name
(Optional) Add more URL parameters to the existing Visualforce page orURL to open the new tab.
URL Parameter
Specify the type of tab to use for this page: Primary or Subtab. Aprimary tab is the main item to work on. A subtab is related to an itemon a primary tab.
Tab Type
25
Add Items to the Patient Card Navigation MenuCustomize the Care Console
DetailsField
Name of the child category in the menu list. This text is the clickable linkthat opens the page or tab.
Subcategory Name
Content type of the new page. Specify VFpage or URL.Page Type
Note: Make sure to add external URLs to the console’s whitelistso that console users can access that domain.
URL to access the page.URL
4. Click Save.
Example: The following example shows how to add a subtab entitled All Medical Records to a category namedMedical Records:
DetailsField
All Medical Data.Menu Option Name
Medical RecordCategory Name
Not necessaryURL Parameter
SubtabTab Type
All Medical RecordsSubcategory Name
VFpagePage Type
Note: Make sure to add external URLs to the console’s whitelistso that console users can access that domain.
/apex/<VF page name>URL
Whitelist Domains for Health Cloud ConsoleAdministrators can let console users access domains outside of Salesforce. For example, you can add www.example.com to aconsole’s whitelist so that console users can access that domain.
1. From Setup, enter Apps in the Quick Find box, then select Apps.
2. Select a console app.
3. Click Edit.
4. In Whitelist Domains, type the domains you want users to access, and separate multiple domains by commas. You don’tneed to add http:// or https:// because those are part of a URL, not a domain.
5. Click Save.
26
Add Items to the Patient Card Navigation MenuCustomize the Care Console

Add Fields to the Patient CardYou can edit the patient card view to add or remove information from EHR or other records.
Health Cloud delivers the patient card with the basic fields that care coordinators commonly use. But you can customize the patientcard and add fields from the source record system so that care coordinators have the information necessary to make informed decisionsand provide excellent patient care.
Each field displays up to 200 characters, after which users can click More to expand the section and view the remaining text. There isno upper limit to the number of fields you can add to the patient card, but we recommend no more than 15-20 fields to ensure optimalperformance. You can add fields from objects that come from the custom EHR tables and other objects, as well. Be sure that the fieldsthat you’re adding to the patient card are related to the Account object.
Tip: Check the Schema Builder in your org if you’re unsure if an object is related to the Account object.
1. From the Health Cloud - Admin Home page, select the Patient Card Configuration tab, and click New.
2. Enter the following:
DescriptionField
Name of the patient card item you’re creating. This name appearsonly on setup pages.
Patient Card Configuration Name
Name of the object that contains the field to show on the patientcard. Use the exact spelling of the object name to ensure correctresults.
Object Name
Name of the field that contains the information to display on thepatient card.
Field Name
Name that appears as a title on the patient card.Friendly Name
Indicates the vertical order in which this field appears on thepatient card.
Sort Order
Enter the name of the field used to define the order in which theresults appear. For example, if you have several medication names
Sort By
27
Add Fields to the Patient CardCustomize the Care Console

DescriptionField
returned, you can sort them by the date prescribed to have themost recent prescriptions appear first in the field.
If you’re creating your own filter field to replace the deliveredone or to add a new field to the patient card, enter the name ofyour filter field.
Override Filter Field
Select to display results in ascending order. This field works inconjunction with the Sort By field.
Ascending
Select to activate this field and have it appear on the patient card.Active
Enter the maximum number of results to display in the field.Limit
Create a Custom Formula Field for the Patient CardYou can customize the information that appears on the patient card by adding a custom filter field to a specified object.
By default, the patient card shows fields that provide basic medical and contact information for the patient. To add other items to thepatient card or to change the information that displays from the delivered fields, create a custom formula field on the object you wantto display. For example, to display medical device information, create a custom field on the EHR_Devices object with a formula thatreturns the information you want to display on the patient card.
1. From Setup, enter Object in the Quick Find box, then select Objects.
2. Select the name of the custom object that holds the information you want to display on the patient card.
3. In the Custom Fields & Relationships section of the page, click New.
4. Select Formula as the data type and click Next.
5. Enter a field label that identifies the custom field.
6. Select Checkbox for the return type and click Next.
7. Create a formula that returns the results that you want to display on the patient card.
For instructions on using the Advanced Formula tab, search for Building Formulas in the Salesforce Help & Training.
Example: The following table shows the objects and fields used to display the default information on the patient card. Whenthere are multiple entries returned for an item, each value is separated by a vertical bar.
FieldObjectDescriptionDisplay Name
Mailing AddressContactPrimary addressAddress
Source System IDAccountPatient identifierPatient ID/MRN
IsVisibleOnPatientCardEHR Related PersonName of person responsible forthe patient.
Agent/Guardian/Guarantor
IsVisibleOnPatientCardEHR PatientPreferred languageLanguage
IsVisibleOnPatientCardEHR Medication PrescriptionName of current medications.Medications
28
Add Fields to the Patient CardCustomize the Care Console
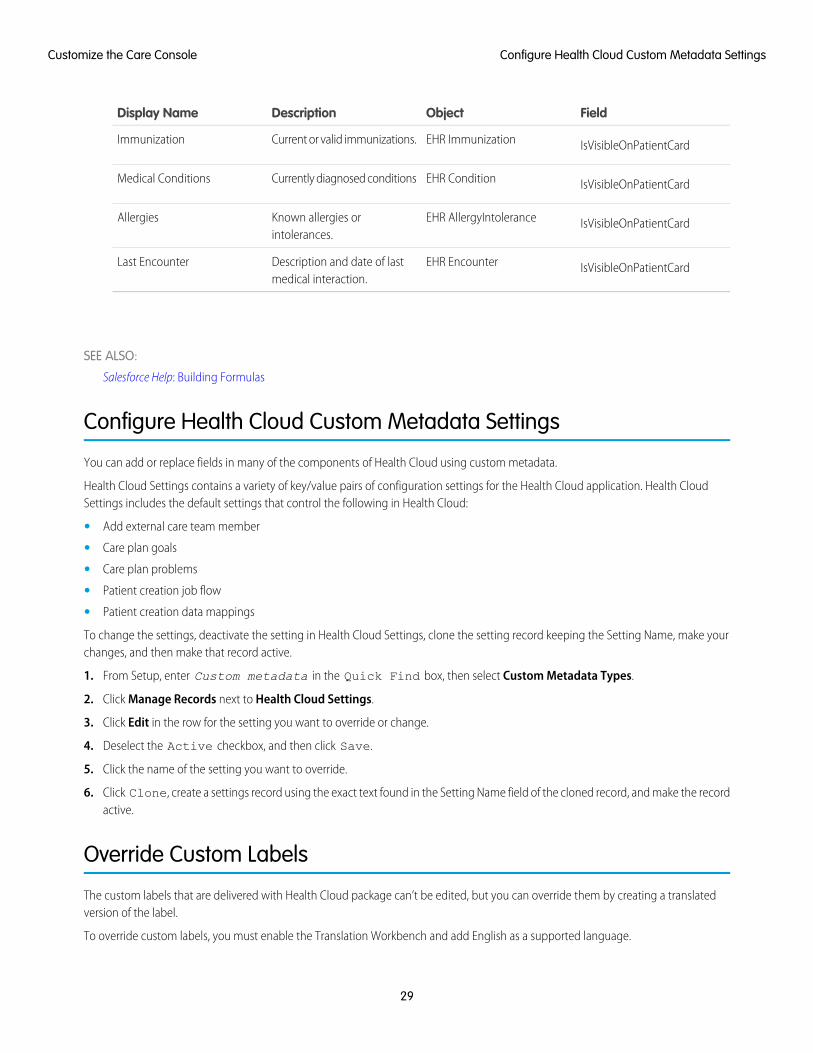
FieldObjectDescriptionDisplay Name
IsVisibleOnPatientCardEHR ImmunizationCurrent or valid immunizations.Immunization
IsVisibleOnPatientCardEHR ConditionCurrently diagnosed conditionsMedical Conditions
IsVisibleOnPatientCardEHR AllergyIntoleranceKnown allergies orintolerances.
Allergies
IsVisibleOnPatientCardEHR EncounterDescription and date of lastmedical interaction.
Last Encounter
SEE ALSO:
Salesforce Help: Building Formulas
Configure Health Cloud Custom Metadata Settings
You can add or replace fields in many of the components of Health Cloud using custom metadata.
Health Cloud Settings contains a variety of key/value pairs of configuration settings for the Health Cloud application. Health CloudSettings includes the default settings that control the following in Health Cloud:
• Add external care team member
• Care plan goals
• Care plan problems
• Patient creation job flow
• Patient creation data mappings
To change the settings, deactivate the setting in Health Cloud Settings, clone the setting record keeping the Setting Name, make yourchanges, and then make that record active.
1. From Setup, enter Custom metadata in the Quick Find box, then select Custom Metadata Types.
2. Click Manage Records next to Health Cloud Settings.
3. Click Edit in the row for the setting you want to override or change.
4. Deselect the Active checkbox, and then click Save.
5. Click the name of the setting you want to override.
6. Click Clone, create a settings record using the exact text found in the Setting Name field of the cloned record, and make the recordactive.
Override Custom Labels
The custom labels that are delivered with Health Cloud package can’t be edited, but you can override them by creating a translatedversion of the label.
To override custom labels, you must enable the Translation Workbench and add English as a supported language.
29
Configure Health Cloud Custom Metadata SettingsCustomize the Care Console
1. From Setup, enter Custom Labels in the Quick Find box, then select Custom Labels.
2. Select the name of the custom label to open.
3. In the Translations related list, click New to override the existing label by creating a new translation.
4. Select the language you are translating into. Since Health Cloud is currently not localized, select English.
5. Enter the Translation Text. This text overrides the value specified in the label’s Value field.
SEE ALSO:
Salesforce Help: Enable and Disable the Translation Workbench
Customize Problems and Goals
EDITIONS
Health Cloud is available inSalesforce Classic
Available in: Enterprise,Performance, andUnlimited Editions
With fields sets, you can add custom fields or change the order of existing fields on the pages usedto create problems and goals.
Note: The delivered problem and goal pages make use of a packaged field set, which letsyou choose the fields and the order in which fields appear on these pages. The deliveredpages aren’t available for edit through the page layout editor.
Customize the fields that show up on the pages care coordinators use to create problems and goalsfor the care plan. Problems and Goals are both custom objects, and you can add custom groupingsof fields by leveraging Salesforce field sets. A field set is a grouping of fields you create and thenadd to an object.
After you create the field sets, you add them to the default field set for that object in the Custom Labels page. For example, to add fieldsto the Problems page, you modify the defaultFieldSet for Problems.
1. From Setup, enter Object in the Quick Find box, then select Objects, and select either the Problem custom object or theGoal custom object.
2. From the management settings for the appropriate object, go to Field Sets, and then click New.
3. Enter a Field Set Label. This is the name presented to subscribers who install the field through a managed package.
4. Optionally, enter a name for your field set.
5. In the Where is this used? area, provide a brief description of which pages use the field set, and for what purpose. This informationhelps a subscriber understand where and how an installed field set is being used, so that they can populate it with their own fields
6. Save your changes.
7. To add fields to the field set, drag the fields from the object palette and drop them into the Available for the FieldSet or the In the Field Set container. The fields in the In the Field Set container are visible by default.
Note: In the field set, you can span to fields that reference multiple objects. When you span a field into a field set that referencesmultiple objects, the only field you can span to is the Name object.
You can drag and drop a field from one container to the other. The vertical order of the In the Field Set list indicates theorder of how the fields render on pages.
8. To remove a field from the field set, drag the element back to the object palette, or click the icon next to the element.
9. To make a field required, double-click the element or click the wrench icon ( ) next to it and select the Required checkbox.
Note: Indicates the field is required and must have a value to save the record.
30
Customize Problems and GoalsCustomize the Care Console

Enable Custom Fields SetsAfter you create custom field sets, make sure to add them to the related default custom label component.
You can edit existing custom labels for goals and problems to add custom field sets or you can create entirely new default labels forproblems and goals.
1. From Setup, enter Custom Label in the Quick Find box and select Custom Labels.
2. Click New Custom Label to create a label, or click Edit next to the custom label that you want to edit.
• To add custom field sets to goals, select the goalDefaultFieldSet custom label.
• To add custom field sets to problems, select the problemDefaultFieldSet custom label.
3. In the Value field, enter the name of the custom field set you want to use in the component.
4. Click Save.
Customize Tasks
Customize the fields on the New Task page so that the field values reflect the kinds of tasks care coordinators most often assign, and userating terminology specific to your organization.
You can add to or change the values for the following picklists on the New Task page:
• Status
• Priority
• Task Type
Add Custom Task Types
EDITIONS
Health Cloud is available inSalesforce Classic
Available in: Enterprise,Performance, andUnlimited Editions
USER PERMISSIONS
To create or change customfields:• “Customize Application”
Custom task types help your care coordinators create tasks that are specific to the type of patientcare that they deliver. For example, for an outpatient orthopedic surgery center, task types couldinclude Pre-Op Lab Work or Weekly PT.
Plan carefully when you create task types so that there aren’t a large number of choices in thepicklist.
31
Enable Custom Fields SetsCustomize the Care Console

1. From Setup, enter Activity Custom Fields in the Quick Find box.
2. Click Task Type.
3. In the Picklist Values section, click New.
4. Add one or more picklist values in the text box. Put each value on its own line
5. Select Care Plan Task so that the new values are associated with the Task Type picklist.
6. Click Save.
7. To change the order in which the values display in the picklist, click Reorder.
8. To specify a default value for the picklist, select the Default checkbox for that task type.
Add or Edit Task Priority ValuesYou can change the values that appear in the Status field that shows the progress or measures the completion of a task.
1. From Setup, enter Task in the Quick Find box and select Task Fields.
2. In the Task Standard Fields list, click Priority.
3. To add a value to the list, click New.
4. Add one or more picklist values in the text box. Put each value on its own line
5. Select Care Plan Task so that the new values are associated with the care plan.
6. Click Save.
7. To change the order in which the values display in the picklist, click Reorder.
8. To specify a default value for the picklist, select the Default checkbox for that priority.
9. Select the value that represents the highest priority for the task.
Add or Edit Task Status ValuesYou can change the values that appear in the Status field that shows the progress or measures the completion of a task.
1. From Setup, enter Task in the Quick Find box and select Task Fields.
2. In the Task Standard Fields list, click Status.
3. To add a value to the list, click New.
4. Add one or more picklist values in the text box. Put each value on its own line
5. Select Care Plan Task so that the new values are associated with the care plan.
6. Click Save.
7. To change the order in which the values display in the picklist, click Reorder.
8. To specify a default value for the picklist, select the Default checkbox for that status.
9. To select a value that closes the task, select the Closed checkbox for that status.
Customize the Create External Member Fields
You can customize the fields that appear on the modal that care coordinators use to create an external care team member.
Use field sets to add new fields or change the order of existing fields used to create external care team members.
32
Add or Edit Task Priority ValuesCustomize the Care Console

1. From Setup, enter Accounts in the Quick Find box, then select Field Sets.
2. Select Edit next to the New External Member field set.
3. Drag and drop the fields you want to display on the New External member modal.
Note: You can only add fields from Account and the related primary contact. Fields from other related objects will be ignored.
4. Click Save.
Customize the Candidate Patient List View
You can customize the fields that appear on the list view that care coordinators use to convert candidate patients to patients in HealthCloud.
Use field sets to add new fields or change the order of existing fields used in the candidate patient list view.
1. From Setup, enter Objects in the Quick Find box, then select Objects.
2. On the Custom Object page, select the Candidate Patient custom object.
3. Scroll to the Field Sets section and click Edit next to the Candidate Patient List View.
4. Drag and drop the fields you want to display on the Candidate Patients list view.
Note: The following fields must be included in the field set and should not be deleted:
• Record ID (Id)
• Name (Name__c)
• Patient Account (AccountId__c)
• Patient Account Name (AccountId__r.Name)
• Patient Account Primary Contact (AccountId__r.PrimaryContact__c)
5. Click Save.
Configure the Timeline View
EDITIONS
Health Cloud is available inSalesforce Classic
Available in: Enterprise,Performance, andUnlimited Editions
You can add or remove healthcare events from the timeline view to provide your care coordinatorswith precisely the information they need to be more effective in managing their patients.
On the Timeline View Configurations tab, add different events to the timeline by exposing fieldson custom or standard object, and then selecting icons to represent the data on the timeline.
1. From the Health Cloud - Admin Home page, select the Timeline View Configurations tab, andclick New.
2. Enter the following:
DescriptionField
Name of the timeline event. This nameappears only on setup pages.
Timeline View ConfigurationName
Name of the category of objects that thisevent is related to. Use this field to create a
Object Category
33
Customize the Candidate Patient List ViewCustomize the Care Console

DescriptionField
group of events. This name appears in the Select All Events menuin the timeline. By default, all pre-configured objects are eitherEngagement Data or Medical Record Data.
Name that appears in the timeline for the event.Friendly Name
Name of the object that contains the field that is shown in thetimeline. Use the exact spelling of the object to ensure correctresults—for example, EhrMedicationPrescription__c.
Object Name
Name of the field to display as an event in the timeline.Detail Field
Date field that the system uses to position the event horizontallyon the correct date on the timeline.
Position Field
Name of the image file that represents the event on the timeline.Upload the image file to the Health Cloud Assets folder in theDocuments tab.
Graphical Icon
Note: For images to display with the best results in thetimeline, they must be within the recommended file andframe size. The recommended file size is up to 1 MB.Salesforce scales the image to roughly 48 x 48 pixels, sosmaller images, and images with an aspect ratio of 1:1(square) provide the best results.
Indicates the vertical order that the events appear if the timelinehas more than one event on the same date.
Sort Order
Example: For example, to display prescriptions, use the EhrMedicationPrescription__c object.
DescriptionField
PrescriptionsTimeline View Configuration Name
Medical DataObject Category
PrescriptionsFriendly Name
EhrMedicationPrescription__cObject Name
MedicationName__cDetail Field
DateWritten__cPosition Field
timeline_icon_pill_pngGraphical Icon
2Sort Order
34
Configure the Timeline ViewCustomize the Care Console

Upload Timeline View Icons
EDITIONS
Health Cloud is available inSalesforce Classic
Available in: Enterprise,Performance, andUnlimited Editions
USER PERMISSIONS
To upload new documents:• “Create” on documents
When you add information from custom objects or fields to the timeline view, make sure to includean icon for the timeline that lets care coordinators understand the type of event that’s represented.
Note: For images to display with the best results in the timeline, they must be within therecommended file and frame size. The recommended file size is up to 1 MB. Salesforce scalesthe image to roughly 48 x 48 pixels, so smaller images, and images with an aspect ratio of1:1 (square) provide the best results.
1. On the Documents tab, click New.
2. On the Upload New Document page, specify a descriptive document name for the image file.To use the file name, leave this field blank. The file name appears automatically when youupload the file.
3. Enter a unique name to be used by the API.
4. To have the image appear in the timeline, select Externally Available Image.
5. Select the Health Cloud Assets folder for the file.
6. Enter a description and keywords to use later as search criteria.
7. Select the option to upload the image file. Click Choose File, choose the file, and click Open.
8. Click Save.
Add Cross-Object Relationships to Customize Patient List Filter Options
Cross-object relationships control which objects and fields appear in the filter selection options when creating patient lists.
Health Cloud delivers a basic set of filters that you can use when you define a patient list. To add other custom records to the patientlist filter options, create relationships that link records with each other. When your users view records, they can also see related data.You can define different types of relationships by creating custom relationship fields between objects. For example, to add fields relatedto patient immunizations to the patient list filters, you create a relationship between Account and EhrImmunization__c.
Before creating relationships, determine which fields you want to expose in the filter and which object exposes those fields. Relationshipsbetween objects in Health Cloud determine sharing, required fields in page layouts, and which fields are available when you create apatient list.
Note: The Account object must be one of the two objects in your cross-object relationship.
To see a list of Health Cloud objects and fields, see the Health Cloud Object Reference Guide.
1. To create the relationship that adds a custom object to the patient list filter criteria, select the Cross Object Relationships tab.
2. Specify the details of the relationship:
DescriptionField
Name that describes the relationshipCross Object Relationship Name
Name of the parent objectFrom Object
Name of the child object to include as an option in patient listfilter criteria
To Object
Name of the custom relationshipRelationship
35
Upload Timeline View IconsCustomize the Care Console

DescriptionField
The name of the object that is the originating or “from” objectReverse Relationship
The following table shows the cross object relationships that are pre-configured with Health Cloud. You can use this table as a referenceto create other cross-object relationships and make more records and fields available when creating patient lists.
ReverseRelationship
RelationshipTo ObjectFromObject
Cross Object Relationship Name
AccountContacts_rContactAccountAccountToContact
AccountParentObservations__rEhrObservation__cAccountAccountToObservation
AccountEncounters__rEhrEncounter__cAccountAcountToEncounter
AccountMedicationPrescriptions__rEhrMedicationPrescription__cAccountAccountToEhrMedicationPrescriptions
AccountConditions__rEhrCondition__cAccountAccountToCondition
Dashboards Give Your Users Access to the Big Picture
Set up your reporting environment, use the report builder to create a basic report, and organize your reports to make it easy to findinformation. You can also find great dashboard apps on the Salesforce AppExchange and add them to the console.
People love the summarized views they get with dashboards, and you can help care coordinators optimize their workload with dashboards.A dashboard shows data from source reports as visual components, which can be charts, gauges, tables, metrics, or Visualforce pages.The components provide a snapshot of key metrics and performance indicators for your organization. Each dashboard can have up to20 components.
You can start with a standard report and customize it to your needs. Users can report on any data they have read or read/write accessto.
For a fun and engaging learning experience, check out the Reports & Dashboards module in the Trailhead Admin Beginner trail.
To save you time, there are many apps available on the AppExchange that you can download and customize. The following sampledashboard was created using the Salesforce Labs Service & Support Dashboards. Search the AppExchange to find the best app for yourneeds.
36
Dashboards Give Your Users Access to the Big PictureCustomize the Care Console

Once you create your dashboard, remember to add it to the console so that care coordinators can use the tab switcher to access thedashboard. From Setup, enter Apps in the Quick Find box, then select Apps. Select the Health Cloud app you want to customizeand then add it as a navigation tab item.
37
Dashboards Give Your Users Access to the Big PictureCustomize the Care Console
CREATE PATIENTS
A Behind-the-Scenes Look at Patient Creation
When you select a patient name from the EHR system, Salesforce creates all the records and objects you need to start managing thatpatient.
Each time you create a patient, Salesforce performs the following actions:
• Creates the patient as an individual, based on the fields you’ve mapped from the EHR system. An individual is an object view of bothAccount and Contact, linked by the Individual ID.
• Creates an account for the individual. The account is linked to the patient ID/MRN field.
• Creates a contact record for the individual. The contact record is linked to the account through the Individual ID.
• Creates a case with a CarePlan record type so that the page layout for the care plan appears automatically. If a care coordinator hasbeen selected, the coordinator becomes the owner of the case.
• Adds the case that represents the care plan to the account record.
• Creates a case team with the individual as the patient, and adds the care coordinator, if one has been selected.
• When a care coordinator is selected, the system adds a task for the care coordinator to create a care plan for the patient.
• Adds the patient’s account ID to the Candidate Patient record.
Create Patients from Imported Records
Create patients using the information you receive through the integration with an electronic medical records system.
Watch a Demo: Create Patients in the Health Cloud Console
The frequency with which you create patients largely depends on how your organization chooses to integrate back-end systems likethe EHR with Health Cloud.
The Candidate Patients pages show all the records that have been brought into Salesforce through integration with an EHR system.There are several options available for viewing these records:
• All shows all patients that have been brought over from the source records system, including those patients who haven’t beenconverted to Health Cloud patients yet. For patients who have already been converted, you can click their Candidate Patient Recordand view their patient data in the Health Cloud console. For those patients who haven’t been converted, click their Patient Nameto view the information waiting to be brought into a Health Cloud patient record.
• Not Converted contains records that have been brought over from the source records system, but have not been converted to aHealth Cloud patient record.
• Converted shows the records that have been successfully converted into Health Cloud patient records. This list can be used as apin list in the console when the console primary tabs are open.
When you select a record to convert to a patient, the system does all the behind-the-scenes setup for that individual, in addition tocreating:
• A patient card that includes the MRN or other identifiers, basic contact information, and important medical information such asconditions and medications
• An empty care plan
38
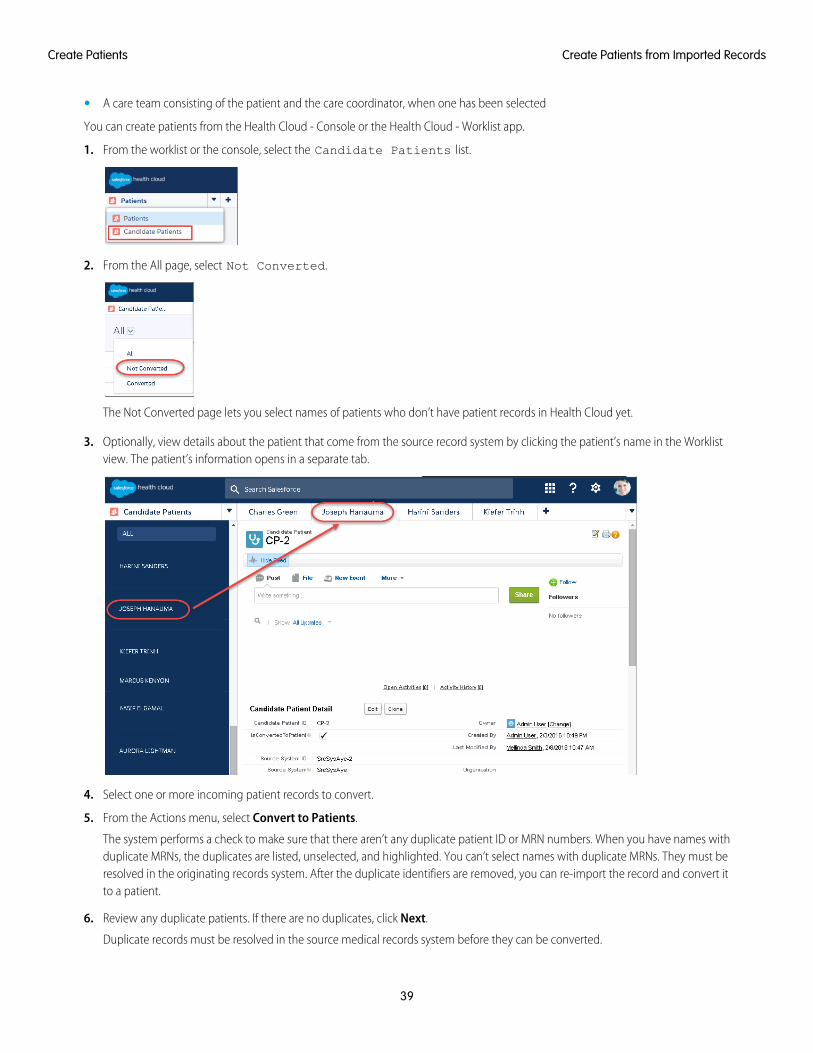
• A care team consisting of the patient and the care coordinator, when one has been selected
You can create patients from the Health Cloud - Console or the Health Cloud - Worklist app.
1. From the worklist or the console, select the Candidate Patients list.
2. From the All page, select Not Converted.
The Not Converted page lets you select names of patients who don’t have patient records in Health Cloud yet.
3. Optionally, view details about the patient that come from the source record system by clicking the patient’s name in the Worklistview. The patient’s information opens in a separate tab.
4. Select one or more incoming patient records to convert.
5. From the Actions menu, select Convert to Patients.
The system performs a check to make sure that there aren’t any duplicate patient ID or MRN numbers. When you have names withduplicate MRNs, the duplicates are listed, unselected, and highlighted. You can’t select names with duplicate MRNs. They must beresolved in the originating records system. After the duplicate identifiers are removed, you can re-import the record and convert itto a patient.
6. Review any duplicate patients. If there are no duplicates, click Next.
Duplicate records must be resolved in the source medical records system before they can be converted.
39
Create Patients from Imported RecordsCreate Patients
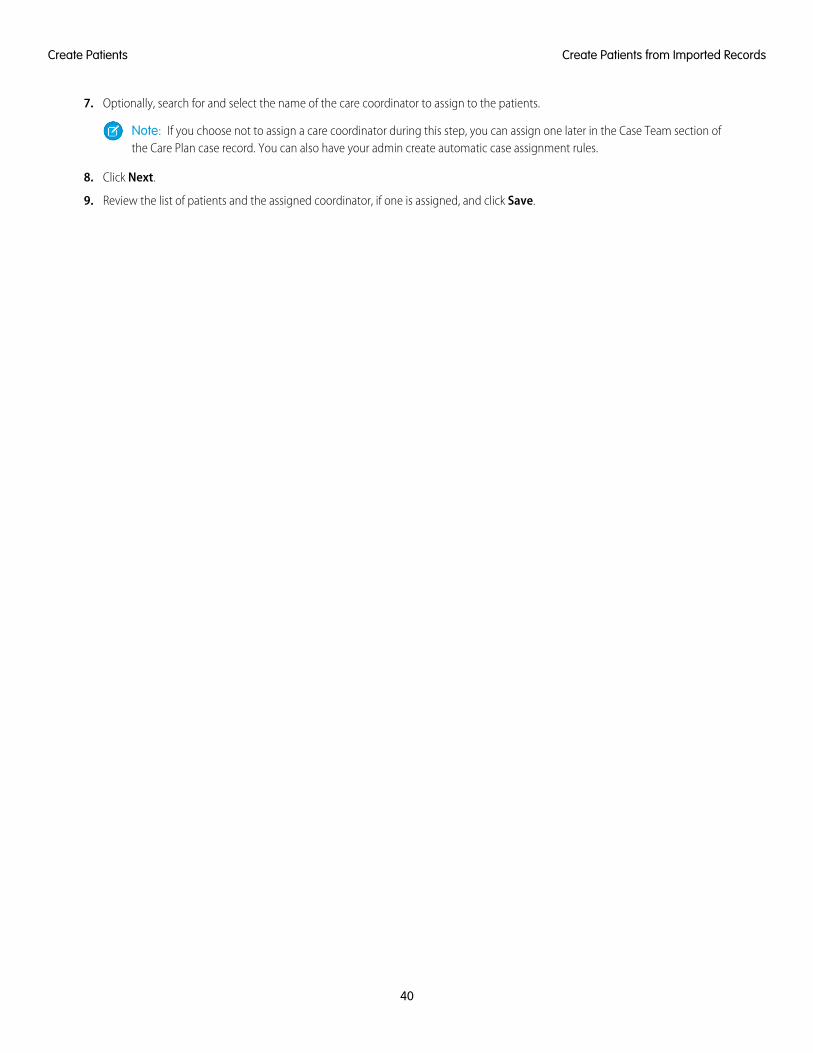
7. Optionally, search for and select the name of the care coordinator to assign to the patients.
Note: If you choose not to assign a care coordinator during this step, you can assign one later in the Case Team section ofthe Care Plan case record. You can also have your admin create automatic case assignment rules.
8. Click Next.
9. Review the list of patients and the assigned coordinator, if one is assigned, and click Save.
40
Create Patients from Imported RecordsCreate Patients

HEALTH CLOUD LIMITATIONS
EDITIONS
Health Cloud is available inSalesforce Classic
Available in: Enterprise,Performance, andUnlimited Editions
Learn about display, access, and customization limitations for Health Cloud.
Display LimitationsHealth Cloud is only available in Microsoft® Internet Explorer® 10, or 11; Microsoft® Edge; themost recent stable version of Mozilla® Firefox®; and the most recent stable version of GoogleChrome™.
Tip: For best performance, we recommend that console users adopt the Google Chrome™
browser and machines with 8 GB of RAM.
Platform EncryptionEvent monitoring and field encryption are not supported as part of Salesforce Shield.
Behavior and Access LimitationsHealth Cloud doesn’t meet accessibility requirements.
Clicking Edit in any of the Object Detail pages from within the console refreshes all tabs in the console.
In the Timeline, the Days to Show field can mistakenly show a negative number of days. Edit the field to show the correctnumber of days.
The After Occurrences option in recurring tasks isn’t supported.
When creating a recurring task, you must select a value in the Repeats On field or the task fails to be created.
When you add a task to the care plan, it doesn’t appear on the Timeline until you refresh the Timeline. Refresh the Timeline by clickingits refresh button or by select the Timeline from the Patient Card tab switcher.
When you add a task to the care plan, it doesn’t appear on the Today page until you refresh the Today page. You can refresh theToday page by refreshing your browser.
On the Today page, tasks with a status of Deferred appear as overdue tasks.
The patient thumbnail image in the care team and the patient card doesn’t display properly in Microsoft® Internet Explorer® 10.
You can’t create custom field sets for the Candidate Patient list view.
41

APPENDIX
Migrating More Data in the Patient Creation Job Flow
When patients are first imported into Health Cloud, the information required to identify and represent those patients is created. Historicalmedical information associated with patients is not imported into Health Cloud by default; however, you can choose to map morehistorical information, as needed. You can implement a custom integration to import historical medical records from the EHR systemand append it to the default patient creation job flow.
Patient Creation Job Flow in Health CloudEach patient is initially represented in Health Cloud as a candidate for services that are managed in Health Cloud. As a result, each patientstarts with a CandidatePatient__c record. When the candidate patient is converted, the patient creation process creates correspondingobjects in Salesforce:
• An account and contact representing a patient
• A case representing a care plan
• A care team (case team) linked to the care plan coordinator user and the patient contact
The data copied to the Salesforce objects is based on mapping of fields between CandidatePatient__c and the appropriate Salesforceobjects.
The candidate patient record (CandidatePatient__c) is a cross-reference between the representation of a patient in the EHR system andin Health Cloud. The records are linked through the medical record number, which is represented in Salesforce by theSourceSystemId__c external ID field.
The following diagram shows the patient creation job flow. This flow consists of two jobs that perform the steps that occur when acandidate patient record is converted. The third job (Invoke Patient EHR Migration) is a custom integration that you can implement tomigrate more data for that patient into Health Cloud.
42

Extend or Override the Default Patient Creation Job FlowBecause Health Cloud populates objects with minimal information when a patient is converted, you can add a custom integration toimport additional medical records. To migrate more data, append your custom integration as the last job in the patient creation jobflow. You can also deactivate either of the delivered jobs and add your own customized job instead. Or, you can override the entiredelivered job flow and instead use a custom job flow that you create.
Your custom integration consists of an Apex class that extends a base class and implements an interface from the Health Cloud package.The previous job passes your job relevant patient record information through a context parameter. By providing your own implementationfor this custom job, you can choose which patient records you want to migrate to Health Cloud. These are some examples of useful datamigrations after a candidate patient has been converted in Health Cloud.
• Import medical records for a patient from the EHR system, such as:
– The full patient record
– Encounters
– Conditions
– Observations
43
Migrating More Data in the Patient Creation Job FlowAppendix

– Diagnosis
– Treatments
• Flag EHR patient data to be published to Health Cloud if it is changed or created.
• Establish cross-references of patient records between Health Cloud and the EHR system. This cross-reference linkage enables postingdata back to the EHR system through another integration. For example, when one of the following records is created in Health Cloud,it can be updated in the EHR system later.
– Encounters: phone calls to the patient, emails, or Chatter messages
– Observations: Performed remotely by patient or caregivers, or performed by devices
Note: EHR systems can update only the records they create. If records were created in an external system and were migrated,they are viewable, but not editable in the current system.
Create a Custom Apex Class for the Patient Creation Job Flow
Create a custom Apex class that extends a base class and implements an interface from the Health Cloud package. The custom classoverrides the methods in the base class and the interface.
Your Apex class extends the HealthCloudGA.MoiJobFlowFactory.MoiJobBase base class and implements theHealthCloudGA.MoiJobFlowFactory.MoiIJob interface from the Health Cloud package. Your class signature looks asfollows:
public with sharing class InvokePatientDataMigrateextends HealthCloudGA.MoiJobFlowFactory.MoiJobBaseimplements HealthCloudGA.MoiJobFlowFactory.MoiIJob { }
Your class overrides the following methods, which are in the base class.
boolean processJob(HealthCloudGA.MoiJobFlowFactory.MoiIJobContext flowCtxts)Override this method to implement the logic of your data migration job that is part of the patient creation flow. In this method, youcall another method to make a callout to the external EHR system to get more medical records for the patient.
The patient creation job flow runs all the jobs as a single Apex transaction. Partial data changes aren’t saved if an error occurs becauseall changes are rolled back in that transaction. Any callouts must be invoked from a future method so that the data from the firsttwo jobs is saved even if the callout fails. Future methods are executed asynchronously, in the background. For example, this methodsignature represents the callout utility method in our sample.
@Future(callout=true)private static void invokeIntegration(String jsonPatientIds)
The type of the parameter passed to the processJob() method is theHealthCloudGA.MoiJobFlowFactory.MoiIJobContext class, installed from the Health Cloud package. The patientcreation job flow uses this context object to pass information about the created objects to the next job. The jobs for creating a patientpopulate this context object with the account and contact. Next, the job for creating the care plan accesses the objects in the contextto link the case (care plan record type) to CaseTeam members. You can use the objects in the context parameter to find out whichobjects have been created in Health Cloud and link them to the EHR system. The objects you can access from the flowCtxtsparameter are:
• Account
• Contact
• CandidatePatient__c
• Case (CarePlan record type)
44
Create a Custom Apex Class for the Patient Creation JobFlow
Appendix

You can obtain these objects by calling getContextData() on the flowCtxts parameter. The getContextData()method returns a list of maps. Each map corresponds to the context of one patient and contains the objects related to that patient.The map is keyed by the name of the object. For example, this snippet shows how to get the CandidatePatient__c object from areturned map object:
for (Map<String, Object> flowCtxt : flowCtxts.getContextData()) {HealthCloudGA__CandidatePatient__c candidatePatient =
(HealthCloudGA__CandidatePatient__c)flowCtxt.get('CandidatePatient__c'); }
HealthCloudGA.MoiJobFlowFactory.MoiIErrorHandler getErrorHandler()Override this method to add error handling logic when an exception is thrown from processJob(). This method returns aninstance of a class that performs error handling. The class performing the error handling must implement theHealthCloudGA.MoiJobFlowFactory.MoiIErrorHandler interface and override its method:
public void handleError(HealthCloudGA.MoiJobFlowFactory.MoiIJobContext context, Exceptione)
We’ve provided a sample Apex class that you can copy and modify to suit your needs. The implementation of the callout in theinvokeIntegration helper method is not provided and is left for you to provide. Details of how to communicate with the serviceendpoint and fetch data differs based on what you want to accomplish. For information about how to make callouts from Apex, seeInvoking Callouts Using Apex in the Force.com Apex Code Developer's Guide.
You can create an Apex class by using various tools. This walkthrough uses the Developer Console.
1. From Setup, click Your Name and then click Developer Console to open the Developer Console.
2. Click File > New > Apex Class.
3. Enter InvokePatientDataMigrate for the class name, and then press OK.
4. Delete the auto-generated content and paste the following sample.
public with sharing class InvokePatientDataMigrate extendsHealthCloudGA.MoiJobFlowFactory.MoiJobBase
implements HealthCloudGA.MoiJobFlowFactory.MoiIJob {
private static final String CTXTVAR_ACCOUNT = 'Account';private static final String CTXTVAR_CONTACT = 'Contact';private static final String CTXTVAR_CAREPLAN = 'CarePlan';private static final String CTXTVAR_CANDIDIATEPATIENT = 'CandidatePatient__c';
public with sharing class IntegrationErrorHandler implementsHealthCloudGA.MoiJobFlowFactory.MoiIErrorHandler {
public void handleError(HealthCloudGA.MoiJobFlowFactory.MoiIJobContext context,
Exception e) {// Code can be placed here to address the failureSystem.debug('Exception: '+e+' thrown on Job with context '+context);//No Exception
}}
public override HealthCloudGA.MoiJobFlowFactory.MoiIErrorHandler getErrorHandler(){
return (HealthCloudGA.MoiJobFlowFactory.MoiIErrorHandler)new IntegrationErrorHandler();
45
Create a Custom Apex Class for the Patient Creation JobFlow
Appendix
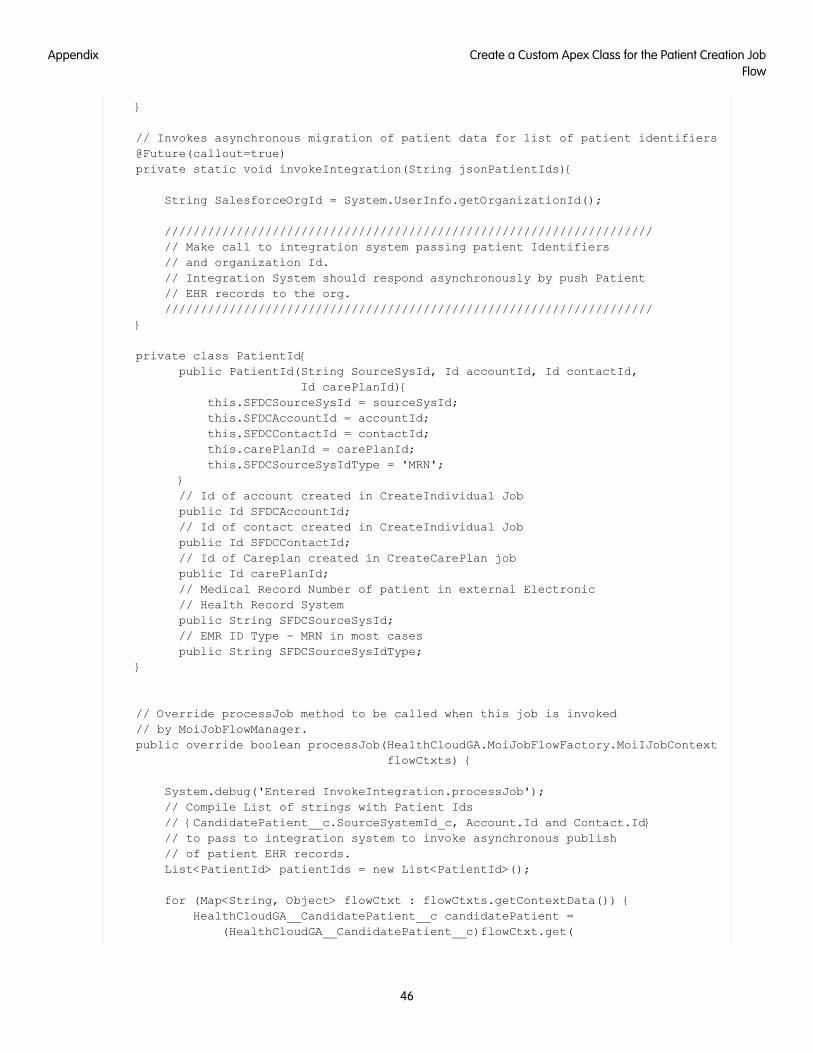
}
// Invokes asynchronous migration of patient data for list of patient identifiers@Future(callout=true)private static void invokeIntegration(String jsonPatientIds){
String SalesforceOrgId = System.UserInfo.getOrganizationId();
////////////////////////////////////////////////////////////////////// Make call to integration system passing patient Identifiers// and organization Id.// Integration System should respond asynchronously by push Patient// EHR records to the org.////////////////////////////////////////////////////////////////////
}
private class PatientId{public PatientId(String SourceSysId, Id accountId, Id contactId,
Id carePlanId){this.SFDCSourceSysId = sourceSysId;this.SFDCAccountId = accountId;this.SFDCContactId = contactId;this.carePlanId = carePlanId;this.SFDCSourceSysIdType = 'MRN';
}// Id of account created in CreateIndividual Jobpublic Id SFDCAccountId;// Id of contact created in CreateIndividual Jobpublic Id SFDCContactId;// Id of Careplan created in CreateCarePlan jobpublic Id carePlanId;// Medical Record Number of patient in external Electronic// Health Record Systempublic String SFDCSourceSysId;// EMR ID Type - MRN in most casespublic String SFDCSourceSysIdType;
}
// Override processJob method to be called when this job is invoked// by MoiJobFlowManager.public override boolean processJob(HealthCloudGA.MoiJobFlowFactory.MoiIJobContext
flowCtxts) {
System.debug('Entered InvokeIntegration.processJob');// Compile List of strings with Patient Ids// {CandidatePatient__c.SourceSystemId_c, Account.Id and Contact.Id}// to pass to integration system to invoke asynchronous publish// of patient EHR records.List<PatientId> patientIds = new List<PatientId>();
for (Map<String, Object> flowCtxt : flowCtxts.getContextData()) {HealthCloudGA__CandidatePatient__c candidatePatient =
(HealthCloudGA__CandidatePatient__c)flowCtxt.get(
46
Create a Custom Apex Class for the Patient Creation JobFlow
Appendix

CTXTVAR_CANDIDIATEPATIENT);if (candidatePatient == null ||
candidatePatient.HealthCloudGA__SourceSystemId__c == '')throw new IntegrationException(
'Failure: No CandidatePatient record set. ' + candidatePatient);
patientIds.add(new PatientId(candidatePatient.HealthCloudGA__SourceSystemId__c,
((Account)flowCtxt.get(CTXTVAR_ACCOUNT)).Id,((Contact)flowCtxt.get(CTXTVAR_CONTACT)).Id,((Case)flowCtxt.get(CTXTVAR_CAREPLAN)).Id)
);}/* for Flow Ctxts (on for each patient in creation flow */
System.debug('Calling future method InvokeIntegration('+patientIds+')');invokeIntegration(JSON.serializePretty(patientIds));return true;
} // processJob()
class IntegrationException extends Exception{}} //class InvokePatientDataMigrate
5. Click File > Save.
Register a Remote Site — Before the callout in this integration can be made, the service endpoint must be registered as a remote sitein Salesforce. To register the remote site:
1. From Setup, enter Remote Site Settings in the Quick Find box, then select Remote Site Settings.
2. Click New Remote Site.
3. Enter a descriptive term for the Remote Site Name. For example, ClinicalIntegrationEndPoint.
4. Enter the URL for the remote site.
5. Optionally, enter a description of the site.
6. Click Save.
Customize the Patient Conversion Process
Patient creation includes two processes: a job flow that creates the patients and then a mapping group that maps data from the CandidatePatient object to other patient objects.
The settings that control these processes are available for customization so that you can control how patient creation and data mappingoccur in your org. From Setup, enter Custom metadata in the Quick Find box, then select Custom Metadata Types.
47
Customize the Patient Conversion ProcessAppendix

• Health Cloud Setting (1) contains the configuration values for processes like the job flow that creates patients.
• Job Flow Data Mapping (2) holds the rules that determine which fields from the Candidate Patient object get mapped to patientobjects like Account, Contact, and Case.
• Job Flow Setting (3) contains the actual job flows that execute in the patient creation process.
You can customize the delivered patient creation job flow by creating your own custom Apex class and adding your own job, changingthe order in which the jobs run, or overriding the job entirely and using your own job flow. You can also change which fields are mappedduring patient creation.
Health Cloud SettingsHealth Cloud Settings contains a variety of key/value pairs of configuration settings for the Health Cloud application. This includes thetwo default settings that control which flow to use when creating patients. PatientCreateFlow_default controls which jobflow to use when creating patients and PatientCreateMappingGroup__default controls which group of mappings is used.You can deactivate either of these records and create your own patient creation flow or mapping group.
When creating your own job flows, you must rename the Setting Name and Setting Value fields. For readability, it’s helpfulto make the object name and label of Health Cloud Setting record be a combination of the setting name and something about the newvalue. For example, you can rename PatientCreateFlow_default to PatientCreateFlow_mynewflow.
To learn more about overriding one of the Health Cloud job settings, see Configure Health Cloud Custom Metadata Settings.
Patient Creation and Data Mapping Job FlowsYou can also add new steps to the patient creation job flow or add new mappings to the data mapping process. To deactivate a step inthe job flow, deselect the Active field for the record.
Override the Health Cloud Job FlowsYou can override either of the delivered jobs in the default patient creation job flow and use your own custom job to create patients orto map patient data from the source record system.
You can deactivate the delivered jobs and use your own custom job when you create and activate a new record with the same job flowname. Since you’re not deleting the delivered setting, you can reactivate it and use it in the future.
1. From Setup, enter Custom Metadata in the Quick Find box, then select Custom Metadata Types.
2. Click Health Cloud Setting, then click Manage Health Cloud Settings.
48
Override the Health Cloud Job FlowsAppendix
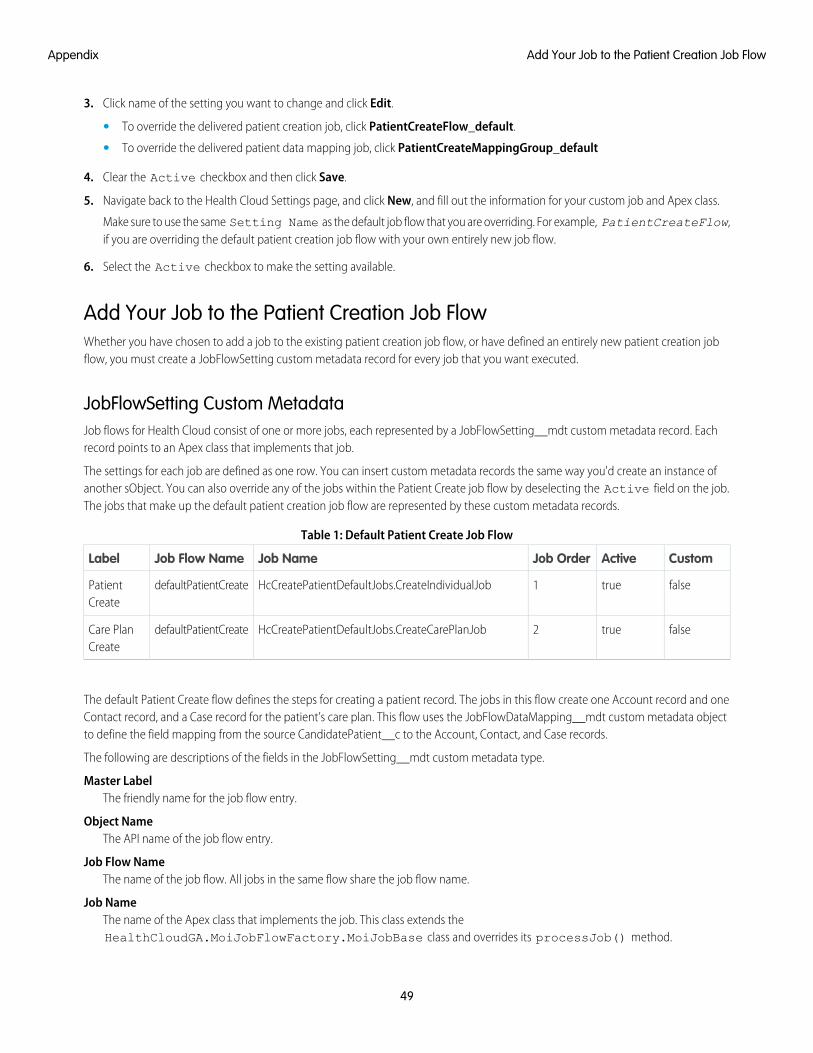
3. Click name of the setting you want to change and click Edit.
• To override the delivered patient creation job, click PatientCreateFlow_default.
• To override the delivered patient data mapping job, click PatientCreateMappingGroup_default
4. Clear the Active checkbox and then click Save.
5. Navigate back to the Health Cloud Settings page, and click New, and fill out the information for your custom job and Apex class.
Make sure to use the same Setting Name as the default job flow that you are overriding. For example, PatientCreateFlow,if you are overriding the default patient creation job flow with your own entirely new job flow.
6. Select the Active checkbox to make the setting available.
Add Your Job to the Patient Creation Job FlowWhether you have chosen to add a job to the existing patient creation job flow, or have defined an entirely new patient creation jobflow, you must create a JobFlowSetting custom metadata record for every job that you want executed.
JobFlowSetting Custom MetadataJob flows for Health Cloud consist of one or more jobs, each represented by a JobFlowSetting__mdt custom metadata record. Eachrecord points to an Apex class that implements that job.
The settings for each job are defined as one row. You can insert custom metadata records the same way you'd create an instance ofanother sObject. You can also override any of the jobs within the Patient Create job flow by deselecting the Active field on the job.The jobs that make up the default patient creation job flow are represented by these custom metadata records.
Table 1: Default Patient Create Job Flow
CustomActiveJob OrderJob NameJob Flow NameLabel
falsetrue1HcCreatePatientDefaultJobs.CreateIndividualJobdefaultPatientCreatePatientCreate
falsetrue2HcCreatePatientDefaultJobs.CreateCarePlanJobdefaultPatientCreateCare PlanCreate
The default Patient Create flow defines the steps for creating a patient record. The jobs in this flow create one Account record and oneContact record, and a Case record for the patient’s care plan. This flow uses the JobFlowDataMapping__mdt custom metadata objectto define the field mapping from the source CandidatePatient__c to the Account, Contact, and Case records.
The following are descriptions of the fields in the JobFlowSetting__mdt custom metadata type.
Master LabelThe friendly name for the job flow entry.
Object NameThe API name of the job flow entry.
Job Flow NameThe name of the job flow. All jobs in the same flow share the job flow name.
Job NameThe name of the Apex class that implements the job. This class extends theHealthCloudGA.MoiJobFlowFactory.MoiJobBase class and overrides its processJob() method.
49
Add Your Job to the Patient Creation Job FlowAppendix

Job OrderAn integer number that specifies the order of the job in the job flow. Jobs in a job flow must have unique job order numbers, andtheir order must be linear.
ActiveIndicates whether the job is used (true) or not (false).
CustomFalse if provided by default in the Health Cloud package; otherwise true.
Protected ComponentSpecifies whether this Job Flow Setting component is hidden outside a managed package. This field is unchecked (false) in theHealth Cloud package as the component is accessible outside the package.
To register your custom integration job, insert a record to the JobFlowSetting__mdt custom metadata. To do so in the user interface:
Register Your Custom Integration Job1. From Setup, enter Custom Metadata Types in the Quick Find box, then select Custom Metadata Types.
2. Click Job Flow Setting, then click Manage Job Flows Settings.
3. Click New, and fill out the information for your custom job and Apex class, including the job flow name, job name, and order inwhich it runs.
4. Ensure that the Active and Custom checkboxes are checked.
5. Click Save.
For example, to register the sample class that’s provided, enter the following information.
1. For Master Label, enter Create Patient: Invoke Integration.
2. For Object Name, enter CreatePatientInvokeIntegration.
3. For Job Flow Name, enter defaultPatientCreate to append your job to the existing job flow.
4. For Job Name, enter the class name InvokePatientDataMigrate.
5. For Job Order, enter 3 to ensure that Health Cloud invokes this job after the second default job for patient creation.
6. Ensure that the Active and Custom checkboxes are checked.
7. Click Save.
Data Mapping to Health Cloud ObjectsWhen a patient is converted, Health Cloud copies patient data from CandidatePatient__c to the corresponding Account, Contact, andCase (CarePlan record type) objects. A mapping defines how patient data maps to the fields in the destination Salesforce objects. Thismapping is specified in the JobFlowDataMapping__mdt custom metadata object.
The following table shows the default mappings that are provided for CandidatePatient__c. These mappings can’t be changed or deleted.To change the mappings in your org, create another mapping group and specify in the Health Cloud Settings to use that mapping groupinstead of the default mappings.
Table 2: JobFlowDataMapping__mdt
TargetFieldTargetObjectSourceFieldSourceObjectMappingGroupName
SourceSystemId__cAccountSourceSystemId__cCandidatePatient__cdefaultPatientCreate
50
Data Mapping to Health Cloud ObjectsAppendix
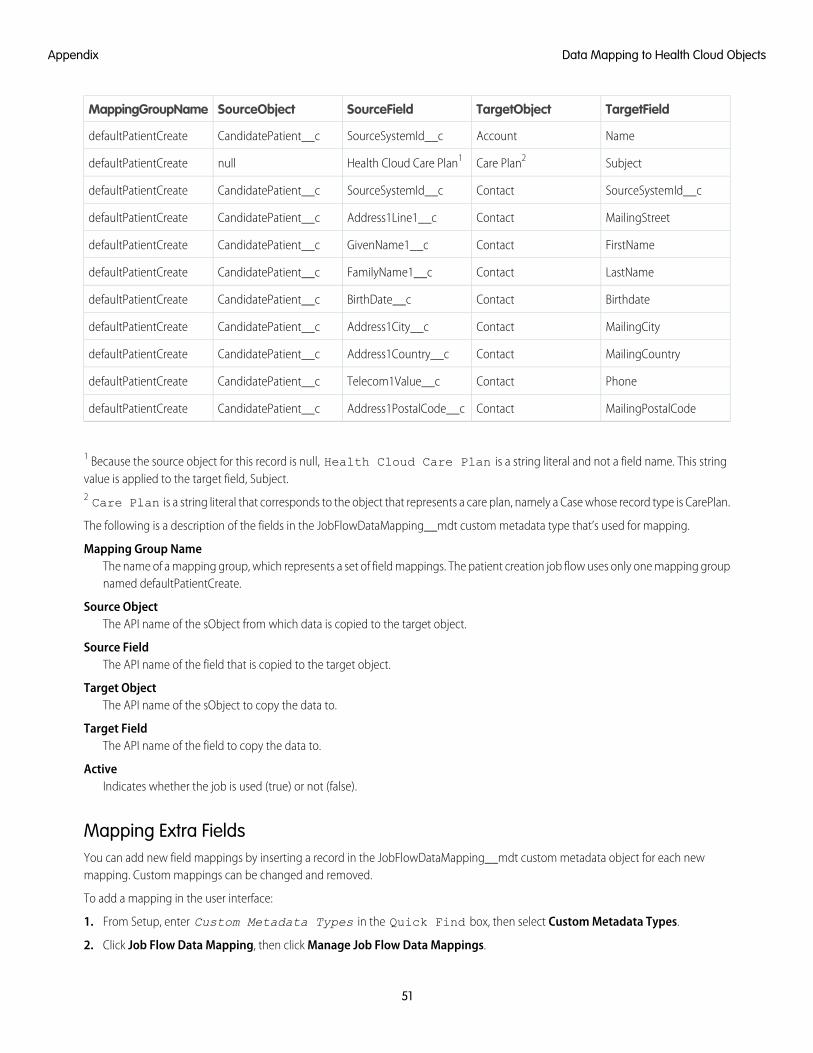
TargetFieldTargetObjectSourceFieldSourceObjectMappingGroupName
NameAccountSourceSystemId__cCandidatePatient__cdefaultPatientCreate
SubjectCare Plan2Health Cloud Care Plan1nulldefaultPatientCreate
SourceSystemId__cContactSourceSystemId__cCandidatePatient__cdefaultPatientCreate
MailingStreetContactAddress1Line1__cCandidatePatient__cdefaultPatientCreate
FirstNameContactGivenName1__cCandidatePatient__cdefaultPatientCreate
LastNameContactFamilyName1__cCandidatePatient__cdefaultPatientCreate
BirthdateContactBirthDate__cCandidatePatient__cdefaultPatientCreate
MailingCityContactAddress1City__cCandidatePatient__cdefaultPatientCreate
MailingCountryContactAddress1Country__cCandidatePatient__cdefaultPatientCreate
PhoneContactTelecom1Value__cCandidatePatient__cdefaultPatientCreate
MailingPostalCodeContactAddress1PostalCode__cCandidatePatient__cdefaultPatientCreate
1 Because the source object for this record is null, Health Cloud Care Plan is a string literal and not a field name. This stringvalue is applied to the target field, Subject.2 Care Plan is a string literal that corresponds to the object that represents a care plan, namely a Case whose record type is CarePlan.
The following is a description of the fields in the JobFlowDataMapping__mdt custom metadata type that’s used for mapping.
Mapping Group NameThe name of a mapping group, which represents a set of field mappings. The patient creation job flow uses only one mapping groupnamed defaultPatientCreate.
Source ObjectThe API name of the sObject from which data is copied to the target object.
Source FieldThe API name of the field that is copied to the target object.
Target ObjectThe API name of the sObject to copy the data to.
Target FieldThe API name of the field to copy the data to.
ActiveIndicates whether the job is used (true) or not (false).
Mapping Extra FieldsYou can add new field mappings by inserting a record in the JobFlowDataMapping__mdt custom metadata object for each newmapping. Custom mappings can be changed and removed.
To add a mapping in the user interface:
1. From Setup, enter Custom Metadata Types in the Quick Find box, then select Custom Metadata Types.
2. Click Job Flow Data Mapping, then click Manage Job Flow Data Mappings.
51
Data Mapping to Health Cloud ObjectsAppendix
3. Click New, and fill out the information for the new mapping.
4. Click Save.
Note: You can also deactivate the delivered JobFlowDataMapping__mdt and use your own custom set of mappings when youcreate and activate a new record with the same setting name and setting value.
52
Data Mapping to Health Cloud ObjectsAppendix