heat recovery units with cooling circuit rhe series
TRANSCRIPT

���� ����� �� � �� �
SELECTION, USE, INSTALLATION AND
MAINTENANCE MANUAL
HEAT RECOVERY UNITS WITH COOLING CIRCUIT
RHE Series
FAST S.p.A.
ISO 9001:2000 - Cert.n° 0882/4


Index En
gli
sh
General norms 4
Unit description 5
Components decription 6
Accessories 7
Technical data 8
Operating limits 10
Sound data 10
Cooling performance variation 11
Fresh air temperature variations on the change of the external
air temperature 12
Heating efficiencies, pressure drops on air side, accessories MBCH, MSS 13
Cooling scheme summer operation 14
Cooling scheme winter operation 15
Dimensions 16
Accessories dimensions 19
Accessories assembly instructions 21
Instructions for assembling roofs for outside installation 21
Installation and use of the unit 23
Positioning of the supporting brackets 24
Ducts connection 25
Hydraulic connections, condensate drain discharge 25
FCH Free-cooling accessory 26
Electrical connections 27
Changing SET fans flow rate 27
Maintenance of the unit 30
Filters 30
Condensate drain pan 30
Recuperator 31
Fans motor assembly 31
Heat exchange coil 31
Decommissioning 31
Disposal 31
Diagnosis and fault solving 32

High efÞ ciency heat recovery unit with cooling circuit - �
-
�Selection, installation, use and maintenance manual �
General norms
The present manual is an integral part
of the documentation enclosed with the
machine.
It must be conserved for future reference
and must accompany the machine throu-
ghout its working life.
The manual defines the purpose to which
the machine was built and establishes the
correct installation and use limits.
• All use, installation and maintenance
instructions of the unit are described
in this manual as well as the main
accident prevention standards.
• Read carefully and fully all informa-
tion contained in this manual before
the installation, starting, use, main-
tenance and cleaning of the unit.
Pay particular attention to the use
regulations that are accompanied by
“DANGER” or “WARNING”, because if
not observed, they could cause dama-
ge to the machine and/or persons and
property.
• For irregularities not contemplated
by this manual, please consult the
local After Sales Service.
• FAST S.p.A. decline any responsibility
for any damage due to the improper
use of the machine, and to a partial or
superficial reading of the information
contained in this manual.
• Installation and maintenance must be
carried out by trained and qualified
personnel, having the requirements
laid down by law 46/90 and/or DPR
380/2001 for electric/electronic and
air conditioning installations, with
consequent registration at the local
CHAMBER of COMMERCE. Otherwise
FAST S.p.A. decline all responsibility
regarding the safety of the product.
THE MANUFACTURER DECLINES ANY
RESPONS IB IL ITY FOR DAMAGE TO
PROPERTY, PERSONS OR ANIMALS
CAUSED BY THE NON OBSERVANCE OF
THE INDICATIONS AND REGULATIONS
CONTAINED IN THE PRESENT MANUAL.
Even though a suitable risk analysis was
carried out during the design of the HRR
unit, pay ATTENTION to the pictograms on
the machine that make the reading of the
manual easier catching the readers atten-
tion concerning risks that can’t be avoided
or sufficiently limited with the adoption
of protection means and measures.
GENERAL DANGER SIGNS
Carefully observe all indications
at the side of the pictogram.
The non observance of the indications
could cause hazardous conditions with
possible injury to the operator and to the
user in general.
VOLTAGE DANGER SIGN
Carefully observe all indications
at the side of the pictogram.
The signs indicate components on the unit
or, in the present manual, identify areas
that could generat risks of an electrical
nature.
GENERAL WARNING SIGNS
Carefully observe all indications
to the side of the pictogram that
limit some actions in order to ensure grea-
ter safety for the operator.
MAIN GUARANTEE
CONDITIONS
• The guarantee does not includ pay-
ment for damages due to incorrect
installation by the installer.
• The guarantee does not include pay-
ment for damages due to the improper
use of the unit by the user.
• The manufacture is not responsible for
injuries to the installer or user, caused
by incorrect installation or improper
use of the unit;
• The equipment must be installed in
such a manner so as to allow mainte-
nance and/or repair operations;
• The guarantee does not cover in any
case costs due to turntable ladders,
scaffolding or othe similar elevating
systems that are necessary to carry
out operations under guarantee.
The guarantee is not valid if:
• the services and repairs have been
carried out by unauthorised personnel
or companies;
• the unit has been previously repaired
or modified with non original parts;
• the unit has not been suitably maintai-
ned;
• the instructions illustrated in the pre-
sent manual have not been observed;
• unauthorised modifications have
been made.
Note:
The manufacturer reserves the right to
carry out modifications at any time dee-
med necessary to improve their product,
and are not obliged to apply the said
modifications to previously manufactured
machines that have already been delive-
red or are being constructed.
The general conditions are in any case
subject to the general sale conditions
included on the stipulation of the con-
tract.

High efÞ ciency heat recovery unit with cooling circuit - �
-
�Selection, installation, use and maintenance manual �
Field 1, 2, 3: RHE
Field 4, 5: sizes 10 - 15 - 25 - 33
Field 6: A (ceiling installation)
B (floor installation)
Description of the unit
The RHE series is the mono-block
solution to the needs of systems
normally used in bars, restaurants,
offices, meeting rooms. The RHE units,
which are divided into four sizes with
a rated airflow from 1000 to 3300
m3/h, have been designed to guarantee
a wellbeing conditions allowing a
suitable air change in order to reduce
the build-up of gas and undesired
particles present in the environment
to be treated (CO2,
cigarette smoke,
unpleasant odours, sweat, dust,.).
The peculiarity of these series is repre-
sented by the high efficiency got thanks
the use of the cross flows plate recupe-
rator combined with a cooling circuit
in heat pump operating with refrigerant
R410A.
The RHE unit, in addition to the
ventilation, filtration and recovery of
heat, also includes, in a mono-bdamper
unit, a heat pump refrigerating circuit.
This allows to obtain a complete
machine which operates independently
in all seasons and which is capable of
combining the necessary renewal of air
with an efficient recovery of heat.
The accurate design of the machine
combines the extremely compact size,
which makes installation on suspended
ceilings easier, with easy accessibility
for the maintenance of all internal parts.
This gives the opportunity, also thanks
to the management and installation
simplicity, to satisfy many system
requirements.
WARNING
The RHE series is made to guarantee
indoor air supply and extraction. The
refrigerating circuit is calculated not
only for giving supply air characteristi-
cs near to that of the indoor air, with
the aim of avoiding disease conditions
near vents, but also for covering in part
ambient thermal loads.
Thermal and refrigerating capacities,
which carry air conditions from the
indoor air ones to those who cover in
part ambient thermal loads, are referred
to as thermal available capacity and
refrigerating available capacity. These
capacities are only an integration of
those guaranted by a conditioning unit.
The RHE series is not a conditioning
unit, and it cannot be set apart from a
conditioning unit if prefixed indoor air
conditions (temperature and humidity)
have to be guaranteed.
Available versions
The RHE units are available in 4
different sizes: Each model can be
configured in such a manner to satisfy
the system requirements by suitable
combining the available options.
The table in fig. 01 shows the procedure
of the commercial acronym in the
6fields from which it is made.
fig.01
Cooling circuit
accessibility
Condensate dischar-
ge 1” J UNI 338
Exhaust fan
Supply fan
Condensate dischar-
ge 1” J UNI 338
By-pass for free-
cooling
Room air suction
Outside air suction
Electrical panel

High efÞ ciency heat recovery unit with cooling circuit - �
-
�Selection, installation, use and maintenance manual �
Description of the componentsPanels and frame:
The frame is made up of 25 mm thick
galvanised self-supporting sandwich panels
with injected polyurethane insulation (
density of 42 kg/m3) and nylon reinforced
corners with glass fi bre. The construction
of the casing simplifi es installation and
maintenance.
Fans: They are centrifugal fans with forward-
curved blades and with directly connected
motor. The 230V - 50 Hz single-phase motor
has one speed. The airfl ow in case of pressure
drops changes of internal components
(clogging fi lters) and distribution system
remains costant.
Refrigerating circuit This is a highly effi cient and silent heat
pump with scroll or rotative compressor
operating with refrigerant R410A (according
to sizes), four-way valve for cycle inversion,
evaporating coil, safety valve, condensing
coil, liquid receiver, thermostatic valve,
liquid light , high/low pressure switch and by
pass valve (for little sizes).
Condensate drain pan:
made of aluminium alloy, removable and
with double discharge.
Evaporating/condensating coil:
with cupper grooved tube and high effi ciency
aluminium fi ns.
Filters: these are cell undulated type placed before
the recovery unit on the supply and return
airfl ow. The standard fi lters are class G4 type
in accordance with classifi cation UNI EN
779 with weighted effi ciency of 90%. They
are 48 mm thick and are easily removable
from the top or bottom of the unit for to do
the cleaning or replacement.
Dirty fi lters pressure switch:
A differential pressure switch is present, pla-
ced close to the electronic controllers, for the
detection of the supply fi lter clogging. The
interventation value can be set. The pressure
switch includes clean contacts (NA, NC) to
remote the alarm.
Heat recovery unit:
This is static cross fl ows recuperator
made of aluminium sheets to grant high
performances. During winter operation, the
average effi ciency is above 80% for the fi rst
two sizes and 70% for the last two sizes,
ensuring fi rst-class energy recovery from the
air expelled from the room.
Support brackets:
They allow the unit to be rapidly and securely
fi xed to the false ceiling.
Accessibility:
The heat recovery, the condensate tank, fans
and fi lters are removable from the bottom,
removing the two lower panels (if the unit
is hanging), the same can be easily removed
from the air by removing the two top panels
(if units is on the ground). The inspection
of the electrical panel and the circuit is
guaranteed by side panels. For the inspection
of the fi lters, in both the cabinet and the fl oor
version, you can disassemble the openings
on the top and bottom panels are fastened
with fl yers.
RegulationThe unit is equipped with an electrical panel with power and regulation section (including the three-way valve for the additional hot water coil and related servomotor), aimed at guaranteeing the management of all refrigerating circuit functions. Also present: NTC temperature probe on the internal air recovery, external air temperature probe, pressure switch on the supply fi lter.With the free-cooling accessory are supplied dampers and servomotors.A remote control terminal is also supplied for the automatic management of the unit, remotable up to 150 meter (cable not supplied). The unit is equipped for the management of a luminous sign (230V) which switches on in case of generic alarm or unit OFF, in conformity with the norms in force for rooms for smokers.The following operations can be performed on the microprocessor: switching on and off of the unit, summer/winter changeover, setting of set-point parameters, reading of room temperature.
N.B. For further information refer to
the user manual.
Key
1 Cooling circuit
2 Electric board
3 Centrifugal fan
4 G4 Filter
5 Heat recovery unit
6 Exchange coil
7 Condensate discharge
8 Fans inverter
RHE 10-15
1
2
8
7
3
6
5
4

High efÞ ciency heat recovery unit with cooling circuit - �
-
�Selection, installation, use and maintenance manual �
fig.02
Accessories
MBCH Hot water coil module This is an external module that can be installed downstream from the motor fan assembly on the fresh air flow, equipped with:• Two-row water heating coil with copper pipes and aluminium fins with P2519 geometry. The collectors are equipped with a ½" G UNI 338 threaded connector for the water inlet and outlet. • The three-way valves and related ON/OFF actuator.
MBCX Module with batteryThis is an outside module that can be installed downstream from the motor fan assembly on the fresh air flow, equipped with:• Electric battery with armoured finned elements. • double safety thermostat with automatic and manual reset.
FCT F7 efficiency filtersThe units can be fitted with two cell-type undulated filters in class F7 according to the UNI EN 779 classification which can be placed as a replacement of the G4 filters. The
filtrating cell is 48 mm thick.
MSS Module with silencers The accessory is made up of one module that is equipped with silencer positioned on the supply or exhaust. (For sizes 10 and 15, the accessory is only inlet compatible).It is made of rockwool panels with the surfaces in contact with the air and protected by a polyester film held between two galvanised and micro-perforated laths.
FGE circular flangesOne accessory is supplied. The accessory should be joined to the rectangular openings of the base unit in such a way as to allow for the use of circular channels. The accessory is not compatible with the MBCH, MBCX, MSS and FBH accessories. NB for further information refer to the tables in this manual and to the various accessory kits; for compatibility refer to fig. 02
FCH Free-cooling kitIt allows for the unit operation in free cooling (temperature only).The “free-
cooling kit ” includes 2 dampers with related ON/OFF 230V servomotors.For further information refer to the Use manual.
BIT Base for floor installationBIM Base for floor installation of the additional modulesThe accessories, equipped with a metal frame with high 120 mm, allow to tran-sform the standard unit to a unit which can be placed on floor.
TPE Roof for outside installationTPM Roof for outside installationof the additional modulesTPMSS Roof for outside installationof the silencers modulesThis accessory, made of galvanized sheet, allows for the protection from rainings for unit and its accessories.*: supplied with appendages near the speed regulators on the outside of the base unit, to protect these from solar irra-diation.
RS485 Interface card Interface card necessary for the interface to supervisione systems according to the MOD-BUS protocol.
MBCH MSS FGEMBCX
Size
Accessories and description 10 15 25 33
MBCH Module with hot water coil MBCH1 MBCH2
MBCX Module with electric battery MBCX1 MBCX2 MBCX3 MBCX4
BIM Base for addit. modules floor install BIM1
TPM Roof for add. modules outside install TPM1 TPM2
FCT Compact filters efficiency class F7 FCT1 FCT2 FCT3
BIT Base for floor installation BIT1 BIT2 BIT3
TPE Roof for outside installation TPE1 TPE2 TPE3
FCH Free-cooling Kit FCH1 FCH2
RS485 RS485 cards RS485
MSS Silencers modules MSS1 MSS2
TPMSS Roof for silencers outside installation TPMSS1 TPMSS2
FGE Circular flanges FGE1

High efÞ ciency heat recovery unit with cooling circuit - �
-
�Selection, installation, use and maintenance manual �
Technical data
Caution: the electronic regulators that are
incorporated in the machine allow to regulate
the air flow in the limits indicated in the
previous table in order to set the system. Once
setting has been completed, the regulators no
longer need to be touched.
1) Fan power supply: 230 V; nominal airflow rate;
without accessories;
(2) Operating conditions: return air 26°C 50%, external
air 34°C 50%;
(3) Operating conditions: return air 20°C 50%, external
air -5°C 80%;
(4) At a free field distance of 1 m with ports canalized.
RHE MODEL 10 15 25 33
External maximal air flow [m3/h] 1000 1500 2500 3300
Recovery maximal air flow [m3/h] 1000 1500 2500 3300
Minimum air flow [m3/h] 800 1000 2000 2500
Supply static available pressure (1) [Pa] 320 245 140 220
Exhaust static available pressure (1) [Pa] 320 245 140 220
Total heating capacity (rec. + compr.) (3) [kW] 7,5 14,2 24,8 33,1
Total cooling capacity (rec. + compr.) (2) [kW] 6,6 8,7 13,8 19,8
Available heating capacity (3) [kW] 2,8 2,9 3,9 7,0
Available cooling capacity (2) [kW] 1,8 3,1 3,3 5,4
Recovered heating capacity (3) [kW] 3,6 10,0 15,3 19,6
Recovered cooling capacity (2) [kW] 2,2 3,2 4,5 5,8
Refrigerating circuit heating capacity (3) [kW] 3,9 4,2 9,5 13,5
Refrigerating circuit cooling capacity (2) [kW] 4,4 5,5 9,3 14,0
Tot. input power in winter (3) [kW] 2,2 2,4 4,2 4,9
Tot. input power in summer (2) [kW] 2,6 2,9 5,1 6,5
Sound pressure level (4) [db(A)] 66 69 72 75
Power supply 1-230-50 1-230-50 3+N-400-50 3+N-400-50
RECUPERATOR
Efficiency in winter [%] 82 80 73 71
Efficiency in summer [%] 82 80 68 65
FANS
Fans number 2 2 2 2
Total nominal input power [kW] 0,9 0,9 2,1 2,1
Total max. absorbed current [A] 7,6 7,6 10,5 10,5
Protection class IP 55 55 55 55
FILTERS
Classification according to EN779 G4 G4 G4 G4
Weight efficiency [%] 90 90 90 90
Classification according to EN779 (filters, accessories) F7 F7 F7 F7
Additional pressure drop for F7 filters (optional) [Pa] 35 59 58 63
REFRIGERATING CIRCUIT (COMPRESSOR)
Refrigerant R410A R410A R410A R410A
Compressors input power in winter (3) [kW] 1,3 1,5 2,1 2,8
Compressors input power in summer (2) [kW] 1,7 2,0 2,8 4,4
Compressors max. absorbed current [A] 10,0 11,0 7,0 10,3
CONDENSATE DRAN PANEL
Diameter of the condensate dran panel charge [in] 1” 1” 1” 1”

High efÞ ciency heat recovery unit with cooling circuit - �
-
�Selection, installation, use and maintenance manual �
1) Inlet/outlet water temperature 70/60°C. Compressor
running. Operating conditions: return air 20°C 50%,
external air -2°C 80%;
(2) Inlet/outlet water temperature 45/40°C. Compressor
running. Operating conditions: return air 20°C 50%,
external air -5°C 80%;
MBCH - Water heating coil 10 15 25 33
Rows [n] 2 2 2 2
Front surfaces [m2] 0,238 0,238 0,238 0,314
Air side pressure drop at nominal flow rate [Pa] 7 18 37 37
Heating capacity (1) [kW] 7,68 10,35 15,56 19,7
Heating capacity (2) [kW] 2,57 4,04 6,45 7,6
Water flow rate (1) [l/h] 673 906 1363 1725
Water side pressure drop (nominal conditions) (1) [kPa] 11 8 18 32
Water flow rate (2) [l/h] 446 700 1118 1311
Water side pressure drop (nominal conditions) (2) [kPa] 3 6 14 22
Water coil manifolds diameter [in] 3/4” 3/4” 3/4” 3/4”
MBCX - Electric heating coil
Power supply 3 ph - 400 V - 50 Hz (power supply separated from unit power supply)
Heating capacity [kW] 5 7,5 12,5 16,5
Air side pressure drop at nominal flow rate [Pa] 10 10 10 10
Stages [n] 1 1 1 1
Electric absorbed current [A] 7,6 11,4 19,0 25,1
ACCESSORIES
High efÞ ciency heat recovery unit with cooling circuit - �
-
� �Selection, installation, use and maintenance manual �
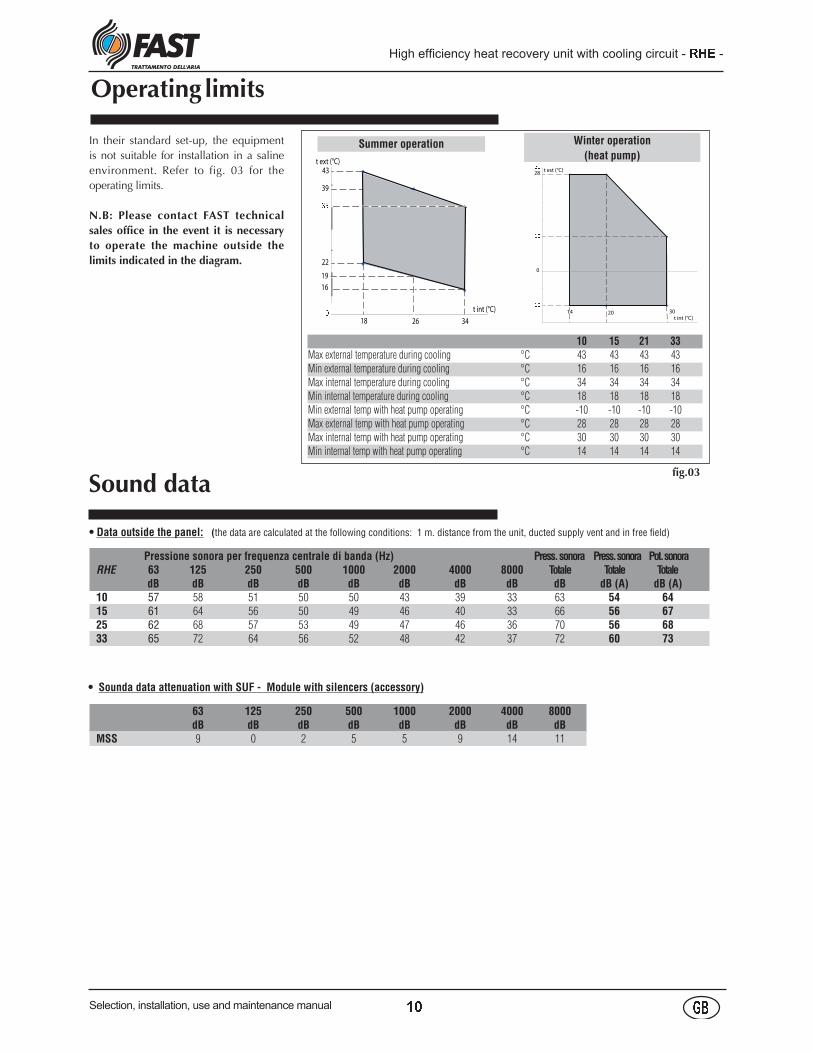
Operating limits
In their standard set-up, the equipment
is not suitable for installation in a saline
environment. Refer to fig. 03 for the
operating limits.
N.B: Please contact FAST technical
sales office in the event it is necessary
to operate the machine outside the
limits indicated in the diagram.
Summer operation Winter operation
(heat pump)
fig.03
10 15 21 33Max external temperature during cooling °C 43 43 43 43
Min external temperature during cooling °C 16 16 16 16
Max internal temperature during cooling °C 34 34 34 34
Min internal temperature during cooling °C 18 18 18 18
Min external temp with heat pump operating °C -10 -10 -10 -10
Max external temp with heat pump operating °C 28 28 28 28
Max internal temp with heat pump operating °C 30 30 30 30
Min internal temp with heat pump operating °C 14 14 14 14
Pressione sonora per frequenza centrale di banda (Hz) Press. sonora Press. sonora Pot. sonora RHE 63 125 250 500 1000 2000 4000 8000 Totale Totale Totale dB dB dB dB dB dB dB dB dB dB (A) dB (A) 10 57 58 51 50 50 43 39 33 63 54 64 15 61 64 56 50 49 46 40 33 66 56 67 25 62 68 57 53 49 47 46 36 70 56 68 33 65 72 64 56 52 48 42 37 72 60 73
Sound data
• Sounda data attenuation with SUF - Module with silencers (accessory)
63 125 250 500 1000 2000 4000 8000 dB dB dB dB dB dB dB dB MSS 9 0 2 5 5 9 14 11
• Data outside the panel: (the data are calculated at the following conditions: 1 m. distance from the unit, ducted supply vent and in free fi eld)
� ��
43
39
22
19
16
18 26 34
t int (°C)
t ext (°C) � �� ��� �
t int (°C)
t est (°C)28
14 20 30
0
High efÞ ciency heat recovery unit with cooling circuit - �
-
� �Selection, installation, use and maintenance manual �
Cooling Performance variations
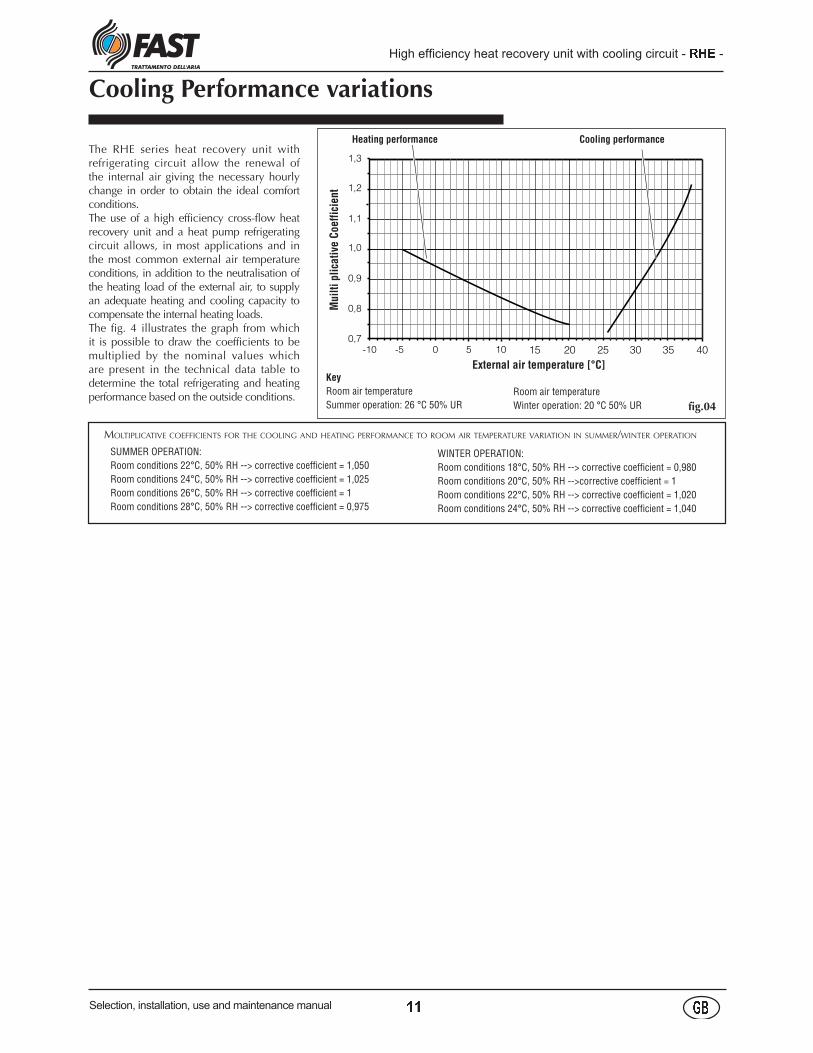
The RHE series heat recovery unit with refrigerating circuit allow the renewal of the internal air giving the necessary hourly change in order to obtain the ideal comfort conditions.The use of a high efficiency cross-flow heat recovery unit and a heat pump refrigerating circuit allows, in most applications and in the most common external air temperature conditions, in addition to the neutralisation of the heating load of the external air, to supply an adequate heating and cooling capacity to compensate the internal heating loads.The fig. 4 illustrates the graph from which it is possible to draw the coefficients to be multiplied by the nominal values which are present in the technical data table to determine the total refrigerating and heating performance based on the outside conditions.
External air temperature [°C]Key
Room air temperature
Summer operation: 26 °C 50% UR fig.04
Heating performance
Muil
ti p
lica
tive
Coeff
icie
nt
Cooling performance
Room air temperature
Winter operation: 20 °C 50% UR
Coefficienti moltiplicativi per la resa frigorifera e termica al variare della temperatura aria ambiente in regime estivo ed invernale:SUMMER OPERATION:
Room conditions 22°C, 50% RH --> corrective coefficient = 1,050
Room conditions 24°C, 50% RH --> corrective coefficient = 1,025
Room conditions 26°C, 50% RH --> corrective coefficient = 1
Room conditions 28°C, 50% RH --> corrective coefficient = 0,975
WINTER OPERATION:
Room conditions 18°C, 50% RH --> corrective coefficient = 0,980
Room conditions 20°C, 50% RH -->corrective coefficient = 1
Room conditions 22°C, 50% RH --> corrective coefficient = 1,020
Room conditions 24°C, 50% RH --> corrective coefficient = 1,040
MOLTIPLICATIVE COEFFICIENTS FOR THE COOLING AND HEATING PERFORMANCE TO ROOM AIR TEMPERATURE VARIATION IN SUMMER/WINTER OPERATION

High efÞ ciency heat recovery unit with cooling circuit - �
-
� �Selection, installation, use and maintenance manual �
Inle
t air
tem
pera
ture
vari
ati
on (
°C)
Conditions: exhaust air 26°, 50% RH.
Outside air temperature (°C)
Fresh air temperature variations on the change of the external air temperature
The following charts allow to determine
the variation of the temperature within
the room on the variation of the external
conditions. The variability of the air fl ows
is that allowed to guarantee that the
refrigerating circuit operates correctly.
Note:
Th e f o l l ow i n g d i a g ra m s a re
representative for all sizes, but without
accessories.
Summer operation
Outside air temperature (°C)
eyConditions: exhaust air 20°, 50% RH.
Winter operation
Inle
t air
tem
pera
ture
vari
ati
on (
°C)
� �� ��� � � � � � � � � � � � � � � � � ! � ! �
"#$ %& %$& #& "& '# '# (# )" $" #" '" (" )' $
NOMINAL FLOW RATE
NOM
INAL F
LOW RATE
FLOW RATE +
10%
FLO
W RATE -
10%
FLOW RATE +10%
FLOW RATE -10%

High efÞ ciency heat recovery unit with cooling circuit - �
-
� *Selection, installation, use and maintenance manual �
Heating efficiencies and accessories pressure drops BCH, MSS
The diagram in fig. 06 allows to determine
for each model, according to the water
temperature and otside air temperature
variation the corrective factor to multiply for
the nominal capacity value are present in
the technical data table.
Fig. 07 illustrates the pressure drops (Pa) on
the air side based on the flow rate for the
MBCH and MSS accessories
Fig. 08 illustrates the pressure drops (kPa)
water side of the MBCH accessory coil.
Note:
The pressure drops illustrated in the
diagram also include those of the three-way
valve.
fig.06
Outside air temperature [°C]
fig.08
Water flow [l/h]
kPa
Air flow [m3/h]
Pafig.07
70/60°C
Corr
ect
ive c
oeff
icie
nt
Pre
ssure
dro
p o
n a
ir s
ide
Pre
ssure
dro
p o
n w
ate
r si
de
45/40°C
+ ,- .- ,/ ./ ,, . 0 1 2 3 4 5 0 6 6 7 0 1 2 3 8 8 0 6 6 4.,9 .9 ,+ .
. , . . 9 . . . 9 , . . + . . . + , . . - . . . - , . . / . . .0 1 2 3 7 : 0 6 6 70 1 2 3 7 5 0 6 6 7; <= <> <? <= <@ <? <A < B C D E FG < B C D E H< < = < < G < < < G = < < A < < < A = < <

High efÞ ciency heat recovery unit with cooling circuit - I J K -
L MSelection, installation, use and maintenance manual N O
Refrigerating circuit summer operation
KEY
CP Compressor
BC Condensing coil
BE Evaporating coil
F Filter
RL Liquid receiver
PA High pressure probe
VIC Inversion valve
AP High pressure switch
BP Low pressure switch
PA
VIC
AP
BP
CP
F
RL
BCFRESH AIR FANBEEXHAUST FAN

High efÞ ciency heat recovery unit with cooling circuit - I J K -
L PSelection, installation, use and maintenance manual N O
Refrigerating circuit winter operation
KEY
CP Compressor
BC Condensing coil
BE Evaporating coil
F Filter
RL Liquid receiver
PA High pressure probe
VIC Inversion valve
AP High pressure switch
BP Low pressure switch
EXHAUST FAN FRESH AIR FAN
PA
VIC
AP
BP
CP
F
RL
BEBC

High efÞ ciency heat recovery unit with cooling circuit - I J K -
L QSelection, installation, use and maintenance manual N O
Dimensions
RHE 10-15
Weights and c.g. kg Gx Gy RHE 10 300 700 650
RHE 15 310 740 745
Gx
Gy
FILTER ACCESSIBILITY
CONDENSATE DISCHARGE 1” J UNI 338
CONDENSATE DISCHARGE 1” J UNI 338
FILTER ACCESSIBILITY
SUPPLY FAN EXHAUST FAN
BY-PASS FOR FREE-COOLING COOLING CIRCUIT ACCESSIBILITY
OUTSIDE AIR
SUCTION
ROOM AIR SUCTION
COOLING CIRCUIT ACCESSIBILITY
ELECTRICAL PANEL
OUTSIDE AIR
SUCTION

High efÞ ciency heat recovery unit with cooling circuit - I J K -
L RSelection, installation, use and maintenance manual N O
Weights and c.g. kg Gx GyRHE 25 373 1130 920
Gx
Gy
RHE 25
FILTER ACCESSIBILITY
FILTER ACCESSIBILITY
CONDENSATE DISCHARGE 1” J UNI 338
CONDENSATE DISCHARGE 1” J UNI 338
BY-PASS FOR FREE-COOLINGOUTSIDE AIR
SUCTION
ROOM AIR
SUCTION
SUPPLY FAN EXHAUST FAN COOLING CIRCUIT ACCESSIBILITY
ELECTRICAL PANEL

High efÞ ciency heat recovery unit with cooling circuit - I J K -
L SSelection, installation, use and maintenance manual N O
Weights and c.g. kg Gx Gy
RHE 33 410 1365 1145
Gx
Gy
RHE 33
FILTER ACCESSIBILITY
FILTER ACCESSIBILITY
CONDENSATE DISCHARGE 1” J UNI 338
CONDENSATE DISCHARGE 1” J UNI 338
BY-PASS FOR FREE-COOLINGOUTSIDE AIR
SUCTION
ROOM AIR SUCTION
electrical panel Inspect Refrigerant circuit inspec

High efÞ ciency heat recovery unit with cooling circuit - I J K -
L TSelection, installation, use and maintenance manual N O
Accessories Dimensions
MSS - Silencers Modules
Mod. [mm] RHE 10-15-25
MSS 1
RHE 33
MSS 2
A 684 846,5
B 684 684
C 574 574
D 500 500
E 59 59
F 59 59
G 16 16
H 718 880,5
I 12,5 12,5
L 342 432,5
M 287 287
N 624 624
A
BC
Mod. [mm] RHE 10-15
BIT 1
RHE 25
BIT 2
RHE 33
BIT 3
A 1490,5 1978 2303
B 1490,5 1490,5 1815,5
C 120 120 120
BIT - Base for floor installation
L L
MM
II
II
CD
H
N
B
A
GF
FG
EE

High efÞ ciency heat recovery unit with cooling circuit - I J K -
U VSelection, installation, use and maintenance manual N O
MBCH - Module with water coil MBCX - Module with electric coil
B
CZ
V
T UI L
M
HG
F
AD
EE
NOS
RQ
P
E F
C
O P
QR
B
A
N
NN
N
ML
IH
GV
UT
S
D
Mod. [mm] RHE 10-15-25
MBCX 1-2-3
RHE 33
MBCX 2
A 610 772,5
B 574 574
C 359 359
D 718 880,5
E 342 423
F 342 423
G 500 500
H 250 287
I 287 287
L 37 37
M 61 61
N 12,5 12,5
O 110 110
P 78 76
Q 68 71
R 150 150
S 225 225
T 59 59
U 59 59
V 16 16
Mod. [mm] RHE 10-15-25
MBCH 1
RHE 33
MBCH 2
A 684 846
B 359 359
C 574 574
D 610 772
E 12,5 12,5
F 500 500
G 290 287
H 284 287
I 339 423
L 345 423
M 12,5 12,5
N 748 910,5
O 718 880,5
P 225 225
Q 59 59
R 59 59
S 16 16
T 201 201
U 158 158
V 79 79
Z 50 50
High efÞ ciency heat recovery unit with cooling circuit - I J K -
U LSelection, installation, use and maintenance manual N O
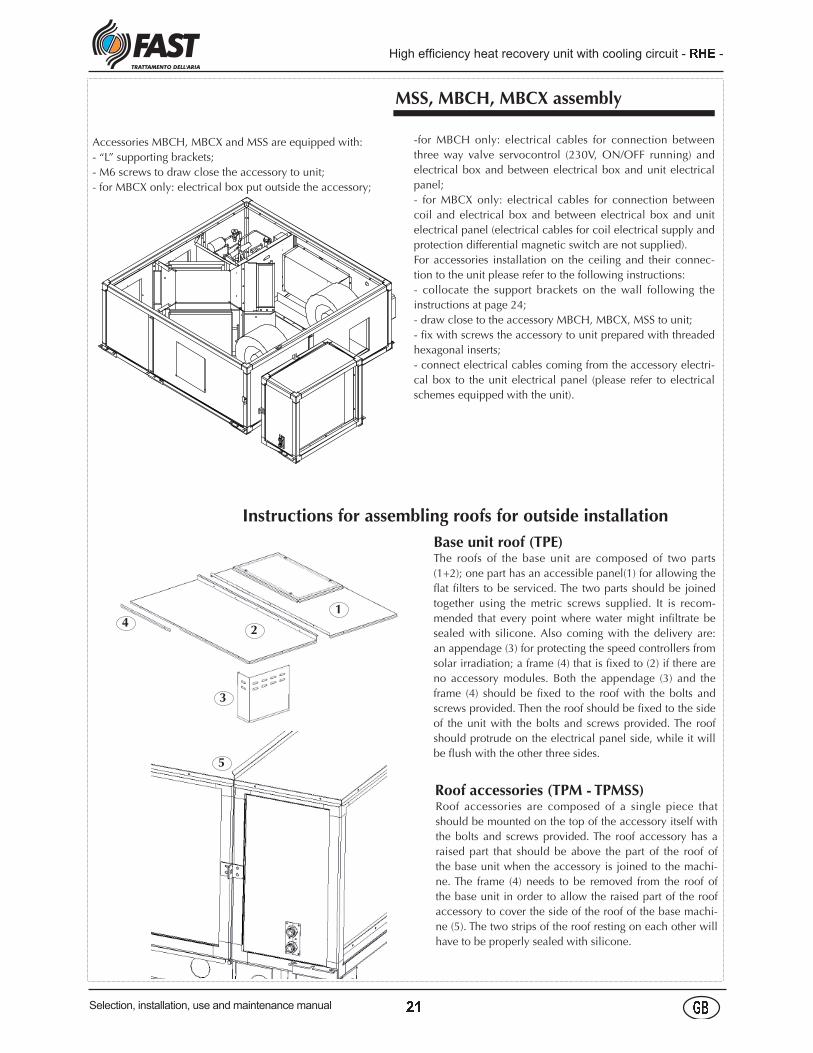
MSS, MBCH, MBCX assembly
Accessories MBCH, MBCX and MSS are equipped with:
- “L” supporting brackets;
- M6 screws to draw close the accessory to unit;
- for MBCX only: electrical box put outside the accessory;
-for MBCH only: electrical cables for connection between
three way valve servocontrol (230V, ON/OFF running) and
electrical box and between electrical box and unit electrical
panel;
- for MBCX only: electrical cables for connection between
coil and electrical box and between electrical box and unit
electrical panel (electrical cables for coil electrical supply and
protection differential magnetic switch are not supplied).
For accessories installation on the ceiling and their connec-
tion to the unit please refer to the following instructions:
- collocate the support brackets on the wall following the
instructions at page 24;
- draw close to the accessory MBCH, MBCX, MSS to unit;
- fix with screws the accessory to unit prepared with threaded
hexagonal inserts;
- connect electrical cables coming from the accessory electri-
cal box to the unit electrical panel (please refer to electrical
schemes equipped with the unit).
Instructions for assembling roofs for outside installation
The roofs of the base unit are composed of two parts
(1+2); one part has an accessible panel(1) for allowing the
flat filters to be serviced. The two parts should be joined
together using the metric screws supplied. It is recom-
mended that every point where water might infiltrate be
sealed with silicone. Also coming with the delivery are:
an appendage (3) for protecting the speed controllers from
solar irradiation; a frame (4) that is fixed to (2) if there are
no accessory modules. Both the appendage (3) and the
frame (4) should be fixed to the roof with the bolts and
screws provided. Then the roof should be fixed to the side
of the unit with the bolts and screws provided. The roof
should protrude on the electrical panel side, while it will
be flush with the other three sides.
Base unit roof (TPE)
Roof accessories are composed of a single piece that
should be mounted on the top of the accessory itself with
the bolts and screws provided. The roof accessory has a
raised part that should be above the part of the roof of
the base unit when the accessory is joined to the machi-
ne. The frame (4) needs to be removed from the roof of
the base unit in order to allow the raised part of the roof
accessory to cover the side of the roof of the base machi-
ne (5). The two strips of the roof resting on each other will
have to be properly sealed with silicone.
Roof accessories (TPM - TPMSS)
1
24
3
5

High efÞ ciency heat recovery unit with cooling circuit - I J K -
U USelection, installation, use and maintenance manual N O
Unit accessibility
Circular flanges (FGE accessory)380 mm
Dampers and actuators (accessory FCH)
Mod. [mm] RHE 10 RHE 15-25 RHE 33
B 450 550 600
H 310 410 460
2 dampers with actuators ON/OFF 230V are included in the accessory free-cooling kit FCH.
A
A + 40
100
B B + 40
Panels for inspection and/or filters replacement

High efÞ ciency heat recovery unit with cooling circuit - I J K -
U WSelection, installation, use and maintenance manual N O
Handling
CAUTION!During the handling phase, wear proper individual protection devices (IPD).
Before installation and use you are recommended to fully unpack the base unit and the all the components that come with it.The units are supplied packed with polythene film and, as a standard, on wooden pallets.
For transport reasons, some accessories travel separately from the standard unit and are to be reassembled by the installer following the instructions in this manual.
Transport
Refer to the weight indications on the plate on each unit in order to transport the unit safely.In any case, the following precautions must be taken when transporting the unit:
•The unit and its accessories, if any, must not be subject to intense knocks which could compromise the integrity of the structure and internal parts;•The unit and possible accessories must be suitably secured to the platform of the transportation by means of cables or similar in order to prevent its movement;•the unit and accessories must be protected in order to prevent protruding parts such as the coil connections, c o n d e n s a t e d r a i n , e l e c t r i c a l components, etc., from being knocked during transport;•the items must be protected against bad weather during transport.
Checks a t mater i a l receipt
When the unit is received it is necessary to carry out an initial inspection to make sure that:•all parts are present ;•the unit and accessories are not
damaged. If there are signs of damage it is necessary to specify it on the carriage note.
General safetyrequirements
WARNING!The RHE series units are destined for civil and tertiary use: for all other applications (in highly corrosive environments, in potentially explosive atmospheres etc. ) its use is not permitted.• Bevor installation make sure that the unit has not been damaged during transportation : The use of the damaged machine might be dangerous;• Ins ta l la t ion and ex t raord inary maintenance must be performed by qualified people in accordance with the present standards;•The unit must not be used to recover equipment, spare parts. Any use other than those indicated in this manual may generate hazards and is therefore prohibited;•Before performing maintenance or cleaning operations, make sure that the unit is disconnected and ensure that it is not reconnected without informing the person who is working on the unit;•During maintenance and cleaning, pay attention to possible burning of the heating coils;•Before starting the unit make sure that the electrical parts have been connected to the earth system of the building;•Before starting the unit make sure that the fan vents have been ducted or include safety meshes;•The unit is not designed for external installation: external installations require particular technical characteristics and devices which these units cannot guarantee; •During installation, maintenance and cleaning, wear suitable Individual Protection Devices (IPD).
The units are fitted with:•an adhesive label (fig. 07a) which indicates the model, the gross weight and the customer•an adhesive label (fig. 07b) which indicates the main technical data such as the model, nominal air volume, efficiency of the heat recovery unit, electrical data and performance of the coils.•Each RHE unit is identified by means of a serial number on the plateN.B.:The serial number must be indicated for future reference when contacting FAST S.p.A.
The necessary controls are the following:•integrity of the finned coil manifolds and condensate trays;•water connections (that these are protected with the rubber plugs). If they are not provide suitable closure devices;•integrity of the panels;•integrity of the electrical panel and electrical/electronic parts.
Installation
It is recommended to carefully follow the indications in the sections below when installing the equipment. The sections are in chronological order in order to make each phase of the installation easier.The necessary technical space must be verified before installation (fig.08):•for the arrangement of the supply and exhaust ducts as well as those for the free-cooling;•for the dampers with free-cooling function;•for the passage of the power supply cables.•if the unit and/or the relative accessory
modules are positioned outside, the
protective roof must be installed;
fig.07 b
RHE
RHE
RHE
RHE
R410A
fig.07 a
Installation and use of the unit

High efÞ ciency heat recovery unit with cooling circuit - I J K -
U MSelection, installation, use and maintenance manual N O
for the components (three-way valves,
condensate drainage traps, etc.)
without which the correct functioning
of the unit can not be guaranteed;
In particular:
• a space of at least 200 mm
must be available for the trap in
correspondence with the condensate
drain (fig. 11).
Positioning of the supporting brackets
The unit must be positioned on a
horizontal surface to avoid:
• the damage of the motor fan
assembl ies caused by weight
imbalance
• the incorrect operation of the
condensate drain.
The unit and the coil and silencer
module are equipped wi th "L"
supporting brackets for horizontal
installation.
The unit can be fixed by means of fins
bars by steel M6 of suitable length, blo-
cked through nuts and washers to sup-
port brackets assembled to unit; it must
be used one bar for each bracket (n.6
bars in all). It is advisable to use fins
bars with resistancy class at least 4.6.
In alternative, can be used tiranti with
equal or higher mechanical resistency.
If they are used fins bars with hifh resi-
stancy (class 8.8 at least), it is possible
to use n.4 fins bars for the blocking of
unit, not connecting the central bra-
ckets.
N.B.: It is recommended to place
rubber dampers to decrease the
vibrations generated by the unit.
fig.08
fig.09
FINS BARS M6 FINS BARS M6
80
0 m
m
200 mm 200 mm
20
0 m
m
80
0 m
m
Minimum clearances
Panels for inspection and/or filters replacement
Ceiling
Ceiling Ceiling or placed on the ground

High efÞ ciency heat recovery unit with cooling circuit - I J K -
U PSelection, installation, use and maintenance manual N O
Ducts connection
CAUTION!
Never start up the unit when the fan
opening vents are not ducted or covered by
protective mesh.
See fig. 10 for the installation of the ducts:
• use adequate brackets to support the ducts
in order to avoid that the recovery unit is
overloaded by their weight;
• in order to prevent the transmission of
vibrations and noise, FAST S.p.A. suggests
the use of ducts with a frontal mass higher
than 10 kg/m2.;;
• connect the supply and exhaust vents to
the ducts using vibration-damping joints
(canvas). The vibration-damping joint must
be screwed to the panel with self-tapping
screws, positioning the screws inside the
border highlighted in the following layout
avoiding that the canvas joints are over
stretched (point 1);
• connect a earth wire to the vibration-
damping joint to act as a jumper to
guarantee the unipotentiality between the
ducts and the recovery unit;
• place the supply duct with a straight
section of at least one meter, before
the bends, branches, etc., and make
sure that the ductling does not have
inclinations of the divergent sections
greater than 7°.
Hydraulic connectionsof the condensate drainThe condensate drain pan is equipped
with 2 exhaust diameter threaded 1 "G
UNI 338:
- 1)The drainage system should feature an
adequately sized trap to:
• freely discharge the condensate;
• prevent the undesired entry of air into
the vacuum systems;
• prevent the undesired exit of air from the
pressure systems;
• prevent the infiltration of odours or insects.
In the lower part of the syphon must have
a bleed cap or must anyway permit fast
dismantling for its cleaning.
Rules to follow for the scaling and
production of the syphon are given below.
-2) A drain is plugged.
fig.10
Anti-vibration joint
canvas
Electric earthing
cable not sup-
plied
Supply duct
MIn. lenght 1 m
max. divergence 7°
fig.11
H1 = 2P
H2= H1 / 2
P is the pressure expressed in
mm of water column (1 mm
c.a. = 9.81 Pa).NB. DURING INSTALLATION INCLINE THE UNIT TO FACILITATE DRAINAGE OF CONDENSATE FROM THE SIPHON.
P
neg.
P
pos.

High efÞ ciency heat recovery unit with cooling circuit - X Y Z -
[ \Selection, installation, use and maintenance manual ] ^
The assembly of the "free-cooling
kit" accessory must be performed by
qualified personnel in accordance with
the present standards and must be
made following the indications in the
electrical layout supplied with the unit.
The compressor is off during the
functioning of the unit in the free-
cooling mode. The temperature settings
are pre-set at fixed values (on request
these values can be changed by
contacting the After-Sales office).
OperationThe free-cooling function foresees that
the air expelled from the room does not
affect the heat recovery unit, passing
directly to the outside through a duct
connected to the damper B.
In order to use the free-cooling function
a duct is required to connect to damper
A and another to connect to damper
B. The two dampers A and B have an
opposing function.When the outside
temperature is close to the ideal
temperature of the room, damper A is
closed while damper B is open.
Accessory assemblyFor the assembly of the free-cooling
accessory please refer to fig. 12:
• place the two dampers with
servomotors as indicated in the figure;
• make sure that the damper is closed
during the free-cooling function
while the damper is open (opposing
functions);
• connect the damper servomotors;
CAUTION!
Before assembling the free-cooling
kit, make sure that the power is not
connected to the unit.
FCH free-cooling accessory
OUTSIDE
ROOM
fig.12
Exh
aust
air
Fres
h a
ir
Ro
om
air
rEx
tern
al a
ir i
nle
t
Exte
rnal
air
in
let
(in
fre
e-co
oli
ng)
External air temp. detector
Room temp. detector
Free-cooling damper motor
Exhaust damper motor
High efÞ ciency heat recovery unit with cooling circuit - X Y Z -
[ _Selection, installation, use and maintenance manual ] ^
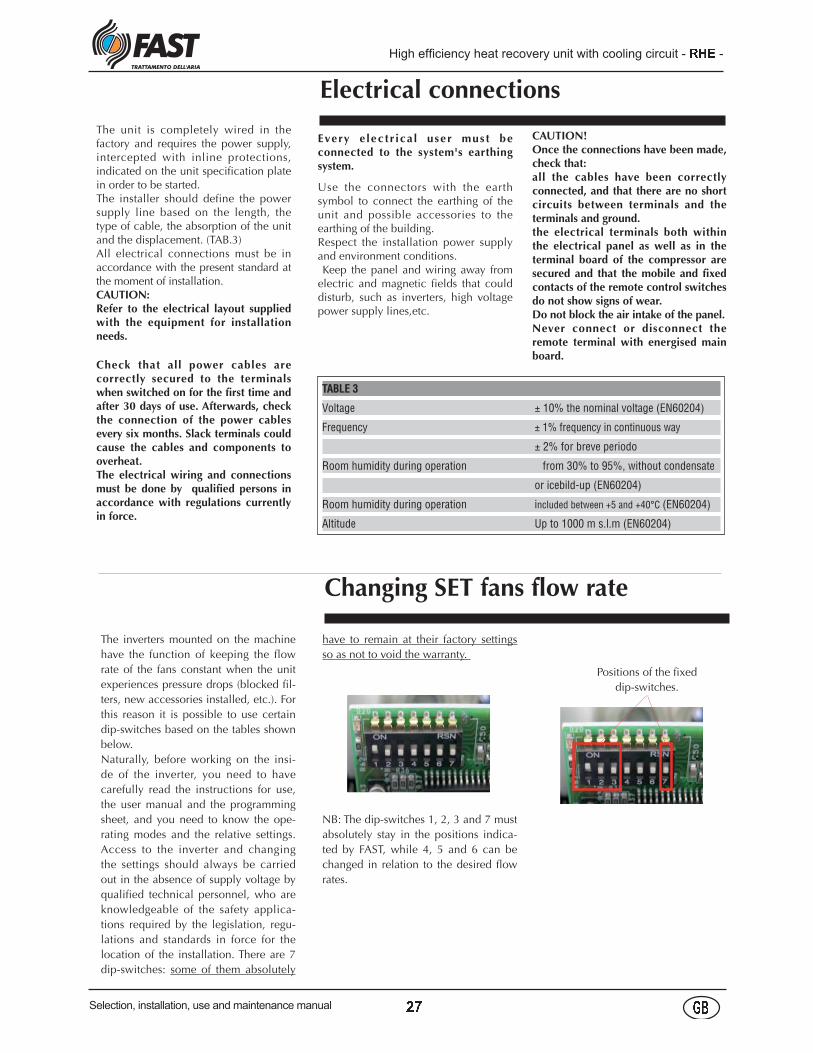
TABLE 3
Voltage ± 10% the nominal voltage (EN60204)
Frequency ± 1% frequency in continuous way
± 2% for breve periodo
Room humidity during operation from 30% to 95%, without condensate
or icebild-up (EN60204)
Room humidity during operation included between +5 and +40°C (EN60204)
Altitude Up to 1000 m s.l.m (EN60204)
The unit is completely wired in the factory and requires the power supply, intercepted with inline protections, indicated on the unit specification plate in order to be started.The installer should define the power supply line based on the length, the type of cable, the absorption of the unit and the displacement. (TAB.3)All electrical connections must be in accordance with the present standard at the moment of installation.CAUTION:Refer to the electrical layout supplied with the equipment for installation needs.
Check that all power cables are correctly secured to the terminals when switched on for the first time and after 30 days of use. Afterwards, check the connection of the power cables every six months. Slack terminals could cause the cables and components to overheat.The electrical wiring and connections must be done by qualified persons in accordance with regulations currently in force.
Every e lectr ica l user must be connected to the system's earthing system.
Use the connectors with the earth symbol to connect the earthing of the unit and possible accessories to the earthing of the building.Respect the installation power supply and environment conditions. Keep the panel and wiring away from electric and magnetic fields that could disturb, such as inverters, high voltage power supply lines,etc.
CAUTION!Once the connections have been made, check that:all the cables have been correctly connected, and that there are no short circuits between terminals and the terminals and ground. the electrical terminals both within the electrical panel as well as in the terminal board of the compressor are secured and that the mobile and fixed contacts of the remote control switches do not show signs of wear.Do not block the air intake of the panel.Never connect or disconnect the remote terminal with energised main board.
Electrical connections
The inverters mounted on the machine
have the function of keeping the flow
rate of the fans constant when the unit
experiences pressure drops (blocked fil-
ters, new accessories installed, etc.). For
this reason it is possible to use certain
dip-switches based on the tables shown
below.
Naturally, before working on the insi-
de of the inverter, you need to have
carefully read the instructions for use,
the user manual and the programming
sheet, and you need to know the ope-
rating modes and the relative settings.
Access to the inverter and changing
the settings should always be carried
out in the absence of supply voltage by
qualified technical personnel, who are
knowledgeable of the safety applica-
tions required by the legislation, regu-
lations and standards in force for the
location of the installation. There are 7
dip-switches: some of them absolutely
have to remain at their factory settings
so as not to void the warranty.
NB: The dip-switches 1, 2, 3 and 7 must
absolutely stay in the positions indica-
ted by FAST, while 4, 5 and 6 can be
changed in relation to the desired flow
rates.
Changing SET fans flow rate
Positions of the fixed
dip-switches.

High efÞ ciency heat recovery unit with cooling circuit - X Y Z -
[ `Selection, installation, use and maintenance manual ] ^
MODEL RHE 10
FIX
ED
FIX
ED
FIX
ED
VA
RIA
BLE
VA
RIA
BLE
VA
RIA
BLE
FIX
ED
DIP-SWITCHES 1 2 3 4 5 6 7
Flow 800 [m3/h]
Flow 900 [m3/h]
Flow 1000 (factory setting) [m3/h]ON
OFF
ON
OFF
ON
OFF
MODEL RHE 15
FIX
ED
FIX
ED
FIX
ED
VA
RIA
BLE
VA
RIA
BLE
VA
RIA
BLE
FIX
ED
DIP-SWITCHES 1 2 3 4 5 6 7
Flow 1100 [m3/h]
Flow 1200 [m3/h]
Flow 1300 [m3/h]
Flow 1400 [m3/h]
Flow 1500 (factory setting) [m3/h]
ON
OFF
ON
OFF
ON
OFF
ON
OFF
ON
OFF

High efÞ ciency heat recovery unit with cooling circuit - X Y Z -
[ aSelection, installation, use and maintenance manual ] ^
MODEL RHE 25
FIX
ED
FIX
ED
FIX
ED
VA
RIA
BLE
VA
RIA
BLE
VA
RIA
BLE
FIX
ED
DIP-SWITCHES 1 2 3 4 5 6 7
Flow 2050 [m3/h]
Flow 2300 [m3/h]
Flow 2550 (factory setting) [m3/h]ON
OFF
ON
OFF
ON
OFF
MODEL RHE 33
FIX
ED
FIX
ED
FIX
ED
VA
RIA
BLE
VA
RIA
BLE
VA
RIA
BLE
FIX
ED
DIP-SWITCHES 1 2 3 4 5 6 7
Flow 2550 [m3/h]
Flow 2800 [m3/h]
Flow 3050 [m3/h]
Flow 3300 (factory setting) [m3/h]
ON
OFF
ON
OFF
ON
OFF
ON
OFF

High efÞ ciency heat recovery unit with cooling circuit - X Y Z -
b cSelection, installation, use and maintenance manual ] ^
Checks during operation
The air flow rate values must not be
lower than 15% of the nominal values
indicated in the technical specifications
table. If an electrical resistance is
present, check the cut-in by measuring
its electrical absorption.
Requirements for R407C gas
The circuit chillers that work on
R407C cooling gas require particular
attent ion during assembly and
maintenance, to prevent operating
faults.
Therefore it is necessary to:
- Avoid refilling with oil different from
the one specified and already used in
the compressor.
- If there are gas leaks causing the unit
to be even partially empty, do not
refill with refrigerant, but empty the
unit completely and refill it with the
foreseen amount.
- In the event of replacement of one of
the refrigerating circuit parts, do not
leave the circuit open for more than
15 minutes.
- In particular, in the event of
replacing the compressor, complete
the installation within the above-
mentioned time after the rubber
plugs have been removed.
- When empty, do not switch on the
compressor; do not compress the air
within the compressor.
- When using R407C gas bottles,
it is recommended to take care of
the maximum number of drawings
permitted in order to guarantee the
correct ratio of components of the
R407C gas.
Refrigerant charge
For data relared to refrigerant gas
quantity R410A to charge, please refer
to the identification plate on the unit.
Unit maintenance
CAUTION !• During the maintenance phase, wear proper individual protection devices (IPD) • Before performing maintenance and/or cleaning operations on the unit, make sure the unit is disconnected from the power supply and that it can not be turned back on without the knowledge of the person performing maintenance, and that the heat exchanger coils are not working.•During maintenance the weight of the inspection panelling could hinder the work.
The RHE series recovery units have
been designed to require very little maintenance and to make every operation easy. Some simple pieces of advice follow for the proper maintenance of the unit.
FiltersFilter cleaning is imperative to maintain high air quality in the room. The synthetic filters installed in the RHE unit can be regenerated with compressed air or can be washed with cold water. To disassemble the filters: • remove the inspection panel with
knobs;• remove the filters;• clean the filters;• replace all parts in reverse order.
Condensate drain panDirt can hoard up in the condensate drain pan. You are therefore recommended to clean the pan regularly and check that the discharge pipe is not clogged. To remove the condensate drain pan of the heat recovery unit.
If the unit is placed in the ceiling:• remove all bottom panels;• disassemble the cross bar;•disconnect the pan from the condensate
drain pipes;• disassemble the pan supporting brackets;• clean the pan;• replace all parts in reverse order.
If the unit is placed on the ground:• remove all above panels;
Before the start-upBefore start-up check that:– the system has been charged and the air has been blown out;– the electrical connections have been made correctly;– the line voltage is within the permitted allowance (±10% of the rated value);
Unit start-upFor detailed information regarding the operating parameter settings and all other machine or control card operations, please refer to the user manual.
CAUTION!
Make sure that all the instructions have been complied with before carrying out the commissioning checks.
Before the first start-up of the heat recovery unit check the following points:
• the exact positioning of the panels in correspondence with the motor ventilating assembly that require opening by means of a screw-driver; • the fixing of the unit to the wall;• the earthing of the unit to the buildings earth system;• the connection to the ducts;• the condensate drain connection to the trap;• the insulation of the tubes to the coils;• the ground wires of the electrical components;• the absence of air in the water coils.In particular check that:• the electrical connection has been performed correctly and that all terminals have been suff iciently tightened;• the voltage on the terminals is 230 V ± 10% (for units with single-phase power) or 400 V ± 10% (for units with three-phase power):If the voltage is subject to frequent
change , contac t our Technica l department in order to select the necessary protection;• there are no leaks of refrigerant through the use of a leak detector.
CAUTION!
Before start-up, check that all the panels of the unit are in place and secured with the screws.
WARNING!If, at the time of the first start, the compressor don’ t start, the cause can be attributed to a wrong wiring of the sequence of the phases L1-L2-L3 or to the interruption of one of them, resulting in the intervention of the relay of the phase sequence.

High efÞ ciency heat recovery unit with cooling circuit - X Y Z -
b dSelection, installation, use and maintenance manual ] ^
• disassemble the cross bar;• disconnect the pan from the
condensate drain pipes;• disassemble the pan supporting
brackets;• clean the pan;• replace all parts in reverse order.
In order to access the condensate drain pan on the coil module, detach the module from the unit and disassemble it.
Heat recovery unitThe heat recovery unit can be cleaned with a jet of compressed air or cold water. To disassemble the heat recovery unit:• remove the condensate drain pan (if
the unit is placed in the ceiling);• remove the heat recovery unit
supporting brackets;• clean the heat recovery unit; • replace all parts in reverse order.
COMPONENT OPERATION FREQUENCY
Filters cleanliness control twice a week
Heat exchanger coil coil claning control each year
Condensate pan cleanliness control each year
Heat recovery unit coil claning control each year
The table indicates the maintenance operations
concerning each component, indicating the
type of check to perform and when it should be
performed.
The frequency is approximate and varies
depending on the working and environmental
conditions in which the heat recovery unit
operates.
Disposal
All units are checked and tested at the factory before shipment, however, during operation an anomaly or failure can occur.
BE SURE TO RESET AN ALARM ONLY AFTER YOU HAVE REMOVED THE CAUSE OF THE FAULT; REPEATED RESET MAY RESULT IN IRREVOCABLE DAMAGE TO THE UNIT.
At the end of their operating life, the RHE units must be disposed of according to the present laws.The main components including the unit of the URFC series are made from:
• Galvanised sheet steel (panels , condensate drain pan, fans);
• aluminium sheet metal (coil fins, dampers, electrical motor casing);
• copper (coil tubes, electric motor winding );
• polyurethane foam (insulation of the sandwich panels);
• rock wool (silencers);
• the cooling gas is recuperated by specialised personnel and forwarded to the disposal centre;
• the compressor oil is also recovered and forwarded for disposal.
DecommissioningDisconnect the unit
All decommissioning operations must be performed by authorized personnel in accordance with the national legislation in force in the country where the unit is located.
•Avoid spills or leaks into the envi-ronment.•Before disconnecting the machine please recover:
•the refrigerant gas;•Glycol mixture in the hydraulic circuit;•the compressor lubricating oil.
Before decommissioning the machi-ne can be stored outdoors, provi-ding that it has the electrical box, refrigerant circuit and hydraulic cir-cuit intact and closed.
Disposal, recovery and re-cycling
The frame and components, if unu-sable, should be taken apart and sor-ted by type, especially copper and aluminum that are present in large quantities in the machine.All materials must be recovered or disposed in accordance with natio-nal regulations.
RAEE Directive (only UE)
•The RAEE Directive requires that the disposal and recycling of elec-trical and electronic equipment must be handled through a special collection, in appropriate centers, separate from that used for the di-sposal of mixed urban waste.•The user has the obligation not to dispose of the equipment at the end of the useful life as municipal waste, but to send it to a special collection center.•The units covered by the RAEE Di-rective are marked with the symbol shown above.•The potential effects on the envi-ronment and human health are de-tailed in this manual.•Additional information can be obtained from the manufacturer.
Fans-motor assemblyThe fans motor assembly needs to be checked to see how clean the rotor is, whether there is corrosion or damage, and whether there are abnormal noises. If necessary disassemble the motor fan assembly as follows:• remove all inspection panels;• disconnect the power supply cable;• unscrew the four screws that hold each of the motor fan assemblies to the frame;
• check the motor fan assemblies and replace them if necessary;• replace all parts in reverse order.
Heat exchanger coils To maintain an efficient heat exchange the coils must be cleaned with a jet of compressed air and the circuit (water coil) must be free from air. To access the heat exchanger coil of the MBC accessory, disconnect the module
from the unit and disassemble it .
High efÞ ciency heat recovery unit with cooling circuit - X Y Z -
b [Selection, installation, use and maintenance manual ] ^
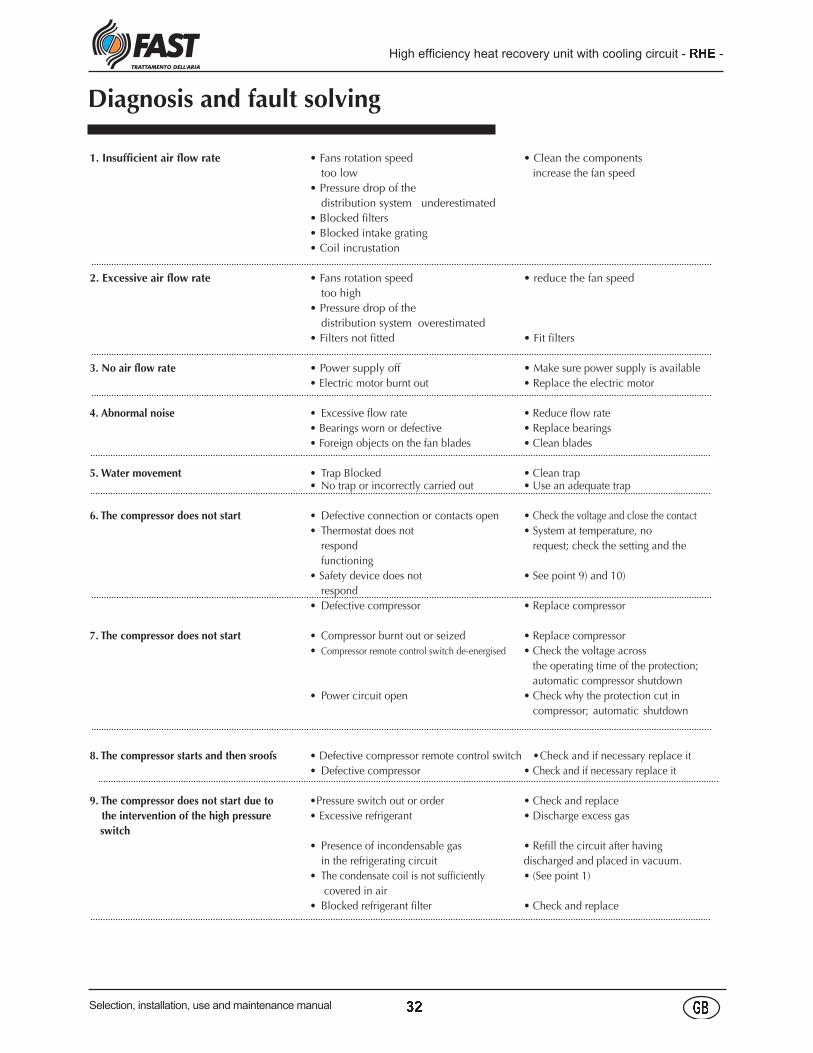
Diagnosis and fault solving
1. Insufficient air flow rate • Fans rotation speed • Clean the components
too low increase the fan speed
• Pressure drop of the
distribution system underestimated
• Blocked filters
• Blocked intake grating
• Coil incrustation
2. Excessive air flow rate • Fans rotation speed • reduce the fan speed
too high
• Pressure drop of the
distribution system overestimated
• Filters not fitted • Fit filters
3. No air flow rate • Power supply off • Make sure power supply is available
• Electric motor burnt out • Replace the electric motor
4. Abnormal noise • Excessive flow rate • Reduce flow rate
• Bearings worn or defective • Replace bearings
• Foreign objects on the fan blades • Clean blades
5. Water movement • Trap Blocked • Clean trap • No trap or incorrectly carried out • Use an adequate trap
6. The compressor does not start • Defective connection or contacts open • Check the voltage and close the contact
• Thermostat does not • System at temperature, no
respond request; check the setting and the
functioning
• Safety device does not • See point 9) and 10)
respond
• Defective compressor • Replace compressor
7. The compressor does not start • Compressor burnt out or seized • Replace compressor
• Compressor remote control switch de-energised • Check the voltage across
the operating time of the protection;
automatic compressor shutdown
• Power circuit open • Check why the protection cut in
compressor; automatic shutdown
8. The compressor starts and then sroofs • Defective compressor remote control switch • Check and if necessary replace it
• Defective compressor • Check and if necessary replace it
9. The compressor does not start due to •Pressure switch out or order • Check and replace
the intervention of the high pressure • Excessive refrigerant • Discharge excess gas
switch
• Presence of incondensable gas • Refill the circuit after having
in the refrigerating circuit discharged and placed in vacuum.
• The condensate coil is not sufficiently • (See point 1)
covered in air
• Blocked refrigerant filter • Check and replace

High efÞ ciency heat recovery unit with cooling circuit - X Y Z -
b bSelection, installation, use and maintenance manual ] ^
10. The compressor does not start due • Pressure switch out of order • Check and replace
to the intervention of the • Machine completely empty • See point 11)
low pressure switch • Poor air flow • Check the air duct and the state of
the filters.
• Blocked refrigerant filter • Check and replace
•The thermal expansion valve does not • Check, clean or if necessary
function correctly replace it.
11. Lack of gas • Leak in the refrigerating circuit • Check the refrigerating circuit
with a leak detector
12. Hot liquid pipe • Lack of refrigerant • See point 11)
13. The refrigerating circuit functions • Lack of refrigerant • See point 11)
correctly but with insufficient • Presence of humidity or incondensable • Replace the filter and if necessary
proficiency in the refrigerating circuit drain and refill the circuit
14. Compressor suction tube • Thermal expansion valve • Check the valve and
frosted if it is not working
correctly replace it
• Poor air flow • Check filters, fans and ducts.
• Lack of refrigerant • See point 11)
• Blocked liquid filter • Clean or replace
15. Abnormal noise in the system • Vibrations in the pipes • Secure the pipes
• Noisy compressor • Check electrical phases connection
• Noisy thermostatic valve • Check and add refrigerant
16. Evaporator coil • Lack of refrigerant in the circuit: • Check for leaks and eliminate them
before bubbles visible in the indicator. roofping up with refrigerant.
• Thermostatic expansion valve over . • Reduce the overheating of the
closed: suction pipe too hot thermostatic expansion valve
turn the valve stem and
check the suction pressure .
• Thermostatic expansion valve over . • Change the valve or free the
closed: expansion valve bulb control pipe.
partially blocked or pressure intake pipe
blocked
• Filter-drier blocked: bubbles in the • Change the filter-drier.
flow indicator and liquid pipe colder
at the filter drier outlet
• The manifold feed pipes are • Remove the obstruction; clean or change
blocked or oil has accumulated in the the evaporator.
coil: not all of the evaporator circuits
are working
17. Compressor too hot •Thermostatic expansion valve • Reduce the overheating of the
over closed: excessive overheating thermostatic valve
of the evaporator discharge gas
18. Compressor to cold and noisy • Expansion valve over open: • Measure and reset the overheating
the system works with the overheating by closing the valve
to low (return of liquid to the
compressor).
• Thermostatic valve out of order: the stem or • Replace the valve or free the
the seat of the expansion valve is pressure inlet pipe
corroded. Pressure inlet pipe blocked.
• Foreign objects between the stem and the seat • Clean the stem and the holes of the
of the thermostatic valve: abnormal function thermostatic valve
of the thermostatic valve

NOTE


FAST S.p.A. TRATTAMENTO DELL'ARIA35044 Montagnana (PD) - ItalyVia Luppia Alberi, 170Tel. (+39) 0429 806311 - Fax 0429 806340E-mail: [email protected]://www.fastaer.com
efgf higje ke k he l
Technical data shown in this booklet are not binding.FAST S.p.A. shall have the right to introduce at any time whatever modifications deemed necessary to the improvement of the product.