heavy weapons leader course read ahead packet and
TRANSCRIPT

Heavy Weapons Leader Course Read Ahead Packet and Prerequisite Training Tasks

Heavy Weapons Leader Course Read Ahead Packet and Prerequisite Training Tasks
Page intentionally left blank for printing purposes
Heavy Weapons Leader Course Read Ahead Packet and Prerequisite Training Tasks
DEPARTMENT OF THE ARMY HWLC, B CO, 2ND BATTALION, 29TH INFANTRY REGIMENT
7980 BRADSHAW ROAD, BUILDING 301 FORT BENNING, GA 31905-4471
ATSH-INB-B 5 June 2013
MEMORANDUM FOR RECORD
SUBJECT: Pre-requisite training instruction.
1. Soldiers attending Heavy Weapons Leaders Course (HWLC) are required to complete the following skill level 1 training as a pre-requirement for attendance to this course. All training will be completed at the Soldiers home station by their first line supervisor. All Soldiers will be required to receive all “Go’s” prior to the attendance of this course. After being trained by the first line supervisor, the training packet will be signed by the first O3 or above in the Soldiers chain of command no more than 30 days prior to the course start date. This document will be hand carried by the Soldier to HWLC to be included in the Soldier’s student packet.
2. Equipment required for conducting prerequisite training/testing:
Equiptment QTY M2A1 .50 CAL machine gun ................................................ 1 Tripod with gun cradle .......................................................... 1 .50 CAL linked dummy rounds .............................................. 5 MK 19 machine gun .............................................................. 1 Tripod with gun cradle .......................................................... 5 40mm linked dummy rounds ................................................. 5 M41 ITAS will all sub-components ........................................ 1 M98A2 Command Launch Unit ............................................. 1 Javelin missile Simulation Round complete .......................... 1 with battery coolant unit BA 5590U battery ................................................................. 1 M98A2 Javelin basic skills trainer ......................................... 1 M41 ITAS basic skills trainer................................................. 1
3. The following is a list of the skill level 1 tasks will be tested:
Unload M1A2 .50 CAL machine gun Clear M1A2 .50 CAL machine gun
Load M1A2 .50 CAL machine gun Correct malfunction M1A2 .50 CAL machine gun Unload MK 19 machine gun Clear MK 19 machine gun Load MK 19 machine gun Correct malfunction MK 19 machine gun Unload MK 19 machine gun

Heavy Weapons Leader Course Read Ahead Packet and Prerequisite Training Tasks
Assemble M41 ITAS Engage a stationary target using the M41 ITAS basic skills trainer Prepare a M98A2 Javelin for fire Engage a stationary target using the Javelin basic skills trainer 4. Failure to complete this pre-requisite training could result in an administrative drop for this course with the opportunity to continue to train. If this should happen the Soldier will not receive a graduation certificate and will not receive the B8 ASI.
5. Point of contact for this memorandum is the undersigned 706-545-2193/7499 and/or Heavy Weapons Leaders Course 706-545-6164.
///Original Signed/// BRYAN V. KELSO CPT, IN Commanding

Heavy Weapons Leader Course Read Ahead Packet and Prerequisite Training Tasks
Date:
SUBJECT: Heavy Weapons Leaders Course (HWLC) Prerequisite Training Checklist.
1. The following Soldier __________________________, ___________ has completed the following Prerequisite
(Rank, Last, First) (Last 4 SSN) Training required prior to Prerequisite Testing.
Date of Class:____________________
Task Name Date Completed First Line Supervisor Initials
M2A1 CLEAR, LOAD, CORRECT MALFUNCTION AND UNLOAD AND CLEAR
MK19 CLEAR, LOAD, CORRECT MALFUNCTION AND UNLOAD AND CLEAR
M41 ITAS ASSEMBLY M41 ITAS STATIONARY ENGAGEMENT ON BST
M98A2 JAVELIN PREP FOR FIRE
M98A2 JAVELIN STATIONARY
ENGAGEMENT ON BST
2. I _____________________ have verified that the above S/M has completed the required Prerequisite Training (Commander’s Name) for the Heavy Weapons Leaders Course (HWLC).
_______________________________ ___________________________________ _______ Commander’s Name Commander’s Signature Date

Heavy Weapons Leader Course Read Ahead Packet and Prerequisite Training Tasks
Report Date: 18 Jan 2012 Summary Report for Individual Task
071-022-0004 Unload a Caliber .50 M2 Machine Gun
Status: Approved DISTRIBUTION RESTRICTION: Distribution authorized to U.S. Government agencies only DESTRUCTION NOTICE: Destroy by any method that will prevent disclosure of contents or reconstruction of the document Condition: As a gunner, given a .50 caliber M2 machine gun mounted on a tripod or cupola, loaded with linked .50 caliber ammunition. You have been directed to unload the .50 caliber M2 machine gun. Some iterations of this task should be performed in MOPP. Standard: Remove all ammunition and links from the .50 caliber M2 machine gun. Correctly clear the weapon, and verify the chamber is empty. Special Condition: None Special Standards: None Special Equipment: None Safety Level: Low MOPP: None
Task Statements
None Cue: None
None
CAUTION None
Remarks: None
Notes: None
Warning
Heavy Weapons Leader Course Read Ahead Packet and Prerequisite Training Tasks
Performance Steps
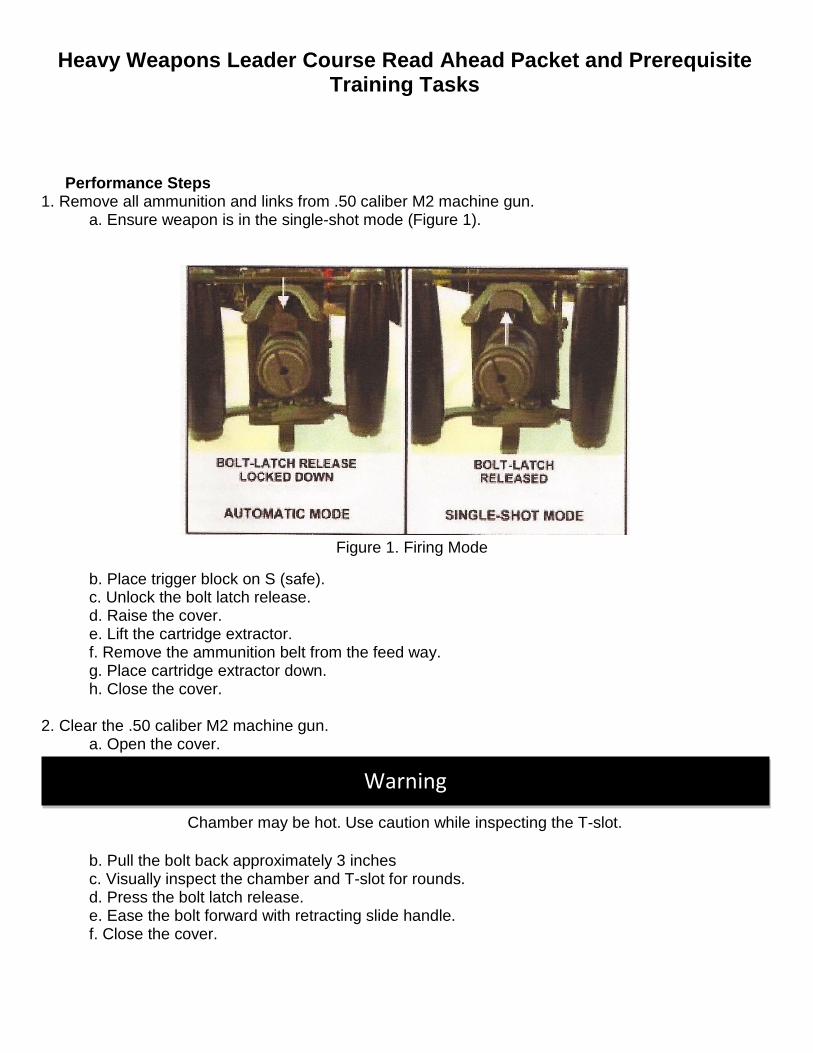
1. Remove all ammunition and links from .50 caliber M2 machine gun. a. Ensure weapon is in the single-shot mode (Figure 1).
Figure 1. Firing Mode
b. Place trigger block on S (safe). c. Unlock the bolt latch release. d. Raise the cover. e. Lift the cartridge extractor. f. Remove the ammunition belt from the feed way.und may fall to surface and possibly explode. g. Place cartridge extractor down. h. Close the cover.
2. Clear the .50 caliber M2 machine gun.
a. Open the cover.
Chamber may be hot. Use caution while inspecting the T-slot.
b. Pull the bolt back approximately 3 inches c. Visually inspect the chamber and T-slot for rounds. d. Press the bolt latch release. e. Ease the bolt forward with retracting slide handle. f. Close the cover.
Warning

Heavy Weapons Leader Course Read Ahead Packet and Prerequisite Training Tasks
3. Verify the chamber is empty. (Asterisks indicate a leader performance step.)
Evaluation Preparation: SETUP: Provide the Soldier with the equipment and/or materials described in the conditions statement. BRIEF THE SOLDIER: Explain what is expected of the Soldier by reviewing the task standards. Stress to the Soldier the importance of observing all cautions, warnings, and dangers to avoid injury to personnel and, if applicable, damage to equipment.
PERFORMANCE MEASURES GO NO-GO NA 1. Removed all ammunition and links from the .50 caliber M2 machine
2. Cleared the .50 caliber M2 machine gun. 3. Verified the chamber was empty.
Supporting Reference(s):
Step
Reference
Reference Name Required Primary FM 3-22.65
BROWNING MACHINE GUN, CALIBER .50 HB, M2
No No
TM 9-1005-245- 13&P
OPERATORS, UNIT, AND DIRECT SUPPORT MAINTENANCE MANUAL WITH REPAIR PARTS AND SPECIAL TOOLS LIST (RPSTL) FOR MACHINE GUN MOUNTS AND COMBINATIONS FOR TACTICAL/ARMORED VEHICLES AND GROUND MOUNTING M122 MACH
No No
Environment: Environmental protection is not just the law but the right thing to do. It is a continual process and starts with deliberate planning. Always be alert to ways to protect our environment during training and missions. In doing so, you will contribute to the sustainment of our training resources while protecting people and the environment from harmful effects. Safety: In a training environment, leaders must perform a risk assessment in accordance with FM 5-19, Composite Risk Management. Leaders will complete a DA Form 7566 COMPOSITE RISK MANAGEMENT WORKSHEET during the planning and completion of each task and sub-task by assessing mission, enemy, terrain and weather, troops and support available-time available and civil considerations, (METT-TC). Note: During MOPP training, leaders must ensure personnel are monitored for potential heat injury. Local policies and procedures must be followed during times of increased heat category in order to avoid heat related injury. Consider the MOPP work/rest cycles and water replacement guidelines. IAW FM 3-11.4, NBC Protection, FM 3-11.5, CBRN Decontamination. Everyone is responsible for safety. A thorough risk assessment must be completed prior to every mission or operation.
Heavy Weapons Leader Course Read Ahead Packet and Prerequisite Training Tasks
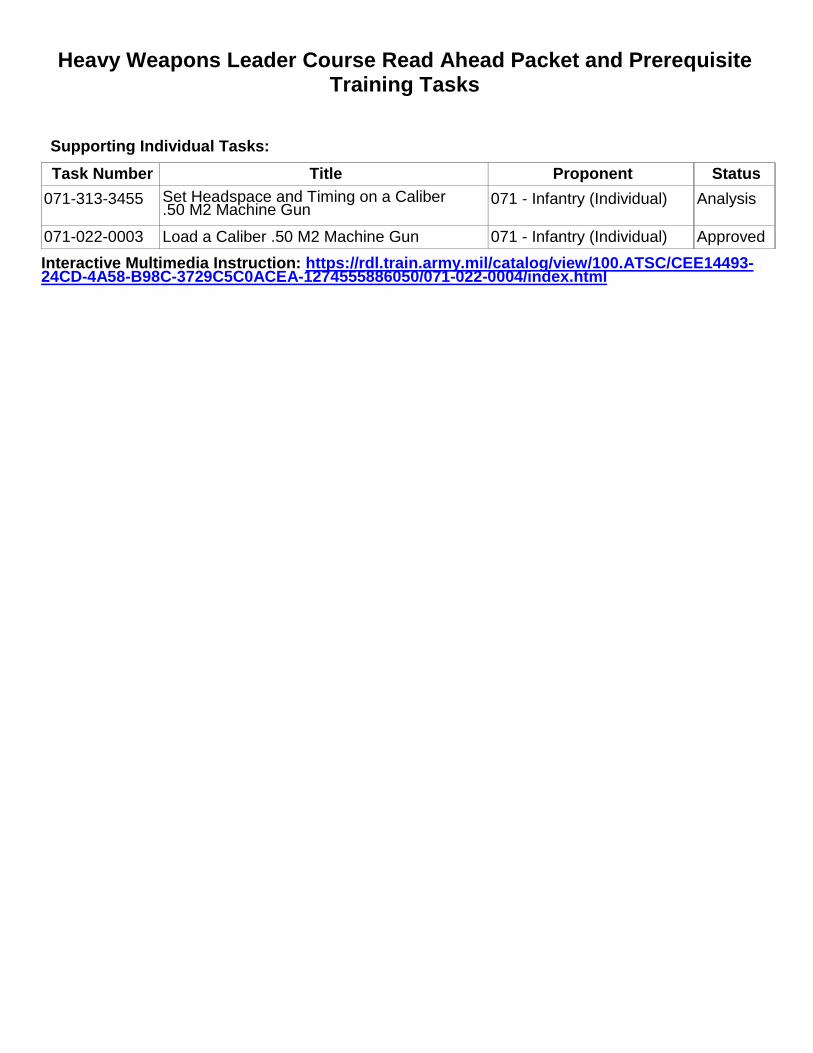
Supporting Individual Tasks: Task Number Title Proponent Status
071-313-3455 Set Headspace and Timing on a Caliber .50 M2 Machine Gun
071 - Infantry (Individual) Analysis
071-022-0003 Load a Caliber .50 M2 Machine Gun 071 - Infantry (Individual) Approved Interactive Multimedia Instruction: https://rdl.train.army.mil/catalog/view/100.ATSC/CEE14493-24CD-4A58-B98C-3729C5C0ACEA-1274555886050/071-022-0004/index.html
Heavy Weapons Leader Course Read Ahead Packet and Prerequisite Training Tasks
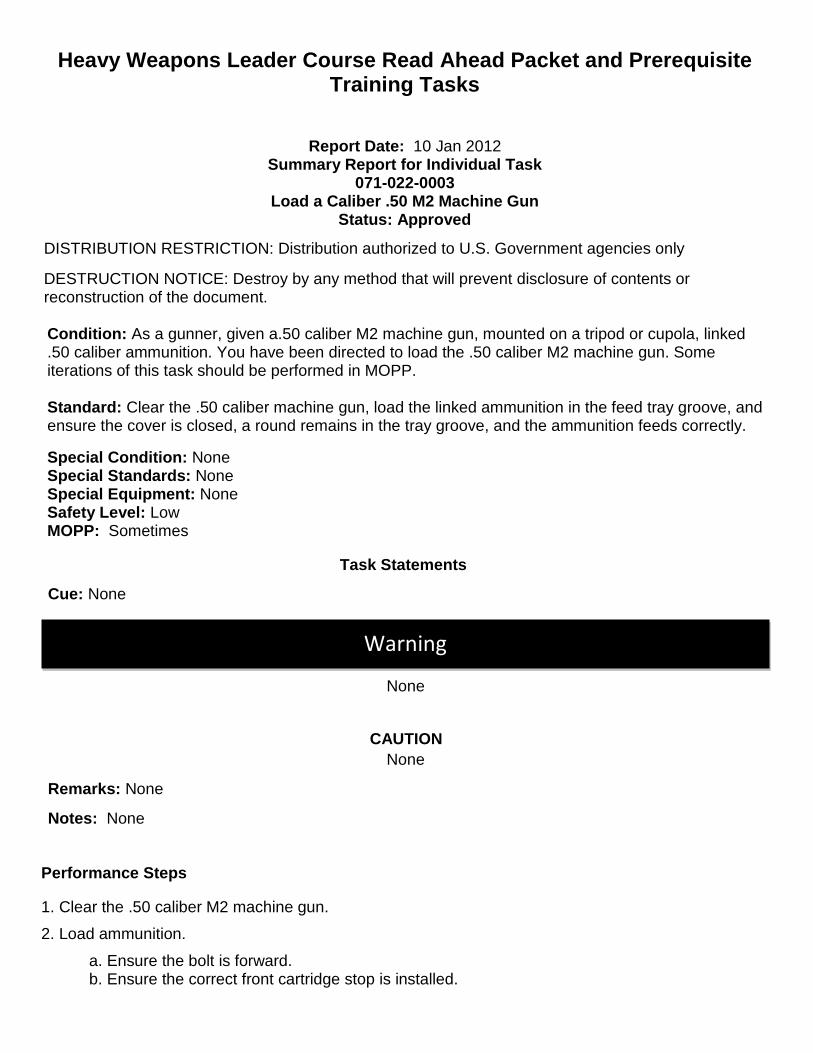
Report Date: 10 Jan 2012 Summary Report for Individual Task
071-022-0003 Load a Caliber .50 M2 Machine Gun
Status: Approved DISTRIBUTION RESTRICTION: Distribution authorized to U.S. Government agencies only DESTRUCTION NOTICE: Destroy by any method that will prevent disclosure of contents or reconstruction of the document. Condition: As a gunner, given a.50 caliber M2 machine gun, mounted on a tripod or cupola, linked .50 caliber ammunition. You have been directed to load the .50 caliber M2 machine gun. Some iterations of this task should be performed in MOPP.
Standard: Clear the .50 caliber machine gun, load the linked ammunition in the feed tray groove, and ensure the cover is closed, a round remains in the tray groove, and the ammunition feeds correctly.
Special Condition: None Special Standards: None Special Equipment: None Safety Level: Low MOPP: Sometimes
Task Statements
Cue: None
None
CAUTION
None Remarks: None
Notes: None
Performance Steps 1. Clear the .50 caliber M2 machine gun. 2. Load ammunition.
a. Ensure the bolt is forward. b. Ensure the correct front cartridge stop is installed.
Warning
Heavy Weapons Leader Course Read Ahead Packet and Prerequisite Training Tasks
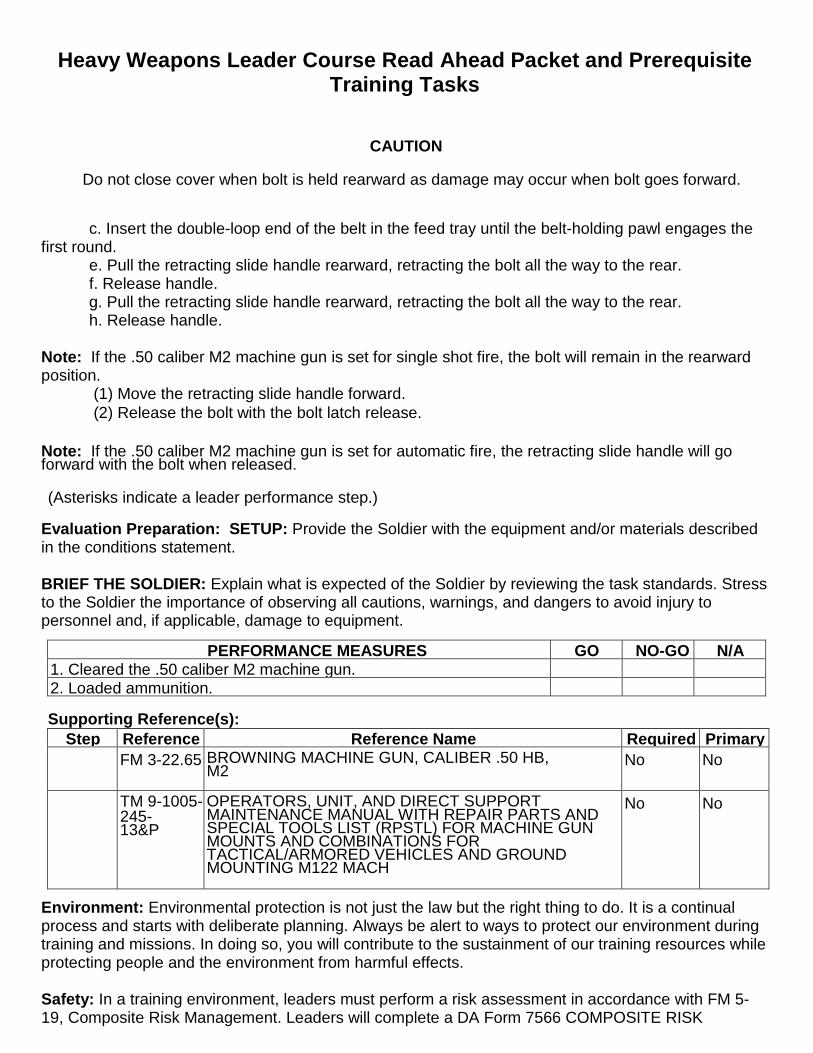
CAUTION
Do not close cover when bolt is held rearward as damage may occur when bolt goes forward.
c. Insert the double-loop end of the belt in the feed tray until the belt-holding pawl engages the
first round. e. Pull the retracting slide handle rearward, retracting the bolt all the way to the rear. f. Release handle. g. Pull the retracting slide handle rearward, retracting the bolt all the way to the rear. h. Release handle.
Note: If the .50 caliber M2 machine gun is set for single shot fire, the bolt will remain in the rearward position.
(1) Move the retracting slide handle forward. (2) Release the bolt with the bolt latch release.
Note: If the .50 caliber M2 machine gun is set for automatic fire, the retracting slide handle will go forward with the bolt when released. (Asterisks indicate a leader performance step.)
Evaluation Preparation: SETUP: Provide the Soldier with the equipment and/or materials described in the conditions statement. BRIEF THE SOLDIER: Explain what is expected of the Soldier by reviewing the task standards. Stress to the Soldier the importance of observing all cautions, warnings, and dangers to avoid injury to personnel and, if applicable, damage to equipment.
PERFORMANCE MEASURES GO NO-GO N/A 1. Cleared the .50 caliber M2 machine gun. 2. Loaded ammunition.
Supporting Reference(s):
Step
Reference
Reference Name Required Primary FM 3-22.65 BROWNING MACHINE GUN, CALIBER .50 HB,
M2 No No
TM 9-1005-245- 13&P
OPERATORS, UNIT, AND DIRECT SUPPORT MAINTENANCE MANUAL WITH REPAIR PARTS AND SPECIAL TOOLS LIST (RPSTL) FOR MACHINE GUN MOUNTS AND COMBINATIONS FOR TACTICAL/ARMORED VEHICLES AND GROUND MOUNTING M122 MACH
No No
Environment: Environmental protection is not just the law but the right thing to do. It is a continual process and starts with deliberate planning. Always be alert to ways to protect our environment during training and missions. In doing so, you will contribute to the sustainment of our training resources while protecting people and the environment from harmful effects. Safety: In a training environment, leaders must perform a risk assessment in accordance with FM 5-19, Composite Risk Management. Leaders will complete a DA Form 7566 COMPOSITE RISK
Heavy Weapons Leader Course Read Ahead Packet and Prerequisite Training Tasks
MANAGEMENT WORKSHEET during the planning and completion of each task and sub-task by assessing mission, enemy, terrain and weather, troops and support available-time available and civil considerations, (METT-TC). Note: During MOPP training, leaders must ensure personnel are monitored for potential heat injury. Local policies and procedures must be followed during times of increased heat category in order to avoid heat related injury. Consider the MOPP work/rest cycles and water replacement guidelines IAW FM 3-11.4, NBC Protection, FM 3-11.5, CBRN Decontamination. Everyone is responsible for safety. A thorough risk assessment must be completed prior to every mission or operation.
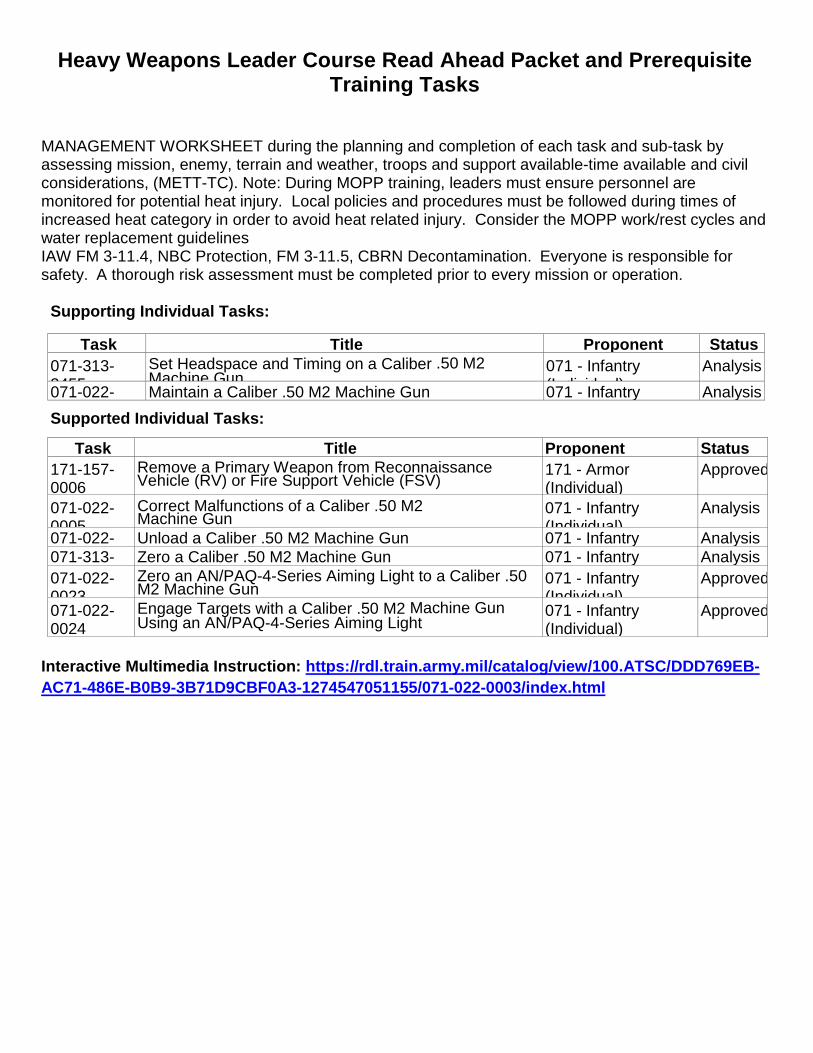
Supporting Individual Tasks:
Task
Title Proponent Status 071-313-3455
Set Headspace and Timing on a Caliber .50 M2 Machine Gun
071 - Infantry (I di id l)
Analysis 071-022-
Maintain a Caliber .50 M2 Machine Gun 071 - Infantry
Analysis
Supported Individual Tasks:
Task
Title Proponent Status 171-157-0006
Remove a Primary Weapon from Reconnaissance Vehicle (RV) or Fire Support Vehicle (FSV)
171 - Armor (Individual)
Approved
071-022-0005
Correct Malfunctions of a Caliber .50 M2 Machine Gun
071 - Infantry (Individual)
Analysis
071-022-
Unload a Caliber .50 M2 Machine Gun 071 - Infantry
Analysis 071-313-
Zero a Caliber .50 M2 Machine Gun 071 - Infantry
Analysis
071-022-0023
Zero an AN/PAQ-4-Series Aiming Light to a Caliber .50 M2 Machine Gun
071 - Infantry (Individual)
Approved
071-022-0024
Engage Targets with a Caliber .50 M2 Machine Gun Using an AN/PAQ-4-Series Aiming Light
071 - Infantry (Individual)
Approved
Interactive Multimedia Instruction: https://rdl.train.army.mil/catalog/view/100.ATSC/DDD769EB-AC71-486E-B0B9-3B71D9CBF0A3-1274547051155/071-022-0003/index.html
Heavy Weapons Leader Course Read Ahead Packet and Prerequisite Training Tasks
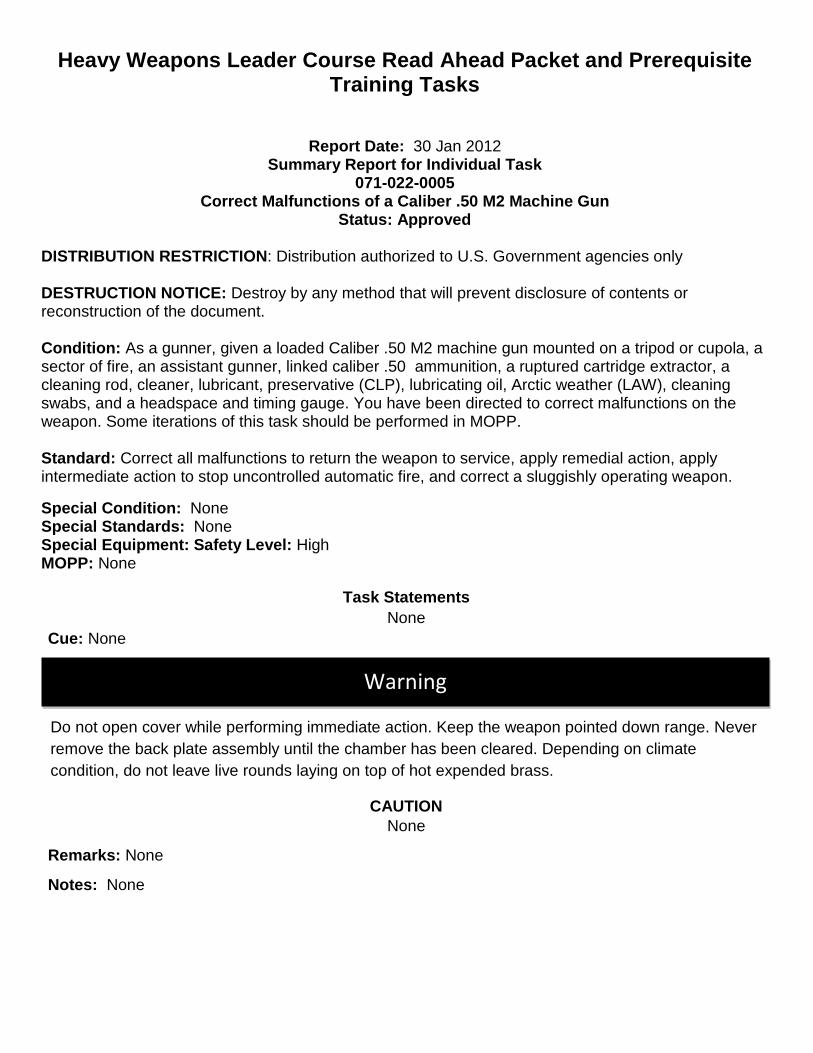
Report Date: 30 Jan 2012 Summary Report for Individual Task
071-022-0005 Correct Malfunctions of a Caliber .50 M2 Machine Gun
Status: Approved DISTRIBUTION RESTRICTION: Distribution authorized to U.S. Government agencies only DESTRUCTION NOTICE: Destroy by any method that will prevent disclosure of contents or reconstruction of the document. Condition: As a gunner, given a loaded Caliber .50 M2 machine gun mounted on a tripod or cupola, a sector of fire, an assistant gunner, linked caliber .50 ammunition, a ruptured cartridge extractor, a cleaning rod, cleaner, lubricant, preservative (CLP), lubricating oil, Arctic weather (LAW), cleaning swabs, and a headspace and timing gauge. You have been directed to correct malfunctions on the weapon. Some iterations of this task should be performed in MOPP. Standard: Correct all malfunctions to return the weapon to service, apply remedial action, apply intermediate action to stop uncontrolled automatic fire, and correct a sluggishly operating weapon. Special Condition: None Special Standards: None Special Equipment: Safety Level: High MOPP: None
Task Statements None
Cue: None
Do not open cover while performing immediate action. Keep the weapon pointed down range. Never remove the back plate assembly until the chamber has been cleared. Depending on climate condition, do not leave live rounds laying on top of hot expended brass.
CAUTION
None Remarks: None
Notes: None
Warning

Heavy Weapons Leader Course Read Ahead Packet and Prerequisite Training Tasks
Performance Steps 1. Correct malfunction to return the weapon to service.
a. On a cool weapon (fired less than 200 rounds in 2 minutes). (1) Hold the weapon on target. (2) Wait 10 seconds in case the weapon has a hang fire. (3) Pull the retracting handle to the rear. (4) Return the retracting slide handle to its forward position. (5) If the bolt locks to the rear, depress the bolt latch to the return bolt to the forward position. (6) Attempt to fire. If weapon fires, you have corrected the stoppage. (7) If the weapon fails to fire, wait 10 seconds, pull retracting slide handle to the rear, and lock it in the rearward position (engage with bolt latch). (8) Return the retracting slide to its forward position.
The climatic temperature of various global regions will make a difference as to what constitutes a “hot gun”. A cook-off can occur within 50 rounds when the weapon and ammunition have been exposed for a prolonged period in the sun.
b. Take action within 10 seconds on a hot weapon (fired 200 or more rounds in 2 minutes) that stops firing. (1) Hold the weapon on target. (2) Pull the retracting slide handle to the rear. (3) Observe if the round or fired case is ejected, release retracting slide handle, and attempt to fire again. (4) If the weapon fails to fire place the bolt in the forward position and place the weapon in single action mode. (5) Evacuate immediate area and wait 30 minutes before proceeding to Step 1b(6). (6) If immediate action fails to correct stoppage, apply remedial action after the weapon has cooled sufficiently.
Keep the weapon pointed down range while performing remedial action procedures.
2. Apply remedial action.
a. Open the cover assembly and remove ammunition belt. (1) Check for faulty ammunition. (2) Check for an obstruction in the barrel assembly and chamber. b. Pull the retracting slide handle to the rear. c. If a round is not ejected lock the bolt to the rear, if applicable, return retracting slide handle forward. d. If a round is present in the chamber, direct the assistant gunner to stand to the side of the weapon. (1) Insert cleaning rod into muzzle end of machine gun.
Warning
Warning

Heavy Weapons Leader Course Read Ahead Packet and Prerequisite Training Tasks
(2) Gently tap the round/case from chamber. e. The weapon is now clear. f. Return the bolt to the forward position. g. Reload and continue to fire.
3. Apply immediate action to stop uncontrolled automatic fire (runaway gun). a. Perform one of three actions: (1) Keep the gun laid on target. (2) Twist the belt, causing the gun to jam. (3) Wait 5 minutes to guard against cook off. (4) Clear the weapon, replace broken worn, or burred parts. (5) Check the side plate trigger and trigger control mechanism, when applicable.
Never reload a runaway weapon until it is repaired. Be sure weapon is cleared.
b. Check to ensure the weapon is clear and go to Step 3c, if you have fired all your ammunition. (1) Check to see if the weapon is hot (fired more than 150 rounds in less than 2 minutes).
(2) Keep the cover assembly closed, wait 15 minutes, then proceed to Step 3c, if the weapon is hot. c. Disassemble the weapon and inspect for defective parts. d. Clean the weapon, remove obstructions, replace defective parts, lubricate, and assemble the weapon. e. If applicable check headspace and timing and adjust, if necessary. f. If the weapon still fails to fire properly, notify your supervisor. g. Check the sideplate trigger control mechanism, when applicable.
4. Correct a sluggishly operating weapon.
a. Clear the weapon. b. Disassemble, clean, and lubricate the weapon. c. Assemble the weapon. d. If applicable set headspace and timing.
(Asterisks indicate a leader performance step.) Evaluation Preparation:
SETUP: Provide the Soldier with the equipment and/or materials described in the conditions statement.
BRIEF THE SOLDIER: Explain what is expected of the Soldier by reviewing the task standards. Stress to the Soldier the importance of observing all cautions, warnings, and dangers to avoid injury to personnel and, if applicable, damage to equipment.
PERFORMANCE MEASURES GO NO-GO N/A
1. Corrected malfunction to return weapon to service. 2. Applied remedial action. 3. Applied immediate action to stop uncontrolled automatic fire (runaway
)
4. Corrected a sluggishly operating weapon.
Warning
Heavy Weapons Leader Course Read Ahead Packet and Prerequisite Training Tasks
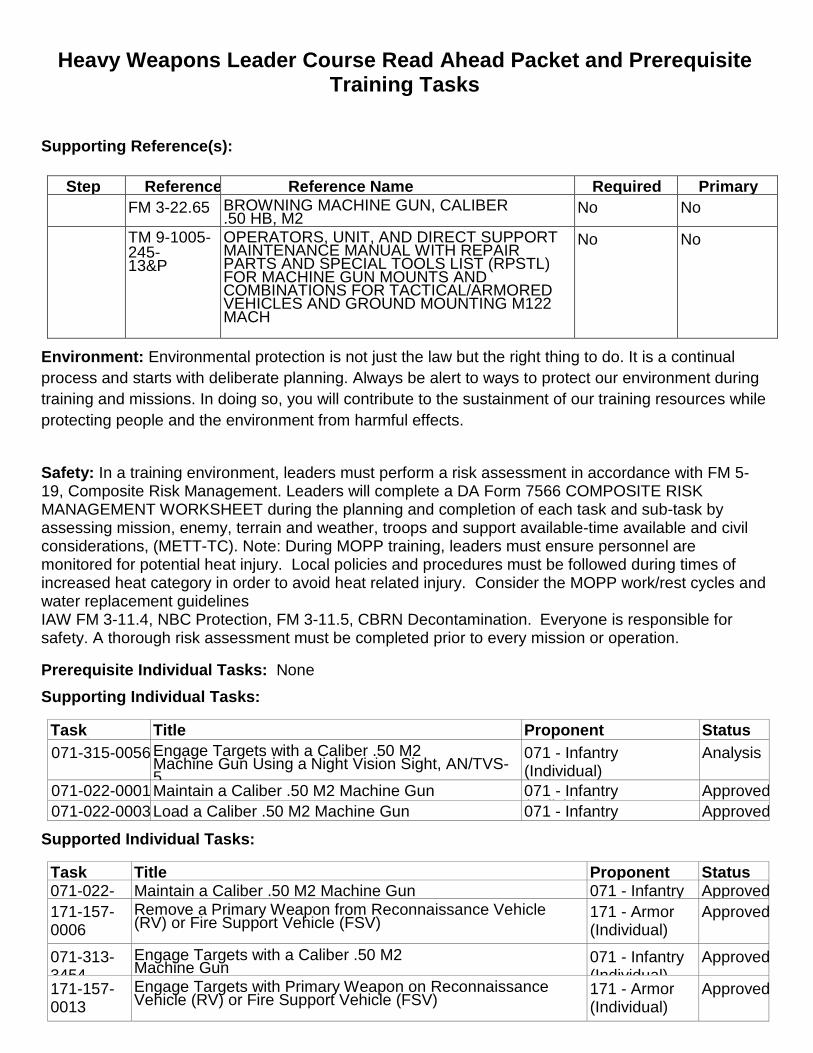
Supporting Reference(s):
Step
Reference
Reference Name Required Primary FM 3-22.65 BROWNING MACHINE GUN, CALIBER
.50 HB, M2 No No
TM 9-1005-245- 13&P
OPERATORS, UNIT, AND DIRECT SUPPORT MAINTENANCE MANUAL WITH REPAIR PARTS AND SPECIAL TOOLS LIST (RPSTL) FOR MACHINE GUN MOUNTS AND COMBINATIONS FOR TACTICAL/ARMORED VEHICLES AND GROUND MOUNTING M122 MACH
No No
Environment: Environmental protection is not just the law but the right thing to do. It is a continual process and starts with deliberate planning. Always be alert to ways to protect our environment during training and missions. In doing so, you will contribute to the sustainment of our training resources while protecting people and the environment from harmful effects.
Safety: In a training environment, leaders must perform a risk assessment in accordance with FM 5-19, Composite Risk Management. Leaders will complete a DA Form 7566 COMPOSITE RISK MANAGEMENT WORKSHEET during the planning and completion of each task and sub-task by assessing mission, enemy, terrain and weather, troops and support available-time available and civil considerations, (METT-TC). Note: During MOPP training, leaders must ensure personnel are monitored for potential heat injury. Local policies and procedures must be followed during times of increased heat category in order to avoid heat related injury. Consider the MOPP work/rest cycles and water replacement guidelines IAW FM 3-11.4, NBC Protection, FM 3-11.5, CBRN Decontamination. Everyone is responsible for safety. A thorough risk assessment must be completed prior to every mission or operation. Prerequisite Individual Tasks: None Supporting Individual Tasks:
Task N b
Title Proponent Status 071-315-0056 Engage Targets with a Caliber .50 M2
Machine Gun Using a Night Vision Sight, AN/TVS-5
071 - Infantry (Individual)
Analysis
071-022-0001 Maintain a Caliber .50 M2 Machine Gun 071 - Infantry (I di id l)
Approved 071-022-0003 Load a Caliber .50 M2 Machine Gun 071 - Infantry
(I di id l) Approved
Supported Individual Tasks:
Task
Title Proponent Status 071-022-
Maintain a Caliber .50 M2 Machine Gun 071 - Infantry
Approved
171-157-0006
Remove a Primary Weapon from Reconnaissance Vehicle (RV) or Fire Support Vehicle (FSV)
171 - Armor (Individual)
Approved
071-313-3454
Engage Targets with a Caliber .50 M2 Machine Gun
071 - Infantry (Individual)
Approved
171-157-0013
Engage Targets with Primary Weapon on Reconnaissance Vehicle (RV) or Fire Support Vehicle (FSV)
171 - Armor (Individual)
Approved

Heavy Weapons Leader Course Read Ahead Packet and Prerequisite Training Tasks
171-122-1056
Engage Targets with a Caliber .50 M2 HB Machine Gun on an M113
171 - Armor (Individual)
Approved
Interactive Multimedia Instruction: https://rdl.train.army.mil/catalog/view/100.ATSC/07C9A840-C358-4190-A371-E29D63B574C5-1274548135211/071-022-0005/index.html

Heavy Weapons Leader Course Read Ahead Packet and Prerequisite Training Tasks
Report Date: 17 Feb 2012 Summary Report for Individual Task
071-030-0006 Unload an MK 19 Grenade Machine Gun
Status: Approved DISTRIBUTION RESTRICTION: Distribution authorized to U.S. Government agencies only DESTRUCTION NOTICE: Destroy by any method that will prevent disclosure of contents or reconstruction of the document. Condition: As a gunner, given a MK 19 grenade machine gun, mounted on a tripod or vehicle, loaded with linked 40mm grenade ammunition, and a 40mm ammunition can. You have been directed to unload the weapon. Some iterations of this task should be performed in MOPP. Standard: Place the safety switch to safe, remove the case catch bag, charge the weapon, remove all live rounds or spent cases from the bolt, open the top cover, remove linked rounds from the feeder, return the bolt to the forward position and place the safety switch in the S position. Special Condition: None Special Standards: None Special Equipment: None Safety Level: Low MOPP: Sometimes
Task Statements None
Cue: None
None
CAUTION None
Remarks: None Notes: None Performance Steps
1. Place the safety switch to S (SAFE). 2. Remove the case catch bag, if applicable. 3. Charge the weapon.
Warning
Heavy Weapons Leader Course Read Ahead Packet and Prerequisite Training Tasks
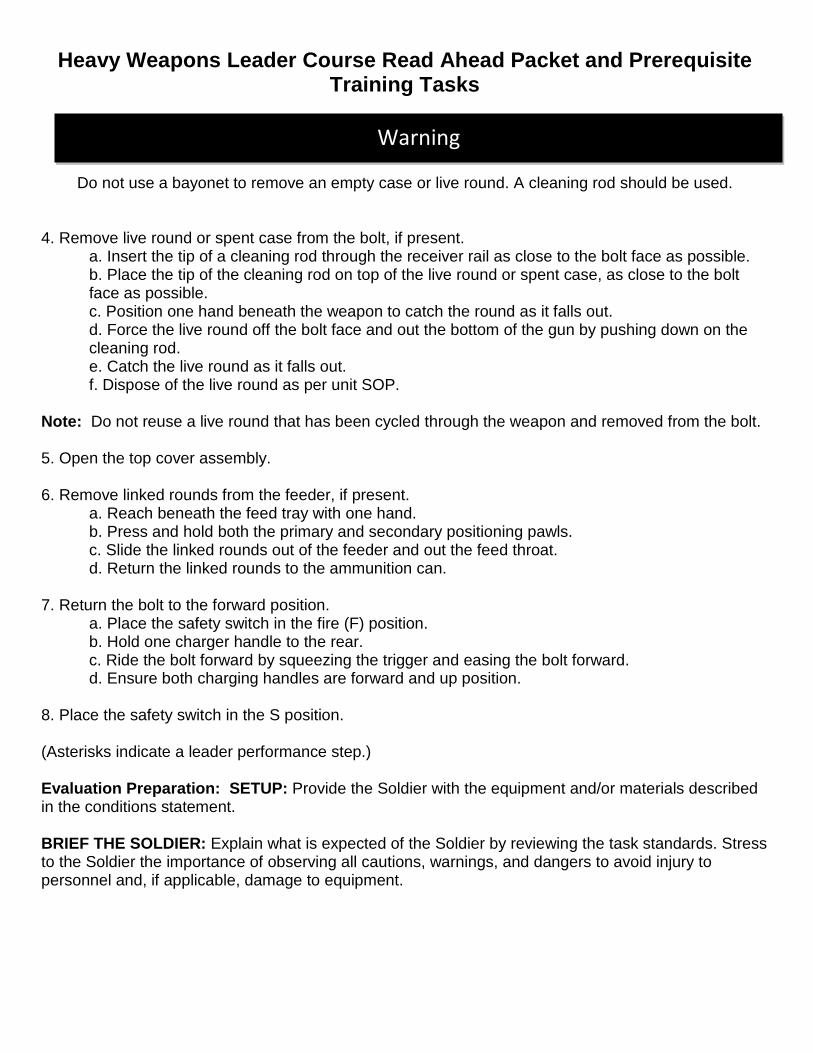
Do not use a bayonet to remove an empty case or live round. A cleaning rod should be used. 4. Remove live round or spent case from the bolt, if present.
a. Insert the tip of a cleaning rod through the receiver rail as close to the bolt face as possible. b. Place the tip of the cleaning rod on top of the live round or spent case, as close to the bolt face as possible. c. Position one hand beneath the weapon to catch the round as it falls out. d. Force the live round off the bolt face and out the bottom of the gun by pushing down on the cleaning rod. e. Catch the live round as it falls out. f. Dispose of the live round as per unit SOP.
Note: Do not reuse a live round that has been cycled through the weapon and removed from the bolt. 5. Open the top cover assembly. 6. Remove linked rounds from the feeder, if present.
a. Reach beneath the feed tray with one hand. b. Press and hold both the primary and secondary positioning pawls. c. Slide the linked rounds out of the feeder and out the feed throat. d. Return the linked rounds to the ammunition can.
7. Return the bolt to the forward position.
a. Place the safety switch in the fire (F) position. b. Hold one charger handle to the rear. c. Ride the bolt forward by squeezing the trigger and easing the bolt forward. d. Ensure both charging handles are forward and up position.
8. Place the safety switch in the S position. (Asterisks indicate a leader performance step.) Evaluation Preparation: SETUP: Provide the Soldier with the equipment and/or materials described in the conditions statement. BRIEF THE SOLDIER: Explain what is expected of the Soldier by reviewing the task standards. Stress to the Soldier the importance of observing all cautions, warnings, and dangers to avoid injury to personnel and, if applicable, damage to equipment.
Warning
Heavy Weapons Leader Course Read Ahead Packet and Prerequisite Training Tasks
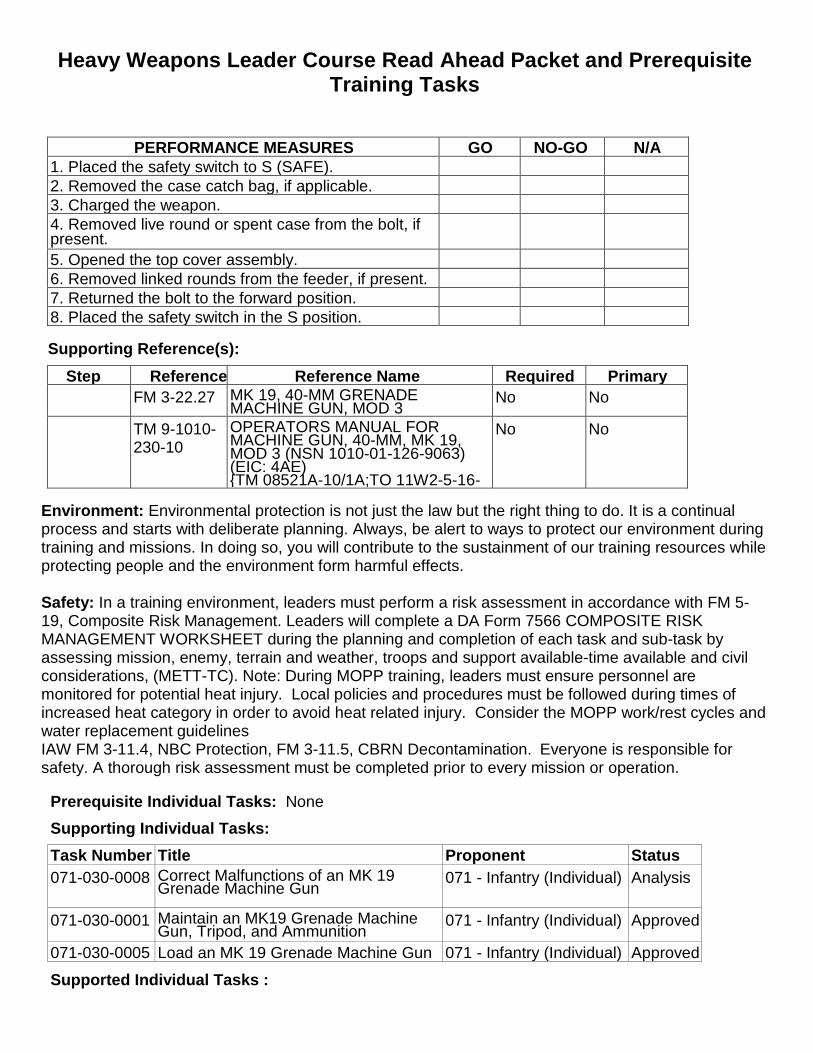
PERFORMANCE MEASURES GO NO-GO N/A 1. Placed the safety switch to S (SAFE). 2. Removed the case catch bag, if applicable. 3. Charged the weapon. 4. Removed live round or spent case from the bolt, if present.
5. Opened the top cover assembly. 6. Removed linked rounds from the feeder, if present. 7. Returned the bolt to the forward position. 8. Placed the safety switch in the S position.
Supporting Reference(s):
Step
Reference
Reference Name Required Primary FM 3-22.27 MK 19, 40-MM GRENADE
MACHINE GUN, MOD 3 No No
TM 9-1010-230-10
OPERATORS MANUAL FOR MACHINE GUN, 40-MM, MK 19, MOD 3 (NSN 1010-01-126-9063) (EIC: 4AE) {TM 08521A-10/1A;TO 11W2-5-16- 1 SW 363 C3 MMM 010}
No No
Environment: Environmental protection is not just the law but the right thing to do. It is a continual process and starts with deliberate planning. Always, be alert to ways to protect our environment during training and missions. In doing so, you will contribute to the sustainment of our training resources while protecting people and the environment form harmful effects. Safety: In a training environment, leaders must perform a risk assessment in accordance with FM 5-19, Composite Risk Management. Leaders will complete a DA Form 7566 COMPOSITE RISK MANAGEMENT WORKSHEET during the planning and completion of each task and sub-task by assessing mission, enemy, terrain and weather, troops and support available-time available and civil considerations, (METT-TC). Note: During MOPP training, leaders must ensure personnel are monitored for potential heat injury. Local policies and procedures must be followed during times of increased heat category in order to avoid heat related injury. Consider the MOPP work/rest cycles and water replacement guidelines IAW FM 3-11.4, NBC Protection, FM 3-11.5, CBRN Decontamination. Everyone is responsible for safety. A thorough risk assessment must be completed prior to every mission or operation.
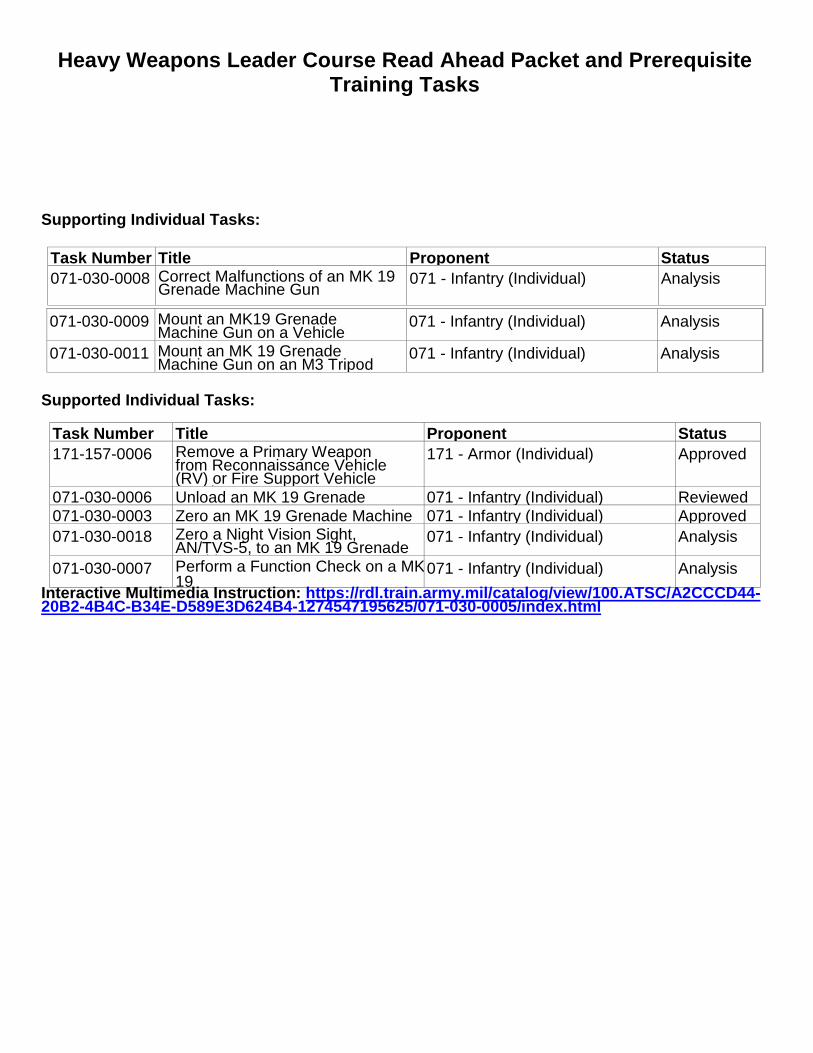
Prerequisite Individual Tasks: None Supporting Individual Tasks: Task Number Title Proponent Status 071-030-0008 Correct Malfunctions of an MK 19
Grenade Machine Gun 071 - Infantry (Individual) Analysis
071-030-0001 Maintain an MK19 Grenade Machine Gun, Tripod, and Ammunition
071 - Infantry (Individual) Approved
071-030-0005 Load an MK 19 Grenade Machine Gun 071 - Infantry (Individual) Approved
Supported Individual Tasks :
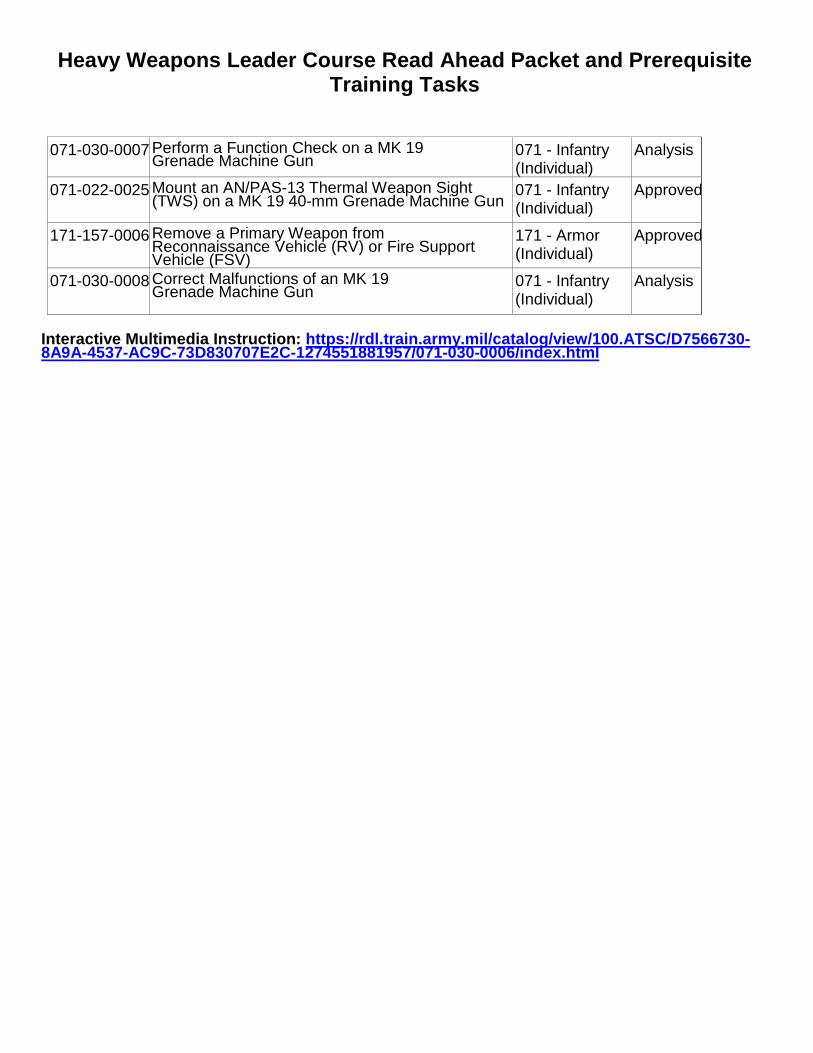
Heavy Weapons Leader Course Read Ahead Packet and Prerequisite Training Tasks
071-030-0007 Perform a Function Check on a MK 19
Grenade Machine Gun 071 - Infantry (Individual)
Analysis
071-022-0025 Mount an AN/PAS-13 Thermal Weapon Sight (TWS) on a MK 19 40-mm Grenade Machine Gun
071 - Infantry (Individual)
Approved
171-157-0006 Remove a Primary Weapon from Reconnaissance Vehicle (RV) or Fire Support Vehicle (FSV)
171 - Armor (Individual)
Approved
071-030-0008 Correct Malfunctions of an MK 19 Grenade Machine Gun
071 - Infantry (Individual)
Analysis
Interactive Multimedia Instruction: https://rdl.train.army.mil/catalog/view/100.ATSC/D7566730-8A9A-4537-AC9C-73D830707E2C-1274551881957/071-030-0006/index.html

Heavy Weapons Leader Course Read Ahead Packet and Prerequisite Training Tasks
Report Date: 17 Feb 2012 Summary Report for Individual Task
071-030-0005 Load an MK 19 Grenade Machine Gun
Status: Approved
DISTRIBUTION RESTRICTION: Distribution authorized to U.S. Government agencies only DESTRUCTION NOTICE: Destroy by any method that will prevent disclosure of contents or reconstruction of the document Condition: As a gunner, given a MK19 grenade machine gun, mounted on a tripod or vehicle, with linked 40mm grenade ammunition, and 40mm ammunition can. You have been directed to load the weapon. Some iterations of this task should be performed in MOPP. Standard: Clear the weapon, attach feed throat to feeder, insert round, load round and place weapon on safe. Special Condition: None Special Standards: None Special Equipment: None Safety Level: Low MOPP: Sometimes
Task Statements Cue: None
Before performing any procedure, ensure the weapon is clear of any ammunition. Use only ammunition authorized for use with the MK19 machine gun.
Do not allow the top cover to slam shut from raised position when loading. Hand injury or equipment
damage may result.
CAUTION
None Remarks: None
Notes: None
Warning
Heavy Weapons Leader Course Read Ahead Packet and Prerequisite Training Tasks
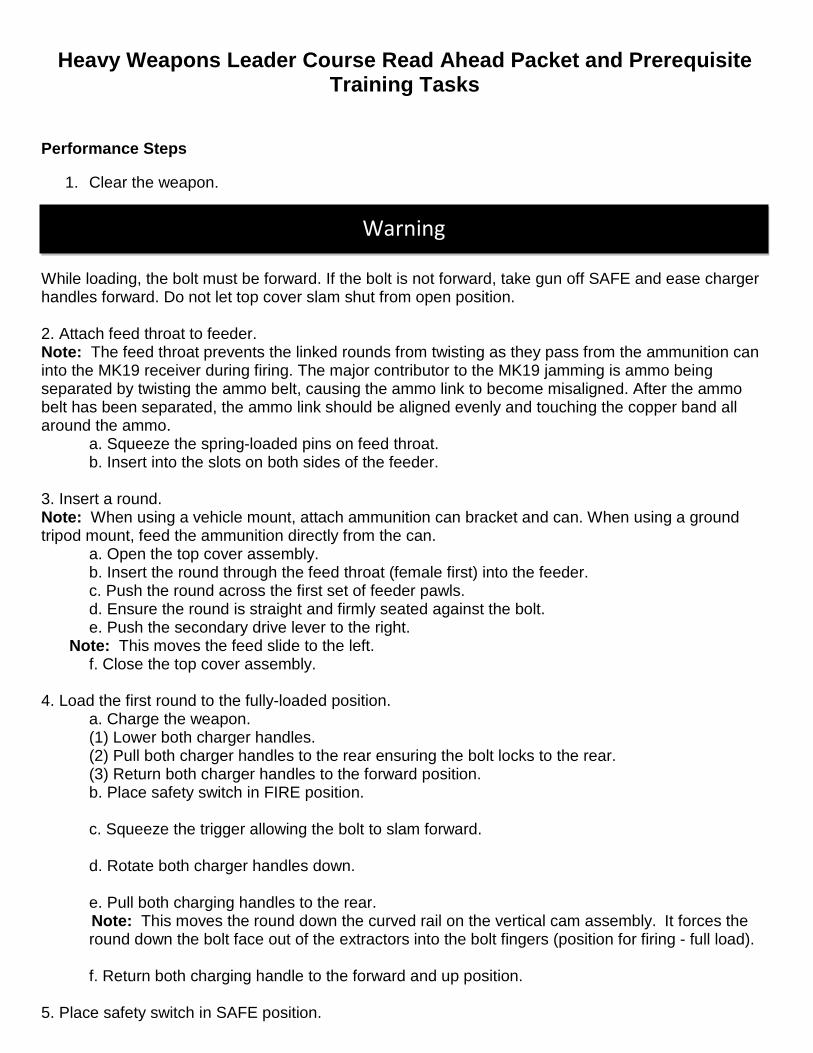
Performance Steps
1. Clear the weapon.
While loading, the bolt must be forward. If the bolt is not forward, take gun off SAFE and ease charger handles forward. Do not let top cover slam shut from open position. 2. Attach feed throat to feeder. Note: The feed throat prevents the linked rounds from twisting as they pass from the ammunition can into the MK19 receiver during firing. The major contributor to the MK19 jamming is ammo being separated by twisting the ammo belt, causing the ammo link to become misaligned. After the ammo belt has been separated, the ammo link should be aligned evenly and touching the copper band all around the ammo.
a. Squeeze the spring-loaded pins on feed throat. b. Insert into the slots on both sides of the feeder.
3. Insert a round. Note: When using a vehicle mount, attach ammunition can bracket and can. When using a ground tripod mount, feed the ammunition directly from the can.
a. Open the top cover assembly. b. Insert the round through the feed throat (female first) into the feeder. c. Push the round across the first set of feeder pawls. d. Ensure the round is straight and firmly seated against the bolt. e. Push the secondary drive lever to the right.
Note: This moves the feed slide to the left. f. Close the top cover assembly.
4. Load the first round to the fully-loaded position. a. Charge the weapon. (1) Lower both charger handles. (2) Pull both charger handles to the rear ensuring the bolt locks to the rear. (3) Return both charger handles to the forward position. b. Place safety switch in FIRE position.
c. Squeeze the trigger allowing the bolt to slam forward. d. Rotate both charger handles down.
e. Pull both charging handles to the rear. Note: This moves the round down the curved rail on the vertical cam assembly. It forces the round down the bolt face out of the extractors into the bolt fingers (position for firing - full load).
f. Return both charging handle to the forward and up position.
5. Place safety switch in SAFE position.
Warning

Heavy Weapons Leader Course Read Ahead Packet and Prerequisite Training Tasks
Note: The weapon is now ready to fire. (Asterisks indicate a leader performance step.) Evaluation Preparation:
SETUP: Provide the Soldier with the equipment and/or materials described in the conditions statement.
BRIEF THE SOLDIER: Explain what is expected of the Soldier by reviewing the task standards. Stress to the Soldier the importance of observing all cautions, warnings, and dangers to avoid injury to personnel and, if applicable, damage to equipment.
PERFORMANCE MEASURES GO NO-GO N/A
1. Cleared the weapon. 2. Attached feed throat to feeder. 3. Inserted a round. 4. Loaded the first round to the fully-loaded position. 5. Placed the safety switch on SAFE.
Supporting Reference(s):
Step Number Reference ID Reference Name Required Primary FM 3-22.27 MK 19, 40-MM GRENADE
MACHINE GUN, MOD 3 No No
TM 9-1010-230-10
OPERATORS MANUAL FOR MACHINE GUN, 40-MM, MK 19, MOD 3 (NSN 1010-01-126-9063) (EIC: 4AE) {TM 08521A 10/1A TO 11W2 5
No No
Environment: Environmental protection is not just the law but the right thing to do. It is a continual process and starts with deliberate planning. Always, be alert to ways to protect our environment during training and missions. In doing so, you will contribute to the sustainment of our training resources while protecting people and the environment form harmful effects. Safety: In a training environment, leaders must perform a risk assessment in accordance with FM 5-19, Composite Risk Management. Leaders will complete a DA Form 7566 COMPOSITE RISK MANAGEMENT WORKSHEET during the planning and completion of each task and sub-task by assessing mission, enemy, terrain and weather, troops and support available-time available and civil considerations, (METT-TC). Note: During MOPP training, leaders must ensure personnel are monitored for potential heat injury. Local policies and procedures must be followed during times of increased heat category in order to avoid heat related injury. Consider the MOPP work/rest cycles and water replacement guidelines IAW FM 3-11.4, NBC Protection, FM 3-11.5, CBRN Decontamination. Everyone is responsible for safety. A thorough risk assessment must be completed prior to every mission or operation. Prerequisite Individual Tasks: None
Heavy Weapons Leader Course Read Ahead Packet and Prerequisite Training Tasks
Supporting Individual Tasks:
Task Number Title Proponent Status 071-030-0008 Correct Malfunctions of an MK 19
Grenade Machine Gun 071 - Infantry (Individual) Analysis
071-030-0009 Mount an MK19 Grenade
Machine Gun on a Vehicle 071 - Infantry (Individual) Analysis
071-030-0011 Mount an MK 19 Grenade Machine Gun on an M3 Tripod
071 - Infantry (Individual) Analysis
Supported Individual Tasks:
Task Number Title Proponent Status 171-157-0006 Remove a Primary Weapon
from Reconnaissance Vehicle (RV) or Fire Support Vehicle (FSV)
171 - Armor (Individual) Approved
071-030-0006 Unload an MK 19 Grenade
071 - Infantry (Individual) Reviewed 071-030-0003 Zero an MK 19 Grenade Machine
071 - Infantry (Individual) Approved
071-030-0018 Zero a Night Vision Sight, AN/TVS-5, to an MK 19 Grenade M hi G
071 - Infantry (Individual) Analysis
071-030-0007 Perform a Function Check on a MK 19
071 - Infantry (Individual) Analysis
Interactive Multimedia Instruction: https://rdl.train.army.mil/catalog/view/100.ATSC/A2CCCD44-20B2-4B4C-B34E-D589E3D624B4-1274547195625/071-030-0005/index.html
Heavy Weapons Leader Course Read Ahead Packet and Prerequisite Training Tasks
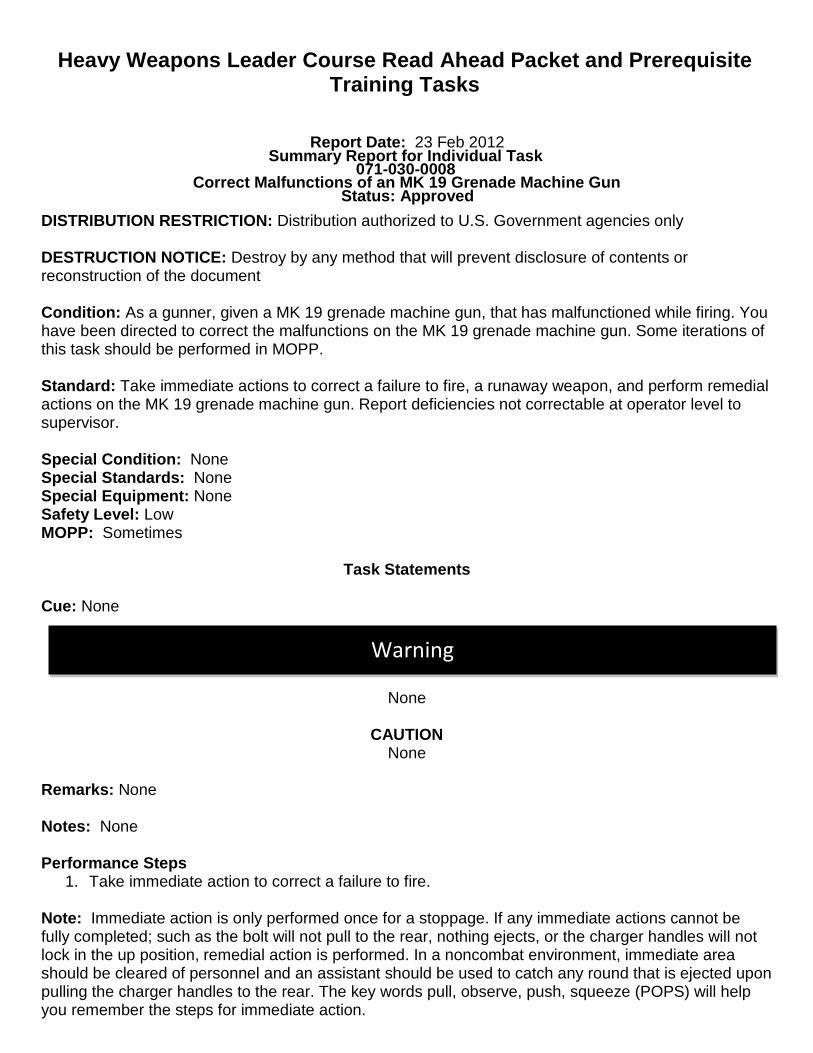
Report Date: 23 Feb 2012 Summary Report for Individual Task
071-030-0008 Correct Malfunctions of an MK 19 Grenade Machine Gun
Status: Approved DISTRIBUTION RESTRICTION: Distribution authorized to U.S. Government agencies only DESTRUCTION NOTICE: Destroy by any method that will prevent disclosure of contents or reconstruction of the document Condition: As a gunner, given a MK 19 grenade machine gun, that has malfunctioned while firing. You have been directed to correct the malfunctions on the MK 19 grenade machine gun. Some iterations of this task should be performed in MOPP. Standard: Take immediate actions to correct a failure to fire, a runaway weapon, and perform remedial actions on the MK 19 grenade machine gun. Report deficiencies not correctable at operator level to supervisor. Special Condition: None Special Standards: None Special Equipment: None Safety Level: Low MOPP: Sometimes
Task Statements Cue: None
None
CAUTION None
Remarks: None Notes: None Performance Steps
1. Take immediate action to correct a failure to fire.
Note: Immediate action is only performed once for a stoppage. If any immediate actions cannot be fully completed; such as the bolt will not pull to the rear, nothing ejects, or the charger handles will not lock in the up position, remedial action is performed. In a noncombat environment, immediate area should be cleared of personnel and an assistant should be used to catch any round that is ejected upon pulling the charger handles to the rear. The key words pull, observe, push, squeeze (POPS) will help you remember the steps for immediate action.
Warning
Heavy Weapons Leader Course Read Ahead Packet and Prerequisite Training Tasks
a. Pull the charger handles to the rear. b. Observe the ejection port to see if a case, link, or round ejects. c. Push the charger handles forward to the up position. d. Squeeze the trigger.
Never try to break the ammo belt with your hands. Injury could result. 2. Take immediate action to secure a runaway weapon. Note: A runaway weapon or uncontrolled fire is when the weapon continues to fire after the trigger has been released.
a. Keep the weapon oriented on the target area. b. Allow all remaining rounds in the loaded belt to fire or stop the ammunition feed by pressing the charger handle locks and lowering the charging handle(s) to disrupt the cycle of firing. c. Place the gun on S (SAFE). d. Perform corrective action on a runaway weapon. (1) Wait 5 minutes to allow the barrel to cool. (2) Load the MK 19. (3) Engage targets. (4) Take remedial action on the MK 19 if the uncontrolled firing continues.
3. Perform remedial action to correct a failure to fire. Note: Remedial action is needed if, after applying immediate action it did not correct the failure to fire.
a. Place the safety switch to the S (SAFE) position. b. Keep the weapon oriented on the target area. c. Remove the case catch bag, if applicable. d. Charge the weapon. (1) Lower both charger handles. (2) Pull both charger handles to the rear ensuring the bolt locks to the rear.
Note: If bolt will not lock to the rear then the gunner must hold the bolt to the rear as the assistant
gunner removes the live round or spent case, if present. (3) Return both charger handles to the forward position. (4) Rotate only one charger handle up. e. Remove live round or spent case from the bolt, if present. (1) Insert the tip of a cleaning rod through the receiver rail as close to the bolt face as possible. (2) Place the tip of the cleaning rod on top of the live round or spent case, as close to the bolt face as possible. (3) Position one hand beneath the weapon to catch the round as it falls out. (4) Force the live round off the bolt face and out the bottom of the gun by pushing down on the cleaning rod.
Warning

Heavy Weapons Leader Course Read Ahead Packet and Prerequisite Training Tasks
(5) Catch the live round as it falls out. (6) Dispose of the live round as per unit standard operating procedure (SOP).
Note: Do not reuse a live round that has been cycled through the weapon and removed from the bolt. f. Inspect removed round. (1) Check the primer to see if it is indented or not. (2) Proceed to step, load the MK19, if the primer is indented, as this indicates bad round.
Note: Dispose of bad round IAW unit policies. (3) Continue remedial action, after recording the MK 19 has a bad firing pin, if the primer is not indented.
If the bolt jams during firing, do not let the bolt slam forward as the top cover is being opened because
a round could fire.
g. Open the top cover assembly. h. Remove linked rounds and any loose links from the feeder, if present. (1) Reach beneath the feed tray with one hand. (2) Press and hold both the primary and secondary positioning pawls. (3) Slide the linked rounds out of the feeder and out the feed throat. (4) Return the linked rounds to the ammunition can.
i. Return the bolt to the forward position. (1) Place the safety switch on F (FIRE). (2) Hold one charger handle to the rear. (3) Ride the bolt forward by squeezing the trigger and easing the bolt forward. (4) Ensure both charger handles are forward and up position. (5) Place the safety switch on S (SAFE).
j. Check for an obstructed bore, if suspected.
Note: Indicators of a bore obstruction are:
(1) A muffled sound of round firing; (2) Excess smoke out of the chamber area; or (3) Excess debris/gases below gun). The preferred method for checking the bore is by running the bore obstruction detector from the top of the receiver through the barrel until it protrudes from the muzzle. However, the bore obstruction detector may also be feed from the bottom of the receiver. The bolt must be to the rear to use the bore obstruction detector from the bottom.
Do not transport weapon with projectile lodged in bore.
(4) Conduct deliberate check for an obstructed bore.
Warning
Warning

Heavy Weapons Leader Course Read Ahead Packet and Prerequisite Training Tasks
(a) Remove the backplate pin, bolt, and backplate assembly, vertical cam assembly, and primary drive lever. (b) Observe the bore for any type of bore obstruction.
(5) Conduct rapid check for an obstructed bore. (a) Insert the bore obstruction detector (weighted end first) into the chamber end of the barrel. (b) Snake the bore obstruction detector into the barrel.
Note: If the cable stops feeding, pull it back, and push it forward again. If the cable can't be pushed forward any further, you have a bore obstruction.
WARNING
Only trained and qualified personnel should engage in the removal and recovery of the round.
CAUTION
Do not use round removal tool to remove a spent case lodged in the bore. Damage to barrel and tool will occur. The round removal tool is used to extract a complete round or a separated round that is
lodged in the barrel.
k. Remove bore obstruction, if present, using the round removal tool. (1) Place round removal tool collar over end of flash suppressor. (2) Screw five cap screws into slots of the suppressor. (3) Attach either end of handle to the end of the threaded rod. (4) Screw threaded rod into barrel. (5) Push out bore obstruction. (6) Catch projectile with both hands as it is forced from the barrel. (7) Carefully dispose of live projectile as per unit SOP.
l. Inspect linked ammunition belt. (1) Check that the link band is even and adjacent to copper band all around ammo. (2) Check that the female link is positioned to be loaded first.
WARNING
Do not re-link or fire any ammunition that has been cycled through the weapon.
(3) Remove the first round from belt if there is any indication of a bad link. m. Load the MK 19, if the MK 19 has no uncorrected faults. n. Attempt to fire the MK 19, if the MK 19 has no uncorrected faults.
4. Report deficiencies not correctable at the operator level to the supervisor.
a. Turn-in the MK 19 for service. b. Record any identified fault that cannot be corrected.
(Asterisks indicate a leader performance step.)
Warning
Warning

Heavy Weapons Leader Course Read Ahead Packet and Prerequisite Training Tasks
Evaluation Preparation:
SETUP: Provide the Soldier with the equipment and/or materials described in the conditions statement.
BRIEF THE SOLDIER: Explain what is expected of the Soldier by reviewing the task standards. Stress to the Soldier the importance of observing all cautions, warnings, and dangers to avoid injury to personnel and, if applicable, damage to equipment.
PERFORMANCE MEASURES GO NO-GO N/A
1. Took immediate action to correct a failure to fire. 2. Took immediate action to secure a runaway weapon. 3. Performed remedial action to correct a failure to fire. 4. Reported deficiencies not correctable at operator level to the
Supporting Reference(s):
Step Number Reference ID Reference Name Required Primary FM 3-22.27 MK 19, 40-MM GRENADE
MACHINE GUN, MOD 3 No No
TM 9-1010-230-10
OPERATORS MANUAL FOR MACHINE GUN, 40-MM, MK 19, MOD 3 (NSN 1010-01-126-9063) (EIC: 4AE) {TM 08521A 10/1A TO 11W2 5
No No
Environment: Environmental protection is not just the law but the right thing to do. It is a continual process and starts with deliberate planning. Always, be alert to ways to protect our environment during training and missions. In doing so, you will contribute to the sustainment of our training resources while protecting people and the environment form harmful effects. Safety: In a training environment, leaders must perform a risk assessment in accordance with FM 5-19, Composite Risk Management. Leaders will complete a DA Form 7566 COMPOSITE RISK MANAGEMENT WORKSHEET during the planning and completion of each task and sub-task by assessing mission, enemy, terrain and weather, troops and support available-time available and civil considerations, (METT-TC). Note: During MOPP training, leaders must ensure personnel are monitored for potential heat injury. Local policies and procedures must be followed during times of increased heat category in order to avoid heat related injury. Consider the MOPP work/rest cycles and water replacement guidelines IAW FM 3-11.4, NBC Protection, FM 3-11.5, CBRN Decontamination. Everyone is responsible for safety. A thorough risk assessment must be completed prior to every mission or operation. Prerequisite Individual Tasks: None Supporting Individual Tasks:
Task Number Title Proponent Status 071-030-0001 Maintain an MK19 Grenade
Machine
071 - Infantry (Individual) Approved
071-030-0004 Engage Targets with an MK 19 Grenade
071 - Infantry (Individual) Analysis
071-030-0006 Unload an MK 19 Grenade
071 - Infantry (Individual) Approved

Heavy Weapons Leader Course Read Ahead Packet and Prerequisite Training Tasks
071-030-0022 Engage Targets with a MK 19 Grenade Machine Gun using an AN/PAS-13
071 - Infantry (Individual) Approved
Supported Individual Tasks :
Task Number Title Proponent Status 071-030-0005 Load an MK 19 Grenade Machine
071 - Infantry (Individual) Approved
071-030-0006 Unload an MK 19 Grenade
071 - Infantry (Individual) Approved 171-157-0006 Remove a Primary Weapon
from Reconnaissance Vehicle (RV) or Fire Support Vehicle (FSV)
171 - Armor (Individual) Approved
071-030-0007 Perform a Function Check on a MK 19
071 - Infantry (Individual) Approved
Interactive Multimedia Instruction: https://rdl.train.army.mil/catalog/view/100.ATSC/330DC6D0-389D-46E1-8070-4515C415766D-1274548205985/071-030-0008/index.html
Heavy Weapons Leader Course Read Ahead Packet and Prerequisite Training Tasks
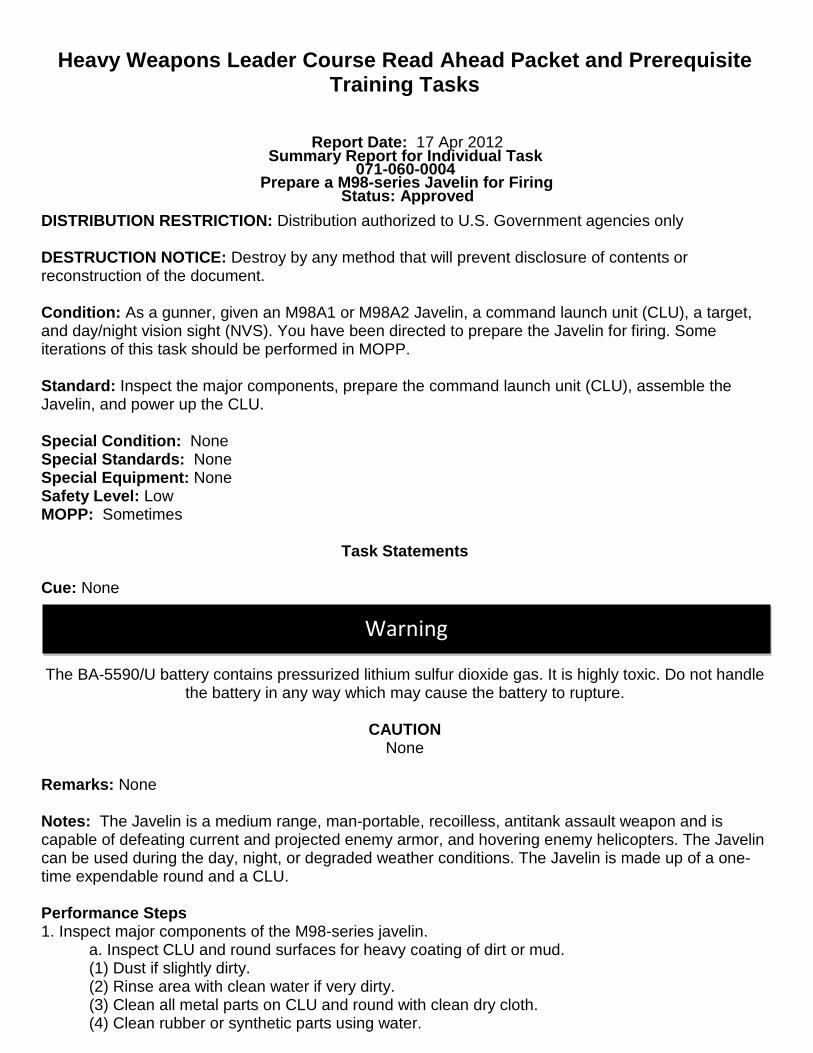
Report Date: 17 Apr 2012 Summary Report for Individual Task
071-060-0004 Prepare a M98-series Javelin for Firing
Status: Approved DISTRIBUTION RESTRICTION: Distribution authorized to U.S. Government agencies only DESTRUCTION NOTICE: Destroy by any method that will prevent disclosure of contents or reconstruction of the document. Condition: As a gunner, given an M98A1 or M98A2 Javelin, a command launch unit (CLU), a target, and day/night vision sight (NVS). You have been directed to prepare the Javelin for firing. Some iterations of this task should be performed in MOPP. Standard: Inspect the major components, prepare the command launch unit (CLU), assemble the Javelin, and power up the CLU. Special Condition: None Special Standards: None Special Equipment: None Safety Level: Low MOPP: Sometimes
Task Statements Cue: None
WARNING The BA-5590/U battery contains pressurized lithium sulfur dioxide gas. It is highly toxic. Do not handle
the battery in any way which may cause the battery to rupture.
CAUTION None
Remarks: None Notes: The Javelin is a medium range, man-portable, recoilless, antitank assault weapon and is capable of defeating current and projected enemy armor, and hovering enemy helicopters. The Javelin can be used during the day, night, or degraded weather conditions. The Javelin is made up of a one-time expendable round and a CLU. Performance Steps 1. Inspect major components of the M98-series javelin.
a. Inspect CLU and round surfaces for heavy coating of dirt or mud. (1) Dust if slightly dirty. (2) Rinse area with clean water if very dirty. (3) Clean all metal parts on CLU and round with clean dry cloth. (4) Clean rubber or synthetic parts using water.
Warning

Heavy Weapons Leader Course Read Ahead Packet and Prerequisite Training Tasks
(5) Dry all parts with clean dry cloth. b. Inspect daysight and night vision sight (NVS) lens.
CAUTION
Do not touch the lens with your hands or fingers. Wash hands before cleaning lenses. Natural oils produced by the skin are corrosive to lens coatings.
(1) Open daysight and NVS lens covers.
CAUTION Do not scrub lens surface. Optical coating may be damaged.
(2) Pour clean water, repeatedly over lens until all dirt or mud is removed. (3) Dry lens with clean dry cloth. (4) Secure a lens cleaning paper. (5) Wipe the lens. (a) Begin at center of lens. (b) Apply light pressure with fingers. (c) Wipe in an expanding circular motion (spiral) to edge of lens. (6) Close daysight and NVS lens covers. c. Inspect the round interface connectors for dirt or mud. (1) Dust if slightly dirty. (2) Rinse area with clean water if very dirty. (3) Dry all wet parts with clean dry cloth.
2. Prepare the CLU.
a. Ensure the power switch is in the OFF position. b. Install the CLU battery. (1) Release the bail from the battery cover. (2) Raise the battery cover. (3) Clean the battery compartment of dirt or loose objects. (4) Remove the white tape from the electrical connector. (5) Shake the battery.
Note: This ensures the battery has not developed an oxidation layer between cells.
(6) Slide battery into battery compartment, making sure battery engages with battery interface connector. (7) Replace the battery compartment cover. (8) Secure the bail to the battery cover.
3. Assemble the Javelin.
a. Place the round on the ground with the flat sides of the end caps down and latch assembly facing up. b. Kneel on the left side of the round, at the forward end, facing forward.
Heavy Weapons Leader Course Read Ahead Packet and Prerequisite Training Tasks
c. Remove the protective covers from the CLU interface connectors.
(1) Pull on tab of lanyard to snug protective cover against side of the round. (2) Position protective cover so that no interference will exist when round is connected. d. Remove the protective covers from the round interface connectors. (1) Pull on tab of lanyard to snug protective cover against side of the CLU. (2) Position protective cover so that no interference will exist when CLU is connected. e. Place round interface bracket in round hooks. f. Engage CLU and round interface connectors by sliding forward and press down on CLU.\
Note: Round and CLU are connected correctly when latch release snaps into place. g. Ensure that the round and CLU are connected. (1) Rock the CLU from side-to-side. (2) Pick up the Javelin. h. Remove the forward end cap. (1) Remove the locking pin by pulling straight up on the wire rope. (2) Turn the forward end cap latch release counterclockwise.
Note: If the forward end cap does not come off, press manual release button to relieve pressure.
CAUTION With forward end cap removed, seeker dome is exposed. Use caution when tipping end of round down to avoid foreign material (rocks, mud, etc.) coming in contact with seeker dome.
(3) Remove forward end cap by lifting the Javelin way from the forward end cap. i. Position open end of round on forward end cap.
4. Power up the CLU. a. Open daysight and NVS lens covers on CLU. b. Set power switch to the NIGHT position.
Note: The CLU has four modes of operation: Off, Day, Night (IR Surveillance) and test.
c. Verify the CLU indicators are lit. Note: CLU indicators may flash on and off during initial power up. This indicates that the battery needs time to warm up before CLU can power up properly.
d. Perform battery warm-up procedures, as required. (1) Turn the power switch to the DAY position for 30 to 60 seconds. (2) Turn the power switch to the OFF position, then back to the NIGHT position. e. Repeat warm-up if indicators continue to flash. f. Adjust diopter adjust ring for best clarity of CLU display.
Note: The Javelin is now prepared to engage a target.

Heavy Weapons Leader Course Read Ahead Packet and Prerequisite Training Tasks
(Asterisks indicate a leader performance step.) Evaluation Preparation:
SETUP: Provide the Soldier with the equipment and/or materials described in the conditions statement.
BRIEF THE SOLDIER: Tell the Soldier what is expected by reviewing the task standards. Stress to the Soldier the importance of observing all cautions, warnings, and dangers to avoid injury to personnel and, if applicable, damage to equipment.
PERFORMANCE MEASURES GO NO-GO N/A 1. Inspect major components of the M98-series Javelin. 2. Prepared the CLU. 3. Assembled the Javelin. 4. Powered up the CLU.
Supporting Reference(s):
Step Number Reference ID Reference Name Required Primary FM 3-22.37 JAVELIN - CLOSE COMBAT
MISSILE SYSTEM, MEDIUM No Yes
TM 9-1425-1687- 10
Operator’s Manual for the Javelin Weapon System M98A2 (NSN: 1430- 01532-8900)(EIC: NA){Marine C
No Yes
TM 9-1425-688-10
OPERATOR'S MANUAL FOR THE JAVELIN WEAPON SYSTEM M98A1
No Yes Environment: Environmental protection is not just the law but the right thing to do. It is a continual process and starts with deliberate planning. Always be alert to ways to protect our environment during training and missions. In doing so, you will contribute to the sustainment of our training resources while protecting people and the environment from harmful effects. Refer to FM 3-34.5 Environmental Considerations and GTA 05-08-002 ENVIRONMENTAL-RELATED RISK ASSESSMENT Safety: In a training environment, leaders must perform a risk assessment in accordance with FM 5-19, Composite Risk Management. Leaders will complete a DA Form 7566 COMPOSITE RISK MANAGEMENT WORKSHEET during the planning and completion of each task and sub-task by assessing mission, enemy, terrain and weather, troops and support available-time available and civil considerations, (METT-TC). Note: During MOPP training, leaders must ensure personnel are monitored for potential heat injury. Local policies and procedures must be followed during times of increased heat category in order to avoid heat related injury. Consider the MOPP work/rest cycles and water replacement guidelines IAW FM 3-11.4, NBC Protection, FM 3-11.5, CBRN Decontamination. In a training environment, leaders must perform a risk assessment in accordance with FM 5-19, Composite Risk Management. Leaders will complete a DA Form 7566 COMPOSITE RISK MANAGEMENT WORKSHEET during the planning and completion of each task and sub-task by assessing mission, enemy, terrain and weather, troops and support available-time available and civil considerations, (METT-TC). Note: During MOPP training, leaders must ensure personnel are monitored for potential heat injury. Local policies and procedures must be followed
Heavy Weapons Leader Course Read Ahead Packet and Prerequisite Training Tasks
during times of increased heat category in order to avoid heat related injury. Consider the MOPP work/rest cycles and water replacement guidelines IAW FM 3-11.4, NBC Protection, FM 3-11.5, CBRN Decontamination. Prerequisite Individual Tasks: None Supporting Individual Tasks:
Task Number Title Proponent Status 071-060-0007 Restore a M98-series Javelin to
Carrying
071 - Infantry (Individual) Reviewed
071-060-0001 Construct a Fighting Position for a
071 - Infantry (Individual) Approved 071-060-0003 Maintain a Javelin 071 - Infantry (Individual) Analysis 071-060-0006 React to Javelin that Fails to Fire 071 - Infantry (Individual) Reviewed 071-060-0005 Engage Targets with a Javelin 071 - Infantry (Individual) Analysis Supported Individual Tasks:
Task Number Title Proponent Status 071-060-0005 Engage Targets with a Javelin 071 - Infantry (Individual) Analysis 071-060-0006 React to Javelin that Fails to Fire 071 - Infantry (Individual) Reviewed 071-060-0007 Restore a M98-series Javelin to
Carrying
071 - Infantry (Individual) Reviewed

Heavy Weapons Leader Course Read Ahead Packet and Prerequisite Training Tasks
Report Date: 11 Jul 2012 Summary Report for Individual Task
071-060-0005 Engage Targets with a Javelin BST
Status: Approved DISTRIBUTION RESTRICTION: Distribution authorized to U.S. Government agencies only DESTRUCTION NOTICE: Destroy by any method that will prevent disclosure of contents or reconstruction of the document Condition: As a gunner given a M98-series Javelin prepared for firing, ear plugs, a detected stationary or moving target at an engageable range. You have directed to engage the target. Some iterations of this task should be performed in MOPP. Standard: Assume an appropriate firing position, acquire the target using the command & launch unit (CLU), determine target engageability, identify target, activate the seeker, obtain seeker lock-on, and launch the missile. Use appropriate engagement techniques to ensure each target is hit. Special Condition: None Special Standards: None
Special Equipment: Javelin basic skills trainer (BST)
Safety Level: Low
MOPP: Sometimes
Task Statements Cue: None
WARNING Keep body at a 30 degree angle away from the round when launching a missile from the prone position. Injury may occur if body is extended into backblast area.
CAUTION
None Remarks: None Notes: None
Warning
Heavy Weapons Leader Course Read Ahead Packet and Prerequisite Training Tasks
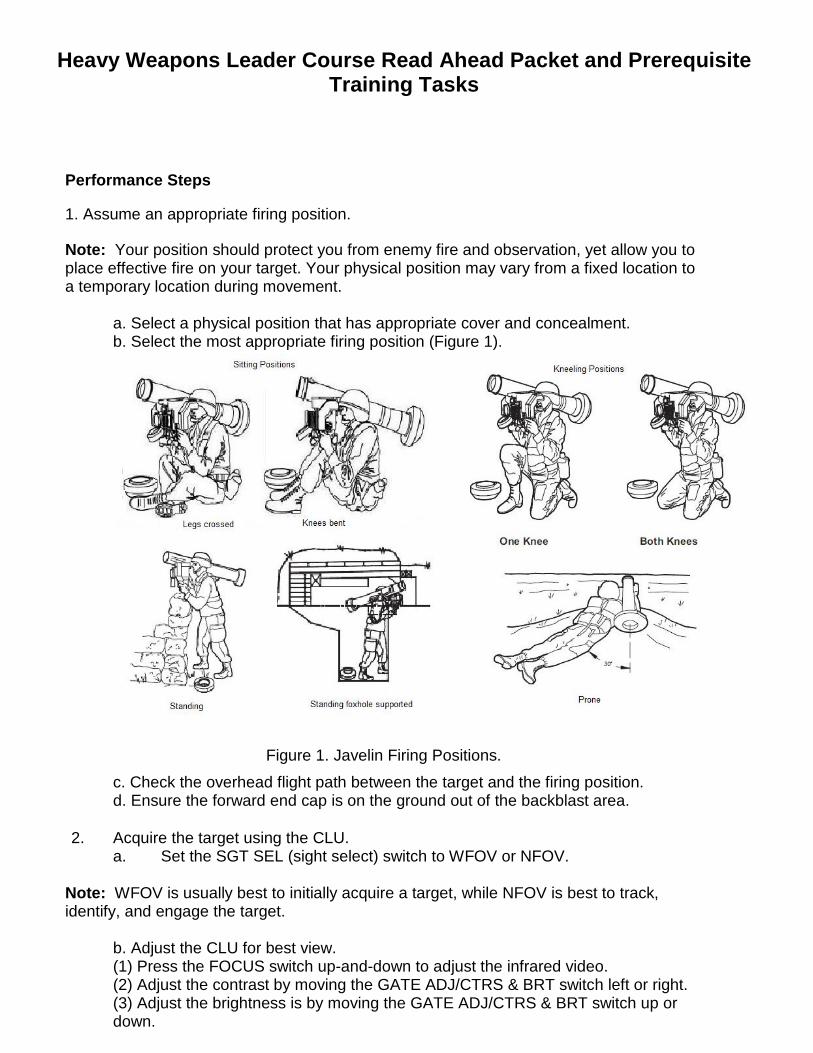
Performance Steps 1. Assume an appropriate firing position. Note: Your position should protect you from enemy fire and observation, yet allow you to place effective fire on your target. Your physical position may vary from a fixed location to a temporary location during movement.
a. Select a physical position that has appropriate cover and concealment. b. Select the most appropriate firing position (Figure 1).
Figure 1. Javelin Firing Positions. c. Check the overhead flight path between the target and the firing position. d. Ensure the forward end cap is on the ground out of the backblast area.
2. Acquire the target using the CLU. a. Set the SGT SEL (sight select) switch to WFOV or NFOV.
Note: WFOV is usually best to initially acquire a target, while NFOV is best to track, identify, and engage the target.
b. Adjust the CLU for best view. (1) Press the FOCUS switch up-and-down to adjust the infrared video. (2) Adjust the contrast by moving the GATE ADJ/CTRS & BRT switch left or right. (3) Adjust the brightness is by moving the GATE ADJ/CTRS & BRT switch up or
down.
Heavy Weapons Leader Course Read Ahead Packet and Prerequisite Training Tasks
c.Scan for target.
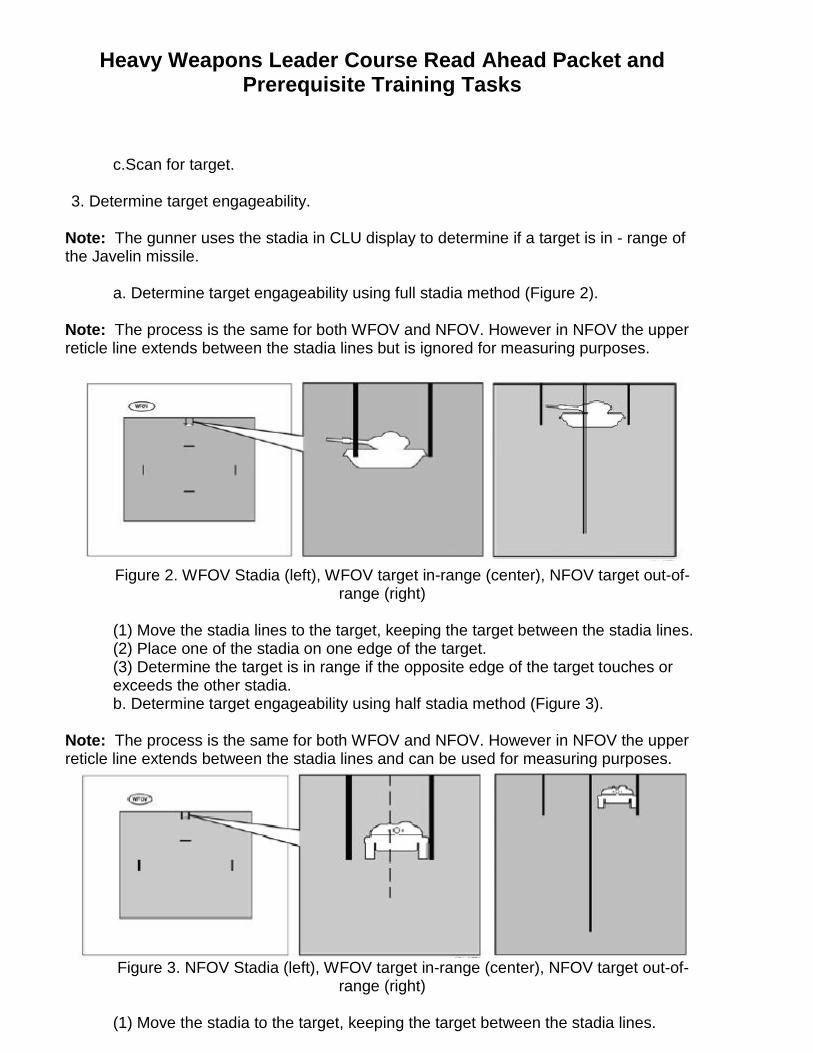
3. Determine target engageability.
Note: The gunner uses the stadia in CLU display to determine if a target is in - range of the Javelin missile.
a. Determine target engageability using full stadia method (Figure 2). Note: The process is the same for both WFOV and NFOV. However in NFOV the upper reticle line extends between the stadia lines but is ignored for measuring purposes.
Figure 2. WFOV Stadia (left), WFOV target in-range (center), NFOV target out-of-
range (right) (1) Move the stadia lines to the target, keeping the target between the stadia lines. (2) Place one of the stadia on one edge of the target. (3) Determine the target is in range if the opposite edge of the target touches or exceeds the other stadia. b. Determine target engageability using half stadia method (Figure 3).
Note: The process is the same for both WFOV and NFOV. However in NFOV the upper reticle line extends between the stadia lines and can be used for measuring purposes.
Figure 3. NFOV Stadia (left), WFOV target in-range (center), NFOV target out-of-
range (right)
(1) Move the stadia to the target, keeping the target between the stadia lines.

Heavy Weapons Leader Course Read Ahead Packet and Prerequisite Training Tasks
(2) Place one of the stadia lines on one edge of the target. (3) Visualize a line running halfway between the two WFOV stadia lines (use the reticle line if in NFOV. (4) Determine the target is in range if the opposite edge of the target touches or exceeds the visualized line of reticle line.
4. Identify target.
a. Threat b. Non-Threat
5. Activate the seeker. Note: The battery coolant unit (BCU) has a limited battery life. Once the BCU is activated, the gunner will have approximately 4 minutes to launch the missile. The BATTERY COOLANT UNIT LOW indicator is located at the bottom of the CLU display at the far left. During system operation, after seeker activation, the indicator will flash to indicate the BCU has approximately 30 seconds (or more, depending on the ambient temperature) of operating time remaining. When it lights solid, the BCU is spent, the CLU reverts to the last CLU FOV, all missile functions stop, and the missile cannot be launched.
a. Re-center target in the day FOV. b. Lift the seeker trigger guard on the left handgrip. c. Squeeze the seeker trigger and wait for the SEEK and battery indicators to light.
Note: The NFOV indicator will remain lit. Remember to listen for the BCU squib sound when the seeker is activated. Once the BCU is activated, the gunner will have approximately 4 minutes to launch the missile. The BCU indicator flashes when the BCU has approximately 30 seconds of operating time remaining.
d. Release seeker trigger after the SEEK and battery indicators are lit. e. Observe the activation of the seeker.
Note: The activation of the seeker takes approximately 10-15 seconds, indicated by the NFOV and battery indicators going out and the TOP indicator and flashing track gates coming on.
f. Select direct attack mode, as required.
Note: Top attack is the default attack mode for the missile. Attack mode can be changed between top attack and direct attack anytime before seeker lock by pressing ATTK SEL switch.
(1) Press ATTK SEL switch. (2) Observe that DIR indicator lights and TOP indicator is off.
6. Activate seeker lock-on.
Heavy Weapons Leader Course Read Ahead Packet and Prerequisite Training Tasks
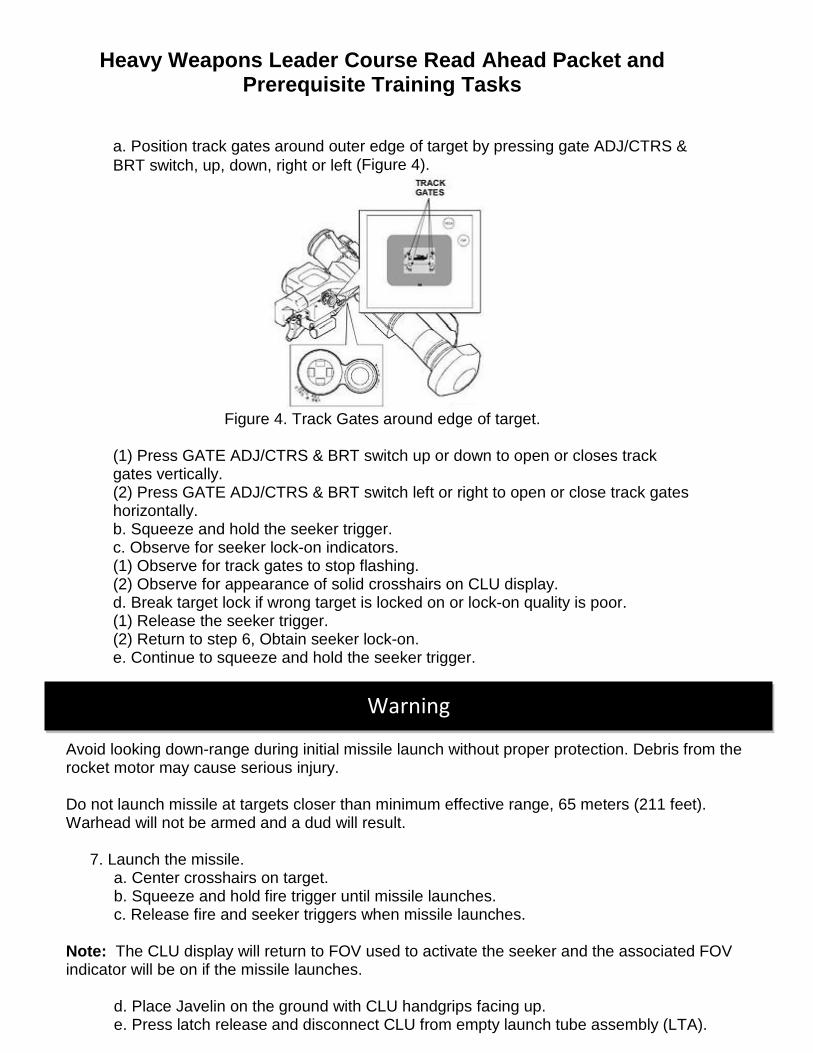
a. Position track gates around outer edge of target by pressing gate ADJ/CTRS & BRT switch, up, down, right or left (Figure 4).
Figure 4. Track Gates around edge of target.
(1) Press GATE ADJ/CTRS & BRT switch up or down to open or closes track gates vertically. (2) Press GATE ADJ/CTRS & BRT switch left or right to open or close track gates horizontally. b. Squeeze and hold the seeker trigger. c. Observe for seeker lock-on indicators. (1) Observe for track gates to stop flashing. (2) Observe for appearance of solid crosshairs on CLU display. d. Break target lock if wrong target is locked on or lock-on quality is poor. (1) Release the seeker trigger. (2) Return to step 6, Obtain seeker lock-on. e. Continue to squeeze and hold the seeker trigger.
WARNING Avoid looking down-range during initial missile launch without proper protection. Debris from the rocket motor may cause serious injury. Do not launch missile at targets closer than minimum effective range, 65 meters (211 feet). Warhead will not be armed and a dud will result.
7. Launch the missile. a. Center crosshairs on target. b. Squeeze and hold fire trigger until missile launches. c. Release fire and seeker triggers when missile launches.
Note: The CLU display will return to FOV used to activate the seeker and the associated FOV indicator will be on if the missile launches.
d. Place Javelin on the ground with CLU handgrips facing up. e. Press latch release and disconnect CLU from empty launch tube assembly (LTA).
Warning
Heavy Weapons Leader Course Read Ahead Packet and Prerequisite Training Tasks
f. Discard empty LTA. g. Secure a new round and connect CLU, as required.
(Asterisks indicate a leader performance step.) Evaluation Preparation: SETUP: Provide the Soldier with the equipment and/or materials described in the conditions statement. BRIEF THE SOLDIER: Tell the Soldier what is expected by reviewing the task standards. Stress to the Soldier the importance of observing all cautions, warnings, and dangers to avoid injury to personnel and, if applicable, damage to equipment.
PERFORMANCE MEASURES GO NO-GO N/A 1. Assumed an appropriate firing position. 2. Acquired the target using the CLU. 3. Determined target engageability. 4. Identified target. 5. Activated the seeker. 6. Obtained seeker lock-on. 7. Launched the missile.
Supporting Reference(s):
Step
Reference ID Reference Name Required Primary FM 3-22.37 JAVELIN - CLOSE COMBAT
MISSILE SYSTEM, MEDIUM No Yes
TM 9-1425-1687- 10
Operator’s Manual for the Javelin Weapon System M98A2 (NSN: 1430- 01532-8900)(EIC: NA){Marine C
No Yes
TM 9-1425-688-10 OPERATOR'S MANUAL FOR THE JAVELIN WEAPON SYSTEM M98A1
No Yes Environment: Environmental protection is not just the law but the right thing to do. It is a continual process and starts with deliberate planning. Always, be alert to protect our environment during training and missions. In doing so, you will contribute to the sustainment of our training resources while protecting people and the environment from harmful effects. Safety: In a training environment, leaders must perform a risk assessment in accordance with FM 5-19, Composite Risk Management. Leaders will complete a DA Form 7566 COMPOSITE RISK MANAGEMENT WORKSHEET during the planning and completion of each task and sub-task by assessing mission, enemy, terrain and weather, troops and support available-time available and civil considerations, (METT-TC). Note: During MOPP training, leaders must ensure personnel are monitored for potential heat injury. Local policies and procedures must be followed during times of increased heat category in order to avoid heat related injury. Consider the MOPP work/rest cycles and water replacement guidelines IAW FM 3-11.4, NBC Protection, FM 3-11.5, CBRN Decontamination. Leaders must perform a risk assessment in accordance with FM 5-19, Composite Risk Management. Leaders will complete a DA Form 7566 COMPOSITE RISK MANAGEMENT WORKSHEET during the planning and completion of each task and sub-task by assessing mission, enemy, terrain and weather, troops and support

Heavy Weapons Leader Course Read Ahead Packet and Prerequisite Training Tasks
available-time available and civil considerations, (METT-TC). Note: During MOPP training, leaders must ensure personnel are monitored for potential heat injury. Local policies and procedures must be followed during times of increased heat category in order to avoid heat related injury. Consider the MOPP work/rest cycles and water replacement guidelines IAW FM 3-11.4, NBC Protection, FM 3-11.5, CBRN Decontamination. Prerequisite Individual Tasks: None Supporting Individual Tasks:
Task Number Title Proponent Status 071-056-1122 Prepare a Range Card for a Close
Combat Missile System (CCMS) 071 - Infantry (Individual) Approved
071-450-0011 Conduct an Antiarmor Area Ambush by a
071 - Infantry (Individual) Approved
071-060-0001 Construct a Fighting Position for a
071 - Infantry (Individual) Approved 071-060-0004 Prepare a M98-series Javelin for
071 - Infantry (Individual) Approved
071-060-0006 React to Javelin that Fails to Fire 071 - Infantry (Individual) Approved Supported Individual Tasks:
Task Number Title Proponent Status 071-060-0004 Prepare a M98-series Javelin for
071 - Infantry (Individual) Approved
071-060-0006 React to Javelin that Fails to Fire 071 - Infantry (Individual) Approved Supported Collective Tasks:
Task Number Title Proponent Status 07-2- 1477.P(Step: 12.)
Breach an Obstacle (Company/Platoon)
07 - Infantry (Collective) Analysis
07-2-9010(Step:
Created from Template: Conduct an
07 - Infantry (Collective) Analysis
07-2- 3027.P(Step: 15.)
Integrate Direct Fires (Company/Platoon)
07 - Infantry (Collective) Analysis
07-null- 0003(Step: 20 )
LDAC Conduct an Ambush (Platoon- Company)
130 - Cadet Command Proposed
07-3-1333(Step:
Knock Out a Bunker 07 - Infantry (Collective) Analysis
07-2-9055(Step:
Conduct an Ambush (Company/Platoon)
07 - Infantry (Collective) Analysis
(Step: 20.) Created from Template: Cross a Water
07 - Infantry (Collective) Proposed
07-2-1369(Step:
Created from Template: Cross a Water
07 - Infantry (Collective) Analysis

Heavy Weapons Leader Course Read Ahead Packet and Prerequisite Training Tasks
Report Date: 28 Feb 2013 Summary Report for Individual Task
071-056-1111 Assemble the M41 TOW Improved Target Acquisition System in the Tripod Configuration
Status: Approved
DISTRIBUTION RESTRICTION: Distribution authorized to U.S. Government agencies only DESTRUCTION NOTICE: Destroy by any method that will prevent disclosure of contents or reconstruction of the document Condition: As a TOW Gunner, given a M41 Improved Target Acquisition System (ITAS) equipped with basic issue items, a designated firing position for the launcher, a sector of fire, and you have been directed to assemble the M41 ITAS in the tripod configuration. Some iterations of this task should be performed in MOPP. Standard: Correctly assemble the M41 in the tripod configuration at designated location; install all required components of the M41ITAS, to include position attitude determination system (PADS) and/or the commander's viewer as required. Perform operational checkout procedures. Special Condition: None Special Standards: None Special Equipment: None Safety Level: Low MOPP: Sometimes
Task Statements None
Cue: None
WARNING
None
CAUTION
Ensure all ITAS components are turned OFF before beginning assembly procedures.
Connector pins are fragile. Do not use side-to-side pressure when installing connectors. This could cause misalignment or bent pins.
Remarks: None Notes: None
Warning
Heavy Weapons Leader Course Read Ahead Packet and Prerequisite Training Tasks
Performance Steps 1. Setup the tripod at the designated firing position.
a. Position the tripod with data plate facing the direction of fire on level ground as the terrain permits. Note: The firing position must not slope more than 30 degrees. Proper adjustment of the tripod legs will compensate for uneven ground up to a slope of 30 degrees.
b. Extend the legs. (1) Press in on one detent stop lever. (2) Pull the leg out until leg support reaches the bottom detent stop. (3) Release the detent stop lever. (4) Ensure the detent stops in the proper position. (5) Repeat steps 1b (1) through (4) for the other two legs. c. Ensure each foot is flush with the ground. d. Adjust tripod to desired height. e. Level the tripod.
Note: When the tripod legs are properly positioned, the bubble in each level will be between the marks on the level indicator.
(1) Observe leveling bubbles to ensure tripod is level. (2) Adjust legs until tripod is level. f. Lower the three locking handles approximately 90 degrees or until tight. g. Anchor the tripod. (1) Force all three anchor claws into ground. (2) Drive stakes into ground through holes in each foot if additional support is needed. h. Open coupling clamp.
CAUTION Do not set the TU down on the coil cable. Do not lift TU by gunner hand grip handles. Do not lay TU
down on azimuth lock. 2. Install the traversing unit (TU) onto the tripod.
a. Position the TU coil cable. (1) Hold the TU over the tripod. (2) Feed the TU coil cable down through the tripod body. b. Lower the TU onto tripod so that the azimuth lock is facing the opposite direction of the tripod data plate. c. Hook the end of the TU coil cable and pin saver adapter on a tripod leg support. d. Lock the TU to the tripod. (1) Close coupling clamp handle. (2) Place locking spring over coupling clamp handle. e. Attempt to turn the TU to ensure the TU is installed correctly. f. Rotate gunner hand grips to the operating position. g. Lock the TU in the 8-degree down position. h. Open the target acquisition system (TAS) mount coupling clamp. i. Remove TAS mount connector cover.
Heavy Weapons Leader Course Read Ahead Packet and Prerequisite Training Tasks
j. Attach the TAS mount connector cover to the back of the gunner's left hand grip. k. Ensure TAS mount connector is free of dirt, foreign material. l. Rotate the TAS mount locking collar fully to the left. m. Set the limiters, if installed on traversing unit. (1) Remove locking pins (2) Move stops to down position. (3) Reinstall locking pins.
3. Install the target acquisition system (TAS).
a. Ensure TAS Power switch is set to OFF position. b. Carry the TAS with two hands, ensuring one hand is on the carrying strap at all times.
Note: Maintain positive control of the TAS and carrying strap until the coupling clamp is closed.
c. Position TAS on TAS mount with front window facing forward. d. Rotate the TAS on the TAS mount until the index lug slot on the bottom of the TAS fits over the index lug on the TAS mount. e. Lock TAS into position. (1) Ensure the TAS is fully seated. (2) Close TAS mount coupling clamp handle. (3) Place locking spring over coupling clamp handle. (4) Rotate TAS mount locking collar to the right until it stops. (5) Gently push TAS mount connector knob up. (6) Gently rotate the TAS interface cable left and right until the connector knob moves up into the lock position. (7) Rotate TAS mount locking collar to the right until it clicks into place.
4. Install the position attitude determination system (PADS), as required. Note: The PADS is optional and does not have to be mounted for the M41 ITAS. The PADS must be fully mounted on top of the TAS prior to system power up. Failure to do so will cause the TAS to not recognize that the PADS is connected to the M41 ITAS and could possibly cause the PADS to short out.
a. Remove the PADS from the transit case. b. Stand on the left side of the improved target acquisition system (ITAS) system. c. Hold the PADS with the PEQ 2/PAQ 4 mount towards the gunner.
Note: This allows the PADS to rest on the spider mount with the J1 connector on the same side of the TAS as the launch tube.
d. Tilt the PADS at a 45 degree angle away from the gunner's body. e. Gently lower the PADS onto the spider mount ensuring the mounting guide pins align with and slide into the mounting guide pin slots on the spider mount. f. Lower the side of the PADS closest to the gunner onto the spider mounts. g. Secure the PADS to the spider mount with four butterfly clips. h. Flip all four locking wings up when all four butterfly clips have been secured. i. Remove video output connector cover. j. Connect the PADS Interface cable P1 connector to the TAS video output connector.

Heavy Weapons Leader Course Read Ahead Packet and Prerequisite Training Tasks
k. Connect the PADS Interface cable P2 connector to the J1 connector on the PADS. l. Secure the PADS Interface cable to the TAS by pushing the cable into the retaining clip on the right TAS housing cover.
5. Install the launch tube.
a. Ensure the front end of launch tube is pointing upward. b. Place launch tube index lugs in launch tube brackets of TU. c. Lift the launch tube latch on TU. d. Lower front end of launch tube ensuring the locating pin on TU lines up with the mating hole in launch tube. e. Place launch tube latch in launch tube catch. f. Press down on launch tube latch until it latches
6. Install the fire control system (FCS). a. Remove FCS from stow bag. b. Position the FCS to the right rear of the tripod with the ON/OFF switch facing the gunner. c. Ensure FCS power switch is set to OFF position. d. Remove connector cover from J2 connector on FCS. e. Connect coil cable with pin saver adapter to J2 connector on the FCS.
7. Install the lithium-ion battery box (LBB).
a. Position LBB to right of the FCS, standing up with the display on the left side as seen by the gunner or laid on its side with the vent fan facing up. b. Ensure LBB power switch is in the OFF position. c. Remove interface cable from FCS stow bag pocket. d. Remove J2 connector cover on LBB. e. Connect interface cable P2 connector to FCS J1 connector. f. Connect interface cable P1 connector to LBB J2 connector.
8. Connect the commander's viewer, as required. Note: The commander’s viewer is optional and does not have to be mounted for the M41 ITAS. Additionally, the commander’s viewer may be mounted in conjunction with the PADs or without the PADS. If mounted without the PADS then the TAS video adapter must be used.
a. Remove the video output connector cover. b. Connect TAS video connector to video output connector. c. Connect one end of video cable to TAS video connector, and the other end of video cable to the commander viewer video input. d. Connect one end of power cable to the commanders viewer 12 VDC receptacle. e. Connect the battery adapter on the opposite end of the power cable to a BB-390A/U or BA-5590/U battery.
9. Perform operational checkout procedures. Note: Operational checkout procedures are performed immediately after the M41 ITAS is fully setup. (Asterisks indicate a leader performance step.)
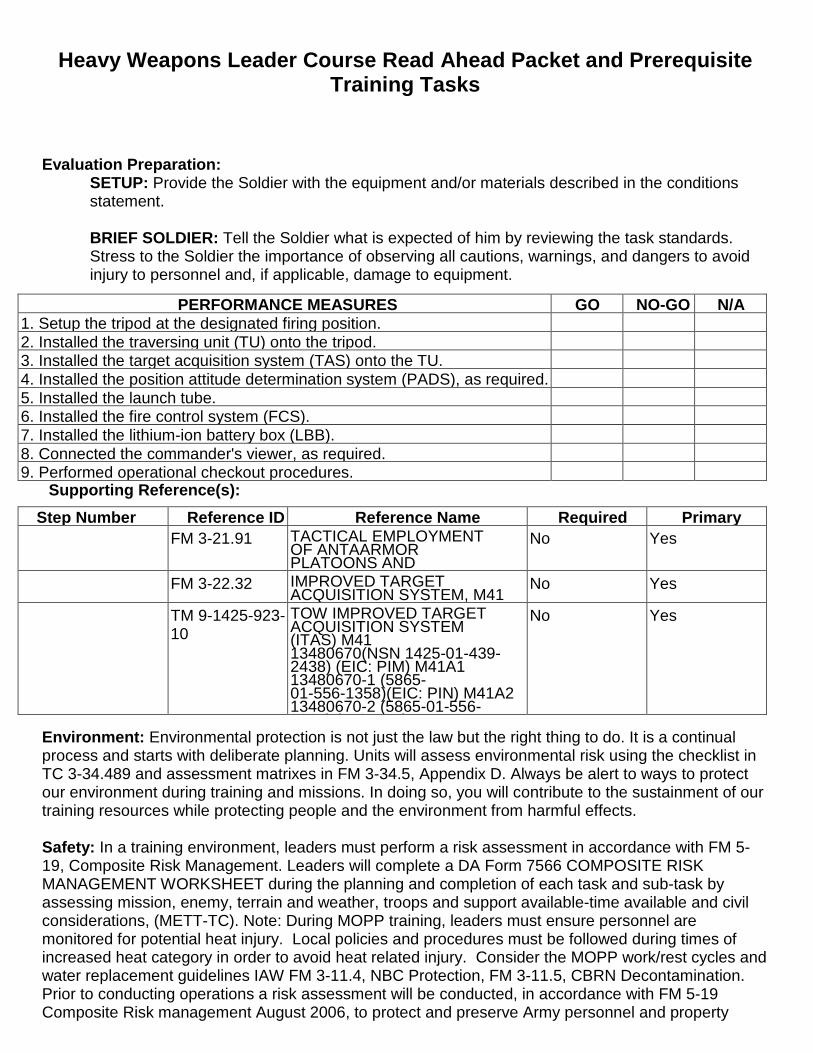
Heavy Weapons Leader Course Read Ahead Packet and Prerequisite Training Tasks
Evaluation Preparation:
SETUP: Provide the Soldier with the equipment and/or materials described in the conditions statement.
BRIEF SOLDIER: Tell the Soldier what is expected of him by reviewing the task standards. Stress to the Soldier the importance of observing all cautions, warnings, and dangers to avoid injury to personnel and, if applicable, damage to equipment.
PERFORMANCE MEASURES GO NO-GO N/A
1. Setup the tripod at the designated firing position. 2. Installed the traversing unit (TU) onto the tripod. 3. Installed the target acquisition system (TAS) onto the TU. 4. Installed the position attitude determination system (PADS), as required. 5. Installed the launch tube. 6. Installed the fire control system (FCS). 7. Installed the lithium-ion battery box (LBB). 8. Connected the commander's viewer, as required. 9. Performed operational checkout procedures.
Supporting Reference(s): Step Number Reference ID Reference Name Required Primary
FM 3-21.91 TACTICAL EMPLOYMENT OF ANTAARMOR PLATOONS AND COMPANIES
No Yes
FM 3-22.32 IMPROVED TARGET ACQUISITION SYSTEM, M41
No Yes
TM 9-1425-923-10
TOW IMPROVED TARGET ACQUISITION SYSTEM (ITAS) M41 13480670(NSN 1425-01-439-2438) (EIC: PIM) M41A1 13480670-1 (5865- 01-556-1358)(EIC: PIN) M41A2 13480670-2 (5865-01-556-1361) (EIC PIP) M41A3
No Yes
Environment: Environmental protection is not just the law but the right thing to do. It is a continual process and starts with deliberate planning. Units will assess environmental risk using the checklist in TC 3-34.489 and assessment matrixes in FM 3-34.5, Appendix D. Always be alert to ways to protect our environment during training and missions. In doing so, you will contribute to the sustainment of our training resources while protecting people and the environment from harmful effects. Safety: In a training environment, leaders must perform a risk assessment in accordance with FM 5-19, Composite Risk Management. Leaders will complete a DA Form 7566 COMPOSITE RISK MANAGEMENT WORKSHEET during the planning and completion of each task and sub-task by assessing mission, enemy, terrain and weather, troops and support available-time available and civil considerations, (METT-TC). Note: During MOPP training, leaders must ensure personnel are monitored for potential heat injury. Local policies and procedures must be followed during times of increased heat category in order to avoid heat related injury. Consider the MOPP work/rest cycles and water replacement guidelines IAW FM 3-11.4, NBC Protection, FM 3-11.5, CBRN Decontamination. Prior to conducting operations a risk assessment will be conducted, in accordance with FM 5-19 Composite Risk management August 2006, to protect and preserve Army personnel and property
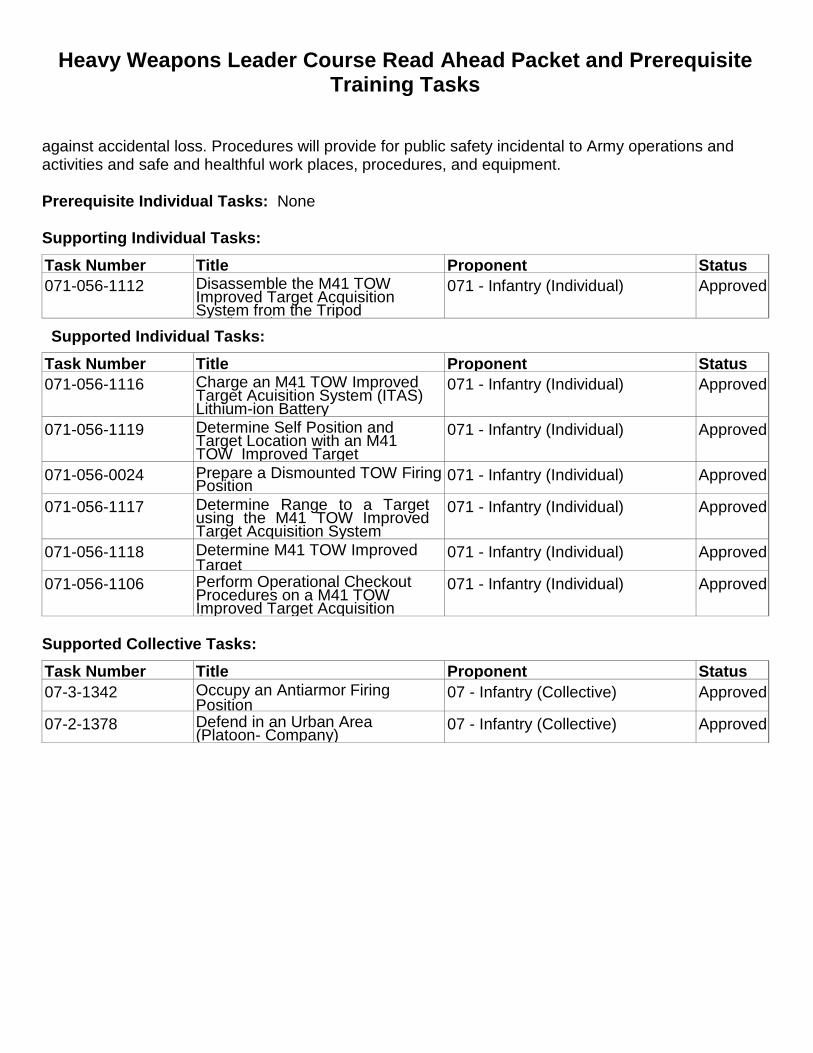
Heavy Weapons Leader Course Read Ahead Packet and Prerequisite Training Tasks
against accidental loss. Procedures will provide for public safety incidental to Army operations and activities and safe and healthful work places, procedures, and equipment. Prerequisite Individual Tasks: None Supporting Individual Tasks: Task Number Title Proponent Status 071-056-1112 Disassemble the M41 TOW
Improved Target Acquisition System from the Tripod C fi ti
071 - Infantry (Individual) Approved
Supported Individual Tasks:
Task Number Title Proponent Status 071-056-1116 Charge an M41 TOW Improved
Target Acuisition System (ITAS) Lithium-ion Battery
071 - Infantry (Individual) Approved
071-056-1119 Determine Self Position and Target Location with an M41 TOW Improved Target A i iti S t
071 - Infantry (Individual) Approved
071-056-0024 Prepare a Dismounted TOW Firing Position
071 - Infantry (Individual) Approved
071-056-1117 Determine Range to a Target using the M41 TOW Improved Target Acquisition System
071 - Infantry (Individual) Approved
071-056-1118 Determine M41 TOW Improved Target
071 - Infantry (Individual) Approved
071-056-1106 Perform Operational Checkout Procedures on a M41 TOW Improved Target Acquisition S t
071 - Infantry (Individual) Approved
Supported Collective Tasks: Task Number Title Proponent Status 07-3-1342 Occupy an Antiarmor Firing
Position
07 - Infantry (Collective) Approved
07-2-1378 Defend in an Urban Area (Platoon- Company)
07 - Infantry (Collective) Approved

Heavy Weapons Leader Course Read Ahead Packet and Prerequisite Training Tasks
Report Date: 17 Apr 2012 Summary Report for Individual Task
071-056-1108 Engage Targets with a TOW Missile Using the M41 TOW Improved Target Acquisition System
BST Status: Approved
DISTRIBUTION RESTRICTION: Distribution authorized to U.S. Government agencies only DESTRUCTION NOTICE: Destroy by any method that will prevent disclosure of contents or reconstruction of the document Condition: As a TOW gunner, given a tripod or vehicle mounted M41 TOW ITAS, a loaded TOW missile, a stationary or moving target (armored vehicle, aircraft, reinforced structure or bunker) at an engageable range. Operational checkout procedures have been successfully completed. You have been direct to engage targets with TOW missile. Some iterations of this task should be performed in MOPP. Standard: Detect target(s), identify target(s) as threat and non-threat target(s), decide on target engagement, engage target(s), and assess effects on target. Special Condition: None Special Standards: None Special Equipment: None Safety Level: Low MOPP: Sometimes
Task Statements None
Cue: None
WARNING
None
CAUTION
None
Remarks: None Notes: Detect, identify, decide, engage, and assess (DIDEA) is the iterative, standardized, and systematic approach to target engagement activities.
Performance Steps 1. Detect target(s). Note: Detection of targets depends on location, scanning skill, and the ability to observe an area and recognize target indicators. Crew members and nearby Soldiers search during both good and limited visibility conditions by using thermal optics, infrared (IR) night-vision devices, machine gun optics,
Warning
Heavy Weapons Leader Course Read Ahead Packet and Prerequisite Training Tasks
naked eye, or binoculars. Once a target is detected, the target location must be immediately reported to the vehicle commander.
a. Scan the sector of fire using the TAS in the wide field of view (WFOV) mode. (1) Release the azimuth and elevation locks on the TU. (2) Select daysight or night visions sight (NVS), as appropriate. (3) Manipulate the sight to scan the width and depth of the sector of fire. b. Determine target location by personal detection or by detection report of another Soldier.
Note: typical target-location methods include: clock, sector, traverse, reference-point, quick target- reference-point, precise-reference-point, and grid.
c. Determine the target threat level. (1) Most Dangerous (2) Dangerous (3) Least Dangerous d. Prioritize Targets (1) Engage close-range targets before long-range targets. (2) Engage stationary target before moving targets (3) Engage frontal targets before flank or rear. e. Acquire the target using the TAS. (1) Manipulate the sight to view the target. (2) Center the reticle on the target. (3) Select NFOV (narrow field of view). f. Begin tracking the target.
2. Identify target(s) as threat and non-threat target(s).
a. Classify the target. Note: Classification between vehicular or personnel targets is instantaneous and not viewed as a separate step. Vehicular targets are then classified by type (such as car, truck, or as a combat vehicle such as a tank or personnel carrier.
b. Identify combat vehicles. c. Discriminate targets as enemy, friend, or neutral/unknown.
3. Decide on target engagement.
a. Determine range to target(s).
Note: Determining range is a shared responsibility among the crew and may be made immediately after detection or at a later point within the engagement process. The SL bears the main responsibility for determining range and as such may have additional tools, such as binoculars, maps (printed or digital) range card, or a hand-held laser range finder.
(1) Determine range by using active or passive ranging (See task Determine Range to target using the M41 TOW ITAS). (2) Estimate range using methods such as the 100-meter unit of measure method, flash to bang method, or the appearance of objects method. (3) Determine the range by using another ranging method as appropriate. b. Verify the target is within range of the loaded TOW missile. c. Determine if the target is engageable based on TOW firing limitations.
Heavy Weapons Leader Course Read Ahead Packet and Prerequisite Training Tasks
d. Verify sufficient time to engage a moving target. Note: A stationary target always has sufficient exposure time.
(1) Center the crosshairs on the target. (2) Determine that the target is engageable.
Note: The target is engageable, if the area between the vertical crosshair and the edge of the NFOV in the direction of travel is clear of obstructions.
(3) Determine that the target is not engageable if this area has an obstruction that can interfere with the missile’s flight or wire. e. Check the level indicator(s). (1) Check HMMWV level gauge to ensure that the side slope is no greater than 10 degrees and that the forward slope is no greater than 30 degrees (Vehicle mounted). (2) Verify the two tripod the level indicators show the tripod is level.(Tripod configuration) f. Determine the appropriate engagement techniques to employ against the target.
Note: Techniques vary based on the target being hard or soft, ground or aerial and whether it is a point or area target. 4. Engage target(s).
a. Select NFOV. b. Arm the system by raising the arming lever. c. Verify key TAS display indicators. (1) Verify the state box changes from SURV to MANUAL ENGAGE. (2) Verify the missile indicator appears in the lower left corner of the TAS display. (3) Verify the type of missile loaded as identified by the missile indicator display. d. Determine whether to track the target manually or by using the aided target tracker (ATT).
Note: Tracking the target with the ATT is preferred over manually tracking the target. The ATT keeps the missile on line with the target even if the gunner drifts off the target. During manual tracking the flight control of the missile is dependent upon the gunner’s ability to manually keep the crosshairs centered on the target.
e. Track the target using the aided target tracker (ATT). (Skip this step for a manual engagement). (1) Lock onto the Target.
(a) Activate the track gates by pressing TRK GATE switch on the right gunner's handgrip. (b) Verify flashing track gates appear in the gunner's display.
Note: The track gates will be sized for a tank at 1500 meters away (the default range) unless a target has been lased or passively ranged within the past two minutes, in which case the track gates will come up sized for a tank at that range.
(c) Adjust the flashing track gates to the size of the target. _1_ Move the GATE ADJ switch up or down to move the track gates vertically apart or together. _2_ Move the GATE ADJ switch left or right to moves the track gates horizontally together or apart.

Heavy Weapons Leader Course Read Ahead Packet and Prerequisite Training Tasks
(d) Lock the track gates when the flashing track gates are adjusted around the target by pressing the TRK GATE switch.
Note: The track gates will stop flashing, indicating target lock-on. (2) Verify the STATE BOX changes from MANUAL ENGAGE to TRACKER ENGAGE.
Note: To cancel target lock-on, press the TRK GATE switch while the crosshairs are inside the track gates or press the MENU switch on the left gunner's handle and select CTGTK. If two track gates are present, selecting CTGTK cancels the track gates furthest from the crosshairs.
(3) Continue to manually track the target by manipulating the gunner’s handgrip to keep the crosshairs centered on the target. (4) Observe the track gates to ensure they remain around the target and appear solid. f. Track the target manually by manipulating the gunner’s handgrip to keep the crosshairs centered on the target. g. Confirm target by either receiving target confirmation from the SL or as a result of personal observation.
Note: Target confirmation is the rapid verification of the initial identification and discrimination of the target, and is usually done by the SL. If the gunner confirms that the target is hostile, he completes his final lay and engages the target on order. If the gunner determines that the target is friendly or neutral, he announces his confirmation to the SL (“FRIENDLY” or “NEUTRAL”). If he cannot determine the nature of the target, he announces “UNKNOWN.” The SL then confirms the target is in the gunner’s field of view and conducts the combat identification process again.
h. Fire the TOW missile towards the target. (1) Raise trigger guard. (2) Squeeze and hold the trigger.
Note: There will be a 1.5 second delay in missile launch. Two noises will be heard after the trigger is squeezed: The activation of the GYRO. This is not a loud noise but can be distracting. The launch motor firing is a loud noise and may cause personnel to flinch.
i. Continue to track the target until the missile impacts.
Note: The missile will fly to the center of the track gates. Keep the crosshairs on the target as much as possible because if the tracker loses the target the software will look to the crosshairs to try to reacquire the target. The firing process ends when the TOW missile hits the target, explodes in flight, fails to fire (misfire or hangfire), missile control is lost, or the elects to disengage the target.
WARNING
Aborting TOW missile in an unsafe area could kill or injure Soldiers. Check path of TOW missile for
Soldiers and equipment before you abort TOW missile. j. React to misfire if the TOW fails to fire, as required. k. Cut the command wire by opening the breach clamp.
Warning

Heavy Weapons Leader Course Read Ahead Packet and Prerequisite Training Tasks
5. Assess effects on target.
a. Announce the effects on the target or the results of an observed miss. b. Receive assessment of effects on a target from the squad leader, if observed.
Note: The SL is ultimately responsible for assessing the effects on a target to determine when to cease fire against the target, when to shift fire to another target when multiple targets are present, and when to tactically move from one fighting position to another. (Asterisks indicate a leader performance step.) Evaluation Preparation:
SETUP: Provide the Soldier with the equipment and/or materials described in the conditions statement.
BRIEF SOLDIER: Tell the Soldier what is expected of him by reviewing the task standards. Stress to the Soldier the importance of observing all cautions, warnings, and dangers to avoid injury to personnel and, if applicable, damage to equipment.
PERFORMANCE MEASURES GO NO-GO N/A
1. Detected target(s). 2. Identified target(s) as threat and non-threat target(s). 3. Decided on target engagement. 4. Engaged target(s). 5. Assessed effects on target.
Supporting Reference(s):
Step Number Reference ID Reference Name Required Primary
FM 3-22.32 IMPROVED TARGET ACQUISITION SYSTEM, M41
No Yes
TM 9-1425-923-10
TOW IMPROVED TARGET ACQUISITION SYSTEM (ITAS) M41 13480670(NSN 1425-01-439-2438) (EIC: PIM) M41A1 13480670-1 (5865- 01-556-1358)(EIC: PIN) M41A2 13480670-2 (5865-01-556-1361) (EIC PIP) M41A3
No Yes
Environment: None Safety: In a training environment, leaders must perform a risk assessment in accordance with FM 5-19, Composite Risk Management. Leaders will complete a DA Form 7566 COMPOSITE RISK MANAGEMENT WORKSHEET during the planning and completion of each task and sub-task by assessing mission, enemy, terrain and weather, troops and support available-time available and civil considerations, (METT-TC). Note: During MOPP training, leaders must ensure personnel are monitored for potential heat injury. Local policies and procedures must be followed during times of increased heat category in order to avoid heat related injury. Consider the MOPP work/rest cycles and water replacement guidelines IAW FM 3-11.4, NBC Protection, FM 3-11.5, CBRN Decontamination. Prerequisite Individual Tasks: None
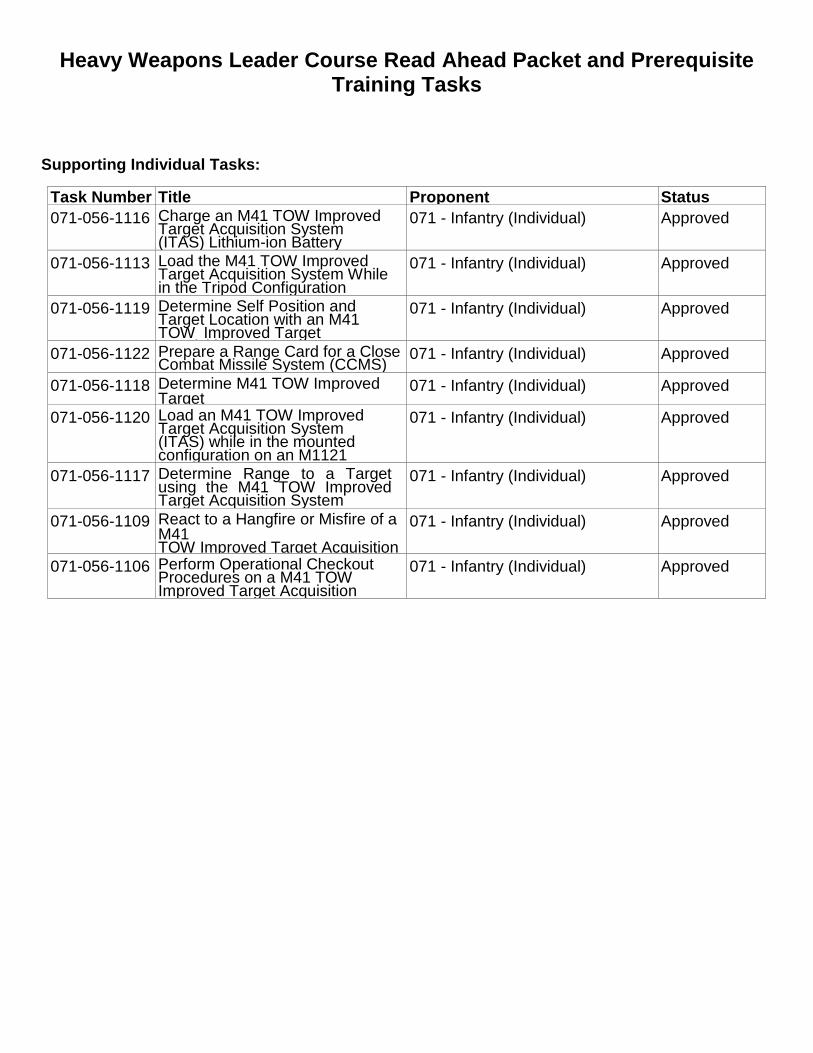
Heavy Weapons Leader Course Read Ahead Packet and Prerequisite Training Tasks
Supporting Individual Tasks:
Task Number Title Proponent Status 071-056-1116 Charge an M41 TOW Improved
Target Acquisition System (ITAS) Lithium-ion Battery
071 - Infantry (Individual) Approved
071-056-1113 Load the M41 TOW Improved Target Acquisition System While in the Tripod Configuration
071 - Infantry (Individual) Approved
071-056-1119 Determine Self Position and Target Location with an M41 TOW Improved Target A i iti S t
071 - Infantry (Individual) Approved
071-056-1122 Prepare a Range Card for a Close Combat Missile System (CCMS)
071 - Infantry (Individual) Approved
071-056-1118 Determine M41 TOW Improved Target
071 - Infantry (Individual) Approved
071-056-1120 Load an M41 TOW Improved Target Acquisition System (ITAS) while in the mounted configuration on an M1121 TOW C i
071 - Infantry (Individual) Approved
071-056-1117 Determine Range to a Target using the M41 TOW Improved Target Acquisition System
071 - Infantry (Individual) Approved
071-056-1109 React to a Hangfire or Misfire of a M41 TOW Improved Target Acquisition
071 - Infantry (Individual) Approved
071-056-1106 Perform Operational Checkout Procedures on a M41 TOW Improved Target Acquisition S t
071 - Infantry (Individual) Approved

Heavy Weapons Leader Course Read Ahead Packet and Prerequisite Training Tasks
071-022-0004 Unload a Caliber .50 M2 Machine Gun
071-022-0003
Load a Caliber .50 M2 Machine Gun
PERFORMANCE MEASURES GO NO-GO 1. Cleared the .50 caliber M2 machine gun. 2. Loaded ammunition.
071-022-0005
Correct Malfunctions of a Caliber .50 M2 Machine Gun
PERFORMANCE MEASURES GO NO-GO 1. Corrected malfunction to return weapon to service. 2. Applied remedial action.
071-030-0006
Unload an MK 19 Grenade Machine Gun
PERFORMANCE MEASURES GO NO-GO 1. Placed the safety switch to S (SAFE). 2. Removed the case catch bag, if applicable.
3. Charged the weapon. 4. Removed live round or spent case from the bolt, if present. 5. Opened the top cover assembly. 6. Removed linked rounds from the feeder, if present. 7. Returned the bolt to the forward position. 8. Placed the safety switch in the S position.
071-030-0005 Load an MK 19 Grenade Machine Gun
PERFORMANCE MEASURES GO NO-GO 1. Removed all ammunition and links from the .50 caliber M2 machine gun. 2. Cleared the .50 caliber M2 machine gun. 3. Verified the chamber was empty.
PERFORMANCE MEASURES GO NO-GO 1. Cleared the weapon. 2. Attached feed throat to feeder. 3. Inserted a round. 4. Loaded the first round to the fully-loaded position. 5. Placed the safety switch on SAFE.
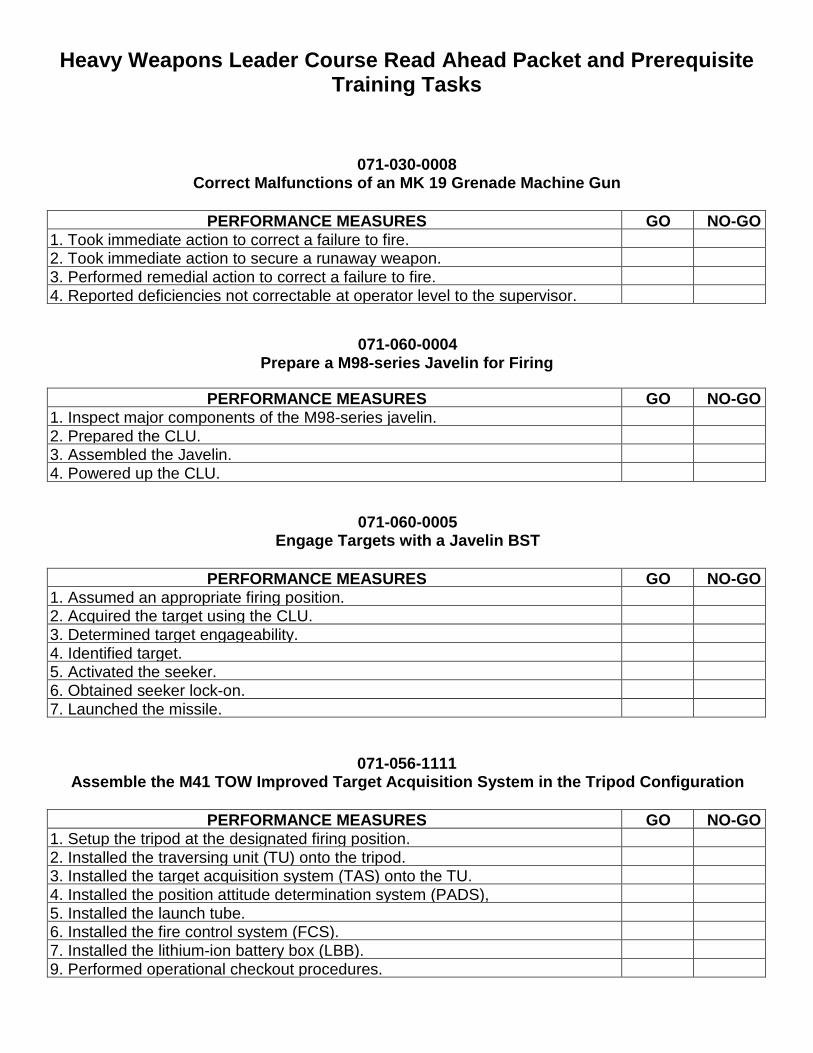
Heavy Weapons Leader Course Read Ahead Packet and Prerequisite Training Tasks
071-030-0008
Correct Malfunctions of an MK 19 Grenade Machine Gun
PERFORMANCE MEASURES GO NO-GO 1. Took immediate action to correct a failure to fire. 2. Took immediate action to secure a runaway weapon. 3. Performed remedial action to correct a failure to fire. 4. Reported deficiencies not correctable at operator level to the supervisor.
071-060-0004 Prepare a M98-series Javelin for Firing
PERFORMANCE MEASURES GO NO-GO 1. Inspect major components of the M98-series javelin. 2. Prepared the CLU. 3. Assembled the Javelin. 4. Powered up the CLU.
071-060-0005 Engage Targets with a Javelin BST
PERFORMANCE MEASURES GO NO-GO
1. Assumed an appropriate firing position. 2. Acquired the target using the CLU. 3. Determined target engageability. 4. Identified target. 5. Activated the seeker. 6. Obtained seeker lock-on. 7. Launched the missile.
071-056-1111 Assemble the M41 TOW Improved Target Acquisition System in the Tripod Configuration
PERFORMANCE MEASURES GO NO-GO
1. Setup the tripod at the designated firing position. 2. Installed the traversing unit (TU) onto the tripod. 3. Installed the target acquisition system (TAS) onto the TU. 4. Installed the position attitude determination system (PADS), 5. Installed the launch tube. 6. Installed the fire control system (FCS). 7. Installed the lithium-ion battery box (LBB). 9. Performed operational checkout procedures.

Heavy Weapons Leader Course Read Ahead Packet and Prerequisite Training Tasks
071-056-1108 Engage Targets with a TOW Missile Using the M41 TOW Improved Target Acquisition System
BST
PERFORMANCE MEASURES GO NO-GO 1. Detected target(s). 2. Identified target(s) as threat and non-threat target(s). 3. Decided on target engagement. 4. Engaged target(s). 5. Assessed effects on target.