helixmedia!library!userguide!...
TRANSCRIPT

HELIX MEDIA LIBRARY USER GUIDE Helix Media Library Version 2.0
Revision Date: May 2012

Helix Media Library User Guide
2
Summary of Contents Introduction ............................................................................................................................................................................ 5
Homepage .............................................................................................................................................................. 5 Toolbar .................................................................................................................................................................... 6 Sidebar .................................................................................................................................................................... 7
Playback and Embedding ................................................................................................................................................. 8 Copy URL ................................................................................................................................................................ 9 Copy Code .............................................................................................................................................................. 9 Chapterization – Using the chapter points feature ........................................................................... 12 Inappropriate Content Reporting ............................................................................................................. 14 Comments ........................................................................................................................................................... 14
RSS Feed ................................................................................................................................................................................ 15 Adding Media ...................................................................................................................................................................... 16
Clip Metadata ..................................................................................................................................................... 16 File Selection ...................................................................................................................................................... 17 Thumbnails ......................................................................................................................................................... 18 Associated Files ................................................................................................................................................ 19
User Content Management ............................................................................................................................................ 21 Mobile Sites – iPhone, iPad, BlackBerry and Android ....................................................................................... 22 Enabling Segmentation ................................................................................................................................................... 23 Using the My Account Section ...................................................................................................................................... 26
Details and Picture .......................................................................................................................................... 26 My Media ............................................................................................................................................................. 28 My Playlists ........................................................................................................................................................ 29 Viewing a playlist ............................................................................................................................................. 31 My Stats ................................................................................................................................................................ 31 My Preferences ................................................................................................................................................. 32
HML Administration ........................................................................................................................................................ 33 Content .................................................................................................................................................................................. 33
3
Categories ........................................................................................................................................................... 33 Adding a category ............................................................................................................................................ 33 Enabling iTunes U ............................................................................................................................................ 36 iTunes U Feed .................................................................................................................................................... 37
Secure Categories .............................................................................................................................................................. 41 How to Configure Session Manager ......................................................................................................... 42
Media Listing ....................................................................................................................................................................... 47 Reported Comments ........................................................................................................................................................ 49
Reported Media ................................................................................................................................................ 49 Encoder .................................................................................................................................................................................. 50
Disable Real: ...................................................................................................................................................... 51 Security .................................................................................................................................................................................. 52
Groups .................................................................................................................................................................. 52 Adding Groups .................................................................................................................................................. 52 Users ...................................................................................................................................................................... 54 Adding Users ...................................................................................................................................................... 55
Settings .................................................................................................................................................................................. 56 General Settings ............................................................................................................................................... 56 Customization Options .................................................................................................................................. 57 Security ................................................................................................................................................................ 60 File System Preferences ................................................................................................................................ 61 Exe References .................................................................................................................................................. 61 URL References ................................................................................................................................................. 62 E-‐Mail Notifications ........................................................................................................................................ 62 E-‐Mail Text .......................................................................................................................................................... 63 Help Text Editing ............................................................................................................................................. 65 Embed Code & Video Player Configuration .......................................................................................... 66 iTunes U Settings ............................................................................................................................................. 67 Content Ingest ................................................................................................................................................... 68 API .......................................................................................................................................................................... 70
Statistics Pages ................................................................................................................................................................... 71

Helix Media Library User Guide
4
Real Bulk Uploader ........................................................................................................................................................... 71 Bulk Importing Other Content ..................................................................................................................................... 77 LDAP/Active Directory Integration .......................................................................................................................... 79 How to add the .srt file extension as an accepted MIME type in IIS ............................................................ 80 Addendum ............................................................................................................................................................................ 82
Supported Codecs ............................................................................................................................................ 82
5
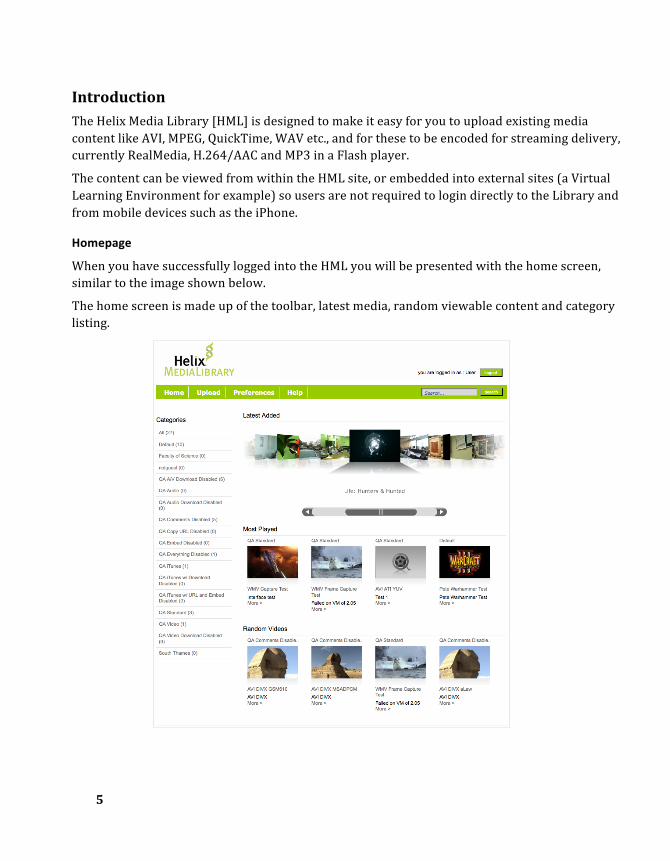
Introduction The Helix Media Library [HML] is designed to make it easy for you to upload existing media content like AVI, MPEG, QuickTime, WAV etc., and for these to be encoded for streaming delivery, currently RealMedia, H.264/AAC and MP3 in a Flash player.
The content can be viewed from within the HML site, or embedded into external sites (a Virtual Learning Environment for example) so users are not required to login directly to the Library and from mobile devices such as the iPhone.
Homepage
When you have successfully logged into the HML you will be presented with the home screen, similar to the image shown below.
The home screen is made up of the toolbar, latest media, random viewable content and category listing.

Helix Media Library User Guide
6
Toolbar
The toolbar offers a number of options:
Home will bring you back to the main page from any point.
If you have media to add to the service and have been granted sufficient privileges to the system, clicking Upload will take you to the Add Media wizard.
My Account holds within it a number of options, those of which are discussed later in this guide under the heading “Using the My Account Section”.
Help will offer basic guidelines to the use of the system, plus any specifics added by your administration team.
The search box will allow you to discover items based on media title, description or keyword.
The login section allows registered users greater access to the system, such as upload rights. Enter your credentials in the provided fields as shown. Selecting Remember Me will avoid this procedure on return to the site. This is not recommended on publically accessible machines.

7
Sidebar
The sidebar shows all categories you are able to view. Selecting a category will display a list similar to the one shown below. Simply select a thumbnail to view the content.
With iTunes U integration enabled, categories that offer the function will show a link to the iTunes U page of the institution for quick access to content via that program. To view the media in iTunes U click the link at the bottom of the list of clips.

Helix Media Library User Guide
8
Playback and Embedding At the home screen, clicking on a thumbnail (or double clicking on the Latest Media carousel) will take you through to the media playback page. Similarly, selecting a category will bring up the media list for that section, again click the thumbnail or title brings up the viewing page.
9
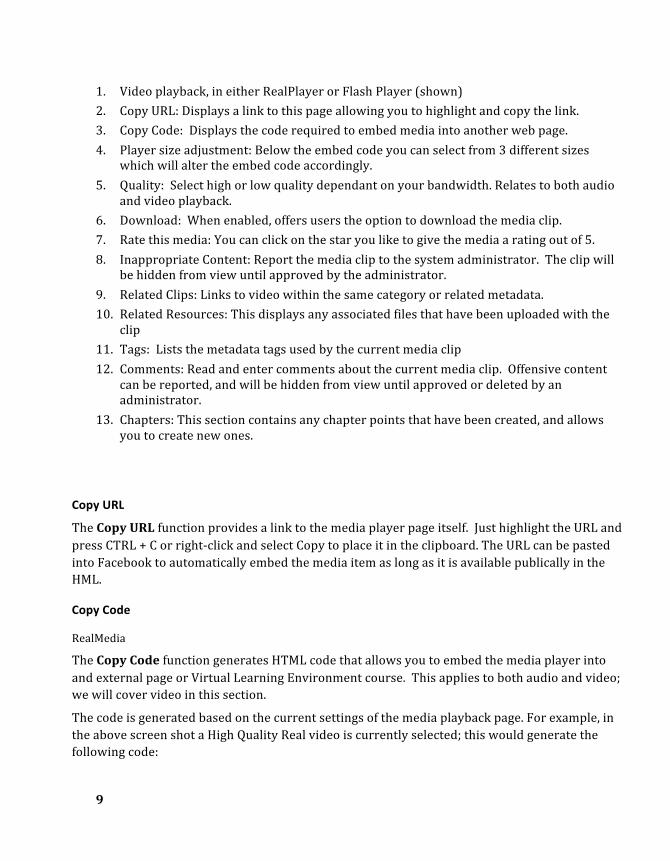
1. Video playback, in either RealPlayer or Flash Player (shown) 2. Copy URL: Displays a link to this page allowing you to highlight and copy the link. 3. Copy Code: Displays the code required to embed media into another web page. 4. Player size adjustment: Below the embed code you can select from 3 different sizes
which will alter the embed code accordingly. 5. Quality: Select high or low quality dependant on your bandwidth. Relates to both audio
and video playback. 6. Download: When enabled, offers users the option to download the media clip. 7. Rate this media: You can click on the star you like to give the media a rating out of 5. 8. Inappropriate Content: Report the media clip to the system administrator. The clip will
be hidden from view until approved by the administrator. 9. Related Clips: Links to video within the same category or related metadata. 10. Related Resources: This displays any associated files that have been uploaded with the
clip 11. Tags: Lists the metadata tags used by the current media clip 12. Comments: Read and enter comments about the current media clip. Offensive content
can be reported, and will be hidden from view until approved or deleted by an administrator.
13. Chapters: This section contains any chapter points that have been created, and allows you to create new ones.
Copy URL
The Copy URL function provides a link to the media player page itself. Just highlight the URL and press CTRL + C or right-‐click and select Copy to place it in the clipboard. The URL can be pasted into Facebook to automatically embed the media item as long as it is available publically in the HML.
Copy Code
RealMedia
The Copy Code function generates HTML code that allows you to embed the media player into and external page or Virtual Learning Environment course. This applies to both audio and video; we will cover video in this section.
The code is generated based on the current settings of the media playback page. For example, in the above screen shot a High Quality Real video is currently selected; this would generate the following code:

Helix Media Library User Guide
10
<OBJECT ID=RVOCX CLASSID="clsid:CFCDAA03-‐8BE4-‐11cf-‐B84B-‐0020AFBBCCFA" WIDTH=320 HEIGHT=240> <PARAM NAME="SRC" VALUE="rtsp://helix_server/media/12345678_hi.rm"> <PARAM NAME="CONTROLS" VALUE="ImageWindow"> <PARAM NAME="CONSOLE" VALUE="12345678"> <PARAM NAME="AUTOSTART" VALUE="false"> <EMBED type="audio/x-‐pn-‐realaudio-‐plugin" SRC="rtsp://helix_server/media/12345678_hi.rm" WIDTH=320 HEIGHT=240 NOJAVA=true CONTROLS=ImageWindow CONSOLE=12345678 AUTOSTART=false> </OBJECT> <br> <OBJECT ID=RVOCX CLASSID="clsid:CFCDAA03-‐8BE4-‐11cf-‐B84B-‐0020AFBBCCFA" WIDTH=320 HEIGHT=75> <PARAM NAME="CONTROLS" VALUE="All"> <PARAM NAME="CONSOLE" VALUE="12345678"> <EMBED type="audio/x-‐pn-‐realaudio-‐plugin" SRC="rtsp://helix_server/media/12345678_hi.rm" WIDTH=320 HEIGHT=75 NOJAVA=true CONTROLS=All CONSOLE=12345678> </OBJECT> Three types of embed code are available: Legacy Flash – This can be used to support flash only playback iframe and javascript – This will support playback across all devices Javascript ‘Modes’ – Sometimes certain applications won’t accept the iframe embed code, so this embed code can be used instead
To use the code within your own embed page, click anywhere in the Copy Code text-‐box and press CTRL + C or right-‐click and select Copy. This will place the code within the clipboard.
Within the <body></body> tags of your webpage or blank work area of a VLE course, press CTRL + V or right-‐click and select Paste, to place the code.
As you can see, emphasized within the code as WIDTH and HEIGHT attributes. These are the only areas you should change in general use. Where width and height are highlighted, change both accordingly, usually no higher than 640x480.
Where width only is highlighted, change the value to match that of the previous changes.
When embedding audio you can ignore the width and height requirements in most cases, unless you are specifying an image to display in the Flash player.

11
Flash MP4
The embed code for the Flash player is far simpler, with one caveat on the playback size of the video. The code below shows a typical embed object that can as before be pasted into a web page or VLE module. <embed src=http://medialibraryserver.com/player.swf width="320" height="260" allowscriptaccess="always" allowfullscreen="true" flashvars="height=260&width=320&file=http://helix.server.com/flash/12345678_hi.mp4&searchbar=false&autostart=false&image=http://server.com/thumbnails/12345678.jpg" />
Again the emphasized section shows the width and height attributes that can be modified. As before, it is inadvisable to set the video size above 640 [width] x 480 [height].
In this example to set the video playback window at 640x480 change both width attributes to 640, but you must change the height attribute to 505. This is required to allow room for the player controls (start/stop etc) to be displayed correctly.
In all instances of changing the default sizes always add 25 pixels to the height of your chosen video size. The predefined aspect ratio options can be clicked to automatically change these values.
iframe embed code looks like the following.
<iframe width="320" height="260" src="http://vls.dev.videolibraryserver.com/player?autostart=y&fullscreen=y&width=320&height=260&videoId=9&quality=hi&captions=y" frameborder="0" scrolling="no"></iframe>
Javascript ‘Modes’ code looks like the following:
<div id="player9">Loading Video Player....</div><script type="text/javascript" src="http://vls.dev.videolibraryserver.com/player/getJsEmbedCode.aspx?autostart=y&fullscreen=y&width=320&height=260&videoId=9&quality=hi&captions=y"></script>
NOTE: Since the iframe embed code works across the vast majority of devices, we recommend using this going forward in terms of compatibility

Helix Media Library User Guide
12
Chapterization – Using the chapter points feature
To create a chapter point click on the plus button underneath Add Chapter. The screen shown below will appear.
Clicking on play on each clip lets you watch to the point you want to start and end the chapter, clicking pause to set the time in the box below. You can seek through the clip to the point you want, or alternatively using the format 00:00:00 populate the time boxes yourself.

13
A title and description must be provided, and then the chapter can be created by clicking Add Chapter. The chapter will appear on the right-‐hand side. To view it click on the title of the chapter.
To remove a chapter, click on the red cross. Points of interest can be set on a clip in the comments section. If you like a specific part of the clip you can enter a comment along with the time of the part you like written as follows: @00:00:35. This will create a hyperlink which when clicked will take you to the 35th second in the clip and carry on playing it from that point.
Helix Media Library User Guide
14
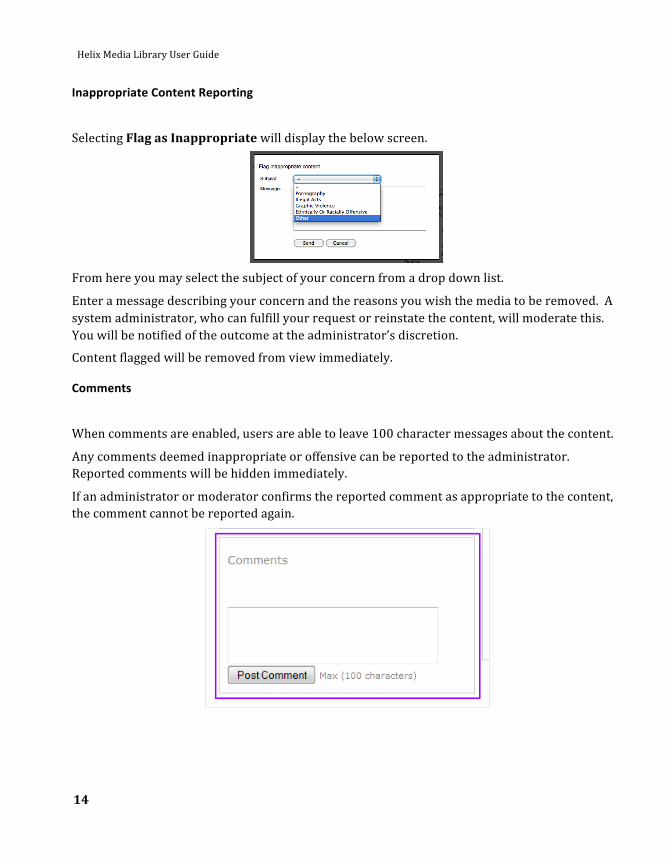
Inappropriate Content Reporting
Selecting Flag as Inappropriate will display the below screen.
From here you may select the subject of your concern from a drop down list.
Enter a message describing your concern and the reasons you wish the media to be removed. A system administrator, who can fulfill your request or reinstate the content, will moderate this. You will be notified of the outcome at the administrator’s discretion.
Content flagged will be removed from view immediately.
Comments
When comments are enabled, users are able to leave 100 character messages about the content.
Any comments deemed inappropriate or offensive can be reported to the administrator. Reported comments will be hidden immediately.
If an administrator or moderator confirms the reported comment as appropriate to the content, the comment cannot be reported again.

15
RSS Feed Clicking the RSS button within a category will display the Really Simple Syndication [RSS] feed. This allows a user to subscribe to a basic feed, updating automatically whenever new video or audio is added to their chosen category.
When a feed is chosen, you will see a preview of the content to be delivered. The screenshot below shows the Firefox browser previewing the content.
The RSS feed link can be added to any compatible viewer such as the RSS Feed Reader built into Windows Vista or Windows 7.

Helix Media Library User Guide
16
Adding Media
Clip Metadata
Click on the Upload tab. Users with standard access rights will be shown the below screen.
You will need to provide a title and description; these are compulsory fields. Dependent on your upload rights, you will be able to select a number of categories to upload to, in most cases it will default to the corresponding faculty/school/department you are in.
Provide an email address to be notified when your media is ready.
Tagging media uploads allows you to relate content to certain areas. For example, adding a Sport tag to a number of uploads will group that content in a relationship that can be easily searched.
You may be asked to agree to a disclaimer in some circumstances when uploading media. This will be dependent on rules set by the site administrator.
Selecting Next will bring up the file selection screen.

17
File Selection
Click Upload Media to choose a file to upload. Depending on the file types allowed by your system administrator, you are able to upload:
• AVI (Indeo, Cinepak, Motion JPEG, MPEG1/2/4,DiVX, XViD)
• MPEG4 (DiVX, XViD, 3iVX)
• MOV (Sorenson, H263, H264, animation – Apple LossLess not supported)
• MPEG1 / MPEG2
• WMV (all versions -‐ DRM not supported)
• DV / DVCPro
• MP3, Windows Media Audio, WAV
Selecting the file and clicking Open will start the file upload process. The file size allowed will be limited to 1GB, 500MB, 250MB, or 100MB. Your system administrator sets this limit.

Helix Media Library User Guide
18
Thumbnails
Once the upload has completed, you will be presented with a range of thumbnails to choose from generated from the uploaded video.
From here, you can select one of the predefined images, choose to upload an image of your own (640x204 pixels), or use the default thumbnail that is assigned to the category you have uploaded to.
Remember to select the Next button associated with your selection, for example underneath the thumbnail preview images, or Next under Use Default Thumbnail if you wish to continue without a custom image.
When uploading an audio file, thumbnail selection changes. At this stage you can choose the default category thumbnail, or upload your own as no thumbnails will be generated from an audio upload.

19
Associated Files
This next screen will allow you attach associated documents to the media.
In a similar style to adding media, select browse and choose a file to upload. File types of *.doc, *.docx, *.pptx, *.xls, *.pdf, *.swf, *.jpg, *.gif, *.htm, *.txt, and *.zip are allowed. You can upload 3 associated files per clip. Give the file a title and click Upload Media, for each file you want to upload.
There is also the option of uploading a captions file. The following file extensions can be uploaded: *.smi, *.rt, *.ssf, *.srt, *.ttxt, *.sub, *.txt, *.xml. Please be aware that to upload .srt files the .srt extension needs to be specified as an allowed MIME type in IIS. See the bottom of this guide for how to do this.
When you have uploaded a file it will be listed as below. You can delete it by checking the box and clicking Delete selected file(s).

Helix Media Library User Guide
20
Click the Next button further down the page to continue through to the final screen.
That's it! The content has been uploaded and you will soon be notified when it is ready to view.
21
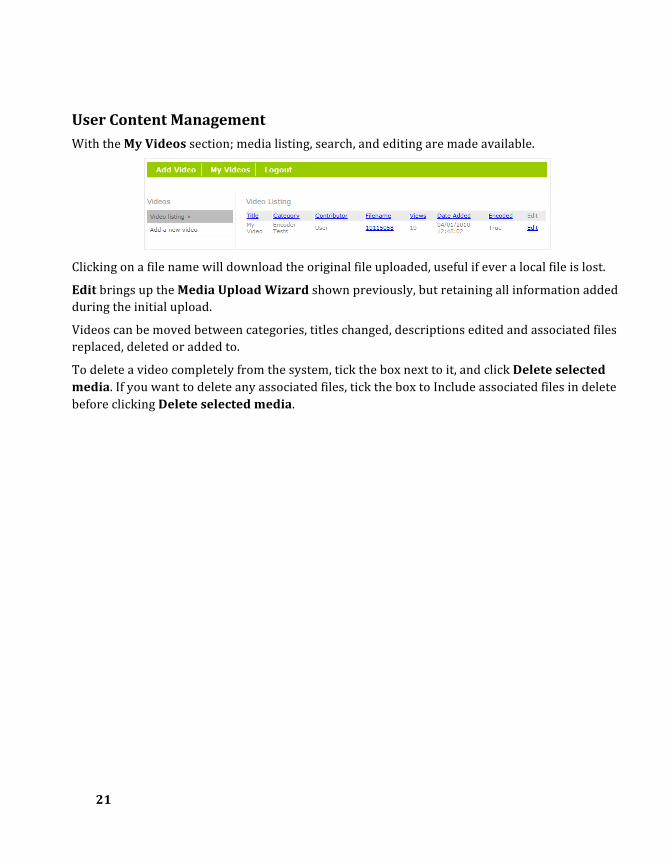
User Content Management With the My Videos section; media listing, search, and editing are made available.
Clicking on a file name will download the original file uploaded, useful if ever a local file is lost.
Edit brings up the Media Upload Wizard shown previously, but retaining all information added during the initial upload.
Videos can be moved between categories, titles changed, descriptions edited and associated files replaced, deleted or added to.
To delete a video completely from the system, tick the box next to it, and click Delete selected media. If you want to delete any associated files, tick the box to Include associated files in delete before clicking Delete selected media.

Helix Media Library User Guide
22
Mobile Sites – iPhone, iPad, BlackBerry and Android
When navigating the Helix Media Library from an Apple iPhone, iPod Touch, Android or BlackBerry, the site will render specifically for that device (if site is enabled, see the end of this section on how to enable). When public access to the Media Library is enabled, your first visit to the site will show a list of videos available to unauthenticated users, such as the image.
From here selecting the play icon that appears over the video thumbnail will play the media immediately.
The home screen offers Most Played, Latest Added and Random video selections.
If guest access is not enabled, you will be asked to log in. These credentials will be the same as used for the main Helix Media Library site.
Selecting the Title of a clip will bring up the information for that media.
Selecting Search at any point will bring up the search page. From here you are able to search on the default tags, such as Latest Added, or Most Played.
You are able to define a more specific search by choosing categories to search within, looking for a particular contributor or specifying a search term based on tags or media name and description. Accessing the site from an iPad will look the same as the main site. However functionality that relies on Flash being supported like uploading videos and creating chapter points is not enabled with the iPad site.

23
Enabling Segmentation To enable the mobile sites, from the upload site click on Settings and then General. Scroll to the bottom and you will see the ‘Mobile Settings’ section.
Enabling the iPhone/Android site will enable the mobile site for the iPhone and Android devices, and enabling the BlackBerry site will turn on the mobile site for BlackBerry’s.
There is an option to enable BlackBerry audio because when it is enabled it allows BlackBerry users to download the audio clips. If it is disabled then audio clips will not be available on the BlackBerry site.
You can enable segmentation for the iPhone and iPad which means that when you access clips from these devices you will be accessing the file in segments to enable smoother delivery for long form content. When it is enabled, the Helix Server needs to be configured to allow this to happen. Segmentation is recommended when viewing clips over 2 MB in size from the iPhone/iPad. If it is likely that there will be heavy mobile usage with the HML it is recommended that segmentation is enabled.
Helix Media Library User Guide
24
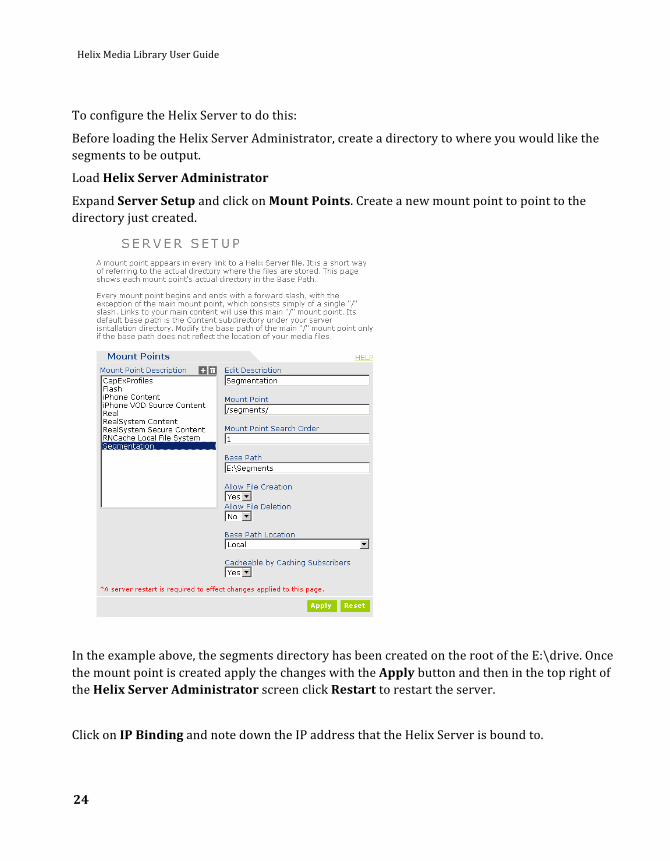
To configure the Helix Server to do this:
Before loading the Helix Server Administrator, create a directory to where you would like the segments to be output.
Load Helix Server Administrator
Expand Server Setup and click on Mount Points. Create a new mount point to point to the directory just created.
In the example above, the segments directory has been created on the root of the E:\drive. Once the mount point is created apply the changes with the Apply button and then in the top right of the Helix Server Administrator screen click Restart to restart the server.
Click on IP Binding and note down the IP address that the Helix Server is bound to.

25
Now from the menus on the left click on Content Management and then click on Media Segmentation. Change the drop-‐down box to Yes where it says Enable Segmentation, and for the Server Hostname put in the IP address you noted down in the step above. Click on the plus icon where it says Source Path and enter your flash mount point. Change Enable Source Path to Yes and select the destination mount point, which will be your /segments/ one.
Scroll to the bottom of the page and click Apply. From the menus on the left go back up to HTTP/S Delivery under the Server Setup heading. Under HTTP Delivery click the plus icon and add the /segments/ mount point, and if not already added, the /flash/ one. Click Apply to save the changes.
Helix Media Library User Guide
26
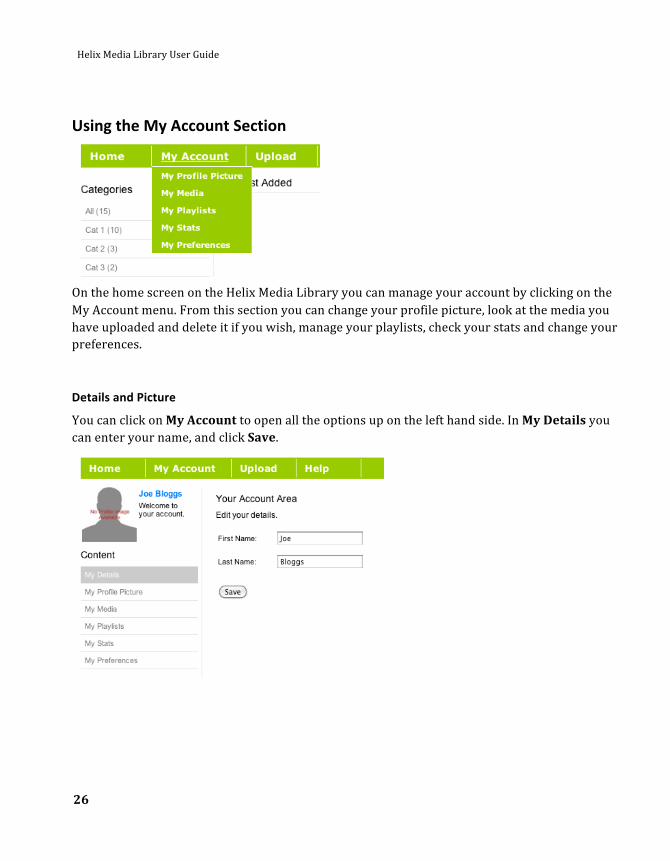
Using the My Account Section
On the home screen on the Helix Media Library you can manage your account by clicking on the My Account menu. From this section you can change your profile picture, look at the media you have uploaded and delete it if you wish, manage your playlists, check your stats and change your preferences.
Details and Picture
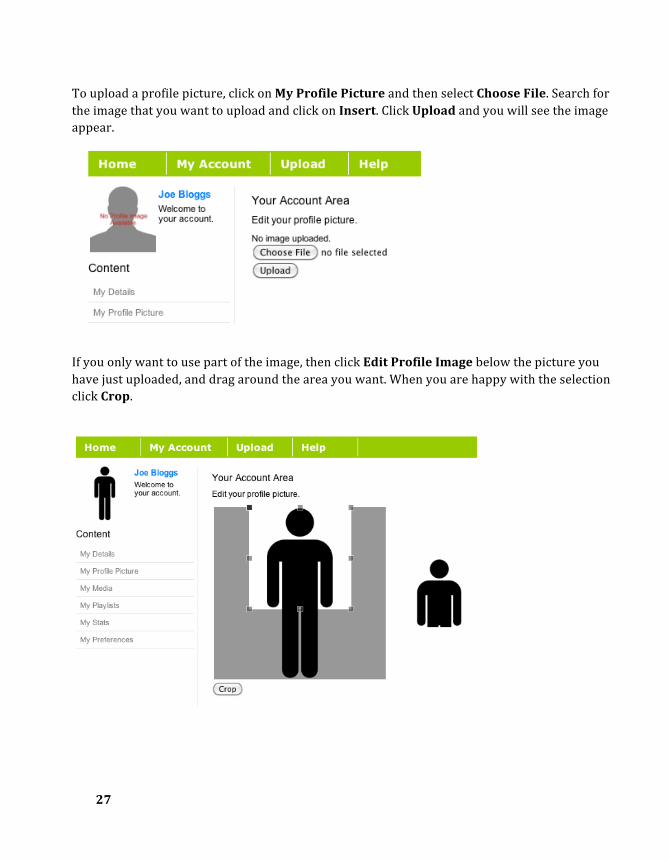
You can click on My Account to open all the options up on the left hand side. In My Details you can enter your name, and click Save.
27
To upload a profile picture, click on My Profile Picture and then select Choose File. Search for the image that you want to upload and click on Insert. Click Upload and you will see the image appear.
If you only want to use part of the image, then click Edit Profile Image below the picture you have just uploaded, and drag around the area you want. When you are happy with the selection click Crop.
Helix Media Library User Guide
28
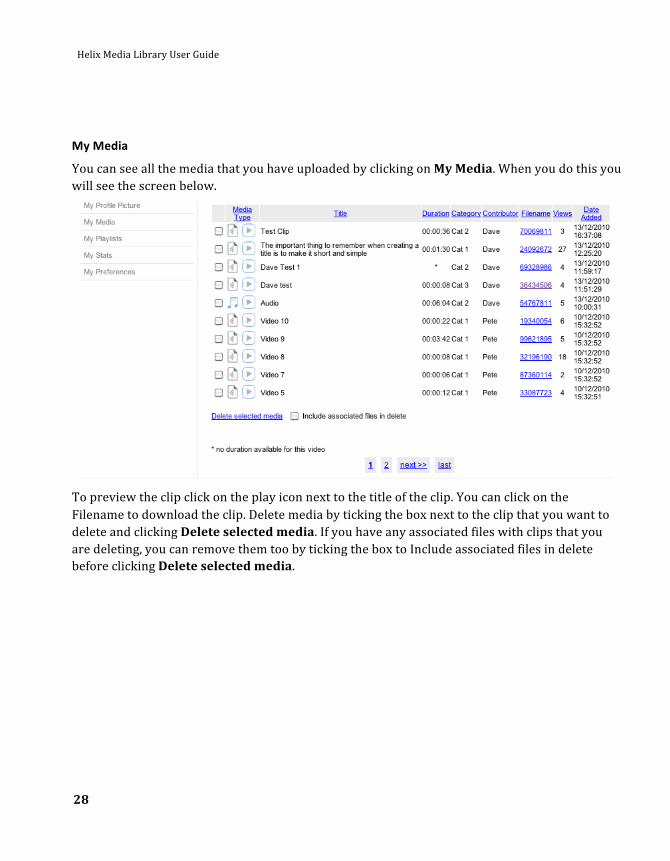
My Media
You can see all the media that you have uploaded by clicking on My Media. When you do this you will see the screen below.
To preview the clip click on the play icon next to the title of the clip. You can click on the Filename to download the clip. Delete media by ticking the box next to the clip that you want to delete and clicking Delete selected media. If you have any associated files with clips that you are deleting, you can remove them too by ticking the box to Include associated files in delete before clicking Delete selected media.

29
My Playlists
Clicking on My Playlists will show any playlists that you have created, and allow you to create new ones.
To remove a playlist check the box and click below to delete it.
To create a new playlist, click Add Playlist from the menu on the left and the Add Playlist screen will appear.
Enter the name, any info that you want to add and then click Save to create it.

Helix Media Library User Guide
30
Once the playlist is created, clips can be added to it. To add a clip to a playlist, navigate back to the homepage and click on the thumbnail of a clip as you would to view it. You can now use the drop-‐down box to select the playlist that you would like to add the clip to, and click the plus button to add it.
Another option that is available when editing a playlist is to view the contents of the playlist in XML format. You can use this link to subscribe to the content in a browser as an RSS feed.
When you have populated the playlist with some clips, you can click here to remove clips that you no longer wish to appear in it.
31
To remove media, check the box next to each clip you want to remove and click Delete selected media. If you have more than 10 clips in the playlist, you can navigate through them using the Next and Prev buttons at the bottom.
Viewing a playlist
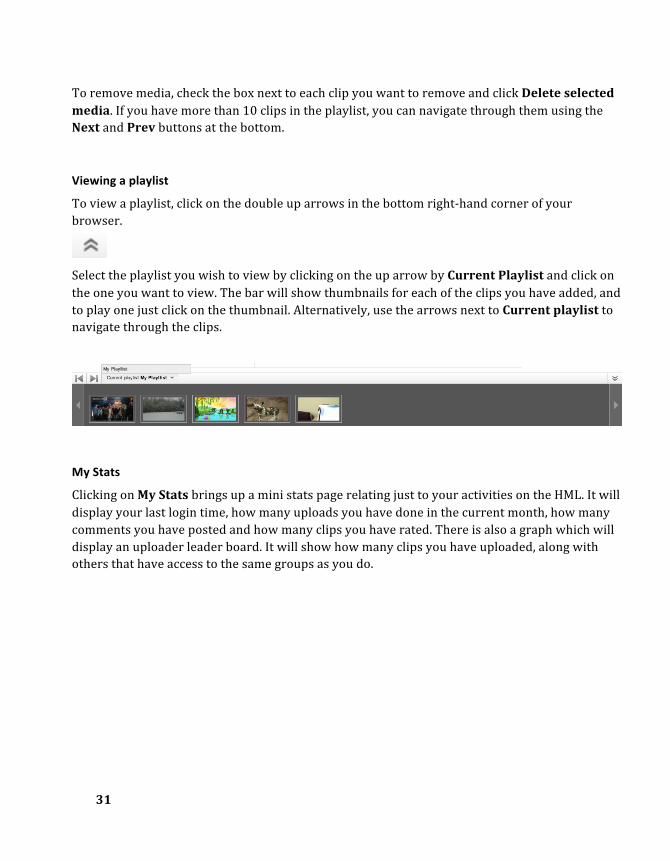
To view a playlist, click on the double up arrows in the bottom right-‐hand corner of your browser.
Select the playlist you wish to view by clicking on the up arrow by Current Playlist and click on the one you want to view. The bar will show thumbnails for each of the clips you have added, and to play one just click on the thumbnail. Alternatively, use the arrows next to Current playlist to navigate through the clips.
My Stats
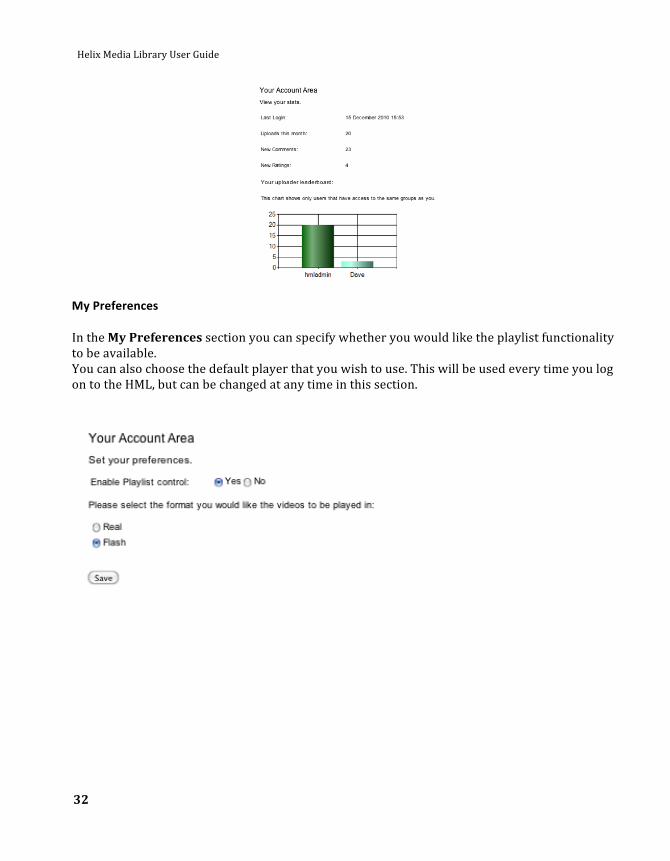
Clicking on My Stats brings up a mini stats page relating just to your activities on the HML. It will display your last login time, how many uploads you have done in the current month, how many comments you have posted and how many clips you have rated. There is also a graph which will display an uploader leader board. It will show how many clips you have uploaded, along with others that have access to the same groups as you do.
Helix Media Library User Guide
32
My Preferences In the My Preferences section you can specify whether you would like the playlist functionality to be available. You can also choose the default player that you wish to use. This will be used every time you log on to the HML, but can be changed at any time in this section.

33
HML Administration Entering the administration section of the Helix Media Library is done by selecting Upload. When requested for a username and password, enter the administrator credentials provided to you.
A range of new options will be made available:
Content Content offers access to all categories, media, reported comments and content on the library.
Categories
Selecting categories displays the below screen. All current categories are listed, up to 10 per page, with the page selection shown at the bottom.
Adding a category
Selecting Add a new category or Edit will bring up an almost identical set of options. In this case we will use Edit.
Helix Media Library User Guide
34
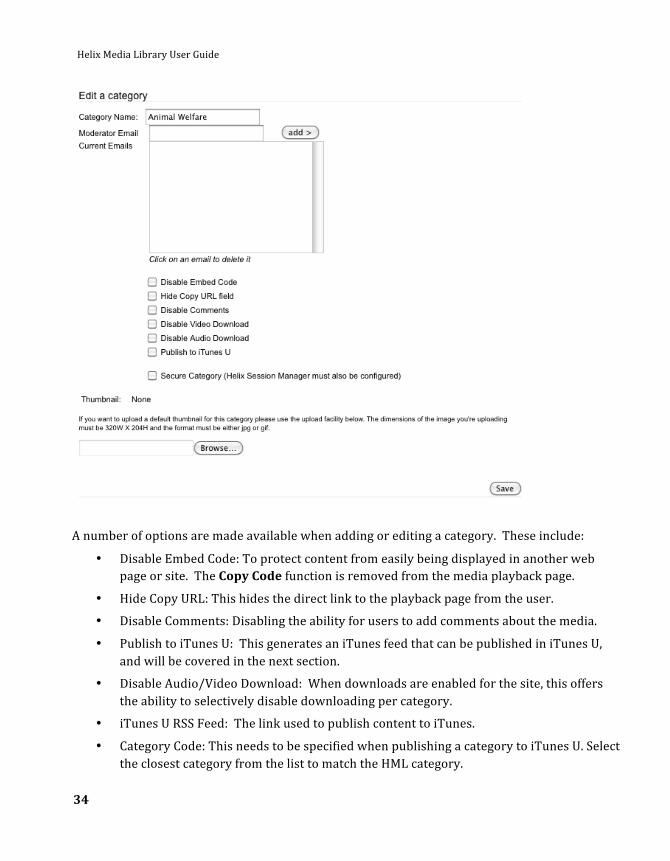
A number of options are made available when adding or editing a category. These include:
• Disable Embed Code: To protect content from easily being displayed in another web page or site. The Copy Code function is removed from the media playback page.
• Hide Copy URL: This hides the direct link to the playback page from the user.
• Disable Comments: Disabling the ability for users to add comments about the media.
• Publish to iTunes U: This generates an iTunes feed that can be published in iTunes U, and will be covered in the next section.
• Disable Audio/Video Download: When downloads are enabled for the site, this offers the ability to selectively disable downloading per category.
• iTunes U RSS Feed: The link used to publish content to iTunes.
• Category Code: This needs to be specified when publishing a category to iTunes U. Select the closest category from the list to match the HML category.

35
• Thumbnail: You can select a picture to upload for the category.
• Secure Category check box: This is used when securing content in the category so it can only be viewed by selected computers or network locations. This is explained later on in this section.
These settings affect all media within the category.
A thumbnail image can be linked to the category. For example a Photography course may assign a picture of a camera as the image for a video.
This is used in conjunction with the automatically generated thumbnails if images cannot be taken from videos in some cases.
The thumbnail should be 320 pixels wide by 204 high and in the .JPG format.
Helix Media Library User Guide
36
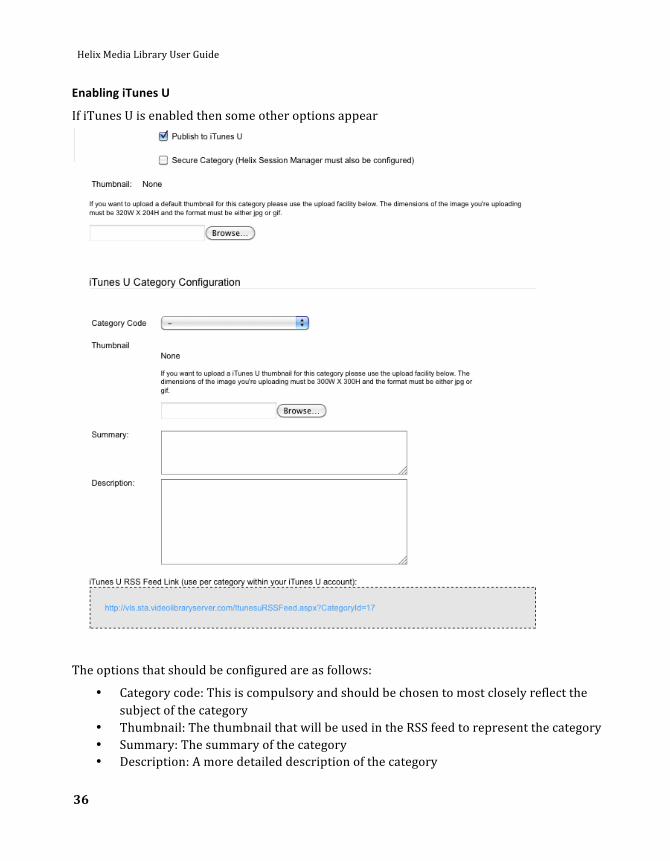
Enabling iTunes U
If iTunes U is enabled then some other options appear
The options that should be configured are as follows:
• Category code: This is compulsory and should be chosen to most closely reflect the subject of the category
• Thumbnail: The thumbnail that will be used in the RSS feed to represent the category • Summary: The summary of the category • Description: A more detailed description of the category

37
iTunes U Feed
The Helix Media Library generates specific iTunes U compatible feeds. These differ from the standard RSS feeds described earlier. iTunes U feeds are required to be publically accessible, standard HML RSS feeds are secured by username and password.
Please refer to your iTunes U Administration Guide for proper use of iTunes U. This will be only a brief explanation of the process for adding a feed, focusing on the steps for setting it up with the HML.
1. In the category creation or Edit section as mentioned previously, select Publish to iTunes U.
From the list select the category that closest matches:
A new URL will appear in the iTunes U RSS Feed Link box. Highlight this URL and press CTRL + C or right-‐click and select Copy.
Helix Media Library User Guide
38
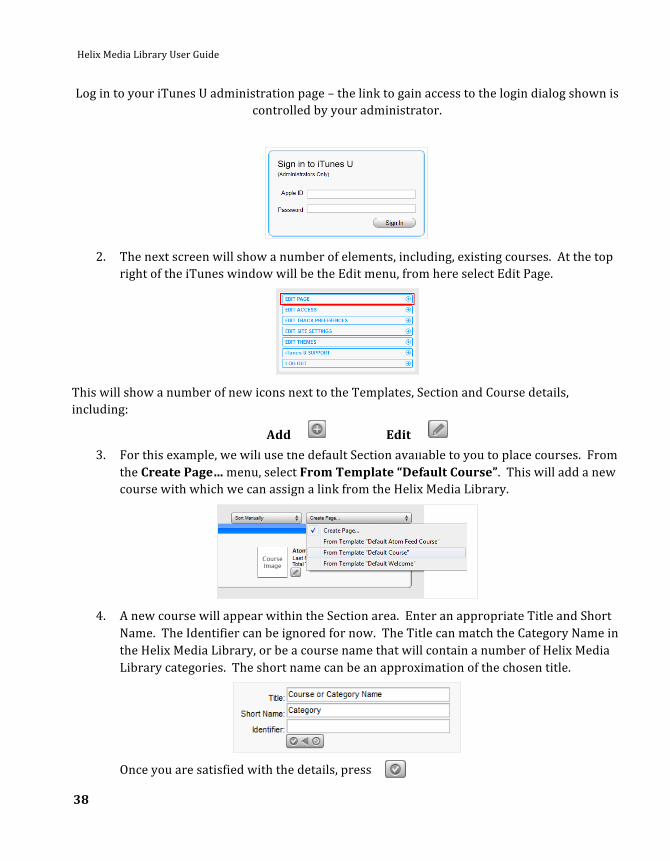
Log in to your iTunes U administration page – the link to gain access to the login dialog shown is controlled by your administrator.
2. The next screen will show a number of elements, including, existing courses. At the top
right of the iTunes window will be the Edit menu, from here select Edit Page.
This will show a number of new icons next to the Templates, Section and Course details, including:
3. For this example, we will use the default Section available to you to place courses. From the Create Page… menu, select From Template “Default Course”. This will add a new course with which we can assign a link from the Helix Media Library.
4. A new course will appear within the Section area. Enter an appropriate Title and Short
Name. The Identifier can be ignored for now. The Title can match the Category Name in the Helix Media Library, or be a course name that will contain a number of Helix Media Library categories. The short name can be an approximation of the chosen title.
Once you are satisfied with the details, press
Add Edit

39
5. A new course has been created. The course will appear will appear as below:
The content links now need to be added, to proceed, click the title of your course. In the example above, you would select Helix Media Library.
6. A new blank course page will appear. From this section, Course Image, Description and Groups can be edited. Firstly, select Edit Page from the menu in the top right of the page, as per below:
As before, the edit and add icons will appear next to each editable section.
7. By default, 2 blank ‘Groups’ are created for you. Imagine these groups to pertain to albums, or in this scenario, categories from the Helix Media Library. Select the Edit icon next to the Group 1 name. Edit the group name to match your category.
8. The group section will expand to the Feed editor. By default, these options should be
used:
a) Feed URL: This will point to the Helix Media Library iTunes U RSS feed, for example, http://hml.helixmedialibrary.com/itunesuRSSFeed.aspx?Categoryid=
b) Security: Keep this as default, None
c) Signature: Keep this as default, None
d) Check for changes: Set to Daily
An example is shown below:
*For all other iTunes U functions, please refer to the iTunes U Administration Guide provided by Apple .

Helix Media Library User Guide
40
Click Apply once you have entered the details.
9. If content is available in the category you have chosen, the media will be displayed in the track listing below the Group tab.
You can now select End Editing from the menu located at the top right of the page, or repeat the process to add more categories to the course.

41
Secure Categories Securing a category means that the media located in the category that is secured, can only be viewed if the user is logged into HML or as a failover on an IP address range specified in the Secure Category list. This is especially relevant if content is embedded elsewhere. When testing you must be logged out of the HML or using a different browser, because if you are logged in you will see the media even if your IP address is not on the list.
For secure categories to work, Helix Session Manager must be running on the server. To find out about licensing for this please contact your local sales representative.
When you secure a category the screen will expand and more options will appear:
When the rules are enabled (by ticking the box for them on the left) you can allow content to be viewed from only the IP addresses specified. So to give access to content from just one IP address the to and from values would be the same, i.e. 192.168.10.1 – 192.168.10.1. To allow a range of IP addresses to view the content extend the range.. When this is set up, people whose computers/devices do not fall within the lists of IP’s specified will not be able to view any content that has been embedded in a web page.
users simply tick the Secure Category option and do not add any IP Addresses. If you just wish to secure the category is terms of allowing the media to just be viewed by logged in

Helix Media Library User Guide
42
How to Configure Session Manager
Helix Session Manager is a separate product from Helix Server and Helix Media Library. To enable secure categories in the media library it needs to be purchased as a bolt-‐on. For more information please contact your local sales representative. With Session Manager purchased, it needs to be downloaded from your PAM site: http://pam.realnetworks.com/pam
1. Log into your PAM site and navigate to the Session Manager software. Click on View Details or Download Product underneath it and click to download the software.
2. Extract the .tar.gz file that was downloaded, and open the unzipped folder. 3. Locate the folder that corresponds to your operating system and open it. 4. Inside there will be a .dll file called Sessionmgr.dll 5. Copy this .dll file and place it in the plugins folder in your Helix Server install. If you have
Helix Server installed to the C: drive, then the path the .dll needs to be stored is: C:\Program files\Real\Helix Server\Plugins\
6. Back on the PAM site, open the Session Manager link “View Details or Download Product”.
7. Click on Download License Key and send the key to yourself. 8. When you receive the key (on email) copy it to the license directory: C:\Program
Files\Real\Helix Server\Licenses\ 9. Navigate to the main directory for Helix Server: C:\Program Files\Real\Helix Server 10. Use WordPad to edit the rmserver.cfg file 11. Add the following XML references in BLUE to the config file, after the following lines of
code:
<Var ClientConnections=”0”/> <Var Capacity=”10000”/>
<List Name="DAUCSessionMgr"> <Var Enabled="1"/> <List Name="SessionManagement"> <Var Realm="server.realm"/> <Var Port="8087"/> <Var Username="admin"/> <Var Password="password"/> <Var AuthenticationType="basic"/> </List> <List Name="LogOutput"> <Var AuthLogging="1"/> <Var AuthLogFileName="C:\Program Files\Real\Helix Server\Logs\sessionmgr.log"/> <Var LogRollSize="50"/>

43
<Var TemplateFormat="%Client.*.Session.*.PlayerRequestedURL%"/> <Var LogServerStart="1"/> <Var IntervalLogging="1"/> <Var IdleLogging="1"/> </List> <List Name="Events"> <List Name="SessionStart"> <Var Blocking="1"/> <List Name="Actions"> <List Name="Action_1"> <Var Type="ExternalAuth"/> <Var ExternalAuthServer="Server"/> <Var ConnectionTimeout="30"/> <Var ResponseTimeout="15"/> <List Name="DefaultAction"> <Var Name="Deny"/> </List> </List> <List Name="Action_2"> <Var Type="Log"/> </List> </List> </List> </List> <List Name="ExternalAuthServers"> <List Name="Server"> <Var Server="upload.organisation.com"/> <Var Port="80"/> <Var Path="/security/HelixSessionAuth.aspx"/> </List> </List> </List>
12. Change the parts of the references in the XML code above that are in RED, so that they
match the setup of your environment. 13. Restart your Helix Server. To do this click on Start on the Windows desktop, click Run
and type services.msc in the run box and hit return. Find the service called Helix Server/Helix Mobile Server and right-‐click it. Click Stop, and then when it has stopped do the same again and click Start.
14. To check that Helix has started correctly, play a clip from the Helix Media Library and check the Logs folder in the Helix Server directory. You should see a Sessionmgr.log file
15. Add an IP Address restriction to a category within the Media Library and test playback from an IP Address outside of that range. The clip should fail to playback, no specific error will be given but the playback will timeout.
Helix Media Library User Guide
44
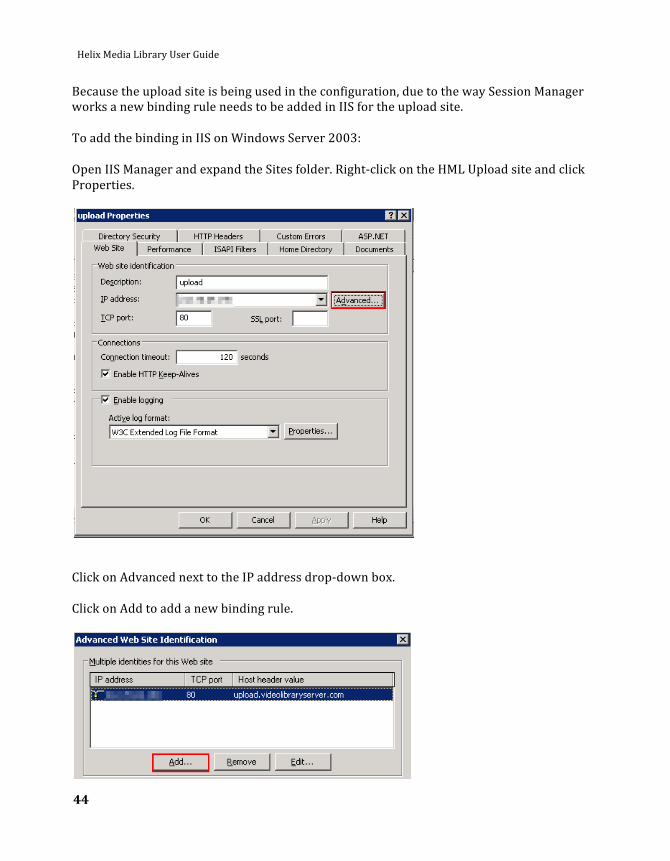
Because the upload site is being used in the configuration, due to the way Session Manager works a new binding rule needs to be added in IIS for the upload site. To add the binding in IIS on Windows Server 2003: Open IIS Manager and expand the Sites folder. Right-‐click on the HML Upload site and click Properties.
Click on Advanced next to the IP address drop-‐down box. Click on Add to add a new binding rule.

45
Select the same IP address that the upload site is currently bound to from the drop-‐down box. Enter port 80 for the port but leave the host header value blank.
Click OK, then OK to the open windows and exit IIS. To add the binding in IIS 7 on Windows Server 2008: Open IIS Manager and expand the Sites folder. Right-‐click the HML Upload site and click on Edit Bindings.

Helix Media Library User Guide
46
In the Site Bindings window, click Add.
Leave the type set to http, and change the IP address to the same one that the upload site is currently bind to. Leave the port set to 80 and the host name blank then click OK.
Click Close to the Site Bindings box and exit IIS.

47
Media Listing The videos section offers a wide range of options, from simple search to downloading the original source files of uploaded content.
Selecting search without entering any keyword terms will display all the videos within a category, or in this case, All. Category, name/description, or contributor can narrow searches.
Information including title, category, uploaded by, assigned system filename, how many views via the player page, date uploaded, and if the file encoded successfully.
Clicking on any of the information titles will sort the media listing by that section, for example, date.
Under the filename section you can download a file uploaded to the system. This is useful when investigating any issues with a video, such as a failed encode.
By selecting the check box to the left of the media list, multiple pieces of content can be chosen for deletion. Any associated files can be deleted at the same time.
Adding media takes you through the same process as a standard user. Editing media allows you to make changes to all aspects of the upload process, including replacing attachments or the media files. All previously entered details are recalled.
Clicking the play button icon under the Media Type column will show a preview of the clip.

Helix Media Library User Guide
48
When you click on Edit you are taken to the media metadata page. You can go through each step again by clicking Save, Skip or Next on each page in line with what you are modifying, or if you only want to make a change on the first page then you can use the bar along the top to navigate to the finish page once you have made the change.
If you for example to just want to change the description of a clip, you can edit it on the first page, click Save at the bottom and when the next page loads just click the blue Finished arrow to complete the process. If you don’t want to change anything on the first page but want to change a thumbnail or add an associated file, you can click Thumbnails or Assoc file respectively to take you straight to the section that you need.

49
Reported Comments This section allows the administrator to view all reported comments. Comments can be deleted or approved.
To delete or approve a comment or comments, highlight the checkbox(s) and select either Delete or Reinstate from the process list.
Reported Media
Any content flagged by users as being inappropriate for display will be listed here.
Administrators are able to:
• View the content by downloading a small version of the clip.
• Reinstate the content if it is deemed acceptable. In this instance it is advised to communicate to the user why you feel the clip should be available.
• Delete the content if it does violate terms and conditions of use.

Helix Media Library User Guide
50
Encoder Encoder offers two main options; encoder profiles and logging.
Profiles define the quality, screen size and bit-‐rate for both formats.
Standard video settings for both formats:
Bit-‐Rate (Kilobits per second) Frame Size (width x height)
256K 320x240
384K 384x288
512K 512x384
768K 640x480
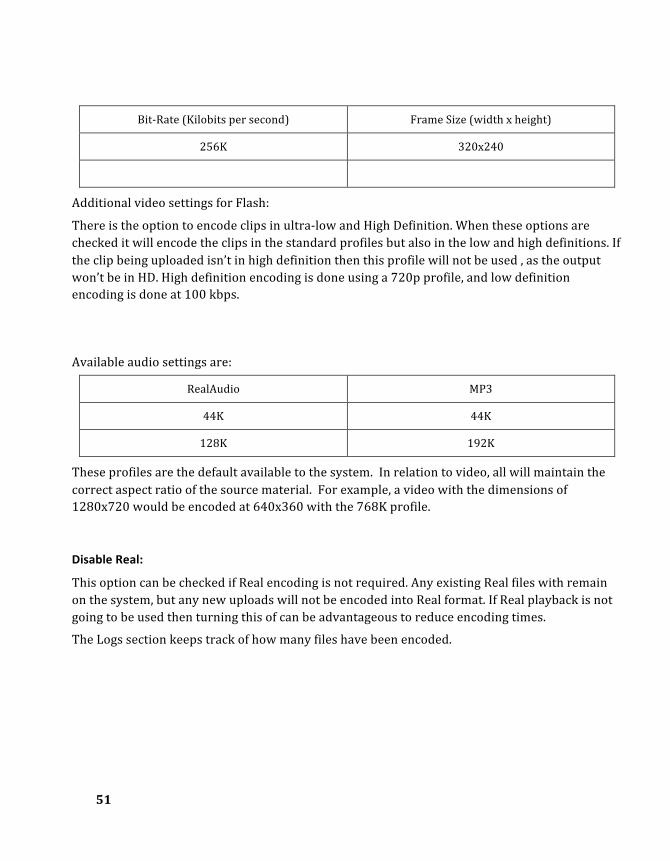
51
Bit-‐Rate (Kilobits per second) Frame Size (width x height)
256K 320x240
Additional video settings for Flash:
There is the option to encode clips in ultra-‐low and High Definition. When these options are checked it will encode the clips in the standard profiles but also in the low and high definitions. If the clip being uploaded isn’t in high definition then this profile will not be used , as the output won’t be in HD. High definition encoding is done using a 720p profile, and low definition encoding is done at 100 kbps.
Available audio settings are:
RealAudio MP3
44K 44K
128K 192K
These profiles are the default available to the system. In relation to video, all will maintain the correct aspect ratio of the source material. For example, a video with the dimensions of 1280x720 would be encoded at 640x360 with the 768K profile.
Disable Real:
This option can be checked if Real encoding is not required. Any existing Real files with remain on the system, but any new uploads will not be encoded into Real format. If Real playback is not going to be used then turning this of can be advantageous to reduce encoding times.
The Logs section keeps track of how many files have been encoded.

Helix Media Library User Guide
52
Security Security controls all aspects of user interaction and access with the Helix Media Library. The administration of this part of the system can differ per installation. This will cover the standard user management and a note on Active Directory/LDAP integrated systems.
Active Directory and LDAP integration is enabled using a separate module which is available to purchase through your system provider, please contact your local sales representative for details
Groups
Groups control user access to the categories on the system. The group listing shows all currently created, and allows filtering for easier management. As relevant characters are added the list shortens to match as shown below.
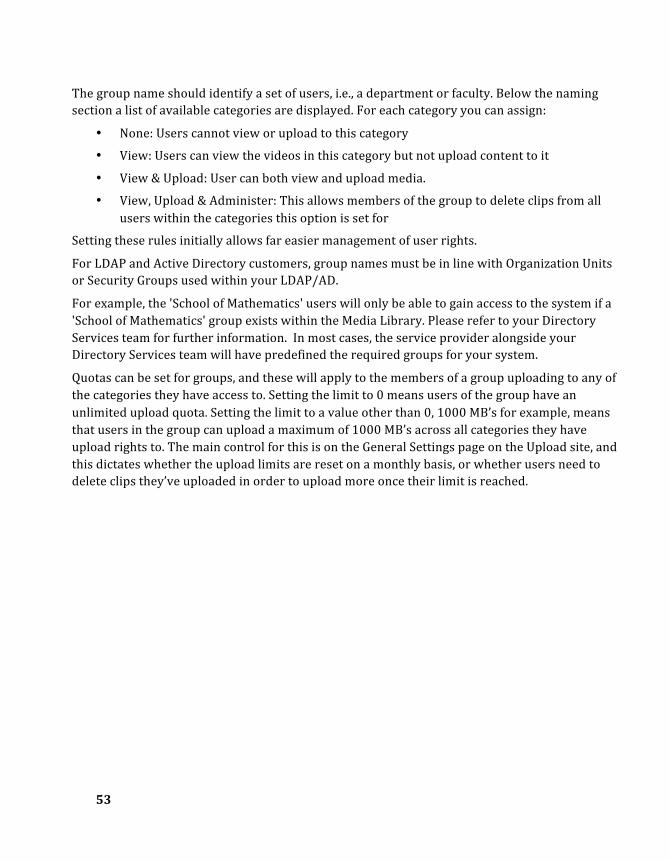
Adding Groups
Adding and editing groups are almost identical in function, for this well will create a new group. Selecting Add a new group will bring up the screen shown below.
53
The group name should identify a set of users, i.e., a department or faculty. Below the naming section a list of available categories are displayed. For each category you can assign:
• None: Users cannot view or upload to this category
• View: Users can view the videos in this category but not upload content to it
• View & Upload: User can both view and upload media.
• View, Upload & Administer: This allows members of the group to delete clips from all users within the categories this option is set for
Setting these rules initially allows far easier management of user rights.
For LDAP and Active Directory customers, group names must be in line with Organization Units or Security Groups used within your LDAP/AD.
For example, the 'School of Mathematics' users will only be able to gain access to the system if a 'School of Mathematics' group exists within the Media Library. Please refer to your Directory Services team for further information. In most cases, the service provider alongside your Directory Services team will have predefined the required groups for your system.
Quotas can be set for groups, and these will apply to the members of a group uploading to any of the categories they have access to. Setting the limit to 0 means users of the group have an unlimited upload quota. Setting the limit to a value other than 0, 1000 MB’s for example, means that users in the group can upload a maximum of 1000 MB’s across all categories they have upload rights to. The main control for this is on the General Settings page on the Upload site, and this dictates whether the upload limits are reset on a monthly basis, or whether users need to delete clips they’ve uploaded in order to upload more once their limit is reached.

Helix Media Library User Guide
54
Users
If you are intending to use or are currently using the LDAP or Active Directory module, you can skip this section as your central services team controls all user interaction.
This section allows you to search, add, edit and delete users. The user list is fully searchable, highlighting matches as they are entered in the search box as shown in the below example.
55
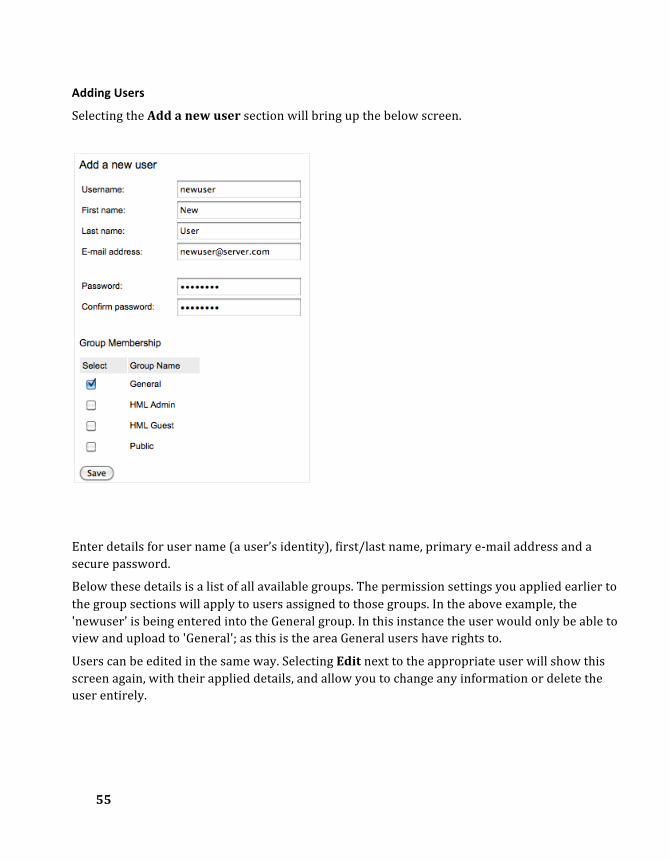
Adding Users
Selecting the Add a new user section will bring up the below screen.
Enter details for user name (a user’s identity), first/last name, primary e-‐mail address and a secure password.
Below these details is a list of all available groups. The permission settings you applied earlier to the group sections will apply to users assigned to those groups. In the above example, the 'newuser' is being entered into the General group. In this instance the user would only be able to view and upload to 'General'; as this is the area General users have rights to.
Users can be edited in the same way. Selecting Edit next to the appropriate user will show this screen again, with their applied details, and allow you to change any information or delete the user entirely.

Helix Media Library User Guide
56
Settings This section will outline the main areas of the Settings panel. In most cases, no changes will need to be made here other than customization of texts, such as e-‐mail responses, help and disclaimers. These settings are site wide, and will overrule settings in categories.
General Settings
• Page Title: Change site heading displayed in the browser.
• Enable RSS: Produce Really Simple Syndication feeds that can be subscribed to in many newsreaders and browsers.
57
• Enable Coverflow: Enable the graphical video selection image on the main page.
• Enable Comments: Allow commenting for the Helix Media Library. This primary setting overrides individual category settings.
• Enable Rating: Allows people to use the star rating feature to rate clips
• Enable Playlists: Allows the creating of playlists for peoples favourite clips
• Enable Audio/Video Download: This adds a download link to the video player page. This is a site wide setting. Individual disable the download link.
• Category Sorting: When viewing category lists, videos can be sorted by either Name or by the number of videos available (in descending order).
• Default Format: Choose the preferred format for users. The first time a user logs in, the default format specifies if content is delivered through RealPlayer or Flash player.
• Allowed input formats: Here, formats enabled for upload to the system
• Maximum Upload Size: Limit the size of video allowed to be uploaded. This can be set to 100MB, 250MB, 500MB, or 1GB.
• User Upload Limits: You can set user upload limits to be by total uploaded or by month. This is the main setting, but actual limits are set within the groups. Setting limits by total uploaded means that when the maximum limit is reached users will need to delete any clips they no longer want, and by month will mean their upload limit will be reset every month.
• Mobile Settings: Here you can enable the iPhone site to allow iPhone and iPod Touch users to view a custom formatted site. You can enable the BlackBerry site and enable media segmentation for the iPhone and iPad. Enabling this feature changes the way that the media is accessed when viewed from an iPhone or iPad, and provides better continuity of playback over slower connections.
Customization Options
From here you will be able to:
• Apply a new header image for the administration pages (800 pixels wide by 94 high).
• Apply a new header image for the user pages (800 pixels wide by 94 high).
• Change the navigation menu color (top) and the accompanying text.
• Change the text color, highlight and selected color of the side menu.
• Set a background image for the front end to display as a frame around the HML
• Change the site wide font used for all body text and its color.
• Set a background color to be used as a frame around the HML (instead of background image)

Helix Media Library User Guide
58
59
• Apply a border color. This will be the thin border between the HML and the picture or color frame you set around it
• Apply an image to the bottom of the page (800 pixels wide by 94 high)
• Set the color of the text for the Helix Media Library
• Custom menu Links: These can be added and will appear on the front end of the HML to link to any external web site. The links will appear at the bottom of the categories on the left hand side of the screen
• Text, hover and selected colors for the side menus can be changed
• The Helix icon is displayed in the footer by default, and this links to the Helix Media Library website. Unchecking the box will remove it.
• Footer text can be set
• A footer image can be displayed
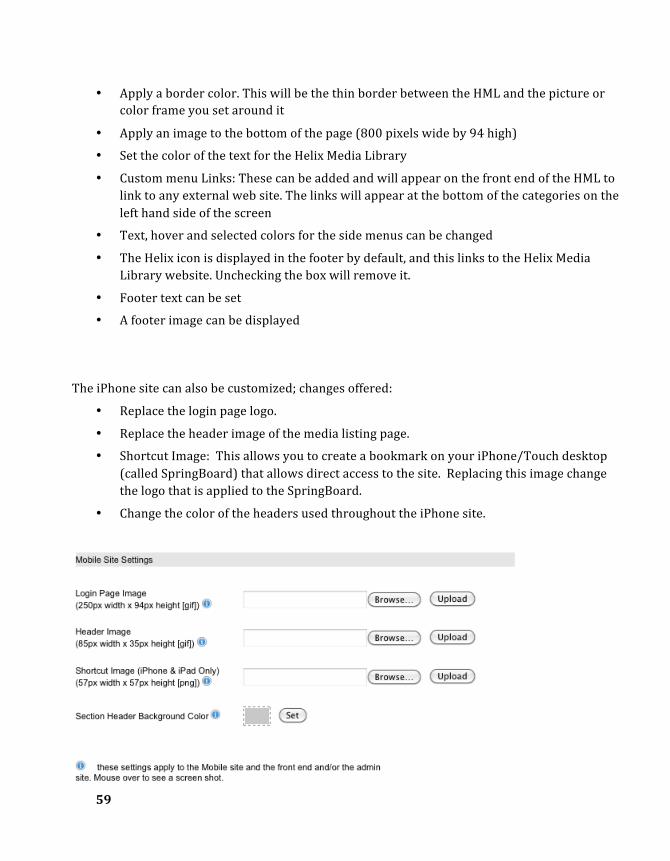
The iPhone site can also be customized; changes offered:
• Replace the login page logo.
• Replace the header image of the media listing page.
• Shortcut Image: This allows you to create a bookmark on your iPhone/Touch desktop (called SpringBoard) that allows direct access to the site. Replacing this image change the logo that is applied to the SpringBoard.
• Change the color of the headers used throughout the iPhone site.
Helix Media Library User Guide
60
Security
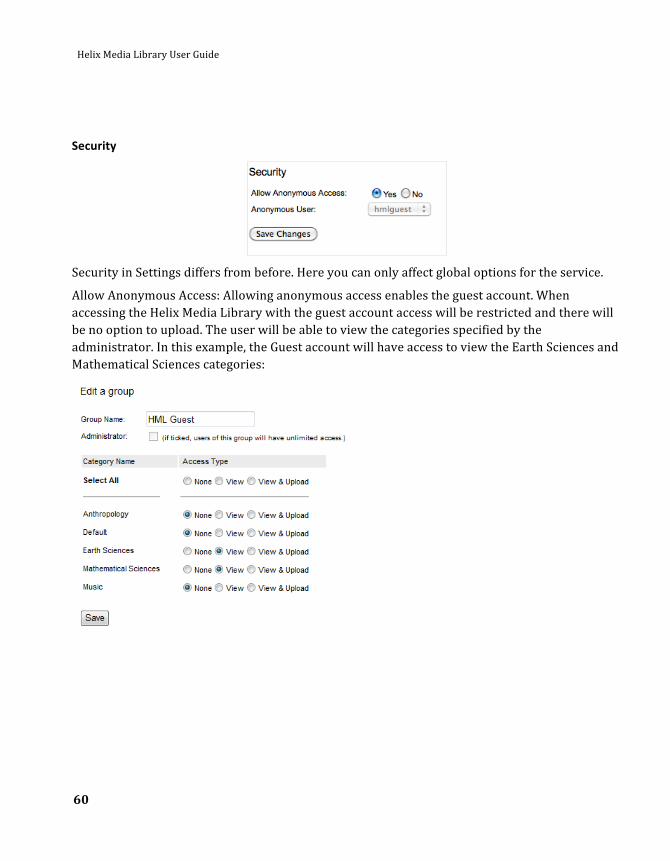
Security in Settings differs from before. Here you can only affect global options for the service.
Allow Anonymous Access: Allowing anonymous access enables the guest account. When accessing the Helix Media Library with the guest account access will be restricted and there will be no option to upload. The user will be able to view the categories specified by the administrator. In this example, the Guest account will have access to view the Earth Sciences and Mathematical Sciences categories:
61
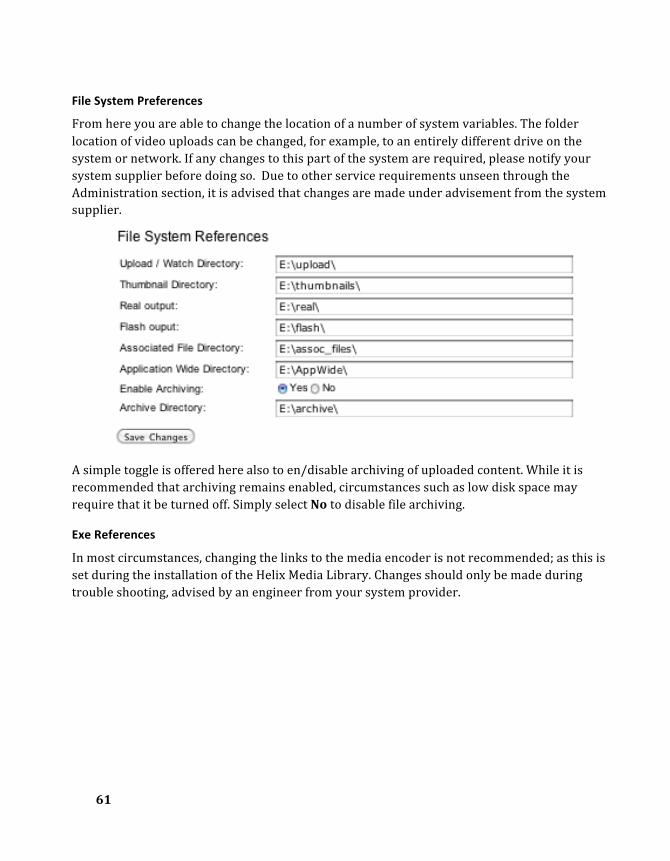
File System Preferences
From here you are able to change the location of a number of system variables. The folder location of video uploads can be changed, for example, to an entirely different drive on the system or network. If any changes to this part of the system are required, please notify your system supplier before doing so. Due to other service requirements unseen through the Administration section, it is advised that changes are made under advisement from the system supplier.
A simple toggle is offered here also to en/disable archiving of uploaded content. While it is recommended that archiving remains enabled, circumstances such as low disk space may require that it be turned off. Simply select No to disable file archiving.
Exe References
In most circumstances, changing the links to the media encoder is not recommended; as this is set during the installation of the Helix Media Library. Changes should only be made during trouble shooting, advised by an engineer from your system provider.

Helix Media Library User Guide
62
URL References
Again, this advanced section is only used during server upgrades, relocation, or troubleshooting.
The image above shows all URL's available to the system. These are all linked to other services and are dependent on each other; a change here without the respective service change could be detrimental to the stability of the system. In circumstances where URL's do need changing, please contact your system supplier.
E-‐Mail Notifications
The option to send e-‐mails to users can be set here and also the e-‐mail delivery server can be configured from this page.
Changes to the server section will not affect any other part of the system and can be configured safely as required.
The IP or DNS name of the mail server needs to be supplied, along with any security credentials that may be required.
Selecting Allow reporting of offensive content gives users the ability to notify the administrator of any content deemed inappropriate.
63
E-‐Mail Text
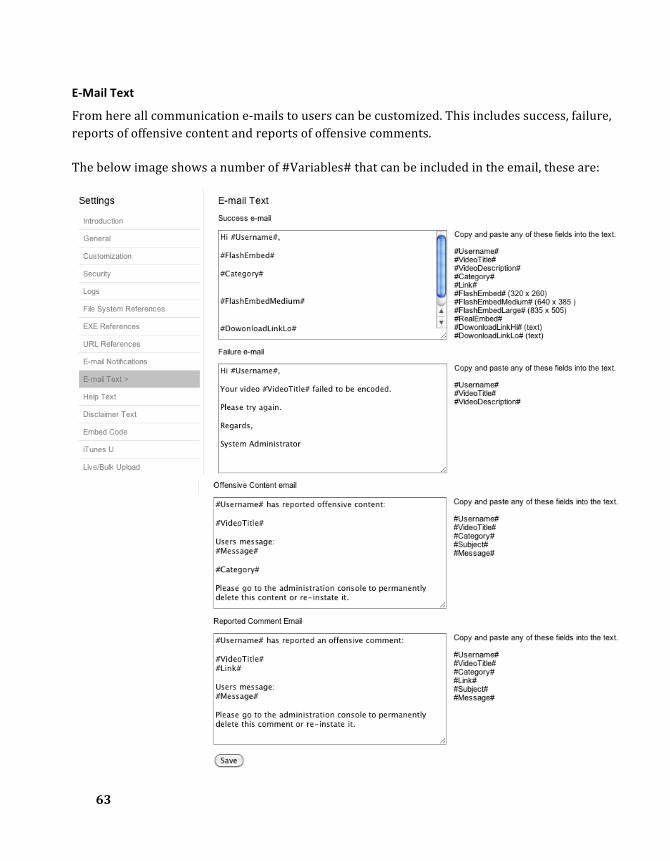
From here all communication e-‐mails to users can be customized. This includes success, failure, reports of offensive content and reports of offensive comments. The below image shows a number of #Variables# that can be included in the email, these are:
Helix Media Library User Guide
64
• #Username# : Display the users login name
• #VideoTitle# : Show user provided title
• #VideoDescription# : Display user provided description
• #Category# : Display the category the clip was uploaded to
• #Link# : Offer the URL to the video page
• #FlashEmbed# : Provide the HTML embed code to place Flash player and video into a web page at 320 x 260 pixels. This is the same size as the Flash player on the main Media Library site
• #FlashEmbedMedium# : Provide the HTML embed code for embedding into a web page but with bigger Flash player at 640 x 385 pixels
• #FlashEmbedLarge# : Same as above but with a large Flash player at 835 x 505 pixels
• #EmbedSmall# (320 x 260) Provide the HTML embed code to place the iframe embed code into a web page at 320 x 260 pixels. This is the same size as the Flash player on the main Media Library site. The iframe embed code options are recommended so as your embed code can work across non Flash enabled devices e.g. iPad/iPhone. #EmbedMedium# (640 x 385 ) Same as above but at 640 x 385 pixels #EmbedLarge# (835 x 505) Same as above but at 835 x 505 pixels
• #RealEmbed#: Provide the HTML embed code to place RealPlayer content into a web page
• #DownloadLinkHi# : Display a link to the high quality version of file that you can click to download
• #DownloadLinkLo# : Same as the above but with the lo quality version of the file
• #Subject# : User provided complaint title used in Offensive Content section
• #Message#: User message describing offensive content

65
Help Text Editing
Within this section, a WYSIWYG editor is provided, allowing full formatting of text, including justification, font changes/styles, tabling, etc.
The final product is all HTML, so by clicking the 'Source' button shown at the top right of the help text window will allow all changes to be made in HTML code. For example, this help guides’ code can be cut and pasted into this section.
Once complete, this guide is available to all users of the system, including guest accounts if enabled.
Disclaimer Text Editing
This is displayed in the exact same way as the Help editor, a full WYSIWYG HTML editor. Any copyright notices, or legal notices you require a user to adhere to when uploading a video can be placed here. Enabled by selecting Yes.

Helix Media Library User Guide
66
Embed Code & Video Player Configuration
From within this section, all changes relating to the displaying of video within the HML and also when embedded into external pages can be made. If Real encoding is turned off then a message is displayed letting you know.
The version shown above relates to the RealPlayer Standard and Flash variants.
Real Settings
• Auto Start: Media can be set to play automatically as soon as a playback page is displayed. This is set as on by default within the HML. Externally embedded videos are set to off for usability purposes.
• Full Screen: Grants or denies users the ability to play back video full screen.
• Link to launch external player: This gives the user the ability to view a video within their default media player. Options include HTTP links; this can be very useful for users behind strict firewalls who cannot normally view streaming content. The RTSP link offered is the same streaming type used by the HML in normal circumstances.

67
• Display direct link to content below the player: This option, very much as it say, offers a text link to the video clip, in either RTSP or HTTP formats that can be cut and paste into external web pages.
Flash Settings
• Auto Start: As with Real, en/disable automatic playback of the video on page load.
• Include Thumbnail: With Auto Start disabled, the player will show a high-‐resolution image within the player window until the media playback is started.
• Default embed code type: This lets you set the default embed that will be shown on the playback page, and can be set to Flash, JavaScript or iFrame.
iTunes U Settings
This section covers information for the iTunes U RSS feed and also the status of the service.
• Enable iTunes: Setting this to On allows the Helix Media Library to produce an iTunes U compatible feed. This is defined separately as iTunes requires unauthenticated feeds to be sent to the system. Enabling iTunes U on a category makes that feed publically accessible. While not a security risk, it is separated in this way so both types of RSS feed can be generated. Once enabled, categories can be allowed to publish feeds to iTunes.
• Institution Name: This forms part of the RSS feed and is part of the information you will see when accessing iTunes U. It is a required field
• Owner Email: This needs to be filled out with an email address in order to comply with the Apple standard for acceptable RSS atom feeds and is a required field.
• iTunes U URL: A direct link to your iTunes account. You will receive this with your iTunes U registration details. Enter that information here. For example, http://phobos.apple.com/instituion. This is a required field.
Helix Media Library User Guide
68
• Display iTunes Link: This enables users browsing the Helix Media Library to visit your iTunes U page from within the library. A link will be displayed at the bottom of each category page that has the function enabled.
• Copyright Message: There needs to be a message in here so that the RSS atom feed complies with the Apple standard
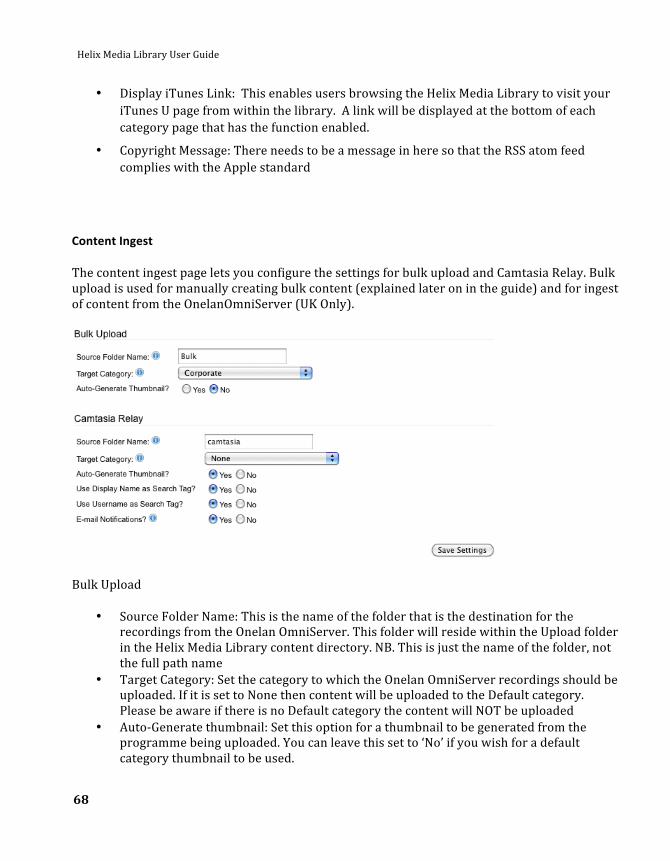
Content Ingest The content ingest page lets you configure the settings for bulk upload and Camtasia Relay. Bulk upload is used for manually creating bulk content (explained later on in the guide) and for ingest of content from the OnelanOmniServer (UK Only).
Bulk Upload
• Source Folder Name: This is the name of the folder that is the destination for the recordings from the Onelan OmniServer. This folder will reside within the Upload folder in the Helix Media Library content directory. NB. This is just the name of the folder, not the full path name
• Target Category: Set the category to which the Onelan OmniServer recordings should be uploaded. If it is set to None then content will be uploaded to the Default category. Please be aware if there is no Default category the content will NOT be uploaded
• Auto-‐Generate thumbnail: Set this option for a thumbnail to be generated from the programme being uploaded. You can leave this set to ‘No’ if you wish for a default category thumbnail to be used.

69
Camtasia Relay
• Source Folder Name: This is the name of the folder that is the destination for the Camtasia recordings. This folder will reside within the Upload folder in the Helix Media Library content directory. NB. This is just the name of the folder, not the full path name
• Target Category: This is the category to which the Camtasia recordings get uploaded. If it is set to None then the recordings will be uploaded to the Default category. Please be aware that if there is no Default category the content will NOT be uploaded
• Auto-‐Generate Thumbnail: If this is set to Yes then a thumbnail will be generated from the recording. If set to No then the default category thumbnail will be used
• Use Display Name as Search Tag: If this option is set to Yes then when the clip has been uploaded the display name used in the Camtasia Relay client will be used as a search tag
• Use Username as Search Tag: This is the same as above, and will use the Camtasia Relay client username as a search tag for the clip
• E-‐mail Notifications: If this is enabled the system administrator will receive an email when the recording has been encoded
Setting Up the Destination Folder for Camtasia Recordings In order for Camtasia recordings to be ingested into the Helix Media Library, there needs to be a Camtasia folder located in the Upload folder within the Helix Media Library content directory. To set up the Camtasia upload directory, create the folder on the server in the content directory, so for example where “X” is the drive letter: X:\HelixMediaLibraryContent\Upload\Camtasia Ensure that your Camtasia Server can FTP to this folder in order for the recordings to be sent to it.

Helix Media Library User Guide
70
API The API section allows IP ranges to be entered so that the Helix Media Library API can be made available to specific systems such as Moodle and Blackboard or to applications developed to work with the Helix Media Library API Separate documentation is available with regards the Helix Media Library Moodle Module and the Helix Media Library Blackboard Building Block. Please contact your system provider for further details. A table is presented to allow a range to be entered (or the same address twice to allow just one server address access) along with a label for your own tracking purposes

71
Statistics Pages In the upload site of the Helix Media Library there are statistics pages to show various information on how the HML is being used. There is a page under each of the headings that displays information pertaining to the menu Heading. Below is an example from the Home section which displays an overview of the Helix Media Library.
Helix Media Library User Guide
72
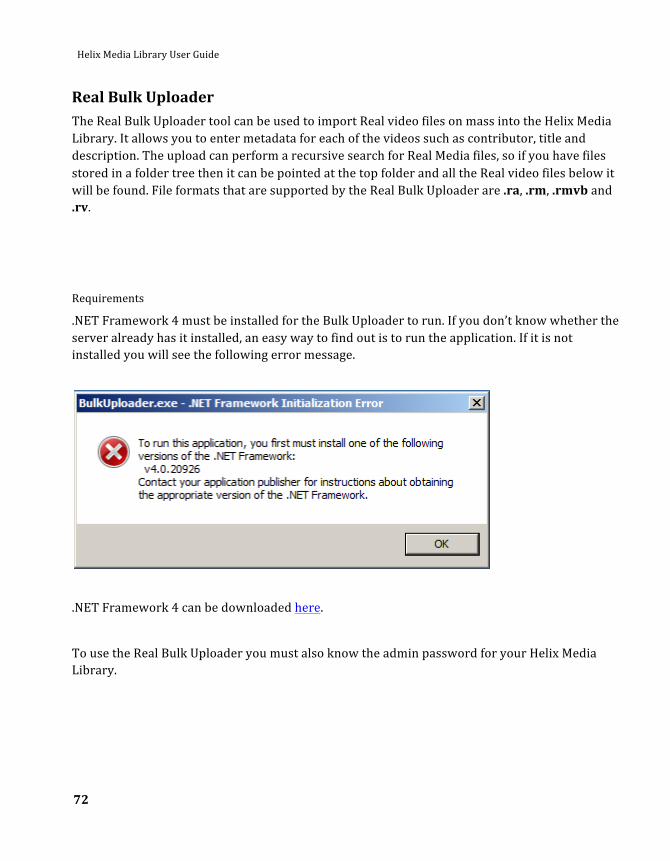
Real Bulk Uploader The Real Bulk Uploader tool can be used to import Real video files on mass into the Helix Media Library. It allows you to enter metadata for each of the videos such as contributor, title and description. The upload can perform a recursive search for Real Media files, so if you have files stored in a folder tree then it can be pointed at the top folder and all the Real video files below it will be found. File formats that are supported by the Real Bulk Uploader are .ra, .rm, .rmvb and .rv.
Requirements
.NET Framework 4 must be installed for the Bulk Uploader to run. If you don’t know whether the server already has it installed, an easy way to find out is to run the application. If it is not installed you will see the following error message.
.NET Framework 4 can be downloaded here.
To use the Real Bulk Uploader you must also know the admin password for your Helix Media Library.

73
Running the Uploader
Double-‐click the BulkUploader icon. This must be run on the piece of hardware where Helix Media Library is installed.
One the page that loads you will be need to provide the location where the Helix Media Library is installed, the location of the Real files that you want to upload, and the admin credentials of the Helix Media Library.

Helix Media Library User Guide
74
The following window will load, containing all the Real video files in the folder you selected, and those within child level folders
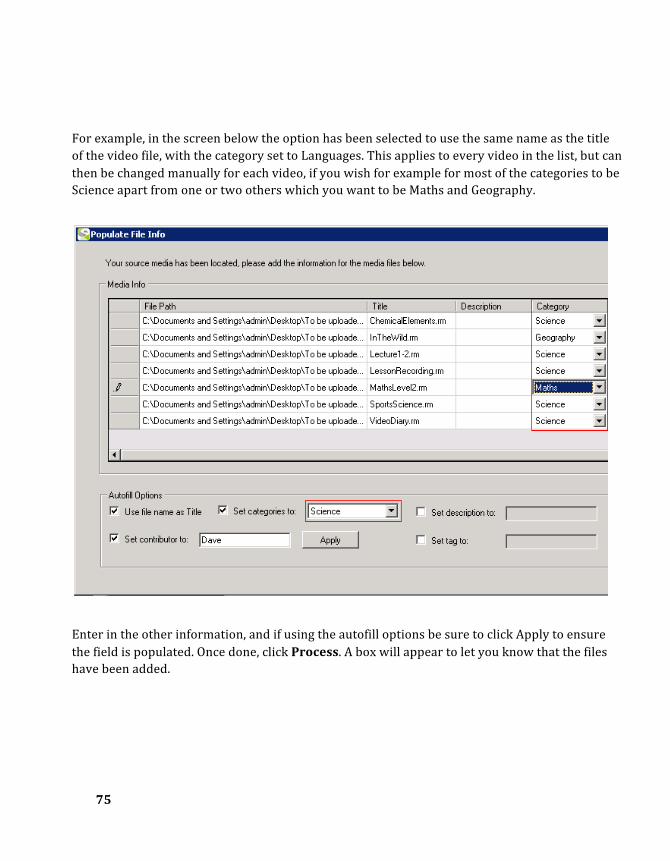
The Title, Description, Category and Contributor fields needs to be populated, however the Tags field is optional. When filling the fields out there are two options. You can manually enter in the information you want, or you can use the Autofill section to fill in the fields for every clip.
75
For example, in the screen below the option has been selected to use the same name as the title of the video file, with the category set to Languages. This applies to every video in the list, but can then be changed manually for each video, if you wish for example for most of the categories to be Science apart from one or two others which you want to be Maths and Geography.
Enter in the other information, and if using the autofill options be sure to click Apply to ensure the field is populated. Once done, click Process. A box will appear to let you know that the files have been added.
Helix Media Library User Guide
76
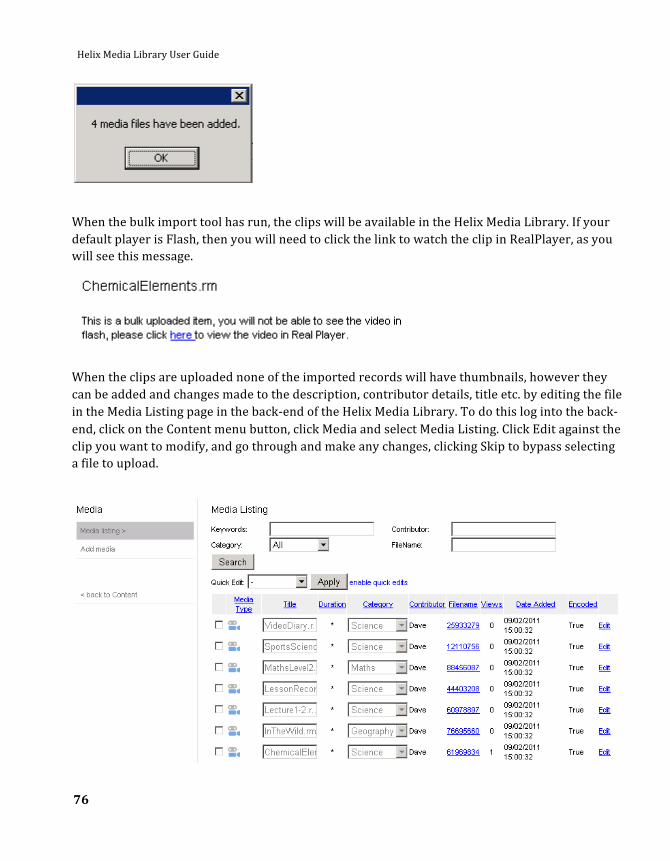
When the bulk import tool has run, the clips will be available in the Helix Media Library. If your default player is Flash, then you will need to click the link to watch the clip in RealPlayer, as you will see this message.
When the clips are uploaded none of the imported records will have thumbnails, however they can be added and changes made to the description, contributor details, title etc. by editing the file in the Media Listing page in the back-‐end of the Helix Media Library. To do this log into the back-‐end, click on the Content menu button, click Media and select Media Listing. Click Edit against the clip you want to modify, and go through and make any changes, clicking Skip to bypass selecting a file to upload.

77
Bulk Importing Other Content To import non Real Media content in bulk an accompanying .XML file needs to be produced for each of the files that are going to be uploaded to contain the metadata for that file. If you are going to upload a file called “file1.mp4” for example then the accompanying .XML file needs to be called “file1.mp4.xml”. Both of these files then need to be dropped into the bulk upload folder which is located in the Upload folder in the content directory. To set up the bulk upload directory, create the folder on the server in the content directory, so for example where “X” is the drive letter: X:\HelixMediaLibraryContent\Upload\Bulk Once created log into the Helix Media Library and on the upload site open Settings and then click on the Live/Bulk Upload menu option. For the source folder name, type in Bulk. Select a target category for the content to be uploaded to and select Yes for thumbnails to be generated automatically. Click Save to save the changes.

Helix Media Library User Guide
78
Creating the .XML file To create the associated .XML file, you can use notepad. Open up a blank notepad document and use the following schema to create the metadata for your files: <?xml version="1.0" encoding="UTF-8"?> <video xmlns="UploadXSD"> <title> My video </title> <description> This is a video </description> <contributor> Me </contributor> <subject> Maths </subject> </video> The fields that you can modify are Title, Description, Contributor and Subject (Category). Tip: If you have lots of files that you want to get up onto the HML but it doesn’t matter too much about the metadata at the moment, create the .XML files to be all the same, but just change the names of the files to match each of the clips you are uploading. A useful tool for bulk renaming files is Lupas Rename. Once the files have been uploaded the metadata can be modified f at a later date. Once all the of the .XML files have been created and dropped into the Bulk folder along with the corresponding media files, they will automatically be sucked through to the Upload folder by the watcher service, and encoded next time the encoder task runs.
79
LDAP/Active Directory Integration Once purchased this module will enable the Helix Media Library to integrate with LDAP or Active Directory to allow authentication against Security Groups or Organizational Units. Integration relies upon a module which needs to be dropped into the installation and then configured to work with the particular LDAP/AD environment. It is available on request; please enquire to find out more about how it will operate in your environment. A supplementary document detailing specifics is available from your system provider but below is a summary of how the integration works.
Summary of LDAP/Active Directory Integration
-‐ Organisational Units or Security Groups exist or are set up in the Directory -‐ “Groups” are created in the Helix Media Library in the back end through the Helix Media
Library Security Admin GUI. The groups need to have the same name as the OU’s or Security Groups in Active Directory
-‐ When a user authenticates, LDAP/AD is queried to determine that a) the user is in the directory and b) which OU / Security Group they belong to
-‐ The user is granted access to the Helix Media Library categories based on the permissions set in terms of “View”, “View & Upload” or “None”
-‐ The permissions are set in the back end of the Helix Media Library for each group. The groups in the group listing page in the Helix Media Library match OU / Security Group names that the Administrator wishes to have access to the Helix Media Library
-‐ To allow access to more OU’s or Security Groups the administrator would add another group in the Helix Media Library Security Admin GUI of the same name as the OU / Security Group in the directory that needs access
-‐ When a user that is a member of the newly added group logs in they will have permissions to the categories as defined by the administrator for that group
-‐ If the user is not in AD/LDAP or in an OU or Security Group they are denied access with an appropriate error message.

Helix Media Library User Guide
80
How to add the .srt file extension as an accepted MIME type in IIS Open IIS Manager and click on the server name on the left-‐hand side
From the right-‐hand side click on Add…
In the window that opens, enter in the extension as .srt and the MIME type as text/plain

81

Helix Media Library User Guide
82
Addendum
Supported Codecs
The below is an overview of supported codec’s that can be uploaded to the Helix Media Library for conversion.
Video
• AVI
§ DiVX (3.11, 5, 6+)
§ Indeo Codecs
§ Intel Indeo / iTU
§ MS MP4
§ XViD
§ Techsmith Screen
§ VP6
§ X264
§ MJPEG
• MP4
§ DiVX
§ XViD
§ 3ViX
§ H.264
§ MPEG 4 Part 2
• MOV
§ H.263
§ H.264
§ MPEG 4 Part 2
§ Sorenson (including Animation)
Apple LossLess audio is unsupported in all of the above
§ FLV
§ VP6
§ H.264

83
§ DV
§ DV PAL/NTSC
§ DVCPro PAL/NTSC
§ MPEG
§ MPEG 1
§ MPEG 2
§ WMV
§ Windows Media v7+
§ Windows Media Screen
§ Windows Media Uncompressed
§ Windows Media Audio v7+
*Windows Media with DRM is unsupported
Audio
§ WAV
§ MP3
§ WMA