high dynamic range (hdr) · each of the 5 stops: all the way from shadows, through quarter tones,...
TRANSCRIPT

Photography 1450 - HDR 1
Introduction
It is the popular belief that when you take a picture, you are creating an accurate representation of what your eyes saw. This is myth! Cam-eras are no match for human eyes. Our eyes see stereoscopically and they see more colors more colors than a camera (or other man-made device). Perhaps their most significant limitations has to do with dy-namic range. Dynamic range is the ratio between the smallest and largest values of light that can be recorded; in photography we usually think of this ratio in terms of stops of light. Our eyes can see some-thing in the order of 20 stops; the modern DSLR is capable of record-ing far less, perhaps about 8 stops. In most landscape photography, one simply cannot capture the entire dynamic range of the light. We either expose for the highlights and let the shadows block-up, or we expose for the shadows and blow out the highlights.
This dilemma has existed as long as photography itself. It was the driving force behind the development of the Zone System. Regarding
High Dynamic Range (HDR)YOUR NOTES
Figure 1 is Ansel Adam’s Frozen Lake and Cliffs, Sequoia National Park (1932). The scene’s dynamic range far exceeded the dynamic range of Adam’s camera and film.

2 Photography 1450 - HDR
Figure 1, Adams1 wrote: ‘It was a complicated exposure problem: the deeply shadowed recesses of the cliffs contrasted with the blinding sunlit snow. The ice is blocked up in the negative to a degree requiring a very long burning-in time. Making the print involves the use of many controls and trials to obtain results that approximate what I saw and felt when I made this exposure’. The print is all the more remarkable because of the problems Adams describes. It is also a testament to Adams exceptional dark room skills.
As computers were applied to image-processing it was recognized that here was a method to the improve the dynamic range limita-tions of cameras and their recording media. First practical applica-tions came from the movie industry in the late 1980’s. As computers became increasingly powerful and much more affordable, the digital revolution cascaded.
As applied to still photography, the HDR2 concept is deceptively simple. If the scene has a dynamic range in excess of what’s possi-ble with a single image, then ‘bracket’ the scene with as many differ-ent exposures as are necessary to capture all of the scene’s dynamic range. For example, consider a scene which has a dynamic range of 12 stops. The camera to be used can only capture 8 stops. If we expose for the middle of the dynamic range, we leave 2 stops unac-counted both in the highlights and the shadows. But there is more to this story.
Linear Capture and ETTR
Experienced film shooters were aware that slide film can register a contrast range of about 5 stops as compared to our eyes which can register as much as 20 stops. Furthermore film characteristic curves were designed so that the information it can register is about equal in each of the 5 stops: all the way from shadows, through quarter tones, midtones, three-quarter tones and highlights.
Today’s digital sensors have something like double the dynamic range of slide film. However, they are not able to deliver equal information in each stop as was the case for slide film. Digital cameras capture information differently than film.
Here’s the way to think about digital capture. What is the difference between the brightness of the 1st stop and that of the 2nd stop; by
1 The Making of 40 Photographs by Ansel Adams: ISBN082121750X 2 Two of the better books on the subject are: a) The HDRI Handbook: High Dynamic Range
Imaging for Photographers and CG Artists, by Christian Bloch: ISBN 9781933952055, and b) The Complete Guide to High Dynamic Range Digital Photography, by Ferrell McCollough: ISBN 9781600591969.
YOUR NOTES

Photography 1450 - HDR 3
definition the 2nd is one-half the 1st. That’s the fundamental ‘stop’ principle; each stop is one-half the next higher and twice that of the next lower. So the 1st stop is going to see the brightest half of the tonal range. Assuming that sensor captures 12-bits that means half of the total number of tones, which is one-half of 4096 or 2048. That leaves the remaining 2048 to be divided up amongst the remaining stops. The 2nd stop, in turn sees one-half of the remaining 2048 tones or 1024, leaving the remainder for the remaining stops. If we run out to several more stops, we get: 1st stop, 2048 tones; 2nd stop, 1024 tones; 3rd stop, 512 tones; 4th stop, 256 tones; 5th stop, 128 tones; 6th stop, 64 tones; 7th stop, 32 tones and so forth.
So ask yourself this question: shooting digitally, which stop give you the best detail? Clearly the 1st, because it has the most levels (twice as many as does the 2nd stop). Second question: which stop gives you the fewest levels? Clearly the last stop!
Suppose the scene your shooting has a wide dynamic range; say 12 stops which approaches the limits of most digital cameras. You expose
YOUR NOTES
Figure 3 shows the relationship between measured and ‘effective’ dynamic range as well as the number of tones digitally captured in each stop
Figure 2 shows comparisons between the dynamic range of the human eye as compared to a variety of film and digital displays and capture devices.

4 Photography 1450 - HDR
for a full tonal range and preferably no blown highlights. The result is an image with detail throughout, and a histogram which stretches from highlights all the way to shadows. However, as we’ve just shown there is a lot more detail in the right half of the histogram than in its left half. In fact, there it is entirely possible that the four darkest stops will have so much noise that the relatively few tonal levels will be overwhelmed by the noise and therefore add nothing usable to the image. Figure 3 illustrates this point.
Consider another shot where the dynamic range is only 5 stops. If you expose to place the his-togram in the center of the LCD screen, there will be space on both sides of the histogram be-cause the camera’s dynamic range is greater than that of the scene. But is this the best ‘detail’ you can realize with this scene? And the answer is NO, because you’ve not taken full ad-vantage of the greater number of levels in the camera’s 1st stop. Bet-ter to increase exposure and move the histogram to the right to make sure you fully utilize that 1st stop with its 2048 levels. This is the ‘Ex-pose to the Right’ (ETTR) principle. In a situation like this, with the dynamic range of the scene significantly less than that of the camera, ETTR will produce an unattractively bright image on the camera’s LCD. However the file has much more detail, and the file with the greater detail will produce a better image when optimized in your computer.
The point here is that by making successive exposures of a high dy-namic range scene not only can we bracket the entire dynamic range but just as important we can make sure we capture the maximum tonal range in every stop along the way, and eliminate any issue of noise contamination in the process. Figure 5 shows how one might go about shooting a HDR composition of a 13-stop scene using 7-ex-posures each 1-stop apart.
HDR Basics
Adobe introduced HDR in Photoshop CS2, which was arguably the most significant new feature from a ‘photography standpoint’. HDR has been around in several forms since 1985, but has come to the fore with the introduction of high resolution digital cameras. It has been used in many high end motion pictures (e.g. the Harry Potter and Lord of the Rings films).
YOUR NOTES
Figure 4 shows a roughly 5-stop histogram which is located far to the left.

Photography 1450 - HDR 5
A traditional approach to the problem of excessive dynamic range has been to use split neutral density filters to reduce the scene’s dynamic range. Typically, one used the filter to darken the sky, thus better bal-ancing the bright sky with the darker land, and thereby bringing the scene’s dynamic range within the limits of the recording media. The technique works well when there is a clear horizon along which to place the filter’s transition zone, not so well elsewhere.
With digital cameras, an alternate procedure is to make one exposure for the sky and another for the land and then to blend the two in Pho-toshop, a very tedious process itself.
HDR is a collection of techniques which lets one substantially increase the capture dynamic range. The basic idea is to make a series of ex-posures which bracket the dynamic range of the scene, then use soft-ware to combine these exposures. While one can combine the dif-ferent exposures manually, it’s an incredibly tedious job. Photomatix, Photoshop and a number of other software products can to the job much better and faster. The benefit is an image which comes much closer to what our eyes can see than has been previously possible.
Figure 6 is an example of what’s possible with a single exposure where the photographer exposed ‘for the highlights’; the result is blocked up shadows in the foreground rock and grasses, and the sky is blown out. Figure 7 is an HDR version of the same image and more closely ap-proximates what I saw at the time I made the photograph I could see detail in the sky and in both the foreground rocks and grasses.
I’ve been using HDR for several years now, almost exclusively for my landscape work for the last five years. I’ve become convinced that
YOUR NOTES
Figure 5 shows how one might shoot a 13-stop dynamic range scene using 7 exposures at 1-stop intervals.

6 Photography 1450 - HDR
HDR improves results not only in terms of capturing more dynamic range, but in addition it invariably produces much improved shadow detail, and reduced noise. One caveat: because of the multiple images required, the technique does not work for moving subjects.
Like all good things. HDR can be overdone. Figure 8 is an example of what is often referred to as the HDR ‘grunge’ look. However appropri-ate it may be in the context of this old car, ‘a little of this goes a long
YOUR NOTES
Figure 6 (above) is a morning scene on an October morning in northern Ontario. The dynamic range of the scene is over 13-stops. This is the
nominally correct exposure with some ACR adjustments. Figure 7 (below) is an 7-exposure HDR version of the same image shown in Figure 5.

Photography 1450 - HDR 7
way’. As mentioned earlier both Photomatix and Photoshop can be used to process HDR compositions. However Photomatix provides four different processing methods, three of which are aimed at produc-ing a photo-realistic result. For that reason, I’ll concentrate on Photom-tix for the software side of HDR image making.
In the next two sections, we’ll discuss (first) what we think are the most appropriate procedures for HDR in the field, then (second) our recommendations for HDR in the studio.
HDR in the Field
As always, it is most important to start by using the best possible tech-nical and composition skills in the field:
1. I do most of my HDR work with two lenses; my 24-120 mm and my 17 mm T/S.
2. With the 24-105 mm, I use hyperfocal focusing to maximize depth of field, and prefer apertures in the f/8-f/16 range because lenses tend to be sharpest in this region.
3. Wind moving tree limbs and grasses3 create serious problems when images are combined. I use the lowest possible setting for ISO, but will increase it if necessary to assure shutter speeds which minimize subject movement.
4. With the 17 mm T/S, that lens is sharpest wide open (f/4). Its tilt/shift feature allows me maximize DoF at large apertures by
3 Wind on water or fast moving clouds are generally not a problem, and often create a pleas-ing effect.
YOUR NOTES
Figure 8 is an HDR composition showing what is often called the ‘grunge’ look. The car is very old and rests in a farm field in Door County, Wisconsin. Grunge is interesting
with a subject like this one, but is generally unsuitable for nature landscapes.

8 Photography 1450 - HDR
tilting the lens in relation to the sensor plane, as is done with a view camera. This, in turn, means faster shutter speeds.
5. I shoot all of my images in RAW mode.6. Always shoot from a tripod.7. I find it helpful to use a double-bubble level to keep my horizon
level.8. I use a mirror lockup and a cable release to minimize any camera
vibration which might affect image sharpness4.9. I normally shoot with automatic white balance; the rationale be-
ing that the lighting (white balance) is unlikely to change in the ‘less than a minute’ my exposures for the scene will require, however, should you graduate to HDR panoramas, AWB would not be appropriate.
10. I use Evaluative (Matrix) Metering mode.11. Compositions should almost always include a foreground, mid-
dle ground and background; each of which is different in terms of texture and color, or ‘physicality’ as my good friend Willard Clay describes it.
12. Once I’ve setup my composition, I choose what I think is an appropriate aperture setting and then manually focus the lens to the hyperfocal distance. These settings should produce suf-ficient DoF that my foreground, middle ground, and background are all ‘in focus’. You can ‘verify’ focus using the DoF preview button on your camera5. However, using ‘Live View’ (which lets you preview your shot on the camera’s LCD screen) is much su-perior. Using this feature in combination with the Magnify but-ton (10x), the Scroll feature, DoF preview button and a Hoodman loupe makes checking focus at the foreground, middle ground and background much more precise.
13. Maintain a constant aperture throughout the HDR image se-quence so DoF does not change. Some folks like to use Aper-ture Priority mode and to adjust shutter speed either by adjust-ing exposure compensation or using the auto-bracketing feature on the camera.
14. An HDR composition needs a minimum of 2 images. Most all of my work is done with 7 images. I typically use a one-stop interval between images. Others use fewer images and a larger interval. The important thing is to make sure that one misses no detail in either shadows or highlights.
15. I prefer to shoot in Manual exposure mode. Starting from the shutter speed recommended by the camera’s metering system, I dial down 3-stops of shutter speed and take my first shot, then check the camera LCD screen to see that even the brightest parts of the composition are exposed in the lower half of the
4 If you don’t have a cable release, all DSLRs include a 2-second self-timer options which is more than sufficient to damp out any vibrations caused by depressing the shutter button.
5 Under most ambient light conditions I find it very difficult to assess DoF through the cam-era’s viewfinder eyepiece without the use of a photographer’s black cloth.
YOUR NOTES

Photography 1450 - HDR 9
histogram. I then add 1-stop of shutter speed, shoot, and repeat 6 times. After the 7th shot, I again check the LCD screen to see that even the darkest areas of the image are exposed well to the right in the histogram6.
16. Using manual exposure, I’ve found it takes me about 45 sec-onds to make my 7 exposures. Using auto-bracketing is faster but less flexible.
17. I’ve found that with these wide-angle compositions, using a po-larizing filter is a very bad idea. It delivers a nice effect, but only in a small portion of the overall sky; which is very distracting, and impossible to change!
HDR in the Studio
Photomatix is a third-party software product that has been around for a long time and has been well tested. It is generally regarded as su-perior to Photoshop for reasons of speed and simplicity in use. In this section, I’m going to concentrate on the 3 Photomatix HDR processing methods which produce the most photo-realistic images. If you don’t have Photomatix, go to their website at: http://www.hdrsoft.com http://www.hdrsoft.com. Check out their ‘Video Tutorials’. Their free trial download or Photomatix Pro is ‘fully functional and never expires, but adds a water mark to final images’. They also have a very useful 39-page User Manual which you can access (and print) under the ‘Help’ menu in the software itself7.
This process will begin after you have downloaded the images from the flash card and placed them into an appropriate folder on your com-puter.
1. The first step is to open Photomatix. Figure 9 is the screen you see when you open Photomatix, and click on ‘Generate HDR image’8.
2. Next, navigate to the folder containing the images you want to use to create the HDR composition. There’s two ways you can load the photos into the dialog (Figure 10). One alternative is to click on the ‘Browse’ button and (in Windows Explorer) navigate to the folder containing the photos. Then <Click> on the first, <Shift><Click> on the last to select the group, then click ‘Open’ which loads the photos into the Photomatix dialog. The other alternative is to simply ‘drag and drop’ the photos from where-
6 The ‘checking of the histogram’ after the 1st and 7th shot are intended to make sure I have the best possible detail throughout the full dynamic range of the scene. If necessary, I will add additional shots to make sure this condition is met.
7 The User Manual discusses several issues which are not included in these notes: ‘De-ghosting’, Working with Single Files, Tone Mapping with the Details Enhancer, and Auto-mating with Batch Processing.
8 Alternatively one can select the ‘Batch Processing’ tab. This choice is more fully described in Appendix #2.
YOUR NOTES

10 Photography 1450 - HDR
YOUR NOTES
Figure 9 (above) is first screen you will see when you open Photomatix 5 (the current version). After you finished reading the ‘What’s new ... in Pro
5), click on ‘OK’ to close that screen. Figure 10 (below) shows several images have been loaded into the ‘Load Bracketed Photos’ dialog box.

Photography 1450 - HDR 11
ever they are located into Figure 10. I think it’s a good idea to turn ‘ON’ the ‘Show 32-bit unprocessed image’ option; this lets you get a look at the composite, check its histogram (see below) and save it for future use. Finally click the ‘OK’ button.
3. The amount of time it takes Photomatix to process the images into an HDR composition will vary with the number and size of the images, the processing you’ve specified and the speed of your computer. You will see a progress bar similar to that shown in Figure 12 which will indicae the current task being performed by the computer .
4. The resultant HDR image is shown in Figure 13 . The image is certainly not attractive and this is because it has a dynamic range well beyond what can be shown on the printed page (see Figure 2). It’s a good idea to save this 32-bit image so you will have it available for further processing in the future; save using Photomatix’ default ‘32-bit floating tif’ format. Next, use the command <View><HDR Histogram> to open that histogram which is shown in the bottom-right of Figure 13. The HDR
YOUR NOTES
Figure 11 (above) is the Photomatix dialog in which you specify which features you want to include along with my recommendations for images
that do not include moving subjects and were shot at low ISO.

12 Photography 1450 - HDR
histogram has an estimated dynamic range of 1545:1 which is something in excess of 11 stops.
5. The next step is to Tone Map the image. Describing this pro-cess, Christian Bloch (in the HDR Handbook) says: “Having ex-panded the tonal range when the HDR composition was cre-ated, we now reduce the dynamic range by tone mapping so it fits back into a single low dynamic range image (which can be displayed or printed). Here the outcome is not so clear, and there are a million ways to do it. Technically, it is impossible anyway. We’re trying to squeeze something very big into a tiny container. There is no ideal result. So we have to make compro-mises. The whole trick is to make good use of the tonal values available and redistribute them in a way that makes sense. This redistribution is what tone mapping is about”.
6. As mentioned earlier Photomatix provides four tone mapping alternatives. In my opinion the Detail Enhancer most often pro-
YOUR NOTES
Figure 12 (above) is the processing bar you’ll see as Photomatix does the processing you specified in the Figure 11 dialog. Figure 13 (below) shows the comparatively unattractive
HDR composite image. Also shown at the bottom-right is the 32-bit HDR histogram.

Photography 1450 - HDR 13
duces results that are not photo-realistic. I therefore recom-mend using all of the other three (Fusion, Contrast Optimizer and Tone Compressor) and then either select the best of the three alternative or use Photoshop to blend the better alterna-tives together.
7. Start the process by closing the HDR histogram and then click-ing on the ‘Tone Map / Fuse’ bar (red rectangle) on the right side of Figure 13. After some processing, Photomatix will display Figure 14; this should be the HDR composite tone mapped us-ing the Contrast Optimizer process. Check to be sure this is the case by examining the top box in the left-hand column: ‘Process’ should be ‘Tone Mapping’ and just below ‘Process’, ‘Method’ should be ‘Contrast Optimizer’. In addition the drop down just below the ‘Presets’ header should also be set to ‘Contrast Opti-mizer’. If your display does not show these settings, adjust the dropdown selections accordingly.
8. The best way to use Photomatix is to start by trying out the Presets. Double click on any one of the Preset alternatives and watch the sliders on the left move and the image change ac-cordingly. Try out all of the Presets and decide which one deliv-ers closest to the look you prefer. You can then work with the individual sliders to fine-tune your preferred result. Photomatix provides good interactive explanations of how each slider oper-ates. For example, in Figure 14, the cursor (red circle) is next to the ‘Strength’ slider, and at the bottom of the left-hand column (red rectangle) Photomatix explains that ‘Strength affects the amount of enhancement given to contrast and detail in the im-age. A value of 100 gives the greatest enhancement. Moving
YOUR NOTES
Figure 14 illustrates the development of the Contrast Optimizer version of the composite.

14 Photography 1450 - HDR
the slider to the left give a more natural effect. The default value is 50’.
9. I chose the ‘Vibrant’ Preset and then generally cut back on the extremes of this Preset; the result was Figure 14. Then I clicked on the Apply button, which resulted in some more processing by Photomatix and Figure 15. Here, you have a chance to do add what Photomatix calls ‘Finishing Touch’ by tweaking Con-trast, Color and Sharpening. If you’re a Photoshop user, you
YOUR NOTES
Figure 15 shows the Contrast Optimizer version after processing and ready to have ‘finishing touches’ applied. The final step is to ‘Save Final Image’
Figure 16 shows the settings used to create the Tone Compression version of the composite
Photography 1450 - HDR 15
may prefer to make these final moves in Elements, Lightroom or Photoshop. Whatever the case the final step is to click on the ‘Save Final Image’ button.
10. Once the image has been saves, you can click on the ‘Redo with Other Settings’ button just below the ‘Save Final Image’ button. This brings you back to where you were in step 7, Figure 14. Next, set ‘Process’ to ‘Tone Mapping’, ‘Method’ to ‘Tone Compression’ and ‘Presets’ to ‘Tone Compression’. The result is Figure 15. Proceed as before and double click on each of the three Preset options to see which you prefer. Then use the sliders on the left to optimize that Preset result. In Figure 15, I chose the ‘Photographic’ Preset. Note on the left side that the cursor was located on the ‘Color Temperature’ slider and Photo-matix provides an explanation of how this slider works in the red rectangle at the bottom of the left column. Proceed as in steps 9 & 10 above to optimize, finish (as desired) and save the ‘Tone Compression’ alternative.
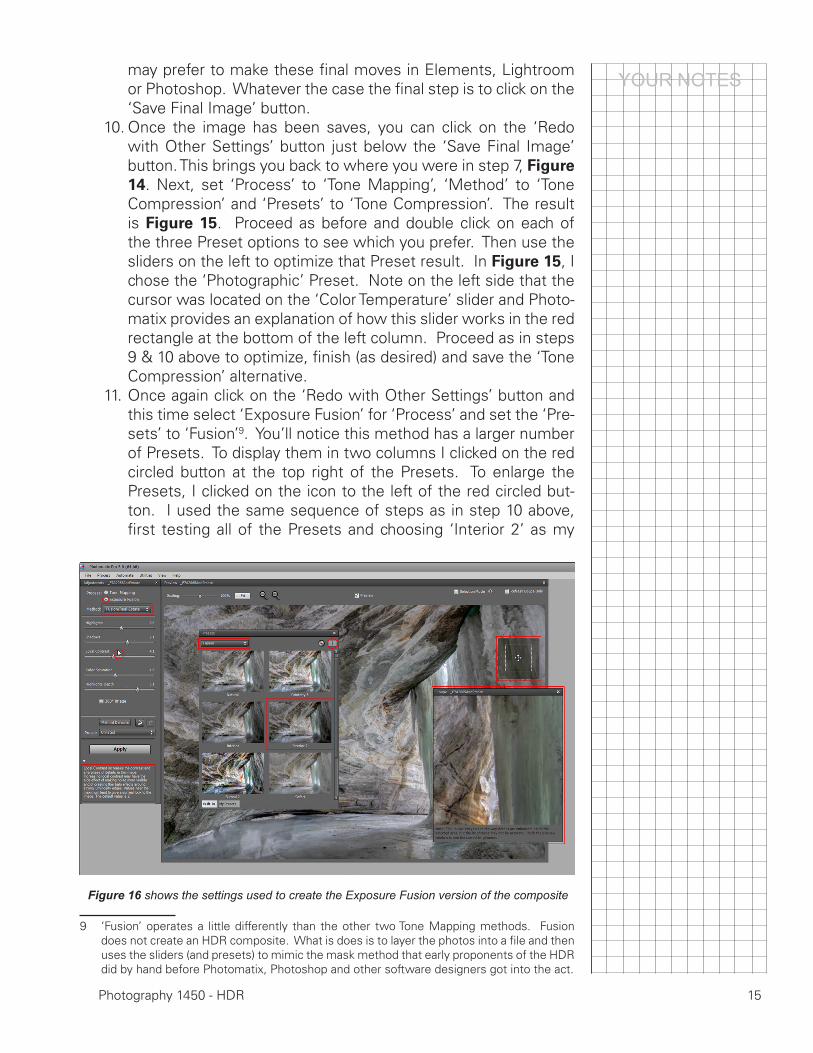
11. Once again click on the ‘Redo with Other Settings’ button and this time select ‘Exposure Fusion’ for ‘Process’ and set the ‘Pre-sets’ to ‘Fusion’9. You’ll notice this method has a larger number of Presets. To display them in two columns I clicked on the red circled button at the top right of the Presets. To enlarge the Presets, I clicked on the icon to the left of the red circled but-ton. I used the same sequence of steps as in step 10 above, first testing all of the Presets and choosing ‘Interior 2’ as my
9 ‘Fusion’ operates a little differently than the other two Tone Mapping methods. Fusion does not create an HDR composite. What is does is to layer the photos into a file and then uses the sliders (and presets) to mimic the mask method that early proponents of the HDR did by hand before Photomatix, Photoshop and other software designers got into the act.
YOUR NOTES
Figure 16 shows the settings used to create the Exposure Fusion version of the composite

16 Photography 1450 - HDR
preferred. Then I optimized the left column sliders. Figure 16 shows another display option: near the top right there is a red square inside of which is square outlined by a dotted white line. That cursor can be used to magnify any selected area. This can be useful for help in fine tuning how the sliders affect critical portions of an image such as the margin between the white and green ice.
12. The result of this process is three alternative images. From this point you can either choose one of these version as ‘best’ or as mentioned earlier use your favorite image-optimization program to combine the best results of two or more of these images.
YOUR NOTES