high-performance raft slab - greenbuildingadvisor
TRANSCRIPT

For many years, my company built conventional poured-
concrete foundations, always aiming to be below frost depth (4 ft. in our area). But as we got into high-performance building and changed the way we built walls, our foundation system had to evolve. We started with double-stud walls about six years ago, and were able to pair those with 4-ft. frost walls and maintain a thermal break between the interior slab and the outer frost wall. But as we strived for even higher levels of performance, we began looking at exterior insulation and Larsen truss assemblies that neces-sitated a different type of foundation. Further driving this evolution, many of our customers started requesting houses without basements.
Our standard high-performance house uses a 2x6 structural wall with Zip System sheathing and 12 in. of exterior insulation supported by vertically mounted I-joists. For optimal performance, the insula-tion layer needs to be continuous from the walls to beneath the slab and over the building (a separate discussion). A frost-protected shal-low foundation (FPSF) is an efficient way to handle the underslab part of this. The approach has been around for years, and there are a handful of off-the-shelf systems that can work well.
The problem we encountered was finding an FPSF system that would work with our various wall assemblies. No two clients want exactly the same thing, so we need the ability to vary the level of per-
formance of the foundation system along with the walls. We looked all over, and talked to a number of suppliers of ready-made systems. Some had some of the features we wanted, but none touched every base. We may be picky, but I have to stand face-to-face with our customers and answer the hard questions when something isn’t just right. Accepting a foundation system that doesn’t check all the boxes isn’t an option.
That led us to develop our own system. We found out we could order EPS foam in different sizes, thicknesses, and densities through our local building-supply center and have it on-site in about a week. From there it was a matter of designing a simple yet effective system we can assemble on-site and customize for various projects. Five houses later, we like what we’ve come up with—and our excavator likes it, our concrete subcontractor likes it, and our homeowners like it too.
□
Josh Edmonds is a Certified Passive House Consultant and managing partner at Simple Integrity LLC. Photos by Matthew Millham.
High-Performance Raft SlabThis versatile frost-protected shallow foundation is adaptable for different wall systems and climates
By Josh Edmonds
12-in.-thick EPS stem wall
Skim-coated tile backerboard
Min. 6 in. EPS subslab insulation
3-in. EPS frost wing
Thickened edge of concrete slab
Larsen truss using I-joists
#4 rebar
Drain tile
12 in. #2 stone base, compacted
2x6 wall with Zip System sheathing
FINEHOMEBUILDING.cOM64 Drawing: Christopher MIlls
H297ED.indd 64 12/17/20 11:21 AM
COPYRIGHT 2021 by The Taunton Press, Inc. Copying and distribution of this article is not permitted. • Fine Homebuilding #297 – February/March 2021

High-Performance Raft SlabTwo-way
HeaT SHieldThis type of frost-protected shallow foundation relies on geothermal energy to keep
the soil around and below the building from freezing. our
thickened-edge slab sits in a raft of ePS foam insulation,
which itself is ringed with a skirt of insulation that
extends beyond the building perimeter. The underslab
foam slows heat loss through the floor and, along with
the skirt, traps heat in the soil below the building. This,
along with a thick gravel base and a perimeter drain
to move water away from the structure, prevents frost
heave while keeping the heat produced by the mechanical
systems inside the house.
Different approach, different considerationsBuilding a raft slab is a different animal from a conventional foundation. Within the world of slab-on-grade options, frost-protected shallow-foundation (FPSF) systems have their own set of considerations. Beyond the calculations (which you can find in the American Society of Civil Engineers’ ASCE Standard 32-01), there are some critical considerations to keep in mind when selecting or developing an FPSF system.
The first is prep: How easy is the system to prep from an excavators point of view? We sub out excavation and are fortunate to work with an experienced operator, but we need to consider his work in addition to ours. If it’s too complex or too confusing, the project will suffer.
Next is height: How much of the stem wall shows above ground and how much is below ground? Many of these systems rely on the back-fill outside the foundation to keep it in place. We like the ability to have 1 ft. showing and 1 ft. below grade. Code also plays a role in determin-ing the depth requirements.
Perimeter foam is key to making this work. Minimum requirements for the thickness and projection of this frost skirt are determined by local code, but we go a bit above minimum for ease of mind and use 3-in.-thick EPS foam frost wings that extend 4 ft. from the building. Each inch of EPS has the insulation equivalent of 4 ft. of soil. We may be able to get away with less,
but it all comes back to risk assessment. The incremental cost of 3-in. foam vs. 2-in. foam is minimal, but a foundation issue down the road may be irreparable, both for our repu-tation and the physical building.
Stem-wall thickness is a big deal; we like to have some flexibility. One house may have 12 in. of exterior insulation, but another may have 6 in. We need to have the option for both within the same foundation system.
Another consideration is finish and protec-tion. There are lots of ways to protect the foam above grade (and below if you’re in termite country), and this is what people are going to see in the finished product.
Finally, the inner foam: Some systems come with inner foam and some require you to supply your own. Some details can compli-cate its placement. For example, is a grade beam necessary, or even possible with the chosen foundation system?
February/March 2021 65
H297ED.indd 65 12/17/20 11:21 AM
COPYRIGHT 2021 by The Taunton Press, Inc. Copying and distribution of this article is not permitted. • Fine Homebuilding #297 – February/March 2021
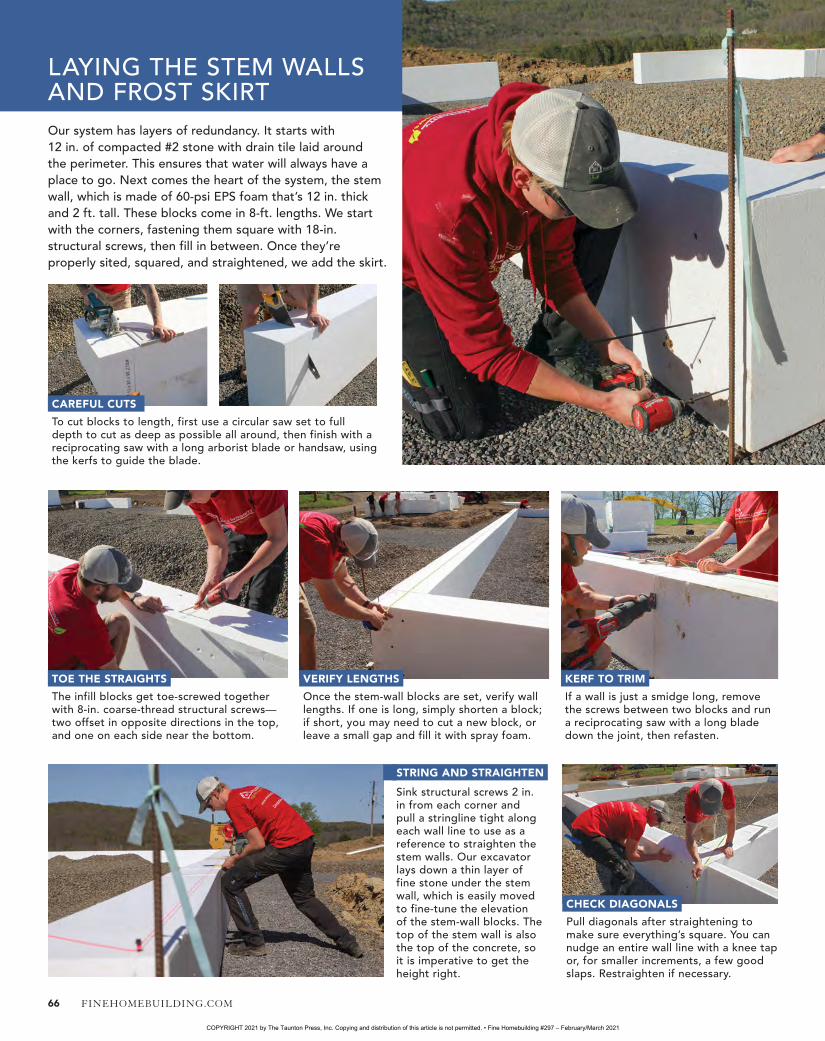
Laying the stem waLLs and frost skirtour system has layers of redundancy. it starts with 12 in. of compacted #2 stone with drain tile laid around the perimeter. this ensures that water will always have a place to go. next comes the heart of the system, the stem wall, which is made of 60-psi ePs foam that’s 12 in. thick and 2 ft. tall. these blocks come in 8-ft. lengths. we start with the corners, fastening them square with 18-in. structural screws, then fill in between. once they’re properly sited, squared, and straightened, we add the skirt.
to cut blocks to length, first use a circular saw set to full depth to cut as deep as possible all around, then finish with a reciprocating saw with a long arborist blade or handsaw, using the kerfs to guide the blade.
CAREFUL CUTS
ToE ThE STRAighTS VERiFy LEngThS KERF To TRim
ChECK diAgonALS
the infill blocks get toe-screwed together with 8-in. coarse-thread structural screws—two offset in opposite directions in the top, and one on each side near the bottom.
once the stem-wall blocks are set, verify wall lengths. if one is long, simply shorten a block; if short, you may need to cut a new block, or leave a small gap and fill it with spray foam.
sink structural screws 2 in. in from each corner and pull a stringline tight along each wall line to use as a reference to straighten the stem walls. our excavator lays down a thin layer of fine stone under the stem wall, which is easily moved to fine-tune the elevation of the stem-wall blocks. the top of the stem wall is also the top of the concrete, so it is imperative to get the height right.
if a wall is just a smidge long, remove the screws between two blocks and run a reciprocating saw with a long blade down the joint, then refasten.
Pull diagonals after straightening to make sure everything’s square. you can nudge an entire wall line with a knee tap or, for smaller increments, a few good slaps. restraighten if necessary.
STRing And STRAighTEn
FINEHOMEBUILDING.cOM66
H297ED.indd 66 12/17/20 11:21 AM
COPYRIGHT 2021 by The Taunton Press, Inc. Copying and distribution of this article is not permitted. • Fine Homebuilding #297 – February/March 2021

Fill and Flush
Plug the holes
add a skirt
string sets elevation secure in Place
Rake the gravel to create a slope away from the building and add the frost skirt. Tape the joints (here we used Zip System flashing tape) to help keep the skirt in place during backfill and seal the skirt to shed water away from the building.
Taut stringlines flush with the stem walls serve as reference for the location and depth of the drain system, as well as the incoming electric and water lines. Crossed stringlines can serve as crosshairs to site stub-ups.
We drive wooden stakes into the gravel, and secure the incoming water line and electrical conduit to them with cable ties, using cutoffs of foam to keep them spaced.
steady the drains
Secure drains in place with rebar or wooden stakes driven on both sides below the connector, and tape around the entire assembly.
To keep concrete from filling conduits and drains, plug all openings with foam and tape. We make plugs of foam using a hole saw, then cut them flush with a recip saw before taping.
Spray-foam any gaps between frost-wall blocks and trim the overflow flush once it’s firmed up.
Roughing-in meChaniCaLSonce the stem wall is set, it’s time to place mechanicals. We run all the subslab plumbing lines, electrical entrance conduit, radon pipe, incoming water line, and anything else that is going to be under the slab. To make laying the interior foam easier, we try to keep the horizontal plumbing below the foam. We could put our supply lines here, too, but we prefer to run them through walls and ceiling chases.
February/March 2021 67
H297ED.indd 67 12/18/20 1:30 PM
COPYRIGHT 2021 by The Taunton Press, Inc. Copying and distribution of this article is not permitted. • Fine Homebuilding #297 – February/March 2021

FILL AND FOAMA reinforced thickened edge around the perimeter helps distribute the weight of the structural walls that will sit on top of it. The illustration (p. 64) shows how the layers of 3-in. EPS foam are staggered to create it, as well as the use of stone fill. A walk-behind plate compactor works well to compact the stone without pushing the stem walls out of alignment.
Once the inner fill is at the right elevation around the interior perimeter, we start laying the first band of 3-in.-thick subslab foam.
Slowly raise the grade on both sides of the stem wall at the same time to keep it from shifting. The interior gets #2 stone, starting with a perimeter band wide enough for the first layer of foam. The frost skirt is covered with clean fill.
More gravel is added to bring the rest of the interior flush with the first layer of subslab foam, then it’s compacted.
The next layer of foam covers the entire interior, lapping over the perimeter layer and the gravel, with the seams staggered.
Use hole saws to make cutouts for round penetrations. Various saws and knives work for odd-shaped cutouts.
START OF SUBSLAB FOAMBALANCE THE FILL
GRAVEL, AGAIN
STEM-WALL FINISH
The exterior finish starts at the same time as the first layer of interior foam. We like to leave 10 in. to 12 in. of the top of the stem wall exposed above grade to keep the siding off the ground, and our protective layer of parge-coated cementboard extends at least 6 in. below grade. The backfill on the outside is slightly lower than the gravel on the inside at this point just to make this job easier. We’ve been finishing these foundations to look similar to parged-block foundations or concrete stem walls, though there are other methods or finishes that could work as well, or along with elements of this approach.
We rip 3-ft. by 5-ft. sheets of Durock Cement Board in half lengthwise, then butter and notch both the board and the foam stem wall with thinset mortar, and set the Durock firmly into the thinset.
ROCK ON
ADD ANOTHER LAYER CUTOUTS FOR MECHANICALS
FINEHOMEBUILDING.COM68
H297ED.indd 68 12/17/20 11:22 AM
COPYRIGHT 2021 by The Taunton Press, Inc. Copying and distribution of this article is not permitted. • Fine Homebuilding #297 – February/March 2021

Fill the gaps
As each foam layer goes down, fill any gaps around mechanicals or abutting sheets with spray foam.
We install the third layer of foam inset 2 ft. from the perimeter to create a thickened edge, which gets rebar reinforcement. The placement of the sheets ensures all areas have a least 6 in. of foam.
Cover the foam with a sturdy vapor barrier—here we used 6-mil poly sheeting—carefully cutting out for penetrations. Let it hang long around the entire perimeter so it can be sealed to the wall sheathing later on. Tape seams and around any penetrations with high-quality tape for a good vapor seal.
thickened edge
Before parge-coating, we tape the joints with fiberglass mesh tape embedded in thinset.
Apply a parge coat of fiber-reinforced bonding cement over the surface of the Durock.
Finish the parge coat with a sponge float for a slightly textured appearance.
Use an old countersink bit to create countersinks at the four corners and center of each board, and fasten with coarse-thread screws.
tape the seams parge over rock Float to Finishcountersink and screw
Final layer
February/March 2021 69
H297ED.indd 69 12/17/20 11:22 AM
COPYRIGHT 2021 by The Taunton Press, Inc. Copying and distribution of this article is not permitted. • Fine Homebuilding #297 – February/March 2021