highjump one – ui basics one – ui basics lab exercises ... this manual contains self-directed...
TRANSCRIPT

HighJump One – UI Basics Lab Exercises
Version 1.0 (with HighJump One 1.0)
September 2017

HighJump One User Interface Basics
Table of Contents i
HighJump
(800) 328–3271
(952) 947–4088 in the Minneapolis/St. Paul metropolitan area
(952) 947–0440 (fax)
5600 W 83rd Street, Suite 600, 8200 Tower, Minneapolis, Minnesota 55437
www.highjump.com
© 2016 HighJump. All Rights Reserved.
This document and the software it describes are copyrighted properties of HighJump with all rights reserved. The documentation and software are confidential and a valid license from HighJump is required for possession and use. Neither this information nor the software may be copied in whole or in part without the prior written consent of the copyright owner. This document was created in the United States of America.
HighJump is a trademark of HighJump Software Inc. All other marks are the property of their respective owners.
HighJump warrants the software covered by this document only as stated in a legally binding license agreement between a customer and HighJump or one of its current or historic subsidiaries or affiliates.
This document is subject to change at the sole discretion of HighJump.
If this document and the software it describes are being acquired by or for the U.S. Government, or by any prime contractor or subcontractor (at any tier) under any prime contract, grant, cooperative agreement, or other transaction agreement with the U.S. Government, the following provisions apply: By accepting delivery of this software and information, the U.S. Government, prime contractor or subcontractor hereby agrees that this software qualifies as "commercial computer software" within the meaning of the applicable U.S. Government procurement or financial acquisition regulations and agency-specific supplemental regulations. The terms and conditions set forth above shall apply to the U.S. Government's use, duplication, modification, adaption, and disclosure of this document and the software it describes, and shall supersede any conflicting terms and conditions. If these terms and conditions fail to meet the U.S. Government's needs or are inconsistent in any respect with Federal law, the U.S. Government agrees to return this document and the software it describes, unused, to HighJump.

HighJump One User Interface Basics
Table of Contents ii
Table of Contents
Getting Started: Introduction .................................................................. 5
Introduction ........................................................................................................5
Background Information ....................................................................................5
Using this Manual ........................................................................................5
Getting Help .................................................................................................6
Providing Feedback .....................................................................................6
Logon Procedures ..............................................................................................6
HighJump One UI ........................................................................................6
HighJump One Workspace ..........................................................................8
Class Deliverables ............................................................................................11
Lab Exercise 1: Navigating the User Interface ................................... 13
Introduction ......................................................................................................13
Online Lesson ..................................................................................................13
Activities ..........................................................................................................13
Activity 1.1 – Adding Record ....................................................................13
Activity 1.2 – Using Action Bar ................................................................14
Activity 1.3 – Editing Record ....................................................................14
Activity 1.4 – Deleting Record ..................................................................15
Summary ..........................................................................................................15
Lab Exercise 2: Working with Spaces ................................................. 16
Introduction ......................................................................................................16
Online Lesson ..................................................................................................16
Activities ..........................................................................................................16
Activity 2.1 – Opening Spaces...................................................................16
Activity 2.2 – Viewing Spaces...................................................................17
Activity 2.3 – Closing Spaces ....................................................................17
Summary ..........................................................................................................17
Lab Exercise 3: Working with Favorites ............................................. 18
Introduction ......................................................................................................18
Online Lesson ..................................................................................................18
Activities ..........................................................................................................18
Activity 3.1 – Creating Favorites ...............................................................18

HighJump One User Interface Basics
Table of Contents iii
Activity 3.2 – Naming Favorites ................................................................19
Activity 3.3 – Deleting Favorites ...............................................................19
Summary ..........................................................................................................19
Lab Exercise 4: Working with Page Preferences ............................... 20
Introduction ......................................................................................................20
Online Lesson ..................................................................................................20
Activities ..........................................................................................................20
Activity 4.1 – Sorting Column ...................................................................20
Activity 4.2 – Selecting Columns ..............................................................21
Activity 4.3 – Reordering Columns ...........................................................21
Activity 4.4 – Setting Items per Page ........................................................21
Activity 4.5 – Resizing Columns ...............................................................22
Activity 4.6 – Reverting Preference ...........................................................22
Summary ..........................................................................................................22
Lab Exercise 5: Working with Data Filters .......................................... 24
Introduction ......................................................................................................24
Online Lesson ..................................................................................................24
Activities ..........................................................................................................24
Activity 5.1 – Filtering Data ......................................................................24
Summary ..........................................................................................................25
Lab Exercise 6: Working with New Users ........................................... 26
Introduction ......................................................................................................26
Online Lesson ..................................................................................................26
Activities ..........................................................................................................26
Activity 6.1: Creating New User ...............................................................26
Activity 6.2: Confirming New User...........................................................27
Summary ..........................................................................................................28
Lab Exercise 7: Working with User Settings ...................................... 29
Introduction ......................................................................................................29
Online Lesson ..................................................................................................29
Activities ..........................................................................................................29
Activity 7.1: Viewing User Settings ..........................................................29
Activity 7.2: Changing User Settings ........................................................30
Summary ..........................................................................................................30
Lab Exercise 8: Working with Inline Editing ....................................... 31
Introduction ......................................................................................................31
Online Lesson ..................................................................................................31

HighJump One User Interface Basics
Table of Contents iv
Activities ..........................................................................................................31
Activity 8.1: Using Inline Edit ...................................................................31
Summary ..........................................................................................................32
Lab Exercise 9: Working with Data Exports ....................................... 33
Introduction ......................................................................................................33
Online Lesson ..................................................................................................33
Activities ..........................................................................................................33
Activity 9.1: Exporting Data ......................................................................33
Summary ..........................................................................................................34

HighJump Getting Started: Introduction 5
Getting Started: Introduction
Introduction
The HighJump One Platform is an HTML5 centric application platform and the foundation upon which HighJump’s web-based solutions are be delivered. The HighJump One Platform provides broad support for browsers and devices and delivers a common experience across HighJump’s product lines. There are three core components to the platform:
The HighJump One Platform User Interface (UI) is a web-based tool which allows you to view and edit data from a database table in an easy-to-use format. By using applications that run inside the HighJump One Platform UI you can view and edit elements like sales orders, work tasks, and locations.
The HighJump One Workspace is a web-based tool that allows administrators to setup and maintain user profiles.
The HighJump Page Editor is a development tool used to design the appearance and behavior of the HighJump One Platform UI pages.
This objective of this class is to provide you with the basic skills required to work with the HighJump One Platform User Interface (UI).
Background Information
Using this Manual
This manual contains self-directed exercises for the HighJump One User Interface (UI) VLab. Each exercise contains on-line video instruction and demonstration for a following set of corresponding hands-on activities. The exercises are designed to be stand-alone. However, it is strongly recommended that they be completed in the order they are presented in the manual.
Each on-line lesson must be viewed in its entirety.

HighJump Getting Started: Introduction 6
Getting Help
If you unable to complete an exercise, revisit the topical videos before contacting HighJump University. If you need to contact an instructor, click the Ask an Instructor button in the panel on the right side of VLab environment.
Providing Feedback
When you complete the course, please fill out the online evaluation. It is completely anonymous and will help HJU improve its training deliverables. You can access the online evaluation by clicking on the Evaluate HJU VLabs button in the panel on the right side of the VLab environment.
Logon Procedures
In this class, you will be working with the HighJump One Platform UI and HighJump One Workspace. The procedures on how to access and open these applications are detailed in this section.
The training exercises in the rest of this manual do not detail these logon processes. If necessary, return to these logon procedures in
later exercises.
HighJump One UI
Complete the steps that follow to logon to the HighJump One UI.
Open an instance of Internet Explorer.
Enter the following URL in the address bar:
http://HJU-VLAB:30000/core/default.html

HighJump Getting Started: Introduction 7
“HJU-VLAB” represents the machine name of the web server used in this VLab class. In a customer environment, “HJU-VLAB” would be replaced by the corresponding machine name of their web server.
The system displays the login screen.
Choose Workspace Authentication in the Authentication drop-down list.
Enter User Name: Administrator
Enter Password: HJSPASS
Click the Login button.
The system loads applications and opens the HighJump One home page.

HighJump Getting Started: Introduction 8
This home page is the launching pad from which you can view and modify the warehousing data in your Supply Chain Advantage system. In the exercises that follow, you learn the basics on working with this user interface.
The HighJump One Platform UI can be run on browsers supporting HTLM5. Internet Explorer and Chrome are available in this training environment.
HighJump One Workspace
Complete the steps that follow to logon to the HighJump One Workspace.
Open another instance (or another tab) of Internet Explorer.
Enter the following URL in the address bar:
http://HJU-VLAB:30000/workspace/default.html

HighJump Getting Started: Introduction 9
“HJU-VLAB” represents the machine name of the web server used in this VLab class. In a customer environment, “HJU-VLAB” would be replaced by the corresponding machine name of their web server.
The system displays the login screen.
Choose Workspace Authentication in the Authentication drop-down list.
Enter User Name: sa
Enter Password: hj1sapass
Click the Login button.
The system displays the main page of the HighJump One Workspace.

HighJump Getting Started: Introduction 10
This home page is the launching pad from which you can view and modify the user profiles for the HighJump One system. In a later exercise, you learn some basics on working with this user interface.
The HighJump One Workspace must be run in an Internet Explorer browser.
If the HighJump One Workspace displays an error connecting to the license management server, click the Dismiss button in the bottom right corner of the window. Connection is not required for the VLab.
HighJump Getting Started: Introduction 11
Class Deliverables
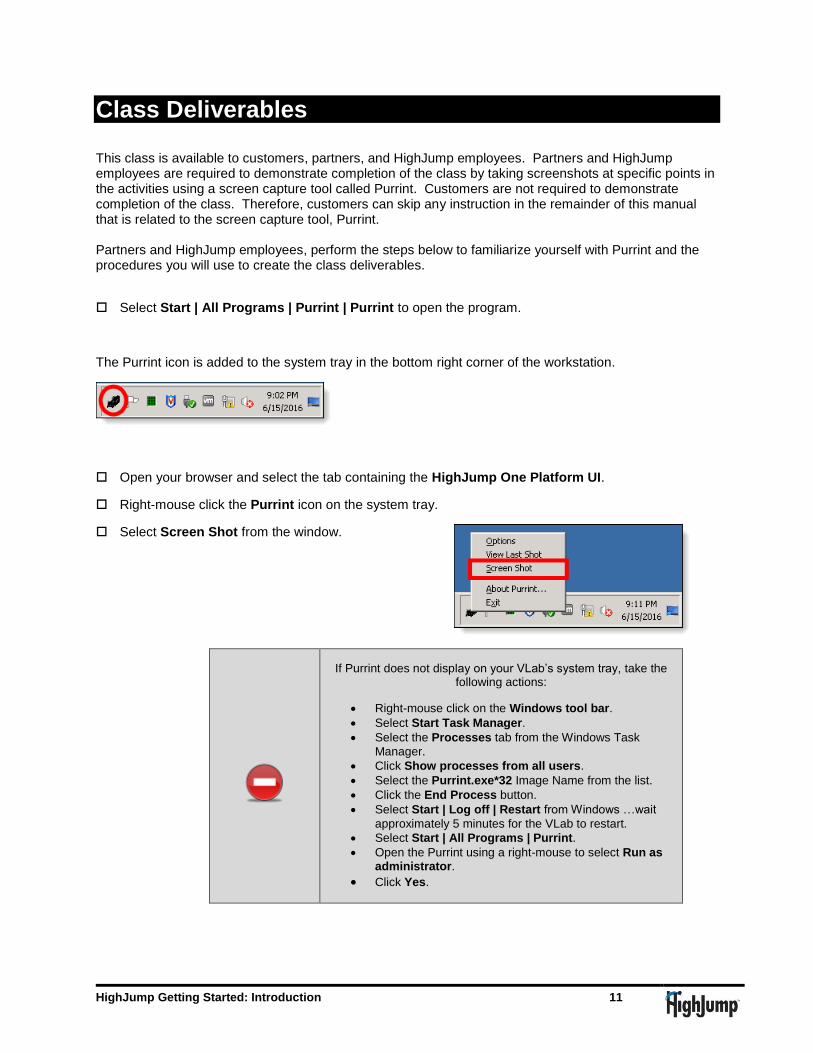
This class is available to customers, partners, and HighJump employees. Partners and HighJump employees are required to demonstrate completion of the class by taking screenshots at specific points in the activities using a screen capture tool called Purrint. Customers are not required to demonstrate completion of the class. Therefore, customers can skip any instruction in the remainder of this manual that is related to the screen capture tool, Purrint. Partners and HighJump employees, perform the steps below to familiarize yourself with Purrint and the procedures you will use to create the class deliverables.
Select Start | All Programs | Purrint | Purrint to open the program.
The Purrint icon is added to the system tray in the bottom right corner of the workstation.
Open your browser and select the tab containing the HighJump One Platform UI.
Right-mouse click the Purrint icon on the system tray.
Select Screen Shot from the window.
If Purrint does not display on your VLab’s system tray, take the following actions:
Right-mouse click on the Windows tool bar.
Select Start Task Manager.
Select the Processes tab from the Windows Task
Manager.
Click Show processes from all users.
Select the Purrint.exe*32 Image Name from the list.
Click the End Process button.
Select Start | Log off | Restart from Windows …wait
approximately 5 minutes for the VLab to restart.
Select Start | All Programs | Purrint.
Open the Purrint using a right-mouse to select Run as administrator.
Click Yes.

HighJump Getting Started: Introduction 12
A snapshot of everything that is currently displayed on your monitor (Purrint001.bmp) is saved to the following directory in your VLab: C:\VLab Screen Captures
For Partners and HighJump Employees Only
Your completion of this class cannot be confirmed without the capture of the directed screen prints. Failure to provide this information will
mean that credit cannot be applied to you efforts.
The lab exercises in the rest of this manual do not detail the steps to use Purrint. If necessary, return to these logon procedures in later
exercises.

HighJump Lab Exercise 1:
Navigating the User Interface 13
Lab Exercise 1: Navigating the User Interface
Introduction
In this exercise you will learn the basic skills related to navigating the menu, accessing pages, and editing data in the HighJump One Platform User Interface (UI).
Online Lesson
The online lessons include explanations and demonstrations that must be viewed to complete the next activity.
Open the HighJump One User Interface online course.
Click the Platform UI Layout topic and view the online lesson in its entirety.
Click the Navigating the UI topic and view the online lesson in its entirety.
Click the Menu Panel topic and view the online lesson in its entirety.
Click the Row Operations topic and view the online lesson in its entirety.
Click the Row Details topic and view the online lesson in its entirety.
Activities Complete the following activities to demonstrate you have viewed the online lessons and that you have a command of the material.
Activity 1.1 – Adding Record
Scenario: Your warehouse requires a new Put-away Class for hazardous items. It is your responsibility to setup foundational data. Using the HighJump One Platform UI, add the following Put-away Class to the system.
Navigate to Supply Chain Advantage | Warehouse Advantage | Warehouse Setup | Put-away Classes.
Search for all Put-away Classes in the Warehouse ID of Warehouse 01.

HighJump Lab Exercise 1:
Navigating the User Interface 14
Use the Add Put-away Class option from the menu bar to add the record below.
Attribute Value
Warehouse ID Warehouse 01
Class ID HZ
Description Hazardous
Overflow Class <None>
Target Put Percentage
Right-mouse click Purrint on the System Tray and select Screen Shot.
Activity 1.2 – Using Action Bar
Scenario: There is a team meeting for your Inventory Control department today. Several people seem to be unaware of the meeting and you want to send a reminder to everyone. Use the HighJump One Platform UI to complete the steps below.
Navigate to Supply Chain Advantage | Advantage Dashboard | Employee Messaging | View Employee Messages.
Search for Employee Messages in the Warehouse ID of Warehouse 01.
Use the Send a Message to Department option on the Action Bar to send the following message: MEETING 10:00 AM IN BREAK ROOM.
Right-mouse click Purrint on the System Tray and select Screen Shot.
Activity 1.3 – Editing Record
Scenario: Your solution was setup with a pick area description that has caused confusion in certain reports. It is your responsibility to maintain foundational data. Use the HighJump One Platform UI to modify the Pick Area description.
Navigate to Supply Chain Advantage | Warehouse Advantage | Warehouse Setup | Pick Areas.
Search for the Pick Area CASE in the Warehouse ID Warehouse 01.
From the Pick Area report page, edit the CASE pick area description. The new value should be Picks for cases.

HighJump Lab Exercise 1:
Navigating the User Interface 15
Right-mouse click Purrint on the System Tray and select Screen Shot.
Activity 1.4 – Deleting Record
Scenario: Your solution was setup with a Reason Code that does not apply to the business operations. It is your responsibility to maintain foundational data. Use the HighJump One Platform UI to remove the Reason Code from the system.
Navigate to Supply Chain Advantage | Warehouse Advantage | Reason Codes.
Search for all records in the system.
From the Reason Codes report page, delete the Reason Code 15 (Missing Paperwork).
Right-mouse click Purrint on the System Tray and select Screen Shot.
Summary
By completing this exercise, you have learned the basics on navigating the HighJump One Platform User Interface (UI):
Accessing the Main Menu
Accessing Application Menus
Using the Workspace and Action Bar
Searching for Information
Viewing Information
Editing Information
Adding Information

HighJump Lab Exercise 2:
Working with Spaces 16
Lab Exercise 2: Working with Spaces
Introduction
In this exercise, you will learn how to work with spaces in the HighJump One Platform User Interface (UI). Spaces are distinct work area containers that can be accessed concurrently. This feature provides an easy method of toggling between the two, or more, data sets.
Online Lesson
The Spaces online lesson includes explanations and demonstrations that must be viewed to complete the next activity.
Open the HighJump One User Interface online course.
Click the Spaces topic.
View the online lesson in its entirety.
Activities Complete the following activities to demonstrate you have viewed the online lesson and that you have a command of the material.
Activity 2.1 – Opening Spaces
Scenario: Your warehouse experienced a stock-out of some important items yesterday. Receipts for these items are anticipated today. You are responsible for monitoring the inbound receipt of these items and the fulfillment of any related outbound orders. Use the HighJump One Platform UI to complete the steps below.
Open a space for click the Supply Chain Advantage | Advantage Dashboard | Receiving | Inbound Orders menu.
Search for the Order Type of Purchase Orders in the Warehouse ID of Warehouse 01.
View the results in the Inbound Orders report page.
Open a space for the Supply Chain Advantage | Advantage Dashboard | Shipping | Outbound Orders menu.

HighJump Lab Exercise 2:
Working with Spaces 17
Search for the Order Type of Sales Orders in the Warehouse ID of Warehouse 01.
View the results in the Outbound Orders report page.
Use the menu bar to display the Inbound and Outbound spaces you just created.
Right-mouse click Purrint on the System Tray and select Screen Shot.
Activity 2.2 – Viewing Spaces
Scenario: You created Inbound and Outbound Spaces to monitor the receipt and fulfillment of some important items today. The last time you checked, no progress had been made with Inbound or Outbound. Your boss just asked you for a status update. Use the HighJump One Platform UI to complete the steps below.
Use the menu bar to toggle between Inbound and Outbound spaces.
Activity 2.3 – Closing Spaces
Scenario: You created Inbound and Outbound Spaces to monitor the receipt and fulfillment of some important items today. All items have been received so the Inbound Orders space is no longer needed. Use the HighJump One Platform UI to complete the steps below.
Remove the Inbound Orders space.
Use the menu bar to display the one remaining space (Outbound).
Right-mouse click Purrint on the System Tray and select Screen Shot.
Summary
By completing this exercise, you have learned the basics on working with spaces in the HighJump One Platform User Interface (UI):
Creating spaces
Viewing spaces
Deleting spaces

HighJump Lab Exercise 3:
Working with Favorites 18
Lab Exercise 3: Working with Favorites
Introduction
In this exercise, you will learn how to work with favorites in the HighJump One Platform User Interface (UI). Favorites are links to pages that you visit frequently. By adding a page to your favorites list, you can go to that page by simply clicking its name, instead of navigating through the menu.
Online Lesson
The Favorites online lesson includes explanations and demonstrations that must be viewed to complete the next activity.
Open the HighJump One User Interface online course.
Click the Favorites topic.
View the online lesson in its entirety.
Activities Complete the following activities to demonstrate you have viewed the online lesson and that you have a command of the material.
Activity 3.1 – Creating Favorites
Scenario: Several Outbound Orders for SAMS CLUB (one of your company’s primary customers) were recently overlooked and shipped late from the warehouse. You have been tasked with monitoring this customer’s orders (for the foreseeable future) to make sure it does not happen again. Use the HighJump One Platform UI to complete the steps below.
Navigate to Supply Chain Advantage | Advantage Dashboard | Shipping | Outbound Orders.
Search for all outbound orders in the system with a Ship To Name like SAMS CLUB.
Add the Outbound Orders report page to your favorites.
Use the menu bar to display the favorites (if necessary).
Right-mouse click Purrint on the System Tray and select Screen Shot.

HighJump Lab Exercise 3:
Working with Favorites 19
Activity 3.2 – Naming Favorites
Scenario: You recently saved an Outbound Orders favorite for a specific customer (SAMS CLUS). It now appears other customers may have been impacted and need similar monitoring. As a result you need a more descriptive name for the existing favorite. Use the HighJump One Platform UI to complete the steps below.
Modify the name for the Outbound Orders favorite to Outbound Orders – SAMS CLUB.
Use the menu bar to display the favorites (if necessary).
Right-mouse click Purrint on the System Tray and select Screen Shot.
Activity 3.3 – Deleting Favorites
Scenario: The dust has settled and your company has addressed the operational exceptions that led to late shipments for an important customer. As a result, you no longer need to monitor Outbound Orders for SAMS CLUB. You want to remove this favorite. Use the HighJump One Platform UI to complete the steps below.
Delete the Outbound Orders – SAMS CLUB favorite.
Use the menu bar to display the favorites (if necessary).
Right-mouse click Purrint on the System Tray and select Screen Shot.
Summary
By completing this exercise, you have learned the basics on working with favorites in the HighJump One Platform User Interface (UI):
Creating favorites
Viewing favorites
Deleting favorites

HighJump Lab Exercise 4:
Working with Page Preferences 20
Lab Exercise 4: Working with Page Preferences
Introduction
In this exercise, you will learn how to work with page preferences in the HighJump One Platform User Interface (UI). Pages display with a default view in the UI. Users have options to alter that defaulted view and set their own preferences for pages.
Online Lesson
The Page Preferences online lesson includes explanations and demonstrations that must be viewed to complete the next activity.
Open the HighJump One User Interface online course.
Click the Page Preferences topic.
View the online lesson in its entirety.
Activities Complete the following activities to demonstrate you have viewed the online lesson and that you have a command of the material.
Activity 4.1 – Sorting Column
Scenario: The ASNs report page default displays information in order of Warehouse ID and ASN. However, your role as Manager of Warehouse Vendor Relations requires an alternative perspective. You prefer that this information display in ascending order of the vendor’s name whenever you view this page. Use the HighJump One Platform UI to complete the steps below.
Navigate to Supply Chain Advantage | Advantage Dashboard | Receiving | ASN.
Search for all ASNs in the system.
Modify the ASNs report page to display information in the ascending order of Vendor Name.
Save the page preferences.

HighJump Lab Exercise 4:
Working with Page Preferences 21
Right-mouse click Purrint on the System Tray and select Screen Shot.
Activity 4.2 – Selecting Columns
Scenario: The Inbound Orders report page default displays the Order Type and Print – Put List columns that are not used in your solution. You prefer to not display these columns whenever you view this page. Use the HighJump One Platform UI to complete the steps below.
Navigate to Supply Chain Advantage | Advantage Dashboard | Receiving | Inbound Orders.
Search for all Inbound Orders in the system.
Modify the Inbound Order report page to not display the Order Type and Print – Put List columns.
Save the page preferences.
Right-mouse click Purrint on the System Tray and select Screen Shot.
Activity 4.3 – Reordering Columns
Scenario: The Inventory by Lot report page default displays the first five columns in the following order: Warehouse ID; Client Code; Item Number; Lot Number; Attributes. Your searches are always for a specific Warehouse ID so it is not necessary to have it be the first column displayed on the page. You also prefer that the Lot Number display in the first column. Use the HighJump One Platform UI to complete the steps below.
Navigate to Supply Chain Advantage | Advantage Dashboard | Inventory | Lots.
Search for all Locations in the Warehouse 01 Warehouse ID.
Reorder the display of the first four columns to the following order: Lot Number; Client Code; Item Number; Attributes; Warehouse ID.
Save the page preferences.
Right-mouse click Purrint on the System Tray and select Screen Shot.
Activity 4.4 – Setting Items per Page
Scenario: The Items report page default displays 18 records per page. However, the browser on your workstation can display only 10 records per page without requiring that the user scroll-down to view the bottom 8 records. You prefer to not scroll to view information and would like to adjust the items per page setting accordingly. Use the HighJump One Platform UI to complete the steps below.
Navigate to Supply Chain Advantage | Advantage Dashboard | Inventory | Items.

HighJump Lab Exercise 4:
Working with Page Preferences 22
Search for all items in the system.
Modify the Items per Page setting to 10.
Save the page preferences.
Right-mouse click Purrint on the System Tray and select Screen Shot.
Activity 4.5 – Resizing Columns
Scenario: On some occasions, the Reusable Container report page has not displayed the full Container Number. You want to resize the column to ensure that the full data string is displayed on the page. Use the HighJump One Platform UI to complete the steps below.
Navigate to Supply Chain Advantage | Advantage Dashboard | Inventory | Reusable Containers.
Search for all Reusable Containers in the system.
Resize the Container Number column to be approximately twice its current width.
Save the page preferences.
Right-mouse click Purrint on the System Tray and select Screen Shot.
Activity 4.6 – Reverting Preference
Scenario: Earlier you modified the Items report page and saved a preference to display 10 records per page. However, you just upgraded to a new monitor that can display the original page default of 18 records per page. Use the HighJump One Platform UI to complete the steps below.
Navigate to Supply Chain Advantage | Advantage Dashboard | Inventory | Items.
Search for all items in the system.
Revert the page preference.
Right-mouse click Purrint on the System Tray and select Screen Shot.
Summary
By completing this exercise, you have learned the basics on working with page preferences in the HighJump One Platform User Interface (UI):
Sorting Columns
Selecting Columns

HighJump Lab Exercise 4:
Working with Page Preferences 23
Reordering Columns
Setting Items per Page
Resizing Columns
Reverting Page Preferences

HighJump Lab Exercise 5:
Working with Data Filters 24
Lab Exercise 5: Working with Data Filters
Introduction
In this exercise, you will learn how to work with data filters in the HighJump One Platform User Interface (UI). Report pages display information from filters established in the UI (i.e. Search Pages). Users have options to add additional filters after the initial results are displayed.
Online Lesson
The Data Filters online lesson includes explanations and demonstrations that must be viewed to complete the next activity.
Open the HighJump One User Interface online course.
Click the Data Filters topic.
View the online lesson in its entirety.
Activities Complete the following activities to demonstrate you have viewed the online lesson and that you have a command of the material.
Activity 5.1 – Filtering Data
Scenario: The Locations report page can be searched on by Warehouse ID, Location ID, and Location Type. On occasion, you need to limit the results to a specific Pick Area. The frequency of this need does not justify a code change. Use the HighJump One Platform UI to complete the steps below.
Navigate to Supply Chain Advantage | Advantage Dashboard | Inventory | Locations.
Search for all Locations in the Warehouse 01 Warehouse ID.
Apply a filter on the results in the Locations report page to display only records in the CASE Pick Area.
Right-mouse click Purrint on the System Tray and select Screen Shot.

HighJump Lab Exercise 5:
Working with Data Filters 25
Summary
By completing this exercise, you have learned the basics on working with data filters on report pages in the HighJump One Platform User Interface (UI):

HighJump Lab Exercise 6:
Working with New Users 26
Lab Exercise 6: Working with New Users
Introduction
In this exercise, you will learn how to create a new user profile for the HighJump One Platform User Interface (UI). Anyone who wants access to the HighJump One Platform UI must have a HighJump One Platform profile defined in the HighJump Workspace tool. The profile includes the user name, password, culture, and a set of parameters that dictate which pages the user can access.
Online Lesson
The Creating New Users online lesson includes explanations and demonstrations that must be viewed to complete the next activity.
Open the HighJump One User Interface online course.
Click the Creating New Users topic.
View the online lesson in its entirety.
Activities Complete the following activities to demonstrate you have viewed the online lesson and that you have a command of the material.
Activity 6.1: Creating New User
Scenario: Francisco Sneed is a new hire, and he is going to start his new role in the warehouse next week. It is your responsibility to grant Francisco access to the HighJump One Platform UI. Because he will operate in an administrative capacity, he needs full access to all pages. Use the HighJump One Workspace and the table below to create a new user profile.

HighJump Lab Exercise 6:
Working with New Users 27
Attribute Details
First Name Francisco
Last Name Sneed
Email [email protected]
Login Francisco
Password HJSPASS
Culture English (United States)
Roles Administrators.mPage
Authorization Applications Advantage Commander 12.7
Supply Chain Advantage 12.7
HighJump One Platform 1.0
Identity Claims - Supply Chain Advantage application
Menu Level = Administrator
Identity Claims - Advantage Commander application
Menu Level = Administrator
Activity 6.2: Confirming New User
Scenario: Francisco Sneed’s new user has just been setup. Use the HighJump One Platform UI to complete the steps below.
Use Logout menu option near the upper right corner to log off of the Administrator session.
Choose Workspace Authentication in the Authentication drop-down list.
Enter User Name: Francisco
Enter Password: HJSPASS
Click the Login button.
Navigate to Supply Chain Advantage | Advantage Dashboard | Inventory | Lots.
Search for all Lots in the Warehouse 01 Warehouse ID.
Right-mouse Purrint on the System Tray and select Screen Shot.

HighJump Lab Exercise 6:
Working with New Users 28
Summary
By completing this exercise, you have learned the basics on creating a new user profile for the HighJump One Platform User Interface (UI).

HighJump Lab Exercise 7:
Working with User Settings 29
Lab Exercise 7: Working with User Settings
Introduction
In this exercise, you will learn how to modify user settings through the HighJump One Platform User Interface (UI). A User button in the UI provides access to a Settings menu. Personal information, security questions, and passwords can be updated form this menu. The UI logout option is also located in this menu.
Online Lesson
The User Settings online lesson includes explanations and demonstrations that must be viewed to complete the next activity.
Open the HighJump One User Interface online course.
Click the User Settings topic.
View the online lesson in its entirety.
Activities Complete the following activities to demonstrate you have viewed the online lesson and that you have a command of the material.
Activity 7.1: Viewing User Settings
Scenario: Francisco Sneed (a new hire) just received his credentials from the System Administrator. He has been asked to confirm his personal information. Use the HighJump One Platform UI to complete the steps below.
If necessary, logon as Francisco (User Name Francisco and Password HJSPASS).
View and confirm the user settings below.

HighJump Lab Exercise 7:
Working with User Settings 30
Attribute Details
First Name Francisco
Last Name Sneed
Email [email protected]
Activity 7.2: Changing User Settings
Scenario: Francisco Sneed just reviewed his credentials and would like to change his first name and password. Use the HighJump One Platform UI to complete the steps below.
If necessary, logon as Francisco (User Name Francisco and Password HJSPASS)
Change Francisco’s name and password.
Attribute Details
Old First Name Francisco
New First Name Francis
Old Password HJSPASS
New Password HJU2020
Right-mouse Purrint on the System Tray and select Screen Shot.
Logout of Francis Sneed’s session.
Summary
By completing this exercise, you have learned the basics on user settings for the HighJump One Platform User Interface (UI).

HighJump Lab Exercise 8:
Working with Inline Editing 31
Lab Exercise 8: Working with Inline Editing
Introduction
In this exercise, you will learn how to perform work with inline editing in the HighJump One Platform User Interface (UI). Inline editing allows users to edit information directly from report pages. When enabled for a page, this feature provides a more direct editing alternative when compared to the formal method of accessing an edit page.
Online Lesson
The Inline Editing online lesson includes explanations and demonstrations that must be viewed to complete the next activity.
Open the HighJump One User Interface online course.
Click the Inline Editing topic.
View the online lesson in its entirety.
Activities Complete the following activities to demonstrate you have viewed the online lesson and that you have a command of the material.
Activity 8.1: Using Inline Edit
Scenario: Your warehouse footprint has expanded to a formerly unused area of the facility. This reconfiguration of layout has impacted the Label picking and the default staging location now needs to be updated. Use the HighJump One Platform UI to complete the steps below.
Logon as Administrator (User Name Administrator and Password HJSPASS).
Navigate to Supply Chain Advantage | Warehouse Advantage | Warehouse Setup | Warehouses | Warehouse Controls.
Search for all Warehouse Controls in the Warehouse 01 Warehouse ID.

HighJump Lab Exercise 8:
Working with Inline Editing 32
Select the DEFAULT_LABEL_STAGE Control Type record.
Perform and inline edit and update the C1 column value to S3.
Right-mouse click Purrint on the System Tray and select Screen Shot.
Summary
By completing this exercise, you have learned the basics on inline editing for the HighJump One Platform User Interface (UI).

HighJump Lab Exercise 9:
Working with Data Exports 33
Lab Exercise 9: Working with Data Exports
Introduction
In this exercise, you will learn how to work with data exports in the HighJump One Platform User Interface (UI). An Export button in the action bar of report pages allows users to export the result set to a Microsoft Excel document. This feature allows for one-off ad hoc reports to be created outside of the solution.
Online Lesson
The Export Data online lesson includes explanations and demonstrations that must be viewed to complete the next activity.
Open the HighJump One User Interface online course.
Click the Export Data topic.
View the online lesson in its entirety.
Activities Complete the following activities to demonstrate you have viewed the online lesson and that you have a command of the material.
Activity 9.1: Exporting Data
Scenario: Your warehouse pick line is expanding and you need an editable list of all current locations. This is a one-off situation and you don’t have time to wait for this information from the system administration group. Use the HighJump One Platform UI to complete the steps below.
Navigate to Supply Chain Advantage | Warehouse Advantage | Warehouse Setup | Locations.
Search for all Locations with a Forward Pick Location Type in the Warehouse 01 Warehouse ID.
Export the list to an Excel document.
Open the Excel document.

HighJump Lab Exercise 9:
Working with Data Exports 34
Right-mouse click Purrint on the System Tray and select Screen Shot.
Summary
By completing this exercise, you have learned the basics on exporting data from the HighJump One Platform User Interface (UI).