highly reliable systems - high-rely
TRANSCRIPT

Highly Reliable Systems
Premier DXRTM
Documentation Supplement V1.2Copyright © 2008by Highly Reliable Systems. All Rights Reserved.

READ THIS FIRSTImportant Quick Start Information for your PremierDXR
● The latest Service Packs are important! Microsoft has continued to Debug removable drives on the Windows 2000, XP, 2003 and Vista product lines. If you do not have Service Pack 4 on Windows 2000 or Service Pack 2 on XP you may have problems. For example, XP machines without Service Pack 2 cannot properly recognize drives above 137GB. While it may appear to work, the drive will corrupt data when it fills above that level. Read the manual or our web site for more details.
● Not all eSATA ports are created equal. We recommend that only controllers based on the Silicon Image chip set for maximum compatibility are used. Other eSATA ports may only recognize the first drive in a multi-drive system or may not function at all.
● If you have more High-Rely media than you have bays, you WILL have a drive letter problem as you change your media. Windows will assign drive letters randomly, which causes your backup software to fail. You can use the High-Rely Drive Manager utility HRDM2.MSI to solve this problem. To do this, install HRDM2 on the machine that the High-Rely system will be connected to. See “Understanding the High-Rely Drive Manager” in this manual for more information.
● If you use Veritas Backup Exec, only version 9.1 or higher should be used. Always choose the “Backup to Removable Disk” folder. Never use the “Backup to Disk folder” since Backup Exec may become confused when restoring data from removable drives.
● Particular photos in this manual may not be your exact unit.
The information in this manual primarily documents Windows 2000, 2003, or XP systems with some coverage of Vista. Although the Premier may work with Windows NT, Linux, Mac OS X and other operating systems, at this time, our tech support can assist with Windows platforms only.

Table of Contents• 1. Introduction........................................................................................................................................4• 2.Choosing media sizes. ........................................................................................................................4• 3.Connecting a Premier DXR to your computer....................................................................................4• 4.Changing backup drives (media).........................................................................................................5
• 1.Initialization and failed drives........................................................................................................6• 2.Resetting the DXR and Establishing a Master drive......................................................................7• 3.Moving data from one drive to another..........................................................................................7• 4.Assigning Drive letters...................................................................................................................8
• 5.Premier DXR Technical Notes............................................................................................................8• 1.Degradation....................................................................................................................................8• 2.Status and Errors.............................................................................................................................8• 3.Selecting Different RAID types......................................................................................................9

1. IntroductionPremier DXR is a unique backup product which provides your backup strategy with a large, reliable, redundant means of near-line storage as well as a removable means of storing data for off-site backups. With the Premier DXR, your backup can be both near-line and off-site without the addition of any software or configuration. This is because the Premier DXR has a built-in hardware RAID controller which can mirror (copy) the drives in your Premier automatically. Thus, you're free to remove one of the drives for off-site storage while the other remains on-line to your host. Removal and replacement of the off-site drive will not interfere or even alert the host that anything has changed because the drive will never go off-line during a drive change. As far as your host computer is concerned, the Premier DXR is a single stand-alone drive. Thus, special software drivers or backup software configuration is unnecessary making the Premier DXR very portable from host to host.
For maximum interoperability, the Premier DXR is also capable of accepting either a USB 2.0 or eSATA connection to your host computer.
Additionally, the RAID 1 (mirror) configuration will tolerate a single drive failure without loss of data (provided the drive failure does not occur during a rebuild or copying process).
There is no proprietary information written to either drive by the RAID controller so any off-site media can be read directly by another computer without special hardware or software.
The Premier DXR's capacity, flexibility, choice of USB or eSATA and its convenient use of sata media in stand-alone drive storage systems plus the benefits of RAID 1 data protection make Premier DXR a unique and superior proposition in the set of tools used by today's businesses for data storage and backup.
2.Choosing media sizes. The media size you chose for the Premier DXR should be the same size across the whole set of media. For example, all 750 GB Seagate drives. The Premier DXR will not mirror data from a larger drive to a smaller drive which may limit some of your backup options. Keeping all media the same size avoids this road block.
3.Connecting a Premier DXR to your computer.The Premier DXR allows for either an eSATA or USB 2.0 connection to the host computer. The Premier DXR supports several different configurations (RAID0, RAID 1, JBOD). In RAID 0 or RAID 1, the Premier DXR will appear to your host as a single drive. Because of this, a multi-drive (PM or Port multiplier aware) capable eSATA controller is not necessary. However, cards other than our tested High-Rely eSATA controllers may present other problems. This document will not explore all possibilities of configurations of the Premier DXR. But, if you set the DXR to JBOD mode, your host's controller will need to be multi-drive capable. This means it must be able to see multiple drives through a single eSATA channel (connection).
The first order of work is to install your controller card. As this document is a supplement for the DXR function only. To install your controller card into your host, please read the manual on your disk entitled “High-Rely documentation for SATA systems” if you plan to connect to a SATA controller.
Please read the manual on your disk entitled “High-Rely documentation for USB systems” if you plan to connect with USB.
The DXR will automatically sense whichever port you plug into and operate from that port (USB or eSATA). However, even though both connectors are present, it will only function correctly through one port at a time. Thus only one of either type maybe plugged in at one time.
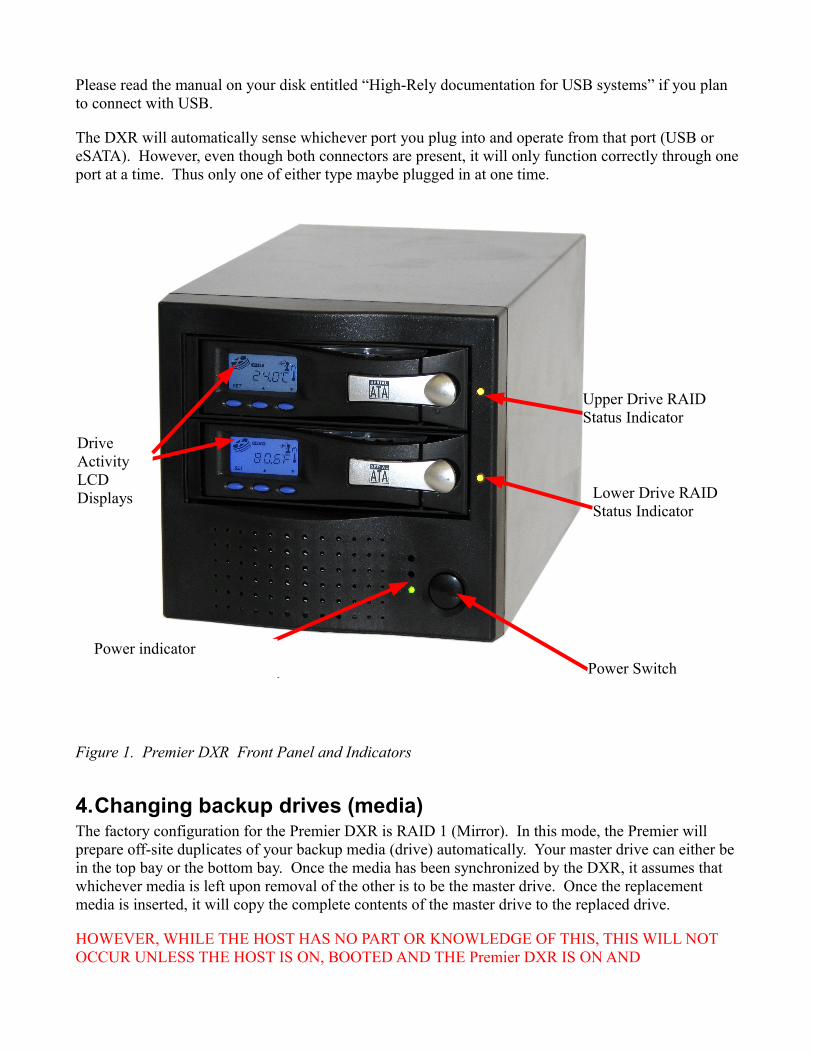
Figure 1. Premier DXR Front Panel and Indicators
4.Changing backup drives (media)The factory configuration for the Premier DXR is RAID 1 (Mirror). In this mode, the Premier will prepare off-site duplicates of your backup media (drive) automatically. Your master drive can either be in the top bay or the bottom bay. Once the media has been synchronized by the DXR, it assumes that whichever media is left upon removal of the other is to be the master drive. Once the replacement media is inserted, it will copy the complete contents of the master drive to the replaced drive.
HOWEVER, WHILE THE HOST HAS NO PART OR KNOWLEDGE OF THIS, THIS WILL NOT OCCUR UNLESS THE HOST IS ON, BOOTED AND THE Premier DXR IS ON AND
Upper Drive RAID Status Indicator
Lower Drive RAID Status Indicator
Power SwitchPower indicator
Drive Activity LCD Displays

CONNECTED TO THE HOST. It may appear that copying has begun if the replacement drive is smaller in capacity than the master. But in this case, copying will not occur. This is evident by checking the “Trouble/off-line” indicator in the rear. If this light remains lit more than 1 minute beyond the time the replacement drive was inserted, the Premier DXR is unable to use the replacement drive for some reason – either a failure of some sort or the replacement is smaller than the master. The disk activity indicators on the LCD display will also show if copying is occurring. Both indicators should be showing activity (the little disk image will appear to rotate).
Assuming no problems and copying has started, during this copying period, if the Master drive is removed, permanent data loss or corruption can occur. Depending on the size of your drives, this re syncing can take between 1 and ½ hours to 12 hours or more (about 1 hour per 25 GB). Such will also depend on if your host is creating extra activity on the Premier DXR while it is syncing (copying). The DXR will grant priority to the host's disk requests, delaying it's own internal copying. The RAID Status indicator next to the drive being synced will flash during this whole time. So, once the light has ceased flashing and remains on, the drives are synced and either maybe removed provided the “safely remove” procedure outlined in the the eSATA or USB manual is followed. If the blue indicators on the media itself or the Drive Activity LCD indicate activity, it is not safe to remove the media, stop the function, process or program causing the activity before removing the drive.
In the event your DXR goes off-line and can not be brought back on, turn off the power, wait one minute, then restore power.
Figure 2. Premier DXR Back Interface Panel
1. Initialization and failed drives.Because RAID 1 is a mirror, there is no RAID drive initialization. All that is necessary is to establish which drive (media) is the master and then which drive needs to be synced. Once everything is synced, there is no longer a master. If a drive then fails or is removed, the remaining drive immediately becomes the master. The failed or removed drive should have it's RAID status indicator blinking. If
eSATA connector
USB connector
eSATA Link indicator
Initialize/change mode button
RAID type (SAFE)
USB Link indicator
Power indicator
Trouble - off-line
the Trouble/off-line indicator (figure 2) is lit on the back of the Premier DXR, that indicates an actual problem with the drive who's indicator is blinking and the drive may need servicing.
2. Resetting the DXR and Establishing a Master drive.Turn off the power on the Premier DXR. Place the master drive (media) in the Premier DXR (top bay). The master drive will be the one you consider “good” that contains all your data. If you're starting from scratch with no data, just put in one of the drives. Fully latch and turn on the drive with the key lock. Be sure the Premier DXR, is set to “safe” mode, is plugged into the host, the host is on and booted.
Next, turn the power switch on the Premier DXR on. After a minute or more, use a pointed object to press the Change Mode button (see photo above). The master volume should be visible on the host machine within 2 minutes. Once it is, place the copy media in the remaining bay, latch in and turn the key lock on. The drive should power up.
After a minute or so, the copy media's RAID status indicator should light steady. Then, after another minute or so, it should start to blink again as it begins to sync. This will continue until the drives are in sync. You will see the disk activity indicator on the LCD display of both drives showing activity on both drives even though the host may not be accessing the drives. The copy media's RAID Status indicator should be blinking the whole time and should continue to blink until the copy media is synced with the master media. Keep in mind, copy media's drive must always be the same size or larger as the drive in the Master media.
3. Moving data from one drive to anotherIt may become necessary to move data from one drive to another where the source drive is larger than the target drive. The DXR can not perform this itself because it always expects the target to be the same or larger than the source. However, the DXR can be switched to expose both drives independently (JBOD). Once this is done, you may manually access both drives and copy the data from the larger to the smaller through explorer for example. Be aware that the target drive may still need to be initialized and formatted by your operating system.
To do this, turn off the Premier DXR. Using a small screwdriver, knife or your fingernail, turn the RAID Type selector on the back of the DXR (see figure 2) to the JBOD setting. Turn on the DXR. Then, with an opened paper clip or some other small stiff object, press the recessed Initialize/Change Mode button. WARNING! If the RAID type selector is not set to the JBOD or SAFE mode when pressing this button, data loss may occur!
Within about 2 minutes, both drives should be visible to the host (use MyComputer/Manage/Disk management). If your target drive is already formatted, you may use explorer or what ever other program you wish to transfer data to the smaller target drive from the source drive.
When completed, turn off the DXR and move the RAID type selector back to the SAFE position. If the target drive is to be the new master drive, remove the source drive. Otherwise, remove the target drive. Turn on the DXR. After 1 minute, press the Initialize/Change mode button again. Within about 2 minutes, the system should be back to normal.

4. Assigning Drive lettersBecause the DXR is one volume (default configuration), and drive swaps are invisible to the host, there are not multiple drive letter issues with media as in a standard High-Rely systems. The HRDM2 utility should have no use.
5.Premier DXR Technical Notes
1. DegradationWhen the DXR is resynchronizing, this is also referred to as “running degraded”. Performance will be less for host accesses during this time because of the background activity of the DXR resynchronizing the drives.
2. Status and ErrorsIn addition to the regular High-Rely media indicators, the Premier DXR has several indicators on its rear panel. Also, the indicators on the side of either bay are used to indicate whether or not the media drive is operational and synced. Please see figure 1 and 2 above.
● ESATA link indicator – lit when an eSATA connection is made to the host.
● RAID type – should always be set to “SAFE”. Changing this may cause DATA LOSS!
● USB Link indicator – lit when a USB connection is made to the host.
● Power indicator – lit when unit is powered on.
● Trouble / Alarm indicator – lit when volume is off-line. This occurs when there is a problem involving both media. For example, both are removed, both have failed or there has been a SATA error.
● Right and Left RAID status indicators:
State MeaningOff Device is unplugged or has no power.
Flashing Device is off-line or rebuilding.
On Device is on-line and usable.
Note: If both indicators are flashing, the DXR is off-line with the host.

3. Selecting Different RAID typesAlthough not included in our technical support service, the Premier DXR supports other RAID configurations as well. These are engaged by changing the RAID Type selector on the back of the Premier DXR.
RAID Type Setting DescriptionGUI All settings established by a separate Windows program which is
not available at this time.Big The drives are “spanned” or joined meaning that both drives appear
as a single volume to the host and each drives entire capacity is added together (sizes can vary with no waste). The drives will become a set and data loss will occur if they are separated under this configuration. When first picking this setting, the drives will be initialized (erased). This could take up to 10 hours before the volume appears on-line. Both RAID status indicators will blink while the drives are initializing but the Trouble light should not be lit.
JBOD The drives are presented to the host as individual drives.FAST The drives are striped (RAID 0) meaning the capacities of the
smallest drive in the set of two are multiplied by 2 and presented to the host as one volume. Data is split between both drives resulting in higher access and throughput speed. When first picking this setting, the drives will be initialized (erased). This could take up to 10 hours before the volume appears on-line. Both RAID status indicators will blink while the drives are initializing but the Trouble light should not be lit.
SAFE This is the factory default setting and is supported by High-Rely's Technical support department. The drives are mirrored (RAID 1) and presented to the host as a single volume. One drive can fail and be replaced without disturbing the availability of the volume to the host.
SAFE 33 1/3 of the drives capacities will be mirrored (RAID 1) and presented as a volume to the host. The remaining space will be spanned and presented to the host as another volume. The drives will become a set and data loss will occur on the spanned volume if they are separated under this configuration. When first picking this setting, the drives will be initialized (erased). This could take up to 10 hours before the volume appears on-line. Both RAID status indicators will blink while the drives are initializing but the Trouble light should not be lit.
SAFE 50 Sames as SAFE 33 but the allocation will be 50% to the mirror.
Note: Even if power is removed between RAID type changes, the type will only change and initialization will begin (if applicable) once the Initialize/Change Mode button is pressed.
Contact Information
Highly Reliable Systems
1900 Vassar Street
Reno Nevada 89502-2109
TEL: 775-329-5139
FAX: 775-322-5397
www.high-rely.com