hispec engineering ltd operators manualthe hispec kompactor has been designed to meet the demands of...
TRANSCRIPT

Manufacturers of High Quality Agricultural Machinery
HiSpec Engineering Ltd
Operators Manual
HiSpec Engineering Ltd. Station Rd, Bagenalstown, Co. Carlow Tel +353 (0) 59 9721929 / 9721992 Fax: +353 (0) 59 9721980 Website: www.hispec.net Email: [email protected]

Operation Manual
20150930_Kompactor Operation Manual 2

Operation Manual
20150930_Kompactor Operation Manual 3
1. Emergency Numbers;

Operation Manual
20150930_Kompactor Operation Manual 4
Parts are subject to change at any time, without prior or direct notice to the customer. The contents of this manual can also be changed without prior notice. For information about adjustment, maintenance or repair, which are not mentioned in this manual, you are advised to consult the technical support of your supplier.
This manual has been made with all possible effort, but HiSpec Engineering and its suppliers cannot be responsible for possible mistakes in this manual, nor for the consequences.

Operation Manual
20150930_Kompactor Operation Manual 5
1. Contents
2. Introduction ................................................................................................................................. 7
3. Approved Machine Applications .................................................................................................. 8
4. Identification and Safety Decals .................................................................................................. 9
4.1. HiSpec Identification Plate .................................................................................................... 9
4.2. Safety Decals ......................................................................................................................... 9
5. Safety.......................................................................................................................................... 15
5.1. General Safety Precautions ................................................................................................. 15
5.2. General Safety Precautions (Continued) ............................................................................. 16
5.3. Safety Check List .................................................................................................................. 16
5.4. Safety Decal Locations ......................................................................................................... 18
5.4.1. Front ............................................................................................................................. 18
5.4.2. Side A / B ...................................................................................................................... 19
6. Machine Overview ..................................................................................................................... 20
6.1. Machine Variations ............................................................................................................. 20
6.2. Machine Data Sheet ............................................................................................................ 21
6.3. Main Machine Parts ............................................................................................................ 22
6.4. Optional Extras .................................................................................................................... 24
7. Emergency / Parking Brake ........................................................................................................ 25
8. Hydraulic Connections ............................................................................................................... 27
9. Electrical Connections ................................................................................................................ 29
10. Wheel removal/refitting ......................................................................................................... 30
11. Tractor Requirements ............................................................................................................. 31
12. Connection to Tractor ............................................................................................................. 32
13. Road Transport ........................................................................................................................ 33
14. Operating Procedures ............................................................................................................. 34
14.1. Filling or 'In The Field' Operating Instructions ................................................................. 34
14.2. 'In The Yard' Operating Instructions ................................................................................ 34
14.3. Tailgate Operation ........................................................................................................... 35
14.4. Moving Floor Operation .................................................................................................. 35
14.5. Sliding Axle Operation ..................................................................................................... 37
14.6. Passive Steering Axle Operation ...................................................................................... 38
14.7. Forced Steering Axle Operation ....................................................................................... 39

Operation Manual
20150930_Kompactor Operation Manual 6
14.8. Lift Axle Operation ........................................................................................................... 40
14.9. 'Demounting' Operating Procedure ................................................................................ 41
14.10. Mounting the trailer body ............................................................................................... 43
15. Maintenance, Cleaning & Storage .......................................................................................... 44
15.1. Warning! .......................................................................................................................... 44
15.2. General Precautions ........................................................................................................ 45
15.3. Daily Checks / Maintenance ............................................................................................ 46
15.4. 25 hour Checks / Maintenance ........................................................................................ 46
15.5. 6 Month Checks / Maintenance ...................................................................................... 46
15.6. Bolt Tightening Torques ................................................................................................... 47
15.7. Tyre Options .................................................................................................................... 47
15.8. Wearing Parts .................................................................................................................. 48
15.9. Replacing Nylon Strips ..................................................................................................... 48
15.10. Grease Points ................................................................................................................... 49
15.10.1. Grease Point A ; Axles............................................................................................... 50
15.10.2. Grease Point B ; Drawbar ......................................................................................... 51
15.10.3. Grease Point C ; Tailgate .......................................................................................... 52
15.11. Cleaning & Storage .......................................................................................................... 53
16. Notes ....................................................................................................................................... 54
17. Sales & Service ........................................................................................................................ 55
18. Warranty ................................................................................................................................. 56
19. Conditions of Sale ................................................................................................................... 57
20. Registration Forms .................................................................................................................. 60
21. Registration Forms .................................................................................................................. 61
22. Declaration of Conformity ...................................................................................................... 63

Operation Manual
20150930_Kompactor Operation Manual 7
2. Introduction
Congratulations on Purchasing a HiSpec Kompactor Trailer.
Please Read the Following Manual Before Using the Machine.
The way you care for and maintain this machine will decide its future performance. This manual has been carefully written to help you maintain the condition of your machine. Read this manual carefully to learn how to operate and service your machine correctly. Failure to do so could result in personal injury or machine damage. HiSpec Kompactor Trailers have been designed and manufactured in compliance with the following
directives and standards;
Machinery Directive 2006/42/EEC
Harmonised standards;
• EN ISO 12100 : 2010 ; General Principles for Design - Risk Assessment and Risk Reduction.
• EN ISO 4254 - 1:2013 ; Agricultural Machinery - Safety - Part 1 General Safety.
• EN ISO 14121-1:2007, Safety of Machinery – Principle of Risk Assessment
• EN 842:1996 + A1:2008 ; Safety of Machinery - Visual Danger Signals - General Requirements, Design and Testing.
This manual should be kept within the vicinity of the machine at all times and should be considered a permanent part of your machine. It should remain with the machine should you decide to sell it.
Warranty is provided as a part of HiSpec Engineering’s support program for customers who operate and maintain this machine and equipment as described in this manual. This warranty provides you the assurance that HiSpec Engineering will back its machines should defects appear within the warranty period. If the machine is abused, or modified to change its performance beyond the original factory specifications, the warranty will become void and improvements may be denied.
All information, illustrations and specifications in this manual are based on the latest product information available at the time of publication.
It is the policy of HiSpec Engineering to improve its products and designs whenever it is practical and possible to do so. We reserve the right to make changes or improvements at any time without incurring any obligation to make such changes on products sold previously.
Thank You for Choosing HiSpec Engineering

Operation Manual
20150930_Kompactor Operation Manual 8
3. Approved Machine Applications
The HiSpec Kompactor trailers have been designed using the most modern practices and robust, quality materials for the purpose of increasing the efficiency in the transportation of Low Density Fibrous Materials (Forage crops) such as Chopped Grass, Maize Silage and Whole Crop Silages.
The Kompactor has been designed to decrease the amount of maintenance time spent on trailers. It has been designed to be able to compact low density materials so as to increase load capacity. (The compaction process can lead to an increase of 50% of dry grass material) which in turn leads to a decrease in the overall amount of time the machine spends on the road away from the forager, a decrease in the number of machines required to carry out the harvesting job and hence a decrease in the amount of labour cost.
The HiSpec Kompactor has been designed to meet the demands of the modern efficient Farmer and Contractor.
HiSpec Engineering will not be held responsible for any loss or damage resulting from machine applications other than those specified above. Any other use the machine may be put to is entirely at the owners/operators risk. The Designated use of a Kompactor trailer includes that the operating, maintenance and repair instructions given by the manufacturer will be strictly fulfilled. Designated use means operating the Kompactor trailer is exclusively for persons familiar with the machine and fully aware of the associated risks involved in operating it.
By any alteration of safety equipment, the Declaration of Conformity, as well as the CE sign on machine loses it validity.

Operation Manual
20150930_Kompactor Operation Manual 9
4. Identification and Safety Decals
4.1. HiSpec Identification Plate
Identification plate explanation
A Manufactures Information
B Tyre Specifications
C Dimensions and Loading Information
4.2. Safety Decals
Safety decals are important safety notices to operators, they should be kept visible, maintained and
replaced when worn.
Decals;
Decal Name ; Read Operators Manual 1
Description ; Read the operators manual before Maintenance and Use
A
B C

Operation Manual
20150930_Kompactor Operation Manual 10
Manual No. ; 1
Order No. ; 819-f9
Decal Name ; Read Operators Manual 2
Description ; Read the operators manual before Maintenance and Use
Manual No. ; 2
Order No. ; 819-f8
Decal Name ; Avoid risk from High Pressure Fluids, Consult Manual before Maintenance.
Description ; High pressure fluid can puncher the skin and enter the blood stream, consult operators manual for service procedures
Manual No. ; 3
Order No. ; 819-244
Decal Name ; Danger due to High Pressure Fluids, Consult Manual before Maintenance.

Operation Manual
20150930_Kompactor Operation Manual 11
Description ; The Accumulator is under gas and oil pressure, improper use and maintenance causes risk of injury, Consult operators manual for service procedures
Manual No. ; 4
Order No. ; 819-
Decal Name ; Maintain a safe distance from the machine while in operation
Description ; To avoid injury maintain a safe distance from the machine while in operation
Manual No. ; 5
Order No. ; 819-224
Decal Name ; Stay clear of tailgate swing area while in operation
Description ; To avoid injury stay clear of the machines tailgate while in operation
Manual No. ; 6
Order No. ; 819-208
Operation Manual
20150930_Kompactor Operation Manual 12
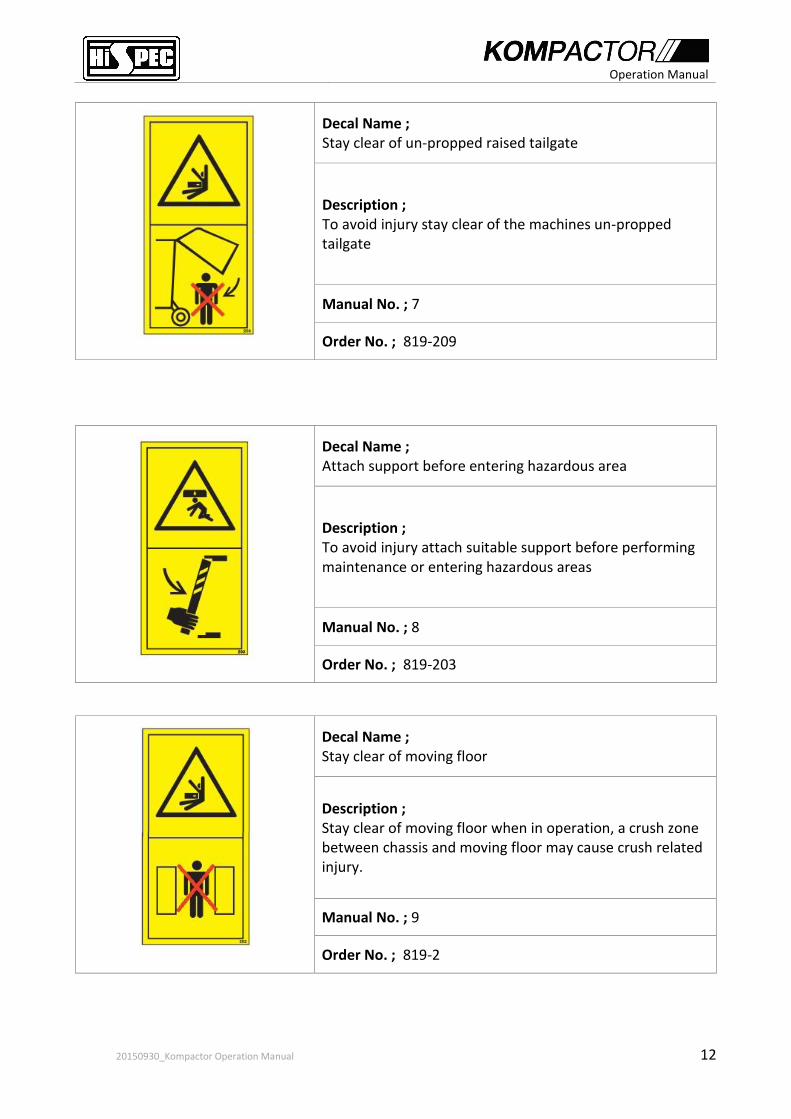
Decal Name ; Stay clear of un-propped raised tailgate
Description ; To avoid injury stay clear of the machines un-propped tailgate
Manual No. ; 7
Order No. ; 819-209
Decal Name ; Attach support before entering hazardous area
Description ; To avoid injury attach suitable support before performing maintenance or entering hazardous areas
Manual No. ; 8
Order No. ; 819-203
Decal Name ; Stay clear of moving floor
Description ; Stay clear of moving floor when in operation, a crush zone between chassis and moving floor may cause crush related injury.
Manual No. ; 9
Order No. ; 819-2

Operation Manual
20150930_Kompactor Operation Manual 13
Decal Name ; Do not ride on platform or ladder
Description ; Do not ride on platform or ladder when the machine is in operation
Manual No. ; 10
Order No. ; 819-227
Decal Name ; Check wheel nuts and tyre pressure
Description ; A reminder to the operator to Check the tightness of wheel nuts and tyre pressure regularly.
Manual No. ; 11
Order No. ; 819-2xx
Decal Name ; Machine Jacking Point
Description ; This is the location at which it is safest to raise and support the machine via a jack and axle stands.
Manual No. ; 12

Operation Manual
20150930_Kompactor Operation Manual 14
Order No. ; 819-2xy
Operation Manual
20150930_Kompactor Operation Manual 15
5. Safety
5.1. General Safety Precautions
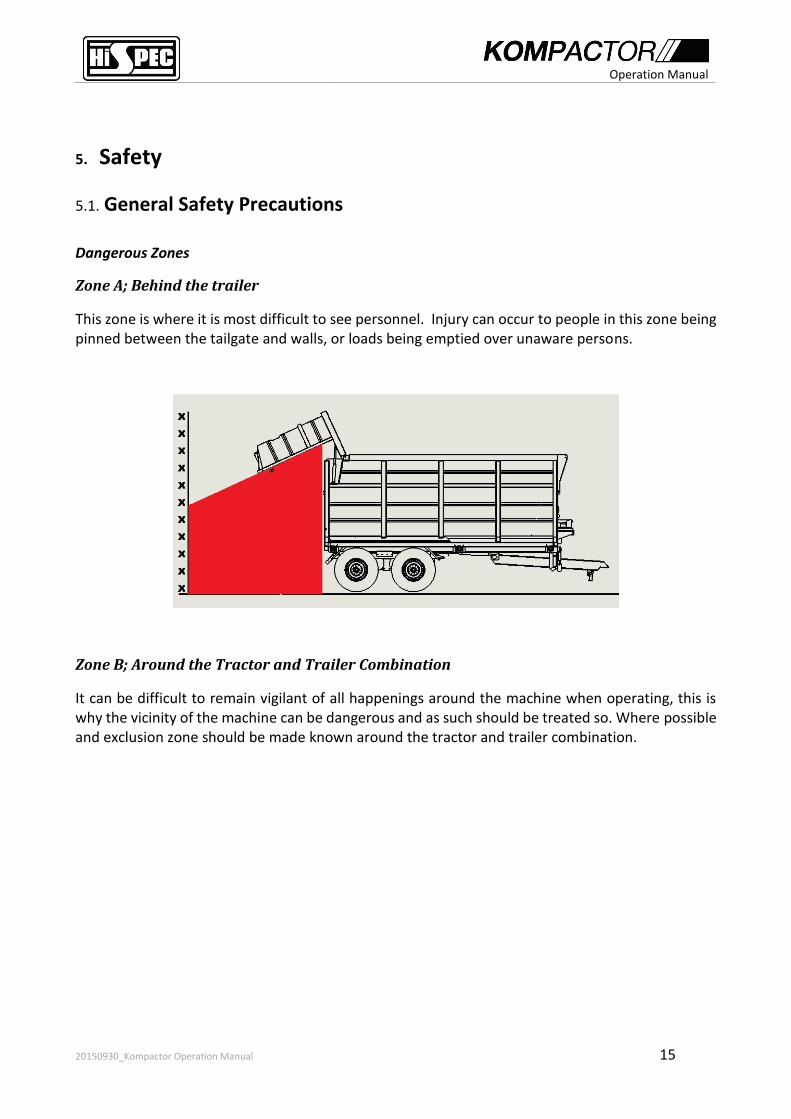
Dangerous Zones
Zone A; Behind the trailer
This zone is where it is most difficult to see personnel. Injury can occur to people in this zone being pinned between the tailgate and walls, or loads being emptied over unaware persons.
Zone B; Around the Tractor and Trailer Combination
It can be difficult to remain vigilant of all happenings around the machine when operating, this is why the vicinity of the machine can be dangerous and as such should be treated so. Where possible and exclusion zone should be made known around the tractor and trailer combination.

Operation Manual
20150930_Kompactor Operation Manual 16
5.2. General Safety Precautions (Continued)
• Keep a first-aid kit and a fire extinguisher close by at all times, if possible, on your tractor
with this operator instruction manual.
• Have an emergency plan.
• Keep all emergency numbers close by; write them into your manual.
• Inspect your machine carefully each time before use; this will only take a minute.
• Always check inside the machine before starting or filling it, to make certain it is empty.
• Stop & Park machine when leaving unattended.
• Children should never be in the area when your Kompactor is in operation.
• Using a Kompactor Trailer is a one-man operation therefore there should be no other
person(s) in the vicinity of the machine while in use.
• Remember that the first step to avoiding danger is to recognise the hazards.
5.3. Safety Check List
• Always disconnect all power sources before carrying out any adjustment or maintenance.
• Always check inside the machine to make sure it is empty.
• Always check around the machine making sure everything is in order; this will only take a
minute.
• Study this manual. Provide training to new users. Like all farm machinery, any machine is
potentially dangerous when under the control of untrained personnel.

Operation Manual
20150930_Kompactor Operation Manual 17
• Exercise extreme care when loading manure into the machine.
• Always ensure guards and other safety devices are kept in good working order. Replace if
necessary.
• Keep clear of all moving parts.
• Always use shear bolts recommended to you by HiSpec Engineering.
• Always keep all hydraulic hoses and electric cables clear from PTO shaft.
• Always apply the handbrake before unhitching and park the machine in a level area.
• Always use the ladder for inspecting inside the machine. Do not climb up the side of the
machine.
• Always take extra precautions when using the machine on hilly or sloping ground.
• Never permit young persons or spectators to operate equipment or stand anywhere close by
when the machine is in operation.
• Never permit untrained personnel to operate the machine without reading this manual and or
receiving training.
• Never operate the machine without having all guards in place; they are there for your safety
and protection against serious injury and death.

Operation Manual
20150930_Kompactor Operation Manual 18
5.4. Safety Decal Locations
5.4.1. Front
List of decals;
1; Read Operators Manual 1 5; Maintain a safe distance from the machine while in operatiion 2; Read Operators Manual 2 9; Stay clear of moving floor 3; Avoid risk from High Pressure Fluids 4; Danger due to high pressure fluids...
10; Do not ride on platform or ladder
1,2,3,4,5
9
10

Operation Manual
20150930_Kompactor Operation Manual 19
5.4.2. Side A / B
List of decals;
5; Maintain a safe distance from the machine while in operation 6; Stay clear of tailgate swing area while in operation 7; Stay clear of un-propped raised tailgate
8; Attach support before entering hazardous area 11; Check wheel nuts and tyre pressure ID Plate; HiSpec Identification plate
5 ,11
6,7,8
ID Plate

Operation Manual
20150930_Kompactor Operation Manual 20
6. Machine Overview
6.1. Machine Variations
The HiSpec Kompactor trailer range consists of 4 models; the K30, K33, K36 and K40
Standard Equipment includes;
▪ HiSpec Moving Headboard Mechanism ▪ HiSpec Locking Tailgate ▪ Tailgate Check Valves ▪ Hydraulically suspended Drawbar ▪ Cable Controlled Park Brake ▪ Hydraulic / Air Braking system ▪ Sprung Tandem Axle Running Gear (Tridem Std on K 40) ▪ Super Single Wheels / Tyres ▪ High Quality hydraulic components ▪ LED Lighting Package

Operation Manual
20150930_Kompactor Operation Manual 21
6.2. Machine Data Sheet

Operation Manual
20150930_Kompactor Operation Manual 22
6.3. Main Machine Parts
Front
a Top Support Member f Drawbar Stand b Hydraulic Hose Reel g Drawbar c Mid Support Member h Hydraulic / Air Connections d Moving Floor i Hydraulic Push-off Mechanisms e Hydraulic Suspension j Moving Headboard
a
c
j
b
i d
e
g
h
f

Operation Manual
20150930_Kompactor Operation Manual 23
Rear
a Contained Tailboard control d Standard Light board b Upper LED lights e Rear Bumper c Tailboard (with internal locks) f Standard Tandem Bogie
a
b
c
f e
d

Operation Manual
20150930_Kompactor Operation Manual 24
6.4. Optional Extras
a) Choice of Sliding Tandem K 33 and K 36 models
b) Choice of Tridem lift axle on K 40 models
c) Passive Steering Rear axle on Tandem models
d) Force Steering Front and Rear axle on Tridem models
e) Upgraded Wheels / Tyres (as shown in the product brochure)
f) Demountable Option on K 36 and K 40 models

Operation Manual
20150930_Kompactor Operation Manual 25
7. Emergency / Parking Brake
The Kompactor trailers are fitted with a breakaway system that comes into effect when the Air brake hoses become disconnected from the tractor, The loss of pressure causes the brakes to engage so as to prevent the trailer becoming a runaway.
The purpose of controlled repositioning of a parked trailer in a yard this function can be disengaged by activating the shunting valve.
The trailer is also supplied with a park brake consisting of a ratchet mechanism and wire rope connected to the axles park brakes. This wire rope should be tight enough so it will work effectively when the trailer is disconnected from the tractor, but loose enough that the handbrake is not been applied during normal operation.
Shunt Valve;
Parking Handbrake;
Ratchet Handle
Ratchet Lock
Ratchet Mechanism Cable to Axles
Engaged Disengaged

Operation Manual
20150930_Kompactor Operation Manual 26
Disengaging the Park handbrake
The handbrake is disengaged by following the steps below:
• Pull the handle towards the front of the trailer so the ratchet will disconnect itself from the
Ratchet teeth.
• Press down on the ratchet lock (pressing towards the ratchet mechanism)
• Push the handle back to its original off position.
WARNING: It is important to check that the handbrake be fully released when the trailer is in use. If the brake is left half applied it will cause damage to the trailers brakes.
Ratchet Lock
Ratchet Handle
Ratchet Mechanism

Operation Manual
20150930_Kompactor Operation Manual 27
8. Hydraulic Connections
a; Hydraulic Hose Colour Indicator c; Hydraulic Hose Stowage b; Air Hose Stowage
Connections
Green Tailgate open
Red Tailgate Close / Lock
Blue Floor Unload
Black Floor Reverse
Yellow (set) Auxiliary 1
White (set) Auxiliary 2
*Auxiliary 1 used for pressurising drawbar and the demount process, once set this can be left in
storage ports provided.
** Auxiliary 2 used for steering axle lock, and sliding bogie or lift axle.
a
b
c

Operation Manual
20150930_Kompactor Operation Manual 28

Operation Manual
20150930_Kompactor Operation Manual 29
9. Electrical Connections
Control box ;
a On / off switch
b Steering lock / axle control (slide / lift)
c Power Light (illuminated when powered on)
Connect to tractor using a Standard 12 volt plug,
a
c
b

Operation Manual
20150930_Kompactor Operation Manual 30
10. Wheel removal/refitting
Due to the size and weight of trailing agricultural machines special precautions must be adhered to when removing or replacing a tyre and wheel assembly.
Due to the risks involved, wheel removal MUST only be carried out by skilled trained personnel (i.e.
professional tyre fitter).
It is advised that before any work is carried out;
• If the machine is a hazard on a public road that suitable warning is provided to other road users;
• The machine is emptied and moved to a level area with good solid ground;
• The machine wheels are chocked and it is hitched to a tractor with its parking brake effectively engaged;
• A jacking / lifting / supporting position is chosen to maintain maximum machine stability;
• The load at the jacking / lifting point is known;
• The jacking / lifting equipment has sufficient lift capacity and is adequately maintained for the task;
• Ground conditions at the jacking point can withstand the loading;
• The hydraulics of any Forklift Truck / Telescopic Handler / etc, deployed are not solely relied upon while working in the danger zone;
• An adequately rated axle stand or other prop is positioned following the same safety procedure as for choosing the jacking point;
• There is no possibility of slippage between the safety prop (axle stand or other adequate strength support) and the machine;
• As far as possible those involved in the task stay clear of the danger zone (crush area if the machine were to collapse off its temporary support);
• Where possible, mechanical aids are used to lift / position wheels;
• High visibility clothing is worn where appropriate and where possible the work is carried out away from live traffic;
• Please consult your local HiSpec dealer or contact HiSpec Engineering Ltd directly if there are any queries.
Jacking Points
• Jacking points are provided at the rear of the machine as indicated by this symbol.
• Trailer must be empty before jacking
• Jacking and wheel removal must only be carried out by skilled trained personnel (i.e. professional tyre fitter).

Operation Manual
20150930_Kompactor Operation Manual 31
11. Tractor Requirements
Kompactor Requirements
Model / Requirements
K30 K 33 K 36 K 40
Min Hp (Kw) 110 (82) 140 (90) 160 (105) 160 (120)
Max Hyd Pressure (bar)
200 200 200 200
Hydraulic Connection *
2/3 x DA Spool 2 / 3 x - DA Spools
3 / 4 x - DA Spools
3 / 4 x - DA Spools
Electrical Connections
7 Pin Light Socket 7 Pin Light Socket / 9 Volt Control
box
7 Pin Light Socket / 9 Volt Control
box
7 Pin Light Socket / 9 Volt Control
box Brake Connection
Hydraulic / Air Hydraulic / Air Hydraulic / Air Hydraulic / Air
Max Km/Hr 40 / 60 40 / 60 40 / 60 40 / 60
* depending on optional equipment added to machine

Operation Manual
20150930_Kompactor Operation Manual 32
12. Connection to Tractor
▪ Connection of the trailer to the tractor and use of the combination should only be carried out by
competent users who have read this manual and been trained in the use of the machine.
▪ Ensure work area is clear of non-essential personnel,
▪ Ensure Trailer Park Brake is engaged and wheel chocks are in place,
▪ Perform a visual inspection of the machine (Include Hydraulic lines, Air lines, Grease Points, Nuts & Bolts, and Wheel Studs)
▪ Ensure Trailer Hitch is not excessively worn,
▪ Ensure Tractor Hitch is also not excessively worn.
▪ Hitch the Tractor to the Trailer,
▪ Ensure the Hitch is locked,
▪ Apply Tractor Handbrake,
▪ Raise Trailer Stand to the Stowage position,
▪ Connect the Trailer Braking system to the Tractor
(Single Hydraulic pipe or Double Air pipe supply),
▪ Connect the Hydraulic Connections as shown in (fig...) (2 Connections for Headboard)
(2 Connections for Tailgate)
(2 Connections for AUX (Where Applicable))
▪ Connect the Electrical Connections (Trailer Lighting Connections)
(Control Box Connection (9 volt) (Where Applicable)
▪ Test Trailer Brakes, (An additional person may be required for this operation) (Some Tractors may require disengagement of the handbrake for this operation) (Disengagement of the Trailer park brake is required)
▪ Reapply Tractor Handbrake and Trailer Park Brake,
▪ Test Hydraulic Functions of the Machine; (Proper Headboard Movement) (Proper Tailgate Movement & Locking) (Passive Steering Lock & Unlock where applicable) (Lift axle functions where applicable)
▪ Connect Forced Steering Setup as Shown in (fig...) ( Where applicable),
▪ Check Wheel Nuts and Tyre Pressures (Dependant on Tyre Choice),
▪ Ensure free movement of all moving parts,
▪ Disengage Trailer Park Brake,
▪ Remove Wheel Chocks
▪ Perform Final Test of Trailer Functions in a controlled area (Trailer movement,) (Trailer Braking) (Trailer steering where applicable)
▪ Ensure Tractor Link arms do not contact trailer drawbar or hydraulic / air hoses

Operation Manual
20150930_Kompactor Operation Manual 33
13. Road Transport
Operators must take care to operate to the road rules and regulations relating to their locality. Always thinking of what may be ahead and behind. Local weights and speed limitations must be adhered to. Operators should also ensure that;
▪ The machine is only operated by competent personnel. It should only be used on public roads by persons legally allowed to do so.
▪ Weights do not exceed that of the manufacturers' specifications or that allowable by law in region of use.
▪ Speeds do not exceed that of the manufacturers' specifications or that allowable by law in region of use.
▪ On Trailers equipped with passive steering axles, the axles should be locked when travelling at speeds exceeding 15 Km/Hr.
▪ Before travelling on a public road the operator must ensure that the trailer lights are connected and working. Warning lights (flashing amber beacons) should be mounted and used where necessary.
▪ Extra care should be taken on narrow roads. ▪ Do not operate when fatigued. ▪ Do not use mobile devices while operating the machine.

Operation Manual
20150930_Kompactor Operation Manual 34
14. Operating Procedures
14.1. Filling or 'In The Field' Operating Instructions
▪ Ensure the trailers tailgate is closed and locked correctly before field operations. ▪ Maintain a safe distance from other machinery operating in the area, ▪ Treat slopes with respect, lock steering axles on slopes ▪ Ensure the trailer has a load of 50% before compacting material. ▪ Only compact the load using the machines moving headboard mechanism ▪ Whilst compacting the load you may continue to load the rear of the trailer, ▪ Once you have compacted the load return the headboard to the front of the trailer and fill
the front, ▪ Repeat the process as necessary, ▪ Load the trailer evenly ▪ Do not overload the trailer ▪ Use the steering axles when turning on headlands to avoid excess wear on running gear and
the field surface. ▪ Drive in a manner that suits the ground conditions ▪ Beware of over head electrical wires
14.2. 'In The Yard' Operating Instructions
1. Ensure Operating area is clear of obstructions and non essential persons 2. Check for any height restrictive obstacle's 3. Be aware of the maximum height of the machine (with the tailgate open) 4. Ensure the operating area has a firm grounding suitable to carry the gross weight of both
fully laden trailer and tractor combination. 5. Be aware of overhead power lines 6. Where applicable use Steering axles when manoeuvring in the operating area, locking the
axles when reversing 7. Position the rear of the trailer at the point of unloading, with a clear path for exit in front of
the combination, 8. Check crush zones before opening tailgate 9. Open Tailgate fully 10. Use the headboard mechanism to push the load out the rear of the trailer, 11. Move Trailer forward as required while unloading 12. Ensure the crush zones remain clear 13. Retract headboard mechanism at least 50% of the trailers length 14. Close the tailgate 15. Ensure tailgate is locked.

Operation Manual
20150930_Kompactor Operation Manual 35
14.3. Tailgate Operation
Before operating the tailgate insure that the operating area is cleared of all personnel and that there are no obstructions to the closing or opening functions of the tailgate.
Insure that both the tailgate hydraulic lines (Green and Red tags) are connected to the same set of double acting spool valve on the tractor.
To Open the Tailgate;
• Ensure operating area is clear,
• Activate the 'Green' Line to unlock the tailgate,
• Keep the 'Green' Line activated to open the tailgate to the fully open point.
To Close and Lock the Tailgate
• Ensure operating area is clear,
• Activate the 'Red' line to shut the tailgate
• Continue to operate the 'Red' line to Lock the tailgate
Due to the addition of check valves to the tailgate hydraulic circuit the tailgate will fail to close when activating the red line if both the Red and Green lines are not connected.
14.4. Moving Floor Operation
Before operating the moving floor mechanism ensure operating area is clear of all personnel and obstructions. Insure both moving floor mechanisms hydraulic lines are connected (Blue and Black tags) to the same set of double acting spool valves on the tractor
When Compacting the Load
• Ensure the tailgate is closed and locked,
• Ensure that the trailer is loaded to approximately 50% standard capacity,
• Activate the 'Blue' line to move the floor and headboard rearwards,
• Keep the 'Blue' line activated to Compact the load against the rear door,(levels of compaction will vary depending on crop.)
• The system is fitted with a hydraulic relief valve to prevent over pressurising the load and tailgate, this must not be tampered with.
• When finished compacting activate the 'Black' line to return the floor and headboard mechanism to the front of the trailer.
• Repeat the compaction process as necessary.

Operation Manual
20150930_Kompactor Operation Manual 36
When Emptying the Trailer
• Ensure area is emptying area is sufficient to support the weight of the combination,
• Ensure operating area is clear of personnel and obstructions,
• Ensure clear exiting area,
• Unlock and fully Open the tailgate,
• Actuate the 'Blue' line and push the load from the trailer body
• 'Inch' the tractor trailer combination forward as necessary to facilitate unloading
• Once fully unloaded activate the 'Black' line to return the floor and headboard mechanism to the front position
• The tailgate can be closed and locked once the floor and headboard mechanism has returned 25% to the frontward position
• Return the headboard full to the front of the trailer and deactivate the Headboard and tailgate hydraulic circuits.

Operation Manual
20150930_Kompactor Operation Manual 37
14.5. Sliding Axle Operation
This operation is used to reduce compaction on fields via evenly distributing the trailers weight. To achieve this, the axle bogie moves fore and aft. When the axles are in the forward position the trailer takes most of the loads weight, when extra grip is needed in field the axles can be pushed to the rear.
Beware having the axles forward also increases tail swing of the trailer, extra care should be taken due to this.
It is advised that for road work the axles are moved rearwards so a balance is found that places weight on the tractors drawbar, and so as to avoid an excessive tail swing.
The sliding bogie is operated via;
• turning on the electrical control box
• Selecting axle control
• Pressurising the auxiliary 2 hydraulic circuit in the required direction.
Axles in the rearward position Axles in the forward position

Operation Manual
20150930_Kompactor Operation Manual 38
14.6. Passive Steering Axle Operation
This feature allows for easy turning of a tandem axle unit, this reduces wear and drag on tyres, and also reduces damage to field headlands,
This feature should only be used at low speeds (under 15 Km/hr)
To insure this, the operator must lock the axle. The axle is locked hydraulically via;
• Switching the electrical control box on.
• Selecting the steering lock function,
• Pressurising the auxiliary 2 hydraulic circuit.
This operation should only be carried out when the trailer is moving and in a straight, forward
direction.
The feature is unlocked by following steps 1 and 2 and then depressurising the auxiliary 2 hydraulic circuit.

Operation Manual
20150930_Kompactor Operation Manual 39
14.7. Forced Steering Axle Operation
This feature allows for easy turning of a tri-axle unit, this reduces wear and drag on tyres, and also reduces damage to field headlands,
To fit this option to the trailer and the trailer to function the tractors hitch may have to be modified to suit the coupling system
This is a constant operation and care should be taken when travelling at high speeds.
Before operating the machine tracking should be set.
This should be carried out by qualified professionals with experience
To do so, carry out the following procedure;
• Connect tractor and trailer in a straight line, check this via a fixed reference point (e.g. distance between centre axle of trailer and rear axle of tractor on both sides)
• Visually inspect the axles wheels,
• If out of line check that the axles hydraulic cylinders are set correctly
• If cylinders are correct, check track rods alignment and set accordingly
Forced Steering Axles Drawbar Setup

Operation Manual
20150930_Kompactor Operation Manual 40
14.8. Lift Axle Operation
This operation is used to reduce compaction on fields via evenly distributing the trailers weight. To achieve this, the front axle is lowered. When the axle is in the lowered position the trailer takes most of the loads weight, when extra grip is needed in field the axle can be raised.
The axles should remain in the lowered position when travelling with a loaded trailer exceeding the gross weight of 23000 kg, the front axle may be lifted when travelling empty or with a load not exceeding 23000kg, this can reduce tyre wear significantly
The lift axle is operated via:
• Switching the electrical control box on
• Selecting Axle control
• Pressurising the Auxiliary 2 hydraulic circuit in the required direction.

Operation Manual
20150930_Kompactor Operation Manual 41
14.9. 'Demounting' Operating Procedure
▪ Ensure Operating area is clear of obstructions and non-essential persons (1 extra person may be required to help in this operation) (a)
▪ Ensure Body storage area is level (a)
▪ Park Trailer in the allocated area. (a) ▪ Ensure the body is empty. (a)
(a)
▪ Make sure that steering axles are locked and that the tractor is facing straight (a)
▪ Ensure the Tailgate is locked, and moving floor and headboard are fully forward. (a)
▪ Open all twist locks using the spanner provided. (h)
▪ Disconnect all electrical and hydraulic connections between the chassis and body.
▪ Ensure the body is free to rise off the chassis.
▪ Activate the switch for moving the ‘Lift’ cylinders. Engage tractor spool to lift the body. NOTE: The body may not rise evenly. This is not a concern so long as the dismount area is level and the body is completely empty.
▪ Insert Rear legs fully, (d) (e)
▪ Insert front legs fully, (g)
NOTE: The drawbar lifting function can be used to aim the demounting if required.
(b)

Operation Manual
20150930_Kompactor Operation Manual 42
(c)
(d)
▪ Inspect the Legs, and body
▪ Lower the lifting rams using the tractor hydraulics. Ensure all rams are fully retracted.
(e)
▪ Slowly move the chassis forward ensuring not to catch the trailer body (j,k,l)
▪ Once the chassis is clear, cordon off the body area.
(f)
(g)
(h)

Operation Manual
20150930_Kompactor Operation Manual 43
14.10. Mounting the trailer body
▪ This is the reverse to the demounting operation.
▪ Ensure Operating area is clear of obstructions and non essential persons (1 extra person may
be required to help in this operation)
▪ Position the tractor and trailer directly in front of the trailer body.
▪ Make sure that steering axles are locked and that the tractor is facing straight
▪ Ensure lifting rams are fully retracted
▪ Slowly Reverse the chassis under the centre of the body, keeping the chassis as close to
central as possible,
▪ Slowly reverse into position
▪ Ensure that the 4 lifting cylinder align with the bracket on the trailer
▪ Raise the lifting cylinders. Ensure they are raised fully and the body is resting correctly on
the lifting pin
▪ Remove the front legs & rear legs
▪ Lower the lifting cylinders
▪ Lock twists lock couplers into place and tighten using the spanner supplied
▪ Connect the hydraulic and electrical connections to the body,
▪ Test the functions of the machine
▪
NOTE
Check tightness of twist locks daily

Operation Manual
20150930_Kompactor Operation Manual 44
15. Maintenance, Cleaning & Storage
15.1. Warning!
Installing, doing periodical maintenance and performing repairs may only be done by technically skilled person unless otherwise indicated.
When repairing, maintaining and cleaning always shut down the motor, remove ignition key and carefully observe the instructions in the
manual.
Always use the correct tools and wear gloves when performing any maintenance. If working on a hoisted machine always ensure adequate
support.
Damage, including damage caused by insufficient greasing, is not covered by the warranty.
When servicing Hydraulic components always ensure that any waste oil is properly disposed off according to the local environmental laws.
After the first hour operating, tighten wheel nuts and check around machine for any problems
If there is a problem with the machine contact your local HiSpec Dealer or HiSpec Engineering Ltd directly.

Operation Manual
20150930_Kompactor Operation Manual 45
15.2. General Precautions
• Learn how to service your machine correctly
• Follow the correct maintenance and inspection procedures shown in this manual
• Inspect the machine daily before use.
• Visual inspection should include components of the hydraulic and air systems, axle
components, body and chassis structural components, and general nuts and bolts. These
should be checked for excessive wear, cracks, and proper fitting.
• Check for loose or missing parts
• Always de-pressurise hydraulic system, park and switch off tractor before carrying out
maintenance.
• Never operate machine without safety guards in position.
• Ensure Tailgate is adequately Propped before attempting entering the rear of the trailer, or
performing maintenance under an open tailgate
During operation, some parts of the hydraulic system can become hot;
allow the machine to cool down before beginning inspection or
maintenance procedures.

Operation Manual
20150930_Kompactor Operation Manual 46
15.3. Daily Checks / Maintenance
• Check tightness of wheel nuts,
• Check tyre pressures,
• Check wear on axles/tyres
• Check Drawbar wearing parts ; toeing eye, pivot point, suspension parts
• Check suspension pressure
• For demountable bodies check twist lock tightness
• Ensure all safety decals are in good condition and clearly legible, replace as required.
15.4. 25 hour Checks / Maintenance
• Grease all points
• Ensure correct torque on all axle u-bolts
o Spring over axle = 540 Nm
o Spring under axle = 640 Nm
• Check Hydraulic components and hoses for wear, leakage, and damage. Replace damaged
parts
• Check Headboard and Moving floor Rubber seals, Adjust and Replace as necessary
• Inspect Nylon wear plates, Replace as necessary
• Inspect Headboard Nuts and Bolts, Tighten and Replace as necessary
• Check wear on tailgate locking system.
• Check for water in brake air tanks, remove accordingly.
• Check Headboard / Moving floor movement, Ensure full free travel, adjust accordingly
15.5. 6 Month Checks / Maintenance
• Inspect Axles, and Axle wearing parts bearing etc., adjust and replace as necessary
• inspect brake shoes, discs and pads, replace where necessary
• Remove old grease from hubcap and replace

Operation Manual
20150930_Kompactor Operation Manual 47
15.6. Bolt Tightening Torques
Bolt Tightening Torques (8.8 quality bolts)
Thread Dimension Spanner Size (mm) Tightening Moment (Nm)
M8 13 24
M10 17 48
M12 19 85
M14 22 135
M16 24 210
M18 27 290
M20 30 400
M22 34 550
M24 36 700
15.7. Tyre Options
The initial Tyre options for the Kompactor trailers are;
Brand Size Pattern Rating Dimensions (mm)
Advised Pressure
BKT 600/55 - 22.5 Ridemax FL693 159D / 156E
Dia. 1172 x 600mm
4.0
Barkley (brand may differ)
445/65 - 22.5 BL606 169J Dia. 1150 x 445mm
6.0
due to the range of speeds of current tractors from 30 kph to 60 kph tyres should be set to tyre manufactures specifications that best suit your requirements.

Operation Manual
20150930_Kompactor Operation Manual 48
15.8. Wearing Parts
While HiSpec has done its upmost to reduce the amount of wearing parts in this machine some still remain, these include;
• Nylon wear pads
• Rubber sealing strips
• General Hydraulic fittings
• Axle wearing parts
• General Nuts and bolts
A full parts list is available from HiSpec, as are all wearing parts. It is suggested to use genuine HiSpec parts as not doing so may void warranty.
15.9. Replacing Nylon Strips
To replace nylon strips it may be necessary to remove the headboard mechanism from the trailer body. This should only be carried out by competent persons, and with machinery with the appropriate lifting capacity.
• Extend the headboard rearwards by approximately half the trailer length,
• Unbolt the main hydraulic cylinder from the moving floor,
• Retract the main cylinder and remove from the trailer. Capping all hydraulic connections and
hoses
• Unbolt the tandem cylinder between the moving floor and headboard.
• Disconnect the hydraulic connections and cap them,
• Remove tandem cylinder.
• Clamp headboard in position securely.
• Perform a 'test' lift from lifting point in the middle of the headboard top rail, this is to find
centre of gravity and prevent mechanism rotating.
• Move the headboard along the moving floor and clamp in appropriate place.
• Remove the trailer front cross members
• Slowly manoeuvre the headboard mechanism to the front of the trailer,
• Lift the mechanism over the front cylinder mount and remove it from the trailer.
• Place the mechanism on suitable supports (timber chocks),
• Unclamp the headboard and manoeuvre it off the back of the moving floor.
• Change the headboard nylons
• Lift the moving floor onto suitable supports and change the associated nylon strips.
• Reassemble the headboard onto the moving floor and clamp securely in the appropriate
position.
• Slowly Lift the assembly back into the trailer body
• Reassemble the front trailer supports
• Reassemble hydraulic components
• Test functionality of the unit.

Operation Manual
20150930_Kompactor Operation Manual 49
15.10. Grease Points
Grease Point Location No. Of Points
A Axles 16 *
B Drawbar 14
C Tailgate 6
* Depending on Number of axles and choice of steering / standard axles (20 steering rear, 30 tri
axle steering front and rear)
A
B
C

Operation Manual
20150930_Kompactor Operation Manual 50
15.10.1. Grease Point A ; Axles
1 Steering Hub 6 Brake Outer Hub
2 Tie Rod 7 Brake Connector Rod
3 Brake Inner Hub 8 Brake Inner Hub
4 Brake Connector Rod 9 Axle Hub
5 Brake Outer Hub
1
2
3
4 5
6
7
8
9

Operation Manual
20150930_Kompactor Operation Manual 51
15.10.2. Grease Point B ; Drawbar
1 Toeing Eye 5 Drawbar Lateral Support
2 Drawbar Pulling Pin 6 Drawbar Suspension Upper Pin
3 Drawbar Lateral Support 7 Drawbar Suspension Lower Pin
4 Drawbar Lateral Support
2
1
3
4
5
6
7

Operation Manual
20150930_Kompactor Operation Manual 52
15.10.3. Grease Point C ; Tailgate
1 Tailgate Sliding Hinge 3 Tailgate Cylinder Lower Pin
2 Tailgate Cylinder Upper Pin
1
2
3
Operation Manual
20150930_Kompactor Operation Manual 53
15.11. Cleaning & Storage
Cleaning
It is important to regularly clean the machine, this helps locate areas of required maintenance, prolongs the lifetime of the machine, and helps stop cross contamination of fields / farms.
At the end of a season the trailer body and chassis should be thoroughly cleaned, removing all materials, muck, grease and dust.
To clean the inside of the body;
• Move The headboard mechanism to the front of the trailer,
• Prop the tailgate,
• enter the body
• remove material from the headboard, floor and sides and brush them out or the rear
ensuring to dispose of them correctly,
• Exit the body
• Keep the Tailgate open and move the Headboard Mechanism to the rear of the trailer
• Clean the exposed chassis and front half of the trailer
• Return the headboard to the front of the trailer and close the tailgate.
Clean the underside of the body and the trailer chassis.
Prior to storage,
• Visually inspect the full trailer and replace any parts that are worn, broken or missing.
• replace any warning decals, and respray areas of worn paint
• Where possible coat the trailer with a light coating of oil to prevent rust and ceasing of
moving parts

Operation Manual
20150930_Kompactor Operation Manual 54
16. Notes

Operation Manual
20150930_Kompactor Operation Manual 55
17. Sales & Service
Ireland
Head Office;
HiSpec Engineering Ltd., Station Road, Bagenalstown, Co. Carlow, Ireland.
Tel ; +353 (0)59 972 19 29 Fax ; +353 (0)59 972 19 80
Email ; [email protected] or [email protected]
After Sales Service
Contact ; Eoin Keane; HiSpec Engineering Ltd. Tel ; +353 (0)87 256 29 63
Email ; [email protected]
Machine Servicing
Contact ; Michael Brennan ; HiSpec Engineering Ltd. Tel ; +353 (0)87 240 33 12
Spare Parts Store
Contact ; Michael Nolan or Terence Byrne , HiSpec Engineering Ltd.
Tel ; +353 (0)59 972 19 29 Fax ; +353 (0)59 972 19 80
Email ; [email protected]
UK
East & South East England
Contact ; Edward Lewis, HiSpec Engineering Ltd. Tel ; +44 (0)7876 452 698
Email ; [email protected]
Northern England & Scotland
Contact ; Gordon Brodie, HiSpec Engineering Ltd. Tel ; +44 (0) 7810 04 01 00
Email ; [email protected]
For Spare Parts
Contact your local HiSpec dealer. If you require a contact name and number you can telephone head office and we would be glad to assist you.

Operation Manual
20150930_Kompactor Operation Manual 56
18. Warranty
The following is a list of warranty terms. Warranty claims will be disallowed if they do not fall into the categories shown here.
Warranty Terms
Subject to condition of sale
12 months on all parts, excluding the below;
NO Warranty on the following:
▪ Hydraulic fittings
▪ Hydraulic hoses
▪ Electrical connections between machine and tractor
▪ Wearing parts as noted in section 15.8
NO Warranty allowed for breakdowns due to:
▪ Misuse of the machine, e.g. overloading by the operator
▪ Lack of maintenance, e.g. failure to carry out regular oiling and greasing of components and
bearings where appropriate, failure to replace wearing parts such as nylon strips.

Operation Manual
20150930_Kompactor Operation Manual 57
19. Conditions of Sale
General
In these conditions the word “Company” means HiSpec Engineering Limited. The word “dealer” means a customer of HiSpec Engineering Ltd. Purchasing machines from them for resale at recommended retail prices and the word “first user” means the first person to whom the dealer sells any goods for actual use. The company’s employees may negotiate orders and issue quotations but an order is only binding on a company when it has acknowledged the order in writing on the company’s official acknowledgement forms.
Such acknowledgement and confirmation will only be given subject to these conditions of sale. The acceptance of delivery of the goods either at the dealer’s premises or those of the first user if delivered direct to the first user shall bind the dealer and the dealer shall only sell to the first user on conditions which incorporate the company’s warranty. If he fails to sell the dealer shall have no claim whatsoever against the company except insofar as the company will honour the warranty to the dealer and through him to the first user. The term goods where used means such articles as are invoiced by the company whether manufactured, imported, distributed or otherwise sold by them.
Delivery
Should the company be prevented from delivering any goods owing to any lockout, strike, weather conditions, or other exceptional causes occurring either at their own premises, or elsewhere, then delivery shall be postponed until a reasonable time after the occurrence has seized to cause delay, unless the parties shall mutually serge to the cancellation of the contract in respect of such goods.
Cancellation of Orders
The only ground for acceptance of a cancellation of an order shall be the non acceptance of these terms and conditions by the dealer and then only if within seven days of receiving notification of the terms and conditions the dealer notifies the company in writing of its non-acceptance. The dealer pays the company any losses suffered included any carriage charges if these have been incurred.
Delays
While every effort has been made to adhere to delivery dates or times quoted by the company, such dates or times given though given in good faith are mere estimates only. The company accepts no responsibility for delay in delivery or for the consequences of such delay however caused nor shall the dealer be entitled to reject goods thereof by reason.

Operation Manual
20150930_Kompactor Operation Manual 58
Design
No responsibility is accepted for any deviation from drawings or from illustrations in catalogues, price lists, brochures or advertising material for discrepancies in weight, rated outputs. Performance from those mentioned here in which shall be treated as illustrative and approximate only.
Price
Any fluctuation in prices arising after the contract but before dispatch shall entail adjustment in the contract price and the price to be paid shall be fixed at the date of dispatch.
Damage, Shortage or Loss
The company do not accept any responsibility for any damage, shortage or loss in transit when goods are dispatched to instructions and where the transit is affected through a third party and not by the Company itself.
Conditions of Resale
The dealer shall only re-sell any of the company’s products with the full and unaltered warranty that is issued with every machine invoiced by the company. If the dealer either through negligence or for any other cause fails to get the agreement of the first user to accept this warranty the dealer shall have no other recourse against the company except that contained in these conditions of sale and he dealer expressly agrees that in accepting delivery he has recourse in law against the company nor will he join the company as third or other party in any action which results against him from the resale of the company’s products.
Warranty
The Company warrants its products through the dealer and through the dealer to the first user. The dealer shall only re-sell the company’s machines with the benefit of the company’s warrants. The said warranty is as follows:
The company warrants, subject as hereinafter provided, that all new goods supplied by it shall be free from defects in material and workmanship, its liability under such warranty being limited to making good at a factory to be nominated by it, such parts or parts which shall within six calendar months from the date which the product was delivered new to the retail purchaser be returned to the company or its authorised representative which the company is satisfied on its examination of the part or parts to have been defective in material or workmanship provided that. All replaced parts shall become the property of the company.
The foregoing warranty does not extend to any product which shall have been repaired, altered, neglected or used in any way so as, in the judgement of the company (whose decision is final) may have adversely affected its stability or reliability, nor does this warranty apply to proprietary articles, accessories or parts not manufactured by the company but where any such warranty is given by the manufacturers of such articles, accessories or parts any benefits under such warranty will be passed on by the company.

Operation Manual
20150930_Kompactor Operation Manual 59
The company will not be responsible for damage or loss caused by incorrect machine settings, ground speed or operation of the machine in unsuitable conditions and the company’s decision as to the suitability of the condition shall be final. Fair wear and tear is excluded from any claim and no responsibility whatsoever is accepted for damage, which in the company’s Opinion is caused by hazards of soil, stones of foreign objects.
The warranty is transferable to a second or subsequent owner (within the warranty period) subject to the company being notified in writing of this change of ownership.
Complaints referring to faulty or incomplete deliveries or to obvious faults must be notified to the dealer in writing within fourteen days after receipt of goods. In the absence of such notification delivery shall be considered as having been accepted as in good order and condition.
The company does not give any warranty in respect of its goods except therefore going Warranty which is given expressly in lieu of and excludes all other warranties and conditions expressed or implied whether under common law, Statue or otherwise and every form of liability for loss or damage direct or consequential or for any accidents resulting from defective material faulty workmanship or otherwise, is expressly excluded.
Liability
In no circumstances whatsoever shall the Company’s liability (in contract, tort or otherwise) to a buyer under, out of or in connection with this contract or the goods supplied exceed the invoice price of the particular goods in regard to which component is made.
Title of the Goods
The title in the goods shall not pass to the customer until the customer shall have discharged all sums due by the customer to the company at the date of the final handing over of the possessions of goods.
Interest
If the customer shall fail to pay any sum due in foot of this transaction within fourteen days after the same shall become due, the customer shall pay interest thereon calculated from the due date of payment at the annual rate equal to 4% over the prime rate charged from time to time by the associated banks on secured loans to individual customers.

Operation Manual
20150930_Kompactor Operation Manual 60
20. Registration Forms
HiSpec Engineering Ltd.
Station Rd., Bagenalstown,
Co. Carlow, Ireland
Tel: - 059 9721929
Fax: - 059 9721980
Please complete the following forms in full. The first is a warranty registration form; this form is issued in accordance with our conditions of sale and with particular reference to the condition governing warranty. We cannot process a claim unless all particulars are supplied.
The second is an acceptance form, which the purchaser is asked to sign to acknowledge he/she has received a copy of the Operator manual and full training for the machine purchased.
Please do not sign if you have not received both of these.
Warranty Registration
Machine Type Machine Model
Date of Purchase Serial Number
Purchasers Name Dealer's Name
Signature Signature
Address Address
Phone Phone
Training and Operator Manual Registration
Please sign the following declaration to state that you (the purchaser) received the appropriate Operators Manual and Training Instructions on the day of purchase of your HiSpec product.
I, the purchaser have received my HiSpec Operators Manual and training from the below dealer.
Purchaser Dealer
Signature Signature
Date Date
This copy is to be kept in your manual for your reference.

Operation Manual
20150930_Kompactor Operation Manual 61
21. Registration Forms
HiSpec Engineering Ltd.
Station Rd., Bagenalstown,
Co. Carlow, Ireland
Tel: - 059 9721929
Fax: - 059 9721980
Please complete the following forms in full. The first is a warranty registration form; this form is issued in accordance with our conditions of sale and with particular reference to the condition governing warranty. We cannot process a claim unless all particulars are supplied.
The second is an acceptance form, which the purchaser is asked to sign to acknowledge he/she has received a copy of the Operator manual and full training for the machine purchased.
Please do not sign if you have not received both of these.
Warranty Registration
Machine Type Machine Model
Date of Purchase Serial Number
Purchasers Name Dealer's Name
Signature Signature
Address Address
Phone Phone
Training and Operator Manual Registration
Please sign the following declaration to state that you (the purchaser) received the appropriate Operators Manual and Training Instructions on the day of purchase of your HiSpec product.
I, the purchaser have received my HiSpec Operators Manual and training from the below dealer.
Purchaser Dealer
Signature Signature
Date Date

Operation Manual
20150930_Kompactor Operation Manual 62
This copy is to be posted to HiSpec Engineering or given to your dealer

Operation Manual
20150930_Kompactor Operation Manual 63
22. Declaration of Conformity
Applied Directive(s);
• EC Machinery Directive - 2006/42/EC
We hereby certify that the machinery stipulated below complies with all relevant provisions of the EC Machinery Directive and the National Laws and Regulations adopting this Directive.
Modifications to the machine without prior approval from the undersigned will render this declaration null and void.
Manufacture HiSpec Engineering Ltd.
Machine Kompactor
Model(s) 'K30' to 'K40'
Serial Number ________________________________
Manufacture's Address ; Station Road, Bagenalstown, Co. Carlow, Ireland.
Machine Description;
The Kompactor is a 'Push-Off' type agricultural trailer, to be used in combination with an agricultural tractor, for the transport of low density materials such as; Grass forage, Compost, Wood Shavings, etc.
Applied Harmonised Standards;
• EN ISO 12100 : 2010 ; General Principles for Design - Risk Assessment and Risk Reduction.
• EN ISO 4254 - 1: 2013 ; Agricultural Machinery - Safety - Part 1 General Safety.
• EN ISO 14121-1:2007, Safety of Machinery – Principle of Risk Assessment
• EN 842:1996 + A1: 2008 ; Safety of Machinery - Visual Danger Signals - General Requirements, Design and Testing.
Signed
Name
Date
Position
Being the responsible person appointed by the manufacturer

Operation Manual
20150930_Kompactor Operation Manual 64
HiSpec Engineering reserves the right to make changes and improvements at any time without incurring any obligation to make such changes on products previously sold.

Operation Manual
20150930_Kompactor Operation Manual 65