hitachi infrastructure director user guide · pdf file1 mb 1,024 kb or 1,0242 bytes 1 gb 1,024...
TRANSCRIPT
Hitachi Infrastructure DirectorUser Guide
MK-94HID004-01
© 2015 Hitachi, Ltd. All rights reserved.
No part of this publication may be reproduced or transmitted in any form or by anymeans, electronic or mechanical, including photocopying and recording, or stored in adatabase or retrieval system for any purpose without the express written permission ofHitachi, Ltd.
Hitachi, Ltd., reserves the right to make changes to this document at any time withoutnotice and assumes no responsibility for its use. This document contains the mostcurrent information available at the time of publication. When new or revised informationbecomes available, this entire document will be updated and distributed to all registeredusers.
Some of the features described in this document might not be currently available. Referto the most recent product announcement for information about feature and productavailability, or contact Hitachi Data Systems Corporation at https://support.hds.com/en_us/contact-us.html.
Notice: Hitachi, Ltd., products and services can be ordered only under the terms andconditions of the applicable Hitachi Data Systems Corporation agreements. The use ofHitachi, Ltd., products is governed by the terms of your agreements with Hitachi DataSystems Corporation.
By using this software, you agree that you are responsible for:1. Acquiring the relevant consents as may be required under local privacy laws or
otherwise from employees and other individuals to access relevant data; and2. Verifying that data continues to be held, retrieved, deleted, or otherwise processed
in accordance with relevant laws.
EXPORT CONTROLS - Licensee will comply fully with all applicable export laws andregulations of the United States and other countries, and Licensee shall not export, orallow the export or re-export of, the API in violation of any such laws or regulations. Bydownloading or using the API, Licensee agrees to the foregoing and represents andwarrants that Licensee is not located in, under the control of, or a national or resident ofany embargoed or restricted country.
Hitachi is a registered trademark of Hitachi, Ltd., in the United States and othercountries. Hitachi Data Systems is a registered trademark and service mark of Hitachi,Ltd., in the United States and other countries.
Archivas, Essential NAS Platform, HiCommand, Hi-Track, ShadowImage, Tagmaserve,Tagmasoft, Tagmasolve, Tagmastore, TrueCopy, Universal Star Network, and UniversalStorage Platform are registered trademarks of Hitachi Data Systems.
All other trademarks, service marks, and company names in this document or web siteare properties of their respective owners.
2Hitachi Infrastructure Director User Guide
Contents
User guide abstract........................................................................... 0
Preface................................................................................................. 5Intended Audience...................................................................................................6Product version........................................................................................................6Document conventions............................................................................................. 6Conventions for storage capacity values.....................................................................7Accessing product documentation............................................................................. 8Getting help.............................................................................................................8Comments...............................................................................................................8
1 Getting started...................................................................................... 9Overview of Infrastructure Director..........................................................................10
Configuring block storage and file storage.......................................................... 10Dashboard....................................................................................................... 11
Analyzing data in the dashboard...................................................................13Inventory and resource information................................................................... 15
Onboarding a block storage system workflow...........................................................16Configuring a storage system workflow....................................................................16Creating and attaching volumes to servers workflow.................................................17
2 Configure block storage........................................................................19Adding a block storage system................................................................................20Verifying storage system initial settings....................................................................21Enabling port security.............................................................................................22Adding a fabric switch............................................................................................ 23
Supported fabric switch models......................................................................... 24Creating parity groups ........................................................................................... 24
Creating parity groups, basic method................................................................. 26Creating parity groups or hot spares, advanced method...................................... 27Managing free and spare disks...........................................................................29Parity groups inventory..................................................................................... 29
Creating a pool...................................................................................................... 30
3Hitachi Infrastructure Director User Guide
Creating a pool, basic method........................................................................... 31Creating a pool, advanced method.....................................................................33How Infrastructure Director calculates pool sizes for the basic method of poolcreation........................................................................................................... 35Pools inventory.................................................................................................35Pool details...................................................................................................... 36
Create and attach volumes to servers...................................................................... 37Creating volumes to attach to servers................................................................ 37Attaching volumes to servers.............................................................................39
Managing storage systems......................................................................................40Storage system inventory.................................................................................. 40Updating a storage system................................................................................ 45
Managing servers...................................................................................................45Adding servers................................................................................................. 45Server inventory............................................................................................... 46Server details................................................................................................... 46Updating a server............................................................................................. 47
Managing volumes................................................................................................. 48Creating volumes..............................................................................................48Attaching existing volumes to a server............................................................... 49Update a volume.............................................................................................. 50Volumes inventory............................................................................................ 51Volume details..................................................................................................52
3 Protect data........................................................................................ 53Protecting volumes by cloning.................................................................................55Protecting volumes by creating snapshots................................................................55Suspend, resume, restore, and unprotect.................................................................56
4 Monitor block storage...........................................................................59Monitoring capacity................................................................................................ 60Monitoring hardware.............................................................................................. 61Monitoring data protection......................................................................................62Monitoring jobs......................................................................................................63Setting up to receive SNMP alerts............................................................................64
5 Administer Infrastructure Director......................................................... 67Administering security............................................................................................ 68
Adding an account domain................................................................................ 68Assigning user roles..........................................................................................69
Backup and restore system settings.........................................................................70System settings included in backup....................................................................70
Downloading the system log file..............................................................................71
Index..................................................................................................73
4Hitachi Infrastructure Director User Guide
PrefaceHitachi Infrastructure Director is an infrastructure management solution thatunifies storage management solutions such as storage provisioning, dataprotection, and storage management; simplifies the management of largescale data centers by providing smarter software services; and is extensibleto provide better programmability and better control.
□ Intended Audience
□ Product version
□ Document conventions
□ Conventions for storage capacity values
□ Accessing product documentation
□ Getting help
□ Comments
Preface 5Hitachi Infrastructure Director User Guide
Intended Audience
This document is intended for system administrators, Hitachi Data Systemsrepresentatives, and authorized service providers who configure and operatethe Hitachi Virtual Storage Platform G200, G400, G600, G800 storagesystems with Hitachi Infrastructure Director.
Readers of this document should be familiar with the following:• RAID storage systems and their basic functions.• Volume creation and management.• Pool creation and management.• Parity group creation and management.
Product version
This document revision applies to Hitachi Infrastructure Director version 1.1.0or later.
Document conventionsThis document uses the following typographic conventions:
Convention Description
Bold Indicates text on a window, other than the window title, including menus,menu options, buttons, fields, and labels. Example: Click OK.
Italic Indicates a variable, which is a placeholder for actual text provided by theuser or system. Example: copy source-file target-file
Note: Angled brackets (< >) are also used to indicate variables.
Monospace Indicates text that is displayed on screen or entered by the user. Example:pairdisplay -g oradb
< > angled brackets Indicates a variable, which is a placeholder for actual text provided by theuser or system. Example: pairdisplay -g <group>
Note: Italic font is also used to indicate variables.
[ ] square brackets Indicates optional values. Example: [ a | b ] indicates that you can choose a,b, or nothing.
{ } braces Indicates required or expected values. Example: { a | b } indicates that youmust choose either a or b.
| vertical bar Indicates that you have a choice between two or more options or arguments.Examples:
[ a | b ] indicates that you can choose a, b, or nothing.
{ a | b } indicates that you must choose either a or b.
6 PrefaceHitachi Infrastructure Director User Guide
This document uses the following icons to draw attention to information:
Icon Label Description
Note Calls attention to important or additional information.
Tip Provides helpful information, guidelines, or suggestions for performingtasks more effectively.
Caution Warns the user of adverse conditions or consequences (for example,disruptive operations).
WARNING Warns the user of severe conditions or consequences (for example,destructive operations).
Conventions for storage capacity valuesPhysical storage capacity values (for example, disk drive capacity) arecalculated based on the following values:
Physical capacity unit Value
1 kilobyte (KB) 1,000 (10 3) bytes
1 megabyte (MB) 1,000 KB or 1,0002 bytes
1 gigabyte (GB) 1,000 MB or 1,0003 bytes
1 terabyte (TB) 1,000 GB or 1,0004 bytes
1 petabyte (PB) 1,000 TB or 1,0005 bytes
1 exabyte (EB) 1,000 PB or 1,0006 bytes
Logical storage capacity values (for example, logical device capacity) arecalculated based on the following values:
Logical capacity unit Value
1 block 512 bytes
1 cylinder Mainframe: 870 KB
Open-systems:• OPEN-V: 960 KB• Others: 720 KB
1 KB 1,024 (210) bytes
1 MB 1,024 KB or 1,0242 bytes
1 GB 1,024 MB or 1,0243 bytes
1 TB 1,024 GB or 1,0244 bytes
1 PB 1,024 TB or 1,0245 bytes
Preface 7Hitachi Infrastructure Director User Guide
Logical capacity unit Value
1 EB 1,024 PB or 1,0246 bytes
Accessing product documentationProduct documentation is available on Hitachi Data Systems SupportConnect: https://support.hds.com/en_us/documents.html. Check this site forthe most current documentation, including important updates that may havebeen made after the release of the product.
Getting helpHitachi Data Systems Support Connect is the destination for technical supportof products and solutions sold by Hitachi Data Systems. To contact technicalsupport, log on to Hitachi Data Systems Support Connect for contactinformation: https://support.hds.com/en_us/contact-us.html.
Hitachi Data Systems Community is a global online community for HDScustomers, partners, independent software vendors, employees, andprospects. It is the destination to get answers, discover insights, and makeconnections. Join the conversation today! Go to community.hds.com,register, and complete your profile.
CommentsPlease send us your comments on this document to [email protected] the document title and number, including the revision level (forexample, -07), and refer to specific sections and paragraphs wheneverpossible. All comments become the property of Hitachi Data SystemsCorporation.
Thank you!
8 PrefaceHitachi Infrastructure Director User Guide
1Getting started
Hitachi Infrastructure Director is a unified software management tool thatreduces the complexity of managing storage systems by simplifying thesetup, management, and maintenance of storage resources.
"Get Started with Hitachi Infrastructure Director"
This video provides guidance to configure a storage system by providing astep-by-step workflow instruction with guided steps and UI transitionsexplaining each step.
You can review the following to gain an understanding of InfrastructureDirector concepts:
□ Overview of Infrastructure Director
□ Onboarding a block storage system workflow
□ Configuring a storage system workflow
□ Creating and attaching volumes to servers workflow
Getting started 9Hitachi Infrastructure Director User Guide

Overview of Infrastructure DirectorHitachi Infrastructure Director is a unified software management tool thatreduces the complexity of managing storage systems by simplifying thesetup, management, and maintenance of storage resources.
Infrastructure Director reduces infrastructure management complexities andenables a new simplified approach to managing storage infrastructures. Itprovides intuitive graphical user interfaces and recommended configurationpractices to streamline system configurations and storage managementoperations. You can leverage Infrastructure Director to easily provision newstorage capacity for business applications without requiring in-depthknowledge of the underlining infrastructure resource details. It providescentralized management while reducing the number of steps to configure,optimize, and deploy new infrastructure resources.
Some of the key Infrastructure Director capabilities include:• Simplified user experience for managing infrastructure resources. Provides
visual aids to easily view and interpret key management information, suchas used and available capacity, and guide features to help quicklydetermine appropriate next steps for a given management task.
• Recommended system configurations to speed initial storage system setupand accelerate new infrastructure resource deployments.
• Integrated configuration workflows with Hitachi recommended practices tostreamline storage provisioning and data protection tasks.
• Provides common, centralized management for Hitachi VSP familymidrange systems.
• REST-based API to provide full management programmability and controlin addition to unified file-based management support.
• Infrastructure Director enables automated SAN zoning during volumeattach and detach. Optional auto-zoning eliminates the need for repetitivezoning tasks to be performed on the switch.
Configuring block storage and file storage
Infrastructure Director can be used to configure both block storage systemsand file storage systems.• Block storage systems:
In a block storage system, you create storage volumes. A server-basedoperating system can connect to each block of storage and control it as anindividual hard drive. Each storage block can be individually formatted withthe required file system, such as NTFS or VMFS. Block storage systems aretypically deployed in a Storage Area Network (SAN) environment.From the dashboard of Infrastructure Director, you can discover, register,and onboard a block storage system.
• File storage systems:
10 Getting startedHitachi Infrastructure Director User Guide
A file storage system is a centralized location for storing files and folders,and it is usually deployed on a Network Attached Storage (NAS) device.File storage systems use protocols such as SMB/CIFS (for Windows) andNFS (for Linux and VMware).Infrastructure Director uses REST API services to register and onboard filestorage systems.
DashboardOnce a storage system has been onboarded to Infrastructure Director, thedashboard displays as soon as you log in. The Infrastructure Directordashboard provides the tools to easily configure, manage, and monitorstorage systems.
From the Infrastructure Director dashboard, you can access managedresources and provision storage in the context of a given storage system orserver. The provided templates and configurations make it possible to quicklyand easily provision a storage system, without knowing the details of theunderlying hardware and software.
The top navigation menu provides access to Jobs and Monitoring pages. Linksto the following Settings are available, based on the user role:• Tier Management• Security Settings• SNMP Settings• Change Local Password
The dashboard has three distinct sections:• Resource side panel: The left pane provides quick access to review the
configuration of your storage systems, servers, and fabric switches.
Getting started 11Hitachi Infrastructure Director User Guide
• Alert tiles: At the top of the page are four alert tiles that representvarious aspects of the health of your storage system. When InfrastructureDirector detects a problem with a storage system environment, a numberappears in the tile. The number indicates the number of alerts for thataspect of the storage system. Click the alert tile to go directly to asummary of the problems.
• Resource summary: The middle area, with the information gauge,provides a summary of the capacity allocated from the registered storagesystems.
Resource side panel
The resource side panel enables quick access to storage systems and toservers.• Click Storage Systems to view and add storage systems.• Click Servers to view and add servers.• Click Fabric Switches to view and add fabric switches.
Alert tiles
Across the top of the dashboard are tiles that display alerts for storagecapacity, data protection, jobs, and hardware.
If a tile includes a circled check mark, there are no alerts for that part of thestorage system, and everything is functioning normally. A number in a redcircle within a tile indicates one or more problems with that part of thestorage system.
You can click a tile for Capacity Alerts, Data Protection Alerts, or HardwareAlerts to view the summary for the category in the Monitoring tab.
The Jobs Alert tile displays the number of jobs in the last 24 hours with astatus of Failed or Success with Errors.
Resource summary
The three rings in the center of the dashboard form the information gauge,which shows information about the available storage. The numerical data foreach capacity parameter in the ring is displayed to the left of the informationgauge.• The number in the center of the rings shows the total usable capacity of all
storage systems. The total usable capacity is the capacity available fromall the parity groups across all storage systems.If you do not have any parity groups configured on the storage system,this number is zero and all other data points in the capacity visualizationare zero.
• The white, middle ring indicates the sum of all pool capacity availableacross all storage systems. The light grey indicates the parity groupcapacity that is not yet allocated to pools.
12 Getting startedHitachi Infrastructure Director User Guide
If you do not have any pools created, the white ring indicates zero. As youcreate pools, this number increases to eventually become equal to thetotal usable capacity when you have consumed all parity groups for poolcreation.
• The black, outer ring indicates the subscribed capacity, which is the sum ofall volumes created on storage pools. As you start creating volumes onstorage pools, the subscription starts to increase.If volume allocation results in oversubscription, a thick line extends out tothe right from the top of the ring. This extended line is a key visualindicator that helps track allocation oversubscription.
• The green, inner ring indicates the storage utilization. As you createvolumes on the pools and start consuming capacity, the utilization of thinpools increases and you will notice the value in green starting to increase.If the Thin Used (light green ring) starts to increase and get closer to yourtotal pool capacity, that indicates that the pools may be starting to fill up.
If you notice the total pool capacity (white) and Thin used (light green)values getting closer to total capacity, you may be running out of storage onone or more storage systems and may need to add disks to increase storagecapacity. Review the information gauge for each storage system to identifywhich storage system needs additional capacity.
The right side of the resource summary is the breakdown of data protectionmetrics. It includes a representation of types of protected, unprotected, andsecondary capacity and gauge of the total percentage of capacity protected.
Analyzing data in the dashboard
The dashboard is a visual display of the important information needed toanalyze the overall capacity utilization and health of your storage system. Itprovides visual indicators such as total usable capacity, current utilization,data protection summary, and monitoring alerts.
Analyzing data shown in alert tiles
The alert tiles collectively present the health of the storage systemenvironment. In one glance you can verify that the overall health is sound ifyou see no alerts on the alert tiles. This means that there are no capacity orhardware issues in the environment, no failed jobs in the last 24 hours andthat the data protection is working without any issues.
If there are any alerts, you can drill down to the relevant alert page toinvestigate the cause. Infrastructure Director provides alerts for capacityutilization, hardware, data protection, and jobs status.
Analyzing data in the information gauge
The information gauge provides a visual indication of the total capacity of allstorage systems managed by Infrastructure Director.
Getting started 13Hitachi Infrastructure Director User Guide
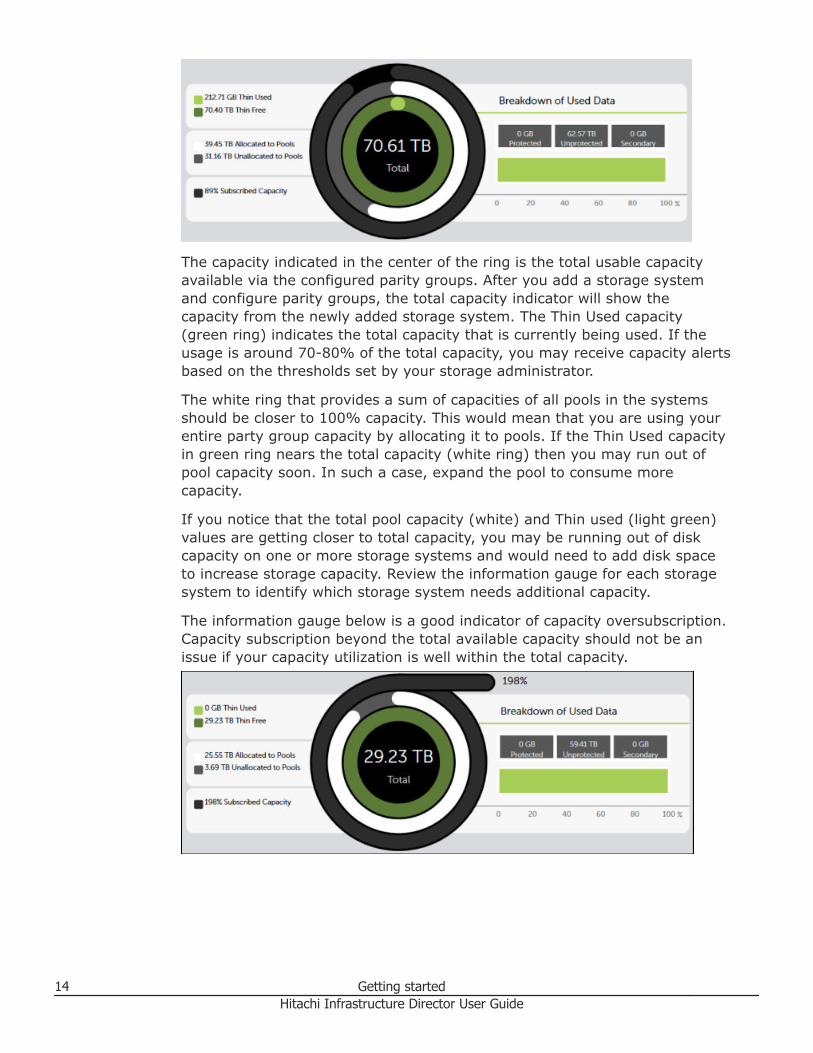
The capacity indicated in the center of the ring is the total usable capacityavailable via the configured parity groups. After you add a storage systemand configure parity groups, the total capacity indicator will show thecapacity from the newly added storage system. The Thin Used capacity(green ring) indicates the total capacity that is currently being used. If theusage is around 70-80% of the total capacity, you may receive capacity alertsbased on the thresholds set by your storage administrator.
The white ring that provides a sum of capacities of all pools in the systemsshould be closer to 100% capacity. This would mean that you are using yourentire party group capacity by allocating it to pools. If the Thin Used capacityin green ring nears the total capacity (white ring) then you may run out ofpool capacity soon. In such a case, expand the pool to consume morecapacity.
If you notice that the total pool capacity (white) and Thin used (light green)values are getting closer to total capacity, you may be running out of diskcapacity on one or more storage systems and would need to add disk spaceto increase storage capacity. Review the information gauge for each storagesystem to identify which storage system needs additional capacity.
The information gauge below is a good indicator of capacity oversubscription.Capacity subscription beyond the total available capacity should not be anissue if your capacity utilization is well within the total capacity.
14 Getting startedHitachi Infrastructure Director User Guide
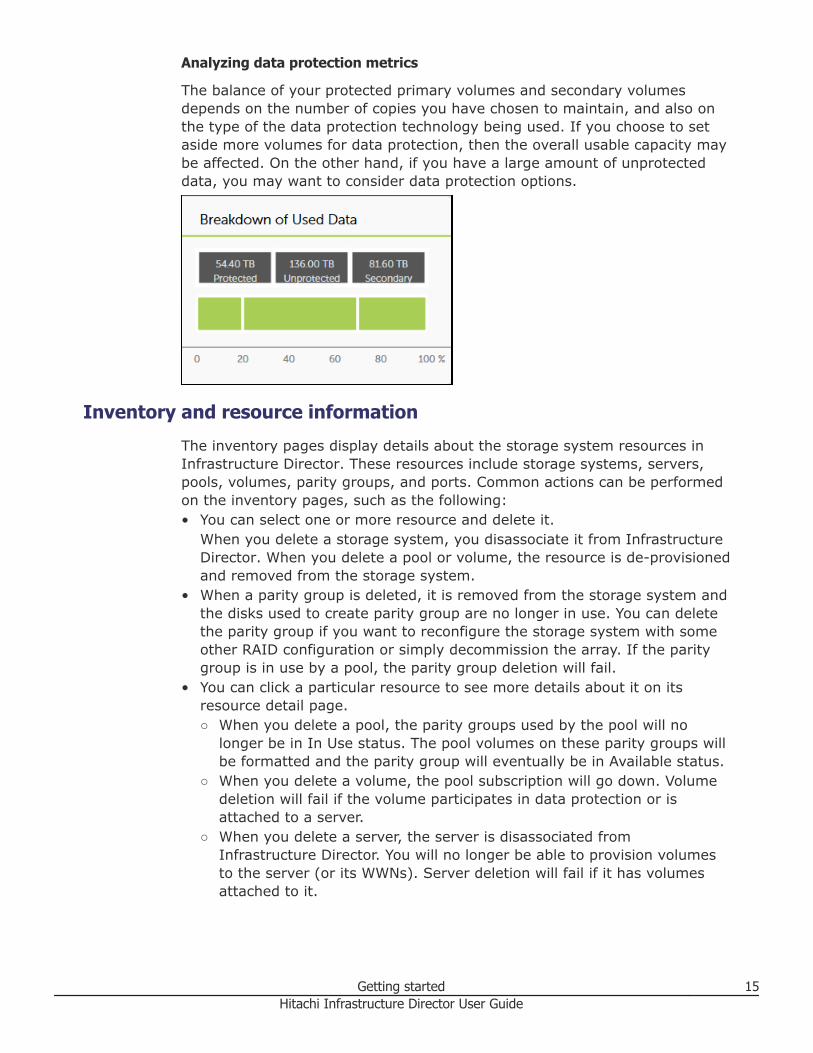
Analyzing data protection metrics
The balance of your protected primary volumes and secondary volumesdepends on the number of copies you have chosen to maintain, and also onthe type of the data protection technology being used. If you choose to setaside more volumes for data protection, then the overall usable capacity maybe affected. On the other hand, if you have a large amount of unprotecteddata, you may want to consider data protection options.
Inventory and resource information
The inventory pages display details about the storage system resources inInfrastructure Director. These resources include storage systems, servers,pools, volumes, parity groups, and ports. Common actions can be performedon the inventory pages, such as the following:• You can select one or more resource and delete it.
When you delete a storage system, you disassociate it from InfrastructureDirector. When you delete a pool or volume, the resource is de-provisionedand removed from the storage system.
• When a parity group is deleted, it is removed from the storage system andthe disks used to create parity group are no longer in use. You can deletethe parity group if you want to reconfigure the storage system with someother RAID configuration or simply decommission the array. If the paritygroup is in use by a pool, the parity group deletion will fail.
• You can click a particular resource to see more details about it on itsresource detail page.○ When you delete a pool, the parity groups used by the pool will no
longer be in In Use status. The pool volumes on these parity groups willbe formatted and the parity group will eventually be in Available status.
○ When you delete a volume, the pool subscription will go down. Volumedeletion will fail if the volume participates in data protection or isattached to a server.
○ When you delete a server, the server is disassociated fromInfrastructure Director. You will no longer be able to provision volumesto the server (or its WWNs). Server deletion will fail if it has volumesattached to it.
Getting started 15Hitachi Infrastructure Director User Guide
Related concepts
• Storage system inventory on page 40• Parity groups inventory on page 29• Pools inventory on page 35• Volumes inventory on page 51
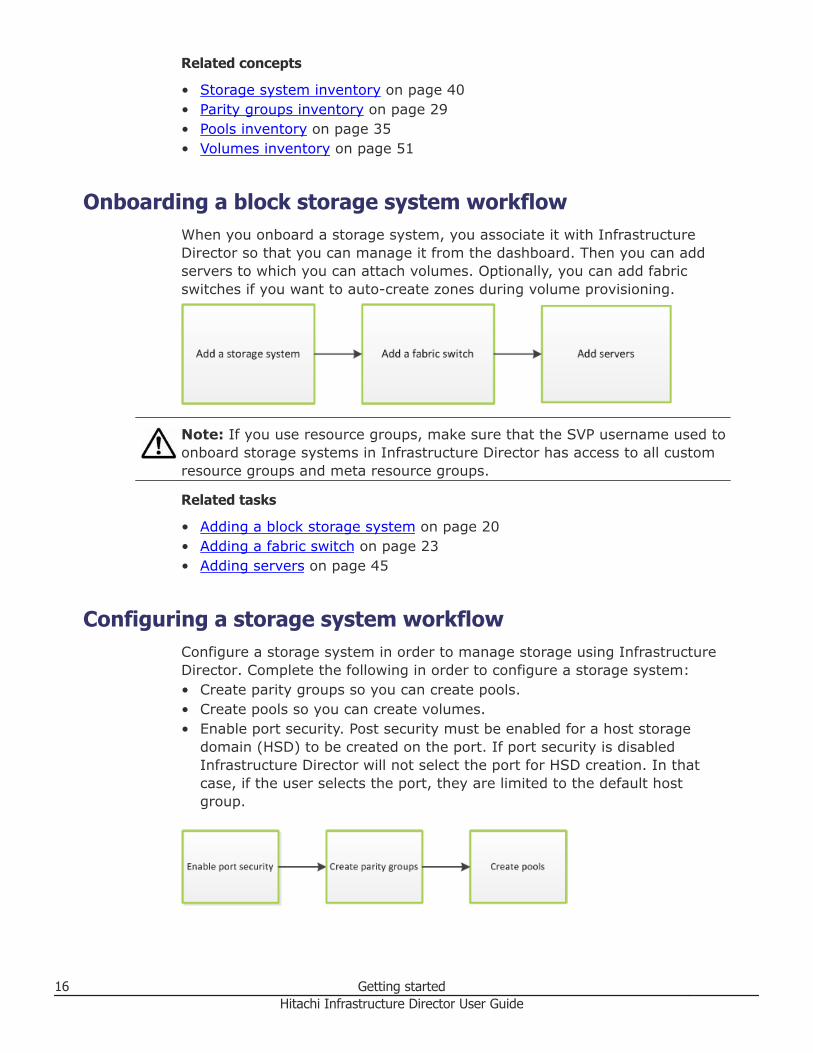
Onboarding a block storage system workflowWhen you onboard a storage system, you associate it with InfrastructureDirector so that you can manage it from the dashboard. Then you can addservers to which you can attach volumes. Optionally, you can add fabricswitches if you want to auto-create zones during volume provisioning.
Note: If you use resource groups, make sure that the SVP username used toonboard storage systems in Infrastructure Director has access to all customresource groups and meta resource groups.
Related tasks
• Adding a block storage system on page 20• Adding a fabric switch on page 23• Adding servers on page 45
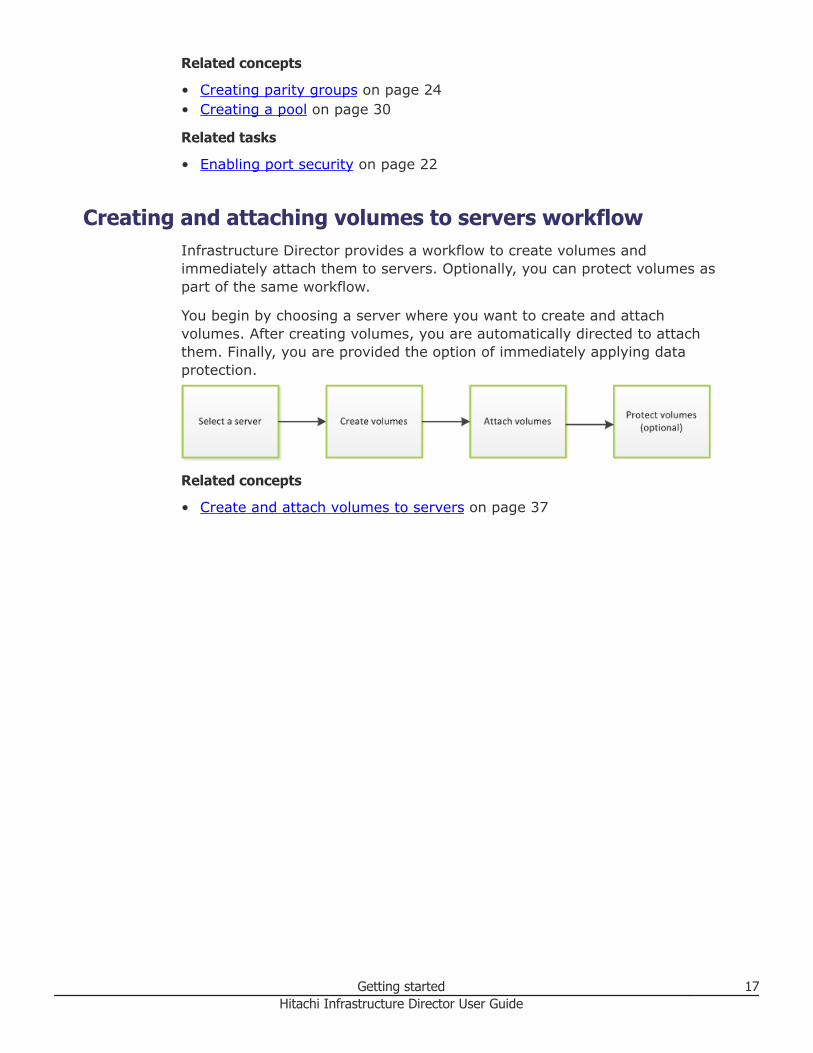
Configuring a storage system workflowConfigure a storage system in order to manage storage using InfrastructureDirector. Complete the following in order to configure a storage system:• Create parity groups so you can create pools.• Create pools so you can create volumes.• Enable port security. Post security must be enabled for a host storage
domain (HSD) to be created on the port. If port security is disabledInfrastructure Director will not select the port for HSD creation. In thatcase, if the user selects the port, they are limited to the default hostgroup.
16 Getting startedHitachi Infrastructure Director User Guide
Related concepts
• Creating parity groups on page 24• Creating a pool on page 30
Related tasks
• Enabling port security on page 22
Creating and attaching volumes to servers workflowInfrastructure Director provides a workflow to create volumes andimmediately attach them to servers. Optionally, you can protect volumes aspart of the same workflow.
You begin by choosing a server where you want to create and attachvolumes. After creating volumes, you are automatically directed to attachthem. Finally, you are provided the option of immediately applying dataprotection.
Related concepts
• Create and attach volumes to servers on page 37
Getting started 17Hitachi Infrastructure Director User Guide

18 Getting startedHitachi Infrastructure Director User Guide
2Configure block storage
Use Infrastructure Director to add a storage system and then configure it.
□ Adding a block storage system
□ Verifying storage system initial settings
□ Enabling port security
□ Adding a fabric switch
□ Creating parity groups
□ Creating a pool
□ Create and attach volumes to servers
□ Managing storage systems
□ Managing servers
□ Managing volumes
Configure block storage 19Hitachi Infrastructure Director User Guide
Adding a block storage system
Onboarding a block storage system is the process of associating it withInfrastructure Director. After the block storage system is onboarded, manageit from the Infrastructure Director dashboard.
Prerequisites
Infrastructure Director requires access to all resources groups on the storagesystem so that the workflows function correctly. Verify that the serviceprocessor (SVP) user name used to onboard a storage system inInfrastructure Director has access to all custom resource groups and metaresource groups.
Procedure
1. On the Infrastructure Director dashboard, click Storage Systems on theleft pane.
2. Click the plus sign (+) to add a storage system.3. Enter values for the following parameters on the Add Storage System
page.• SVP IP Address: Enter the IP address of the external service
processor for the storage system you want to discover.• User name and password: Log in as a user that has administrator
privileges on this storage system. For example, you can log in as theuser maintenance.
4. Click Submit.
Result
The Jobs tab is updated with the job called Create Storage System.
Wait a while for the storage system to be onboarded. Refresh the Jobs tab toverify that storage system is onboarded.
The dashboard shows the displayed number of storage systems has beenincremented by one. Additionally, when you click Storage Systems, you areredirected to the storage system inventory where you can see the newlyadded storage system in the inventory.
When a storage system is onboarded, Infrastructure Director goes through aninitialization process where it gathers the information about the currentconfiguration of the storage system. During this time you will see that theports, volumes, pools, and parity groups in the storage system are "Notaccessible". Once the initialization is complete, you can see the port, pool,volume, and parity group information in the storage system details.
20 Configure block storageHitachi Infrastructure Director User Guide
Next steps
1. In the storage system details page, review the settings in the InitialSetup Wizard. This will show you the completed storage systemsettings.
Note: Do not change any of the initial setup information. Thesetup of a discovered Virtual Storage Platform G200, G400, G600,G800 storage system has been completed by a Hitachi DataSystems representative or authorized service provider.
2. In the parity group inventory for the storage system, create paritygroups to convert the raw disk capacity into usable capacity.
3. From the settings menu, access the tier definitions before creatingpools.
Related concepts
• Creating parity groups on page 24• Tier management on page 44
Related tasks
• Verifying storage system initial settings on page 21
Verifying storage system initial settings
Look through the initial storage system setup to verify the settings for thestorage system, which includes network configuration, date, time, and licensekeys.
Note: Do not change any of the initial setup information. The setup of adiscovered Virtual Storage Platform G200, G400, G600, G800 storage systemhas been completed by a Hitachi Data Systems representative or authorizedservice provider.
Prerequisites
Initial setup is complete.
Procedure
1. From the Dashboard, click Storage Systems from the resource sidepanel.
2. Click on a storage system.
Configure block storage 21Hitachi Infrastructure Director User Guide
3. In the top right of the page, click the settings icon ( ) and select InitialSetup Wizard (Settings).
4. On the Common page, verify the information provided.• The name of the storage system• The contact name for the storage system• The location of the storage system
Click Next.5. On the Time-Zone page, verify the information provided, then click
Next.• Time zone• Current date and time on the storage system• NTP servers
6. On the Licenses page, verify the list of product licenses and itsinformation, then click Next.• Product name• License status• Information that specifies the type of the license and the used
capacity7. On the Notification page, verify the information in the list shown.
• The email address of the sender of the alerts• The email addresses of the recipients of the SNMP alerts for the
selected storage system• The IP address of the mail server• The mail server user name and password• The SNMP community type and IP address
8. Click Submit to close the initial setup wizard.
Enabling port securityBefore a host storage domain (HSD) can be created on a port, port securitymust be enabled. By default, security is disabled on the following storagesystems: Hitachi Virtual Storage Platform G200, G400, G600, G800. If portsecurity is disabled Infrastructure Director will not select the port for HSDcreation. If you select a port that has security disabled, you are limited to thedefault host group.
Procedure
1. On the Infrastructure Director dashboard, click Storage Systems to seethe inventory of storage systems and capacity information.
2. Click a storage system to see its configuration of pools, ports, volumes,and parity groups.
3. Click Ports to see the configured storage ports for the storage system.
22 Configure block storageHitachi Infrastructure Director User Guide
4. Select one or more ports and click Enable/Disable Security to enableor disable security.
Adding a fabric switchYou can add a fabric switch after onboarding a storage system. Add, update,and delete fabric switches in the Infrastructure Director interface.
After a fabric switch is added, you can choose to auto-create zones duringvolume provisioning. A fabric switch is required for any operations that useauto-select, such as host group creation and auto-selection of ports whileattaching volumes to servers.
Prerequisites• Make sure servers and ports are connected according the manufacturer's
instructions.• Make sure there is an active zone set with at least one dummy zone
available.• The Infrastructure Director server is connected to the same IP network
and has access to SNMP broadcast of Fibre Channel switches.• You have the required information about the fabric switch: Virtual Fabric
ID (required only for Cisco switches), Fabric Switch Type, Fabric Switch IPAddress, Port Number, Username, and Password.
• You have the Admin role for the fabric switch.
Procedure
1. On the Infrastructure Director dashboard, select Fabric Switches toopen the Fabric Switches page.
2. Click the plus sign (+) to open the Add Fabric Switches page.3. Enter the following information from the configuration of the switch you
are adding:• Virtual Fabric ID: For Cisco switches, the VSAN ID. Not applicable to
Brocade switches.• Fabric Switch Type: Select Brocade or Cisco.• Fabric Switch IP Address
To add or update a core switch, use the Management IP address of theswitch or the Active CP IP address.
• Port Number• Username• Password
4. Click the plus sign (+) to add the switch and click Submit.
Result
A job is created to add the fabric switch.
Configure block storage 23Hitachi Infrastructure Director User Guide
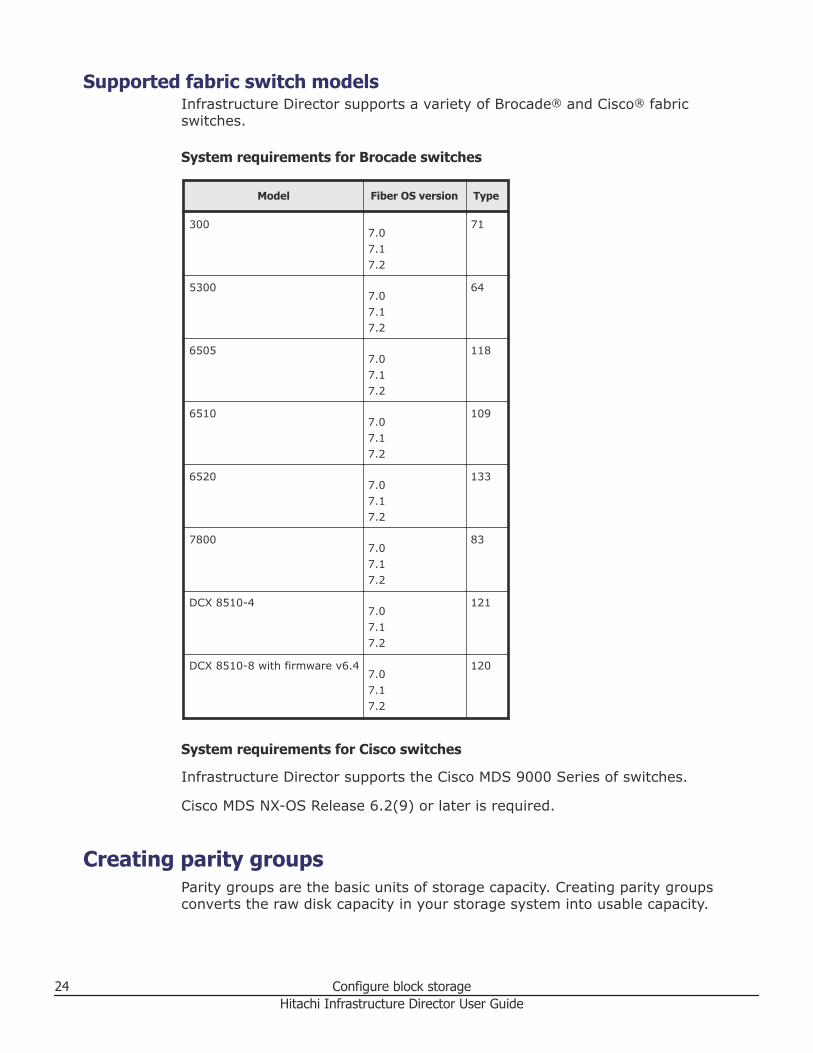
Supported fabric switch modelsInfrastructure Director supports a variety of Brocade® and Cisco® fabricswitches.
System requirements for Brocade switches
Model Fiber OS version Type
3007.07.17.2
71
53007.07.17.2
64
65057.07.17.2
118
65107.07.17.2
109
65207.07.17.2
133
78007.07.17.2
83
DCX 8510-47.07.17.2
121
DCX 8510-8 with firmware v6.47.07.17.2
120
System requirements for Cisco switches
Infrastructure Director supports the Cisco MDS 9000 Series of switches.
Cisco MDS NX-OS Release 6.2(9) or later is required.
Creating parity groupsParity groups are the basic units of storage capacity. Creating parity groupsconverts the raw disk capacity in your storage system into usable capacity.
24 Configure block storageHitachi Infrastructure Director User Guide
Infrastructure Director parity group concepts
Infrastructure Director provides a simple one-click method of parity groupcreation that is based on best practices applicable to the disks in the storagesystem.
An advanced method of parity group creation is also available. You canchoose to use the advanced method if there is not a need to rely on bestpractices.
Creating parity groups in Infrastructure Director also creates LDEVs that canbe consumed for pool creation.
Normal practice is to use all available disk capacity when creating paritygroups to ensure that all of the storage system capacity is usable. There canbe exceptions to this practice; for example:• If the entire capacity of the storage system is not needed.• If there is a need to create fewer parity groups in order to reserve more
disks as spares.
Viewing parity groups
Access the Parity Groups page by clicking Storage Systems on thedashboard and then clicking a storage system tile. Click the Parity Groupstile.
A summary of parity groups includes disk type, number of parity groups,capacity, and available spares, all sorted by disk type.
You can click Manage Spare Disk to open the Disk Management page andset free disks as spare disks, or spares as free disks.
Click any parity group tile to view its details.
Click the plus sign (+) to open the Create Parity Groups page.
When you open the Create Parity Groups page, the basic method isselected by default.• Basic option: Creating a parity group using the basic option requires no
input, but you can change the RAID type or the number of parity groups.Infrastructure Director applies recommended best practices for creatingthese parity groups.
• Advanced option: The advanced option allows the user to fully configurethe RAID layout of the parity group by selecting the specific disks and hotspares to assign for parity group creation.
Related concepts
• Creating a pool on page 30
Configure block storage 25Hitachi Infrastructure Director User Guide
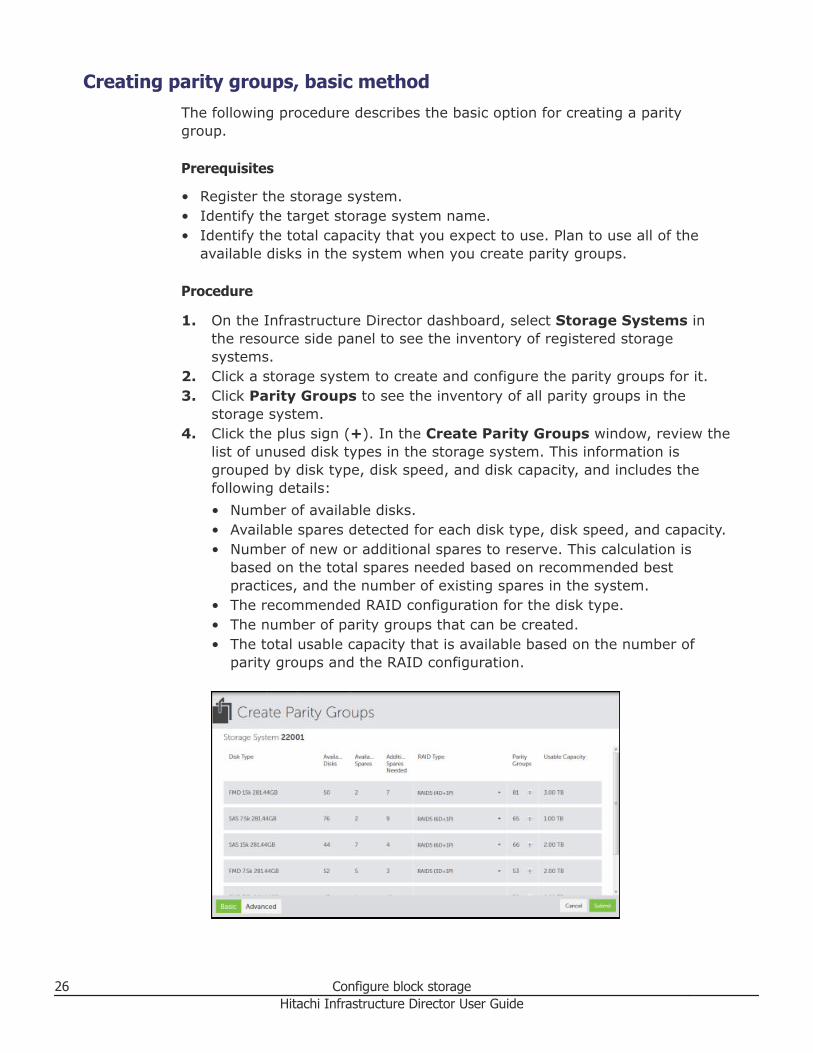
Creating parity groups, basic methodThe following procedure describes the basic option for creating a paritygroup.
Prerequisites
• Register the storage system.• Identify the target storage system name.• Identify the total capacity that you expect to use. Plan to use all of the
available disks in the system when you create parity groups.
Procedure
1. On the Infrastructure Director dashboard, select Storage Systems inthe resource side panel to see the inventory of registered storagesystems.
2. Click a storage system to create and configure the parity groups for it.3. Click Parity Groups to see the inventory of all parity groups in the
storage system.4. Click the plus sign (+). In the Create Parity Groups window, review the
list of unused disk types in the storage system. This information isgrouped by disk type, disk speed, and disk capacity, and includes thefollowing details:• Number of available disks.• Available spares detected for each disk type, disk speed, and capacity.• Number of new or additional spares to reserve. This calculation is
based on the total spares needed based on recommended bestpractices, and the number of existing spares in the system.
• The recommended RAID configuration for the disk type.• The number of parity groups that can be created.• The total usable capacity that is available based on the number of
parity groups and the RAID configuration.
26 Configure block storageHitachi Infrastructure Director User Guide
5. Decide if the recommended RAID configuration for each disk type isacceptable. Choose one of the following options:• Accept the recommended RAID configuration, which uses the full
capacity of the installed drives.• Change the recommended RAID configuration or create fewer parity
groups. Infrastructure Director shows the number of parity groupsthat can be created for the new RAID configuration and thecorresponding usable capacity.
6. Click Submit.
Result
A job is started to create the parity group for the storage system. This jobincludes the following tasks:
• Identifies the appropriate number and position for the spare disk.• Assigns a spare disk.• Creates the required number of parity groups for the requested RAID
layout.• Creates and quick formats the necessary volumes on the parity group so
that it is ready for pool creation.• The job may create sub-jobs when multiple parity groups are being
created. Each sub-job will show the status of the parity groups beingcreated.
Next steps
• Check the status of the parity group creation job by clicking Jobs.
Note: Parity group creation may take a long time.
Related tasks
• Creating parity groups or hot spares, advanced method on page 27• Managing free and spare disks on page 29
Creating parity groups or hot spares, advanced methodThe advanced option enables users to configure parity groups that are notbased on the provided best practices.
The advanced option allows you to fully configure the RAID layout of theparity group by selecting the specific disks and hot spares to assign for paritygroup creation.
Configure block storage 27Hitachi Infrastructure Director User Guide
Procedure
1. On the dashboard, click Storage Systems and click a storage systemtile.
2. Click Parity Groups to open the Parity Groups page and click the plussign to open the Create Parity Groups page.
3. Click Advanced.
4. Select a RAID Type and a RAID Layout.
RAID Type RAID Layout
RAID 5 3D+1P, 4D+1P, 6D+1P, 7D+1P
RAID 6 6D+2P, 12D+2P, 14D+2P
RAID 1+0 2D+2D
5. Choose available disks. Select enough disks to match the RAID Layout.6. Click Submit.
Result
A job is started to create the parity group for the storage system.
Next steps
• Check the status of the job by clicking Jobs.
Note: Parity group creation may take time.
• Create a pool.
28 Configure block storageHitachi Infrastructure Director User Guide
Related concepts
• Creating a pool on page 30
Related tasks
• Monitoring jobs on page 63• Creating parity groups, basic method on page 26• Managing free and spare disks on page 29
Managing free and spare disksYou can set free disks to spare and spare to free.
If you choose to use the basic method to create parity groups, InfrastructureDirector will automatically review the available spare disks and allocate morespare disks if needed.
If you choose to create parity groups using the advanced method, you shouldreview the number of spare disks in the parity groups inventory summary. Ifyou want to assign more or fewer spare disks, use disk management.
Procedure
1. On the dashboard, click Storage Systems.2. Click a storage system tile and click Parity Groups.3. Click Manage Spare Disk to open the Disk Management page and
view disks not being used in any parity group.4. Select one or more disks and click Disks to Set to Free or Disks to Set
to Spare. Selecting Disks to Set to Spare will reserve the disks as aspare disks and they cannot be used for parity group creation. SelectingDisks to Set to Free will unallocate the spare disks and return then to thepool of available disks.
5. Click Submit.
Related tasks
• Creating parity groups, basic method on page 26• Creating parity groups or hot spares, advanced method on page 27
Parity groups inventoryAfter parity groups are created, they are displayed for each storage system.
To view parity groups for a storage system, click Storage Systems on thedashboard and click a storage system tile to view the associated paritygroups, pools, volumes, and ports. Click Parity Groups to open the ParityGroups page.
You can perform the following actions on this page:• Click Manage Spare Disks to open the Disk Management page and
assign free and spare disks.
Configure block storage 29Hitachi Infrastructure Director User Guide
• Select one or more parity groups and do one of the following:○ Click Initialize Parity Groups to initialize parity groups.
You can create and initialize pool volumes on a parity group if poolvolumes have not been created. You can also format any pool volumesthat are in blocked state. You can initialize parity groups in the followingconditions:– When the parity group either does not have any pool volumes or at
least one of the pool volumes is in Blocked state. In this case, youwill notice that the parity group status is Uninitialized.
– When the pool volumes on the parity group do not account for theentire parity group capacity and there are unused partitions on theparity group. In this case you will notice that the parity group statusis Available but the available capacity is much less than the totalcapacity. This is supported only when the parity group status isavailable or uninitialized.
○ Click Delete to delete the parity group. When you delete a parity group,it is removed from the storage system and the disks used to create theparity group are no longer in use. You can delete the parity group if youwant to reconfigure the storage system with some other RAIDconfiguration or simply decommission the array.
• If there are hardware alerts related to the parity groups, you can click theHardware Alerts tile to view details for different types of components onthe Monitoring page for the storage system.
• Click the plus sign (+) to create a new parity group.• Use the filters to view the status of parity groups. Click a filter to apply it
and click it again to remove it.○ Available: Parity group is not being used for any storage pools. It is
available for pool creation.○ Formatting: At least one of the pool volumes in the parity group is
being formatted.○ In Use: Parity group is being used by a storage pool.○ Uninitialized: The parity group either has no volumes or at least one
of the pool volumes is in Blocked status, or one or more partitions isuninitialized and has a size greater than 16,787,456 blocks.
○ Unsupported Attached: At least one of the pool volumes has a pathto a storage port.
○ Unsupported MixedResourceGroup: Parity group and at least one ofits pool volumes are in different resource groups and user does nothave access to one of the resource groups.
Creating a poolUse the basic option to take advantage of tiers that are based on bestpractices.
30 Configure block storageHitachi Infrastructure Director User Guide
If you want more flexibility and do not need to take advantage of bestpractices, you can use the advanced option to select specific parity groups.
Related concepts
• Create and attach volumes to servers on page 37
Creating a pool, basic methodUse the basic method of pool creation to create pools based on bestpractices.
Note: The following pool types are identical:• Thin = HDP (Hitachi Dynamic Provisioning)
HDP is functionality that allocates virtual volumes to a host and uses thephysical capacity that is necessary according to the data write request.
• Tiered = HDT (Hitachi Dynamic Tiering)HDT is used with Hitachi Dynamic Provisioning and places data in ahardware tier according to the I/O load. For example, a data area that hasa high I/O load is placed in a high-speed hardware tier, and a data areathat has a low I/O load is placed in a low-speed hardware tier.
• Snap = HTI (Hitachi Thin Image)HTI stores snapshot data in pools. A pool consists of multiple pool-VOLs.The pool-VOLs contain the snapshot data. A pool can contain up to 1,024pool-VOLs.
Prerequisites
Create and configure parity groups on the storage system.
You need a minimum of 4 parity groups to create a pool using the basicmethod. Otherwise, you can use the advanced method of pool creation.
Procedure
1. On the Infrastructure Director dashboard, click Storage Systems to seethe inventory of registered storage systems.
2. Click a storage system to create a pool for it.3. Click Pools.
Configure block storage 31Hitachi Infrastructure Director User Guide
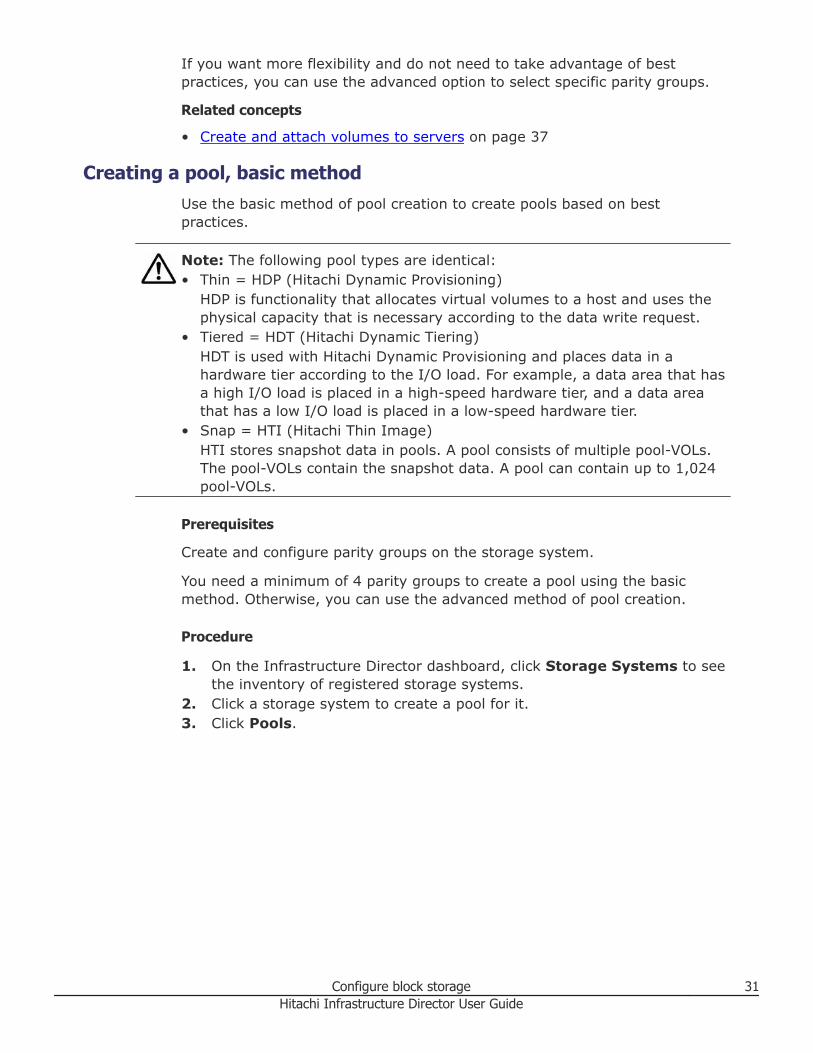
4. Click the plus sign (+) to open the Create Pool page.By default, the Basic option is selected.
5. Enter a Pool Label.6. In the Select capacity from Tiers to Allocate to Pool pane, you can
choose storage from 1, 2, or a maximum of 3 tiers (Platinum, Gold,Silver, or Bronze).• If you select only one tier, you can use the Intend to use for Snaps?
toggle to decide whether to use Snap pools.○ Click Yes to create Snap pools.
Note: Use this option if you want to use data protection tocreate snapshots. You can also create a pool for snapshotslater by returning to the Create Pool page.
○ Click No to create Thin pools.• If you select 2 or 3 tiers, the system creates Tiered pools.
Table 1 Tier Definitions
Pool Tier Description
Platinum SSD and FMD
Gold SAS 15 k
Silver SAS 10 k
Bronze 7.2 k
7. Click a selected tier to view the available storage capacity and select acapacity size.
32 Configure block storageHitachi Infrastructure Director User Guide

8. Click Tier Management to see the disk type, capacity, and speed ofeach pool category.
9. Review the high and low pool utilization thresholds, for watermarks orwarnings, and the subscription limit. The thresholds will serve as theWarning and Critical thresholds for monitoring capacity. Adjust thethresholds if needed.
Note: Subscription limits are not applicable to Snap pools.
10. Click Submit.
Result
A job is started to allocate the storage capacity and create the pool.
Next steps
• Check the status of the pool creation job by clicking Jobs.• Create a volume.
Related concepts
• Creating parity groups on page 24• How Infrastructure Director calculates pool sizes for the basic method of
pool creation on page 35
Related tasks
• Creating a pool, advanced method on page 33• Creating volumes to attach to servers on page 37
Creating a pool, advanced methodYou can use the advanced method of pool creation to select parity groupsfiltered by disk type, speed, layout, and RAID level. This method does notemploy best practices.
Note: Mixing different disk types in an HDP or Thin pool is notrecommended. If you choose to create such a pool, Infrastructure Directoridentifies the tier in this pool as "mixed".
Prerequisites
Create and configure parity groups on the storage system.
Configure block storage 33Hitachi Infrastructure Director User Guide
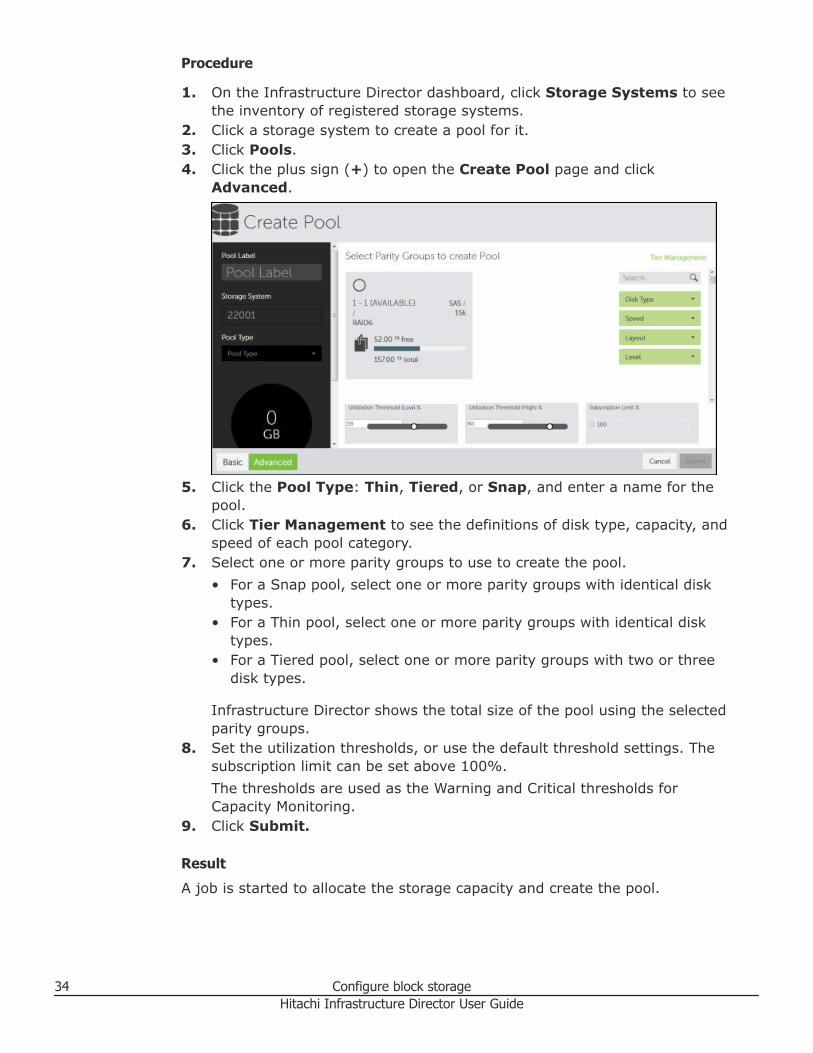
Procedure
1. On the Infrastructure Director dashboard, click Storage Systems to seethe inventory of registered storage systems.
2. Click a storage system to create a pool for it.3. Click Pools.4. Click the plus sign (+) to open the Create Pool page and click
Advanced.
5. Click the Pool Type: Thin, Tiered, or Snap, and enter a name for thepool.
6. Click Tier Management to see the definitions of disk type, capacity, andspeed of each pool category.
7. Select one or more parity groups to use to create the pool.• For a Snap pool, select one or more parity groups with identical disk
types.• For a Thin pool, select one or more parity groups with identical disk
types.• For a Tiered pool, select one or more parity groups with two or three
disk types.
Infrastructure Director shows the total size of the pool using the selectedparity groups.
8. Set the utilization thresholds, or use the default threshold settings. Thesubscription limit can be set above 100%.The thresholds are used as the Warning and Critical thresholds forCapacity Monitoring.
9. Click Submit.
Result
A job is started to allocate the storage capacity and create the pool.
34 Configure block storageHitachi Infrastructure Director User Guide
Next steps
• Check the status of the pool-creation job by clicking Jobs.• Create volumes.
Related concepts
• Creating parity groups on page 24
Related tasks
• Creating a pool, basic method on page 31• Creating volumes to attach to servers on page 37
How Infrastructure Director calculates pool sizes for the basicmethod of pool creation
Infrastructure Director incorporates best practices to calculate the best poolsizes based on the media available in the storage system. When the basicpool creation option is used, pool size is determined as follows:• Infrastructure Director identifies all the parity groups of the same disk
type, disk capacity, disk speed, RAID type and layout and determines theavailable capacity of their usable LDEVs. Only parity groups in theAvailable and Quick Formatting states are eligible for pool creating usingthe basic method.
• Infrastructure Director then uses combinations of these parity groupswhere 4 or more parity groups can be added together, to compute variouspossible pool sizes that can be created for the combination of disk type,disk capacity, disk speed, RAID type and layout.
Note: If your parity groups do not meet these requirements, youcan only use the advanced method of pool creation.
• Based on the Storage System model, Infrastructure Director determinesthe maximum pool size.
• Infrastructure Director then displays the pools in increasing order of poolsize.
Pools inventoryAccess the Pools page to add, update, and delete pools.
From the dashboard, click Storage Systems and then click a storage systemtile to view parity groups, pools, volumes, and ports.
Click Pools to view the inventory of pools.
Configure block storage 35Hitachi Infrastructure Director User Guide
View pool details in either a tile view or a list view. Capacity utilization isrepresented by a color bar:• Green: Below 70%.• Orange: From 70% to 80%.• Red: Over 80%.
The following actions are available on this page:• Select a pool and click Edit to update it in the Update Storage Pool page.• Select one or more pools and click Delete to delete the pools. Deleted
pools are de-provisioned and removed from the storage system.• Click the plus sign (+) to add a pool in the Create Pool page.
Pool detailsTo access pool details, click Storage Systems. Then click a storage system toview all resources. Click Pools and then click a pool tile. On the pool detailspage, you can do the following:• View the attributes of the pool.• Edit the pool configuration by clicking the pencil icon to open the Update
Storage Pool page.Once a pool is created, you can edit the pool label or expand the pool.Basic and advanced options, similar to those for pool creation, areavailable for pool expansion. The basic option includes choices for a new/expanded pool size based on the current set of parity groups in the pool.You can choose to expand an existing tier in the pool or add a new tier tothe pool. If you add a tier to a thin pool, it will be expanded and convertedinto a tiered pool. Using the advanced option enables you to add moreparity groups to the pool and increase capacity.○ Disk type○ Layout○ RAID level○ Speed○ Utilization thresholds and subscription limits
The high and low utilization thresholds set the Warning and Criticalthresholds for Capacity Monitoring.
Note: To expand an HDP pool, you must add a parity group of thesame RAID layout, the same disk type, the same RAID level, andthe same disk speed.
Click Submit to update the window and start a job that will update thepool.
36 Configure block storageHitachi Infrastructure Director User Guide
Create and attach volumes to serversYou can create volumes and attach them to servers in a single workflow byfirst selecting a server. Optionally, you can protect volumes as part of thesame workflow.
Creating volumes to attach to serversStart the create-and-attach workflow by selecting a server and creatingvolumes.
When you create volumes in Infrastructure Director you can:• Create multiple volumes of the same size or different sizes at the same
time.• Select the specific pool for volume creation or let Infrastructure Director
automatically select the best pool based on utilization.• Specify a common label and starting label suffix for identical volumes that
are the same size and have the same pool requirement.
Prerequisites
• Create parity groups.• Create pools.• Add servers.
Procedure
1. On the Infrastructure Director dashboard, click Servers to see theinventory of servers.
Configure block storage 37Hitachi Infrastructure Director User Guide
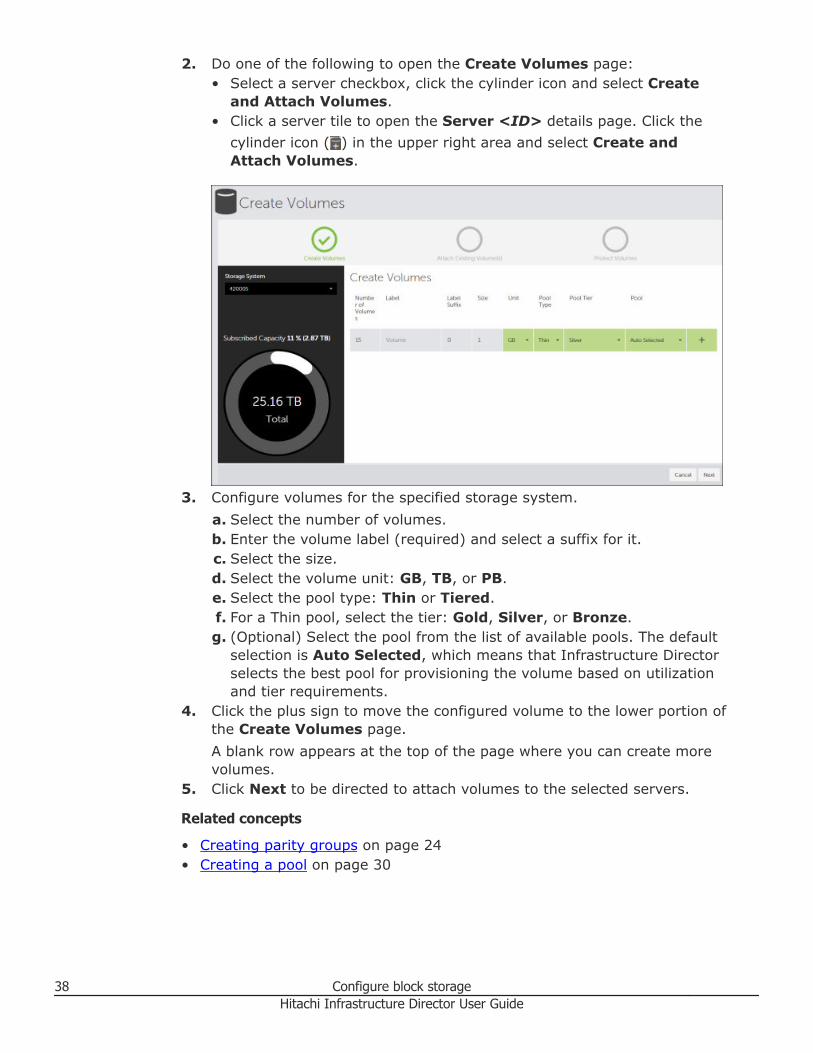
2. Do one of the following to open the Create Volumes page:• Select a server checkbox, click the cylinder icon and select Create
and Attach Volumes.• Click a server tile to open the Server <ID> details page. Click the
cylinder icon ( ) in the upper right area and select Create andAttach Volumes.
3. Configure volumes for the specified storage system.a. Select the number of volumes.b. Enter the volume label (required) and select a suffix for it.c. Select the size.d. Select the volume unit: GB, TB, or PB.e. Select the pool type: Thin or Tiered.f. For a Thin pool, select the tier: Gold, Silver, or Bronze.g. (Optional) Select the pool from the list of available pools. The default
selection is Auto Selected, which means that Infrastructure Directorselects the best pool for provisioning the volume based on utilizationand tier requirements.
4. Click the plus sign to move the configured volume to the lower portion ofthe Create Volumes page.A blank row appears at the top of the page where you can create morevolumes.
5. Click Next to be directed to attach volumes to the selected servers.
Related concepts
• Creating parity groups on page 24• Creating a pool on page 30
38 Configure block storageHitachi Infrastructure Director User Guide
Related tasks
• Adding servers on page 45• Monitoring jobs on page 63• Attaching existing volumes to a server on page 49
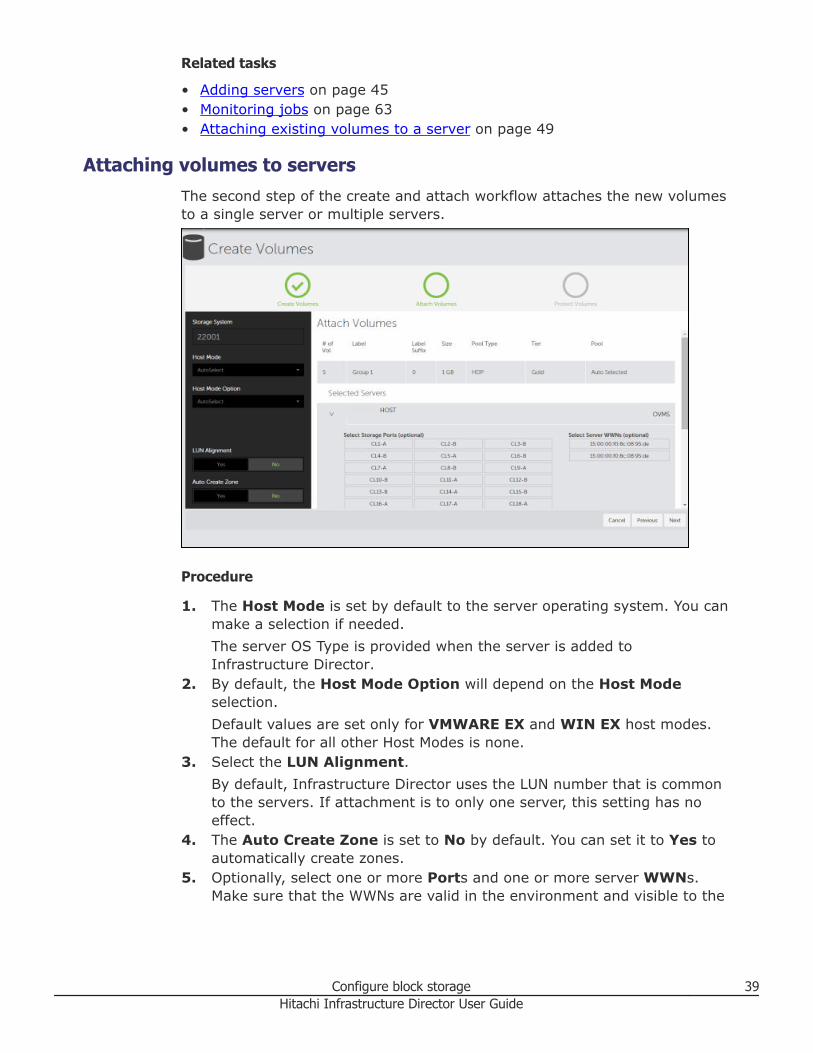
Attaching volumes to serversThe second step of the create and attach workflow attaches the new volumesto a single server or multiple servers.
Procedure
1. The Host Mode is set by default to the server operating system. You canmake a selection if needed.The server OS Type is provided when the server is added toInfrastructure Director.
2. By default, the Host Mode Option will depend on the Host Modeselection.Default values are set only for VMWARE EX and WIN EX host modes.The default for all other Host Modes is none.
3. Select the LUN Alignment.By default, Infrastructure Director uses the LUN number that is commonto the servers. If attachment is to only one server, this setting has noeffect.
4. The Auto Create Zone is set to No by default. You can set it to Yes toautomatically create zones.
5. Optionally, select one or more Ports and one or more server WWNs.Make sure that the WWNs are valid in the environment and visible to the
Configure block storage 39Hitachi Infrastructure Director User Guide
storage system. If the WWN-port pairs selected do not exist,Infrastructure Director creates them.
6. Click Submit.
Next steps
You have the option of immediately applying data protection to the volumesthat were just attached.
Related concepts
• Protect data on page 53
Managing storage systemsAccess the storage system details page for an overview of registered storagesystems. If you need to configure the storage system, you will need to accessthe service processor with Device Manager - Storage Navigator.
Storage system inventoryFrom the dashboard, click Storage Systems to access the StorageSystems page for an overview of registered storage systems.
The Storage Systems page includes a summary section identical to thesummary on the dashboard. This includes monitoring tiles, capacity summaryand data protection summary.
You can search for a specific storage system by searching for its serialnumber in the search box. You can also use various filters to find a specificstorage systems.
From the storage systems page you can view and manage individual storagesystems.
View storage system details in either a tile view or a list view. Capacityutilization is represented by a color bar:• Green: Below 70%.• Orange: From 70% to 80%.• Red: Over 80%.
The following actions are available:• Click a storage system to view details in the Storage System <serial
number> page, where you can also access and manage the associatedparity groups, pools, volumes, and ports.
• To delete a storage system, select it and click Delete.• To edit the user name and password for a storage system, select it and
click Edit to open the Update Storage System <serial number> page.
40 Configure block storageHitachi Infrastructure Director User Guide
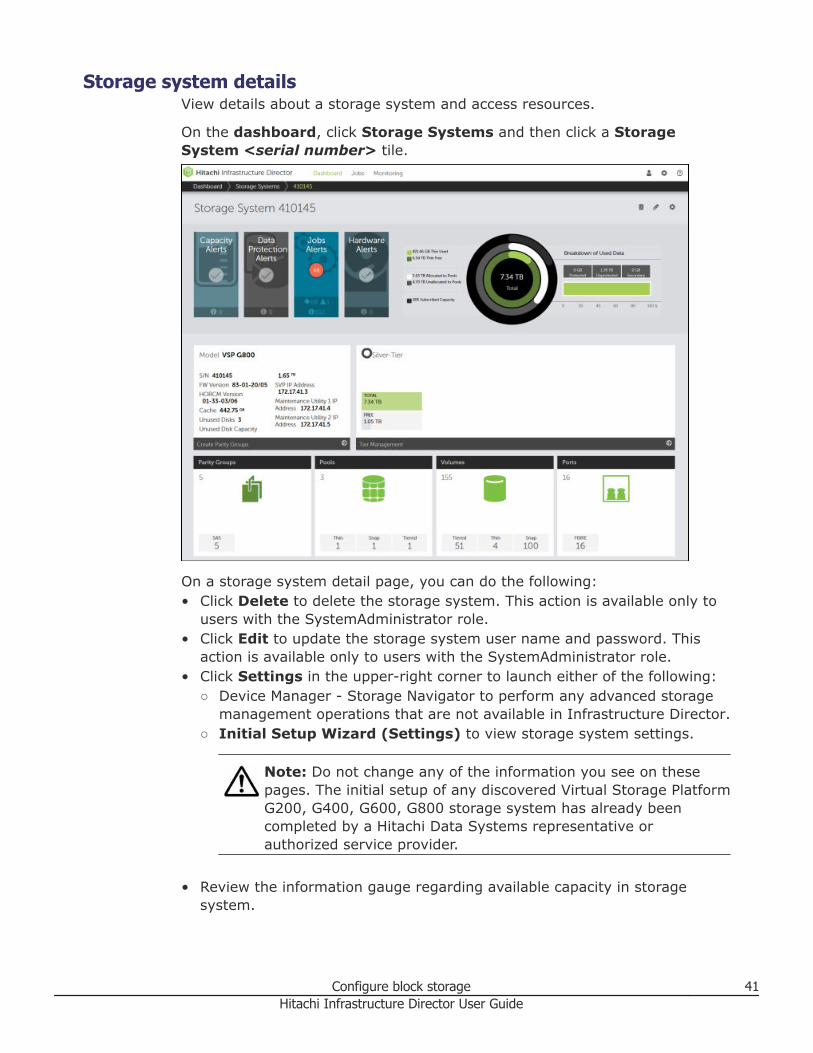
Storage system detailsView details about a storage system and access resources.
On the dashboard, click Storage Systems and then click a StorageSystem <serial number> tile.
On a storage system detail page, you can do the following:• Click Delete to delete the storage system. This action is available only to
users with the SystemAdministrator role.• Click Edit to update the storage system user name and password. This
action is available only to users with the SystemAdministrator role.• Click Settings in the upper-right corner to launch either of the following:
○ Device Manager - Storage Navigator to perform any advanced storagemanagement operations that are not available in Infrastructure Director.
○ Initial Setup Wizard (Settings) to view storage system settings.
Note: Do not change any of the information you see on thesepages. The initial setup of any discovered Virtual Storage PlatformG200, G400, G600, G800 storage system has already beencompleted by a Hitachi Data Systems representative orauthorized service provider.
• Review the information gauge regarding available capacity in storagesystem.
Configure block storage 41Hitachi Infrastructure Director User Guide
• Use the Alerts tiles to access alerts related to the storage system.• Click Review Tiered Categories to open the Tier Management page to view
and edit tier categories.• View attributes about the storage system, including information that
Infrastructure Director discovered about the system, such as model, serialnumber, and SVP IP address.
Field Description
Model Model name of the storage system.
S/N Storage system serial number.
FW Version Firmware version.
HORCM Version 01-33-03/06Hitachi Open Remote Copy Manager is a datareplication component residing on the server.
Cache Capacity Total cache capacity configured on the storage
system.
Unused Disks Disks that are not assigned as hot spares or
used to create parity groups.
Unused Disk Capacity Total unused capacity of all disks.
SVP IP Address Address of the service processor on the
storage system.
Maintenance Utility IP Addresses 1 and 2 Configured automatically when the storage
system is onboarded.
• If you notice that the number of unused disks and unused disk capacity istoo high, it implies that you have additional raw capacity in the systemthat can be converted into usable capacity by creating parity groups. ClickCreate Parity Groups to configure unused disks into parity groups.
• View the total and unused disk capacity for the different pool tiers.• Click Review Tiered Categories to open the Tier Management page,
where you can view the tier definitions and edit their names.• Click a tile in the lower portion of the page to display the details for parity
groups, pools, volumes, or ports for the storage system.
Related concepts
• Tier management on page 44
Using Device Manager - Storage Navigator for advanced storage configuration
Device Manager - Storage Navigator is the element manager for VirtualStorage Platform G200, G400, G600, G800 block module. It is a factory-installed application running on the SVP, which is directly connected to thestorage system. You can access Device Manager - Storage Navigator from theStorage System details page for advanced configuration options while
42 Configure block storageHitachi Infrastructure Director User Guide
performing management operations such as remote replication, volumemigration, and resource group management with Infrastructure Director.
Note: If you use Device Manager - Storage Navigator to manage resourcegroups, make sure that the user who onboards storage systems inInfrastructure Director has access to all custom resource groups and metaresource groups.
Use the Device Manager - Storage Navigator online help to obtain procedureinformation for advanced storage configuration tasks.
Accessing Device Manager - Storage Navigator
Launch Device Manager - Storage Navigator from the Settings menu availablein the Storage System details page. In the login dialog, use the user accountassigned to you by your security administrator. The tasks that you can do onthe system depend on the user role assigned to the user groups to which youbelong. Security administrators with view and modify privileges areresponsible for setting up user accounts in Device Manager - StorageNavigator.
Refer to the Roles table for roles that are available for use and thepermissions that each role provides to the users.
Roles
The following table shows all the roles that are available for use and thepermissions that each role provides to the users. You cannot create a customrole.
Role Capabilities
Security Administrator(View Only)
• Viewing information about user accounts and encryption settings• Viewing information about the encryption key in the key SVP
Security Administrator(View & Modify)
• Configuring user accounts• Creating encryption keys and configuring encryption settings• Viewing and switching where encryption keys are generated• Backing up and restoring encryption keys• Deleting encryption keys backed up in the key SVP• Viewing and changing the password policy for backing up encryption keys on the
management client• Connection to the external server• Backing up and restoring connection configuration to the external server• Configuring the certificate used for the SSL communication• Configuring the fibre channel authentication (FC-SP)• Configuring resource groups• Editing virtual management settings• Setting reserved attributes for global-active device
Audit Log Administrator(View Only)
• Viewing audit log information and downloading audit logs
Configure block storage 43Hitachi Infrastructure Director User Guide
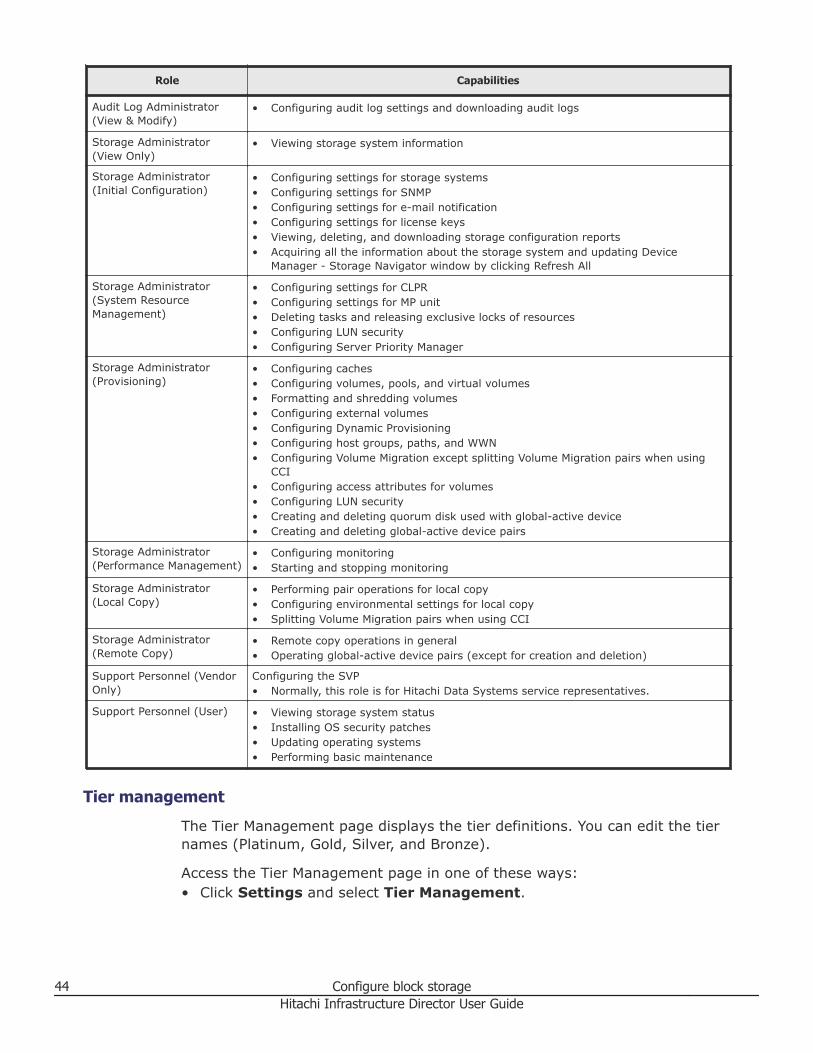
Role Capabilities
Audit Log Administrator(View & Modify)
• Configuring audit log settings and downloading audit logs
Storage Administrator(View Only)
• Viewing storage system information
Storage Administrator(Initial Configuration)
• Configuring settings for storage systems• Configuring settings for SNMP• Configuring settings for e-mail notification• Configuring settings for license keys• Viewing, deleting, and downloading storage configuration reports• Acquiring all the information about the storage system and updating Device
Manager - Storage Navigator window by clicking Refresh All
Storage Administrator(System ResourceManagement)
• Configuring settings for CLPR• Configuring settings for MP unit• Deleting tasks and releasing exclusive locks of resources• Configuring LUN security• Configuring Server Priority Manager
Storage Administrator(Provisioning)
• Configuring caches• Configuring volumes, pools, and virtual volumes• Formatting and shredding volumes• Configuring external volumes• Configuring Dynamic Provisioning• Configuring host groups, paths, and WWN• Configuring Volume Migration except splitting Volume Migration pairs when using
CCI• Configuring access attributes for volumes• Configuring LUN security• Creating and deleting quorum disk used with global-active device• Creating and deleting global-active device pairs
Storage Administrator(Performance Management)
• Configuring monitoring• Starting and stopping monitoring
Storage Administrator(Local Copy)
• Performing pair operations for local copy• Configuring environmental settings for local copy• Splitting Volume Migration pairs when using CCI
Storage Administrator(Remote Copy)
• Remote copy operations in general• Operating global-active device pairs (except for creation and deletion)
Support Personnel (VendorOnly)
Configuring the SVP• Normally, this role is for Hitachi Data Systems service representatives.
Support Personnel (User) • Viewing storage system status• Installing OS security patches• Updating operating systems• Performing basic maintenance
Tier management
The Tier Management page displays the tier definitions. You can edit the tiernames (Platinum, Gold, Silver, and Bronze).
Access the Tier Management page in one of these ways:• Click Settings and select Tier Management.
44 Configure block storageHitachi Infrastructure Director User Guide
• In the detail page for a storage system, click Tier Management.
Updating a storage systemUpdate the user name and password for a storage system. This actionrequires the SystemAdministrator role be assigned to the user.
Procedure
1. Access the Update Storage System <serial number> page one ofthese ways:• On the Storage Systems page, select a storage system and click
Edit.• On the Storage System <serial number> page, click Edit.
2. Edit the Username or Password and click Submit.
Managing serversInfrastructure Director supports provisioning storage to a group of serverWWNs by allowing logical servers to be managed by Infrastructure Director.Once servers are onboarded in Infrastructure Director, storage volumes canbe provisioned to the servers by creating Host Storage Domains andoptionally creating zones to provide a path between the storage volume andserver.
Adding serversAdd servers so you can attach volumes. You can add multiple serverparameters from a file, or add one server at a time.
There are two methods of adding servers:• Manually add information for one server at a time.• Import a CSV (comma-separated values) file with information for one
server in each row.The CSV file must have the following headings, in the order specified:Server Name, Description, IPAddress, OSType, WWNs (comma separatedlist of WWNs). All fields are required except Description.
Procedure
1. On the Infrastructure Director dashboard, click Servers. Then click theplus sign (+) to open the Add Server page.
2. On the Add Server page, do one of the following:• Click the upper plus sign (+) to browse for the CSV file or drag the file
to the plus sign. The values from the file will populate the page.• Click the plus sign (+) in the table to add a row and enter a Server
Name, Description (optional), IP Address, OS Type, and WWN.You can add more servers by clicking the plus sign.
Configure block storage 45Hitachi Infrastructure Director User Guide
3. Click Submit to add the servers.
Result
A job is started to add the servers.
Next steps
Create volumes and attach them to the server.
Related concepts
• Server inventory on page 46• Create and attach volumes to servers on page 37
Server inventoryThe Servers page displays all servers and includes a graphic summary basedon operating systems.
To find the server you are looking for, you can either search by server ID ornarrow down the list of servers using filters available on the right side.
You can click server tiles on this page to access details of individual serversand manage their volumes.
The following actions are available on this page:• To add a server, click the plus sign (+) to open the Add Servers page.• You can select one or more servers and perform the following actions:
○ Click Delete to delete the server.○ Click Edit to update server parameters.○ Click Create and Attach Volumes to use the provided workflow to
create new volumes, attach them to the server, and optionally, protectthe volumes.
○ Click Attach Existing Volumes to attach existing volumes to theserver.
Related tasks
• Adding servers on page 45
Related references
• Server details on page 46
Server detailsThe Server details page provides you all the details about the server as wellas a list of volumes, if any, attached to the server.
46 Configure block storageHitachi Infrastructure Director User Guide
This page also shows you path details for every volume attached to theserver, including the storage ports and server WWNs used to create HSDs aswell as the host mode options set up on the HSD.
You can perform server actions such as removing the server, editing theserver or provisioning volumes to server by attaching existing volumes orcreating and attaching new volumes.
For the volumes already attached to this server, you can perform volumeoperations such protecting or detaching volumes.
On the dashboard, click Servers to open the Servers inventory page. Thenclick a server tile to open the Server <ID> detail page for the selectedserver.
You can perform the following actions at the server level:• Click Delete to remove the server.• Click Edit to update server parameters.• Click the cylinder icon ( ) and select one of the following:
○ Attach Existing Volumes to attach volumes to the server.○ Create and Attach Volumes to create volumes and attach them to the
server.•
The following actions are available after selecting one or more volumes:• Click Edit to rename a volume on the Update Volume page. If the volume
is unprotected, you can also update the size.• Click Detach Volumes to detach volumes from the server.• Click Protect Volumes to protect volumes using Infrastructure Director
data protection technologies.• Click Unprotect Volumes to remove data protection applied to volumes.• Click Suspend Volumes to suspend data protection.• Click Resume to resume data protection.• Click Restore Volumes to restore from a backup.
Related concepts
• Protect data on page 53
Related tasks
• Creating volumes to attach to servers on page 37• Attaching existing volumes to a server on page 49• Update a volume on page 50• Suspend, resume, restore, and unprotect on page 56
Updating a serverYou can change the parameters for an existing server.
Configure block storage 47Hitachi Infrastructure Director User Guide
Prerequisites
Detach all volumes from the server. If you want to remove a WWN, detach allvolumes using the WWN.
Procedure
1. From the dashboard, click Servers to open the inventory of servers.2. Click server you want to update to open the server details page.3. Click the pencil icon to open the Update Server page.4. Edit the parameters and click Submit.
Managing volumes
A volume is a single accessible storage area, created in a pool within a paritygroup on a storage system. Create a volume and manage its properties withInfrastructure Director
Creating volumesCreate volumes for a registered storage system so you can attach them to aserver.
When you create volumes in Infrastructure Director you can:• Create multiple volumes of the same size or different sizes at the same
time.• Select the specific pool for volume creation or let Infrastructure Director
automatically select the best pool based on utilization.• Specify a common label and starting label suffix for identical volumes that
are the same size and have the same pool requirement.
Prerequisites
• Create parity groups.• Create pools.• Add servers (optional).
Procedure
1. On the Infrastructure Director dashboard, click Storage Systems to seethe inventory of storage systems and capacity information.
2. Click a storage system to see its configuration of servers, pools, ports,volumes, and parity groups.
3. Click Volumes to see the inventory of configured volumes for thestorage system.
4. Click the plus sign (+) to open the Create Volumes page.5. Configure volumes for the specified storage system.
a. Select the number of volumes.
48 Configure block storageHitachi Infrastructure Director User Guide
b. Enter the volume label (required) and select a suffix for it.c. Select the size.d. Select the volume unit: GB, TB, or PB.e. Select the pool type: Tiered or Thin.f. For a Thin pool, select the Tier.g. (Optional) Select the pool from the list of available pools. The default
selection is Auto Selected, which means that Infrastructure Directorselects the best pool for provisioning the volume based on utilizationand tier requirements.
6. Click the plus sign to move the configured volume to the lower portion ofthe Create Volumes page.A blank row appears at the top of the page where you can create morevolumes.
7. Click Submit.
Result
A job is started to create the volumes and add them to the volume inventoryfor the storage system.
Next steps
• Check the status of the volume-creation job by clicking Jobs.• Attach volumes to a server.
Related concepts
• Creating parity groups on page 24• Creating a pool on page 30
Related tasks
• Adding servers on page 45
Attaching existing volumes to a serverIf there are volumes that have not been attached to host, you can use thisprocedure to attach them.
Prerequisites• Enable security on ports.• Add servers.• Create volumes.
Configure block storage 49Hitachi Infrastructure Director User Guide
Procedure
1. To select one or more volumes to attach, click Storage Systems andthen click a storage system tile for the storage system where you want toattach volumes.
2. Click Volumes to view the inventory of all volumes.3. Select one or more volumes:
• Select volumes that you want to attach to servers.• To attach a specific volume, click it to open the Volume <ID> page.
You can also attach a single volume from the Volume details page forthe specific volume.
4. Click Attach Volumes.5. On the Attach Volumes page, select a server and click Next.6. The Host Mode is set by default to the server operating system. You can
make a selection if needed.The server OS Type is provided when the server is added toInfrastructure Director.
7. By default, the Host Mode Option will depend on the Host Modeselection.Default values are set only for VMWARE EX and WIN EX host modes.The default for all other Host Modes is none.
8. Select the LUN Alignment.By default, Infrastructure Director uses the LUN number that is commonto the servers. If attachment is to only one server, this setting has noeffect.
9. The Auto Create Zone is set to No by default. You can set it to Yes toautomatically create zones.
10. Optionally, select one or more Ports and one or more server WWNs.Make sure that the WWNs are valid in the environment and visible to thestorage system. If the WWN-port pairs selected do not exist,Infrastructure Director creates them.
11. Click Submit.
Related tasks
• Enabling port security on page 22• Adding servers on page 45• Creating volumes on page 48
Update a volumeYou can expand an unprotected volume and rename any volume.
Procedure
1. Navigate to details for a single volume in one of these ways:
50 Configure block storageHitachi Infrastructure Director User Guide
• From the dashboard, click Storage Systems and then click a storagesystem tile to view its resources. Click Volumes and then click thevolume tile for the volume you want to update.
• From the dashboard, click Servers and then click a server tile to viewits volumes. Click a volume tile for the volume you want to expand.
2. On the Volume <ID> page click Edit to open the Update Volume page.3. You can rename the volume, and if it is unprotected, you can enter an
Update Size and click Submit.
Result
A job is started to update the volume.
Volumes inventoryThe Volumes page enables you to filter, sort, and edit volumes for a singlestorage system, and to select volumes for data protection.
Access the inventory of volumes for a storage system to gain insight intovolume size, data protection and utilization. You can also create volumes,attach existing volumes and perform data protection operations.
View volume details in either a tile view or a list view. Capacity utilization isrepresented by a color bar:• Green: Below 70%.• Orange: From 70% to 80%.• Red: Over 80%.
The following actions are available on this page:• If there are Data Protection Alerts, click the tile to view the alerts in the
Monitoring tab.• Click the plus sign (+) to add volumes on the Create Volumes page.• Click a volume to view details and attach, update or delete the volume.• Select a volume and click Edit to update the volume by editing the name.
If the volume is unprotected you can also expand the capacity.• Select one or more volumes to perform one of the following actions:
○ Click Delete to delete volumes. When you delete a volume, it is de-provisioned and removed from the storage system.
○ Click Attach Volumes to attach existing volumes to one or moreservers on the Attach Volumes page.
○ Click Protect Volumes to apply data protection on the Protect Volumespage.
○ Click Suspend to suspend data protection.○ Click Resume to resume data protection following suspension.○ Click Restore to restore a backup.
Configure block storage 51Hitachi Infrastructure Director User Guide
Volume detailsAccess volume details from the dashboard by clicking Storage Systems, andthen click a storage system tile. Click Volumes to open the Volumes pageand then click a volume tile
On a volume detail page, you can do the following:• View the attributes of the volume.• Attach the volume to a server by clicking Attach Volume.• Edit the volume configuration by clicking Edit to open the Update Volume
window.If the volume is unprotected, you can expand the capacity. When you clickSubmit, a notification informs you that a job has started to expand thevolume.
• Delete the volume.• If there are secondary volumes, you can click the "S" to view details about
the secondary volumes.
52 Configure block storageHitachi Infrastructure Director User Guide

3Protect data
Data protection refers to replication of volumes. Use data protection toensure that you have copies of your data.
You can protect volumes locally on the same storage system and choose toprotect a single volume, a group of volumes, or all volumes belonging to aserver.
Infrastructure Director provides the following methods of protecting data:• The Clone Now method creates a copy of a volume at a point in time.
This method creates a full copy of a primary volume at that point in timeand automatically suspends the copy operation. Any further R/Woperations on the primary volume will not be updated to secondaryvolumes.
• The Snapshot method takes incremental snapshots of volumes based on auser-created schedule. The maximum number of snapshots is 1024.
Note: When the user offboards a storage system and onboards it again, allthe protected volumes using Clone Now will remain untouched, but anySnapshot schedules will be suspended. User will need to resume afteronboarding the storage system.
Selecting volumes to protect
You can select a server, create volumes and attach them to the server, andthen (optionally) protect the volumes.
As an alternative, you can create volumes separately and attach them toservers at a later time. After attaching volumes to servers, you can selectvolumes to protect.
1. To select volumes to protect, do one of the following:• Select a server, create volumes for the server and attach the volumes
to the server.• Select a server to view volumes already attached to the server. You
can filter for unprotected volumes.• On the dashboard, click Storage Systems, then click a storage system
tile and click Volumes to open the Volumes page.
Protect data 53Hitachi Infrastructure Director User Guide

2. Select volumes and then click Protect to open the Protect Volumes pagewith the list of selected volumes displayed.
3. Choose a type of data protection; Clone Now or Snapshot.
Note: The Clone Now method is available for volumes that arealready existing and attached to a server. It is not available whenthe create-and-attach workflow is used to create, attach, andprotect volumes in a single pagle.
If you use the workflow provided to create, attach, and protect volumes,you can choose None as a data protection type to avoid protectingvolumes.
□ Protecting volumes by cloning
□ Protecting volumes by creating snapshots
□ Suspend, resume, restore, and unprotect
54 Protect dataHitachi Infrastructure Director User Guide
Protecting volumes by cloningAfter creating and attaching volumes, you can implement data protection bycreating a clone.
The Clone Now method can be useful if maintenance or testing is needed.You can clone the primary volume and perform testing when the clone iscomplete. If any data is lost, you can retrieve it from the secondary volume.
Note: The Clone Now method is available for volumes that are alreadyexisting and attached to a server. It is not available when the create-and-attach workflow is used to create, attach, and protect volumes in a singlepagle.
Procedure
1. In the Protect Volumes page, select the volumes you want to protectand click Clone Now.
2. Select a replication group from the options in the Replication GroupName list or enter a new name.Up to 28 alphanumeric characters, and also hyphens (-) and underscores(_), are allowed. Spaces are not allowed.
3. Click Submit to clone the volumes.
Result
A job is created and a summary message displays.
Related tasks
• Protecting volumes by creating snapshots on page 55• Creating volumes to attach to servers on page 37• Attaching existing volumes to a server on page 49
Protecting volumes by creating snapshotsAfter creating and attaching volumes, you can implement data protection bycreating incremental snapshots.
You can use the Snapshot method if you don't need continuous copying butwant to schedule the copy depending on expected changes in the data.
Procedure
1. In the Protect Volumes page, select the volumes you want to protectand click Snapshot.
2. You can enable Consistency Group to perform data protection on allpairs in the group simultaneously.
Protect data 55Hitachi Infrastructure Director User Guide
3. Select a Replication Group for each volume or enter a newReplication Group name. Up to 28 alphanumeric characters, alsohyphens (-) and underscores (_), are allowed. Spaces are not allowed.
4. Set a daily, weekly, or monthly schedule and click Submit.A volume cannot have more than one schedule.
Result
A summary message is displayed and snapshots are created according to theschedule.
Related tasks
• Creating volumes to attach to servers on page 37• Attaching existing volumes to a server on page 49• Protecting volumes by cloning on page 55
Suspend, resume, restore, and unprotectSuspend data protection, and then resume or create a new copy. Restore avolume from a copy.
You may need to suspend data protection during maintenance, and thenresume or create a new copy. You can also restore a backup from a copy to aprimary volume. Suspend, resume, and restore all operate on an entirereplication group.
Note: You cannot suspend a volume that is in COPY status. You can checkthe Primary Volume Status on the Affected Volumes page.
You can also unprotect volumes by selecting them and clicking UnprotectVolumes.
The effect of suspension depends on the type of data protection used:• Snapshot: Data protection can be suspended and resumed. Data will be
missing for the period of suspension.• Clone Now: Copying is already suspended. Data protection can be
resumed.
Prerequisites
Before using the Restore function, stop all I/O activity to the volume.
Procedure
1. Select volumes to suspend, resume or restore in one of these ways:• On the dashboard, click Servers, and click a server tile to open
details.• Select volumes for a single storage system:
56 Protect dataHitachi Infrastructure Director User Guide
1. On the dashboard, click Storage Systems and click a storagesystem tile to open details.
2. Click Servers, and click a server tile to open details.
You can filter volumes to view only those that are protected, or byprotection type. Select volumes to suspend, resume, or restore.
2. Choose the operation to perform:• Click Suspend or Resume to open the Affected Volumes page,
where you can view all affected volumes sorted by replication group.Click Yes to confirm the operation and then click Submit.
Note: Suspension will suspend the schedule for snapshots andsuspend the replication for clones.
• Click Restore to open the Restore Volumes page where you canselect copies to restore and then click Submit to restore the copy.
WARNING: The Restore function will overwrite the volume withbackup data. The data on current volume will be destroyed.
Protect data 57Hitachi Infrastructure Director User Guide

58 Protect dataHitachi Infrastructure Director User Guide
4Monitor block storage
Hitachi Infrastructure Director supports monitoring of capacity, dataprotection, jobs, and hardware.
□ Monitoring capacity
□ Monitoring hardware
□ Monitoring data protection
□ Monitoring jobs
□ Setting up to receive SNMP alerts
Monitor block storage 59Hitachi Infrastructure Director User Guide
Monitoring capacityMonitor the capacity of block storage pools.
You can use Infrastructure Director to monitor block storage capacity so youcan tell when physical capacity usage is exceeding thresholds set for yourpools.
Note: Capacity alerts for Snap (HTI) pools are not supported.
Alerts are represented by the number in the Capacity tile. If there ischeckmark, there are no alerts. A red circle represents an Error and a yellowtriangle represents a Warning. Only the highest level of alert is shown, so ared circle can include Errors and Warnings if there is more than one level ofalert. The Error threshold is set in the "Utilization Threshold (High)" fieldwhen the pool is created and the Warning threshold is set in the "UtilizationThreshold (Low)" field.
Capacity Alerts for all storage systems are shown on the dashboard and onthe Monitoring tab. Click the Capacity tile on the Monitoring tab to view thepools that have alerts. In the expanded carousel, click Pools to view alertdetails. The number of Capacity Alerts cannot be more than 1 becauseInfrastructure Director monitors at the component level, which is pools.
The alert clearance process runs every 20 minutes for each storage systemthat has pools with errors. Alerts are only cleared when all pools with errorsin the storage system return to normal state. For example, if there are 5pools with errors in one storage system, then all alerts will display until allthe pool alerts are cleared.
Procedure
1. Monitoring alerts display for the following resources:• All storage systems: If Capacity Alerts on the dashboard has a red
circle or a yellow triangle, click it to open the Monitoring tab with thenumber of Pool alerts exposed in the Capacity carousel.Alternatively, you can click the Monitoring tab and then click theCapacity tile.
• Storage systems inventory: This option also displays all capacityalerts. Click Storage Systems on the dashboard and if the CapacityAlerts tile has a red circle or a yellow triangle, click it to open thecarousel in the Monitoring tab.
• Storage system detail: In the storage systems inventory, click astorage system tile. If the Capacity Alerts tile has a red circle oryellow triangle, click it to open the tile in the Monitoring tab anddisplay the Pool alerts for the selected storage system.
60 Monitor block storageHitachi Infrastructure Director User Guide
• Pool inventory: On the storage system inventory page, click a storagesystem tile to view resources for the storage system. Click Pools.Then click the Capacity Alerts tile to open the alerts carousel for thestorage system pools in the Monitoring tab.
2. In the Capacity alerts carousel, click Pools to populate the table withdetails of the alerts.
Note: Ref Code mapping to trap descriptions is available in a fileincluded with the ISO image.
Next steps
If there are pools with alerts displaying the "Error" status, you can expandthe pools to increase their capacity.
Related concepts
• Creating a pool on page 30
Monitoring hardwareMonitor hardware devices to view and investigate warnings and critical alerts.
Infrastructure Director monitors components in your storage systems anddisplays alerts on resource and storage system pages. You can also see howmany components are in normal status.
Alerts are represented by a number in the Hardware tile or the HardwareAlerts tile. A red circle represents a critical alert and a yellow trianglerepresents a warning. Only critical alerts are shown unless there are nocritical alerts, in which case warning alerts are displayed.
The alerts are received from the storage array. There is one alert percomponent type, for a maximum of 8.
The alert clearance process runs every 20 minutes for each storage systemthat has components with errors. Alerts are only cleared when allcomponents of a given type with errors in the storage system return tonormal state. The exception is disks, each of which can have alerts cleared,even if other disks remain in error. Alerts for ports and processors are clearedtogether, so alerts are cleared only when all ports and all processors arenormal.
For example, if there are 5 fans with alerts in one storage system, they willbe cleared only when each and every fan alert is cleared. However, for disks,each alert is cleared as and when disk alert clearance is available.
Infrastructure Director monitors the following components:
Monitor block storage 61Hitachi Infrastructure Director User Guide
• Disks• Fans• Batteries• Cache• Processors• Power supplies• Ports• Shared memory
Procedure
1. Hardware alerts display in the following pages. Alerts are displayed bytype of component.• Dashboard: Click the Hardware Alerts tile or the Monitoring tab
and click the Hardware tile to display the types of components.• Storage system inventory: Includes all hardware alerts.• Storage system detail: Click a storage system tile and click the
Hardware Alerts tile to view hardware alerts for the selected storagesystem in the Monitoring tab.
• Parity Group inventory: Click a storage system tile and then clickParity Groups to open the inventory. Click the Hardware Alerts tileto view alerts for disks where parity groups are located.
Note: Ref Code mapping to trap descriptions is available in a fileincluded with the ISO image.
2. Click a component type to display details in the table. Review the detailsin order to resolve the issue.
Monitoring data protectionData protection monitoring enables you to monitor the status of each dataprotection task.
You can view jobs alerts for your data protections tasks in a single page. Dataprotection alerts can be viewed by storage system and by server, and areavailable for the aggregated storage systems.
Alerts for the following operations are available:• Failed Clone Now operations• Failed Snapshot operations
Prerequisites
A red circle with a number in a Data Protection alerts tile indicates thenumber of primary volumes and servers on which data protection tasks havefailed. You can click the tile to investigate failed tasks.
62 Monitor block storageHitachi Infrastructure Director User Guide
Procedure
1. View data protection alerts for the following resources:• All data protection alerts:
○ From the dashboard, click Monitoring or Data Protection Alertsto open the Monitoring tab.
○ Click Storage Systems on the dashboard and then click DataProtection Alerts to open the Monitoring tab.
• A single storage system: Click Storage Systems and then click astorage system tile. Click the Data Protection Alerts tile to open theMonitoring tab.
• Volumes attached to a single server: Click Servers from thedashboard and click a Server tile. Then click Data Protection Alertsto open the Monitoring tab.The volumes inventory for a server includes failed tasks marked by anexclamation point. Click an exclamation point to view all volumes withfailed tasks in the Monitoring tab.
2. Click the Data Protection tile in the Monitoring tab to open thecarousel and then click Volumes to display details that can help youidentify the issue. You can click the exclamation point for any failed taskto view details for the volume.
Monitoring jobsView the Jobs page to get an update on the status of a task or to view theerrors associated with a job.
Procedure
1. If there is a red circle with a number in the Jobs Alert tile, it reflects thenumber of failed jobs and jobs that succeeded with errors. Access theJobs page in one of these ways:• From the dashboard, click Jobs Alerts to open the Jobs page, or click
the Jobs tab.• On the dashboard, click Storage Systems to open the storage
systems inventory. If the Jobs Alert tile has a red circle with anumber, click it to view the Jobs page.
• In the storage systems inventory, click a storage system tile. If theJobs Alert tile has a red circle with a number, click it to view theinventory of jobs associated with the storage system.
Monitor block storage 63Hitachi Infrastructure Director User Guide
2. View the status of jobs.You can use the Search function to search by keyword. Common searchterms include:• Volume• Pool• Storage• Create• Provision• Expand• Delete
The Status column displays the job status. You can mouse over thestatus to view the Job ID.
Icon Description
success The job completed successfully.
success with errors The job completed successfully, but there were errors.
in progress The job is still in progress.
failed The job failed.
Many jobs can be expanded to display child jobs in the table, each withan associated report. Reports are the messages that the InfrastructureDirector service returns regarding the progress of each job. Child jobsserve to track jobs that launch multiple, smaller tasks (such as creatingmultiple volumes).
Next steps
• If the job failed, review the job reports to determine the cause of thefailure.
• If the job completed successfully with errors, click the job to view theerror message.
Setting up to receive SNMP alertsIf you are using external management software, you can add an SNMP(Simple Network Manager Protocol) manager to enable alerts about devicesin registered storage systems. This option is not required to monitorhardware in Hitachi Infrastructure Director.
64 Monitor block storageHitachi Infrastructure Director User Guide
When an SNMP manager is added, it collects information from SNMP agentsthat are installed in components of registered storage systems. The storagesystems send traps to Infrastructure Director using SNMP v1.
Note: Infrastructure Director manages such alerts automatically, forprocessors, memory, disks, power supplies, batteries, ports, caches, pools,and fans.
Infrastructure Director uses SNMP v2c to send traps to external managementsoftware as soon as they are received. The structure of the traps is defined ina MIB file and Infrastructure Director uses its own MIB file to add informationto traps received so that the trap is easier to understand. It is important toimport the Infrastructure Director file to access the additional information.The Infrastructure Director MIB file is included in the product installationmedia.
The SNMP manager enables you to do the following in the external software:• Determine whether there are any problems with storage system
components or whether the status is normal.• Identify the specific component that in warning or critical status.
The following types of components can be monitored:• Processor• Memory• Power supply• Battery• Fan• Physical drive or disk• Port• Cache• Pool
Prerequisites
SNMP management requires:• External management software capable of receiving SNMP alerts.• SNMP agents must be configured in the storage environment.• The Infrastructure Director MIB file has been imported to the SNMP
manager.
Procedure
1. Click Settings and select SNMP Settings. Click Add SNMP Manager toopen the SNMP Management page.
2. Enter the following details:• Name: up to 32 characters.• IP Address: of the SNMP manager.
Monitor block storage 65Hitachi Infrastructure Director User Guide
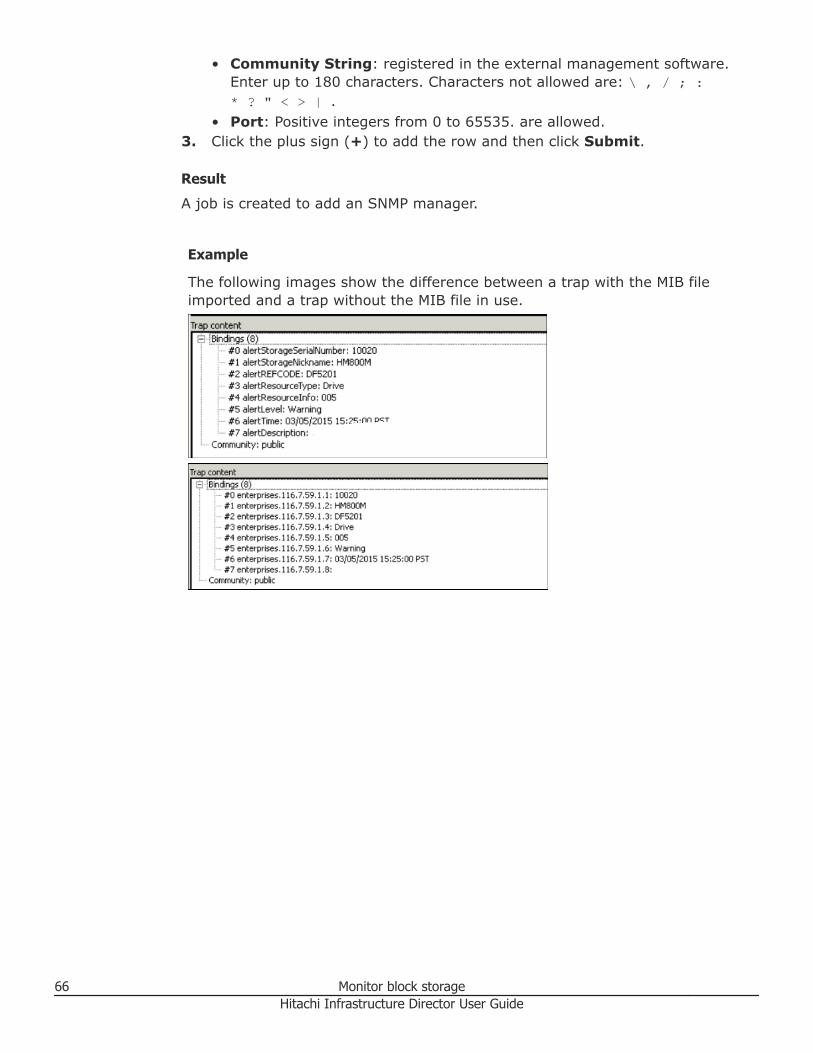
• Community String: registered in the external management software.Enter up to 180 characters. Characters not allowed are: \ , / ; :* ? " < > | .
• Port: Positive integers from 0 to 65535. are allowed.3. Click the plus sign (+) to add the row and then click Submit.
Result
A job is created to add an SNMP manager.
Example
The following images show the difference between a trap with the MIB fileimported and a trap without the MIB file in use.
66 Monitor block storageHitachi Infrastructure Director User Guide
5Administer Infrastructure DirectorAccess Infrastructure Director administration tasks in Virtual ApplianceManager or through the Settings icon ( ) in the top navigation menu.
□ Administering security
□ Backup and restore system settings
□ Downloading the system log file
Administer Infrastructure Director 67Hitachi Infrastructure Director User Guide
Administering securityInfrastructure Director comes with a default local user that has permissionsfor all operations in Infrastructure Director.
On a regular basis, you can change the password of the local user byaccessing Change Local Password in Settings in the top navigation menu.
If you want to provide more granular control to your users, you can use role-based access to control the operations that can be managed by differentusers. To do so, you must first add your LDAP server as the source ofauthentication. Infrastructure Director supports adding one external LDAPserver.
You can then assign Infrastructure Director roles to user groups that exist inthe Active Directory account domain. Members of the user groups will use theassigned user roles, and therefore, only the privileges attached to those userroles.
Adding an account domain
Add an account domain so you can assign roles to user groups.
Note: Once an active directory server is added, you can change thecredentials on an ongoing basis and save the changes. To add a new ActiveDirectory server, remove the existing Active Directory server and add a newone.
Procedure
1. Click Settings and select Security to open the Security page.2. In the Account Domain field, enter the Active Directory server.3. Enter the Active Directory server Username and Password.
Infrastructure Director uses these credentials to connect to the externaldomain and get the list of user groups in the Active Directory source. Youcan assign Infrastructure Director roles to these user groups.Infrastructure Director does not modify the user groups in the ActiveDirectory source.
4. Click Submit.Infrastructure Director displays the Jobs page and the job that has beenstarted to add the account domain.
Next steps
When the job is complete, you can assign user roles.
68 Administer Infrastructure DirectorHitachi Infrastructure Director User Guide
Related tasks
• Assigning user roles on page 69
Assigning user roles
After adding an external LDAP source to Infrastructure Director, you canassign Infrastructure Director roles to user groups.
More than one role can be assigned to a user group. In this case the user willhave permissions for multiple roles.
Once a role is assigned to a user group, you can change the role assignmentand save it.
Prerequisites
Add an account domain.
Procedure
1. Access the Security page by opening the settings menu and thenselecting Security Settings.
2. In the Group Name field, type in a user group name from the accountdomain. Partial matches automatically populate the field.
3. In the User Role field, select an Infrastructure Director user role:• SecurityAdministrator: Includes privileges needed for the following:
○ Addition, administration, and deletion of remote account domains.○ User role assignment to groups.○ Read-only privileges to monitor everything in Infrastructure
Director.• SystemAdministrator: Includes privileges needed for the following:
○ Addition, administration, and deletion of servers, storage, and fabricswitches, onboarding of HNAS and SNMP manager, and tiermanagement.
○ Updating of Initial Setup Wizard settings.○ Addition, administration, and deletion of parity groups and port
configurations.○ Addition, administration, and deletion of EVS cluster resource
groups.○ Read-only privileges to monitor everything in Infrastructure
Director.• StorageAdministrator: Includes privileges needed for storage
provisioning and data protection:○ Addition, administration, and deletion of pools.○ Addition, administration, and deletion of volumes, including
creating, attaching to servers, and data protection.
Administer Infrastructure Director 69Hitachi Infrastructure Director User Guide
○ Read-only privileges to monitor everything in InfrastructureDirector.
4. Click the plus sign (+).5. Click Submit.
A job is started to assign the user roles.
Example
For example, there might be a user group named "IT" in the accountdomain, whose members need to perform security functions inInfrastructure Director. Assigning the User Role "SecurityAdministrator" tothe Group Name "IT" would give security administration privileges to allmembers of "IT".
Related tasks
• Adding an account domain on page 68
Backup and restore system settingsUse Hitachi Virtual Appliance Manager to backup system settings beforemoving Infrastructure Director to another instance or before upgrading.
The settings include configuration files, an email template file and an SQLfile.
Procedure
1. Open a browser and enter https://ip-address/vam/ to access the VirtualAppliance Manager and adjust the settings for your server environment.• User name: service• Password: Chang3Me!
2. Click Backup to download a ZIP file containing system settings.3. When you are ready to restore, log in to Virtual Appliance Manager4. Click Restore and either drag and drop the backup file or click the plus
sign (+).5. Click Submit.
System settings included in backupThe following settings are included in the backup file:
File name Description
cinder.conf Cinder configuration file located on the deployedVM at /opt/rainier/etc/cinder/cinder.conf
70 Administer Infrastructure DirectorHitachi Infrastructure Director User Guide
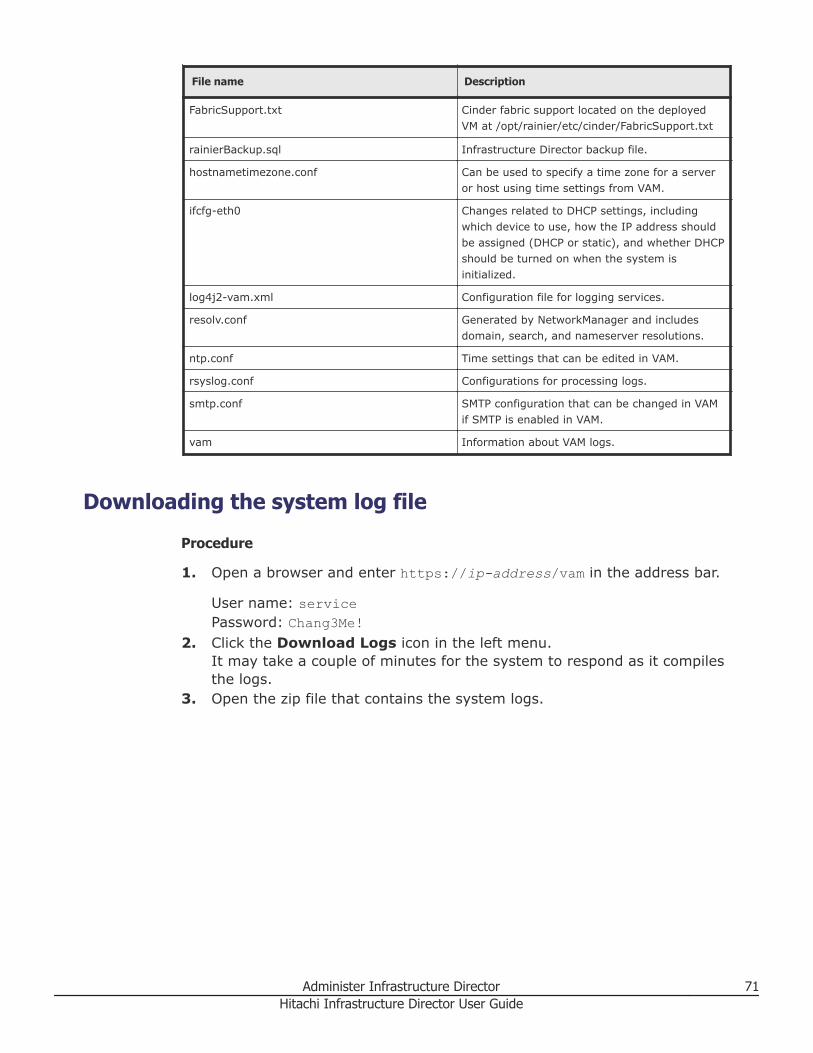
File name Description
FabricSupport.txt Cinder fabric support located on the deployedVM at /opt/rainier/etc/cinder/FabricSupport.txt
rainierBackup.sql Infrastructure Director backup file.
hostnametimezone.conf Can be used to specify a time zone for a serveror host using time settings from VAM.
ifcfg-eth0 Changes related to DHCP settings, includingwhich device to use, how the IP address shouldbe assigned (DHCP or static), and whether DHCPshould be turned on when the system isinitialized.
log4j2-vam.xml Configuration file for logging services.
resolv.conf Generated by NetworkManager and includesdomain, search, and nameserver resolutions.
ntp.conf Time settings that can be edited in VAM.
rsyslog.conf Configurations for processing logs.
smtp.conf SMTP configuration that can be changed in VAMif SMTP is enabled in VAM.
vam Information about VAM logs.
Downloading the system log file
Procedure
1. Open a browser and enter https://ip-address/vam in the address bar.
User name: servicePassword: Chang3Me!
2. Click the Download Logs icon in the left menu.It may take a couple of minutes for the system to respond as it compilesthe logs.
3. Open the zip file that contains the system logs.
Administer Infrastructure Director 71Hitachi Infrastructure Director User Guide

72 Administer Infrastructure DirectorHitachi Infrastructure Director User Guide
IndexA
account domainadding 68
Active Directory 68administration 67alerts 59
Bbackup 70
settings 70block storage systems
configuring 10
Ccapacity
monitoring 60cloning 55
Ddashboard 11
analyzing data 13data protecting
monitoring 62data protection 53
cloning 55restore 56resume 56snapshots 55suspend 56unprotect 56
Device Manager - Storage Navigatoraccessing 43using 42
devicesmonitoring 61
Ffabric switches
adding 23
supported models 24system requirements 24
file storage systemsconfiguring 10
Ggetting started 9
Hhosts
updating 47
Iinventory 15
Jjob status 63jobs
monitoring 63
Llog
download 71
Mmonitoring 59
capacity 60data protecting 62hardware 61jobs 63
Oonboarding 16overview
Hitachi Infrastructure Director 10
Index 73Hitachi Infrastructure Director User Guide
Pparity group
creating 24parity groups
initializing 29inventory 29status 29
parity groups, creatingadvanced method 27basic method 26
passwordlocal, changing 11
pool creationbasic method, calculation of pool sizes 35
poolscreating 30creating with advanced method 33expanding 36inventory 35updating 36viewing details 36
pools, creating 31ports
enabling security 22product version 6
Rreplication 53resources 15Roles 43
Ssecurity
administering 68servers
adding 45attach existing volumes 46create and attach volumes 46delete 46details 46edit 46inventory 46
Settings menu 11snapshots 55SNMP alerts
enabling 64SNMP manager
adding 64spares
managing 29storage system
adding 20configuration workflow 16editing 45updating 45
storage systemsdeleting 41
details 41editing 41Initial Setup Wizard 41inventory 40managing 40
system logdownload 71
Ttiers
managing 44
Uuser groups
roles 43user roles 68
assigning 69
Vverify, storage system 21virtual appliance manager
download system log 71volumes
attaching 39, 49cloning 55create and attach 37create and attach to servers 17details 52expanding 50inventory 51managing 48snapshots 55updating 50
volumes, creating 37, 48
Wworkflow
configuring a storage system 16
74 IndexHitachi Infrastructure Director User Guide

Hitachi Infrastructure Director User Guide
Hitachi Data Systems
Corporate Headquarters2845 Lafayette StreetSanta Clara, California 95050-2639U.S.A.www.hds.com
Regional Contact Information
Americas+1 408 970 [email protected]
Europe, Middle East, and Africa+44 (0) 1753 [email protected]
Asia Pacific+852 3189 [email protected]
MK-94HID004-01