hitachi programmable controller - esco-da.be hitachi/software/sycon.net/manuals/sycon... · hitachi...
TRANSCRIPT
HITACHI PROGRAMMABLE CONTROLLER
PROFIBUS Configuration
PROFIBUS-DP MASTER MODULE (EH-RMP2) Configuration Software
(SYCON.net) Operation Manual
NJI-623(X)

i
The content of this manual may be changed without notice.
Revision History No. Page Item Description of Revision Date of Revision Manual No. 1 First edition September.2014 NJI-623(X)
ii
Table of Contents
Chapter 1 Installation 1-1 ~ 1-9
1.1 System requirements .................................................................................................................................. 1-1
1.2 Installation procedure of Configuration Software (SYCON.net) ............................................................... 1-2
1.3 Installation Procedure of USB Driver ........................................................................................................ 1-6
1.4 Registration of GSD file ............................................................................................................................ 1-8
Chapter2 Configuration 2-1 ~ 2-8
2.1 Online Configuration ................................................................................................................................. 2-1
2.2 Offline Configuration ................................................................................................................................ 2-5
Chapter 1 Installation
1 – 1
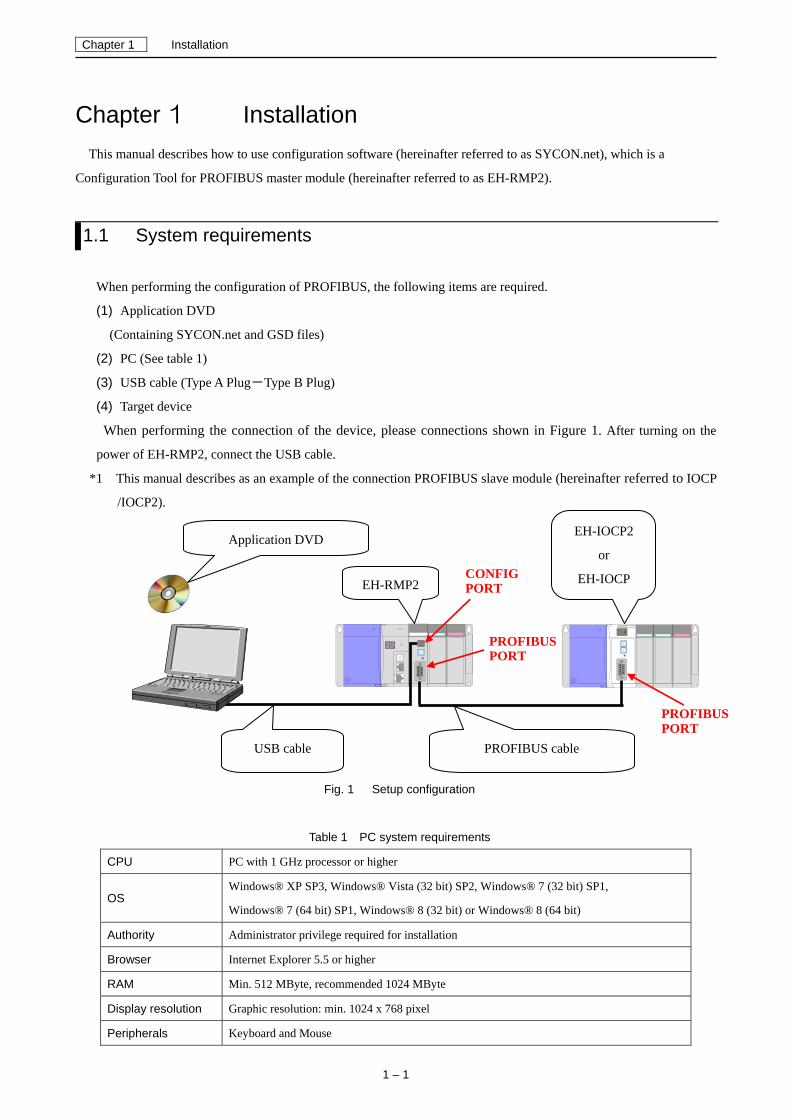
Chapter 1 Installation
This manual describes how to use configuration software (hereinafter referred to as SYCON.net), which is a
Configuration Tool for PROFIBUS master module (hereinafter referred to as EH-RMP2).
1.1 System requirements
When performing the configuration of PROFIBUS, the following items are required.
(1) Application DVD
(Containing SYCON.net and GSD files)
(2) PC (See table 1)
(3) USB cable (Type A Plug-Type B Plug)
(4) Target device
When performing the connection of the device, please connections shown in Figure 1. After turning on the
power of EH-RMP2, connect the USB cable.
*1 This manual describes as an example of the connection PROFIBUS slave module (hereinafter referred to IOCP
/IOCP2).
Fig. 1 Setup configuration
Table 1 PC system requirements
CPU PC with 1 GHz processor or higher
OS Windows® XP SP3, Windows® Vista (32 bit) SP2, Windows® 7 (32 bit) SP1,
Windows® 7 (64 bit) SP1, Windows® 8 (32 bit) or Windows® 8 (64 bit)
Authority Administrator privilege required for installation
Browser Internet Explorer 5.5 or higher
RAM Min. 512 MByte, recommended 1024 MByte
Display resolution Graphic resolution: min. 1024 x 768 pixel
Peripherals Keyboard and Mouse
USB cable PROFIBUS cable
EH-RMP2
EH-IOCP2
or
EH-IOCP
Application DVD
CONFIG PORT
PROFIBUS PORT
PROFIBUS PORT

Chapter 1 Installation
1 – 2
1.2 Installation procedure of Configuration Software (SYCON.net)
(1) Double-click the [Communication-Solutions.exe] in application DVD.
(2) Setup screen is displayed. Click the [Install SYCON.net Configuration Software]
(3) Choose the language and click the “OK” button.
*2 Hereafter English version is described.
Chapter 1 Installation
1 – 3
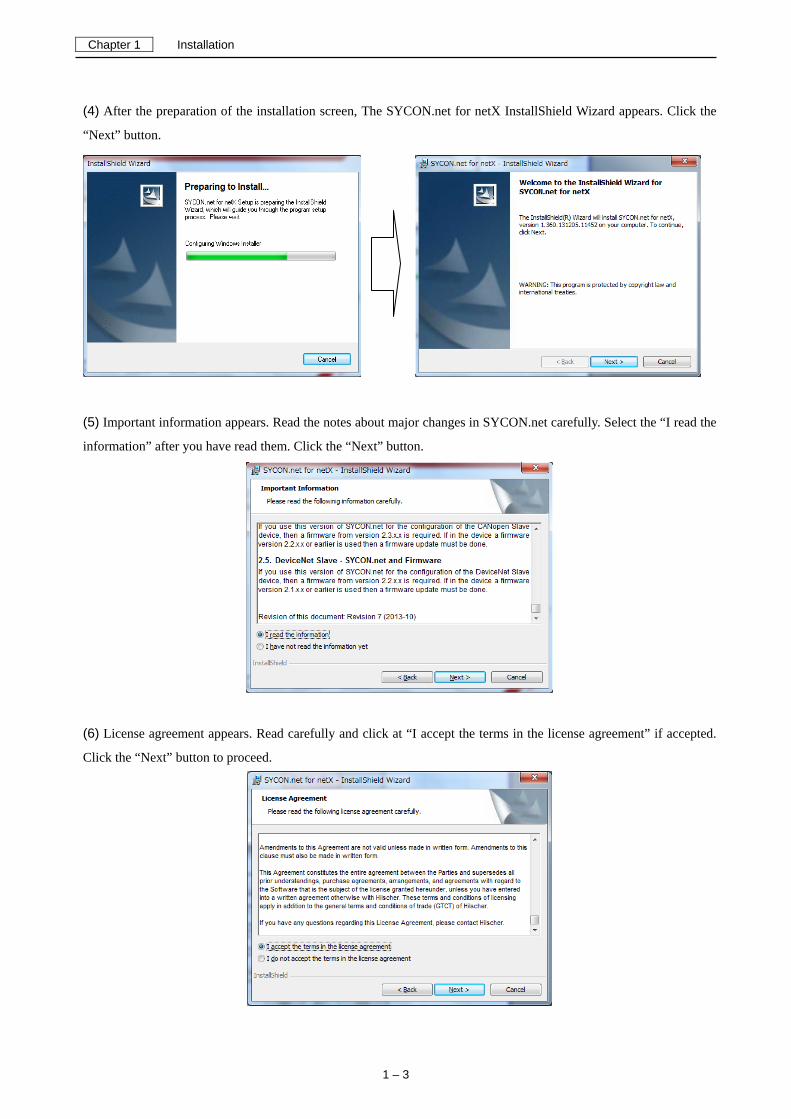
(4) After the preparation of the installation screen, The SYCON.net for netX InstallShield Wizard appears. Click the
“Next” button.
(5) Important information appears. Read the notes about major changes in SYCON.net carefully. Select the “I read the
information” after you have read them. Click the “Next” button.
(6) License agreement appears. Read carefully and click at “I accept the terms in the license agreement” if accepted.
Click the “Next” button to proceed.

Chapter 1 Installation
1 – 4
(7) Customer information dialog appears. Input user name and organization and click the “Next” button to proceed.
(8) Setup type dialog appears. Select the “Complete” to install the complete software. Click the “Next” button.
(9) Ready to Install Program dialog appears. Click the “Install” button.
User Name
Organization
Chapter 1 Installation
1 – 5
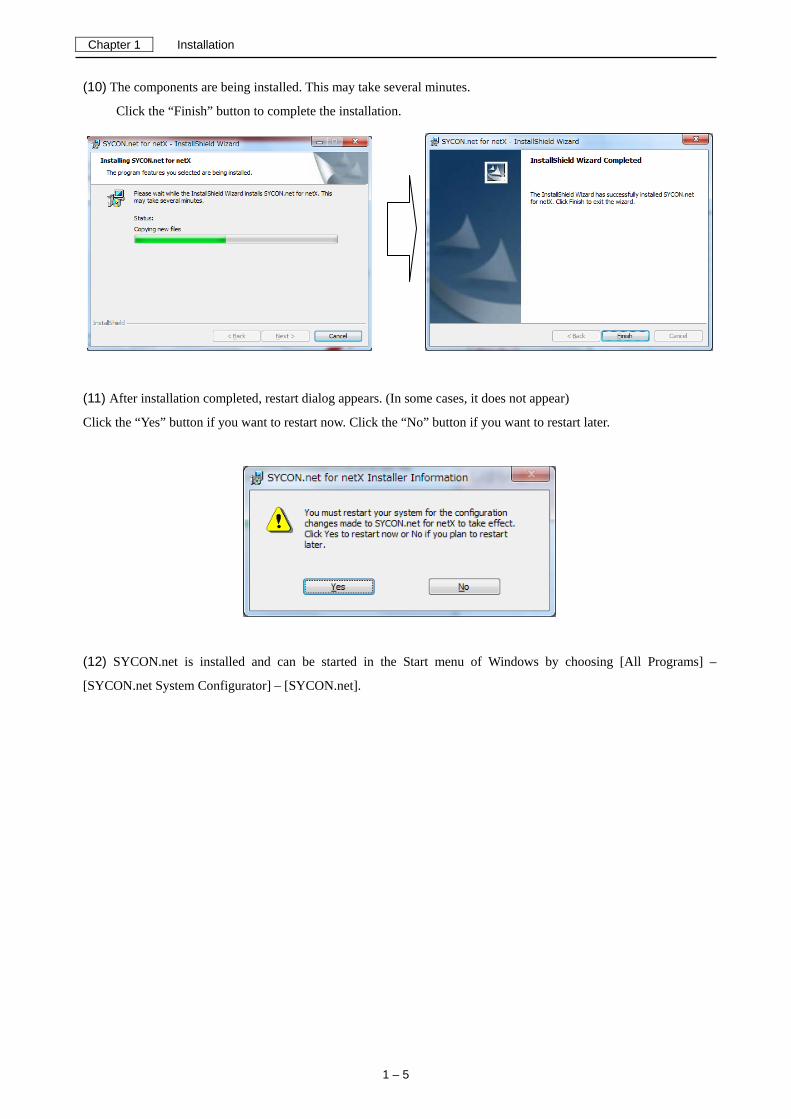
(10) The components are being installed. This may take several minutes.
Click the “Finish” button to complete the installation.
(11) After installation completed, restart dialog appears. (In some cases, it does not appear)
Click the “Yes” button if you want to restart now. Click the “No” button if you want to restart later.
(12) SYCON.net is installed and can be started in the Start menu of Windows by choosing [All Programs] –
[SYCON.net System Configurator] – [SYCON.net].
Chapter 1 Installation
1 – 6
1.3 Installation Procedure of USB Driver
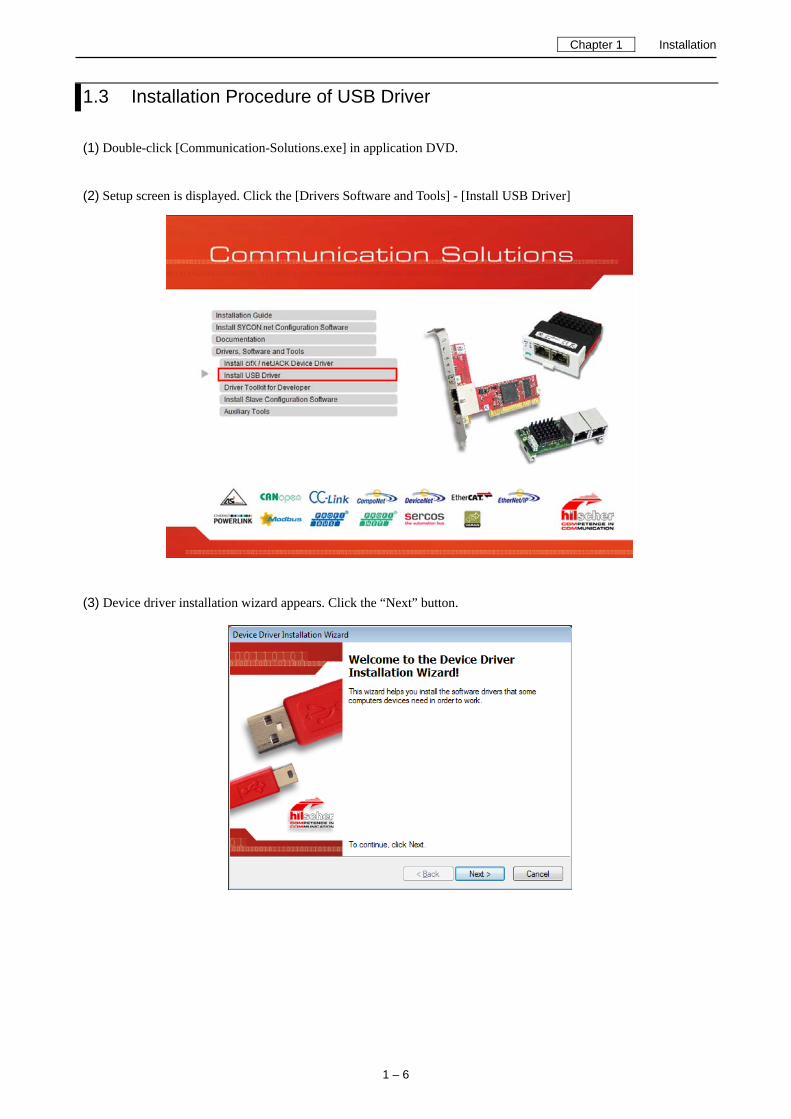
(1) Double-click [Communication-Solutions.exe] in application DVD.
(2) Setup screen is displayed. Click the [Drivers Software and Tools] - [Install USB Driver]
(3) Device driver installation wizard appears. Click the “Next” button.
Chapter 1 Installation
1 – 7
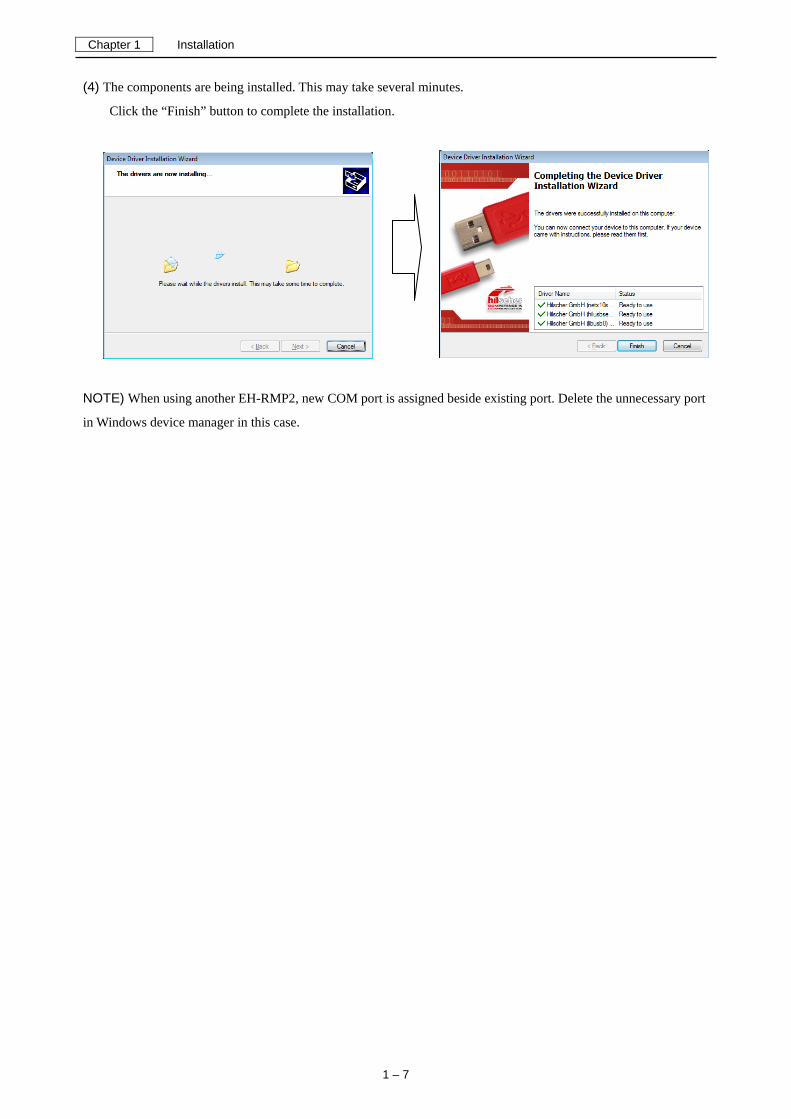
(4) The components are being installed. This may take several minutes.
Click the “Finish” button to complete the installation.
NOTE) When using another EH-RMP2, new COM port is assigned beside existing port. Delete the unnecessary port
in Windows device manager in this case.

Chapter 1 Installation
1 – 8
1.4 Registration of GSD file
(1) When you start the SYCON.net, login dialog appears. Without input password, click the “OK” button.
*3 The password can be set later by [Extras] - [User Management]
(2) Click at the area shown in the figure below ①, [Network] button appears.
Click the [Network] - [Import Device Descriptions].
①Click
②Click
③Click
First login dialog
After the second dialog
Chapter 1 Installation
1 – 9
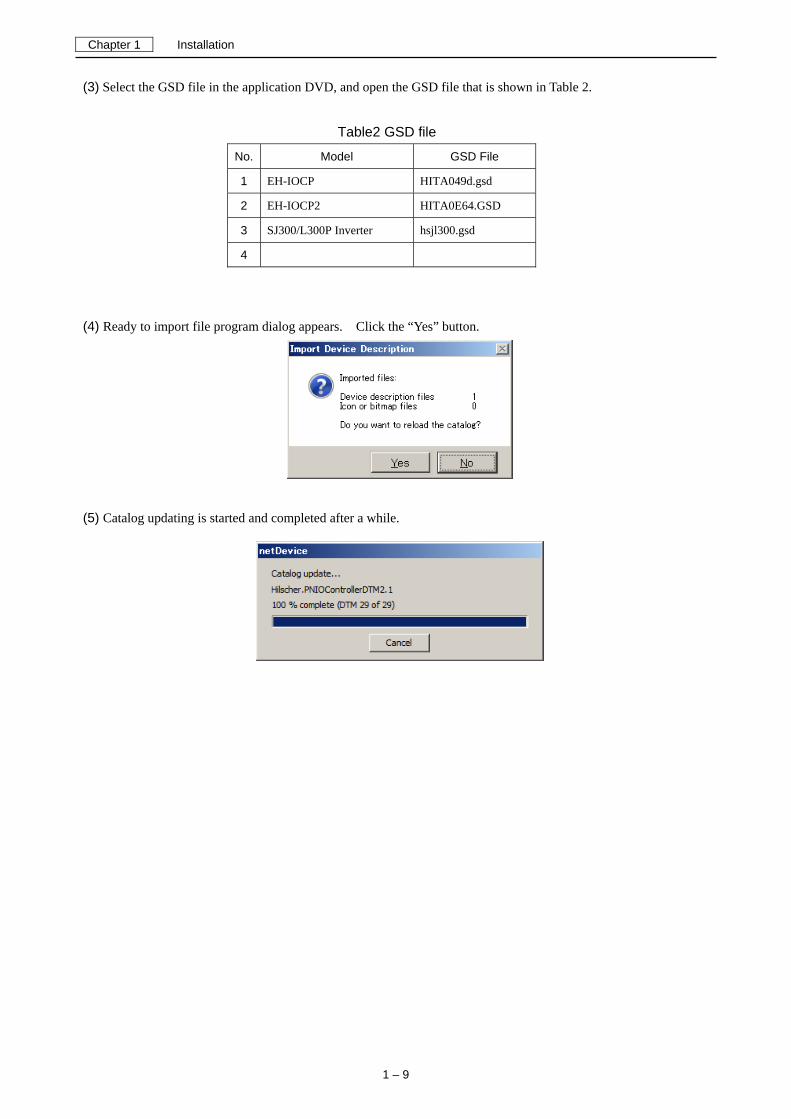
(3) Select the GSD file in the application DVD, and open the GSD file that is shown in Table 2.
(4) Ready to import file program dialog appears. Click the “Yes” button.
(5) Catalog updating is started and completed after a while.
Table2 GSD file
No. Model GSD File
1 EH-IOCP HITA049d.gsd
2 EH-IOCP2 HITA0E64.GSD
3 SJ300/L300P Inverter hsjl300.gsd
4

Chapter2 Configuration
2 – 1
Chapter 2 Configuration
Offline configuration and online configuration are available. Online configuration is supported only by EH-IOCP2
(including EH-IOCP compatible mode). Use offline configuration for EH-IOCP.
2.1 Online Configuration
(1) Setup as shown in Figure 1, turn on power to the EH-RMP2 and connect the USB cable to config port.
(2) Drag [ Profibus DPV0] – [ NETX 100DP/DPM] to the gray colored bus.
(When coming to the right position, the mouse pointer will change from to .)
Double click the “netX”.
Hereafter the following figure screen is called as main screen.
①Drag
②Double click
Chapter2 Configuration
2 – 2
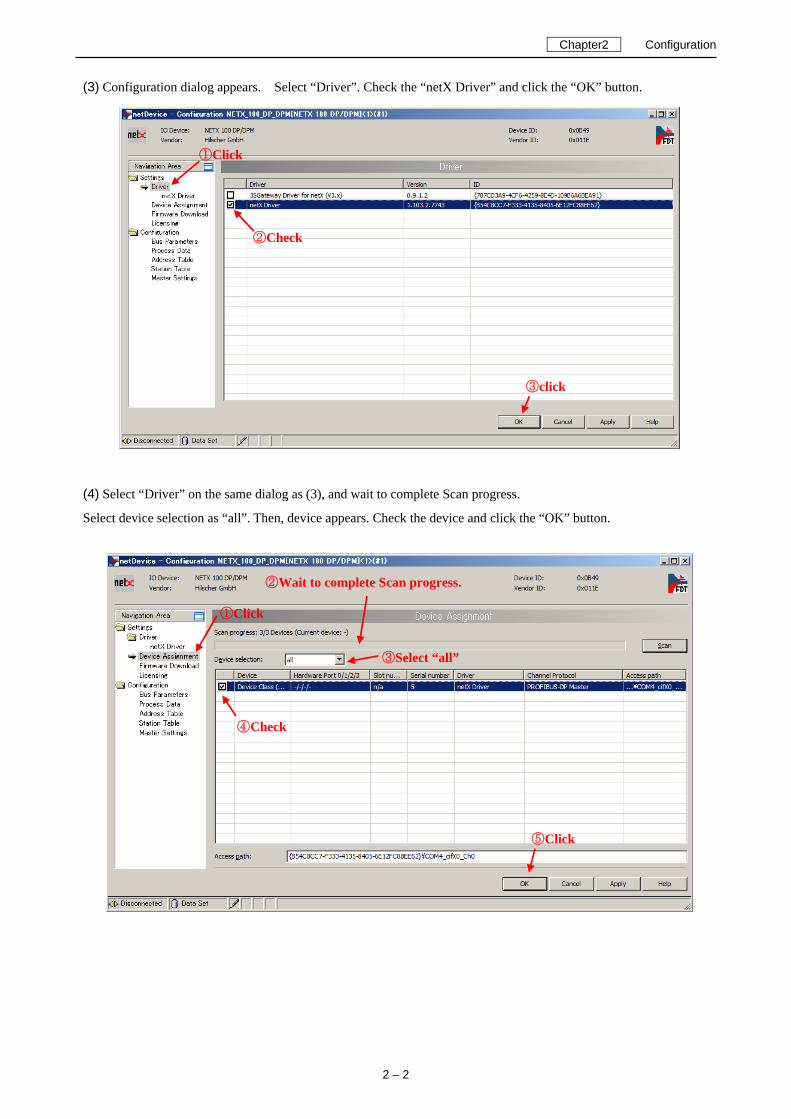
(3) Configuration dialog appears. Select “Driver”. Check the “netX Driver” and click the “OK” button.
(4) Select “Driver” on the same dialog as (3), and wait to complete Scan progress.
Select device selection as “all”. Then, device appears. Check the device and click the “OK” button.
①Click
②Check
③click
①Click
③Select “all”
⑤Click
②Wait to complete Scan progress.
④Check
Chapter2 Configuration
2 – 3
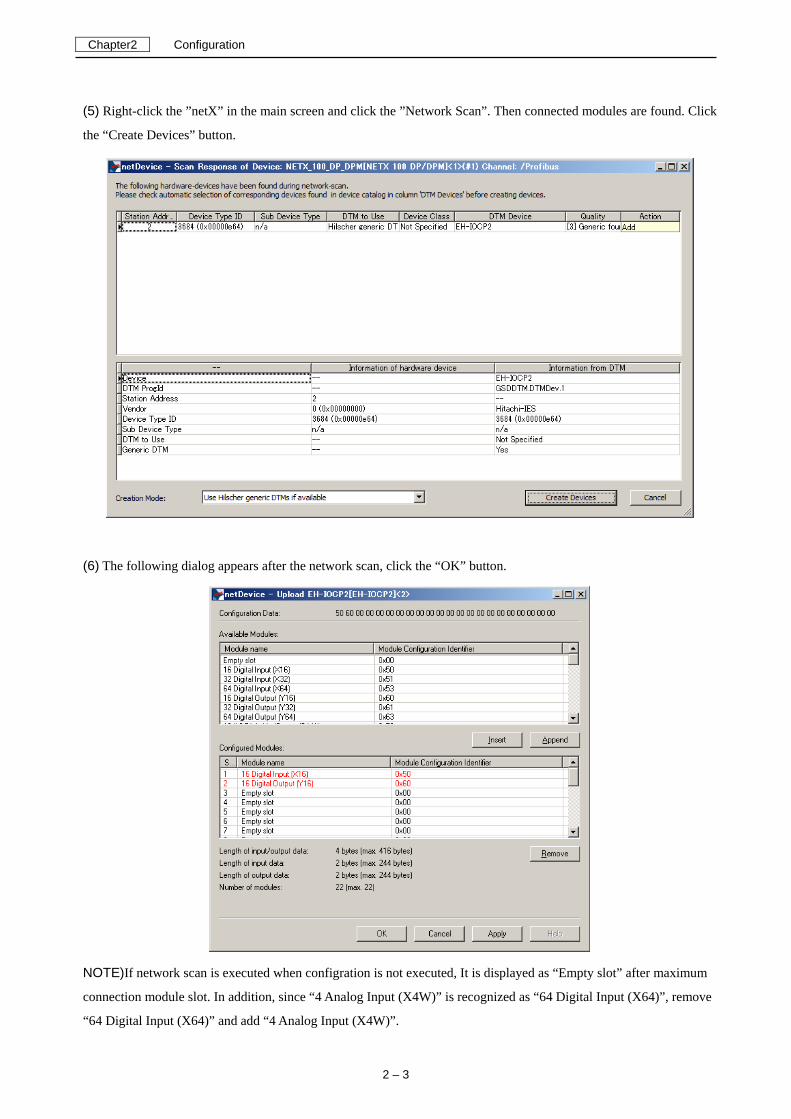
(5) Right-click the ”netX” in the main screen and click the ”Network Scan”. Then connected modules are found. Click
the “Create Devices” button.
(6) The following dialog appears after the network scan, click the “OK” button.
NOTE)If network scan is executed when configration is not executed, It is displayed as “Empty slot” after maximum
connection module slot. In addition, since “4 Analog Input (X4W)” is recognized as “64 Digital Input (X64)”, remove
“64 Digital Input (X64)” and add “4 Analog Input (X4W)”.
Chapter2 Configuration
2 – 4
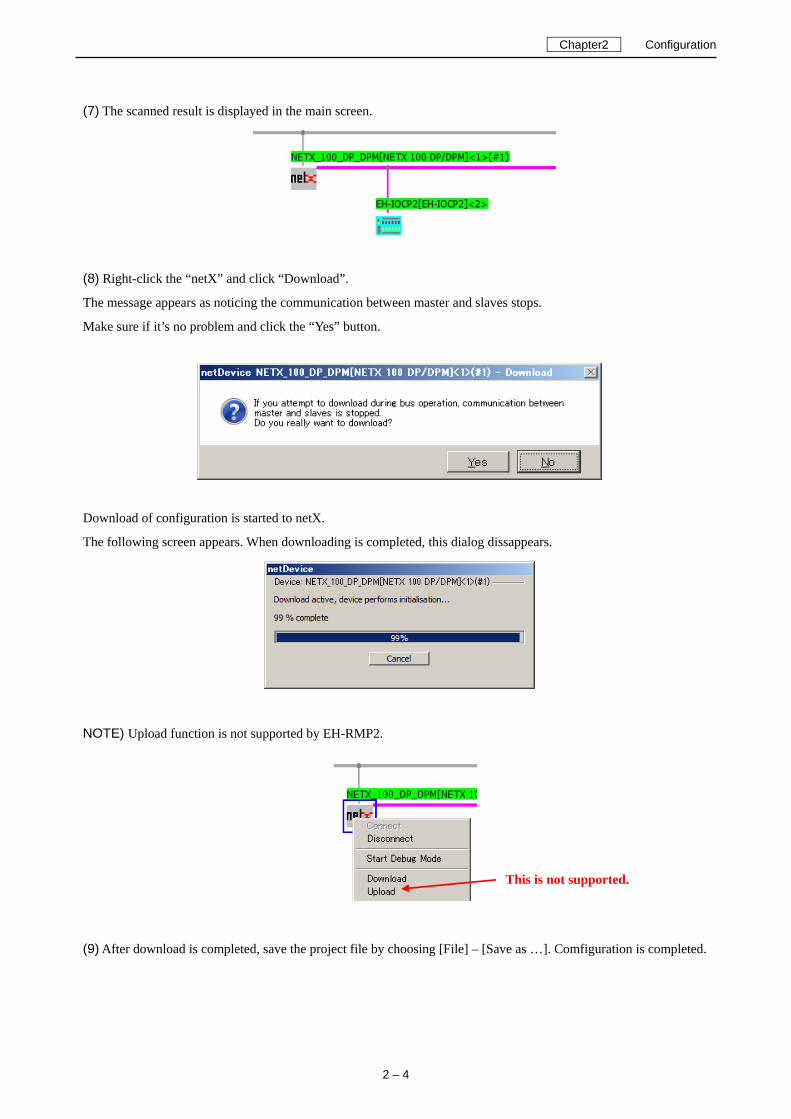
(7) The scanned result is displayed in the main screen.
(8) Right-click the “netX” and click “Download”.
The message appears as noticing the communication between master and slaves stops.
Make sure if it’s no problem and click the “Yes” button.
Download of configuration is started to netX.
The following screen appears. When downloading is completed, this dialog dissappears.
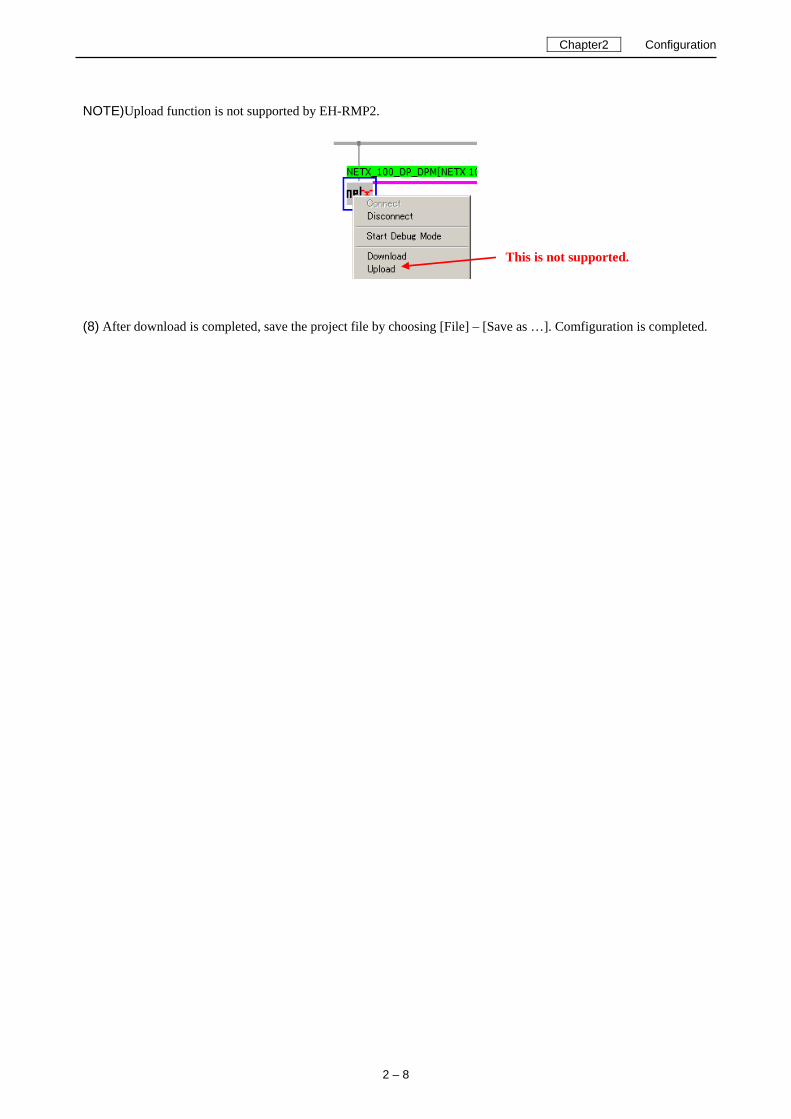
NOTE) Upload function is not supported by EH-RMP2.
(9) After download is completed, save the project file by choosing [File] – [Save as …]. Comfiguration is completed.
This is not supported.
Chapter2 Configuration
2 – 5
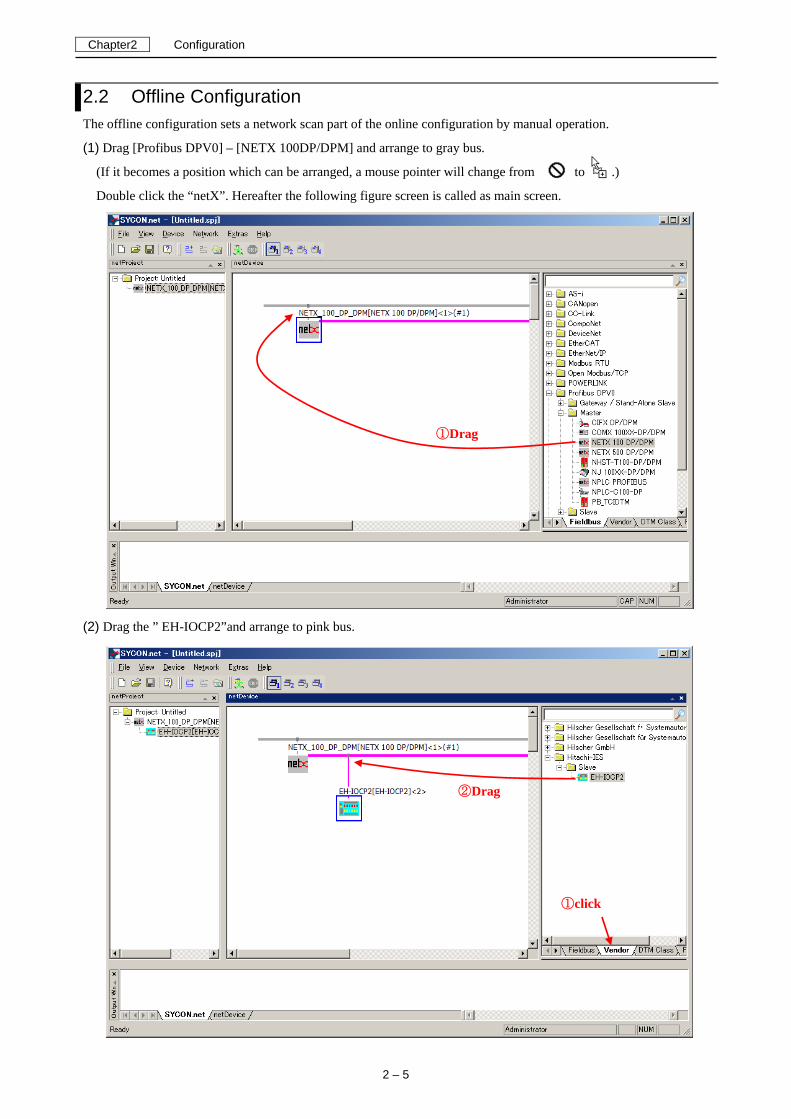
2.2 Offline Configuration The offline configuration sets a network scan part of the online configuration by manual operation.
(1) Drag [Profibus DPV0] – [NETX 100DP/DPM] and arrange to gray bus.
(If it becomes a position which can be arranged, a mouse pointer will change from to .)
Double click the “netX”. Hereafter the following figure screen is called as main screen.
(2) Drag the ” EH-IOCP2”and arrange to pink bus.
①Drag
①click
②Drag
Chapter2 Configuration
2 – 6
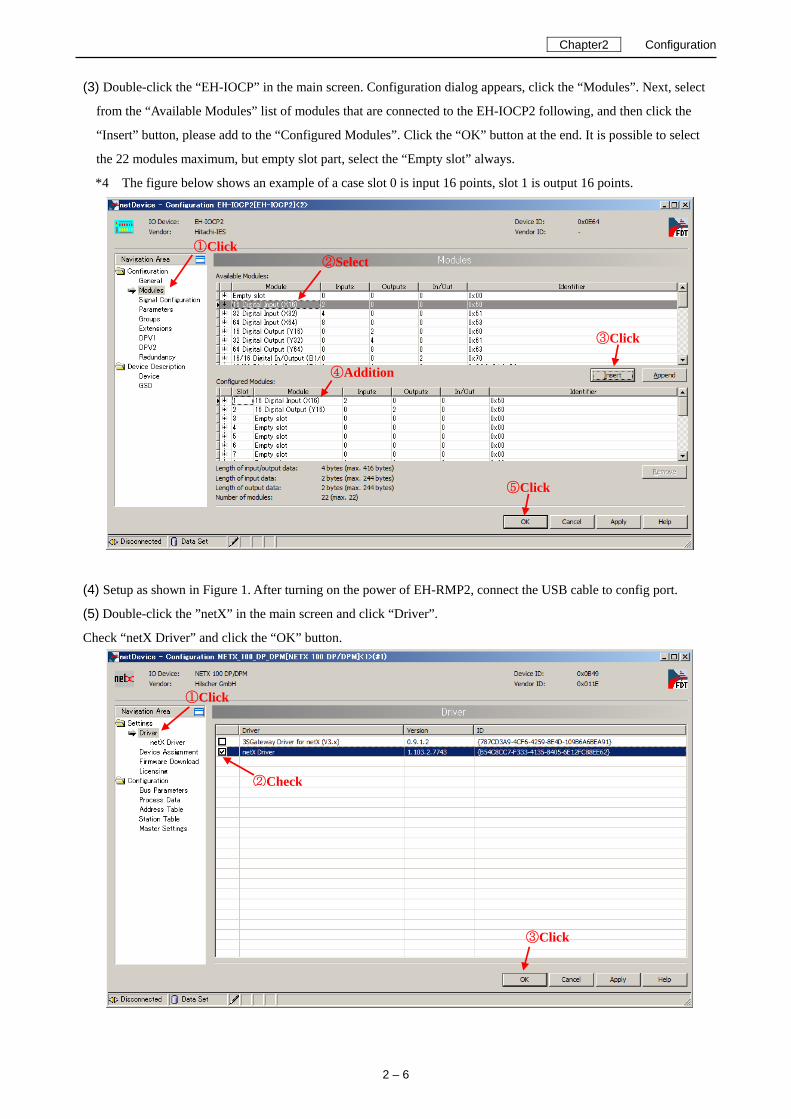
(3) Double-click the “EH-IOCP” in the main screen. Configuration dialog appears, click the “Modules”. Next, select
from the “Available Modules” list of modules that are connected to the EH-IOCP2 following, and then click the
“Insert” button, please add to the “Configured Modules”. Click the “OK” button at the end. It is possible to select
the 22 modules maximum, but empty slot part, select the “Empty slot” always.
*4 The figure below shows an example of a case slot 0 is input 16 points, slot 1 is output 16 points.
(4) Setup as shown in Figure 1. After turning on the power of EH-RMP2, connect the USB cable to config port.
(5) Double-click the ”netX” in the main screen and click “Driver”.
Check “netX Driver” and click the “OK” button.
①Click
①Click
②Check
③Click
②Select
③Click
④Addition
⑤Click
Chapter2 Configuration
2 – 7
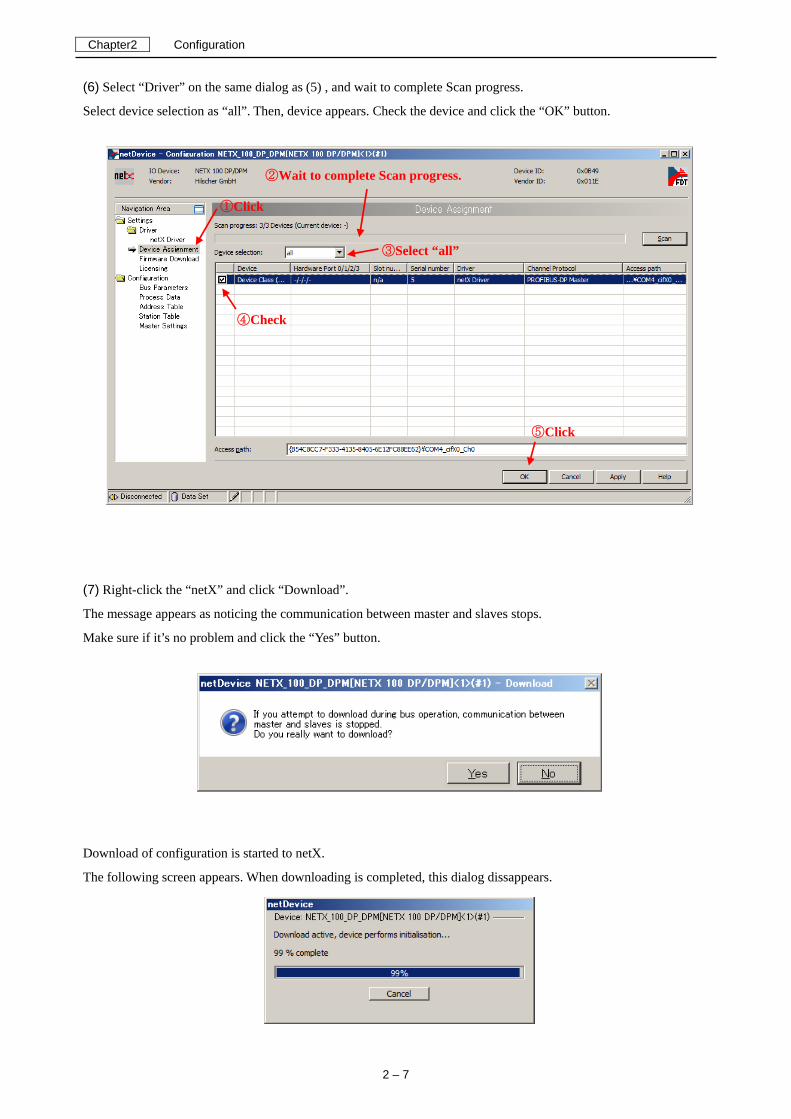
(6) Select “Driver” on the same dialog as (5) , and wait to complete Scan progress.
Select device selection as “all”. Then, device appears. Check the device and click the “OK” button.
(7) Right-click the “netX” and click “Download”.
The message appears as noticing the communication between master and slaves stops.
Make sure if it’s no problem and click the “Yes” button.
Download of configuration is started to netX.
The following screen appears. When downloading is completed, this dialog dissappears.
①Click
③Select “all”
⑤Click
②Wait to complete Scan progress.
④Check
Chapter2 Configuration
2 – 8
NOTE)Upload function is not supported by EH-RMP2.
(8) After download is completed, save the project file by choosing [File] – [Save as …]. Comfiguration is completed.
This is not supported.