hitachi protection manager software · starting the setup gui ... installing the java execution...
TRANSCRIPT

Product Version
Document Organization
Getting Help
FASTFIND LINKS
Contents
Hitachi Protection Manager SoftwareConsole User's Guide
MK-94HC071-12

ii
Console User's Guide
Copyright© 2010 Hitachi, Ltd., Hitachi Data Systems Corporation, ALL RIGHTS RESERVED
No part of this publication may be reproduced or transmitted in any form or by any means, electronic or mechanical, including photocopying and recording, or stored in a database or retrieval system for any purpose without the express written permission of Hitachi, Ltd. (hereinafter referred to as “Hitachi”) and Hitachi Data Systems Corporation (hereinafter referred to as “Hitachi Data Systems”).
Hitachi and Hitachi Data Systems reserve the right to make changes to this document at any time without notice and assume no responsibility for its use. This document contains the most current information available at the time of publication. When new and/or revised information becomes available, this entire document will be updated and distributed to all registered users.
All of the features described in this document may not be currently available. Refer to the most recent product announcement or contact your local Hitachi Data Systems sales office for information on feature and product availability.
Notice : Hitachi Data Systems products and services can be ordered only under the terms and conditions of Hitachi Data Systems’ applicable agreement(s). The use of Hitachi Data Systems products is governed by the terms of your agreement(s) with Hitachi Data Systems.
By using this software, you agree that you are responsible for:
a) Acquiring the relevant consents as may be required under local privacy laws or otherwise from employees and other individuals to access relevant data; and
b) Ensuring that data continues to be held, retrieved, deleted or otherwise processed in accordance with relevant laws.
Hitachi is a registered trademark of Hitachi, Ltd. in the United States and other countries. Hitachi Data Systems is a registered trademark and service mark of Hitachi in the United States and other countries .
Hitachi AMS/WMS, Hitachi SMS100, Hitachi USP, Lightning 9900, ShadowImage, Thunder 9500, and Thunder 9200 are trademarks of Hitachi Data Systems Corporation. in the United States and other countries.
All other trademarks, service marks, and company names are properties of their respective owners.
Microsoft product screen shot(s) reprinted with permission from Microsoft Corporation .

iii
Console User's Guide
Contents
Preface . . . . . . . . . . . . . . . . . . . . . . . . . . . . . . . . . . . . . . . . . . . . .ixIntended Audience . . . . . . . . . . . . . . . . . . . . . . . . . . . . . . . . . . . . . . . . . . . . . xProduct Version . . . . . . . . . . . . . . . . . . . . . . . . . . . . . . . . . . . . . . . . . . . . . . . . xRelease Notes . . . . . . . . . . . . . . . . . . . . . . . . . . . . . . . . . . . . . . . . . . . . . . . . . xDocument Revision Level . . . . . . . . . . . . . . . . . . . . . . . . . . . . . . . . . . . . . . . . . xDocument Organization . . . . . . . . . . . . . . . . . . . . . . . . . . . . . . . . . . . . . . . . . xiReferenced Documents . . . . . . . . . . . . . . . . . . . . . . . . . . . . . . . . . . . . . . . . . xiiDocument Conventions . . . . . . . . . . . . . . . . . . . . . . . . . . . . . . . . . . . . . . . . . xiiConvention for Storage Capacity Values . . . . . . . . . . . . . . . . . . . . . . . . . . . . . .xiiiGetting Help . . . . . . . . . . . . . . . . . . . . . . . . . . . . . . . . . . . . . . . . . . . . . . . . .xiiiComments . . . . . . . . . . . . . . . . . . . . . . . . . . . . . . . . . . . . . . . . . . . . . . . . . .xiii
1 Overview of Protection Manager Console . . . . . . . . . . . . . . . . . . . 1-1Features of Protection Manager . . . . . . . . . . . . . . . . . . . . . . . . . . . . . . . . . . 1-2Reviewing the Components of Hitachi Protection Manager . . . . . . . . . . . . . . . . 1-3Understanding the Features of Protection Manager Console. . . . . . . . . . . . . . . 1-4Implementing Protection Manager Console . . . . . . . . . . . . . . . . . . . . . . . . . . 1-5
System Configuration for File Systems . . . . . . . . . . . . . . . . . . . . . . . . . . . 1-5System Configuration for Databases . . . . . . . . . . . . . . . . . . . . . . . . . . . . 1-5System Configuration with Linkage to Device Manager (Remote Startup) . . 1-6Prerequisite Operating Systems (OSs) for Each Host . . . . . . . . . . . . . . . . . 1-7User Privileges for Executing Protection Manager Console . . . . . . . . . . . . . 1-8
Understanding the Protection Manager Console Functions . . . . . . . . . . . . . . . . 1-9Viewing Application Information . . . . . . . . . . . . . . . . . . . . . . . . . . . . . . . 1-9Viewing Catalog Information. . . . . . . . . . . . . . . . . . . . . . . . . . . . . . . . . . 1-9Backing up and Restoring Data . . . . . . . . . . . . . . . . . . . . . . . . . . . . . . . 1-10Managing Backup Jobs. . . . . . . . . . . . . . . . . . . . . . . . . . . . . . . . . . . . . 1-11Locking a Copy Group . . . . . . . . . . . . . . . . . . . . . . . . . . . . . . . . . . . . . 1-11Resynchronizing a Copy Group . . . . . . . . . . . . . . . . . . . . . . . . . . . . . . . 1-12Outputting Application Information and Catalog Information to Files. . . . . 1-12Mounting and Unmounting a Secondary Volume . . . . . . . . . . . . . . . . . . . 1-12Updating the Dictionary Map Files . . . . . . . . . . . . . . . . . . . . . . . . . . . . . 1-13

iv
Console User's Guide
Linking to Device Manager (Remote Startup) . . . . . . . . . . . . . . . . . . . . . 1-13Starting the Setup GUI. . . . . . . . . . . . . . . . . . . . . . . . . . . . . . . . . . . . . 1-13Configuration Check Function . . . . . . . . . . . . . . . . . . . . . . . . . . . . . . . . 1-13
2 System Configuration with Protection Manager Console . . . . . . . . . 2-1Overview . . . . . . . . . . . . . . . . . . . . . . . . . . . . . . . . . . . . . . . . . . . . . . . . . . 2-2Configuring the System to Back Up and Restore Data Between Volumes. . . . . . 2-2Configuring the System to Mount or Unmount a Secondary Volume . . . . . . . . . 2-3Cluster Configuration of Operation Standby Type (Active-Passive) . . . . . . . . . . 2-3
Using a Backup Job in a Cluster Configuration. . . . . . . . . . . . . . . . . . . . . 2-4Cluster Configuration of Mutual Standby Type (Active-Active) . . . . . . . . . . . . . 2-5Configuring the System to Execute Remote Copy . . . . . . . . . . . . . . . . . . . . . . 2-6
TrueCopy or Universal Replicator Configurations . . . . . . . . . . . . . . . . . . . . 2-7ShadowImage and TrueCopy Multi-Target Configurations. . . . . . . . . . . . . . 2-7ShadowImage and Universal Replicator Multi-Target Configurations . . . . . . 2-8ShadowImage (Multiple Generations), TrueCopy or Universal Replicator Configurations. . . . . . . . . . . . . . . . . . . . . . . . . . . . . . . . . . . . . . . . . . . 2-9
Configuring the System When a Backup Is Made Using VSS . . . . . . . . . . . . . . 2-9Configuring the System When Using a Dynamic Disk Configuration . . . . . . . . 2-10
3 Installing Protection Manager Console . . . . . . . . . . . . . . . . . . . . . 3-1Preparing to Install Protection Manager Console. . . . . . . . . . . . . . . . . . . . . . . 3-2
Confirming Prerequisite Programs . . . . . . . . . . . . . . . . . . . . . . . . . . . . . . 3-2Installing Protection Manager . . . . . . . . . . . . . . . . . . . . . . . . . . . . . . . . . 3-3Installing Device Manager . . . . . . . . . . . . . . . . . . . . . . . . . . . . . . . . . . . 3-3Installing the Java Execution Environment . . . . . . . . . . . . . . . . . . . . . . . . 3-4
Installing Protection Manager Console . . . . . . . . . . . . . . . . . . . . . . . . . . . . . . 3-4Linkage with Device Manager . . . . . . . . . . . . . . . . . . . . . . . . . . . . . . . . . 3-6
Deleting Files Required for Device Manager Linkage . . . . . . . . . . . . . . . 3-6Copying Files Required for Device Manager Linkage . . . . . . . . . . . . . . . 3-6Command Details . . . . . . . . . . . . . . . . . . . . . . . . . . . . . . . . . . . . . . . 3-6
Uninstalling Protection Manager Console . . . . . . . . . . . . . . . . . . . . . . . . . . . . 3-7Releasing Linkage of Protection Manager Console with Device Manager . . . . . . 3-8
4 Environment Setup for Protection Manager Console . . . . . . . . . . . . 4-1Operating Environment for Protection Manager Console . . . . . . . . . . . . . . . . . 4-2Working with the Environment Setup Files for Protection Manager Console. . . . 4-2Working with the Setup Items in the Environment Setup Files . . . . . . . . . . . . . 4-4
Setup Items in the console.conf File (for Local Execution) . . . . . . . . . . . . . 4-5log.level . . . . . . . . . . . . . . . . . . . . . . . . . . . . . . . . . . . . . . . . . . . . . . 4-5log.max_filecount . . . . . . . . . . . . . . . . . . . . . . . . . . . . . . . . . . . . . . . 4-5log.max_filesize. . . . . . . . . . . . . . . . . . . . . . . . . . . . . . . . . . . . . . . . . 4-6gui.progress.elapsed_time.interval . . . . . . . . . . . . . . . . . . . . . . . . . . . 4-6gui.progress.bar.interval . . . . . . . . . . . . . . . . . . . . . . . . . . . . . . . . . . . 4-6

v
Console User's Guide
Setup Items in the agent.conf File. . . . . . . . . . . . . . . . . . . . . . . . . . . . . . 4-6log.level . . . . . . . . . . . . . . . . . . . . . . . . . . . . . . . . . . . . . . . . . . . . . . 4-6log.max_filecount . . . . . . . . . . . . . . . . . . . . . . . . . . . . . . . . . . . . . . . 4-7log.max_filesize . . . . . . . . . . . . . . . . . . . . . . . . . . . . . . . . . . . . . . . . . 4-7
Setup Items in the console.conf File (for Remote Execution) . . . . . . . . . . . 4-7log.level . . . . . . . . . . . . . . . . . . . . . . . . . . . . . . . . . . . . . . . . . . . . . . 4-7log.max_filecount . . . . . . . . . . . . . . . . . . . . . . . . . . . . . . . . . . . . . . . 4-7log.max_filesize . . . . . . . . . . . . . . . . . . . . . . . . . . . . . . . . . . . . . . . . . 4-7gui.progress.elapsed_time.interval. . . . . . . . . . . . . . . . . . . . . . . . . . . . 4-8gui.progress.bar.interval . . . . . . . . . . . . . . . . . . . . . . . . . . . . . . . . . . . 4-8agent.timeout . . . . . . . . . . . . . . . . . . . . . . . . . . . . . . . . . . . . . . . . . . 4-8agent.retry_count . . . . . . . . . . . . . . . . . . . . . . . . . . . . . . . . . . . . . . . 4-8agent.retry_time . . . . . . . . . . . . . . . . . . . . . . . . . . . . . . . . . . . . . . . . 4-8
Setup Items in the schd.conf File . . . . . . . . . . . . . . . . . . . . . . . . . . . . . . 4-8SCH_MAP_PATH . . . . . . . . . . . . . . . . . . . . . . . . . . . . . . . . . . . . . . . . 4-8EXEC_LOG_OUTPUT . . . . . . . . . . . . . . . . . . . . . . . . . . . . . . . . . . . . . 4-9MAX_JOB_REGISTRATION_COUNT . . . . . . . . . . . . . . . . . . . . . . . . . . 4-10MAX_JOB_RESULT_COUNT. . . . . . . . . . . . . . . . . . . . . . . . . . . . . . . . 4-10
Settings for Using Backup Jobs in a Cluster Configuration . . . . . . . . . . . . . . . 4-10
5 Using Setup GUI To Set Up an Environment for Protection Manager 5-1 Overview of Setup GUI . . . . . . . . . . . . . . . . . . . . . . . . . . . . . . . . . . . . . . . . 5-2
Operations Available in the Setup GUI . . . . . . . . . . . . . . . . . . . . . . . . . . 5-2Starting Setup GUI and Components of the Setup GUI Windows . . . . . . . . 5-5
Starting Setup GUI . . . . . . . . . . . . . . . . . . . . . . . . . . . . . . . . . . . . . 5-6Setup GUI Window Components . . . . . . . . . . . . . . . . . . . . . . . . . . . . . 5-6Shared Setup GUI Operation Buttons. . . . . . . . . . . . . . . . . . . . . . . . . . 5-8
Prerequisite Conditions and Notes on Using Setup GUI . . . . . . . . . . . . . . 5-11Prerequisite Conditions. . . . . . . . . . . . . . . . . . . . . . . . . . . . . . . . . . . 5-11Notes . . . . . . . . . . . . . . . . . . . . . . . . . . . . . . . . . . . . . . . . . . . . . . . 5-11
Setting up an Operating Environment for HPtM By Using Setup GUI . . . . . 5-11Environment Setup Flow for a File Server or Database Server . . . . . . . 5-12Environment Setup Flow for a Backup Server . . . . . . . . . . . . . . . . . . . 5-13
Setup GUI Windows. . . . . . . . . . . . . . . . . . . . . . . . . . . . . . . . . . . . . . . . . . 5-14Configuration Settings Window . . . . . . . . . . . . . . . . . . . . . . . . . . . . . . . 5-15Operation Setup Window . . . . . . . . . . . . . . . . . . . . . . . . . . . . . . . . . . . 5-16
If You Selected Non Cluster Configuration as the Configuration Type . . 5-17If You Selected Cluster Configuration as the Configuration Type . . . . . . 5-18
RAID Manager Linkage Window . . . . . . . . . . . . . . . . . . . . . . . . . . . . . . 5-18RAID Manager Operation Window . . . . . . . . . . . . . . . . . . . . . . . . . . . . . 5-20Cluster ConfigurationWindow . . . . . . . . . . . . . . . . . . . . . . . . . . . . . . . . 5-21
If You Selected VCS . . . . . . . . . . . . . . . . . . . . . . . . . . . . . . . . . . . . . 5-22If You Selected MSCS. . . . . . . . . . . . . . . . . . . . . . . . . . . . . . . . . . . . 5-24
Database Configuration Window . . . . . . . . . . . . . . . . . . . . . . . . . . . . . . 5-24If You Selected Non Cluster Configuration as the Configuration Type . . 5-25If You Selected Cluster Configuration as the Configuration Type . . . . . . 5-26

vi
Console User's Guide
VSS Definition Window. . . . . . . . . . . . . . . . . . . . . . . . . . . . . . . . . . . . . 5-27VSS Environment Window . . . . . . . . . . . . . . . . . . . . . . . . . . . . . . . . . . 5-28
If You Selected Database/File Server as the Server Type . . . . . . . . . . . 5-28If You Selected Backup Server as the Server Type . . . . . . . . . . . . . . . 5-30
Protection Manager Service Window . . . . . . . . . . . . . . . . . . . . . . . . . . . 5-30Update Dictionary Map Window . . . . . . . . . . . . . . . . . . . . . . . . . . . . . . 5-31Backup Linkage Window . . . . . . . . . . . . . . . . . . . . . . . . . . . . . . . . . . . 5-33Tape Backup Window. . . . . . . . . . . . . . . . . . . . . . . . . . . . . . . . . . . . . . 5-34
If You Selected NetBackup (NBU) . . . . . . . . . . . . . . . . . . . . . . . . . . . 5-35If You Selected Backup Exec (BEWS). . . . . . . . . . . . . . . . . . . . . . . . . 5-36
Copy Definition Window . . . . . . . . . . . . . . . . . . . . . . . . . . . . . . . . . . . . 5-36List File Window . . . . . . . . . . . . . . . . . . . . . . . . . . . . . . . . . . . . . . . . . 5-38
If You Selected Copy-Group List . . . . . . . . . . . . . . . . . . . . . . . . . . . . 5-39If You Selected Database or Mount Point Directory List . . . . . . . . . . . . 5-40
Extended Commands DefinitionWindow. . . . . . . . . . . . . . . . . . . . . . . . . 5-40If You Selected Non Cluster Configuration as the Configuration type. . . 5-41If You Selected Cluster Configuration as the Configuration Type . . . . . . 5-43
Pre/Post Job Template Window. . . . . . . . . . . . . . . . . . . . . . . . . . . . . . . 5-44Setting User Pre-processing (PRE_PROC). . . . . . . . . . . . . . . . . . . . . . 5-44Setting User Post-Processing. . . . . . . . . . . . . . . . . . . . . . . . . . . . . . . 5-47Setting a User Script File Name. . . . . . . . . . . . . . . . . . . . . . . . . . . . . 5-47Updating a User Script File . . . . . . . . . . . . . . . . . . . . . . . . . . . . . . . . 5-47
Email Notification Window . . . . . . . . . . . . . . . . . . . . . . . . . . . . . . . . . . 5-48About the Configuration Check Function . . . . . . . . . . . . . . . . . . . . . . . . . . . 5-49
Capabilities of the Configuration Check Function. . . . . . . . . . . . . . . . . . . 5-49Prerequisites for and Notes on Using the Configuration Check Function . . 5-52
Prerequisites . . . . . . . . . . . . . . . . . . . . . . . . . . . . . . . . . . . . . . . . . . 5-52Notes . . . . . . . . . . . . . . . . . . . . . . . . . . . . . . . . . . . . . . . . . . . . . . . 5-53
How to Use the Configuration Check Function . . . . . . . . . . . . . . . . . . . . 5-53Performing Configuration Check . . . . . . . . . . . . . . . . . . . . . . . . . . . . 5-53Reviewing the Check Results . . . . . . . . . . . . . . . . . . . . . . . . . . . . . . 5-55
6 Using Protection Manager Console . . . . . . . . . . . . . . . . . . . . . . . . 6-1Operating the Protection Manager Console . . . . . . . . . . . . . . . . . . . . . . . . . . 6-2
Starting Protection Manager Console . . . . . . . . . . . . . . . . . . . . . . . . . . . . 6-3Starting Protection Manager Console on an Application Server . . . . . . . . 6-3Starting Protection Manager Console from Device Manager . . . . . . . . . . 6-3Selecting a Virtual Server . . . . . . . . . . . . . . . . . . . . . . . . . . . . . . . . . . 6-4
Reviewing the Main Window Configuration. . . . . . . . . . . . . . . . . . . . . . . . 6-5Viewing Application Information . . . . . . . . . . . . . . . . . . . . . . . . . . . . . . . 6-9Viewing Catalog Information. . . . . . . . . . . . . . . . . . . . . . . . . . . . . . . . . 6-12Viewing Backup Job Information . . . . . . . . . . . . . . . . . . . . . . . . . . . . . . 6-16
Items Displayed in the Backup Job View . . . . . . . . . . . . . . . . . . . . . . 6-17Items Displayed in the Backup Job Result Details Window . . . . . . . . . . 6-19
Updating the Dictionary Map Files . . . . . . . . . . . . . . . . . . . . . . . . . . . . . 6-19Operations for File Systems . . . . . . . . . . . . . . . . . . . . . . . . . . . . . . . . . . . . 6-20

vii
Console User's Guide
Notes on Backing up Mount Points for Databases . . . . . . . . . . . . . . . . . . 6-22Backup Options for File Systems . . . . . . . . . . . . . . . . . . . . . . . . . . . . . . 6-22Restoration Options for File Systems . . . . . . . . . . . . . . . . . . . . . . . . . . . 6-23Example of Backup and Restore Operations for File Systems . . . . . . . . . . 6-24Backing up a File System to a Secondary Volume . . . . . . . . . . . . . . . . . . 6-26Backing up a File System to a Secondary Volume (When VSS is Used) . . . 6-28Restoring a File System to the Primary Volume . . . . . . . . . . . . . . . . . . . . 6-30
Operations for SQL Server Databases . . . . . . . . . . . . . . . . . . . . . . . . . . . . . 6-31Backup Options for SQL Server Databases . . . . . . . . . . . . . . . . . . . . . . . 6-33Restoration Options for SQL Server Databases . . . . . . . . . . . . . . . . . . . . 6-34Example of Backup and Restore Operations for an SQL Server Database. . 6-36Backing up an SQL Server Database to a Secondary Volume . . . . . . . . . . 6-37Restoring an SQL Server Database to the Primary Volume . . . . . . . . . . . . 6-39
Operations for Exchange Databases . . . . . . . . . . . . . . . . . . . . . . . . . . . . . . 6-42Backup Options for Exchange Databases . . . . . . . . . . . . . . . . . . . . . . . . 6-44Restoration Options for Exchange Databases . . . . . . . . . . . . . . . . . . . . . 6-47Example of Backup and Restore Operations for an Exchange Database . . . 6-48Backing up Storage Groups to a Secondary Volume (for Cold Backup) . . . 6-50Backing up a Storage Group to a Secondary Volume (for Online Backup) . 6-52Backing up a Storage Group to a Secondary Volume (for VSS Backup) . . . 6-55Restoring Storage Groups to a Primary Volume. . . . . . . . . . . . . . . . . . . . 6-58
Operations for Backup Jobs . . . . . . . . . . . . . . . . . . . . . . . . . . . . . . . . . . . . 6-61Registering a Backup Job . . . . . . . . . . . . . . . . . . . . . . . . . . . . . . . . . . . 6-61
Setting up Backup Options . . . . . . . . . . . . . . . . . . . . . . . . . . . . . . . . 6-61Setting up Schedule Options . . . . . . . . . . . . . . . . . . . . . . . . . . . . . . . 6-62Registering a Backup Job . . . . . . . . . . . . . . . . . . . . . . . . . . . . . . . . . 6-66
Running a Backup Job Immediately . . . . . . . . . . . . . . . . . . . . . . . . . . . . 6-66Changing Options for a Backup Job . . . . . . . . . . . . . . . . . . . . . . . . . . . . 6-67Deleting a Backup Job . . . . . . . . . . . . . . . . . . . . . . . . . . . . . . . . . . . . . 6-68Viewing the Execution Results of a Backup Job. . . . . . . . . . . . . . . . . . . . 6-69
Locking a Copy Group . . . . . . . . . . . . . . . . . . . . . . . . . . . . . . . . . . . . . . . . 6-70Resynchronizing a Copy Group . . . . . . . . . . . . . . . . . . . . . . . . . . . . . . . . . . 6-72Mounting and Unmounting a Secondary Volume . . . . . . . . . . . . . . . . . . . . . . 6-73
Mounting a Secondary Volume . . . . . . . . . . . . . . . . . . . . . . . . . . . . . . . 6-73Unmounting a Secondary Volume . . . . . . . . . . . . . . . . . . . . . . . . . . . . . 6-76Backing up or Restoring the Secondary Volume using Tape Media . . . . . . 6-78
Using a User Script . . . . . . . . . . . . . . . . . . . . . . . . . . . . . . . . . . . . . . . . . . 6-78Backing up by Using a User Script . . . . . . . . . . . . . . . . . . . . . . . . . . . . . 6-78Configuring Backup Options for a User Script . . . . . . . . . . . . . . . . . . . . . 6-79Creating or Modifying a User Script . . . . . . . . . . . . . . . . . . . . . . . . . . . . 6-82Backing up a Volume to a Magnetic Tape by Using a User Script. . . . . . . . 6-82
7 Troubleshooting . . . . . . . . . . . . . . . . . . . . . . . . . . . . . . . . . . . . . 7-1Troubleshooting Protection Manager Console . . . . . . . . . . . . . . . . . . . . . . . . . 7-2Working with Protection Manager Console Detailed Messages . . . . . . . . . . . . . 7-2
Format of Displayed Detailed Messages . . . . . . . . . . . . . . . . . . . . . . . . . . 7-3

viii
Console User's Guide
Responding to Detailed Messages . . . . . . . . . . . . . . . . . . . . . . . . . . . . . . . . . 7-4Responding to a Message in the Application Detail Window . . . . . . . . . . . . 7-4Responding to a Message in the Backup Catalog View. . . . . . . . . . . . . . . . 7-4Responding to a Message in the Backup Detail Information Window. . . . . . 7-5Responding to a Message During Mount Processing on a Backup Server . . . 7-6
If the Problem Cannot Be Resolved Using Detailed Messages. . . . . . . . . . . . . . 7-6Reviewing the Protection Manager Console Log Data . . . . . . . . . . . . . . . . . . . 7-7
Analyzing Log Files . . . . . . . . . . . . . . . . . . . . . . . . . . . . . . . . . . . . . . . . 7-7Log File Storage Locations of Protection Manager Console. . . . . . . . . . . . . 7-8Log Data of Protection Manager Console . . . . . . . . . . . . . . . . . . . . . . . . . 7-9Using the Data Collection Tool . . . . . . . . . . . . . . . . . . . . . . . . . . . . . . . 7-11
Reviewing Data from Prerequisite Products . . . . . . . . . . . . . . . . . . . . . . . . . 7-11Calling the Hitachi Data Systems Support Center . . . . . . . . . . . . . . . . . . . . . 7-11
A Environment Setting Commands for Device Manager Linkage. . . . . A-1Copying Files Required for Device Manager Linkage . . . . . . . . . . . . . . . . . . . . A-2Deleting Files Required for Device Manager Linkage . . . . . . . . . . . . . . . . . . . . A-2
B Note on a Firewall on the Local Host . . . . . . . . . . . . . . . . . . . . . . B-1Note on a Firewall on the Local Host . . . . . . . . . . . . . . . . . . . . . . . . . . . . . . . B-2
C Notes on Using the Remote Desktop Functionality. . . . . . . . . . . . . C-1Notes on Using the Remote Desktop Functionality . . . . . . . . . . . . . . . . . . . . . C-2
Acronyms and Abbreviations
Glossary
Index

Preface ix
Console User's Guide
PrefacePreface
This document describes how to use the Hitachi Protection Manager.
This preface includes the following information:
Notice: The use of Hitachi Protection Manager and all other Hitachi Data Systems products is governed by the terms of your agreement(s) with Hitachi Data Systems.
□ Intended Audience
□ Product Version
□ Release Notes
□ Document Revision Level
□ Document Organization
□ Referenced Documents
□ Document Conventions
□ Convention for Storage Capacity Values
□ Getting Help
□ Comments

x Preface
Console User's Guide
Intended AudienceThe Hitachi Protection Manager Console User's Guide describes how to install, manage, and operate Hitachi Protection Manager Console.
This manual is intended for system administrators who use Protection Manager Console to manage data on storage subsystems. The readers of this manual should have a basic knowledge of the following functions:
• Management functions of Windows
• Management functions of Hitachi storage subsystems (HitachiAMS/WMS, Hitachi SMS100, Hitachi USP, Lightning, Thunder Series products)
• Management functions of Hitachi RAID Manager
Product VersionThis document revision applies to Hitachi Protection Manager version 6.4.
Release NotesRelease notes can be found on the documentation CD. Release notes contain requirements and more recent product information that may not be fully described in this manual. Be sure to review the release notes before installation .
Document Revision Level
Revision Date Description
MK-94HC071-P August 2004 Preliminary Release
MK-94HC071-00 March 2005 Initial Release
MK-94HC071-01 May 2005 Revision 1, supersedes and replaces MK-94HC071-00
MK-94HC071-02 November 2005
Revision 2, supersedes and replaces MK-94HC071-01
MK-94HC071-03 January 2006 Revision 3, supersedes and replaces MK-94HC071-02
MK-94HC071-04 December 2006
Revision 4, supersedes and replaces MK-94HC071-03
MK-94HC071-05 May 2007 Revision 5, supersedes and replaces MK-94HC071-04
MK-94HC071-06 October 2007 Revision 6, supersedes and replaces MK-94HC071-05
MK-94HC071-07 April 2008 Revision 7, supersedes and replaces MK-94HC071-06
MK-94HC071-08 May 2008 Revision 8, supersedes and replaces MK-94HC071-07
MK-94HC071-09 November 2008
Revision 9, supersedes and replaces MK-94HC071-08

Preface xi
Console User's Guide
Document OrganizationThe following table provides an overview of the contents and organization of this document. Click the chapter title in the left column to go to that chapter. The first page of each chapter provides links to the sections in that chapter.
MK-94HC071-10 July 2009 Revision 10, supersedes and replaces MK-94HC071-09
MK-94HC071-11 December 2009
Revision 11, supersedes and replaces MK-94HC071-10
MK-94HC071-12 June 2010 Revision 12, supersedes and replaces MK-94HC071-11
Revision Date Description
Chapter Description
Overview of Protection Manager Console
Describes the features, system structure, and functions of Protection Manager Console and Protection Manager.
System Configuration with Protection Manager Console
Describes the primary configuration patterns used for systems based on Protection Manager.
Installing Protection Manager Console
Describes how to install and uninstall Protection Manager Console.
Environment Setup for Protection Manager Console
Describes operating environment settings that are required for Protection Manager Console.
Using Setup GUI To Set Up an Environment for Protection Manager
The Setup GUI is one of the components of the Protection Manager Console. By using the Setup GUI, you can set up an operating environment for Protection Manager from GUI windows.
Using Protection Manager Console
Explains how to operate Protection Manager Console.
Troubleshooting Describes appropriate actions to be taken with respect to problems that might occur during operation of Protection Manager Console.
Environment Setting Commands for Device Manager Linkage
Provides commands to copy and delete the files that are necessary for linkage to Device Manager.
Note on a Firewall on the Local Host
Describes a point to be noted if a firewall is set up on the local host.
Notes on Using the Remote Desktop Functionality
Describes points to be noted when using the Remote Desktop functionality.
Acronyms and Abbreviations
Defines the acronyms and abbreviations used in this document.
Glossary Defines the special terms used in this document.
Index Lists the topics in this document in alphabetical order.

xii Preface
Console User's Guide
Referenced DocumentsThe following Hitachi referenced documents can be found on the applicable Hitachi documentation CD :
• Hitachi Protection Manager Software User's Guide, MK-94HC070
• Hitachi Protection Manager Software Command Reference, MK-94HC072
• Hitachi Protection Manager Software Messages, MK-94HC073
• Hitachi Storage Command Suite Software Server Installation Guide, MK-98HC150
• Hitachi Device Manager Software Agent Installation Guide, MK-92HC019
• Hitachi Device Manager Software Error Codes, MK-92HC016
Document ConventionsThis document uses the following typographic conventions:
This document uses the following icons to draw attention to information:
Convention Description
Bold Indicates text on a window, other than the window title, including menus, menu options, buttons, fields, and labels. Example: Click OK.
Italic Indicates a variable, which is a placeholder for actual text provided by the user or system. Example: copy source-file target-fileNote: Angled brackets (< >) are also used to indicate variables.
screen/code Indicates text that is displayed on screen or entered by the user. Example: # pairdisplay -g oradb
< > angled brackets
Indicates a variable, which is a placeholder for actual text provided by the user or system. Example: # pairdisplay -g <group>Note: Italic font is also used to indicate variables.
[ ] square brackets
Indicates optional values. Example: [ a | b ] indicates that you can choose a, b, or nothing.
{ } braces Indicates required or expected values. Example: { a | b } indicates that you must choose either a or b.
| vertical bar Indicates that you have a choice between two or more options or arguments. Examples:[ a | b ] indicates that you can choose a, b, or nothing.{ a | b } indicates that you must choose either a or b.
Icon Label Description
Note Calls attention to important and/or additional information.
Tip Provides helpful information, guidelines, or suggestions for performing tasks more effectively.
Caution Warns the user of adverse conditions and/or consequences (e.g., disruptive operations).
WARNING Warns the user of severe conditions and/or consequences (e.g., destructive operations).

Preface xiii
Console User's Guide
Convention for Storage Capacity ValuesPhysical storage capacity values (e.g., disk drive capacity) are calculated based on the following values:
Logical storage capacity values (e.g., logical device capacity) are calculated based on the following values:
Getting HelpThe Hitachi Data Systems Support Center staff is available 24 hours a day, seven days a week. To reach us, please visit the support Web site for current telephone numbers and other contact information: http://www.hds.com/services/support/. If you purchased this product from an authorized HDS reseller, contact that reseller for support.
Before calling the Hitachi Data Systems Support Center, please provide as much information about the problem as possible, including:
• The circumstances surrounding the error or failure.
• The exact content of any error message(s) displayed on the host system(s).
CommentsPlease send us your comments on this document: [email protected]. Include the document title, number, and revision, and refer to specific section(s) and paragraph(s) whenever possible .
Physical Capacity Unit Value
1 KB 1,000 bytes
1 MB 1,0002 bytes
1 GB 1,0003 bytes
1 TB 1,0004 bytes
1 PB 1,0005 bytes
1 EB 1,0006 bytes
Logical Capacity Unit Value
1 KB 1,024 (210) bytes
1 MB 1,024 KB or 1,0242 bytes
1 GB 1,024 MB or 1,0243 bytes
1 TB 1,024 GB or 1,0244 bytes
1 PB 1,024 TB or 1,0245 bytes
1 EB 1,024 TB or 1,0246 bytes
1 BLOCK 512 bytes

xiv Preface
Console User's Guide
Thank you! (All comments become the property of Hitachi Data Systems Corporation.)

Overview of Protection Manager Console 1–1
Console User's Guide
1Overview of Protection Manager
Console
Protection Manager Console is a program that allows users to operate Protection Manager, a data management product for storage subsystems, from a console.
This chapter describes the features, system requirements, and functions of Protection Manager Console.
□ Features of Protection Manager
□ Reviewing the Components of Hitachi Protection Manager
□ Understanding the Features of Protection Manager Console
□ Implementing Protection Manager Console
□ Understanding the Protection Manager Console Functions

1–2 Overview of Protection Manager Console
Console User's Guide
Features of Protection ManagerThis section describes the features of Protection Manager as a whole.
Protection Manager eases data maintenance, including backup and restore operations, and ensures protection of important data with minimum interruption to other processing jobs. Protection Manager enables you to manage data using simple operations, without requiring complex procedures and expertise, thus reducing the workload on the system administrator and reducing the cost of data management.
An enterprise information system must be able to protect important data without interrupting other processing jobs, and to restart such processing jobs quickly if an error occurs. To meet these needs, Hitachi disk array subsystems provide RAID management (through RAID Manager) and volume replication functions (through ShadowImage). These replication functions can quickly create a replica of a logical volume within a storage subsystem, without using a host. A system administrator can use these functions to back up a replica (secondary volume) of a primary volume to tape without taking the primary volume offline.
Until now, however, in using volume replication functions to back up a database during online operations (an online backup), one would encounter the following difficulties:
Extensive required expertise
To use the volume replication functions of Hitachi disk array subsystems, you must have extensive expertise with databases, file systems, the logical volume manager, and RAID devices.
Complex operations
Backing up a database object involves many complex operations, some of which are susceptible to human error. Additionally, since backup operations differ depending on the type of database application or file system, it can be difficult to learn all such operations.
Protection Manager resolves these problems and enables high-speed, reliable backup operations that take advantage of the Hitachi disk array subsystem functions.
Protection Manager internally manages information about the relationship between the object subject to backup and the associated logical unit among the RAID devices, the relationship between the primary and secondary volumes, and the backup history. This information is contained in dictionary map files. Protection Manager references the information in the dictionary map files to control the database and RAID devices automatically, thus reducing the system administrator's workload as well as the storage subsystem's TCO.
Figure 1-1: Overview of Protection Manager Functions provides an overview of Protection Manager functions.

Overview of Protection Manager Console 1–3
Console User's Guide
As illustrated in the figure, Protection Manager does the following:
1. Ensures reliable backup operations: Protection Manager freezes file systems or databases in the storage subsystems.
2. Controls RAID Manager: For performing volume backup and restore operations using the volume replication functions of the storage subsystems.
3. Links with backup management: Operate (in linkage) with backup management products to control tape backup and restore operations.
Reviewing the Components of Hitachi Protection ManagerHitachi Protection Manager has several components, as listed in Table 1-1: Components of Hitachi Protection Manager. Each listed product is supported on the Windows platform.
Table 1-1: Components of Hitachi Protection Manager
Figure 1-1: Overview of Protection Manager Functions
Note: Internally, Protection Manager uses the command line interface (CLI) function of RAID Manager and a backup management product. To use Protection Manager, these products must be set up and ready to use.
Product Name Main Components
Hitachi Protection Manager for SQL • Hitachi Protection Manager for SQL• Hitachi Protection Manager Copy Controller• Hitachi Protection Manager Console

1–4 Overview of Protection Manager Console
Console User's Guide
Understanding the Features of Protection Manager Console
Protection Manager Console is a program that allows backup and restore processes to be executed from a console. The following list summarizes the features of Protection Manager Console:
• Display of backup data. A list of information necessary for backup can be displayed. This information can also be output to a file (in a tab-delimited list format), so that you can manage your resources using spreadsheet applications.
• Display of management information. Information necessary for managing the history and generations of backup can be displayed. This information can also be output to a file (in a tab-delimited list format), so that you can manage the backup history using spreadsheet applications.
• Display of instance names and mount points. The instance names and mount points of the file system to be backed up are displayed on the screen, providing confirmation of the objects to be backed up. Also, since the backup options can be specified on the console, complex operations such as command entries are not needed.
• Simple data restoration. Restoration can be performed simply, by selecting the target backup ID to restore, and then specifying restoration. Also, the restore options can be specified on a console, thereby eliminating complex command-based operations.
• Automatic execution of backup operations. Backup operations can be executed automatically through use of a backup schedule. Also, you can check the execution status and results of backup jobs in a list.
• Link capability. By linking functions of Device Manager, backup and restore operations can be performed from a remote site (through remote startup).
• Locking capability. You can lock or unlock a copy group while checking its lock status.
• Copy group resynchronization. You can resynchronize a copy group simply by selecting the backup ID associated with the copy group to be resynchronized, and then specifying resynchronization.
• Setup GUI function. You can set up the operating environment required for Protection Manager by using Setup GUI. The GUI eliminates the need to execute commands or edit configuration files. Also, you can set up only the items you need, in the desired order.
Hitachi Protection Manager for Exchange
• Hitachi Protection Manager for Exchange• Hitachi Protection Manager Copy Controller• Hitachi Protection Manager Console
Product Name Main Components

Overview of Protection Manager Console 1–5
Console User's Guide
Implementing Protection Manager ConsoleBefore you can begin working with Protection Manager Console, you must configure the system. This section describes the basic system configurations for file systems, databases, and remote startup operations.
System Configuration for File SystemsBackup and restore processes for a file system can be executed from a console, by installing Protection Manager Console on the application server where Protection Manager Copy Controller is installed, as shown in Figure 1-2: System Configuration for a File System.
The following programs are required and must be installed on the application server:
• Protection Manager Copy Controller
This product is a prerequisite for Protection Manager Console.
• Java execution environment
Java Runtime Environment (JRE) 32-bit version: version 1.4.2, version 5.0 (1.5.0), or version 6.0
System Configuration for DatabasesYou can execute backup and restore processes for SQL Server or Exchange databases from a console. To do this, you need to install Protection Manager for SQL or Protection Manager for Exchange on the application server where Protection Manager Copy Controller and Protection Manager Console are also installed. Figure 1-3: System Configuration for a Database shows an example of the system configuration for a database.
The following programs are required and must be installed on the application server:
Figure 1-2: System Configuration for a File System
Figure 1-3: System Configuration for a Database

1–6 Overview of Protection Manager Console
Console User's Guide
• Protection Manager Copy Controller
This product is a prerequisite for Protection Manager Console.
• Java execution environment
Java Runtime Environment (JRE) 32-bit version: version 1.4.2, version 5.0 (1.5.0), or version 6.0
• Protection Manager for SQL
This is used when operating on an SQL Server database. Protection Manager for SQL must be installed on the same application server where Protection Manager Copy Controller is installed.
• Protection Manager for Exchange
This is used when operating on an Exchange database. Protection Manager for Exchange must be installed on the same application server where Protection Manager Copy Controller is installed.
System Configuration with Linkage to Device Manager (Remote Startup)
The system can be configured to enable a management client (Device Manager client) to perform a backup or restore from a console, by starting Protection Manager Console on the target application server. Figure 1-4: System Configuration with Linkage to Device Manager (Remote Startup) shows an example of such a configuration.
Hitachi Device Manager is required to start Protection Manager Console from Device Manager.
Figure 1-4: System Configuration with Linkage to Device Manager (Remote Startup)

Overview of Protection Manager Console 1–7
Console User's Guide
The following programs are required for each host:
• Application server
In order to start Protection Manager Console from Device Manager, the application server must have the Device Manager agent and the Java Runtime Environment (JRE) installed, and the Device Manager usage environment must be set up. For details about the Device Manager agent and Java Runtime Environment required for the application server, see the Device Manager manual.
No additional Protection Manager products are necessary when linking to Device Manager. See System Configuration for File Systems and System Configuration for Databases.
• Management server
The management server must have the Device Manager server installed, and the Device Manager usage environment must be set up. For details on the Device Manager server, see the manual for Device Manager.
• Management client (Device Manager client)
From the Device Manager Web Client, you can start Protection Manager Console by specifying an application server. When Protection Manager Console is started from the Web Client for the first time, Protection Manager Console for remote startup is downloaded from the application server.
In order to start Protection Manager Console from Device Manager, the environment must be set up so that the Device Manager Web Client can be used from the client. For information on the Device Manager Web Client, see the manual for Device Manager. Also, the following programs must be installed as the Java execution environment (installing JRE automatically installs JWS):
• Java Runtime Environment (JRE)
• Java Web Start (JWS)
For the version of JRE or JWS required on management clients, see the Device Manager manuals.
Prerequisite Operating Systems (OSs) for Each HostFollowing are the prerequisite OSs for hosts acting as application servers, management servers (Device Manager server) and management clients (Device Manager client).
• Application server
• Windows 2000 Server
• Windows Server 2003
• Windows Server 2008
Note: When Protection Manager Console is started from Device Manager remotely and the OS for the management client is Solaris, you must use the CDE. Because the GNOME desktop is not supported, the Protection Manager Console windows might be displayed incorrectly when using the GNOME desktop.

1–8 Overview of Protection Manager Console
Console User's Guide
If you want to use Windows Server 2003 (IPF), you must install the IA-32 Execution Layer 4.3 software driver. You can download this driver from the Microsoft homepage. If it is not installed, Protection Manager Console might terminate abnormally.
• Management server
Prerequisite OSs are the same as for the Device Manager server. For details, please see the Device Manager manual.
• Management client
• Windows 2000 Professional
• Windows XP Professional
• Windows Vista
• Solaris 9 (SPARC)
• Solaris 10 (SPARC)
User Privileges for Executing Protection Manager ConsoleTo execute Protection Manager Console, the following administrator privileges are required:
• Administrator privileges of the OS
Grant local administrator privileges to the executing user. When the application server OS is Windows Server 2008, OS administrator privileges are required. The user must obtain OS administrator privileges when starting Protection Manager Console.
• Database access privileges
• When backing up an SQL Server database
Access the SQL Server using Windows authentication. The executing user must therefore be registered as a member of the SQL Server sysadmin-fixed server role.
• When backing up an Exchange database
Allow the executing user to belong to the domain Enterprise Admins group or the domain Exchange Domain Servers group.
Note: To start Protection Manager Console from Device Manager, note the following:
• The service start account for the Device Manager agent must have database access privileges.
• The Device Manager agent services must have been started by the Administrator account. If a Device Manager agent service has been started by an account other than the Administrator account, problems might occur. For example, if the environment variable DRM_HOSTNAME is changed, the change might not be applied to the service.

Overview of Protection Manager Console 1–9
Console User's Guide
Understanding the Protection Manager Console FunctionsBackup and restore processing for file systems, SQL Server databases, or Exchange databases can be executed from a console using Protection Manager Console. Protection Manager Console consists of three pages: the Application View, Backup Catalog View, and Backup Job View.
Viewing Application InformationThe Application View, shown in Figure 1-5: Protection Manager Console Application View, displays a list of file systems and database instances that can be backed up or restored. In Protection Manager Console, this information is called the application information.
In order to back up databases or file systems, resource information is needed, including the mount point directory for database objects and the file system, and the relation to the disk number within the RAID device. In Protection Manager, this information is managed as an application map, a core map and a copy group map, in dictionary map files.
By using Protection Manager Console, you can view the list of information necessary for backup without having to enter commands or carry out other operations.
Viewing Catalog InformationThe Backup Catalog View, shown in Figure 1-6: Protection Manager Console Backup Catalog View, displays a list of file systems and database instances that have been backed up thus far. In Protection Manager Console, this information is called catalog information.
Figure 1-5: Protection Manager Console Application View

1–10 Overview of Protection Manager Console
Console User's Guide
Restoring from a backup requires the resource information from when the backup was executed. In Protection Manager, the system resource information used at the time of backup is associated with a unique backup ID, and is managed as a backup catalog of dictionary map files.
By using Protection Manager Console, you can view all information necessary for backup operations, such as backup history, as well as information for management of backup generations.
Backing up and Restoring DataProtection Manager Console supports data backup and restoration on the console so that complex operations such as command entries are not necessary.
By creating a user script, you can back up data from the primary volume to tape, via the secondary volume, with a single command.
• Backing up Data. Users can back up from a primary volume to a secondary volume, through either application database (DBMS) instance units or file system units. Simply by selecting an instance name or a mount point for the file system displayed in the Application View, and then choosing backup, you can carry out a backup without needing to be aware of related information about the applications or file system that you want to back up. Also, since the backup options can be specified on the console, complex command entries are not necessary.
Figure 1-6: Protection Manager Console Backup Catalog View

Overview of Protection Manager Console 1–11
Console User's Guide
• Restoring Data. You can restore data by selecting a backup ID from the catalog information displayed on the Backup Catalog View, and then specifying a restore. Also, since the restore options can be specified on the console, complex operations such as command entries are not necessary.
Managing Backup JobsIf periodic backups are required, it is inefficient to back up manually each time. You can register backup jobs for each backup target displayed in the Application View of Protection Manager Console. By registering backup jobs, you can back up data automatically in accordance with a specified schedule.
The Backup Job View (see Figure 1-7: Protection Manager Console Backup Job View) lists all registered backup jobs, and it lets you perform the following operations:
• Checking the status
• Executing a job immediately
• Changing options
• Deleting jobs
• Displaying the execution result details window
Locking a Copy GroupYou can lock a copy group simply by viewing the catalog information in the Backup Catalog View, selecting the backup ID associated with the copy group you want to lock, and specifying a lock. Similarly, you can also unlock a copy group that has already been locked.
Figure 1-7: Protection Manager Console Backup Job View

1–12 Overview of Protection Manager Console
Console User's Guide
Protection Manager automatically selects the backup destination copy group when executing a backup. However, if you lock a particular copy group beforehand, Protection Manager will continue backup using other copy groups only.
Resynchronizing a Copy GroupWhen you resynchronize a copy group, the primary volume and secondary volume become mirrored. You can resynchronize a copy group simply by viewing the catalog information in the Backup Catalog View, selecting the backup ID associated with the copy group you want to resynchronize, and specifying resynchronization.
• When usual operation is in a split state, resynchronize the copy group before backing up data.
• When usual operation is in a pair state, you do not need to resynchronize the copy group before backing up data. After the tape backup ends, resynchronize the copy group to initialize it.
Outputting Application Information and Catalog Information to Files
Application information displayed in the Application View, as well as catalog information displayed in the Backup Catalog View, can be output to a file. Detailed application and catalog information can also be output to a file, from the Application View or the Backup Catalog View detail display screen.
Using Protection Manager Console, application information and catalog information can be output to a file (in a tab-delimited list format), allowing the user to manage resources and backup history with spreadsheet applications.
Mounting and Unmounting a Secondary VolumeTo reference backup data stored on a secondary volume, the secondary volume must be mounted.
For example, if you want to use backup data on the secondary volume as a source for data mining, you can mount the secondary volume using Protection Manager Console. (Note, however, that once the backup data is used, you can no longer use it as backup data.)
After mounting the secondary volume to reference the data in it, if you then want to synchronize the data in the primary and secondary volumes, unmount the secondary volume and then back it up again. You can use Protection Manager Console to unmount the secondary volume.
Note: When using the Thunder 9200 or when using ShadowImage on the Thunder 9500V Series, Hitachi AMS2000, Hitachi AMS/WMS, or Hitachi SMS100, resynchronize the copy group on the database server. By resynchronizing the copy group first, the backup processing can finish faster.

Overview of Protection Manager Console 1–13
Console User's Guide
Updating the Dictionary Map FilesAfter starting your operation, you must update the dictionary map files when you modify the database configuration or perform related operations. You can use Protection Manager Console to update the dictionary map files on the desired host from one of the application servers (file server, database server, or backup server) or the management client (Device Manager client).
Linking to Device Manager (Remote Startup)In addition to starting directly from an application server (a file server, a database server, or a backup server) on which it is installed, Protection Manager Console can also be started from a management client (Device Manager client) by selecting the target host (the application server).
By linking with Device Manager, backup and restore processing can be performed as part of storage hardware management.
Starting the Setup GUIYou can start Setup GUI from the Protection Manager Console menu. Setup GUI enables you to use a GUI to set up the operating environment required for Protection Manager operation. Using Setup GUI has the following advantages:
• Specialized knowledge about the commands and files used for environment setup is not required.
• You only need to change a limited number of settings because if one setting is changed, other settings will change automatically to reflect those changes.
• You can check the current settings for each function.
For details on how to use Setup GUI and the settings, see Using Setup GUI To Set Up an Environment for Protection Manager.
Configuration Check FunctionProtection Manager provides a configuration check function to verify the required system configurations. With the configuration check function, you can check the following:
• Version of the OS
• Version of the DBMS
• Storage location of the database file to be backed up
• Integrity of the configuration definition file used by Protection Manager
• Existence of the programs required to run VSS (volume shadow copy service)
• Integrity of the volume manager and the disk configuration
When you first construct the system with Protection Manager or modify the existing system configuration, we recommend that you use the configuration check function to verify your system configuration.

1–14 Overview of Protection Manager Console
Console User's Guide
For details on how to use the configuration check function, see About the Configuration Check Function.

System Configuration with Protection Manager Console 2–1
Console User's Guide
2System Configuration with Protection
Manager Console
This chapter describes the primary configuration patterns used for systems based on Protection Manager:
□ Overview
□ Configuring the System to Back Up and Restore Data Between Volumes
□ Configuring the System to Mount or Unmount a Secondary Volume
□ Cluster Configuration of Operation Standby Type (Active-Passive)
□ Cluster Configuration of Mutual Standby Type (Active-Active)
□ Configuring the System to Execute Remote Copy
□ Configuring the System When a Backup Is Made Using VSS
□ Configuring the System When Using a Dynamic Disk Configuration

2–2 System Configuration with Protection Manager Console
Console User's Guide
OverviewProtection Manager Console must be used in an environment in which Protection Manager and all the prerequisite products for Protection Manager Console are already installed and set up. The following sections in this chapter explain the required configuration of the Protection Manager and prerequisite products when using Protection Manager Console.
Configuring the System to Back Up and Restore Data Between Volumes
To backup or restore data between a primary volume and a secondary volume using Protection Manager, connect a file server or database server to the storage subsystem.
For such a configuration, install Protection Manager in the file server or database server, and then back up and restore the data.
Figure 2-1: A System Configured to Back up and Restore Data Between Volumes shows an example of a system configured to back up and restore data between volumes. Only primary volumes can be managed from the file server or database server.
Figure 2-1: A System Configured to Back up and Restore Data Between Volumes
System Configuration with Protection Manager Console 2–3
Console User's Guide
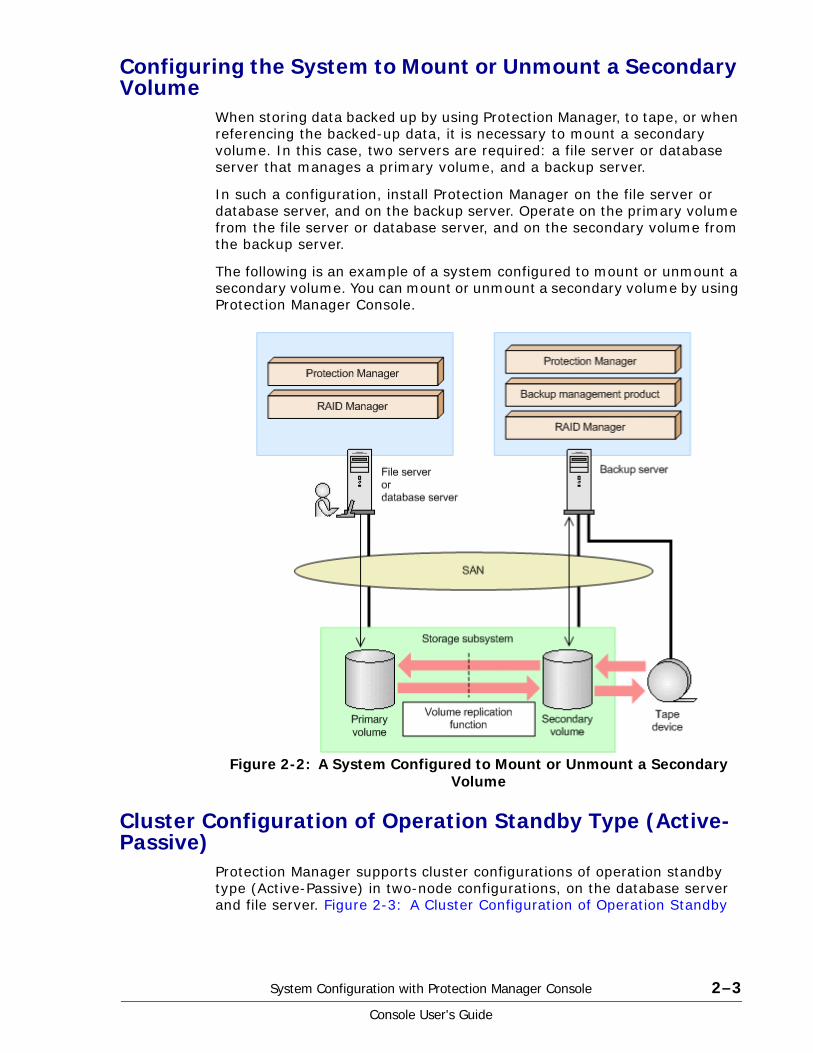
Configuring the System to Mount or Unmount a Secondary Volume
When storing data backed up by using Protection Manager, to tape, or when referencing the backed-up data, it is necessary to mount a secondary volume. In this case, two servers are required: a file server or database server that manages a primary volume, and a backup server.
In such a configuration, install Protection Manager on the file server or database server, and on the backup server. Operate on the primary volume from the file server or database server, and on the secondary volume from the backup server.
The following is an example of a system configured to mount or unmount a secondary volume. You can mount or unmount a secondary volume by using Protection Manager Console.
Cluster Configuration of Operation Standby Type (Active-Passive)
Protection Manager supports cluster configurations of operation standby type (Active-Passive) in two-node configurations, on the database server and file server. Figure 2-3: A Cluster Configuration of Operation Standby
Figure 2-2: A System Configured to Mount or Unmount a Secondary Volume

2–4 System Configuration with Protection Manager Console
Console User's Guide
Type (Active-Passive) shows an example of a cluster configuration of operation standby type (Active-Passive). You can build a cluster configuration using file servers or database servers.
To execute Protection Manager commands in a cluster configuration of operation standby type (Active-Passive), you must assign a storage destination for the dictionary map files used by each virtual server. For details on how to assign the dictionary map files in a cluster configuration, see the Hitachi Protection Manager User's Guide.
Using a Backup Job in a Cluster ConfigurationTo use a backup job in a cluster configuration of operation standby type (Active-Passive), you must use the cluster software to set up the environment. For details on how to do this, see Using a Backup Job in a Cluster Configuration.
In normal operation, you do not need to be aware of internal job-schedule control because one server manages backup jobs regardless of whether the system is in a cluster configuration. However, if a failover occurs in a cluster configuration, you need to be aware of the movement of job-schedule control because the server that manages backup jobs is switched.
In Protection Manager Console on a shared disk, a schedule information file manages backup job schedule information, and a job execution result information file records execution results. During normal operation, the job schedule management function on the active server accesses these files to control the job schedule. After a failover occurs, the same schedule
Figure 2-3: A Cluster Configuration of Operation Standby Type (Active-Passive)

System Configuration with Protection Manager Console 2–5
Console User's Guide
information file and job execution result information file are still used, but control of the job schedule management function is moved from the active server to the standby server.
The job-schedule control moves when a failover occurs because the environment was set up using the cluster software. The following figure shows job-schedule control after a failover.
Cluster Configuration of Mutual Standby Type (Active-Active)
Protection Manager supports cluster configurations of mutual standby type (Active-Active). A cluster configuration of mutual standby type consists of multiple operation standby type environments.
Figure 2-5: A Cluster Configuration of Mutual Standby Type (Active-Active) shows an example of a cluster configuration of mutual standby type (Active-Active). You can build a cluster configuration using file servers or database servers.
Figure 2-4: Job-Schedule Control after a Failover

2–6 System Configuration with Protection Manager Console
Console User's Guide
To execute Protection Manager commands in a cluster configuration of mutual standby type (Active-Active), you must create dictionary map files for each virtual server. You must also assign a storage destination for the dictionary map files used by each virtual server. For details on how to assign the dictionary map files in a cluster configuration, see the Hitachi Protection Manager User's Guide.
To use a backup job in a cluster configuration of mutual standby type (Active-Active), it is necessary to use the cluster software to set up the environment. For details on how to do this, see Settings for Using Backup Jobs in a Cluster Configuration.
Configuring the System to Execute Remote CopyBy using TrueCopy and Universal Replicator, Protection Manager supports backup to a storage subsystem at a remote site, and restoration from that storage subsystem. This support enables recovery from failures in a storage subsystem at the local site. The supported system configurations are as follows:
• TrueCopy or Universal Replicator configurations
• ShadowImage and TrueCopy multi-target configurations
• ShadowImage and Universal Replicator multi-target configurations
Figure 2-5: A Cluster Configuration of Mutual Standby Type (Active-Active)

System Configuration with Protection Manager Console 2–7
Console User's Guide
• ShadowImage (multiple generations), TrueCopy, or Universal Replicator configurations
For cautionary notes on backing up or restoring between storage subsystems, see the Hitachi Protection Manager User's Guide.
TrueCopy or Universal Replicator ConfigurationsProtection Manager supports configurations that use TrueCopy or Universal Replicator for backing up and restoring data between storage subsystems. The following figure shows an example of such a configuration.
ShadowImage and TrueCopy Multi-Target ConfigurationsProtection Manager supports ShadowImage and TrueCopy multi-target configurations. The following figure shows an example of such a configuration.
Figure 2-6: Example TrueCopy or Universal Replicator System Configuration

2–8 System Configuration with Protection Manager Console
Console User's Guide
ShadowImage and Universal Replicator Multi-Target Configurations
Protection Manager supports ShadowImage and Universal Replicator multi-target configurations. The following figure shows an example of such a configuration.
Figure 2-7: Example ShadowImage and TrueCopy Multi-Target Configuration
Figure 2-8: Example ShadowImage and Universal Replicator Multi-Target Configuration

System Configuration with Protection Manager Console 2–9
Console User's Guide
ShadowImage (Multiple Generations), TrueCopy or Universal Replicator Configurations
Protection Manager supports ShadowImage (multiple generations), TrueCopy, or Universal Replicator configurations. The following figure shows an example of such a configuration.
Configuring the System When a Backup Is Made Using VSSProtection Manager can use VSS to back up data when the backup is of a file system or an Exchange database. Protection Manager requires two servers (one file server or database server and one backup server) when it uses VSS to back up data. The file server and database server manage primary volumes. The backup server imports VSS snapshots and verifies the file system or Exchange database. The backup server imports VSS snapshots and verifies the Exchange database. The backup server can also store backup results on a tape.
Figure 2-9: Example ShadowImage (Multiple Generations), TrueCopy or Universal Replicator Configuration

2–10 System Configuration with Protection Manager Console
Console User's Guide
In this configuration, you perform backups and restorations on the file server or database server. In the backup server, the Protection Manager service communicates with the file server or database server to perform the import of the VSS snapshot and the verification of the Exchange database.
The following figure is an example of a system configuration where Protection Manager uses VSS to back up data.
Configuring the System When Using a Dynamic Disk Configuration
Protection Manager supports a system configuration using Windows dynamic disks.
Protection Manager Console allows you to back up and restore a file system only when the file system has a one-to-one relationship with a disk group (disk set).
The following figure shows an example of a system configuration using dynamic disks.
Figure 2-10: A System Configuration Where Protection Manager Uses VSS

System Configuration with Protection Manager Console 2–11
Console User's Guide
Figure 2-11: Example of a system configuration using dynamic disks

2–12 System Configuration with Protection Manager Console
Console User's Guide

Installing Protection Manager Console 3–1
Console User's Guide
3Installing Protection Manager Console
This chapter describes how to install and uninstall Protection Manager Console:
□ Preparing to Install Protection Manager Console
□ Installing Protection Manager Console
□ Uninstalling Protection Manager Console
□ Releasing Linkage of Protection Manager Console with Device Manager

3–2 Installing Protection Manager Console
Console User's Guide
Preparing to Install Protection Manager ConsoleThis section describes the preparations required before you install Protection Manager Console.
Confirming Prerequisite ProgramsBefore installing Protection Manager Console, you must install all prerequisite programs and complete setup of the environment, as listed in the following tables. For information about system conditions for each product, see the Hitachi Protection Manager User's Guide.
Table 3-1: Prerequisite Products and Their Locations (for Local Startup)
Table 3-2: Prerequisite Products and Their Locations (for Remote Startup)
Prerequisite Product Application Server
Protection Manager Products
Protection Manager Copy Controller (required)
Required
Protection Manager for SQL (optional) Required for database operationsProtection Manager for Exchange
(optional)
Java execution environment (JRE) Required
Prerequisite Product Application Server
Management server (Device Manager server)
Management Client (Device
Manager Client)
Protection Manager Products
Protection Manager Copy Controller (required)
Required —
Protection Manager for SQL (optional)
Required for database operationsProtection Manager for
Exchange (optional)
Device Manager
Device Manager server — Required —
Device Manager agent Required — —
Java execution environment
JRE Required — Required
JWS — — Required
Note: You can install the Java execution environment and Device Manager in any order. When using an English version of Protection Manager Console, use English versions of Protection Manager Copy Controller, Protection Manager for SQL, and Protection Manager for Exchange.

Installing Protection Manager Console 3–3
Console User's Guide
Installing Protection ManagerUse of Protection Manager Console requires Protection Manager Copy Controller. When backing up or restoring a database, either Protection Manager for SQL or Protection Manager for Exchange is required, depending on the database.
For information about how to install Protection Manager Copy Controller, Protection Manager for SQL, and Protection Manager for Exchange, as well as details about environment setup, please see the Hitachi Protection Manager User's Guide.
For details about updating the object map, see the Hitachi Protection Manager User's Guide. For details about the drmfsdisplay, drmsqldisplay, and drmexgdisplay commands, see the Hitachi Protection Manager Command Reference.
Installing Device ManagerTo start Protection Manager Console from Device Manager (remote starting), you must install the following Device Manager components on the application server (the Device Manager agent) and the management server (the Device Manager server), and then set up the environment:
• Application server: Install Device Manager agent
• Management server: Install Device Manager server
Notes on the environment settings for Device Manager:
To complete a remote start, specify the application server from Device Manager Web Client, in order to start Protection Manager Console. Afterward, configure the Device Manager server and the Device Manager agent so that you can view the target host (application server) from the Device Manager Web Client.
For information about Device Manager installation and environment setup, please see the manual for Device Manager.
• During the first-time installation of Protection Manager Copy Controller, a value is added to the system environment variable. To apply the system environment variable to the system, restart the system.
• After installing Protection Manager (prerequisite products), or after changing the system configuration (such as instance increases, decreases and volume changes), update the object map for the dictionary map files.
To update the object map, use the following commands:
— For Protection Manager Copy Controller: drmfsdisplay
— For Protection Manager for SQL: drmsqldisplay
— For Protection Manager for Exchange: drmexgdisplay

3–4 Installing Protection Manager Console
Console User's Guide
Installing the Java Execution EnvironmentTo use Protection Manager Console from an application server (local starting), you must install JRE on the application server. To start Protection Manager Console from Device Manager by linking with Device Manager (remote starting), you must install JRE on the application server, and also install JRE and JWS on the Management client (Device Manager client). Download the Java execution environment from the Sun Microsystems, Inc. website. An installation of JRE also installs JWS automatically.
When installing the Java Runtime Environment (JRE), select "Custom install" and install the "Support for Additional Languages" function.
For information about the JRE and JWS versions required on each host, see Implementing Protection Manager Console.
Notes on the JRE version
• When using JRE version 1.4.2_07 or earlier, if the OS is Windows Server 2003 SP1 or Windows Server 2003 R2 and the hardware DEP is enabled, sometimes Protection Manager Console does not run. If this happens, install JRE version 1.4.2_08 or later.
• If the management client OS is Windows Vista, install JRE version 6.0.
Download the Java execution environment from the Sun Microsystems, Inc. website. Installing JRE also installs JWS automatically.
Installing Protection Manager ConsoleYou can install Protection Manager Console on application servers such as file servers, database servers, and backup servers.
This section describes the procedures for installing Protection Manager Console. Before you start the installation, make sure that:
• The prerequisite programs for Protection Manager Console are already installed, and the environment setup is complete.
• You are logged in with Administrator privileges.
• All programs are inactive.
• Services of the Device Manager agent in the application server are inactive (when linking with Device Manager).
To install Protection Manager Console:
1. Insert the Protection Manager installation CD-ROM into the CD-ROM drive.
This example assumes that the x: drive is the CD-ROM drive.
2. From the Windows Start menu, choose Run.
The Run dialog box appears.
3. Enter x:\Windows\Console\Setup.exe, and click the OK button.
Note: If you want to reinstall Protection Manager Console, and the version you want to install is the same as the one already installed, make sure that you completely uninstall the program beforehand.

Installing Protection Manager Console 3–5
Console User's Guide
The installer window appears.
4. Click the Next button.
A dialog box appears, prompting you to enter user information.
5. Enter the user name and company name, then click the Next button.
A dialog box prompting you to confirm the installation destination appears.
6. Change the installation destination from the default if required, then click the Next button.
7. Select the setup type, then click the Next button. You can select any of the following three setup types:
• Standard
The Protection Manager Console program and the online manual are installed.
• Compact
Only the Protection Manager Console program is installed.
• Customized
The user selects the components to be installed.
8. Enter the name of the program folder, then click the Next button.
A dialog box appears, prompting you to enter confirmation before file copying starts.
9. Ensure that the information you specified is correct, then click the Next button.
Installation starts. Wait until a message is displayed, reporting that installation has finished.
10.Click the Finish button.
When the installation finishes, the following directories are added to the PATH environment variable:
• Protection-Manager-Console-installation-directory\lib
Note: If you change the installation destination directory, do not specify a directory where another product is installed. The usable characters are alphanumeric characters, one-byte spaces, and the following special characters:
# + - @ _ ( ) .
If you do not change the installation destination directory, the following folder will be the installation destination for Protection Manager Console:
C:\Program Files\HITACHI\DRM_CONSOLE
If the OS is Windows Server 2003 or Windows Server 2008, the installation destination might be the following folder:
C:\Program Files (x86)\HITACHI\DRM_CONSOLE
A dialog box appears, prompting you to select the setup type.

3–6 Installing Protection Manager Console
Console User's Guide
• Protection-Manager-Console-installation-directory\bin
Linkage with Device ManagerWhen Protection Manager Console is installed, the files relevant to Protection Manager Console are automatically copied to the installation directory of Device Manager agent, so that a link to Device Manager is established. However, if the files copied to the Device Manager agent installation directory are corrupted after the Protection Manager Console installation, they must be deleted and re-copied. Execute these commands from the command prompt to delete or copy the files necessary for Device Manager linkage:
• ptmguiuninst.exe Deletes the files required for Device Manager linkage to the installation directory of Device Manager agent.
• ptmguiinst.exe Copies the files required for Device Manager linkage to the installation directory of Device Manager agent.
Important: Before running either executable, ensure that the following conditions are satisfied:
• Device Manager agent is installed.
• Services for Device Manager agent are stopped.
• Protection Manager Console is installed.
Deleting Files Required for Device Manager Linkage
Execute ptmguiuninst.exe from the command prompt on the application server where Protection Manager Console and Device Manager agent are installed.
Copying Files Required for Device Manager Linkage
Execute ptmguiinst.exe from the command prompt on the application server where Protection Manager Console and Device Manager agent are installed.
Command Details
Installation destination: Protection-Manager-Console-installation-directory\bin
Return code:
• 0: Normal termination
• 1: Termination with an error
For details about output messages, see the Hitachi Protection Manager Messages.
Note: The length of the character string for the system environment variable PATH must be no more than 2,047 bytes. If the length exceeds 2,047 bytes, an error occurs.
Installing Protection Manager Console 3–7
Console User's Guide
Uninstalling Protection Manager ConsoleImportant: Before you uninstall the Protection Manager Console, verify the following items:
• You are logged on with Administrator privileges.
• All programs are inactive.
• When linking with Device Manager, the Device Manager agent services (in the application server) are inactive.
To uninstall Protection Manager Console:
1. From the Windows Start menu, choose Settings and then Control Panel.
The Control Panel opens.
2. Double-click Add or Remove Programs.
in Windows Server 2003, double-click Add or Remove Programs. In Windows Server 2008, double-click Programs and Features.
The Add/Remove Programs dialog box appears.
3. In the Currently installed programs list, select Hitachi Protection Manager Console, then click the Remove button.
In Windows Server 2008, click the Uninstall button.
The installer window appears.
4. Click the Remove button, then click the Next button.
A dialog box appears, confirming whether you want to delete Protection Manager Console.
5. Click the OK button.
Uninstallation starts.
6. After uninstallation finishes, close the dialog box.
7. Delete any user files that were created after installation, such as definitions files or log files.
8. Delete the following directories from the system environment variable PATH:
• Protection-Manager-Console-installation-directory\lib
• Protection-Manager-Console-installation-directory\bin
Note: For details about how to change environment variables, see the Windows help.
Note: If you attempt to uninstall Protection Manager Console in Windows Server 2003 or Windows Server 2008, a window that shows only an X symbol might be displayed and the attempt to uninstall Protection Manager Console might fail. In this case, you must execute the CD-ROM-drive:\Windows\Console\Setup.exe command from the CD-ROM media to uninstall Protection Manager Console.
3–8 Installing Protection Manager Console
Console User's Guide
Releasing Linkage of Protection Manager Console with Device Manager
Uninstalling Protection Manager Console automatically deletes files related to Protection Manager Console from the installation directory of Device Manager agent, and releases linkage of Protection Manager Console with Device Manager. After the uninstallation, please see Linkage with Device Manager for details about deleting files required for Device Manager linkage.

Environment Setup for Protection Manager Console 4–1
Console User's Guide
4Environment Setup for Protection
Manager Console
This chapter describes operating environment settings that are required for Protection Manager Console.
For details on environment setup affecting an entire Protection Manager system, see the Hitachi Protection Manager User's Guide.
□ Operating Environment for Protection Manager Console
□ Working with the Environment Setup Files for Protection Manager Console
□ Working with the Setup Items in the Environment Setup Files
□ Settings for Using Backup Jobs in a Cluster Configuration

4–2 Environment Setup for Protection Manager Console
Console User's Guide
Operating Environment for Protection Manager ConsoleThe operation environment of Protection Manager Console is configured through environment setup files. The following items can be configured using the files:
• The log function for Protection Manager Console
• Communication with the Device Manager agent
• Backup job management
Default values are set for all items. Alter these as necessary to suit your operations. For details on the environment setup files for Protection Manager Console, see Working with the Environment Setup Files for Protection Manager Console and Working with the Setup Items in the Environment Setup Files.
Working with the Environment Setup Files for Protection Manager Console
Figure 4-1: Environment Setup Files for Protection Manager Console provides an overview of the environment setup files.
Note: To use Protection Manager Console, environment setup for Protection Manager Copy Controller must be completed. Similarly, to back up or restore a database, depending on the target DBMS, the environment setup for either Protection Manager for SQL or Protection Manager for Exchange must be completed. For more information on how to setup the environment for these products, see the Hitachi Protection Manager User's Guide.

Environment Setup for Protection Manager Console 4–3
Console User's Guide
Table 4-1: Environment Setup Files for Protection Manager Console describes the files for local execution (when using Protection Manager Console running on an application server) and remote execution (when using Protection Manager Console running on an application file server, from a management client (Device Manager client).
Table 4-1: Environment Setup Files for Protection Manager Console
Figure 4-1: Environment Setup Files for Protection Manager Console
Type File Name Server Installed Location
Setup file for local execution
console.conf Application server Protection-Manager-Console-installation-directory\conf\
Setup files for remote execution
agent.conf Application server Protection-Manager-Console-installation-directory\conf\
console.conf Management client (Device Manager client)
In Windows:user-home-directory-for-the-management-client\drm_console\conf\In Solaris:home-directory-for-the-management-client/drm_console/conf/

4–4 Environment Setup for Protection Manager Console
Console User's Guide
Files for local execution, console.conf and agent.conf, are created when Protection Manager Console is installed on an application server. In contrast, the file for remote execution, console.conf, is created when Protection Manager Console is started for the first time on the management client (Device Manager client).
The schd.conf file is created when Protection Manager is installed. If necessary, edit the settings by using a text editor. For details, see Setup Items in the schd.conf File.
If changes have been made to the settings items in the:
• agent.conf file, restart the Device Manager Agent service to validate the changes.
• console.conf file, restart Protection Manager Console to validate the changes.
• schd.conf file, restart Protection Manager Console to validate the changes.
Working with the Setup Items in the Environment Setup Files
The following table lists the environment setup files for Protection Manager Console, and lists the setup items in each file.
Table 4-2: Environment Setup Files for Protection Manager Console and Setup Items
Setup file for backup job management
schd.conf Application server Protection-Manager-installation-directory\conf\
Type File Name Server Installed Location
Environment setup file Setup Item Description
console.conf(For local execution)
log.level Setup items relating to log files, for local execution, that are located on an application server.
log.max_filecount
log.max_filesize
gui.progress.elapsed_time.interval
gui.progress.bar.interval
agent.conf log.level Setup items relating to log files, for remote execution, that are located on an application server.
log.max_filecount
log.max_filesize

Environment Setup for Protection Manager Console 4–5
Console User's Guide
Setup Items in the console.conf File (for Local Execution)
log.level
Use this setup item to set the threshold level for the trace log files output by the log output function. Specify one of the following four values: 0, 10, 20, or 30. Larger values allow more detailed log information to be output.
Regardless of the type of each message (such as error, warning, or information), in Protection Manager Console the log output levels 0, 10, 20 and 30 are set according to the message content. Messages that have output levels less than or equal to the value set in log.level are output to the trace log file (trace$.log). The default value is 10.
The meaning of each output level is as follows:
• 0: Specify for normal operation. Only high severity level messages are output.
• 10: Specify for normal operation (including waiting for recovery). Warning level messages are output.
• 20: Specify for error investigation (for recovery testing). The output messages are at a level that enables the readers to understand the processing flow.
• 30: Specify for error investigation. All messages are output.
log.max_filecount
Use this setup item to set the maximum number of trace log files (trace$.log) output by the log output function.
console.conf(For remote execution)
log.level Setup items relating to log files, for remote execution, that are located on a management client (Device Manager client).
log.max_filecount
log.max_filesize
gui.progress.elapsed_time.interval
gui.progress.bar.interval
agent.timeout Setup items relating to communication with the Device Manager agent.
agent.retry_count
agent.retry_time
schd.conf SCH_MAP_PATH Setup items relating to storage destinations for the files used for backup job management.
EXEC_LOG_OUTPUT
MAX_JOB_REGISTRATION_COUNT
Setup items relating to maximum values that can be specified for backup job management.MAX_JOB_RESULT_COUNT
Environment setup file Setup Item Description

4–6 Environment Setup for Protection Manager Console
Console User's Guide
When the files become full of output log data, each file is backed up in turn until the number of files reaches a number one less than the maximum number specified in log.max_filecount. The most recent log file name has a 0 in place of the $. For the older files, the number can be any number greater than 0 and less than the specified number; the larger the number is, the older the log file. Specify a value between 2 and 10 for log.max_filecount. The default value is 2. Set a value that is appropriate for the operating environment.
log.max_filesize
Use this setup item to set the maximum size of the trace log files output by the log output function. The size should be specified in megabyte (MB) units. Specify a value between 1 and 32 for log.max_filesize. The default value is 1. Set a value that is appropriate for the operating environment.
gui.progress.elapsed_time.interval
Use this setup item to specify (in seconds) the refresh interval for the elapsed time displayed during the running of backup, restoration, lock, unlock, and resynchronization operations. Specify a value from 1 to 60 for gui.progress.elapsed_time.interval. The default value is 1.
gui.progress.bar.interval
Use this setup item to specify (in seconds) the refresh interval for the progress rate displayed during the running of backup, restoration, and resynchronization operations. Setting a small value may cause an increase in inquiries about progress status made to the application server, resulting in a delay in backup and other processes, or an increase in network load. A system administrator should set this value only when it is necessary to adjust the performance of Protection Manager Console. Specify a value from 10 to 60 for gui.progress.bar.interval. The default value is 30.
Setup Items in the agent.conf FileSettings in the agent.conf file are only effective for remote execution of Protection Manager Console. Setting the agent.conf file is not necessary for local execution.
log.level
Use this setup item to set the threshold level for the trace log files output by the log output function. Specify one of the following four values: 0, 10, 20, or 30. Larger values allow more detailed log information to be output.
Regardless of the type of each message (such as error, warning, or information), in Protection Manager Console the log output levels 0, 10, 20 and 30 are set according to the message content. Messages that have output levels less than or equal to the value set in log.level are output to the trace log file (agt_trace.log.$). The default value is 10.

Environment Setup for Protection Manager Console 4–7
Console User's Guide
log.max_filecount
Use this setup item to set the maximum number of trace log files (agt_trace.log.$) output by the log output function.
When the files become full of output log data, each file is backed up in turn until the number of files reaches a number one less than the maximum number specified in log.max_filecount. The most recent log file has the name agt_trace.log. For the older files, the number assigned to the file in its file name can be any number greater than 1 and less than the specified number; the larger the number is, the older the log file. Specify a value between 2 and 10 for log.max_filecount. The default value is 2.
log.max_filesize
Use this setup item to set the maximum size of the trace log files output by the log output function. Specify the size sin megabytes (MB). Specify a value between 1 and 32 for log.max_filesize. The default value is 1.
Setup Items in the console.conf File (for Remote Execution)
log.level
Use this setup item to set the threshold level for the trace log files output by the log output function. Specify one of the following four values: 0, 10, 20, or 30. Larger values allow more detailed log information to be output.
Regardless of the type of each message (such as error, warning, or information), in Protection Manager Console the log output levels 0, 10, 20 and 30 are set according to the message content. Messages that have output levels less than or equal to the value set in log.level are output to the trace log file (ip-address-of-application-server-or-host-name_trace$.log). The default value is 10.
log.max_filecount
Use this setup item to set the maximum number of trace log files (ip-address-of-application-server-or-host-name_trace$.log) output by the log output function.
When the files become full of log output, each file is backed up in turn until the number of files reaches a number one less than the maximum number specified in log.max_filecount. The most recent log file name has a 0 in place of the $. For the older files, the number can be any number greater than 0 and less than the specified number; the larger the number is, the older the log file. Specify a value between 2 and 10 for log.max_filecount. The default value is 2.
log.max_filesize
Use this setup item to set the maximum size of the trace log files output by the log output function. The size should be specified in megabyte (MB) units. Specify a value between 1 and 32 for log.max_filesize. The default value is 1.

4–8 Environment Setup for Protection Manager Console
Console User's Guide
gui.progress.elapsed_time.interval
Use this setup item to specify (in seconds) the refresh interval of the elapsed time displayed during the running of backup, restoration, lock, unlock, and resynchronization operations. Specify a value from 1 to 60 for gui.progress.elapsed_time.interval. The default value is 1.
gui.progress.bar.interval
Use this setup item to specify (in seconds) the refresh interval for the progress rate displayed during the running of backup, restoration, and resynchronization operations. Setting a small value may cause an increase in inquiries about progress status made to the application server, resulting in a delay in backup and other processes, or an increase in network load. A system administrator should set this value only when it is necessary to adjust the performance of Protection Manager Console. Specify a value from 10 to 60 for gui.progress.bar.interval. The default value is 30.
agent.timeout
Use this setup item to set the connection timeout value, in milliseconds, for communication with Device Manager agent. You can specify agent.timeout as a value between 0 and the value set in Device Manager as the web server function completion time (server.agent.shutDownTime) for Device Manager agent. If 0 is specified, no timeouts will occur. The default value is 5,000.
agent.retry_count
Use this setup item to set the retry count for when communication problems occur with Device Manager agent. Specify a value between 0 and 2,147,483,647 for agent.retry_count. The default value is 5.
agent.retry_time
Use this setup item to set the retry interval, in seconds, for when communication problems occur with Device Manager agent. You can specify agent.retry_time as a value between 0 and the value set in Device Manager as the web server function completion time (server.agent.shutDownTime) for Device Manager agent. The default value is 10.
Setup Items in the schd.conf File
SCH_MAP_PATH
Use this setup item to set the storage destination for a schedule information file by an absolute path. The settings vary depending on whether the system is in a cluster configuration. If the system is in a cluster configuration, you must specify the storage destination on a shared disk. For details on a schedule information file, see Using a Backup Job in a Cluster Configuration.
• For a cluster configuration:

Environment Setup for Protection Manager Console 4–9
Console User's Guide
If the virtual server is VS1, and the storage destination for a schedule information file viewed from the server is M:\PTM\schedule, the setting is as follows:
# Virtual Server (VS1) Storage MappingSCH_MAP_PATH=M:\PTM\schedule;VS1
If the virtual servers are VS1 and VS2, and the storage destinations for schedule information files viewed from those servers are M:\PTM\schedule and N:\PTM\schedule respectively, the settings are as follows:
# Virtual Server (VS1) Storage MappingSCH_MAP_PATH=M:\PTM\schedule;VS1 # Virtual Server (VS2) Storage MappingSCH_MAP_PATH=N:\PTM\schedule;VS2
• For a non-cluster configuration:
If the storage destination for a schedule information file is C:\Program files\PTM\schedule, the settings are as follows:
# Server Storage MappingSCH_MAP_PATH=C:\Program files\PTM\schedule
If you omit this parameter, the following storage destination is assumed by default:
Protection-Manager-installation-directory \schedule
EXEC_LOG_OUTPUT
Use this setup item to set the storage destination for a job execution result information file by an absolute path. The settings vary depending on whether the system is in a cluster configuration. If the system is in a cluster configuration, you must specify the storage destination on a shared disk. For details on a job execution result information file, see Using a Backup Job in a Cluster Configuration.
• For a cluster configuration:
Supposing that the virtual servers are VS1 and VS2, and the storage destinations for job execution result information files viewed from those servers are M:\PTM\schedule and N:\PTM\schedule respectively, the settings are as follows:
# Virtual Server (VS1) Storage MappingEXEC_LOG_OUTPUT=M:\PTM\schedule;VS1 # Virtual Server (VS2) Storage MappingEXEC_LOG_OUTPUT=N:\PTM\schedule;VS2
• For a non-cluster configuration:
Supposing that the storage destination for a job execution result information file is C:\Program files\PTM\schedule, the settings are as follows:
# Server Storage MappingEXEC_LOG_OUTPUT=C:\Program files\PTM\schedule
If you omit this parameter, the following storage destination is assumed by default:
4–10 Environment Setup for Protection Manager Console
Console User's Guide
Protection-Manager-installation-directory \schedule
MAX_JOB_REGISTRATION_COUNT
Use this setup item to set the maximum number of backup jobs that can be registered. Specify a value between 1 and 500 for MAX_JOB_REGISTRATION_COUNT. The default value is 500.
MAX_JOB_RESULT_COUNT
Use this setup item to set the maximum number of execution results that can be displayed for one backup job. Specify a value between 1 and 64 for MAX_JOB_RESULT_COUNT. The default value is 64.
Settings for Using Backup Jobs in a Cluster ConfigurationThis section describes how to set up an operating environment that enables backup jobs to be used in a cluster configuration.
Protection Manager Console provides a dedicated command (drmjobsch.exe) for switching the target node for which backup jobs are to be executed. Set up this command in the cluster software so that it runs automatically when a failover occurs.
Verify the following before performing the appropriate procedure for the cluster software you are using:
• Protection Manager and the cluster software have been installed successfully.
• You have logged in as a member of the Administrators group.
When using MSCS
Perform the following procedure on each server that makes up the virtual server.
To specify the required settings:
1. Create a VBScript file.
File name: RecoverJob.vbs
File storage location: Protection-Manager-installation-directory\schedule
You can change the name of a created VBScript file and the file storage location. For maintenance reasons, we recommend that you use the above file name and file storage location.
2. Edit the VBScript file, and specify the recovery processing to be performed by drmjobsch.exe.
Note: If MAX_JOB_REGISTRATION_COUNT is set to a smaller value than the number of backup jobs that have already been registered, the specified value is ignored and the default value is used as the maximum value.
Note: For details on the Protection Manager installation directory, see the Hitachi Protection Manager User's Guide.

Environment Setup for Protection Manager Console 4–11
Console User's Guide
At the entry point Function Online( ), specify that the following command is to be executed, where virtual-server-name is the name of a virtual sever to be put online:
"Protection-Manager-installation-directory\bin\drmjobsch.exe" -recover -hostname virtual-server-name
The following shows an example of specifying a VBScript file. In the example, Protection-Manager-installation-directory is C:\Program Files\HITACHI\DRM.
'Script-Level Global VariablesResource.LogInformation("Script-wide code begins execution")Dim WshShell, oExecSet WshShell = CreateObject("WScript.Shell") Function Online( ) Online = 0 Resource.LogInformation "Entering Online" Set oExec = WshShell.Exec (CHR(34) & "C:\Program Files\Hitachi\drm\ bin\drmjobsch.exe" & CHR(34) & " -recover -hostname virtual-server-name") Do While oExec.Status = 0 Set oWait = WshShell.Exec("timeout /t 1") Loop Resource.LogInformation "Exiting Online"End Function Function Offline( ) Offline = 0End Function Function LooksAlive( ) LooksAlive = 0End Function Function IsAlive( ) IsAlive = 0End Function Function Open( ) Open = 0End Function Function Close( ) Close = 0End Function

4–12 Environment Setup for Protection Manager Console
Console User's Guide
Function Terminate( ) Terminate = 0End Function
3. Use the Cluster Administrator wizard to add the new resource to the cluster resource group with the name virtual-server-name (such as a cluster resource group for SQL Server or Exchange Server).
Resource type: Generic Script
Script file path: Path name of the created VBScript file
If the VBScript file is stored on a shared disk for nodes, register this shared disk as a Physical Disk resource in the Resource dependencies field in the Dependencies dialog box.
When using VCS
Perform the following procedure on each server that makes up the virtual server.
To specify the required settings:
1. Create a batch file (.bat).
File name: postonline.bat
File storage location: %VCS_HOME%\bin\triggers
VCS_HOME is a system environment variable that indicates the location in which VCS is installed. If postonline.bat is already created in the above location, add the recovery processing to be performed by drmjobsch.exe shown in step2.
Supplementary information
A script to be set for a PostOnline event trigger can be created in the form of an executable file (.exe) or Perl script (.pl). For details on how to specify the script and how to set up the event trigger, see the VCS documentation.
2. Edit postonline.bat, and specify the recovery processing to be performed by drmjobsch.exe.
Specify that the following command is to be executed when the service group that manages backup targets of Protection Manager programs changes to the online state:
"Protection-Manager-installation-directory\bin\drmjobsch.exe" -recover -hostname virtual-server-name
Note: CHR(34) indicates a double quotation mark ("). When Protection-Manager-installation-directory does not contain any spaces, you do not need to specify CHR(34). The following is the specification when there are no spaces:
"C:\drm\bin\drmjobsch.exe" & " -recover -hostname virtual-server-name"
For details on the specification method, see the VBScript documentation.

Environment Setup for Protection Manager Console 4–13
Console User's Guide
For virtual-server-name, a name of the VCS service group is to be specified. Therefore, make sure beforehand that the name of the virtual server that manages backup targets of Protection Manager programs matches the name of the VCS service group.
An example of specifying postonline.bat is shown below. In the example, Protection-Manager-installation-directory is C:\Program Files\HITACHI\DRM.
@echo offset SERVICE_GROUP=%2 ---(1)REM Only for virtual servers of Protection Manager's targetset DRM_HOSTNAME1=virtual-server-name ---(2)IF "%SERVICE_GROUP%"=="%DRM_HOSTNAME1%" ---(3)set SCH_MAP_PATH=storage-destination-for-a-schedule-information-file ---(4)set LOOP_MAX=retry-count ---(5)set LOOP_INTERVAL=retry-interval ---(6)goto SUB_JOBRECOVER)exit /BREM recovery processing of Protection Manager job scheduler:SUB_JOBRECOVER set LOOP_COUNT=0:LOOPif EXIST %SCH_MAP_PATH%\NUL goto EXEC_JOB_RECOVER ---(7)set /A LOOP_COUNT=LOOP_COUNT+1if "%LOOP_MAX%"=="%LOOP_COUNT%" goto ERR_TIMEOUT ---(8)timeout /t %LOOP_INTERVAL%goto LOOP :EXEC_JOB_RECOVER"C:\Program Files\HITACHI\DRM\bin\drmjobsch.exe" -recover -hostname %SERVICE_GROUP% ---(9)exit /B %errorlevel% :ERR_TIMEOUTecho Timeout for waiting online of scheduler map directory.exit /B 1
The table below explains the values to be specified for each constant and their processing. The numbers in the following table correspond to those in the above example:
Table 4-3: Explanation of Values to Be Specified for Each Constant and Their Processing
Number Explanation
(1)#1 For %2, the name of the service group that has changed to the online state is given by VCS as an argument for the batch file.
(2)#1 Specify the name of the virtual server that manages backup targets of Protection Manager programs. The specified value must be the same as the value set for SCH_MAP_PATH in the setup file for backup job management (schd.conf)#2.

4–14 Environment Setup for Protection Manager Console
Console User's Guide
#1
You can use desired names for the constant names specified in postonline.bat.
#2
For details on the setup file for backup job management (schd.conf), see Setup Items in the schd.conf File.
#3
For details on the Protection Manager configuration definition file (init.conf), see the Hitachi Protection Manager User's Guide.
(3) This line determines whether the name of the service group that has changed to the online state is the same as the name of the virtual server specified in line (2).VCS executes the batch file whenever any service group changes to the online state. Therefore, specify the processing in which drmjobsch.exe is executed only when the virtual server specified in line (2) changes to the online state.
(4)#1 Specify the storage destination for a schedule information file for the virtual server specified in line (2). The specified value must be the same as the value set for SCH_MAP_PATH in the setup file for backup job management (schd.conf)#2.
(5)#1 Specify the retry count of the processing in which the cluster resource status is checked. The specified value must be the same as the value set for CLU_RETRY_TIME in the Protection Manager configuration definition file (init.conf)#3.
(6)#1 Specify the retry interval (in seconds) of the processing in which the cluster resource status is checked. The specified value must be the same as the value set for CLU_RETRY_WAIT in the Protection Manager configuration definition file (init.conf)#3.
(7) and (8) This line checks the cluster resource status. If all the cluster resources do not change to online within the specified period (retry-count-specified-in-line-(5) x retry-interval-in-seconds-specified-in-line-(6)), the batch file is ended.If drmjobsch.exe is executed before the storage destination for a schedule information file can be accessed, the command ends with an error. To prevent an error from occurring, specify the processing in which the execution of drmjobsch.exe waits until all the cluster resources change to online.
(9) This line executes drmjobsch.exe.
Number Explanation

Using Setup GUI To Set Up an Environment for Protection Manager 5–1
Console User's Guide
5Using Setup GUI To Set Up an
Environment for Protection Manager
Setup GUI is one of the components of the Protection Manager Console. By using Setup GUI, you can set up an operating environment for Protection Manager from GUI windows.
This chapter describes how to set up an environment for Protection Manager by using Setup GUI.
This chapter also explains how to use the configuration check function to check the environment after setting it up with Setup GUI.
For details on settings, see the Hitachi Protection Manager Software User's Guide.
□ Overview of Setup GUI
□ Setup GUI Windows
□ About the Configuration Check Function

5–2 Using Setup GUI To Set Up an Environment for Protection Manager
Console User's Guide
Overview of Setup GUISetup GUI allows you to use GUI windows to set up an operating environment for Protection Manager.
In the Setup GUI window, the operating environment settings required for Protection Manager operation are grouped into, and displayed as tabbed pages, each corresponding to a particular processing target, functionality, or operating method. You can use Setup GUI to navigate to the tab where the desired setting can be specified (called tab navigation). To set up an environment for Protection Manager, follow the tab navigation instructions to assign item values as necessary for each tab, and then click the Save button.
Operations Available in the Setup GUI Of the operating environment settings that are required for Protection Manager operation, you can use Setup GUI to specify the items listed in the table below.
Table 5-1: Protection Manager Operating Environment Settings Specifiable in Setup GUI
Item Tab Configuration files Command Server
Configuration settings for Protection Manager operation
Configuration Settings tab
None None FS, DB, BK
Protection Manager operation settings
Operation Setup tab
Protection Manager configuration definition file (init.conf)
None FS, DB, BK
Creation of dictionary map files
Operation Setup tab
None drmdbsetup -i FS, DB, BK
Settings for linkage with RAID Manager
RAID Manager Linkage tab, RAID Manager Operation tab
RAID Manager-linkage definition file (DEFAULT.dat1)
None FS, DB, BK

Using Setup GUI To Set Up an Environment for Protection Manager 5–3
Console User's Guide
Creation of a cluster information configuration definition file
Cluster Configuration tab (the Instance Details dialog box is also used)
For VCS:Cluster information configuration definition file (VCS.dat) DEFAULT.dat 1
drmclusinit FS, DB
For MSCS:Protection Manager configuration definition file(init.conf)
None
Creation of a database configuration definition file (required when the backup is of an SQL Server database)
Database Configuration tab
Database configuration definition file (instance-name.dat)
drmsqlinit FS, DB
Protection Manager configuration definition file (init.conf)
None
Settings required to use VSS (required if the backup is of a file system or an Exchange database)
VSS Definition tab
VSS definition file (vsscom.conf)
None FS, DB, BK
VSS Environment tab
Environment variables
None
Specification of the port number to be used by the Protection Manager service
Protection Manager Service tab
Windows services file
None FS, DB, BK
Updating of the dictionary map file
Update Dictionary Map tab
None drmfsdisplay -refresh or drmsqldisplay -refresh or drmexgdisplay -refresh
FS, DB, BK2
Item Tab Configuration files Command Server

5–4 Using Setup GUI To Set Up an Environment for Protection Manager
Console User's Guide
Legend:
• FS: This item is required on a file server.
• DB: This item is required on a database server.
• BK: This item is required on a backup server.
1Although these files are of the same name DEFAULT.dat, they are different files stored at different locations.
2This is not usually required for a backup server. When a primary volume does not exist in the backup server, updating of the dictionary map files is not necessary. It is only necessary to update the file when a primary volume exists in the backup server.
Settings for linkage with the backup management product
Backup Linkage tab
Configuration definition file for linkage with the backup management product (DEFAULT.dat1)
drmtapeinit BK
Tape Backup tab
Tape backup configuration definition file (NBU.dat, BEWS.dat)
None
Settings for Linkage with RAID Manager particular to the operation style
Copy Definition tab
Copy parameter definition file3 (any-file-name)
None FS, DB, BK
Creation of target definition files (except the transaction log list file)
List File tab List file (any-file-name)
None FS, DB, BK
Preparation for extended command execution
Extended Commands Definition tab
Operation definition file (_operation-ID.dat)
None FS, DB, BK
Host environment settings file (host.dat)
None
Creating a user script
Pre/Post Job Template tab
User script file (any file name)
None FS, DB
Mail send settings
Email Notification tab
Mail send definition file (mail.conf)
None FS, DB
Item Tab Configuration files Command Server

Using Setup GUI To Set Up an Environment for Protection Manager 5–5
Console User's Guide
3When Protection Manager is verifying pair status at the time of backup, restore, or resynchronization, use this file if you want to specify the number of verification times or specify interval lengths separately for particular processing purposes or load conditions.
You cannot use Setup GUI to specify the environment settings shown in Table 5-2: Environment Settings for Prerequisite Products required for prerequisite products.
Table 5-2: Environment Settings for Prerequisite Products
Legend:
• FS: This item is required on a file server.
• DB: This item is required on a database server.
• BK: This item is required on a backup server.
Starting Setup GUI and Components of the Setup GUI WindowsThis section describes how to start Setup GUI and the components of the Setup GUI windows.
Note: You cannot use Setup GUI to specify or perform the following items or tasks:
• Specification of the PAIR_CREATE parameter in the RAID Manager-linkage definition file (DEFAULT.dat)
For details on how to specify the PAIR_CREATE parameter, see the Hitachi Protection Manager Software User's Guide.
• Creation of a transaction log list file
For details on how to create a transaction log list file, see the Hitachi Protection Manager Software User's Guide.
• Specification of the SQL Server login timeout option (SQL_LOGIN_TIMEOUT parameter) or SQL Server automatic recovery time (SQL_AUTORECOVERY_TIME parameter) in the configuration file sqlinit_instance-name.conf is required when the backup is of an SQL Server database
For details on the settings related to linkage with an SQL server, see the Hitachi Protection Manager Software User's Guide.
Environment setting Configuration file Server type
Configuration of the storage subsystem volume replication function
None Not applicable
Configuration of RAID Manager RAID Manager configuration definition file (horcmn.conf where n is the instance number)
FS, DB, BK
Configuration of the backup management product
None BK

5–6 Using Setup GUI To Set Up an Environment for Protection Manager
Console User's Guide
Starting Setup GUI
To start Setup GUI, select Tools and then Setup from the menu in the Protection Manager Console Main window. For further information on how to start Protection Manager Console and about the Protection Manager Console Main window, see the 6.1.1 Starting Protection Manager Console.
Setup GUI Window Components
The Setup GUI window consists of a title bar, a tab view bar, and a tab-name window. When you select a tab on the tab view bar, the tab-name window displays the detailed information for that tab, allowing you to specify the main Protection Manager operating environment settings in the window.
A window that appears when the corresponding tab is clicked on the tab view bar is hereafter called a tab-name window. For example, the window displayed when the Configuration Settings tab is selected is called the Configuration Settings window.
Figure 5-1: Setup GUI Window Components shows the Setup GUI window components:
Note: Before you can use Setup GUI, Protection Manager Console must be installed.
Note that you can use Setup GUI only when Protection Manager Console has been locally started from an application server. You cannot use Setup GUI if Protection Manager Console has been remotely started from Device Manager.
Figure 5-1: Setup GUI Window Components

Using Setup GUI To Set Up an Environment for Protection Manager 5–7
Console User's Guide
Title bar
Displays the title of the window you specified in the Configuration Settings window, in the following format:
Hitachi Protection Manager - Setup [Server type - Configuration type - Backup object]
The following information is displayed in the title area:
Hitachi Protection Manager - Setup
Indicates that the window is a Setup GUI window.
Server type
Displays the server type (Database/File server or Backup server) selected in the Configuration Settings window.
Configuration type
Displays the Configuration type (Non Cluster Configuration or Cluster Configuration) selected in the Configuration Settings window.
Backup object
Displays the backup object (File system, SQL, and/or Exchange) selected in the Configuration Settings window.
If you selected two or more backup objects, the selected backup objects are displayed in a list, with each object separated by a comma (,).
For example, if you selected File system and SQL, the backup objects are displayed as follows: File system, SQL
Tab view bar
Parameters required for Protection Manager operation are grouped according to the processing target, functionality, and manipulation style, and these groups are displayed as tabs. When you click a tab, the corresponding tab-name window appears.
tab-name window
Displays a list of the settings that are required for Protection Manager operation.
On each tab-name window, the left area displays the title of the setting (the main category of the setting) and the right area displays the setup parameter names (more detailed subcategories of the setting) and input/output fields for these parameter values.
Note: You can use Setup GUI to navigate to other tabs where you can specify the remaining settings, based on the settings that you specified in the Configuration Settings window. Depending on the specified settings, the number of displayed tabs varies.

5–8 Using Setup GUI To Set Up an Environment for Protection Manager
Console User's Guide
Shared Setup GUI operation buttons are also displayed. For further information on these buttons, see Shared Setup GUI Operation Buttons.
Shared Setup GUI Operation Buttons
Shared Setup GUI operation buttons displayed in a tab-name window are outlined below. To learn the functionality of a button on a specific tab, see the Setup GUI help that appears when the Help button is clicked.
Help
Displays help information about the current window in a default browser window. Click this button when you want to learn or confirm details about an item in the window.
Previous
If you have not modified a parameter value in the current window, and then click this button, the previous window is displayed.
If you have modified one or more parameter values in the current window and click this button, a dialog box appears, asking you whether you want to save the modified parameter values.
If you click the Yes button:
The modified parameter values are saved in the corresponding configuration files, and then the previous window is displayed.
If you click the No button:
The previous window is displayed, without saving the changes to the parameter values.
If you click the Cancel button:
Note: Supplementary explanation
• Placing the mouse cursor near a setting on a tab-name window will display a brief text description (a tool tip) of the item.
• The top line of a tab-name window indicates what you can specify in the current tab in the following format:
Step number-of-the-step-being-executed/total-number-of-steps - overview-of-setup-item-to-be-specified-on-the-window
This shows how far you have progressed within the entire setup flow.
For the following setup windows, which can only be displayed by direct selection, only an overview-of-setup-item-to-be-specified-on-the-window is displayed:
— Copy Definition window
— List File window
— Extended Commands Definition window
• The number and types of items that are displayed in a tab-name window other than the Configuration Settings window vary depending on the settings specified in the Configuration Settings window.
• On some windows, settings are displayed as check boxes. You can specify a value for such a setting by selecting the check box.

Using Setup GUI To Set Up an Environment for Protection Manager 5–9
Console User's Guide
The current window will remain.
Next
If you have not modified a parameter value in the current window, and then click this button, the next required window will be displayed.
If you have modified one or more parameter values in the current window, and then click this button, a dialog box appears, asking whether you want to save the modified parameter values.
If you click the Yes button:
The modified parameter values are saved in the corresponding configuration files, and then the next required window is displayed.
If you click the No button:
The next required window is displayed, without saving the changes to the parameter values.
If you click the Cancel button:
The current window will remain.
Support Product Version
Displays environment information, including the storage subsystem in use, RAID Manager information, and VSS information (such as the serial number, micro code, and version information) in the Version Information window.
Save
The modified parameter values are reflected in the settings.
If you have modified one or more parameter values in the window, and then click this button, Setup GUI checks whether the command corresponding to each modified parameter needs to be executed.
If command execution is necessary:
The command is executed and a corresponding configuration definition file is created or updated.
If the corresponding command is drmclusinit, drmsqlinit, or drmtapeinit, Setup GUI checks whether a corresponding configuration definition file exists, and what values are assigned to the parameters.
If a corresponding configuration definition file exists, the existing file is backed up in the following format (where the file name is followed by the date and time when you clicked the Save button):
file-name-yyyy-mm-dd-hh-mm-ss.extension
If a parameter value is invalid, Setup GUI prompts you to reenter the value.
If command execution is not necessary:
Setup GUI checks whether a corresponding configuration definition file exists.

5–10 Using Setup GUI To Set Up an Environment for Protection Manager
Console User's Guide
If a configuration definition file corresponding to the parameter exists, the existing file is backed up in the following format (where the file name is followed by the date and time when you clicked the Save button). Then, the existing configuration definition file is updated with the modified parameter value:
file-name-yyyy-mm-dd-hh-mm-ss.extension
If a configuration definition file corresponding to the parameter does not exist, a new configuration definition file is created. If a directory for the configuration definition file does not exist, a new directory is also created.
If the configuration definition file corresponding to the parameter is not assigned a standard file name (or can be assigned any file name), a file selection dialog box is displayed, for you to specify a new file name.
If you have not modified any parameters in the window, this button is disabled.
Undo
The modified parameter values are restored to their previous values.
If you have modified one or more parameter values in the window, and then click this button, a dialog box appears, asking whether you want to undo the modifications.
If you click the Yes button:
Setup GUI displays the previous parameter value, or the parameter value that was last saved by using the Save button or other means.
If you click the No button:
Nothing will be performed. The window display does not change.
If you have not modified a parameter value in the window, and then click this button, nothing is performed, and the window display does not change.
Cancel
If you have not modified a parameter value in the window, and then click this button, Setup GUI terminates.
If you have modified one or more parameter values in the window, and then click this button, a dialog box appears, asking whether you want to save the modified parameter values.
If you click the Yes button:
The modified parameter values are saved in the corresponding configuration files, and then Setup GUI terminates.
If you click the No button:
Setup GUI terminates, without saving the modified parameter values.
Note: The backup destination directory for the existing configuration definition file is the setup_bk directory in the directory containing that file.

Using Setup GUI To Set Up an Environment for Protection Manager 5–11
Console User's Guide
If you click the Cancel button:
Nothing will be performed. The window display does not change.
Prerequisite Conditions and Notes on Using Setup GUIThis section describes prerequisite conditions and notes on using Setup GUI.
Prerequisite Conditions
Before you can use Setup GUI, RAID Manager and the backup management product must be set up.
For details on how to set up RAID Manager, see the Hitachi Protection Manager Software User's Guide and the RAID Manager documentation. For details on how to set up the backup management product, see the documentation for the backup management product.
Notes
You must check that the current environment settings displayed in the Version Information window are supported by Protection Manager. The environment information displayed in the Version Information window includes the storage subsystem in use, RAID Manager, and VSS information (including the serial number, micro code, and version information).
If the correct RAID Manager installation path is not assigned to the INSTALLPATH parameter in the RAID Manager-linkage definition file (DEFAULT.dat), Setup GUI cannot display the storage subsystem information or the RAID Manager information. In the RAID Manager Linkage window, specify the correct RAID Manager installation path.
When you click the Support Product Version button in the Setup GUI window, the Version Information window is displayed.
In the Version Information window used to display the storage subsystem information, the microcode version of DKC is displayed as "aa-bb-cc/ee" instead of as "aa-bb-cc-dd/ee".
Setting up an Operating Environment for HPtM By Using Setup GUIWhen you use Setup GUI, we recommend the following window transition sequence. First, in the current Setup GUI window, set up the environment by specifying the setting for each displayed item, then click the Save button, and then click the Next or Previous button. This will move you to the next appropriate Setup GUI window in the environment setup flow. Alternatively, you can specify an item setting by directly selecting the relevant tab.
To follow the Setup GUI window transition, first select the Configuration Settings tab, and then, in the Configuration Settings window, specify items to be backed up. When you click the Next button, the next window that you need to set up is displayed, depending on the settings that you have made

5–12 Using Setup GUI To Set Up an Environment for Protection Manager
Console User's Guide
in the Configuration Settings window. In the displayed tab window, specify the settings for the items in the window and then click the Next button. The next required window will be displayed.
In this way, you can specify almost all the settings that are required for Protection Manager operation simply by clicking the Next button repeatedly, until you reach a window with an inactive Next button. To confirm or modify the settings that you have made in the previous window, click the Previous button.
Depending on the type of the server that manages the backup target, the objects to be backed up, and whether the system is in a cluster configuration, the environment setup flow navigated by using Setup GUI varies.
With Setup GUI, there are two main types of environment setup flow:
• Environment setup flow for a file server or database server
• Environment setup flow for a backup server
These two types of environment setup flow are explained below.
Environment Setup Flow for a File Server or Database Server
Figure 5-2: Environment Setup Flow for a File Server or Database Server shows the environment setup flow for a file server or database server.
Note: When you click the Save button in a tab window, the command corresponding to the parameter that you have specified in the window is executed, and the settings are written into the corresponding configuration file. If you click the Next or Previous button, or select another tab without clicking the Save button in the current window, a confirmation dialog box appears, asking whether you want to save any changes to settings you have made in the current window. If you click the Yes button, your settings are saved, and then the next or previous window is displayed. If you click the No button, the next or previous window is displayed, without saving changes you have made to item settings. If you click the Cancel button, the current window will remain.
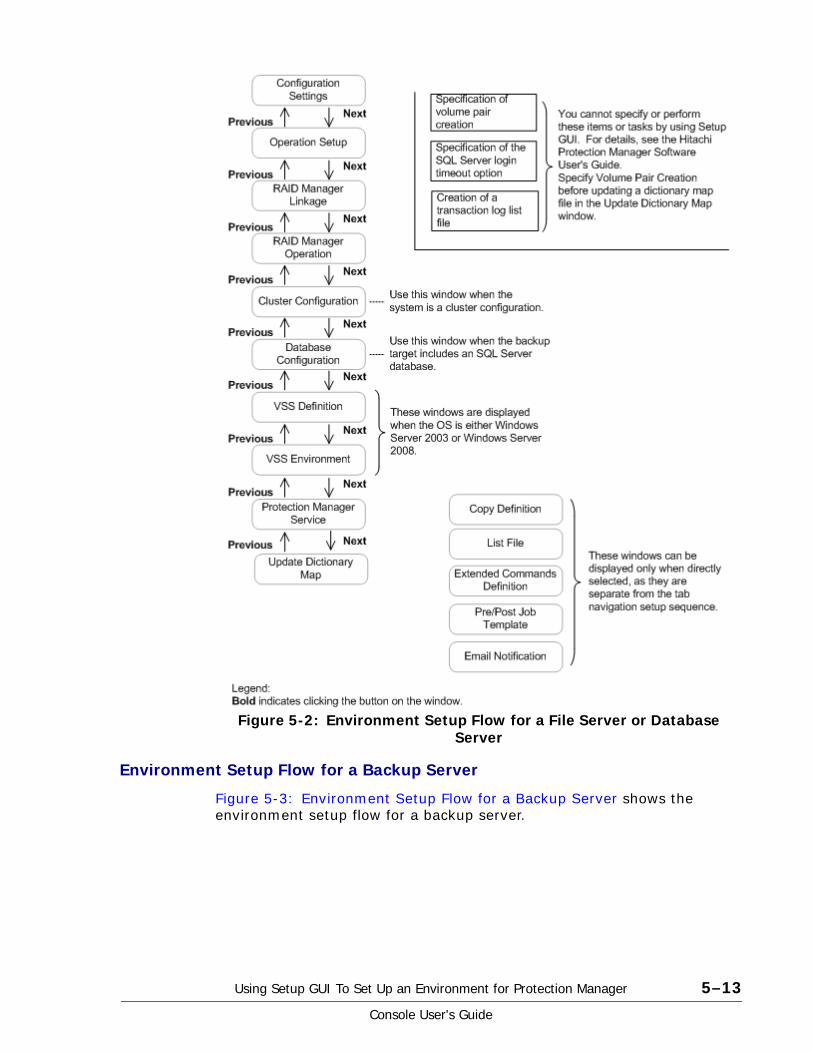
Using Setup GUI To Set Up an Environment for Protection Manager 5–13
Console User's Guide
Environment Setup Flow for a Backup Server
Figure 5-3: Environment Setup Flow for a Backup Server shows the environment setup flow for a backup server.
Figure 5-2: Environment Setup Flow for a File Server or Database Server

5–14 Using Setup GUI To Set Up an Environment for Protection Manager
Console User's Guide
Setup GUI WindowsThere are two types of Setup GUI windows:
• Windows that are displayed in the setup sequence as navigated by Setup GUI. These Setup GUI windows include the Next and Previous buttons. Based on the settings you specified in the Configuration Settings window, click these buttons to navigate from window to window in the setup sequence determined by Setup GUI.
• Windows that are displayed through direct tab selection. These Setup GUI windows are displayed when you directly select a tab. The windows are separate from those displayed in a tab navigation setup sequence.
Figure 5-3: Environment Setup Flow for a Backup Server

Using Setup GUI To Set Up an Environment for Protection Manager 5–15
Console User's Guide
The remaining sections of this manual describe each window in detail, focusing on the relationship between the settings specified in the window and the Protection Manager environment setup parameters. For further information on the settings specified in each window, see the Reference column in the table that lists the items displayed in the window.
If a configuration file already exists for a window that is displayed, and a parameter value in the file can be used for Protection Manager, that parameter value is displayed as a setting value in the window. If no such configuration file exists, the field for the setting in the window displays the default value or is blank.
Configuration Settings WindowThe Configuration Settings window is the window that is used first in Setup GUI navigated environment setup flow (tab navigation). Use this window to specify configuration settings required for Protection Manager operation. Settings are needed for file servers, database servers, and backup servers.
Table 5-3: Configuration Settings Window Items lists items in the Configuration Settings Window.
Table 5-3: Configuration Settings Window Items
Figure 5-4: Configuration Settings Window
Item Environment setup parameter or description Default value
Server type Specifies the server type (required). Database/File server

5–16 Using Setup GUI To Set Up an Environment for Protection Manager
Console User's Guide
The items specified in this window are not associated with any Protection Manager environment setup parameter. Note that the settings you specify in this window determine the number of tabs that will be displayed on the tab view bar, the setup procedure, and the items that will be displayed in each setup window.
Operation Setup WindowUse the Operation Setup window to specify settings related to Protection Manager operation and specify a directory where the dictionary map files are to be created. The settings you specify here will be reflected in the Protection Manager configuration definition file (init.conf). The dictionary map files will be created at the specified location.
Settings are needed for file servers, database servers, and backup servers.
Although dictionary map files are automatically created during installation, you must create a separate dictionary map files if:
• The system is in a cluster configuration, or
• You want to create dictionary map files in a user-specified directory and use them there.
Depending on the value you have specified for Configuration type in the Configuration Settings window, the information displayed in the Operation Setup window varies.
Backup object Specifies the backup target object(s) (required).
File system
Configuration type
Specifies whether the system is in a cluster configuration (required).
Non Cluster Configuration
Setup Steps Displays the setup steps in Setup GUI.
Depending on the combination of the selected settings, the steps displayed and their sequence vary.
Item Environment setup parameter or description Default value

Using Setup GUI To Set Up an Environment for Protection Manager 5–17
Console User's Guide
If You Selected Non Cluster Configuration as the Configuration Type
Table 5-4: Operation Setup Window Items (for Non Cluster Configuration)
Figure 5-5: Operation Setup Window (for Non Cluster Configuration)
Item Environment setup parameter or description
Process status check retry Count SVC_RETRY_TIME
Interval SVC_RETRY_WAIT
Command execution status retry
Count COM_RETRY_TIME
Interval COM_RETRY_WAIT
Dictionary map file path Location DRM_DB_PATH
Log output level LOGLEVEL
Number of trace log file(s) PP_LOGFILE_NUM
Remote command timeout SERVICE_TIMEOUT

5–18 Using Setup GUI To Set Up an Environment for Protection Manager
Console User's Guide
If You Selected Cluster Configuration as the Configuration Type
Table 5-5: Operation Setup Window Items (for Cluster Configuration)
RAID Manager Linkage WindowUse the RAID Manager Linkage window to specify or update the following items that are required for linkage with RAID Manager. The settings that you specify here will be reflected in the RAID Manager-linkage definition file (DEFAULT.dat).
Figure 5-6: Operation Setup Window (for Cluster Configuration)
ItemEnvironment setup
parameter or description
Cluster resource status check retry
Count CLU_RETRY_TIME
Interval CLU_RETRY_WAIT
Command execution status retry
Count COM_RETRY_TIME
Interval COM_RETRY_WAIT
Dictionary map file path Virtual server name DRM_DB_PATH
Location(in shared disk)
Log output level LOGLEVEL
Number of trace log file(s) PP_LOGFILE_NUM
Remote command timeout SERVICE_TIMEOUT

Using Setup GUI To Set Up an Environment for Protection Manager 5–19
Console User's Guide
• RAID Manager instance number
• Data copy track size
• Setting for dynamic secondary volume recognition
• Setting of the operation mode assumed for automatic copy group selection
• RAID Manager installation path
• Whether the pair status is to be changed to PSUS if an error occurs during backup processing
Settings are needed for file servers, database servers, and backup servers.
Table 5-6: RAID Manager Linkage Window Items
Figure 5-7: RAID Manager Linkage Window
Item Environment setup parameter or description
Instance number
HORCMINST HORCMINST
HORCMINST_AUX HORCMINST_AUX
Track size for data copy COPY_SIZE
Dynamic recognition of secondary volume
DEVICE_DETACH
Confirm generation identical CONFIRM_GENERATION_IDENTICAL
RAID Manager installation path INSTALLPATH
Pair Status when Backup Fail RECOVERY_MODE_ON_BACKUP_ABORTING

5–20 Using Setup GUI To Set Up an Environment for Protection Manager
Console User's Guide
RAID Manager Operation WindowUse the RAID Manager Operation window to specify or update the following items that are required for linkage with RAID Manager. The settings that you specify here will be reflected in the RAID Manager-linkage definition file (DEFAULT.dat).
• The retry count and the retry interval for checking Protection Manager's volume pair status
• The retry count and the retry interval for checking Protection Manager's pair status, according to the purpose (Resync (pair resynchronization), Split (pair split), or Restore (resynchronization during restoration)
• The retry count and the retry interval for checking Protection Manager's RAID Manager command busy status
Settings are needed for file servers, database servers, and backup servers.
Table 5-7: RAID Manager Operation Window Items
Figure 5-8: RAID Manager Operation Window
Item Environment setup parameter or description
Pair status check retry setup
Count RETRY_TIME
Interval RETRY_WAIT
Resync retry setup Count RESYNC_RETRY_TIME
Interval RESYNC_RETRY_WAIT

Using Setup GUI To Set Up an Environment for Protection Manager 5–21
Console User's Guide
Cluster ConfigurationWindowUse the Cluster Configuration window to specify the settings that are required in a cluster environment. The settings you specify here will be reflected in a way that depends on the cluster software in use, as explained below.
If VCS is used, your settings will be reflected in the cluster information configuration definition files (VCS.dat and DEFAULT.dat).
If MSCS is used, your settings will be reflected in the Protection Manager configuration definition file (init.conf) as the settings that specify whether restoration is to be performed while the cluster resources that monitor the DBMS remain in the online state or after they are placed in the offline state.
Settings are needed for file servers, database servers. Depending on the cluster software that you select in the window, the information displayed in the Cluster Configuration window varies.
Split retry setup Count SPLIT_RETRY_TIME
Interval SPLIT_RETRY_WAIT
Restore setup Retry Count RESTORE_RETRY_TIME
Interval RESTORE_RETRY_WAIT
Delay retry Count RESTORE_DELAY_RETRY_TIME
Interval RESTORE_DELAY_RETRY_WAIT
Busy retry setup Count BUSY_RETRY_TIME
Interval BUSY_RETRY_WAIT
Item Environment setup parameter or description

5–22 Using Setup GUI To Set Up an Environment for Protection Manager
Console User's Guide
If You Selected VCS
Table 5-8: Cluster Configuration Window Items (for VCS)
When you select one of the instance or application names displayed in the Instance name area and then click the Details button, the Instance Details dialog box appears. The Instance Details dialog box is explained below.
Instance Details dialog box
If the cluster software is Veritas Cluster Server, use the Instance Details dialog box allows you to specify details of the backup target (instance or application) that you have specified in the Cluster Configuration window.
The settings you specify here will be reflected in the cluster information configuration definition file (VCS.dat).
Figure 5-9: Cluster Configuration Window (for VCS)
Item Environment setup parameter or description
Cluster product name Cluster software name
Virtual host name Virtual server name
Resource group name Resource group name
Instance name Name of the backup target instance or application

Using Setup GUI To Set Up an Environment for Protection Manager 5–23
Console User's Guide
Table 5-9: Instance Details Dialog Box Items
Figure 5-10: Instance Details Dialog Box
Item Environment setup parameter or description
Virtual host name Virtual server name specified in the Cluster Configuration window
Resource group name Resource group name specified in the Cluster Configuration window
Instance name Backup target instance name or application name specified in the Cluster Configuration window
Instance details
Resource name Disk resource name
Resource type Resource type
Disk/Service name
Information associated with the disk resource

5–24 Using Setup GUI To Set Up an Environment for Protection Manager
Console User's Guide
If You Selected MSCS
Table 5-10: Cluster Configuration Window Items (for MSCS)
*This item is displayed only when the OS is Windows Server 2003 SP2 or later, or Windows Server 2008.
Database Configuration WindowWhen the backup is of an SQL Server database, use the Database Configuration window to register the following required information into the database configuration definition file (instance-name.dat). In the window you can also specify the options for the backup, dictionary map synchronization, and recovery.
• VDI metafile storage directory
• VDI generation timeout
• UNDO log file storage directory
• Transaction log backup file storage directory
Figure 5-11: Cluster Configuration Window (for MSCS)
Item Environment setup parameter or description
Cluster product name Cluster software name
Cluster resource restoration* CLU_MSCS_RESTORE

Using Setup GUI To Set Up an Environment for Protection Manager 5–25
Console User's Guide
The settings for backup, dictionary map synchronization, and recovery are reflected in the Protection Manager configuration definition file (init.conf).
Settings are needed for file servers, database servers.
The information displayed in the Database Configuration window varies depending on the value you have specified for Configuration type in the Configuration Settings window.
If You Selected Non Cluster Configuration as the Configuration Type
Note: When the backup is of an SQL Server database, the command may terminate with an error due to an SQL Server login request timeout (error message: KAVX1008-E, detailed message DRM-11013, Code: 0), or with an error because the automatic recovery processing at SQL Server startup is not complete (error message: KAVX1008-E, detailed message DRM-11011, Code: 5180). In this case, specify the SQL Server login timeout option, or the SQL Server automatic recovery time. Note that you cannot use Setup GUI to specify these options. For details on how to do this, see the Hitachi Protection Manager Software User's Guide.
Figure 5-12: Database Configuration Window (for Non Cluster Configuration)

5–26 Using Setup GUI To Set Up an Environment for Protection Manager
Console User's Guide
Table 5-11: Database Configuration Window Items (for Non Cluster Configuration)
*In a cluster environment, a character string (in shared disk) is appended.
If You Selected Cluster Configuration as the Configuration Type
For information about the relationship between the items in this window and the environment setup parameters, see Table 5-11: Database Configuration Window Items (for Non Cluster Configuration). In a cluster environment, you must assign a shared disk directory that can be read from
Item Environment setup parameter or description
SQL Instance name SQL Server instance name
Storage location for VDI meta file* VDI metafile storage directory
VDI generation timeout interval VDI generation timeout
Storage location for UNDO log files* UNDO log file storage directory
Storage location for backup log files*
Transaction log backup file storage directory
Check SQL database status SQL_QUICK_BACKUP
Synchronous update of dictionary map
DRM_DB_SYNC
Check SQL database integrity SQL_CHECKDB
Figure 5-13: Database Configuration Window (for Cluster Configuration)

Using Setup GUI To Set Up an Environment for Protection Manager 5–27
Console User's Guide
both the active and standby servers to Storage location for VDI meta file (in shared disk), Storage location for UNDO log files (in shared disk), and Storage location for backup log files (in shared disk).
VSS Definition WindowUse the VSS Definition window to specify VSS definition file information, as this is part of the information that is required for VSS-based online backup when the backup is of a file system or an Exchange database. The settings that you specify in the window will be reflected in the following file:
VSS definition file (vsscom.conf).
You can also create or update your own VSS definition file. Your own VSS definition file is stored in the following location: Protection-Manager-installation-directory\conf\vss.
Settings are needed for file servers and database servers.
For details on other settings required for VSS-based online backup, see the Hitachi Protection Manager Software User's Guide.
Note: This window is supported in Windows Server 2003 and Windows Server 2008 only.
Figure 5-14: VSS Definition Window

5–28 Using Setup GUI To Set Up an Environment for Protection Manager
Console User's Guide
Table 5-12: VSS Definition Window Items
VSS Environment WindowThe VSS Environment window allows you to specify system environment variables required for the use of VSS. Settings are needed for file servers, database servers, and backup servers. Depending on the value you have specified for Server type in the Configuration Settings window, the information displayed in the VSS Environment window varies.
If You Selected Database/File Server as the Server Type
Specify system environment variables for the file server or database server.
Item Environment setup parameter or description
Edit VSS definition file Editing of your own VSS definition file
Backup server host name BACKUP_SERVER
Writer timeout retry Count WRITER_TIMEOUT_RETRY_COUNT
Interval WRITER_TIMEOUT_RETRY_INTERVAL
Exchange verification retry
Count EXG_VERIFY_RETRY_COUNT
Interval EXG_VERIFY_RETRY_INTERVAL
• If you have specified a system environment variable, after Setup GUI is closed, always restart the OS.
• This window is supported in Windows Server 2003 and Windows Server 2008 only.

Using Setup GUI To Set Up an Environment for Protection Manager 5–29
Console User's Guide
Table 5-13: VSS Environment Window Items (for Database/File Server)
*This item will not be displayed if you have selected Multiple Generation as the Generation type.
Figure 5-15: VSS Environment Window (for Database/File Server)
Item Environment variable or description
Generation type Backup generation type (Multiple Generation or Single Generation)
RAID Manager instance number for primary volume*
VSHTCHORCMINST_LOCAL
Copy group mirror unit number* VSHTCHOMRCF_MUN

5–30 Using Setup GUI To Set Up an Environment for Protection Manager
Console User's Guide
If You Selected Backup Server as the Server Type
Table 5-14: VSS Environment Window Items (for Backup Server)
Protection Manager Service Window Use the Protection Manager Service window to specify the TCP port number used by the Protection Manager service. The settings you specify here will be reflected in the Windows services file. The TCP port number setting on the file server or database server must be the same as that on the backup server.
Figure 5-16: VSS Environment Window (for Backup Server)
Item Environment variable or description
Generation type Backup generation type (Multiple Generation or Single Generation)
RAID Manager instance number for secondary volume
VSHTCHORCMINST_REMOTE

Using Setup GUI To Set Up an Environment for Protection Manager 5–31
Console User's Guide
Table 5-15: Protection Manager Service Window Items
Update Dictionary Map WindowThe Update Dictionary Map window allows you to update the dictionary map files if:
• You want to check that the environment has been correctly set up.
• You need to update the dictionary map files after operation has started.
For further information on the cases where the dictionary map files needs to be updated, see the Hitachi Protection Manager Software User's Guide.
Settings are needed for file servers, database servers, and backup servers.
If you are in a cluster environment, you must update the dictionary map files only on the active server. You do not need to update the files on the standby server by switching the cluster to update on the both servers.
Usually, you do not need to update the dictionary map files only on the backup server. However, if a primary volume exists in the backup server, the dictionary map files must be updated.
Figure 5-17: Protection Manager Service Window
Item Environment variable or description
TCP port number for Protection Manager Service
TCP port number to be used by the Protection Manager service (Default value: 22300)
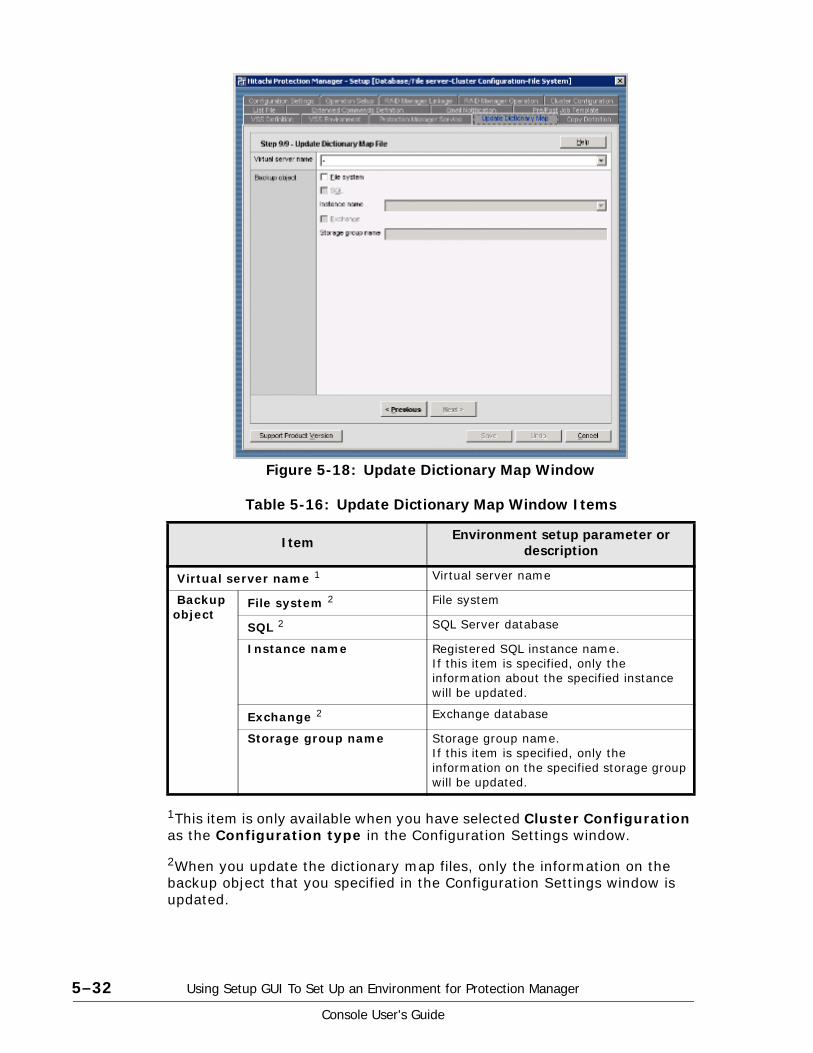
5–32 Using Setup GUI To Set Up an Environment for Protection Manager
Console User's Guide
Table 5-16: Update Dictionary Map Window Items
1This item is only available when you have selected Cluster Configuration as the Configuration type in the Configuration Settings window.
2When you update the dictionary map files, only the information on the backup object that you specified in the Configuration Settings window is updated.
Figure 5-18: Update Dictionary Map Window
Item Environment setup parameter or description
Virtual server name 1 Virtual server name
Backup object
File system 2 File system
SQL 2 SQL Server database
Instance name Registered SQL instance name.If this item is specified, only the information about the specified instance will be updated.
Exchange 2 Exchange database
Storage group name Storage group name.If this item is specified, only the information on the specified storage group will be updated.

Using Setup GUI To Set Up an Environment for Protection Manager 5–33
Console User's Guide
Depending on the specified backup object, one of the following commands is executed. After command execution is complete, check the file date or other information to make sure that the dictionary map files has been updated.
• When the backup is of a file system:
drmfsdisplay -refresh
• When the backup is of an SQL Server database:
drmsqldisplay -refresh or drmsqldisplay instance-name –refresh -coremap
• When the backup is of an Exchange database:
drmsqldisplay -refresh or drmexgdisplay storage-group-name –refresh -coremap
Backup Linkage WindowThe Backup Linkage window allows you to specify the information that is required for linkage with the backup management product. The settings that you specify here will be reflected in the configuration definition file for linkage with the backup management product (DEFAULT.dat). Settings are needed for backup servers.
Before specifying settings in this window, you must specify the medium protection period with the backup management product.
Figure 5-19: Backup Linkage Window

5–34 Using Setup GUI To Set Up an Environment for Protection Manager
Console User's Guide
Table 5-17: Backup Linkage Window Items
Tape Backup WindowThe Tape Backup window allows you to specify the information required for linkage with the backup management product. The settings you specify here will be reflected in the tape backup configuration definition file (NBU.dat or BEWS.dat). Settings are needed for backup servers.
Before specifying settings in this window, you must perform the following tasks for the backup management product that is in use:
If the backup management product is VERITAS NetBackup:
• Create as many CLASS or POLICY definitions as the number of backup operations that are to be performed concurrently.
• Specify a SCHEDULE value for each of the POLICY (CLASS) definitions that you have created.
If the backup management product is Backup Exec:
Specify the media, device, and logon information.
Note that, depending on the backup management product that you select in this window, the information displayed in the Tape Backup window varies.
Item Environment setup parameter or description
Backup product name Backup management product name
Number of days to store backup catalog
Number of days to store the backup catalog for tape backup
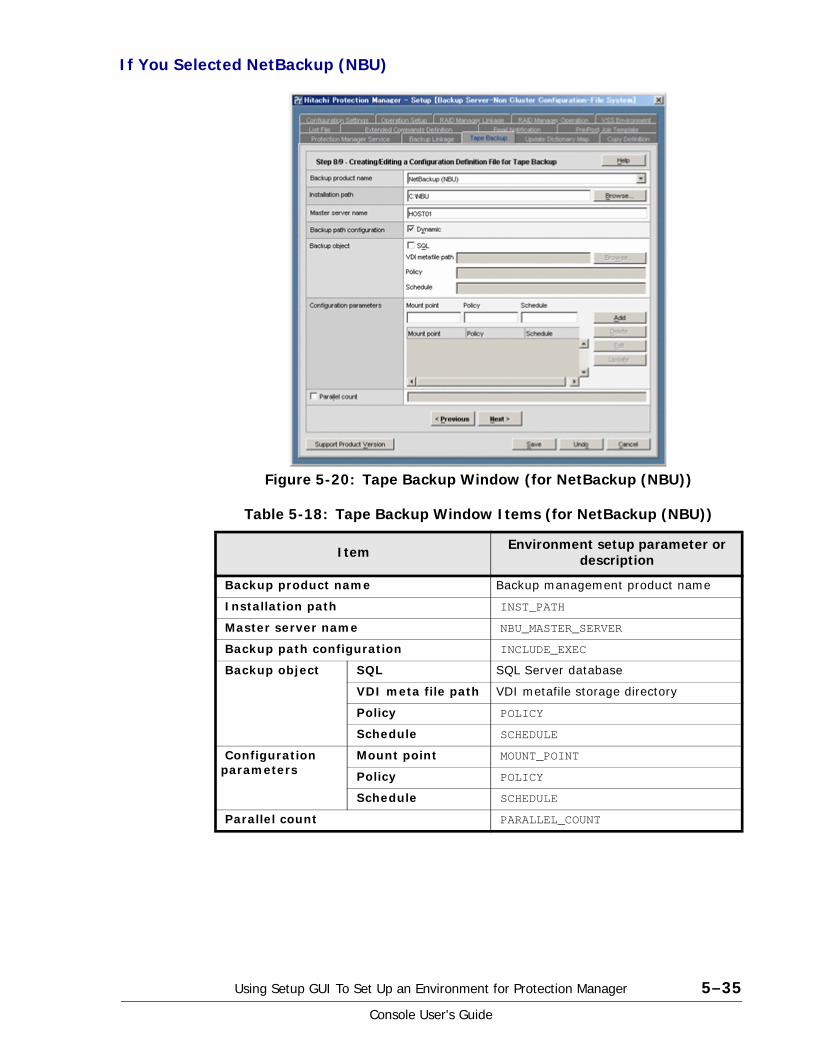
Using Setup GUI To Set Up an Environment for Protection Manager 5–35
Console User's Guide
If You Selected NetBackup (NBU)
Table 5-18: Tape Backup Window Items (for NetBackup (NBU))
Figure 5-20: Tape Backup Window (for NetBackup (NBU))
Item Environment setup parameter or description
Backup product name Backup management product name
Installation path INST_PATH
Master server name NBU_MASTER_SERVER
Backup path configuration INCLUDE_EXEC
Backup object SQL SQL Server database
VDI meta file path VDI metafile storage directory
Policy POLICY
Schedule SCHEDULE
Configuration parameters
Mount point MOUNT_POINT
Policy POLICY
Schedule SCHEDULE
Parallel count PARALLEL_COUNT

5–36 Using Setup GUI To Set Up an Environment for Protection Manager
Console User's Guide
If You Selected Backup Exec (BEWS)
Table 5-19: Tape Backup Window Items (for Backup Exec (BEWS))
Copy Definition WindowThe Copy Definition window is used to create or update the copy parameter definition file (which can be assigned any file name).
You can specify the parameters corresponding to the following items in the copy parameter definition file.
• The retry count and the retry interval for checking Protection Manager's volume pair status.
Figure 5-21: Tape Backup Window (for Backup Exec (BEWS))
Item Environment setup parameter or description
Backup product name Backup management product name
Installation path INST_PATH
Backup object SQL SQL Server database
VDI meta file path VDI metafile storage directory
Script file SCRIPT_FILE
Configuration parameters
Mount point MOUNT_POINT
Script file SCRIPT_FILE

Using Setup GUI To Set Up an Environment for Protection Manager 5–37
Console User's Guide
• The retry count and the retry interval for checking Protection Manager's pair status, depending on the purpose Resync (pair resynchronization), Split (pair split), or Restore (resynchronization during restoration).
When executing a backup, restore, or resynchronization command, you can use parameter values that are appropriate for your purpose and CPU load status by specifying the copy parameter definition file as an argument. During command execution, the values in the copy parameter definition file take precedence over the values in the RAID Manager-linkage definition file (DEFAULT.dat).
The settings in this window are required on the file server, database server, and backup server for which you want to change the retry count and retry interval to check the pair status, depending on the purpose and CPU load status.
Table 5-20: Copy Definition Window Items
Figure 5-22: Copy Definition Window
Item Environment setup parameter or description
Edit copy definition file Editing of your own existing copy parameter definition file
Pair status check retry setup
Count RETRY_TIME
Interval RETRY_WAIT
Resync retry setup Count RESYNC_RETRY_TIME
Interval RESYNC_RETRY_WAIT

5–38 Using Setup GUI To Set Up an Environment for Protection Manager
Console User's Guide
List File WindowThe List File window allows you to create or update the following target definition files (which can be assigned any file name):
• Copy-group list file
• Database or mount point directory list file
You can specify these target definition files as command arguments when you want to back up or restore multiple files, databases, or copy groups in a batch.
The settings in this window are required on the file server, database server, and backup server for multiple files, databases, copy groups, or other entities in which you want to back up or restore in a batch.
Depending on the target definition file type that you select in this window, the information displayed in the List File window varies.
Split retry setup Count SPLIT_RETRY_TIME
Interval SPLIT_RETRY_WAIT
Restore setup
Retry Count RESTORE_RETRY_TIME
Interval RESTORE_RETRY_WAIT
Delay retry Count RESTORE_DELAY_RETRY_TIME
Interval RESTORE_DELAY_RETRY_WAIT
Item Environment setup parameter or description
Note: You cannot use Setup GUI to create or update the transaction log list file. For details on how to create a transaction log list file, see the Hitachi Protection Manager Software User's Guide.

Using Setup GUI To Set Up an Environment for Protection Manager 5–39
Console User's Guide
If You Selected Copy-Group List
Table 5-21: List File Window Items (for Copy-Group List)
Figure 5-23: List File Window (for Copy-Group List)
Item Environment setup parameter or description
Select list file type Target definition file type
Import copy group list file Path to the existing copy-group list file
Selected copy group list A list of the defined copy groups

5–40 Using Setup GUI To Set Up an Environment for Protection Manager
Console User's Guide
If You Selected Database or Mount Point Directory List
Table 5-22: List File Window Items (for Database or Mount Point Directory List)
Extended Commands DefinitionWindowUse the Extended Commands Definition window to create or update the operation definition file (_operation-ID.dat) and the host environment settings file (host.dat) as they are required to execute Protection Manager extended commands.
When you want to execute Protection Manager extended commands, the settings in this window are required on the file server, database server, and backup server. Note that, depending on the backup target and on whether you are in a cluster environment, the server on which the operation definition file is to be located varies. For details on the operation definition file, see the Hitachi Protection Manager Software User's Guide.
Figure 5-24: List File Window (for Database or Mount Point Directory List)
Item Environment setup parameter or description
Select list file type Target definition file type
Import directory list file Path to the existing database or mount point directory list file
Selected file/directory list A list of the defined file names, directory names, SQL Server database names, storage group names, and other items

Using Setup GUI To Set Up an Environment for Protection Manager 5–41
Console User's Guide
You must also perform other preparatory steps before executing extended commands, such as creation of the operation IDs to be used as the operation definition file names. For details on these preparatory steps, see the Hitachi Protection Manager Software User's Guide.
Depending on the value that you have specified for Configuration type in the Configuration Settings window, the information displayed in the Extended Commands Definition window varies.
If You Selected Non Cluster Configuration as the Configuration type
Note: After each file is created, either of the following check tools is automatically executed, depending on the backup target and server type.
After each file is created, either of the following check tools is automatically executed, depending on the backup target and server type.
• Operation definition file check tool
EX_DRM_FS_DEF_CHECK, EX_DRM_SQL_DEF_CHECK or EX_DRM_EXG_DEF_CHECK
• Host environment settings file check tool
EX_DRM_HOST_DEF_CHECK
Figure 5-25: Extended Commands Definition Window (for Non Cluster Configuration)
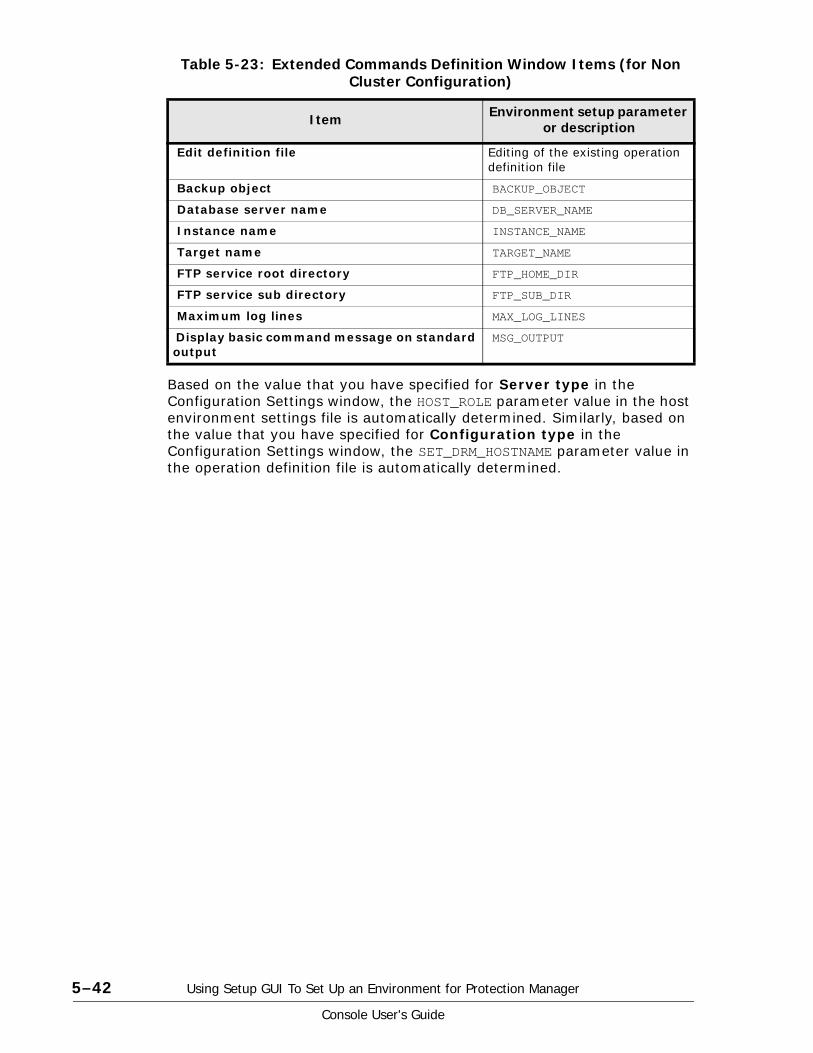
5–42 Using Setup GUI To Set Up an Environment for Protection Manager
Console User's Guide
Table 5-23: Extended Commands Definition Window Items (for Non Cluster Configuration)
Based on the value that you have specified for Server type in the Configuration Settings window, the HOST_ROLE parameter value in the host environment settings file is automatically determined. Similarly, based on the value that you have specified for Configuration type in the Configuration Settings window, the SET_DRM_HOSTNAME parameter value in the operation definition file is automatically determined.
Item Environment setup parameter or description
Edit definition file Editing of the existing operation definition file
Backup object BACKUP_OBJECT
Database server name DB_SERVER_NAME
Instance name INSTANCE_NAME
Target name TARGET_NAME
FTP service root directory FTP_HOME_DIR
FTP service sub directory FTP_SUB_DIR
Maximum log lines MAX_LOG_LINES
Display basic command message on standard output
MSG_OUTPUT

Using Setup GUI To Set Up an Environment for Protection Manager 5–43
Console User's Guide
If You Selected Cluster Configuration as the Configuration Type
Table 5-24: Extended Commands Definition Window Items (for Cluster Configuration)
Based on the value that you have specified for Server type in the Configuration Settings window, the HOST_ROLE parameter value in the host environment settings file is automatically determined. Based on the value
Figure 5-26: Extended Commands Definition Window (for Cluster Configuration)
Item Environment setup parameter or description
Edit definition file Editing of the existing operation definition file
Backup object BACKUP_OBJECT
Virtual server name DB_SERVER_NAME
Instance name INSTANCE_NAME
Target name TARGET_NAME
FTP service root directory FTP_HOME_DIR
FTP service sub directory FTP_SUB_DIR
Maximum log lines MAX_LOG_LINES
Display basic command message on standard output
MSG_OUTPUT

5–44 Using Setup GUI To Set Up an Environment for Protection Manager
Console User's Guide
that you have specified for Configuration type in the Configuration Settings window, the SET_DRM_HOSTNAME parameter value in the operation definition file is automatically determined.
Pre/Post Job Template WindowThe Pre/Post Job Template window enables the user to set or update any of the following items related to a user script:
• User script file name
• User pre-processing before the backup command is issued (PRE_PROC)
• User post-processing after the backup command is issued (POST_PROC)
Table 5-25: Pre/Post Job Template Window Items
The procedures for setting a user script are explained below.
Setting User Pre-processing (PRE_PROC)1. In the Pre/Post Job Template window, click the Add button in Pre Job
Script.
The Add Pre script job dialog box appears.
Figure 5-27: Pre/Post Job Template Window
Item Explanation
Pre/Post Job Template User script file
Pre Job Script Section that defines user pre-processing
Post Job Script Section that defines user post-processing

Using Setup GUI To Set Up an Environment for Protection Manager 5–45
Console User's Guide
2. Set the items shown in the Table 5-26: Add Pre script job Dialog Box Items:
Table 5-26: Add Pre script job Dialog Box Items
Figure 5-28: Add Pre script job Dialog Box
Item Description Value and its meaning
Job Command Line Command to be executed
Command line
Location Command execution server
• Local: Local server• Remote: Backup server
Run Condition Command execution condition#
• Always: Always executes the command.
• Normal case only: Executes the command only when the parent command is normal.
• Error case only: Executes the command only when the parent command is in error.
Timeout Command timeout value
• Wait: Specifies a command timeout value (default: 600).
• No wait: Specifies to not wait for termination of the executed command.

5–46 Using Setup GUI To Set Up an Environment for Protection Manager
Console User's Guide
#: Only Always can be selected for user pre-processing.
The following are the rules for environment variables:
• To add an environment variable, enter the name of the environment variable in Variable and the value of the environment variable in Value, and then click the Add button. The environment variable will be added.
• To edit the environment variable, select the applicable line, and then click the Edit button to display the values set in Variable and Value. Edit the values, and then click the Update button. The environment variable will be edited.
• To delete an environment variable, select the applicable line, and click the Delete button.
3. Click the OK button.
The contents of the settings are displayed in Pre Job Script in the Pre/Post Job Template window The commands will be executed in the order of the lines displayed above.
• To add a line in Pre Job Script, repeat steps 1 and 2. A line is added following the last line.
• To edit the line in Pre Job Script, select the line to be changed, and then click the Edit button to display the Edit Pre script job dialog box. The items that can be set and how to set them are the same as those for the Add Pre script job dialog box, which is displayed by clicking the Add button.
End Judgment User script termination condition
• Not zero: Terminates the script processing if a non-zero return value is returned.
• No Judge: Continues processing regardless of the return value.
• Larger than: Specifies an error threshold value as an integer in the range 0 to 255 (default: 0). The script processing terminates if a return value greater than the specified value is returned.
Environment Variable Environment variable
• Variable: Specifies the name of an environment variable.
• Value: Specifies the value of an environment variable.
If you want to delete the environment variable when executing the command, specify, for Variable, the name of the environment variable that you want to delete, and do not specify a value for Value.
Item Description Value and its meaning

Using Setup GUI To Set Up an Environment for Protection Manager 5–47
Console User's Guide
• To delete a line from Pre Job Script, select the line to be deleted, and click the Delete button.
• To change the order of lines in Pre Job Script (to rearranging the command execution sequence), select the line to be moved and click either the Move up or Move down button.
Setting User Post-Processing1. In the Pre/Post Job Template window, click the Add button in Post Job
Script.
The Add Post script job dialog box appears.
2. Set the appropriate items.
The items that can be set and how to set them are the same as for user pre-processing.
3. Click the OK button.
The contents of the settings are displayed in Post Job Script in the Pre/Post Job Template window.
Setting a User Script File Name1. In Pre/Post Job Template, click the Save or the Save as button.
The Save as dialog box appears.
2. If you have started Protection Manager Console locally, click the Browse button to select a file. If you have started Protection Manager Console remotely from Device Manager, directly enter the absolute path of the file name.
To directly enter the file's absolute path instead of clicking the Browse button, specify an appropriate Windows file name by using no more than 255 bytes.
3. Click the OK button.
The user script file name that is set is displayed in Pre/Post Job Template in the Pre/Post Job Template window.
Updating a User Script File
The procedure for updating a user script file is explained below.
1. In the Pre/Post Job Template window, in Pre/Post Job Template click the Open button.
The Open dialog box appears.
2. If you have started Protection Manager Console locally, click the Browse button to select a file. If you have started Protection Manager Console remotely from Device Manager, directly enter the absolute path of the file name.
Note: The Save button in Pre/Post Job Template is a Save And Overwrite button. The Save as button is a Save under a different name button. If no file name is specified in Pre/Post Job Template, the Save button functions as the Save as button.

5–48 Using Setup GUI To Set Up an Environment for Protection Manager
Console User's Guide
To directly enter the file's absolute path instead of clicking the Browse button, specify an appropriate Windows file name by using no more than 255 bytes.
3. Click the OK button.
The contents of the selected user script file are displayed in the Pre/Post Job Template window.
4. Update the contents of the Pre Job Script or Post Job Script.
5. In Pre/Post Job Template, click the Save button.
The user script file is updated.
Email Notification WindowYou can use the Email Notification window to create or modify the mail send definition file (mail.conf) that is necessary to distribute the execution results of Protection Manager's backup command by e-mail.
Table 5-27: Email Notification Window Items
Figure 5-29: Email Notification Window
Item Environment setup parameter or description
Email Notification MAIL_SEND
Mail Server Name SMTP_SERVER
Address From FROM
To TO

Using Setup GUI To Set Up an Environment for Protection Manager 5–49
Console User's Guide
About the Configuration Check FunctionProtection Manager provides a configuration check function for verifying the system configuration and ensuring that it is appropriate for proper functioning of Protection Manager. Whenever a new system using Protection Manager is built or an existing system configuration is modified, the configuration check function should be used to verify the system configuration.
Capabilities of the Configuration Check FunctionThe configuration check function can check the Protection Manager execution environment items noted in the following table:
Table 5-28: Protection Manager Environment Items Subject to Checking by the Configuration Check Function
Subject On Success SUBJECT_NORMAL
On Error SUBJECT_ERROR
Message TEXT
Item Environment setup parameter or description
No. Check item Description
Check objectCheck
conditionDB BK DB-BK
DB-DB
1 Windows version
Verifies whether the Windows version installed on the server satisfies Protection Manager's prerequisite conditions.
Y Y Y Y --
2 Windows version (with VSS used)
Verifies whether the Windows version installed on the server satisfies the prerequisite conditions for using VSS in Protection Manager.
Y Y Y Y When VSS is being used
3 Versions of the programs used by VSS
Verifies whether the versions of the following programs satisfy prerequisite conditions for using VSS in Protection Manager.• RAID Manager• Hardware provider• Microcode of the
storage subsystem
Y Y Y Y When VSS is being used
4 Existence of Hardware Provider
Verifies whether the hardware provider required for using VSS is installed correctly.
Y Y -- -- When VSS is being used
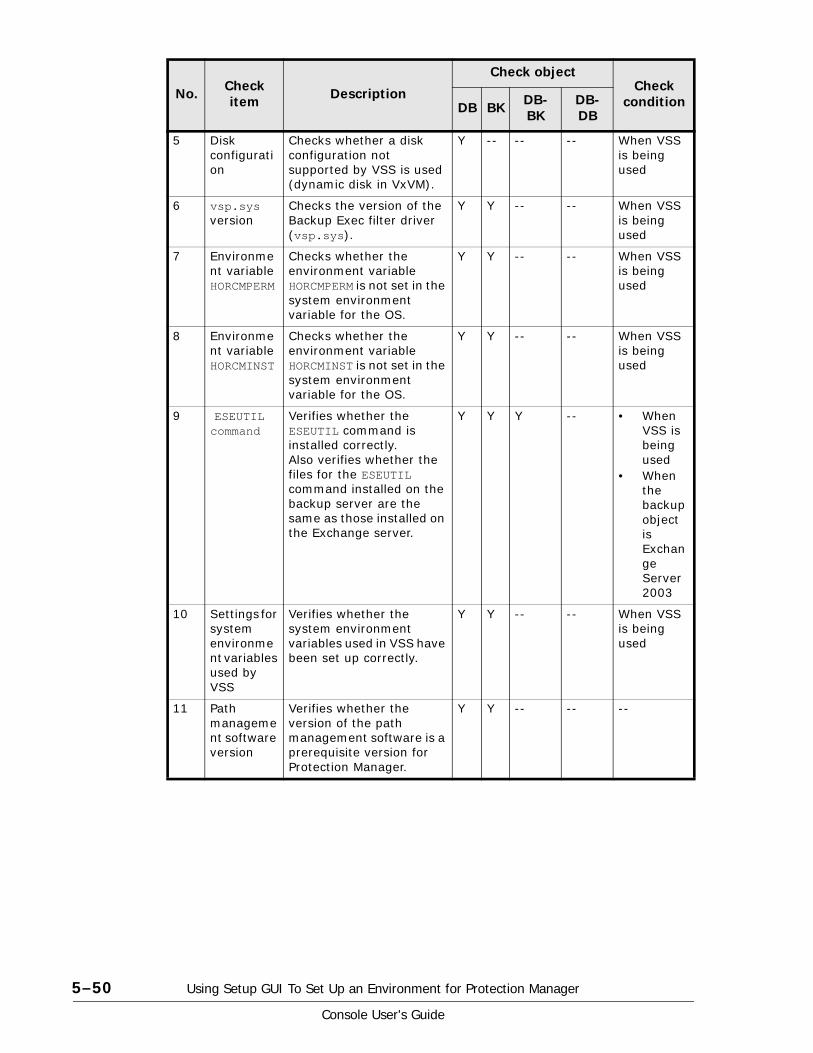
5–50 Using Setup GUI To Set Up an Environment for Protection Manager
Console User's Guide
5 Disk configuration
Checks whether a disk configuration not supported by VSS is used (dynamic disk in VxVM).
Y -- -- -- When VSS is being used
6 vsp.sys version
Checks the version of the Backup Exec filter driver (vsp.sys).
Y Y -- -- When VSS is being used
7 Environment variable HORCMPERM
Checks whether the environment variable HORCMPERM is not set in the system environment variable for the OS.
Y Y -- -- When VSS is being used
8 Environment variable HORCMINST
Checks whether the environment variable HORCMINST is not set in the system environment variable for the OS.
Y Y -- -- When VSS is being used
9 ESEUTIL command
Verifies whether the ESEUTIL command is installed correctly.Also verifies whether the files for the ESEUTIL command installed on the backup server are the same as those installed on the Exchange server.
Y Y Y -- • When VSS is being used
• When the backup object is Exchange Server 2003
10 Settings for system environment variables used by VSS
Verifies whether the system environment variables used in VSS have been set up correctly.
Y Y -- -- When VSS is being used
11 Path management software version
Verifies whether the version of the path management software is a prerequisite version for Protection Manager.
Y Y -- -- --
No. Check item Description
Check objectCheck
conditionDB BK DB-BK
DB-DB

Using Setup GUI To Set Up an Environment for Protection Manager 5–51
Console User's Guide
12 Hotfix required for restoration while the cluster resources are in the online state
Verifies whether Hotfix, which is required for restoration while the cluster resources are in the online state, has been applied to the server.This check item is available when restoration while the cluster resources are in the online state is enabled in init.conf.
Y Y -- Y For cluster configuration
13 Presence/absence of dictionary map file
Verifies that a shared disk is assigned to each virtual server and the dictionary map files are placed on the shared disk.
Y Y -- Y For cluster configuration
14 Exchange Server version
Verifies whether the current version of Exchange Server satisfies Protection Manager's prerequisite conditions. Also verifies whether the required Hotfix has been applied.
Y -- -- Y When the backup object is Exchange Server
15 Storage location for the file to be backed up by Exchange Server
Verifies whether Exchange Server data files (*.edb, *.stm), transaction log files (*.log), and checkpoint files (*.chk) are stored in the appropriate locations.
Y -- -- Y When the backup object is Exchange Server
16 SQL Server version
Verifies whether the current version of SQL Server satisfies Protection Manager's prerequisite conditions.
Y -- -- Y When the backup object is SQL Server
17 Protection Manager service
Verifies whether the installed Protection Manager Copy Controller supports the Protection Manager service.
Y Y -- -- --
18 VSFW (VxVM) version
Checks the compatibility of the current version of VSFW (VxVM) installed on the server and the version of Windows.
Y Y Y Y When VSFS is being used
19 Protection Manager version
Checks the version of the Protection Manager installed on the server.
Y Y Y Y --
No. Check item Description
Check objectCheck
conditionDB BK DB-BK
DB-DB

5–52 Using Setup GUI To Set Up an Environment for Protection Manager
Console User's Guide
Legend:
DB: A database server (file server) is checked.
BK: A backup server is checked.
DB-BK: Integrity between a database server (file server) and a backup server is checked.
DB-DB: Integrity among database servers (file servers) is checked.
Y: Checked
N: Not checked, or not applicable
Prerequisites for and Notes on Using the Configuration Check Function
Prerequisites
The configuration check function can execute from the file server, database server, or backup server. Before the configuration check function can be used, the following program products must be installed in the execution environment and the appropriate environment settings must be in effect:
• Protection Manager Copy Controller
For details about how to install Protection Manager Copy Controller, see the Hitachi Protection Manager Software User's Guide.
• Protection Manager Console
For details about how to install Protection Manager Console, see 3. Installation and Uninstallation.
In addition, the following environment settings must be complete on all file, database, and backup servers to be checked:
• Protection Manager Copy Controller is installed.
• Protection Manager service is running.
For details about the Protection Manager service, see the Hitachi Protection Manager Software User's Guide.
20 Exchange Management Console
Checks whether Exchange Management Console is correctly installed on the backup server. Also checks whether the Exchange Management Console version matches that of Exchange Server 2007.
-- Y Y -- • When VSS is being used
• When the backup object is Exchange Server 2007
No. Check item Description
Check objectCheck
conditionDB BK DB-BK
DB-DB
Using Setup GUI To Set Up an Environment for Protection Manager 5–53
Console User's Guide
Notes• The Configuration Check Function does not check all the configuration
conditions. To verify detailed configuration conditions, see the manual or the Release Notes.
• If the results of the Configuration Check Function show an error, see the information about the relevant configuration in the manual or the Release Notes to correct the flaw before running the Configuration Check Function again.
• The configuration check tool can be used only when Protection Manager Console is directly activated (local starting) from the server on which Protection Manager Console is installed. The configuration check tool cannot be used if Protection Manager Console is activated (remote starting) from Device Manager.
How to Use the Configuration Check FunctionThis section explains how to use the configuration check function in Protection Manager.
Performing Configuration Check
You use the following procedure to execute the configuration check function:
1. Activate Protection Manager Console on the server on which the configuration check is to be executed.
For details about how to activate Protection Manager Console, see Starting Protection Manager Console.
2. In the Protection Manager Console main window, choose Tools, and then Check Configuration
The Input Servers dialog box appears.

5–54 Using Setup GUI To Set Up an Environment for Protection Manager
Console User's Guide
3. In the DB Servers list box, register either the host name or IP address for the file server or database server to be checked.
If there is more than one file server or database server, such as in a cluster configuration, all servers must be registered. You can only register physical servers. You cannot register virtual servers. Lines can be added to or deleted from the list box as follows:
Adding a line
Perform one of the following operations:
- Right-click the position in the list box where a line is to be added, and choose Insert Row from the pop-up menu.
- Select a position in the list box where a line is to be added, and press the Insert key.
- Select the last line in the list box, and press the Tab key.
Deleting a line
Perform one of the following operations:
- In the list box, right-click the line to be deleted, and select Delete Row(s) from the pop-up menu.
- In the list box, select the line to be deleted, and press the Delete key.
4. In the BK Servers list box, register the host name or IP address for the backup server to be checked.
See Step 3 for the registration method.
5. In Backup Object, select the check box associated with the object to be backed up.
Figure 5-30: Input Servers Dialog Box

Using Setup GUI To Set Up an Environment for Protection Manager 5–55
Console User's Guide
6. If VSS is being used, select the Using VSS check box.
7. Click the Check button.
The check starts. The check results are displayed in the Check Results dialog box.
To cancel the configuration check, click the Cancel button.
Reviewing the Check Results
You use the following procedure to review the check results that are output by the configuration check function.
1. Review the contents output in the Check Results dialog box.
The following explains the items that are output in the Check Results dialog box:
Result
The check results for each check item are indicated by the following icons:
Figure 5-31: Check Results Dialog Box
Icon Type Meaning
Error The configuration that was checked could produce errors or is an unsupported configuration.
Warning The configuration that was checked could produce errors depending on the particular operation performed.

5–56 Using Setup GUI To Set Up an Environment for Protection Manager
Console User's Guide
Server Type
Type of server that was checked:
DB: File or database server
BK: Backup server
Server Name
Name (host name or IP address) of the server that was checked. If the check was between servers, a hyphen (-) is displayed.
ID
Message ID.
Message
Message text for the check results.
2. Detailed information about a checked item can be viewed by double-clicking the item's row.
Detailed information is output to the Result dialog box.
If there is a problem in Protection Manager environment settings, the settings should be examined based on the detailed information.
Normal The configuration that was checked has no problems.
Icon Type Meaning
Figure 5-32: Result Dialog Box

Using Setup GUI To Set Up an Environment for Protection Manager 5–57
Console User's Guide
3. Click the Close button.
Closes the Result dialog box.
Repeat Steps 2 to 3 to verify the check results.
4. Click the Close button.
The Check Results dialog box closes, and the configuration check function ends.

5–58 Using Setup GUI To Set Up an Environment for Protection Manager
Console User's Guide

Using Protection Manager Console 6–1
Console User's Guide
6Using Protection Manager Console
This chapter explains how to operate Protection Manager Console. The term storage group refers to a database management unit created on Exchange Server. Note that this definition differs from the term storage group used in other Hitachi Storage Command Suite products.
□ Operating the Protection Manager Console
□ Operations for File Systems
□ Operations for SQL Server Databases
□ Operations for Exchange Databases
□ Operations for Backup Jobs
□ Locking a Copy Group
□ Resynchronizing a Copy Group
□ Mounting and Unmounting a Secondary Volume
□ Using a User Script

6–2 Using Protection Manager Console
Console User's Guide
Operating the Protection Manager ConsoleBefore starting Protection Manager Console operations, please see the Hitachi Protection Manager User's Guide to complete the environment settings for the prerequisite products.
The following figure provides an example of a system configuration using Protection Manager Console.
Figure 6-1: Example of a System Configuration Using Protection Manager Console
• On the backup server, for the secondary volume, Protection Manager Console can only perform mount and unmount operations. In this manual, a server that mounts and unmounts the secondary volume is called a backup server. For details on operations that Protection Manager Console can perform on the secondary volume, see Mounting and Unmounting a Secondary Volume.
• Protection Manager Console treats only ShadowImage, QuickShadow, TrueCopy and Universal Replicator copy types as backup and restoration targets.
Using Protection Manager Console 6–3
Console User's Guide
Starting Protection Manager ConsoleWhen it is installed on an application server, you can start an instance of Protection Manager Console locally or remotely:
• Local start: Start the instance of Protection Manager Console at the application server.
• To perform backup or restore operations, start the Protection Manager Console that is installed either on the file server or the database server.
• To perform mount or unmount operations for the secondary volume, start the instance of Protection Manager Console installed on the backup server.
• Remote start: From Device Manager, start the instance of Protection Manager Console on the desired application server.
Administrator privileges are required to execute Protection Manager Console. For details on such privileges, see User Privileges for Executing Protection Manager Console.
Starting Protection Manager Console on an Application Server
You can start Protection Manager Console on an application server such as a file server, database server, or backup server.
To start Protection Manager Console on an application server:
1. Log on as a user with Administrator privileges.
2. From the Windows Start menu, choose Programs, Hitachi Protection Manager Console, and then Console.
Starting Protection Manager Console from Device Manager
Before starting Protection Manager Console from Device Manager, ensure that the services of the Device Manager agent on the application server are active.
Make sure that the Device Manager agent services have been started by the Administrator account, and the service startup account for the Device Manager agent has database access privileges.
Note: If you changed the program folder name during the installation, choose the changed name. If you updated the existing installed program, the name of the program folder for the previous version is displayed.
Note: If the services of the Device Manager agent are not started by the administrator account, change the user account to the administrator account, and then restart the services. Otherwise, if the services of the Device Manager agent are running under a user account that does not have administrator permissions, problems might occur; for example, the services of the Device Manager agent might not take effect even if the environment variable DRM_HOSTNAME is changed.

6–4 Using Protection Manager Console
Console User's Guide
When the OS on the management client is Windows XP Professional SP2 or Windows Vista, disable the Microsoft Internet Explorer pop-up blocking function. If this function is enabled, you cannot start Protection Manager Console by clicking the Protection Manager button in the property window of a host displayed in the Device Manager Web Client.
Disable the Microsoft Internet Explorer pop-up blocking function by using the Tools menu of Microsoft Internet Explorer. You can choose one of the following ways:
• disabling only the pop-up blocking function of the Device Manager server
• disabling the pop-up blocking function as a whole.
To start Protection Manager Console from Device Manager:
1. Log in to the Device Manager Web Client.
2. In the hierarchy in the Web Client Navigation frame, choose from Hosts the host (file server, database server, or backup server) that you want to access.
In the Web Client Information frame, the Property window for the selected host appears.
3. Click the Protection Manager button.
Protection Manager Console starts, and the Main window will be displayed.
Selecting a Virtual Server
When performing operations for a server in a cluster configuration, you will select the required virtual server from the virtual servers registered in the connection destination host.
To select a virtual server:
1. From the menu bar of the Protection Manager Console main window, choose Action and then Select Virtual Server.
The Select Virtual Server dialog box is displayed.
2. Select the required virtual server from the list of virtual servers displayed in the Select Virtual Server dialog box.
3. Click the OK button.
You can now view the dictionary map files that the selected virtual server uses. The Select Virtual Server dialog box closes.
Note: When Protection Manager Console is started form the Device Manager Web Client for the first time, Protection Manager Console for remote startup is downloaded from the application server before Protection Manager Console starts.
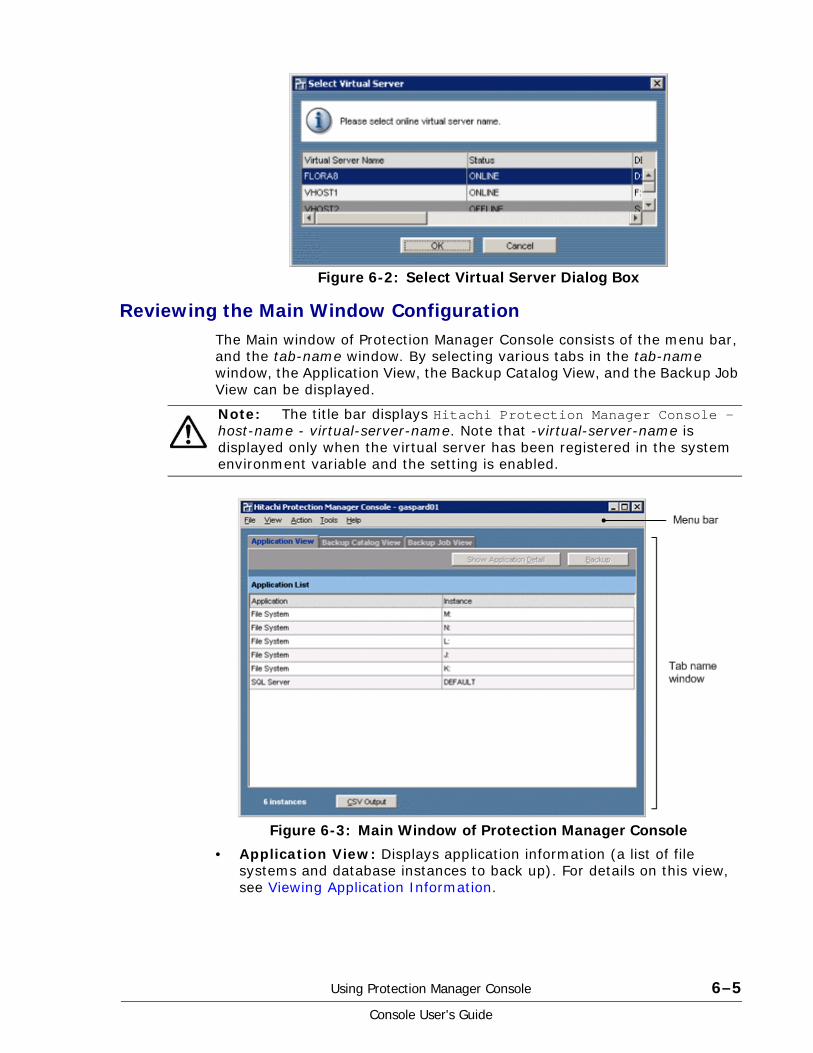
Using Protection Manager Console 6–5
Console User's Guide
Reviewing the Main Window ConfigurationThe Main window of Protection Manager Console consists of the menu bar, and the tab-name window. By selecting various tabs in the tab-name window, the Application View, the Backup Catalog View, and the Backup Job View can be displayed.
• Application View: Displays application information (a list of file systems and database instances to back up). For details on this view, see Viewing Application Information.
Figure 6-2: Select Virtual Server Dialog Box
Note: The title bar displays Hitachi Protection Manager Console - host-name - virtual-server-name. Note that -virtual-server-name is displayed only when the virtual server has been registered in the system environment variable and the setting is enabled.
Figure 6-3: Main Window of Protection Manager Console

6–6 Using Protection Manager Console
Console User's Guide
• Backup Catalog View: Displays catalog information (a list of file systems and database instances that have been backed up). For details on this view, see Viewing Catalog Information.
• Backup Job View: Displays backup job information (a list of backup jobs registered thus far). For details on this view, see Viewing Backup Job Information.
The following table lists the menu items in the Main window.
Table 6-1: Menu Items in the Main Window
Menu Bar Menu Item Description
File CSV Output Outputs the contents displayed in the Application View or the Backup Catalog View to a file (in a tab-delimited format).This item is only enabled when one or more items are displayed in the list, in the Application View or the Backup Catalog View.You can also perform the same operation by clicking the CSV Output button displayed in the Application View and Backup Catalog View.
Exit Quits Protection Manager Console.

Using Protection Manager Console 6–7
Console User's Guide
View Application View Displays the Application View in the tab-name window.This item is only enabled when the Backup Catalog View or Backup Job View is displayed in the Main window. You can also perform the same operation by clicking the Application View tab in the Main window.
Backup Catalog View Displays the Backup Catalog View in the tab-name window.This item is only enabled when the Application View or Backup Job View is displayed in the Main window. You can also perform the same operation by clicking the Backup Catalog View tab in the Main window.
Backup Job View Displays the Backup Job View in the tab-name window.This item is only enabled when the Application View or the Backup Catalog View is displayed in the Main window. You can also perform the same operation by clicking the Backup Job View tab in the Main window.
Application Detail Displays the Application Detail window.The Application Detail window contains detailed application information.This item is only enabled when a record is selected in the Application View. You can also perform the same operation by clicking the Show Application Detail button in the Application View.
Backup Detail Information
Displays the Backup Detail Information window.The Backup Detail Information window contains detailed catalog information.This item is only enabled when a record is selected in the Backup Catalog View. You can also perform the same operation by clicking the Show Backup Detail Information button in the Backup Catalog View.
Backup Job Results Displays the Backup Job Result Details window.The Backup Job Result Details window displays details of the backup job execution results.This item is only enabled when a record is selected in the Backup Job View. You can also perform the same operation by clicking the Show Backup Job Results button in the Backup Job View.
Refresh Updates the information displayed (only for the displayed page) in the tab-name window.
Menu Bar Menu Item Description

6–8 Using Protection Manager Console
Console User's Guide
Action Backup Performs backup.This item is only enabled when a record is selected in the Application View. You can also perform the same operation by clicking the Backup button in the Application View.
Restore Performs restoration processing.This item is only enabled when a record is selected in the Backup Catalog View. You can also perform the same operation by clicking the Restore button in the Backup Catalog View.
Mount Mounts the secondary volume on the backup server. For details on mount operations, see Mounting a Secondary Volume.
Unmount Unmounts the secondary volume on the backup server. For details on unmount operations, see Unmounting a Secondary Volume.
Lock Locks or unlocks a copy group.
Resynchronize Resynchronizes a copy group.
Job Modify Changes options relevant to a backup job.This item is only enabled when a record is selected in the Backup Job View. You can also perform the same operation by clicking the Modify button in the Backup Job View.
Delete Deletes a backup job.This item is only enabled when a record is selected in the Backup Job View. You can also perform the same operation by clicking the Delete button in the Backup Job View.
Run Immediately
Runs a backup job immediately.This item is only enabled when a record is selected in the Backup Job View. You can also perform the same operation by clicking the Run Immediately button in the Backup Job View.
Select Virtual Server Displays the Select Virtual Server dialog box.When the server is in a cluster configuration, the Select Virtual Server dialog box displays virtual servers registered in the connection destination host. For details on how to select a virtual server, see Selecting a Virtual Server.
Update Dictionary Map File
Displays the Update Dictionary Map Files dialog box. For details on how to use this dialog box, see Updating the Dictionary Map Files.
Tools Setup Starts Setup GUI. For details on Setup GUI, see Overview of Setup GUI.
Check Configuration Starts the configuration check functionality. For details on the configuration check functionality, see About the Configuration Check Function.
Menu Bar Menu Item Description

Using Protection Manager Console 6–9
Console User's Guide
Viewing Application InformationApplication information is comprised of a list of file systems, database instances, and storage configuration information to be backed up. You can display application information in the Application View. Detailed application information can be displayed in the Application Detail window.
Help User's Guide Displays the HTML manual. See Note.
Connected Host Information
Displays the product and version of Protection Manager installed on the connection destination host, and the connected virtual server and its database path.
About Protection Manager
Displays the version information for Protection Manager Console.
Note: When you start Protection Manager Console remotely from Device Manager, if the OS running on the management client is Solaris, the HTML manual might not be displayed after you choose the Help menu and then Users Guide. In this case, start another browser, and then reselect Users Guide.
Menu Bar Menu Item Description
Figure 6-4: Example of the Application View

6–10 Using Protection Manager Console
Console User's Guide
A list is displayed in the Application View. You can rearrange the order of the rows to make the list easier to read. You can also click the list headers to sort the contents of that column in ascending or descending order.
The following table lists the items displayed in the Application View.
Table 6-2: Items Displayed in the Application View
Figure 6-5: Example of the Application Detail Window
Item Name Contents
Application The application typeFile System, SQL Server, or Exchange is displayed.
Instance Instance-nameFile System: mount-point-nameSQL Server: database-instance-nameExchange: Storage Groups
n instances The number of instances in the list
Show Application Detail button
Displays the Application Detail window. This item is only enabled when a record is selected in the Application View.
Backup button Performs backup processing. This item is only enabled when a record is selected in the Application View.
CSV Output button Outputs the contents of the Application View to a file (in a tab-delimited format). When this item is selected, a dialog box for specifying the file name and save location will be displayed.

Using Protection Manager Console 6–11
Console User's Guide
Table 6-3: Items Displayed in the Application Detail Window
Item Name Contents
Host Name Host name
Application The application typeFile System, SQL Server, or Exchange is displayed.
Instance Instance-nameFile System: mount-point-nameSQL Server: database-instance-nameExchange: Storage Groups
Number of Lines Number of lines in the list.
DB SQL Server database nameThis item is displayed only when the backup is of an SQL Server database.
Storage Group Storage group nameThis item is displayed only when the backup is of an Exchange database.
File Type File typeThis item is displayed only when the backup is of an SQL Server database or of an Exchange database.SQL Server: DATA/TRANExchange: MAIL/PBLC/TRAN/CHCK
Information Store Name of the information Store.This item is displayed only when the backup is of an Exchange database.
File Name File nameThis item is displayed only when the backup is of an SQL Server database or of an Exchange database.
FS The name of the mount point
Disk Group Disk group name
Device Device file name
Copy Function Copy typeThe name of the copy type varies depending on the DKC software product (storage subsystem unit) and microcode version.-: Indicates a volume that has not been made into a pair volume. (Do not create a program that operates using this display.)
Generation Name Generation identifier
Pair Name Copy group name
PORT# Port name of the server host
TID# Target ID of the server host
LUN# Logical unit number of the server host
MU# Pair identifier
LDEV# Logical device number in the RAID device
P/S Indicates whether the volume is the primary volume or the secondary volume.P: Primary volumeS: Secondary volume-: SMPL volume

6–12 Using Protection Manager Console
Console User's Guide
To view application information:
1. Start Protection Manager Console, and click the Application View tab.
The Application View is displayed. For details on the displayed items, see Table 6-2: Items Displayed in the Application View.
2. From the Application View list, select the record whose details you want to view, and click the Show Application Detail button.
The Application Detail window is displayed. For details on the displayed items, see Table 6-3: Items Displayed in the Application Detail Window. You can also display the Application Detail window by double-clicking a desired record in the list in the Application View.
Viewing Catalog InformationThe current list of the file systems and databases that have been backed up is called catalog information. You can view catalog information in the Backup Catalog View, shown in Figure 6-6: Example of the Backup Catalog View.
SERIAL# Serial number of the RAID device (volume)
CSV Output button Outputs the contents of the Application Detail window to a file (in a tab-delimited format). When this item is selected, a dialog box for specifying the file name and save location will be displayed.
Item Name Contents
Figure 6-6: Example of the Backup Catalog View

Using Protection Manager Console 6–13
Console User's Guide
Detailed catalog information can be displayed in the Backup Detail Information window, shown in Figure 6-7: Example of the Backup Detail Information Window.
A list is displayed in the Backup Catalog View. You can rearrange the order of the rows to make the list easier to read. You can also click the list headers to sort the contents of that column in ascending or descending order.
Table 6-4: Items Displayed in the Backup Catalog View lists the items displayed in the Backup Catalog View.
Table 6-4: Items Displayed in the Backup Catalog View
Figure 6-7: Example of the Backup Detail Information Window
Item Name Contents
Backup Host The name of the host for which backup was performed
Application The application typeFile System, SQL Server, or Exchange is displayed
Instance Instance nameFile System: mount-point-nameSQL Server: database-instance-nameExchange: Storage Groups
Backup Time The time of the backup.
Mode Backup modeCold, Online, or VSS is displayed

6–14 Using Protection Manager Console
Console User's Guide
Table 6-5: Items Displayed in the Backup Detail Information Window lists the items that are displayed in the Backup Detail Information window.
Table 6-5: Items Displayed in the Backup Detail Information Window
Comment Backup comment
Backup ID Backup ID
n Backups The number of instances backed up
Lock Status Lock status.The Backup Catalog View displays All Locked when all target copy groups are locked, All Unlocked when all target copy groups are unlocked, and Partial Locked when some target copy groups are locked.If the lock status cannot be obtained, - appears.
Show Backup Detail Information button
Backup Detail Information window is displayed. This item is only enabled when a record is selected in the Backup Catalog View.
Restore button Performs restoration processing. This item is only enabled when a record is selected in the Backup Catalog View.
Lock button Performs lock processing. This item is only enabled when a record is selected in the Backup Catalog View.
Resync button Performs resynchronization processing. This item is only enabled when a record is selected in the Backup Catalog View.
CSV Output button Outputs the contents of the Backup Catalog View window to a file (in a tab-delimited format). When this item is selected, a dialog box for specifying the file name and save location will be displayed.
Item Name Contents
Item Name Contents
Host Name Host name
Application The application typeFile System, SQL Server, or Exchange is displayed
Instance Instance nameFile System: mount-point-nameSQL Server: database-instance-nameExchange: Storage Groups
Backup Comment Backup comment
Backup ID / Original ID
Backup ID/Original backup IDThe backup ID is overwritten with a new ID during restoration.The original backup ID is the original backup ID obtained during backup.
Mode Backup modeCold, Online, or VSS is displayed
Start Time - End Time
Backup start time and end time
Number of Lines Number of lines in the list

Using Protection Manager Console 6–15
Console User's Guide
To view catalog information:
1. Start Protection Manager Console, and click the Backup Catalog View tab.
DB SQL Server database nameThis item is displayed only when the backup is of an SQL Server database.
Storage Group Storage group nameThis item is displayed only when the backup is of an Exchange database.
File Type File typeThis item is displayed only when the backup is of an SQL Server database or of an Exchange database.SQL Server: META/DATA/TRANExchange: MAIL/PBLC/TRAN/CHCK
Information Store Name of the information StoreThis item is displayed only when the backup is of an Exchange database.
File Name File name
FS Name of the mount point directory where the secondary volume is to be mounted.
Disk Group The disk group name (for environments where logical volume manager is installed) or (-) (for the basic disk configuration) is displayed.
Device Device file nameHarddiskn (n: integer) is displayed.
Pair Name Copy group nameA combination of the RAID Manager group name (dev_group) and RAID Manager pair logical volume name (dev_name).
Lock Status Lock statusThe Backup Detail Information window displays (-) when the copy group name is (-), and LOCKED or UNLOCKED when the copy group name is not (-).If the lock status cannot be obtained, - appears.
PORT# Port name of the server host
TID# Target ID of the server host
LUN# Logical unit number of the server host
MU# Pair identifier
LDEV# Logical device number in the RAID device
P/S Indicates whether the volume is the primary volume or the secondary volume.P: Primary volumeS: Secondary volume-: File in a local disk
SERIAL# Serial number of the RAID device (volume)
CSV Output button Outputs the contents of the Backup Detail Information window to a file (in a tab-delimited format). When this item is selected, a dialog box for specifying the file name and save location will be displayed.
Item Name Contents

6–16 Using Protection Manager Console
Console User's Guide
The Backup Catalog View is displayed. For details on the displayed items, see Table 6-4: Items Displayed in the Backup Catalog View.
2. From the Backup Catalog View list, select the record whose details you want to view, and click the Show Backup Detail Information button.
The Backup Detail Information window is displayed. For details on the displayed items, see Table 6-5: Items Displayed in the Backup Detail Information Window. You can also display the Backup Detail Information window by double-clicking a desired record in the list in the Backup Catalog View.
Viewing Backup Job InformationThe list of backup jobs registered thus far is usually referred to as backup job information. You can view backup job information in the Backup Job View. You can also view details of the backup job execution results in the Backup Job Result Details window.
To view backup job information:
1. Start Protection Manager Console, and click the Backup Job View tab.
The Backup Job View is displayed (see Figure 6-8: Example of the Backup Job View). For details on the displayed items, see Items Displayed in the Backup Job View.
2. From the Backup Job View list, select the record whose details you want to view, and click the Show Backup Job Results button.
Figure 6-8: Example of the Backup Job View

Using Protection Manager Console 6–17
Console User's Guide
The Backup Job Result Details window is displayed (see Figure 6-9: Example of the Backup Job Result Details Window.) For details on the displayed items, see Items Displayed in the Backup Job Result Details Window. You can also display this window by double-clicking a record in the list in the Backup Job View.
Items Displayed in the Backup Job View
The table below lists the items displayed in the Backup Job View.
Table 6-6: Items Displayed in the Backup Job View
Figure 6-9: Example of the Backup Job Result Details Window
Note: To make the list displayed in the Backup Job View easier to read, you can rearrange the order of the rows. You can also click the list headers to sort the contents of that column in ascending or descending order.
Item name Contents
Schedule Backup scheduleThe schedule type is displayed first, followed by the contents specified for the schedule options, such as the date and time.The schedule types are as follows:Daily: Run at the specified time each day.Weekly: Run at the specified day and time each week.Monthly: Run at the specified date and time each month.Day of week in month: Run each month at the specified time, day, and week in the specified month.One time only: Run one time only at the specified date and time.

6–18 Using Protection Manager Console
Console User's Guide
Start Time Backup start time
Status Backup job status:Scheduled: Waiting for schedule executionCompleted: Backup job has completedExecuting: During backup job executionCommand Error: An error occurred at the backup command.Schedule Execution Error: An error occurred during schedule execution.Note: If the status becomes Command Error or Schedule Execution Error, the status remains unchanged until the next time schedule executes normally.
Application The application type:File System, SQL Server, or Exchange is displayed.
Instance Instance nameFile System: mount-point-nameSQL Server: database-instance-nameExchange: Storage Groups
Target Object Backup target nameIf there are multiple backup targets, they are displayed separated by commas.File System: -SQL Server: database-nameExchange: storage-group-name and information-store-nameNote: The name of the information store is displayed only when the backup mode is VSS.
Mode Backup modeCold, Online, or VSS is displayed.
Generation Name Generation identifier
Comment Backup comment
n Jobs Number of backup jobs registered
Run Immediately button
Runs a backup job immediately.This item is only enabled when a record is selected in the Backup Job View.
Modify button The Backup Job Update dialog box is displayed. You can change backup options in this dialog box.This item is only enabled when a record is selected in the Backup Job View.
Delete button Deletes a backup job.This item is only enabled when a record is selected in the Backup Job View.
Show Backup Job Results button
Backup Job Result Details window is displayed.This item is only enabled when a record is selected in the Backup Job View.
CSV Output button Outputs the contents of the Backup Job View window to a file (in a tab-delimited format). When this item is selected, a dialog box for specifying the file name and save location will be displayed.
Item name Contents

Using Protection Manager Console 6–19
Console User's Guide
Items Displayed in the Backup Job Result Details Window
The following table lists the items displayed in the Backup Job Result Details window.
Table 6-7: Items Displayed in the Backup Job Result Details Window
Updating the Dictionary Map FilesEven after you have started normal operation, you need to update the dictionary map files if you have performed any of the following operations:
• changed the RAID Manager configuration definition file
• changed the pair configuration of the volume
• changed the mount point (or the drive letter in Windows)
Note: To make the list displayed in the Backup Job Result Details window easier to read, you can rearrange the order of the rows. You can also click the list headers to sort the contents of that column in ascending or descending order.
Item name Contents
Application The application typeFile System, SQL Server, or Exchange is displayed.
Instance Instance nameFile System: mount-point-nameSQL Server: database-instance-nameExchange: Storage Groups
Mode Backup modeCold, Online, or VSS is displayed.
Backup Comment Backup comment
Backup Job Result Backup job execution results
Executed Job List List of backup job execution resultsWhen the window is opened, job execution results are displayed in descending order of Start Time.
Backup ID Backup ID
Start Time Backup job execution start time
Status Backup job statusCompleted: Backup job has completedCommand Error: An error occurred at the backup command.Schedule Execution Error: An error occurred during schedule execution.
Time Taken (min) Time required for the backup job (minutes)
Show Job Output button
Displays the execution result of the specified Backup ID in the Job Output. The button is enabled only when you have selected a Backup ID from the Executed Job List.
Job Output Backup job execution resultsThe execution result of the specified Backup ID is displayed. If backup operation terminates with an error, you can use this list to investigate the cause.

6–20 Using Protection Manager Console
Console User's Guide
• changed the disk configuration by adding or removing a hard disk
• expanded the dynamic volume
• configured or deleted an SQL Server instance
• added or deleted an SQL Server database
• added, deleted, or moved a configuration file for an SQL Server database
• changed the name of an SQL Server database or a database configuration file
• changed the location of the dictionary map files by using the drmdbsetup utility
You can use the Update Dictionary Map Files dialog box to update the dictionary map files.
Table 6-8: Items Displayed in the Update Dictionary Map Files Dialog Box
After the update has finished, the Application View displays the latest state.
Operations for File SystemsYou can use Protection Manager Console to perform the following operations for file systems.
Note: Note that if you are going to update the dictionary map files in a cluster configuration, update the file on the active server only. You do not normally need to switch clusters and update the file on both servers. If the primary volume resides on the backup server, however, you do need to update the dictionary map files on the backup server.
Figure 6-10: Update Dictionary Map Files Dialog Box
Item name Parameters or description
Virtual server name Virtual server name
Backup Objects File system File system
SQL SQL Server database
Exchange Exchange database
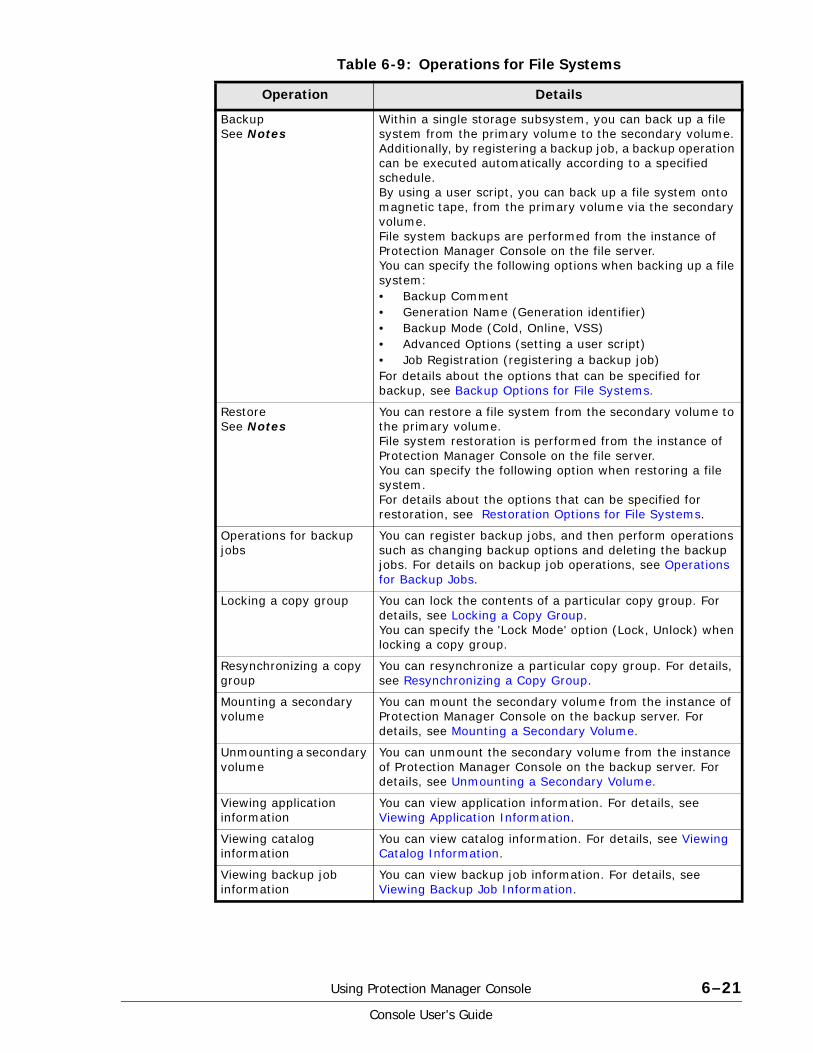
Using Protection Manager Console 6–21
Console User's Guide
Table 6-9: Operations for File Systems
Operation Details
BackupSee Notes
Within a single storage subsystem, you can back up a file system from the primary volume to the secondary volume.Additionally, by registering a backup job, a backup operation can be executed automatically according to a specified schedule.By using a user script, you can back up a file system onto magnetic tape, from the primary volume via the secondary volume.File system backups are performed from the instance of Protection Manager Console on the file server.You can specify the following options when backing up a file system:• Backup Comment• Generation Name (Generation identifier)• Backup Mode (Cold, Online, VSS)• Advanced Options (setting a user script)• Job Registration (registering a backup job)For details about the options that can be specified for backup, see Backup Options for File Systems.
RestoreSee Notes
You can restore a file system from the secondary volume to the primary volume.File system restoration is performed from the instance of Protection Manager Console on the file server.You can specify the following option when restoring a file system.For details about the options that can be specified for restoration, see Restoration Options for File Systems.
Operations for backup jobs
You can register backup jobs, and then perform operations such as changing backup options and deleting the backup jobs. For details on backup job operations, see Operations for Backup Jobs.
Locking a copy group You can lock the contents of a particular copy group. For details, see Locking a Copy Group.You can specify the 'Lock Mode' option (Lock, Unlock) when locking a copy group.
Resynchronizing a copy group
You can resynchronize a particular copy group. For details, see Resynchronizing a Copy Group.
Mounting a secondary volume
You can mount the secondary volume from the instance of Protection Manager Console on the backup server. For details, see Mounting a Secondary Volume.
Unmounting a secondary volume
You can unmount the secondary volume from the instance of Protection Manager Console on the backup server. For details, see Unmounting a Secondary Volume.
Viewing application information
You can view application information. For details, see Viewing Application Information.
Viewing catalog information
You can view catalog information. For details, see Viewing Catalog Information.
Viewing backup job information
You can view backup job information. For details, see Viewing Backup Job Information.

6–22 Using Protection Manager Console
Console User's Guide
Notes on Backing up Mount Points for DatabasesIn the Application View page, the mount points that an SQL Server or Exchange database uses are also displayed. Normally, you select an instance name to perform backup. However, you can also back up a file system by specifying the mount point name. When the database instance data is stored across multiple mount points, do not perform backup on the mount points for the database. The mount points for the database are displayed in the FS field when you display detailed information about the SQL Server or Exchange database in the Application Detail window.
Backup Options for File SystemsWhen performing a backup for a file system, you can specify either online backup or cold backup as the backup mode. You can specify the following options when performing a backup for a file system:
• Generation Name (name identifying the generation)
Specify this option to back up the file system to the copy group that has the specified name identifying the generation. The name identifying the generation syntax is local/remote-identifier_generation-number. If the copy type is the volume duplication function in a subsystem (ShadowImage), local is displayed as the identifier. If the copy type is the volume duplication function between subsystems (TrueCopy or Universal Replicator), remote is displayed as the identifier.
The generation management MU# that is set for the primary volume is displayed as the generation number.
For details about the name identifying the generation, see the Hitachi Protection Manager User's Guide.
• Backup Mode
• Cold (cold backup)
Outputting application information, catalog information, or backup job information to a file
You can output the contents of the displayed application information, catalog information, and backup job information to a file (in a tab-delimited format), from the Protection Manager Console on a file server.
• Before performing a backup or restoration, you must terminate all applications that are using the file system that is to be backed up or restored. Note that volumes being used by the OS cannot be backed up or restored.
• If the file system consists of several volumes, backup and restoration are performed for all primary volumes and their corresponding secondary volumes.
• For systems consisting of a file server and a backup server, backup operations and restore operations can only be performed from the file server.
Operation Details

Using Protection Manager Console 6–23
Console User's Guide
In a cold backup, the file system is unmounted, and backup is performed while the volume is offline. When backup is complete, the file system is mounted again. If the unmount operation fails, backup processing is cancelled. Backup processing is also cancelled if the volume to be backed up is already unmounted.
When backup is performed on a server in a cluster configuration, instead of the file system being unmounted, the disk resource to be backed up is taken offline, and the volume is backed up. If the disk resource is already offline, backup processing is cancelled. Backup processing is also cancelled if the command executes, but fails to take the disk resource offline. When backup is complete, the disk resource subject to backup is brought back online.
• Online (online backup)
In an online backup, backup is performed without unmounting the file system.
When online backup is specified, only synchronization processing is performed before backup. If you do not prevent applications using the file system from updating data, the integrity of the data that is backed up cannot be guaranteed. When performing an online backup, make sure that the directories on the volume to be backed up are not mounted on another volume.
• VSS
Specify this option to perform backup by using VSS. By default, this option is selected as the backup mode.
• Advanced Options (setting a user script)
If you want to use a user script to perform backup operations, click the Pre/Post Job button to open the Advanced Options dialog box, and then set backup options.
• Job Registration (registering a backup job) : You can register a backup job by clicking the Schedule button and setting schedule options. In this case, the backup is not run immediately. For details on registering a backup job, see Registering a Backup Job.
Restoration Options for File SystemsDuring restoration, data is replicated by resynchronization, in which the contents of the primary volume are made identical to the contents of the secondary volume. In restoration processing, the file system to be restored is unmounted, and then is mounted again once processing is complete. For a cluster configuration, the disk resource to be backed up is taken offline, and the volume is restored. Once restoration is complete, the disk resource is brought back online.
You can specify the following option when performing restoration for a file system: Force
Note: For both cold and online backups, the file system to be backed up must be mounted before backup.

6–24 Using Protection Manager Console
Console User's Guide
Only specify this option when normal restoration cannot be performed, such as when the LDEV number has changed when the volume was switched. When you specify this option, if the name of the copy group on the primary volume, obtained when the file server was backed up, matches the information on the file server, then forced restoration is performed. In such a case, forced restoration is performed even when the LDEV number or SERIAL number does not match that from the backup. Note that if this option is specified for a normal restoration, data might be corrupted.
Example of Backup and Restore Operations for File SystemsThe operations described in the following explanations assume a system configuration (consisting of a file server and a backup server), as shown in the following figure.

Using Protection Manager Console 6–25
Console User's Guide
The prerequisites for the system shown in Figure 6-11: System Configuration for Performing Backup and Restore Operations for a File System are:
• A file server (server name: FSServer_A) and a backup server (server name: BKServer) exist.
• Primary volumes on the file server and secondary volumes on the backup server are defined as pairs to constitute a mirror configuration (use the volume replication function and RAID Manager for these settings).
• FSServer_A has the mount point H:.
Figure 6-11: System Configuration for Performing Backup and Restore Operations for a File System

6–26 Using Protection Manager Console
Console User's Guide
• The mount point to be backed up is in the NTFS format.
• The mount point to be backed up is permanently under an ordinary split operation.
• During a cold backup, primary volumes are unmounted when the data is backed up to secondary volumes, and are therefore not accessible from the file server.
Backing up a File System to a Secondary VolumeThis section provides sample instructions for backing up a file system from a primary volume to a secondary volume. In this example, a file system with mount point H: on FSServer_A is backed up to the secondary volume.
To back up a file system:
1. Start the instance of Protection Manager Console on the file server, and then click the Application View tab.
The Application View is displayed. For details on the displayed items, see Table 6-2: Items Displayed in the Application View.
2. Select the file system to be backed up. Select the following rows:
• Application: File system
• Instance: H:
3. In the Application View, click the Backup button.
The Backup File System dialog box is displayed.
4. In the Backup File System dialog box, set the backup options.
• Backup Comment
This registers a backup comment in the backup catalog. The backup-comment value can be a string of up to 64 bytes, consisting of alphanumeric, special, one-byte space, and multi-byte characters. The backup comment is case-sensitive.
• Generation Name
Note: When usual operation is in a split state, you must resynchronize the copy group before backing up data. When usual operation is in a pair state, you do not need to resynchronize the copy group before backing up the data. After the tape backup ends, resynchronize the copy group to initialize it. For details, see Resynchronizing a Copy Group.
Note: To see detailed information about the file system, in the Application View, click the Show Application Detail button. The Application Detail window is displayed, allowing you to view detailed information. For details on the displayed items, see Table 6-3: Items Displayed in the Application Detail Window.
Note: The following special characters cannot be used for backup comments:
\ / ` | < > " * ? & ; ( )
The first character must not be a hyphen (-).

Using Protection Manager Console 6–27
Console User's Guide
This option backs up the file system to the copy group that has the specified name identifying the generation.
• Backup Mode
Sets the backup mode. To perform online backup, select the Online radio button, or to perform a cold backup, select the Cold radio button.
• Advanced Options
If you want to use a user script to perform backup operations, click the Job Script button to open the Advanced Options dialog box, and then set backup options. For more details, see Configuring Backup Options for a User Script.
• Job Registration
To perform backup immediately without registering a backup job, do not click the Schedule button. To register a backup job with the contents specified thus far, see Registering a Backup Job
5. Click the OK button.
A confirmation dialog box for executing the backup is displayed.
6. Click the OK button to start the backup process.
Backup processing starts. Quitting Protection Manager Console during backup does not terminate the command processing.
While the backup is in progress, the status is displayed in Progress, which shows how much of the volume has been copied. This does not represent the progress of the whole backup process. Copy progress might be displayed as progressing rather slowly near the 0% mark, as well as near the 100% mark. To confirm that all volumes are copied, check Progress.
If you have started locally, the Progress Detail displays messages showing the progress of the backup process.
When the backup is finished, a dialog box is displayed to indicate the completion of the backup (See Figure 6-12: Backup File System Dialog Box). This dialog box contains the backup ID.

6–28 Using Protection Manager Console
Console User's Guide
Backing up a File System to a Secondary Volume (When VSS is Used)
This section provides sample instructions for backing up a file system from a primary volume to a secondary volume using VSS. In this example, the file system with mount point H: on FSServer_A is backed up to the secondary volume.
To back up a file system by using VSS:
1. Start the instance of Protection Manager Console on the file server, and then click the Application View tab.
The Application View is displayed. For details on the displayed items, see Table 6-2: Items Displayed in the Application View.
2. Select the file system to be backed up.
Select the following rows:
• Application: File system
• Instance: H:
Figure 6-12: Backup File System Dialog Box
Note: When usual operation is in a split state, you must resynchronize the copy group before backing up data. When usual operation is in a pair state, you do not need to resynchronize the copy group before backing up the data. After the tape backup ends, resynchronize the copy group to initialize it. For details, see Resynchronizing a Copy Group.
Note: To see more detailed information about the file system, in the Application View, click the Show Application Detail button. The Application Detail window is displayed, allowing you to view detailed information. For details on the displayed items, see Table 6-3: Items Displayed in the Application Detail Window.
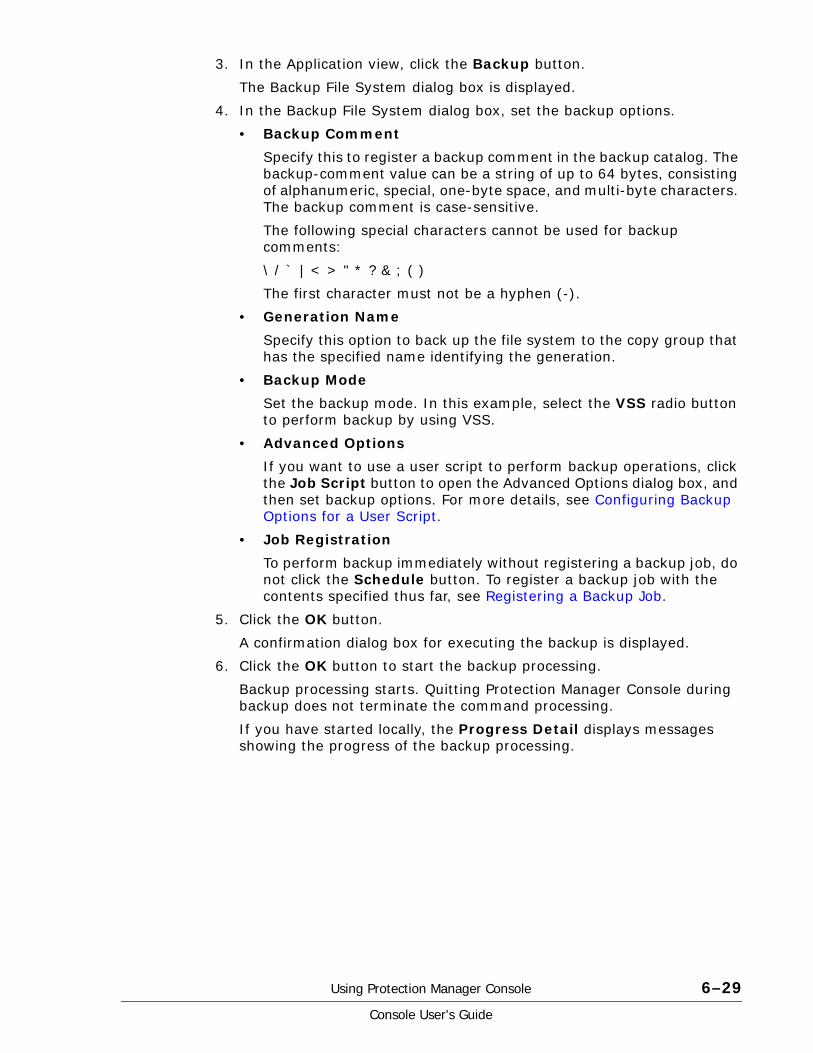
Using Protection Manager Console 6–29
Console User's Guide
3. In the Application view, click the Backup button.
The Backup File System dialog box is displayed.
4. In the Backup File System dialog box, set the backup options.
• Backup Comment
Specify this to register a backup comment in the backup catalog. The backup-comment value can be a string of up to 64 bytes, consisting of alphanumeric, special, one-byte space, and multi-byte characters. The backup comment is case-sensitive.
The following special characters cannot be used for backup comments:
\ / ` | < > " * ? & ; ( )
The first character must not be a hyphen (-).
• Generation Name
Specify this option to back up the file system to the copy group that has the specified name identifying the generation.
• Backup Mode
Set the backup mode. In this example, select the VSS radio button to perform backup by using VSS.
• Advanced Options
If you want to use a user script to perform backup operations, click the Job Script button to open the Advanced Options dialog box, and then set backup options. For more details, see Configuring Backup Options for a User Script.
• Job Registration
To perform backup immediately without registering a backup job, do not click the Schedule button. To register a backup job with the contents specified thus far, see Registering a Backup Job.
5. Click the OK button.
A confirmation dialog box for executing the backup is displayed.
6. Click the OK button to start the backup processing.
Backup processing starts. Quitting Protection Manager Console during backup does not terminate the command processing.
If you have started locally, the Progress Detail displays messages showing the progress of the backup processing.

6–30 Using Protection Manager Console
Console User's Guide
Restoring a File System to the Primary VolumeThe file system is restored by resynchronization from the secondary volume to the primary volume.
To restore a file system:
1. Start the instance of Protection Manager Console on the file server, and then click the Backup Catalog View tab.
The Backup Catalog View is displayed. For details on the displayed items, see Table 6-4: Items Displayed in the Backup Catalog View.
2. Select the file system to be restored.
According to backup ID, backup time, instance, and comment, select the row of the file system you want to restore.
3. Click the Restore button in the Backup Catalog View.
The Restore File System dialog box, where you can set the restoration options, is displayed (Figure 6-14: Restore File System Dialog Box).
Figure 6-13: Backup File System Dialog Box (When Using VSS to Back up)
Note: To see more detailed information about the file system, click the Show Backup Detail Information button in the Backup Catalog View. The Backup Detail Information window is displayed, allowing you to view detailed information.

Using Protection Manager Console 6–31
Console User's Guide
4. Set the Force restoration option to perform restoration to the primary volume, even if it is not the same volume from which the backup was taken.
5. Click the OK button.
A dialog box displays, prompting you to confirm the execution of restoration.
6. Click the OK button to start restoration processing.
Restoration processing starts. Quitting Protection Manager Console during restoration does not terminate the command processing.
While the restoration is in progress, the status is displayed in the Progress that shows how much of the volume has been restored. This does not represent the progress of the whole restoration processing. Copy progress might be displayed as moving rather slowly near the 0% mark, as well as near the 100% mark. To confirm that the restoration finishes, check Progress.
If you have started locally, the Progress Detail displays messages showing the progress of the restoration processing.
When the restoration is finished, a dialog box is displayed to indicate completion of the restoration.
Operations for SQL Server DatabasesYou can use Protection Manager Console to perform the following operations for SQL server databases.
Figure 6-14: Restore File System Dialog Box
Note: Use this option only when normal restoration cannot be performed, such as when the LDEV number has changed when the volume was switched.
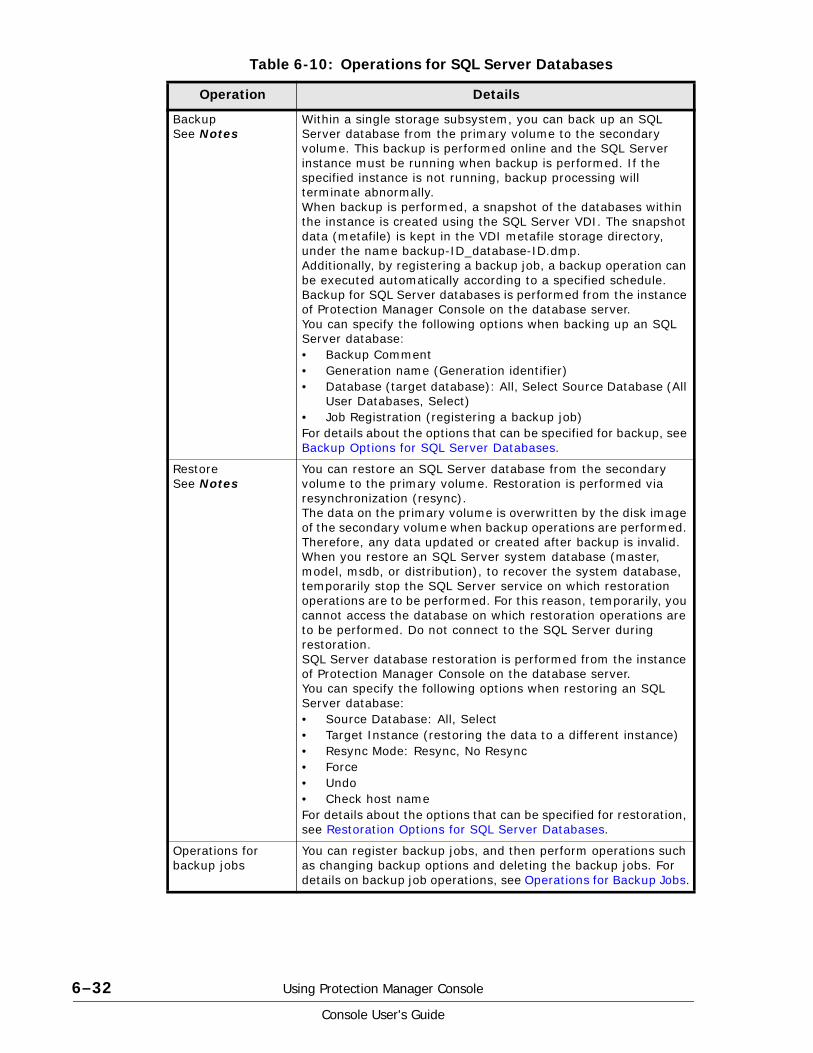
6–32 Using Protection Manager Console
Console User's Guide
Table 6-10: Operations for SQL Server Databases
Operation Details
BackupSee Notes
Within a single storage subsystem, you can back up an SQL Server database from the primary volume to the secondary volume. This backup is performed online and the SQL Server instance must be running when backup is performed. If the specified instance is not running, backup processing will terminate abnormally.When backup is performed, a snapshot of the databases within the instance is created using the SQL Server VDI. The snapshot data (metafile) is kept in the VDI metafile storage directory, under the name backup-ID_database-ID.dmp.Additionally, by registering a backup job, a backup operation can be executed automatically according to a specified schedule.Backup for SQL Server databases is performed from the instance of Protection Manager Console on the database server.You can specify the following options when backing up an SQL Server database:• Backup Comment• Generation name (Generation identifier)• Database (target database): All, Select Source Database (All
User Databases, Select)• Job Registration (registering a backup job)For details about the options that can be specified for backup, see Backup Options for SQL Server Databases.
RestoreSee Notes
You can restore an SQL Server database from the secondary volume to the primary volume. Restoration is performed via resynchronization (resync).The data on the primary volume is overwritten by the disk image of the secondary volume when backup operations are performed. Therefore, any data updated or created after backup is invalid.When you restore an SQL Server system database (master, model, msdb, or distribution), to recover the system database, temporarily stop the SQL Server service on which restoration operations are to be performed. For this reason, temporarily, you cannot access the database on which restoration operations are to be performed. Do not connect to the SQL Server during restoration.SQL Server database restoration is performed from the instance of Protection Manager Console on the database server.You can specify the following options when restoring an SQL Server database:• Source Database: All, Select• Target Instance (restoring the data to a different instance)• Resync Mode: Resync, No Resync• Force• Undo• Check host nameFor details about the options that can be specified for restoration, see Restoration Options for SQL Server Databases.
Operations for backup jobs
You can register backup jobs, and then perform operations such as changing backup options and deleting the backup jobs. For details on backup job operations, see Operations for Backup Jobs.

Using Protection Manager Console 6–33
Console User's Guide
Backup Options for SQL Server DatabasesYou can specify the following options when performing backup for an SQL Server database:
• Generation Name (Generation identifier)
Specify this option to back up the file system to the copy group having the specified name identifying the generation. The name identifying the generation syntax is local/remote-identifier_generation-number. If the copy type is the volume duplication function in a subsystem
Locking a copy group
You can lock the contents of a particular copy group. For details, see Locking a Copy Group.You can specify the 'Lock Mode' option (Lock, Unlock) when locking a copy group.
Resynchronizing a copy group
You can resynchronize a particular copy group. For details, see Resynchronizing a Copy Group.
Mounting a secondary volume
You can mount the secondary volume from the instance of Protection Manager Console on the backup server. For details, see Mounting a Secondary Volume.
Unmounting a secondary volume
You can unmount the secondary volume from the instance of Protection Manager Console on the backup server. For details, see Unmounting a Secondary Volume.
Viewing application information
You can view application information. For details, see Viewing Application Information.
Viewing catalog information
You can view catalog information. For details, see Viewing Catalog Information.
Viewing backup job information
You can view backup job information. For details, see Viewing Backup Job Information.
Outputting application information, catalog information, or backup job information to a file
You can output the contents displayed for application information, catalog information, and backup job information to a file (in a tab-delimited format), from the instance of Protection Manager Console on the database server.
• If the data files, various types of databases, and other objects belonging to the database instance exist across multiple volumes, backup and restoration are performed between all primary volumes and their corresponding secondary volumes.
• For systems consisting of a database server and a backup server, backup operations and restore operations can only be performed from the database server.
• With Protection Manager Console, backup and restoration can only be performed for data files. To back up and restore transaction logs, use the commands instead. For details about using commands to perform backup and restoration, see the Hitachi Protection Manager User's Guide. For details about the commands themselves, see the Hitachi Protection Manager Command Reference.
Operation Details

6–34 Using Protection Manager Console
Console User's Guide
(ShadowImage), local is displayed as the identifier. If the copy type is the volume duplication function between subsystems (TrueCopy or Universal Replicator), remote is displayed as the identifier.
The generation management MU# that is set for the primary volume is displayed as the generation number.
For details about the name identifying the generation, see the Hitachi Protection Manager User's Guide.
• Database (target database)
Specify this to back up a target database. If you back up a system database, the target database will be temporarily inaccessible, because the SQL Server temporarily stops when backup is performed.
• All (all databases)
Specify this to back up all databases, including system databases.
• Select Source Database (select the target database)
Specify this to select the target database for backup. If you want to back up all user databases, select All User Databases. If you want to back up only specific databases, choose Select and then the target databases. When you choose the target databases, specify all databases stored on the logical volume. If you do not specify all of the databases, backup will fail.
• Advanced Options (setting a user script)
If you want to use a user script to perform backup operations, click the Pre/Post Job button to open the Advanced Options dialog box, and then set backup options.
• Job Registration (registering a backup job)
You can register a backup job by clicking the Schedule button and setting schedule options. In this case, the backup is not run immediately. For details on registering a backup job, see Registering a Backup Job.
Restoration Options for SQL Server DatabasesYou can specify the following options when performing a restoration for an SQL Server database:
• Source Database
When restoring only a specific user database from the backed up user databases, select the database to restore from the list.
• Target Instance (restoring the data to a different instance)
If you cannot specify the same SQL Server instance name for the restoration destination database as the one specified as the backup source, restore the data to an SQL Server instance other than the backup source. Select an instance name for the restoration destination from the registered instance names displayed in the combo box. For details on how to restore data to a different instance, see Hitachi Protection Manager User's Guide.
• Resync Mode (Resync mode)

Using Protection Manager Console 6–35
Console User's Guide
• Resync
Performs restoration by resynchronization from the secondary volume to the primary volume. This makes the contents of the primary volume identical to those of the secondary volume. Restoration is performed with the target database detached. Once restoration is complete, the target database is attached, and then the instance is started.
For cluster configurations, the resource and disk resource containing the backed up database are taken offline, and the volume is restored. Once restoration is complete, the disk resource is brought back online, and then the cluster resource containing the database is brought back online.
• No Resync
Performs restoration of only the metafiles for the data on the primary volume, without performing restoration processing from the secondary volume to the primary volume. Use this option when restoration cannot be performed with the Resync option specified, in cases such as when the disk is corrupted, and restoration cannot be performed directly from tape to the primary volume.
• Force
Only specify this option when normal restoration cannot be performed, such as when the LDEV number has changed when the volume was switched. You can select this option only when Resync is selected for the Resync mode. When you specify this option, if the name of the copy group on the primary volume, obtained when the database server was backed up, matches the information on the database server, then forced restoration is performed. In such a case, forced restoration is performed even when the LDEV number or SERIAL number does not match that from the backup. Note that if this option is specified for a normal restoration, data might be corrupted.
• Undo
Specify this option to restore the database in standby mode. This will allow the database to be used as a read-only database, once restoration is complete. Also, a temporary file for each database will be created in the UNDO file directory.
If this option is omitted, normal restoration is performed. In this case, once restoration is complete, the database will be placed in loading status, and cannot be used.
• Check host name
Specify this option to perform restoration for a host other than the one that was backed up when either the host name has changed, or when you are using the log distribution function of Microsoft SQL Server 2000 Enterprise Edition, SQL Server 2005, or SQL Server 2008.
Note: When specifying this option, since the integrity of the host name in the backup catalog is not checked during restoration, be careful not to perform restoration for the wrong host.

6–36 Using Protection Manager Console
Console User's Guide
Example of Backup and Restore Operations for an SQL Server Database
The operations described in the following explanations are based on a system configuration consisting of a database server and a backup server, as shown in Figure 6-15: System Configuration for Performing Backup and Restore Operations for an SQL Server Database.
The prerequisites for the system in the operation example are as follows:
• The primary volume is in NTFS format. Note that volumes for database files being used as databases for SQL Server cannot be shared with the volumes used for logging.
Figure 6-15: System Configuration for Performing Backup and Restore Operations for an SQL Server Database

Using Protection Manager Console 6–37
Console User's Guide
• Primary volumes on the file server and secondary volumes on the backup server are defined as pairs, constituting a mirror configuration (use the volume replication function and RAID Manager for these settings).
• Data for which an online backup was performed from a primary volume to a secondary volume has been backed up to tape.
• A single instance default exists on database server A (server name: DBServer_A), and a service has been started.
• The instance to be backed up is under ordinary split operation.
• The VDI metafile storage directory is created on the database server and backup server.
Backing up an SQL Server Database to a Secondary VolumeThis section provides sample instructions for backing up an SQL Server database from a primary volume to a secondary volume. In this example, the database instance default of a database server DBServer_A is backed up to the secondary volume.
To back up an SQL Server database:
1. Start Protection Manager Console, and then click the Application View tab.
The Application View is displayed. For details on the displayed items, see Table 6-2: Items Displayed in the Application View.
2. Select the SQL Server database instance to be backed up. Select the following rows:
• Application: SQL Server
• Instance: default
3. In the Application View, click the Backup button.
The Backup SQL dialog box is displayed. Set the backup options in the Backup SQL dialog box.
4. Set the backup options:
• Backup Comment
Note: When usual operation is in a split state, you must resynchronize the copy group before backing up data. When usual operation is in a pair state, you do not need to resynchronize the copy group before backing up the data. After the tape backup ends, resynchronize the copy group to initialize it. For details on how to do this, see Resynchronizing a Copy Group.
Note: To see more information about the file system, in the Application View, click the Show Application Detail button. The Application Detail window is displayed, allowing you to view detailed information. For details on the displayed items, see Table 6-3: Items Displayed in the Application Detail Window.

6–38 Using Protection Manager Console
Console User's Guide
Specify this to register a backup comment in the backup catalog. The backup-comment value can be a string of up to 64 bytes, consisting of alphanumeric, special, one-byte space, and multi-byte characters. The backup comment is case-sensitive.
• Database
Specify the target database. To back up all databases including the system database, select the All radio button. To specify the database to be backed up, select the Select Source Database radio button, and then select the database to be backed up. To back up all user databases, select the All User Databases radio button. To back up only a specific database, choose the Select radio button, and then select the database to be backed up.
• Advanced Options
If you want to use a user script to perform backup operations, click the Job Script button to open the Advanced Options dialog box, and then set backup options. For more details, see Configuring Backup Options for a User Script.
• Job Registration
To perform backup immediately without registering a backup job, do not click the Schedule button. To register a backup job with the contents specified thus far, see Registering a Backup Job.
5. Click the OK button.
A confirmation dialog box for executing the backup is displayed.
6. Click the OK button to start the backup process.
Backup processing starts. Quitting Protection Manager Console during backup does not terminate the command processing. While the backup is in progress, the status is displayed in the Progress that shows how much of the volume has been copied. This does not represent the progress of the whole backup process. Copy progress might be displayed as progressing rather slowly near the 0% mark, as well as near the 100% mark. Use the copy progress status display for reference.
If you have started locally, the Progress Detail displays messages showing the progress of the backup process.
When the backup is finished, a dialog box is displayed to indicate the completion of the backup. The backup ID is displayed in this dialog box.
Note: The following special characters cannot be used for backup comments:
\ / ` | < > " * ? & ; ( )
The first character must not be a hyphen (-).

Using Protection Manager Console 6–39
Console User's Guide
Restoring an SQL Server Database to the Primary VolumeThis subsection describes how to restore an SQL Server database from a secondary volume to a primary volume.
• If the drive name of the SQL Server database is not the same as the drive name during backup, the command will fail. Before performing restore operations, view the detailed information for the application and check the drive name for the restoration target.
• You cannot perform recovery operations from Protection Manager Console. Use the drmsqlrecover command or the drmsqlrecovertool command to perform recovery. For details on these commands, see the Hitachi Protection Manager User's Guide and Hitachi Protection Manager Command Reference.
• When you restore an SQL Server database whose name has been changed, detach the SQL Server database on which the restore operations are to be performed. If the SQL Server database is not detached and is restored, restore operations will fail and the target SQL Server database might become unusable. If the SQL Server database cannot be used, detach the database and then re-execute the restore operations.
To restore an SQL Server database from the secondary volume to the primary volume:
Figure 6-16: Backup SQL Dialog Box

6–40 Using Protection Manager Console
Console User's Guide
1. Start Protection Manager Console, and then click the Backup Catalog View tab.
The Backup Catalog View is displayed. For details on the displayed items, see Table 6-4: Items Displayed in the Backup Catalog View.
2. Select the SQL Server database instance to be restored. According to the backup ID, backup time, instance, and comment, select the row of the database you want to restore.
3. Click the Restore button in the Backup Catalog View.
The Restore SQL dialog box, where you can set the restoration options, is displayed.
4. Set the restoration options:
• Source Database
To restore all user databases, select the All radio button. To restore only a specific user database, select the Select radio button, and then select the user database from the list box. Databases that were specified for backup will be displayed in the list box.
When you choose the target databases, specify all databases stored on the logical volume. If you do not specify all databases, restore operations will fail.
• Target Instance
To restore the data to an SQL Server instance that has a different name than the backup source, select the desired instance name from the registered instance names displayed in the combo box.
• Resync Mode
To perform restoration in Resync mode, select the Resync radio button. To perform restoration in No Resync mode, select the No Resync radio button.
When performing restoration in Resync mode, select the Force check box to perform restoration to the primary volume, even if it is not the same volume for which the backup was taken.
• Force
When you have selected the Resync radio button for the Resync Mode option, if you want to restore to a primary volume, even if it is not the same volume for which the backup was taken, select the Force check box. Use this option only when normal restoration cannot be performed, such as when the LDEV number has changed when the volume was switched.
• Undo
Select the Undo check box to restore the database in standby mode. When you restore the database with the Undo option specified, the database is restored in standby mode (read-only mode). This allows you to view the contents of the database. In contrast, when you
Note: To see detailed information about the SQL Server database instance, in the Backup Catalog View, click the Show Backup Detail Information button. The Backup Detail Information window is displayed, allowing you to view detailed information.

Using Protection Manager Console 6–41
Console User's Guide
restore the database without specifying the Undo option, the database is placed in loading status and you cannot view its contents.
When you want to check the contents of the restored database before performing recovery, specify the Undo option.
• Check host name
Select the Check host name check box to check the name of the host.
5. Click the OK button.
A dialog box prompting you to confirm the execution of restoration is displayed.
6. Click the OK button to start restoration processing.
Restoration processing starts. Quitting Protection Manager Console during restoration does not terminate the command processing. While the restoration is in progress, the status is displayed in the Progress that shows how much of the volume has been restored. This does not represent the progress of the whole restoration processing. Copy progress might be displayed as progressing rather slowly near the 0% mark, as well as near the 100% mark. Use the copy progress status display for reference.
If you have started locally, the Progress Detail displays messages showing the progress of the restoration processing.
When the restoration is finished, a dialog box is displayed to indicate completion of the restoration.

6–42 Using Protection Manager Console
Console User's Guide
Operations for Exchange DatabasesYou can use Protection Manager Console to perform the following operations for Exchange databases.
Figure 6-17: Restore SQL Dialog Box

Using Protection Manager Console 6–43
Console User's Guide
Table 6-11: Operations for Exchange Databases
Operation Details
BackupSee Note
Within a single storage subsystem, you can back up an Exchange database from the primary volume to the secondary volume. Backup can be performed on either a whole database or on storage group units. Back up the whole database for Exchange 2000 Server and Exchange Server 2003 Standard Edition. For Exchange 2000 Enterprise Server, Exchange Server 2003 Enterprise Edition, and Exchange Server 2007, either back up the whole database, or back it up in storage group units.Additionally, by registering a backup job, a backup operation can be executed automatically according to a specified schedule.Backup for Exchange databases is performed from the instance of Protection Manager Console on the database server. You can specify the following options when backing up an Exchange database:• Backup comment• Generation Name (Generation identifier)• Backup mode: Cold, Online, VSS• Truncate Transaction Log• Cluster Option: Offline, Online• Source Storage Group: All, Select• Eventlog checking before backup (checking event log data)• Advanced Options (setting a user script)• Job Registration (registering a backup job)For details about the options that can be specified for backup, see Backup Options for Exchange Databases.
RestoreSee Note
You can restore an Exchange database from the primary volume to the secondary volume. Restoration can be performed on a whole database, on storage group units, or on information store units.During restoration, data is replicated by resynchronization, in which the contents of the primary volume are made identical to the contents of the secondary volume. In restoration processing, the file system to be restored is unmounted, and then is mounted again once processing is complete.For a cluster configuration, the disk resource to be backed up is taken offline, and the volume is restored. Once restoration is complete, the disk resource is brought back online.Exchange database restoration is performed from Protection Manager Console on the database server. You can specify the following options when restoring an Exchange database:• Source Storage Group / Information Store: All, Select• Roll Forward• ForceFor details about the options that can be specified for restoration, see Restoration Options for Exchange Databases.
Operations for backup jobs
You can register backup jobs, and then perform operations such as changing backup options and deleting the backup jobs. For details on backup job operations, see Operations for Backup Jobs.
Locking a copy group
You can lock the contents of a particular copy group. For details, see Locking a Copy Group.You can specify the 'Lock Mode' option (Lock, Unlock) when locking a copy group.

6–44 Using Protection Manager Console
Console User's Guide
Backup Options for Exchange DatabasesYou can specify the options shown below when performing a backup for an Exchange database.
Protection Manager Console cannot identify the type of Exchange Server product in use. Because of this, if you specify an option that is not supported by a specific Exchange Server, a command error might occur in Protection Manager Copy Controller.
• Generation Name (Generation identifier)
Specify this option to back up the file system to the copy group that has the specified name identifying the generation. The name identifying the generation syntax is local/remote-identifier_generation-number". If the copy type is the volume duplication function in a subsystem (ShadowImage), local is displayed as the identifier. If the copy type is the volume duplication function between subsystems (TrueCopy or Universal Replicator), remote is displayed as the identifier.
The generation management MU# that is set for the primary volume is displayed as the generation number.
For details about the name identifying the generation, see the Hitachi Protection Manager User's Guide.
• Backup Mode
Resynchronizing a copy group
You can resynchronize a particular copy group. For details, see Resynchronizing a Copy Group.
Mounting a secondary volume
You can mount the secondary volume from the instance of Protection Manager Console on the backup server. For details, see Mounting a Secondary Volume.
Unmounting a secondary volume
You can unmount the secondary volume from the instance of Protection Manager Console on the backup server. For details, see Unmounting a Secondary Volume.
Viewing application information
You can view application information. For details, see Viewing Application Information.
Viewing catalog information
You can view catalog information. For details, see Viewing Catalog Information.
Viewing backup job information
You can view backup job information. For details, see Viewing Backup Job Information.
Outputting application information, catalog information, or backup job information to a file
You can output the contents displayed for application information, catalog information, and backup job information to a file (in a tab-delimited format), from the instance of Protection Manager Console on the database server.
Note: For systems consisting of a database server and a backup server, backup operations and restore operations can only be performed from the database server.
Operation Details
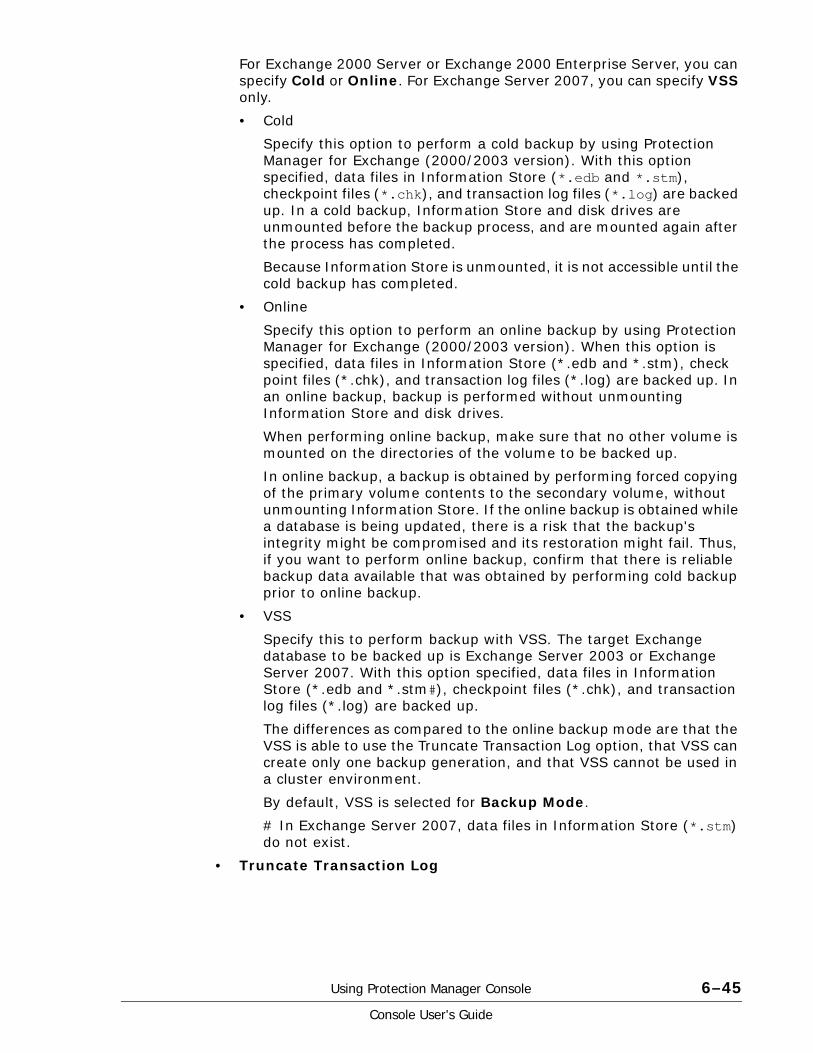
Using Protection Manager Console 6–45
Console User's Guide
For Exchange 2000 Server or Exchange 2000 Enterprise Server, you can specify Cold or Online. For Exchange Server 2007, you can specify VSS only.
• Cold
Specify this option to perform a cold backup by using Protection Manager for Exchange (2000/2003 version). With this option specified, data files in Information Store (*.edb and *.stm), checkpoint files (*.chk), and transaction log files (*.log) are backed up. In a cold backup, Information Store and disk drives are unmounted before the backup process, and are mounted again after the process has completed.
Because Information Store is unmounted, it is not accessible until the cold backup has completed.
• Online
Specify this option to perform an online backup by using Protection Manager for Exchange (2000/2003 version). When this option is specified, data files in Information Store (*.edb and *.stm), check point files (*.chk), and transaction log files (*.log) are backed up. In an online backup, backup is performed without unmounting Information Store and disk drives.
When performing online backup, make sure that no other volume is mounted on the directories of the volume to be backed up.
In online backup, a backup is obtained by performing forced copying of the primary volume contents to the secondary volume, without unmounting Information Store. If the online backup is obtained while a database is being updated, there is a risk that the backup's integrity might be compromised and its restoration might fail. Thus, if you want to perform online backup, confirm that there is reliable backup data available that was obtained by performing cold backup prior to online backup.
• VSS
Specify this to perform backup with VSS. The target Exchange database to be backed up is Exchange Server 2003 or Exchange Server 2007. With this option specified, data files in Information Store (*.edb and *.stm#), checkpoint files (*.chk), and transaction log files (*.log) are backed up.
The differences as compared to the online backup mode are that the VSS is able to use the Truncate Transaction Log option, that VSS can create only one backup generation, and that VSS cannot be used in a cluster environment.
By default, VSS is selected for Backup Mode.
# In Exchange Server 2007, data files in Information Store (*.stm) do not exist.
• Truncate Transaction Log

6–46 Using Protection Manager Console
Console User's Guide
Select the Truncate Transaction Log check box to delete the committed transaction log (the one committed to the database) after completing the backup. Deleting the transaction log file frees disk space. This option cannot be selected for the online backup mode.
This option can be specified for cold backup or VSS backup. When the backup mode is cold backup and circular logging is in use, this option is ignored. For details on circular logging, see the Exchange Server manual.
This option cannot be selected when circular logging is in use.
• Cluster Option
Specify whether to take the cluster resources offline, or to keep them online to perform backup in a cluster environment. This option can only be selected for cold backup mode.
• Offline
Specify this option to take the cluster resources on physical disks offline for backup.
• Online
Specify this option to keep the cluster resources on physical disks online for backup.
• Source Storage Group
When backing up a specific storage group, select it from a list of storage groups. Backups are performed in physical volume (LU) units. When there are multiple storage groups on one physical volume (LU), specify all storage groups. When you choose the target storage groups, specify all storage groups stored on the logical volume. If you do not specify all storage groups, backup will fail. You cannot specify this option if you are using Exchange 2000 Server.
• Eventlog checking before backup
Specify this option to search the Exchange Server event logs for the purpose of determining whether there are any events indicating a corrupted database.
The target event log files to be retrieved are ones that were recorded after the last backup for the Exchange database. If the result of the previous backup does not exist, all the recorded event log data is retrieved. Retrieval of event log data is performed before resynchronizing a pair. If an event indicating a corrupted database is detected, the backup processing terminates with an error.
Protection Manager determines that the database is corrupt when the following event is detected:
• Event category: Application
• Type: Error
• Source: ESE
• Event ID: No limitation
• Character string being included: "-1018", "-1019", or "-1022"
• Advanced Options (setting a user script)

Using Protection Manager Console 6–47
Console User's Guide
If you want to use a user script to perform backup operations, click the Pre/Post Job button to open the Advanced Options dialog box, and then set backup options.
• Job Registration (registering a backup job)
You can register a backup job by clicking the Schedule button and setting schedule options. In this case, the backup is not run immediately. For details on registering a backup job, see Registering a Backup Job.
Restoration Options for Exchange DatabasesYou can specify the options shown below when performing a restoration for an Exchange database.
Protection Manager Console cannot identify the type of Exchange Server product in use. Because of this, if you specify an option that is not supported by a specific Exchange Server, a command error might occur in Protection Manager Copy Controller.
• Source Storage Group / Information Store (target storage group or information store)
When restoring specific storage groups or information stores, specify the objects to be restored from the Source Storage Group / Information Store list. If you restore in units of information stores, the following conditions must be met:
• VSS is selected for Backup Mode when backup is performed.
• Roll Forward is selected when restoration is performed.
For details on the procedure when restoration is performed in units of information stores, see the Hitachi Protection Manager User's Guide. This option is available for Exchange Server 2003 or Exchange Server 2007 only.
• Roll Forward (recovery)
Specify this option to perform a roll forward recovery. Transaction logs subsequent to the backup are committed during the restoration process, and the database will be restored to the most recent status. However, to perform a roll forward recovery, all the transaction logs, from when the backup was performed through to when Roll Forward is executed, must be stored normally on the Exchange Server.
The Roll Forward check box is selected by default. If this check box is cleared, the database is restored to the state it was when the backup was obtained.
• Force
Only specify this option when normal restoration cannot be performed, such as when the LDEV number has changed when the volume was switched. When you specify this option, if the name of the copy group on the primary volume, obtained when the database server was backed up, matches the information on the database server, then forced restoration is performed. In such a case, forced restoration is performed

6–48 Using Protection Manager Console
Console User's Guide
even when the LDEV number or SERIAL number does not match that from the backup. Note that if this option is specified for a normal restoration, data might be corrupted.
Example of Backup and Restore Operations for an Exchange Database
The operations described in the following explanations are based on a system configuration consisting of a database server and a backup server, as shown in the following figure.
Figure 6-18: System Configuration for Performing Backup and Restore Operations for an Exchange Database

Using Protection Manager Console 6–49
Console User's Guide
The prerequisites for the system shown in Figure 6-18: System Configuration for Performing Backup and Restore Operations for an Exchange Database are:
• The primary volumes are in NTFS format.
• Primary volumes and secondary volumes are defined as pairs, constituting a mirror configuration on the database server and backup server (use the volume replication function and RAID Manager for these settings).
• The Exchange Server used in the system is Exchange Server 2003 Enterprise Edition.
• There are two storage groups STR1 and STR2 on the database server A (server name: DBServer_A), and the service is active.
• Storage groups to be backed up are under ordinary split operation.
The prerequisites for the locations of volumes and files are as follows:
• Information Store and transaction logs are stored in separate volumes.
• The configuration of primary volumes and secondary volumes are noted in Table 6-12: Configuration of Primary Volumes and Secondary Volumes.
Table 6-12: Configuration of Primary Volumes and Secondary Volumes
Primary Volume (drive to mount) Objects to Store Secondary Volume
(drive to mount)
Primary volume 1 (D:) Mail box store for a storage group STR1.
Secondary volume 1 (U:)
Primary volume 2 (E:) Public folder store for a storage group STR1.
Secondary volume 2 (V:)
Primary volume 3 (F:) Transaction log file and check point file for a storage group STR1.
Secondary volume 3 (W:)
Primary volume 4 (G:) Mail box store for a storage group STR2.
Secondary volume 4 (X:)
Primary volume 5 (H:) Public folder store for a storage group STR2.
Secondary volume 5 (Y:)
Primary volume 6 (I:) Transaction log file and check point file for a storage group STR2.
Secondary volume 6 (Z:)

6–50 Using Protection Manager Console
Console User's Guide
Backing up Storage Groups to a Secondary Volume (for Cold Backup)
This subsection describes an example of using Protection Manager for Exchange (2000/2003 version) to perform, from a primary volume to a secondary volume, a cold backup of storage groups in an Exchange database . In this example, storage groups STR1 and STR2 in a database server DBSServer_A are backed up on the secondary volume.
To back up storage groups:
1. Start the instance of Protection Manager Console on the database server, and click the Application View tab.
The Application View is displayed. For details on the displayed items, see Table 6-2: Items Displayed in the Application View.
2. Select the Exchange database instance to be backed up. Select the following rows:
• Application: Exchange
• Instance: Storage Groups
3. In the Application View, click the Backup button.
The Backup Exchange dialog box, where you can set the backup options, is displayed.
4. Set the backup options:
• Backup Comment
Specify this to register a backup comment in the backup catalog. The backup-comment value can be a string of up to 64 bytes, consisting of alphanumeric, special, one-byte space, and multi-byte characters. The backup comment is case-sensitive.
The following special characters cannot be used for backup comments:
\ / ` | < > " * ? & ; ( )
The first character must not be a hyphen (-).
• Generation Name
Specify this option to back up the file system to the copy group that has the specified name identifying the generation.
• Backup Mode
Note: When usual operation is in a split state, you must resynchronize the copy group before backing up data. When usual operation is in a pair state, you do not need to resynchronize the copy group before backing up the data. After the tape backup ends, resynchronize the copy group to initialize it. For details on how to do this, see Resynchronizing a Copy Group.
Note: To see detailed information about the Exchange database instance, in the Application View, click the Show Application Detail button. The Application Detail window is displayed, allowing you to view detailed information. For details on the displayed items, see Table 6-3: Items Displayed in the Application Detail Window.

Using Protection Manager Console 6–51
Console User's Guide
Set the backup mode. For this example, select the Cold radio button to perform cold backup.
• Truncate Transaction Log
Select the check box to delete committed transaction logs (committed to the database) at the completion of backup.
• Cluster Option
Set the cluster option. Select the Offline radio button to take the cluster resources on a physical disk offline for backup; select the Online radio button to keep the cluster resources on a physical disk online for backup.
• Source Storage Group
Select storage groups to back up. Select the All radio button to backup all storage groups of the Exchange database instance. Select the Select radio button to backup specific storage groups only, and then select the storage groups to back up from the list box.
Specified storage groups are to be backed up in this example, so select the Select radio button, and select the storage groups STR1 and STR2 from the list box.
• Eventlog checking before backup
Select this check box to search the Exchange Server event logs for the purpose of determining whether there are any events indicating that a corrupted database.
• Advanced Options
If you want to use a user script to perform backup operations, click the Job Script button to open the Advanced Options dialog box, and then set backup options. For more details, see Configuring Backup Options for a User Script.
• Job Registration
To perform backup immediately without registering a backup job, do not click the Schedule button. To register a backup job with the contents specified thus far, see Registering a Backup Job.
5. Click the OK button.
A confirmation dialog box for executing the backup is displayed.
6. Click the OK button to start the backup process.
Backup processing starts. Quitting Protection Manager Console during backup does not terminate the command processing.
While the backup is in progress, the status is displayed in the Progress that shows how much of the volume has been copied. This does not represent the progress of the whole backup process. Copy progress might be displayed as progressing rather slowly near the 0% mark, as well as near the 100% mark. Use the copy progress status display for reference.
If you have started locally, the Progress Detail displays messages showing the progress of the backup process.

6–52 Using Protection Manager Console
Console User's Guide
When the backup is finished, a dialog box is displayed to indicate completion of the backup. The backup ID is displayed in this dialog box.
Backing up a Storage Group to a Secondary Volume (for Online Backup)
This subsection describes an example of using Protection Manager for Exchange (2000/2003 version) to perform, from a primary volume to a secondary volume, an online backup on storage groups on an Exchange database. In this example, storage groups STR1 and STR2 in a database server DBServer_A are backed up on the secondary volume.
To back up storage groups:
Figure 6-19: Backup Exchange Dialog Box (for Cold Backup)
Note: When usual operation is in a split state, you must resynchronize the copy group before backing up data. When usual operation is in a pair state, you do not need to resynchronize the copy group before backing up the data. After the tape backup ends, resynchronize the copy group to initialize it. For details on how to do this, see Resynchronizing a Copy Group.

Using Protection Manager Console 6–53
Console User's Guide
1. Start the instance of Protection Manager Console on the database server, and click the Application View tab.
The Application View is displayed. For details on the displayed items, see Table 6-2: Items Displayed in the Application View.
2. Select the Exchange database instance to be backed up. Select the following rows:
• Application: Exchange
• Instance: Storage Groups
3. In the Application View, click the Backup button.
The Backup Exchange dialog box, where you can set the backup options, is displayed.
4. Set the backup options:
• Backup Comment
Specify this to register a backup comment in the backup catalog. The backup-comment value can be a string of up to 64 bytes, consisting of alphanumeric, special, one-byte space, and multi-byte characters. The backup comment is case-sensitive.
The following special characters cannot be used for backup comments:
\ / ` | < > " * ? & ; ( )
The first character must not be a hyphen (-).
• Generation Name
Specify this option to back up the file system to the copy group that has the specified name identifying the generation.
• Backup Mode
Set the backup mode. For this example, select the Online radio button to perform online backup.
• Source Storage Group
Select storage groups to back up. Select the All radio button to backup all storage groups of the Exchange database instance. Select the Select radio button to backup specific storage groups only, and then select the storage groups from the list box.
Specific storage groups are to be backed up in this example, so select the Select radio button, and then select the storage groups STR1 and STR2 from the list box.
• Eventlog checking before backup
Select this check box to search the Exchange Server event logs for the purpose of determining whether there are any events indicating a corrupted database.
Note: To see more detailed information about the Exchange database instance, in the Application View, click the Show Application Detail button. The Application Detail window is displayed, allowing you to view detailed information. For details on the displayed items, see Table 6-3: Items Displayed in the Application Detail Window.

6–54 Using Protection Manager Console
Console User's Guide
• Advanced Options
If you want to use a user script to perform backup operations, click the Job Script button to open the Advanced Options dialog box, and then set backup options. For more details, see Configuring Backup Options for a User Script.
• Job Registration
To perform backup immediately without registering a backup job, do not click the Schedule button. To register a backup job with the contents specified thus far, see Registering a Backup Job.
5. Click the OK button.
A confirmation dialog box for executing the backup is displayed.
6. Click the OK button to start the backup process.
Backup processing starts. Quitting Protection Manager Console during backup does not terminate the command processing.
While the backup is in progress, the status is displayed in the Progress that shows how much of the volume has been copied. This does not represent the progress of the whole backup process. Copy progress might be displayed as progressing rather slowly near the 0% mark, as well as near the 100% mark. To confirm that all volumes are copied, check the Progress.
If you have started locally, the Progress Detail displays messages showing the progress of the backup process.
When the backup is finished, a dialog box is displayed to indicate completion of the backup. The backup ID is displayed in this dialog box.

Using Protection Manager Console 6–55
Console User's Guide
Backing up a Storage Group to a Secondary Volume (for VSS Backup)
This subsection describes an example of using VSS to back up, from a primary volume to a secondary volume, a storage group of Exchange Server 2003 or Exchange Server 2007. In this example, storage groups STR1 and STR2 in a database server DBServer_A are backed up on the secondary volume.
To back up a storage group:
1. Start the instance of Protection Manager Console on the database server, and click the Application View tab.
Figure 6-20: Backup Exchange Dialog Box (for Online Backup)
Note: When usual operation is in a split state, you must resynchronize the copy group before backing up data. When usual operation is in a pair state, you do not need to resynchronize the copy group before backing up the data. After the tape backup ends, resynchronize the copy group to initialize it. For details on how to do this, see Resynchronizing a Copy Group.
6–56 Using Protection Manager Console
Console User's Guide
The Application View is displayed. For details on the displayed items, see Table 6-2: Items Displayed in the Application View.
2. Select the Exchange database instance to be backed up. Select the following rows:
• Application: Exchange
• Instance: Storage Groups
3. In the Application View, click the Backup button.
The Backup Exchange dialog box, where you can set the backup options, is displayed.
4. Set the backup options:
• Backup Comment
Specify this to register a backup comment in the backup catalog. The backup-comment value can be a string of up to 64 bytes, consisting of alphanumeric, special, one-byte space, and multi-byte characters. The backup comment is case-sensitive.
The following special characters cannot be used for backup comments:
\ / ` | < > " * ? & ; ( )
The first character must not be a hyphen (-).
• Generation Name
Specify this option to back up the file system to the copy group that has the specified name identifying the generation.
• Backup Mode
Set the backup mode. For this example, select the VSS radio button to perform VSS backup.
• Truncate Transaction Log
Select the Delete Transaction Log check box to delete the committed transaction log (committed to the database) after completing the backup.
• Source Storage Group
Select storage groups to back up. Select the All radio button to backup all storage groups of the Exchange database instance. Select the Select radio button to backup specific storage groups only, and then select the storage groups from the list box.
Specific storage groups are to be backed up in this example, so select the Select radio button, and then select the storage groups STR1 and STR2 from the list box.
• Eventlog checking before backup
Note: To see detailed information about the Exchange database instance, in the Application View, click the Show Application Detail button. The Application Detail window is displayed, allowing you to view detailed information. For details on the displayed items, see Table 6-3: Items Displayed in the Application Detail Window.

Using Protection Manager Console 6–57
Console User's Guide
Select this check box to search the Exchange Server event logs for the purpose of determining whether there are any events indicating a corrupted database.
• Advanced Options
If you want to use a user script to perform backup operations, click the Job Script button to open the Advanced Options dialog box, and then set backup options. For more details, see Configuring Backup Options for a User Script.
• Job Registration
To perform backup immediately without registering a backup job, do not click the Schedule button. To register a backup job with the contents specified thus far, see Registering a Backup Job.
5. Click the OK button.
A confirmation dialog box for executing the backup is displayed.
6. Click the OK button to start the backup process.
Backup processing starts. Quitting Protection Manager Console during backup does not terminate the command processing.
If you have started locally, the Progress Detail displays messages showing the progress of the backup process.

6–58 Using Protection Manager Console
Console User's Guide
The above figure shows an example of Protection Manager for Exchange (2000/2003 version).
Restoring Storage Groups to a Primary VolumeThis subsection describes an example of restoring Exchange database storage groups from a secondary volume to a primary volume by resynchronization. This example restores a backup for storage group STR1.
To restore storage groups:
1. Start Protection Manager Console on the database server, and click the Backup Catalog View tab.
The Backup Catalog View is displayed. For details on the displayed items, see Table 6-4: Items Displayed in the Backup Catalog View.
Figure 6-21: Backup Exchange Dialog Box (for VSS Backup)

Using Protection Manager Console 6–59
Console User's Guide
2. Select the Exchange database instances to restore. According to the backup ID, backup time, instance, and comment, select the row of the database you want to restore.
3. In the Backup Catalog View, click the Restore button.
The Restore Exchange dialog box is displayed. Specify the restore options in the Restore Exchange dialog box.
4. Set the restoration options:
• Source Storage Group / Information Store
Select storage groups and information stores to restore. Select the All radio button to restore all storage groups of the Exchange database instance. Select the Select radio button to restore specific storage groups and information stores, and then select the storage groups and information stores from the list box.
Specific storage groups are to be restored in this example, so select the Select radio button, and then select the storage group STR1 from the list box.
• Roll Forward
Select this check box to perform a roll forward recovery. Make sure that you select the check box when restoring the data in units of information stores.
• Force
Select this check box when restoring to a primary volume even if the volume is not the same volume as the backup source primary volume. Use this option only when normal restoration cannot be performed, such as when the LDEV number has changed when the volume was switched.
5. Click the OK button.
A dialog box prompting you to confirm the execution of restoration is displayed.
6. Click the OK button to start the restoration process.
Restoration processing starts. Quitting Protection Manager Console during restoration does not terminate the command processing.
While the restoration is in progress, the status is displayed in the Progress that shows how much of the volume has been restored. This does not represent the progress of the whole restoration process. Copy progress might be displayed as progressing rather slowly near the 0% mark, as well as near the 100% mark. To confirm that the restoration finishes, check the Progress.
Note: To see detailed information about the Exchange database instance, in the Backup Catalog View, click the Show Backup Detail Information button. The Backup Detail Information window is displayed, allowing you to view detailed information.
Note: When you select the storage group check box, all the subordinate information store check boxes are also selected. If you restore the data in units of information stores, clear the check boxes for the information stores that do not need to be restored.

6–60 Using Protection Manager Console
Console User's Guide
If you have started locally, the Progress Detail displays messages showing the progress of the restoration process.
When the restoration is finished, a dialog box is displayed to indicate completion of the restoration.
Figure 6-22: Restore Exchange Dialog Box
Figure 6-23: Restore Exchange Dialog Box (When Backup Mode is VSS)

Using Protection Manager Console 6–61
Console User's Guide
Operations for Backup JobsIf you want a backup to be executed automatically according to a specified schedule, register a backup job using Protection Manager Console. After registering backup jobs, you can run them immediately, change relevant options (backup options and schedule options), delete the backup jobs, or view their execution results.
Registering a Backup JobAfter you register a backup job, the backup is executed automatically according to the specified schedule. The maximum number of backup jobs that can be registered is 500, or the number specified in MAX_JOB_REGISTRATION_COUNT of the schd.conf file. For details on MAX_JOB_REGISTRATION_COUNT, see MAX_JOB_REGISTRATION_COUNT.
Setting up Backup Options
To set up backup options in the backup dialog box:
1. Start Protection Manager Console on the file server or database server and click the Application View tab.
The Application View is displayed. For details on the displayed items, see Table 6-2: Items Displayed in the Application View.
2. From the list in the Application View, select a record you want to back up, and click the Backup button.
The Backup dialog box is displayed. Set the backup options in the Backup dialog box.
3. Click the Schedule button of the Job Registration option.
The Schedule Option dialog box is displayed.
Note: The dialog box for setting up backup options differs depending on the application (file system, SQL Server database, or Exchange database) in use. In the procedures below, these backup option setup dialog boxes are generically called backup dialog boxes.
Note: The backup options to be set up differ depending on the application. For details on which backup options to set, see the backup procedure for the relevant application.

6–62 Using Protection Manager Console
Console User's Guide
Setting up Schedule Options
To set up schedule options in the Schedule Option dialog box:
1. Set up common schedule options.
The following common schedule options must be set up for all types:
• Schedule Type
Select one of the following schedule types:
Daily: Run at the specified time each day.
Weekly: Run at the specified day and time each week.
Monthly: Run at the specified date/time each month. If you specify the date as the 29th, 30th, or 31st, and that date does not exist in the month where the schedule is executed, the specified backup job is not executed.
Day of week in month: Run every time at the specified time, day, and week in the specified month.
One time only: Run one time only at the specified date/time. Once a schedule is executed for a backup job for which One time only is specified, the backup job cannot be reused.
• Start Time
Specify the backup start time. Use the system time of the file server or database server to specify the backup start time.
If backup jobs have been registered in a time zone in which the system time is adjusted for daylight saving time, the system operates as follows:
Figure 6-24: Backup Dialog Box (File System)

Using Protection Manager Console 6–63
Console User's Guide
— Backup jobs scheduled in a time zone in which the time jumps forward at the beginning of daylight saving time (for example, from 2:00 a.m. to 3:00 a.m.) are not executed.
— Backup jobs scheduled in a time zone in which the time is repeated at the end of daylight saving time (for example, from 1:00 a.m. to 2:00 a.m.) are executed twice.
Therefore, to ensure that normal periodic backup is performed by using Protection Manager Console, specify a backup start time that does not fall in a time period in which the system time is adjusted.
2. Set up individual schedule options.
The schedule options for each schedule type are shown in the table below. The settings differ depending on the setting of the Schedule Type option.
Table 6-13: Schedule Option for Each Schedule Type
3. Click the OK button.
You return to the backup dialog box.
Schedule type Schedule option Contents
Daily None Not applicable
Weekly Day(s) of week
Select a day of the week (every week) when you want the backup to run. Multiple days of the week can be selected.
Monthly Day(s) of month
Select a day of the month (every month) when you want the backup to run. Multiple days of the month can be selected.
Day of week in month
Select Month Select the month when you want the backup to run. Selecting a month causes backup to run only in the selected month. Selecting All causes the backup to run in all months.
Select Week Select the week when you want the backup to run.
Select Day Select the day of the week when you want the backup to run. Multiple days of the week can be selected.
One time only Start Date Specify the day when you want the backup to run.

6–64 Using Protection Manager Console
Console User's Guide
Figure 6-25: Schedule Option Dialog Box (Daily)
Figure 6-26: Schedule Option Dialog Box (Weekly)

Using Protection Manager Console 6–65
Console User's Guide
Figure 6-27: Schedule Option Dialog Box (Monthly)
Figure 6-28: Schedule Option Dialog Box (Day of Week in Month)

6–66 Using Protection Manager Console
Console User's Guide
Registering a Backup Job
To register a backup job in the Backup dialog box:
1. Confirm that the Enable Registration checkbox of the Job Registration option is selected.
2. Click the OK button.
The backup job is registered. The registered backup job can be checked in the Backup Job View.
Running a Backup Job ImmediatelyThe following describes how to run a backup job immediately rather than at the scheduled time.
For a backup job whose schedule type was specified as a type other than One time only, an immediate execution of the job cannot be performed when the job is being executed. Wait until the job finishes, and then retry the operation.
To run a backup job immediately (rather than at a later, scheduled time):
1. Start Protection Manager Console and click the Backup Job View tab.
Figure 6-29: Schedule Option Dialog Box (One Time Only)
Note: If the Enable Registration check box is cleared, backup jobs are not registered.
Note: If a schedule is executed for a backup job whose schedule type was specified as One time only, an immediate execution cannot be performed for that job whether the job is being executed or has been completed.

Using Protection Manager Console 6–67
Console User's Guide
The Backup Job View is displayed. For details on the displayed items, see Items Displayed in the Backup Job View.
2. From the list in the Backup Job View, select a schedule you want to run immediately, and click the Run Immediately button.
A confirmation dialog box for executing the backup is displayed.
3. Click the OK button to start the backup processing.
Backup processing starts. Quitting Protection Manager Console during backup does not terminate the command processing.
Changing Options for a Backup JobThe following describes how to change the backup and schedule options after registering backup jobs.
For a backup job whose schedule type has been set to a type other than One time only, its options cannot be changed while the job is running. Wait until the job finishes, and then retry the operation.
To change backup and schedule options after registering backup jobs:
1. Start Protection Manager Console and click the Backup Job View tab.
The Backup Job View is displayed. For details on the displayed items, see Items Displayed in the Backup Job View.
2. From the list in the Backup Job View, select a backup job whose options you want to change, and then click the Modify button.
Figure 6-30: Example of the Backup Job View
• If a schedule is executed for a backup job whose schedule type was specified as One time only, its options cannot be changed regardless of whether the job is running or it has already finished.
• The dialog box for changing backup options differs depending on the application (file system, SQL Server database, or Exchange database) in use. In the procedures below, these dialog boxes are generically called the Backup Job Update dialog box.

6–68 Using Protection Manager Console
Console User's Guide
The Backup Job Update dialog box is displayed. In this dialog box, you can change backup options.
3. Click the Schedule button of the Modify Schedule option.
The Schedule Option dialog box is displayed.
4. Set up schedule options.
For details on how to set up schedule options, see Setting up Schedule Options.
5. After changing schedule options, click the OK button in the Schedule Option dialog box.
You return to the Backup Job Update dialog box.
6. Click the OK button.
The options relevant to the backup job are changed. You can check the changed backup job options in the Backup Job View.
Deleting a Backup JobThe following describes how to delete a backup job that is no longer required.
To delete an unnecessary backup job:
1. Start Protection Manager Console and click the Backup Job View tab.
Note: The backup options to be set up differ depending on the application. For details on the backup options to be set up in the Backup dialog box, see the backup procedures for the relevant application.
Figure 6-31: Backup Job Update Dialog Box (File System)
Note: You cannot delete a backup job that is already being executed. Wait until the backup job finishes, and then retry the operation.

Using Protection Manager Console 6–69
Console User's Guide
The Backup Job View is displayed. For details on the displayed items, see Items Displayed in the Backup Job View.
2. From the list in the Backup Job View, select a backup job you want to delete, and click the Delete button.
A dialog box is displayed, asking if you are sure you want to delete the backup job.
3. If you want to delete the backup job, click the OK button.
Viewing the Execution Results of a Backup JobThe following describes how to view the execution results of a backup job in more detail than the results displayed in the Backup Job View. The maximum number of backup job execution results that can be displayed is 64 (or, the number specified in MAX_JOB_RESULT_COUNT of the schd.conf). For details on MAX_JOB_RESULT_COUNT, see MAX_JOB_RESULT_COUNT.
To view backup job execution results in more detail than those displayed in the Backup Job View:
1. Start Protection Manager Console and click the Backup Job View tab.
The Backup Job View is displayed. For details on the displayed items, see Items Displayed in the Backup Job View.
2. From the Backup Job View, select a backup job you want to view, and click the Show Backup Job Results button.
The Backup Job Result Details window is displayed. For details on the displayed items, see Items Displayed in the Backup Job Result Details Window.
3. From the Executed Job List, select the Backup ID whose execution result you want to view, and click the Show Job Output button.
Using the backup ID as a key, extract a list of logs. The results are displayed in the Job Output field.
The execution result of the specified Backup ID is displayed in the Job Output field.

6–70 Using Protection Manager Console
Console User's Guide
Locking a Copy GroupYou can use Protection Manager Console to lock the contents of a particular copy group. You can also unlock a copy group that has already been locked. Protection Manager automatically selects the backup-destination secondary volume when executing backup. However, the lock function enables you to lock the contents of a particular secondary volume and continue backup using other secondary volumes only.
The following figure illustrates backup of multiple generations when a particular secondary volume has been locked. In this example, generation 1 is obtained, then secondary volume 1 is locked, and then the backed-up contents of generation 1 are locked. Thus, generation 4 and subsequent generations are backed up using the remaining secondary volumes (secondary volumes 2 and 3).
Figure 6-32: Example of the Backup Job Result Details Window

Using Protection Manager Console 6–71
Console User's Guide
To lock a copy group:
1. Start Protection Manager Console, and then click the Backup Catalog View tab.
The Backup Catalog View is displayed. For details on the displayed items, see Table 6-4: Items Displayed in the Backup Catalog View.
2. Select the backup ID corresponding to the copy group to be locked.
3. Click the Lock button in the Backup Catalog View.
The Lock dialog box, where you can set the lock options, is displayed.
4. Set the lock options:
• To enable lock mode, select Lock Mode.
• To lock a copy group, select the Lock radio button. (If the copy group is currently unlocked, the Lock radio button is selected by default.)
• To unlock a copy group that is currently locked, select Unlock.
5. Click the OK button.
A confirmation dialog box for execution of the lock process is displayed.
6. Click the OK button to start the lock process.
Lock processing starts. Quitting Protection Manager Console during lock processing does not terminate the command processing. When the lock processing is finished, a dialog box is displayed.
Figure 6-33: Backup of Multiple Generations When a Secondary Volume Has Been Locked
Note: If - is displayed in Lock Status, the Lock radio button is selected by default.

6–72 Using Protection Manager Console
Console User's Guide
Resynchronizing a Copy GroupYou can use Protection Manager Console to resynchronize a copy group.
To resynchronize a copy group:
1. Start Protection Manager Console, and then click the Backup Catalog View tab.
The Backup Catalog View is displayed. For details on the displayed items, see Table 6-4: Items Displayed in the Backup Catalog View.
2. Select the backup ID corresponding to the copy group to be resynchronized.
3. Click the Resync button in the Backup Catalog View.
The Confirmation to Resync dialog box is displayed. This dialog box displays details on performing resynchronization.
4. Confirm the execution details, then click the OK button.
Notes on performing resynchronization are displayed. Read these notes.
5. Click the OK button to perform resynchronization.
Resynchronization processing starts. Quitting Protection Manager Console during resynchronization does not terminate the command processing. During resynchronization, the resynchronization progress status is displayed. When the resynchronization is finished, a dialog box is displayed.
Figure 6-34: Lock Dialog Box

Using Protection Manager Console 6–73
Console User's Guide
Mounting and Unmounting a Secondary VolumeTo reference files and databases on a secondary volume, it is necessary to mount the secondary volume on the backup server. To perform backup or restoration in an application server, the secondary volume must be unmounted.
This section describes how to mount and unmount the secondary volume by using Protection Manager Console. This section also describes how to back up a mounted secondary volume to tape.
Mounting a Secondary VolumeTo mount a secondary volume, you must determine the name of the copy group to which that volume belongs. Use the following instructions to determine the name of the copy group.
To confirm the name of the copy group:
1. Display the Backup Catalog View from the Protection Manager Console on the file server or database server.
Figure 6-35: Confirmation to Resync Dialog Box
Note: You cannot perform the following operations on a volume mounted by Protection Manager Console:
• Display application information on the backup server. You cannot view application information about the secondary volume on the backup server.
• Use the Protection Manager Copy Controller command (for example, the drmmediabackup command) to back up data to tape.
• Use the Protection Manager for SQL command (the drmsqlrestore, drmsqlrecover, and drmsqlrecovertool commands) to restore or recover an SQL Server database.
• If you have mounted a secondary volume and attached databases in order to view the contents of the files and databases on the secondary volume, then detach the databases and unmount the secondary volume after you finish viewing the contents.

6–74 Using Protection Manager Console
Console User's Guide
For details on the displayed items, see Table 6-4: Items Displayed in the Backup Catalog View.
2. In the Backup Catalog View, select the record of the Backup ID for the target file system or database instance, and display the Backup Detail Information window.
3. Check the copy group name in the Pair Name column of the list.
To mount a secondary volume in a dynamic disk configuration in a VxVM environment, you must create, in advance, a definition file for mounting copy groups. To automatically mount all the secondary volumes in a dynamic disk configuration, specify one of the copy groups that make up the relevant disk group. An error occurs if you specify two or more copy groups.
For details about definition files for mounting copy groups, see the Hitachi Protection Manager User's Guide.
At this point, perform the following operations from the instance of Protection Manager Console on the backup server.
To mount a secondary volume:
1. Start the instance of Protection Manager Console on the backup server.
When Protection Manager Console is started, sometimes a message is displayed at the top of the tab-name window or the KAVX11005-W message is output. However, if setup has completed, there is no problem, so continue to carry out the following procedure.
2. Choose Action, and then Mount.
The Mount dialog box, where you can set the secondary volume to mount, is displayed.
3. Set the secondary volume to mount:
• Pair Name
Enter the name of the copy group belonging to the secondary volume to be mounted.
• Mount Point
Use an absolute path name to specify the mount point directory to which the secondary volume is to be mounted. Specify the drive letter, or the absolute path from the drive letter. Use characters that can be used for directory names in Windows (you cannot use space characters).
— If you specify a drive letter, unused drive names are searched for, in alphabetical order beginning with the specified drive, and then the secondary volume is mounted on the first found drive.
— If a path does not end with the \ character, the command assumes that a \ character is present at the end of the path. For example, D: and D:\ are assumed to be the same drive. Similarly, D:\MOUNTDIR and D:\MOUNTDIR\ are assumed to be the same directory.
Note: A secondary volume that has not been formatted as a file system and a secondary volume in the mirror status cannot be mounted.

Using Protection Manager Console 6–75
Console User's Guide
— When Mount Point is omitted, any drive not in use when the mount is executed will be used.
To mount multiple secondary volumes, you can specify more than one volume. However, when specifying directory paths as mount points, enter them in the appropriate order based on the dependency relationship among the directory paths. Mounting is performed in order from the top line.
You can edit lines used for Pair Name and Mount Point entry, by using the following operations:
• Insert key
Adds a new line above the selected line.
• Tab key
Moves to Mount Point when you select Pair Name. When you select Mount Point, the selected line moves to Pair Name on the next line. If there is no next line, a new line is added.
• Delete key
Deletes the selected line. If multiple lines are selected, multiple lines are deleted.
You can also use the right-click menu to edit lines used for Pair Name and Mount Point entry:
• Insert Row
Adds a new line above the selected line.
• Delete Row(s)
Deletes the selected line. If multiple lines are selected, multiple lines are deleted.
4. Click the OK button.
A dialog box is displayed prompting you to confirm the mount execution.
5. If the copy group name and mount point entered are correct, click the OK button.
Mount operations begin. Quitting Protection Manager Console during mount operations does not terminate the command processing.
When mount operations are finished, a dialog box is displayed to indicate mount completion. During mount operations, the Mount Point column remains blank. After the operations finish, the Mount Point column displays the mount point name. If you plan to unmount the secondary volume later, we recommend that you save the information displayed about the mounted copy group.
If mount operations fail, a dialog box indicating the error is displayed and mount operations are canceled. Only those mount points for which mounting was successfully performed are displayed in the Mount dialog box.

6–76 Using Protection Manager Console
Console User's Guide
Unmounting a Secondary VolumeTo unmount a secondary volume, you must determine the name of the copy group to which that volume belongs. The following method can be used to determine the name of the copy group:
To confirm the name of the copy group:
1. Display the Backup Catalog View from the Protection Manager Console on the file server or database server.
For details on the displayed items, see Table 6-4: Items Displayed in the Backup Catalog View.
2. In the Backup Catalog View, select the record of the Backup ID for the target file system or database instance, and display the Backup Detail Information window.
3. Check the copy group name in the Pair Name column of the list.
To automatically unmount all secondary volumes in a dynamic disk configuration in a VxVM environment, you must specify one of the copy groups that make up the relevant disk group.
At this point, perform the following operations from the instance of Protection Manager Console on the backup server.
To unmount a secondary volume:
1. Start the instance of Protection Manager Console on the backup server.
2. Select Action and then Unmount.
The Unmount dialog box, where you can set the secondary volume to unmount, is displayed.
3. Set the secondary volume to unmount:
• Pair Name
Enter the name of the copy group belonging to the secondary volume to be unmounted. To unmount multiple secondary volumes, specify the volumes.
Figure 6-36: Mount Dialog Box

Using Protection Manager Console 6–77
Console User's Guide
You can edit lines used for Pair Name entry, by using the following operations:
• Insert key
Adds a new line above the selected line.
• Tab key
Moves to the next line. If there is no next line, a new line is added.
• Delete key
Deletes the selected line. If multiple lines are selected, multiple lines are deleted.
You can also use the right-click menu to edit lines used for Pair Name entry:
• Insert Row
Adds a new line above the selected line.
• Delete Row(s)
Deletes the selected line. If multiple lines are selected, multiple lines are deleted.
4. Click the OK button.
A dialog box is displayed prompting you to confirm the unmount execution.
5. If the copy group name and unmount point entered are correct, Click the OK button.
Unmount operations begin. Quitting Protection Manager Console during unmount operations does not terminate the command processing.
When unmount operations are finished, a dialog box is displayed to indicate unmount completion. The mount point used when mounting was performed is displayed in this dialog box.
If unmount operations fail, a dialog box indicating the error is displayed and unmount operations are canceled. Only those mount points for which unmounting was successfully performed are displayed in the Unmount dialog box.
Figure 6-37: Unmount Dialog Box

6–78 Using Protection Manager Console
Console User's Guide
Backing up or Restoring the Secondary Volume using Tape MediaUse backup management software (such as NetBackup and Backup Exec) to back up a secondary volume mounted by Protection Manager Console to backup media, such as tape, or to restore the data from such backup media to a mounted secondary volume.
For details on how to back up data to tape or restore data from tape by using the Protection Manager Copy Controller command, see the Hitachi Protection Manager User's Guide.
Using a User ScriptThis section explains how to perform backups by using a user script.
Backing up by Using a User ScriptIf you specify a user script when you perform a backup, the commands written in the script are executed at the following points:
• User Preprocessing is executed before a backup (PRE_PROC)
• User Postprocessing is executed after a backup (POST_PROC)
• User processing is executed after pair resynchronization (RESYNC_PROC)
• User processing is executed after pair splitting (SPLIT_PROC)
• User processing is executed before finishing processing (FINISH_PROC)
However, you can open the user script that includes the processing above to add User Preprocessing and User Postprocessing.
The following figure shows where in the processing a user script that includes User Preprocessing (PRE_PROC) and User Postprocessing (POST_PROC) is run.
Note: The following processing in the user script cannot be edited in the Protection Manager Console:
• User processing executed after pair resynchronization (RESYNC_PROC)
• User processing executed after pair splitting (SPLIT_PROC)
• User processing executed before finishing processing (FINISH_PROC)

Using Protection Manager Console 6–79
Console User's Guide
Configuring Backup Options for a User ScriptTo configure backup options regarding the use of a user script:
1. Start Protection Manager Console on a file server or a database server and choose the Application View tab.
The Application View is displayed.
2. Select a record that you want to back up from the Application View list, and click the Backup button.
The Backup dialog box is displayed.
3. Click the Pre/Post Job button of the Advanced Options.
The Advanced Options dialog box is displayed.
Figure 6-38: Where the User Script Is Run
Note: The dialog box for setting up backup options differs depending on the application that is in use (file system, SQL Server database, or Exchange database). In the procedures below, these backup option setup dialog boxes are generically called the Backup dialog box.

6–80 Using Protection Manager Console
Console User's Guide
4. Configure backup options as required. The options are as follows:
• Remote Server
If you have specified run remotely in your user script, specify the backup server on which you want your user script to run.
• Check Secondary Volume Readiness before Backup
Select the Enable check box to check the status of a secondary volume on a backup server. This option must be specified concurrently with the Remote Server field. Checking the status of a secondary volume prevents backup or restoration failures. Items, targets, and conditions to be checked are as follows:
Table 6-14: Status Check of a Secondary Volume
Figure 6-39: The Advanced Options Dialog Box (File System)
Check item Volume to be checked Check condition
A secondary volume is hidden from a backup server
All secondary volumes defined for a backup-target primary volume
Checked when a primary volume is defined in pairs with secondary volumes of multiple generations and either of the following items is applicable:- A primary volume is a cluster resource.- A primary volume is a dynamic disk.- A backup by using VSS is performed.

Using Protection Manager Console 6–81
Console User's Guide
• Options
Select the Import Backup Catalog checkbox if you want a backup catalog to be automatically transferred to the remote backup server when the backup to the secondary volume finishes.
Select the Mount Point checkbox and specify the mount point directory name if you want the secondary volume to be automatically mounted on the backup server when the backup to the secondary volume finishes. The mount point directory name must be no more than 64 bytes in length.
Use an absolute path name to specify the mount point directory to which the secondary volume is to be mounted. Specify the drive letter, or specify the absolute path from the drive letter. Use characters that can be used for directory names in Windows. You cannot use space characters.
If you specify a drive letter, unused drive names are searched for, in alphabetical order beginning with the specified drive, and then the secondary volume is mounted on the first found drive.
If a path does not end with the \ character, the command assumes that a \ character is present at the end of the path. For example, D: and D:\ are assumed to be the same drive. Similarly, D:\MOUNTDIR and D:\MOUNTDIR\ are assumed to be the same directory.
When the mount point directory name is omitted, any drive not in use when the mount is executed will be used.
• Job Script File
Specify the user script file name. Click the Open button to display the Open dialog box. If you have started Protection Manager Console locally, next click the Browse button, and then select the file name in the file selection dialog box. If you have started Protection Manager Console remotely from Device Manager, input the absolute path name of the user script directly.
When you input the absolute path name of the user script directly, specify no more than 255 bytes of characters that can be used for directory names in Windows.
After you click the OK button, the user script file name is displayed in the Job Script File field of the Advanced Options dialog box. In Pre Job Script and Post Job Script, settings are displayed.
Select the top check box to enable the user script. Clear the top check box to disable the user script. Note that, even if you clear the check box, the settings will remain in Pre Job Script and Post Job Script.
A secondary volume is not mounted on a backup server
A secondary volume to be the next backup destination
Always checked.
Check item Volume to be checked Check condition

6–82 Using Protection Manager Console
Console User's Guide
Creating or Modifying a User ScriptYou can create a new user script or modify an existing one in the Advanced Options dialog box.
Create or modify a user script in the lower part of the Advanced Options dialog box, below Job Script File. Items in this part of the dialog box are the same as those for the Pre/Post Job Template window in Setup GUI. For details on how to create or modify a user script, see Pre/Post Job Template Window.
Backing up a Volume to a Magnetic Tape by Using a User ScriptIf you specify a backup to a magnetic tape in the user script, you can perform a backup to a magnetic tape from the primary volume through the secondary volume. For details on how to create a user script for a tape backup, see the Hitachi Protection Manager User's Guide.

Troubleshooting 7–1
Console User's Guide
7Troubleshooting
This chapter describes appropriate actions to be taken for problems that might occur during operation of Protection Manager Console:
□ Troubleshooting Protection Manager Console
□ Working with Protection Manager Console Detailed Messages
□ Responding to Detailed Messages
□ If the Problem Cannot Be Resolved Using Detailed Messages
□ Reviewing the Protection Manager Console Log Data
□ Reviewing Data from Prerequisite Products
□ Calling the Hitachi Data Systems Support Center

7–2 Troubleshooting
Console User's Guide
Troubleshooting Protection Manager ConsoleTo resolve problems that might occur during operation of Protection Manager Console, follow these steps:
1. Check the conditions under which the problem occurred.
Check the operating conditions under which the problem occurred, and the message displayed in the Protection Manager Console dialog box. Then, take action appropriate to the message to resolve the problem. For details on Protection Manager Console messages, see the Hitachi Protection Manager Messages.
Depending on the status of the problem, a detailed message (location and cause of the error) may be displayed along with the message. For details about detailed messages, see Working with Protection Manager Console Detailed Messages.
2. Collect log data and other data that can be used to identify the cause.
If the problem persists after step 1, collect reference information such as log data.
• Collect Protection Manager Console log data
If you cannot resolve the problem through the information given by the Protection Manager Console detailed message (location and cause of the error), collect the log data output from Protection Manager Console. For details on the log files to be collected, see Reviewing Data from Prerequisite Products.
• Collect Protection Manager Console version information
Collect the version information file for Protection Manager Console. This file is in the following location:
Protection-Manager-Console-installation-directory\.version_con
• Collect log data and environment configuration information for prerequisite products.
If it appears that the cause of the error might be external to Protection Manager Console, collect reference information such as the log data output from prerequisite products (such as the OS, Protection Manager Copy Controller, and RAID Manager) and their environment configuration information. For an outline of the data to be collected, see Using the Data Collection Tool.
3. Based on the collected data, investigate the cause and analyze the problem. If you still cannot determine the cause of the problem after this step, contact the dealer from which you purchased the product.
Working with Protection Manager Console Detailed Messages
Depending on the type of error, the location and cause of the error might be displayed in a message dialog box. This is called a detailed message.

Troubleshooting 7–3
Console User's Guide
Format of Displayed Detailed MessagesTable 7-1: Contents of a Detailed Message lists the items that are displayed as part of a detailed message.
Table 7-1: Contents of a Detailed Message
Figure 7-1: Example of a Detailed Message Displayed in a Dialog Box
Item Details
Location Displays either Console, Copy Controller or Agent to indicate the location of the error. If there is no data for this item, - is displayed.• Console
Indicates that the error occurred in Protection Manager Console.
• Copy ControllerIndicates that the error occurred in Protection Manager Copy Controller.
• AgentIndicates that the error occurred in the Protection Manager Agent in an environment that is linked with Device Manager. Protection Manager Agent is a plug-in for Device Manager Agent, and is used to link with Device Manager.
Cause Displays a detailed message (for which the message ID is DRM-nnnnn) to indicate the cause of the error.DRM Indicates that the message is a Protection Manager detailed message, and nnnnn indicates the message sequence number.If there is no data for this item, - is displayed.
Detail Displays details on the cause of the error. If there is no information for this item, - is displayed.If the error occurred due to a Protection Manager command execution failure, all of the standard output of the command is also displayed.

7–4 Troubleshooting
Console User's Guide
If an error occurred due to a Protection Manager command execution failure, a part of the standard output of the command is also displayed. For details about Protection Manager command messages, see the Hitachi Protection Manager Messages.
Responding to Detailed MessagesThis section describes how to respond to a detailed message that may display during the operation of Protection Manager Console.
Important: If any of the operations that are associated with a particular message do not resolve the problem, please see the Hitachi Protection Manager User's Guide.
Responding to a Message in the Application Detail WindowIf the items listed in Table 7-2: Error Data Shown in the Application Detail Window are displayed in the message dialog box, backup or restoration processing might be in progress on the connected application server.
Table 7-2: Error Data Shown in the Application Detail Window
To resolve the issue, do the following:
• Wait a while, and then re-display the Application Detail window.
• Check whether backup or restoration is currently in progress on the connected application server.
• Backup or restoration processing is currently in progress if either of the following cases hold:
• A dialog box indicating that backup or restoration is in progress is displayed in the Protection Manager Console that is connected to the application server.
• On the Processes page of Task Manager on the application server, drmxxxbackup.exe or drmxxxrestore.exe is displayed as running.
• If backup or restoration is in progress, you can display the Application Detail window once the processing has finished.
Responding to a Message in the Backup Catalog ViewIf the items listed in Table 7-3: Error Data Shown in the Backup Catalog View are displayed in a message dialog box, one of the following might be the case: Protection Manager Copy Controller has not performed backup for
Item Contents
Message KAVX11003-E KAVX11003-E
Location Copy Controller Copy Controller
Cause DRM-22002 DRM-22002
Detail Command: drmfsdisplay.exeKAVX0016-E, KAVX0017-E, or KAVX0105-E
Command: drmexgdisplay.exeKAVX0006-ECause = DRM-10104

Troubleshooting 7–5
Console User's Guide
the connected application server in the past, or a backup is in progress on the connected application server. If a backup is in progress, an error occurs because the dictionary map is updated during backup.
Table 7-3: Error Data Shown in the Backup Catalog View
To resolve the issue, make sure that Protection Manager Copy Controller has performed backup for the connected application server at least once.
If the above holds, do the following:
• Wait a while, and then re-display the Backup Catalog View.
• Check whether a backup is in progress on the connected application server.
• For details about how to check this, see the part describing actions to be taken in Responding to a Message in the Application Detail Window.
• If a backup is currently in progress, you can display the Backup Catalog View once the backup processing has finished.
Responding to a Message in the Backup Detail Information Window
If the items listed in Table 7-4: Error Data Shown in the Backup Detail Information Window are displayed in the message dialog box, a backup might be in progress on the connected application server. If a backup is currently in progress, an error occurs because the dictionary map is updated during processing.
Table 7-4: Error Data Shown in the Backup Detail Information Window
To resolve the issue, do the following:
• Wait a while, and then re-display the Backup Detail Information window.
• Check whether a backup is in progress on the connected application server.
Item Contents
Message KAVX11005-W
Location Copy Controller
Cause DRM-22004
Detail Command: drmappcat.exeKAVX0024-E
Item Contents
Message KAVX11003-E
Location Copy Controller
Cause DRM-22004
Detail Command: drmfscat.exe or drmsqlcat.exeKAVX0024-E

7–6 Troubleshooting
Console User's Guide
• For details about how to check this, see the part describing actions to be taken in Responding to a Message in the Application Detail Window.
• If a backup is currently in progress, you can display the Backup Detail Information window once the backup processing has finished.
Responding to a Message During Mount Processing on a Backup Server
If the items listed in the table below are displayed in the message dialog box, one of the following might be the case: on the connected application server, either backup or restoration processing is currently in progress, or the item to be mounted is already mounted.
Table 7-5: Mount Processing Error Data
• If Cause = DRM-10008 is displayed, backup or restoration processing might be in progress on the application server. If backup or restoration processing is in progress on the application server, you cannot mount a copy group that is being backed up or restored on the backup server. To resolve the issue, do the following:
• Wait a while, and then retry the mount operation.
• Check whether backup or restoration processing is in progress on the connected application server.
For details about how to check this, see the part describing actions to be taken in Responding to a Message in the Application Detail Window.
If backup or restoration processing is currently in progress, you can perform the mount operation once the processing has finished.
• If Cause = DRM-10111 is displayed, the mount operation might have been performed on a copy group that is already mounted on the backup server. To resolve the issue, check the copy group mounted on the backup server. For details about how to check the mounted copy group, see Mounting a Secondary Volume.
If the Problem Cannot Be Resolved Using Detailed Messages
If you cannot resolve the problem even after reviewing the detailed message, then consult the Protection Manager Console log data. For details, see Reviewing the Protection Manager Console Log Data.
Item Contents
Message KAVX11011-E
Location Copy Controller
Cause DRM-22002
Detail Command: EX_DRM_MOUNT.wsfKAVX0006-ECause = DRM-10008 or Cause = DRM-10111

Troubleshooting 7–7
Console User's Guide
When you click the OK button in the error message dialog box where the detailed message is displayed, the application terminates in some cases but not in others. Even though the cause of the error is not critical if the application does not terminate, we recommend analyzing the log and taking any action, as appropriate.
Reviewing the Protection Manager Console Log DataIf you cannot resolve the problem even after reviewing the error messages and detailed messages of Protection Manager Console, then identify the Protection Manager Console log files to be examined and analyze the data they provide (analysis of the Protection Manager Copy Controller log file might be necessary in some cases).
Analyzing Log FilesThe log file to be analyzed can be identified by the Location information displayed in the detailed message. There are three types of Protection Manager Console log files, as shown in the following figure.
The following terms (local execution, remote execution) are used in the descriptions.
Figure 7-2: Protection Manager Console Log Files

7–8 Troubleshooting
Console User's Guide
• Local execution: Protection Manager Console is used on an application server.
• Remote execution: Protection Manager Console running on an application server is used from a management client (Device Manager client).
Refer to Table 7-6: Log Files to be Analyzed to identify the log files to be analyzed, according to the mode of use for Protection Manager Console, and the error location displayed in the detailed message.
Table 7-6: Log Files to be Analyzed
Log File Storage Locations of Protection Manager ConsoleTable 7-7: Storage Locations of the Log Files of Protection Manager Console lists the locations shows where the Protection Manager Console log files are stored.
Table 7-7: Storage Locations of the Log Files of Protection Manager Console
Protection Manager Console Execution
Method
Error Location Displayed in the
Detailed MessageLog Files to be Analyzed
Local execution Console trace$.log
Copy Controller • trace$.log• The log file output from Protection
Manager Copy Controller.See Note
Remote execution Console application-server-IP-address-or-host-name_trace$.log
Copy Controller • application-server-IP-address-or-host-name_trace$.log
• The log file output from Protection Manager Copy Controller.See Note
Agent • agt_trace.log and agt_trace.log.$ • application-server-IP-address-or-
host-name_trace$.log
Note: For details on log files output from Protection Manager Copy Controller, see the Hitachi Protection Manager User's Guide.
TypeName of the Log File of
Protection Manager Console
Storage Location
Log files for local execution
trace$.log Protection-Manager-Console-Installation-directory-in-the-application-server\log\

Troubleshooting 7–9
Console User's Guide
There are multiple log files (from 2 to a maximum of 10) for each type of log file, and they are used in sequence. The character $ in the file name indicates the file number—its use is described as follows:
• For trace$.log files and application-server-IP-address-or-host-name_trace$.log
0 indicates the most recent file, and the greater the number, the older the log file.
• For agt_trace.log (agt_trace.log.$) files, agt_trace.log is the most recent file. For the other log files (agt_trace.log.$), the greater the number, the older the log file.
The size and maximum number of the log files can be specified in the Protection Manager Console configuration file.
• When more than one Protection Manager Console is concurrently running locally on the same application server, the trace$.log files are created based on the following naming conventions:
• For the Protection Manager Console started first: trace$.log
• For the Protection Manager Console started second: trace$.log.1
• For the Protection Manager Console started (n+1)th: trace$.log.n
• When more than one Protection Manager Console is concurrently running remotely on the same application server from a management client, the corresponding application-server-IP-address-or-host-name_trace$.log files are created:
• For the Protection Manager Console started first: application-server-IP-address-or-host-name_trace$.log
• For the Protection Manager Console started second: application-server-IP-address-or-host-name_trace$.log.1
• For the Protection Manager Console started (n+1)th: application-server-IP-address-or-host-name_trace$.log.n
Log Data of Protection Manager ConsoleThe following data is output to the Protection Manager Console log files.
• Internal functions used by the internal processing sequence from the start to the end of a process specified by Protection Manager Console
Log files for remote execution
application-server-IP-address-or-host-name_trace$.log
In Windows:user-home-directory-in-the-management-client\drm_console\log\In Solaris:home-directory-in-the-management-client/drm_console/log/
agt_trace.log agt_trace.log.$
Protection-Manager-Console-Installation-directory-in-the-application-server\log\
TypeName of the Log File of
Protection Manager Console
Storage Location

7–10 Troubleshooting
Console User's Guide
• The time of execution and the command execution process ID for the processing that was performed at the system call level
• Keywords showing normal and abnormal processing
• Messages showing error causes
Table 7-8: Output Items in the Trace Logs of Protection Manager Console lists the items that are output to the Protection Manager Console log files. The items are displayed in messages in the order shown in the table. The same log format is used for output log data for all three types of Protection Manager Console log files.
Table 7-8: Output Items in the Trace Logs of Protection Manager Console
The log file to be analyzed contains a line with the message ID that was displayed in the error message window, enabling you to analyze the information chronologically.
Output Item Description
Date Date when the log data was output, using the yyyy/mm/dd format
Time Time when the log data was output, using the hh:mm:ss.sss format
Process ID Process ID
Thread ID Thread ID
Class name Class name. When the specified log level is 10 or less, a hyphen (-) is displayed.
Method name Method name. When the specified log level is 10 or less, a hyphen (-) is displayed.
Message ID ID of the message.When the specified log level is 0 or 10, the message ID is formatted as KAVXppmmm-z. • KAVX: Prefix for Protection Manager messages.• pp: Component of Protection Manager. • mmm: Message sequence number. • z: Message type. Displays either E, W, or I.
E: ErrorW: WarningI: Information
Text Message Text.
Note: For the log file agt_trace.log on the application server, chronological analysis may not be simple since the same log file is used for multiple connections, if the server is connected to multiple Device Manager clients. Find the most recent line with the message ID that was displayed on the error message window, to determine the thread ID on the line. Then, analyze the lines with the same thread ID chronologically.

Troubleshooting 7–11
Console User's Guide
Using the Data Collection ToolBy using the data collection tool locally, you can collect the data necessary for analyzing problems. For details on the data collection tool, see the Hitachi Protection Manager User's Guide.
If you use the data collection tool remotely, the data on a management client cannot be collected.
Reviewing Data from Prerequisite ProductsIf you cannot resolve the problem even after reviewing the message and the log files output from Protection Manager Console, then collect data regarding the prerequisite products on the application server.
The following information should be collected. For details on how to collect and analyze the data, see the Hitachi Protection Manager User's Guide.
• OS information on the application server
• Protection Manager Copy Controller information
• RAID Manager information
• Database information (for SQL Server database or Exchange database only)
Device Manager agent information should also be collected as necessary, in an environment where Protection Manager Console is run by remote execution with linkage to Device Manager.
Calling the Hitachi Data Systems Support CenterThe Hitachi Data Systems customer support staff is available 24 hours a day, seven days a week. If you need technical support, please call:
• United States: (800) 446-0744
• Outside the United States: (858) 547-4526
Note: If you cannot resolve the problem even after reviewing the Protection Manager Console log file agt_trace.log, then collect Device Manager agent information. For details on output messages and trace logs from the Device Manager agent, please see the chapter for Device Manager agent troubleshooting in the Device Manager manual.

7–12 Troubleshooting
Console User's Guide

Environment Setting Commands for Device Manager Linkage A–1
Console User's Guide
AEnvironment Setting Commands for
Device Manager Linkage
In order to start Protection Manager Console from a Device Manager client, it is necessary to copy files required for linkage into the Device Manager agent installation directory.
Normally, the necessary files are copied into the Device Manager agent installation directory when Protection Manager Console is installed. The files are deleted when Protection Manager Console is uninstalled.
If the files copied to the Device Manager agent installation directory are corrupted after the Protection Manager Console installation, they must be deleted and re-copied.
Protection Manager Console provides commands to copy and delete the files that are necessary for linkage to Device Manager:
- ptmguiinst.exe copies the files required for Device Manager linkage.
- ptmguiuninst.exe deletes the files required for Device Manager linkage.
Execute these commands from the command prompt to copy or delete the files necessary for Device Manager linkage.
□ Copying Files Required for Device Manager Linkage
□ Deleting Files Required for Device Manager Linkage

A–2 Environment Setting Commands for Device Manager Linkage
Console User's Guide
Copying Files Required for Device Manager LinkageTo copy the files required for Device Manager linkage to the installation directory of Device Manager agent, execute ptmguiinst.exe from the command prompt on the application server where Protection Manager Console and Device Manager agent are installed.
Make sure that the following conditions are satisfied before executing the command:
• Device Manager agent is installed.
• Services for Device Manager agent are stopped.
• Protection Manager Console is installed.
Command name:
ptmguiinst.exe
Installation destination:
Protection-Manager-Console-installation-directory\bin
Return code:
0: Normal termination
1: Termination with an error
The execution results for ptmguiinst.exe are output to the standard output. For details about output messages, see the Hitachi Protection Manager Messages.
Deleting Files Required for Device Manager LinkageTo delete the files required for Device Manager linkage from the installation directory of Device Manager agent, execute ptmguiuninst.exe from the command prompt on the application server where Protection Manager Console and Device Manager agent are installed.
Make sure that the following conditions are satisfied before executing the command:
• Device Manager agent is installed.
• Services for Device Manager agent are stopped.
• Protection Manager Console is installed.
Command name
ptmguiuninst.exe
Installation destination:
Protection-Manager-Console-installation-directory\bin
Return code:
0: Normal termination
1: Termination with an error

Environment Setting Commands for Device Manager Linkage A–3
Console User's Guide
The execution results for ptmguiuninst.exe are output to the standard output. For details about output messages, see the Hitachi Protection Manager Messages.

A–4 Environment Setting Commands for Device Manager Linkage
Console User's Guide

Note on a Firewall on the Local Host B–1
Console User's Guide
BNote on a Firewall on the Local Host
The following provides notes that apply when you set up a firewall on the local host.
□ Note on a Firewall on the Local Host

B–2 Note on a Firewall on the Local Host
Console User's Guide
Note on a Firewall on the Local HostSome of the firewall functions provided by the OS might terminate socket connections in the local host.
You cannot install and operate Hitachi Storage Command Suite products in an environment in which socket connections are terminated in the local host.
When setting up the firewall provided by the OS, configure the settings so that socket connections cannot be terminated in the local host.

Notes on Using the Remote Desktop Functionality C–1
Console User's Guide
CNotes on Using the Remote Desktop
Functionality
The following provides notes that apply when you use the Remote Desktop functionality.
□ Notes on Using the Remote Desktop Functionality

C–2 Notes on Using the Remote Desktop Functionality
Console User's Guide
Notes on Using the Remote Desktop FunctionalityHitachi Storage Command Suite products for Windows support the Windows Remote Desktop functionality. Note that the Microsoft terms used for this functionality differ depending on the Windows OS. The following terms can refer to the same functionality:
• In Windows 2000 Server
Remote access using Terminal Services in the Remote Administration mode
• In Windows Server 2003
Remote access using Remote Desktop for Administration
• In Windows XP Professional
Remote access using Remote Desktop Connection
When using the Remote Desktop functionality to perform a Hitachi Storage Command Suite product operation (including installation or uninstallation), you need to connect to the console session of the target server in advance. However, even if you have successfully connected to the console session, the product might not work properly if another user connects to the console session.

Acronyms–1
Console User's Guide
CA KD E F G H I J L M N O P Q R S T U V W X Y# B ZA C D G I J L N O P S T U V
Acronyms and Abbreviations
This manual uses the following acronyms and abbreviations.
A
API
application programming interface
C
CDE
Common Desktop Environment
CD-ROM
compact disk – read-only memory
CLI
command line interface
D
DB
database
DKC
Disk Contorller
DLL
dynamic linking library

Acronyms–2
Console User's Guide
CA KD E F G H I J L M N O P Q R S T U V W X Y# B ZA C D G I J L N O P S T U V
DRM
Protection Manager detailed message prefix
G
GB
gigabyte
GUI
graphical user interface
I
IPF
Itanium Processor Family
J
JRE
Java Runtime Environment
JWS
Java Wedb Start
k
kB
kilobytes
L
LAN
local area network
LDEV
logical device
LU
logical unit
Acronyms–3
Console User's Guide
CA KD E F G H I J L M N O P Q R S T U V W X Y# B ZA C D G I J L N O P S T U V
N
NTFS
NT file system
O
OS
operating system
P
PC
personal computer system
S
SAN
storage area network
SVP
service processor
T
TB
terabyte
TID
target ID
U
UR
Universal Replicator
V
VCS
Veritas Cluster Server

Acronyms–4
Console User's Guide
CA KD E F G H I J L M N O P Q R S T U V W X Y# B ZA C D G I J L N O P S T U V
VDI
virtual device interface
VSS
volume shadow copy service

Glossary–1
Console User's Guide
CA KD E F G H I J L M N O P Q R S T U V W X Y# B ZA B C D F H P R S T V
Glossary
This glossary defines the special terms used in this document. Click the desired letter below to display the glossary entries that start with that letter.
A
application information
A list of file systems, database instances, and storage configuration information, to be backed up. It is displayed on the Application View in Protection Manager Console. You can execute a backup by selecting the objects to be backed up from the application information.
application map file
One of the map files making up the dictionary map files. Application map files are used to keep track of the mapping information between the application data to be backed up and the files on the file system.
Application View
A page displayed on the main window of Protection Manager Console, on which application information is displayed, showing a list of file systems and database instances to be either backed up or restored.
B
backup catalog
A collection of information necessary to manage the history and generations of backups performed using Protection Manager programs. When a backup is executed, a record containing information related to the backup is created within the backup catalog. When backed-up data is restored, Protection Manager programs reference the backup catalog information, and execute accordingly.

Glossary–2
Console User's Guide
CA KD E F G H I J L M N O P Q R S T U V W X Y# B ZA B C D F H P R S T V
Backup Catalog View
A page displayed on the main window of Protection Manager Console. Catalog information is displayed, showing a table of file systems and database instances that have been backed up thus far.
backup ID
A part of the information recorded in a backup catalog. Backup IDs are used to differentiate backup data, and are assigned automatically when backups are performed using Protection Manager.
backup information
Various types of information that is recorded in a backup catalog during a backup operation by Protection Manager.
backup job information
A list of backup jobs to be automatically executed based on a specified schedule. This list is displayed in the Protection Manager Console Backup Job View. To register a backup job, select it from the application information.
Backup Job View
A page displayed on the Main window of Protection Manager Console. Backup Job View displays backup job information (a list of backup jobs to be automatically executed based on the schedule).
C
Catalog information
A list of file systems and database instances that have been backed up thus far. Catalog information can be viewed in the Protection Manager Console Backup Catalog View. Restoration can be performed by selecting the item to restore from the catalog information.
cluster software
Software required for installation on each node of a cluster when using a cluster configuration for a host.
In Windows, you can use MSCS and VCS as cluster software.
copy group
A copy group consists of a primary volume and secondary volumes that are synchronized and split using volume replication functionality and RAID Manager functionality. A copy group can also be called a pair volume.

Glossary–3
Console User's Guide
CA KD E F G H I J L M N O P Q R S T U V W X Y# B ZA B C D F H P R S T V
copy group map file
One of the map files making up the dictionary map files. Copy group map files are used to keep track of the mapping information between a primary volume and its corresponding secondary volumes.
core map file
One of the map files making up the dictionary map files. Core map files are used to keep track of the information related to mapping the mount point directory on the file system to a disk number on the RAID device.
D
DBMS
An abbreviation for Database Management System. A DBMS consists of programs that manage databases.
dictionary map file
A file required for automating backup processing using Protection Manager. Dictionary map files are used to keep track of all mapping information related to mapping the objects to be backed up to RAID devices.
A dictionary map file consists of three types of map files, and a backup catalog.
— Application map file
— Core map file
— Copy group map file
— Backup catalog
disk set
For Protection Manager programs, in a dynamic disk configuration, a group consisting of one or more dynamic disks and one or more logical volumes allocated to the dynamic disks is called a disk set.
F
failover
The action of automatically switching to a backup system when an error occurs in a system that has been duplicated (that is, multiple instances of the system were made) using cluster software.
freezing a database
The DBMS temporarily stops I/O operations for the disk on which the database is stored. Transactions from applications are controlled by the DBMS until the database is thawed.

Glossary–4
Console User's Guide
CA KD E F G H I J L M N O P Q R S T U V W X Y# B ZA B C D F H P R S T V
If a database is frozen when a paired volume is synchronized, the primary and secondary volumes will be identical. Backing up the database in this state will ensure that its integrity is maintained during backup processing.
H
Hitachi Device Manager
A product that manages storage devices, including devices, logical volumes and physical volumes. It consists of agents that collect information from each host, and a manager that controls management functions.
Hitachi Protection Manager
A general name for the following products:
Hitachi Protection Manager Copy Controller
Hitachi Protection Manager Copy Controller (x64)
Hitachi Protection Manager for SQL
Hitachi Protection Manager for Exchange
Hitachi Protection Manager for Exchange 2007
Hitachi Protection Manager Console
Hitachi Protection Manager Console
This program allows the backup and restoration functionality provided by Protection Manager programs to be used from a GUI.
Hitachi Protection Manager Copy Controller
A program product that performs backups and restorations for Windows file systems. It is also a prerequisite program for backing up databases such as Exchange Server and SQL Server.
Hitachi Protection Manager for Exchange
A program that backs up and restores Exchange Server databases. Hitachi Protection Manager for Exchange is an optional program product.
Hitachi Protection Manager for SQL
A program that backs up and restores SQL Server databases. Hitachi Protection Manager for SQL is an optional program product.
P
pair volume
A pair of physical volumes that are mirror-controlled by RAID Manager and the volume replication functions.

Glossary–5
Console User's Guide
CA KD E F G H I J L M N O P Q R S T U V W X Y# B ZA B C D F H P R S T V
R
RAID Manager
Software used to control storage subsystems from a host. You can use RAID Manager to issue commands from a host to storage subsystems, to control the volume duplication functions of storage subsystems (such as TrueCopy and ShadowImage), and acquire information regarding the configuration and status of volume copy pairs.
S
Setup GUI
Functionality that allows you to set up an operating environment for Protection Manager via a GUI. Using the GUI means it is not necessary to execute commands or edit the configuration files. Setup GUI becomes available when Protection Manager Console is installed.
storage group
A method provided by Exchange Server for managing a grouping of multiple databases. Multiple databases can be managed together since databases within the same group use a common transaction log.
T
target ID
A number used to distinguish the devices connected via a SCSI bus. It is also called a SCSI ID.
V
VDI
An abbreviation of Virtual Device Interface: an application interface for volume replication functionality provided by SQL Server.
volume replication functions
A generic term used in this manual to refer to high-speed volume replication functions in a storage subsystem (such as ShadowImage and TrueCopy). The mirror control function provided by a storage subsystem can be used to quickly create a replica of the volume without passing through the LAN.
VSS
An abbreviation of Volume Shadow Copy Service: one of the storage support functions usable in Windows Server 2003 and Windows Server 2008.

Glossary–6
Console User's Guide
CA KD E F G H I J L M N O P Q R S T U V W X Y# B ZA B C D F H P R S T V
Normally, when database data stored on a storage subsystem volume is copied to another volume, access from hosts (database applications) must be suspended and the database must be frozen. If VSS is used, however, the OS functionality can control transactions for database applications and I/O operations for a volume, and the database can be frozen without the previously mentioned suspensions. This provides higher reliability f 2 or backup operations. To use VSS to freeze a database application, however, VSS must support the database application. Protection Manager programs handle Exchange Server 2003 and Exchange Server 2007 as database applications supported by VSS, and support file system backup and restoration operations using VSS.
Index-1
Console User's Guide
Index
AAdvanced Options 6–23, 6–34, 6–46agt_trace.log.$ file 7–8Application Detail window 6–9application information
outputting to file 6–22application-server-IP-address 7–8application-server-IP-address-or-host-
name_trace$.log 7–8
BBackup Detail Information window 6–13Backup File System dialog box 6–26, 6–29backup job
viewing information 6–16backup job information
displayed in Backup Job Result Details window 6–19
displayed in Backup Job View 6–17outputting to file 6–22
Backup Job Result Details 6–16Backup Job Result Details window
displayed items 6–19Backup Job View 6–6, 6–16
items displayed 6–17backup jobs
changing option 6–67deleting 6–68managing 1–11operations 6–61registering 6–61running immediately 6–66using in cluster configuration 2–4viewing execution results 6–69
Backup Linkage window 5–33backup option (file system)
Job Registration 6–23, 6–34, 6–47
Ccatalog information
outputting to file 6–22
cluster configurationsetup for backup jobs 4–10using backup job 2–4
Cluster configuration of mutual standby typeActive-Active 2–5
Cluster configuration of operation standby typeActive-Passive 2–3
Cluster Configuration window 5–21cold backup
of storage groups in Exchange database 6–50
commandptmguiinst.exe A–2ptmguiuninst.exe A–2
Configuration Check Function 5–49configuration check function 1–13
notes 5–53prerequisites 5–52
Configuration Settings window 5–15configurations
active-active cluster configuration 2–5Active-Passive cluster 2–3when backing up and restoring data between
volumes 2–2when backup is made using VSS 2–9when executing remote copy 2–6when mounting or unmounting secondary
volume 2–3when using dynamic disk configuration 2–10
configuring system to execute remote copy 2–6configuring when using dynamic disk
configuration 2–10Copy Definition window 5–36copying file for
Device Manager linkage A–2
DDatabase Configuration window 5–24deleting file for
Device Manager linkage A–2detailed message
display format 7–3

Index-2
Console User's Guide
Device Managerreleasing linkage 3–8
Device Manager linkagecopying file A–2deleting file A–2environment setting commands A–1
dialog boxBackup File System dialog box 6–30Select Virtual Server dialog box 6–5Update Dictionary Map File 6–20Update Dictionary Map Files 6–20
dictionary map filesupdating 1–13, 6–19
display formatdetailed message 7–3
displayed itemin Backup Job Result Details window 6–19
DRM_HOSTNAME 1–8
EEmail Notification Window 5–48environment setting commands
Device Manager linkage A–1environment setup flow navigated by Setup
GUI 5–12environment setup using Setup GUI
Protection Manager 5–1environment variable
DRM_HOSTNAME 1–8PATH 3–6
Eventlog checking before backup 6–46Exchange database
cold backup 6–50restoration option 6–47
Exchange Management Console 5–52Extended Commands Definition window 5–40
Ffeatures
Protection Manager 1–2file system
restoration option 6–23for backup server
environment setup flow navigated by Setup GUI 5–13
for database serverenvironment setup flow navigated by Setup
GUI 5–12for file server
environment setup flow navigated by Setup GUI 5–12
Hhost-name_trace$.log 7–8
IInstance Details dialog box 5–22investigating
log data 7–7
LList File window 5–38log data
investigating 7–7log file
agt_trace.log file 7–8application-server-IP-address-or-host-
name_trace$.log 7–8trace$.log 7–8
Mmenu bar 6–5
Oonline backup 1–2operating environment
Protection Manager Console 4–2Operation Setup window 5–16operations for Exchange database
cold backup 6–50online backup 6–52
PPre/Post Job Template 5–44Pre/Post Job Template window
window 5–44Protection Manager
features 1–2Protection Manager Console 1–1
system configuration 6–2Protection Manager service 2–10Protection Manager Service window 5–30
RRAID Manager Linkage window 5–18RAID Manager Operation window 5–20releasing linkage
Device Manager 3–8restore
operations for SQL Server databases 6–39restore option (Exchange database)
Source Storage Group / Information Store 6–47
restore option (SQL Server database)target instance 6–34
Sschd.conf file 4–8schd.conf.file
EXEC_LOG_OUTPUT 4–9MAX_JOB_REGISTRATION_COUNT 4–10MAX_JOB_RESULT_COUNT 4–10SCH_MAP_PATH 4–8
setting up Protection Manager environmentSetup GUI 5–1
setup

Index-3
Console User's Guide
for using backup jobs in cluster 4–10Setup GUI 5–2
available operations 5–2notes 5–11prerequisite conditions 5–11setting up operating environment for
Protection Manager 5–11shared operation buttons 5–8starting 1–13, 5–6starting and components 5–5window components 5–6
SQL Server databaserestoration option 6–34
startingSetup GUI 1–13
system configuration 1–5for performing backup and restore for an
Exchange database 6–48for performing backup and restore for an SQL
Server database 6–36for performing backup and restore of file
system 6–25prerequisite OS 1–7using Protection Manager Console 6–2
system to back up and restore data between volume
configuring 2–2system to mount or unmount a secondary volume
configuring 2–3
Ttab-name window 6–5Tape Backup window 5–34trace$.log 7–8troubleshooting
investigating log data 7–7log data 7–9
UUpdate Dictionary Map window 5–31updating
dictionary map files 1–13, 6–19updating dictionary map files 6–19user privileges 1–8user script 6–78using backup job in cluster configuration 2–4
Vviewing
backup job information 6–16VSS Definition window 5–27VSS Environment window 5–28
Wwhen backup is of file system or Exchange
databaseconfiguration for backup with VSS 2–9
window
Backup Job Result Details window 6–17, 6–70
Backup Linkage window 5–33Cluster Configuration window 5–21Configuration Settings window 5–15Copy Definition window 5–36Database Configuration window 5–24Extended Commands Definition
window 5–40Instance Details dialog box 5–22List File window 5–38Operation Setup window 5–16RAID Manager Linkage window 5–18RAID Manager Operation window 5–20Tape Backup window 5–34Update Dictionary Map window 5–31VSS Definition window 5–27VSS Environment window 5–28

Index-4
Console User's Guide

1
Console User's Guide

MK-94HC071-12
Hitachi Data Systems
Corporate Headquarters750 Central ExpresswaySanta Clara, California 95050-2627U.S.A.Phone: 1 408 970 [email protected]
Asia Pacific and Americas750 Central ExpresswaySanta Clara, California 95050-2627U.S.A.Phone: 1 408 970 [email protected]
Europe HeadquartersSefton ParkStoke PogesBuckinghamshire SL2 4HDUnited KingdomPhone: + 44 (0)1753 [email protected]