hl7spy 1.1 user's manual -...
TRANSCRIPT
Inner Harbour Software
HL7Spy 1.1User's Manual
Nov 11, 2009
DRAFT
Table of ContentsIntroduction & Overview.............................................................................5
Audience................................................................................................5HL7Spy Overview..................................................................................5
User Interface Overview.............................................................................7Main Areas of HL7Spy...........................................................................7
HL7Spy Reference...................................................................................11Opening File(s)....................................................................................11Message Editor....................................................................................14
Advanced Topics......................................................................................35Message Framing................................................................................35
Keyboard Shortcuts..................................................................................37

Introduction & Overview
AudienceWe assume the readers of this manual are fully familiar and comfortable with HL7 messaging. In this manual, we explain HL7Spy and all its associated concepts and terminology in detail, but we do not explain topics that are part of HL7 proper. For information on HL7, see www.hl7.org.
HL7Spy OverviewHL7Spy is a productivity enhancement tool for individuals working with HL7 2.x messages.
HL7Spy was developed for a group of HL7 Analysts working for a large provider of Radiology Information Systems (RIS). Their job was to integrate the company's Radiology Work-flow product with the hospital's IT infrastructure.
If you are familiar with HL7 and have had the opportunity to analyze HL7 messages coming from different HL7 systems providers, this can be a very non-trivial task. Site specific variations, fields formatted incorrectly, field lengths not adhered to, missing required fields, or fields put in the wrong location, misinterpretations of the standard, misuse of transaction types, and short-cuts taken by vendors, are the norm, not the exception.
As an analyst, faced with the variability of HL7 and the often incomplete, or inaccurate message definition provided by the customer, the job of interconnecting two systems is a daunting task indeed.
This is where HL7Spy comes in. HL7Spy has been designed to help HL7 analysts and programmers quickly interpret, and characterize very large HL7 message streams. It quickly reads in thousands of messages and provides detailed statistics at the message, field, component, and sub-component levels. This information provides great insight into the nature of the message exchange and takes the guess work out of know which fields are filled in

User's Manual
when, and with what values.
HL7Spy also includes features for viewing, editing, search, sorting, sending and receiving HL7, retrieving messages from databases, viewing messages in hexadecimal format, and a host of other features that make HL7Spy an invaluable tool for on-going maintenance and troubleshooting of HL7 interfaces.
6 Introduction & Overview
User Interface Overview
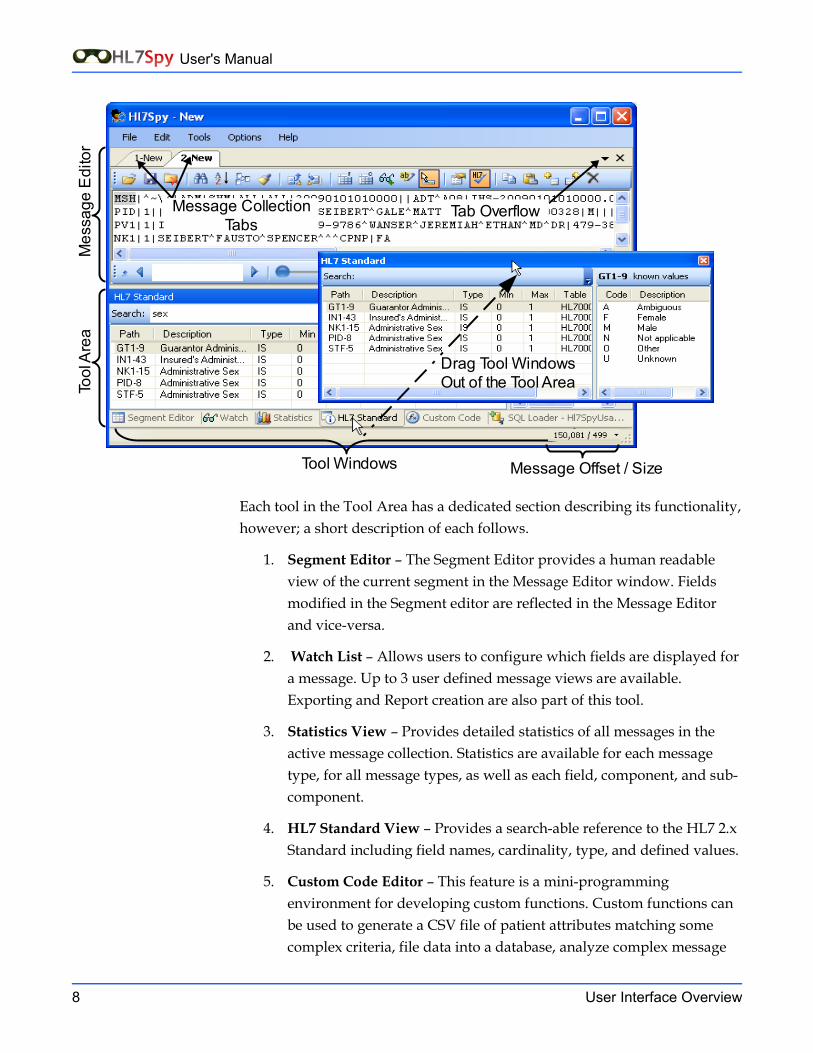
Main Areas of HL7SpyThe figure below shows the main areas of the HL7Spy user interface. The two main regions of the UI are the Message Editor region, and the Tool region.
Each tab in the Message Editor region represents a collection of messages, often referred to as a Message Collection in this document. Messages can come from:
• a File
• a TCP/IP port
• the result of a query against an existing collection
• a Database query
• or generated programatically using the Custom Code feature
It is not uncommon to have 100,000 or more messages open within a single tab in HL7Spy. The larger the sample of messages is, the better chance statistically, that you will find anomalies in the HL7 stream. The Message Editor functionality is described in the next section in detail.
The second main area of the UI is the Tool area which contains some of the tools that are available for acquiring, describing, editing, and manipulating messages in the currently selected Message Editor tab.
As shown in the figure below, windows within the tool area can be pulled out of the tool area, and moved to the desktop by clicking and holding the mouse button on the tab portion of the tool window. Tool windows that are dragged to the desktop “remember” their position between invocations of the product.
User's Manual
Each tool in the Tool Area has a dedicated section describing its functionality, however; a short description of each follows.
1. Segment Editor – The Segment Editor provides a human readable view of the current segment in the Message Editor window. Fields modified in the Segment editor are reflected in the Message Editor and vice-versa.
2. Watch List – Allows users to configure which fields are displayed for a message. Up to 3 user defined message views are available. Exporting and Report creation are also part of this tool.
3. Statistics View – Provides detailed statistics of all messages in the active message collection. Statistics are available for each message type, for all message types, as well as each field, component, and sub-component.
4. HL7 Standard View – Provides a search-able reference to the HL7 2.x Standard including field names, cardinality, type, and defined values.
5. Custom Code Editor – This feature is a mini-programming environment for developing custom functions. Custom functions can be used to generate a CSV file of patient attributes matching some complex criteria, file data into a database, analyze complex message
8 User Interface Overview
Mes
sage
Edi
tor
Tool
Are
a
Message Offset / Size
Tab OverflowMessage CollectionTabs
Drag Tool WindowsOut of the Tool Area
Tool Windows

User's Manual
exchanges, or any task that isn't directly supported by HL7Spy.
6. SQL Loader – Provides a mechanism to retrieve HL7 messages directly from a database by writing SQL select statements. The SQL Loader is able to automatically detect which column contains the message data, and pipes this data to the Message Editor window.
Introduction & Overview 9
HL7Spy Reference
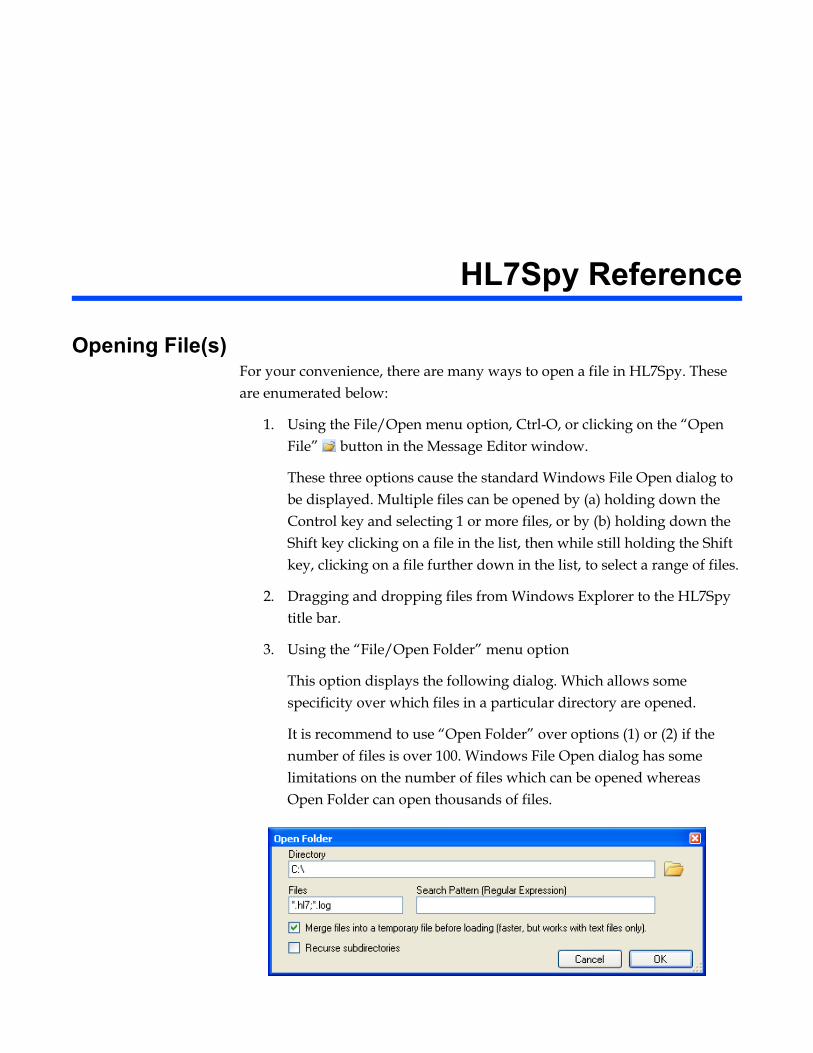
Opening File(s)For your convenience, there are many ways to open a file in HL7Spy. These are enumerated below:
1. Using the File/Open menu option, Ctrl-O, or clicking on the “Open File” button in the Message Editor window.
These three options cause the standard Windows File Open dialog to be displayed. Multiple files can be opened by (a) holding down the Control key and selecting 1 or more files, or by (b) holding down the Shift key clicking on a file in the list, then while still holding the Shift key, clicking on a file further down in the list, to select a range of files.
2. Dragging and dropping files from Windows Explorer to the HL7Spy title bar.
3. Using the “File/Open Folder” menu option
This option displays the following dialog. Which allows some specificity over which files in a particular directory are opened.
It is recommend to use “Open Folder” over options (1) or (2) if the number of files is over 100. Windows File Open dialog has some limitations on the number of files which can be opened whereas Open Folder can open thousands of files.

User's Manual
The options in this dialog are described here:
1. Directory – Specify the path of the folder where the HL7 message files are located, or click on the folder icon to select a path.
2. Files - Specify the extension of the files to be opened. More than one extension can be specified by separating extensions with a semicolon.
3. Search Pattern – Allows you to specify a regular expression that will be run on the text of each file. If the regular expression finds a match the file will be included, otherwise it will be ignored.
4. Merge Files into a temporary file before loading – If you know the files are text, i.e. not gzip, bzip2, or zip format, then using this option will dramatically decrease the time it takes HL7Spy to open thousands of files.
5. Recurse Subdirectories - If selected, files files in subdirectories of the selected directory will be included; otherwise, only files in the directory will be included.
By default, tabs are displayed in the order of the first message in the tab. This behavior can be disabled from the “Options/Order Tabs by MSH-7”.
Opening More than 1 File
If you are opening multiple files at a time, HL7Spy displays the following dialog. This dialog allows you to control whether you want the files to be loaded into a single message tab, or whether a tab should be created for each file.
If you choose to load the messages into a single tab, then the options for controlling how the messages should be sorted are enabled.
12 HL7Spy Reference

User's Manual
Note: HL7Spy automatically disables the “Tab Per File” option if more than 20 files are loaded at a time.
Opening Large Files
If you open a file that is more than 50MB in size, HL7Spy gives you the opportunity to reduce the amount of data that is read using the following dialog.
By dragging the scrollers, you can control which section of the file will be read in. HL7Spy will indicate the offset and size of the section of the file that will be read, as well as the date range.
If the “Continuous” option is selected, the data range is displayed while the scrollers are dragged, otherwise the data range is displayed when the scrollers are released. Having “Continuous” selected may perform poorly on a busy system.
It is also possible to limit the number of messages that are read in by setting a value other than zero in the Load First TextBox.
If you do not wish to limit the data that is being loaded, just click continue and HL7Spy will operate as normal.
File Types Supported
HL7Spy will detect and open the following files types:
• Standard 0x0bMSH...0x1c0x1d
Introduction & Overview 13

User's Manual
• Single message in the file with no framing bytes
• Carriage return separated messages
• Carriage return with Line Feed separated messages
• Japanese framing (omits the 0x0b character at the beginning of the message)
• EGate log file format
• Pyxis log file format
• STC Datagate formats (several flavors)
• IDX ConnectR log format
• Messages encoded in UTF16 format
Message streams that have been compressed in ZIP, GZIP, or BZIP2 will be automatically uncompressed before loading.
If HL7Spy does not correctly open your HL7 file format, please see the Advanced Topics section entitled “Message Framing” for details on how to configure HL7Spy to open more unconventional formats.
Message EditorThe Message Editor is the focal point of the HL7Spy application and as such, has the most complex UI with the most features and options. Most other tools within the application interact, or are coupled in some way to the Message Editor window.
Message Editor Tabs
Many tabs can be open simultaneous. Each tab in the Message Editor represents a collection of messages, often referred to as a Message Collection in this document. Messages Collections can come from:
• a File
• a TCP/IP port
• the result of a query against an existing collection
• a Database query
• or generated programatically using the Custom Code feature
14 HL7Spy Reference

User's Manual
The active Message Collection, or active tab, is used in context with many of the other tools within the application. For instance, the Segment Editor, Watch List, and Statistics View, always show details for the active Message Collection.
Navigation Bar
Messages in the Message Tab can be thought of as being stacked together, one on top of the other as shown in the figure below.
The first message is identified with an index of 1, and the last message with index equal to the number of messages in the current Message Collection. The current index is the index of the current message being displayed in the active Message Editor tab.
The Navigation Bar is provided as a mechanism to quickly navigate through a large Message Collection. It always operates within context of the active Message Editor Tab. A description of each of its components follows:
1. Change Navigation Bar Position – toggles the position of the Navigation Bar from being docked on the bottom or top of the Message Editor window.
2. Previous Match – displays a message matching the search text in (3) that has a message index less than the current index. If no text is
Introduction & Overview 15
MSH|^~\&|ADM|SHMPID|1||908171717PV1|1|E|P188^R14NK1|1|WOODLIFF^DIN1|1|MDCR||||||||||||||ORC|NW|90101010400.1438||
MSH|^~\&|ADM|SHMPID|1||908171717PV1|1|E|P188^R14NK1|1|WOODLIFF^DIN1|1|MDCR||||||||||||||ORC|NW|90101010400.1438||
MSH|^~\&|ADM|SHMPID|1||908171717PV1|1|E|P188^R14NK1|1|WOODLIFF^DIN1|1|MDCR||||||||||||||ORC|NW|90101010400.1438||
MSH|^~\&|ADM|SHMPID|1||908171717PV1|1|E|P188^R14NK1|1|WOODLIFF^DIN1|1|MDCR||||||||||||||ORC|NW|90101010400.1438||
Index 1
Index NMSH|^~\&|ADM|SHM||||PID|1||908171717||||PV1|1|E|P188^R14||||NK1|1|WOODLIFF^DIN1|1|MDCR||||||||||||||ORC|NW|90101010400||OBR||90101010400||||
CurrentIndex
3. Quick Search
2. Previous Match
4. Next Match
1. Change Navigation
Bar Position
5. Message Scroller
11. Goto Last
Message
10. Next Message
9. Total Number of Messages
8. Current Message
Index
7. Previous Message
6. Goto First
Message

User's Manual
present this button behaves the same as (7).
3. Quick Search – entering text in this textbox and hitting the enter key will find the next message in the message collection that contains the specified text. Hitting the enter key subsequent times will repeat the previous search.
Text within the message body that contains the specified text are highlighted in yellow to make them easily visible.
4. Next Match – displays a message matching the search text in (3) that has a message index greater than the current index. If no text is present this button behaves the same as (10).
5. Message Scroller – provides course grain navigation through a large message collection. Moving the scroller 25% of the way along its track will move the current index to a value equal to 25% of the total number of message in the message collection.
6. Goto First Message – moves the current index to the first message in the message collection.
7. Previous Message – make the message previous to the current message index the active message (current index = current index - 1).
8. Current Message Index – the current message index is the active message, or currently displayed message in the message editor.
The current message index can be edited, by clicking on the textbox, or hitting Control-G (Goto), and typing in a value between 1 and the number of items in the message collection.
9. Total Number of Messages – displays the total number of messages in the active message collection.
10. Next Message – make the next message in the message collection the active message (current index = current index + 1).
11. Goto Last Message - moves the current index to the last message in the message collection.
16 HL7Spy Reference

User's Manual
Editor Toolbar
1. Open File – Opens a new file, in a new tab. See section “OpeningFile(s)“ on page 11.
2. Save File – Saving allows changes made to a message collection to be persisted to disk. HL7Spy always saves the contents of a message collection to a new file.
Clicking on the “Save File” toolbar button displays the following dialog which provides control over the location and format of the files being saved.
When the “Save” button is clicked, each message in the message collection will be written to the file specified in the “File Path” textbox, using the specified character encoding.
The Frame Start/Frame End specify how messages are delimited. By default, Standard HL7 Message Framing is used with each message preceded by the byte 0x0B and proceeded by 0x1C0X1D. This results in messages stored with the following format: 0BMSH....1C0D0BMSH...1C0D.....
Introduction & Overview 17
1. Open File
2. Save File
3. Close File
4. Search
5. SortMessages
6. MergeTabs
7. Clean-upMessages
8. Send HL7
9. Receive HL7
10. Field Statistics
11. Component Statistics
12. Add Watch
13. HighlightField
14. Field Tooltips
15. Change Character Encoding
16. ChangeMessage Framing
17. Message Properties
18. Display using |^~\&
19. Copy Message
20. Paste Message
21. Insert Message Before
22. Insert Message
After
23. Delete Message
24. Message Error
User's Manual
3. Close File – Closes the active message tab. Files can also be closed by using the File/Close menu option, clicking on a tab with the middle mouse button, or using the Control-Q key combination.
4. Search – In addition to the Quick Search functionality provided in the Navigation Bar, HL7Spy provides another, more feature reach search tool. See section “Searching“ on page 22, for more details.
5. Sort – Allows messages within a Message Collection to be sorted by one or more HL7 fields, or by message size/offset. Changing the order of the messages in the Message Collection affects the order in which messages are used in other parts of the application such as HL7 Send, the Message Editor, etc. See section “Sorting” on page 23, for more details on message sorting.
6. Merge Message Collections – Messages from multiple tabs can be merged together into a single tab using the “Merge Messages” dialog. See section “Merging Message Collections” on page 25, for more information on how to use this feature.
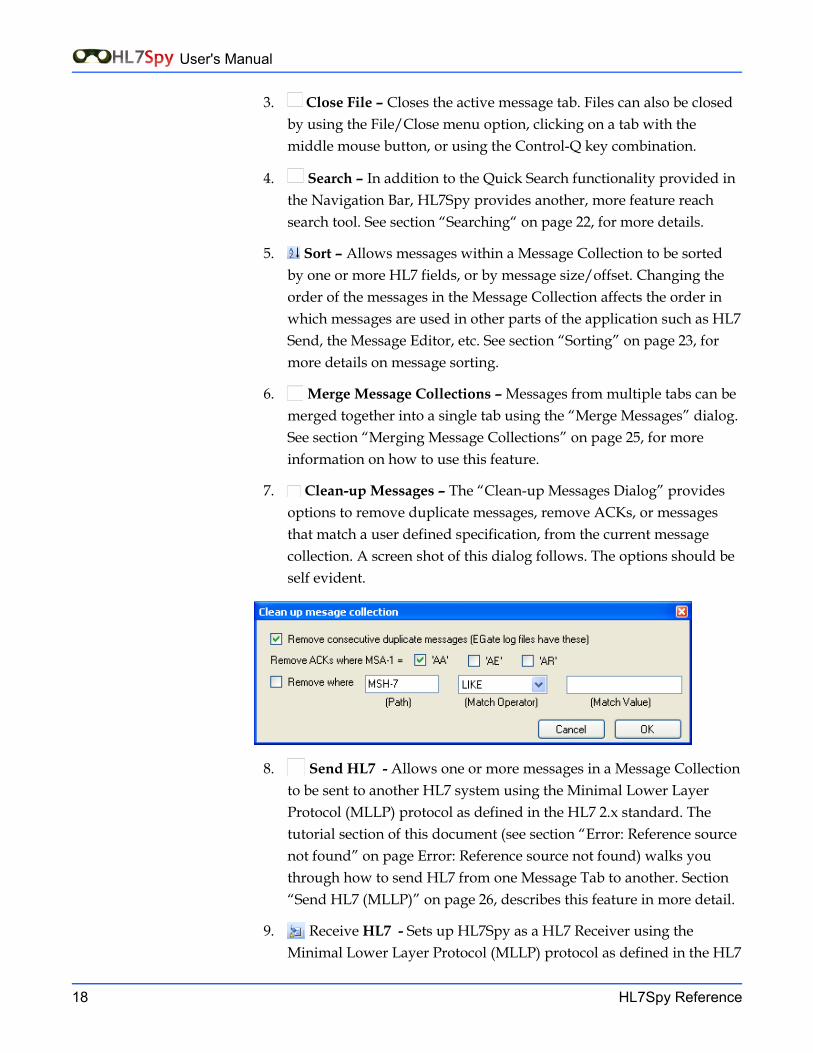
7. Clean-up Messages – The “Clean-up Messages Dialog” provides options to remove duplicate messages, remove ACKs, or messages that match a user defined specification, from the current message collection. A screen shot of this dialog follows. The options should be self evident.
8. Send HL7 - Allows one or more messages in a Message Collection to be sent to another HL7 system using the Minimal Lower Layer Protocol (MLLP) protocol as defined in the HL7 2.x standard. The tutorial section of this document (see section “Error: Reference sourcenot found” on page Error: Reference source not found) walks you through how to send HL7 from one Message Tab to another. Section “Send HL7 (MLLP)” on page 26, describes this feature in more detail.
9. Receive HL7 - Sets up HL7Spy as a HL7 Receiver using the Minimal Lower Layer Protocol (MLLP) protocol as defined in the HL7
18 HL7Spy Reference

User's Manual
2.x standard. The tutorial section of this document (see section “Error:Reference source not found” on page Error: Reference source notfound) walks you through how to receive HL7 from another Message Tab acting as a sender. Section “Receive HL7 (MLLP)” on page 28, describes this feature in more detail.
10. Field Statistics – Provides statistics for a specific HL7 Field for all messages in a Message Collection. This is a very powerful feature of HL7Spy because it gives you the distribution of all values found in a given field. If you are integrating two systems together this is invaluable information.
This functionality can also be accessed by holding down the Control key and double-clicking on a field in the Message Editor, by right-clicking a field in the Message Editor and selecting the “Field Statistics” menu option, or by selecting “Tools/Calculate Field Statistics” from the main menu.
The tutorial (see section “Error: Reference source not found” on page Error: Reference source not found) walks much of this functionality. If you have not taken the time to go through this section, we recommend you do so now.
Section “Field and Component Statistics” on page 30, describes this feature in more detail.
11. Component Statistics – Provides the same functionality as (10) Field Statistics, except the statistics are at the Component level instead of the Field level.
This functionality can also be accessed by double-clicking on a field in the Message Editor, by right-clicking a field in the Message Editor and selecting the “Component Statistics” menu option, or by selecting “Tools/Calculate Components Statistics” from the main menu.
Section “Field and Component Statistics” on page 30, describes this feature in more detail.
12. Add Watch – This button adds the field currently selected in the Message Editor window to the active Watch List. The tutorial (see section “Error: Reference source not found” on page Error: Referencesource not found) walks through a demonstration of this feature.
13. Highlight Fields by Field Name– Use this feature to highlight a particular field by the name of the field. For instance, typing in
Introduction & Overview 19
User's Manual
“doctor” in the pop-up dialog will highlight all the doctor fields in the message, e.g. Attending Doctor, Referring Doctor, etc.
14. Field Tooltips – By default, tooltips are displayed when you move the cursor around, or click on fields, in the Message Editor. Tooltips can be disabled by clicking on this button.
15. Change Character Encoding – Use this option to change the character set that HL7Spy uses to display messages.
16. Message Framing – Messages within a stream, such as a file, are identified with a start signature, and an end signature. In HL7Spy this is called Message Framing. This option allows control over how HL7Spy interprets the start and end of a message. See section “Message Framing” on page 35, for more details.
17. Message Properties/Hex Editor – displays a hexadecimal display of the current message in the Message Editor as well as some information about it's character encoding, the file the message belongs to, the message offset and size, and whether it has been modified or not. Section “” on page , covers this feature in more detail.
18. Show Messages Using Standard Encoding – HL7 allows messages to be encoded using characters other than the beloved |^~\& characters found in most HL7 Messages. Why anyone would use characters other than these is beyond understanding, however; the standard permits it. If you are used to seeing messages using the standard encoding characters, your brain gets used to viewing and automatically parsing this format. Switch the encoding characters and your brain suddenly has a very difficult time processing what it sees.
Enabling this feature (the default), automatically displays any message using the default encoding. It does not change how the message is sent stored on disk, or how it is sent out via MLLP, just how it is displayed in the Message Editor
19. Copy Message To Clipboard – Copies the currently displayed message in the Message Editor, to the clipboard.
20. Paste Message – Pastes the message currently in the clipboard into
the current Message Collection. When “Paste Message” is selected, a dialog pops up and asks whether the message should be 1) inserted before the current message, 2) inserted after the current message, or 3)
20 HL7Spy Reference
User's Manual
overwrite the current message.
21. Insert New Message Before – Inserts a new, empty HL7 Message. The new message is placed before the current message in the Message Editor.
22. Insert New Message After – Inserts a new, empty HL7 Message. The new message is placed after the current message in the Message Editor.
23. Delete Current Message – Removes the current message from the active Message Editor.
Note: the message data on disk is not removed, it is just removed from the visible Message Collection. However, saving the file will remove the message.
24. Message Error – This icon is displayed if there was a problem parsing the current message in the Message Editor. Hovering the mouse over the icon will give you an indication what the error is.
Introduction & Overview 21
User's Manual
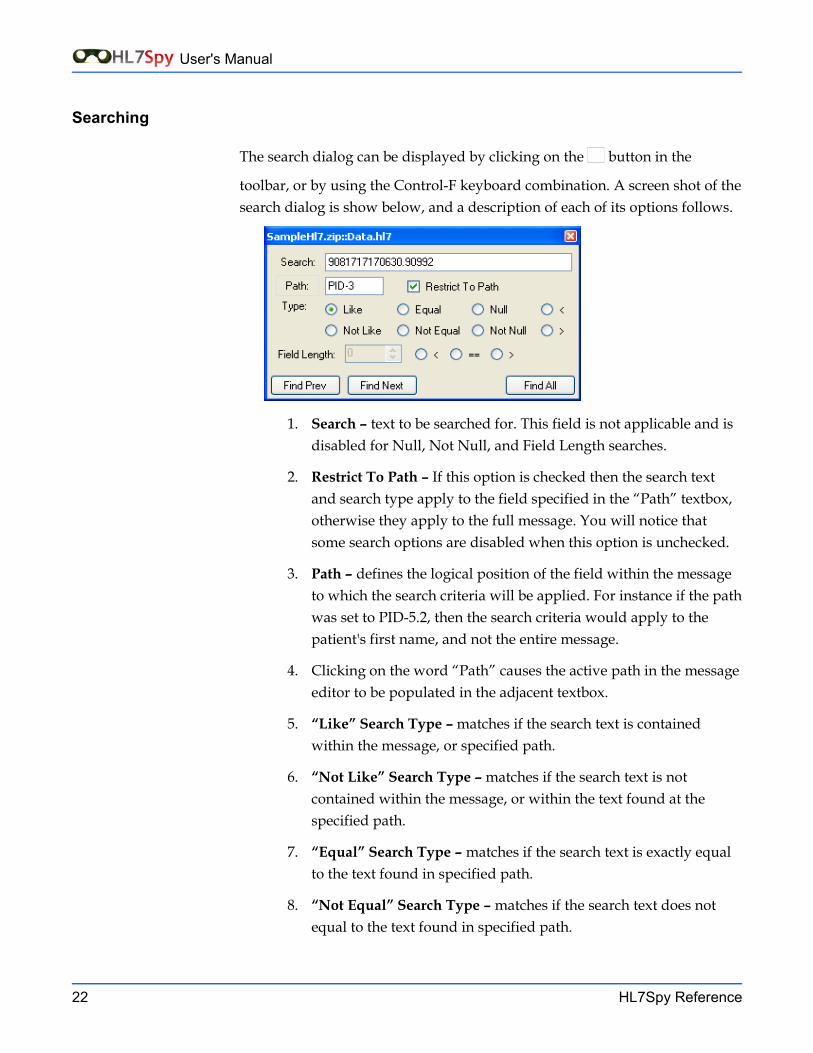
Searching
The search dialog can be displayed by clicking on the button in the
toolbar, or by using the Control-F keyboard combination. A screen shot of the search dialog is show below, and a description of each of its options follows.
1. Search – text to be searched for. This field is not applicable and is disabled for Null, Not Null, and Field Length searches.
2. Restrict To Path – If this option is checked then the search text and search type apply to the field specified in the “Path” textbox, otherwise they apply to the full message. You will notice that some search options are disabled when this option is unchecked.
3. Path – defines the logical position of the field within the message to which the search criteria will be applied. For instance if the path was set to PID-5.2, then the search criteria would apply to the patient's first name, and not the entire message.
4. Clicking on the word “Path” causes the active path in the message editor to be populated in the adjacent textbox.
5. “Like” Search Type – matches if the search text is contained within the message, or specified path.
6. “Not Like” Search Type – matches if the search text is not contained within the message, or within the text found at the specified path.
7. “Equal” Search Type – matches if the search text is exactly equal to the text found in specified path.
8. “Not Equal” Search Type – matches if the search text does not equal to the text found in specified path.
22 HL7Spy Reference

User's Manual
9. “Null” Search Type – matches if the search text is found to be null at specified path.
10. “Not Null” Search Type – matches if the search text is found to be not null at specified path.
11. “<” Search Type – matches if the search text is found to be less than the value found at specified path. This search type is most useful for HL7 Date/Time data types.
12. “>” Search Type – matches if the search text is found to be greater than the value found at specified path. This search type is most useful for HL7 Date/Time data types.
13. Field Length Search – this search option allows you to search for fields with sizes that are less than, greater than, or equal to a specified value.
14. Find Prev – finds the previous message that matches the specified search criteria.
15. Find Next – finds the next message that matches the specified search criteria.
16. Find All – finds all messages that matches the specified search criteria and puts these messages into a separate message tab.
Sorting
The first question you might ask is “why would you want to sort messages?” There are a few scenarios where this is useful.
1. Messages in a given file have been saved in a different order from how they were received.
2. You have opened several files into a single Message Tab using the “Open Folder” feature (see “Opening More than 1 File” on page 12). In this case the files are not likely to be opened in the correct order and the messages in the Message Tab will be out-of-order.
3. You have “Merged” to Message Collections into a new collection and wish to order the messages in the new message collection by the Control ID (MSH-10) so that they are in time sequence order.
4. You want to find the largest message in a Message Collection.
Introduction & Overview 23
User's Manual
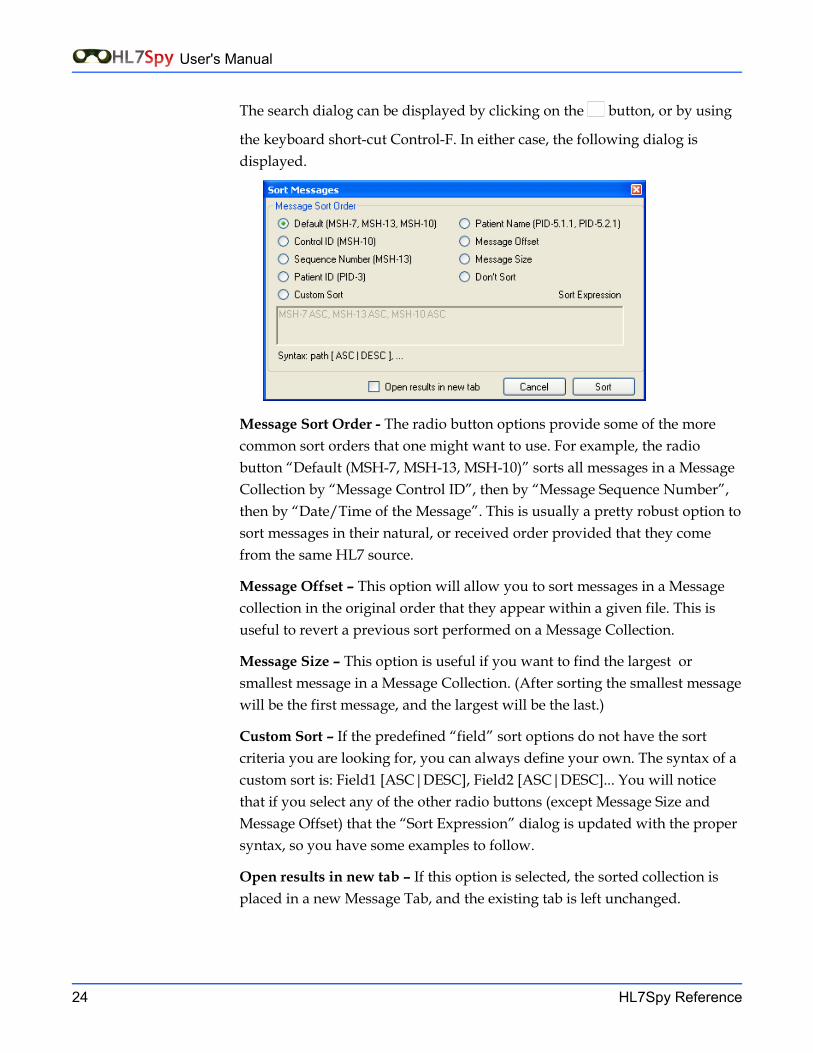
The search dialog can be displayed by clicking on the button, or by using
the keyboard short-cut Control-F. In either case, the following dialog is displayed.
Message Sort Order - The radio button options provide some of the more common sort orders that one might want to use. For example, the radio button “Default (MSH-7, MSH-13, MSH-10)” sorts all messages in a Message Collection by “Message Control ID”, then by “Message Sequence Number”, then by “Date/Time of the Message”. This is usually a pretty robust option to sort messages in their natural, or received order provided that they come from the same HL7 source.
Message Offset – This option will allow you to sort messages in a Message collection in the original order that they appear within a given file. This is useful to revert a previous sort performed on a Message Collection.
Message Size – This option is useful if you want to find the largest or smallest message in a Message Collection. (After sorting the smallest message will be the first message, and the largest will be the last.)
Custom Sort – If the predefined “field” sort options do not have the sort criteria you are looking for, you can always define your own. The syntax of a custom sort is: Field1 [ASC|DESC], Field2 [ASC|DESC]... You will notice that if you select any of the other radio buttons (except Message Size and Message Offset) that the “Sort Expression” dialog is updated with the proper syntax, so you have some examples to follow.
Open results in new tab – If this option is selected, the sorted collection is placed in a new Message Tab, and the existing tab is left unchanged.
24 HL7Spy Reference

User's Manual
Merging Message Collections
The “Merge Message Collections” dialog can be activated by clicking on the button in the Message Editor toolbar, or selecting the “Tools/Merge” from
the main menu. As a result, the following dialog will be displayed.
Message Tab Selection – The top portion of the dialog displays the currently loaded Collections. To include, or excluded, a specific Message Collection, just toggle the “Select” checkbox adjacent to the Message Collection. For example, in the figure above, the messages from “SampleHl7.zip::Data.hl7” and “Anonymize.txt” will be included in the newly created Message Collection, “Data.hl7” will not.
Sort Order – This set of options control how messages will be sorted in the newly created Message Collection. Only the most common sort criteria are available here. To perform more complex sorting, just click “OK” and use the more feature rich “Sort Message” dialog (see section “Sorting” on page 23.
Introduction & Overview 25

User's Manual
Send HL7 (MLLP)
HL7Spy has the ability to send HL7 messages to external systems using the HL7 Standard protocol known as the Minimum Lower Layer Protocol (MLLP).
The MLLP protocol assumes there are two participants in the communication, a sender and a receiver. HL7Spy can act as either a sender or a receiver. In section “Error: Reference source not found” on page Error:Reference source not found, there is a demonstration of HL7Spy acting as both by sending messages from 1 message tab (the Sender), to another message tab (the Receiver). If you have not already followed this tutorial, we recommend you do so now. It will give you a better feel for what is involved.
To active the “Send HL7” window, use the “Tools/Send Messages (MLLP)” option in the main menu, or click on the “Send HL7” button in the Message Editor's toolbar. Doing so will cause the “Send HL7” window to be displayed to the right of the current Message Editor as shown in the figure below.
“Send HL7” windows are always bound to a specific message collection. In the figure above, it is bound to the “SampleHl7.zip::Data.hl7” Message Collection as can be seen by the title bar.
It is worth noting here that like other windows that are docked in this location, this window can be pulled to the desktop by clicking the title bar of the window and dragging and dropping it to the desktop.
In order to communicate with an external system, select an existing configuration in the “Destinations” drop down list (1). If there are no
26 HL7Spy Reference
(1)
User's Manual
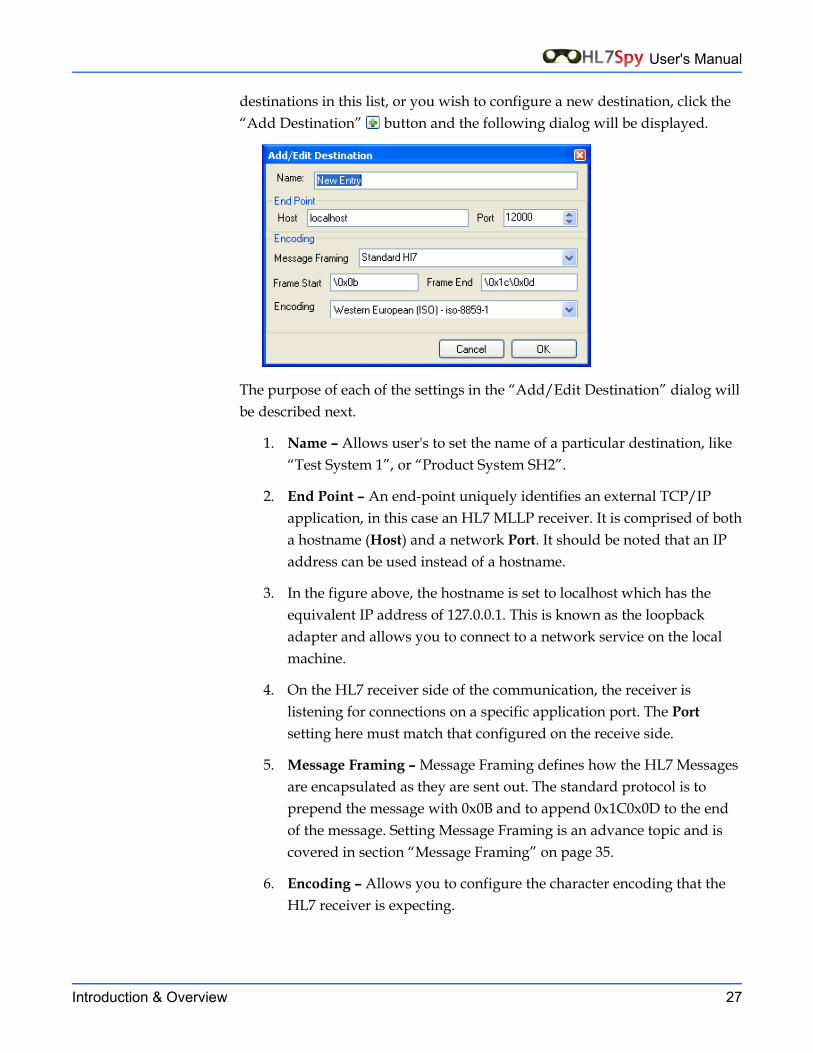
destinations in this list, or you wish to configure a new destination, click the “Add Destination” button and the following dialog will be displayed.
The purpose of each of the settings in the “Add/Edit Destination” dialog will be described next.
1. Name – Allows user's to set the name of a particular destination, like “Test System 1”, or “Product System SH2”.
2. End Point – An end-point uniquely identifies an external TCP/IP application, in this case an HL7 MLLP receiver. It is comprised of both a hostname (Host) and a network Port. It should be noted that an IP address can be used instead of a hostname.
3. In the figure above, the hostname is set to localhost which has the equivalent IP address of 127.0.0.1. This is known as the loopback adapter and allows you to connect to a network service on the local machine.
4. On the HL7 receiver side of the communication, the receiver is listening for connections on a specific application port. The Port setting here must match that configured on the receive side.
5. Message Framing – Message Framing defines how the HL7 Messages are encapsulated as they are sent out. The standard protocol is to prepend the message with 0x0B and to append 0x1C0x0D to the end of the message. Setting Message Framing is an advance topic and is covered in section “Message Framing” on page 35.
6. Encoding – Allows you to configure the character encoding that the HL7 receiver is expecting.
Introduction & Overview 27
User's Manual
Receive HL7 (MLLP)
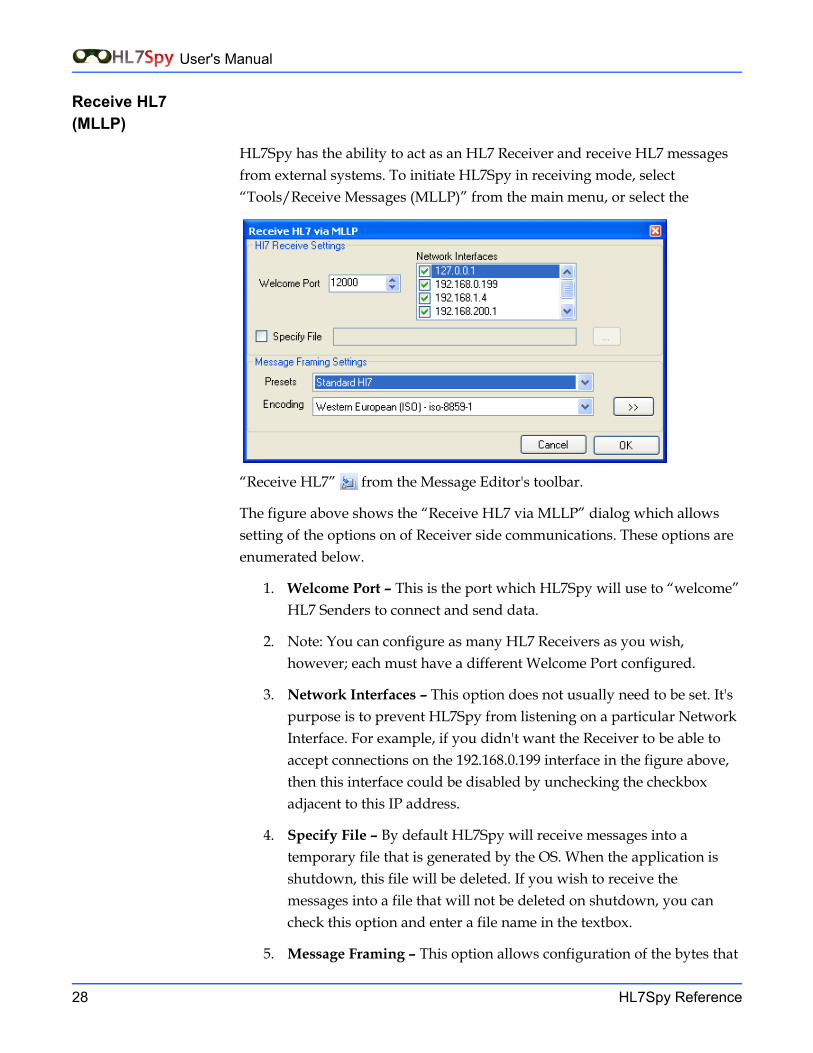
HL7Spy has the ability to act as an HL7 Receiver and receive HL7 messages from external systems. To initiate HL7Spy in receiving mode, select “Tools/Receive Messages (MLLP)” from the main menu, or select the
“Receive HL7” from the Message Editor's toolbar.
The figure above shows the “Receive HL7 via MLLP” dialog which allows setting of the options on of Receiver side communications. These options are enumerated below.
1. Welcome Port – This is the port which HL7Spy will use to “welcome” HL7 Senders to connect and send data.
2. Note: You can configure as many HL7 Receivers as you wish, however; each must have a different Welcome Port configured.
3. Network Interfaces – This option does not usually need to be set. It's purpose is to prevent HL7Spy from listening on a particular Network Interface. For example, if you didn't want the Receiver to be able to accept connections on the 192.168.0.199 interface in the figure above, then this interface could be disabled by unchecking the checkbox adjacent to this IP address.
4. Specify File – By default HL7Spy will receive messages into a temporary file that is generated by the OS. When the application is shutdown, this file will be deleted. If you wish to receive the messages into a file that will not be deleted on shutdown, you can check this option and enter a file name in the textbox.
5. Message Framing – This option allows configuration of the bytes that
28 HL7Spy Reference

User's Manual
the receiver expects to encapsulate the HL7 message. The standard protocol is to prepend the message with 0x0B and to append 0x1C0x0D to the end of the message and does not usually need to be changed. However; there are some instances where you might need to modify the framing bytes. A more detailed discussion of Message Framing can be found in section “Message Framing” on page 35.
Once you have configured an HL7Spy receiver, and selected the “OK” button in the “Receive HL7 via MLLP” dialog, a message tab will be created with 0 messages. The name of the tab is “Mllp:Welcome Port”, where the Welcome Port is the integer value set in (1).
The HL7 Receiver message tab looks like the standard message tab that you would see when you open a file, however; this tab is bound to the configured network end-point and is capable of receiving HL7 messages from 1 or more external systems.
To exit the HL7 Receiver, just close the tab that is hosting it.
Introduction & Overview 29

User's Manual
Field and Component Statistics
When configuring, or troubleshooting, HL7 interfaces it is often useful (if not always) to know what values to expect in particular field, what are the minimum and maximum lengths expected, how often the value is null, etc. The “Statistics Tool” tab provides high-level statistics for all messages and fields, whereas the Field and Component Statistics UI displays more detailed statistics for an individual field, or component.
The Field Statistics and Component Statistics feature share the same UI since they have identical functionality. The difference being that the former provides statistics at the field level, and the later at the component level.
The tutorial (see section “Error: Reference source not found” on page Error:Reference source not found) demonstrates this difference quite well. If you have not taken the time to go through this section, we recommend you do so
now.
The figure above are the statistics for field PID-8. A description of fields and capabilities of this window follows:
1. Title Bar – The title bar of this window has the following information. HL7 Field Path, Name of HL7 Field – Message Collection.
2. Not Null – Shows the number of messages in the active Message Tab where the selected field was not empty. In the figure, all 10028 messages had a value set for PID-8.
30 HL7Spy Reference

User's Manual
3. Null – Shows the number of messages in the Message Tab that had an empty field. In this example, no messages had an empty value for PID-8.
Note: If there are fields with Null values, you can click on the text “Null” and the Message Editor will find the next Null value. Holding down the Control key and clicking on the text “Null” will move the Message Editor to the previous message with that field being NULL.
4. Unique – Shows the number of unique values found for the selected field in the active message collection. In the above example, there are only 3 unique values “M”, “F”, and “U”.
5. No SEG – Where SEG represents the segment name of the selected field. This number describes how many messages in the active message collection were missing the segment of the requested field. This is, of course, slightly different then what is tracked in the “Null” field since having a segment and the value being NULL is different than not having the segment at all.
6. Field Value Grid – These are the unique values for all messages in the active Message Tab, for the specified field. As can be seen from the figure, each value has a count (labeled as Num), and a length (labeled as Len). The default order of the grid is from most common to least common value, however; this can be changed by clicking on one of the columns of the grid.
In the example above, there are 5149 messages for female patients, 4863 messages for male patients, and 16 messages where the technologist couldn't determine the patients sex. All fields have a length of 1 as you would expect for this field.
7. All Button – Clicking the “All” button will cause HL7Spy to create a new Message Tab containing all messages where the selected field equals the row selected in the Field Value Grid (6).
In the example above, clicking the “All” button would cause a new Message Tab to be created with all the messages where PID-8 has the value of “U”.
8. Field Value Navigation – Clicking the left and right arrows buttons cause the message Editor to move to the previous and next message that have a field matching the value selected in the Field Value Grid (6), respectively.
Introduction & Overview 31
User's Manual
9. Right Click Menu – Right-clicking on a row in the Field Value Grid (6) displays a menu with search criteria available for the selected value.
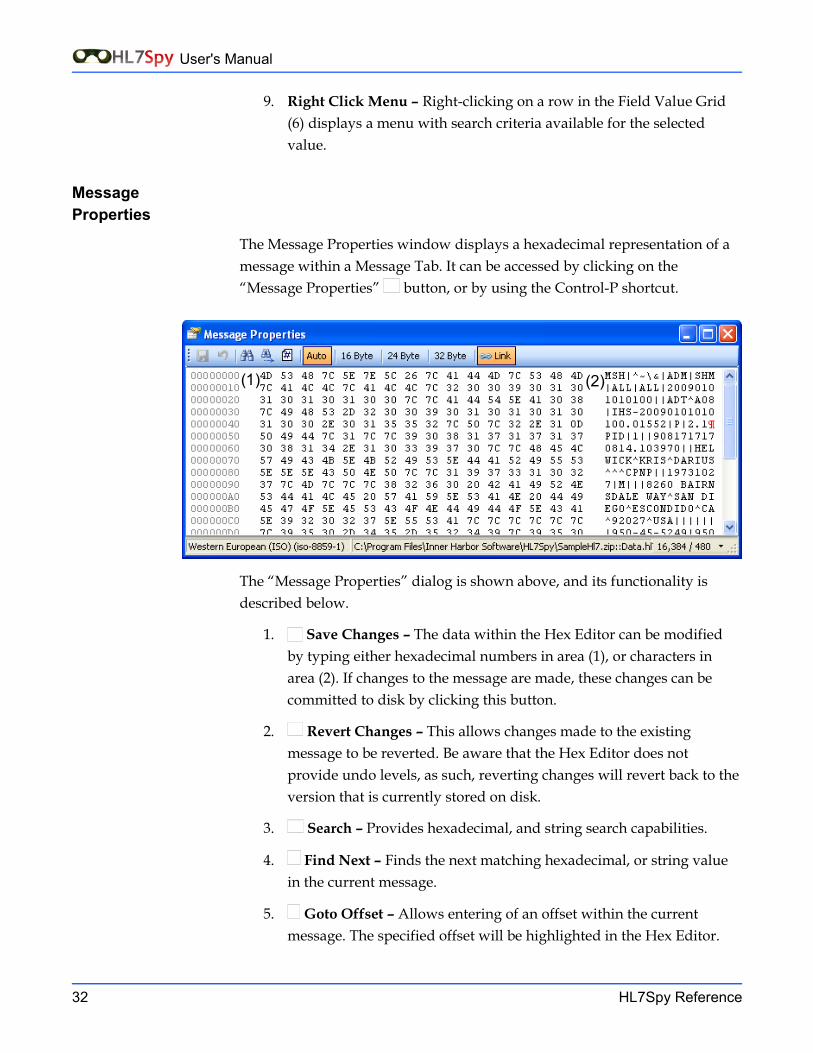
Message Properties
The Message Properties window displays a hexadecimal representation of a message within a Message Tab. It can be accessed by clicking on the “Message Properties” button, or by using the Control-P shortcut.
The “Message Properties” dialog is shown above, and its functionality is described below.
1. Save Changes – The data within the Hex Editor can be modified by typing either hexadecimal numbers in area (1), or characters in area (2). If changes to the message are made, these changes can be committed to disk by clicking this button.
2. Revert Changes – This allows changes made to the existing message to be reverted. Be aware that the Hex Editor does not provide undo levels, as such, reverting changes will revert back to the version that is currently stored on disk.
3. Search – Provides hexadecimal, and string search capabilities.
4. Find Next – Finds the next matching hexadecimal, or string value in the current message.
5. Goto Offset – Allows entering of an offset within the current message. The specified offset will be highlighted in the Hex Editor.
32 HL7Spy Reference
(1) (2)

User's Manual
6. Display Options Auto, 16 Byte, 24 Byte, and 32 Byte- Controls how many hexadecimal byte pairs are displayed per line. For instance, selecting the 16 Byte option will display 16 hexadecimal bytes per line. Auto will find the best fit based on the size of the Message Properties window.
7. Link To Message Editor – If this option is selected (the default), as the Hex Editor will display the same message that is displayed in the Message Editor, and will advance as the Message Editor is advanced. Otherwise, if the option is disabled, the Hex Editor will continue to display the same message regardless of what is displayed in the Message Editor.
Introduction & Overview 33
Advanced Topics
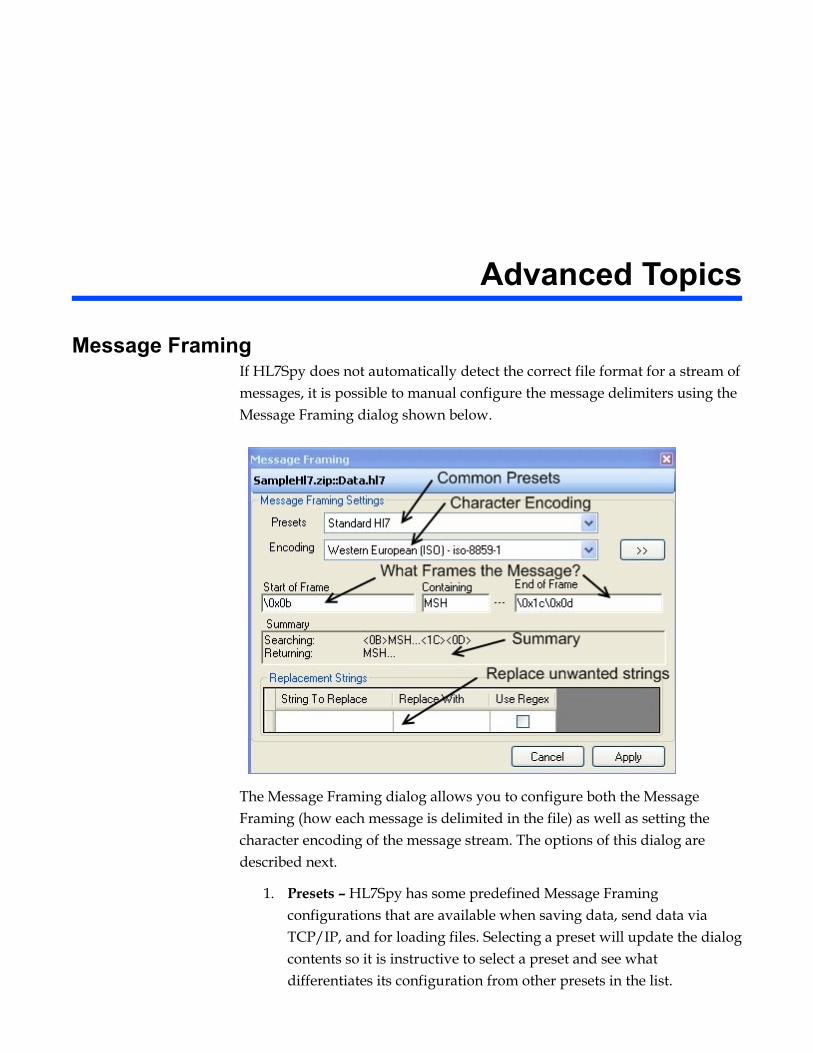
Message FramingIf HL7Spy does not automatically detect the correct file format for a stream of messages, it is possible to manual configure the message delimiters using the Message Framing dialog shown below.
The Message Framing dialog allows you to configure both the Message Framing (how each message is delimited in the file) as well as setting the character encoding of the message stream. The options of this dialog are described next.
1. Presets – HL7Spy has some predefined Message Framing configurations that are available when saving data, send data via TCP/IP, and for loading files. Selecting a preset will update the dialog contents so it is instructive to select a preset and see what differentiates its configuration from other presets in the list.
User's Manual
2. Encoding – Select one of the many character encodings provided by the Windows operating system.
3. Start of Frame – Defines the bytes (in hexadecimal format) that indicate the start of an HL7 message. For the Standard HL7 preset we are using 0x0b as defined for the Minimum Lower Layer Protocol (MLLP), or HL7 over TCP/IP. Note: It is possible to specify nothing here, which is the case for some of the other presets.
4. Containing – Besides the “start of frame”, for a message to be identified as an HL7 message, the text contained in this textbox must be found. By default it is set to MSH, but in a difficult to parse message stream it could be set to MSH|^~\&|, or whatever encoding characters are being used.
5. End of Frame - Defines the bytes (in hexadecimal format) that indicate the end of an HL7 message. For the Standard HL7 preset we are using 0x1C0x1D as definesd for the Minimum Lower Layer Protocol (MLLP), or HL7 over TCP/IP.
6. Summary – Gives a summary of the message framing settings that were selected.
7. Replacement Strings – Replacement Strings allow you to perform some message clean-up when loading messages. For example look at the ASCII Separators preset. This preset is used for reading messages that are formatted as such:
8. <11>MSH....<13>\r\rPID...<13>\r\r....<28><13>
9. A pretty awful format, but HL7Spy can still handle it. In the replacement strings section you will see that <13> is to be replaced with an empty string, and \r\r (2 carriage returns) is to be replaced with a single \r. This is done twice since some messages from this vendor have 4 \r's in a row. After the string replacements are made, the message conforms to a standard HL7 message which will be properly handled by HL7Spy.
36 Advanced Topics
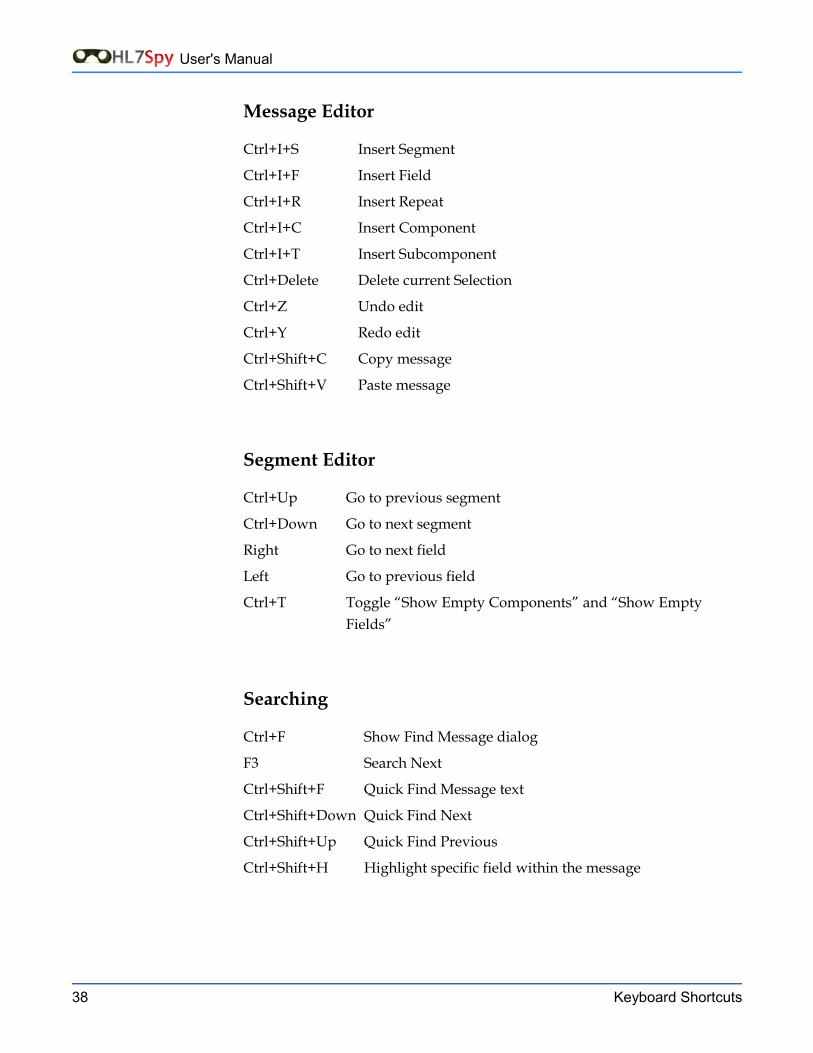
Keyboard ShortcutsTool Navigation
Ctrl+Tab Switch Focus between the Editor and Segment Editor
Ctrl+P Open message property window for the selected message
Ctrl+E Show Segment Editor view
Ctrl+Shfit+M Merge Message tabs
Ctrl+W Show the Watch List view
Ctrl+Shift+S Sort Message tab
Ctrl+Shift+R Generate watch list report
F1 Show HL7 Standard view
Message/Field Navigation
Ctrl+Left Move to previous non-null field
Ctrl+Right Move to next non-null field
Alt+Right Go to next message
Alt+Left Go to previous message
Ctrl+Home Go to first message
Ctrl+End Go to last message
Ctrl+(0-9) Move to a specific field number. Eg Ctrl+19 move to field 19 in the current segment.
Ctrl+G Go to specific message index.
User's Manual
Message Editor
Ctrl+I+S Insert Segment
Ctrl+I+F Insert Field
Ctrl+I+R Insert Repeat
Ctrl+I+C Insert Component
Ctrl+I+T Insert Subcomponent
Ctrl+Delete Delete current Selection
Ctrl+Z Undo edit
Ctrl+Y Redo edit
Ctrl+Shift+C Copy message
Ctrl+Shift+V Paste message
Segment Editor
Ctrl+Up Go to previous segment
Ctrl+Down Go to next segment
Right Go to next field
Left Go to previous field
Ctrl+T Toggle “Show Empty Components” and “Show Empty Fields”
Searching
Ctrl+F Show Find Message dialog
F3 Search Next
Ctrl+Shift+F Quick Find Message text
Ctrl+Shift+Down Quick Find Next
Ctrl+Shift+Up Quick Find Previous
Ctrl+Shift+H Highlight specific field within the message
38 Keyboard Shortcuts
User's Manual
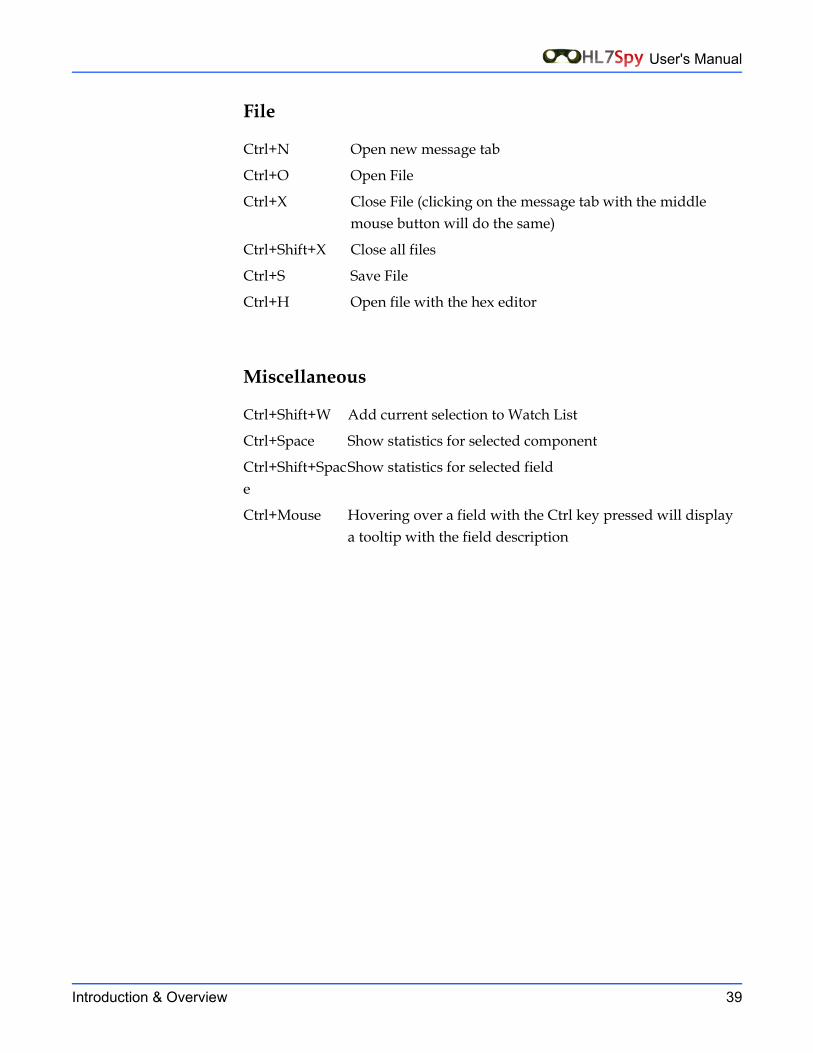
File
Ctrl+N Open new message tab
Ctrl+O Open File
Ctrl+X Close File (clicking on the message tab with the middle mouse button will do the same)
Ctrl+Shift+X Close all files
Ctrl+S Save File
Ctrl+H Open file with the hex editor
Miscellaneous
Ctrl+Shift+W Add current selection to Watch List
Ctrl+Space Show statistics for selected component
Ctrl+Shift+Space
Show statistics for selected field
Ctrl+Mouse Hovering over a field with the Ctrl key pressed will display a tooltip with the field description
Introduction & Overview 39