hol 7554 practical devops with linux and … practical devops with linux and ... preparing the...
TRANSCRIPT

HOL7554
Practical DevOps with Linux and Virtualization
Simon COTER
Director of Product Management – Oracle VM & VirtualBox
2
CONTENTS
HOL7554 ................................................................................................................................................ 1
Practical DevOps with Linux and Virtualization ..................................................................................... 1
Simon COTER ....................................................................................................................................... 1
Director of Product Management – Oracle VM & VirtualBox................................................................. 1
Introduction .............................................................................................................................................. 4
Preparation (done before LAB) ................................................................................................................ 5
Summary of the Lab steps ....................................................................................................................... 6
Global picture ........................................................................................................................................... 6
Vagrant & VirtualBox ................................................................................................................................ 7
Create first virtual machine by Vagrant and VirtualBox ............................................................................. 7
Add further vNIC to the virtual machine ................................................................................................... 11
Create more virtual machine under the same Vagrant Project ............................................................... 13
Automate different steps on the first Virtual Machine boot ...................................................................... 16
Oracle Linux & Docker ........................................................................................................................... 19
Run first Docker Container....................................................................................................................... 19
Other important Docker command options .............................................................................................. 22
Run Demo Web-App in a Docker Container ............................................................................................ 24
Summary ................................................................................................................................................ 27
Appendix A: preparing the environment to run the lab from your home or office .................................. 28
Find a Suitable Machine .......................................................................................................................... 28
Download required binaries ..................................................................................................................... 28
Install Oracle VM VirtualBox and Vagrant ............................................................................................... 29
Appendix B: References ........................................................................................................................ 30
About the Author .................................................................................................................................... 30
Acknowledgments .................................................................................................................................. 30
3
Last update: September 18th, 2017 Author : Simon COTER Special thanks to : Christophe Pauliat, Simon Hayler

4
INTRODUCTION
This document details all actions that were done during Oracle Open World 2017 session Hands-On Lab 7554. This hands-on lab takes you through different examples and approaches on how-to build a DevOps environment by leveraging open-source utilities like Vagrant, VirtualBox, Oracle Linux and Docker. Vagrant is an open-source software product for building and maintaining portable virtual software development environments, e.g. for VirtualBox. The core idea behind it lies in the fact that the environment maintenance of virtualizations becomes increasingly difficult in a large software development project. Vagrant simplifies the necessary software configuration management in order to increase development productivity. Vagrant is written in the Ruby language, but its ecosystem supports development in almost all major languages. Oracle VM VirtualBox is a free and open-source hypervisor for x86 computers being developed by Oracle Corporation. VirtualBox may be installed on a number of host operating systems, including: Linux, macOS, Windows and Solaris; It supports the creation and management of guest virtual machines running versions and derivations of Windows, Linux, BSD, OS/2, Solaris, macOS and others. For some guest operating systems, a "Guest Additions" package of device drivers and system applications is available which typically improves performance. Oracle Linux (OL) is a Linux distribution packaged and freely distributed by Oracle, available partially under the GNU General Public License since late 2006. It is compiled from Red Hat Enterprise Linux source code, replacing Red Hat branding by Oracle's. It also used by Oracle Cloud and Oracle Engineered Systems such as Oracle Exadata and others. Potential users can freely download Oracle Linux through Oracle's E-delivery service (Oracle Software Delivery Cloud) or from a variety of mirror sites, and can deploy and distribute it without cost. Docker is a software technology providing containers, promoted by the company Docker, Inc. Docker provides an additional layer of abstraction and automation of operating-system-level virtualization on Windows and Linux. Docker uses the resource isolation features of the Linux kernel such as cgroups and kernel namespaces, and a union-capable file system such as OverlayFS to allow independent "containers" to run within a single Linux instance.
Note: You can also run this lab at your home or office on anx86 server, desktop, or laptop.

5
PREPARATION (DONE BEFORE LAB) To save time and fit in the one-hour slot of Oracle Open World labs, the following actions were performed before the actual lab.
o Install Oracle Linux 7.4 (64 bits) as host operating system (the lab can also run on Windows or macOS).
o Install Oracle VM VirtualBox 5.1.28 plus extension-pack on the host OS. o Install Vagrant on the host operating system.
Note: To run this lab from your home or office, perform the tasks in Appendix A first to prepare your environment before you run the lab.

6
SUMMARY OF THE LAB STEPS In this lab, you will get the foundation for running DevOps environment by using Vagrant, VirtualBox, Oracle Linux and Docker. There is no particular requirement to start with this HOL except for the “Preparation phase described above”.
GLOBAL PICTURE Figure 1 shows all the components (Oracle VM VirtualBox and Oracle VM virtual machines) with their names and configuration (memory, IP addresses, and so on).
Figure 1.Diagram of all the components and their configuration.
7
VAGRANT & VIRTUALBOX
CREATE FIRST VIRTUAL MACHINE BY VAGRANT AND VIRTUALBOX
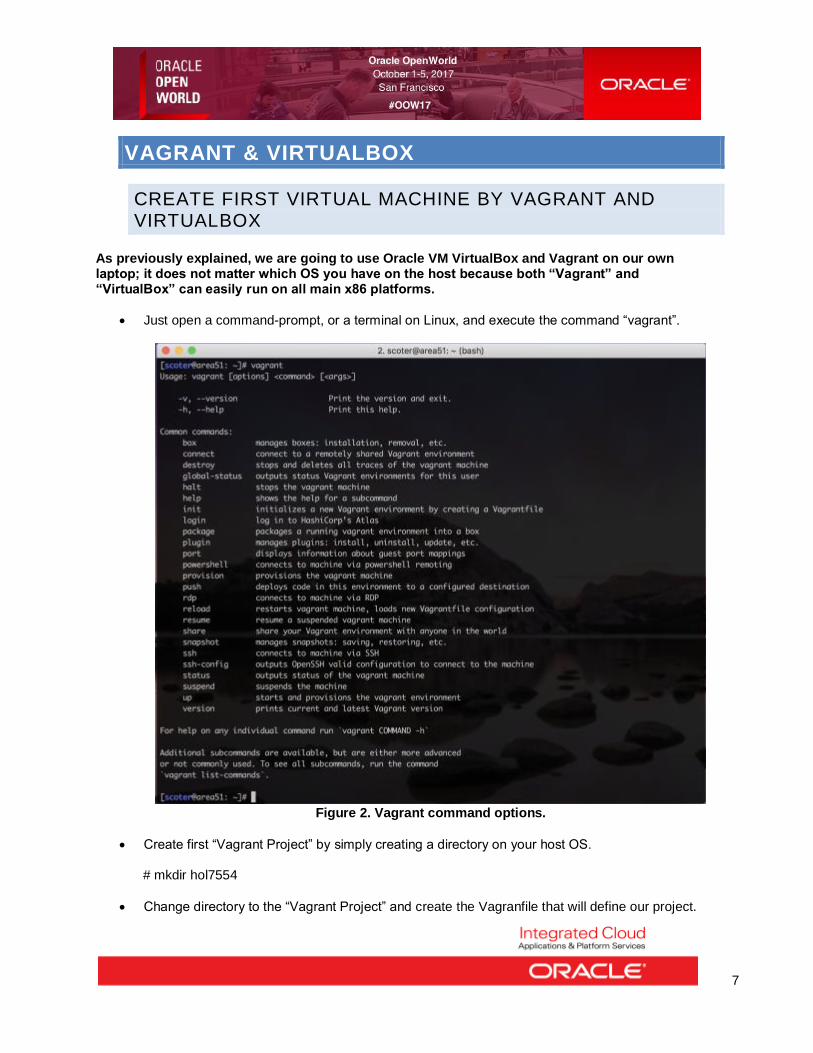
As previously explained, we are going to use Oracle VM VirtualBox and Vagrant on our own laptop; it does not matter which OS you have on the host because both “Vagrant” and “VirtualBox” can easily run on all main x86 platforms.
• Just open a command-prompt, or a terminal on Linux, and execute the command “vagrant”.
Figure 2. Vagrant command options.
• Create first “Vagrant Project” by simply creating a directory on your host OS.
# mkdir hol7554
• Change directory to the “Vagrant Project” and create the Vagranfile that will define our project.

8
# cd hol7554 # vagrant init
Figure 3. Vagrant Project initialization.
• Before starting with “vagrant’ command line utility, just look for the availability of your favorite Linux distribution; open a web-browser and connect to “Vagrant Boxes Search Engine” from Hashicorp.
On this website you’ll be able to look for boxes already installed and ready-to-run with unlimited combinations of platforms, releases and software installed on top. Official “Oracle Linux” Vagrant Boxes are also available on our own website at: http://yum.oracle.com/boxes
• Try to execute the command “vagrant up” under your Vagrant Project created before (folder hol7554)
# vagrant up
Figure 4. Vagrant Project initialization.
And you’ll see that an error like on “Figure 4” will appear; it’s expected, we have to decide which box we’ll use as the default one to download & start.
• So, just edit your “Vagrantfile” using your preferred editor (like “vi”) and replace following line with a specific box for developers; the resulting “Vagrantfile” will have to contain following line:

9
Figure 5. Editing Vagrant Project file.
So the text to replace is from:
config.vm.box = "base"
To:
config.vm.box = "ubuntu/trusty64"
So now, based on our Vagrant configuration file we have, as default box to run/start named “ubuntu/trusty64”; if you want to get much more details on this just open this URL.
• Download and start this Vagrant Box, by executing following command: # vagrant box add --name “ubuntu/trusty64” <URL> # vagrant up During this demo URL is: http://10.158.234.132/virtualbox.box
Figure 6. Download and start one Vagrant Box.

10
NOTE: Obviously on this HOL all the images we are going to use has already been downloaded and so you won’t have to wait to have them locally available; on a totally cleaned-up environment for each Box you download and start, you’ll have to wait some minutes to have it locally available only on first run!
• Connect to the Vagrant Box created and verify OS running.
# vagrant ssh # uname -a
Figure 7. Connect to the Vagrant Box running.
As you can see from the “Figure 5” we are now connected to our Box (Virtual Machine) running on top of VirtualBox.
• Exit from the running Virtual Machine (box) and then destroy the box created on this project.
# exit # vagrant destroy (confirm with “y”)
Figure 8. Stop & Destroy the virtual machine created
11
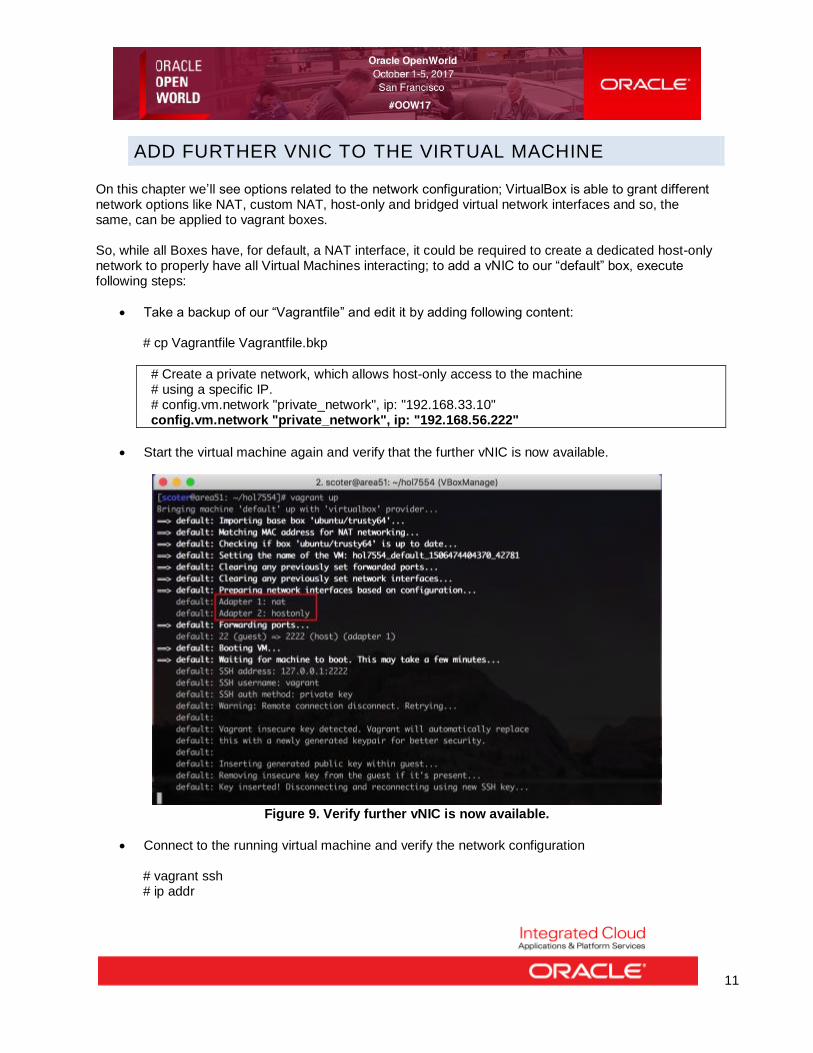
ADD FURTHER VNIC TO THE VIRTUAL MACHINE On this chapter we’ll see options related to the network configuration; VirtualBox is able to grant different network options like NAT, custom NAT, host-only and bridged virtual network interfaces and so, the same, can be applied to vagrant boxes. So, while all Boxes have, for default, a NAT interface, it could be required to create a dedicated host-only network to properly have all Virtual Machines interacting; to add a vNIC to our “default” box, execute following steps:
• Take a backup of our “Vagrantfile” and edit it by adding following content:
# cp Vagrantfile Vagrantfile.bkp
# Create a private network, which allows host-only access to the machine # using a specific IP. # config.vm.network "private_network", ip: "192.168.33.10" config.vm.network "private_network", ip: "192.168.56.222"
• Start the virtual machine again and verify that the further vNIC is now available.
Figure 9. Verify further vNIC is now available.
• Connect to the running virtual machine and verify the network configuration
# vagrant ssh # ip addr

12
Figure 10. Connect by “vagrant ssh”
Figure 11. Verify Network configuration within the VM.
• Add one new custom Linux user to the running VM and change the password to “tmpuser”. # sudo useradd tmpuser # sudo passwd tmpuser
• Open one new terminal / command-prompt and try to connect to the running VM using VirtualBox host-only network: # ssh [email protected]

13
Figure 12. Connect to the VM using VirtualBox host-only Network.
• Exit from the running Virtual Machine (box) and then destroy the box created on this project.
# exit # vagrant destroy (confirm with “y”)
Figure 13. Stop & Destroy the virtual machine created
CREATE MORE VIRTUAL MACHINE UNDER THE SAME
VAGRANT PROJECT
Within a Vagrant Project you can obviously have more virtual machines; by this chapter we’ll see how to have more Virtual Machines, theoretically acting of different layers of the same application. Final result will be based on two different virtual machines, one running Ubuntu as a web-server and one running Oracle Linux 7.4 as a database-server.
• On the first step, we’ll download a new box, based on latest Oracle Linux 7.4; to get this box, under the same Vagrant Project, just execute the following command: # vagrant box add --name ol74 <URL> During this demo URL is: http://10.158.234.132/ol74.box

14
Figure 14. Download Oracle Linux 7.4 Vagrant Box.
• Backup original Vagrantfile before editing it # cp Vagrantfile Vagrantfile.host-only-network
• Edit actual “Vagrantfile” and add following changes:
# Every Vagrant development environment requires a box. You can search for # boxes at https://atlas.hashicorp.com/search. # config.vm.box = "ubuntu/trusty64" config.vm.define "web" do |web| web.vm.box = "ubuntu/trusty64" web.vm.network "private_network", ip: "192.168.56.222" end config.vm.define "db" do |db| db.vm.box = "ol74" db.vm.network "private_network", ip: "192.168.56.111" end
NB: you also have to comment out following line related to the old network configuration
# Create a private network, which allows host-only access to the machine # using a specific IP. # config.vm.network "private_network", ip: "192.168.33.10" # config.vm.network "private_network", ip: "192.168.56.222"
• Start all Virtual Machines defined: # vagrant up
• Connect to the web virtual machine and verify that database virtual machine is reachable, as shown on Figure 14. # vagrant ssh web # ping 192.168.56.111

15
Figure 15. From the web machine, ping the database one.
“Vagrantfile” allows you to define other options for virtual machines, like the number of CPUs, the amount of memory and so on; to get further details on this check the “Reference” section of this document.
• Exit from the running Virtual Machine (box) and then destroy the box created on this project.
# exit # vagrant destroy (confirm with “y” on both virtual machines)
Figure 16. Stop & Destroy the virtual machines created

16
AUTOMATE DIFFERENT STEPS ON THE FIRST VIRTUAL
MACHINE BOOT By Vagrant it’s also possible to automate different steps on the first virtual machine boot; starting from the Vagrantfile created before, we’re now going to automate some steps on both our Virtual Machines, web and db. The target of this chapter is to get following results:
• Get the web virtual machine with Apache2 and Tomcat6 installed
• Get the db virtual machine (Oracle Linux) with following custom changes o Add one new vdisk with btrfs on it o Install docker on the machine and configure it to run on the new device above o Install Oracle Linux pre-install RPM for the Oracle Database 12cR2
• Backup original Vagrantfile before editing it # cp Vagrantfile Vagrantfile.two-vms
• Edit the “Vagrantfile” by using following configuration file (copy&paste text below):
# -*- mode: ruby -*- # vi: set ft=ruby : Vagrant.configure("2") do |config| config.vm.define "web" do |web| web.vm.box = "ubuntu/trusty64" web.vm.network "private_network", ip: "192.168.56.222" web.vm.provision "shell", inline: <<-'SHELL' # updated OS apt-get update -y apt-get install apache2 tomcat6 -y SHELL end config.vm.define "db" do |db| db.vm.box = "ol74" db.vm.network "private_network", ip: "192.168.56.111" db.vm.provision "shell", inline: <<-'SHELL' # Install Docker yum install -y docker-engine btrfs-progs oracle-database-server-12cR2-preinstall # Create a BTRFS partition mkfs.btrfs /dev/sdb # Configure docker to use our BTRFS volume eval $(blkid -o export /dev/sdb) cat <<-EOF >/etc/systemd/system/var-lib-docker.mount [Unit]

17
Description = Docker Image Store After=network.target [Mount] What = UUID=${UUID} Where = /var/lib/docker Type = btrfs [Install] WantedBy = multi-user.target EOF mkdir /var/lib/docker systemctl enable var-lib-docker.mount systemctl start var-lib-docker.mount cat <<-EOF >/etc/systemd/system/docker.service.d/var-lib-docker-mount.conf [Unit] Requires=var-lib-docker.mount After=var-lib-docker.mount EOF # Ensure we use BTRFS driver sed -i "s/^DOCKER_STORAGE_OPTIONS=.*/DOCKER_STORAGE_OPTIONS='--storage-driver btrfs'/g" /etc/sysconfig/docker-storage # Add vagrant user to docker group usermod -a -G docker vagrant # Start Docker systemctl start docker systemctl enable docker echo "Your Docker VM is ready to use!" echo "Type vagrant ssh to get started." SHELL end end
• Start all Virtual Machines defined and verify that all custom “SHELL” operations are executed on both (see Figure 17 and 18 – green text): # vagrant up

18
Figure 17. Automated installation of Apache2 and Tomcat6 on Ubuntu.
Figure 18. Automated installation of Docker and Oracle Datatabase 12.2 requirements.
• Shutdown the virtual machine “web” (do not destroy, just stop it): # vagrant halt web
Figure 19. Graceful shutdown of a virtual machine.

19
Virtual machine named “db” will be the base of the following chapter dedicated to “Docker”. FYI, once you have customized a box you can also save the same with its own name by using following command: # vagrant package db --output ol74-for-db12c
Figure 20. Package an existing virtual machine into a new box.
ORACLE LINUX & DOCKER
Thanks to the running virtual machine with Oracle Linux 7.4 we created before, we can now experience Docker containers; as you already know, in a company you can always have different platforms, OS releases and so on, an this layer (the VM running on VirtualBox) it’s something that can create a standard for everyone: who runs Linux, who runs Windows or macOS or whatever, will have the same foundation (virtual machine) with Oracle Linux 7.4 and Docker running on top.
RUN FIRST DOCKER CONTAINER
• Check that “docker” daemon is running as a background process on our Oracle Linux 7.4 Vagrant machine.
# systemctl status docker
Figure 21. Package an existing virtual machine into a new box.
• Connect to the VM running OL 7.4 (named db) with docker installed and once connected just execute “Docker” to get command options:
# vagrant ssh db # docker

20
Figure 22. Docker command options.
• Look for possible Docker images containing Oracle stuff, by executing following command: # docker search oracle
Figure 23. Docker “search” command option.
As you can see on “Figure 22” we can get access, for free, to different Oracle Linux (or Oracle stuff) Docker containers and, between them, we also have the official Docker container “oraclelinux”.

21
• Let’s download the official Oracle Linux 7.4 Docker container:
# docker pull oraclelinux
Figure 24. Docker “pull” command option (Oracle Linux).
• Let’s download the official Ubuntu Docker container:
# docker pull Ubuntu
Figure 25. Docker “pull” command option (Ubuntu).
• Get all the Docker images available locally and details related: # docker images
Figure 26. Docker “images” command option.
• Let’s start to play with “docker run” command option; this docker option allows to execute a command within the container without any required authentication; in the following examples we’re getting binary release of specific commands on Ubuntu and Oracle Linux:
# docker run ubuntu apt-get –v # docker run oraclelinux yum -v

22
Figure 27. Docker “run” on a specific Ubuntu only command.
Figure 28. Docker “run” on a specific Oracle Linux only command.
So, in the examples above, we got the specific release of commands “apt-get”, package manager for Ubuntu or Debian based Linux distribution and “yum”, package manager for Oracle Linux or Red Hat based Linux distributions. But…..what happened? Behind the scenes, a lot of stuff happened. When you call run:
1. The Docker client contacts the Docker daemon 2. The Docker daemon checks local store if the image is available locally, and if not,
dowloads it from Docker Store. 3. The Docker daemon creates the container and then runs a command in that container. 4. The Docker daemon streams the output of the command to the Docker client
OTHER IMPORTANT DOCKER COMMAND OPTIONS
• Let’s continue to see what can be accomplished with Docker; first point, I want to see running Docker containers:
# docker ps
Figure 29. Docker “ps” command option.

23
Obviously we won’t see any running Docker container, because commands we executed before were one-shoot to get a specific output.
• So, let’s try the variant to get Docker containers had run until now:
# docker ps –a
Figure 30. Docker “ps -a” command option.
• So, how can I get a Docker container started with a running session within:
# docker run -it oraclelinux /bin/bash
Figure 29. Docker “run -it” command option.
Thanks to the “-it” option, instructs Docker to allocate a pseudo-TTY connected to the container’s stdin; creating an interactive bash shell in the container.

24
RUN DEMO WEB-APP IN A DOCKER CONTAINER
Now that we’ve played a bit with Docker, let’s start to deploy a demo web application on Docker.
• First, we'll use Docker to run a static website in a container. There is a famous docker container image, ready-to-run, containing static website for demo purposes; to just start, execute the following command:
# docker run -d dockersamples/static-site
Figure 30. Docker “run -d” command option.
By executing “docker run –d” we have enabled “detached mode”, which detaches the running container from the terminal/shell and returns your prompt after the container starts. At the same time, this Docker container image wasn’t available locally and, so, docker immediately downloaded it.
• Check the running Docker container by executing following command: # docker ps
Figure 31. Check running Docker containers.
• Stop the running Docker container by executing following command: # docker stop <container_id> (you can check the output of the above command to get it)
Figure 32. Stop one running Docker container.

25
• Re-start the Docker container by using following command syntax: # docker run --name mysite -e AUTHOR="Your Name" -d -P dockersamples/static-site where: -d will create a container with the process detached from our terminal -P will publish all the exposed container ports to random ports on the Docker host -e is how you pass environment variables to the container --name allows you to specify a container name AUTHOR is the environment variable name and Your Name is the value that you can pass So, as example for myself: # docker run --name mysite -e AUTHOR="Simon Coter" -d -P dockersamples/static-site # docker ps
Figure 33. “docker run” with further options.
From the output of “docker ps” command we can also see that following port-redirection is now in-place:
Container Port Host (VM) Port
80 9001
443 9000
Please verify your port-redirection configuration by executing the command “docker ps”; an other option to check port-redirection configuration is available by the option “port”; example: # docker port mysite
Figure 34. “docker port” with further options.
So, now, the architecture that we have in place is based on: Host OS (laptop) VirtualBox VM Docker Container (with web-service exposed) Architecture picture with network details could be:

26
Figure 35. Web application architecture.
So, you can now open a browser and connect to the following URL, just to check that the application is reachable: # http://<vm_ip_address>:<random_redirect_port> Example: # http://192.168.56.111:9001
Figure 36. Web application.

27
• Let’s try to have this web-application available on a specific port by executing following command: # docker run --name mysite2 -e AUTHOR="Your Name" -d -p 8888:80 dockersamples/static-site Example: # docker run --name mysite2 -e AUTHOR="SITE - 2" -d -p 8888:80 dockersamples/static-site
Figure 36. Port redirection on a specific port.
And by connection to the URL http://192.168.56.111:8888 you’ll get the message: “Hello SITE – 2!”
• Let’s stop our running containers with two different command options:
# docker stop mysite # docker rm mysite and, for the other container, just force its removal by executing: # docker rm -f mysite2
SUMMARY Congratulations! You have successfully completed this Hands on Lab and started to play with DevOps solutions like VirtualBox, Vagrant, Oracle Linux and Docker.

28
APPENDIX A: PREPARING THE ENVIRONMENT TO RUN THE LAB FROM YOUR HOME OR OFFICE
FIND A SUITABLE MACHINE This appendix explains how to prepare the environment if you want to run this lab from your home or office. The first step is to find an x86 machine (server, desktop, or laptop) that has the required resources:
• At least 8 GB of RAM
• An x86 64-bit CPU (Intel or AMD) with at least four CPU threads and with virtualization extensions (Intel VT or AMD-V)—only Parallel Virtual Machine (PVM) guests are allowed on top of this architecture
• An OS supported by Oracle VM VirtualBox and Vagrant (Microsoft Windows, various Linux distributions, Oracle Solaris 10 or 11, or Apple Mac OSX)
• 100 GB of disk space Then you only need to download the required binaries, install Oracle VM VirtualBox and Vagrant on the machine.
DOWNLOAD REQUIRED BINARIES This section lists the required binaries and explains how to download them. 1. Download the files for your x86 machine:
Oracle VM VirtualBox binaries (version 5.1.28 during writing of this document) Download the version for your OS from https://www.virtualbox.org/wiki/Downloads.
Oracle VM VirtualBox extension Pack 5.1.28 Download this from https://www.virtualbox.org/wiki/Downloads (the same file is used for all operating systems).
2. Download Vagrant for your platform:
Vagrant Binaris 2.0.0 Download this from https://www.vagrantup.com
29
INSTALL ORACLE VM VIRTUALBOX AND VAGRANT
1. Install the Oracle VM VirtualBox 5.1.x binaries on your x86 machine.
2. Start the Oracle VM VirtualBox console.
3. If it has not already been created, go to File-> Preferences-> Network and create a host-only network in Oracle VM VirtualBox using the default IP information (IPv4 address 192.168.56.1 and netmask 255.255.255.0 for your x86 machine). Also disable the default Oracle VM VirtualBox DHCP server.
4. Go to File-> Preferences-> General-> Default Machine Folder and choose the folder you want
to use to store the virtual machines files.
5. Go to File-> Preferences-> Extensions and install the Oracle VM VirtualBox extension Pack you downloaded.
6. Install the “Vagrant” binary on your OS.

30
APPENDIX B: REFERENCES
Oracle VM VirtualBox documentation: https://www.virtualbox.org/wiki/Documentation Oracle Linux 7 documentation: https://docs.oracle.com/cd/E52668_01/index.html Vagrant documentation: https://www.vagrantup.com/docs/ Docker documentation: https://docs.docker.com Oracle Linux Blog – From Zero to Docker sandbox in 2 minutes: https://blogs.oracle.com/linux/from-zero-to-docker-sandbox-in-2-minutes GitHub Labs on Docker: https://github.com/docker/labs/blob/master/beginner/chapters/alpine.md https://github.com/docker/labs/blob/master/beginner/chapters/webapps.md https://github.com/docker/labs/blob/master/beginner/chapters/votingapp.md
In addition, this hands-on-lab document is available at the following site:
https://blogs.oracle.com/scoter/
ABOUT THE AUTHOR
Simon Coter is Director of Product Management for Oracle VM and VirtualBox.
ACKNOWLEDGMENTS
Special thanks to Christophe Pauliat and Simon Hayler for their contributions