home and community-based services - hhs … · provider mailing address ... about hcs the home and...
TRANSCRIPT
Provider User Guide
Department of Aging and Disability Services
June 2010 (Revised)
Home and Community-based Services
HCS

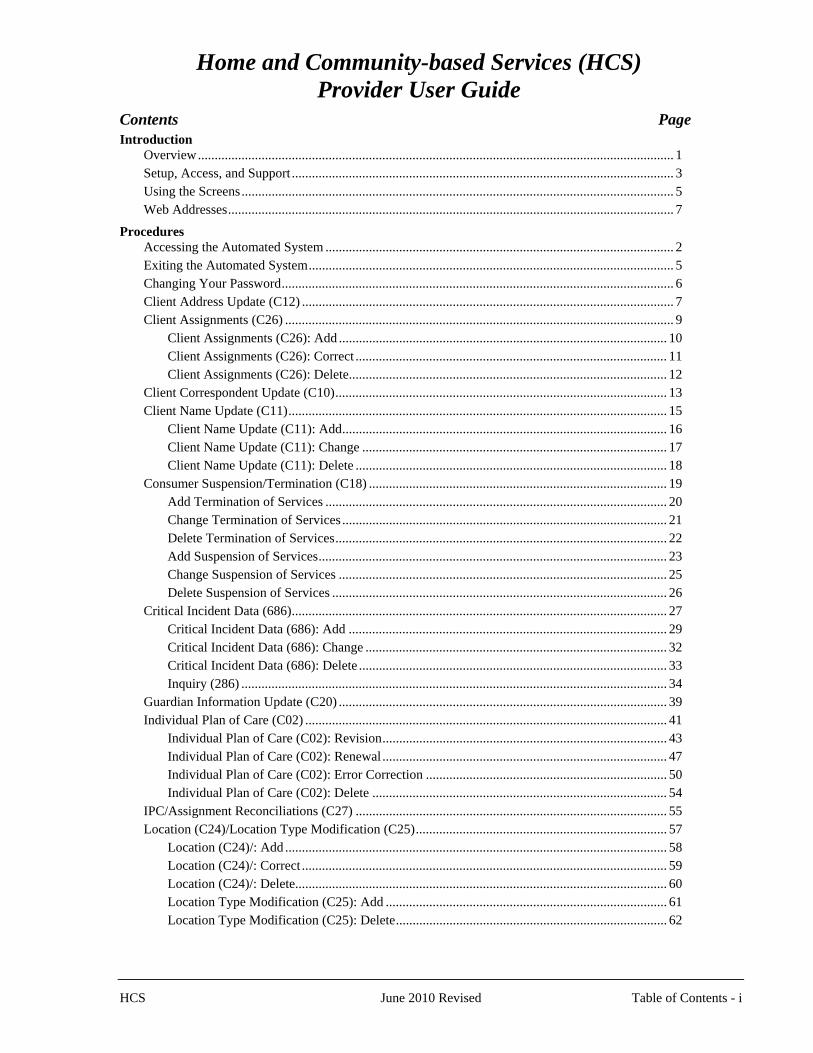
Home and Community-based Services (HCS) Provider User Guide
Contents Page
Introduction Overview.............................................................................................................................................. 1 Setup, Access, and Support .................................................................................................................. 3 Using the Screens................................................................................................................................. 5 Web Addresses..................................................................................................................................... 7
Procedures Accessing the Automated System ........................................................................................................ 2 Exiting the Automated System............................................................................................................. 5 Changing Your Password..................................................................................................................... 6 Client Address Update (C12) ............................................................................................................... 7 Client Assignments (C26) .................................................................................................................... 9 Client Assignments (C26): Add .................................................................................................. 10 Client Assignments (C26): Correct ............................................................................................. 11 Client Assignments (C26): Delete............................................................................................... 12 Client Correspondent Update (C10)................................................................................................... 13 Client Name Update (C11)................................................................................................................. 15 Client Name Update (C11): Add................................................................................................. 16 Client Name Update (C11): Change ........................................................................................... 17 Client Name Update (C11): Delete ............................................................................................. 18 Consumer Suspension/Termination (C18) ......................................................................................... 19 Add Termination of Services ...................................................................................................... 20 Change Termination of Services ................................................................................................. 21 Delete Termination of Services................................................................................................... 22 Add Suspension of Services........................................................................................................ 23 Change Suspension of Services .................................................................................................. 25 Delete Suspension of Services .................................................................................................... 26 Critical Incident Data (686)................................................................................................................ 27 Critical Incident Data (686): Add ............................................................................................... 29 Critical Incident Data (686): Change .......................................................................................... 32 Critical Incident Data (686): Delete ............................................................................................ 33 Inquiry (286) ............................................................................................................................... 34 Guardian Information Update (C20) .................................................................................................. 39 Individual Plan of Care (C02) ............................................................................................................ 41 Individual Plan of Care (C02): Revision..................................................................................... 43 Individual Plan of Care (C02): Renewal ..................................................................................... 47 Individual Plan of Care (C02): Error Correction ........................................................................ 50 Individual Plan of Care (C02): Delete ........................................................................................ 54 IPC/Assignment Reconciliations (C27) ............................................................................................. 55 Location (C24)/Location Type Modification (C25)........................................................................... 57 Location (C24)/: Add .................................................................................................................. 58 Location (C24)/: Correct ............................................................................................................. 59 Location (C24)/: Delete............................................................................................................... 60 Location Type Modification (C25): Add .................................................................................... 61 Location Type Modification (C25): Delete................................................................................. 62
HCS June 2010 Revised Table of Contents - i
ii - Table of Contents June 2010 Revised HCS
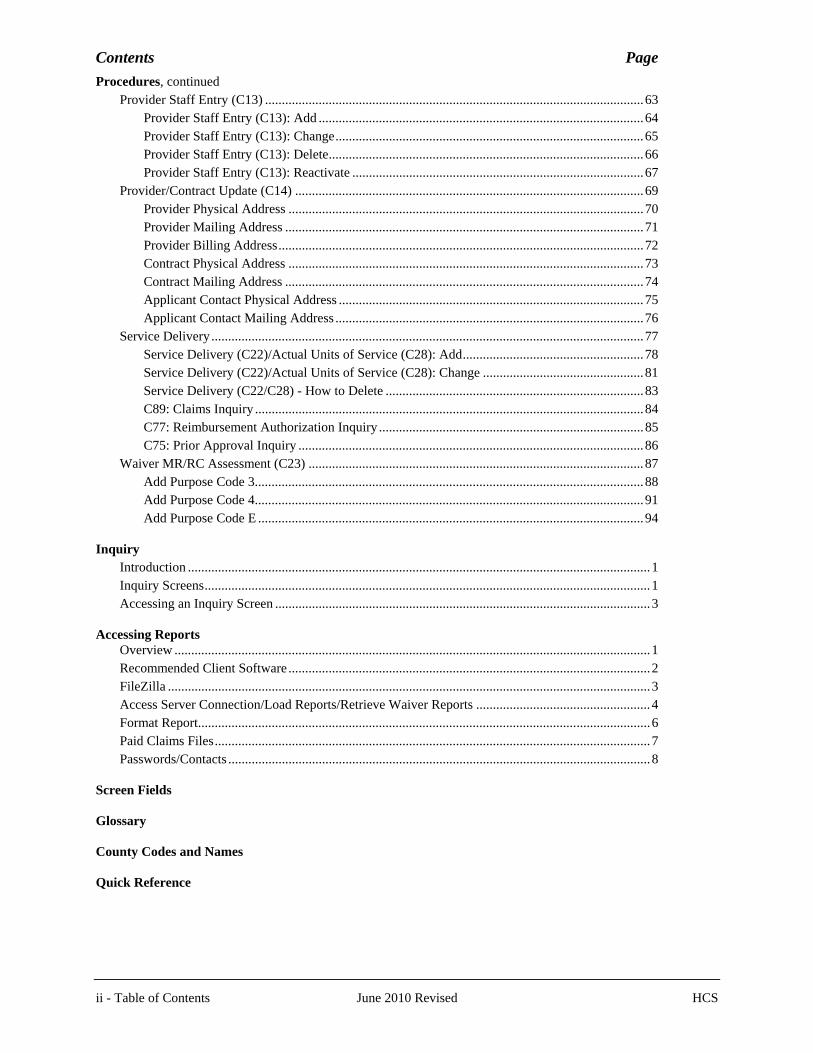
Contents Page
Procedures, continued Provider Staff Entry (C13) .................................................................................................................63 Provider Staff Entry (C13): Add .................................................................................................64 Provider Staff Entry (C13): Change............................................................................................65 Provider Staff Entry (C13): Delete..............................................................................................66 Provider Staff Entry (C13): Reactivate .......................................................................................67 Provider/Contract Update (C14) ........................................................................................................69 Provider Physical Address ..........................................................................................................70 Provider Mailing Address ...........................................................................................................71 Provider Billing Address.............................................................................................................72 Contract Physical Address ..........................................................................................................73 Contract Mailing Address ...........................................................................................................74 Applicant Contact Physical Address ........................................................................................... 75 Applicant Contact Mailing Address ............................................................................................76 Service Delivery .................................................................................................................................77 Service Delivery (C22)/Actual Units of Service (C28): Add......................................................78 Service Delivery (C22)/Actual Units of Service (C28): Change ................................................81 Service Delivery (C22/C28) - How to Delete .............................................................................83 C89: Claims Inquiry ....................................................................................................................84 C77: Reimbursement Authorization Inquiry ...............................................................................85 C75: Prior Approval Inquiry .......................................................................................................86 Waiver MR/RC Assessment (C23) ....................................................................................................87 Add Purpose Code 3....................................................................................................................88 Add Purpose Code 4....................................................................................................................91 Add Purpose Code E ...................................................................................................................94 Inquiry Introduction ..........................................................................................................................................1 Inquiry Screens.....................................................................................................................................1 Accessing an Inquiry Screen ................................................................................................................3 Accessing Reports Overview ..............................................................................................................................................1 Recommended Client Software ............................................................................................................2 FileZilla ................................................................................................................................................3 Access Server Connection/Load Reports/Retrieve Waiver Reports ....................................................4 Format Report.......................................................................................................................................6 Paid Claims Files..................................................................................................................................7 Passwords/Contacts ..............................................................................................................................8 Screen Fields Glossary County Codes and Names Quick Reference

Introduction
Overview _______________________________________________________________
About HCS The Home and Community-based Services (HCS) program is a Medicaid waiver program authorized under 1915(c) of the Social Security Act. HCS was first initiated in 1985.
The HCS program allows the state to include and reimburse, under their state
plan for medical assistance (Medicaid), approved home and community-based services to individuals who would otherwise require care in an intermediate care facility for persons with mental retardation (ICF/MR).
Another objective of the HCS program is to facilitate individuals with mental
retardation and/or a related condition returning to their family’s home or moving into the community from institutional settings.
_____________________________________________________________ Consumer Directed Consumer Directed Services is a service delivery option in which an Services Option individual or legally authorized representative (LAR) employs and retains
service providers and directs the delivery of program services. An individual who chooses the CDS option is supported by a consumer directed services agency (CDSA) chosen by the individual to provide financial management services, and, at the individual’s request, support consultation services if offered by the program in which the individual is enrolled.
_____________________________________________________________ Provider-managed The traditional agency model (provider-managed) service delivery option is Services Option available to provide approved services that the individual/LAR elects not to
self-direct. In the traditional agency option, the individual or his or her legally authorized representative (LAR) choose a certified and contracted HCS Program provider capable of delivering the full array of HCS Program service components. The program provider employs and retains service providers, and directs the delivery of program services.
_____________________________________________________________ Service Coordination The local Mental Retardation Authority (MRA) provides the service
coordination, and program providers are responsible for the delivery of services to individuals who are enrolled in the HCS program.
_______________________________________________________________
HCS June 2010 Revised Introduction - 1
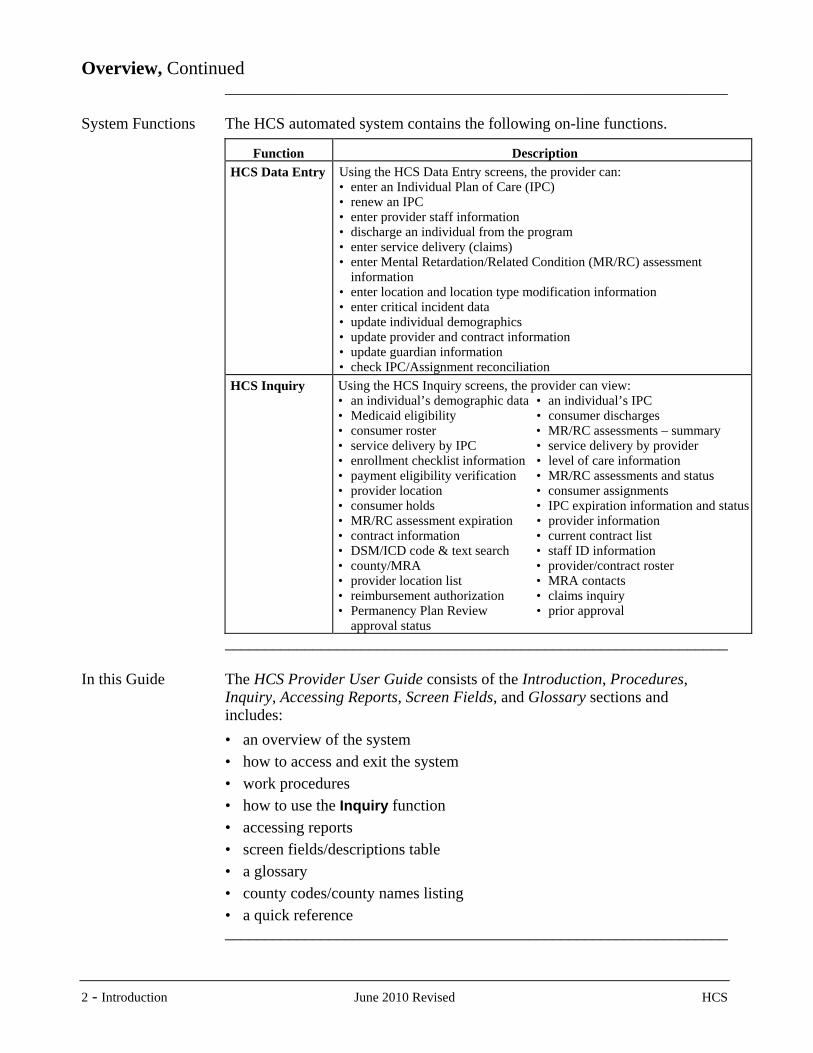
Overview, Continued _______________________________________________________________ System Functions The HCS automated system contains the following on-line functions.
Function
Description HCS Data Entry
Using the HCS Data Entry screens, the provider can: • enter an Individual Plan of Care (IPC) • renew an IPC • enter provider staff information • discharge an individual from the program • enter service delivery (claims) • enter Mental Retardation/Related Condition (MR/RC) assessment information • enter location and location type modification information • enter critical incident data • update individual demographics • update provider and contract information • update guardian information • check IPC/Assignment reconciliation
HCS Inquiry
Using the HCS Inquiry screens, the provider can view: • an individual’s demographic data • an individual’s IPC • Medicaid eligibility • consumer discharges • consumer roster • MR/RC assessments – summary • service delivery by IPC • service delivery by provider • enrollment checklist information • level of care information • payment eligibility verification • MR/RC assessments and status • provider location • consumer assignments • consumer holds • IPC expiration information and status• MR/RC assessment expiration • provider information • contract information • current contract list • DSM/ICD code & text search • staff ID information • county/MRA • provider/contract roster • provider location list • MRA contacts • reimbursement authorization • claims inquiry • Permanency Plan Review • prior approval approval status
_______________________________________________________________ In this Guide The HCS Provider User Guide consists of the Introduction, Procedures,
Inquiry, Accessing Reports, Screen Fields, and Glossary sections and includes:
• an overview of the system • how to access and exit the system • work procedures • how to use the Inquiry function • accessing reports • screen fields/descriptions table • a glossary • county codes/county names listing • a quick reference _______________________________________________________________
2 - Introduction June 2010 Revised HCS
Setup, Access, and Support _______________________________________________________________ Introduction The Texas Department of Aging and Disability Services (DADS) currently
operates an automated enrollment and billing system for the Home and Community-based Services (HCS) program. This system allows providers to electronically submit billing, make inquiries, and enter an individual’s information.
To have access to this system, the provider must have a PC system. It is the
provider’s responsibility to have a licensed copy of Windows 3.1 or higher loaded on each machine and their modem (if using dial-up) fully functioning before requesting access.
_______________________________________________________________ Becoming a VPN or To become a Virtual Private Network (VPN) or dial-up user, the user must be Dial-up User a contracted provider of HCS services and be serving an individual. Although
both VPN and dial-up are available, VPN is the preferred method and is much faster and more reliable than dial-up. Also, the fees for VPN service are lower than the fees for dial-up.
A provider should contact their DADS Access & Intake, Program
Enrollment contact person as soon as they receive their first individual. The necessary forms required for being set up to use VPN or dial-up and accessing the automated system will then be sent to the provider. The completed forms, and any required fees must be returned to the provider’s DADS contact person for approval before access to any systems will be granted.
If a provider has CARE access and needs an additional account, the
provider must contact the Central Help Desk at 1-888-952-HELP (4357) and tell them what is needed.
DADS provides one free dial-up account per component code. A VPN
account or additional dial-up accounts may be obtained for a fee. Contact DADS Community Services Contracts for information on the cost of an additional account. Fee payments must be sent to DADS, not to ESM.
_______________________________________________________________ Network After receiving a VPN or Dial-up User ID and Password from Enterprise
Security Management (ESM) staff, the provider will need to establish a connection to the HHSC network (HHSCN).
The VPN Installation Guide can be obtained at http://vpn.tx.net/. The instructions contained in this guide must be completed prior to installing the QWS3270 emulation software. The user must log in to VPN before downloading and/or using QWS3270
Information about VPN or dial-up can be obtained by calling the Help Desk. The dial-up set up must be completed prior to installing the QWS3270 emulation software. The user must log in to dial-up before downloading and/or using QWS3270.
_______________________________________________________________
HCS June 2010 Revised Introduction - 3
Setup, Access, and Support, Continued _______________________________________________________________ QW3270 Software After completing the instructions and establishing a connection with the
HHSCN, the QWS3270 emulation software can be installed. The QWS3270 installation software is available via download from the ESM Intranet site http://hhscx.hhsc.state.tx.us/tech/security/default.shtml by selecting the Private Provider Setup and Information link.
_______________________________________________________________ Windows Vista The version of QWS3270 that is supported by HHSC is not compatible
with Windows Vista. HHSC does not support the version of QWS3270 that is Vista compatible.
Users with Windows Vista must purchase and download a compatible version
of QWS3270, which can be found at www.jollygiant.com. _______________________________________________________________ Forms Once a dial-up account has been established with HHSCN, forms requesting
access to systems and applications may be obtained at the ESM Intranet site by clicking on the Enterprise Systems and Applications Security Access Forms link.
To request additional access to DADS automated systems, use the Waiver Programs Provider Access Request Form IS090. (Use IS090C for HCS/TxHmL Waiver Programs – CDS Agency)
A Security and Privacy Agreement (SPA), EASM-SM-002 form must be submitted by all users of any DADS system or application.
_______________________________________________________________ Support For questions about installing the QWS3270 emulation software, User ID and
Password information, or accessing the mainframe (after a VPN or dial-up connection to HHSCN has been established), you may call the Central Help Desk at 1-888-952-HELP (4357).
_______________________________________________________________ Technical Support To successfully access the dial-up system, you must follow your hardware/ software installation directions precisely and install each item according to the
manufacturer’s directions. To effectively use the dial-up access system, it is important to have the
technical expertise required to install and maintain your hardware and software. DADS will not install and/or maintain the provider’s hardware or software.
DADS does not take responsibility for installation of your equipment. As there are many combinations of hardware and software that you could be
using, DADS cannot resolve every problem you may encounter. You will need to rely on your technical expert for information concerning your hardware, software, and communications setup.
_______________________________________________________________
4 - Introduction June 2010 Revised HCS
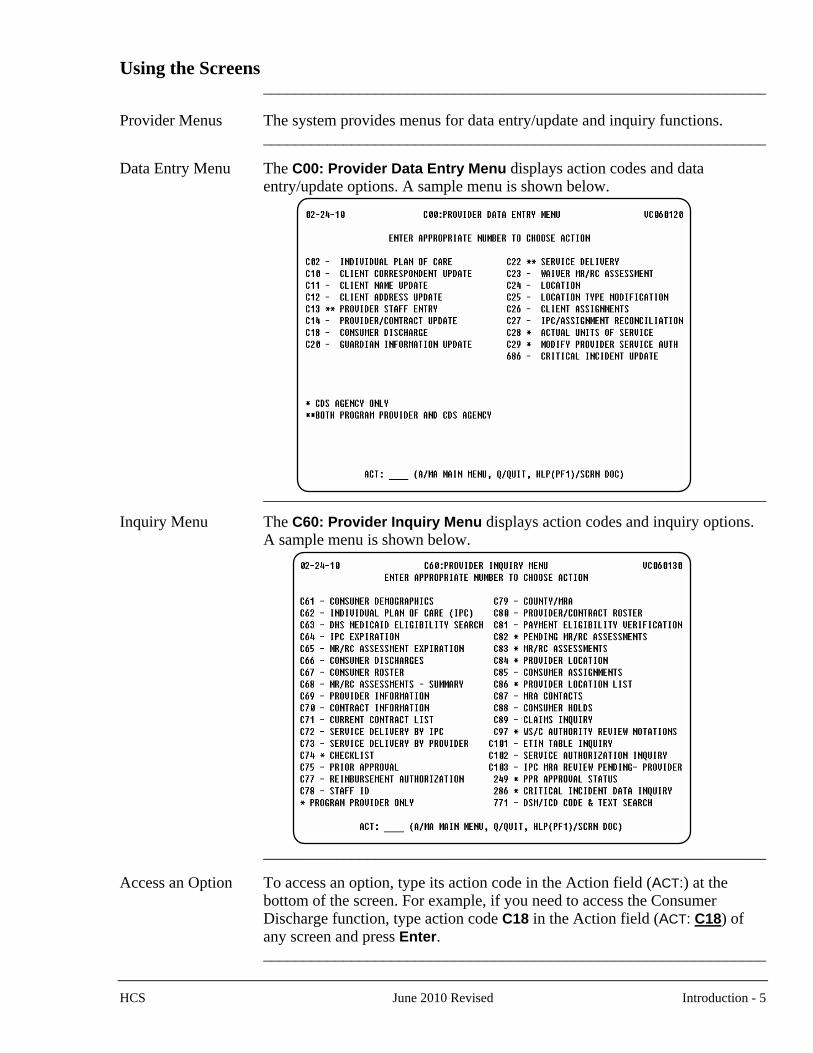
Using the Screens _______________________________________________________________ Provider Menus The system provides menus for data entry/update and inquiry functions. _______________________________________________________________ Data Entry Menu The C00: Provider Data Entry Menu displays action codes and data
entry/update options. A sample menu is shown below.
_______________________________________________________________
Inquiry Menu The C60: Provider Inquiry Menu displays action codes and inquiry options. A sample menu is shown below.
_______________________________________________________________ Access an Option To access an option, type its action code in the Action field (ACT:) at the
bottom of the screen. For example, if you need to access the Consumer Discharge function, type action code C18 in the Action field (ACT: C18) of any screen and press Enter.
_______________________________________________________________
HCS June 2010 Revised Introduction - 5
6 - Introduction June 2010 Revised HCS
Using the Screens, Continued _______________________________________________________________ Header Screens When you access a data entry or data update option, the first screen displayed
requests client-identifying information. This screen is referred to as the header screen. Header screens may also include the Add/Change/Delete or Add/Correct/Delete direction in the title of the screen.
_______________________________________________________________ Add/Change/Delete When using the data entry screens, you will add, change, and delete records.
Use to… Add add a new record.
Change or Correct
change or correct incorrect information on a record.
Delete delete a record entered in error.
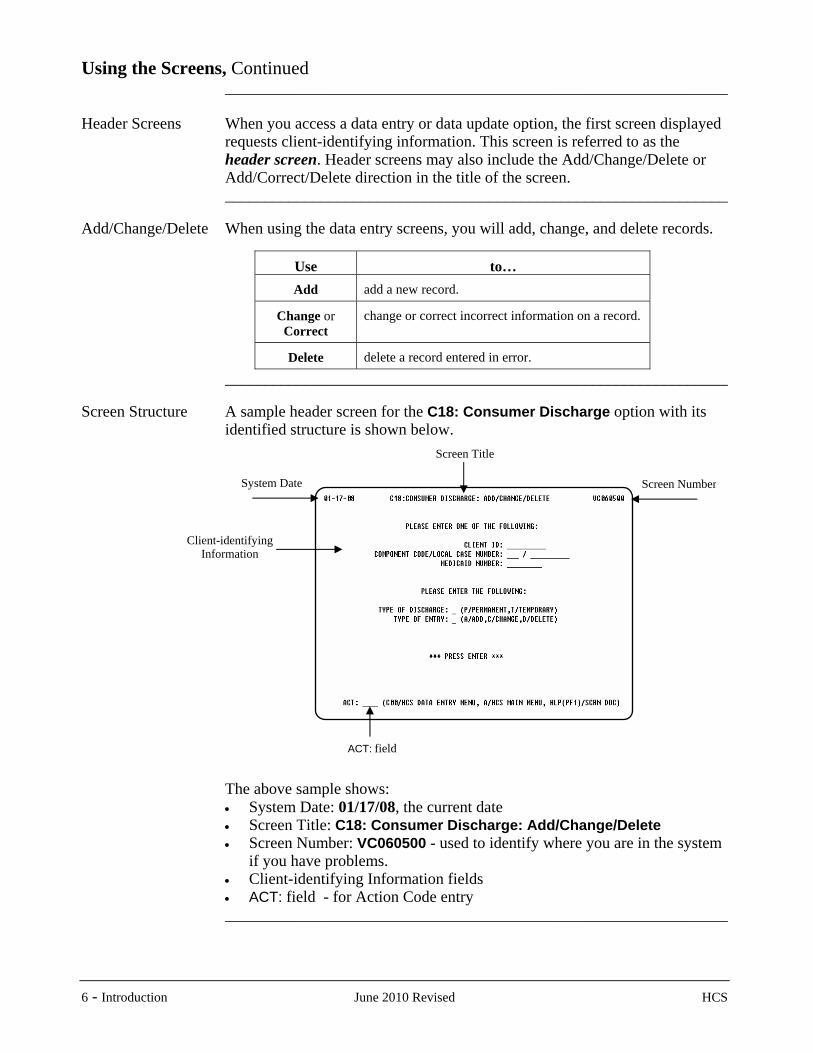
_______________________________________________________________ Screen Structure A sample header screen for the C18: Consumer Discharge option with its
identified structure is shown below.
The above sample shows:
• System Date: 01/17/08, the current date • Screen Title: C18: Consumer Discharge: Add/Change/Delete • Screen Number: VC060500 - used to identify where you are in the system
if you have problems. • Client-identifying Information fields • ACT: field - for Action Code entry
_______________________________________________________________
Screen Title
Screen NumberSystem Date
ACT: field
Client-identifying Information
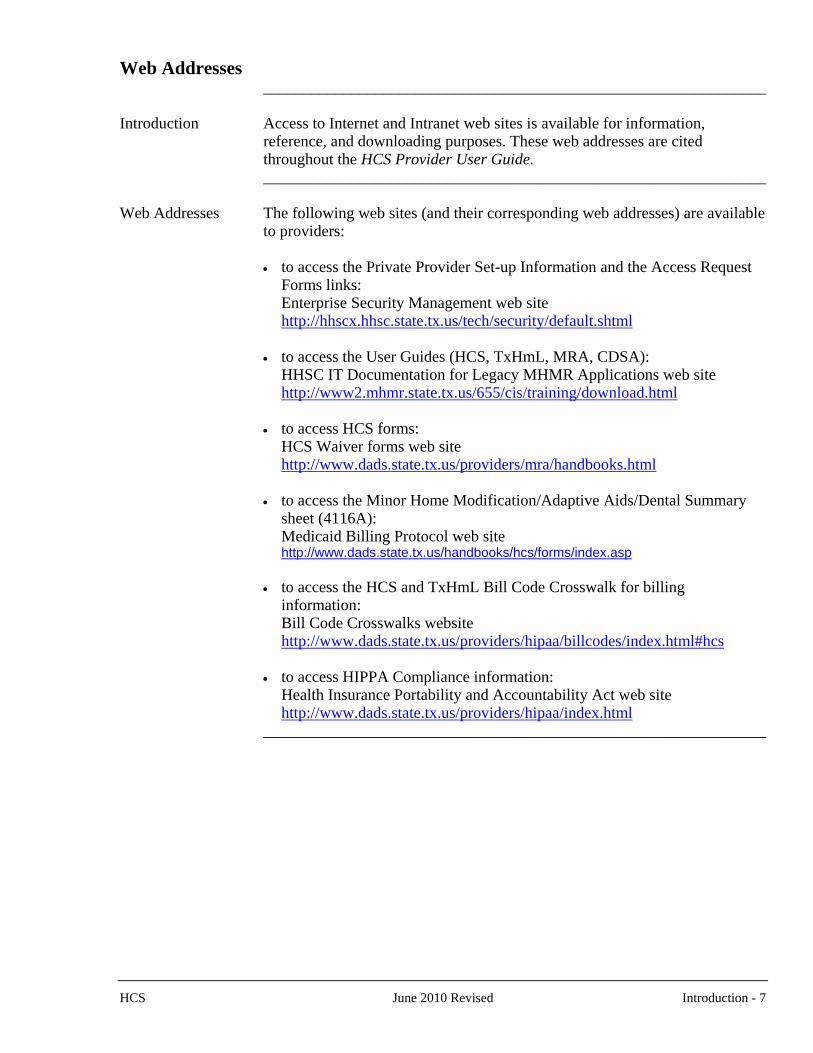
Web Addresses _______________________________________________________________ Introduction Access to Internet and Intranet web sites is available for information,
reference, and downloading purposes. These web addresses are cited throughout the HCS Provider User Guide.
_______________________________________________________________ Web Addresses The following web sites (and their corresponding web addresses) are available
to providers:
• to access the Private Provider Set-up Information and the Access Request Forms links: Enterprise Security Management web site
http://hhscx.hhsc.state.tx.us/tech/security/default.shtml • to access the User Guides (HCS, TxHmL, MRA, CDSA): HHSC IT Documentation for Legacy MHMR Applications web site http://www2.mhmr.state.tx.us/655/cis/training/download.html • to access HCS forms:
HCS Waiver forms web site http://www.dads.state.tx.us/providers/mra/handbooks.html • to access the Minor Home Modification/Adaptive Aids/Dental Summary
sheet (4116A): Medicaid Billing Protocol web site
http://www.dads.state.tx.us/handbooks/hcs/forms/index.asp
• to access the HCS and TxHmL Bill Code Crosswalk for billing information: Bill Code Crosswalks website
http://www.dads.state.tx.us/providers/hipaa/billcodes/index.html#hcs
• to access HIPPA Compliance information: Health Insurance Portability and Accountability Act web site
http://www.dads.state.tx.us/providers/hipaa/index.html _______________________________________________________________
HCS June 2010 Revised Introduction - 7

8 - Introduction June 2010 Revised HCS
This page was intentionally left blank.
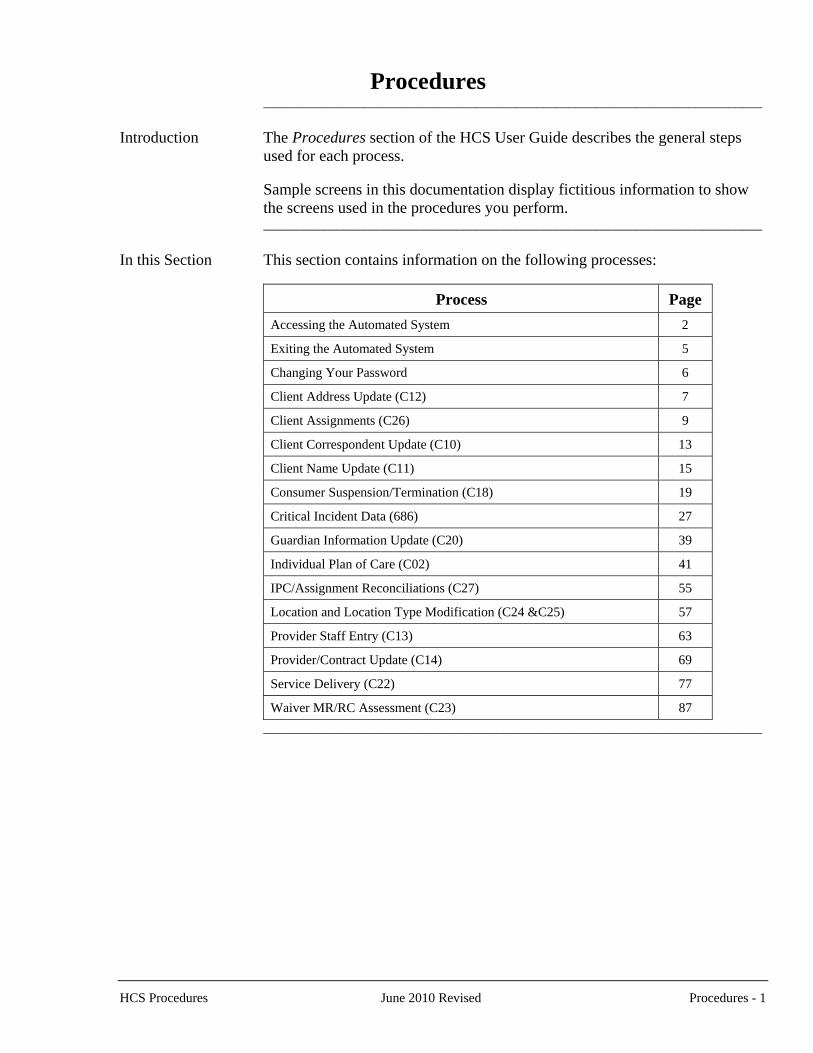
Procedures ___________________________________________________________________________ Introduction The Procedures section of the HCS User Guide describes the general steps
used for each process. Sample screens in this documentation display fictitious information to show
the screens used in the procedures you perform. ___________________________________________________________________________ In this Section This section contains information on the following processes:
Process Page Accessing the Automated System 2
Exiting the Automated System 5
Changing Your Password 6
Client Address Update (C12) 7
Client Assignments (C26) 9
Client Correspondent Update (C10) 13
Client Name Update (C11) 15
Consumer Suspension/Termination (C18) 19
Critical Incident Data (686) 27
Guardian Information Update (C20) 39
Individual Plan of Care (C02) 41
IPC/Assignment Reconciliations (C27) 55
Location and Location Type Modification (C24 &C25) 57
Provider Staff Entry (C13) 63
Provider/Contract Update (C14) 69
Service Delivery (C22) 77
Waiver MR/RC Assessment (C23) 87 ___________________________________________________________________________
HCS Procedures June 2010 Revised Procedures - 1
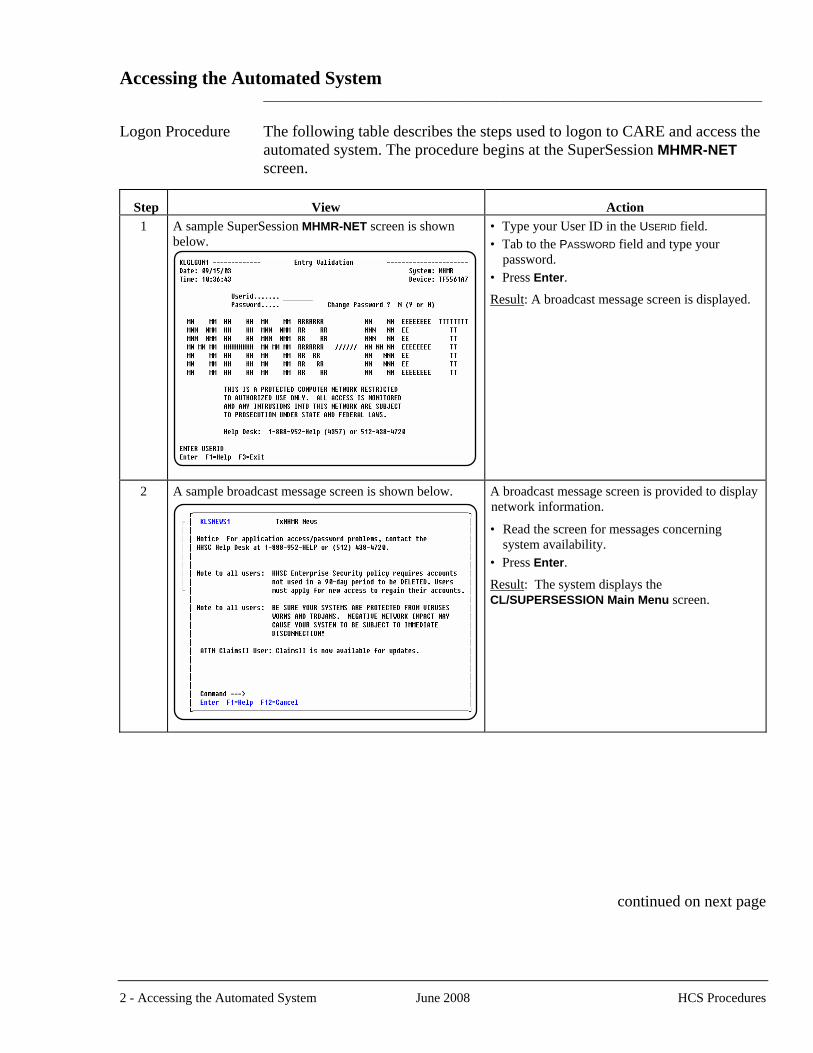
Accessing the Automated System ___________________________________________________________________________ Logon Procedure The following table describes the steps used to logon to CARE and access the
automated system. The procedure begins at the SuperSession MHMR-NET screen.
Step
View
Action 1 A sample SuperSession MHMR-NET screen is shown
below.
• Type your User ID in the USERID field. • Tab to the PASSWORD field and type your
password. • Press Enter.
Result: A broadcast message screen is displayed.
2 A sample broadcast message screen is shown below.
A broadcast message screen is provided to display network information.
• Read the screen for messages concerning system availability.
• Press Enter.
Result: The system displays the CL/SUPERSESSION Main Menu screen.
continued on next page
2 - Accessing the Automated System June 2008 HCS Procedures
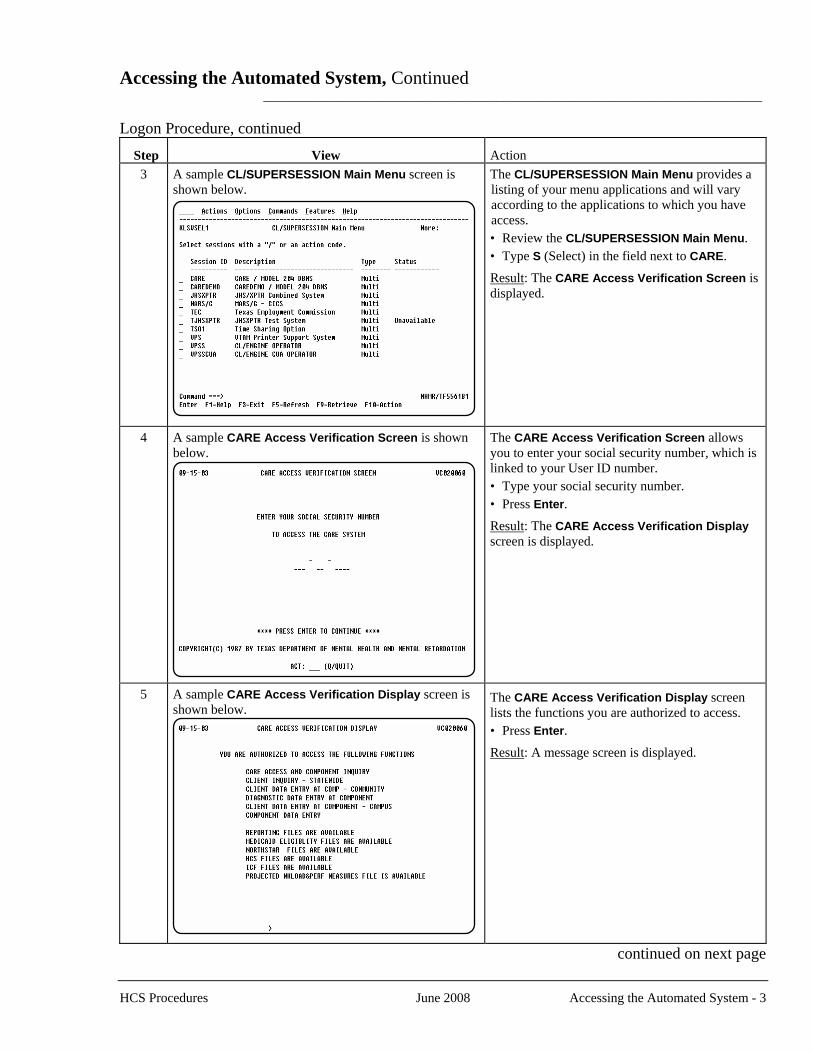
Accessing the Automated System, Continued ___________________________________________________________________________ Logon Procedure, continued
Step
View
Action 3 A sample CL/SUPERSESSION Main Menu screen is
shown below.
The CL/SUPERSESSION Main Menu provides a listing of your menu applications and will vary according to the applications to which you have access. • Review the CL/SUPERSESSION Main Menu. • Type S (Select) in the field next to CARE.
Result: The CARE Access Verification Screen is displayed.
4 A sample CARE Access Verification Screen is shown below.
The CARE Access Verification Screen allows you to enter your social security number, which is linked to your User ID number. • Type your social security number. • Press Enter.
Result: The CARE Access Verification Display screen is displayed.
5 A sample CARE Access Verification Display screen is shown below.
The CARE Access Verification Display screen lists the functions you are authorized to access. • Press Enter.
Result: A message screen is displayed.
continued on next page
HCS Procedures June 2008 Accessing the Automated System - 3
Accessing the Automated System, Continued ___________________________________________________________________________ Logon Procedure, continued
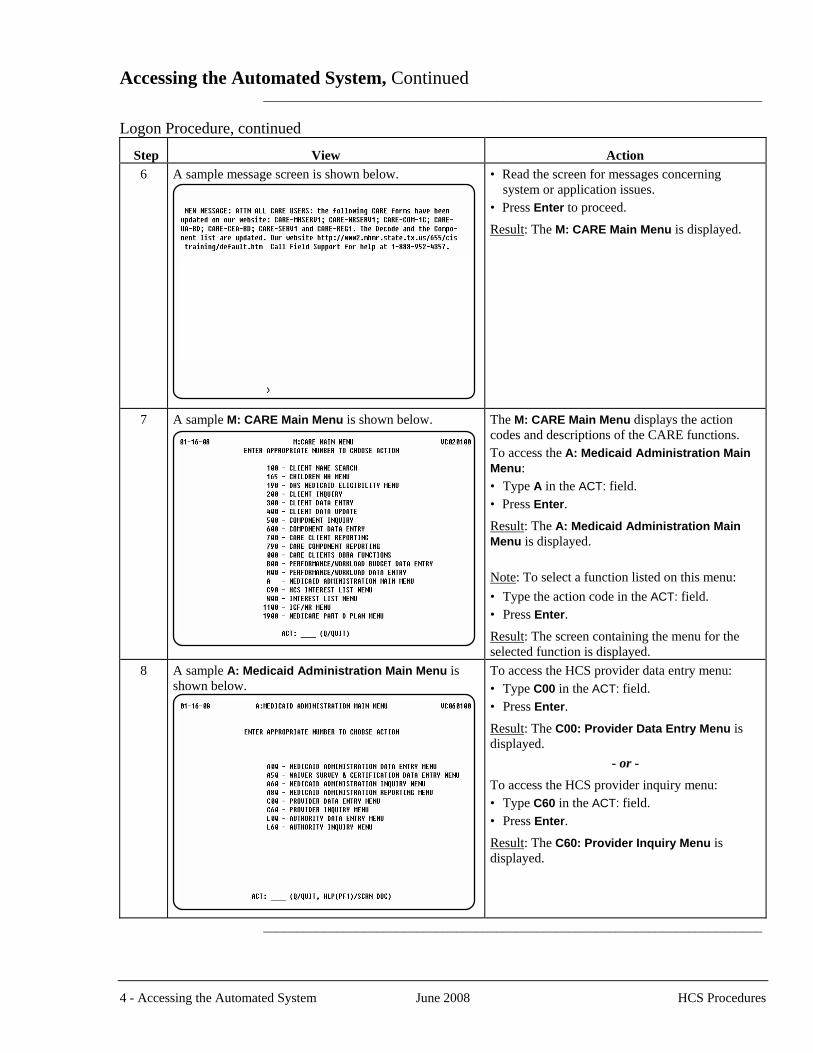
Step
View
Action 6 A sample message screen is shown below.
• Read the screen for messages concerning
system or application issues. • Press Enter to proceed.
Result: The M: CARE Main Menu is displayed.
7 A sample M: CARE Main Menu is shown below.
The M: CARE Main Menu displays the action codes and descriptions of the CARE functions. To access the A: Medicaid Administration Main Menu: • Type A in the ACT: field. • Press Enter.
Result: The A: Medicaid Administration Main Menu is displayed. Note: To select a function listed on this menu: • Type the action code in the ACT: field. • Press Enter.
Result: The screen containing the menu for the selected function is displayed.
8 A sample A: Medicaid Administration Main Menu is shown below.
To access the HCS provider data entry menu: • Type C00 in the ACT: field. • Press Enter.
Result: The C00: Provider Data Entry Menu is displayed.
- or - To access the HCS provider inquiry menu: • Type C60 in the ACT: field. • Press Enter.
Result: The C60: Provider Inquiry Menu is displayed.
4 - Accessing the Automated System June 2008 HCS Procedures
___________________________________________________________________________
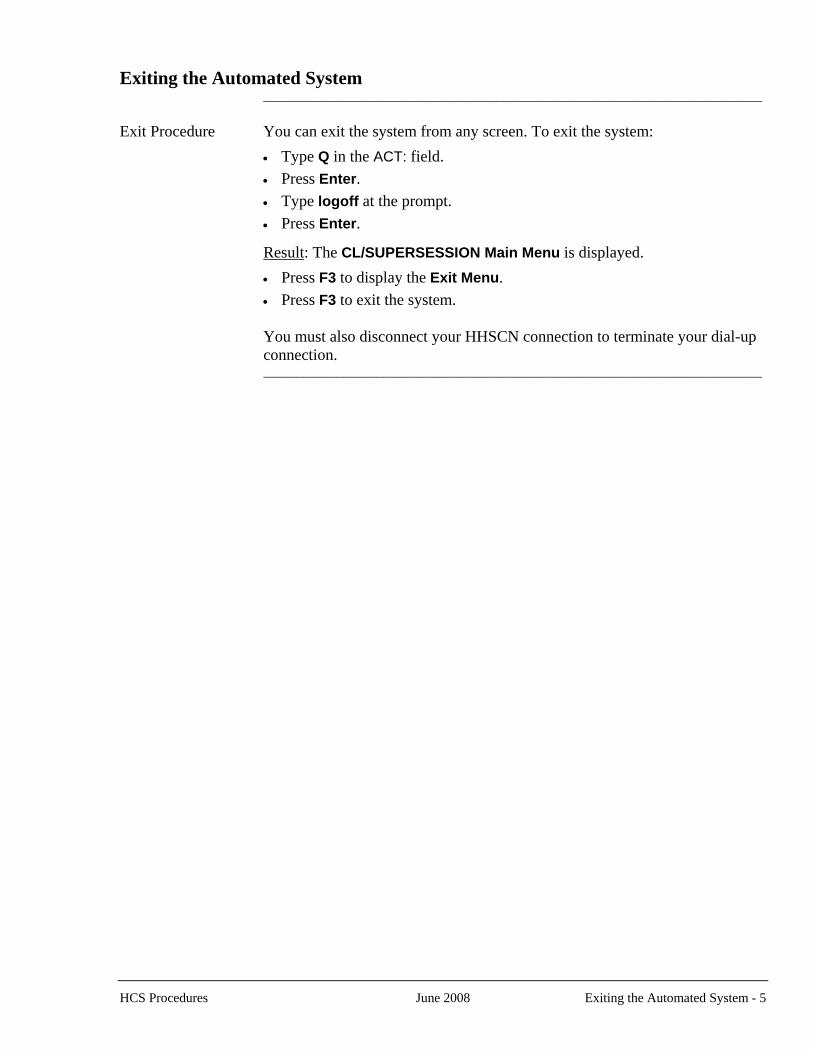
Exiting the Automated System ___________________________________________________________________________ Exit Procedure You can exit the system from any screen. To exit the system:
• Type Q in the ACT: field. • Press Enter. • Type logoff at the prompt. • Press Enter.
Result: The CL/SUPERSESSION Main Menu is displayed. • Press F3 to display the Exit Menu. • Press F3 to exit the system.
You must also disconnect your HHSCN connection to terminate your dial-up
connection. ___________________________________________________________________________
HCS Procedures June 2008 Exiting the Automated System - 5
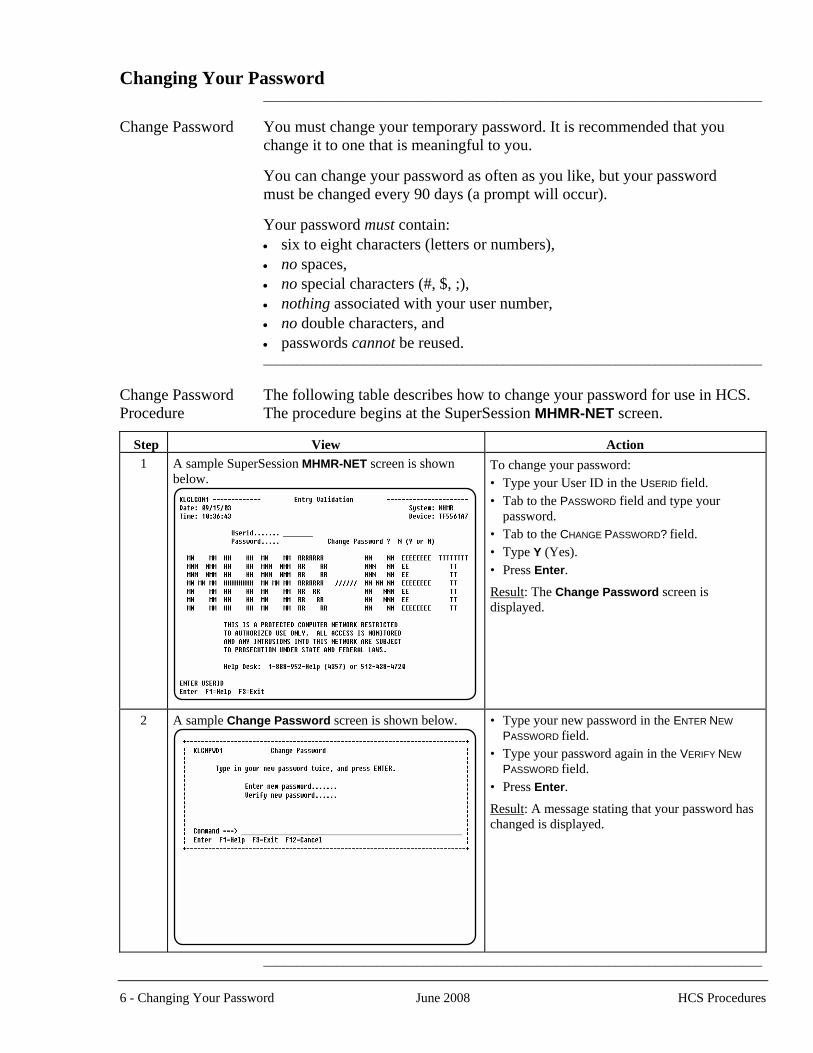
Changing Your Password ___________________________________________________________________________ Change Password You must change your temporary password. It is recommended that you
change it to one that is meaningful to you. You can change your password as often as you like, but your password
must be changed every 90 days (a prompt will occur). Your password must contain:
• six to eight characters (letters or numbers), • no spaces, • no special characters (#, $, ;), • nothing associated with your user number, • no double characters, and • passwords cannot be reused.
___________________________________________________________________________ Change Password The following table describes how to change your password for use in HCS. Procedure The procedure begins at the SuperSession MHMR-NET screen.
Step
View
Action 1 A sample SuperSession MHMR-NET screen is shown
below.
To change your password: • Type your User ID in the USERID field. • Tab to the PASSWORD field and type your
password. • Tab to the CHANGE PASSWORD? field. • Type Y (Yes). • Press Enter.
Result: The Change Password screen is displayed.
2 A sample Change Password screen is shown below.
• Type your new password in the ENTER NEW PASSWORD field.
• Type your password again in the VERIFY NEW PASSWORD field.
• Press Enter.
Result: A message stating that your password has changed is displayed.
___________________________________________________________________________
6 - Changing Your Password June 2008 HCS Procedures

Client Address Update (C12) _______________________________________________________________ Introduction The Client Address Update process allows a provider to update an
individual’s address record. Note: All HCS individuals must have a current address and a current guardian
or Legally Authorized Representative (LAR) address. _______________________________________________________________
HCS Procedures June 2008 Client Address Update - 7
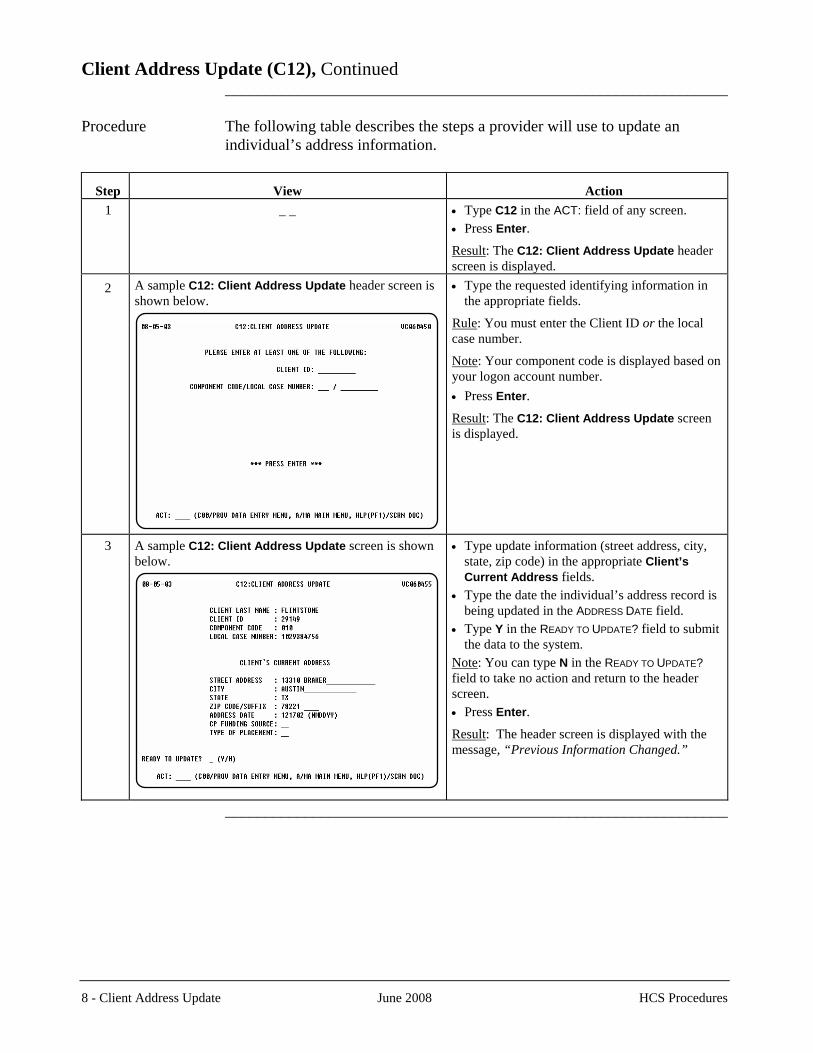
Client Address Update (C12), Continued _______________________________________________________________ Procedure The following table describes the steps a provider will use to update an
individual’s address information.
Step
View
Action 1 _ _
• Type C12 in the ACT: field of any screen. • Press Enter. Result: The C12: Client Address Update header screen is displayed.
2 A sample C12: Client Address Update header screen is shown below.
• Type the requested identifying information in the appropriate fields.
Rule: You must enter the Client ID or the local case number.
Note: Your component code is displayed based on your logon account number. • Press Enter.
Result: The C12: Client Address Update screen is displayed.
3 A sample C12: Client Address Update screen is shown below.
• Type update information (street address, city, state, zip code) in the appropriate Client’s Current Address fields.
• Type the date the individual’s address record is being updated in the ADDRESS DATE field.
• Type Y in the READY TO UPDATE? field to submit the data to the system.
Note: You can type N in the READY TO UPDATE? field to take no action and return to the header screen. • Press Enter.
Result: The header screen is displayed with the message, “Previous Information Changed.”
_______________________________________________________________
8 - Client Address Update June 2008 HCS Procedures
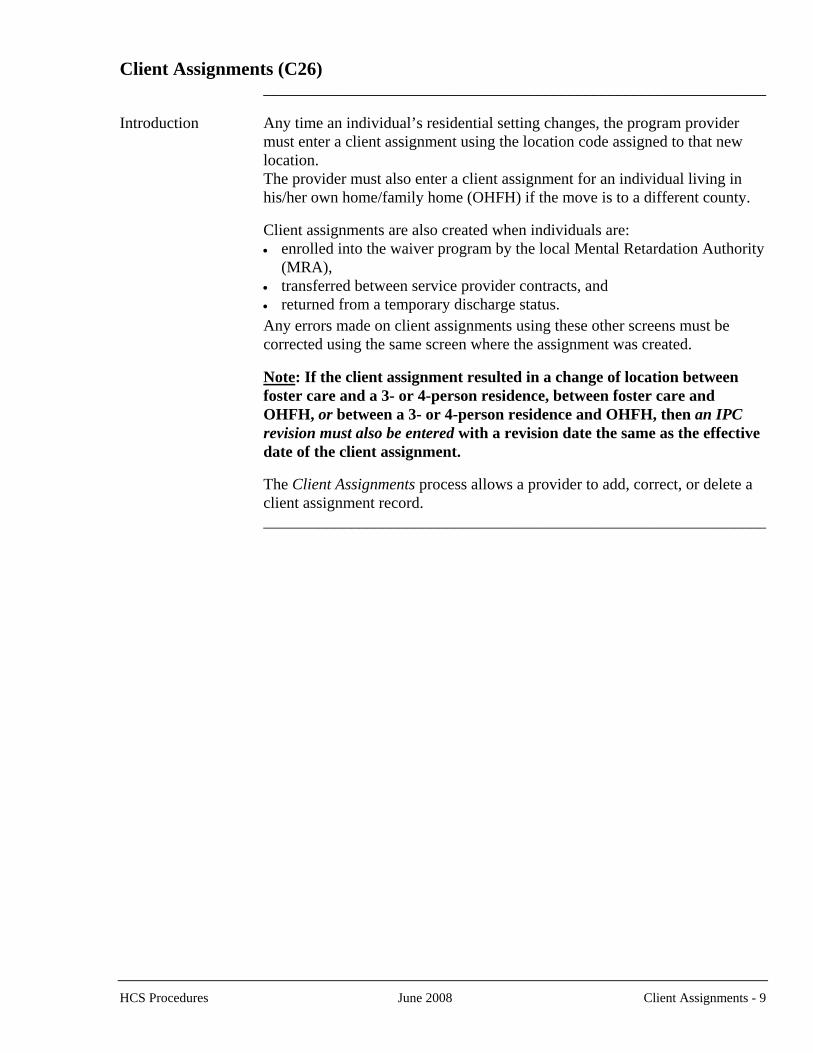
Client Assignments (C26) _______________________________________________________________ Introduction Any time an individual’s residential setting changes, the program provider
must enter a client assignment using the location code assigned to that new location.
The provider must also enter a client assignment for an individual living in his/her own home/family home (OHFH) if the move is to a different county.
Client assignments are also created when individuals are:
• enrolled into the waiver program by the local Mental Retardation Authority (MRA),
• transferred between service provider contracts, and • returned from a temporary discharge status.
Any errors made on client assignments using these other screens must be corrected using the same screen where the assignment was created.
Note: If the client assignment resulted in a change of location between
foster care and a 3- or 4-person residence, between foster care and OHFH, or between a 3- or 4-person residence and OHFH, then an IPC revision must also be entered with a revision date the same as the effective date of the client assignment.
The Client Assignments process allows a provider to add, correct, or delete a
client assignment record. _______________________________________________________________
HCS Procedures June 2008 Client Assignments - 9
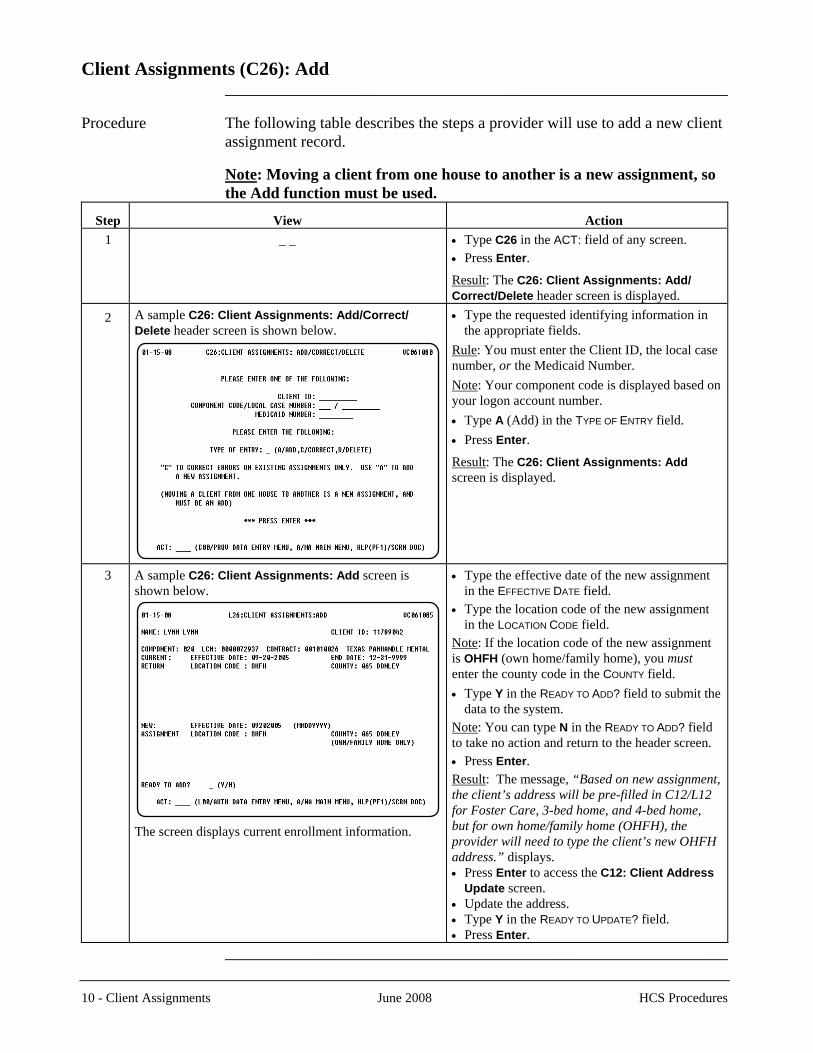
Client Assignments (C26): Add _______________________________________________________________ Procedure The following table describes the steps a provider will use to add a new client
assignment record. Note: Moving a client from one house to another is a new assignment, so
the Add function must be used.
Step
View
Action 1 _ _
• Type C26 in the ACT: field of any screen. • Press Enter. Result: The C26: Client Assignments: Add/ Correct/Delete header screen is displayed.
2 A sample C26: Client Assignments: Add/Correct/ Delete header screen is shown below.
• Type the requested identifying information in the appropriate fields.
Rule: You must enter the Client ID, the local case number, or the Medicaid Number. Note: Your component code is displayed based on your logon account number. • Type A (Add) in the TYPE OF ENTRY field. • Press Enter.
Result: The C26: Client Assignments: Add screen is displayed.
3 A sample C26: Client Assignments: Add screen is shown below.
The screen displays current enrollment information.
• Type the effective date of the new assignment in the EFFECTIVE DATE field.
• Type the location code of the new assignment in the LOCATION CODE field.
Note: If the location code of the new assignment is OHFH (own home/family home), you must enter the county code in the COUNTY field. • Type Y in the READY TO ADD? field to submit the
data to the system. Note: You can type N in the READY TO ADD? field to take no action and return to the header screen. • Press Enter. Result: The message, “Based on new assignment, the client’s address will be pre-filled in C12/L12 for Foster Care, 3-bed home, and 4-bed home, but for own home/family home (OHFH), the provider will need to type the client’s new OHFH address.” displays. • Press Enter to access the C12: Client Address
Update screen. • Update the address. • Type Y in the READY TO UPDATE? field. • Press Enter.
_______________________________________________________________
10 - Client Assignments June 2008 HCS Procedures
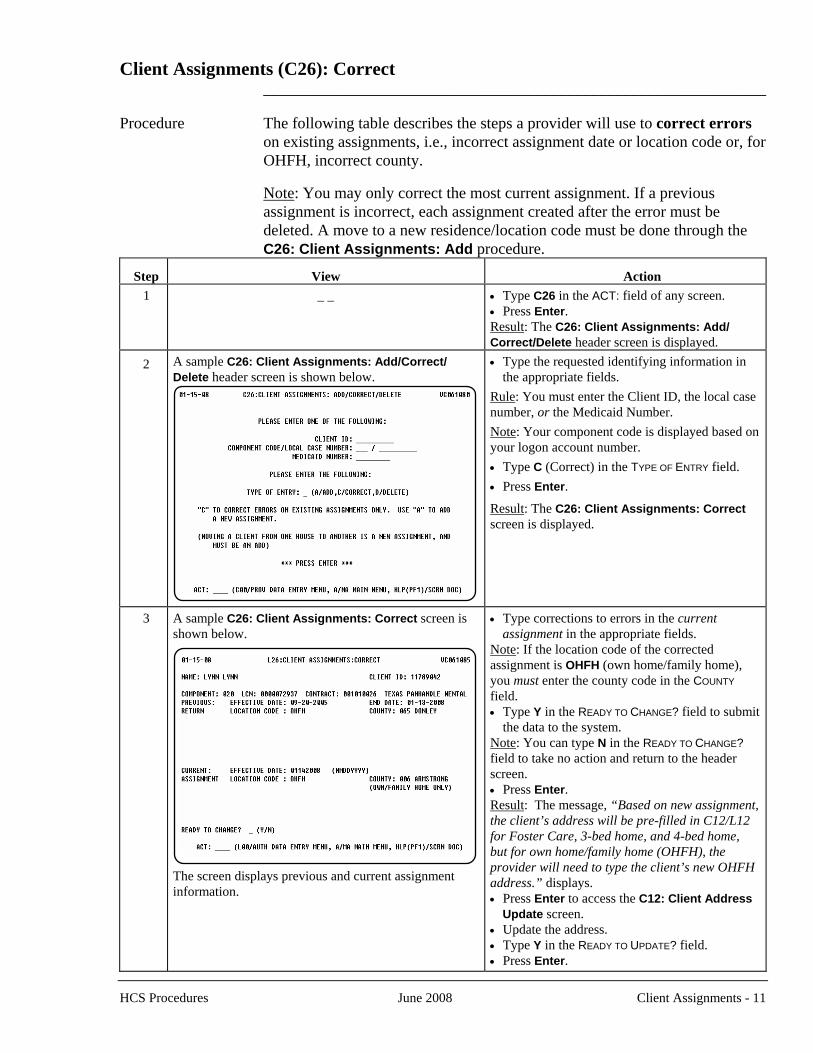
Client Assignments (C26): Correct _______________________________________________________________ Procedure The following table describes the steps a provider will use to correct errors
on existing assignments, i.e., incorrect assignment date or location code or, for OHFH, incorrect county.
Note: You may only correct the most current assignment. If a previous
assignment is incorrect, each assignment created after the error must be deleted. A move to a new residence/location code must be done through the C26: Client Assignments: Add procedure.
Step
View
Action 1 _ _
• Type C26 in the ACT: field of any screen. • Press Enter. Result: The C26: Client Assignments: Add/ Correct/Delete header screen is displayed.
2 A sample C26: Client Assignments: Add/Correct/ Delete header screen is shown below.
• Type the requested identifying information in the appropriate fields.
Rule: You must enter the Client ID, the local case number, or the Medicaid Number. Note: Your component code is displayed based on your logon account number. • Type C (Correct) in the TYPE OF ENTRY field. • Press Enter.
Result: The C26: Client Assignments: Correct screen is displayed.
3 A sample C26: Client Assignments: Correct screen is shown below.
The screen displays previous and current assignment information.
• Type corrections to errors in the current assignment in the appropriate fields.
Note: If the location code of the corrected assignment is OHFH (own home/family home), you must enter the county code in the COUNTY field. • Type Y in the READY TO CHANGE? field to submit
the data to the system. Note: You can type N in the READY TO CHANGE? field to take no action and return to the header screen. • Press Enter. Result: The message, “Based on new assignment, the client’s address will be pre-filled in C12/L12 for Foster Care, 3-bed home, and 4-bed home, but for own home/family home (OHFH), the provider will need to type the client’s new OHFH address.” displays. • Press Enter to access the C12: Client Address
Update screen. • Update the address. • Type Y in the READY TO UPDATE? field. • Press Enter.
HCS Procedures June 2008 Client Assignments - 11
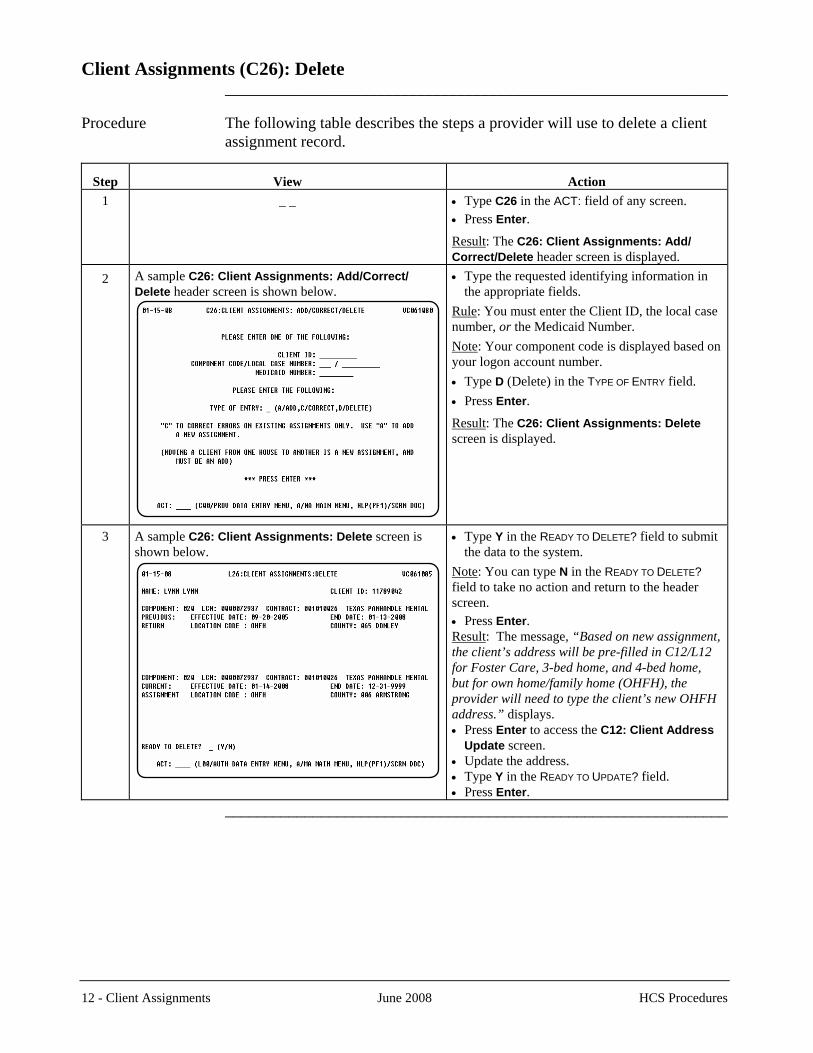
Client Assignments (C26): Delete _______________________________________________________________ Procedure The following table describes the steps a provider will use to delete a client
assignment record.
Step
View
Action 1 _ _
• Type C26 in the ACT: field of any screen. • Press Enter. Result: The C26: Client Assignments: Add/ Correct/Delete header screen is displayed.
2 A sample C26: Client Assignments: Add/Correct/ Delete header screen is shown below.
• Type the requested identifying information in the appropriate fields.
Rule: You must enter the Client ID, the local case number, or the Medicaid Number. Note: Your component code is displayed based on your logon account number. • Type D (Delete) in the TYPE OF ENTRY field. • Press Enter.
Result: The C26: Client Assignments: Delete screen is displayed.
3 A sample C26: Client Assignments: Delete screen is shown below.
• Type Y in the READY TO DELETE? field to submit the data to the system.
Note: You can type N in the READY TO DELETE? field to take no action and return to the header screen. • Press Enter. Result: The message, “Based on new assignment, the client’s address will be pre-filled in C12/L12 for Foster Care, 3-bed home, and 4-bed home, but for own home/family home (OHFH), the provider will need to type the client’s new OHFH address.” displays. • Press Enter to access the C12: Client Address
Update screen. • Update the address. • Type Y in the READY TO UPDATE? field. • Press Enter.
_______________________________________________________________
12 - Client Assignments June 2008 HCS Procedures
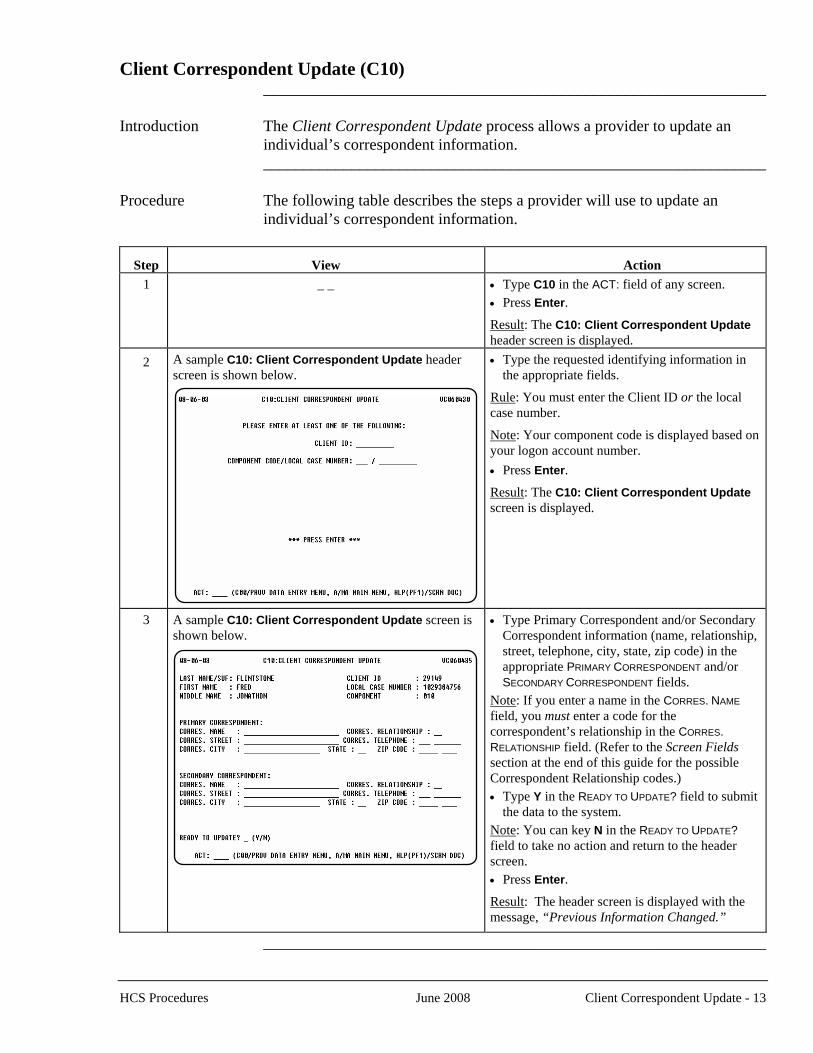
Client Correspondent Update (C10) _______________________________________________________________ Introduction The Client Correspondent Update process allows a provider to update an
individual’s correspondent information. _______________________________________________________________ Procedure The following table describes the steps a provider will use to update an
individual’s correspondent information.
Step
View
Action 1 _ _
• Type C10 in the ACT: field of any screen. • Press Enter. Result: The C10: Client Correspondent Update header screen is displayed.
2 A sample C10: Client Correspondent Update header screen is shown below.
• Type the requested identifying information in the appropriate fields.
Rule: You must enter the Client ID or the local case number.
Note: Your component code is displayed based on your logon account number. • Press Enter.
Result: The C10: Client Correspondent Update screen is displayed.
3 A sample C10: Client Correspondent Update screen is shown below.
• Type Primary Correspondent and/or Secondary Correspondent information (name, relationship, street, telephone, city, state, zip code) in the appropriate PRIMARY CORRESPONDENT and/or SECONDARY CORRESPONDENT fields.
Note: If you enter a name in the CORRES. NAME field, you must enter a code for the correspondent’s relationship in the CORRES. RELATIONSHIP field. (Refer to the Screen Fields section at the end of this guide for the possible Correspondent Relationship codes.) • Type Y in the READY TO UPDATE? field to submit
the data to the system. Note: You can key N in the READY TO UPDATE? field to take no action and return to the header screen. • Press Enter.
Result: The header screen is displayed with the message, “Previous Information Changed.”
_______________________________________________________________
HCS Procedures June 2008 Client Correspondent Update - 13
14 - Client Correspondent Update June 2008 HCS Procedures
This page was intentionally left blank.
Client Name Update (C11) _______________________________________________________________ Introduction The Client Name Update process allows a provider to update an individual’s
name record. Use the following types of entry to add, change, or delete name information:
• The Add option is used when an individual’s name has legally changed so that a record of the name history is kept.
• The Change option is used if the name was entered incorrectly by your component.
• The Delete option is used if a name update was entered in error by your component.
_______________________________________________________________
HCS Procedures June 2008 Client Name Update - 15
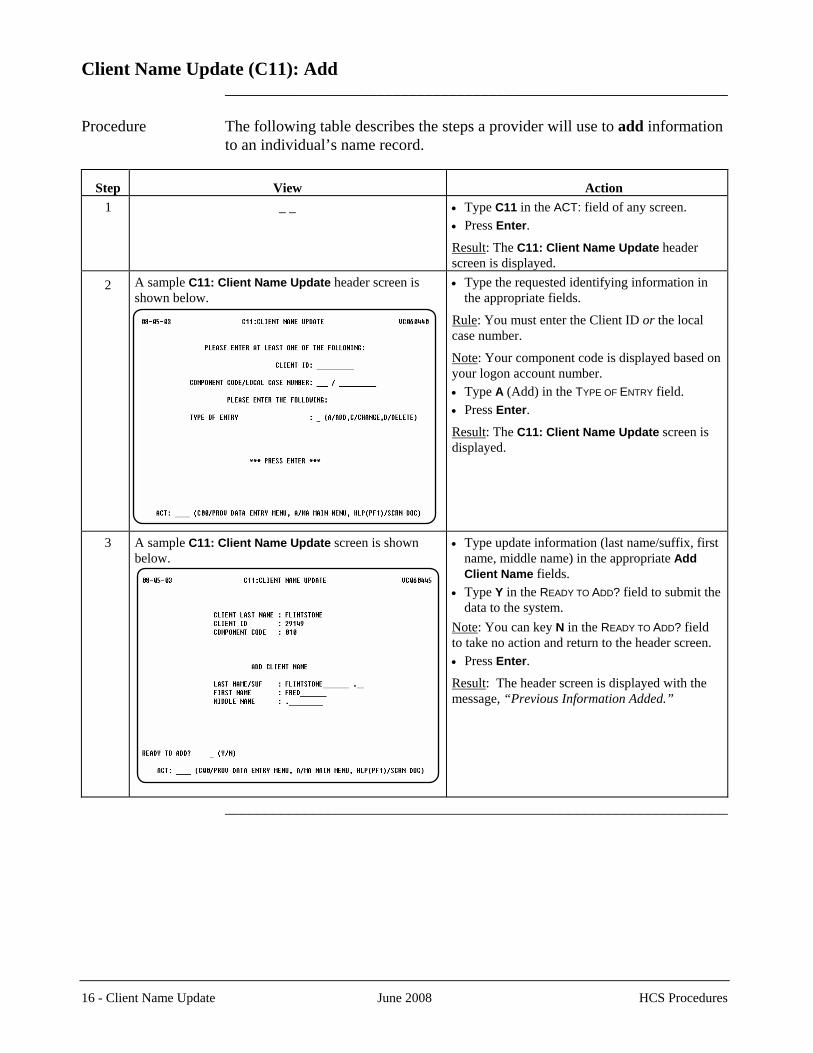
Client Name Update (C11): Add _______________________________________________________________ Procedure The following table describes the steps a provider will use to add information
to an individual’s name record.
Step
View
Action 1 _ _
• Type C11 in the ACT: field of any screen. • Press Enter. Result: The C11: Client Name Update header screen is displayed.
2 A sample C11: Client Name Update header screen is shown below.
• Type the requested identifying information in the appropriate fields.
Rule: You must enter the Client ID or the local case number.
Note: Your component code is displayed based on your logon account number. • Type A (Add) in the TYPE OF ENTRY field. • Press Enter.
Result: The C11: Client Name Update screen is displayed.
3 A sample C11: Client Name Update screen is shown below.
• Type update information (last name/suffix, first name, middle name) in the appropriate Add Client Name fields.
• Type Y in the READY TO ADD? field to submit the data to the system.
Note: You can key N in the READY TO ADD? field to take no action and return to the header screen. • Press Enter.
Result: The header screen is displayed with the message, “Previous Information Added.”
_______________________________________________________________
16 - Client Name Update June 2008 HCS Procedures
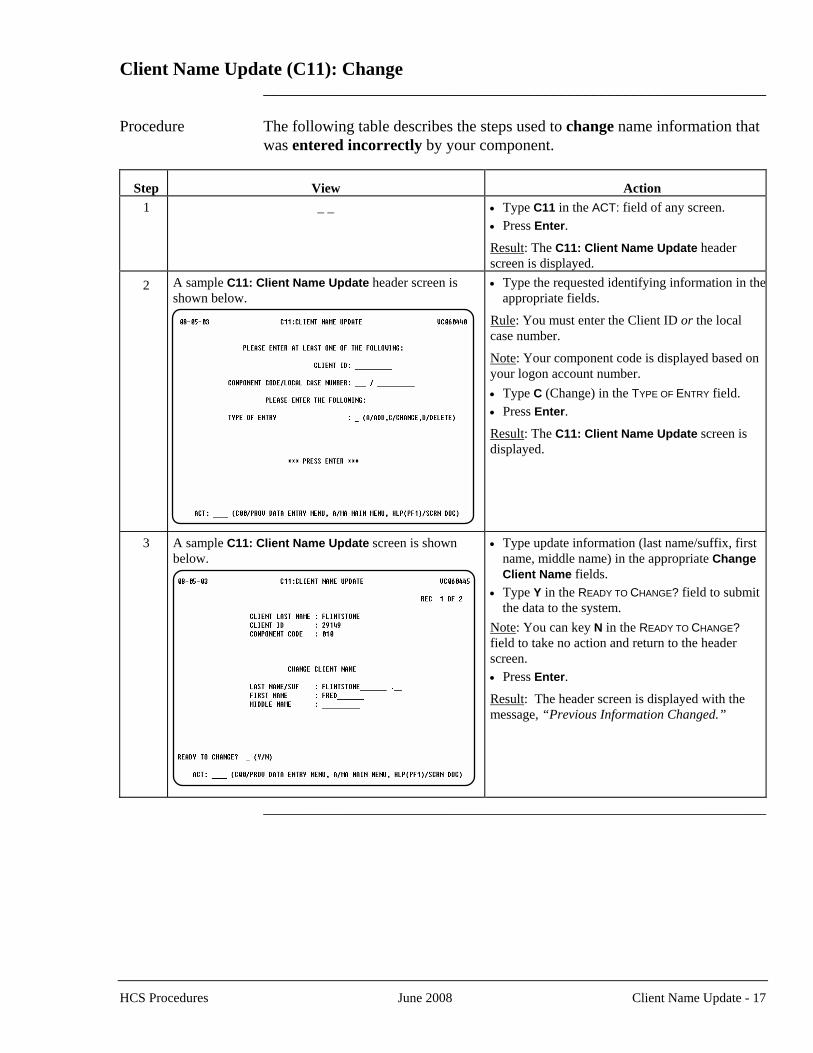
Client Name Update (C11): Change _______________________________________________________________ Procedure The following table describes the steps used to change name information that
was entered incorrectly by your component.
Step
View
Action 1 _ _
• Type C11 in the ACT: field of any screen. • Press Enter. Result: The C11: Client Name Update header screen is displayed.
2 A sample C11: Client Name Update header screen is shown below.
• Type the requested identifying information in theappropriate fields.
Rule: You must enter the Client ID or the local case number.
Note: Your component code is displayed based on your logon account number. • Type C (Change) in the TYPE OF ENTRY field. • Press Enter.
Result: The C11: Client Name Update screen is displayed.
3 A sample C11: Client Name Update screen is shown below.
• Type update information (last name/suffix, first name, middle name) in the appropriate Change Client Name fields.
• Type Y in the READY TO CHANGE? field to submit the data to the system.
Note: You can key N in the READY TO CHANGE? field to take no action and return to the header screen. • Press Enter.
Result: The header screen is displayed with the message, “Previous Information Changed.”
_______________________________________________________________
HCS Procedures June 2008 Client Name Update - 17
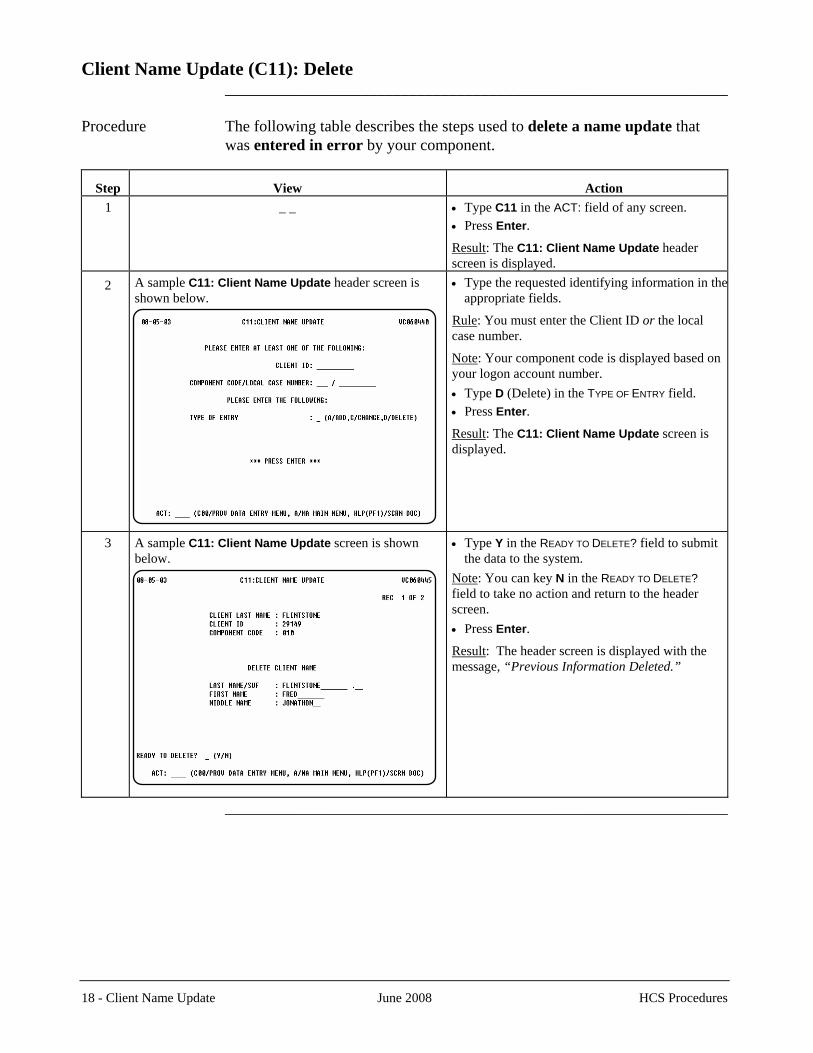
Client Name Update (C11): Delete _______________________________________________________________ Procedure The following table describes the steps used to delete a name update that
was entered in error by your component.
Step
View
Action 1 _ _
• Type C11 in the ACT: field of any screen. • Press Enter. Result: The C11: Client Name Update header screen is displayed.
2 A sample C11: Client Name Update header screen is shown below.
• Type the requested identifying information in theappropriate fields.
Rule: You must enter the Client ID or the local case number.
Note: Your component code is displayed based on your logon account number. • Type D (Delete) in the TYPE OF ENTRY field. • Press Enter.
Result: The C11: Client Name Update screen is displayed.
3 A sample C11: Client Name Update screen is shown below.
• Type Y in the READY TO DELETE? field to submit the data to the system.
Note: You can key N in the READY TO DELETE? field to take no action and return to the header screen. • Press Enter.
Result: The header screen is displayed with the message, “Previous Information Deleted.”
_______________________________________________________________
18 - Client Name Update June 2008 HCS Procedures

Consumer Discharge (C18) _______________________________________________________________ Introduction The termination of waiver services policy is described in the HCS Handbook
and can be accessed at: http://www.dads.state.tx.us/handbooks/hcs/ _______________________________________________________________ Termination of A termination of waiver services (permanent discharge) is the termination of Waiver Services an individual’s waiver services because the individual is unable or unavailable
to receive services. For termination of waiver services, after the termination staffing has occurred
the C18: Consumer Discharge must be entered by the provider and the L18: Consumer Discharge must be entered by the Mental Retardation Authority (MRA). The MRA’s Service Coordinator is responsible for submitting the required documentation to DADS Access & Intake, Program Enrollment for authorization of termination of services after the data entry has been completed.
_______________________________________________________________ Suspension of A suspension of waiver services (temporary discharge) is the temporary Waiver Services suspension of an individual’s waiver services by the provider while the
individual is unable or unwilling to receive services. For suspension of waiver services, no documentation needs to be sent to
DADS Access & Intake, Program Enrollment.
If a provider wants to continue a suspension of waiver services past 270 days, the extension must be approved by DADS Access & Intake, Program Enrollment.
When suspending an individual’s waiver services on the C18: Consumer Discharge, the provider will not enter the discharge end date until the individual has returned to the provider for waiver services. The discharge end date is the last full day the individual was absent from the program.
Do not end a suspension of waiver services for an individual who is
transferring to another contract unless the individual returns to the current contract prior to the transfer effective date.
_______________________________________________________________
HCS Procedures June 2010 Revised Consumer Discharge - 19
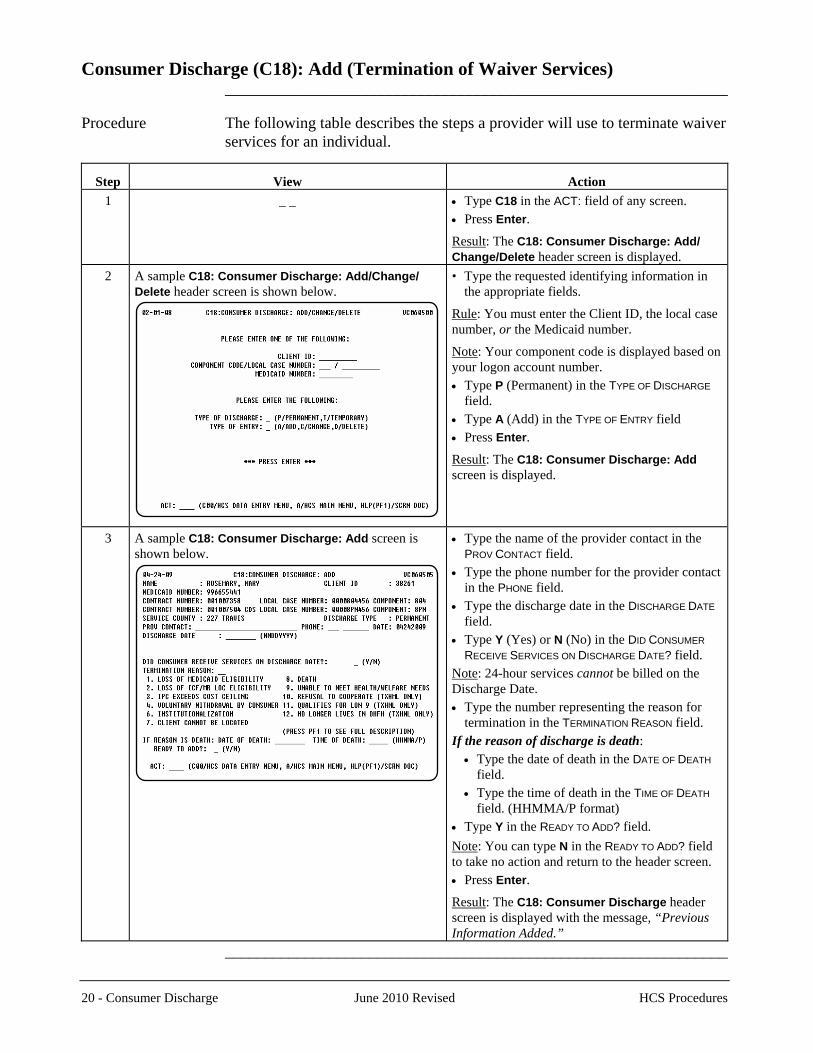
Consumer Discharge (C18): Add (Termination of Waiver Services) _______________________________________________________________ Procedure The following table describes the steps a provider will use to terminate waiver
services for an individual.
Step
View
Action 1 _ _
• Type C18 in the ACT: field of any screen. • Press Enter. Result: The C18: Consumer Discharge: Add/ Change/Delete header screen is displayed.
2 A sample C18: Consumer Discharge: Add/Change/ Delete header screen is shown below.
• Type the requested identifying information in the appropriate fields.
Rule: You must enter the Client ID, the local case number, or the Medicaid number.
Note: Your component code is displayed based on your logon account number. • Type P (Permanent) in the TYPE OF DISCHARGE
field. • Type A (Add) in the TYPE OF ENTRY field • Press Enter.
Result: The C18: Consumer Discharge: Add screen is displayed.
3 A sample C18: Consumer Discharge: Add screen is shown below.
• Type the name of the provider contact in the PROV CONTACT field.
• Type the phone number for the provider contact in the PHONE field.
• Type the discharge date in the DISCHARGE DATE field.
• Type Y (Yes) or N (No) in the DID CONSUMER
RECEIVE SERVICES ON DISCHARGE DATE? field. Note: 24-hour services cannot be billed on the Discharge Date. • Type the number representing the reason for
termination in the TERMINATION REASON field. If the reason of discharge is death:
• Type the date of death in the DATE OF DEATH field.
• Type the time of death in the TIME OF DEATH field. (HHMMA/P format)
• Type Y in the READY TO ADD? field. Note: You can type N in the READY TO ADD? field to take no action and return to the header screen. • Press Enter.
Result: The C18: Consumer Discharge header screen is displayed with the message, “Previous Information Added.”
_______________________________________________________________
20 - Consumer Discharge June 2010 Revised HCS Procedures
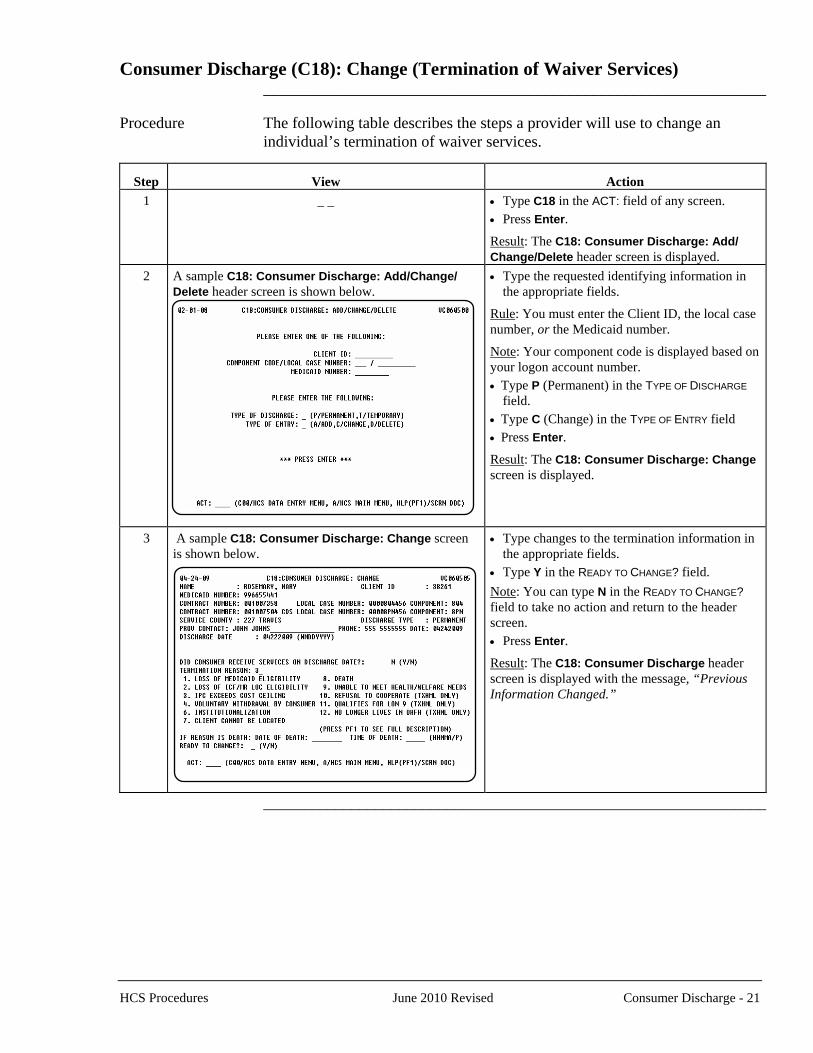
Consumer Discharge (C18): Change (Termination of Waiver Services) _______________________________________________________________ Procedure The following table describes the steps a provider will use to change an
individual’s termination of waiver services.
Step
View
Action 1 _ _
• Type C18 in the ACT: field of any screen. • Press Enter. Result: The C18: Consumer Discharge: Add/ Change/Delete header screen is displayed.
2 A sample C18: Consumer Discharge: Add/Change/ Delete header screen is shown below.
• Type the requested identifying information in the appropriate fields.
Rule: You must enter the Client ID, the local case number, or the Medicaid number.
Note: Your component code is displayed based on your logon account number. • Type P (Permanent) in the TYPE OF DISCHARGE
field. • Type C (Change) in the TYPE OF ENTRY field • Press Enter.
Result: The C18: Consumer Discharge: Change screen is displayed.
3 A sample C18: Consumer Discharge: Change screen is shown below.
• Type changes to the termination information in the appropriate fields.
• Type Y in the READY TO CHANGE? field. Note: You can type N in the READY TO CHANGE? field to take no action and return to the header screen. • Press Enter.
Result: The C18: Consumer Discharge header screen is displayed with the message, “Previous Information Changed.”
_______________________________________________________________
HCS Procedures June 2010 Revised Consumer Discharge - 21
Consumer Discharge (C18): Delete (Termination of Waiver Services) _______________________________________________________________ Procedure The following table describes the steps a provider will use to delete an
individual’s termination of waiver services.
Step
View
Action 1 _ _
• Type C18 in the ACT: field of any screen. • Press Enter. Result: The C18: Consumer Discharge: Add/ Change/Delete header screen is displayed.
2 A sample C18: Consumer Discharge: Add/Change/ Delete header screen is shown below.
• Type the requested identifying information in the appropriate fields.
Rule: You must enter the Client ID, the local case number, or the Medicaid number.
Note: Your component code is displayed based on your logon account number. • Type P (Permanent) in the TYPE OF DISCHARGE
field. • Type D (Delete) in the TYPE OF ENTRY field • Press Enter.
Result: The C18: Consumer Discharge: Delete screen is displayed.
3 A sample C18: Consumer Discharge: Delete screen is shown below.
• Type Y in the READY TO DELETE? field. Note: You can type N in the READY TO DELETE? field to take no action and return to the header screen. • Press Enter.
Result: The header screen is displayed with the message, “Previous Information Deleted.”
_______________________________________________________________
22 - Consumer Discharge June 2010 Revised HCS Procedures
Consumer Discharge (C18): Add (Suspension of Waiver Services) _______________________________________________________________ Procedure The following table describes the steps a provider will use to enter an
individual’s suspension of waiver services.
Step
View
Action 1 _ _
• Type C18 in the ACT: field of any screen. • Press Enter. Result: The C18: Consumer Discharge: Add/ Change/Delete header screen is displayed.
2 A sample C18: Consumer Discharge: Add/Change/ Delete header screen is shown below.
• Type the requested identifying information in the appropriate fields.
Rule: You must enter the Client ID, the local case number, or the Medicaid number.
Note: Your component code is displayed based on your logon account number. • Type T (Temporary) in the TYPE OF DISCHARGE
field. • Type A (Add) in the TYPE OF ENTRY field • Press Enter.
Result: The C18: Consumer Discharge: Add screen is displayed.
continued on next page
HCS Procedures June 2010 Revised Consumer Discharge - 23
Consumer Discharge (C18): Add (Suspension of Waiver Services), Continued _______________________________________________________________
Procedure, continued
Step
View
Action 3 A sample C18: Consumer Discharge: Add screen is
shown below.
• Type the name of the provider contact in the PROV
CONTACT field. • Type the phone number for the provider contact in
the PHONE field. • Type the suspension of waiver services begin date
in the DISCHARGE BEGIN DATE field. • Type the projected return date in the PROJECTED
RETURN DATE field. • Type Y (Yes) or N (No) in the DID CONSUMER
RECEIVE SERVICES ON DISCHARGE BEGIN DATE? field. Note: 24-hour services cannot be billed on the Discharge Date. • Type the reason for suspension of waiver services
in the TERMINATION REASON field. The following table lists the reasons and their descriptions.
Reason Description 1. Loss of Financial
Eligibility Individual has lost Medicaid eligibility
2. Hospitalization (Medical)
Individual is in a medical hospital.
3. Elopement (Unable to Locate)
Individual cannot be found or refuses to cooperate.
4. Crisis Stabilization Individual is in a private psychiatric hospital or an acute behavioral treatment center.
5. Hospitalization (Psychiatric)
Individual is in a State Hospital.
6. Vacation/Furlough Individual is on vacation or not receiving waiver services.
7. Incarceration Individual is in a city/town, county, state, or federal correction facility.
8. State School Individual is in a State Supported Living Center.
9. Nursing Facility Individual is in a nursing home or other type of nursing facility.
10. ICF/MR Individual is in an intermediate care facility.
• Type Y in the READY TO ADD? field. • Press Enter. Result: The C18: Consumer Discharge header screen is displayed with the message, “Previous Information Added.”
_______________________________________________________________
24 - Consumer Discharge June 2010 Revised HCS Procedures
Consumer Discharge (C18): Change (Suspension of Waiver Services) _______________________________________________________________
Procedure The following table describes the steps a provider will use to change an individual’s suspension of waiver services.
The provider will also use the change function to end a suspension of waiver services.
Step
View
Action 1 _ _
• Type C18 in the ACT: field of any screen. • Press Enter. Result: The C18: Consumer Discharge: Add/ Change/Delete header screen is displayed.
2 A sample C18: Consumer Discharge: Add/Change/ Delete header screen is shown below.
• Type the requested identifying information in the appropriate fields.
Rule: You must enter the Client ID, the local case number, or the Medicaid number.
Note: Your component code is displayed based on your logon account number. • Type T (Temporary) in the TYPE OF DISCHARGE
field. • Type C (Change) in the TYPE OF ENTRY field • Press Enter.
Result: The C18: Consumer Discharge: Change screen is displayed.
3 A sample C18: Consumer Discharge: Change screen is shown below.
• Type changes to the suspension of waiver services information in the appropriate fields.
• If the individual is ending his/her suspension of waiver services, type the end date in the END DATE field.
Note: If the discharge is temporary, do not type the discharge end date until the individual has returned. The discharge end date is the last full day the individual was absent from the program. • Type Y in the READY TO CHANGE? field. • Press Enter. Result: The C18: Consumer Discharge header screen is displayed with the message, “Previous Information Changed.”
_______________________________________________________________
HCS Procedures June 2010 Revised Consumer Discharge - 25
Consumer Discharge (C18): Delete (Suspension of Waiver Services) _______________________________________________________________ Procedure The following table describes the steps a provider will use to delete an
individual’s suspension of waiver services.
Step
View
Action 1 _ _
• Type C18 in the ACT: field of any screen. • Press Enter. Result: The C18: Consumer Discharge: Add/ Change/Delete header screen is displayed.
2 A sample C18: Consumer Discharge: Add/Change/ Delete header screen is shown below.
• Type the requested identifying information in the appropriate fields.
Rule: You must enter the Client ID, the local case number, or the Medicaid number.
Note: Your component code is displayed based on your logon account number. • Type T (Temporary) in the TYPE OF DISCHARGE
field. • Type D (Delete) in the TYPE OF ENTRY field • Press Enter.
Result: The C18: Consumer Discharge: Delete screen is displayed.
3 A sample C18: Consumer Discharge: Delete screen is shown below.
• Type Y in the READY TO DELETE? field. Note: You can type N in the READY TO DELETE? field to take no action and return to the header screen. • Press Enter.
Result: The C18: Consumer Discharge header screen is displayed with the message, “Previous Information Deleted.”
_______________________________________________________________
26 - Consumer Discharge June 2010 Revised HCS Procedures
Critical Incident Data (686) _______________________________________________________________ Introduction The Critical Incident Data process allows a provider to add, change, or delete
critical incident data. The entry of critical incident data is required on a monthly basis for all of the
contracts administered by a provider of MRA General Revenue, HCS, TxHmL, and ICF/MR services. Critical incident data must be entered no later than 30 days from the end of the month being reported. For example, the data reported in the month of September will reflect data that was entered in August.
When adding critical incident data, the fields on the 686: Critical Incident
Data: Add screen will clear to allow for multiple entries of the contracts for your component, and the number of contracts entered is displayed.
Note: HCS information that was previously entered in WebCARE must be
entered in CARE beginning September 1, 2009. _______________________________________________________________ Reportable Data The following information provides terms and definitions used on the Critical
Incident Data screens.
Term Definition Medication Error A medication error is reported when there is a discrepancy between what a
physician prescribes and what an individual actually takes and the individual self-administers medication under supervision of the Program Provider or has medication administered by the Program Provider. A medication error occurs in one of three ways: • Wrong medication - an individual takes medication that is not prescribed for
that individual. This includes taking medication after it has been discontinued or taking the incorrect medication because it was inappropriately labeled.
• Wrong dose - an individual takes a dose of medication other than the dose prescribed.
• Omitted dose - an individual does not take a prescribed dose of medication within one hour before or one hour after the prescribed time, except an omitted dose does not include an individual’s refusal to take medication.
Serious Injury A serious physical injury is reported, regardless of the cause or setting in which it occurred, when an individual sustains: • a fracture; • a dislocation of any joint; • an internal injury; • a contusion larger than 2½ inches in diameter; • a concussion; • a second or third degree burn; • a laceration requiring sutures; or • an injury determined serious by a physician, physician assistant, registered
nurse, or a vocational nurse. continued on next page
HCS Procedures September 2009 (Revised) Critical Incident Data –27
Critical Incident Data (686), Continued _______________________________________________________________ Reportable Data, continued
Term Definition Behavior Intervention Plan Authorizing Restraint
A behavior intervention plan is reported if it authorizes a personal, mechanical or psychoactive medication, as defined below, for an individual. • Personal restraint - the application of pressure, except physical guidance or
prompting of brief duration that restricts the free movement of part or all of an individual’s body.
• Mechanical restraint - the use of a device that restricts the free movement of part or all of an individual’s body. Such a device includes an anklet, a wristlet, a camisole, a helmet with fasteners, a mitt with fasteners, a posey, a waist strap, a head strap, and a restraining sheet. Such a device does not include one used to provide support for functional body position or proper balance, such as a wheelchair belt, or one used for medical treatment, such as a helmet to prevent injury during a seizure.
• Psychoactive medication - the use of a chemical, including a pharmaceutical, through topical application, oral administration, injection, or other means, to control an individual’s activity and which is not a standard treatment for the individual’s medical or psychiatric condition.
Emergency Personal Restraint
An emergency personal restraint is reported when the Program Provider uses a personal restraint, as defined above, and such restraint is not authorized in a written behavior intervention plan approved by the individual’s IDT.
Emergency Mechanical Restraint
An emergency mechanical restraint is reported when the Program Provider uses a mechanical restraint, as defined above, and such restraint is not authorized in a written behavior intervention plan approved by the individual’s IDT.
Emergency Psychoactive Medication
An emergency psychoactive medication is reported when the Program Provider uses a psychoactive medication, as defined above and such restraint is not authorized in a written behavior intervention plan approved by the individual’s IDT.
Individual Requiring Emergency Restraint
An individual is reported as requiring emergency restraint if the individual is restrained (by either personal or mechanical restraint or psychoactive medication) at least once during a calendar month. If an individual is restrained more than once during a calendar month, the individual is reported only once for that month.
Restraint Related Injury
A restraint related injury is a serious injury sustained by an individual that is clearly related to the application of a personal restraint, an emergency mechanical restraint, or an emergency psychoactive medication administered to an individual. Reportable injuries in this category are not due to self-injury that occurred prior to the application of restraint. Serious injuries sustained during the application of a restraint that are investigated by DFPS as an allegation of abuse, neglect or exploitation must be included in CIRS reporting for this category.
_______________________________________________________________
28- Critical Incident Data September 2009 (Revised) HCS Procedures
Critical Incident Data (686): Add _______________________________________________________________ Procedure The following table describes the steps a provider will use to enter critical
incident data for a specified reporting month.
Step
View
Action 1 _ _
• Type 686 in the ACT: field of any screen. • Press Enter. Result: The 686: Critical Incident Data: Add/ Change/Delete header screen is displayed.
2 A sample 686: Critical Incident Data: Add/Change/ Delete header screen is shown below.
Your component code is displayed based on your logon account number. • Type the month and year being reported in the
MONTH AND YEAR field. (MMYYYY format) • Type the contract number in the CONTRACT
NUMBER field. • Type A (Add) in the TYPE OF ENTRY field. • Press Enter. Result: The 686: Critical Incident Data: Add screen is displayed.
continued on next page
HCS Procedures September 2009 (Revised) Critical Incident Data –29
Critical Incident Data (686): Add, Continued _______________________________________________________________ Procedure, continued
Step
View
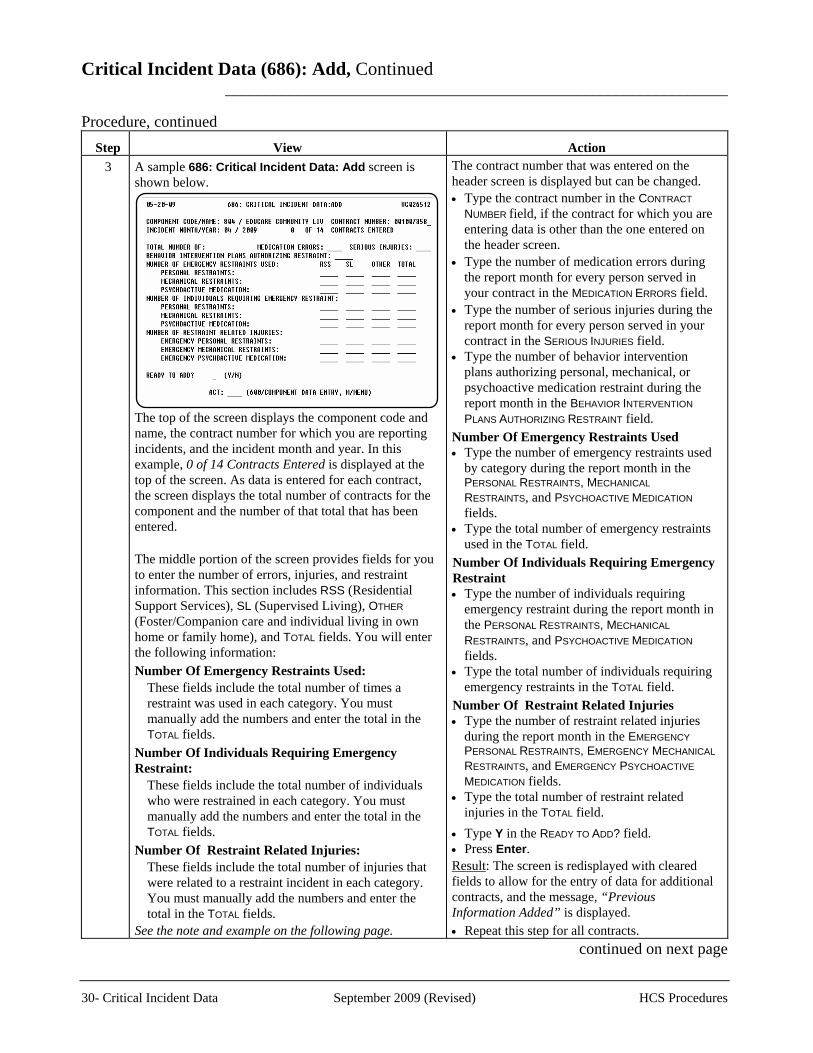
Action 3 A sample 686: Critical Incident Data: Add screen is
shown below. The top of the screen displays the component code and name, the contract number for which you are reporting incidents, and the incident month and year. In this example, 0 of 14 Contracts Entered is displayed at the top of the screen. As data is entered for each contract, the screen displays the total number of contracts for the component and the number of that total that has been entered. The middle portion of the screen provides fields for you to enter the number of errors, injuries, and restraint information. This section includes RSS (Residential Support Services), SL (Supervised Living), OTHER (Foster/Companion care and individual living in own home or family home), and TOTAL fields. You will enter the following information: Number Of Emergency Restraints Used: These fields include the total number of times a
restraint was used in each category. You must manually add the numbers and enter the total in the TOTAL fields.
Number Of Individuals Requiring Emergency Restraint: These fields include the total number of individuals
who were restrained in each category. You must manually add the numbers and enter the total in the TOTAL fields.
Number Of Restraint Related Injuries: These fields include the total number of injuries that
were related to a restraint incident in each category. You must manually add the numbers and enter the total in the TOTAL fields.
See the note and example on the following page.
The contract number that was entered on the header screen is displayed but can be changed. • Type the contract number in the CONTRACT
NUMBER field, if the contract for which you are entering data is other than the one entered on the header screen.
• Type the number of medication errors during the report month for every person served in your contract in the MEDICATION ERRORS field.
• Type the number of serious injuries during the report month for every person served in your contract in the SERIOUS INJURIES field.
• Type the number of behavior intervention plans authorizing personal, mechanical, or psychoactive medication restraint during the report month in the BEHAVIOR INTERVENTION
PLANS AUTHORIZING RESTRAINT field. Number Of Emergency Restraints Used • Type the number of emergency restraints used
by category during the report month in the PERSONAL RESTRAINTS, MECHANICAL RESTRAINTS, and PSYCHOACTIVE MEDICATION fields.
• Type the total number of emergency restraints used in the TOTAL field.
Number Of Individuals Requiring Emergency Restraint • Type the number of individuals requiring
emergency restraint during the report month in the PERSONAL RESTRAINTS, MECHANICAL
RESTRAINTS, and PSYCHOACTIVE MEDICATION fields.
• Type the total number of individuals requiring emergency restraints in the TOTAL field.
Number Of Restraint Related Injuries • Type the number of restraint related injuries
during the report month in the EMERGENCY PERSONAL RESTRAINTS, EMERGENCY MECHANICAL RESTRAINTS, and EMERGENCY PSYCHOACTIVE
MEDICATION fields. • Type the total number of restraint related
injuries in the TOTAL field. • Type Y in the READY TO ADD? field. • Press Enter. Result: The screen is redisplayed with cleared fields to allow for the entry of data for additional contracts, and the message, “Previous Information Added” is displayed. • Repeat this step for all contracts.
continued on next page
30- Critical Incident Data September 2009 (Revised) HCS Procedures
Critical Incident Data (686): Add, Continued _______________________________________________________________ Procedure, continued
Step
View
Action 3
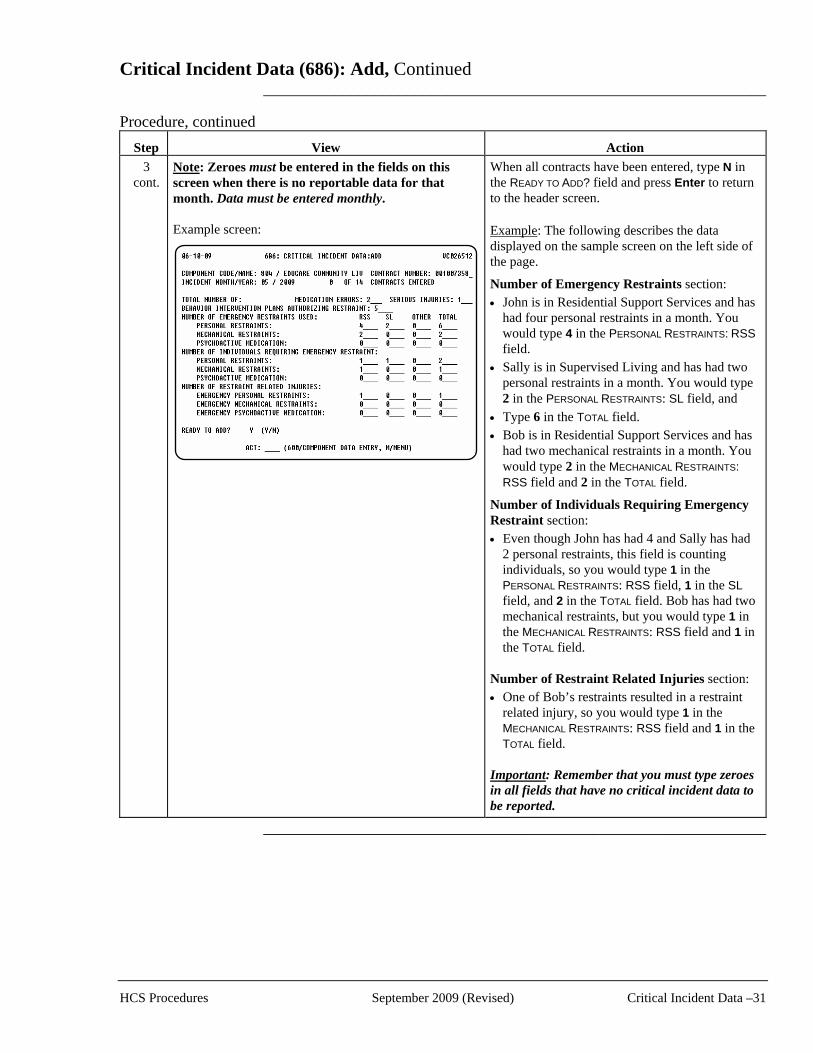
cont. Note: Zeroes must be entered in the fields on this screen when there is no reportable data for that month. Data must be entered monthly. Example screen:
When all contracts have been entered, type N in the READY TO ADD? field and press Enter to return to the header screen. Example: The following describes the data displayed on the sample screen on the left side of the page.
Number of Emergency Restraints section: • John is in Residential Support Services and has
had four personal restraints in a month. You would type 4 in the PERSONAL RESTRAINTS: RSS field.
• Sally is in Supervised Living and has had two personal restraints in a month. You would type 2 in the PERSONAL RESTRAINTS: SL field, and
• Type 6 in the TOTAL field. • Bob is in Residential Support Services and has
had two mechanical restraints in a month. You would type 2 in the MECHANICAL RESTRAINTS: RSS field and 2 in the TOTAL field.
Number of Individuals Requiring Emergency Restraint section: • Even though John has had 4 and Sally has had
2 personal restraints, this field is counting individuals, so you would type 1 in the PERSONAL RESTRAINTS: RSS field, 1 in the SL field, and 2 in the TOTAL field. Bob has had two mechanical restraints, but you would type 1 in the MECHANICAL RESTRAINTS: RSS field and 1 in the TOTAL field.
Number of Restraint Related Injuries section: • One of Bob’s restraints resulted in a restraint
related injury, so you would type 1 in the MECHANICAL RESTRAINTS: RSS field and 1 in the TOTAL field.
Important: Remember that you must type zeroes in all fields that have no critical incident data to be reported.
_______________________________________________________________
HCS Procedures September 2009 (Revised) Critical Incident Data –31
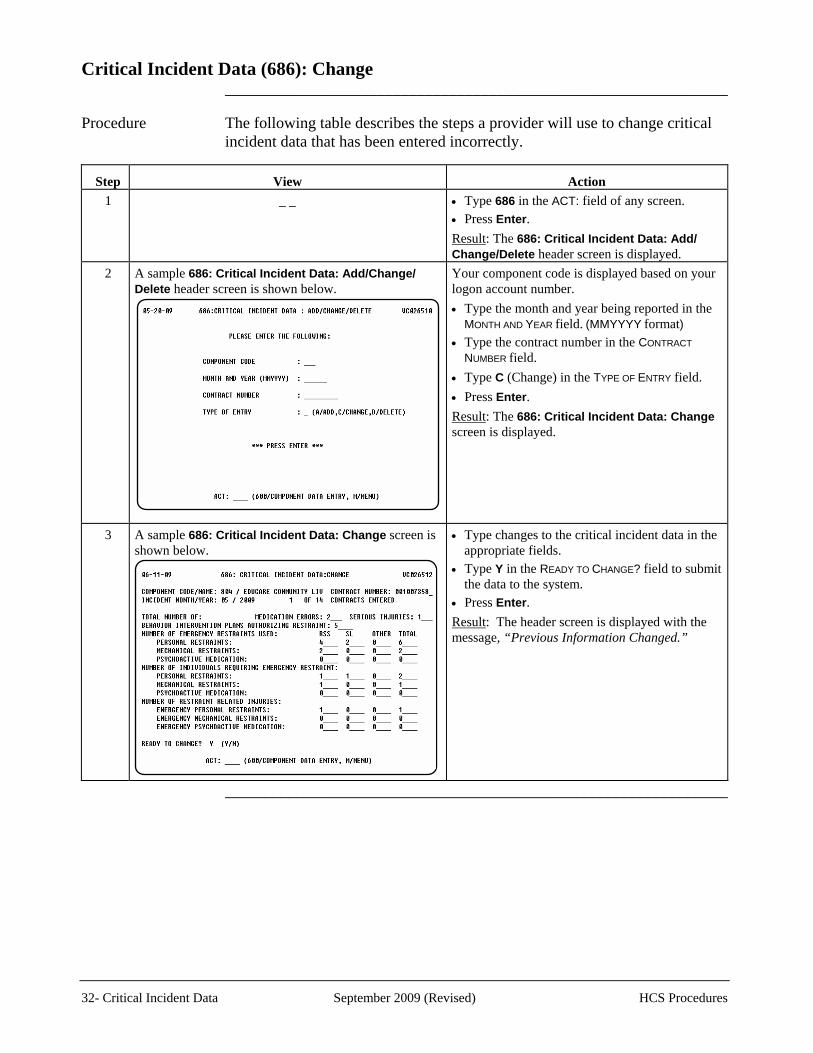
Critical Incident Data (686): Change _______________________________________________________________ Procedure The following table describes the steps a provider will use to change critical
incident data that has been entered incorrectly.
Step
View
Action 1 _ _
• Type 686 in the ACT: field of any screen. • Press Enter. Result: The 686: Critical Incident Data: Add/ Change/Delete header screen is displayed.
2 A sample 686: Critical Incident Data: Add/Change/ Delete header screen is shown below.
Your component code is displayed based on your logon account number. • Type the month and year being reported in the
MONTH AND YEAR field. (MMYYYY format) • Type the contract number in the CONTRACT
NUMBER field. • Type C (Change) in the TYPE OF ENTRY field. • Press Enter. Result: The 686: Critical Incident Data: Change screen is displayed.
3 A sample 686: Critical Incident Data: Change screen is shown below.
• Type changes to the critical incident data in the appropriate fields.
• Type Y in the READY TO CHANGE? field to submit the data to the system.
• Press Enter. Result: The header screen is displayed with the message, “Previous Information Changed.”
_______________________________________________________________
32- Critical Incident Data September 2009 (Revised) HCS Procedures
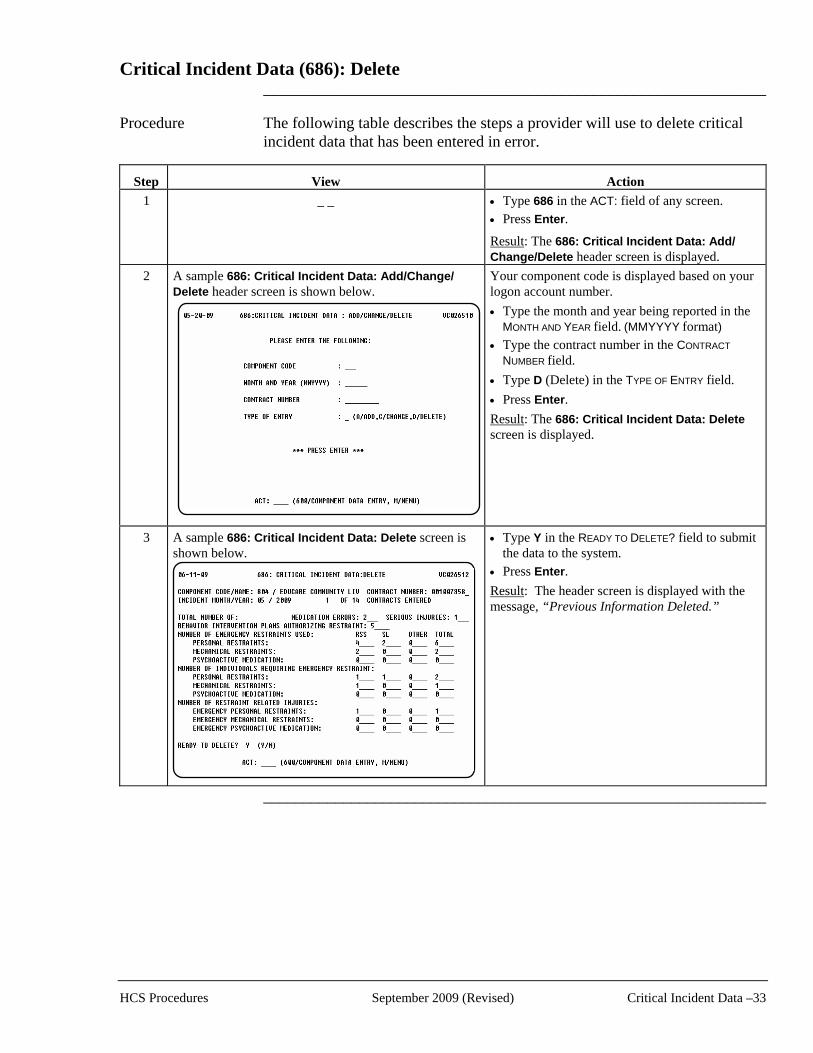
Critical Incident Data (686): Delete _______________________________________________________________ Procedure The following table describes the steps a provider will use to delete critical
incident data that has been entered in error.
Step
View
Action 1 _ _
• Type 686 in the ACT: field of any screen. • Press Enter. Result: The 686: Critical Incident Data: Add/ Change/Delete header screen is displayed.
2 A sample 686: Critical Incident Data: Add/Change/ Delete header screen is shown below.
Your component code is displayed based on your logon account number. • Type the month and year being reported in the
MONTH AND YEAR field. (MMYYYY format) • Type the contract number in the CONTRACT
NUMBER field. • Type D (Delete) in the TYPE OF ENTRY field. • Press Enter. Result: The 686: Critical Incident Data: Delete screen is displayed.
3 A sample 686: Critical Incident Data: Delete screen is shown below.
• Type Y in the READY TO DELETE? field to submit the data to the system.
• Press Enter. Result: The header screen is displayed with the message, “Previous Information Deleted.”
_______________________________________________________________
HCS Procedures September 2009 (Revised) Critical Incident Data –33
Critical Incident Data: Inquiry (286) _______________________________________________________________ Introduction The Critical Incident Data: Inquiry option is used to view critical incident
data based on the information reported on the 686: Critical Incident Data screens.
The report can be displayed in one of three ways. You can:
• Request a complete report that includes both the summary of incidents reported for each contract and a list of contracts for which incidents were not reported.
• Request a report that includes only the summary. • Request a report that includes a list of contracts for which incidents were
not reported. _______________________________________________________________ Requesting Reports When you request a report and enter only the Component Code and Month
and Year on the header screen: • The first screen(s) will display critical incidents for each contract • The second screen will display contracts that did not report • The third screen will display the Total Number of Critical Incidents for all
contracts that reported If you enter the Component Code, Month and Year, and a specific Contract
Number on the header screen and: • If the contract reported incidents for the Component Code and Month and
Year: o The first screen will display critical incidents for the contract o The second screen will display 0 number of contracts did not report o The third screen will display the total number of Critical Incidents for
that contract • If the contract did not report for the Component Code and Month and
Year: o The first screen will not be displayed o The second screen will display that the contract did not report o The third screen will display the 0 totals for Critical Incidents for that
contract _______________________________________________________________ continued on next page
34- Critical Incident Data September 2009 (Revised) HCS Procedures
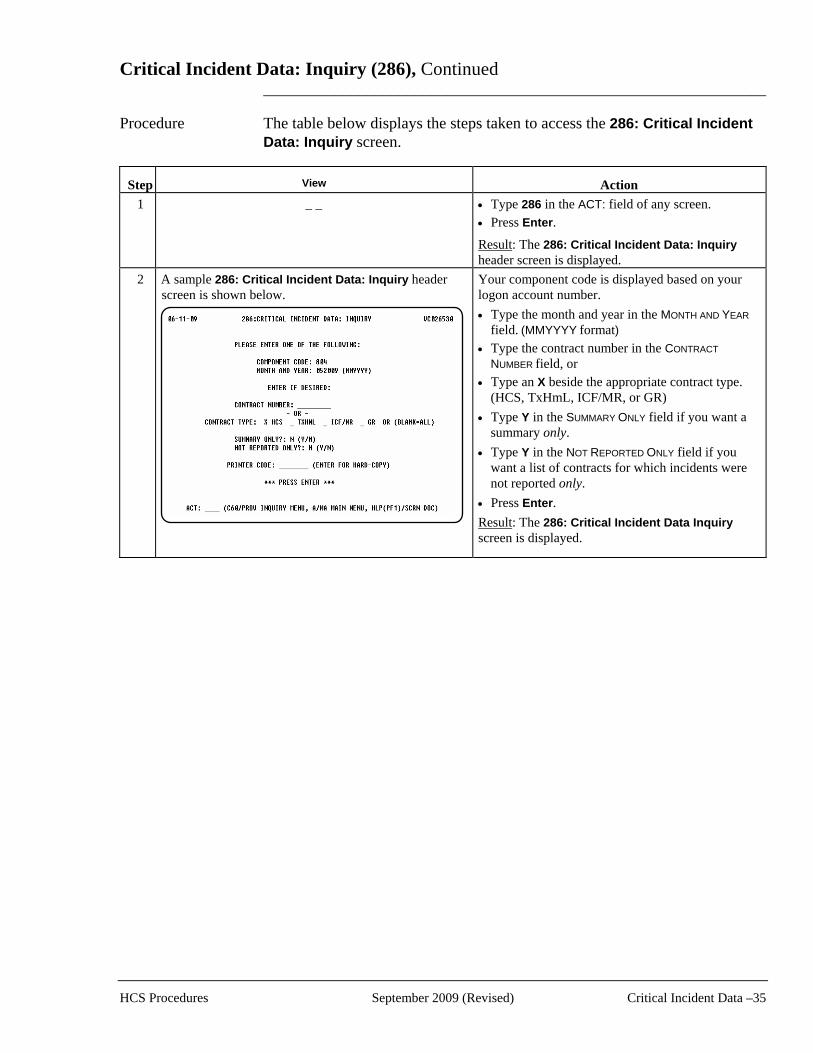
Critical Incident Data: Inquiry (286), Continued _______________________________________________________________ Procedure The table below displays the steps taken to access the 286: Critical Incident
Data: Inquiry screen.
Step
View
Action 1 _ _
• Type 286 in the ACT: field of any screen. • Press Enter. Result: The 286: Critical Incident Data: Inquiry header screen is displayed.
2 A sample 286: Critical Incident Data: Inquiry header screen is shown below.
Your component code is displayed based on your logon account number. • Type the month and year in the MONTH AND YEAR
field. (MMYYYY format) • Type the contract number in the CONTRACT
NUMBER field, or • Type an X beside the appropriate contract type.
(HCS, TxHmL, ICF/MR, or GR) • Type Y in the SUMMARY ONLY field if you want a
summary only. • Type Y in the NOT REPORTED ONLY field if you
want a list of contracts for which incidents were not reported only.
• Press Enter. Result: The 286: Critical Incident Data Inquiry screen is displayed.
HCS Procedures September 2009 (Revised) Critical Incident Data –35
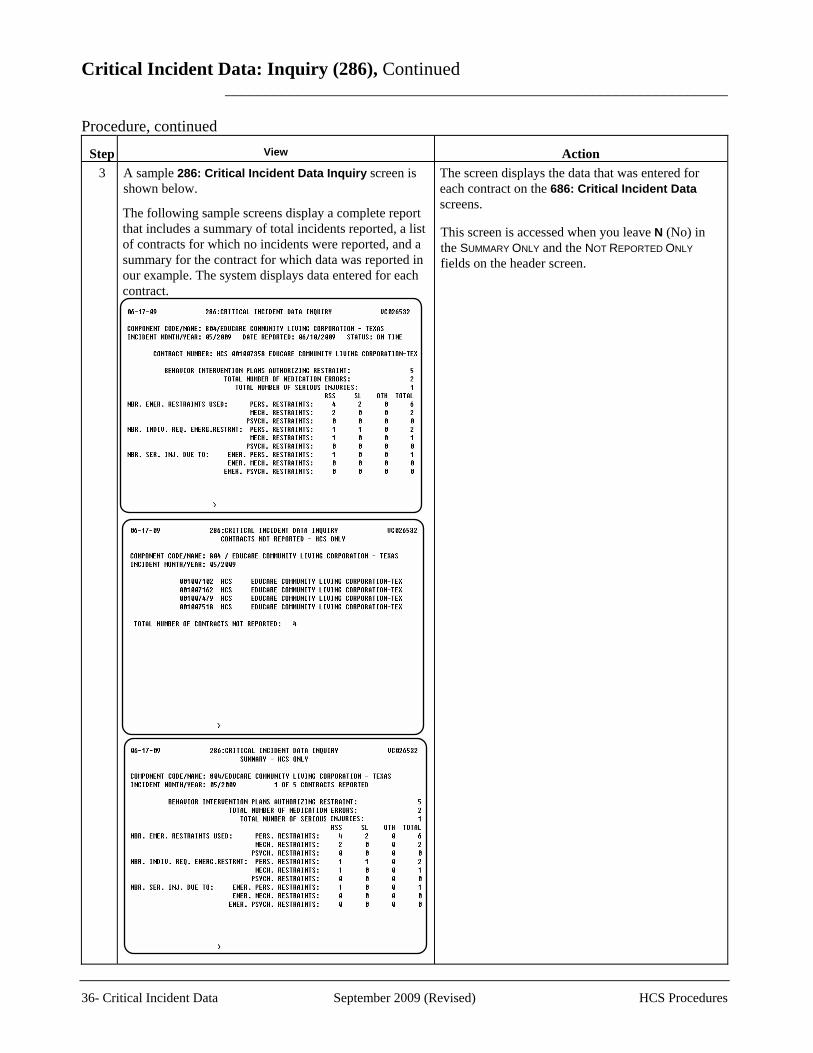
Critical Incident Data: Inquiry (286), Continued _______________________________________________________________ Procedure, continued
Step
View
Action 3 A sample 286: Critical Incident Data Inquiry screen is
shown below.
The following sample screens display a complete report that includes a summary of total incidents reported, a list of contracts for which no incidents were reported, and a summary for the contract for which data was reported in our example. The system displays data entered for each contract.
The screen displays the data that was entered for each contract on the 686: Critical Incident Data screens. This screen is accessed when you leave N (No) in the SUMMARY ONLY and the NOT REPORTED ONLY fields on the header screen.
36- Critical Incident Data September 2009 (Revised) HCS Procedures
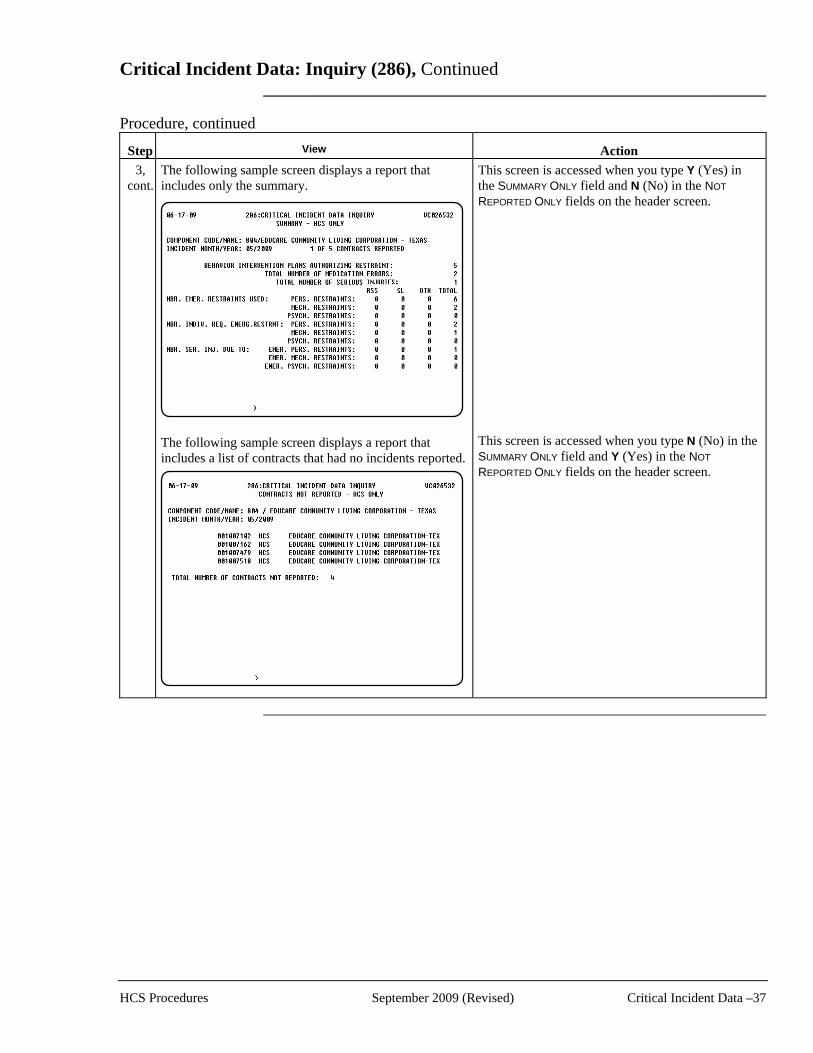
Critical Incident Data: Inquiry (286), Continued _______________________________________________________________ Procedure, continued
Step
View
Action 3,
cont. The following sample screen displays a report that includes only the summary. The following sample screen displays a report that includes a list of contracts that had no incidents reported.
This screen is accessed when you type Y (Yes) in the SUMMARY ONLY field and N (No) in the NOT
REPORTED ONLY fields on the header screen. This screen is accessed when you type N (No) in the SUMMARY ONLY field and Y (Yes) in the NOT
REPORTED ONLY fields on the header screen.
_______________________________________________________________
HCS Procedures September 2009 (Revised) Critical Incident Data –37
38- Critical Incident Data September 2009 (Revised) HCS Procedures
This page was intentionally left blank.
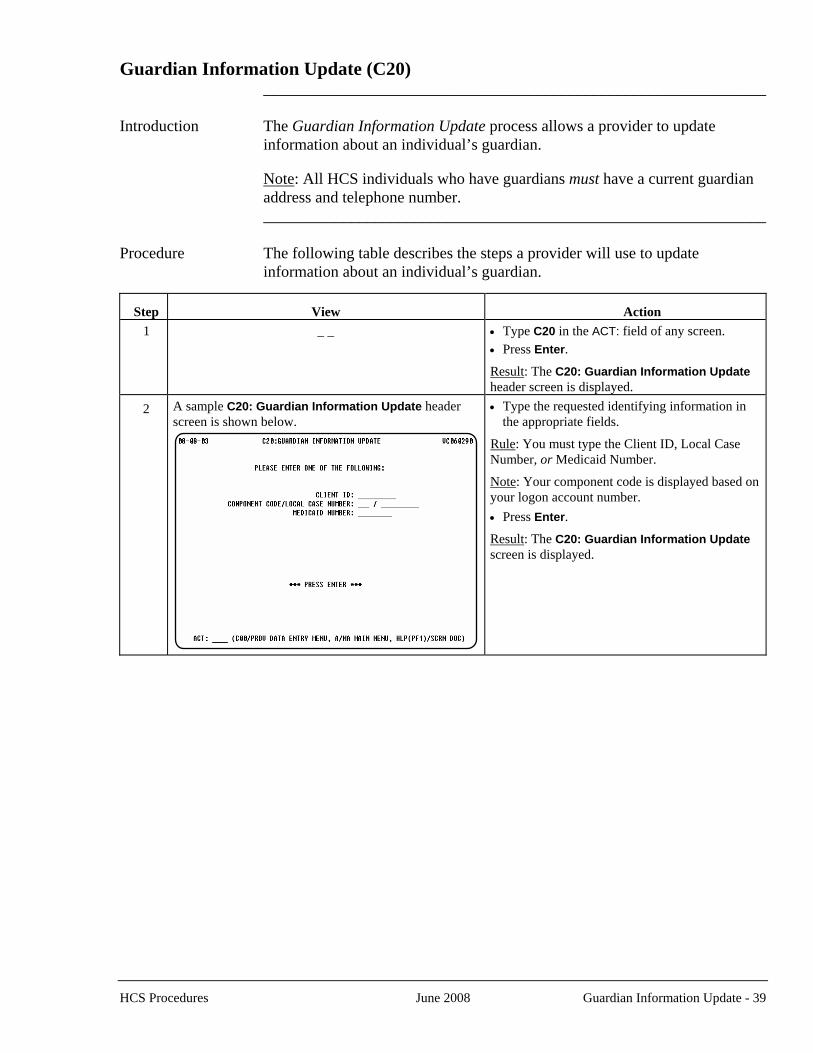
Guardian Information Update (C20) _______________________________________________________________ Introduction The Guardian Information Update process allows a provider to update
information about an individual’s guardian. Note: All HCS individuals who have guardians must have a current guardian
address and telephone number. _______________________________________________________________ Procedure The following table describes the steps a provider will use to update
information about an individual’s guardian.
Step
View
Action 1 _ _
• Type C20 in the ACT: field of any screen. • Press Enter. Result: The C20: Guardian Information Update header screen is displayed.
2 A sample C20: Guardian Information Update header screen is shown below.
• Type the requested identifying information in the appropriate fields.
Rule: You must type the Client ID, Local Case Number, or Medicaid Number.
Note: Your component code is displayed based on your logon account number. • Press Enter.
Result: The C20: Guardian Information Update screen is displayed.
HCS Procedures June 2008 Guardian Information Update - 39
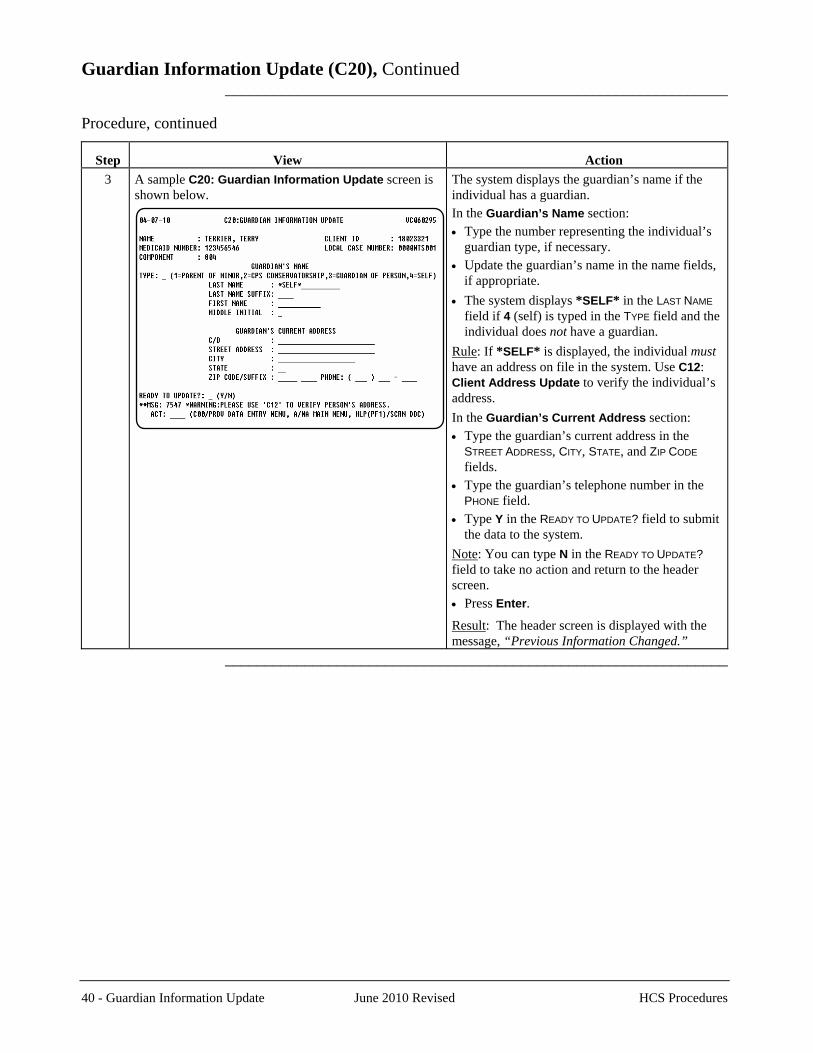
Guardian Information Update (C20), Continued _______________________________________________________________ Procedure, continued
Step
View
Action 3 A sample C20: Guardian Information Update screen is
shown below.
The system displays the guardian’s name if the individual has a guardian. In the Guardian’s Name section: • Type the number representing the individual’s
guardian type, if necessary. • Update the guardian’s name in the name fields,
if appropriate. • The system displays *SELF* in the LAST NAME
field if 4 (self) is typed in the TYPE field and the individual does not have a guardian.
Rule: If *SELF* is displayed, the individual must have an address on file in the system. Use C12: Client Address Update to verify the individual’s address. In the Guardian’s Current Address section: • Type the guardian’s current address in the
STREET ADDRESS, CITY, STATE, and ZIP CODE
fields. • Type the guardian’s telephone number in the
PHONE field. • Type Y in the READY TO UPDATE? field to submit
the data to the system. Note: You can type N in the READY TO UPDATE? field to take no action and return to the header screen. • Press Enter.
Result: The header screen is displayed with the message, “Previous Information Changed.”
_______________________________________________________________
40 - Guardian Information Update June 2010 Revised HCS Procedures

Individual Plan of Care (C02) _______________________________________________________________ Introduction The Individual Plan of Care screens are used to revise, renew, error correct,
and delete an Individual Plan of Care (IPC). These screens display service categories and allow the provider to enter units
of service to be provided annually for each category. The dollars for adaptive aids, minor home modification, and dental services must also be specified. The system calculates and displays the total annual cost after all necessary information is entered.
_______________________________________________________________ Service Coordinator Once an IPC is entered into CARE by the program provider the MRA Review service coordinator will have seven days to complete their review. Only
after the service coordinator has completed the review, or the seven day timeframe has expired will the IPC be transmitted to DADS. Providers may not enter claims on an IPC prior to transmittal to DADS.
_______________________________________________________________ Notes A provider cannot:
• create, error correct, or delete an initial IPC (used for enrollment) • error correct or delete a transfer IPC
For revisions and renewals: If an IPC is entered that exceeds the current authorized amount, the message,
“Warning: Plan cost exceeds the authorized amount.” is displayed when calculating the IPC cost. Providers should continue data entering the IPC as this no longer affects authorizations and billing for services already approved. Providers must submit a packet of information to Program Enrollment (PE) for review when this occurs in order to have the new or increased services approved.
Providers may view the current authorized amount by viewing the C62, IPC
inquiry screen prior to completing any data entry. _______________________________________________________________
HCS Procedures June 2010 Revised Individual Plan of Care - 41
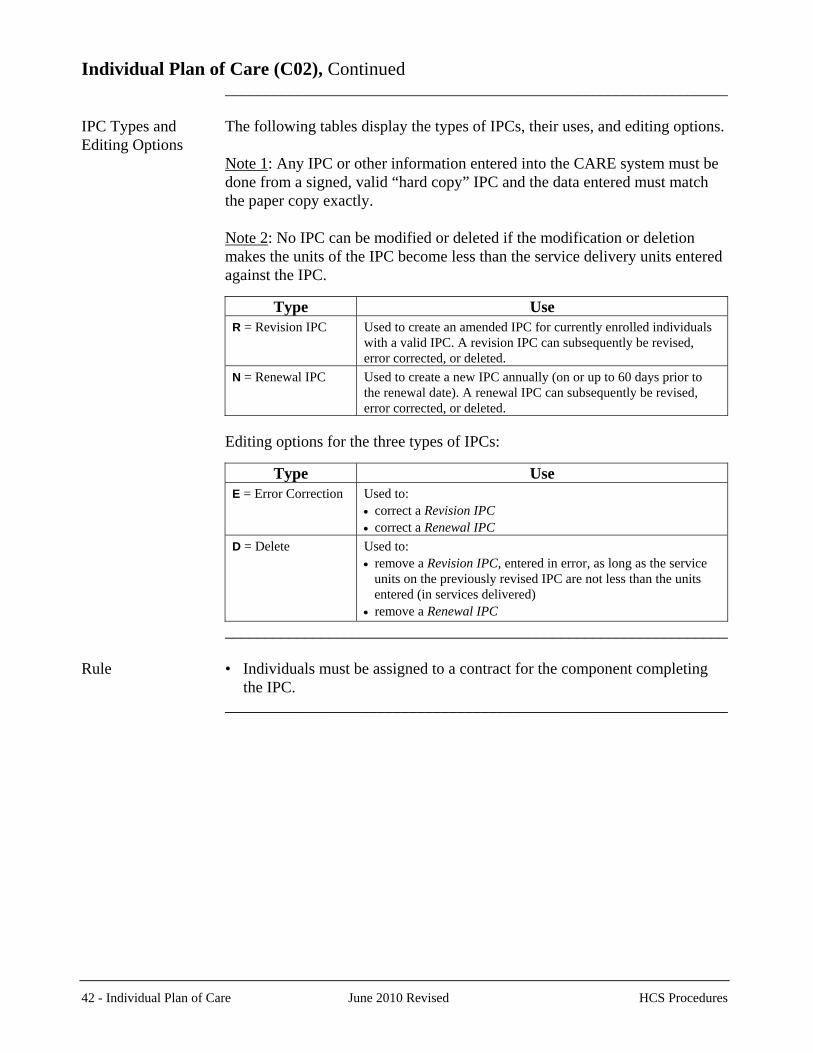
Individual Plan of Care (C02), Continued _______________________________________________________________ IPC Types and The following tables display the types of IPCs, their uses, and editing options. Editing Options
Note 1: Any IPC or other information entered into the CARE system must be done from a signed, valid “hard copy” IPC and the data entered must match the paper copy exactly.
Note 2: No IPC can be modified or deleted if the modification or deletion
makes the units of the IPC become less than the service delivery units entered against the IPC.
Type Use R = Revision IPC Used to create an amended IPC for currently enrolled individuals
with a valid IPC. A revision IPC can subsequently be revised, error corrected, or deleted.
N = Renewal IPC Used to create a new IPC annually (on or up to 60 days prior to the renewal date). A renewal IPC can subsequently be revised, error corrected, or deleted.
Editing options for the three types of IPCs:
Type Use E = Error Correction Used to:
• correct a Revision IPC • correct a Renewal IPC
D = Delete Used to: • remove a Revision IPC, entered in error, as long as the service
units on the previously revised IPC are not less than the units entered (in services delivered)
• remove a Renewal IPC _______________________________________________________________ Rule • Individuals must be assigned to a contract for the component completing
the IPC. _______________________________________________________________
42 - Individual Plan of Care June 2010 Revised HCS Procedures
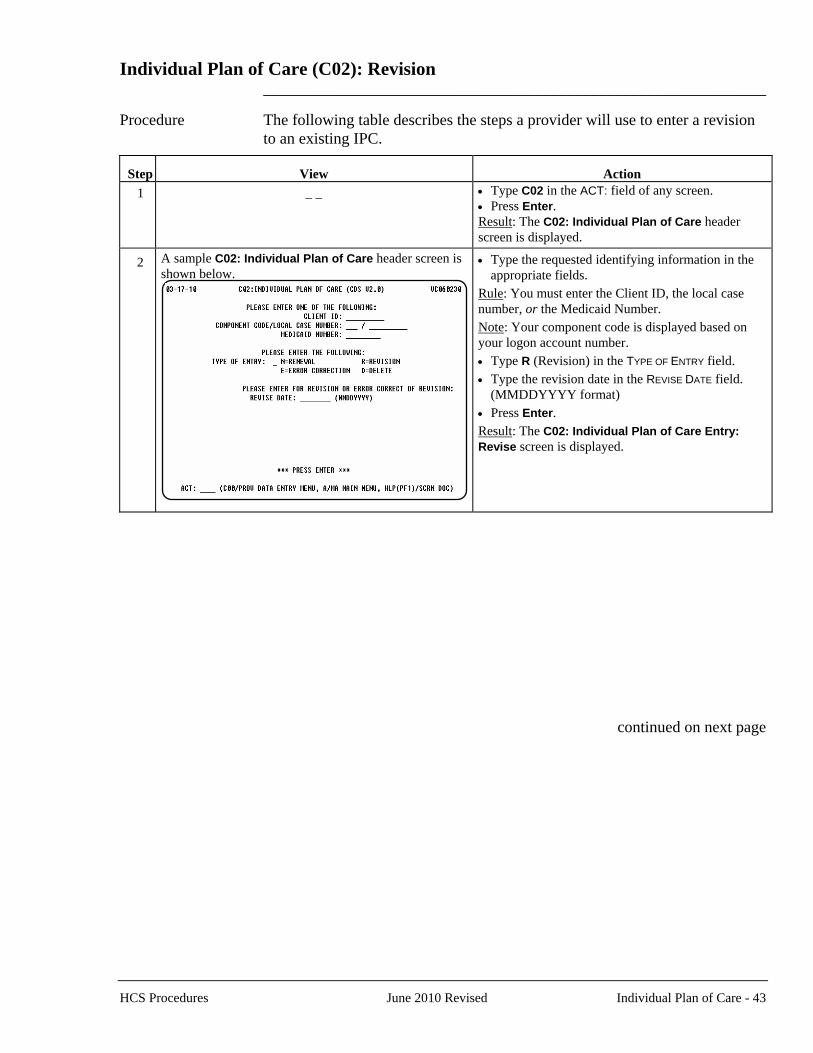
Individual Plan of Care (C02): Revision _______________________________________________________________
Procedure The following table describes the steps a provider will use to enter a revision to an existing IPC.
Step
View
Action 1 _ _
• Type C02 in the ACT: field of any screen. • Press Enter. Result: The C02: Individual Plan of Care header screen is displayed.
2 A sample C02: Individual Plan of Care header screen is shown below.
• Type the requested identifying information in the appropriate fields.
Rule: You must enter the Client ID, the local case number, or the Medicaid Number. Note: Your component code is displayed based on your logon account number. • Type R (Revision) in the TYPE OF ENTRY field. • Type the revision date in the REVISE DATE field.
(MMDDYYYY format) • Press Enter. Result: The C02: Individual Plan of Care Entry: Revise screen is displayed.
continued on next page
HCS Procedures June 2010 Revised Individual Plan of Care - 43
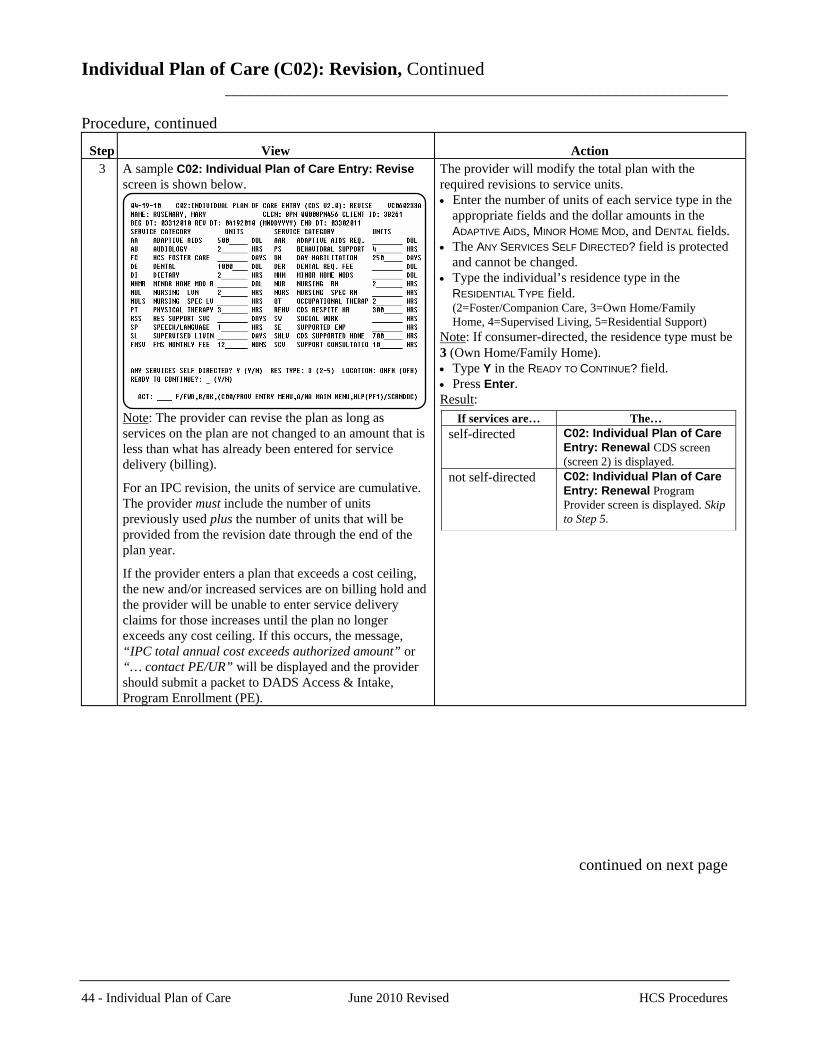
44 - Individual Plan of Care June 2010 Revised HCS Procedures
Individual Plan of Care (C02): Revision, Continued _______________________________________________________________ Procedure, continued
Step
View
Action 3 A sample C02: Individual Plan of Care Entry: Revise
screen is shown below.
Note: The provider can revise the plan as long as services on the plan are not changed to an amount that is less than what has already been entered for service delivery (billing).
For an IPC revision, the units of service are cumulative. The provider must include the number of units previously used plus the number of units that will be provided from the revision date through the end of the plan year.
If the provider enters a plan that exceeds a cost ceiling, the new and/or increased services are on billing hold and the provider will be unable to enter service delivery claims for those increases until the plan no longer exceeds any cost ceiling. If this occurs, the message, “IPC total annual cost exceeds authorized amount” or “… contact PE/UR” will be displayed and the provider should submit a packet to DADS Access & Intake, Program Enrollment (PE).
The provider will modify the total plan with the required revisions to service units. • Enter the number of units of each service type in the
appropriate fields and the dollar amounts in the ADAPTIVE AIDS, MINOR HOME MOD, and DENTAL fields.
• The ANY SERVICES SELF DIRECTED? field is protected and cannot be changed.
• Type the individual’s residence type in the RESIDENTIAL TYPE field.
(2=Foster/Companion Care, 3=Own Home/Family Home, 4=Supervised Living, 5=Residential Support) Note: If consumer-directed, the residence type must be 3 (Own Home/Family Home). • Type Y in the READY TO CONTINUE? field. • Press Enter. Result:
continued on next page
If services are… The… self-directed C02: Individual Plan of Care
Entry: Renewal CDS screen (screen 2) is displayed.
not self-directed C02: Individual Plan of Care Entry: Renewal Program Provider screen is displayed. Skip to Step 5.
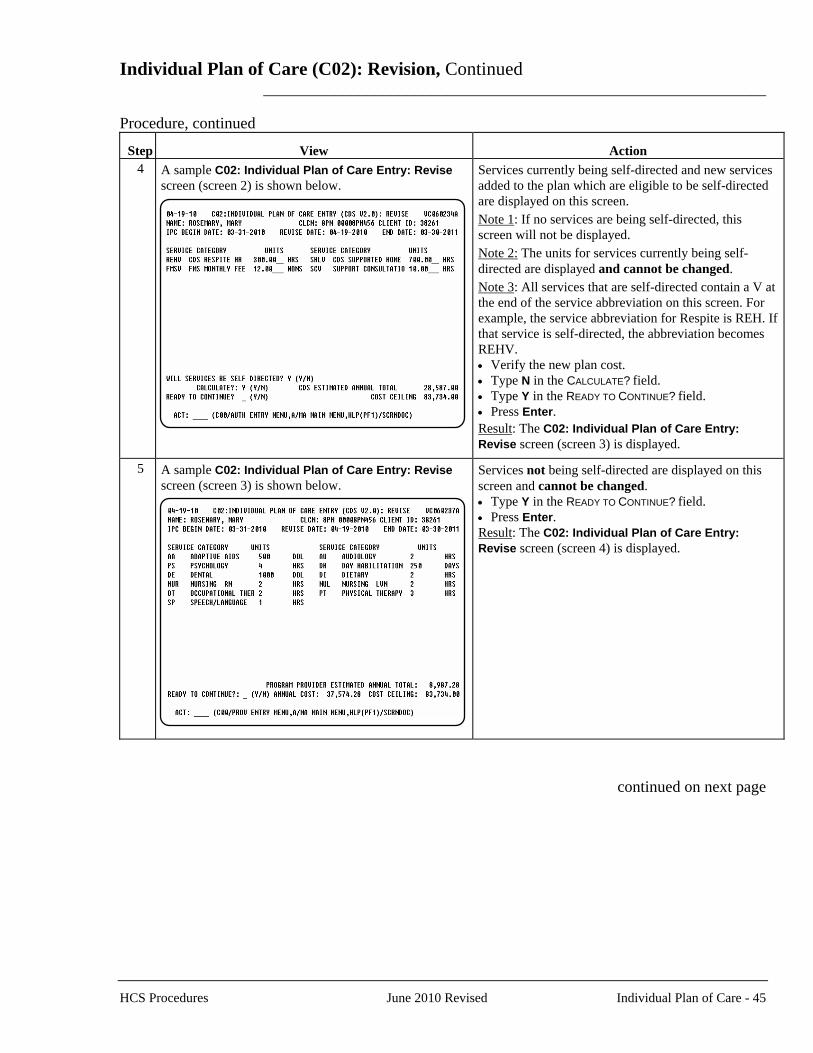
Individual Plan of Care (C02): Revision, Continued _______________________________________________________________ Procedure, continued
Action Step View 4 A sample C02: Individual Plan of Care Entry: Revise
screen (screen 2) is shown below.
Services currently being self-directed and new services added to the plan which are eligible to be self-directed are displayed on this screen. Note 1: If no services are being self-directed, this screen will not be displayed. Note 2: The units for services currently being self-directed are displayed and cannot be changed. Note 3: All services that are self-directed contain a V at the end of the service abbreviation on this screen. For example, the service abbreviation for Respite is REH. If that service is self-directed, the abbreviation becomes REHV. • Verify the new plan cost. • Type N in the CALCULATE? field. • Type Y in the READY TO CONTINUE? field. • Press Enter. Result: The C02: Individual Plan of Care Entry: Revise screen (screen 3) is displayed.
5 A sample C02: Individual Plan of Care Entry: Revise screen (screen 3) is shown below.
Services not being self-directed are displayed on this screen and cannot be changed. • Type Y in the READY TO CONTINUE? field. • Press Enter. Result: The C02: Individual Plan of Care Entry: Revise screen (screen 4) is displayed.
continued on next page
HCS Procedures June 2010 Revised Individual Plan of Care - 45
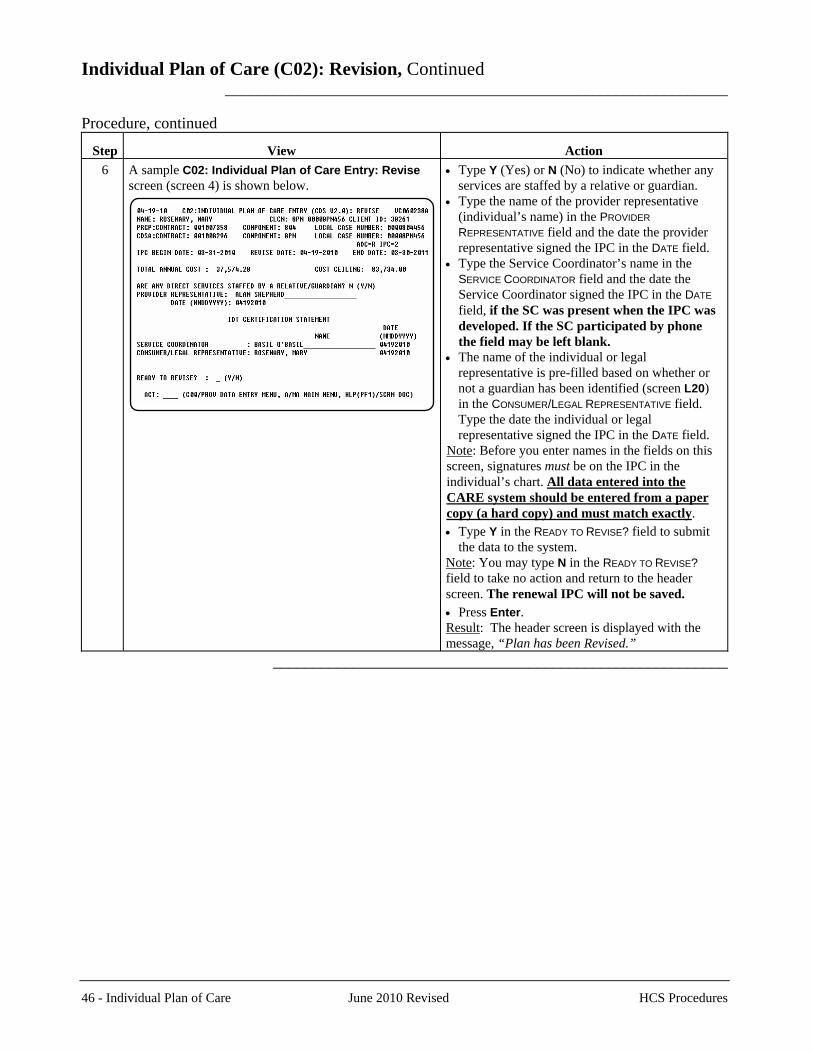
Individual Plan of Care (C02): Revision, Continued _______________________________________________________________ Procedure, continued
Action Step View 6 A sample C02: Individual Plan of Care Entry: Revise
screen (screen 4) is shown below.
• Type Y (Yes) or N (No) to indicate whether any services are staffed by a relative or guardian.
• Type the name of the provider representative (individual’s name) in the PROVIDER
REPRESENTATIVE field and the date the provider representative signed the IPC in the DATE field.
• Type the Service Coordinator’s name in the SERVICE COORDINATOR field and the date the Service Coordinator signed the IPC in the DATE field, if the SC was present when the IPC was developed. If the SC participated by phone the field may be left blank.
• The name of the individual or legal representative is pre-filled based on whether or not a guardian has been identified (screen L20) in the CONSUMER/LEGAL REPRESENTATIVE field. Type the date the individual or legal representative signed the IPC in the DATE field.
Note: Before you enter names in the fields on this screen, signatures must be on the IPC in the individual’s chart. All data entered into the CARE system should be entered from a paper copy (a hard copy) and must match exactly. • Type Y in the READY TO REVISE? field to submit
the data to the system. Note: You may type N in the READY TO REVISE? field to take no action and return to the header screen. The renewal IPC will not be saved. • Press Enter. Result: The header screen is displayed with the message, “Plan has been Revised.”
_________________________________________________________
46 - Individual Plan of Care June 2010 Revised HCS Procedures
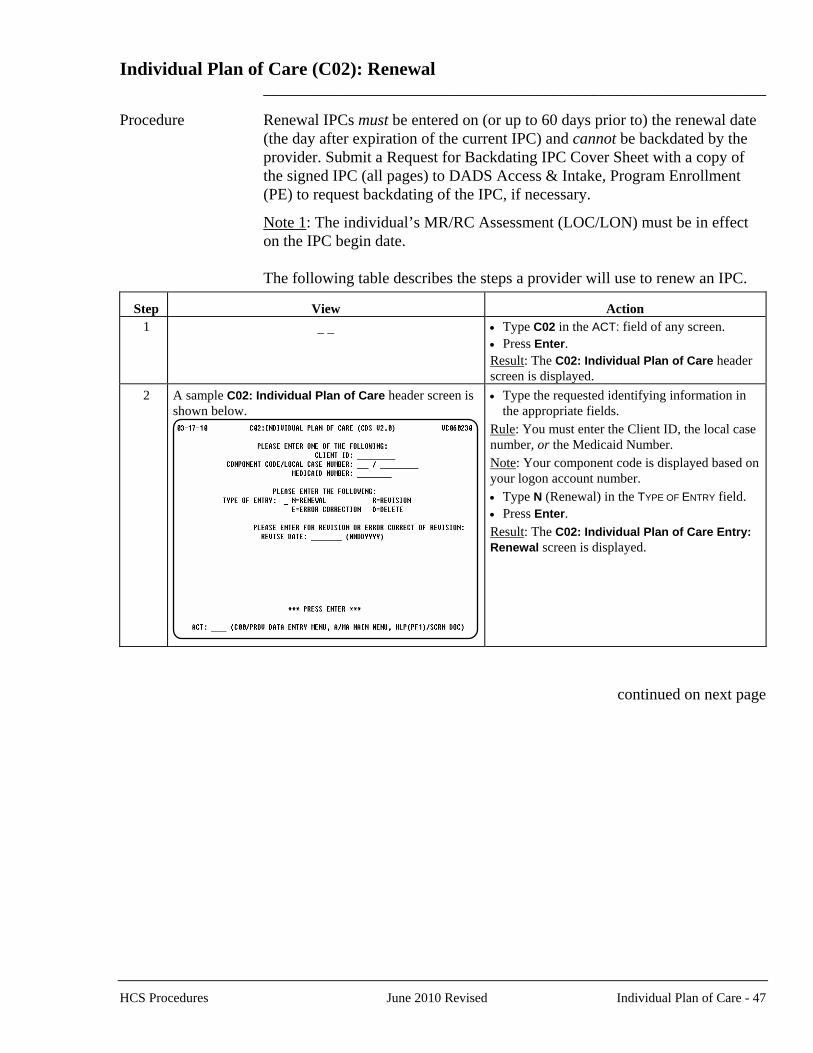
Individual Plan of Care (C02): Renewal _______________________________________________________________
Procedure Renewal IPCs must be entered on (or up to 60 days prior to) the renewal date (the day after expiration of the current IPC) and cannot be backdated by the provider. Submit a Request for Backdating IPC Cover Sheet with a copy of the signed IPC (all pages) to DADS Access & Intake, Program Enrollment (PE) to request backdating of the IPC, if necessary.
Note 1: The individual’s MR/RC Assessment (LOC/LON) must be in effect on the IPC begin date.
The following table describes the steps a provider will use to renew an IPC.
Action Step View 1 _ _
• Type C02 in the ACT: field of any screen. • Press Enter. Result: The C02: Individual Plan of Care header screen is displayed.
2 A sample C02: Individual Plan of Care header screen is shown below.
• Type the requested identifying information in the appropriate fields.
Rule: You must enter the Client ID, the local case number, or the Medicaid Number. Note: Your component code is displayed based on your logon account number. • Type N (Renewal) in the TYPE OF ENTRY field. • Press Enter. Result: The C02: Individual Plan of Care Entry: Renewal screen is displayed.
continued on next page
HCS Procedures June 2010 Revised Individual Plan of Care - 47
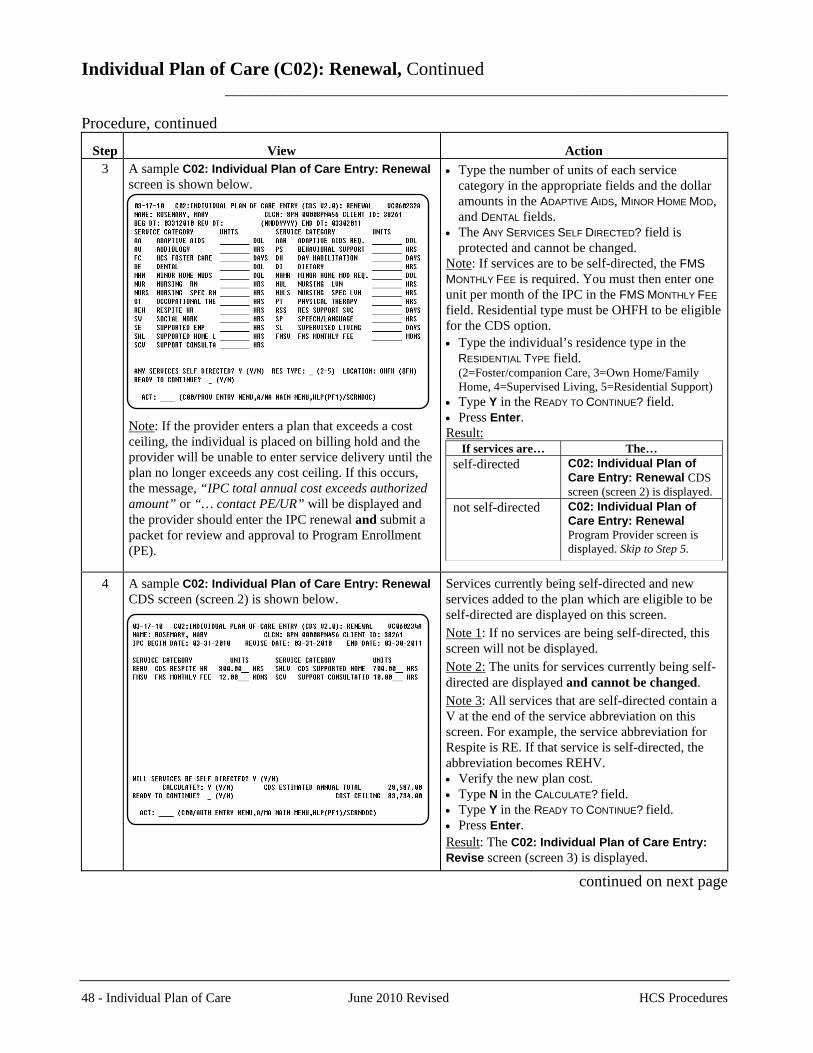
Individual Plan of Care (C02): Renewal, Continued _______________________________________________________________ Procedure, continued
Action Step View 3 A sample C02: Individual Plan of Care Entry: Renewal
screen is shown below.
Note: If the provider enters a plan that exceeds a cost ceiling, the individual is placed on billing hold and the provider will be unable to enter service delivery until the plan no longer exceeds any cost ceiling. If this occurs, the message, “IPC total annual cost exceeds authorized amount” or “… contact PE/UR” will be displayed and the provider should enter the IPC renewal and submit a packet for review and approval to Program Enrollment (PE).
• Type the number of units of each service category in the appropriate fields and the dollar amounts in the ADAPTIVE AIDS, MINOR HOME MOD, and DENTAL fields.
• The ANY SERVICES SELF DIRECTED? field is protected and cannot be changed.
Note: If services are to be self-directed, the FMS
MONTHLY FEE is required. You must then enter one unit per month of the IPC in the FMS MONTHLY FEE field. Residential type must be OHFH to be eligible for the CDS option. • Type the individual’s residence type in the
RESIDENTIAL TYPE field. (2=Foster/companion Care, 3=Own Home/Family Home, 4=Supervised Living, 5=Residential Support) • Type Y in the READY TO CONTINUE? field. • Press Enter. Result:
If services are… The… self-directed C02: Individual Plan of
Care Entry: Renewal CDS screen (screen 2) is displayed.
not self-directed C02: Individual Plan of Care Entry: Renewal Program Provider screen is displayed. Skip to Step 5.
4 A sample C02: Individual Plan of Care Entry: Renewal CDS screen (screen 2) is shown below.
Services currently being self-directed and new services added to the plan which are eligible to be self-directed are displayed on this screen. Note 1: If no services are being self-directed, this screen will not be displayed. Note 2: The units for services currently being self-directed are displayed and cannot be changed. Note 3: All services that are self-directed contain a V at the end of the service abbreviation on this screen. For example, the service abbreviation for Respite is RE. If that service is self-directed, the abbreviation becomes REHV. • Verify the new plan cost. • Type N in the CALCULATE? field. • Type Y in the READY TO CONTINUE? field. • Press Enter. Result: The C02: Individual Plan of Care Entry: Revise screen (screen 3) is displayed.
continued on next page
48 - Individual Plan of Care June 2010 Revised HCS Procedures
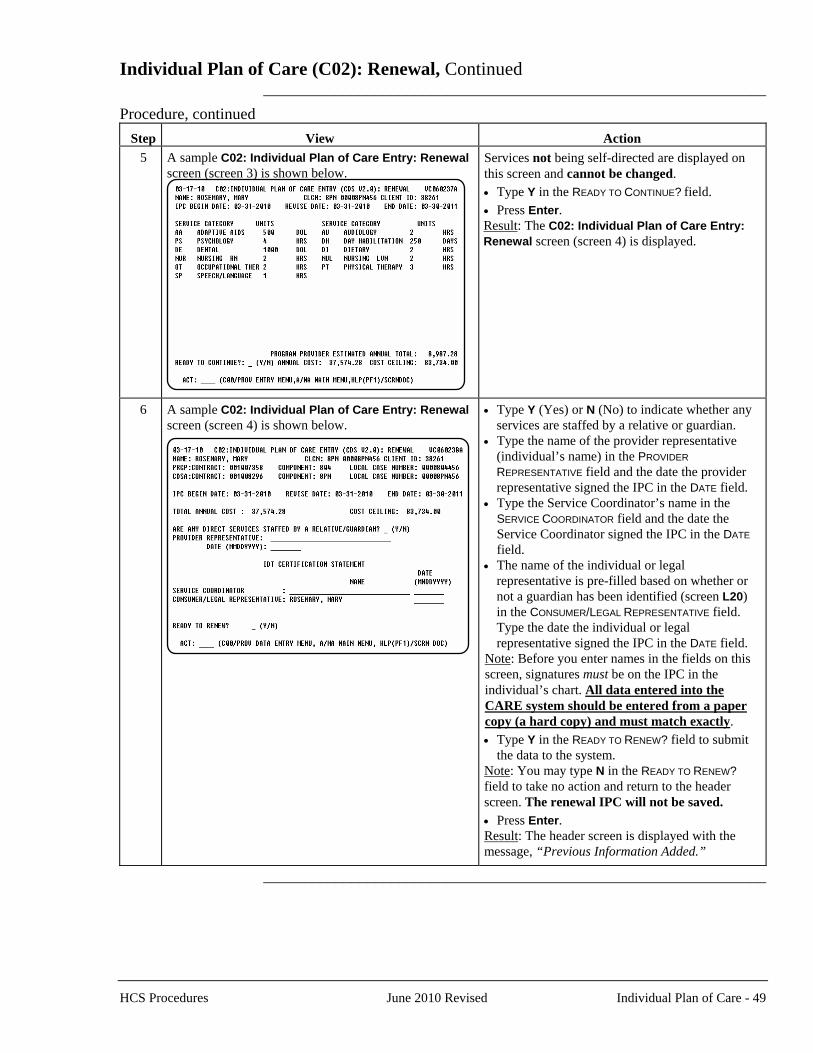
Individual Plan of Care (C02): Renewal, Continued _______________________________________________________________
Procedure, continued
Step
View
Action 5 A sample C02: Individual Plan of Care Entry: Renewal
screen (screen 3) is shown below. Services not being self-directed are displayed on this screen and cannot be changed.
• Type Y in the READY TO CONTINUE? field. • Press Enter. Result: The C02: Individual Plan of Care Entry: Renewal screen (screen 4) is displayed.
6 A sample C02: Individual Plan of Care Entry: Renewal screen (screen 4) is shown below.
• Type Y (Yes) or N (No) to indicate whether any services are staffed by a relative or guardian.
• Type the name of the provider representative (individual’s name) in the PROVIDER
REPRESENTATIVE field and the date the provider representative signed the IPC in the DATE field.
• Type the Service Coordinator’s name in the SERVICE COORDINATOR field and the date the Service Coordinator signed the IPC in the DATE field.
• The name of the individual or legal representative is pre-filled based on whether or not a guardian has been identified (screen L20) in the CONSUMER/LEGAL REPRESENTATIVE field. Type the date the individual or legal representative signed the IPC in the DATE field.
Note: Before you enter names in the fields on this screen, signatures must be on the IPC in the individual’s chart. All data entered into the CARE system should be entered from a paper copy (a hard copy) and must match exactly. • Type Y in the READY TO RENEW? field to submit
the data to the system. Note: You may type N in the READY TO RENEW? field to take no action and return to the header screen. The renewal IPC will not be saved. • Press Enter. Result: The header screen is displayed with the message, “Previous Information Added.”
_______________________________________________________________
HCS Procedures June 2010 Revised Individual Plan of Care - 49

Individual Plan of Care (C02): Error Correction _______________________________________________________________ Procedure The following table describes the steps a provider will use to correct data
entry errors on a previously entered IPC.
Step
View
Action
1 _ _ • Type C02 in the ACT: field of any screen. • Press Enter. Result: The C02: Individual Plan of Care header screen is displayed.
2 A sample C02: Individual Plan of Care header screen is shown below.
• Type the requested identifying information in the appropriate fields.
Rule: You must enter the Client ID, the local case number, or the Medicaid Number. Note: Your component code is displayed based on your logon account number. • Type E (Error Correction) in the TYPE OF ENTRY
field. • Type the date in the REVISE DATE field if error
correcting a revision. • Press Enter. Result: The C02: Individual Plan of Care Entry: Correct screen is displayed.
continued on next page
50 - Individual Plan of Care June 2010 Revised HCS Procedures
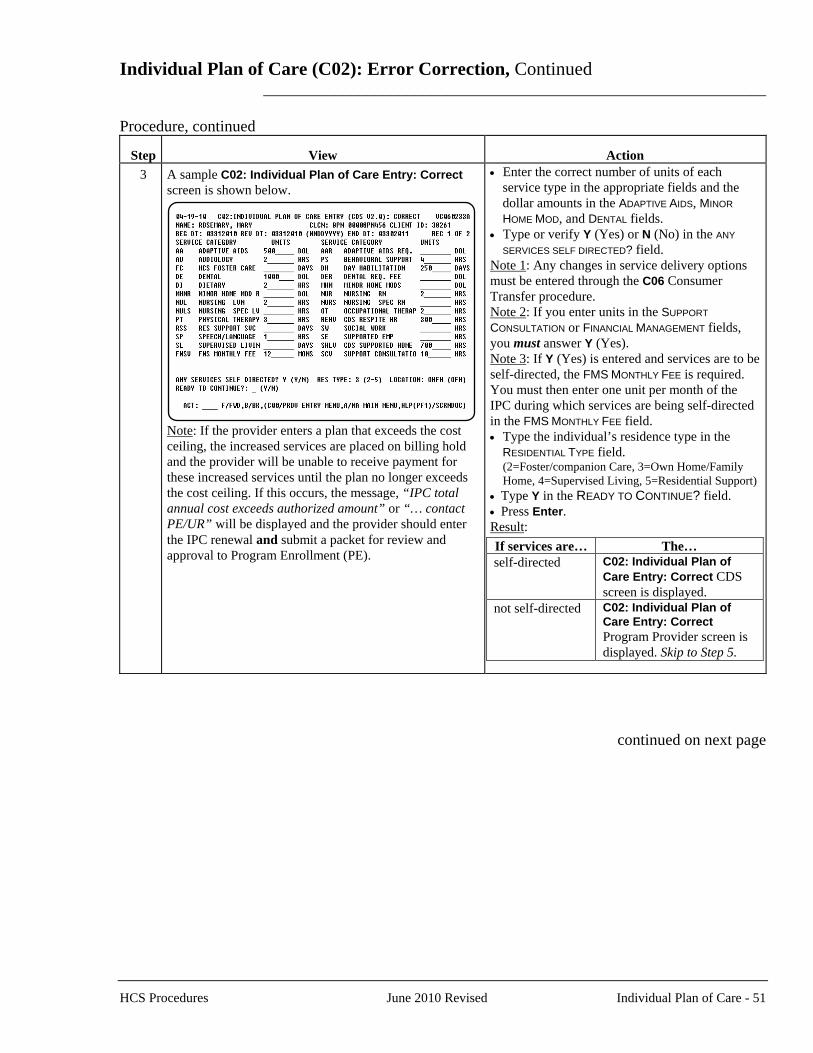
Individual Plan of Care (C02): Error Correction, Continued _______________________________________________________________ Procedure, continued
Step
Action View
• Enter the correct number of units of each service type in the appropriate fields and the dollar amounts in the ADAPTIVE AIDS, MINOR
HOME MOD, and DENTAL fields.
3 A sample C02: Individual Plan of Care Entry: Correct screen is shown below.
Note: If the provider enters a plan that exceeds the cost ceiling, the increased services are placed on billing hold and the provider will be unable to receive payment for these increased services until the plan no longer exceeds the cost ceiling. If this occurs, the message, “IPC total annual cost exceeds authorized amount” or “… contact PE/UR” will be displayed and the provider should enter the IPC renewal and submit a packet for review and approval to Program Enrollment (PE).
• Type or verify Y (Yes) or N (No) in the ANY
SERVICES SELF DIRECTED? field. Note 1: Any changes in service delivery options must be entered through the C06 Consumer Transfer procedure. Note 2: If you enter units in the SUPPORT
CONSULTATION or FINANCIAL MANAGEMENT fields, you must answer Y (Yes). Note 3: If Y (Yes) is entered and services are to be self-directed, the FMS MONTHLY FEE is required. You must then enter one unit per month of the IPC during which services are being self-directed in the FMS MONTHLY FEE field. • Type the individual’s residence type in the
RESIDENTIAL TYPE field. (2=Foster/companion Care, 3=Own Home/Family Home, 4=Supervised Living, 5=Residential Support) • Type Y in the READY TO CONTINUE? field. • Press Enter. Result:
If services are… The… self-directed C02: Individual Plan of
Care Entry: Correct CDS screen is displayed.
not self-directed C02: Individual Plan of Care Entry: Correct Program Provider screen is displayed. Skip to Step 5.
continued on next page
HCS Procedures June 2010 Revised Individual Plan of Care - 51
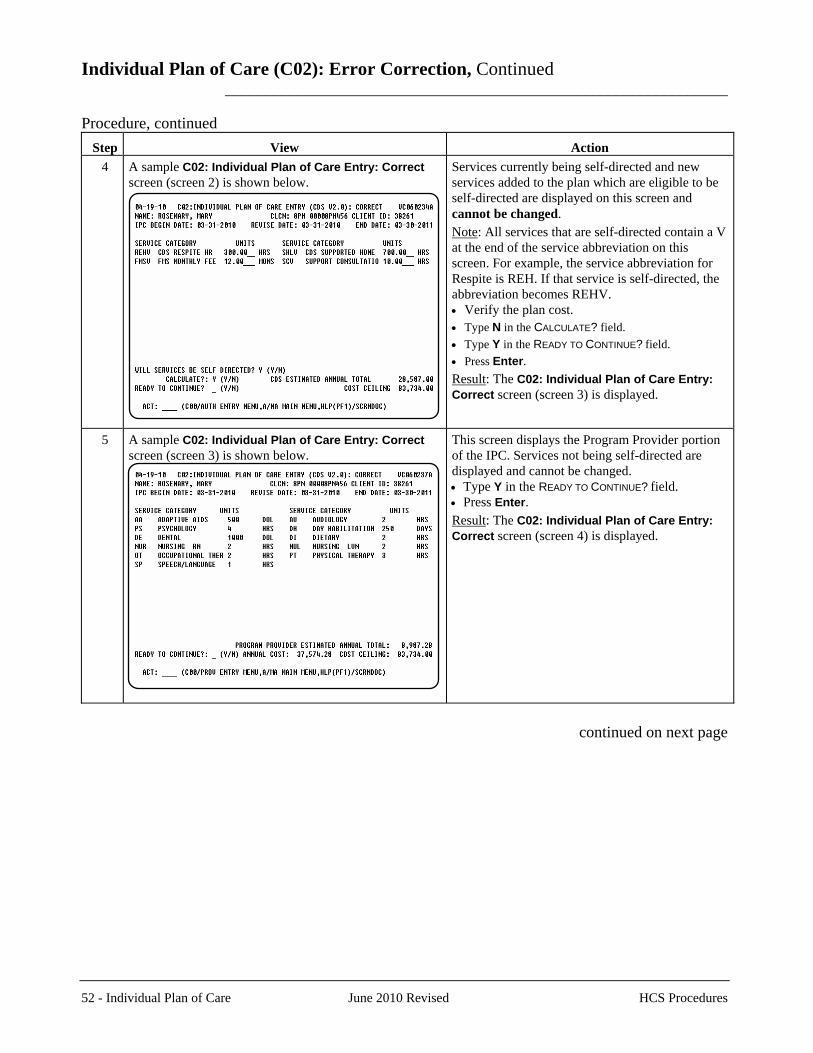
Individual Plan of Care (C02): Error Correction, Continued _______________________________________________________________ Procedure, continued
Step
View
Action 4 A sample C02: Individual Plan of Care Entry: Correct
screen (screen 2) is shown below.
Services currently being self-directed and new services added to the plan which are eligible to be self-directed are displayed on this screen and cannot be changed.
Note: All services that are self-directed contain a V at the end of the service abbreviation on this screen. For example, the service abbreviation for Respite is REH. If that service is self-directed, the abbreviation becomes REHV. • Verify the plan cost. • Type N in the CALCULATE? field. • Type Y in the READY TO CONTINUE? field. • Press Enter. Result: The C02: Individual Plan of Care Entry: Correct screen (screen 3) is displayed.
5 A sample C02: Individual Plan of Care Entry: Correct screen (screen 3) is shown below.
This screen displays the Program Provider portion of the IPC. Services not being self-directed are displayed and cannot be changed. • Type Y in the READY TO CONTINUE? field. • Press Enter. Result: The C02: Individual Plan of Care Entry: Correct screen (screen 4) is displayed.
continued on next page
52 - Individual Plan of Care June 2010 Revised HCS Procedures
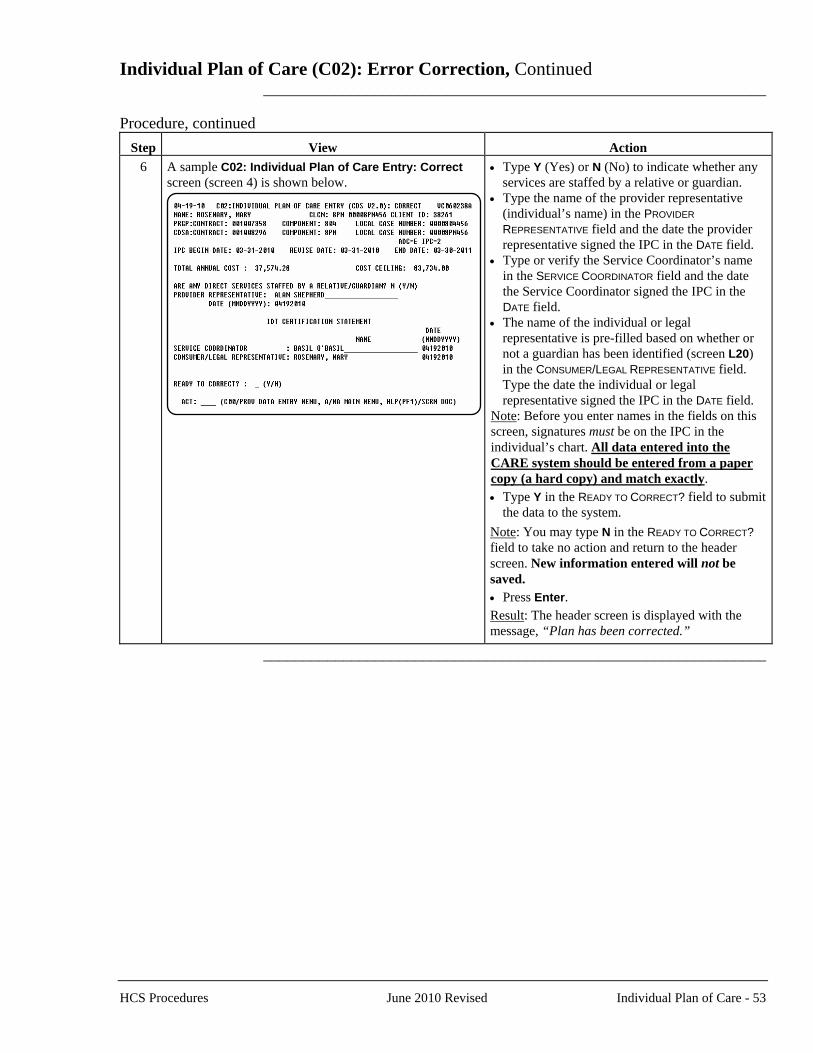
Individual Plan of Care (C02): Error Correction, Continued _______________________________________________________________ Procedure, continued
Step
View
Action 6 A sample C02: Individual Plan of Care Entry: Correct
screen (screen 4) is shown below.
• Type Y (Yes) or N (No) to indicate whether any services are staffed by a relative or guardian.
• Type the name of the provider representative (individual’s name) in the PROVIDER
REPRESENTATIVE field and the date the provider representative signed the IPC in the DATE field.
• Type or verify the Service Coordinator’s name in the SERVICE COORDINATOR field and the date the Service Coordinator signed the IPC in the DATE field.
• The name of the individual or legal representative is pre-filled based on whether or not a guardian has been identified (screen L20) in the CONSUMER/LEGAL REPRESENTATIVE field. Type the date the individual or legal representative signed the IPC in the DATE field.
Note: Before you enter names in the fields on this screen, signatures must be on the IPC in the individual’s chart. All data entered into the CARE system should be entered from a paper copy (a hard copy) and match exactly. • Type Y in the READY TO CORRECT? field to submit
the data to the system. Note: You may type N in the READY TO CORRECT? field to take no action and return to the header screen. New information entered will not be saved. • Press Enter. Result: The header screen is displayed with the message, “Plan has been corrected.”
_______________________________________________________________
HCS Procedures June 2010 Revised Individual Plan of Care - 53
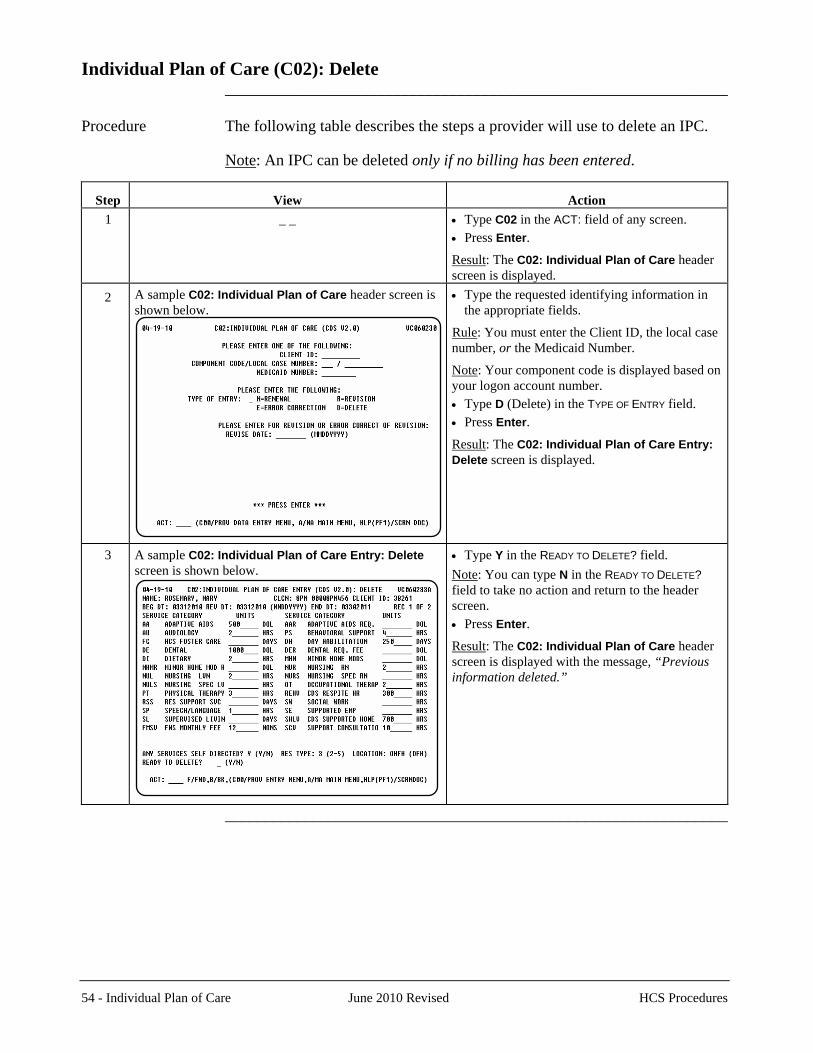
Individual Plan of Care (C02): Delete _______________________________________________________________ Procedure The following table describes the steps a provider will use to delete an IPC. Note: An IPC can be deleted only if no billing has been entered.
Step
View
Action 1 _ _
• Type C02 in the ACT: field of any screen. • Press Enter. Result: The C02: Individual Plan of Care header screen is displayed.
A sample C02: Individual Plan of Care header screen is shown below.
• Type the requested identifying information in the appropriate fields.
2
54 - Individual Plan of Care June 2010 Revised HCS Procedures
Rule: You must enter the Client ID, the local case number, or the Medicaid Number.
Note: Your component code is displayed based on your logon account number. • Type D (Delete) in the TYPE OF ENTRY field. • Press Enter.
Result: The C02: Individual Plan of Care Entry: Delete screen is displayed.
3 A sample C02: Individual Plan of Care Entry: Delete screen is shown below.
• Type Y in the READY TO DELETE? field. Note: You can type N in the READY TO DELETE? field to take no action and return to the header screen. • Press Enter.
Result: The C02: Individual Plan of Care header screen is displayed with the message, “Previous information deleted.”
_______________________________________________________________
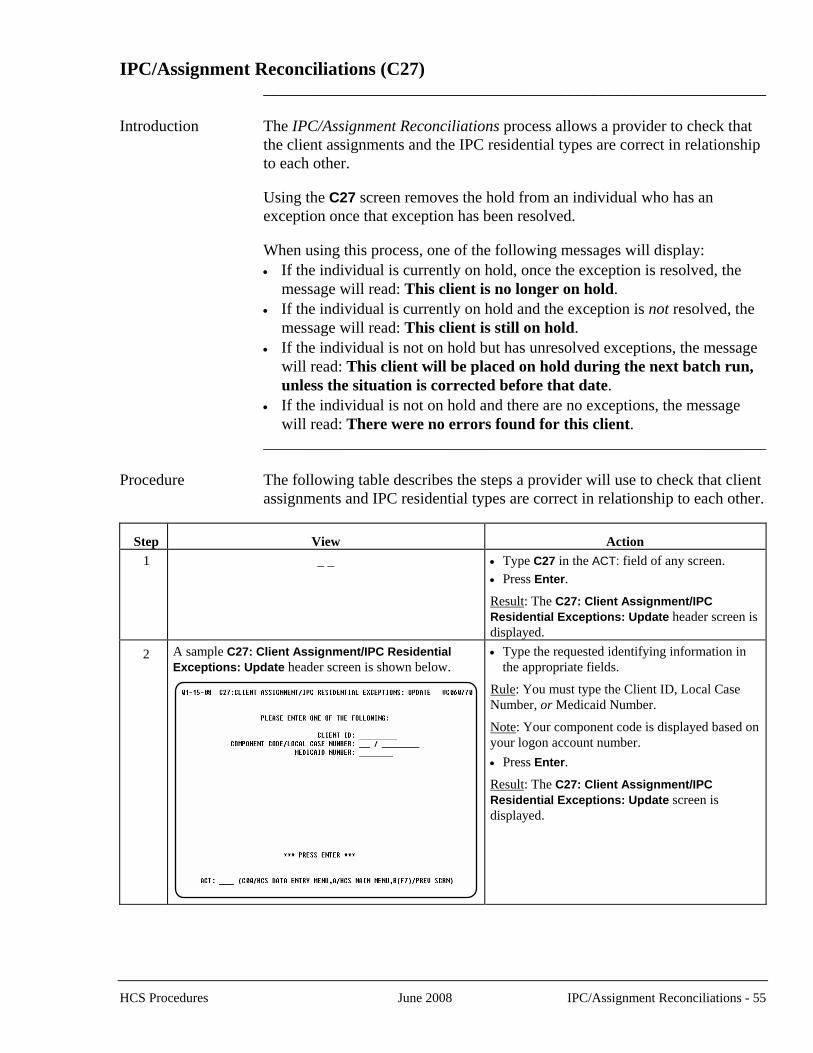
IPC/Assignment Reconciliations (C27) _______________________________________________________________ Introduction The IPC/Assignment Reconciliations process allows a provider to check that
the client assignments and the IPC residential types are correct in relationship to each other.
Using the C27 screen removes the hold from an individual who has an
exception once that exception has been resolved. When using this process, one of the following messages will display:
• If the individual is currently on hold, once the exception is resolved, the message will read: This client is no longer on hold.
• If the individual is currently on hold and the exception is not resolved, the message will read: This client is still on hold.
• If the individual is not on hold but has unresolved exceptions, the message will read: This client will be placed on hold during the next batch run, unless the situation is corrected before that date.
• If the individual is not on hold and there are no exceptions, the message will read: There were no errors found for this client.
_______________________________________________________________ Procedure The following table describes the steps a provider will use to check that client
assignments and IPC residential types are correct in relationship to each other.
Step
View
Action 1 _ _
• Type C27 in the ACT: field of any screen. • Press Enter. Result: The C27: Client Assignment/IPC Residential Exceptions: Update header screen is displayed.
2 A sample C27: Client Assignment/IPC Residential Exceptions: Update header screen is shown below.
• Type the requested identifying information in the appropriate fields.
Rule: You must type the Client ID, Local Case Number, or Medicaid Number.
Note: Your component code is displayed based on your logon account number. • Press Enter.
Result: The C27: Client Assignment/IPC Residential Exceptions: Update screen is displayed.
HCS Procedures June 2008 IPC/Assignment Reconciliations - 55
IPC/Assignment Reconciliations (C27), Continued _______________________________________________________________ Procedure, continued
Step
View
Action 3 A sample C27: Client Assignment/IPC Residential
Exceptions: Update screen is shown below.
The screen displays a message concerning the reconciliation of the specified individual’s assignment and any IPC residential exceptions.
In the example, the message, “There were no errors found for this client.” is displayed.
_______________________________________________________________
56 - IPC/Assignment Reconciliations June 2008 HCS Procedures
Location (C24)/Location Type Modification (C25) _______________________________________________________________ Introduction All new foster/companion care and 3- and 4-person residences must be
assigned a unique location code and entered into CARE by the provider. All individuals residing in their own or family home, but not receiving foster care services, will be assigned the generic code OHFH. The program provider will use the C24 Provider Location screens to add, correct, or delete location records.
It is possible that a physical location may change its residential type. For
example, a foster care setting may change to a 3-person setting. The program provider must enter this information into CARE using the C25 Provider Location Type Modification screens to modify the residential type for an existing location. The program provider will also use the C25 screens to delete a previously entered location type modification.
_______________________________________________________________ Notes The provider cannot change the location county once individuals have been
assigned to a location. Each physical location must have a unique location code. If a foster care
family moves, then a new location code for their new address must be created. The individual must then be assigned to the location using the C26 Client Assignments screens. Once the individual is assigned to the new location, the provider will close the original location.
_______________________________________________________________ 4-Person Residence The program provider must request and obtain approval from Waiver Approval Process Survey & Certification of a residence in which four individuals receiving HCS services will live. To receive approval of a residence, the provider must
submit the following documentation for review: • the address of the residence; • written certification from the provider that the provider is providing or
intends to provide residential support for one or more individuals who will live in the residence;
• written certification by the fire safety authority having jurisdiction for the location for the residence that, based upon inspection of the residence, the residence complies with the provisions of the current edition of the National Fire Protection Association 101, Life Safety Code as adopted by the Texas Department of Insurance.
• written certification from the provider that the residence to be approved is not the residence of any direct service provider.
With receipt of the documentation, Waiver Survey & Certification may grant approval of the residence.
_______________________________________________________________
HCS Procedures June 2008 Location/Location Type Modification - 57
Location (C24): Add _______________________________________________________________ Procedure The following table describes the steps a provider will use to add a new
location record.
Step
View
Action 1 _ _
• Type C24 in the ACT: field of any screen. • Press Enter. Result: The C24: Provider Location Add/Correct/Delete header screen is displayed.
2 A sample C24: Provider Location Add/Correct/Delete header screen is shown below.
Your component code is displayed based on your logon account number. • Type the location code in the LOCATION CODE
field. • Type A (Add) in the TYPE OF ENTRY field. • Press Enter.
Result: The C24: Waiver Location Add/Correct/ Delete screen is displayed.
3 A sample C24: Waiver Location Add/Correct/Delete screen is shown below.
• Type the name of the location in the NAME field. • Type the code for the location type in the TYPE
field. • Type the date of the opening of the location in
the OPEN DATE field. Note: The open date cannot be a future date unless the location type is 4 (4-Bed). • Type line 1 of the location address in the
ADDRESS field. • Type the city of the location in the CITY field. • Type the state of the location in the STATE field. • Type the code for the county of the location in
the COUNTY field. (The county must exist on the provider’s contracts.)
• Type the name of a person who can be contacted and the contact’s telephone number in the CONTACT and PHONE fields. This person must be available 24 hours a day.
• Type Y in the READY TO ADD? field to submit the data to the system.
Note: You can type N in the READY TO ADD? field to take no action and return to the header screen. No data entered is saved. • Press Enter. Result: The header screen is displayed with the message, “Previous Information Added.”
_______________________________________________________________
58 - Location/Location Type Modification June 2008 HCS Procedures

Location (C24): Correct _______________________________________________________________ Procedure The following table describes the steps a provider will use to correct errors in
location information.
Step
View
Action 1 _ _
• Type C24 in the ACT: field of any screen. • Press Enter. Result: The C24: Provider Location Add/ Correct/Delete header screen is displayed.
2 A sample C24: Provider Location Add/Correct/Delete header screen is shown below.
Your component code is displayed based on your logon account number. • Type the location code in the LOCATION CODE
field. • Type C (Correct) in the TYPE OF ENTRY field. Note: You will use C to correct errors only. C25 is used to change the residential type for an existing location. • Press Enter.
Result: The C24: Waiver Location Add/Correct/ Delete screen is displayed.
3 A sample C24: Waiver Location Add/Correct/Delete screen is shown below.
• Type corrections to the location information in the appropriate fields.
• Type Y in the READY TO CHANGE? field to submit the data to the system.
Note: You can type N in the READY TO CHANGE? field to take no action and return to the header screen. No data entered is saved. • Press Enter.
Result: The header screen is displayed with the message, “Previous Information Changed.”
_______________________________________________________________
HCS Procedures June 2008 Location/Location Type Modification - 59
Location (C24): Delete _______________________________________________________________ Procedure The following table describes the steps a provider will use to delete a location
record. Note: You cannot delete a location if individuals have ever been assigned to
that location.
Step
View
Action 1 _ _
• Type C24 in the ACT: field of any screen. • Press Enter. Result: The C24: Provider Location Add/ Correct/Delete header screen is displayed.
2 A sample C24: Provider Location Add/Correct/Delete header screen is shown below.
Your component code is displayed based on your logon account number. • Type the location code in the LOCATION CODE
field. • Type D (Delete) in the TYPE OF ENTRY field. • Press Enter.
Result: The C24: Waiver Location Add/Correct/ Delete screen is displayed.
3 A sample C24: Waiver Location Add/Correct/Delete screen is shown below.
• Type Y in the READY TO DELETE? field to submit the data to the system.
Note: You can type N in the READY TO DELETE? field to take no action and return to the header screen. • Press Enter.
Result: The header screen is displayed with the message, “Previous Information Deleted.”
_______________________________________________________________
60 - Location/Location Type Modification June 2008 HCS Procedures
Location Type Modification (C25): Add _______________________________________________________________ Procedure The following table describes the steps a provider will use to add a location
type modification (add a new residential type) to an existing location.
Step
View
Action 1 _ _
• Type C25 in the ACT: field of any screen. • Press Enter. Result: The C25: Provider Location Type Modification A/D header screen is displayed.
2 A sample C25: Provider Location Type Modification A/D header screen is shown below.
Your component code is displayed based on your logon account number. • Type the location code in the LOCATION CODE
field. • Type A (Add) in the TYPE OF ENTRY field. • Press Enter.
Result: The C25: Provider Location Type Modification A/D screen is displayed.
3 A sample C25: Provider Location Type Modification A/D screen is shown below.
Note: The current status, location type, and effective date are displayed in the Current section of the screen.
In the New section of the screen: • Type the location type in the LOCATION TYPE
field. • Type the effective date of the modified location
type in the EFF. DATE field. • Type Y in the READY TO ADD? field to submit the
data to the system. Note: You can type N in the READY TO ADD? field to take no action and return to the header screen. No data entered is saved. • Press Enter.
Result: The header screen is displayed with the message, “Previous Information Changed.”
_______________________________________________________________
HCS Procedures June 2008 Location/Location Type Modification - 61
Location Type Modification (C25): Delete _______________________________________________________________ Procedure The following table describes the steps a provider will use to delete a
previously entered location type modification.
Step
View
Action 1 _ _
• Type C25 in the ACT: field of any screen. • Press Enter. Result: The C25: Provider Location Type Modification A/D header screen is displayed.
2 A sample C25: Provider Location Type Modification A/D header screen is shown below.
Your component code is displayed based on your logon account number. • Type the location code in the LOCATION CODE
field. • Type D (Delete) in the TYPE OF ENTRY field. • Press Enter.
Result: The C25: Provider Location Type Modification A/D screen is displayed.
3 A sample C25: Provider Location Type Modification A/D screen is shown below.
Note: The previous status, location type, and effective/end dates are displayed in the Current section of the screen. The current location type and effective date are displayed in the New section of the screen.
• Type Y in the READY TO DELETE? field to submit the data to the system.
Note: You can type N in the READY TO DELETE? field to take no action and return to the header screen. No data entered is saved. • Press Enter.
Result: The header screen is displayed with the message, “Previous Information Deleted.”
_______________________________________________________________
62 - Location/Location Type Modification June 2008 HCS Procedures
Provider Staff Entry (C13) _______________________________________________________________ Introduction The Provider Staff Entry process allows a provider to add, change, delete, or
reactivate information on staff members who provide services to individuals. _______________________________________________________________
HCS Procedures June 2008 Provider Staff Entry - 63
Provider Staff Entry (C13): Add _______________________________________________________________ Procedure The following table describes the steps a provider will use to add information
on a staff member who provides services to individuals.
Note: Each provider defines their own staff ID numbers. The numbers can be alpha, numeric, or alphanumeric and up to five characters in length.
Step
View
Action 1 _ _
• Type C13 in the ACT: field of any screen. • Press Enter. Result: The C13: Provider Staff Entry: Add/ Change/Delete/Reactivate header screen is displayed.
2 A sample C13: Provider Staff Entry: Add/Change/ Delete/Reactivate header screen is shown below.
Your component code is displayed based on your logon account number. • Type the staff member’s identification number
in the STAFF ID field. • Type A (Add) in the TYPE OF ENTRY field. • Press Enter.
Result: The C13: Provider Staff Entry: Add screen is displayed.
3 A sample C13: Provider Staff Entry: Add screen is shown below.
• Type the date the staff member began providing services at your program in the STAFF BEGIN
DATE field. • Type the date of the last day the staff member
provided services in the END DATE field. This field can be left blank.
• Type the last name of the service provider in the LAST NAME field.
• Type the suffix, if any, of the service provider in the SUF field.
• Type the first name of the service provider in the FIRST NAME field.
• Type the middle initial of the service provider, if available, in the MIDDLE INITIAL field.
• Type Y in the READY TO ADD? field to submit the data to the system.
Note: You can type N in the READY TO ADD? field to take no action and return to the header screen. • Press Enter.
Result: The header screen is displayed with the message, “Previous Information Added.”
_______________________________________________________________
64 - Provider Staff Entry June 2008 HCS Procedures
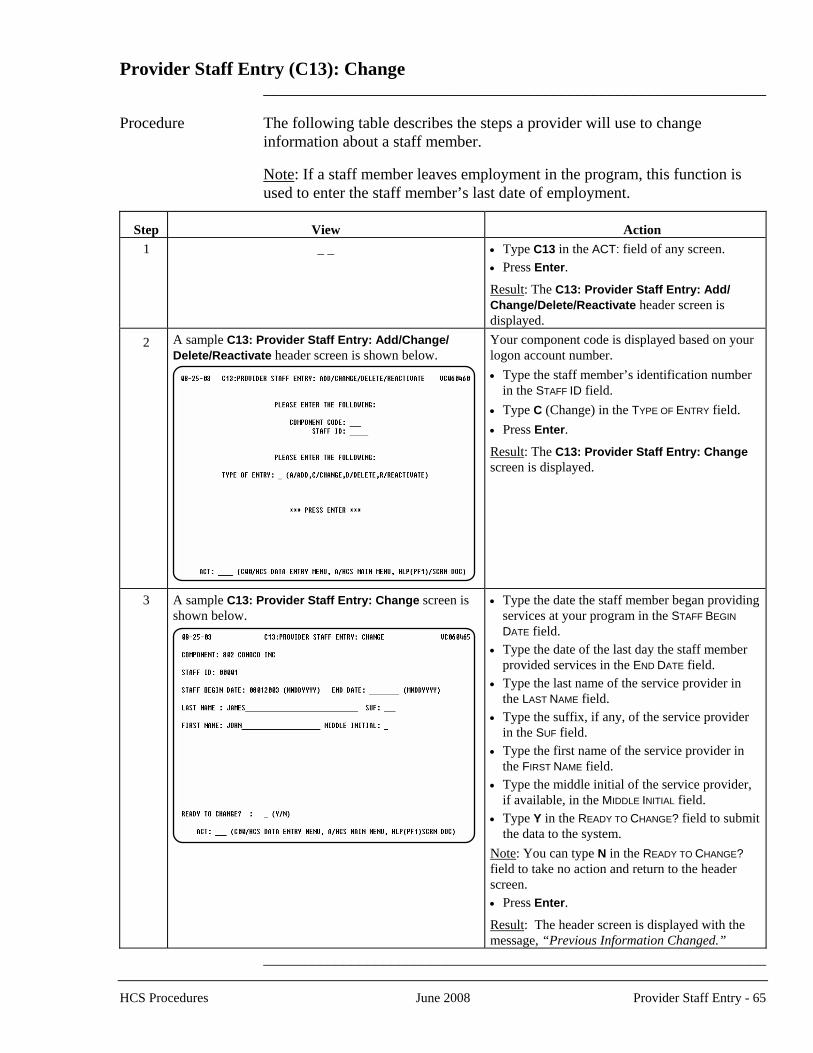
Provider Staff Entry (C13): Change _______________________________________________________________ Procedure The following table describes the steps a provider will use to change
information about a staff member. Note: If a staff member leaves employment in the program, this function is
used to enter the staff member’s last date of employment.
Step
View
Action 1 _ _
• Type C13 in the ACT: field of any screen. • Press Enter. Result: The C13: Provider Staff Entry: Add/ Change/Delete/Reactivate header screen is displayed.
2 A sample C13: Provider Staff Entry: Add/Change/ Delete/Reactivate header screen is shown below.
Your component code is displayed based on your logon account number. • Type the staff member’s identification number
in the STAFF ID field. • Type C (Change) in the TYPE OF ENTRY field. • Press Enter.
Result: The C13: Provider Staff Entry: Change screen is displayed.
3 A sample C13: Provider Staff Entry: Change screen is shown below.
• Type the date the staff member began providing services at your program in the STAFF BEGIN
DATE field. • Type the date of the last day the staff member
provided services in the END DATE field. • Type the last name of the service provider in
the LAST NAME field. • Type the suffix, if any, of the service provider
in the SUF field. • Type the first name of the service provider in
the FIRST NAME field. • Type the middle initial of the service provider,
if available, in the MIDDLE INITIAL field. • Type Y in the READY TO CHANGE? field to submit
the data to the system. Note: You can type N in the READY TO CHANGE? field to take no action and return to the header screen. • Press Enter.
Result: The header screen is displayed with the message, “Previous Information Changed.”
_______________________________________________________________
HCS Procedures June 2008 Provider Staff Entry - 65
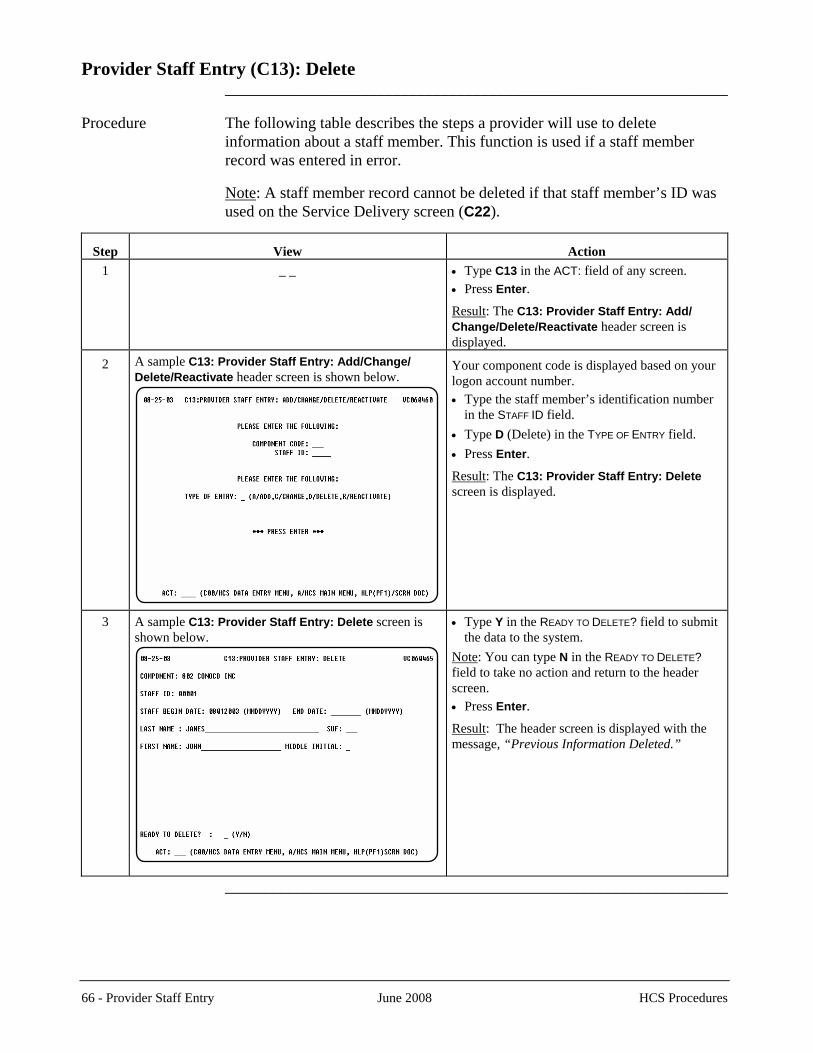
Provider Staff Entry (C13): Delete _______________________________________________________________ Procedure The following table describes the steps a provider will use to delete
information about a staff member. This function is used if a staff member record was entered in error.
Note: A staff member record cannot be deleted if that staff member’s ID was
used on the Service Delivery screen (C22).
Step
View
Action 1 _ _
• Type C13 in the ACT: field of any screen. • Press Enter. Result: The C13: Provider Staff Entry: Add/ Change/Delete/Reactivate header screen is displayed.
2 A sample C13: Provider Staff Entry: Add/Change/ Delete/Reactivate header screen is shown below.
Your component code is displayed based on your logon account number. • Type the staff member’s identification number
in the STAFF ID field. • Type D (Delete) in the TYPE OF ENTRY field. • Press Enter.
Result: The C13: Provider Staff Entry: Delete screen is displayed.
3 A sample C13: Provider Staff Entry: Delete screen is shown below.
• Type Y in the READY TO DELETE? field to submit the data to the system.
Note: You can type N in the READY TO DELETE? field to take no action and return to the header screen. • Press Enter.
Result: The header screen is displayed with the message, “Previous Information Deleted.”
_______________________________________________________________
66 - Provider Staff Entry June 2008 HCS Procedures
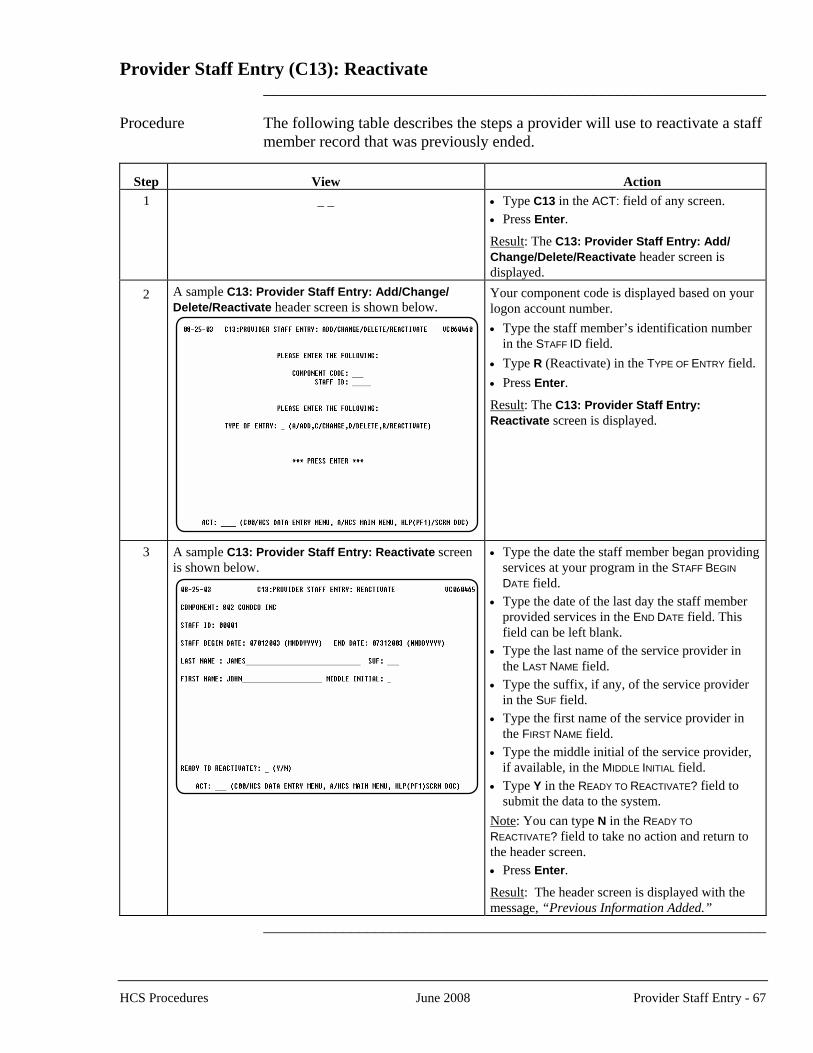
Provider Staff Entry (C13): Reactivate _______________________________________________________________ Procedure The following table describes the steps a provider will use to reactivate a staff
member record that was previously ended.
Step
View
Action 1 _ _
• Type C13 in the ACT: field of any screen. • Press Enter. Result: The C13: Provider Staff Entry: Add/ Change/Delete/Reactivate header screen is displayed.
2 A sample C13: Provider Staff Entry: Add/Change/ Delete/Reactivate header screen is shown below.
Your component code is displayed based on your logon account number. • Type the staff member’s identification number
in the STAFF ID field. • Type R (Reactivate) in the TYPE OF ENTRY field. • Press Enter.
Result: The C13: Provider Staff Entry: Reactivate screen is displayed.
3 A sample C13: Provider Staff Entry: Reactivate screen is shown below.
• Type the date the staff member began providing services at your program in the STAFF BEGIN
DATE field. • Type the date of the last day the staff member
provided services in the END DATE field. This field can be left blank.
• Type the last name of the service provider in the LAST NAME field.
• Type the suffix, if any, of the service provider in the SUF field.
• Type the first name of the service provider in the FIRST NAME field.
• Type the middle initial of the service provider, if available, in the MIDDLE INITIAL field.
• Type Y in the READY TO REACTIVATE? field to submit the data to the system.
Note: You can type N in the READY TO
REACTIVATE? field to take no action and return to the header screen. • Press Enter.
Result: The header screen is displayed with the message, “Previous Information Added.”
_______________________________________________________________
HCS Procedures June 2008 Provider Staff Entry - 67

68 - Provider Staff Entry June 2008 HCS Procedures
This page was intentionally left blank.
Provider/Contract Update (C14) _______________________________________________________________ Introduction The Provider/Contract Update process allows a provider to add, change, or
delete provider, contract, and applicant contact address information that includes: • the provider’s physical address* • the provider’s mailing address • the provider’s billing address • the contract physical address** • the contract mailing address • the applicant contact’s physical address • the applicant contact’s mailing address * The provider’s email address can be updated when updating the Provider’s
Physical Address.
** The Program Contact name, telephone number, and fax number information can also be updated when updating the Contract Physical Address.
_______________________________________________________________ Important It is vital that all provider and contract information be kept current. Failure to
do so will delay the ability to get information to providers. Provider and contract information that C14: Provider/Contract Update will
not allow a provider to enter must be sent to the Community Services (CS), Contracts section of Provider Services for data entry.
_______________________________________________________________
HCS Procedures September 2008 Revised Provider/Contract Update - 69
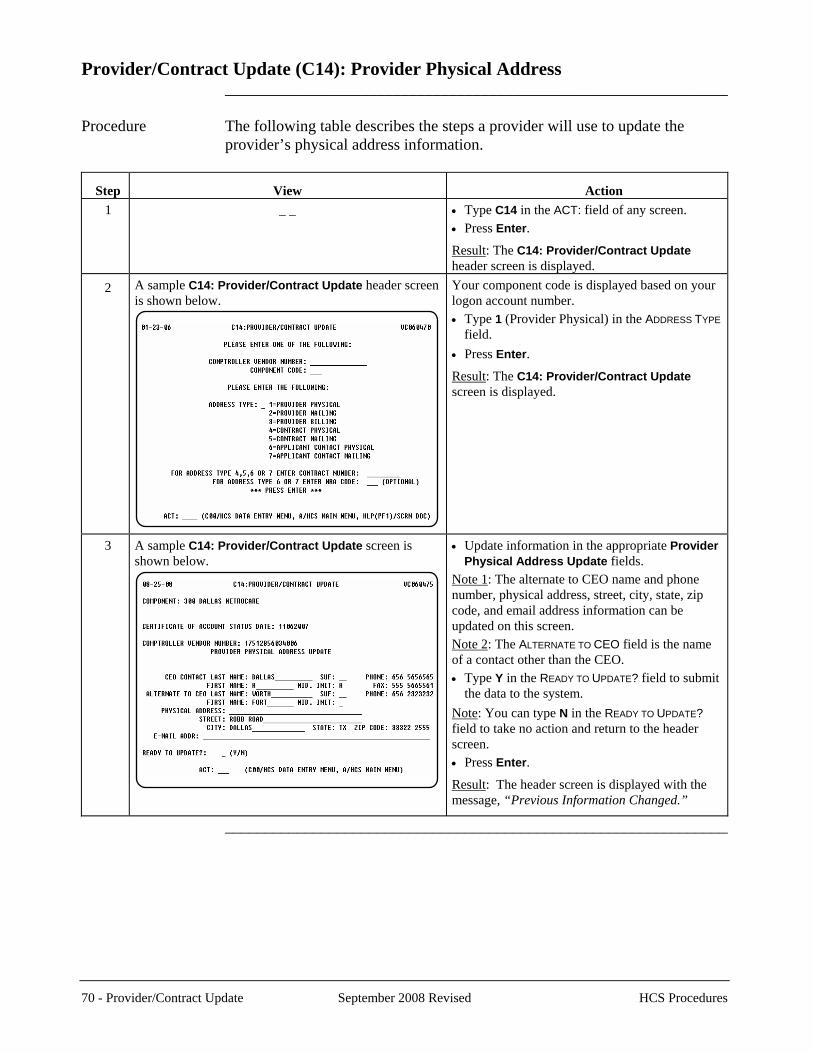
Provider/Contract Update (C14): Provider Physical Address _______________________________________________________________ Procedure The following table describes the steps a provider will use to update the
provider’s physical address information.
Step
View
Action 1 _ _
• Type C14 in the ACT: field of any screen. • Press Enter. Result: The C14: Provider/Contract Update header screen is displayed.
2 A sample C14: Provider/Contract Update header screen is shown below.
Your component code is displayed based on your logon account number. • Type 1 (Provider Physical) in the ADDRESS TYPE
field. • Press Enter.
Result: The C14: Provider/Contract Update screen is displayed.
3 A sample C14: Provider/Contract Update screen is shown below.
• Update information in the appropriate Provider Physical Address Update fields.
Note 1: The alternate to CEO name and phone number, physical address, street, city, state, zip code, and email address information can be updated on this screen. Note 2: The ALTERNATE TO CEO field is the name of a contact other than the CEO. • Type Y in the READY TO UPDATE? field to submit
the data to the system. Note: You can type N in the READY TO UPDATE? field to take no action and return to the header screen. • Press Enter.
Result: The header screen is displayed with the message, “Previous Information Changed.”
_______________________________________________________________
70 - Provider/Contract Update September 2008 Revised HCS Procedures
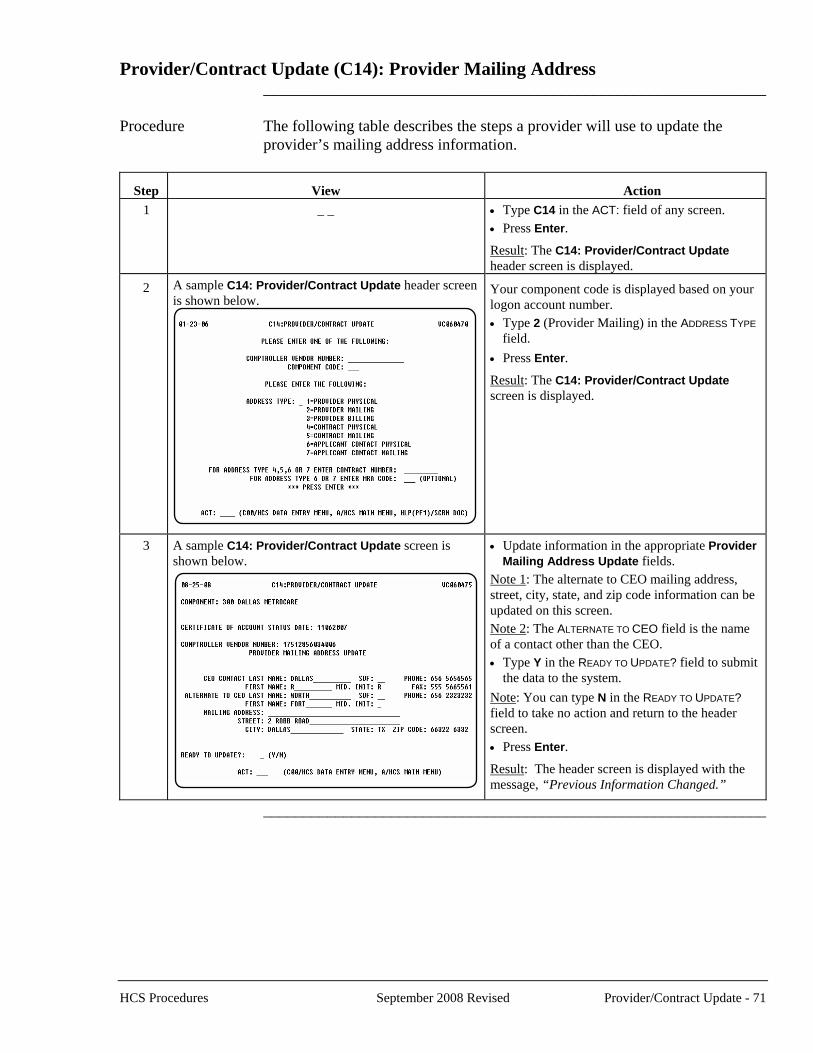
Provider/Contract Update (C14): Provider Mailing Address _______________________________________________________________ Procedure The following table describes the steps a provider will use to update the
provider’s mailing address information.
Step
View
Action 1 _ _
• Type C14 in the ACT: field of any screen. • Press Enter. Result: The C14: Provider/Contract Update header screen is displayed.
2 A sample C14: Provider/Contract Update header screen is shown below.
Your component code is displayed based on your logon account number. • Type 2 (Provider Mailing) in the ADDRESS TYPE
field. • Press Enter.
Result: The C14: Provider/Contract Update screen is displayed.
3 A sample C14: Provider/Contract Update screen is shown below.
• Update information in the appropriate Provider Mailing Address Update fields.
Note 1: The alternate to CEO mailing address, street, city, state, and zip code information can be updated on this screen. Note 2: The ALTERNATE TO CEO field is the name of a contact other than the CEO. • Type Y in the READY TO UPDATE? field to submit
the data to the system. Note: You can type N in the READY TO UPDATE? field to take no action and return to the header screen. • Press Enter.
Result: The header screen is displayed with the message, “Previous Information Changed.”
_______________________________________________________________
HCS Procedures September 2008 Revised Provider/Contract Update - 71
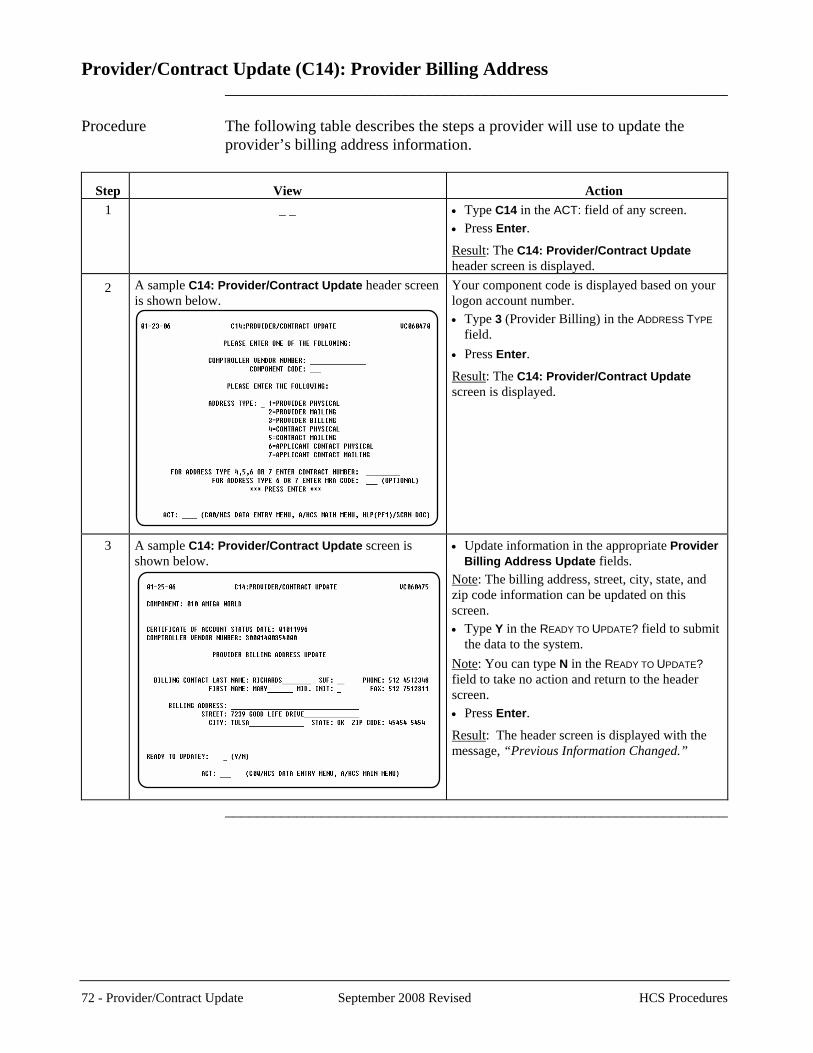
Provider/Contract Update (C14): Provider Billing Address _______________________________________________________________ Procedure The following table describes the steps a provider will use to update the
provider’s billing address information.
Step
View
Action 1 _ _
• Type C14 in the ACT: field of any screen. • Press Enter. Result: The C14: Provider/Contract Update header screen is displayed.
2 A sample C14: Provider/Contract Update header screen is shown below.
Your component code is displayed based on your logon account number. • Type 3 (Provider Billing) in the ADDRESS TYPE
field. • Press Enter.
Result: The C14: Provider/Contract Update screen is displayed.
3 A sample C14: Provider/Contract Update screen is shown below.
• Update information in the appropriate Provider Billing Address Update fields.
Note: The billing address, street, city, state, and zip code information can be updated on this screen. • Type Y in the READY TO UPDATE? field to submit
the data to the system. Note: You can type N in the READY TO UPDATE? field to take no action and return to the header screen. • Press Enter.
Result: The header screen is displayed with the message, “Previous Information Changed.”
_______________________________________________________________
72 - Provider/Contract Update September 2008 Revised HCS Procedures
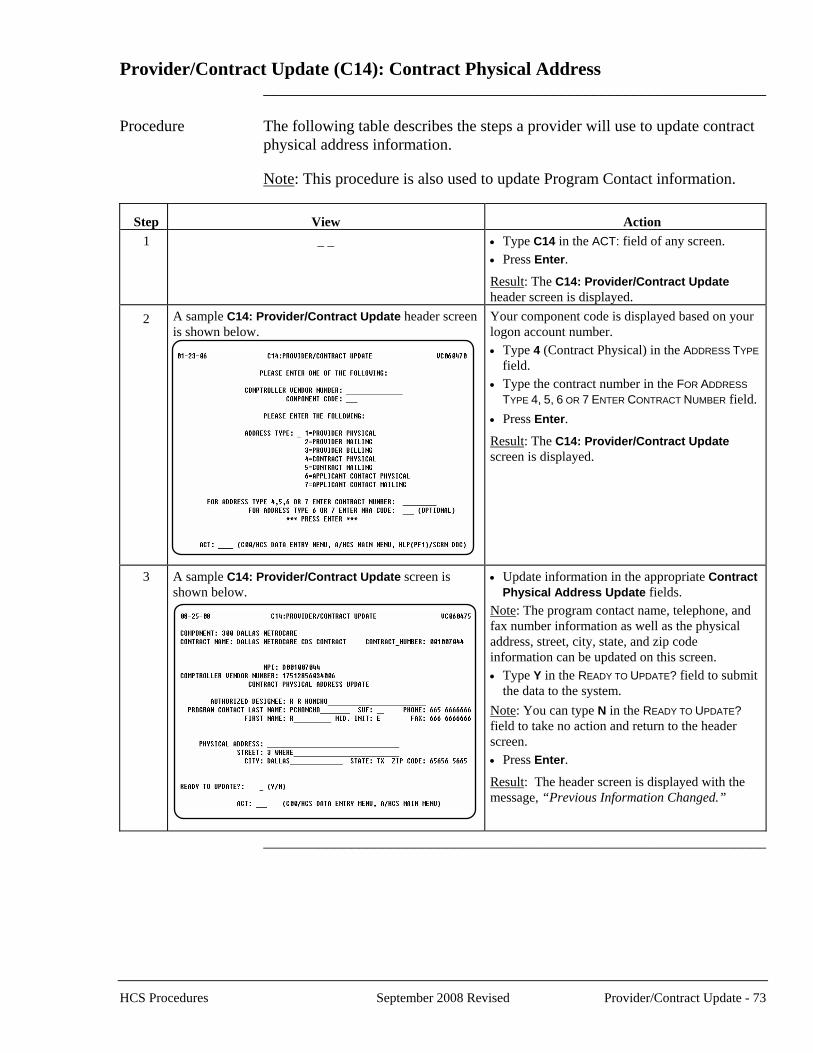
Provider/Contract Update (C14): Contract Physical Address _______________________________________________________________ Procedure The following table describes the steps a provider will use to update contract
physical address information. Note: This procedure is also used to update Program Contact information.
Step
View
Action 1 _ _
• Type C14 in the ACT: field of any screen. • Press Enter. Result: The C14: Provider/Contract Update header screen is displayed.
2 A sample C14: Provider/Contract Update header screen is shown below.
Your component code is displayed based on your logon account number. • Type 4 (Contract Physical) in the ADDRESS TYPE
field. • Type the contract number in the FOR ADDRESS
TYPE 4, 5, 6 OR 7 ENTER CONTRACT NUMBER field. • Press Enter.
Result: The C14: Provider/Contract Update screen is displayed.
3 A sample C14: Provider/Contract Update screen is shown below.
• Update information in the appropriate Contract Physical Address Update fields.
Note: The program contact name, telephone, and fax number information as well as the physical address, street, city, state, and zip code information can be updated on this screen. • Type Y in the READY TO UPDATE? field to submit
the data to the system. Note: You can type N in the READY TO UPDATE? field to take no action and return to the header screen. • Press Enter.
Result: The header screen is displayed with the message, “Previous Information Changed.”
_______________________________________________________________
HCS Procedures September 2008 Revised Provider/Contract Update - 73

Provider/Contract Update (C14): Contract Mailing Address _______________________________________________________________ Procedure The following table describes the steps a provider will use to update the
contract mailing address information.
Step
View
Action 1 _ _
• Type C14 in the ACT: field of any screen. • Press Enter. Result: The C14: Provider/Contract Update header screen is displayed.
2 A sample C14: Provider/Contract Update header screen is shown below.
Your component code is displayed based on your logon account number. • Type 5 (Contract Mailing) in the ADDRESS TYPE
field. • Type the contract number in the FOR ADDRESS
TYPE 4, 5, 6 OR 7 ENTER CONTRACT NUMBER field. • Press Enter.
Result: The C14: Provider/Contract Update screen is displayed.
3 A sample C14: Provider/Contract Update screen is shown below.
• Update information in the appropriate Contract Mailing Address Update fields.
Note: The mailing address, street, city, state, and zip code information can be updated on this screen. • Type Y in the READY TO UPDATE? field to submit
the data to the system. Note: You can type N in the READY TO UPDATE? field to take no action and return to the header screen. • Press Enter.
Result: The header screen is displayed with the message, “Previous Information Changed.”
_______________________________________________________________
74 - Provider/Contract Update September 2008 Revised HCS Procedures
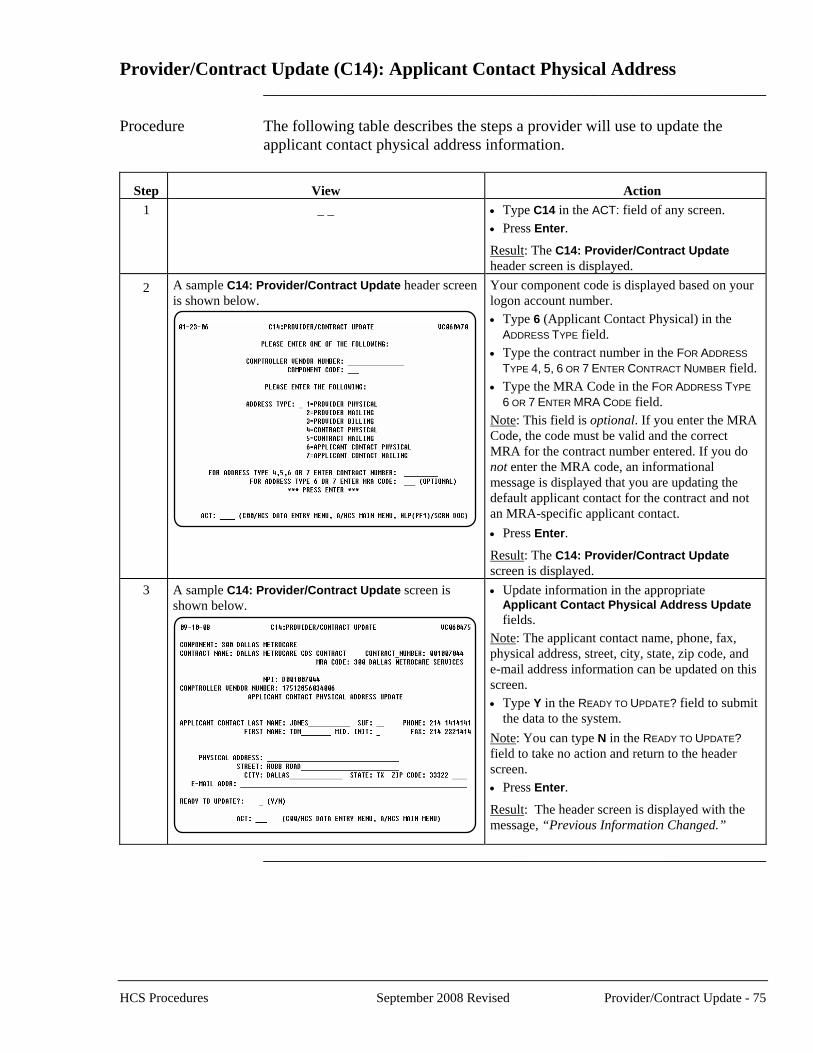
Provider/Contract Update (C14): Applicant Contact Physical Address _______________________________________________________________ Procedure The following table describes the steps a provider will use to update the
applicant contact physical address information.
Step
View
Action 1 _ _
• Type C14 in the ACT: field of any screen. • Press Enter. Result: The C14: Provider/Contract Update header screen is displayed.
2 A sample C14: Provider/Contract Update header screen is shown below.
Your component code is displayed based on your logon account number. • Type 6 (Applicant Contact Physical) in the
ADDRESS TYPE field. • Type the contract number in the FOR ADDRESS
TYPE 4, 5, 6 OR 7 ENTER CONTRACT NUMBER field. • Type the MRA Code in the FOR ADDRESS TYPE
6 OR 7 ENTER MRA CODE field. Note: This field is optional. If you enter the MRA Code, the code must be valid and the correct MRA for the contract number entered. If you do not enter the MRA code, an informational message is displayed that you are updating the default applicant contact for the contract and not an MRA-specific applicant contact. • Press Enter.
Result: The C14: Provider/Contract Update screen is displayed.
3 A sample C14: Provider/Contract Update screen is shown below.
• Update information in the appropriate Applicant Contact Physical Address Update fields.
Note: The applicant contact name, phone, fax, physical address, street, city, state, zip code, and e-mail address information can be updated on this screen. • Type Y in the READY TO UPDATE? field to submit
the data to the system. Note: You can type N in the READY TO UPDATE? field to take no action and return to the header screen. • Press Enter.
Result: The header screen is displayed with the message, “Previous Information Changed.”
_______________________________________________________________
HCS Procedures September 2008 Revised Provider/Contract Update - 75
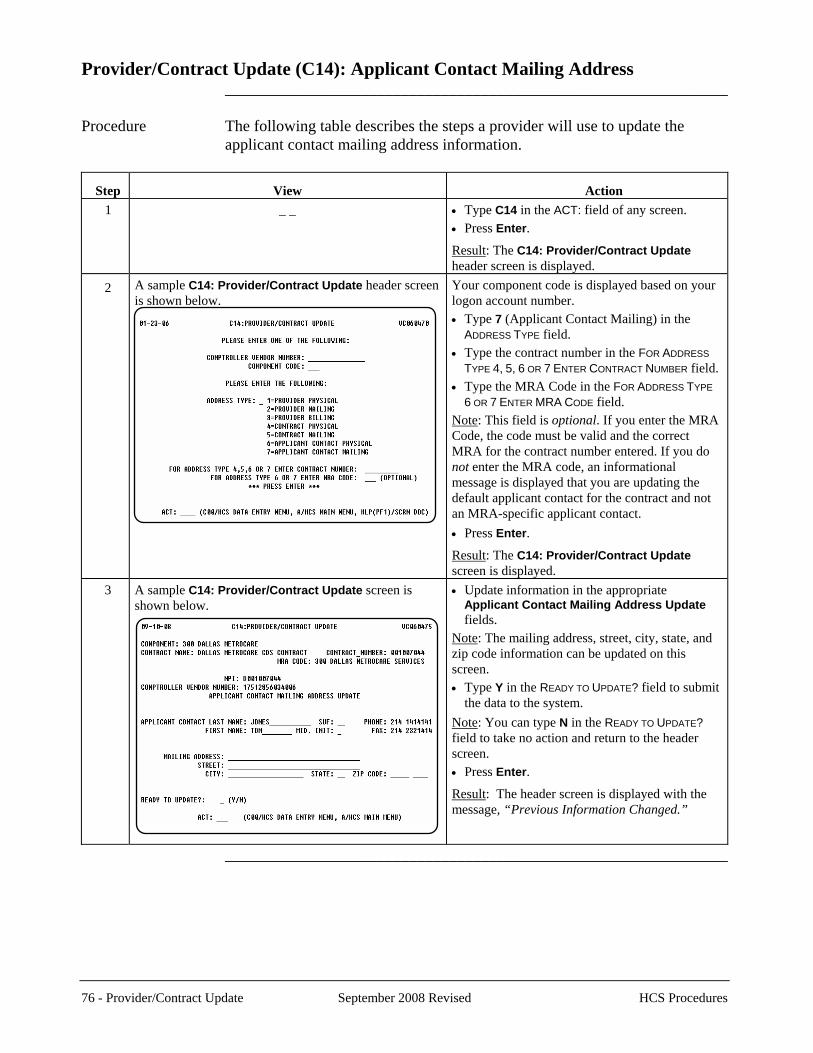
Provider/Contract Update (C14): Applicant Contact Mailing Address _______________________________________________________________ Procedure The following table describes the steps a provider will use to update the
applicant contact mailing address information.
Step
View
Action 1 _ _
• Type C14 in the ACT: field of any screen. • Press Enter. Result: The C14: Provider/Contract Update header screen is displayed.
2 A sample C14: Provider/Contract Update header screen is shown below.
Your component code is displayed based on your logon account number. • Type 7 (Applicant Contact Mailing) in the
ADDRESS TYPE field. • Type the contract number in the FOR ADDRESS
TYPE 4, 5, 6 OR 7 ENTER CONTRACT NUMBER field. • Type the MRA Code in the FOR ADDRESS TYPE
6 OR 7 ENTER MRA CODE field. Note: This field is optional. If you enter the MRA Code, the code must be valid and the correct MRA for the contract number entered. If you do not enter the MRA code, an informational message is displayed that you are updating the default applicant contact for the contract and not an MRA-specific applicant contact. • Press Enter.
Result: The C14: Provider/Contract Update screen is displayed.
3 A sample C14: Provider/Contract Update screen is shown below.
• Update information in the appropriate Applicant Contact Mailing Address Update fields.
Note: The mailing address, street, city, state, and zip code information can be updated on this screen. • Type Y in the READY TO UPDATE? field to submit
the data to the system. Note: You can type N in the READY TO UPDATE? field to take no action and return to the header screen. • Press Enter.
Result: The header screen is displayed with the message, “Previous Information Changed.”
_______________________________________________________________
76 - Provider/Contract Update September 2008 Revised HCS Procedures
Service Delivery ____________________________________________________________
Introduction The HCS program’s reimbursement methodology is based on fee for service, and payment is based on service entry. The Service Delivery process allows a provider to enter individual services provided to HCS individuals, as well as change or delete service delivery data. For all self-directed services other than Financial Management (FMSV) actual units of services must be entered into CARE. After adding claims for all self-directed services except Financial Management (FMSV) and Support Consultation (SCV) on the C22: Service Delivery screen, the system will automatically branch to the C28: Actual Units of Service screen where actual units of services will be entered.
Documentation on two inquiry screens, C89: Claims Inquiry and C77: Reimbursement Authorization Inquiry, is included with this procedure as data from these screens is required for the provider to bill certain services or make changes to claims in C22. Documentation on a third inquiry screen, C75: Prior Approval Inquiry, is also included as data from this screen is required on the Minor Home Modifications/Adaptive Aids/Dental Summary Sheet (4116A).
____________________________________________________________
Special Special consideration must be given to minor home modifications (MHM), Consideration adaptive aids (AA), and dental (DE) services.
Prior Approval for AA/MHM services: Providers may obtain prior approval to determine how much DADS Provider Services will pay for a particular AA or MHM. Providers submit the AA/MHM Request for Prior Approval form to DADS Provider Services to request approval of an AA or MHM prior to its purchase. Submitted requests will be assigned a Prior Approval (PA) Tracking Number. Providers are responsible for accessing C75: Prior Approval Inquiry to look up the PA Tracking Number and status for a submitted request.
Reimbursement Authorization for MHM/AA/DE services: When providers submit a Minor Home Modification/Adaptive Aids/Dental Summary Sheet (4116A) with receipts and any other needed information, they are requesting Reimbursement Authorization (i.e., authorization for payment). Once Reimbursement Authorization has been given an “approved” status in C77: Reimbursement Authorization Inquiry, providers may bill for the AA, MHM, or DE service using C22: Service Delivery. The Reimbursement Authorization (RA) Tracking Number obtained from C77 should be used as the authorization number in C22. Providers are responsible for reviewing C77 to obtain the RA Tracking Number and status for a submitted request.
____________________________________________________________
HCS Procedures September 2009 (Revised) Service Delivery - 77
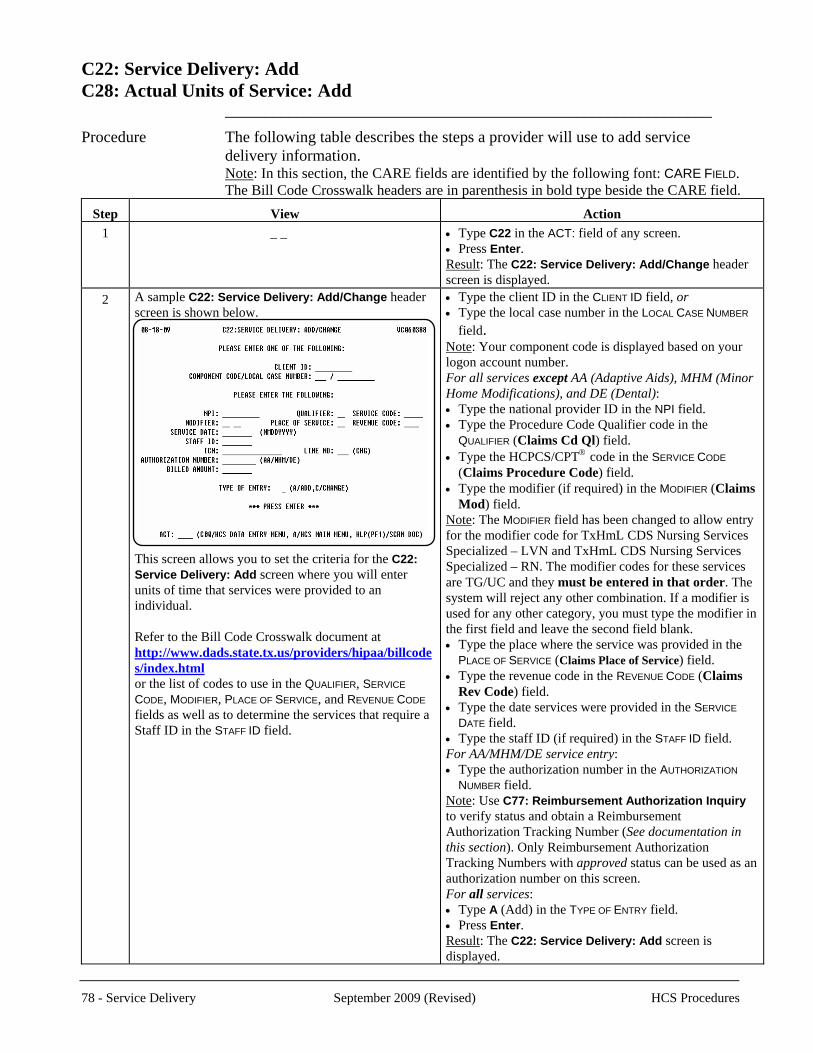
C22: Service Delivery: Add C28: Actual Units of Service: Add _____________________________________________________________
Procedure The following table describes the steps a provider will use to add service delivery information.
Note: In this section, the CARE fields are identified by the following font: CARE FIELD. The Bill Code Crosswalk headers are in parenthesis in bold type beside the CARE field.
Step
View
Action 1 _ _
• Type C22 in the ACT: field of any screen. • Press Enter. Result: The C22: Service Delivery: Add/Change header screen is displayed.
2 A sample C22: Service Delivery: Add/Change header screen is shown below.
This screen allows you to set the criteria for the C22: Service Delivery: Add screen where you will enter units of time that services were provided to an individual. Refer to the Bill Code Crosswalk document at http://www.dads.state.tx.us/providers/hipaa/billcodes/index.html or the list of codes to use in the QUALIFIER, SERVICE
CODE, MODIFIER, PLACE OF SERVICE, and REVENUE CODE fields as well as to determine the services that require a Staff ID in the STAFF ID field.
• Type the client ID in the CLIENT ID field, or • Type the local case number in the LOCAL CASE NUMBER
field. Note: Your component code is displayed based on your logon account number. For all services except AA (Adaptive Aids), MHM (Minor Home Modifications), and DE (Dental): • Type the national provider ID in the NPI field. • Type the Procedure Code Qualifier code in the
QUALIFIER (Claims Cd Ql) field. • Type the HCPCS/CPT® code in the SERVICE CODE
(Claims Procedure Code) field. • Type the modifier (if required) in the MODIFIER (Claims
Mod) field. Note: The MODIFIER field has been changed to allow entry for the modifier code for TxHmL CDS Nursing Services Specialized – LVN and TxHmL CDS Nursing Services Specialized – RN. The modifier codes for these services are TG/UC and they must be entered in that order. The system will reject any other combination. If a modifier is used for any other category, you must type the modifier in the first field and leave the second field blank. • Type the place where the service was provided in the
PLACE OF SERVICE (Claims Place of Service) field. • Type the revenue code in the REVENUE CODE (Claims
Rev Code) field. • Type the date services were provided in the SERVICE
DATE field. • Type the staff ID (if required) in the STAFF ID field. For AA/MHM/DE service entry: • Type the authorization number in the AUTHORIZATION
NUMBER field. Note: Use C77: Reimbursement Authorization Inquiry to verify status and obtain a Reimbursement Authorization Tracking Number (See documentation in this section). Only Reimbursement Authorization Tracking Numbers with approved status can be used as an authorization number on this screen. For all services: • Type A (Add) in the TYPE OF ENTRY field. • Press Enter. Result: The C22: Service Delivery: Add screen is displayed.
78 - Service Delivery September 2009 (Revised) HCS Procedures
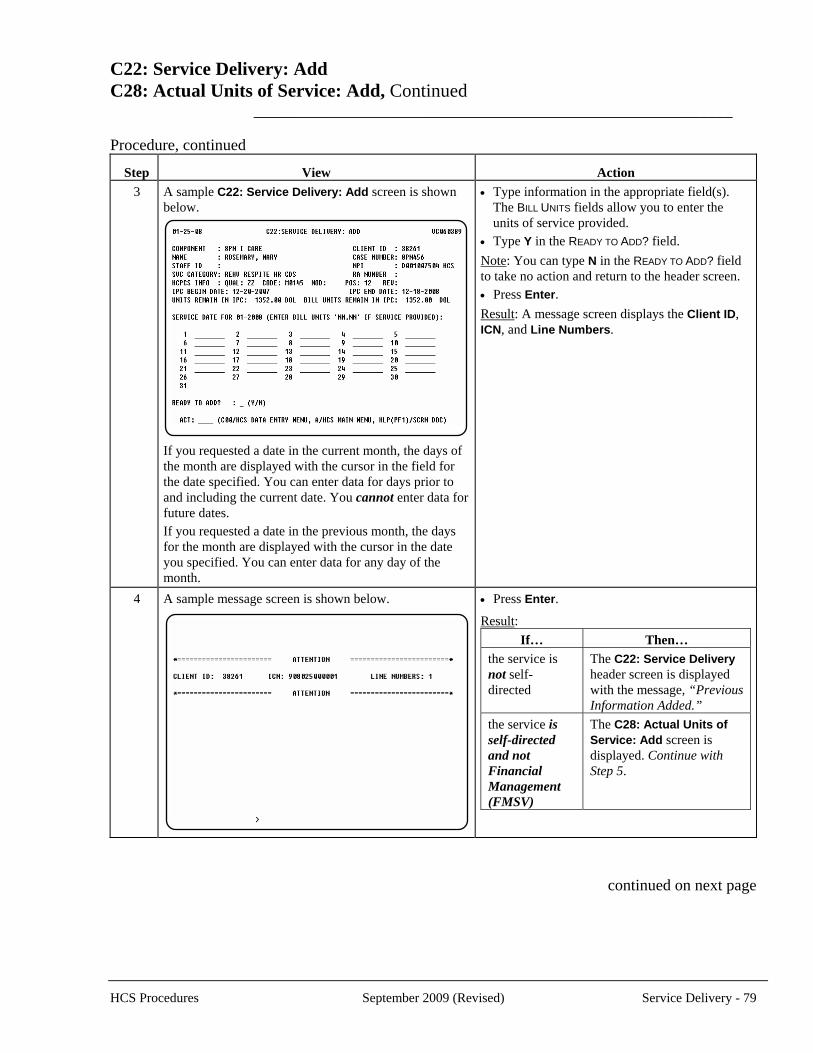
C22: Service Delivery: Add C28: Actual Units of Service: Add, Continued ____________________________________________________________ Procedure, continued
Step
View
Action 3 A sample C22: Service Delivery: Add screen is shown
below.
If you requested a date in the current month, the days of the month are displayed with the cursor in the field for the date specified. You can enter data for days prior to and including the current date. You cannot enter data for future dates. If you requested a date in the previous month, the days for the month are displayed with the cursor in the date you specified. You can enter data for any day of the month.
• Type information in the appropriate field(s). The BILL UNITS fields allow you to enter the units of service provided.
• Type Y in the READY TO ADD? field. Note: You can type N in the READY TO ADD? field to take no action and return to the header screen. • Press Enter. Result: A message screen displays the Client ID, ICN, and Line Numbers.
4 A sample message screen is shown below.
• Press Enter.
Result: If… Then…
the service is not self-directed
The C22: Service Delivery header screen is displayed with the message, “Previous Information Added.”
the service is self-directed and not Financial Management (FMSV)
The C28: Actual Units of Service: Add screen is displayed. Continue with Step 5.
continued on next page
HCS Procedures September 2009 (Revised) Service Delivery - 79
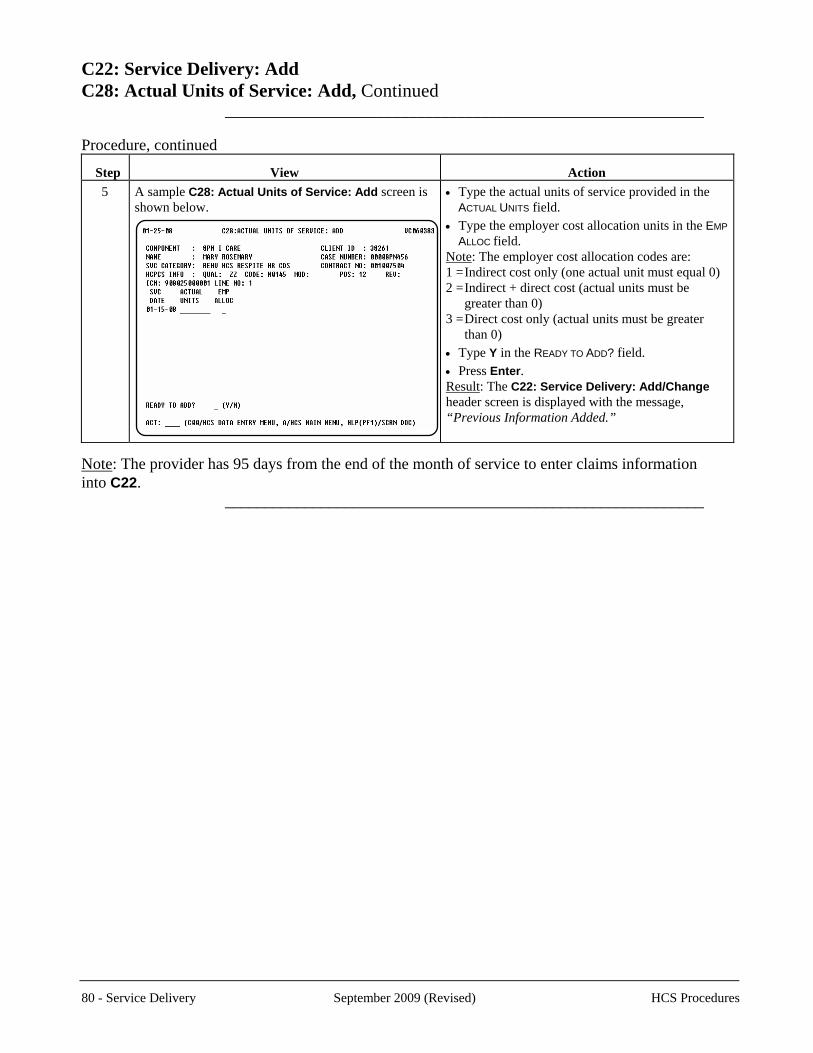
C22: Service Delivery: Add C28: Actual Units of Service: Add, Continued ____________________________________________________________ Procedure, continued
Step
View
Action 5 A sample C28: Actual Units of Service: Add screen is
shown below.
• Type the actual units of service provided in the ACTUAL UNITS field.
• Type the employer cost allocation units in the EMP
ALLOC field. Note: The employer cost allocation codes are: 1 = Indirect cost only (one actual unit must equal 0) 2 = Indirect + direct cost (actual units must be
greater than 0) 3 = Direct cost only (actual units must be greater
than 0) • Type Y in the READY TO ADD? field. • Press Enter. Result: The C22: Service Delivery: Add/Change header screen is displayed with the message, “Previous Information Added.”
Note: The provider has 95 days from the end of the month of service to enter claims information into C22. ____________________________________________________________
80 - Service Delivery September 2009 (Revised) HCS Procedures
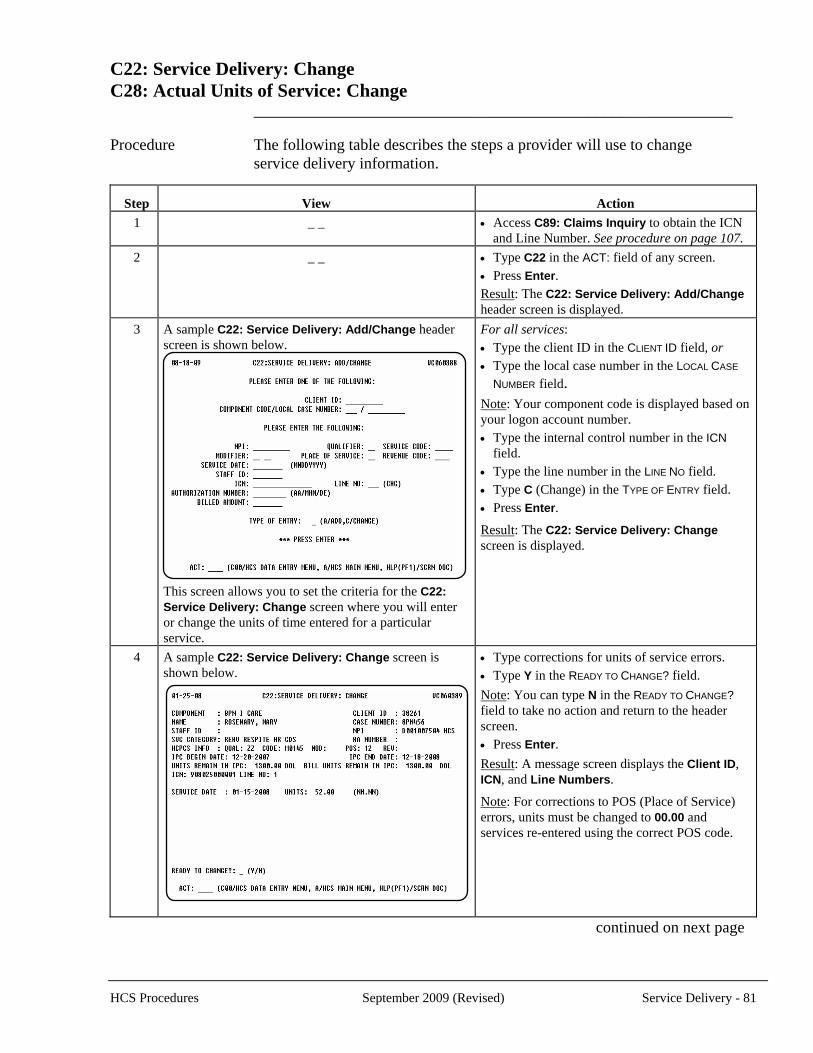
C22: Service Delivery: Change C28: Actual Units of Service: Change ____________________________________________________________ Procedure The following table describes the steps a provider will use to change
service delivery information.
Step
View
Action 1 _ _ • Access C89: Claims Inquiry to obtain the ICN
and Line Number. See procedure on page 107. 2 _ _
• Type C22 in the ACT: field of any screen. • Press Enter. Result: The C22: Service Delivery: Add/Change header screen is displayed.
3 A sample C22: Service Delivery: Add/Change header screen is shown below.
This screen allows you to set the criteria for the C22: Service Delivery: Change screen where you will enter or change the units of time entered for a particular service.
For all services: • Type the client ID in the CLIENT ID field, or • Type the local case number in the LOCAL CASE
NUMBER field. Note: Your component code is displayed based on your logon account number. • Type the internal control number in the ICN
field. • Type the line number in the LINE NO field. • Type C (Change) in the TYPE OF ENTRY field. • Press Enter.
Result: The C22: Service Delivery: Change screen is displayed.
4 A sample C22: Service Delivery: Change screen is shown below.
• Type corrections for units of service errors. • Type Y in the READY TO CHANGE? field. Note: You can type N in the READY TO CHANGE? field to take no action and return to the header screen. • Press Enter. Result: A message screen displays the Client ID, ICN, and Line Numbers.
Note: For corrections to POS (Place of Service) errors, units must be changed to 00.00 and services re-entered using the correct POS code.
continued on next page
HCS Procedures September 2009 (Revised) Service Delivery - 81
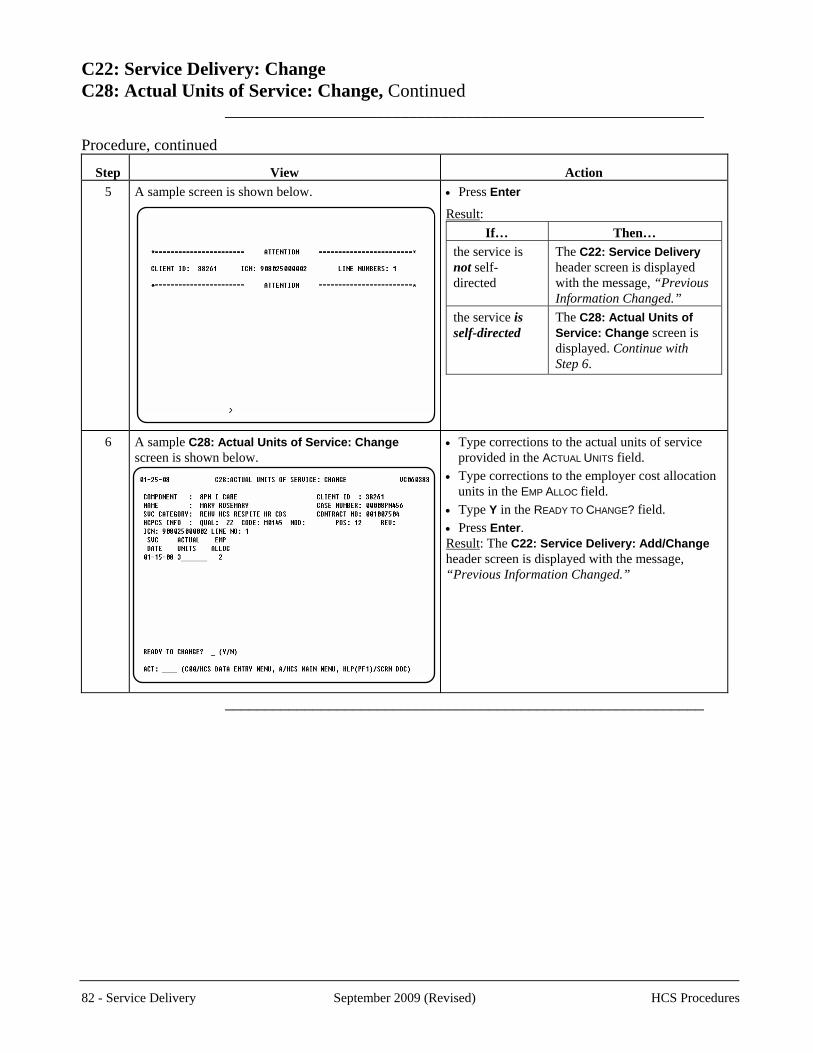
C22: Service Delivery: Change C28: Actual Units of Service: Change, Continued ____________________________________________________________ Procedure, continued
Step
View
Action 5 A sample screen is shown below.
• Press Enter
Result: If… Then…
the service is not self-directed
The C22: Service Delivery header screen is displayed with the message, “Previous Information Changed.”
the service is self-directed
The C28: Actual Units of Service: Change screen is displayed. Continue with Step 6.
6 A sample C28: Actual Units of Service: Change screen is shown below.
• Type corrections to the actual units of service provided in the ACTUAL UNITS field.
• Type corrections to the employer cost allocation units in the EMP ALLOC field.
• Type Y in the READY TO CHANGE? field. • Press Enter. Result: The C22: Service Delivery: Add/Change header screen is displayed with the message, “Previous Information Changed.”
____________________________________________________________
82 - Service Delivery September 2009 (Revised) HCS Procedures
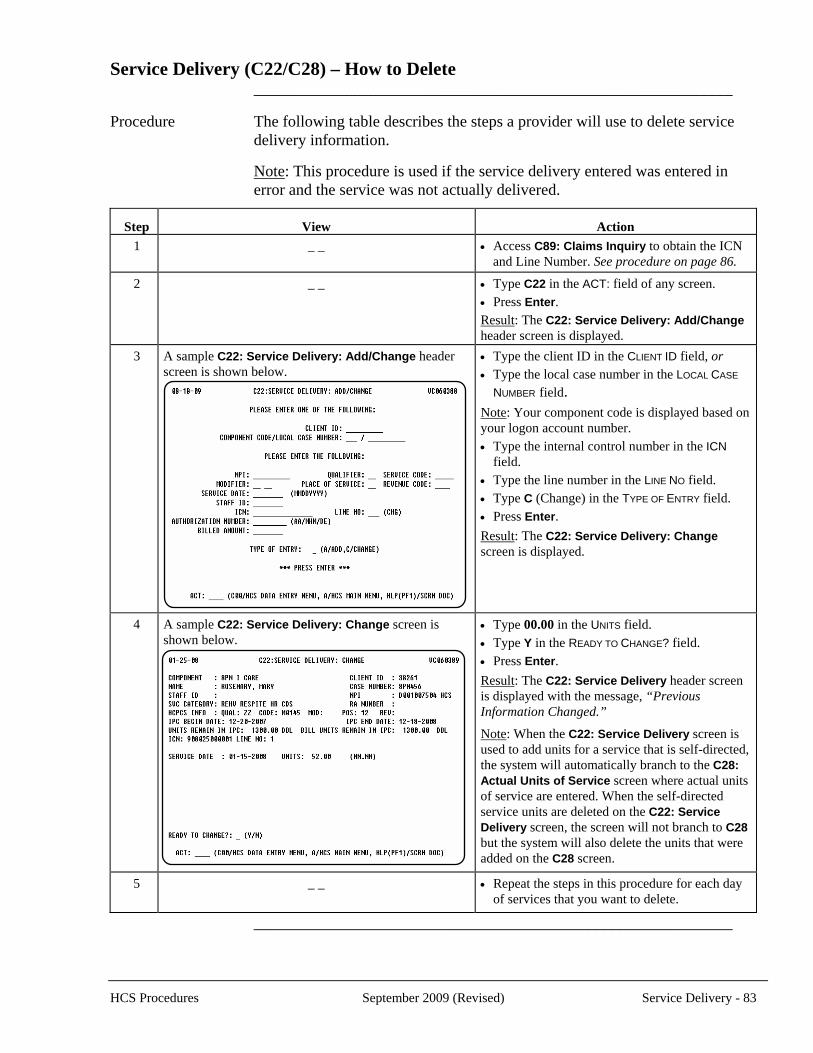
Service Delivery (C22/C28) – How to Delete ____________________________________________________________ Procedure The following table describes the steps a provider will use to delete service
delivery information.
Note: This procedure is used if the service delivery entered was entered in error and the service was not actually delivered.
Step
View
Action 1 _ _ • Access C89: Claims Inquiry to obtain the ICN
and Line Number. See procedure on page 86. 2 _ _
• Type C22 in the ACT: field of any screen. • Press Enter. Result: The C22: Service Delivery: Add/Change header screen is displayed.
3 A sample C22: Service Delivery: Add/Change header screen is shown below.
• Type the client ID in the CLIENT ID field, or • Type the local case number in the LOCAL CASE
NUMBER field. Note: Your component code is displayed based on your logon account number. • Type the internal control number in the ICN
field. • Type the line number in the LINE NO field. • Type C (Change) in the TYPE OF ENTRY field. • Press Enter. Result: The C22: Service Delivery: Change screen is displayed.
4 A sample C22: Service Delivery: Change screen is shown below.
• Type 00.00 in the UNITS field. • Type Y in the READY TO CHANGE? field. • Press Enter. Result: The C22: Service Delivery header screen is displayed with the message, “Previous Information Changed.”
Note: When the C22: Service Delivery screen is used to add units for a service that is self-directed, the system will automatically branch to the C28: Actual Units of Service screen where actual units of service are entered. When the self-directed service units are deleted on the C22: Service Delivery screen, the screen will not branch to C28 but the system will also delete the units that were added on the C28 screen.
5 _ _
• Repeat the steps in this procedure for each day of services that you want to delete.
____________________________________________________________
HCS Procedures September 2009 (Revised) Service Delivery - 83
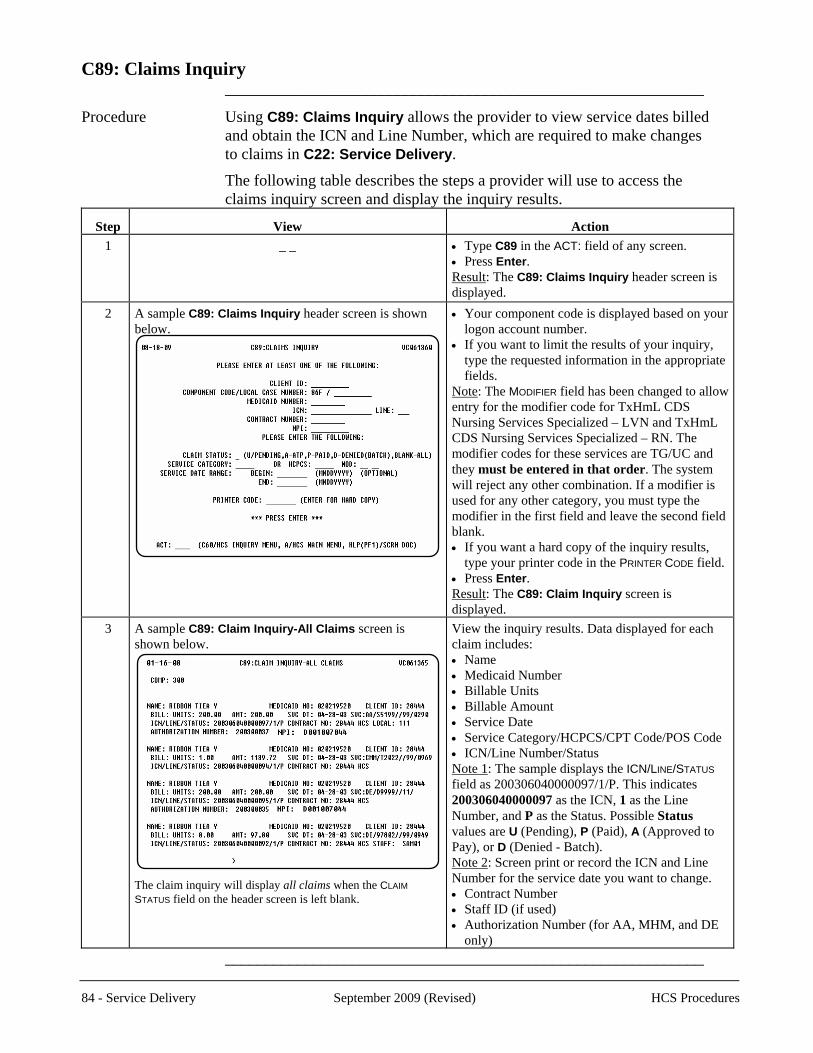
C89: Claims Inquiry ____________________________________________________________
Procedure Using C89: Claims Inquiry allows the provider to view service dates billed and obtain the ICN and Line Number, which are required to make changes to claims in C22: Service Delivery.
The following table describes the steps a provider will use to access the claims inquiry screen and display the inquiry results.
Step
View
Action 1 _ _
• Type C89 in the ACT: field of any screen. • Press Enter. Result: The C89: Claims Inquiry header screen is displayed.
2 A sample C89: Claims Inquiry header screen is shown below.
• Your component code is displayed based on your logon account number.
• If you want to limit the results of your inquiry, type the requested information in the appropriate fields.
Note: The MODIFIER field has been changed to allow entry for the modifier code for TxHmL CDS Nursing Services Specialized – LVN and TxHmL CDS Nursing Services Specialized – RN. The modifier codes for these services are TG/UC and they must be entered in that order. The system will reject any other combination. If a modifier is used for any other category, you must type the modifier in the first field and leave the second field blank. • If you want a hard copy of the inquiry results,
type your printer code in the PRINTER CODE field. • Press Enter. Result: The C89: Claim Inquiry screen is displayed.
3 A sample C89: Claim Inquiry-All Claims screen is shown below.
The claim inquiry will display all claims when the CLAIM STATUS field on the header screen is left blank.
View the inquiry results. Data displayed for each claim includes: • Name • Medicaid Number • Billable Units • Billable Amount • Service Date • Service Category/HCPCS/CPT Code/POS Code • ICN/Line Number/Status Note 1: The sample displays the ICN/LINE/STATUS field as 200306040000097/1/P. This indicates 200306040000097 as the ICN, 1 as the Line Number, and P as the Status. Possible Status values are U (Pending), P (Paid), A (Approved to Pay), or D (Denied - Batch). Note 2: Screen print or record the ICN and Line Number for the service date you want to change. • Contract Number • Staff ID (if used) • Authorization Number (for AA, MHM, and DE
only) ____________________________________________________________
84 - Service Delivery September 2009 (Revised) HCS Procedures
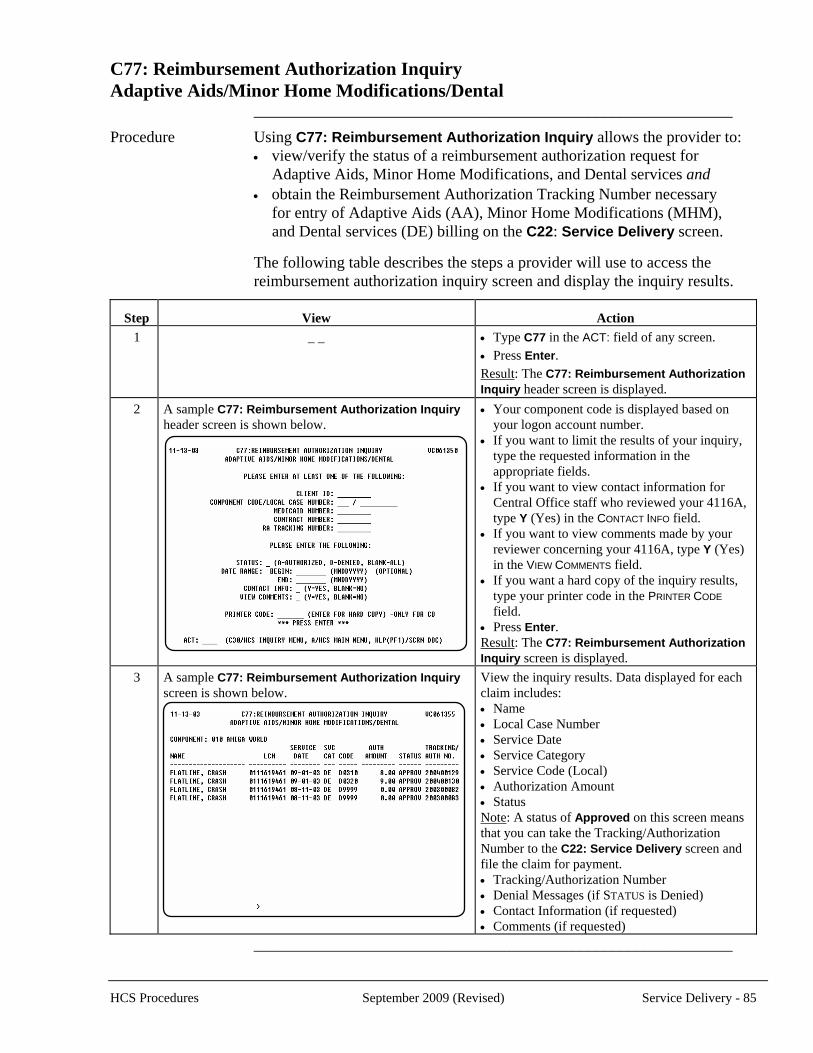
C77: Reimbursement Authorization Inquiry Adaptive Aids/Minor Home Modifications/Dental ____________________________________________________________
Procedure Using C77: Reimbursement Authorization Inquiry allows the provider to: • view/verify the status of a reimbursement authorization request for
Adaptive Aids, Minor Home Modifications, and Dental services and • obtain the Reimbursement Authorization Tracking Number necessary
for entry of Adaptive Aids (AA), Minor Home Modifications (MHM), and Dental services (DE) billing on the C22: Service Delivery screen.
The following table describes the steps a provider will use to access the reimbursement authorization inquiry screen and display the inquiry results.
Step
View
Action 1 _ _
• Type C77 in the ACT: field of any screen. • Press Enter. Result: The C77: Reimbursement Authorization Inquiry header screen is displayed.
2 A sample C77: Reimbursement Authorization Inquiry header screen is shown below.
• Your component code is displayed based on your logon account number.
• If you want to limit the results of your inquiry, type the requested information in the appropriate fields.
• If you want to view contact information for Central Office staff who reviewed your 4116A, type Y (Yes) in the CONTACT INFO field.
• If you want to view comments made by your reviewer concerning your 4116A, type Y (Yes) in the VIEW COMMENTS field.
• If you want a hard copy of the inquiry results, type your printer code in the PRINTER CODE field.
• Press Enter. Result: The C77: Reimbursement Authorization Inquiry screen is displayed.
3 A sample C77: Reimbursement Authorization Inquiry screen is shown below.
View the inquiry results. Data displayed for each claim includes: • Name • Local Case Number • Service Date • Service Category • Service Code (Local) • Authorization Amount • Status Note: A status of Approved on this screen means that you can take the Tracking/Authorization Number to the C22: Service Delivery screen and file the claim for payment. • Tracking/Authorization Number • Denial Messages (if STATUS is Denied) • Contact Information (if requested) • Comments (if requested)
____________________________________________________________
HCS Procedures September 2009 (Revised) Service Delivery - 85
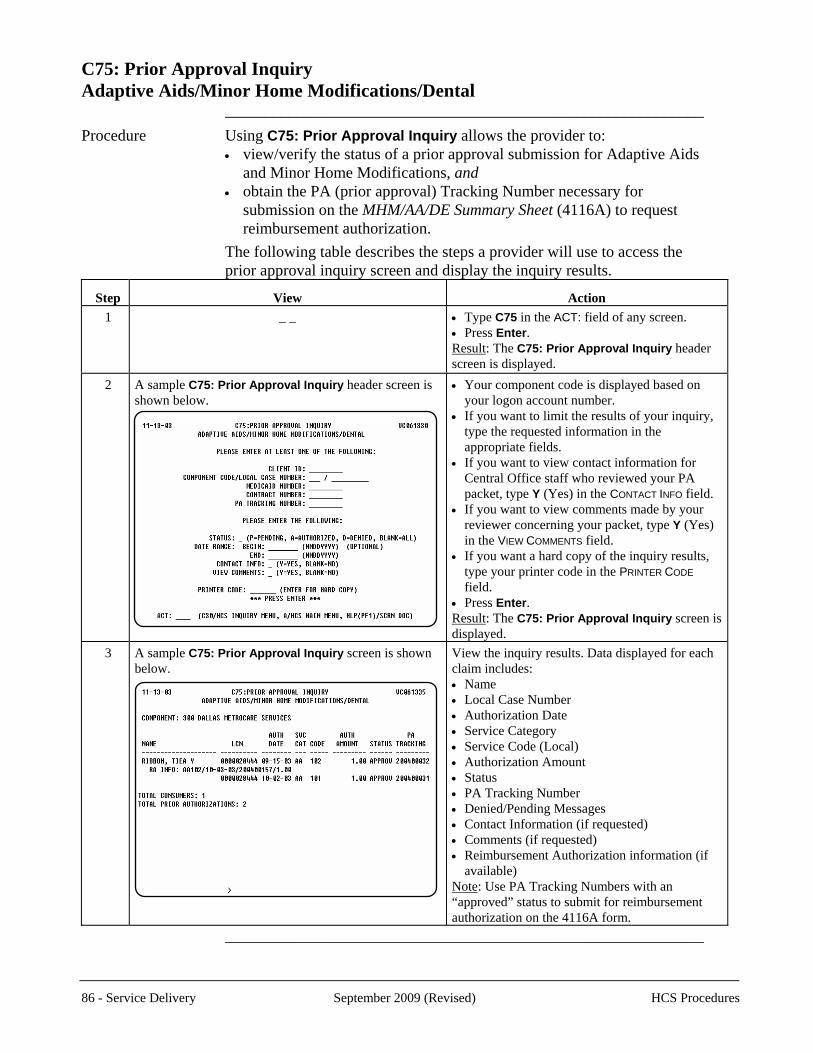
C75: Prior Approval Inquiry Adaptive Aids/Minor Home Modifications/Dental ____________________________________________________________
Procedure Using C75: Prior Approval Inquiry allows the provider to: • view/verify the status of a prior approval submission for Adaptive Aids
and Minor Home Modifications, and • obtain the PA (prior approval) Tracking Number necessary for
submission on the MHM/AA/DE Summary Sheet (4116A) to request reimbursement authorization.
The following table describes the steps a provider will use to access the prior approval inquiry screen and display the inquiry results.
Step
View
Action 1 _ _
• Type C75 in the ACT: field of any screen. • Press Enter. Result: The C75: Prior Approval Inquiry header screen is displayed.
2 A sample C75: Prior Approval Inquiry header screen is shown below.
• Your component code is displayed based on your logon account number.
• If you want to limit the results of your inquiry, type the requested information in the appropriate fields.
• If you want to view contact information for Central Office staff who reviewed your PA packet, type Y (Yes) in the CONTACT INFO field.
• If you want to view comments made by your reviewer concerning your packet, type Y (Yes) in the VIEW COMMENTS field.
• If you want a hard copy of the inquiry results, type your printer code in the PRINTER CODE field.
• Press Enter. Result: The C75: Prior Approval Inquiry screen is displayed.
3 A sample C75: Prior Approval Inquiry screen is shown below.
View the inquiry results. Data displayed for each claim includes: • Name • Local Case Number • Authorization Date • Service Category • Service Code (Local) • Authorization Amount • Status • PA Tracking Number • Denied/Pending Messages • Contact Information (if requested) • Comments (if requested) • Reimbursement Authorization information (if
available) Note: Use PA Tracking Numbers with an “approved” status to submit for reimbursement authorization on the 4116A form.
____________________________________________________________
86 - Service Delivery September 2009 (Revised) HCS Procedures

HCS Procedures June 2010 Revised Waiver MR/RC Assessment - 87
Waiver MR/RC Assessment (C23) _______________________________________________________________
Introduction The Waiver MR/RC Assessment process consists of seven screens that allow a
provider to add, change, or delete an individual’s MR/RC assessment information.
Refer to the MR/RC Assessment instructions at
http://dadsview.dads.state.tx.us/forms/8578/ for information on the fields used on these screens.
Note: The program provider is responsible for all MR/RC assessments for
Purpose Code 3 (Continued Stay Assessment), Purpose Code 4 (Change LON on Existing Assessment), and Purpose Code E (Gaps in LOC/LON).
The following pages display the Add screens for Purpose Code 3, Purpose
Code 4, and Purpose Code E. The change and delete functions are not described but are used in the same way as other change and delete functions. However, once a MR/RC assessment has been electronically sent for review, Program Enrollment (PE) staff must electronically “return” it in order for you to access these functions. _______________________________________________________________
Coordinator Service Once an MR/RC Assessment is entered into CARE by the program
Review provider the MRA service coordinator will have seven days to complete their review. Only after the service coordinator has completed the review, or the seven day timeframe has expired will the MR/RC Assessment be transmitted to DADS.
_______________________________________________________________
Waiver MR/RC Assessment Purpose Code 3 (C23): Add
_______________________________________________________________ Procedure The following table describes the steps a provider will use to add an MR/RC
continued stay assessment (Purpose Code 3).
Step
View
Action 1 _ _
• C23 Type in the ACT: field of any screen. • Press Enter. Result: The C23: Waiver MR/RC Assessment: Add/Chg/Del header screen is displayed.
2 A sample C23: Waiver MR/RC Assessment: dd/Chg/Del header screen is shown below. A
This screen allows you to select the appropriate purpose code and type of entry for the individual’s data. This documentation describes the procedure for adding a Purpose Code 3 (Continued Stay Assessment).
• Type the requested identifying information in the appropriate fields.
Rule: You must enter the Client ID, the local case number, or the Medicaid Number. Note: Your component code is displayed based on your logon account number. • Type the contract number under which services are
field.provided to this individual in the CONTRACT NO
• Type 3 (Continued Stay Assessment) in the PURPOSE
CODE field. ld. • Type A (Add) in the TYPE OF ENTRY fie
• Type the requested begin date in the REQUESTED
DATE field. BEGIN
Notes: - Within 60 days prior to the expiration, the begin date
can be the day after the expiration date. Other than during this 60-day window, the begin date must be the date of data entry.
- Within 60 days of expiration of the current LOC/LON, the requested begin date may be any date from the date of data entry to the day after the current LOC/LON expires.
• Press Enter. Result: The C23: Waiver MR/RC Assessment Purpose Code 3: Add screen is displayed.
3 A sample C23: Waiver MR/RC Assessment Purpose ode 3: Add screen is shown below. C
• Type the date the MR/RC Assessment was completed in the field. COMPLETED DATE
• Type the latest physical examination date in the PHYS
field. EXAM DATE
itional inform n in the ap elds.• Type add atio propriate fiNote: The LEGAL STATUS and PREV. RES. fields are required. • Press Enter. Result: The C23: Waiver MR/RC Assessment Purpose Code 3: Add (Screen 2) is displayed.
Note: All data entered into the CARE system should be entered from a paper copy (a hard copy) and match exactly.
continued on next page
88 - Waiver MR/RC Assessment June 2010 Revised HCS Procedures
Waiver MR/RC Assessment Purpose Code 3 (C23): Add, Continued
_______________________________________________________________ Procedure, continued
Step
View
Action4 A sample C23: Waiver MR/RC Assessment Purpose
ode 3: Add (Screen 2) is shown below. C
This screen is a view screen that allows you to view client information and available MR/RC record information. It displays the Client Comp/Case, Client Name, Client Address, and diagnosis descriptions for codes entered for primary, medical, and psychiatric diagnoses. Information from the latest LOC record is also included.
Note: If you need to add or change information on these screens, you can page backward to correct any entry on previous screens. Use F7 (function type) or type B in the ACT: field to page backward to the previous screen. You will not lose the information you have already entered. • View ient and MR/• Press to continue.
the cl RC record information. Enter
Result: The C23: Waiver MR/RC Assessment Purpose Code 3: Add (Screen 3) is displayed.
5 A sample C23: Waiver MR/RC Assessment Purpose ode 3: Add (Screen 3) is shown below. C
•
Required fields on this screen are IQ, ABL
(Adaptive Behavior Level), BROAD INDEPENDENCE, GEN. MALADAPTIVE, ICAP SERVICE LEVEL, BEHAVIOR
PROGRAM (
Type information in the appropriate fields.
YES OR NO), SELF-INJURY BEHAVIOR, SERIOUS DISRUP BEH, AGGRESSIVE BEHAVIOR, and SEX. AGGRESS. BEH. (See form 8578 and instructions for codes and how they affect the LON) Note: For the 32. GEN. MALADAPTIVE field, if the number is negative, you must use the – (minus) sign just above the alpha section of the keyboard, no sign on the 10-key pad. t the –• Press Enter.
Result: The C23: Waiver MR/RC Assessment Purpose Code 3: Add (Screen 4) is displayed.
continued on next page
HCS Procedures June 2010 Revised Waiver MR/RC Assessment - 89
Waiver MR/RC Assessment Purpose Code 3 (C23): Add, Continued _______________________________________________________________
Procedure, continued
Step
View
Action 6 A sample C23: Waiver MR/RC Assessment Purpose
ode 3: Add (Screen 4) is shown below. C
• Type information in the appropriate fields. Note: All of the fields on this screen are required. (See instructions for codes.) • Press Enter. Result: The C23: Waiver MR/RC Assessment
urpose Code 3: Add (Screen 5) is displayed. P
7 A sample C23: Waiver MR/RC Assessment Purpose ode 3: Add (Screen 5) is shown below. C
• Type information in the appropriate fields. • If any data is entered or shown on this screen, all
fields must be correctly entered (not required for waiver programs).
Note: The fields (48-55) on this screen are not required to be completed. If any information is contained in the fields, they must all be filled out completely and accurately. • EnterPress . Result: The C23: Waiver MR/RC Assessment Purpose Code 3: Add (Screen 6) is displayed.
8 A sample C23: Waiver MR/RC Assessment Purpose ode 3: Add (Screen 6) is shown below. C
Note: All data entered into the CARE system should be entered from a paper copy (a hard copy) and match exactly.
• Type information in the appropriate fields. Note: The title of the person listed on the FULL NAME
OF field (field 57) must be on the list displayed on this screen. • Type Y (Yes) or N (No) in the READY TO SEND TO
MRA FOR REVIEW: field to indicate whether or not you are ready to send the MR/RC Assessment to
r review the MRA Service Coordinator fo .• Type Y (Yes) or N (No) in the READY TO ADD?
field to indicate whether or not you are ready to add the record. You may want to add the record pending further modifications even if you are not ready to send it for review.
Note: You can type N in the READY TO ADD? field to take no action and return to the header screen. No
ill be saved. data entered w• Press Enter. Result: The C23: Waiver MR/RC Assessment header screen is displayed with the message, “Previous Information Added.”
90 - Waiver MR/RC Assessment June 2010 Revised HCS Procedures
Waiver MR/RC Assessment Purpose Code 4 (C23): Add
_______________________________________________________________ Procedure The following table describes the steps a provider will use to add a request to
change the LON (Level of Need) on an existing assessment (Purpose Code 4).
Step
View
Action 1 _ _
• Type C23 r.
in the ACT: field of any screen. • Press EnteResult: The C23: Waiver MR/RC Assessment:
dd/Chg/De header screen is displayed. A l2 A sample C23: Waiver MR/RC Assessment:
dd/Chg/Del header screen is shown below. A This screen allows you to select the appropriate purpose code and type of entry for the individual’s data. This documentation describes the procedure for adding a Purpose Code 4 (Change LON on Existing Assessment).
• Type the requested identifying information in the appropriate fields.
Rule: You must enter the Client ID, the local case number, or the Medicaid Number. Note: Your component code is displayed based on your logon account number. • Type the contract number under which services
are provided to this individual in the CONTRACT
NO field. • Type 4 (Change LON on Existing Assessment)
in the field. PURPOSE CODE
• Type (Add) in the T E field. A YPE OF NTRY
• Type the requested begin date in the REQUESTED
field. BEGIN DATE
Note: For a Purpose Code 4, the begin date must equal the date of data entry. The end date will be
current LOC/LON expires. the date that the• Press . EnterResult: The C23: Waiver MR/RC Assessment Purpose Code 4: Add screen is displayed.
3 A sample C23: Waiver MR/RC Assessment Purpose ode 4: Add screen is shown below. C
• Type the date the MR/RC Assessment was completed in the COMPLETED DATE field.
• Type the recommended Level of Need (LON) in the REC. LON field.
• Type additional information in the appropriate fields.
• Press Enter to continue.
Result: The C23: Waiver MR/RC Assessment Purpose Code 4: Add (Screen 2) is displayed.
continued on next page
HCS Procedures June 2010 Revised Waiver MR/RC Assessment - 91
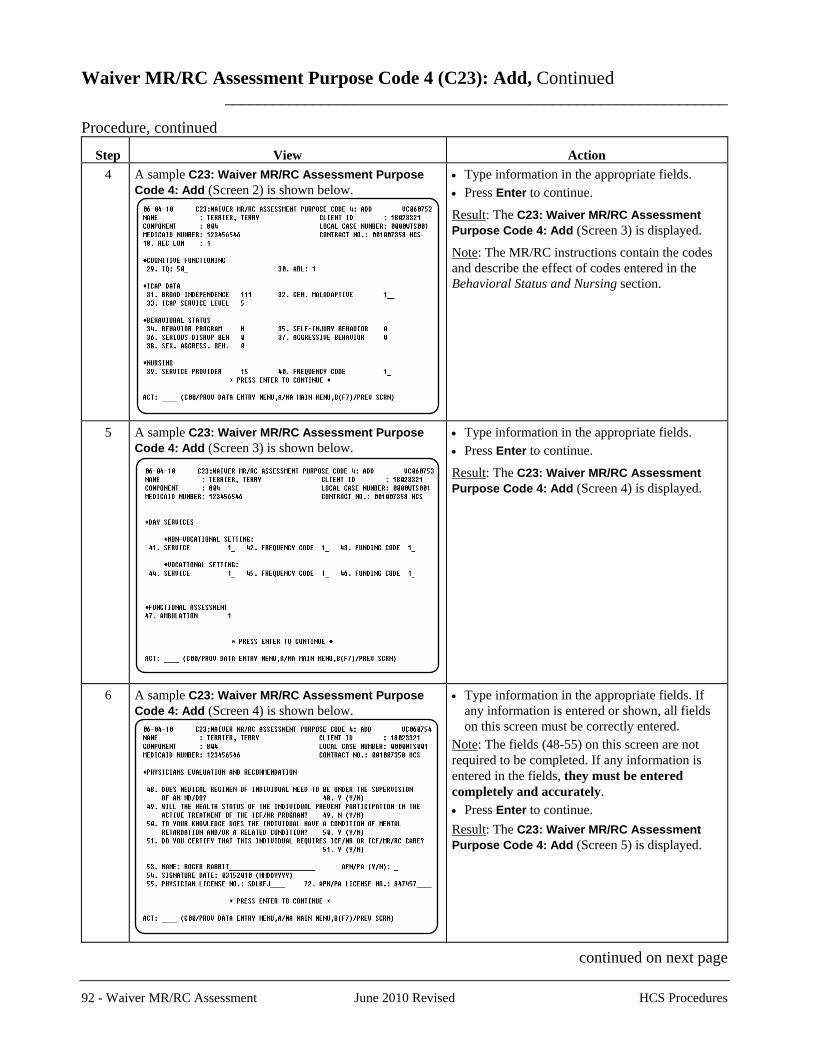
Waiver MR/RC Assessment Purpose Code 4 (C23): Add, Continued
_______________________________________________________________
Procedure, continued
Step
View
Action 4 A sample C23: Waiver MR/RC Assessment Purpose
ode 4: Add (Screen 2) is shown below. C
• Type information in the a• Press Enter to continue.
ppropriate fields.
Result: The C23: Waiver MR/RC Assessment Purpose Code 4: Add (Screen 3) is displayed.
Note: The MR/RC instructions contain the codes and describe the effect of codes entered in the Behavioral Status and Nursing section.
5 A sample C23: Waiver MR/RC Assessment Purpose ode 4: Add (Screen 3) is shown below. C
•
Press to continue. Type information in the appropriate fields.
• Enter
Result: The C23: Waiver MR/RC Assessment Purpose Code 4: Add (Screen 4) is displayed.
6 A sample C23: Waiver MR/RC Assessment Purpose ode 4: Add (Screen 4) is shown below. C
• Type information in the appropriate fields. If any information is entered or shown, all fields on this screen must be correctly entered.
Note: The fields (48-55) on this screen are not required to be completed. If any information is entered in the fields, they must be entered
. completely and accuratelyPress to continue. • Enter
Result: The C23: Waiver MR/RC Assessment Purpose Code 4: Add (Screen 5) is displayed.
continued on next page
92 - Waiver MR/RC Assessment June 2010 Revised HCS Procedures
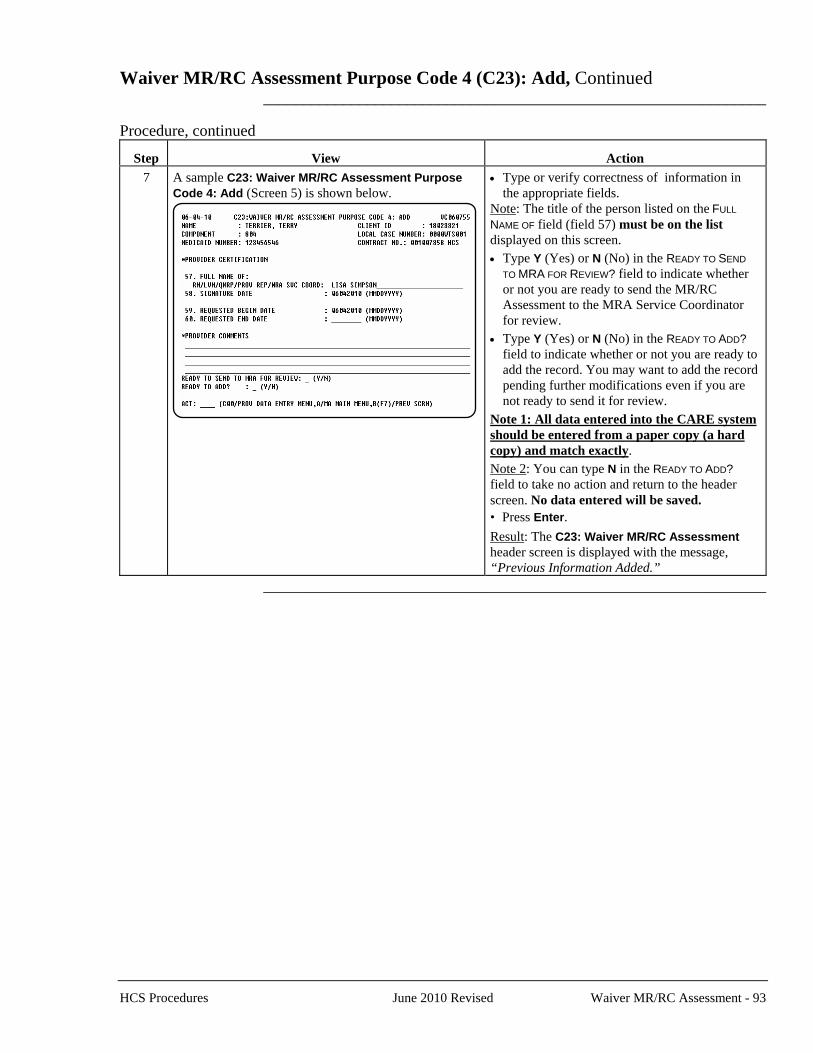
Waiver MR/RC Assessment Purpose Code 4 (C23): Add, Continued
_______________________________________________________________ Procedure, continued
Step
View
Action 7 A sample C23: Waiver MR/RC Assessment Purpose
ode 4: Add (Screen 5) is shown below. C
• Type or verify correctness of information in the appropriate fields.
Note: The title of the person listed on the FULL
NAME OF field (field 57) must be on the list displ daye on this screen. • Type Y (Yes) or N (No) in the READY TO SEND
TO MRA FOR REVIEW? field to indicate whether or not you are ready to send the MR/RC Assessment to the MRA Service Coordinator for review.
• Type Y (Yes) or N (No) in the READY TO ADD? field to indicate whether or not you are ready to add the record. You may want to add the record pending further modifications even if you are not ready to send it for review.
Note 1: All data entered into the CARE system should be entered from a paper copy (a hard copy) and match exactly. Note 2: You can type N in the READY TO ADD? field to take no action and return to the header
o da entered will be saved. screen. N ta• Press . EnterResult: The C23: Waiver MR/RC Assessment header screen is displayed with the message, “Previous Information Added.”
_______________________________________________________________
HCS Procedures June 2010 Revised Waiver MR/RC Assessment - 93
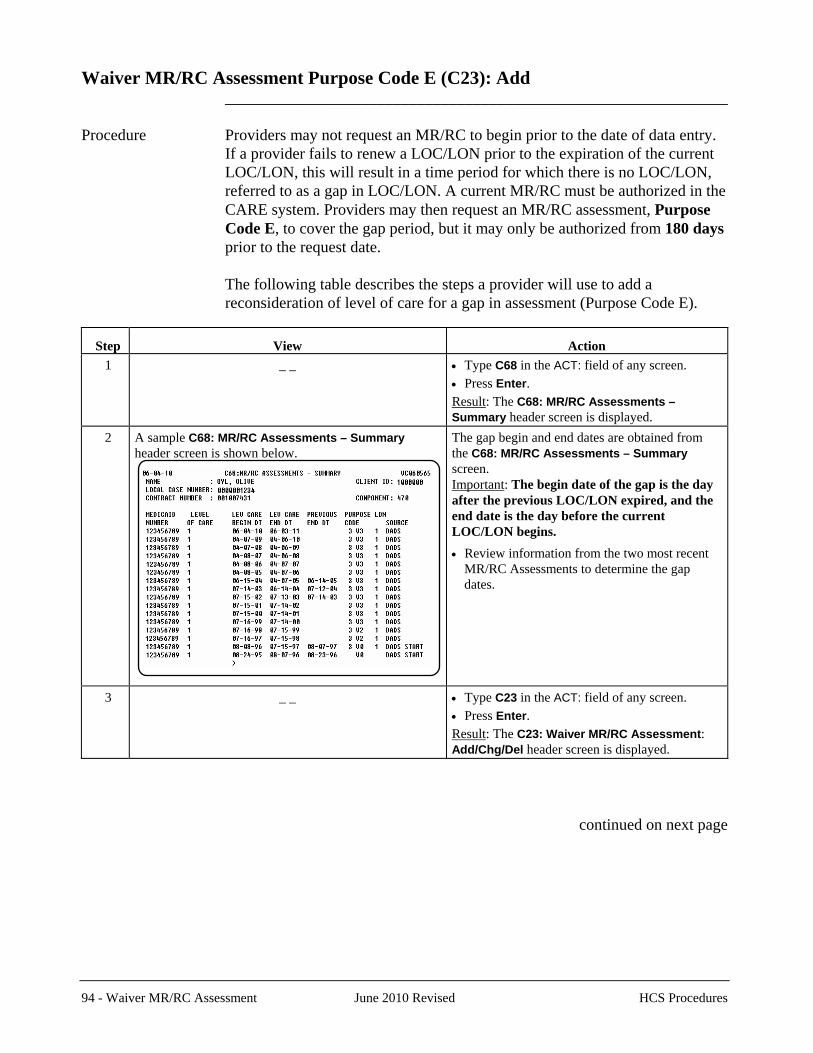
Waiver MR/RC Assessment Purpose Code E (C23): Add
_______________________________________________________________ Procedure Providers may not request an MR/RC to begin prior to the date of data entry.
If a provider fails to renew a LOC/LON prior to the expiration of the current LOC/LON, this will result in a time period for which there is no LOC/LON, referred to as a gap in LOC/LON. A current MR/RC must be authorized in the CARE system. Providers may then request an MR/RC assessment, Purpose Code E, to cover the gap period, but it may only be authorized from 180 days prior to the request date.
The following table describes the steps a provider will use to add a
reconsideration of level of care for a gap in assessment (Purpose Code E).
Step
View
Action1 _ _
• Type C68 n thr.
i e ACT: field of any screen. • Press EnteResult: The C68: MR/RC Assessments –
header screen is displayed. Summary2 A sample C68: MR/RC Assessments – Summary
eader screen is shown below. h
The gap begin and end dates are obtained from the C68: MR/RC Assessments – Summary screen. Important: The begin date of the gap is the day after the previous LOC/LON expired, and the end date is the day before the current
ins. LOC/LON beg
• Review information from the two most recent MR/RC Assessments to determine the gap dates.
3 _ _
• Type n thPress r.
C23 i e ACT: field of any screen. • EnteResult: The C23: Waiver MR/RC Assessment: Add/Chg/Del header screen is displayed.
continued on next page
94 - Waiver MR/RC Assessment June 2010 Revised HCS Procedures
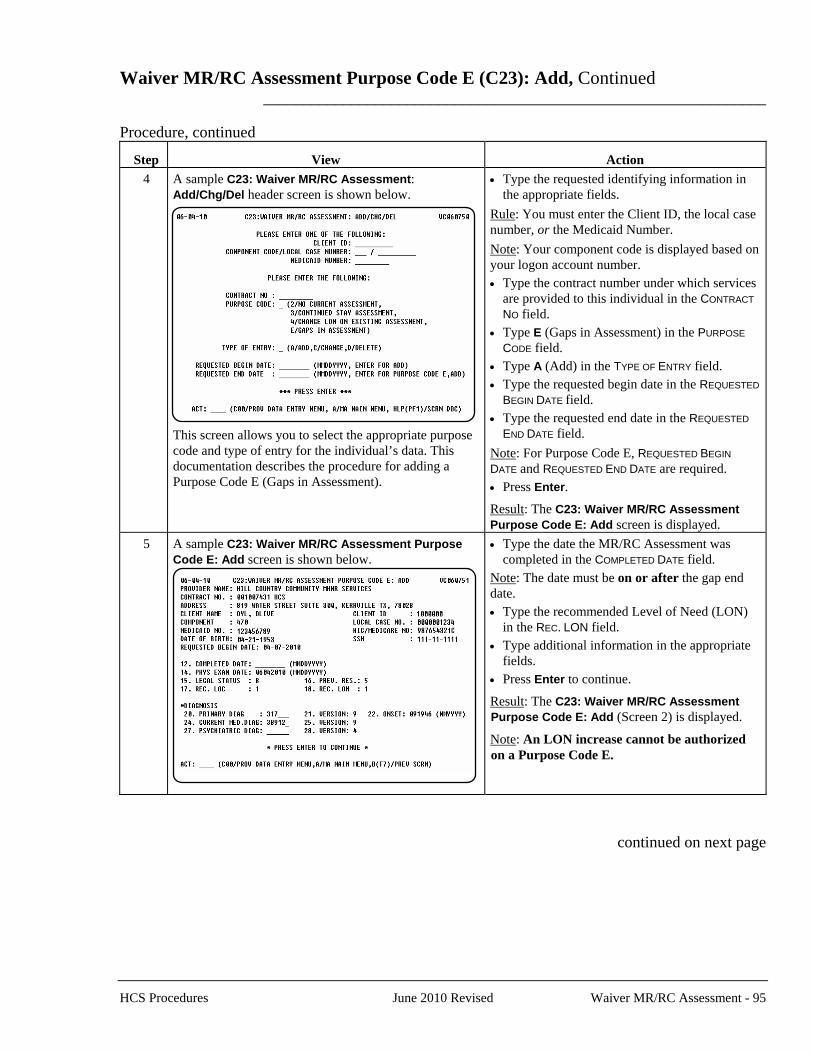
Waiver MR/RC Assessment Purpose Code E (C23): Add, Continued
_______________________________________________________________ Procedure, continued
Step
View
Action4 A sample C23: Waiver MR/RC Assessment:
dd/Chg/Del header screen is shown below. A This screen allows you to select the appropriate purpose code and type of entry for the individual’s data. This documentation describes the procedure for adding a Purpose Code E (Gaps in Assessment).
• Type the requested identifying information in the appropriate fields.
Rule: You must enter the Client ID, the local case number, or the Medicaid Number. Note: Your component code is displayed based on your logon account number. • Type the contract number under which services
are provided to this individual in the CONTRACT
NO field. • Type E (Gaps in Assessment) in the PURPOSE
CODE field. ld. • Type A (Add) in the TYPE OF ENTRY fie
• Type the requested begin date in the REQUESTED
BEGIN DATE field. • Type the requested end date in the REQUESTED
field. END DATE
Note: For Purpose Code E, REQUESTED BEGIN
R STED END DATE are required. DATE and EQUE
• Press Enter.
Result: The C23: Waiver MR/RC Assessment u screen is displayed. P rpose Code E: Add
5 A sample C23: Waiver MR/RC Assessment Purpose ode E: Add screen is shown below. C
• Type the date the MR/RC Assessment was completed in the C field. OMPLETED DATE
Note: The date must be on or after the gap end date. • Type the recommended Level of Need (LON)
in the REC. LON field. • Type additional information in the appropriate
fields. • EnterPress to continue.
Result: The C23: Waiver MR/RC Assessment Purpose Code E: Add (Screen 2) is displayed.
Note: An LON increase cannot be authorized on a Purpose Code E.
continued on next page
HCS Procedures June 2010 Revised Waiver MR/RC Assessment - 95
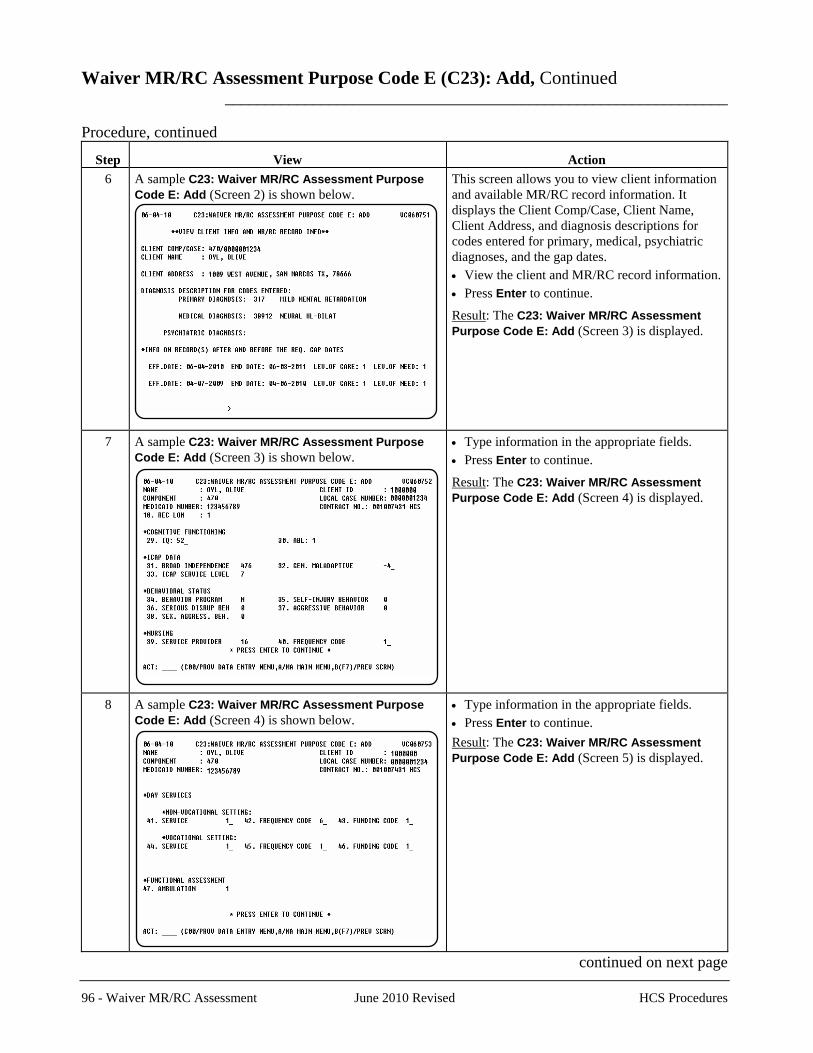
Waiver MR/RC Assessment Purpose Code E (C23): Add, Continued
_______________________________________________________________ Procedure, continued
Step
View
Action6 A sample C23: Waiver MR/RC Assessment Purpose
ode E: Add (Screen 2) is shown below. C
This screen allows you to view client information and available MR/RC record information. It displays the Client Comp/Case, Client Name, Client Address, and diagnosis descriptions for codes entered for primary, medical, psychiatric diagnoses, and the gap dates. • View ient and MR/• Press to continue.
the cl RC record information. Enter
Result: The C23: Waiver MR/RC Assessment Purpose Code E: Add (Screen 3) is displayed.
7 A sample C23: Waiver MR/RC Assessment Purpose ode E: Add (Screen 3) is shown below. C
• Type information in the a• Press Enter to continue.
ppropriate fields.
Result: The C23: Waiver MR/RC Assessment Purpose Code E: Add (Screen 4) is displayed.
8 A sample C23: Waiver MR/RC Assessment Purpose ode E: Add (Screen 4) is shown below. C
• Type ation in the aPress Enter to continue.
inform ppropriate fields. •
Result: The C23: Waiver MR/RC Assessment Purpose Code E: Add (Screen 5) is displayed.
continued on next page
96 - Waiver MR/RC Assessment June 2010 Revised HCS Procedures
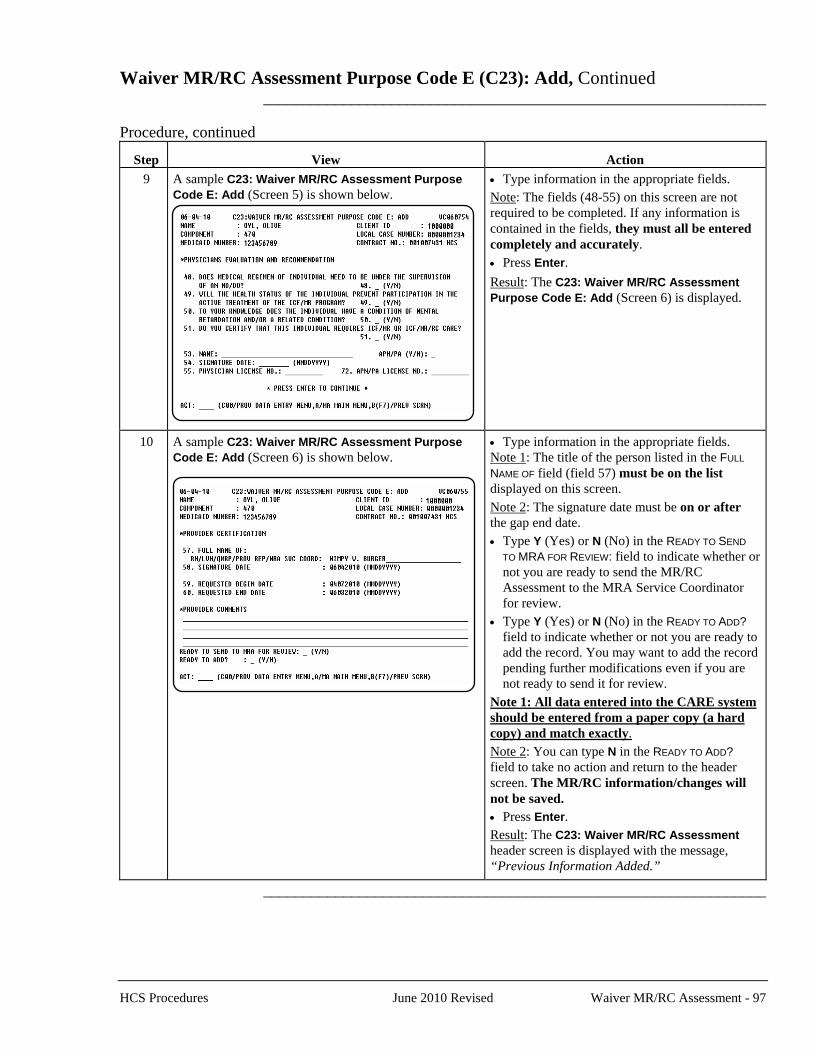
Waiver MR/RC Assessment Purpose Code E (C23): Add, Continued
_______________________________________________________________ Procedure, continued
Step
View
Action9 A sample C23: Waiver MR/RC Assessment Purpose
ode E: Add (Screen 5) is shown below. C
• Type information in the appropriate fields. Note: The fields (48-55) on this screen are not required to be completed. If any information is contained in the fields, they must all be entered completely and accurately. • Press Enter. Result: The C23: Waiver MR/RC Assessment Purpose Code E: Add (Screen 6) is displayed.
10 A sample C23: Waiver MR/RC Assessment Purpose ode E: Add (Screen 6) is shown below. C
• Type information in the appropriate fields. Note 1: The title of the person listed in the FULL
NAME OF field (field 57) must be on the list displayed on this screen. Note 2: The signature date must be on or after the gap end date. • Type Y (Yes) or N (No) in the READY TO SEND
TO MRA FOR REVIEW: field to indicate whether or not you are ready to send the MR/RC Assessment to the MRA Service Coordinator
ifor rev ew. • Type Y (Yes) or N (No) in the READY TO ADD?
field to indicate whether or not you are ready to add the record. You may want to add the record pending further modifications even if you are not ready to send it for review.
Note 1: All data entered into the CARE system should be entered from a paper copy (a hard copy) and match exactly. Note 2: You can type N in the READY TO ADD? field to take no action and return to the header screen. The MR/RC information/changes will not be saved.
P• Enteress r. Result: The C23: Waiver MR/RC Assessment header screen is displayed with the message, “Previous Information Added.”
_______________________________________________________________
HCS Procedures June 2010 Revised Waiver MR/RC Assessment - 97

98 - Waiver MR/RC Assessment June 2010 Revised HCS Procedures
This page was intentionally left blank.
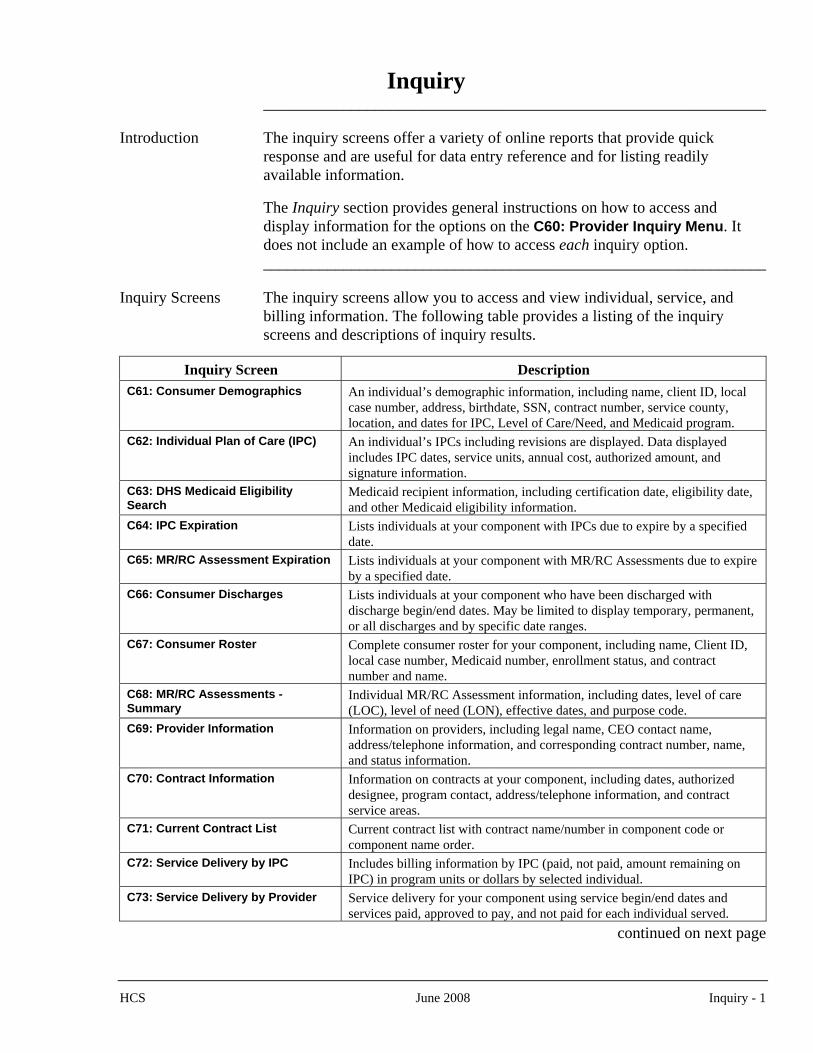
HCS June 2008 Inquiry - 1
Inquiry _______________________________________________________________ Introduction The inquiry screens offer a variety of online reports that provide quick
response and are useful for data entry reference and for listing readily available information.
The Inquiry section provides general instructions on how to access and
display information for the options on the C60: Provider Inquiry Menu. It does not include an example of how to access each inquiry option. _______________________________________________________________
Inquiry Screens The inquiry screens allow you to access and view individual, service, and
billing information. The following table provides a listing of the inquiry screens and descriptions of inquiry results.
Inquiry Screen Description C61: Consumer Demographics An individual’s demographic information, including name, client ID, local
case number, address, birthdate, SSN, contract number, service county, location, and dates for IPC, Level of Care/Need, and Medicaid program.
C62: Individual Plan of Care (IPC) An individual’s IPCs including revisions are displayed. Data displayed includes IPC dates, service units, annual cost, authorized amount, and signature information.
C63: DHS Medicaid Eligibility Search
Medicaid recipient information, including certification date, eligibility date, and other Medicaid eligibility information.
C64: IPC Expiration Lists individuals at your component with IPCs due to expire by a specified date.
C65: MR/RC Assessment Expiration Lists individuals at your component with MR/RC Assessments due to expire by a specified date.
C66: Consumer Discharges Lists individuals at your component who have been discharged with discharge begin/end dates. May be limited to display temporary, permanent, or all discharges and by specific date ranges.
C67: Consumer Roster Complete consumer roster for your component, including name, Client ID, local case number, Medicaid number, enrollment status, and contract number and name.
C68: MR/RC Assessments - Summary
Individual MR/RC Assessment information, including dates, level of care (LOC), level of need (LON), effective dates, and purpose code.
C69: Provider Information Information on providers, including legal name, CEO contact name, address/telephone information, and corresponding contract number, name, and status information.
C70: Contract Information Information on contracts at your component, including dates, authorized designee, program contact, address/telephone information, and contract service areas.
C71: Current Contract List Current contract list with contract name/number in component code or component name order.
C72: Service Delivery by IPC Includes billing information by IPC (paid, not paid, amount remaining on IPC) in program units or dollars by selected individual.
C73: Service Delivery by Provider Service delivery for your component using service begin/end dates and services paid, approved to pay, and not paid for each individual served.
continued on next page
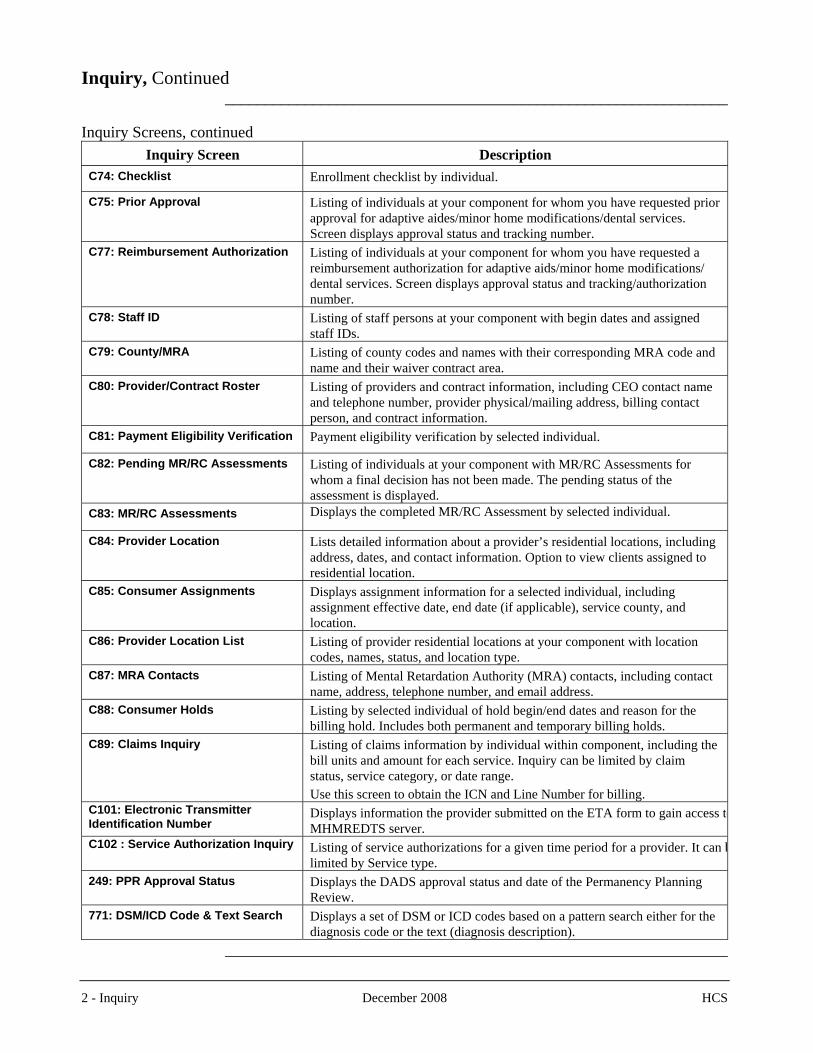
2 - Inquiry December 2008 HCS
Inquiry, Continued _______________________________________________________________
Inquiry Screens, continued
Inquiry Screen Description C74: Checklist Enrollment checklist by individual.
C75: Prior Approval Listing of individuals at your component for whom you have requested prior approval for adaptive aides/minor home modifications/dental services. Screen displays approval status and tracking number.
C77: Reimbursement Authorization Listing of individuals at your component for whom you have requested a reimbursement authorization for adaptive aids/minor home modifications/ dental services. Screen displays approval status and tracking/authorization number.
C78: Staff ID Listing of staff persons at your component with begin dates and assigned staff IDs.
C79: County/MRA Listing of county codes and names with their corresponding MRA code and name and their waiver contract area.
C80: Provider/Contract Roster Listing of providers and contract information, including CEO contact name and telephone number, provider physical/mailing address, billing contact person, and contract information.
C81: Payment Eligibility Verification Payment eligibility verification by selected individual.
C82: Pending MR/RC Assessments Listing of individuals at your component with MR/RC Assessments for whom a final decision has not been made. The pending status of the assessment is displayed.
C83: MR/RC Assessments Displays the completed MR/RC Assessment by selected individual.
C84: Provider Location Lists detailed information about a provider’s residential locations, including address, dates, and contact information. Option to view clients assigned to residential location.
C85: Consumer Assignments Displays assignment information for a selected individual, including assignment effective date, end date (if applicable), service county, and location.
C86: Provider Location List Listing of provider residential locations at your component with location codes, names, status, and location type.
C87: MRA Contacts Listing of Mental Retardation Authority (MRA) contacts, including contact name, address, telephone number, and email address.
C88: Consumer Holds Listing by selected individual of hold begin/end dates and reason for the billing hold. Includes both permanent and temporary billing holds.
C89: Claims Inquiry Listing of claims information by individual within component, including the bill units and amount for each service. Inquiry can be limited by claim status, service category, or date range. Use this screen to obtain the ICN and Line Number for billing.
C101: Electronic Transmitter Identification Number
Displays information the provider submitted on the ETA form to gain access toMHMREDTS server.
C102 : Service Authorization Inquiry Listing of service authorizations for a given time period for a provider. It can blimited by Service type.
249: PPR Approval Status Displays the DADS approval status and date of the Permanency Planning Review.
771: DSM/ICD Code & Text Search Displays a set of DSM or ICD codes based on a pattern search either for the diagnosis code or the text (diagnosis description).
_______________________________________________________________
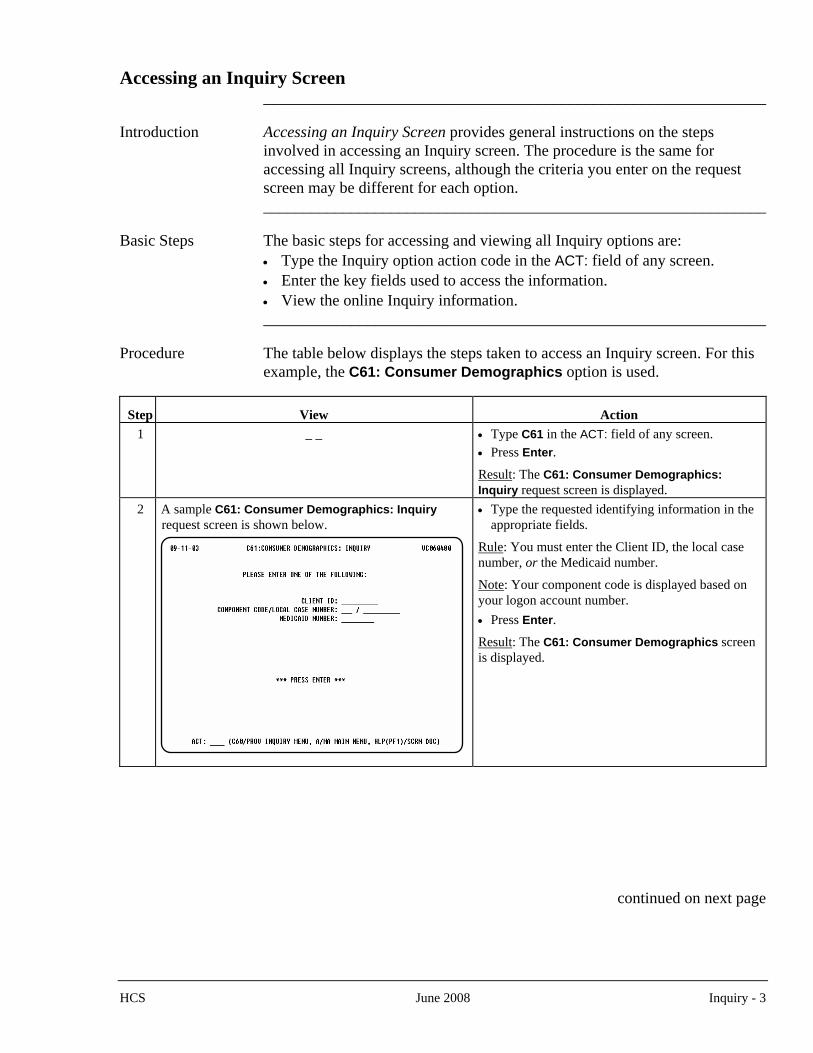
Accessing an Inquiry Screen
_______________________________________________________________ Introduction Accessing an Inquiry Screen provides general instructions on the steps
involved in accessing an Inquiry screen. The procedure is the same for accessing all Inquiry screens, although the criteria you enter on the request screen may be different for each option. _______________________________________________________________
Basic Steps The basic steps for accessing and viewing all Inquiry options are:
• Type the Inquiry option action code in the field of any screen. ACT:• Enter the key fields used to access the information. • View the online Inquiry information. _______________________________________________________________
Procedure The table below displays the steps taken to access an Inquiry screen. For this
example, the C61: Consumer Demographics option is used.
Step
View
Action 1 _ _
• Type • Press Enter.
C61 in the ACT: field of any screen.
Result: The C61: Consumer Demographics: Inquiry request screen is displayed.
2 A sample C61: Consumer Demographics: Inquiry equest screen is shown below. r
• Type the requested identifying information in the appropriate fields.
Rule: You must enter the Client ID, the local case number, or the Medicaid number.
Note: Your component code is displayed based on your logon account number. • Press Enter.
Result: The C61: Consumer Demographics screen is displayed.
continued on next page
HCS June 2008 Inquiry - 3
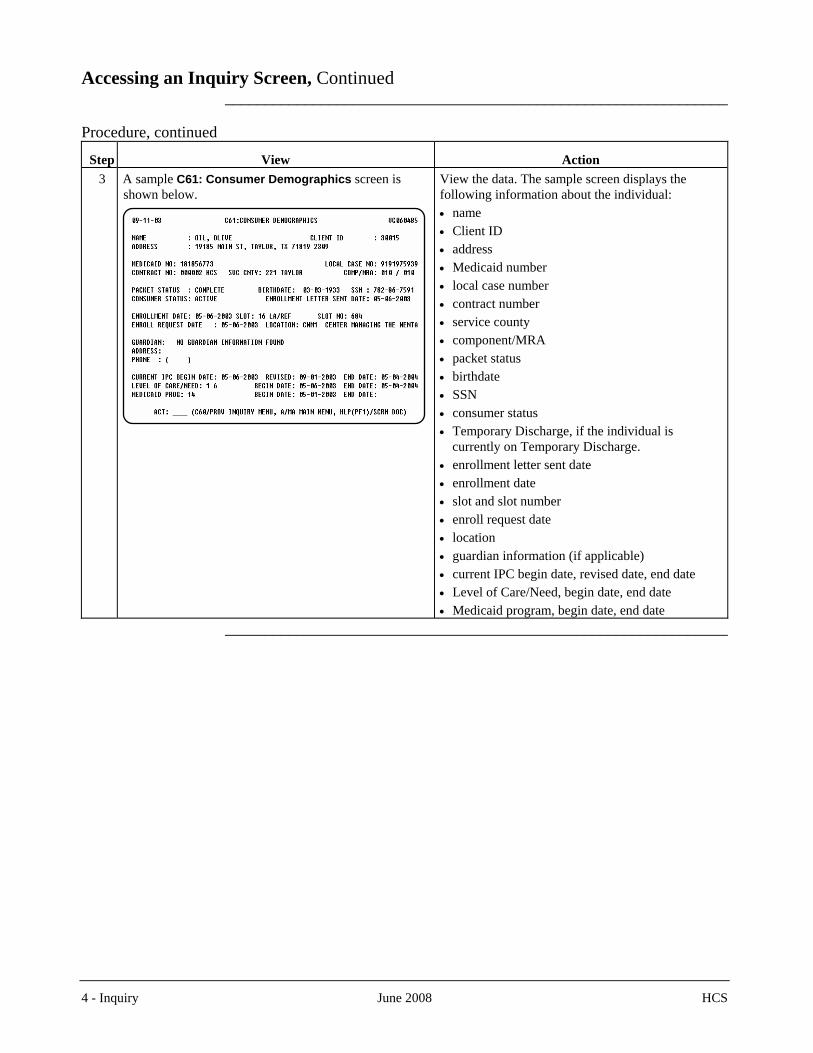
Accessing an Inquiry Screen, Continued
_______________________________________________________________ Procedure, continued
Step
View
Action 3 A sample C61: Consumer Demographics screen is
hown below. s
View the data. The sample screen displays the information about the individual: following
name •
• Client ID• address
Medicaid number •
r • local case number • contract numbe
service county •
RA • component/Mtus • packet sta
birthdate •
• SSN • consumer status • Temporary Discharge, if the individual is
currently on Temporary Discharge. • enrollment letter sent date • enrollment date
slot and slot number •
uest date • enroll req• location
guardian information (if applicable) •
ate • current IPC begin date, revised date, end d • Level of Care/Need, begin date, end date
4 - Inquiry June 2008 HCS
• Medicaid program, begin date, end date
_______________________________________________________________
Accessing Reports Overview ____________________________________________________________ Introduction Reports have been developed to give MRAs and program providers cost,
claim, billing, and information about individuals. A provider will receive, via the internet, Waiver reports, such as the consumer billing report, client profile report, etc., which will assist the provider in managing the program.
Providers will continue to be able to view reports using XPTR. However,
since most providers have been unable to print reports from XPTR, the EDTS server has been established. Providers will be able to access this server to obtain certain reports.
____________________________________________________________ EDTS Server The DADS HCS/TXHML EDTS server was purchased solely for DADS
HCS/TXHML to send reports to the provider and to send/receive X12 transaction files from/to the provider. No extraneous space was purchased, nor is any space available for providers to store copies of reports or uploads of any other miscellaneous data. Monthly scans are performed to clean out report files older than 16 days. In addition, random scans are performed and unauthorized data (i.e., files and folders) will be removed without notification to the provider.
____________________________________________________________ Obtain Access For a Waiver provider to establish a connection with DADS
HCS/TXHML to retrieve Waiver reports, the following steps must be completed.
To obtain access to the EDTS server:
1. A provider must submit an Electronic Transmission Agreement (ETA) form fax to HHS Enterprise Security Management (ESM), using the fax number provided in the Forward Completed Form To: section of the form. The ETA form is, in part, a request for a user ID and password to have access to retrieve the Waiver reports. The user ID and password created by the ETA form are separate from the CARE user ID and password and the retrieval of the Waiver reports uses a process that is also completely separate from CARE. DO NOT confuse the ETA and CARE user IDs and passwords.
2. While ESM is processing the ETA form, the provider must determine which software to use and download it. Because of HIPAA Privacy rules, providers must use encryption software to retrieve Waiver reports. See the options in the Recommended Client Software section (most options can be downloaded from the Internet).
HCS January 2009 Revised Accessing Reports - 1
Overview, Continued ____________________________________________________________ Obtain Access, continued
3. After the ETA form is processed, HHS Enterprise Security Management (ESM) will telephone the provider with a user ID and password. This process should take about two weeks.
____________________________________________________________ Retrieve Reports in It is the provider’s responsibility to retrieve the reports from their a Timely Manner respective EDTS server folder. Providers should be aware that their
reports are overwritten each time new reports are loaded. Several of these reports are loaded weekly. Therefore, providers must access the EDTS server on a weekly basis to avoid missing reports.
____________________________________________________________ Backup Files Backup files are kept in the event that previous reports must be
recovered. These files, however, are not kept indefinitely, and reports can only be recovered for a limited period of time. Reports will be limited only to recovery for the most recent three months including the current month. Reports requested for recovery will be loaded to the provider’s EDTS server folder. They will not be mailed.
____________________________________________________________
2 - Accessing Reports January 2009 Revised HCS
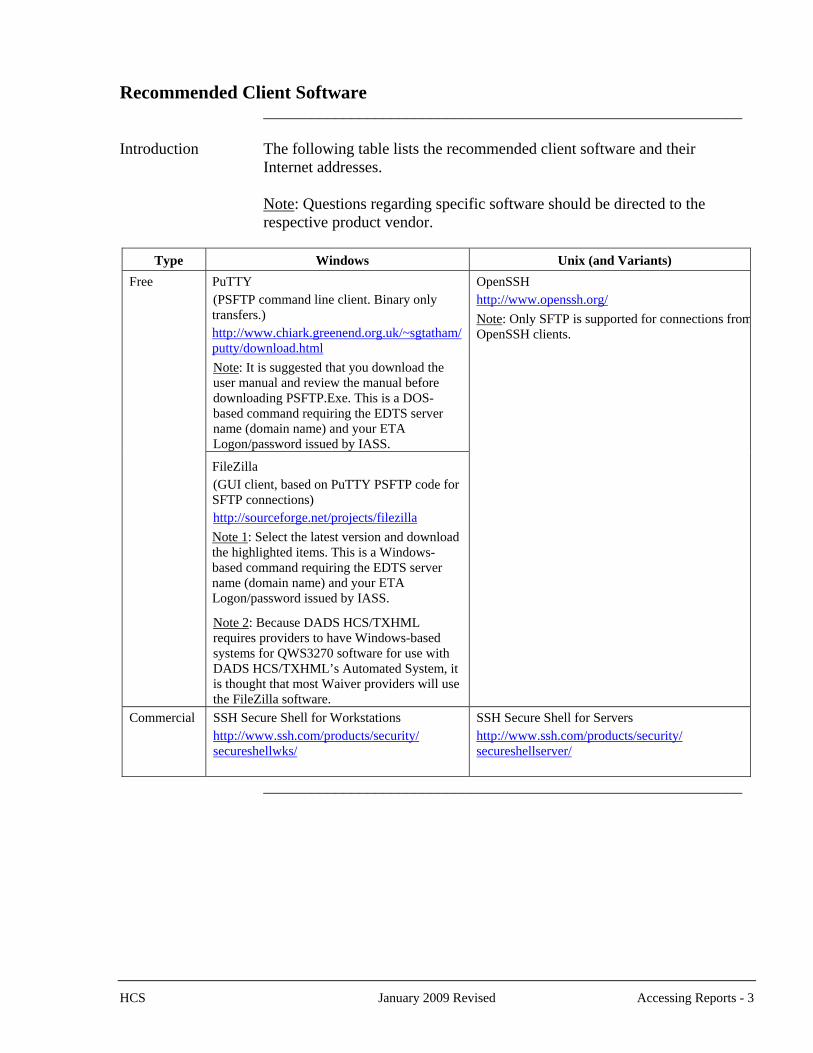
Recommended Client Software ____________________________________________________________ Introduction The following table lists the recommended client software and their
Internet addresses. Note: Questions regarding specific software should be directed to the
respective product vendor.
Type Windows Unix (and Variants) PuTTY (PSFTP command line client. Binary only transfers.) http://www.chiark.greenend.org.uk/~sgtatham/ putty/download.html Note: It is suggested that you download the user manual and review the manual before downloading PSFTP.Exe. This is a DOS-based command requiring the EDTS server name (domain name) and your ETA Logon/password issued by IASS.
Free
FileZilla (GUI client, based on PuTTY PSFTP code for SFTP connections) http://sourceforge.net/projects/filezilla Note 1: Select the latest version and download the highlighted items. This is a Windows-based command requiring the EDTS server name (domain name) and your ETA Logon/password issued by IASS.
Note 2: Because DADS HCS/TXHML requires providers to have Windows-based systems for QWS3270 software for use with DADS HCS/TXHML’s Automated System, it is thought that most Waiver providers will use the FileZilla software.
OpenSSH http://www.openssh.org/ Note: Only SFTP is supported for connections fromOpenSSH clients.
Commercial SSH Secure Shell for Workstations http://www.ssh.com/products/security/ secureshellwks/
SSH Secure Shell for Servers http://www.ssh.com/products/security/ secureshellserver/
____________________________________________________________
HCS January 2009 Revised Accessing Reports - 3
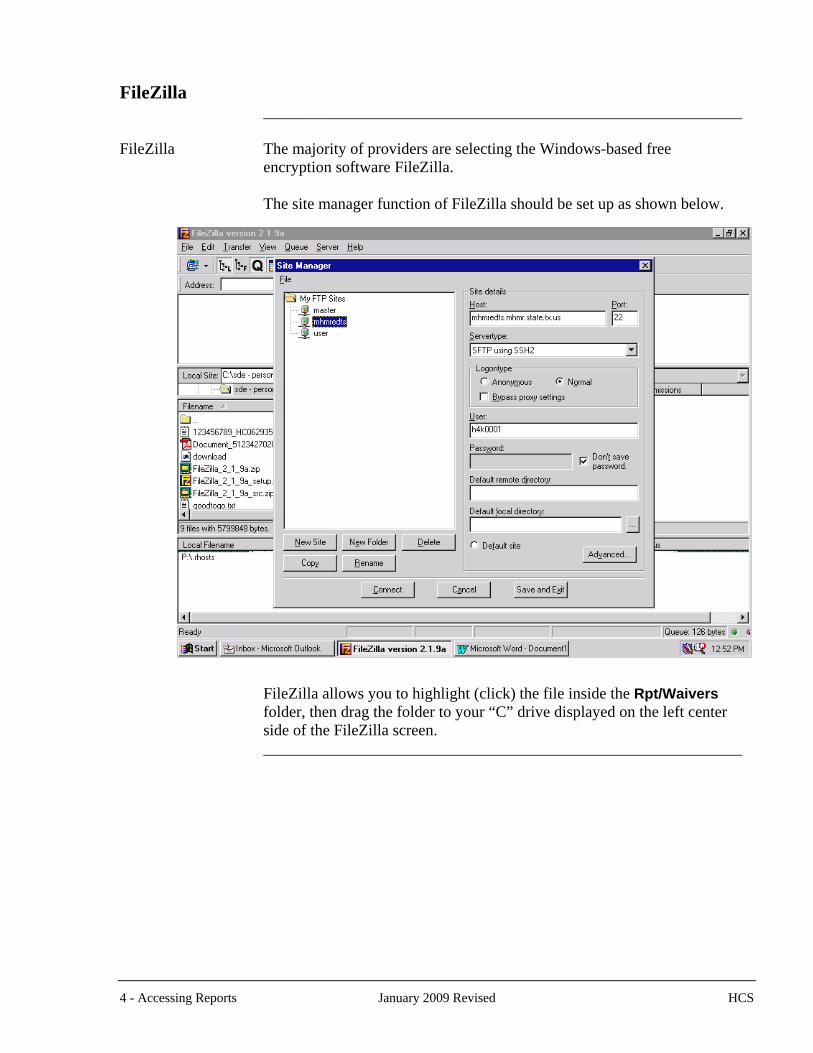
FileZilla ____________________________________________________________ FileZilla The majority of providers are selecting the Windows-based free
encryption software FileZilla. The site manager function of FileZilla should be set up as shown below.
FileZilla allows you to highlight (click) the file inside the Rpt/Waivers folder, then drag the folder to your “C” drive displayed on the left center side of the FileZilla screen.
____________________________________________________________
4 - Accessing Reports January 2009 Revised HCS

Zip/Unzip Software ____________________________________________________________ Introduction Starting July 1, 2004, DADS HCS/TXHML began compressing or
‘Zipping’ all reports loaded to the EDTS server. Therefore, providers will be required to use zip software to open their report files. This is being done in anticipation in years to come of an increased number of providers needing access to the EDTS server, as well as additional reports becoming available.
____________________________________________________________ Zip Software DADS HCS/TXHML plans to use the WINZIP software, which does
have a minor cost associated with it. Providers may use any ZIP software to Unzip a file, regardless of the software that DADS HCS/TXHML uses to Zip the file. A comprehensive list of ZIP software products can be found at http://www.tucows.com/comp95_default.html.
____________________________________________________________ Freeware Some of the ZIP software products available at the above link are
available at no cost to the user. They are listed as ‘Freeware.’ DADS HCS/TXHML reviewed four of the nine listed Freeware products for ease of understanding and usability. The IZArc software screen was found to be the easiest to understand; however, users had to reference the help section to fully understand how to utilize the screen's capability. It is at the provider's discretion which ZIP software is downloaded and used to UnZIP files.
____________________________________________________________ Support DADS HCS/TXHML will not provide support for any non-DADS
HCS/TXHML software downloaded by the provider. It will be the provider’s responsibility to contact the software company or vendor if problems are encountered during downloading or usage of ZIP software.
____________________________________________________________
HCS January 2009 Revised Accessing Reports - 5
Access Server Connection/Load Reports/Retrieve Waiver Reports ____________________________________________________________ Access the EDTS After the software has been downloaded, the provider must access the EDTS Server Connection server to retrieve the Waiver reports. This server is accessible from any
internet provider. Connections to the server must use the Secure Shell (SSH) version 2 protocol via an SFTP server. The EDTS server name (domain name) that must be used with the software is mhmredts.mhmr.state.tx.us
The contact name from ETA form will be considered the primary user
and will have access to a folder named Rpt Folders named X12in and X12out will be visible on the screen, but will not be able to be accessed unless the provider is billing via X12 transactions (batch billing). Additional provider staff who have access will be considered secondary users and will only see and have access to the Rpt folder (the X12in and X12out folders will not be visible to secondary users). Request for additional access may be obtained by completing the IS090 form and faxing it to the appropriate party.
____________________________________________________________ Reports Loaded By obtaining access, a folder unique to the provider will be created. As
reports are prepared, they will be loaded to the folder according to the report time schedule.
The following reports will be loaded to the Rpt folder:
• HC062460 – MRA Service Utilization Report * (Portrait) Tuesday after the last Friday of the month/Monthly
The Texas Home Living Utilization Report. • HC062942 – Remittance & Status Report (Landscape) Friday/Weekly The Remittance & Status Report reconciles the warrant (actual paid
claims from the Comptroller) to claims submitted, minus any additional credits from the Comptroller.
• HC062962 – HCS Accumulated Approved to Pay Report (Landscape) Friday/Weekly
The Accumulated Approved to Pay report contains information on all claims submitted and sent for payment at the comptroller, it does not indicate payment from the comptroller.
• HC062017 – Approved to Pay Report * (Landscape) Tuesday/Weekly Formerly known as the Billing Report. The information on this report
now includes ICN & Line numbers. This report has the same information as the Paid Claim File (GC062040), except that it is in a report format.
• HC062310 – Service Utilization Report * (Portrait) Tuesday after the last Friday of the month/Monthly
The Utilization Report has not changed. continued on next page
6 - Accessing Reports January 2009 Revised HCS

Access Server Connection/Load Reports/Retrieve Waiver Reports, Continued ____________________________________________________________ Reports Loaded, continued
• HC062015 – Denied Claims Report * (Landscape) Tuesday/Weekly Formerly known as the Exceptions Report. The information on this
report now includes ICN & Line numbers. • GC062040 – Paid Claim File * (File, semi-colon delimited)
Tuesday/Weekly The Paid Claims File is new and contains data on claims DADS HCS &
TXHML Waiver Programs have sent to the Comptroller to be paid. The data in this file is in semi-colon delimited format, which can be downloaded directly into the provider’s local billing program.
• HC062020 – Client Profile Report * (Landscape) Tuesday after the last Friday of the month/Monthly
• HC062746 – Waiver Local Authority Refinance by MRA Report * (Landscape)
• HC062835 – HHSC Cost Report (Portrait) Annually after 1st billing run in September.
Contains information that will assist with Annual Cost Reports. *All billing reports will be available once Medicaid Administration approves billing. Note: See Format Report for assistance on formatting the reports.
____________________________________________________________
Retrieve Reports The reports that are in the Rpt subfolder use the following naming convention: nnnnnnnnn_rrrrrrrr.txt. The nnnnnnnnn represents the provider’s Electronic Transmission Interface Number (ETIN) and rrrrrrrr is the report number. Example: 123456789_HC062020
Note: The ETIN is a unique number assigned to each provider to ensure the
provider receives the correct reports and is the same as the provider’s Federal Tax Identification Number or Social Security Number.
Report files will be available for download into the provider’s system from
the Rpt sub-folder. See the Formatting Report section for formatting assistance.
The reports in the Rpt folder will be overwritten each week, so the provider
must save them to the C: drive if the reports are to be saved. To copy a report from the EDTS Server to your C drive: • Click Rpt. • Click Waiver. • Locate the report you want to copy. • Click and hold down the button to select the report. • Drag and drop the document in the Rpt/Waiver section on the left side of
the screen. • Replace each saved file name with a unique name so the report will not
be overwritten the next time the report is retrieved. ____________________________________________________________
HCS January 2009 Revised Accessing Reports - 7
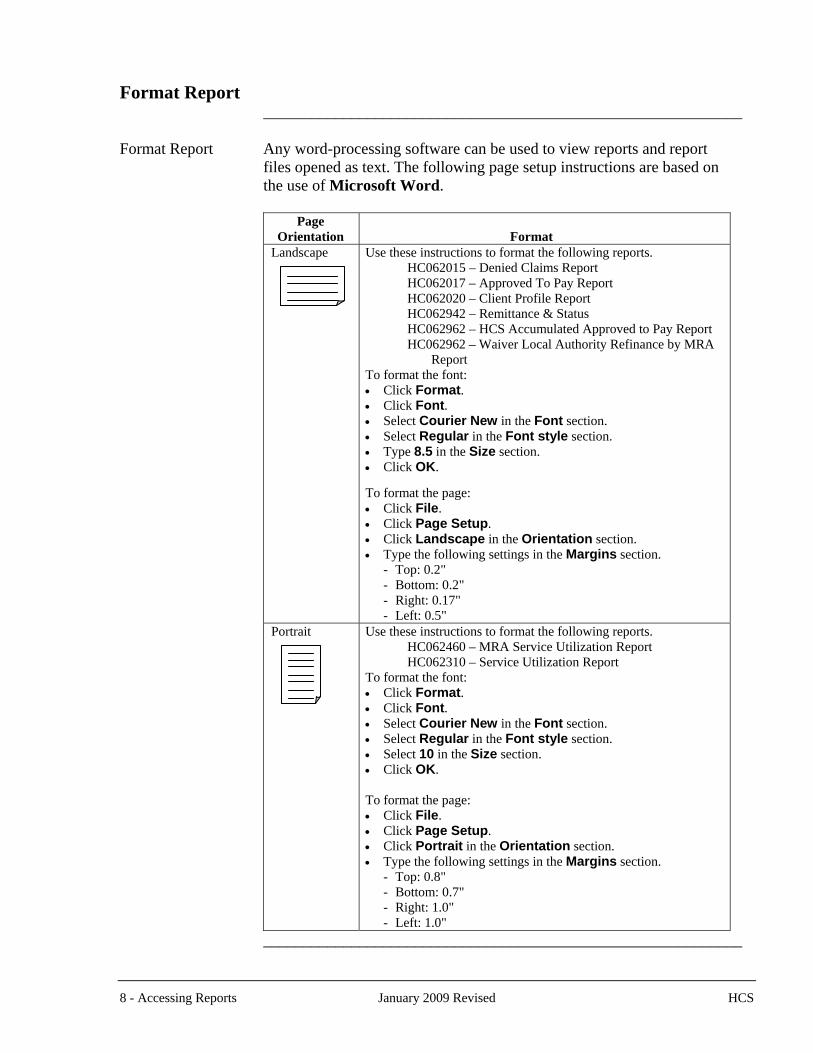
Format Report ____________________________________________________________ Format Report Any word-processing software can be used to view reports and report
files opened as text. The following page setup instructions are based on the use of Microsoft Word.
Page
Orientation
Format Landscape Use these instructions to format the following reports.
HC062015 – Denied Claims Report HC062017 – Approved To Pay Report HC062020 – Client Profile Report HC062942 – Remittance & Status HC062962 – HCS Accumulated Approved to Pay Report HC062962 – Waiver Local Authority Refinance by MRA
Report To format the font: • Click Format. • Click Font. • Select Courier New in the Font section. • Select Regular in the Font style section. • Type 8.5 in the Size section. • Click OK.
To format the page: • Click File. • Click Page Setup. • Click Landscape in the Orientation section. • Type the following settings in the Margins section.
- Top: 0.2" - Bottom: 0.2" - Right: 0.17" - Left: 0.5"
Portrait Use these instructions to format the following reports. HC062460 – MRA Service Utilization Report HC062310 – Service Utilization Report
To format the font: • Click Format. • Click Font. • Select Courier New in the Font section. • Select Regular in the Font style section. • Select 10 in the Size section. • Click OK.
To format the page: • Click File. • Click Page Setup. • Click Portrait in the Orientation section. • Type the following settings in the Margins section.
- Top: 0.8" - Bottom: 0.7" - Right: 1.0" - Left: 1.0"
____________________________________________________________
8 - Accessing Reports January 2009 Revised HCS
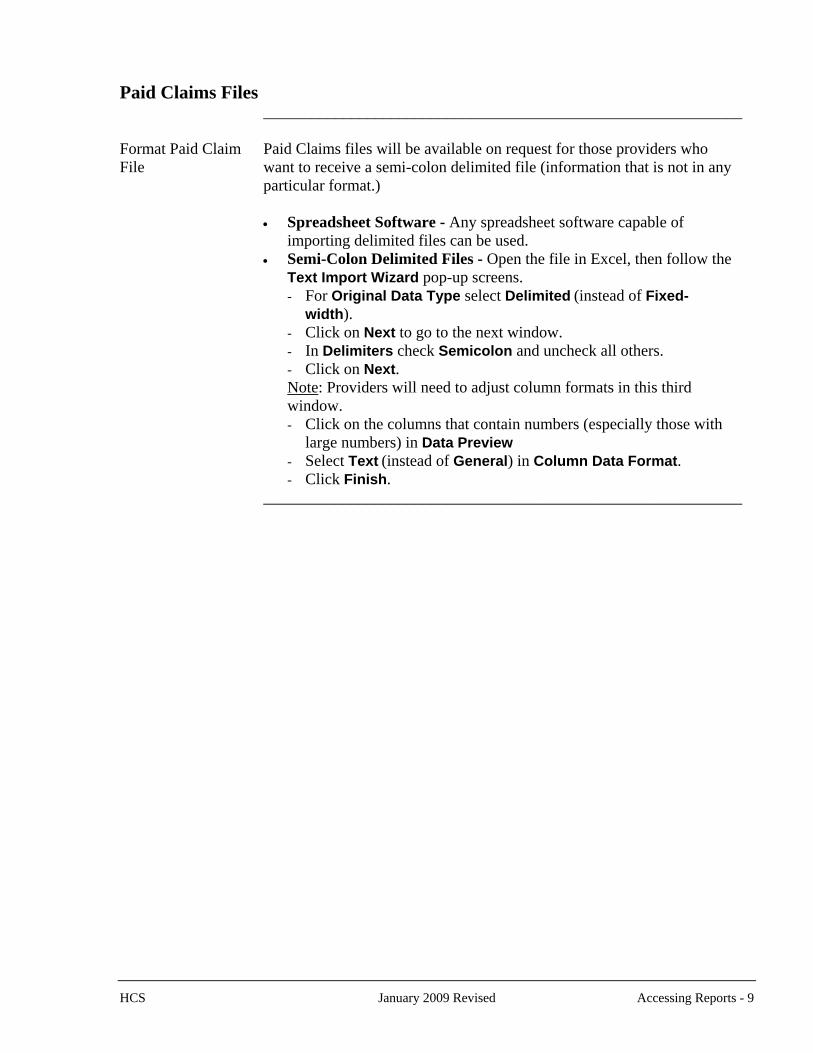
Paid Claims Files ____________________________________________________________ Format Paid Claim Paid Claims files will be available on request for those providers who File want to receive a semi-colon delimited file (information that is not in any
particular format.)
• Spreadsheet Software - Any spreadsheet software capable of importing delimited files can be used.
• Semi-Colon Delimited Files - Open the file in Excel, then follow the Text Import Wizard pop-up screens. - For Original Data Type select Delimited (instead of Fixed-
width). - Click on Next to go to the next window. - In Delimiters check Semicolon and uncheck all others. - Click on Next. Note: Providers will need to adjust column formats in this third window. - Click on the columns that contain numbers (especially those with
large numbers) in Data Preview - Select Text (instead of General) in Column Data Format. - Click Finish.
____________________________________________________________
HCS January 2009 Revised Accessing Reports - 9
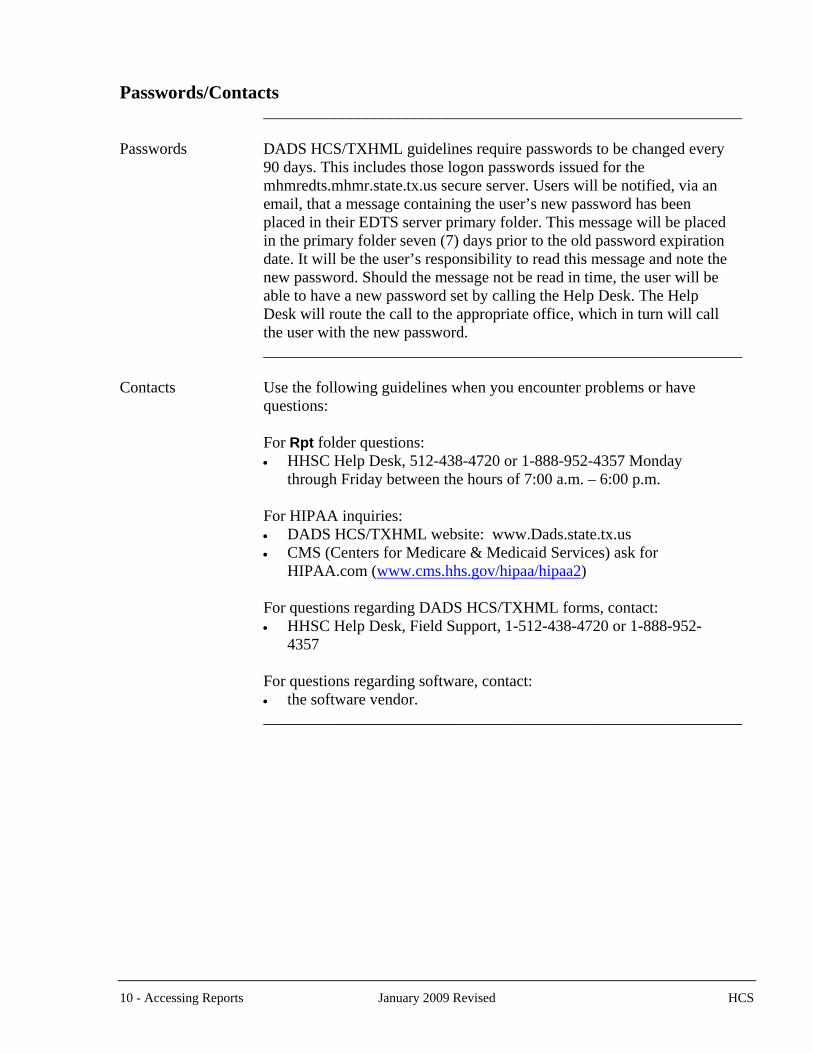
10 - Accessing Reports January 2009 Revised HCS
Passwords/Contacts ____________________________________________________________ Passwords DADS HCS/TXHML guidelines require passwords to be changed every
90 days. This includes those logon passwords issued for the mhmredts.mhmr.state.tx.us secure server. Users will be notified, via an email, that a message containing the user’s new password has been placed in their EDTS server primary folder. This message will be placed in the primary folder seven (7) days prior to the old password expiration date. It will be the user’s responsibility to read this message and note the new password. Should the message not be read in time, the user will be able to have a new password set by calling the Help Desk. The Help Desk will route the call to the appropriate office, which in turn will call the user with the new password.
____________________________________________________________ Contacts Use the following guidelines when you encounter problems or have
questions: For Rpt folder questions:
• HHSC Help Desk, 512-438-4720 or 1-888-952-4357 Monday through Friday between the hours of 7:00 a.m. – 6:00 p.m.
For HIPAA inquiries:
• DADS HCS/TXHML website: www.Dads.state.tx.us • CMS (Centers for Medicare & Medicaid Services) ask for
HIPAA.com (www.cms.hhs.gov/hipaa/hipaa2) For questions regarding DADS HCS/TXHML forms, contact:
• HHSC Help Desk, Field Support, 1-512-438-4720 or 1-888-952-4357
For questions regarding software, contact:
• the software vendor. ____________________________________________________________
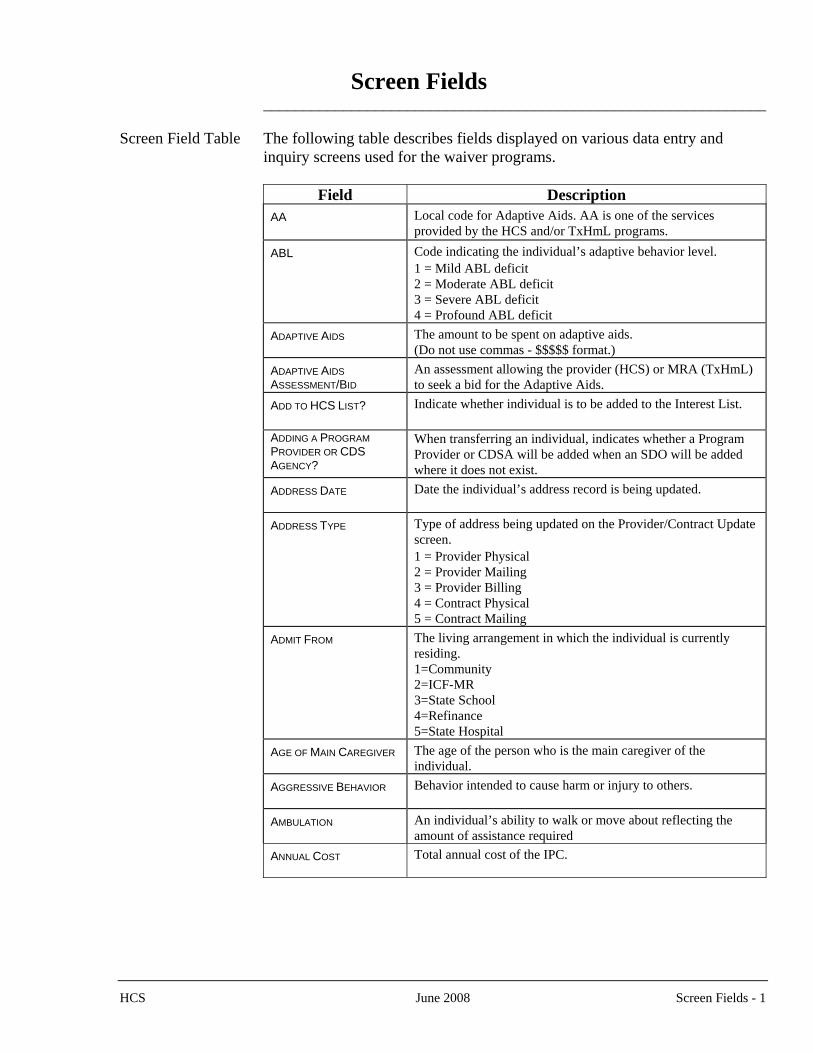
Screen Fields _______________________________________________________________ Screen Field Table The following table describes fields displayed on various data entry and
inquiry screens used for the waiver programs.
Field Description AA Local code for Adaptive Aids. AA is one of the services
provided by the HCS and/or TxHmL programs.
ABL Code indicating the individual’s adaptive behavior level. 1 = Mild ABL deficit 2 = Moderate ABL deficit 3 = Severe ABL deficit 4 = Profound ABL deficit
ADAPTIVE AIDS The amount to be spent on adaptive aids. (Do not use commas - $$$$$ format.)
ADAPTIVE AIDS ASSESSMENT/BID
An assessment allowing the provider (HCS) or MRA (TxHmL) to seek a bid for the Adaptive Aids.
ADD TO HCS LIST? Indicate whether individual is to be added to the Interest List.
ADDING A PROGRAM PROVIDER OR CDS AGENCY?
When transferring an individual, indicates whether a Program Provider or CDSA will be added when an SDO will be added where it does not exist.
ADDRESS DATE Date the individual’s address record is being updated.
ADDRESS TYPE
Type of address being updated on the Provider/Contract Update screen. 1 = Provider Physical 2 = Provider Mailing 3 = Provider Billing 4 = Contract Physical 5 = Contract Mailing
ADMIT FROM The living arrangement in which the individual is currently residing. 1=Community 2=ICF-MR 3=State School 4=Refinance 5=State Hospital
AGE OF MAIN CAREGIVER The age of the person who is the main caregiver of the individual.
AGGRESSIVE BEHAVIOR Behavior intended to cause harm or injury to others.
AMBULATION An individual’s ability to walk or move about reflecting the amount of assistance required
ANNUAL COST Total annual cost of the IPC.
HCS June 2008 Screen Fields - 1
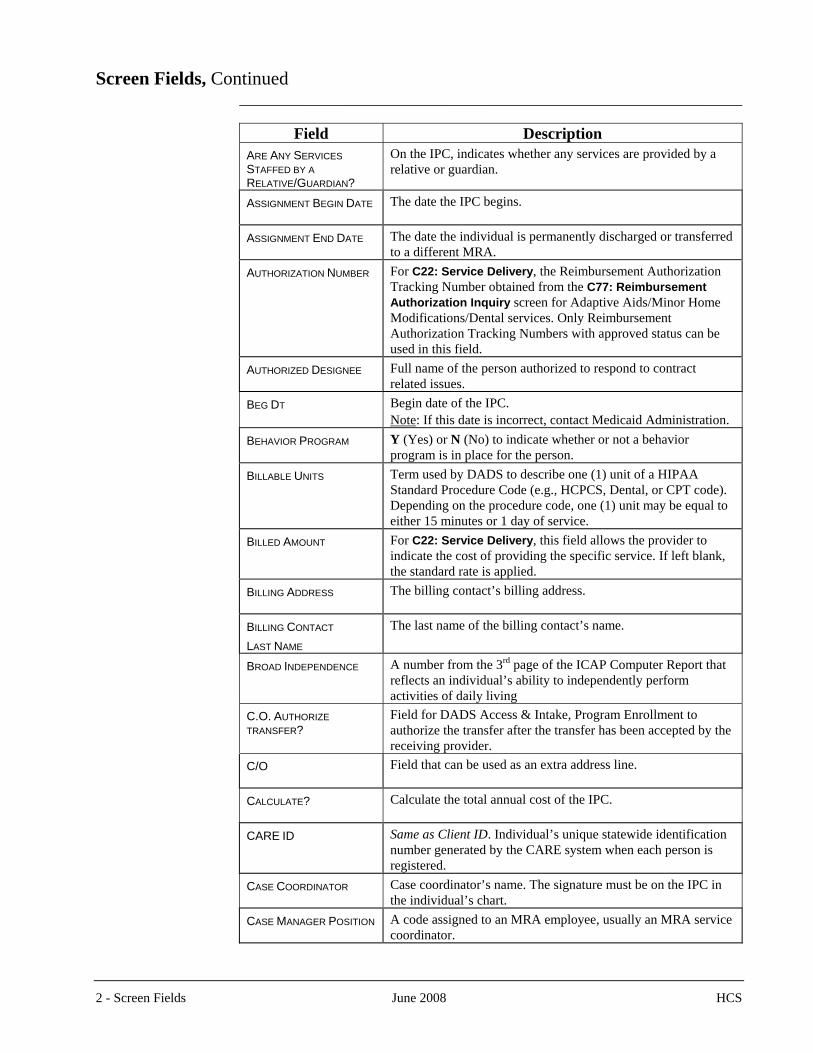
Screen Fields, Continued _______________________________________________________________
Field Description ARE ANY SERVICES STAFFED BY A RELATIVE/GUARDIAN?
On the IPC, indicates whether any services are provided by a relative or guardian.
ASSIGNMENT BEGIN DATE The date the IPC begins.
ASSIGNMENT END DATE The date the individual is permanently discharged or transferred to a different MRA.
AUTHORIZATION NUMBER For C22: Service Delivery, the Reimbursement Authorization Tracking Number obtained from the C77: Reimbursement Authorization Inquiry screen for Adaptive Aids/Minor Home Modifications/Dental services. Only Reimbursement Authorization Tracking Numbers with approved status can be used in this field.
AUTHORIZED DESIGNEE Full name of the person authorized to respond to contract related issues.
BEG DT Begin date of the IPC. Note: If this date is incorrect, contact Medicaid Administration.
BEHAVIOR PROGRAM Y (Yes) or N (No) to indicate whether or not a behavior program is in place for the person.
BILLABLE UNITS Term used by DADS to describe one (1) unit of a HIPAA Standard Procedure Code (e.g., HCPCS, Dental, or CPT code). Depending on the procedure code, one (1) unit may be equal to either 15 minutes or 1 day of service.
BILLED AMOUNT For C22: Service Delivery, this field allows the provider to indicate the cost of providing the specific service. If left blank, the standard rate is applied.
BILLING ADDRESS The billing contact’s billing address.
BILLING CONTACT LAST NAME
The last name of the billing contact’s name.
BROAD INDEPENDENCE A number from the 3rd page of the ICAP Computer Report that reflects an individual’s ability to independently perform activities of daily living
C.O. AUTHORIZE TRANSFER?
Field for DADS Access & Intake, Program Enrollment to authorize the transfer after the transfer has been accepted by the receiving provider.
C/O Field that can be used as an extra address line.
CALCULATE? Calculate the total annual cost of the IPC.
CARE ID Same as Client ID. Individual’s unique statewide identification number generated by the CARE system when each person is registered.
CASE COORDINATOR Case coordinator’s name. The signature must be on the IPC in the individual’s chart.
CASE MANAGER POSITION A code assigned to an MRA employee, usually an MRA service coordinator.
2 - Screen Fields June 2008 HCS
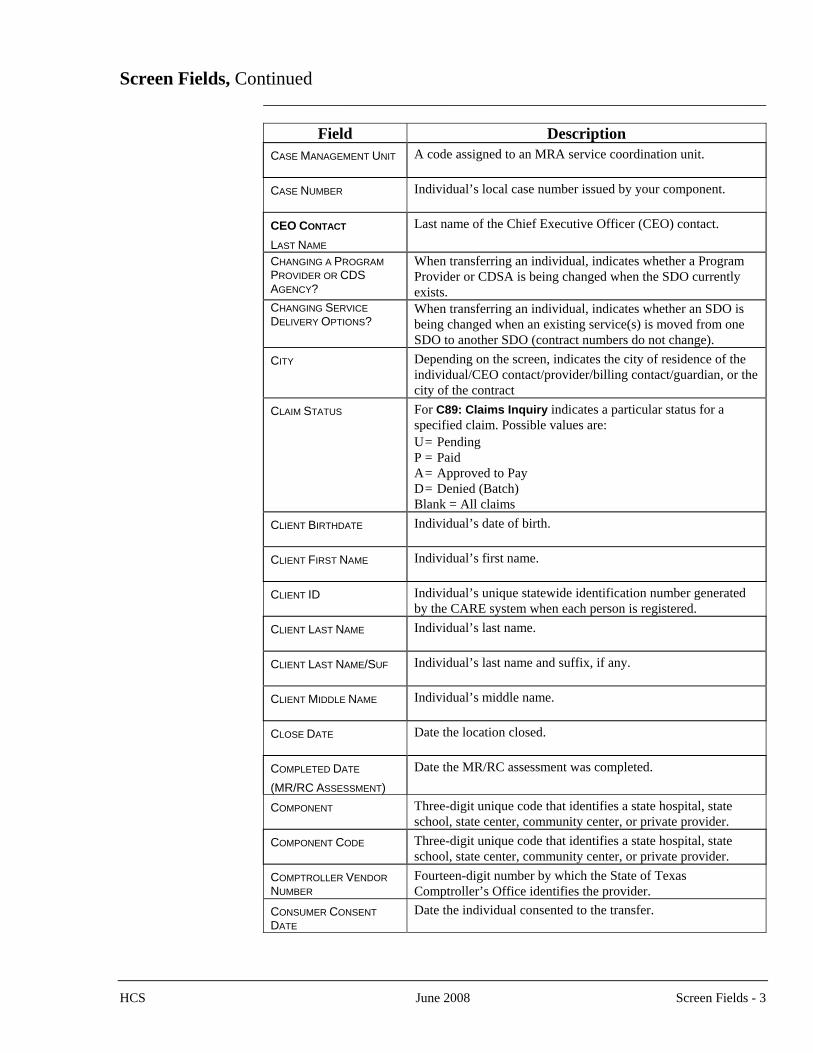
Screen Fields, Continued _______________________________________________________________
Field Description CASE MANAGEMENT UNIT A code assigned to an MRA service coordination unit.
CASE NUMBER Individual’s local case number issued by your component.
CEO CONTACT LAST NAME
Last name of the Chief Executive Officer (CEO) contact.
CHANGING A PROGRAM PROVIDER OR CDS AGENCY?
When transferring an individual, indicates whether a Program Provider or CDSA is being changed when the SDO currently exists.
CHANGING SERVICE DELIVERY OPTIONS?
When transferring an individual, indicates whether an SDO is being changed when an existing service(s) is moved from one SDO to another SDO (contract numbers do not change).
CITY Depending on the screen, indicates the city of residence of the individual/CEO contact/provider/billing contact/guardian, or the city of the contract
CLAIM STATUS For C89: Claims Inquiry indicates a particular status for a specified claim. Possible values are: U = Pending P = Paid A = Approved to Pay D = Denied (Batch) Blank = All claims
CLIENT BIRTHDATE Individual’s date of birth.
CLIENT FIRST NAME Individual’s first name.
CLIENT ID Individual’s unique statewide identification number generated by the CARE system when each person is registered.
CLIENT LAST NAME Individual’s last name.
CLIENT LAST NAME/SUF Individual’s last name and suffix, if any.
CLIENT MIDDLE NAME Individual’s middle name.
CLOSE DATE Date the location closed.
COMPLETED DATE (MR/RC ASSESSMENT)
Date the MR/RC assessment was completed.
COMPONENT Three-digit unique code that identifies a state hospital, state school, state center, community center, or private provider.
COMPONENT CODE Three-digit unique code that identifies a state hospital, state school, state center, community center, or private provider.
COMPTROLLER VENDOR NUMBER
Fourteen-digit number by which the State of Texas Comptroller’s Office identifies the provider.
CONSUMER CONSENT DATE
Date the individual consented to the transfer.
HCS June 2008 Screen Fields - 3
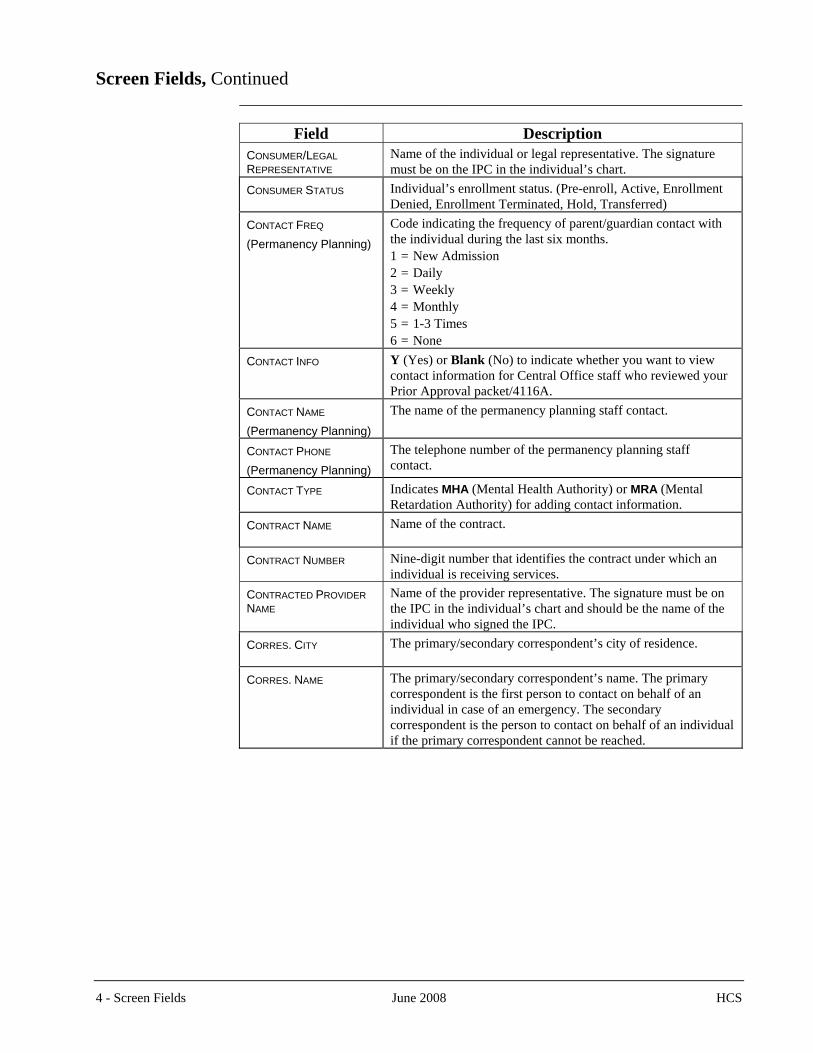
Screen Fields, Continued _______________________________________________________________
Field Description CONSUMER/LEGAL REPRESENTATIVE
Name of the individual or legal representative. The signature must be on the IPC in the individual’s chart.
CONSUMER STATUS Individual’s enrollment status. (Pre-enroll, Active, Enrollment Denied, Enrollment Terminated, Hold, Transferred)
CONTACT FREQ (Permanency Planning)
Code indicating the frequency of parent/guardian contact with the individual during the last six months. 1 = New Admission 2 = Daily 3 = Weekly 4 = Monthly 5 = 1-3 Times 6 = None
CONTACT INFO Y (Yes) or Blank (No) to indicate whether you want to view contact information for Central Office staff who reviewed your Prior Approval packet/4116A.
CONTACT NAME (Permanency Planning)
The name of the permanency planning staff contact.
CONTACT PHONE (Permanency Planning)
The telephone number of the permanency planning staff contact.
CONTACT TYPE Indicates MHA (Mental Health Authority) or MRA (Mental Retardation Authority) for adding contact information.
CONTRACT NAME Name of the contract.
CONTRACT NUMBER Nine-digit number that identifies the contract under which an individual is receiving services.
CONTRACTED PROVIDER NAME
Name of the provider representative. The signature must be on the IPC in the individual’s chart and should be the name of the individual who signed the IPC.
CORRES. CITY The primary/secondary correspondent’s city of residence.
CORRES. NAME The primary/secondary correspondent’s name. The primary correspondent is the first person to contact on behalf of an individual in case of an emergency. The secondary correspondent is the person to contact on behalf of an individual if the primary correspondent cannot be reached.
4 - Screen Fields June 2008 HCS
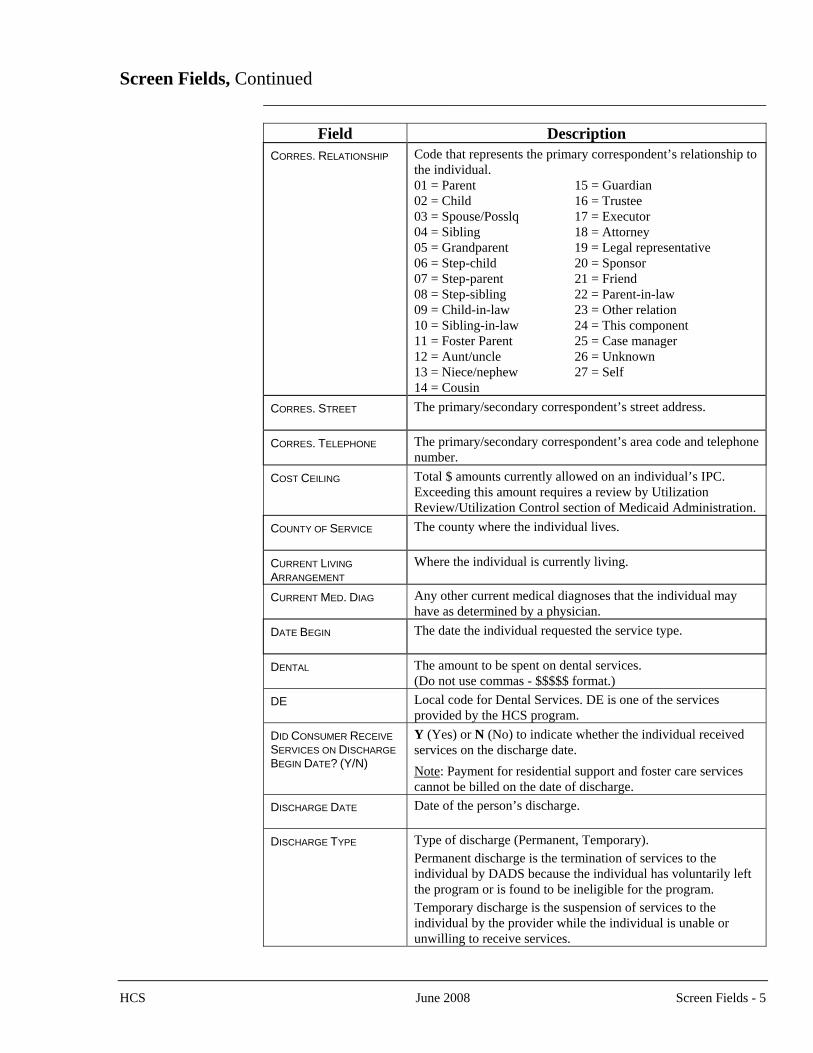
Screen Fields, Continued _______________________________________________________________
Field Description CORRES. RELATIONSHIP Code that represents the primary correspondent’s relationship to
the individual. 01 = Parent 15 = Guardian 02 = Child 16 = Trustee 03 = Spouse/Posslq 17 = Executor 04 = Sibling 18 = Attorney 05 = Grandparent 19 = Legal representative 06 = Step-child 20 = Sponsor 07 = Step-parent 21 = Friend 08 = Step-sibling 22 = Parent-in-law 09 = Child-in-law 23 = Other relation 10 = Sibling-in-law 24 = This component 11 = Foster Parent 25 = Case manager 12 = Aunt/uncle 26 = Unknown 13 = Niece/nephew 27 = Self 14 = Cousin
CORRES. STREET The primary/secondary correspondent’s street address.
CORRES. TELEPHONE The primary/secondary correspondent’s area code and telephone number.
COST CEILING Total $ amounts currently allowed on an individual’s IPC. Exceeding this amount requires a review by Utilization Review/Utilization Control section of Medicaid Administration.
COUNTY OF SERVICE The county where the individual lives.
CURRENT LIVING ARRANGEMENT
Where the individual is currently living.
CURRENT MED. DIAG Any other current medical diagnoses that the individual may have as determined by a physician.
DATE BEGIN The date the individual requested the service type.
DENTAL The amount to be spent on dental services. (Do not use commas - $$$$$ format.)
DE Local code for Dental Services. DE is one of the services provided by the HCS program.
DID CONSUMER RECEIVE SERVICES ON DISCHARGE BEGIN DATE? (Y/N)
Y (Yes) or N (No) to indicate whether the individual received services on the discharge date.
Note: Payment for residential support and foster care services cannot be billed on the date of discharge.
DISCHARGE DATE Date of the person’s discharge.
DISCHARGE TYPE Type of discharge (Permanent, Temporary). Permanent discharge is the termination of services to the individual by DADS because the individual has voluntarily left the program or is found to be ineligible for the program. Temporary discharge is the suspension of services to the individual by the provider while the individual is unable or unwilling to receive services.
HCS June 2008 Screen Fields - 5
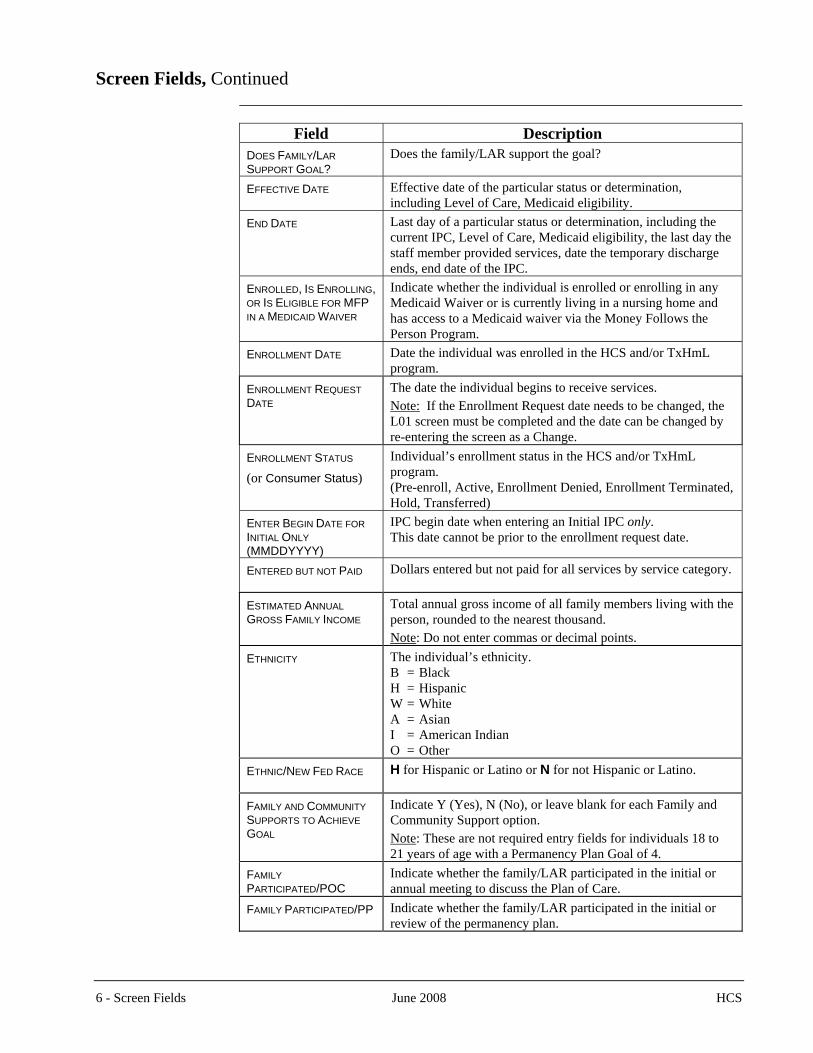
Screen Fields, Continued _______________________________________________________________
Field Description DOES FAMILY/LAR SUPPORT GOAL?
Does the family/LAR support the goal?
EFFECTIVE DATE Effective date of the particular status or determination, including Level of Care, Medicaid eligibility.
END DATE Last day of a particular status or determination, including the current IPC, Level of Care, Medicaid eligibility, the last day the staff member provided services, date the temporary discharge ends, end date of the IPC.
ENROLLED, IS ENROLLING, OR IS ELIGIBLE FOR MFP IN A MEDICAID WAIVER
Indicate whether the individual is enrolled or enrolling in any Medicaid Waiver or is currently living in a nursing home and has access to a Medicaid waiver via the Money Follows the Person Program.
ENROLLMENT DATE Date the individual was enrolled in the HCS and/or TxHmL program.
ENROLLMENT REQUEST DATE
The date the individual begins to receive services. Note: If the Enrollment Request date needs to be changed, the L01 screen must be completed and the date can be changed by re-entering the screen as a Change.
ENROLLMENT STATUS
(or Consumer Status)
Individual’s enrollment status in the HCS and/or TxHmL program. (Pre-enroll, Active, Enrollment Denied, Enrollment Terminated, Hold, Transferred)
ENTER BEGIN DATE FOR INITIAL ONLY (MMDDYYYY)
IPC begin date when entering an Initial IPC only. This date cannot be prior to the enrollment request date.
ENTERED BUT NOT PAID Dollars entered but not paid for all services by service category.
ESTIMATED ANNUAL GROSS FAMILY INCOME
Total annual gross income of all family members living with the person, rounded to the nearest thousand. Note: Do not enter commas or decimal points.
ETHNICITY The individual’s ethnicity. B = Black H = Hispanic W = White A = Asian I = American Indian O = Other
ETHNIC/NEW FED RACE H for Hispanic or Latino or N for not Hispanic or Latino.
FAMILY AND COMMUNITY SUPPORTS TO ACHIEVE GOAL
Indicate Y (Yes), N (No), or leave blank for each Family and Community Support option. Note: These are not required entry fields for individuals 18 to 21 years of age with a Permanency Plan Goal of 4.
FAMILY PARTICIPATED/POC
Indicate whether the family/LAR participated in the initial or annual meeting to discuss the Plan of Care.
FAMILY PARTICIPATED/PP Indicate whether the family/LAR participated in the initial or review of the permanency plan.
6 - Screen Fields June 2008 HCS
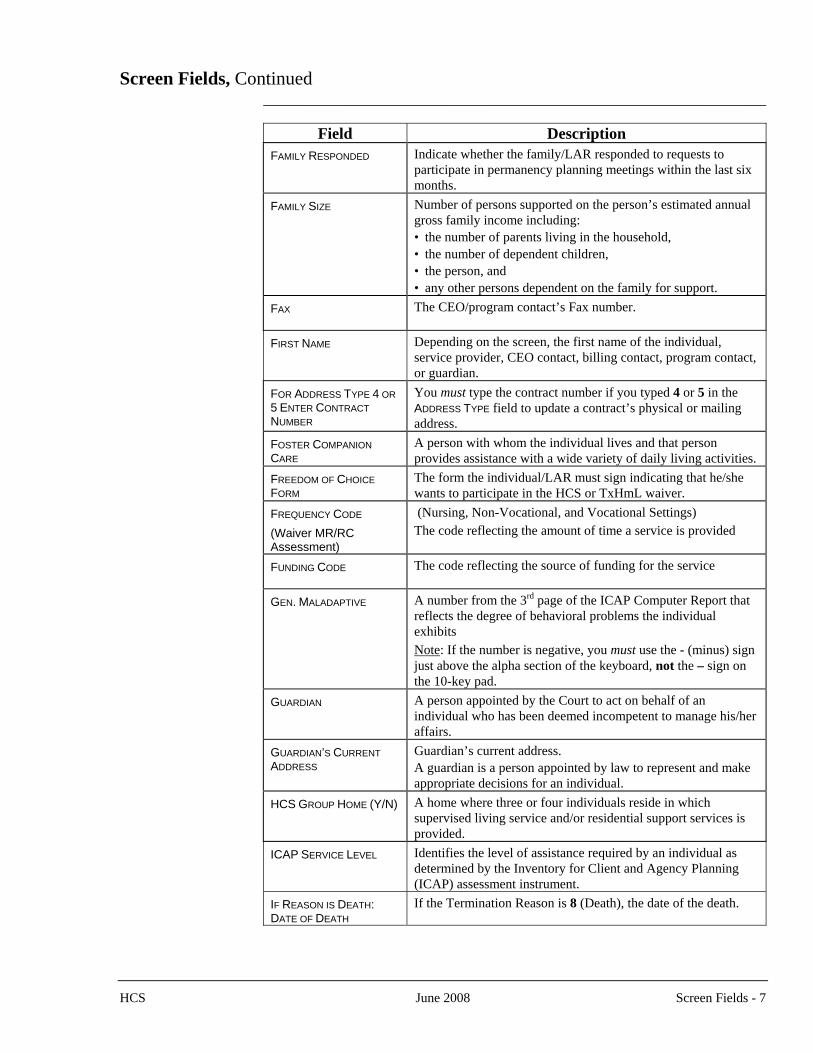
Screen Fields, Continued _______________________________________________________________
Field Description FAMILY RESPONDED Indicate whether the family/LAR responded to requests to
participate in permanency planning meetings within the last six months.
FAMILY SIZE Number of persons supported on the person’s estimated annual gross family income including: • the number of parents living in the household, • the number of dependent children, • the person, and • any other persons dependent on the family for support.
FAX The CEO/program contact’s Fax number.
FIRST NAME Depending on the screen, the first name of the individual, service provider, CEO contact, billing contact, program contact, or guardian.
FOR ADDRESS TYPE 4 OR 5 ENTER CONTRACT NUMBER
You must type the contract number if you typed 4 or 5 in the ADDRESS TYPE field to update a contract’s physical or mailing address.
FOSTER COMPANION CARE
A person with whom the individual lives and that person provides assistance with a wide variety of daily living activities.
FREEDOM OF CHOICE FORM
The form the individual/LAR must sign indicating that he/she wants to participate in the HCS or TxHmL waiver.
FREQUENCY CODE (Waiver MR/RC Assessment)
(Nursing, Non-Vocational, and Vocational Settings) The code reflecting the amount of time a service is provided
FUNDING CODE The code reflecting the source of funding for the service
GEN. MALADAPTIVE A number from the 3rd page of the ICAP Computer Report that reflects the degree of behavioral problems the individual exhibits Note: If the number is negative, you must use the - (minus) sign just above the alpha section of the keyboard, not the – sign on the 10-key pad.
GUARDIAN A person appointed by the Court to act on behalf of an individual who has been deemed incompetent to manage his/her affairs.
GUARDIAN’S CURRENT ADDRESS
Guardian’s current address. A guardian is a person appointed by law to represent and make appropriate decisions for an individual.
HCS GROUP HOME (Y/N) A home where three or four individuals reside in which supervised living service and/or residential support services is provided.
ICAP SERVICE LEVEL Identifies the level of assistance required by an individual as determined by the Inventory for Client and Agency Planning (ICAP) assessment instrument.
IF REASON IS DEATH: DATE OF DEATH
If the Termination Reason is 8 (Death), the date of the death.
HCS June 2008 Screen Fields - 7
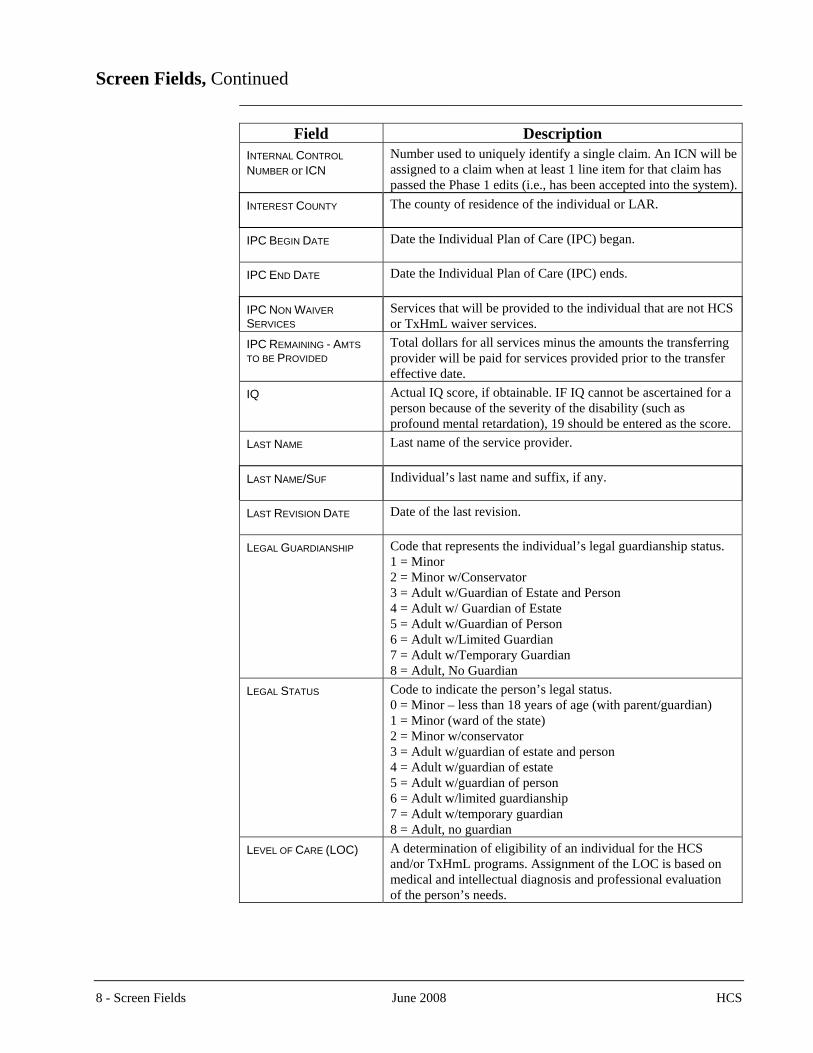
Screen Fields, Continued _______________________________________________________________
Field Description INTERNAL CONTROL NUMBER or ICN
Number used to uniquely identify a single claim. An ICN will be assigned to a claim when at least 1 line item for that claim has passed the Phase 1 edits (i.e., has been accepted into the system).
INTEREST COUNTY The county of residence of the individual or LAR.
IPC BEGIN DATE Date the Individual Plan of Care (IPC) began.
IPC END DATE Date the Individual Plan of Care (IPC) ends.
IPC NON WAIVER SERVICES
Services that will be provided to the individual that are not HCS or TxHmL waiver services.
IPC REMAINING - AMTS TO BE PROVIDED
Total dollars for all services minus the amounts the transferring provider will be paid for services provided prior to the transfer effective date.
IQ Actual IQ score, if obtainable. IF IQ cannot be ascertained for a person because of the severity of the disability (such as profound mental retardation), 19 should be entered as the score.
LAST NAME Last name of the service provider.
LAST NAME/SUF Individual’s last name and suffix, if any.
LAST REVISION DATE Date of the last revision.
LEGAL GUARDIANSHIP Code that represents the individual’s legal guardianship status. 1 = Minor 2 = Minor w/Conservator 3 = Adult w/Guardian of Estate and Person 4 = Adult w/ Guardian of Estate 5 = Adult w/Guardian of Person 6 = Adult w/Limited Guardian 7 = Adult w/Temporary Guardian 8 = Adult, No Guardian
LEGAL STATUS Code to indicate the person’s legal status.
0 = Minor – less than 18 years of age (with parent/guardian) 1 = Minor (ward of the state) 2 = Minor w/conservator 3 = Adult w/guardian of estate and person 4 = Adult w/guardian of estate 5 = Adult w/guardian of person 6 = Adult w/limited guardianship 7 = Adult w/temporary guardian 8 = Adult, no guardian
LEVEL OF CARE (LOC) A determination of eligibility of an individual for the HCS and/or TxHmL programs. Assignment of the LOC is based on medical and intellectual diagnosis and professional evaluation of the person’s needs.
8 - Screen Fields June 2008 HCS
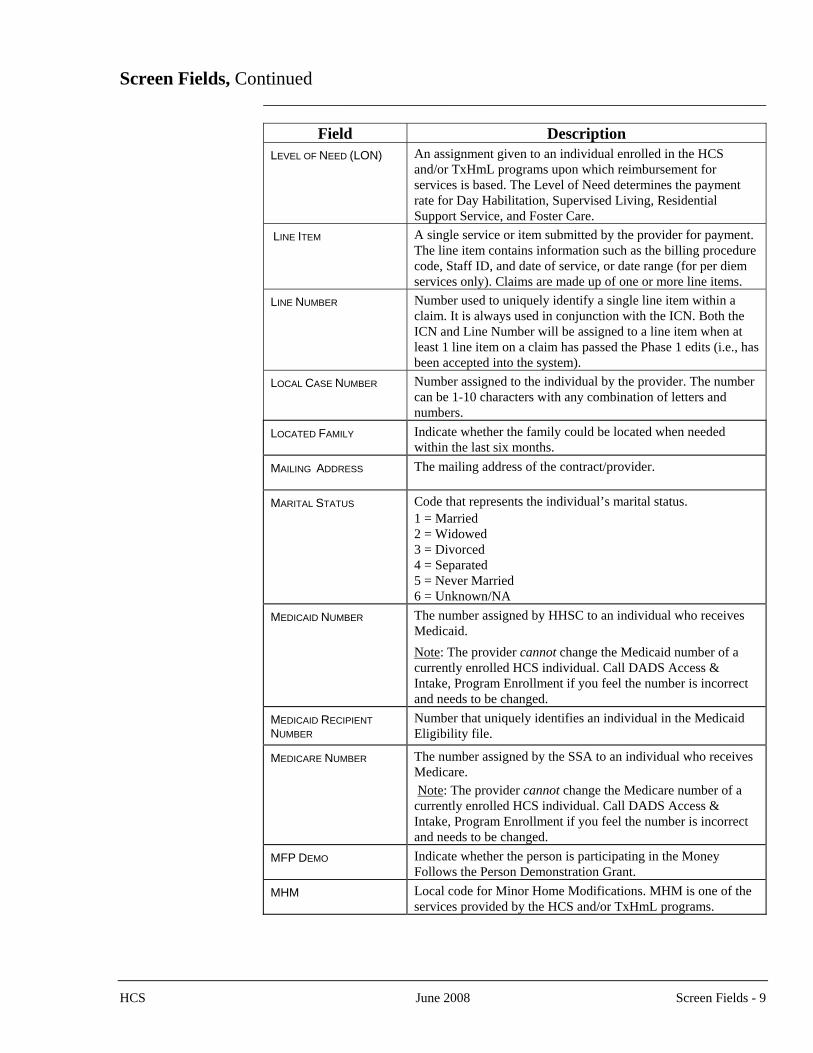
Screen Fields, Continued _______________________________________________________________
Field Description LEVEL OF NEED (LON) An assignment given to an individual enrolled in the HCS
and/or TxHmL programs upon which reimbursement for services is based. The Level of Need determines the payment rate for Day Habilitation, Supervised Living, Residential Support Service, and Foster Care.
LINE ITEM A single service or item submitted by the provider for payment. The line item contains information such as the billing procedure code, Staff ID, and date of service, or date range (for per diem services only). Claims are made up of one or more line items.
LINE NUMBER Number used to uniquely identify a single line item within a claim. It is always used in conjunction with the ICN. Both the ICN and Line Number will be assigned to a line item when at least 1 line item on a claim has passed the Phase 1 edits (i.e., has been accepted into the system).
LOCAL CASE NUMBER Number assigned to the individual by the provider. The number can be 1-10 characters with any combination of letters and numbers.
LOCATED FAMILY Indicate whether the family could be located when needed within the last six months.
MAILING ADDRESS The mailing address of the contract/provider.
MARITAL STATUS Code that represents the individual’s marital status. 1 = Married 2 = Widowed 3 = Divorced 4 = Separated 5 = Never Married 6 = Unknown/NA
MEDICAID NUMBER The number assigned by HHSC to an individual who receives Medicaid.
Note: The provider cannot change the Medicaid number of a currently enrolled HCS individual. Call DADS Access & Intake, Program Enrollment if you feel the number is incorrect and needs to be changed.
MEDICAID RECIPIENT NUMBER
Number that uniquely identifies an individual in the Medicaid Eligibility file.
MEDICARE NUMBER The number assigned by the SSA to an individual who receives Medicare. Note: The provider cannot change the Medicare number of a currently enrolled HCS individual. Call DADS Access & Intake, Program Enrollment if you feel the number is incorrect and needs to be changed.
MFP DEMO Indicate whether the person is participating in the Money Follows the Person Demonstration Grant.
MHM Local code for Minor Home Modifications. MHM is one of the services provided by the HCS and/or TxHmL programs.
HCS June 2008 Screen Fields - 9
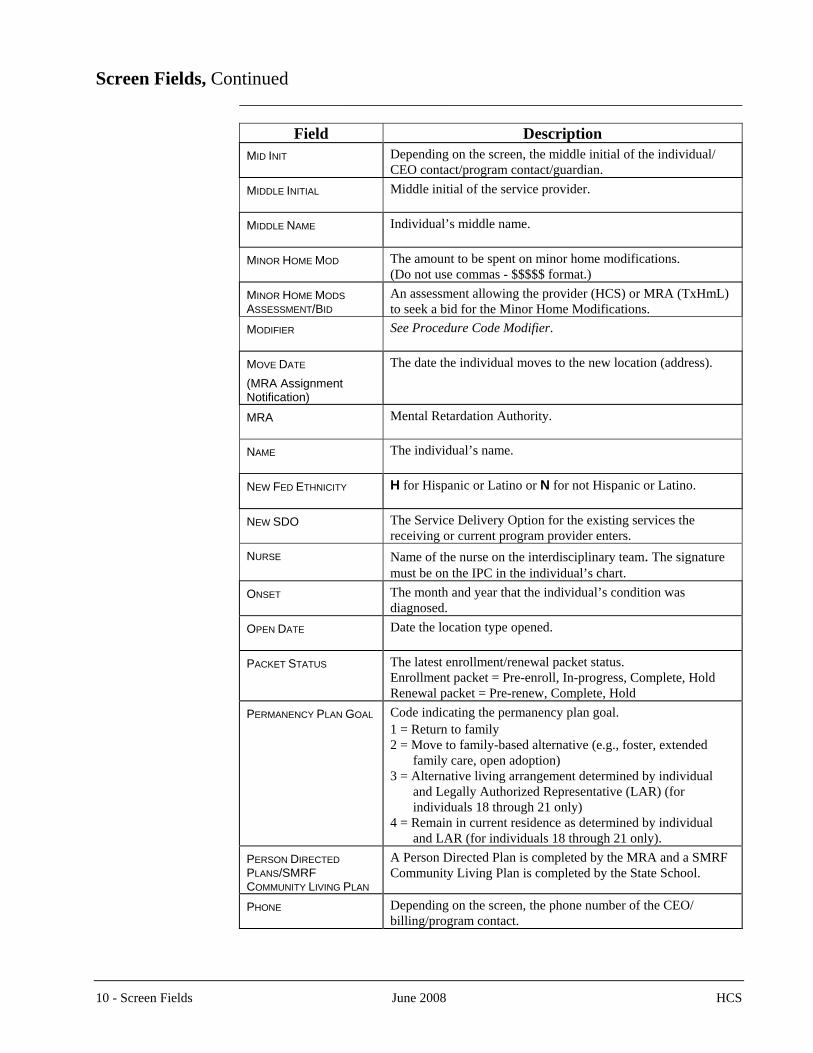
Screen Fields, Continued _______________________________________________________________
Field Description MID INIT Depending on the screen, the middle initial of the individual/
CEO contact/program contact/guardian. MIDDLE INITIAL Middle initial of the service provider.
MIDDLE NAME Individual’s middle name.
MINOR HOME MOD The amount to be spent on minor home modifications.
(Do not use commas - $$$$$ format.) MINOR HOME MODS ASSESSMENT/BID
An assessment allowing the provider (HCS) or MRA (TxHmL) to seek a bid for the Minor Home Modifications.
MODIFIER See Procedure Code Modifier.
MOVE DATE (MRA Assignment Notification)
The date the individual moves to the new location (address).
MRA Mental Retardation Authority.
NAME The individual’s name.
NEW FED ETHNICITY H for Hispanic or Latino or N for not Hispanic or Latino.
NEW SDO The Service Delivery Option for the existing services the receiving or current program provider enters.
NURSE Name of the nurse on the interdisciplinary team. The signature must be on the IPC in the individual’s chart.
ONSET The month and year that the individual’s condition was diagnosed.
OPEN DATE Date the location type opened.
PACKET STATUS The latest enrollment/renewal packet status. Enrollment packet = Pre-enroll, In-progress, Complete, Hold Renewal packet = Pre-renew, Complete, Hold
PERMANENCY PLAN GOAL Code indicating the permanency plan goal. 1 = Return to family 2 = Move to family-based alternative (e.g., foster, extended family care, open adoption) 3 = Alternative living arrangement determined by individual and Legally Authorized Representative (LAR) (for individuals 18 through 21 only) 4 = Remain in current residence as determined by individual and LAR (for individuals 18 through 21 only).
PERSON DIRECTED PLANS/SMRF COMMUNITY LIVING PLAN
A Person Directed Plan is completed by the MRA and a SMRF Community Living Plan is completed by the State School.
PHONE Depending on the screen, the phone number of the CEO/ billing/program contact.
10 - Screen Fields June 2008 HCS
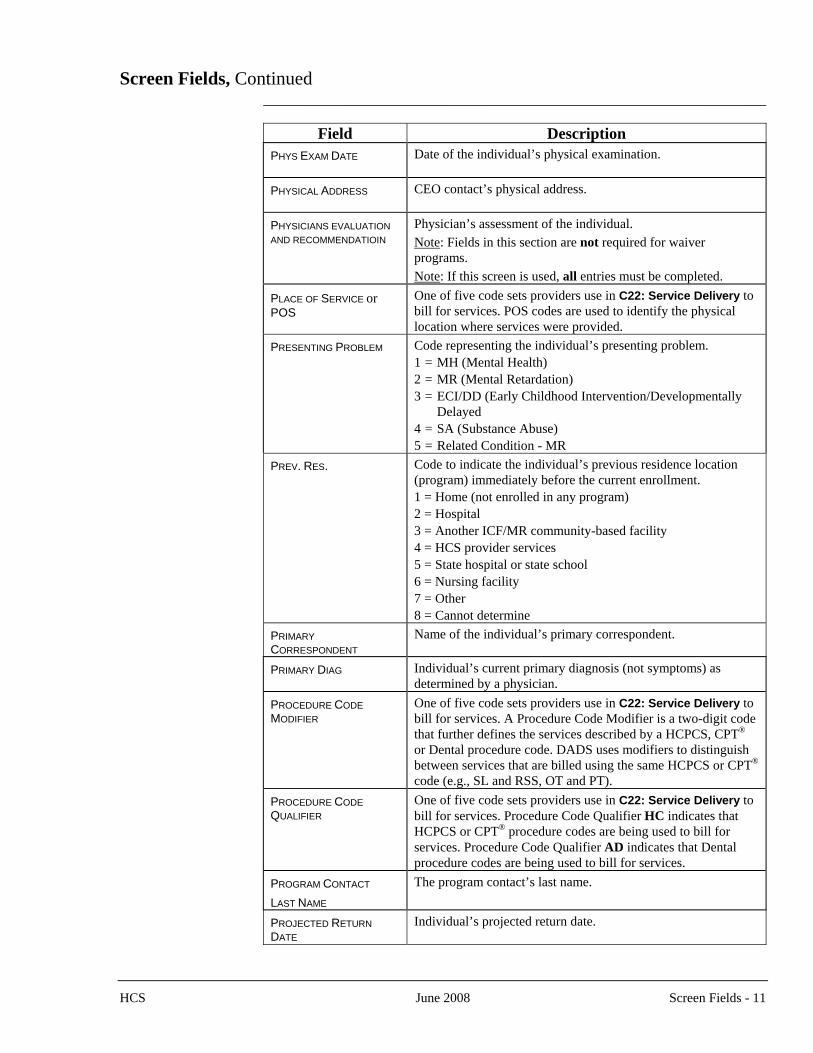
Screen Fields, Continued _______________________________________________________________
Field Description PHYS EXAM DATE Date of the individual’s physical examination.
PHYSICAL ADDRESS CEO contact’s physical address.
PHYSICIANS EVALUATION AND RECOMMENDATIOIN
Physician’s assessment of the individual. Note: Fields in this section are not required for waiver programs. Note: If this screen is used, all entries must be completed.
PLACE OF SERVICE or POS
One of five code sets providers use in C22: Service Delivery to bill for services. POS codes are used to identify the physical location where services were provided.
PRESENTING PROBLEM Code representing the individual’s presenting problem. 1 = MH (Mental Health) 2 = MR (Mental Retardation) 3 = ECI/DD (Early Childhood Intervention/Developmentally
Delayed 4 = SA (Substance Abuse) 5 = Related Condition - MR
PREV. RES. Code to indicate the individual’s previous residence location (program) immediately before the current enrollment. 1 = Home (not enrolled in any program) 2 = Hospital 3 = Another ICF/MR community-based facility 4 = HCS provider services 5 = State hospital or state school 6 = Nursing facility 7 = Other 8 = Cannot determine
PRIMARY CORRESPONDENT
Name of the individual’s primary correspondent.
PRIMARY DIAG Individual’s current primary diagnosis (not symptoms) as determined by a physician.
PROCEDURE CODE MODIFIER
One of five code sets providers use in C22: Service Delivery to bill for services. A Procedure Code Modifier is a two-digit code that further defines the services described by a HCPCS, CPT® or Dental procedure code. DADS uses modifiers to distinguish between services that are billed using the same HCPCS or CPT® code (e.g., SL and RSS, OT and PT).
PROCEDURE CODE QUALIFIER
One of five code sets providers use in C22: Service Delivery to bill for services. Procedure Code Qualifier HC indicates that HCPCS or CPT® procedure codes are being used to bill for services. Procedure Code Qualifier AD indicates that Dental procedure codes are being used to bill for services.
PROGRAM CONTACT LAST NAME
The program contact’s last name.
PROJECTED RETURN DATE
Individual’s projected return date.
HCS June 2008 Screen Fields - 11
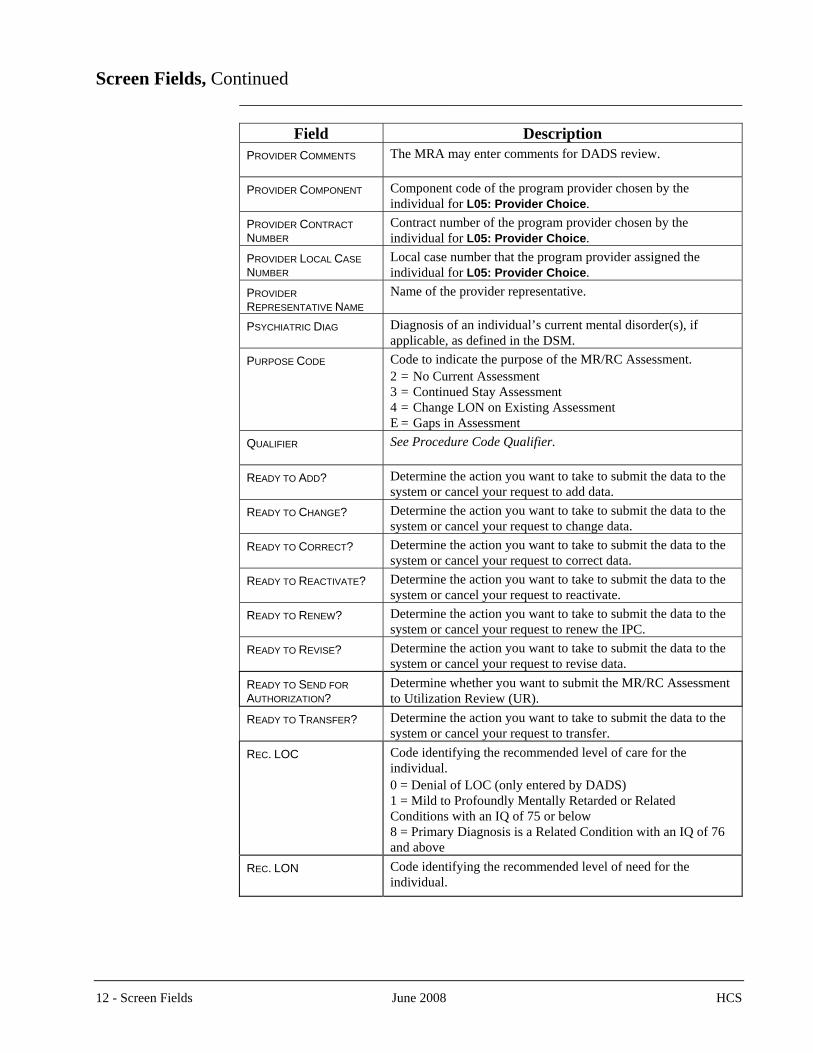
Screen Fields, Continued _______________________________________________________________
Field Description PROVIDER COMMENTS The MRA may enter comments for DADS review.
PROVIDER COMPONENT Component code of the program provider chosen by the
individual for L05: Provider Choice. PROVIDER CONTRACT NUMBER
Contract number of the program provider chosen by the individual for L05: Provider Choice.
PROVIDER LOCAL CASE NUMBER
Local case number that the program provider assigned the individual for L05: Provider Choice.
PROVIDER REPRESENTATIVE NAME
Name of the provider representative.
PSYCHIATRIC DIAG Diagnosis of an individual’s current mental disorder(s), if applicable, as defined in the DSM.
PURPOSE CODE Code to indicate the purpose of the MR/RC Assessment. 2 = No Current Assessment 3 = Continued Stay Assessment 4 = Change LON on Existing Assessment E = Gaps in Assessment
QUALIFIER See Procedure Code Qualifier.
READY TO ADD? Determine the action you want to take to submit the data to the system or cancel your request to add data.
READY TO CHANGE? Determine the action you want to take to submit the data to the system or cancel your request to change data.
READY TO CORRECT? Determine the action you want to take to submit the data to the system or cancel your request to correct data.
READY TO REACTIVATE? Determine the action you want to take to submit the data to the system or cancel your request to reactivate.
READY TO RENEW? Determine the action you want to take to submit the data to the system or cancel your request to renew the IPC.
READY TO REVISE? Determine the action you want to take to submit the data to the system or cancel your request to revise data.
READY TO SEND FOR AUTHORIZATION?
Determine whether you want to submit the MR/RC Assessment to Utilization Review (UR).
READY TO TRANSFER? Determine the action you want to take to submit the data to the system or cancel your request to transfer.
REC. LOC
Code identifying the recommended level of care for the individual. 0 = Denial of LOC (only entered by DADS) 1 = Mild to Profoundly Mentally Retarded or Related Conditions with an IQ of 75 or below 8 = Primary Diagnosis is a Related Condition with an IQ of 76 and above
REC. LON
Code identifying the recommended level of need for the individual.
12 - Screen Fields June 2008 HCS
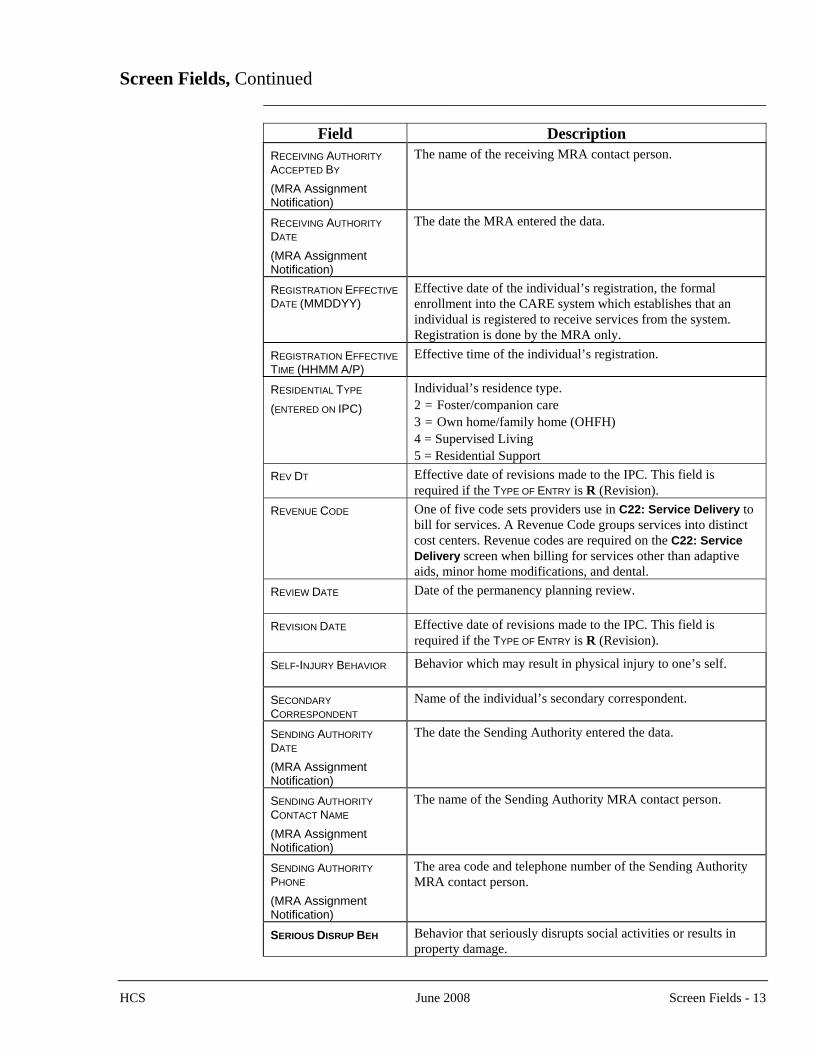
Screen Fields, Continued _______________________________________________________________
Field Description RECEIVING AUTHORITY ACCEPTED BY (MRA Assignment Notification)
The name of the receiving MRA contact person.
RECEIVING AUTHORITY DATE (MRA Assignment Notification)
The date the MRA entered the data.
REGISTRATION EFFECTIVE DATE (MMDDYY)
Effective date of the individual’s registration, the formal enrollment into the CARE system which establishes that an individual is registered to receive services from the system. Registration is done by the MRA only.
REGISTRATION EFFECTIVE TIME (HHMM A/P)
Effective time of the individual’s registration.
RESIDENTIAL TYPE (ENTERED ON IPC)
Individual’s residence type. 2 = Foster/companion care 3 = Own home/family home (OHFH) 4 = Supervised Living 5 = Residential Support
REV DT Effective date of revisions made to the IPC. This field is required if the TYPE OF ENTRY is R (Revision).
REVENUE CODE One of five code sets providers use in C22: Service Delivery to bill for services. A Revenue Code groups services into distinct cost centers. Revenue codes are required on the C22: Service Delivery screen when billing for services other than adaptive aids, minor home modifications, and dental.
REVIEW DATE Date of the permanency planning review.
REVISION DATE
Effective date of revisions made to the IPC. This field is required if the TYPE OF ENTRY is R (Revision).
SELF-INJURY BEHAVIOR Behavior which may result in physical injury to one’s self.
SECONDARY CORRESPONDENT
Name of the individual’s secondary correspondent.
SENDING AUTHORITY DATE (MRA Assignment Notification)
The date the Sending Authority entered the data.
SENDING AUTHORITY CONTACT NAME (MRA Assignment Notification)
The name of the Sending Authority MRA contact person.
SENDING AUTHORITY PHONE (MRA Assignment Notification)
The area code and telephone number of the Sending Authority MRA contact person.
SERIOUS DISRUP BEH Behavior that seriously disrupts social activities or results in property damage.
HCS June 2008 Screen Fields - 13
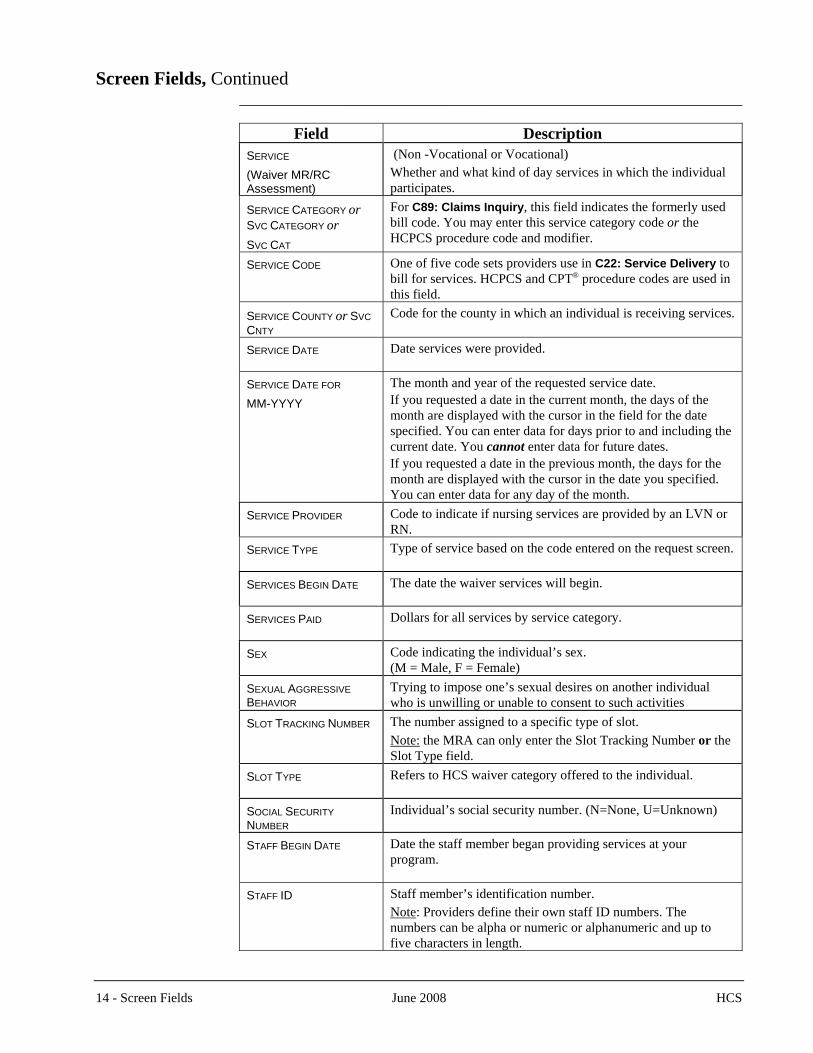
Screen Fields, Continued _______________________________________________________________
Field Description SERVICE (Waiver MR/RC Assessment)
(Non -Vocational or Vocational) Whether and what kind of day services in which the individual participates.
SERVICE CATEGORY or
SVC CATEGORY or SVC CAT
For C89: Claims Inquiry, this field indicates the formerly used bill code. You may enter this service category code or the HCPCS procedure code and modifier.
SERVICE CODE One of five code sets providers use in C22: Service Delivery to bill for services. HCPCS and CPT® procedure codes are used in this field.
SERVICE COUNTY or SVC CNTY
Code for the county in which an individual is receiving services.
SERVICE DATE Date services were provided.
SERVICE DATE FOR MM-YYYY
The month and year of the requested service date. If you requested a date in the current month, the days of the month are displayed with the cursor in the field for the date specified. You can enter data for days prior to and including the current date. You cannot enter data for future dates.
If you requested a date in the previous month, the days for the month are displayed with the cursor in the date you specified. You can enter data for any day of the month.
SERVICE PROVIDER Code to indicate if nursing services are provided by an LVN or RN.
SERVICE TYPE Type of service based on the code entered on the request screen.
SERVICES BEGIN DATE The date the waiver services will begin.
SERVICES PAID Dollars for all services by service category.
SEX Code indicating the individual’s sex. (M = Male, F = Female)
SEXUAL AGGRESSIVE BEHAVIOR
Trying to impose one’s sexual desires on another individual who is unwilling or unable to consent to such activities
SLOT TRACKING NUMBER The number assigned to a specific type of slot. Note: the MRA can only enter the Slot Tracking Number or the Slot Type field.
SLOT TYPE Refers to HCS waiver category offered to the individual.
SOCIAL SECURITY NUMBER
Individual’s social security number. (N=None, U=Unknown)
STAFF BEGIN DATE Date the staff member began providing services at your program.
STAFF ID Staff member’s identification number.
Note: Providers define their own staff ID numbers. The numbers can be alpha or numeric or alphanumeric and up to five characters in length.
14 - Screen Fields June 2008 HCS
Screen Fields, Continued _______________________________________________________________
Field Description STATE Depending on the screen, the state of residence of the
primary/secondary correspondent, individual, CEO contact, provider, billing contact, guardian, or the contract.
STAT The individual’s current status relative to the service type.
STATUS • For C89: Claims Inquiry, displays the status for a specified claim. Possible values are:
U =Pending P =Paid A =Approved to Pay D =Denied (Batch) Blank = All Claims • For C77: Reimbursement Authorization Inquiry, indicate the
status of the AA/MHM/DE claim. Possible values are: A =Authorized D =Denied Blank = All Claims • For C75: Prior Approval Inquiry, indicate the status of the
AA/MHM claim. Possible values are: P =Pending A =Authorized D =Denied Blank = All Claims
STATUS DATE The date the current status was changed. Note: The Status Date cannot be changed without changing the Status Field.
STREET Depending on the screen, the street address of the contract, individual, CEO contact, provider, billing contact, or guardian.
SUF Depending on the screen, the suffix (if any) of the service provider, CEO contact, billing contact, or program contact.
TERMINATION REASON (PERMANENT DISCHARGE)
Code that indicates the reason the individual is being permanently discharged. 1 = Loss of Medicaid Eligibility 2 = Loss of ICF/MR LOC Eligibility 3 = IPC Exceeds Cost Ceiling 4 = Voluntary Withdrawal by Consumer 6 = Institutionalization (Hospital, NF, ICFMR) 7 = Client Cannot Be Located 8 = Death 9 = Unable to Meet Health and Welfare Needs
TERMINATION REASON (TEMPORARY DISCHARGE)
Code that indicates the reason the individual is being temporarily discharged. 1 = Loss of Financial Eligibility 2 = Hospitalization 3 = Elopement 4 = Crisis Stabilization
HCS June 2008 Screen Fields - 15
Screen Fields, Continued _______________________________________________________________
Field Description TERMINATION REVIEWED BY: DATE:
The name of the MRA Representative who reviewed the termination request and the date the request was reviewed. Note: the date entered should be the same as the Effective Date of Discharge located under the signature line.
TIME (HHMM A/P) The registration effective time.
TIME OF DEATH If the TERMINATION REASON is Death, indicates the time of the death.
TO BE PROVIDED NOW TO TRANSFER DT
Dollars to be provided between today and the transfer effective date for all services that have not been entered. Note: If no amount is entered, the transferring provider will not be able to enter any additional services for that individual.
TO USE The number of units to be used from now to transfer effective date (units that have not been claimed) for the transferring program and/or the transferring CDSA. The entry must be a valid number or “NA.” The field will allow decimal fraction of units up to two decimal places (dollars for CDS services).
TOTAL ANNUAL COST Total annual cost of the IPC.
TRANSFER ACCEPTED? Indicates whether the provider receiving the individual accepts the transfer. The receiving provider completes this field after the transfer IPC has been entered.
TRANSFER EFFECTIVE DATE
Effective date of the individual’s transfer.
TRANSFER TO COMPONENT
Three-digit code of the component to which the individual is transferring. Note: The provider transferring the individual completes this field. When the receiving provider accesses this screen, this field is displayed.
TRANSFER TO CONTRACT NUMBER
Contract number to which the individual is transferring.
TRANSFER TO SERVICE COUNTY
Service county to which the individual is transferring. See the County Codes section for a list of county codes and names.
TRAUMATIC BRAIN INJURY Indicate whether the person has a history of traumatic brain injury.
TXHML STATUS The status of the individual’s TxHmL offer.
TYPE OF DISCHARGE Type of discharge (P=Permanent, T=Temporary).
TYPE OF ENTRY Determine the action you want to take. (A=Add, C=Change/Correct, D=Delete).
16 - Screen Fields June 2008 HCS
Screen Fields, Continued _______________________________________________________________
Field Description TYPE OF ENTRY (Individual Plan of Care)
Type of IPC (Individual Plan of Care) being entered. I = Initial E = Error Correction R = Revision N = Renewal T = Transfer D = Delete
TYPE OF LOCATION (entered on C:24 Location and C25: Location Type Modification screens)
Code to indicate the type of location. 2 = Foster/Companion Care 3 = 3-bed facility 4 = 4-bed facility
UNITS Units (hours, days, or months) the service was provided.
UNITS REMAIN IN IPC The remaining units in the IPC for the type of service requested. Indicates whether the units are by hours, days, or months.
VIEW COMMENTS Y (Yes) or Blank (No) to indicate whether you want to view comments made by your reviewer concerning your Prior Approval packet/4116A.
ZIP CODE Depending on the screen, the zip code of the individual/primary correspondent/secondary correspondent/CEO contact/provider/ billing contact/contract.
ZIP CODE/SUFFIX Individual’s zip code and suffix.
# VISITS BY FAM Number of visits to the facility by the parent/guardian.
# VISITS TO FAM Number of the resident’s visits to the home.
WAIVER TYPE The waiver type in which the individual is to be enrolled. (1=HCS, 4=TxHmL)
_______________________________________________________________
HCS June 2008 Screen Fields - 17

18 - Screen Fields June 2008 HCS
This page was intentionally left blank.
Glossary _______________________________________________________________ Introduction The following terms and definitions are used in the automated systems for the
Home and Community-Based Services (HCS) and Texas Home Living (TxHmL) programs.
Forms identified in the Glossary are located on the Department of Aging and
Disability Services (DADS) website. For a listing of web sites and their corresponding web addresses, refer to the Web Addresses section of the Introduction.
_______________________________________________________________ Adult A person who is 18 years of age or older.
Actively involved Involvement with an individual that the individual’s service planning team
deems to be of a quality nature based on the following: • observed interactions of the person with the individual; • a history of advocating for the best interests of the individual; • knowledge and sensitivity to the individual’s preferences, values, and
beliefs; • ability to communicate with the individual; and • availability to the individual for assistance or support when needed.
Allowable Cost A billable service or item that is within the rate and spending limits of the rate established by the Health and Human Services Commission and that meets the requirements of an individual’s program.
Applicant Depending on the context, an applicant is: • a person applying for employment with an employer; • a person or legal entity applying for a contract with an employer to
deliver services to an individual; or • a person applying for services through a DADS program.
Assignment (to Location Code)
Identifies the location and residential type of an individual’s residence.
Authorized Amount
Total dollar amounts currently allowed on an individual’s IPC (Individual Plan of Care). Exceeding this amount requires a review by the Program Enrollment/Utilization Review (PE/UR) unit of Mental Retardation Authorities.
Billable Unit A term used by DADS to describe one (1) unit of a HIPAA standard procedure code. Depending on the procedure code, one (1) Billable Unit may be equal to 15 minutes, 1 day of service, or 1 month of service.
HCS June 2008 Glossary - 1
Glossary, Continued _______________________________________________________________ Budget A written projection of expenditures for each program service delivered
through the CDS option. Budgeted Unit Rate The unit rate calculated for employee compensation (wages and benefits) in
the budgeting process for services delivered through the CDS option. The rate is calculated after employer support services have been budgeted.
CARE (Client Assignment and REgistration) System
Centralized, confidential client database, in which service recipients are registered and tracked.
CARE CDS Service Codes
In the CARE system, all services being self-directed have acronyms that end in “V.” For example, in HCS with Supported Home Living (SHL), this service will appear as “SHLV.”
Case Manager A person who provides case management services to an individual. The case manager assists an individual who receives program services in gaining access to needed services, regardless of the funding source for the services, and assists with other duties as required by the individual’s program. In the HCS Program, an individual is assigned a case manager.
CDS Option (Consumer Directed Services)
A service delivery option that allows individuals or their legally authorized representatives to be the employer of their direct service providers by recruiting, hiring, training, supervising, and terminating their service providers. Services that can be self-directed vary depending on the DADS program.
Certified HCS Provider
A contracted HCS program provider, serving enrolled individuals, that has received an on-sight survey by DADS and has demonstrated compliance with the HCS Principles.
Certified TxHmL Provider
A contracted TxHmL program provider, serving enrolled individuals, that has received an on-sight survey by DADS and has demonstrated compliance with TxHmL standards.
Claim A service that is submitted by the provider for payment. Each claim must be for one individual, one contract, one service type, one month, one place of service, and one level of need. A single claim may include multiple dates of service within the month.
Client Identification Number (Client ID)
Unique statewide identifier generated by the CARE system when each person is registered by the Mental Retardation Authority. Also referred to as the CARE ID.
2 - Glossary June 2008 HCS
Glossary, Continued _______________________________________________________________ Client/Consumer A person enrolled in the HCS and/or TxHmL program.
Community-Based Services
Services provided within the community by community centers or private providers. Includes the array of services reflected on the IPC.
Component Code Three-digit unique code that identifies a state hospital, state school, state center, community center, or private provider.
You must provide this three-digit code each time you contact DADS.
Comptroller Vendor Number
Fourteen-digit number by which the State of Texas Comptroller’s office identifies the provider.
Consumer Directed Services Agency (CDSA)
An agency that contracts with DADS to provide financial management services (FMS) to individuals who choose to use the consumer directed services option.
Consumer Enrollment
Process of enrolling an individual into HCS and/or TxHmL in which the local Mental Retardation Authority has the responsibility of completing all steps in the enrollment process, including developing the PDP, MRRC, and IPC, monitoring the financial eligibility determination process, and electronically submitting information to the DADS, Program Enrollment/Utilization Review unit for review. The Program Enrollment unit approves all enrollments into the HCS or TxHmL program.
Consumer Hold Consumer hold may be temporary hold or permanent hold and results in withholding of payment after claims have been submitted. Reasons for consumer hold are listed on the Consumer Hold Report (HC062270).
Contract Number Nine-digit number that identifies the contract under which an individual is receiving services.
Contractor A person, such as a licensed or certified therapist, a licensed or registered nurse, or other professional, who has a service agreement with an employer to perform one or more program services as an independent contractor, rather than an employee of the employer or of an entity. A contractor may be a sole proprietor.
Correspondent In case of an emergency, the primary correspondent is the first person to contact on behalf of an individual. This person is not necessarily a relative or financially responsible for the care of the individual being served. The secondary correspondent is the person to contact on behalf of an individual if the primary correspondent cannot be reached.
HCS June 2008 Glossary - 3
Glossary, Continued _______________________________________________________________ Cost Ceiling See Authorized Amount.
CPT®Code Current Procedural Terminology (CPT®) is a set of procedure codes
providers use to bill for services in C22: Service Delivery. CPT® Codes are used in the SERVICE CODE field.
DADS The Department of Aging and Disability Services.
Designated Representative (DR)
An adult who is chosen by the employer (individual or LAR) to assist or to perform employer responsibilities in the CDS option. This individual must be willing to perform these duties on a volunteer basis, must be age 18 years or older, must pass a criminal background check and must not be listed on either the Employee Misconduct Registry or the Nurse Aid Registry.
Discharge Permanent Discharge (PD): the termination of services to the individual by DADS because the individual has voluntarily left the program or is found to be ineligible for the program. Temporary Discharge (TD): the suspension of services to the individual by the provider while the individual is unable, ineligible, or unwilling to receive services.
Electronic Transmission Agreement (ETA)
A DADS form that providers use to request access to a secure server. Access may be for the provider, a clearinghouse that the provider has designated to transmit X12 transactions on its behalf, or any provider to retrieve reports from the EDTS server.
Employee A person employed by an employer through a service agreement to deliver program services and is paid an hourly wage for those services.
Employer An individual or LAR who chooses to participate in the CDS option, and, therefore, is responsible for hiring and retaining service providers to deliver program services. In the CDS option the employer must be either the individual receiving services (who is at least 18 years of age and does not have a legal guardian), a parent, or legal representative of a minor-aged individual, or the legal guardian, regardless of the age of the individual receiving services.
Employer-Agent The Internal Revenue Service (IRS) designation of a CDSA as the entity responsible for specific activities and responsibilities required by the IRS on behalf of an employer in the CDS option.
4 - Glossary June 2008 HCS
Glossary, Continued _______________________________________________________________ Employer Support Services
Services and items the employer needs to perform employer and employment responsibilities, such as office equipment and supplies, recruitment, and payment of Hepatitis B vaccinations for employees and support consultation.
Entity An organization that has a legal identity such as a corporation, limited partnership, limited liability company, professional association, or cooperative.
Financial Eligibility
To be served in the HCS or TxHmL program, an individual must receive Medicaid benefits. An individual is financially eligible if he/she is receiving Supplemental Security Income (SSI) benefits through the Social Security Administration or is receiving Medicaid Assistance Only (MAO) through the Texas Health and Human Services Commission.
Financial Management Services (FMS)
A service provided to the employer (individual or LAR) by a CDSA. This service consists of registration as the individual’s employer-agent, assistance as necessary with the individual’s service budget, approval of the service budget, performance of criminal background and registry checks upon request, verification of direct service provider credentials, processing direct service provider timesheets, computing and paying all federal and state taxes, distributing payroll, processing invoices and receipts for payment, maintenance of records for all expenses and reimbursements, monitoring of budgets, preparation of at least quarterly reports regarding the CDS budget for the employer and CM or SC.
Guardian A person appointed by law to represent and make appropriate decisions for an individual because of a physical, mental, psychological, or intellectual condition that prevents the individual from making reasonable decisions or doing what is necessary for his or her health or welfare.
HCPCS Healthcare Common Procedure Coding System. HCPCS (pronounced hick′ • picks) is a set of procedure codes providers use to bill for services in C22: Service Delivery. HCPCS Codes are used in the SERVICE CODE field.
Home and Community-Based Services (HCS) Waiver Program
A waiver of the Medicaid state plan granted under Section 1915 (c) of the Social Security Act which provides community-based services to certain people with mental retardation as an alternative to institutional care.
ICAP Service Level The ICAP service level identifies the level of service as determined by the Inventory for Client and Agency Planning (ICAP) assessment instrument.
ICF/MR
An intermediate care facility for persons with mental retardation or a related condition.
HCS June 2008 Glossary - 5
Glossary, Continued _______________________________________________________________ Individual A person enrolled in a program.
Individual Plan of Care (IPC)
A format for documentation of services needed by a person receiving services in the HCS or TxHmL program. The IPC is based on an assessment of the individual’s needs and personal goals and is developed by qualified individuals. The IPC contains the specific types of services required to support an individual in the community, the units of services, and the estimated annual cost.
Individual Service Plan (ISP)
A written plan developed by the Interdisciplinary Team that describes the individual’s characteristics, desires, needs, and personal outcomes, the waiver and non-waiver services necessary to achieve the individual’s outcomes, the objectives and methodologies related to each service, and the justification for each service. The ISP must be reviewed and updated at least annually and as the individual’s circumstances change. The ISP describes the services to be included in the IPC.
Interdisciplinary Team (IDT)
A planning team constituted by the provider consisting of the individual and Legally Authorized Representative (LAR), a case manager, a nurse, other persons chosen by the individual/LAR, and professional or direct care staff necessary to address the needs and desires of the individual.
Internal Control Number or ICN
An ICN is used to uniquely identify a single claim. An ICN will be assigned to a claim when at least 1 line item for that claim has passed the Phase 1 edits (i.e., has been accepted into the system).
Inventory for Client and Agency Planning (ICAP)
A validated, standardized assessment that measures the level of assistance and supervision an individual requires and, thus, the amount and intensity of services and supports an individual needs.
Legally Authorized Representative (LAR)
A person authorized or required by law to act on behalf of an individual with regard to a matter described in this chapter, including a parent, guardian, managing conservator of a minor, or the guardian of an adult.
Level of Care (LOC)
A determination of eligibility of an individual for the ICF/MR, HCS, or TxHmL programs. Assignment of the LOC is based on medical and intellectual diagnosis and professional evaluation of the person’s needs.
Level of Need (LON)
An assignment given to an individual enrolled in the ICF/MR, HCS, or TxHmL programs upon which reimbursement for services is based. The Level of Need determines the payment rate for Day Habilitation, Supervised Living, Residential Support Service, and Foster Care in HCS and the daily rate in community ICF/MRs.
6 - Glossary June 2008 HCS
Glossary, Continued _______________________________________________________________ Line Item The part of the claim that specifies the date of service. Multiple line items
can be included as part of one claim. Line Number
Number used to uniquely identify a single line item within a claim. It is always used in conjunction with the ICN. Both the ICN and Line Number will be assigned to a line item when at least 1 line item on a claim has passed the Phase 1 edits (i.e., has been accepted into the system).
Local Case Number
Number assigned to the individual by the provider. The local case number can be 1-10 characters with any combination of letters and numbers. When an individual moves from one provider to another, the new provider must assign a local case number.
Location Code
Code used to identify a home in which residential services are provided. The Location Code can be 1-4 characters with any combination of letters and numbers.
Logon Account Number (User ID Number)
Number assigned to each user by DADS that identifies the user and allows that user to access the network.
Mental Retardation Authority (MRA)
An entity to which the Texas Health and Human Services Commission’s authority and responsibility described in THSC, §531.002(11) has been delegated.
Minor A person who is 17 years of age or younger.
Minor Home Modification/ Adaptive Aids/ Dental Summary Sheet (4116A)
A form that is used to request Reimbursement Authorization for adaptive aids, minor home modifications, or dental services.
Modifier See Procedure Code Modifier.
MR/RC Assessment
A form utilized by DADS for eligibility determination, LOC determination, and LON assignment.
Refer to the MR/RC Assessment instructions at http://www.dads.state.tx.us/handbooks/instr/8000/F8578-HCS/ for definitions of the terms used on the MR/RC.
Non-Program Resource
A resource other than an individual’s program that provides one or more support services or items.
Parent A natural, legal, foster, or adoptive parent of a minor.
HCS June 2008 Glossary - 7
Glossary, Continued _______________________________________________________________ Permanency Planning
A philosophy and planning process that focuses on the outcome of family support for an individual under 22 years of age by facilitating a permanent living arrangement in which the primary feature is an enduring and nurturing parental relationship.
Person-Directed Plan (PDP)
The service plan for individuals in the TxHmL program that describes the supports and services necessary to achieve the desired outcomes identified by the individual, or the LAR on behalf of the individual. This document identifies the program services to be provided to the individual, the number of units of each service to be provided, and the projected cost of each service.
Place of Service or POS
One of five code sets providers use in C22: Service Delivery to bill for services. POS codes are used to identify the physical location where services were provided.
Prior Approval Approval for those adaptive aids (AA) and minor home modifications (MHM) that have not been purchased. Providers may obtain prior approval to determine how much DADS will pay for a particular AA or MHM. Providers submit the AA/MHM Request for Prior Approval form to DADS, Provider Services, Billing and Payment unit to request approval of an AA or MHM prior to its purchase. Submitted requests will be assigned a Prior Approval (PA) Tracking Number. Providers are responsible for accessing C75: Prior Approval Inquiry to look up the PA Tracking Number and status for a submitted request.
Prior Authorization
A general term used in the healthcare industry to describe a process in which providers are responsible for getting services authorized, usually before the services have been provided, but in some cases afterward. Both Prior Approval and Reimbursement Authorization are types of prior authorization.
Procedure Code Modifier
One of five code sets providers use in C22: Service Delivery to bill for services. A Procedure Code Modifier is a two-digit code that further defines the services described by a HCPCS, CPT®, or Dental procedure code. DADS uses modifiers to distinguish between services that are billed using the same HCPCS or CPT® code (e.g., SL and RSS, OT and PT).
Procedure Code Qualifier
One of five code sets providers use in C22: Service Delivery to bill for services. Procedure Code Qualifier HC indicates that HCPCS or CPT® procedure codes are being used to bill for services. Procedure Code Qualifier AD indicates that Dental procedure codes are being used to bill for services.
8 - Glossary June 2008 HCS
Glossary, Continued _______________________________________________________________ Program A community services program administered by DADS.
Program Unit A term used by DADS to describe one (1) unit of service as it appears on
the IPC. Depending on the service type, one (1) unit may be equal to 1 hour, 1 day, or 1 month of service.
Provider A service provider with whom the department contracts for the delivery of community-based mental retardation services in a specified local service area (contract area) of the state.
Program Provider (PRGP)
In the CDS option, this term refers to the individual’s comprehensive program provider agency.
Provisionally Certified HCS Provider
A legal entity that has completed the application process to become an HCS program provider, including submission of required contract information and an HCS Self-Assessment, attendance at the Pre-Application Orientation and New Provider Orientation, and demonstration of an HCS Self-Assessment that is in 100% compliance with the HCS Principles. Provisional certification must be obtained prior to the legal entity contracting with DADS as an HCS program provider.
Provisionally Certified TxHmL Provider
A legal entity that has completed the application process to become a TxHmL program provider. Provisional certification must be obtained prior to the legal entity contracting with DADS as a TxHmL program provider.
Qualifier See Procedure Code Qualifier.
Registration Formal enrollment into the CARE system which establishes that an individual is registered to receive services. Registration is done by the MRA only.
Reimbursement Authorization
Authorization that providers request from DADS to bill for adaptive aids (AA), minor home modifications (MHM), or dental (DE) services that have already been purchased and which may or may not have gone through the Prior Approval process. When providers submit a Minor Home Modification/Adaptive Aids/Dental Summary Sheet (4116A) with receipts and any other needed information, they are requesting Reimbursement Authorization (i.e., authorization for payment). Once Reimbursement Authorization has been given an “approved” status in C77: Reimbursement Authorization Inquiry, providers may bill for the AA, MHM, or DE service using C22: Service Delivery. The Reimbursement Authorization (RA) Tracking Number obtained from C77 should be used as the authorization number in C22. Providers are responsible for reviewing C77 to obtain the RA Tracking Number and status for a submitted request.
HCS June 2008 Glossary - 9
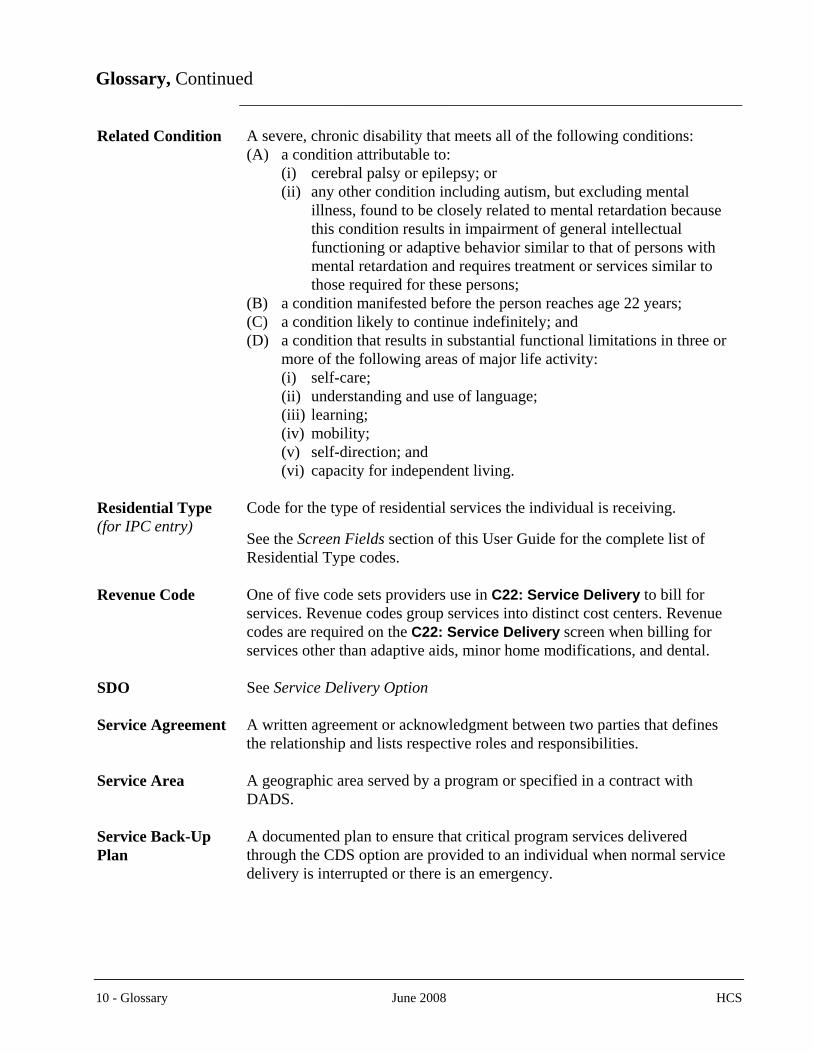
Glossary, Continued _______________________________________________________________ Related Condition
A severe, chronic disability that meets all of the following conditions: (A) a condition attributable to: (i) cerebral palsy or epilepsy; or (ii) any other condition including autism, but excluding mental
illness, found to be closely related to mental retardation because this condition results in impairment of general intellectual functioning or adaptive behavior similar to that of persons with mental retardation and requires treatment or services similar to those required for these persons;
(B) a condition manifested before the person reaches age 22 years; (C) a condition likely to continue indefinitely; and (D) a condition that results in substantial functional limitations in three or
more of the following areas of major life activity: (i) self-care; (ii) understanding and use of language; (iii) learning; (iv) mobility; (v) self-direction; and (vi) capacity for independent living.
Residential Type (for IPC entry)
Code for the type of residential services the individual is receiving.
See the Screen Fields section of this User Guide for the complete list of Residential Type codes.
Revenue Code One of five code sets providers use in C22: Service Delivery to bill for services. Revenue codes group services into distinct cost centers. Revenue codes are required on the C22: Service Delivery screen when billing for services other than adaptive aids, minor home modifications, and dental.
SDO See Service Delivery Option
Service Agreement A written agreement or acknowledgment between two parties that defines the relationship and lists respective roles and responsibilities.
Service Area A geographic area served by a program or specified in a contract with DADS.
Service Back-Up Plan
A documented plan to ensure that critical program services delivered through the CDS option are provided to an individual when normal service delivery is interrupted or there is an emergency.
10 - Glossary June 2008 HCS
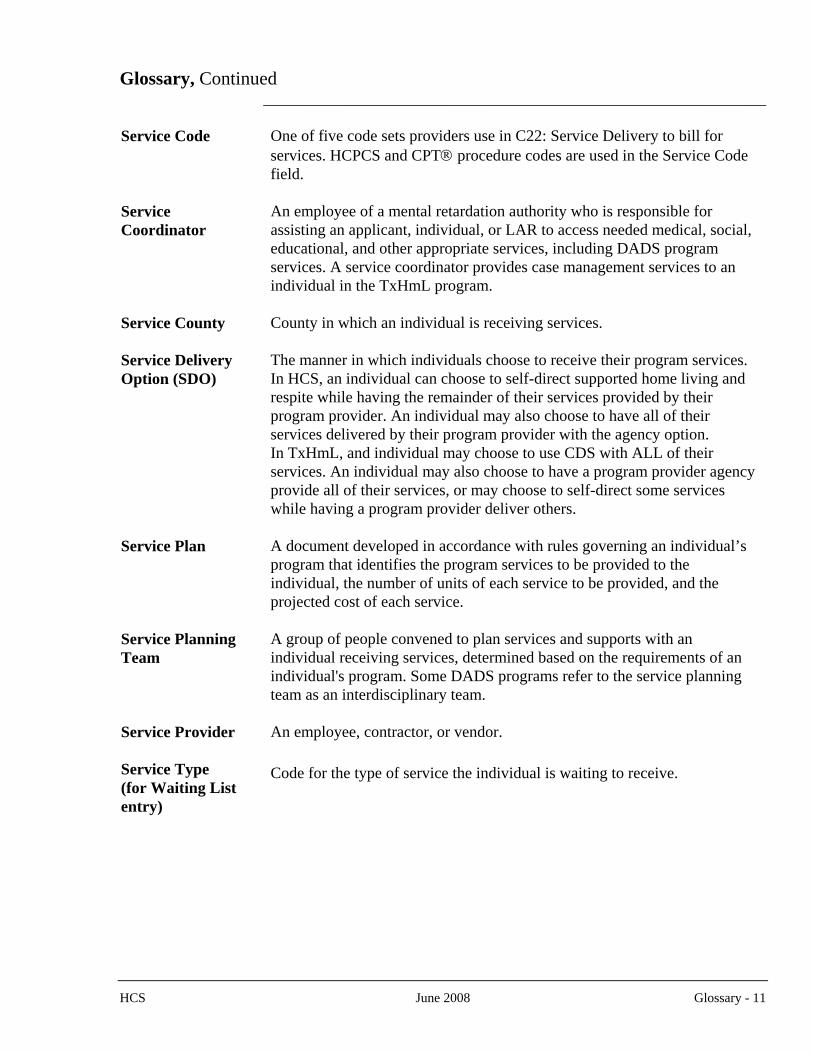
Glossary, Continued _______________________________________________________________ Service Code One of five code sets providers use in C22: Service Delivery to bill for
services. HCPCS and CPT® procedure codes are used in the Service Code field.
Service Coordinator
An employee of a mental retardation authority who is responsible for assisting an applicant, individual, or LAR to access needed medical, social, educational, and other appropriate services, including DADS program services. A service coordinator provides case management services to an individual in the TxHmL program.
Service County County in which an individual is receiving services.
Service Delivery Option (SDO)
The manner in which individuals choose to receive their program services. In HCS, an individual can choose to self-direct supported home living and respite while having the remainder of their services provided by their program provider. An individual may also choose to have all of their services delivered by their program provider with the agency option. In TxHmL, and individual may choose to use CDS with ALL of their services. An individual may also choose to have a program provider agency provide all of their services, or may choose to self-direct some services while having a program provider deliver others.
Service Plan A document developed in accordance with rules governing an individual’s program that identifies the program services to be provided to the individual, the number of units of each service to be provided, and the projected cost of each service.
Service Planning Team
A group of people convened to plan services and supports with an individual receiving services, determined based on the requirements of an individual's program. Some DADS programs refer to the service planning team as an interdisciplinary team.
Service Provider An employee, contractor, or vendor.
Service Type (for Waiting List entry)
Code for the type of service the individual is waiting to receive.
HCS June 2008 Glossary - 11
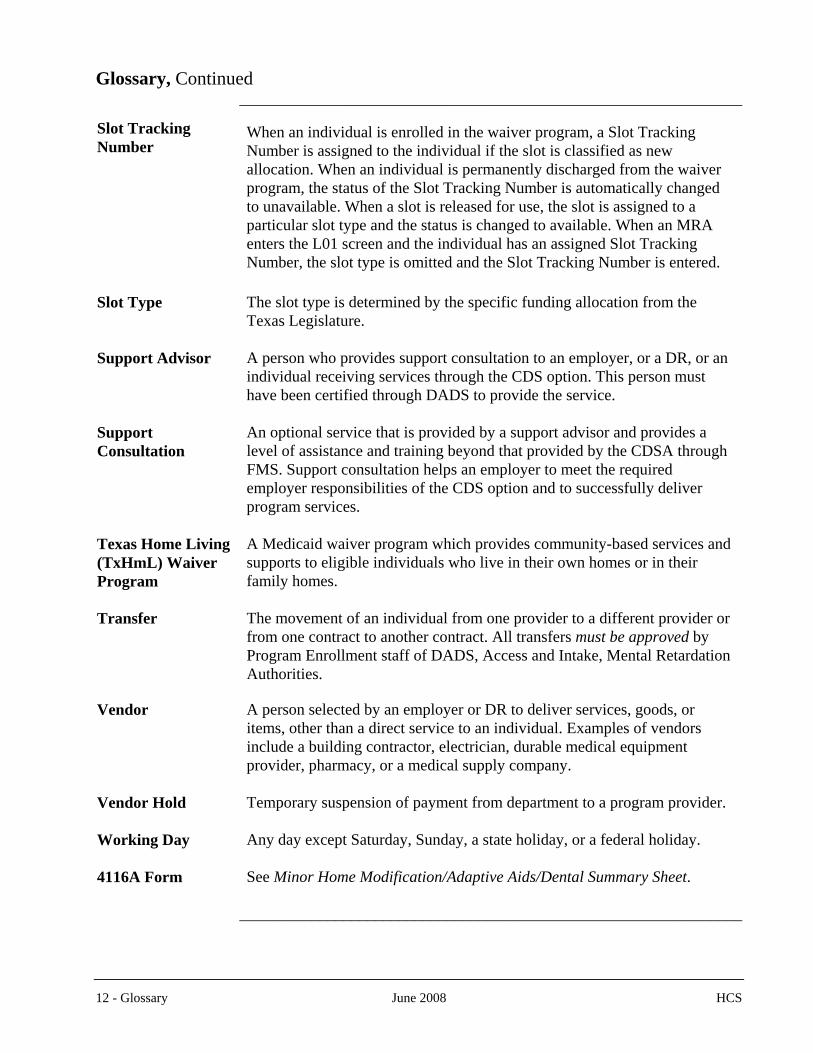
12 - Glossary June 2008 HCS
Glossary, Continued _______________________________________________________________
Slot Tracking Number
When an individual is enrolled in the waiver program, a Slot Tracking Number is assigned to the individual if the slot is classified as new allocation. When an individual is permanently discharged from the waiver program, the status of the Slot Tracking Number is automatically changed to unavailable. When a slot is released for use, the slot is assigned to a particular slot type and the status is changed to available. When an MRA enters the L01 screen and the individual has an assigned Slot Tracking Number, the slot type is omitted and the Slot Tracking Number is entered.
Slot Type The slot type is determined by the specific funding allocation from the Texas Legislature.
Support Advisor A person who provides support consultation to an employer, or a DR, or an individual receiving services through the CDS option. This person must have been certified through DADS to provide the service.
Support Consultation
An optional service that is provided by a support advisor and provides a level of assistance and training beyond that provided by the CDSA through FMS. Support consultation helps an employer to meet the required employer responsibilities of the CDS option and to successfully deliver program services.
Texas Home Living (TxHmL) Waiver Program
A Medicaid waiver program which provides community-based services and supports to eligible individuals who live in their own homes or in their family homes.
Transfer
The movement of an individual from one provider to a different provider or from one contract to another contract. All transfers must be approved by Program Enrollment staff of DADS, Access and Intake, Mental Retardation Authorities.
Vendor A person selected by an employer or DR to deliver services, goods, or items, other than a direct service to an individual. Examples of vendors include a building contractor, electrician, durable medical equipment provider, pharmacy, or a medical supply company.
Vendor Hold Temporary suspension of payment from department to a program provider.
Working Day Any day except Saturday, Sunday, a state holiday, or a federal holiday.
4116A Form See Minor Home Modification/Adaptive Aids/Dental Summary Sheet.
_______________________________________________________________
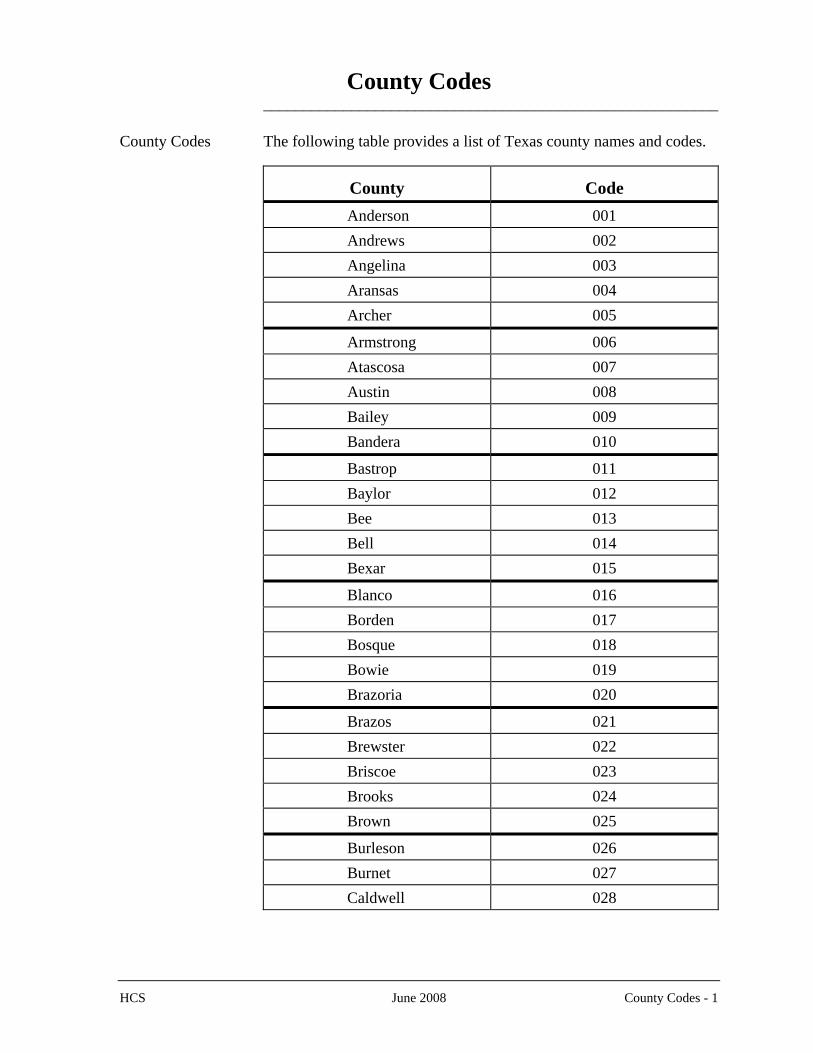
County Codes _________________________________________________________ County Codes The following table provides a list of Texas county names and codes.
County Code Anderson 001 Andrews 002 Angelina 003 Aransas 004 Archer 005
Armstrong 006 Atascosa 007 Austin 008 Bailey 009 Bandera 010
Bastrop 011 Baylor 012 Bee 013 Bell 014 Bexar 015
Blanco 016 Borden 017 Bosque 018 Bowie 019 Brazoria 020
Brazos 021 Brewster 022 Briscoe 023 Brooks 024 Brown 025
Burleson 026 Burnet 027 Caldwell 028
HCS June 2008 County Codes - 1
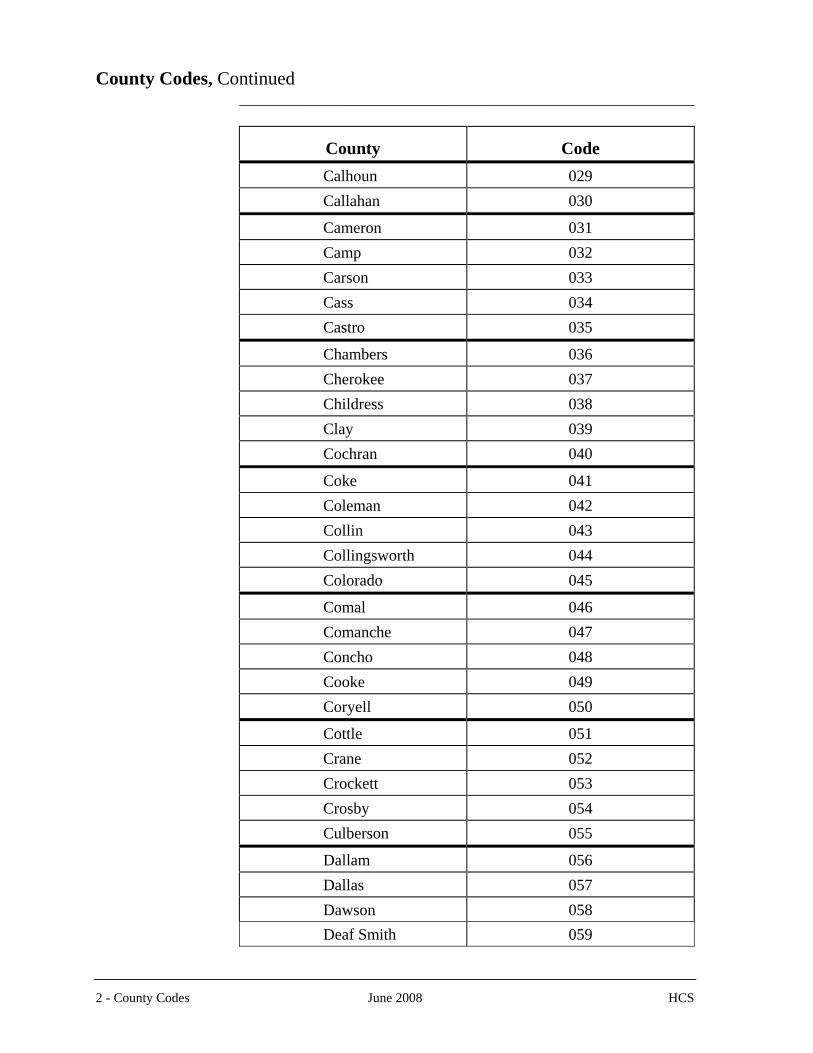
County Codes, Continued _________________________________________________________
County Code Calhoun 029 Callahan 030
Cameron 031 Camp 032 Carson 033 Cass 034 Castro 035
Chambers 036 Cherokee 037 Childress 038 Clay 039 Cochran 040
Coke 041 Coleman 042 Collin 043 Collingsworth 044 Colorado 045
Comal 046 Comanche 047 Concho 048 Cooke 049 Coryell 050
Cottle 051 Crane 052 Crockett 053 Crosby 054 Culberson 055
Dallam 056 Dallas 057 Dawson 058 Deaf Smith 059
2 - County Codes June 2008 HCS
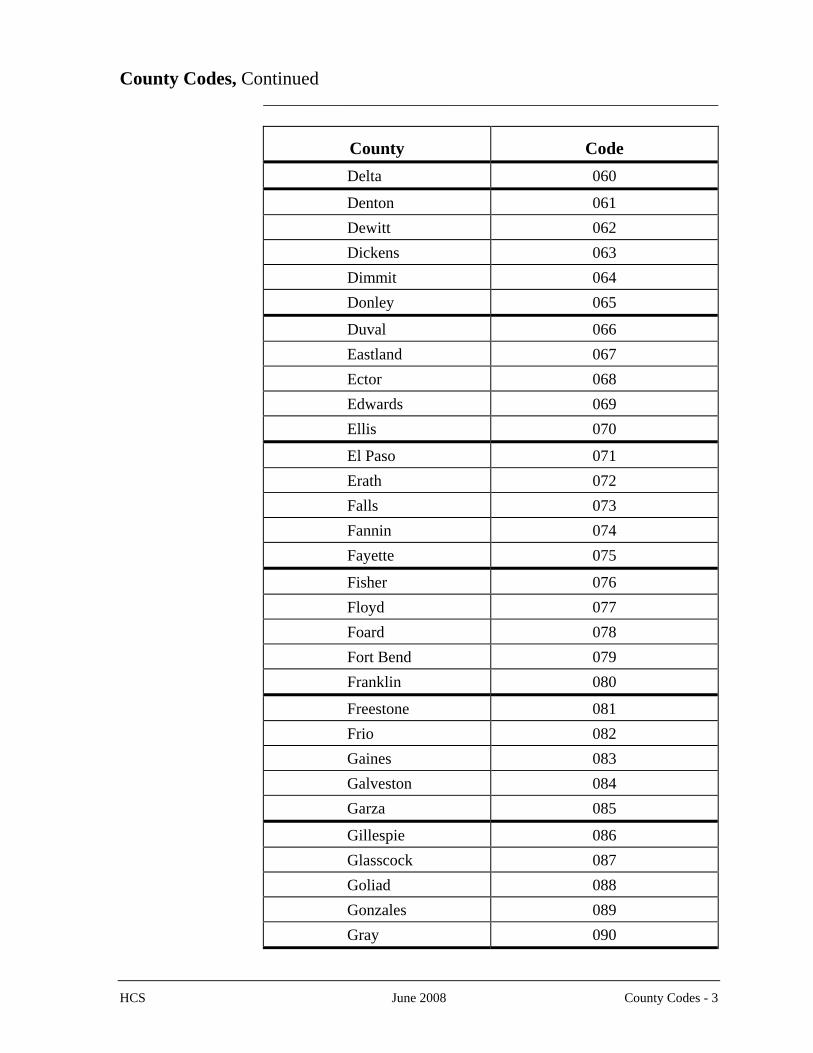
County Codes, Continued _________________________________________________________
County Code Delta 060
Denton 061 Dewitt 062 Dickens 063 Dimmit 064 Donley 065
Duval 066 Eastland 067 Ector 068 Edwards 069 Ellis 070
El Paso 071 Erath 072 Falls 073 Fannin 074 Fayette 075
Fisher 076 Floyd 077 Foard 078 Fort Bend 079 Franklin 080
Freestone 081 Frio 082 Gaines 083 Galveston 084 Garza 085
Gillespie 086 Glasscock 087 Goliad 088 Gonzales 089 Gray 090
HCS June 2008 County Codes - 3
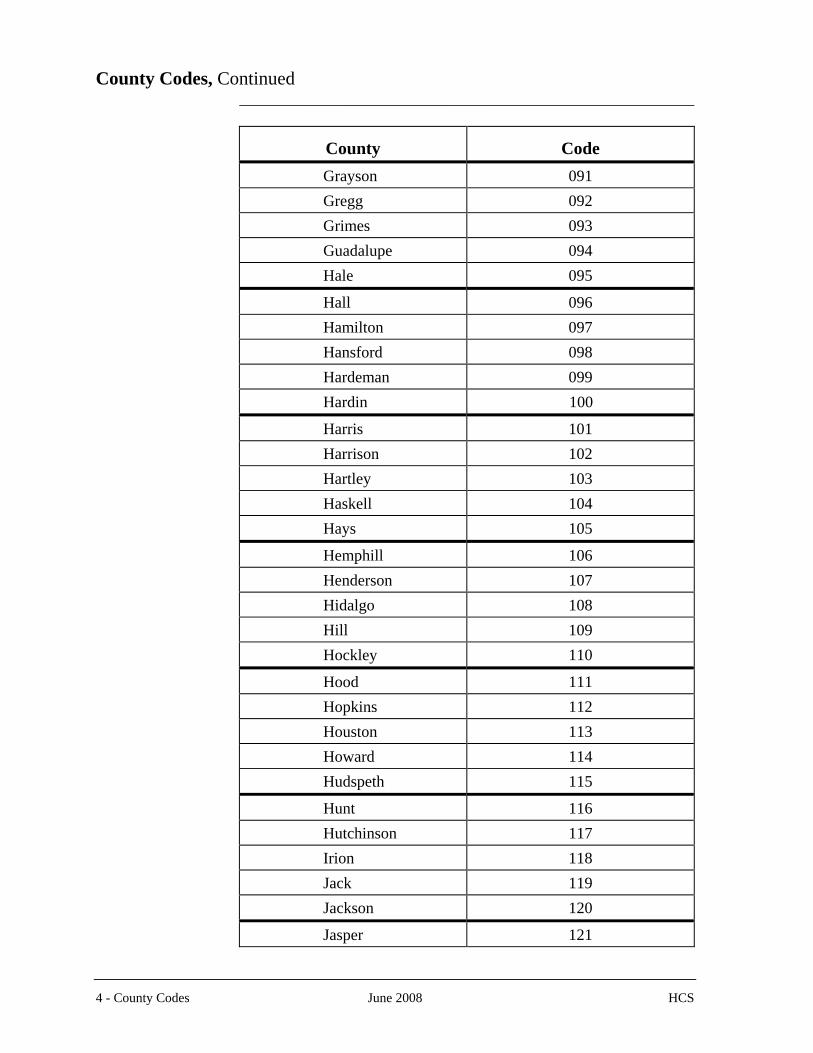
County Codes, Continued _________________________________________________________
County Code Grayson 091 Gregg 092 Grimes 093 Guadalupe 094 Hale 095
Hall 096 Hamilton 097 Hansford 098 Hardeman 099 Hardin 100
Harris 101 Harrison 102 Hartley 103 Haskell 104 Hays 105
Hemphill 106 Henderson 107 Hidalgo 108 Hill 109 Hockley 110
Hood 111 Hopkins 112 Houston 113 Howard 114 Hudspeth 115
Hunt 116 Hutchinson 117 Irion 118 Jack 119 Jackson 120
Jasper 121
4 - County Codes June 2008 HCS
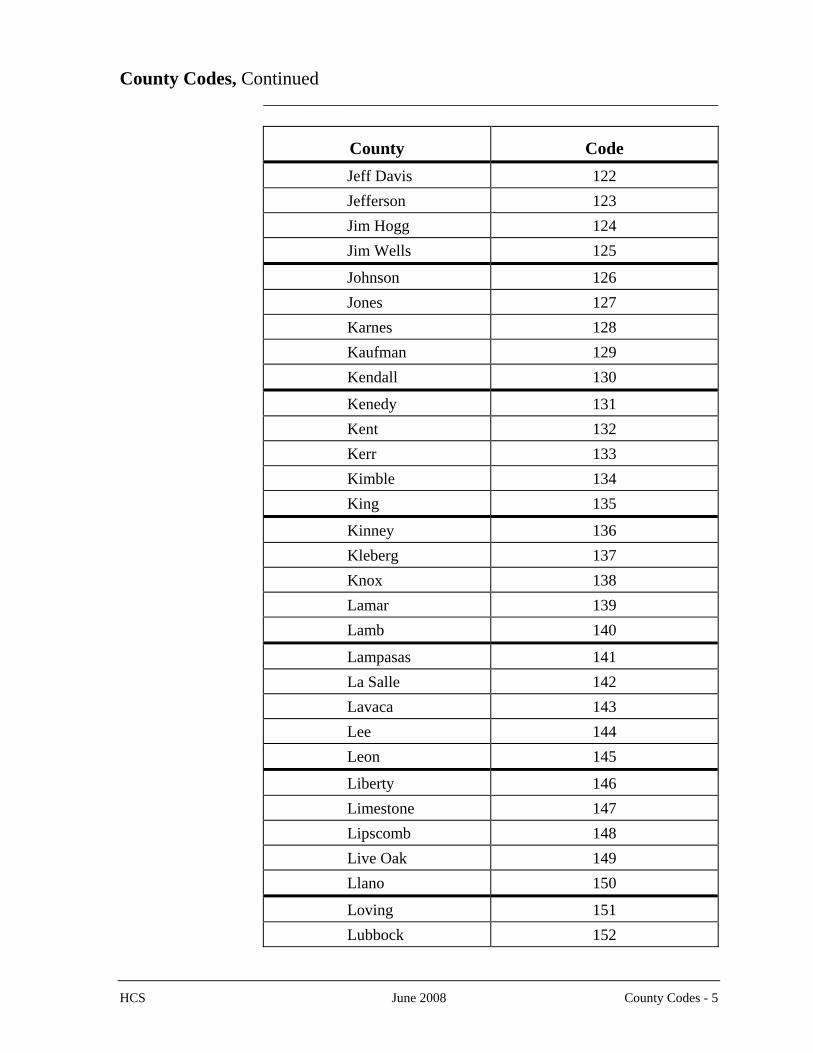
County Codes, Continued _________________________________________________________
County Code Jeff Davis 122 Jefferson 123 Jim Hogg 124 Jim Wells 125
Johnson 126 Jones 127 Karnes 128 Kaufman 129 Kendall 130
Kenedy 131 Kent 132 Kerr 133 Kimble 134 King 135
Kinney 136 Kleberg 137 Knox 138 Lamar 139 Lamb 140
Lampasas 141 La Salle 142 Lavaca 143 Lee 144 Leon 145
Liberty 146 Limestone 147 Lipscomb 148 Live Oak 149 Llano 150
Loving 151 Lubbock 152
HCS June 2008 County Codes - 5
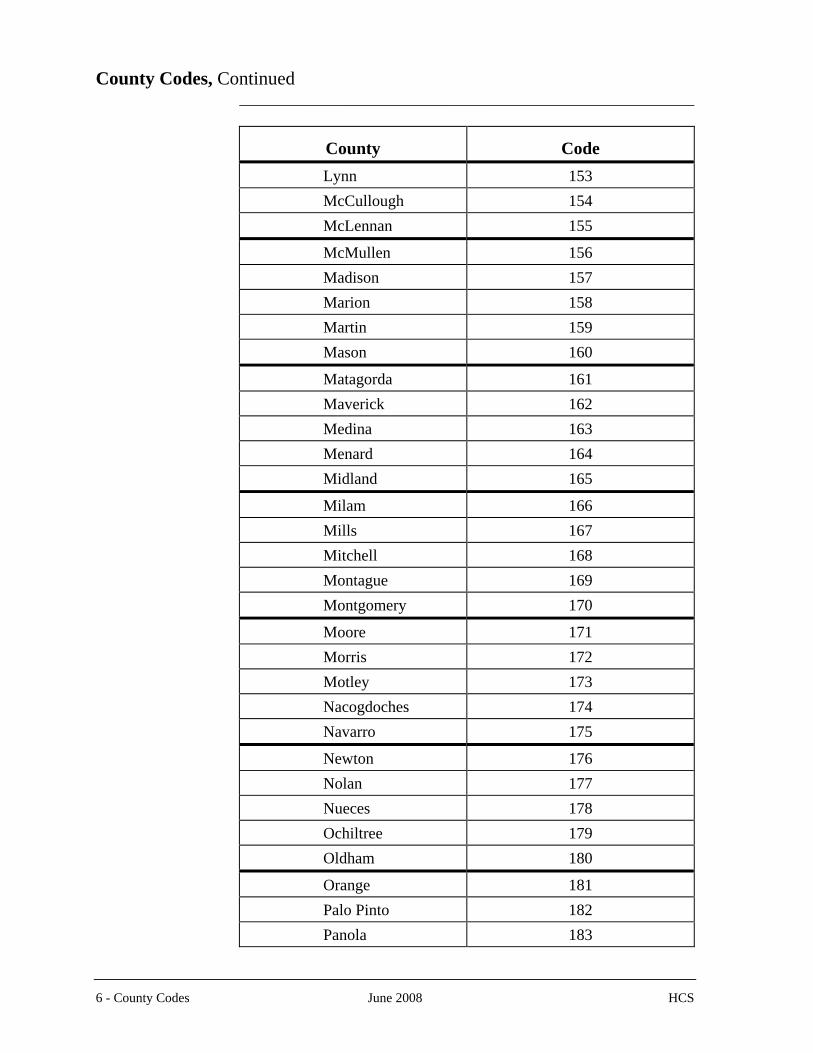
County Codes, Continued _________________________________________________________
County Code Lynn 153 McCullough 154 McLennan 155
McMullen 156 Madison 157 Marion 158 Martin 159 Mason 160
Matagorda 161 Maverick 162 Medina 163 Menard 164 Midland 165
Milam 166 Mills 167 Mitchell 168 Montague 169 Montgomery 170
Moore 171 Morris 172 Motley 173 Nacogdoches 174 Navarro 175
Newton 176 Nolan 177 Nueces 178 Ochiltree 179 Oldham 180
Orange 181 Palo Pinto 182 Panola 183
6 - County Codes June 2008 HCS
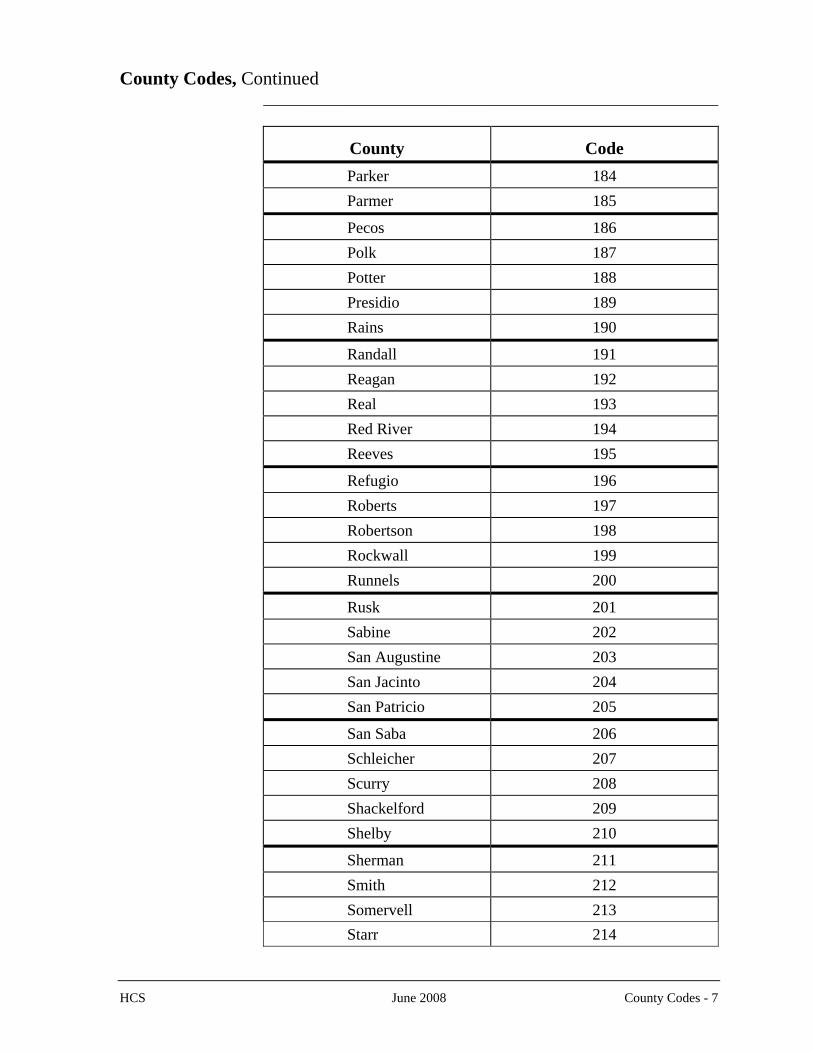
County Codes, Continued _________________________________________________________
County Code Parker 184 Parmer 185
Pecos 186 Polk 187 Potter 188 Presidio 189 Rains 190
Randall 191 Reagan 192 Real 193 Red River 194 Reeves 195
Refugio 196 Roberts 197 Robertson 198 Rockwall 199 Runnels 200
Rusk 201 Sabine 202 San Augustine 203 San Jacinto 204 San Patricio 205
San Saba 206 Schleicher 207 Scurry 208 Shackelford 209 Shelby 210
Sherman 211 Smith 212 Somervell 213 Starr 214
HCS June 2008 County Codes - 7
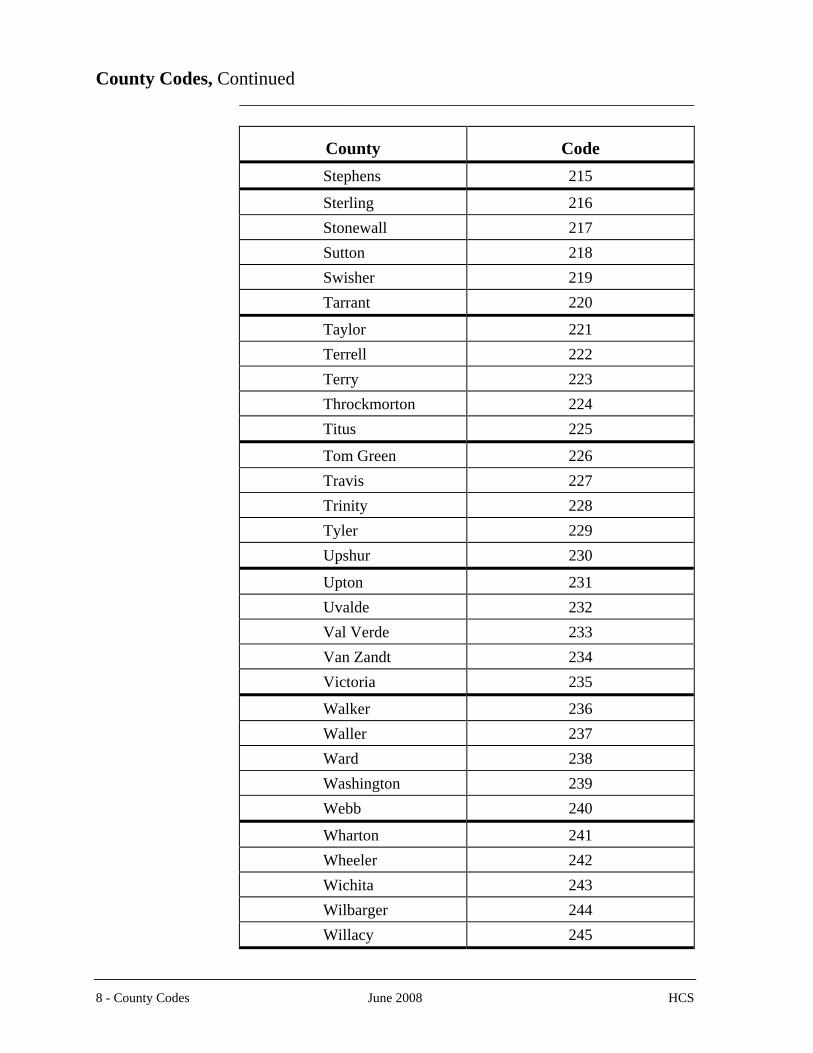
County Codes, Continued _________________________________________________________
County Code Stephens 215
Sterling 216 Stonewall 217 Sutton 218 Swisher 219 Tarrant 220
Taylor 221 Terrell 222 Terry 223 Throckmorton 224 Titus 225
Tom Green 226 Travis 227 Trinity 228 Tyler 229 Upshur 230
Upton 231 Uvalde 232 Val Verde 233 Van Zandt 234 Victoria 235
Walker 236 Waller 237 Ward 238 Washington 239 Webb 240
Wharton 241 Wheeler 242 Wichita 243 Wilbarger 244 Willacy 245
8 - County Codes June 2008 HCS
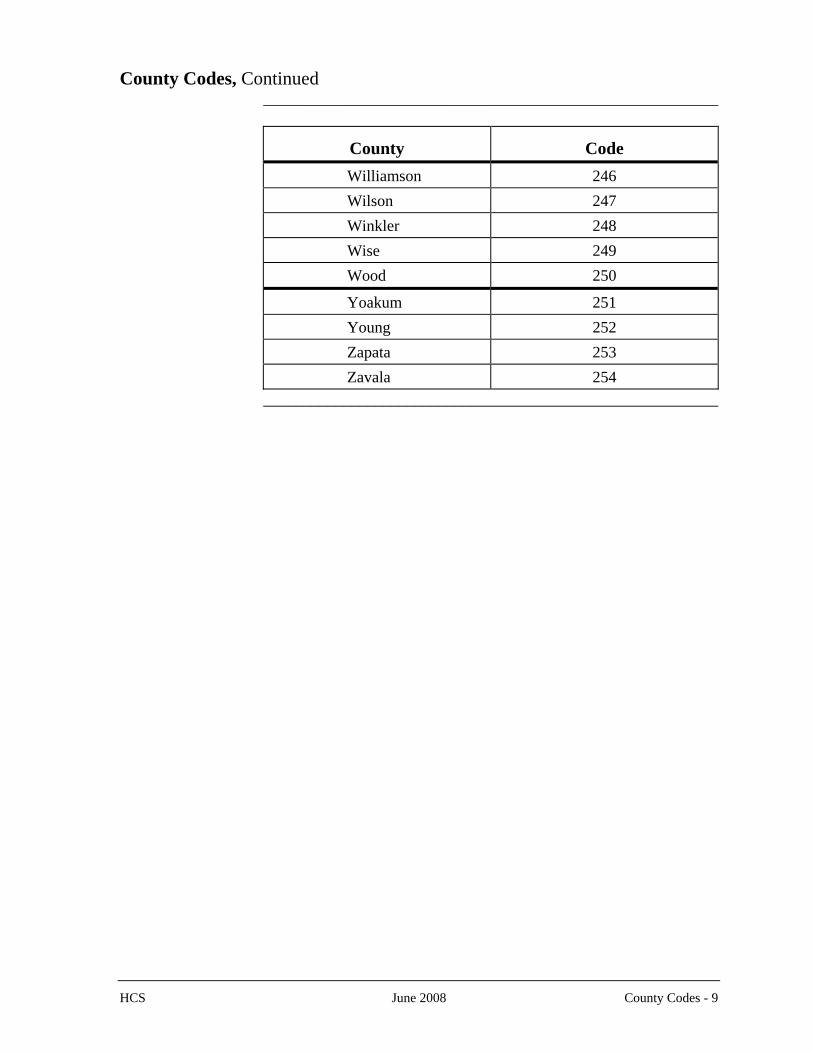
County Codes, Continued _________________________________________________________
County Code Williamson 246 Wilson 247 Winkler 248 Wise 249 Wood 250
Yoakum 251 Young 252 Zapata 253 Zavala 254
_________________________________________________________
HCS June 2008 County Codes - 9

10 - County Codes June 2008 HCS
This page was intentionally left blank.
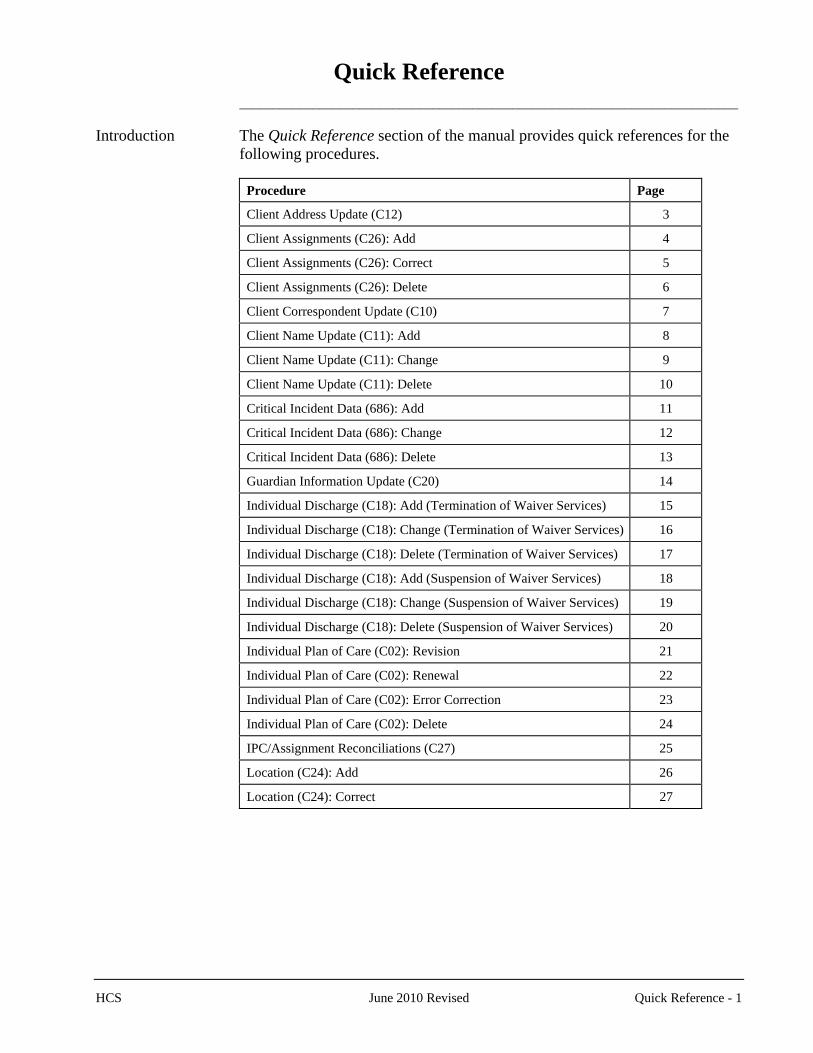
Quick Reference
___________________________________________________________________________ Introduction The Quick Reference section of the manual provides quick references for the
following procedures.
Procedure Page
Client Address Update (C12) 3
Client Assignments (C26): Add 4
Client Assignments (C26): Correct 5
Client Assignments (C26): Delete 6
Client Correspondent Update (C10) 7
Client Name Update (C11): Add 8
Client Name Update (C11): Change 9
Client Name Update (C11): Delete 10
Critical Incident Data (686): Add 11
Critical Incident Data (686): Change 12
Critical Incident Data (686): Delete 13
Guardian Information Update (C20) 14
Individual Discharge (C18): Add (Termination of Waiver Services) 15
Individual Discharge (C18): Change (Termination of Waiver Services) 16
Individual Discharge (C18): Delete (Termination of Waiver Services) 17
Individual Discharge (C18): Add (Suspension of Waiver Services) 18
Individual Discharge (C18): Change (Suspension of Waiver Services) 19
Individual Discharge (C18): Delete (Suspension of Waiver Services) 20
Individual Plan of Care (C02): Revision 21
Individual Plan of Care (C02): Renewal 22
Individual Plan of Care (C02): Error Correction 23
Individual Plan of Care (C02): Delete 24
IPC/Assignment Reconciliations (C27) 25
Location (C24): Add 26
Location (C24): Correct 27
HCS June 2010 Revised Quick Reference - 1
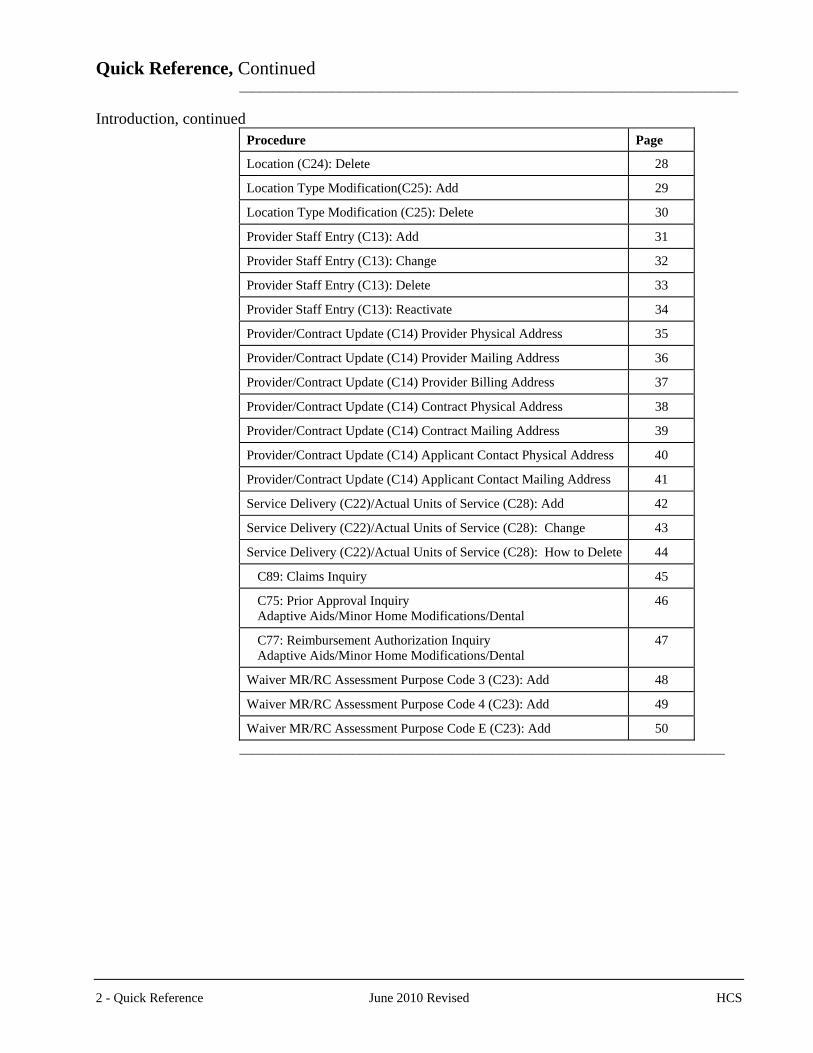
Quick Reference, Continued ___________________________________________________________________________ Introduction, continued
Procedure Page
Location (C24): Delete 28
Location Type Modification(C25): Add 29
Location Type Modification (C25): Delete 30
Provider Staff Entry (C13): Add 31
Provider Staff Entry (C13): Change 32
Provider Staff Entry (C13): Delete 33
Provider Staff Entry (C13): Reactivate 34
Provider/Contract Update (C14) Provider Physical Address 35
Provider/Contract Update (C14) Provider Mailing Address 36
Provider/Contract Update (C14) Provider Billing Address 37
Provider/Contract Update (C14) Contract Physical Address 38
Provider/Contract Update (C14) Contract Mailing Address 39
Provider/Contract Update (C14) Applicant Contact Physical Address 40
Provider/Contract Update (C14) Applicant Contact Mailing Address 41
Service Delivery (C22)/Actual Units of Service (C28): Add 42
Service Delivery (C22)/Actual Units of Service (C28): Change 43
Service Delivery (C22)/Actual Units of Service (C28): How to Delete 44
C89: Claims Inquiry 45
C75: Prior Approval Inquiry Adaptive Aids/Minor Home Modifications/Dental
46
C77: Reimbursement Authorization Inquiry Adaptive Aids/Minor Home Modifications/Dental
47
Waiver MR/RC Assessment Purpose Code 3 (C23): Add 48
Waiver MR/RC Assessment Purpose Code 4 (C23): Add 49
Waiver MR/RC Assessment Purpose Code E (C23): Add 50 _________________________________________________________________________
2 - Quick Reference June 2010 Revised HCS
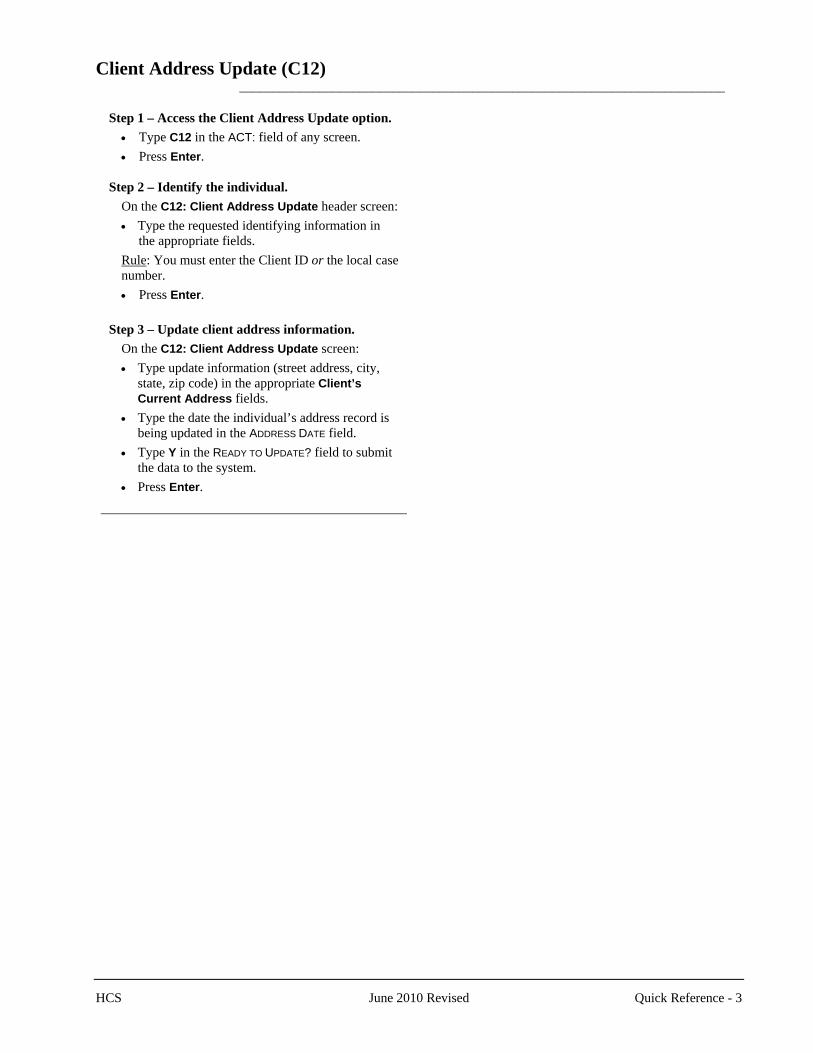
Client Address Update (C12) _________________________________________________________________________
Step 1 – Access the Client Address Update option. • Type C12 in the ACT: field of any screen. • Press Enter.
Step 2 – Identify the individual.
On the C12: Client Address Update header screen: • Type the requested identifying information in
the appropriate fields. Rule: You must enter the Client ID or the local case number. • Press Enter.
Step 3 – Update client address information.
On the C12: Client Address Update screen: • Type update information (street address, city,
state, zip code) in the appropriate Client’s Current Address fields.
• Type the date the individual’s address record is being updated in the ADDRESS DATE field.
• Type Y in the READY TO UPDATE? field to submit the data to the system.
• Press Enter.
HCS June 2010 Revised Quick Reference - 3
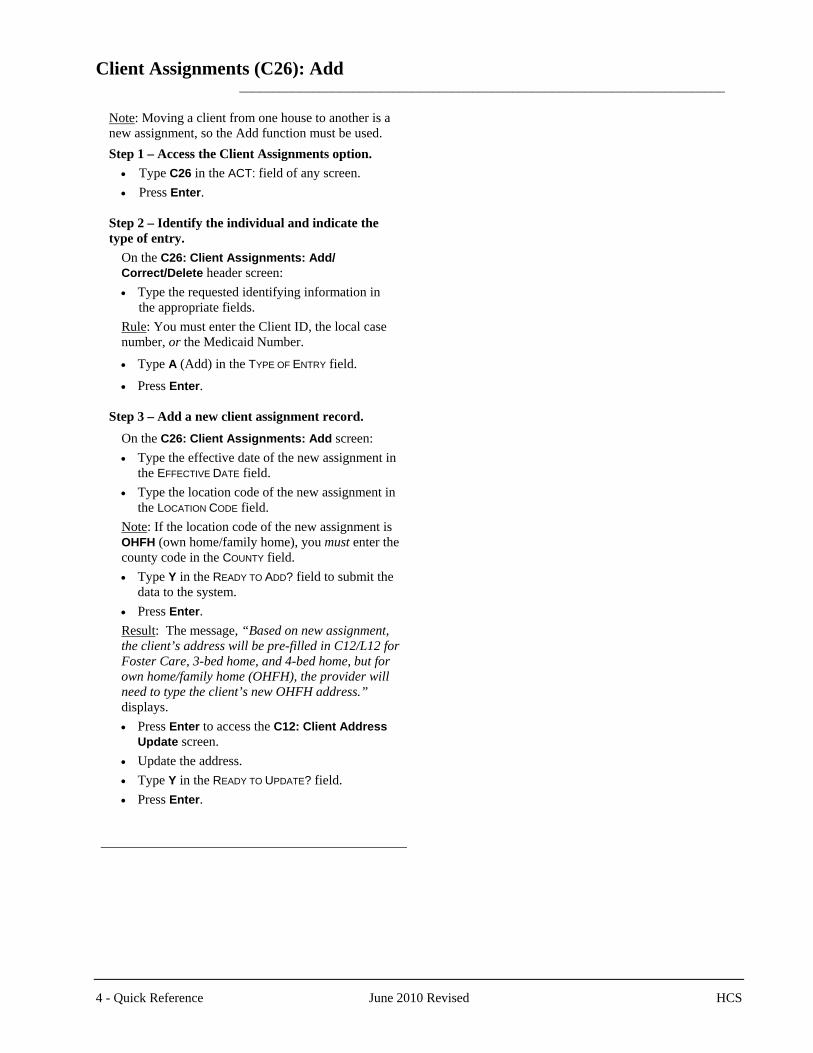
Client Assignments (C26): Add _________________________________________________________________________
Note: Moving a client from one house to another is a new assignment, so the Add function must be used. Step 1 – Access the Client Assignments option.
• Type C26 in the ACT: field of any screen. • Press Enter.
Step 2 – Identify the individual and indicate the type of entry.
On the C26: Client Assignments: Add/ Correct/Delete header screen: • Type the requested identifying information in
the appropriate fields. Rule: You must enter the Client ID, the local case number, or the Medicaid Number.
• Type A (Add) in the TYPE OF ENTRY field.
• Press Enter. Step 3 – Add a new client assignment record.
On the C26: Client Assignments: Add screen: • Type the effective date of the new assignment in
the EFFECTIVE DATE field. • Type the location code of the new assignment in
the LOCATION CODE field. Note: If the location code of the new assignment is OHFH (own home/family home), you must enter the county code in the COUNTY field. • Type Y in the READY TO ADD? field to submit the
data to the system. • Press Enter. Result: The message, “Based on new assignment, the client’s address will be pre-filled in C12/L12 for Foster Care, 3-bed home, and 4-bed home, but for own home/family home (OHFH), the provider will need to type the client’s new OHFH address.” displays. • Press Enter to access the C12: Client Address
Update screen. • Update the address. • Type Y in the READY TO UPDATE? field. • Press Enter.
4 - Quick Reference June 2010 Revised HCS
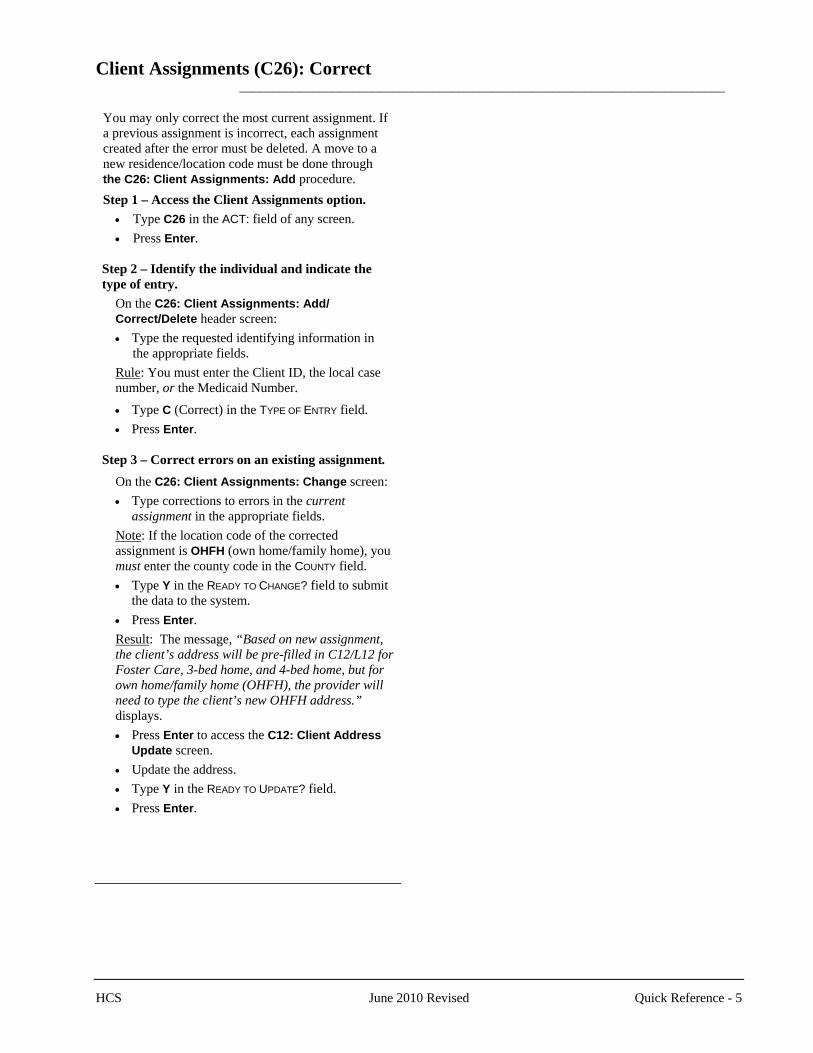
Client Assignments (C26): Correct _________________________________________________________________________
You may only correct the most current assignment. If a previous assignment is incorrect, each assignment created after the error must be deleted. A move to a new residence/location code must be done through the C26: Client Assignments: Add procedure. Step 1 – Access the Client Assignments option.
• Type C26 in the ACT: field of any screen. • Press Enter.
Step 2 – Identify the individual and indicate the type of entry.
On the C26: Client Assignments: Add/ Correct/Delete header screen: • Type the requested identifying information in
the appropriate fields. Rule: You must enter the Client ID, the local case number, or the Medicaid Number.
• Type C (Correct) in the TYPE OF ENTRY field. • Press Enter.
Step 3 – Correct errors on an existing assignment.
On the C26: Client Assignments: Change screen: • Type corrections to errors in the current
assignment in the appropriate fields. Note: If the location code of the corrected assignment is OHFH (own home/family home), you must enter the county code in the COUNTY field. • Type Y in the READY TO CHANGE? field to submit
the data to the system. • Press Enter. Result: The message, “Based on new assignment, the client’s address will be pre-filled in C12/L12 for Foster Care, 3-bed home, and 4-bed home, but for own home/family home (OHFH), the provider will need to type the client’s new OHFH address.” displays. • Press Enter to access the C12: Client Address
Update screen. • Update the address. • Type Y in the READY TO UPDATE? field. • Press Enter.
HCS June 2010 Revised Quick Reference - 5
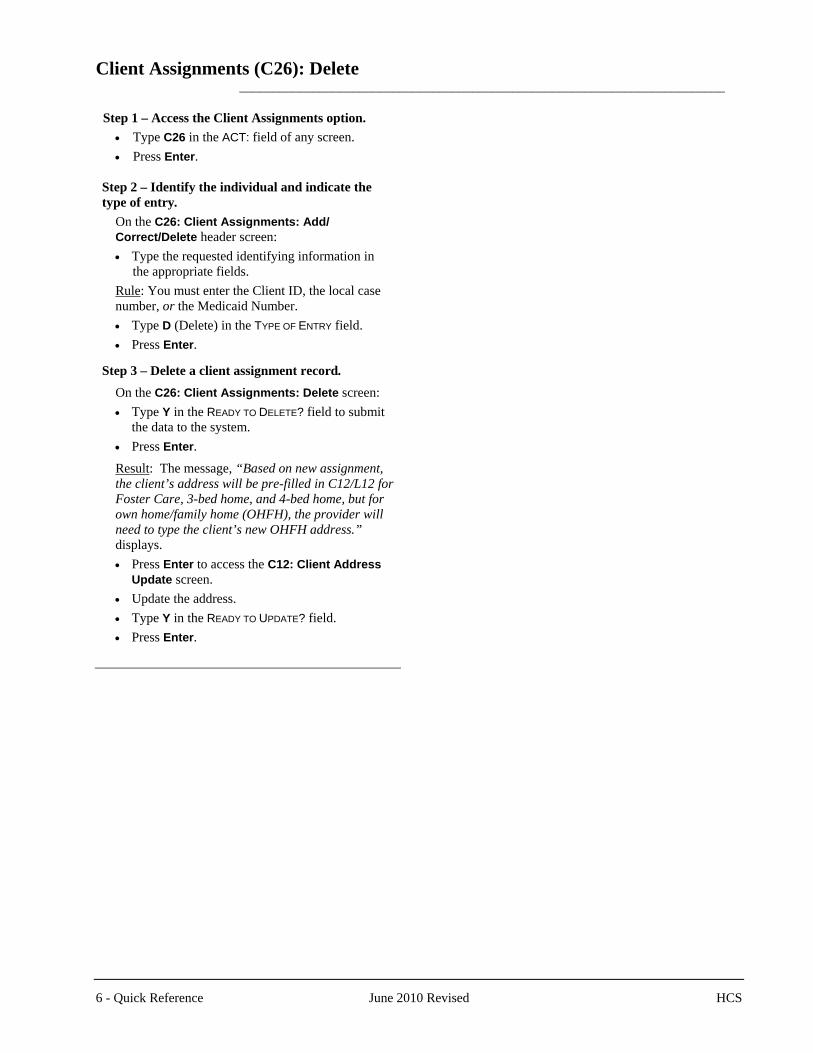
Client Assignments (C26): Delete _________________________________________________________________________
Step 1 – Access the Client Assignments option. • Type C26 in the ACT: field of any screen. • Press Enter.
Step 2 – Identify the individual and indicate the type of entry.
On the C26: Client Assignments: Add/ Correct/Delete header screen: • Type the requested identifying information in
the appropriate fields. Rule: You must enter the Client ID, the local case number, or the Medicaid Number. • Type D (Delete) in the TYPE OF ENTRY field. • Press Enter.
Step 3 – Delete a client assignment record.
On the C26: Client Assignments: Delete screen: • Type Y in the READY TO DELETE? field to submit
the data to the system. • Press Enter.
Result: The message, “Based on new assignment, the client’s address will be pre-filled in C12/L12 for Foster Care, 3-bed home, and 4-bed home, but for own home/family home (OHFH), the provider will need to type the client’s new OHFH address.” displays. • Press Enter to access the C12: Client Address
Update screen. • Update the address. • Type Y in the READY TO UPDATE? field. • Press Enter.
6 - Quick Reference June 2010 Revised HCS
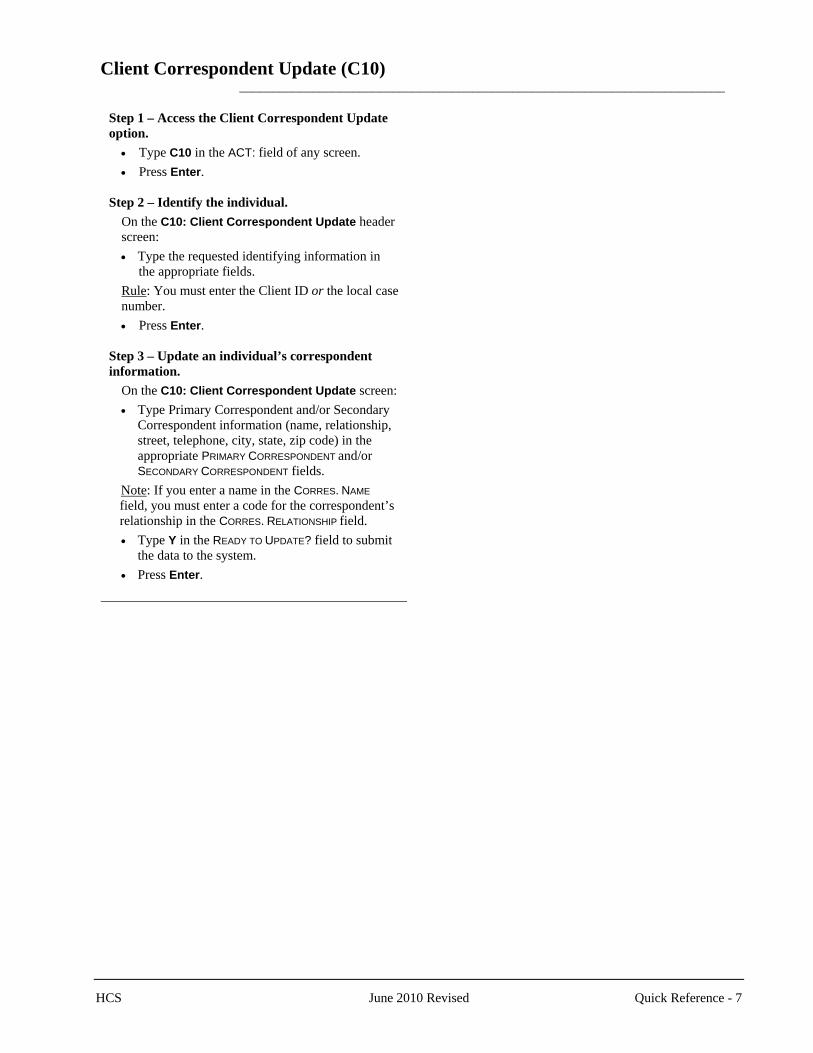
Client Correspondent Update (C10) _________________________________________________________________________
Step 1 – Access the Client Correspondent Update option.
• Type C10 in the ACT: field of any screen. • Press Enter.
Step 2 – Identify the individual.
On the C10: Client Correspondent Update header screen: • Type the requested identifying information in
the appropriate fields. Rule: You must enter the Client ID or the local case number. • Press Enter.
Step 3 – Update an individual’s correspondent information.
On the C10: Client Correspondent Update screen: • Type Primary Correspondent and/or Secondary
Correspondent information (name, relationship, street, telephone, city, state, zip code) in the appropriate PRIMARY CORRESPONDENT and/or SECONDARY CORRESPONDENT fields.
Note: If you enter a name in the CORRES. NAME field, you must enter a code for the correspondent’s relationship in the CORRES. RELATIONSHIP field. • Type Y in the READY TO UPDATE? field to submit
the data to the system. • Press Enter.
HCS June 2010 Revised Quick Reference - 7
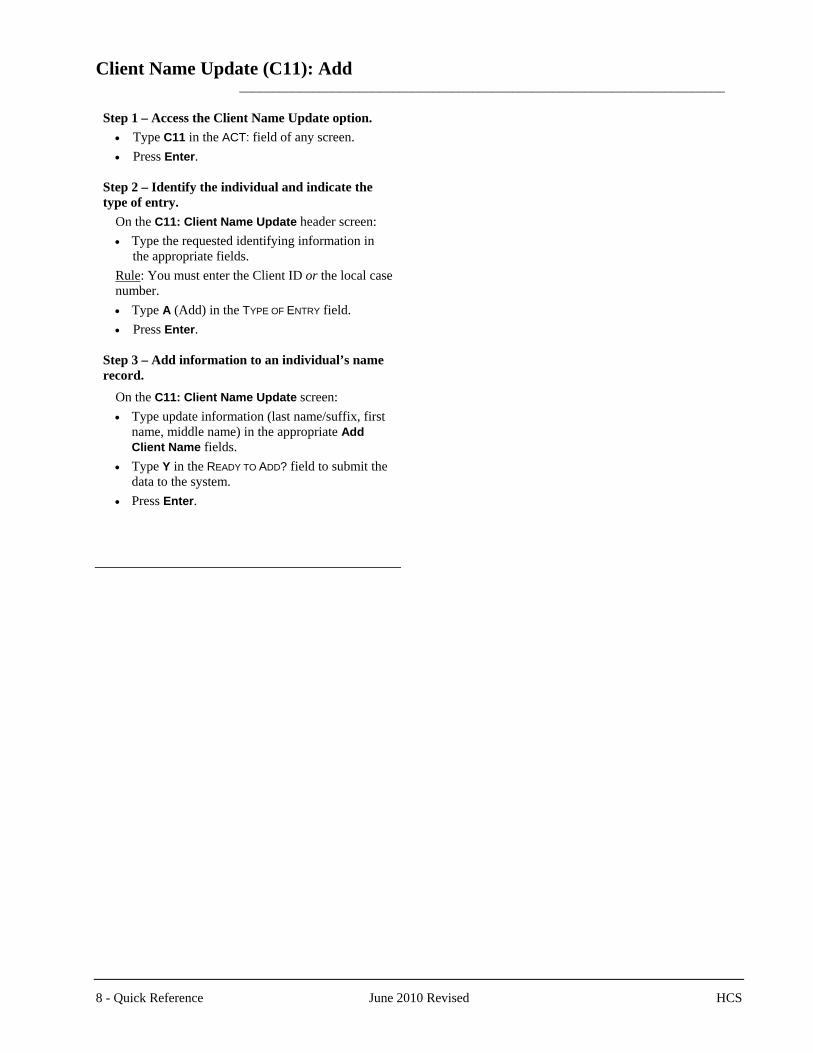
Client Name Update (C11): Add _________________________________________________________________________
Step 1 – Access the Client Name Update option. • Type C11 in the ACT: field of any screen. • Press Enter.
Step 2 – Identify the individual and indicate the type of entry.
On the C11: Client Name Update header screen: • Type the requested identifying information in
the appropriate fields. Rule: You must enter the Client ID or the local case number. • Type A (Add) in the TYPE OF ENTRY field. • Press Enter.
Step 3 – Add information to an individual’s name record.
On the C11: Client Name Update screen: • Type update information (last name/suffix, first
name, middle name) in the appropriate Add Client Name fields.
• Type Y in the READY TO ADD? field to submit the data to the system.
• Press Enter.
8 - Quick Reference June 2010 Revised HCS
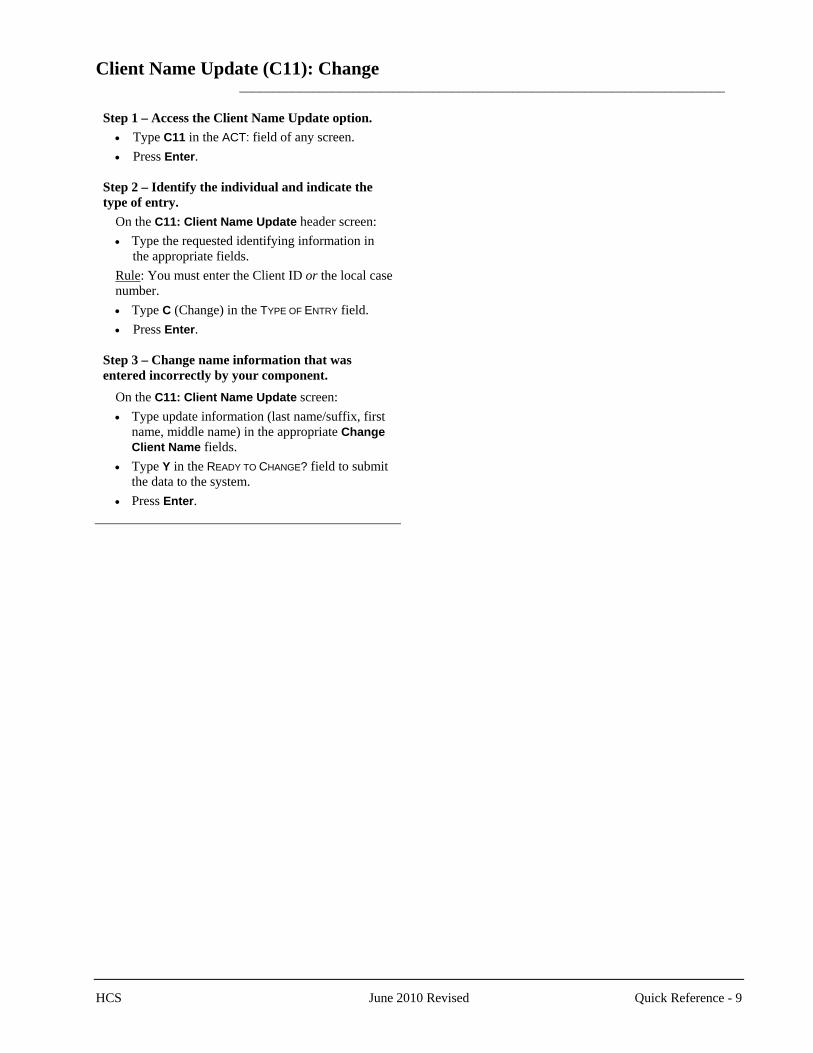
Client Name Update (C11): Change _________________________________________________________________________
Step 1 – Access the Client Name Update option. • Type C11 in the ACT: field of any screen. • Press Enter.
Step 2 – Identify the individual and indicate the type of entry.
On the C11: Client Name Update header screen: • Type the requested identifying information in
the appropriate fields. Rule: You must enter the Client ID or the local case number. • Type C (Change) in the TYPE OF ENTRY field. • Press Enter.
Step 3 – Change name information that was entered incorrectly by your component.
On the C11: Client Name Update screen: • Type update information (last name/suffix, first
name, middle name) in the appropriate Change Client Name fields.
• Type Y in the READY TO CHANGE? field to submit the data to the system.
• Press Enter.
HCS June 2010 Revised Quick Reference - 9

Client Name Update (C11): Delete _________________________________________________________________________
Step 1 – Access the Client Name Update option. • Type C11 in the ACT: field of any screen. • Press Enter.
Step 2 – Identify the individual and indicate the type of entry.
On the C11: Client Name Update header screen: • Type the requested identifying information in
the appropriate fields. Rule: You must enter the Client ID or the local case number. • Type D (Delete) in the TYPE OF ENTRY field. • Press Enter.
Step 3 – Delete a name update that was entered in error by your component.
On the C11: Client Name Update screen: • Type Y in the READY TO DELETE? field to submit
the data to the system. • Press Enter.
10 - Quick Reference June 2010 Revised HCS
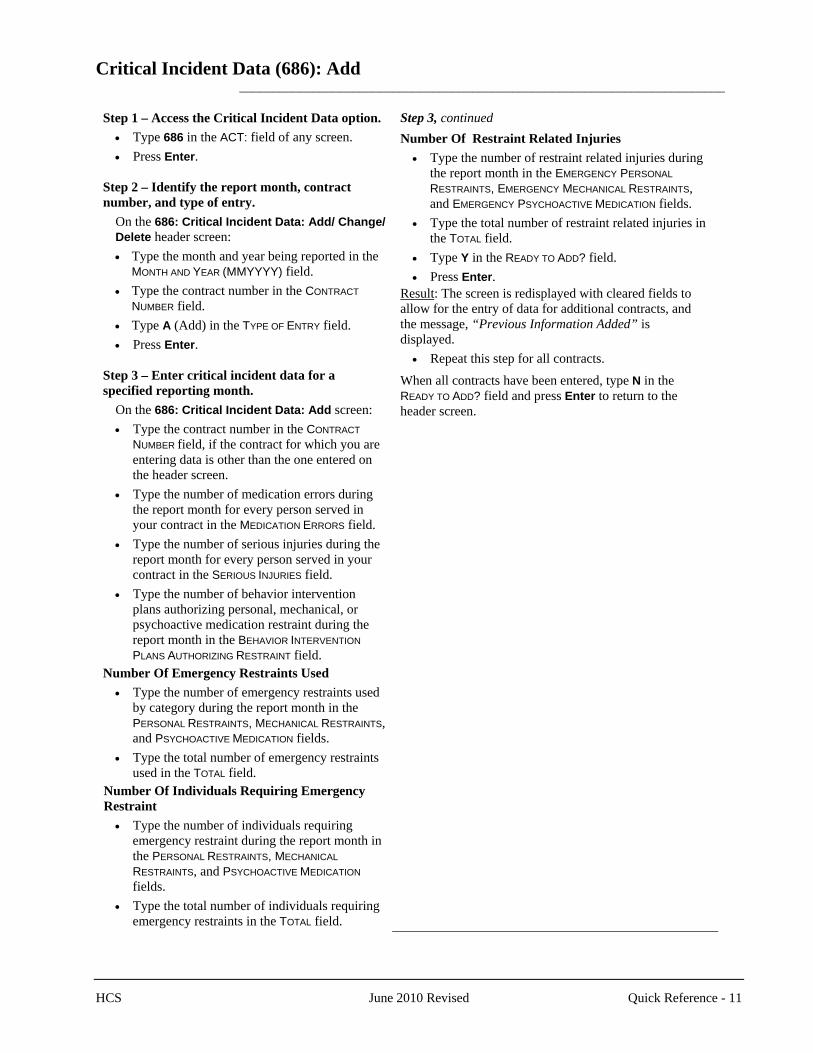
HCS June 2010 Revised Quick Reference - 11
Critical Incident Data (686): Add _________________________________________________________________________
Step 1 – Access the Critical Incident Data option. • Type 686 in the ACT: field of any screen. • Press Enter.
Step 2 – Identify the report month, contract number, and type of entry.
On the 686: Critical Incident Data: Add/ Change/ Delete header screen: • Type the month and year being reported in the
MONTH AND YEAR (MMYYYY) field. • Type the contract number in the CONTRACT
NUMBER field. • Type A (Add) in the TYPE OF ENTRY field. • Press Enter.
Step 3 – Enter critical incident data for a specified reporting month.
On the 686: Critical Incident Data: Add screen: • Type the contract number in the CONTRACT
NUMBER field, if the contract for which you are entering data is other than the one entered on the header screen.
• Type the number of medication errors during the report month for every person served in your contract in the MEDICATION ERRORS field.
• Type the number of serious injuries during the report month for every person served in your contract in the SERIOUS INJURIES field.
• Type the number of behavior intervention plans authorizing personal, mechanical, or psychoactive medication restraint during the report month in the BEHAVIOR INTERVENTION PLANS AUTHORIZING RESTRAINT field.
Number Of Emergency Restraints Used • Type the number of emergency restraints used
by category during the report month in the PERSONAL RESTRAINTS, MECHANICAL RESTRAINTS, and PSYCHOACTIVE MEDICATION fields.
• Type the total number of emergency restraints used in the TOTAL field.
Number Of Individuals Requiring Emergency Restraint
• Type the number of individuals requiring emergency restraint during the report month in the PERSONAL RESTRAINTS, MECHANICAL RESTRAINTS, and PSYCHOACTIVE MEDICATION fields.
• Type the total number of individuals requiring emergency restraints in the TOTAL field.
Step 3, continued Number Of Restraint Related Injuries
• Type the number of restraint related injuries during the report month in the EMERGENCY PERSONAL RESTRAINTS, EMERGENCY MECHANICAL RESTRAINTS, and EMERGENCY PSYCHOACTIVE MEDICATION fields.
• Type the total number of restraint related injuries in the TOTAL field.
• Type Y in the READY TO ADD? field. • Press Enter.
Result: The screen is redisplayed with cleared fields to allow for the entry of data for additional contracts, and the message, “Previous Information Added” is displayed.
• Repeat this step for all contracts.
When all contracts have been entered, type N in the READY TO ADD? field and press Enter to return to the header screen.
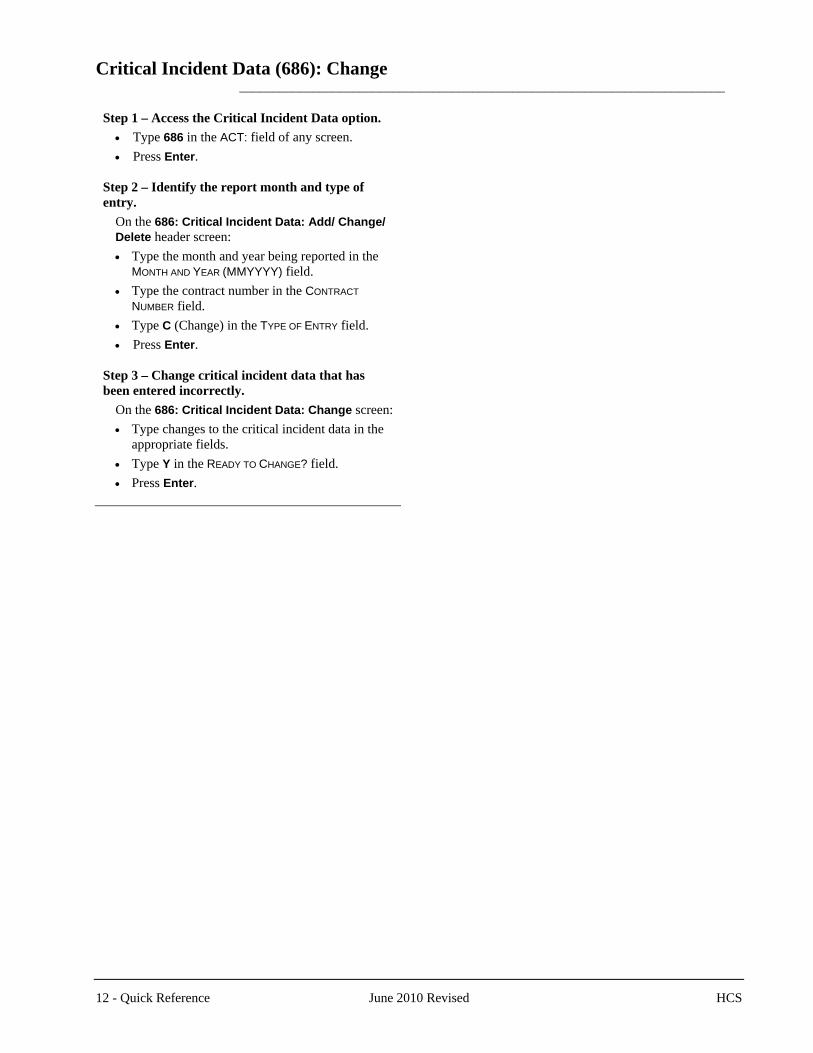
Critical Incident Data (686): Change _________________________________________________________________________
Step 1 – Access the Critical Incident Data option. • Type 686 in the ACT: field of any screen. • Press Enter.
Step 2 – Identify the report month and type of entry.
On the 686: Critical Incident Data: Add/ Change/ Delete header screen: • Type the month and year being reported in the
MONTH AND YEAR (MMYYYY) field. • Type the contract number in the CONTRACT
NUMBER field. • Type C (Change) in the TYPE OF ENTRY field. • Press Enter.
Step 3 – Change critical incident data that has been entered incorrectly.
On the 686: Critical Incident Data: Change screen: • Type changes to the critical incident data in the
appropriate fields. • Type Y in the READY TO CHANGE? field. • Press Enter.
12 - Quick Reference June 2010 Revised HCS
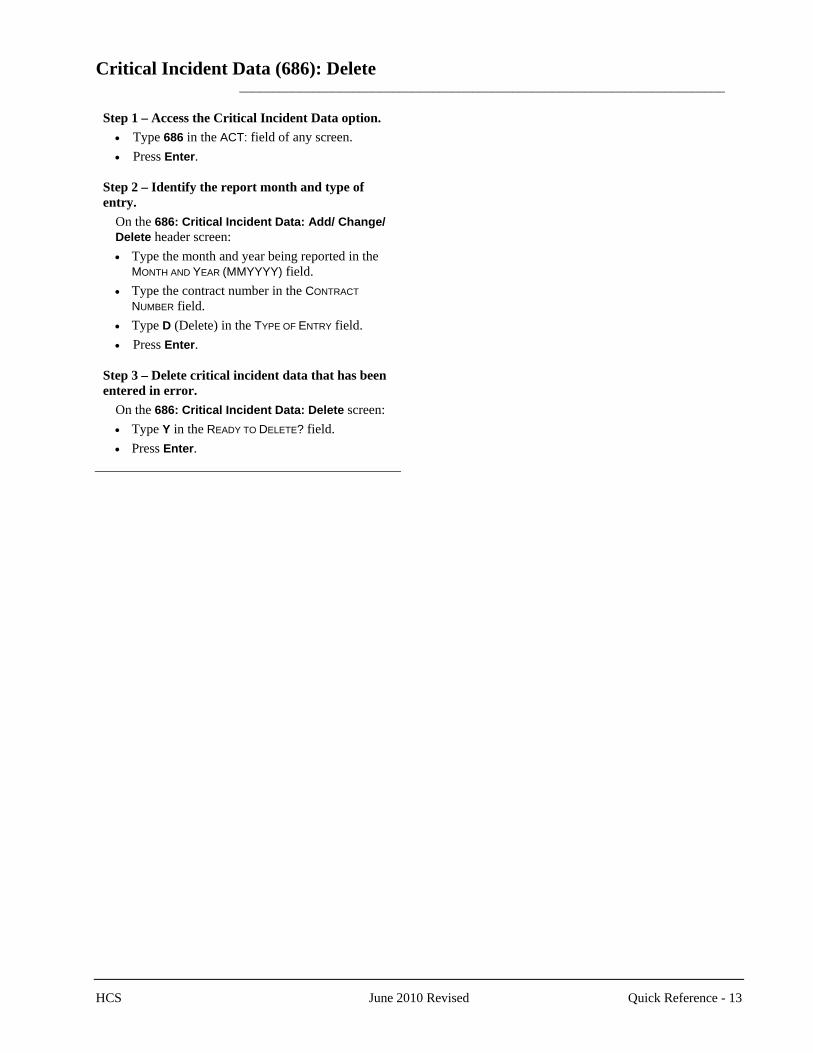
Critical Incident Data (686): Delete _________________________________________________________________________
Step 1 – Access the Critical Incident Data option. • Type 686 in the ACT: field of any screen. • Press Enter.
Step 2 – Identify the report month and type of entry.
On the 686: Critical Incident Data: Add/ Change/ Delete header screen: • Type the month and year being reported in the
MONTH AND YEAR (MMYYYY) field. • Type the contract number in the CONTRACT
NUMBER field. • Type D (Delete) in the TYPE OF ENTRY field. • Press Enter.
Step 3 – Delete critical incident data that has been entered in error.
On the 686: Critical Incident Data: Delete screen: • Type Y in the READY TO DELETE? field. • Press Enter.
HCS June 2010 Revised Quick Reference - 13
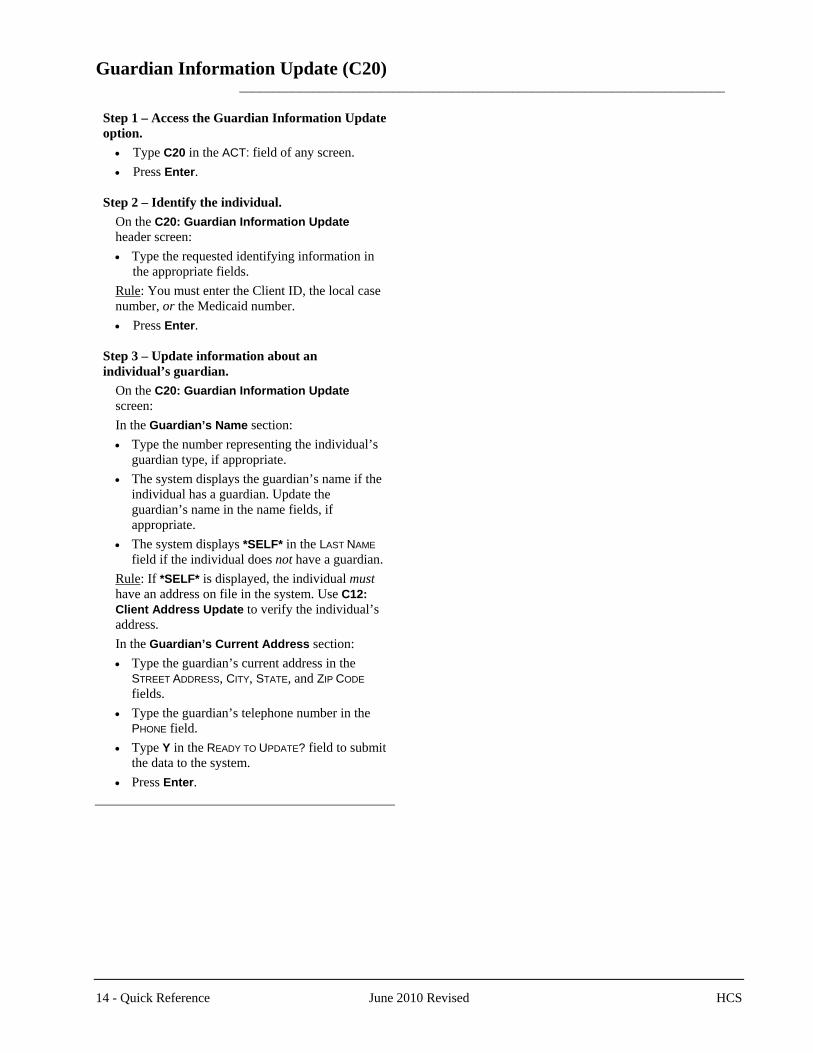
Guardian Information Update (C20) _________________________________________________________________________
Step 1 – Access the Guardian Information Update option.
• Type C20 in the ACT: field of any screen. • Press Enter.
Step 2 – Identify the individual.
On the C20: Guardian Information Update header screen: • Type the requested identifying information in
the appropriate fields. Rule: You must enter the Client ID, the local case number, or the Medicaid number. • Press Enter.
Step 3 – Update information about an individual’s guardian.
On the C20: Guardian Information Update screen: In the Guardian’s Name section: • Type the number representing the individual’s
guardian type, if appropriate. • The system displays the guardian’s name if the
individual has a guardian. Update the guardian’s name in the name fields, if appropriate.
• The system displays *SELF* in the LAST NAME field if the individual does not have a guardian.
Rule: If *SELF* is displayed, the individual must have an address on file in the system. Use C12: Client Address Update to verify the individual’s address. In the Guardian’s Current Address section: • Type the guardian’s current address in the
STREET ADDRESS, CITY, STATE, and ZIP CODE fields.
• Type the guardian’s telephone number in the PHONE field.
• Type Y in the READY TO UPDATE? field to submit the data to the system.
• Press Enter.
14 - Quick Reference June 2010 Revised HCS
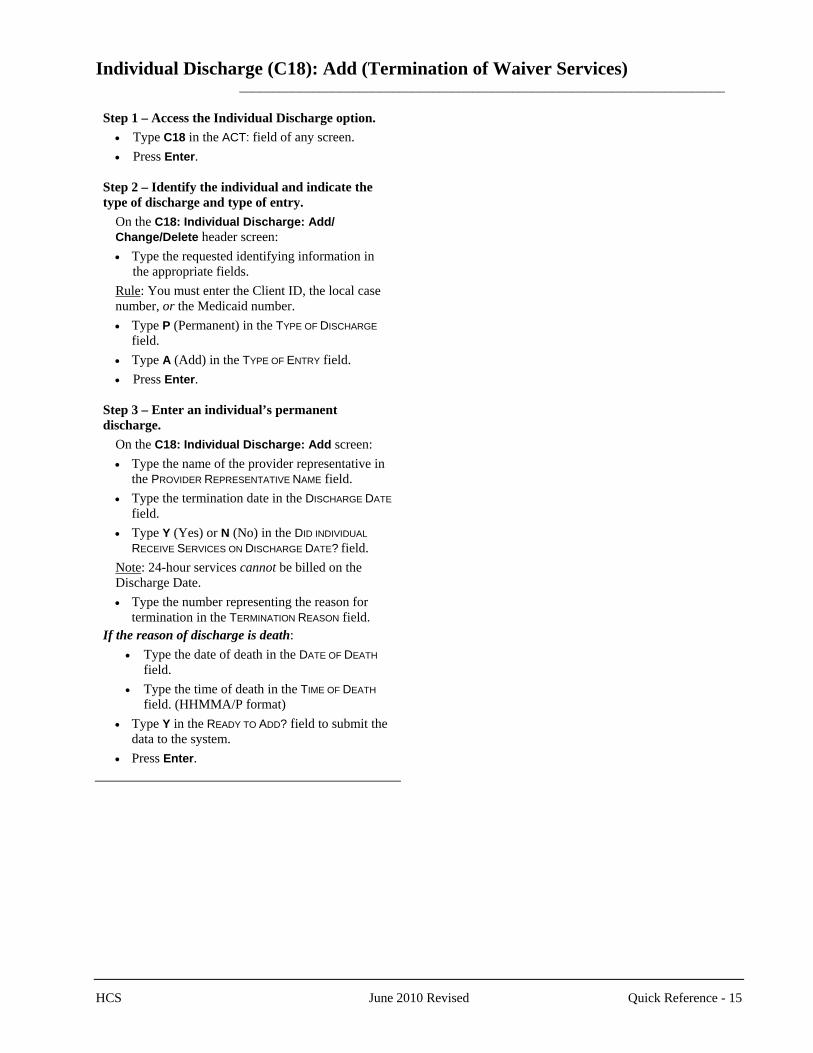
Individual Discharge (C18): Add (Termination of Waiver Services) _________________________________________________________________________
Step 1 – Access the Individual Discharge option. • Type C18 in the ACT: field of any screen. • Press Enter.
Step 2 – Identify the individual and indicate the type of discharge and type of entry.
On the C18: Individual Discharge: Add/ Change/Delete header screen: • Type the requested identifying information in
the appropriate fields. Rule: You must enter the Client ID, the local case number, or the Medicaid number. • Type P (Permanent) in the TYPE OF DISCHARGE
field. • Type A (Add) in the TYPE OF ENTRY field. • Press Enter.
Step 3 – Enter an individual’s permanent discharge.
On the C18: Individual Discharge: Add screen: • Type the name of the provider representative in
the PROVIDER REPRESENTATIVE NAME field. • Type the termination date in the DISCHARGE DATE
field. • Type Y (Yes) or N (No) in the DID INDIVIDUAL
RECEIVE SERVICES ON DISCHARGE DATE? field. Note: 24-hour services cannot be billed on the Discharge Date. • Type the number representing the reason for
termination in the TERMINATION REASON field. If the reason of discharge is death:
• Type the date of death in the DATE OF DEATH field.
• Type the time of death in the TIME OF DEATH field. (HHMMA/P format)
• Type Y in the READY TO ADD? field to submit the data to the system.
• Press Enter.
HCS June 2010 Revised Quick Reference - 15
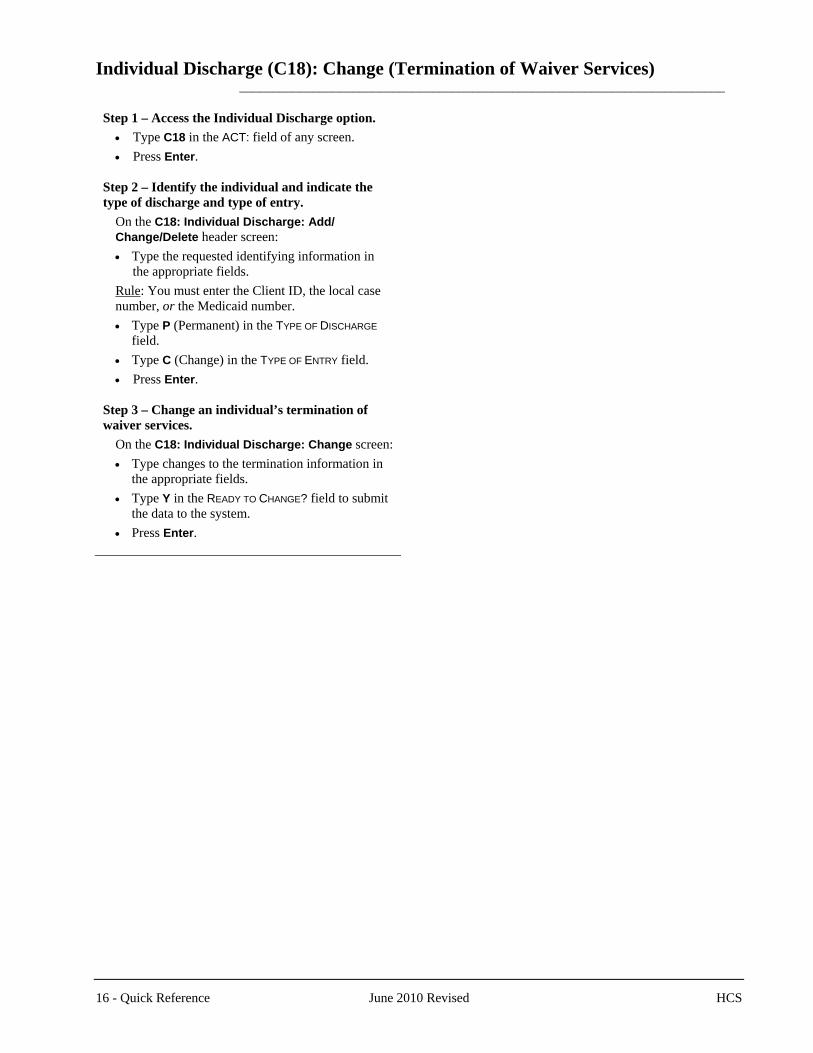
Individual Discharge (C18): Change (Termination of Waiver Services) _________________________________________________________________________
Step 1 – Access the Individual Discharge option. • Type C18 in the ACT: field of any screen. • Press Enter.
Step 2 – Identify the individual and indicate the type of discharge and type of entry.
On the C18: Individual Discharge: Add/ Change/Delete header screen: • Type the requested identifying information in
the appropriate fields. Rule: You must enter the Client ID, the local case number, or the Medicaid number. • Type P (Permanent) in the TYPE OF DISCHARGE
field. • Type C (Change) in the TYPE OF ENTRY field. • Press Enter.
Step 3 – Change an individual’s termination of waiver services.
On the C18: Individual Discharge: Change screen: • Type changes to the termination information in
the appropriate fields. • Type Y in the READY TO CHANGE? field to submit
the data to the system. • Press Enter.
16 - Quick Reference June 2010 Revised HCS
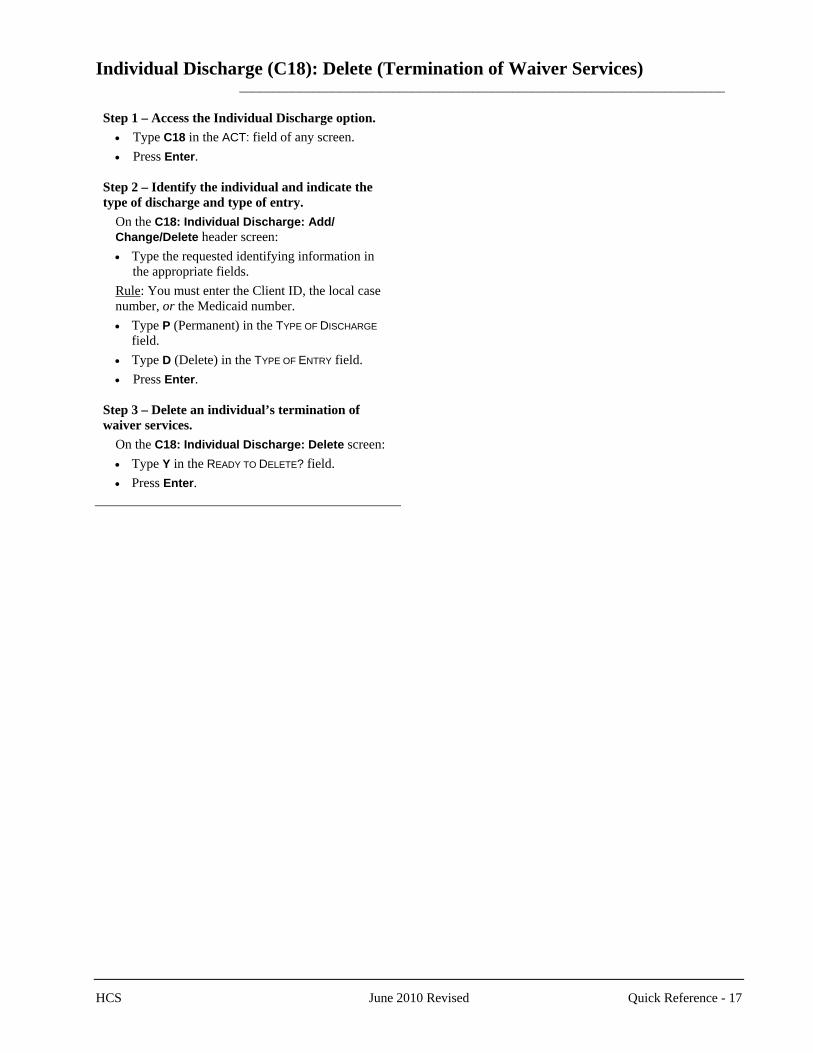
Individual Discharge (C18): Delete (Termination of Waiver Services) _________________________________________________________________________
Step 1 – Access the Individual Discharge option. • Type C18 in the ACT: field of any screen. • Press Enter.
Step 2 – Identify the individual and indicate the type of discharge and type of entry.
On the C18: Individual Discharge: Add/ Change/Delete header screen: • Type the requested identifying information in
the appropriate fields. Rule: You must enter the Client ID, the local case number, or the Medicaid number. • Type P (Permanent) in the TYPE OF DISCHARGE
field. • Type D (Delete) in the TYPE OF ENTRY field. • Press Enter.
Step 3 – Delete an individual’s termination of waiver services.
On the C18: Individual Discharge: Delete screen: • Type Y in the READY TO DELETE? field. • Press Enter.
HCS June 2010 Revised Quick Reference - 17
Individual Discharge (C18): Add (Suspension of Waiver Services) _________________________________________________________________________
Step 1 – Access the Individual Discharge option. • Type C18 in the ACT: field of any screen. • Press Enter.
Step 2 – Identify the individual and indicate the type of discharge and type of entry.
On the C18: Individual Discharge: Add/ Change/Delete header screen: • Type the requested identifying information in
the appropriate fields. Rule: You must enter the Client ID, the local case number, or the Medicaid number. • Type T (Temporary) in the TYPE OF DISCHARGE
field. • Type A (Add) in the TYPE OF ENTRY field. • Press Enter.
Step 3 – Enter an individual’s suspension of waiver services.
On the C18: Individual Discharge: Add screen: • Type the name of the provider representative in
the PROVIDER REPRESENTATIVE NAME field. • Type the suspension begin date in the DISCHARGE
BEGIN DATE field. • Type the projected return date in the PROJECTED
RETURN DATE field. • Type Y (Yes) or N (No) in the DID INDIVIDUAL
RECEIVE SERVICES ON DISCHARGE BEGIN DATE? field.
Note: 24-hour services cannot be billed on the Discharge Date. • Type the reason for suspension of waiver
services in the TERMINATION REASON field. • Type Y in the READY TO ADD? field to submit the
data to the system. • Press Enter.
18 - Quick Reference June 2010 Revised HCS
Individual Discharge (C18): Change (Suspension of Waiver Services) _________________________________________________________________________
The change function is used to change an individual’s suspension of waiver services and to end a suspension of waiver services.
Step 1 – Access the Individual Discharge option. • Type C18 in the ACT: field of any screen. • Press Enter.
Step 2 – Identify the individual and indicate the type of discharge and type of entry.
On the C18: Individual Discharge: Add/ Change/Delete header screen: • Type the requested identifying information in
the appropriate fields. Rule: You must enter the Client ID, the local case number, or the Medicaid number. • Type T (Temporary) in the TYPE OF DISCHARGE
field. • Type C (Change) in the TYPE OF ENTRY field. • Press Enter.
Step 3 – Change or end an individual’s suspension of waiver services.
On the C18: Individual Discharge: Change screen: • Type changes to the suspension information in
the appropriate fields. • If the individual is ending his/her suspension of
waiver services, type the end date in the END DATE field.
Note: If an individual has a suspension of waiver services, do not type the discharge end date until the individual has returned. The suspension end date is the last full day the individual was absent from the program. • Type Y in the READY TO CHANGE? field to submit
the data to the system. • Press Enter.
HCS June 2010 Revised Quick Reference - 19
Individual Discharge (C18): Delete (Suspension of Waiver Services) _________________________________________________________________________
Step 1 – Access the Individual Discharge option. • Type C18 in the ACT: field of any screen. • Press Enter.
Step 2 – Identify the individual and indicate the type of discharge and the type of entry.
On the C18: Individual Discharge: Add/ Change/Delete header screen: • Type the requested identifying information in
the appropriate fields. Rule: You must enter the Client ID, the local case number, or the Medicaid number. • Type T (Temporary) in the TYPE OF DISCHARGE
field. • Type D (Delete) in the TYPE OF ENTRY field. • Press Enter.
Step 3 – Delete an individual’s suspension of waiver services.
On the C18: Individual Discharge: Delete screen: • Type Y in the READY TO DELETE? field. • Press Enter.
20 - Quick Reference June 2010 Revised HCS
Individual Plan of Care (C02): Revision _________________________________________________________________________
Step 1 – Access the Individual Plan of Care option. • Type C02 in the ACT: field of any screen. • Press Enter.
Step 2 – Identify the individual and indicate the type of entry.
On the C02: Individual Plan of Care header screen: • Type the requested identifying information in
the appropriate fields. Rule: You must enter the Client ID, the local case number, or the Medicaid Number. • Type R (Revision) in the TYPE OF ENTRY field. • Type the revision date in the REVISE DATE field.
(MMDDYYYY format) • Press Enter.
Step 3 – Enter a revision to an existing IPC.
On the C02: Individual Plan of Care Entry: Revise screen: The provider will modify the total plan with the required revisions to service units. You cannot reduce the units where it would leave a current provider without any service authorizations for their service delivery option. • Enter the number of units of each service type in
the appropriate fields and the dollar amounts in the ADAPTIVE AIDS, MINOR HOME MOD, and DENTAL fields.
• The ANY SERVICES SELF DIRECTED? field is protected and cannot be changed.
• Type the individual’s residence type in the RESIDENTIAL TYPE field.
(2=Foster/Companion Care, 3=Own Home/Family Home, 4=Supervised Living, 5=Residential Support)
Note: If individual-directed, the residence type must be 3 (Own Home/Family Home). • Type Y in the READY TO CONTINUE? field. • Press Enter.
Step 4 – Continue the IPC revision – Individual Directed Services
On the C02: Individual Plan of Care Entry: Revise screen (Screen 2): Services currently being self-directed and new services added to the plan which are eligible to be self-directed are displayed on this screen. Note 1: If no services are being self-directed, this screen will not be displayed. Note 2: The units for services currently being self-directed are displayed and cannot be changed.
Step 4, continued Note 3: All services that are self-directed contain a V at the end of the service abbreviation on this screen. For example, the service abbreviation for Respite is RE. If that service is self-directed, the abbreviation becomes REV.
• Verify the new plan cost. • Type N in the CALCULATE? field. • Type Y in the READY TO CONTINUE? field. • Press Enter.
Step 5 – Continue the IPC revision – Program Provider
On the C02: Individual Plan of Care Entry: Revise screen (Screen 3): Services not being self-directed are displayed on this screen and cannot be changed. • Type Y in the READY TO CONTINUE? field. • Press Enter.
Step 6 – Complete the IPC revision. On the C02: Individual Plan of Care Entry: Revise screen (Screen 4): • Type Y (Yes) or N (No) to indicate whether any
services are staffed by a relative or guardian. • Type or verify the name of the provider
representative (individual’s name) in the PROVIDER REPRESENTATIVE field and the date the provider representative signed the IPC in the DATE field.
• Type or verify the Service Coordinator’s name in the SERVICE COORDINATOR field and the date the Service Coordinator signed the IPC in the DATE field.
• The name of the individual or legal representative is pre-filled based on whether or not a guardian has been identified (screen C20) in the INDIVIDUAL/LEGAL REPRESENTATIVE field. Type the date the individual or legal representative signed the IPC in the DATE field.
Note: Before you enter names in the fields on this screen, signatures must be on the IPC in the individual’s chart. All data entered into the CARE system should be entered from a paper copy (a hard copy) and match exactly. • Type Y in the READY TO REVISE? field to submit the
data to the system. • Press Enter.
HCS June 2010 Revised Quick Reference - 21
Individual Plan of Care (C02): Renewal _________________________________________________________________________
Renewal IPCs must be entered on (or up to 60 days prior to) the renewal date (the day after expiration of the current IPC) and cannot be backdated by the provider. Submit a Request for Backdating IPC Cover Sheet with a copy of the signed IPC (all pages) to DADS Access & Intake, Program Enrollment/Utilization Review (PE/UR) to request backdating of the IPC, if necessary. Note 1: The individual’s MR/RC Assessment (LOC/LON) must be in effect on the IPC begin date. Step 1 – Access the Individual Plan of Care option.
• Type C02 in the ACT: field of any screen. • Press Enter.
Step 2 – Identify the individual and indicate the type of entry.
On the C02: Individual Plan of Care header screen: • Type the requested identifying information in the
appropriate fields. Rule: You must enter the Client ID, the local case number, or the Medicaid Number. • Type N (Renewal) in the TYPE OF ENTRY field. • Press Enter.
Step 3 – Renew an IPC for the next plan year.
On the C02: Individual Plan of Care Entry: Renewal screen: • Type the number of units of each service category
in the appropriate fields and the dollar amounts in the ADAPTIVE AIDS, MINOR HOME MOD, and DENTAL fields.
• The ANY SERVICES SELF DIRECTED? field is protected and cannot be changed.
Note: If services are to be self-directed, the FMS MONTHLY FEE is required. You must then enter one unit per month of the IPC in the FMS MONTHLY FEE field. Residential type must be OHFH to be eligible for the CDS option. • Type the individual’s residence type in the
RESIDENTIAL TYPE field. (2=Foster/Companion Care, 3=Own Home/Family
Home, 4=Supervised Living, 5=Residential Support) • Type Y in the READY TO CONTINUE? field. • Press Enter.
Step 4 – Continue the IPC renewal – Individual Directed Services.
On the C02: Individual Plan of Care Entry: Renewal screen (Screen 2): Services currently being self-directed and new services added to the plan which are eligible to be self-directed are displayed on this screen.
Step 4 , continued Note 1: If no services are being self-directed, this screen will not be displayed. Note 2: The units for services currently being self-directed are displayed and cannot be changed. Note 3: All services that are self-directed contain a V at the end of the service abbreviation on this screen. For example, the service abbreviation for Respite is RE. If that service is self-directed, the abbreviation becomes REV.
• Verify the new plan cost. • Type N in the CALCULATE? field. • Type Y in the READY TO CONTINUE? field. • Press Enter.
Step 5 – Continue the IPC revision – Program Provider.
On the C02: Individual Plan of Care Entry: Revise screen (Screen 3): Services not being self-directed are displayed on this screen and cannot be changed. • Type Y in the READY TO CONTINUE? field. • Press Enter.
Step 6 – Complete the IPC revision. On the C02: Individual Plan of Care Entry: Revise screen (Screen 4): • Type Y (Yes) or N (No) to indicate whether any
services are staffed by a relative or guardian. • Type or verify the name of the provider
representative (individual’s name) in the PROVIDER REPRESENTATIVE field and the date the provider representative signed the IPC in the DATE field.
• Type or verify the Service Coordinator’s name in the SERVICE COORDINATOR field and the date the Service Coordinator signed the IPC in the DATE field.
• The name of the individual or legal representative is pre-filled based on whether or not a guardian has been identified (screen C20) in the INDIVIDUAL/LEGAL REPRESENTATIVE field. Type the date the individual or legal representative signed the IPC in the DATE field.
Note: Before you enter names in the fields on this screen, signatures must be on the IPC in the individual’s chart. All data entered into the CARE system should be entered from a paper copy (a hard copy) and match exactly. • Type Y in the READY TO RENEW? field to submit the
data to the system. • Press Enter.
22 - Quick Reference June 2010 Revised HCS
Individual Plan of Care (C02): Error Correction _________________________________________________________________________
Step 1 – Access the Individual Plan of Care option. • Type C02 in the ACT: field of any screen. • Press Enter.
Step 2 – Identify the individual and indicate the type of entry.
On the C02: Individual Plan of Care header screen: • Type the requested identifying information in
the appropriate fields. Rule: You must enter the Client ID, the local case number, or the Medicaid Number. • Type E (Error Correction) in the TYPE OF ENTRY
field. • Type the date in the REVISE DATE field if error
correcting a revision. • Press Enter.
Step 3 – Correct data entry errors on a previously entered IPC.
On the C02: Individual Plan of Care Entry: Correct screen: Note: You do not have to change the revision date, unless the date was previously entered incorrectly. • Enter the correct number of units of each service
type in the appropriate fields and the dollar amounts in the ADAPTIVE AIDS, MINOR HOME MOD, and DENTAL fields.
• Type or verify Y (Yes) or N (No) in the ANY SERVICES SELF DIRECTED? field.
Note 1: Any changes in service delivery options must be entered through the C06 Individual Transfer procedure. Note 2: If you enter units in the SUPPORT CONSULTATION or FINANCIAL MANAGEMENT fields, you must answer Y (Yes). Note 3: If Y (Yes) is entered and services are to be self-directed, the FMS MONTHLY FEE is required. You must then enter one unit per month of the IPC during which services are being self-directed in the FMS MONTHLY FEE field. • Type the individual’s residence type in the
RESIDENTIAL TYPE field. (2=Foster/Companion Care, 3=Own Home/Family
Home, 4=Supervised Living, 5=Residential Support) • Type Y in the READY TO CONTINUE? field. • Press Enter.
Step 4 – Continue with the IPC corrections – Individual Directed Services
On the C02: Individual Plan of Care Entry: Correct screen (Screen 2): Services currently being self-directed and new services added to the plan which are eligible to be self-directed are displayed on this screen and cannot be changed.
Step 4 , continued Note 1: All services that are self-directed contain a V at the end of the service abbreviation on this screen. For example, the service abbreviation for Respite is RE. If that service is self-directed, the abbreviation becomes REV.
• Verify the plan cost. • Type N in the CALCULATE? field. • Type Y in the READY TO CONTINUE? field. • Press Enter.
Step 5 – Continue with the IPC corrections – Program Provider
On the C02: Individual Plan of Care Entry: Correct screen (Screen 3): This screen displays the Program Provider portion of the IPC. Services not being self-directed are displayed and cannot be changed. • Type Y in the READY TO CONTINUE? field. • Press Enter.
Step 6 – Complete the IPC corrections.
On the C02: Individual Plan of Care Entry: Correct screen (Screen 4): • Type Y (Yes) or N (No) to indicate whether any
services are staffed by a relative or guardian. • Type or verify the name of the provider
representative (individual’s name) in the PROVIDER REPRESENTATIVE field and the date the provider representative signed the IPC in the DATE field.
• Type or verify the Service Coordinator’s name in the SERVICE COORDINATOR field and the date the Service Coordinator signed the IPC in the DATE field.
• The name of the individual or legal representative is pre-filled based on whether or not a guardian has been identified (screen C20) in the INDIVIDUAL/LEGAL REPRESENTATIVE field. Type the date the individual or legal representative signed the IPC in the DATE field.
Note: Before you enter names in the fields on this screen, signatures must be on the IPC in the individual’s chart. All data entered into the CARE system should be entered from a paper copy (a hard copy) and match exactly. • Type Y in the READY TO CORRECT? field to submit
the data to the system. • Press Enter.
HCS June 2010 Revised Quick Reference - 23
Individual Plan of Care (C02): Delete _________________________________________________________________________
An IPC can be deleted only if no billing has been entered. Step 1 – Access the Individual Plan of Care option.
• Type C02 in the ACT: field of any screen. • Press Enter.
Step 2 – Identify the individual and indicate the type of entry.
On the C02: Individual Plan of Care header screen: • Type the requested identifying information in
the appropriate fields. Rule: You must enter the Client ID, the local case number, or the Medicaid Number.
• Type D (Delete) in the TYPE OF ENTRY field. • Press Enter.
Step 3 – Delete an IPC.
On the C02: Individual Plan of Care Entry: Delete screen: • Type Y in the READY TO DELETE? field. • Press Enter.
24 - Quick Reference June 2010 Revised HCS
IPC/Assignment Reconciliations (C27) _________________________________________________________________________
Step 1 – Access the IPC/Assignment Reconciliations option.
• Type C27 in the ACT: field of any screen. • Press Enter.
Step 2 – Identify the individual.
On the C27: Client Assignment/IPC Residential Exceptions: Update header screen: • Type the requested identifying information in
the appropriate fields. Rule: You must enter the Client ID, the local case number, or the Medicaid Number. • Press Enter.
Step 3 – Check that client assignments and IPC residential types are correct in relationship to each other.
On the C27: Client Assignment/IPC Residential Exceptions: Update screen: • A message concerning the reconciliation of the
specified client’s assignment and any IPC residential exceptions is displayed.
One of the following messages will display: • If the client is currently on hold, once the
exception is resolved, the message will read: This client is no longer on hold.
• If the client is currently on hold and the exception is not resolved, the message will read: This client is still on hold.
• If the client is not on hold but has unresolved exceptions, the message will read: This client will be placed on hold during the next batch run, unless the situation is corrected before that date.
• If the client is not on hold and there are no exceptions, the message will read: There were no errors found for this client.
HCS June 2010 Revised Quick Reference - 25
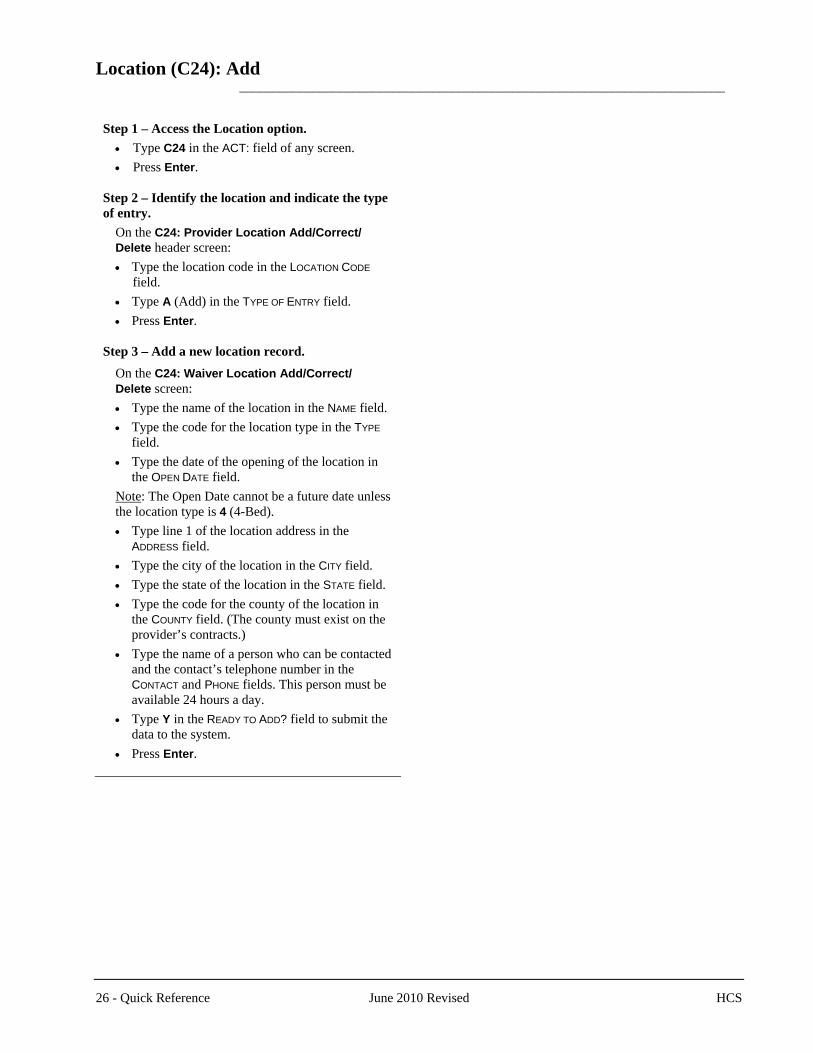
Location (C24): Add _________________________________________________________________________
Step 1 – Access the Location option. • Type C24 in the ACT: field of any screen. • Press Enter.
Step 2 – Identify the location and indicate the type of entry.
On the C24: Provider Location Add/Correct/ Delete header screen: • Type the location code in the LOCATION CODE
field. • Type A (Add) in the TYPE OF ENTRY field. • Press Enter.
Step 3 – Add a new location record.
On the C24: Waiver Location Add/Correct/ Delete screen: • Type the name of the location in the NAME field. • Type the code for the location type in the TYPE
field. • Type the date of the opening of the location in
the OPEN DATE field. Note: The Open Date cannot be a future date unless the location type is 4 (4-Bed). • Type line 1 of the location address in the
ADDRESS field. • Type the city of the location in the CITY field. • Type the state of the location in the STATE field. • Type the code for the county of the location in
the COUNTY field. (The county must exist on the provider’s contracts.)
• Type the name of a person who can be contacted and the contact’s telephone number in the CONTACT and PHONE fields. This person must be available 24 hours a day.
• Type Y in the READY TO ADD? field to submit the data to the system.
• Press Enter.
26 - Quick Reference June 2010 Revised HCS
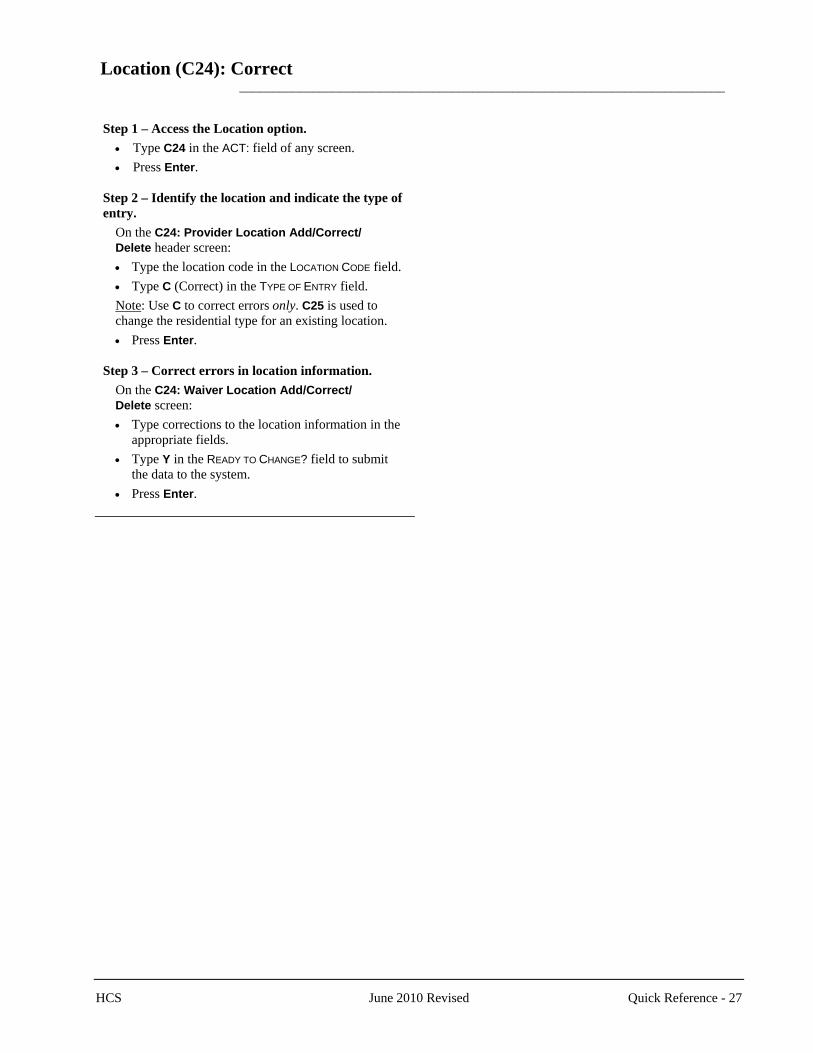
Location (C24): Correct _________________________________________________________________________
Step 1 – Access the Location option. • Type C24 in the ACT: field of any screen. • Press Enter.
Step 2 – Identify the location and indicate the type of entry.
On the C24: Provider Location Add/Correct/ Delete header screen: • Type the location code in the LOCATION CODE field. • Type C (Correct) in the TYPE OF ENTRY field. Note: Use C to correct errors only. C25 is used to change the residential type for an existing location. • Press Enter.
Step 3 – Correct errors in location information.
On the C24: Waiver Location Add/Correct/ Delete screen: • Type corrections to the location information in the
appropriate fields. • Type Y in the READY TO CHANGE? field to submit
the data to the system. • Press Enter.
HCS June 2010 Revised Quick Reference - 27
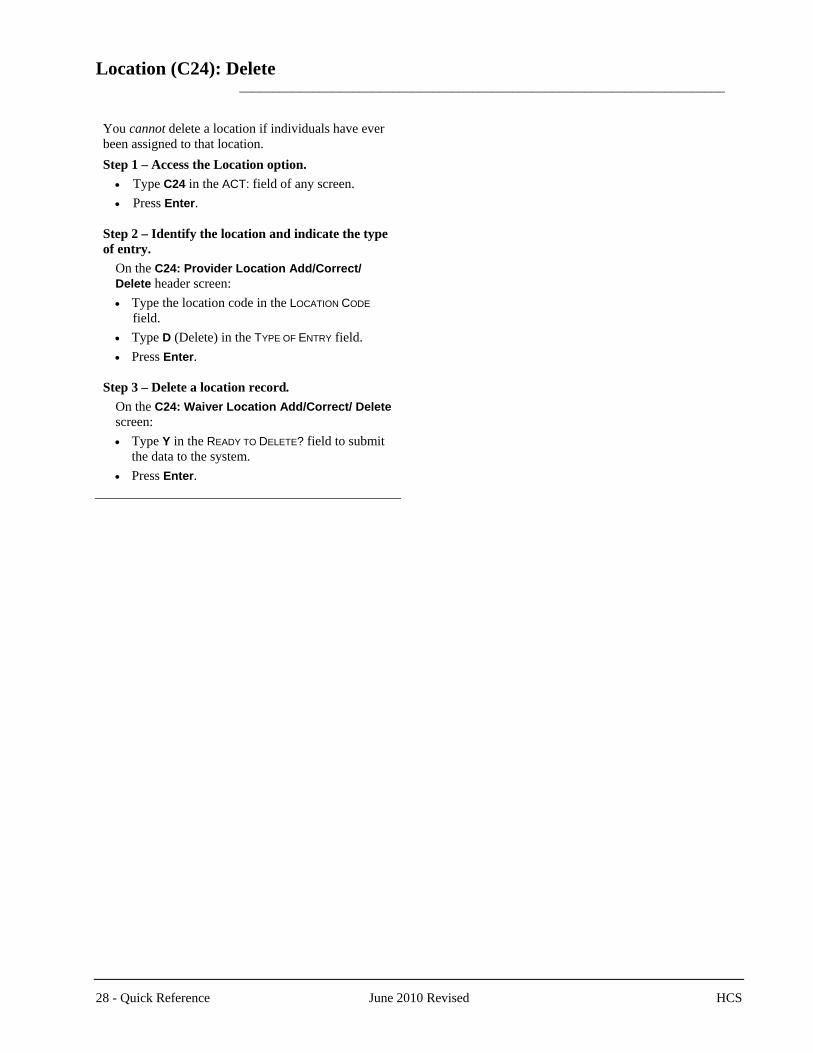
Location (C24): Delete _________________________________________________________________________
You cannot delete a location if individuals have ever been assigned to that location. Step 1 – Access the Location option.
• Type C24 in the ACT: field of any screen. • Press Enter.
Step 2 – Identify the location and indicate the type of entry.
On the C24: Provider Location Add/Correct/ Delete header screen: • Type the location code in the LOCATION CODE
field. • Type D (Delete) in the TYPE OF ENTRY field. • Press Enter.
Step 3 – Delete a location record.
On the C24: Waiver Location Add/Correct/ Delete screen: • Type Y in the READY TO DELETE? field to submit
the data to the system. • Press Enter.
28 - Quick Reference June 2010 Revised HCS
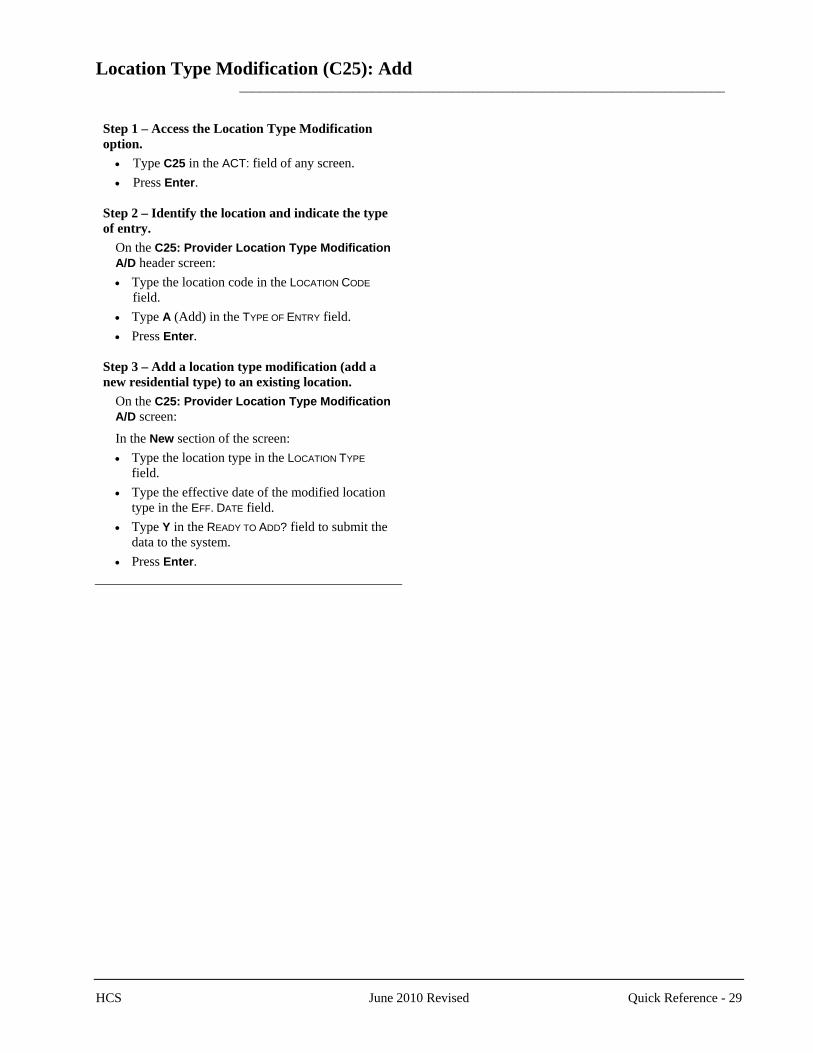
Location Type Modification (C25): Add _________________________________________________________________________
Step 1 – Access the Location Type Modification option.
• Type C25 in the ACT: field of any screen. • Press Enter.
Step 2 – Identify the location and indicate the type of entry.
On the C25: Provider Location Type Modification A/D header screen: • Type the location code in the LOCATION CODE
field. • Type A (Add) in the TYPE OF ENTRY field. • Press Enter.
Step 3 – Add a location type modification (add a new residential type) to an existing location.
On the C25: Provider Location Type Modification A/D screen:
In the New section of the screen: • Type the location type in the LOCATION TYPE
field. • Type the effective date of the modified location
type in the EFF. DATE field. • Type Y in the READY TO ADD? field to submit the
data to the system. • Press Enter.
HCS June 2010 Revised Quick Reference - 29
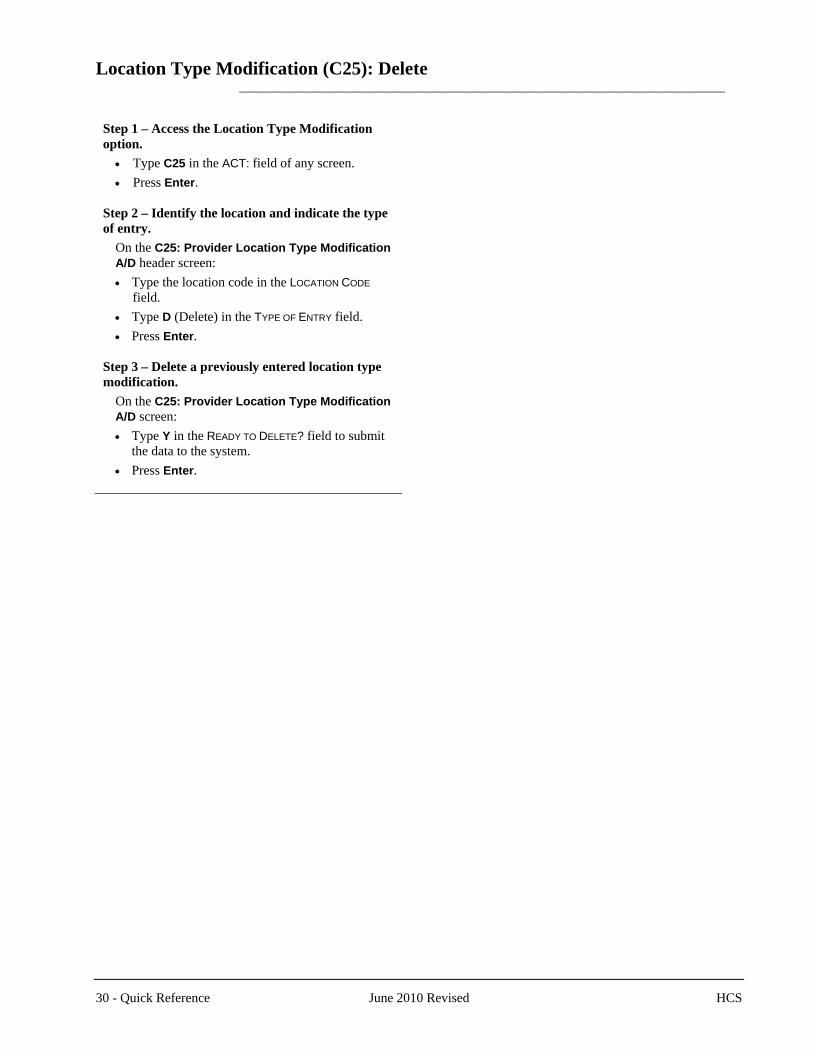
Location Type Modification (C25): Delete _________________________________________________________________________
Step 1 – Access the Location Type Modification option.
• Type C25 in the ACT: field of any screen. • Press Enter.
Step 2 – Identify the location and indicate the type of entry.
On the C25: Provider Location Type Modification A/D header screen: • Type the location code in the LOCATION CODE
field. • Type D (Delete) in the TYPE OF ENTRY field. • Press Enter.
Step 3 – Delete a previously entered location type modification.
On the C25: Provider Location Type Modification A/D screen: • Type Y in the READY TO DELETE? field to submit
the data to the system. • Press Enter.
30 - Quick Reference June 2010 Revised HCS
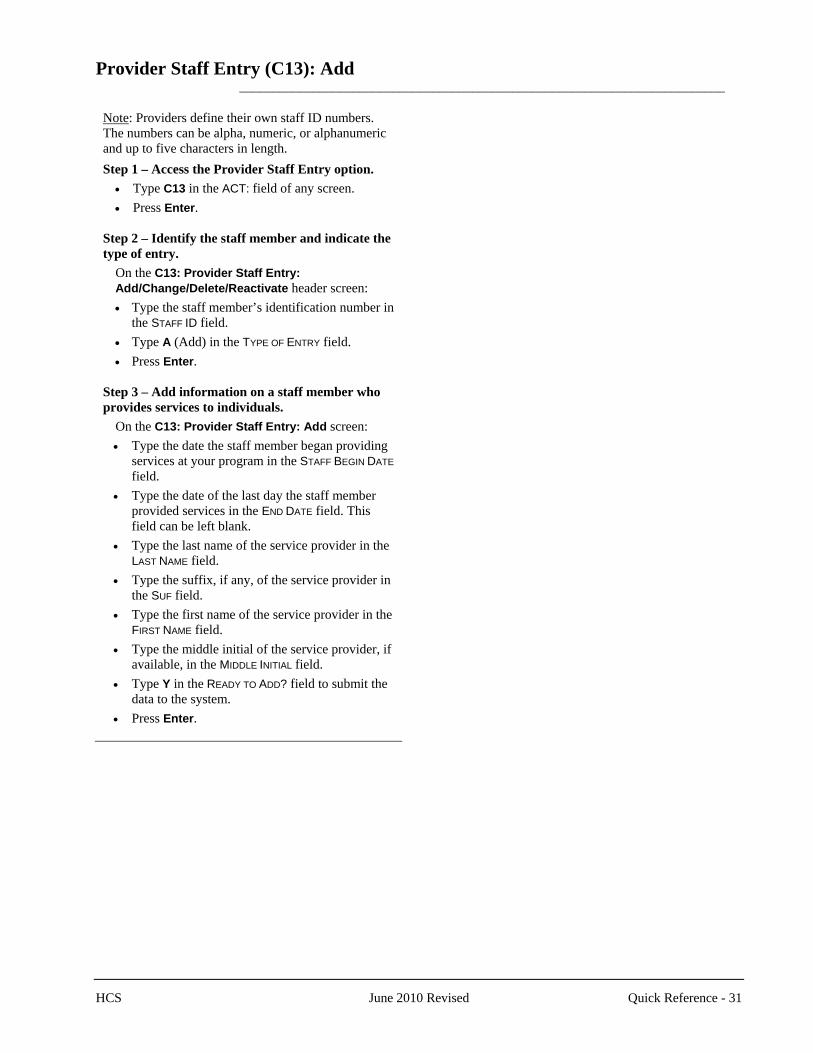
Provider Staff Entry (C13): Add _________________________________________________________________________
Note: Providers define their own staff ID numbers. The numbers can be alpha, numeric, or alphanumeric and up to five characters in length. Step 1 – Access the Provider Staff Entry option.
• Type C13 in the ACT: field of any screen. • Press Enter.
Step 2 – Identify the staff member and indicate the type of entry.
On the C13: Provider Staff Entry: Add/Change/Delete/Reactivate header screen: • Type the staff member’s identification number in
the STAFF ID field. • Type A (Add) in the TYPE OF ENTRY field. • Press Enter.
Step 3 – Add information on a staff member who provides services to individuals.
On the C13: Provider Staff Entry: Add screen: • Type the date the staff member began providing
services at your program in the STAFF BEGIN DATE field.
• Type the date of the last day the staff member provided services in the END DATE field. This field can be left blank.
• Type the last name of the service provider in the LAST NAME field.
• Type the suffix, if any, of the service provider in the SUF field.
• Type the first name of the service provider in the FIRST NAME field.
• Type the middle initial of the service provider, if available, in the MIDDLE INITIAL field.
• Type Y in the READY TO ADD? field to submit the data to the system.
• Press Enter.
HCS June 2010 Revised Quick Reference - 31
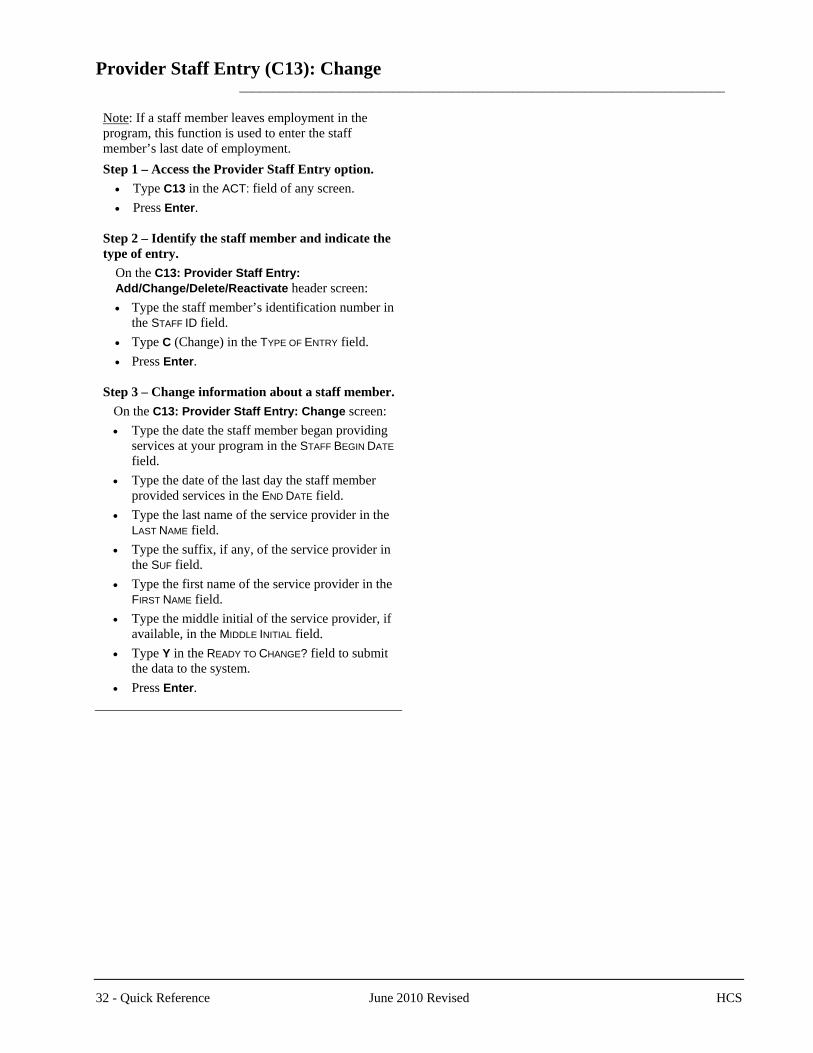
Provider Staff Entry (C13): Change _________________________________________________________________________
Note: If a staff member leaves employment in the program, this function is used to enter the staff member’s last date of employment. Step 1 – Access the Provider Staff Entry option.
• Type C13 in the ACT: field of any screen. • Press Enter.
Step 2 – Identify the staff member and indicate the type of entry.
On the C13: Provider Staff Entry: Add/Change/Delete/Reactivate header screen: • Type the staff member’s identification number in
the STAFF ID field. • Type C (Change) in the TYPE OF ENTRY field. • Press Enter.
Step 3 – Change information about a staff member.
On the C13: Provider Staff Entry: Change screen: • Type the date the staff member began providing
services at your program in the STAFF BEGIN DATE field.
• Type the date of the last day the staff member provided services in the END DATE field.
• Type the last name of the service provider in the LAST NAME field.
• Type the suffix, if any, of the service provider in the SUF field.
• Type the first name of the service provider in the FIRST NAME field.
• Type the middle initial of the service provider, if available, in the MIDDLE INITIAL field.
• Type Y in the READY TO CHANGE? field to submit the data to the system.
• Press Enter.
32 - Quick Reference June 2010 Revised HCS
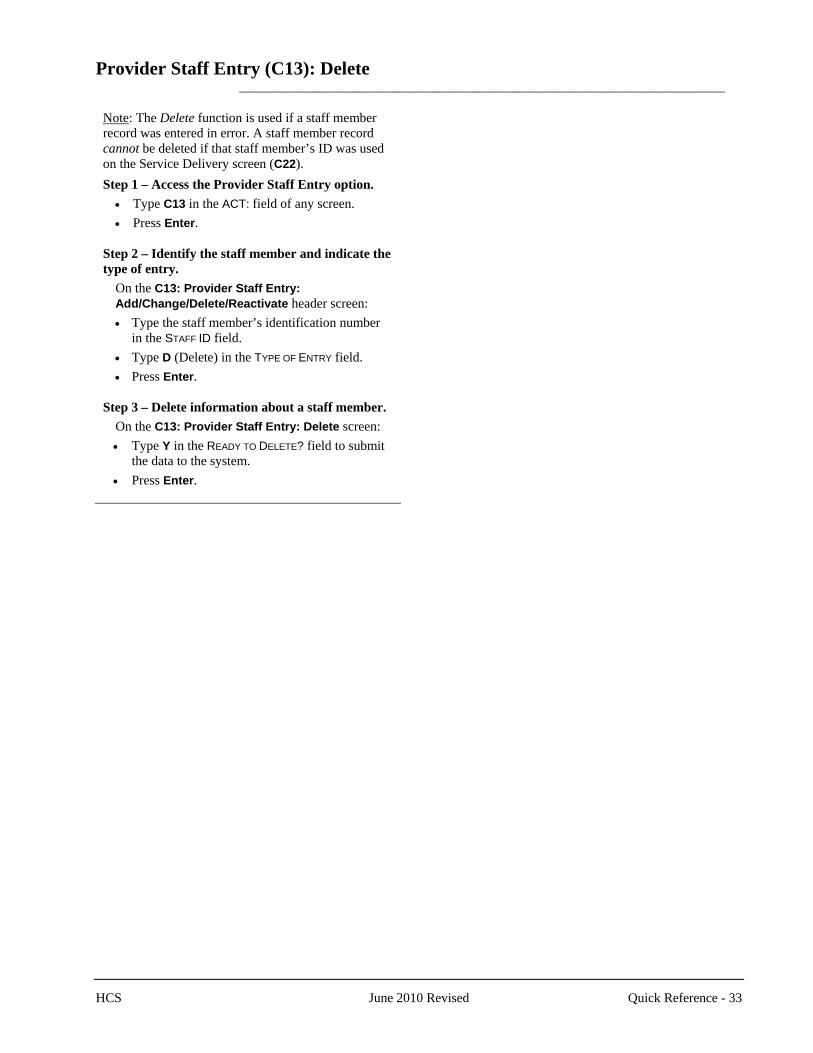
Provider Staff Entry (C13): Delete _________________________________________________________________________
Note: The Delete function is used if a staff member record was entered in error. A staff member record cannot be deleted if that staff member’s ID was used on the Service Delivery screen (C22). Step 1 – Access the Provider Staff Entry option.
• Type C13 in the ACT: field of any screen. • Press Enter.
Step 2 – Identify the staff member and indicate the type of entry.
On the C13: Provider Staff Entry: Add/Change/Delete/Reactivate header screen: • Type the staff member’s identification number
in the STAFF ID field. • Type D (Delete) in the TYPE OF ENTRY field. • Press Enter.
Step 3 – Delete information about a staff member.
On the C13: Provider Staff Entry: Delete screen: • Type Y in the READY TO DELETE? field to submit
the data to the system. • Press Enter.
HCS June 2010 Revised Quick Reference - 33
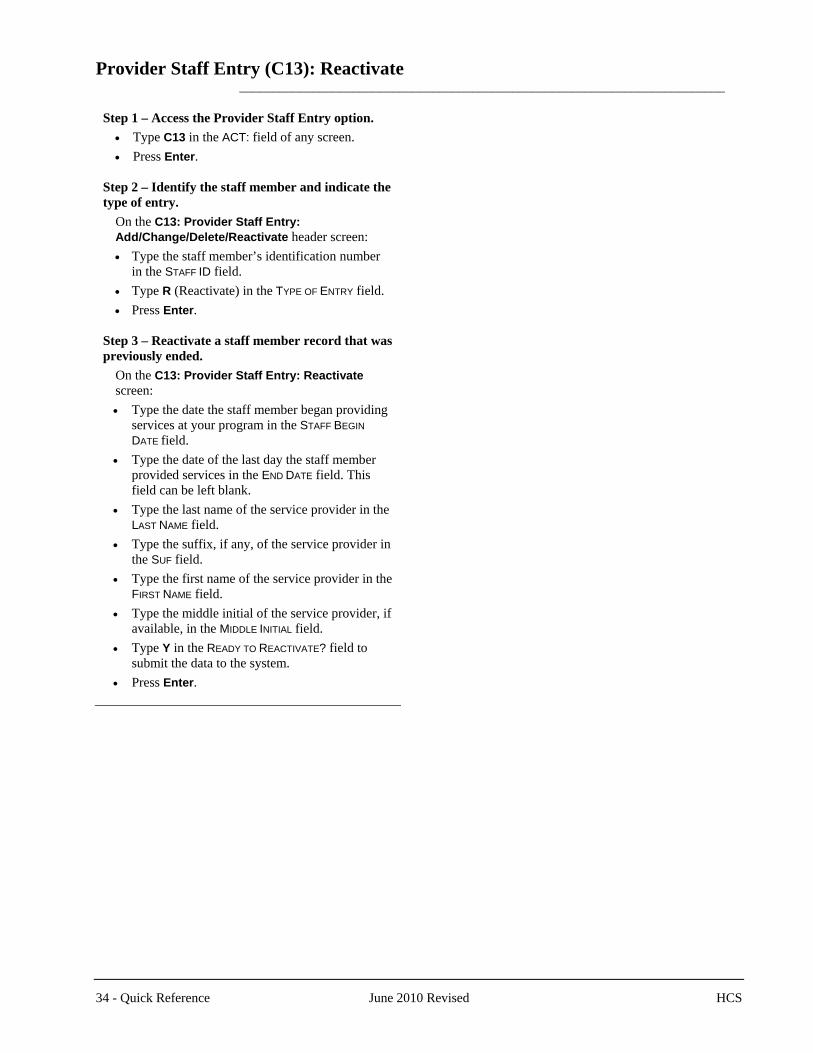
Provider Staff Entry (C13): Reactivate _________________________________________________________________________
Step 1 – Access the Provider Staff Entry option. • Type C13 in the ACT: field of any screen. • Press Enter.
Step 2 – Identify the staff member and indicate the type of entry.
On the C13: Provider Staff Entry: Add/Change/Delete/Reactivate header screen: • Type the staff member’s identification number
in the STAFF ID field. • Type R (Reactivate) in the TYPE OF ENTRY field. • Press Enter.
Step 3 – Reactivate a staff member record that was previously ended.
On the C13: Provider Staff Entry: Reactivate screen: • Type the date the staff member began providing
services at your program in the STAFF BEGIN DATE field.
• Type the date of the last day the staff member provided services in the END DATE field. This field can be left blank.
• Type the last name of the service provider in the LAST NAME field.
• Type the suffix, if any, of the service provider in the SUF field.
• Type the first name of the service provider in the FIRST NAME field.
• Type the middle initial of the service provider, if available, in the MIDDLE INITIAL field.
• Type Y in the READY TO REACTIVATE? field to submit the data to the system.
• Press Enter.
34 - Quick Reference June 2010 Revised HCS
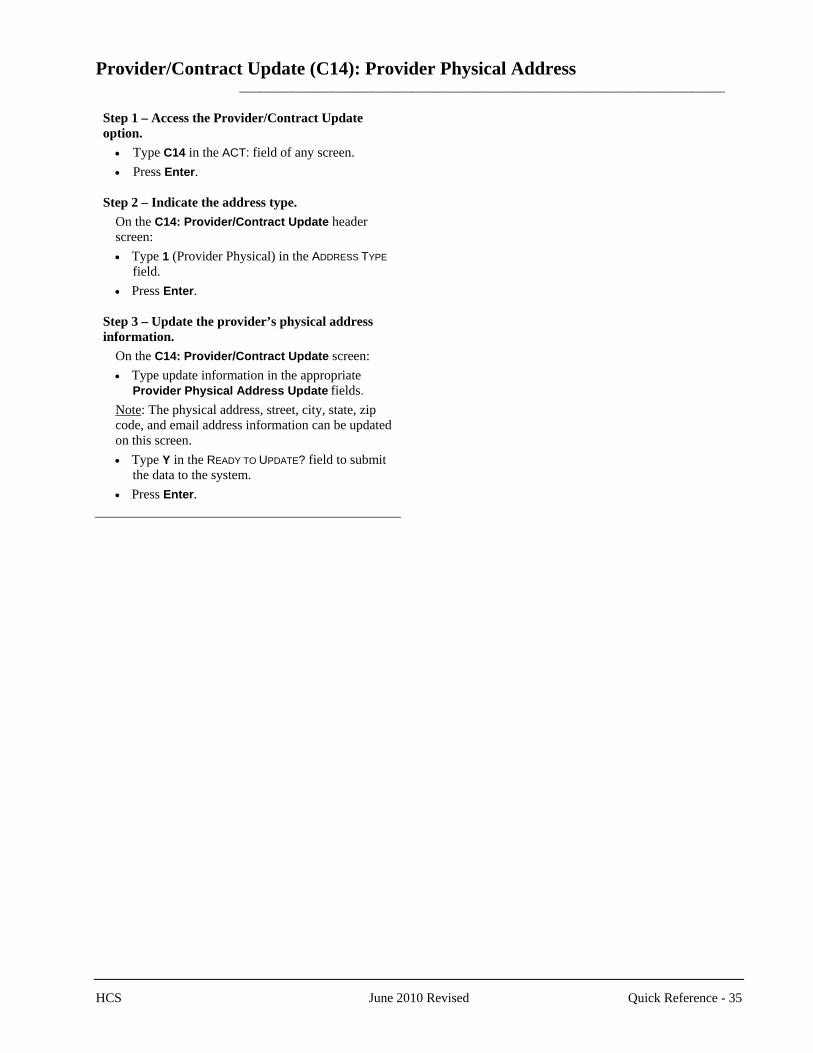
Provider/Contract Update (C14): Provider Physical Address _________________________________________________________________________
Step 1 – Access the Provider/Contract Update option.
• Type C14 in the ACT: field of any screen. • Press Enter.
Step 2 – Indicate the address type.
On the C14: Provider/Contract Update header screen: • Type 1 (Provider Physical) in the ADDRESS TYPE
field. • Press Enter.
Step 3 – Update the provider’s physical address information.
On the C14: Provider/Contract Update screen: • Type update information in the appropriate
Provider Physical Address Update fields. Note: The physical address, street, city, state, zip code, and email address information can be updated on this screen. • Type Y in the READY TO UPDATE? field to submit
the data to the system. • Press Enter.
HCS June 2010 Revised Quick Reference - 35
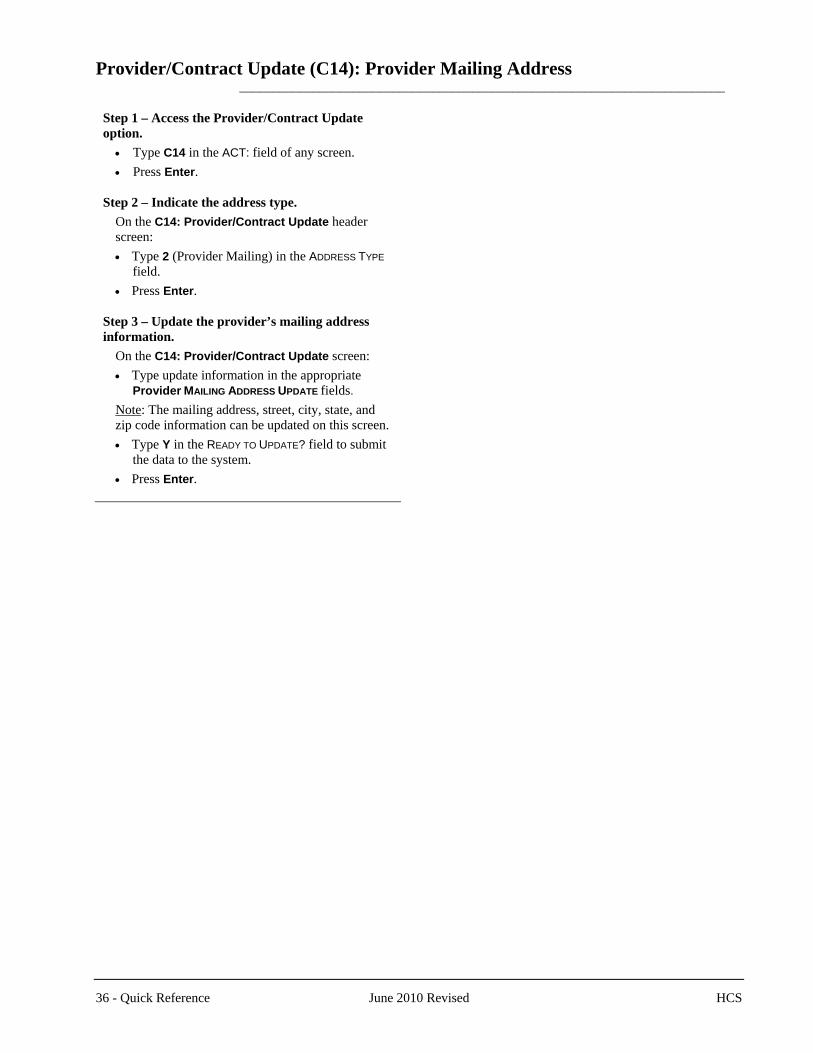
Provider/Contract Update (C14): Provider Mailing Address _________________________________________________________________________
Step 1 – Access the Provider/Contract Update option.
• Type C14 in the ACT: field of any screen. • Press Enter.
Step 2 – Indicate the address type.
On the C14: Provider/Contract Update header screen: • Type 2 (Provider Mailing) in the ADDRESS TYPE
field. • Press Enter.
Step 3 – Update the provider’s mailing address information.
On the C14: Provider/Contract Update screen: • Type update information in the appropriate
Provider MAILING ADDRESS UPDATE fields. Note: The mailing address, street, city, state, and zip code information can be updated on this screen. • Type Y in the READY TO UPDATE? field to submit
the data to the system. • Press Enter.
36 - Quick Reference June 2010 Revised HCS
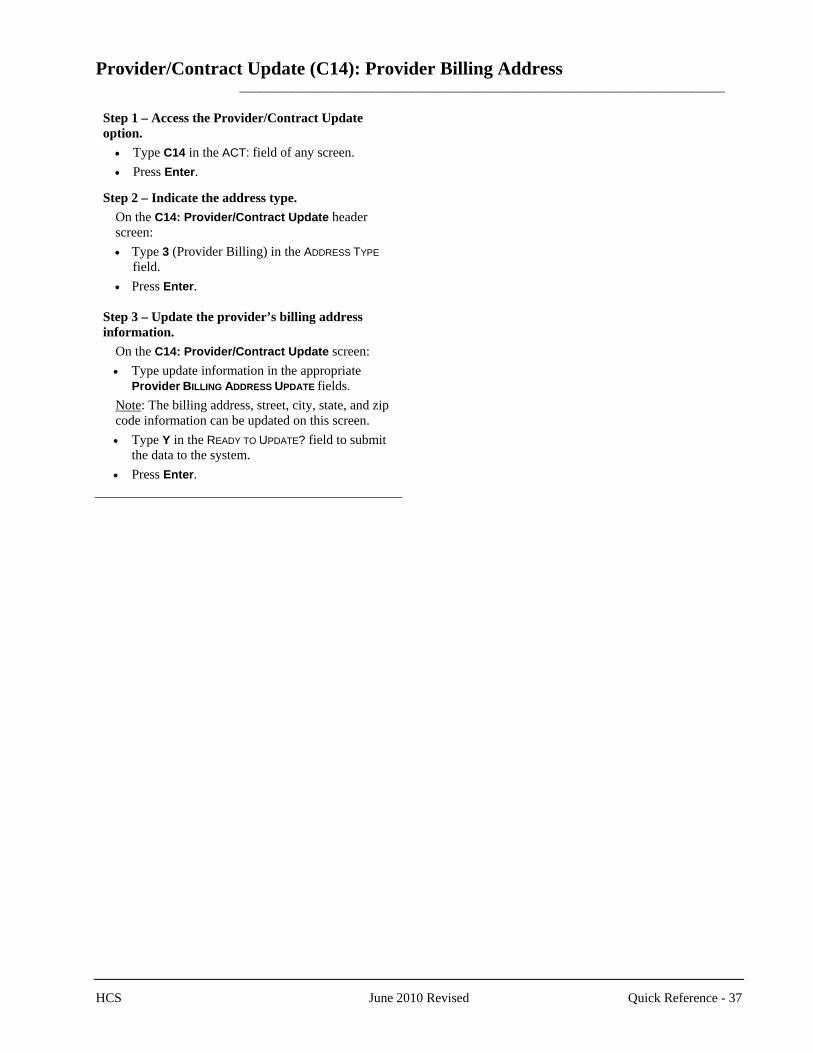
Provider/Contract Update (C14): Provider Billing Address _________________________________________________________________________
Step 1 – Access the Provider/Contract Update option.
• Type C14 in the ACT: field of any screen. • Press Enter.
Step 2 – Indicate the address type.
On the C14: Provider/Contract Update header screen: • Type 3 (Provider Billing) in the ADDRESS TYPE
field. • Press Enter.
Step 3 – Update the provider’s billing address information.
On the C14: Provider/Contract Update screen: • Type update information in the appropriate
Provider BILLING ADDRESS UPDATE fields. Note: The billing address, street, city, state, and zip code information can be updated on this screen. • Type Y in the READY TO UPDATE? field to submit
the data to the system. • Press Enter.
HCS June 2010 Revised Quick Reference - 37
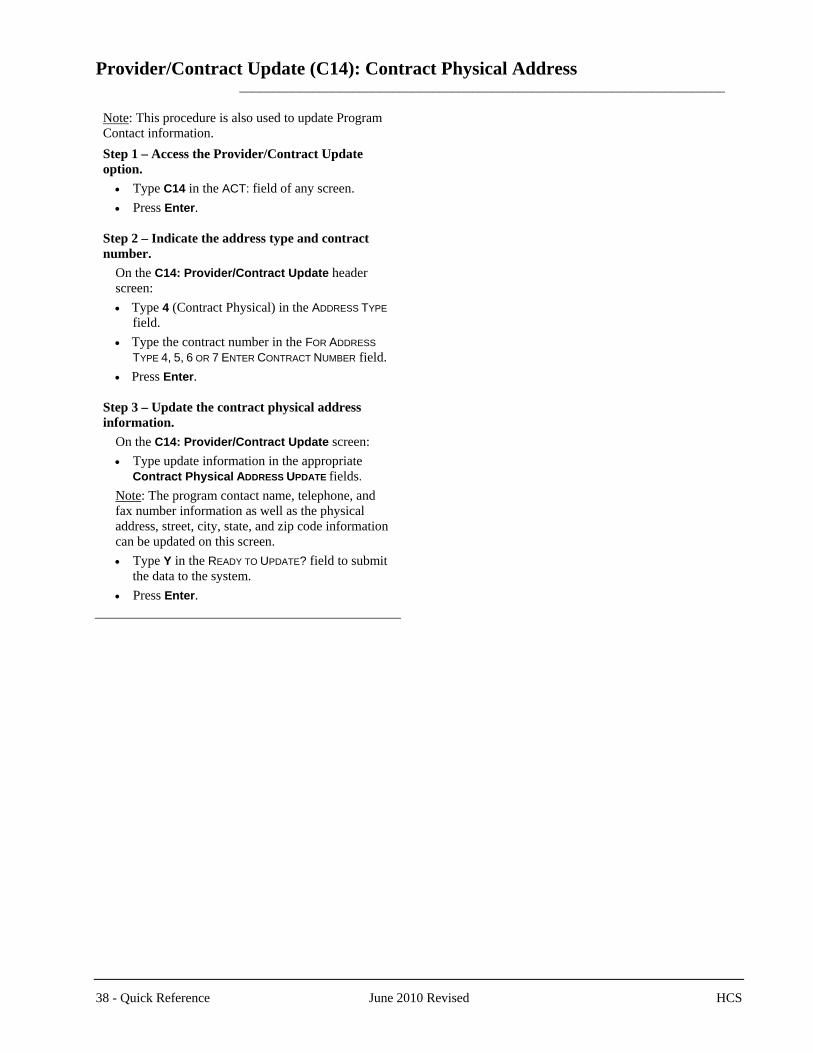
Provider/Contract Update (C14): Contract Physical Address _________________________________________________________________________
Note: This procedure is also used to update Program Contact information. Step 1 – Access the Provider/Contract Update option.
• Type C14 in the ACT: field of any screen. • Press Enter.
Step 2 – Indicate the address type and contract number.
On the C14: Provider/Contract Update header screen: • Type 4 (Contract Physical) in the ADDRESS TYPE
field. • Type the contract number in the FOR ADDRESS
TYPE 4, 5, 6 OR 7 ENTER CONTRACT NUMBER field. • Press Enter.
Step 3 – Update the contract physical address information.
On the C14: Provider/Contract Update screen: • Type update information in the appropriate
Contract Physical ADDRESS UPDATE fields. Note: The program contact name, telephone, and fax number information as well as the physical address, street, city, state, and zip code information can be updated on this screen. • Type Y in the READY TO UPDATE? field to submit
the data to the system. • Press Enter.
38 - Quick Reference June 2010 Revised HCS

Provider/Contract Update (C14): Contract Mailing Address _________________________________________________________________________
Step 1 – Access the Provider/Contract Update option.
• Type C14 in the ACT: field of any screen. • Press Enter.
Step 2 – Indicate the address type and contract number.
On the C14: Provider/Contract Update header screen: • Type 5 (Contract Mailing) in the ADDRESS TYPE
field. • Type the contract number in the FOR ADDRESS
TYPE 4, 5, 6 OR 7 ENTER CONTRACT NUMBER field. • Press Enter.
Step 3 – Update the contract mailing address information.
On the C14: Provider/Contract Update screen: • Type update information in the appropriate
Contract Mailing Address UPDATE fields. Note: The mailing address, street, city, state, and zip code information can be updated on this screen. • Type Y in the READY TO UPDATE? field to submit
the data to the system. • Press Enter.
HCS June 2010 Revised Quick Reference - 39
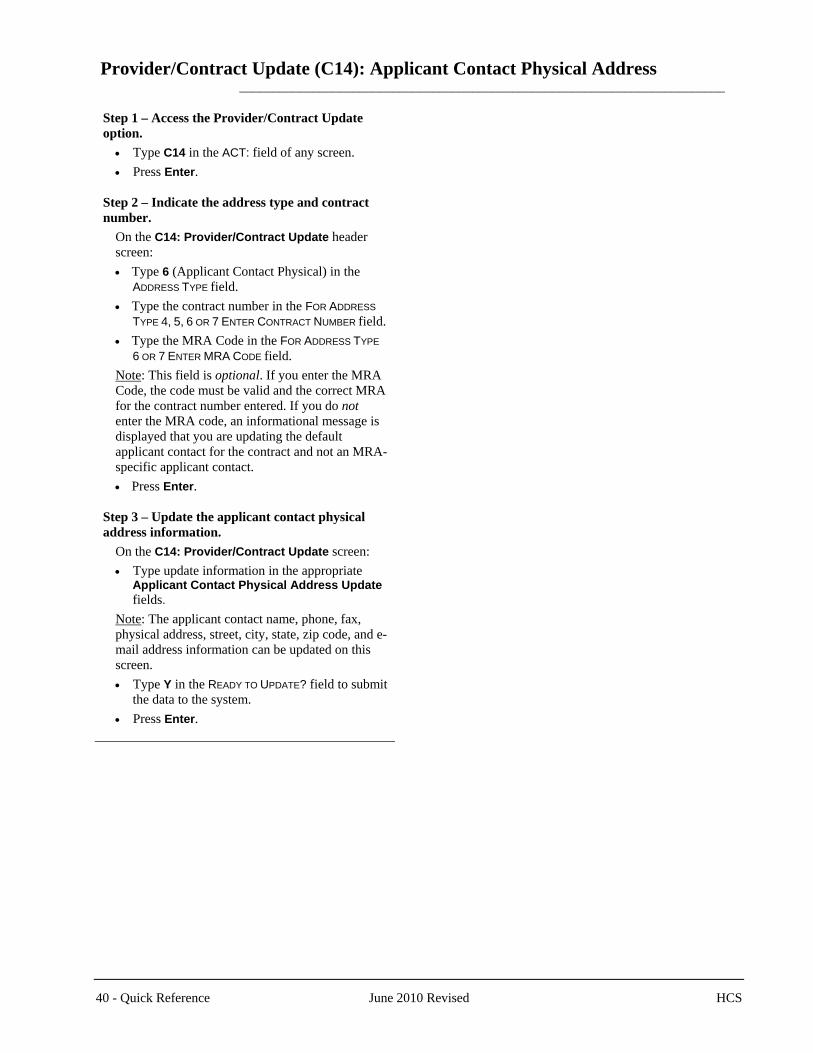
Provider/Contract Update (C14): Applicant Contact Physical Address _________________________________________________________________________
Step 1 – Access the Provider/Contract Update option.
• Type C14 in the ACT: field of any screen. • Press Enter.
Step 2 – Indicate the address type and contract number.
On the C14: Provider/Contract Update header screen: • Type 6 (Applicant Contact Physical) in the
ADDRESS TYPE field. • Type the contract number in the FOR ADDRESS
TYPE 4, 5, 6 OR 7 ENTER CONTRACT NUMBER field. • Type the MRA Code in the FOR ADDRESS TYPE
6 OR 7 ENTER MRA CODE field. Note: This field is optional. If you enter the MRA Code, the code must be valid and the correct MRA for the contract number entered. If you do not enter the MRA code, an informational message is displayed that you are updating the default applicant contact for the contract and not an MRA-specific applicant contact. • Press Enter.
Step 3 – Update the applicant contact physical address information.
On the C14: Provider/Contract Update screen: • Type update information in the appropriate
Applicant Contact Physical Address Update fields.
Note: The applicant contact name, phone, fax, physical address, street, city, state, zip code, and e-mail address information can be updated on this screen. • Type Y in the READY TO UPDATE? field to submit
the data to the system. • Press Enter.
40 - Quick Reference June 2010 Revised HCS
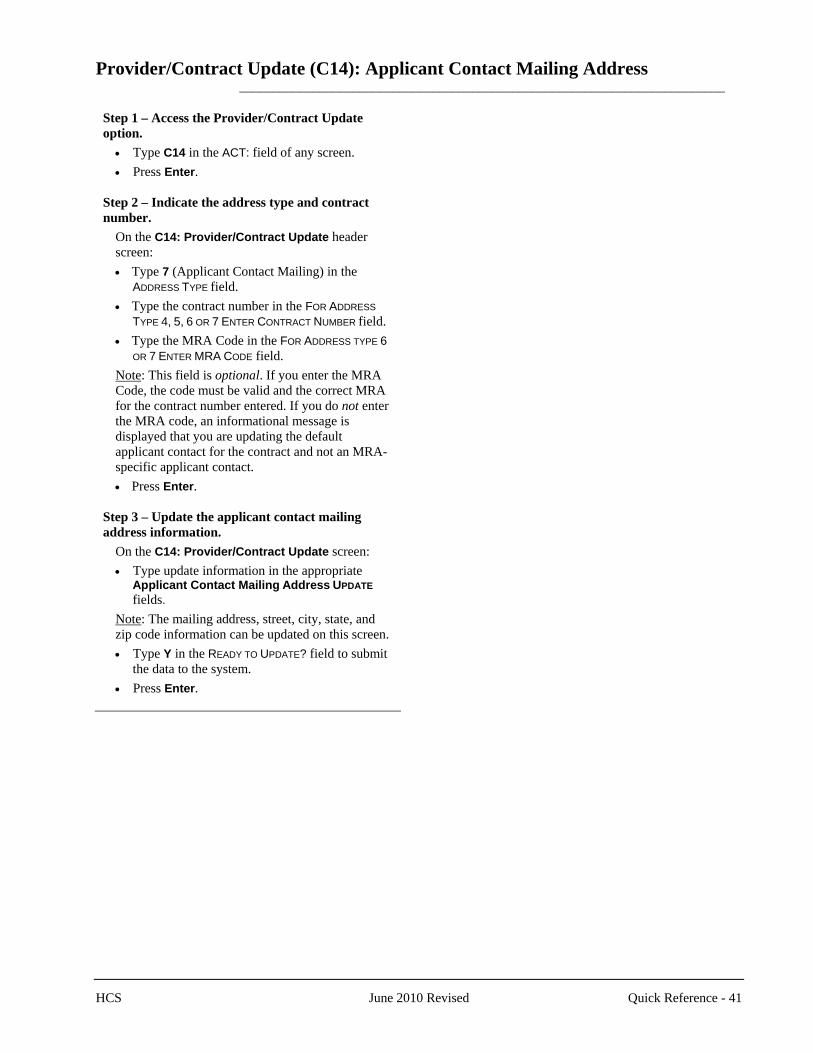
Provider/Contract Update (C14): Applicant Contact Mailing Address _________________________________________________________________________
Step 1 – Access the Provider/Contract Update option.
• Type C14 in the ACT: field of any screen. • Press Enter.
Step 2 – Indicate the address type and contract number.
On the C14: Provider/Contract Update header screen: • Type 7 (Applicant Contact Mailing) in the
ADDRESS TYPE field. • Type the contract number in the FOR ADDRESS
TYPE 4, 5, 6 OR 7 ENTER CONTRACT NUMBER field. • Type the MRA Code in the FOR ADDRESS TYPE 6
OR 7 ENTER MRA CODE field. Note: This field is optional. If you enter the MRA Code, the code must be valid and the correct MRA for the contract number entered. If you do not enter the MRA code, an informational message is displayed that you are updating the default applicant contact for the contract and not an MRA-specific applicant contact. • Press Enter.
Step 3 – Update the applicant contact mailing address information.
On the C14: Provider/Contract Update screen: • Type update information in the appropriate
Applicant Contact Mailing Address UPDATE fields.
Note: The mailing address, street, city, state, and zip code information can be updated on this screen. • Type Y in the READY TO UPDATE? field to submit
the data to the system. • Press Enter.
HCS June 2010 Revised Quick Reference - 41
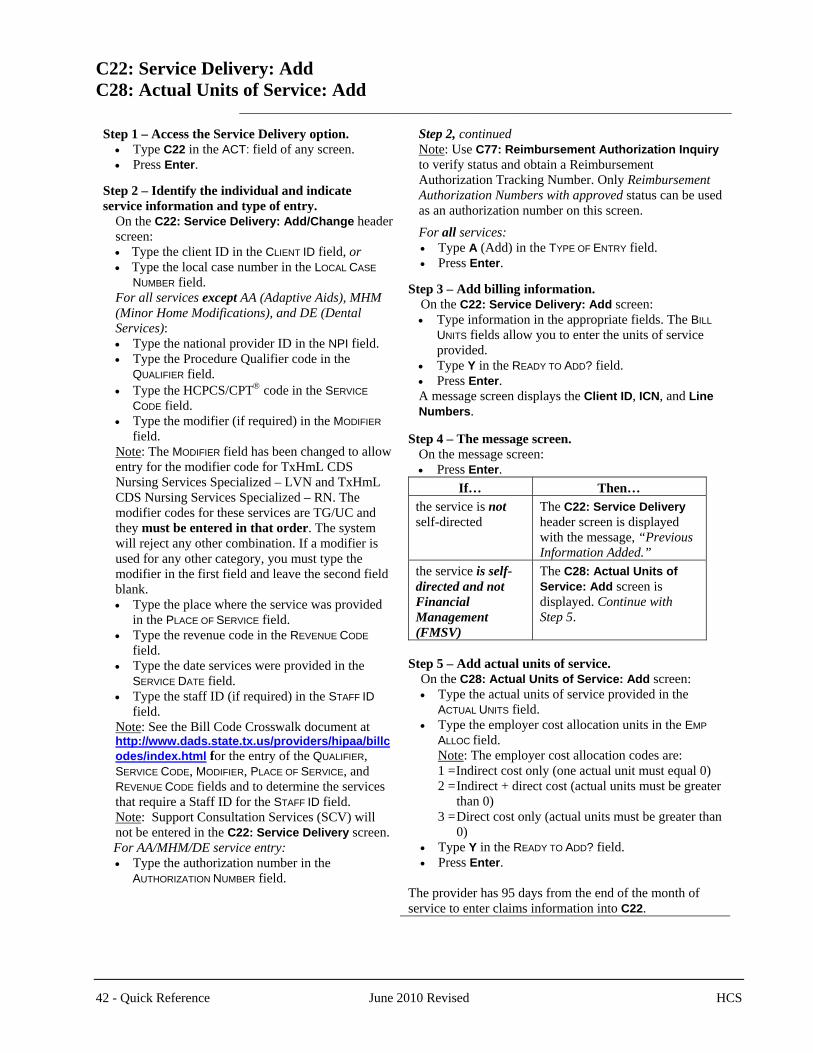
C22: Service Delivery: Add C28: Actual Units of Service: Add __________________________________________________________________________
Step 1 – Access the Service Delivery option. • Type C22 in the ACT: field of any screen. • Press Enter.
Step 2 – Identify the individual and indicate service information and type of entry.
On the C22: Service Delivery: Add/Change header screen: • Type the client ID in the CLIENT ID field, or • Type the local case number in the LOCAL CASE
NUMBER field. For all services except AA (Adaptive Aids), MHM (Minor Home Modifications), and DE (Dental Services): • Type the national provider ID in the NPI field. • Type the Procedure Qualifier code in the
QUALIFIER field. • Type the HCPCS/CPT® code in the SERVICE
CODE field. • Type the modifier (if required) in the MODIFIER
field. Note: The MODIFIER field has been changed to allow entry for the modifier code for TxHmL CDS Nursing Services Specialized – LVN and TxHmL CDS Nursing Services Specialized – RN. The modifier codes for these services are TG/UC and they must be entered in that order. The system will reject any other combination. If a modifier is used for any other category, you must type the modifier in the first field and leave the second field blank. • Type the place where the service was provided
in the PLACE OF SERVICE field. • Type the revenue code in the REVENUE CODE
field. • Type the date services were provided in the
SERVICE DATE field. • Type the staff ID (if required) in the STAFF ID
field. Note: See the Bill Code Crosswalk document at http://www.dads.state.tx.us/providers/hipaa/billcodes/index.html for the entry of the QUALIFIER, SERVICE CODE, MODIFIER, PLACE OF SERVICE, and REVENUE CODE fields and to determine the services that require a Staff ID for the STAFF ID field. Note: Support Consultation Services (SCV) will not be entered in the C22: Service Delivery screen. For AA/MHM/DE service entry: • Type the authorization number in the
AUTHORIZATION NUMBER field.
Step 2, continued Note: Use C77: Reimbursement Authorization Inquiry to verify status and obtain a Reimbursement Authorization Tracking Number. Only Reimbursement Authorization Numbers with approved status can be used as an authorization number on this screen.
For all services: • Type A (Add) in the TYPE OF ENTRY field. • Press Enter.
Step 3 – Add billing information.
On the C22: Service Delivery: Add screen: • Type information in the appropriate fields. The BILL
UNITS fields allow you to enter the units of service provided.
• Type Y in the READY TO ADD? field. • Press Enter. A message screen displays the Client ID, ICN, and Line Numbers.
Step 4 – The message screen. On the message screen: • Press Enter.
If… Then… the service is not self-directed
The C22: Service Delivery header screen is displayed with the message, “Previous Information Added.”
the service is self-directed and not Financial Management (FMSV)
The C28: Actual Units of Service: Add screen is displayed. Continue with Step 5.
Step 5 – Add actual units of service.
On the C28: Actual Units of Service: Add screen: • Type the actual units of service provided in the
ACTUAL UNITS field. • Type the employer cost allocation units in the EMP
ALLOC field. Note: The employer cost allocation codes are: 1 = Indirect cost only (one actual unit must equal 0) 2 = Indirect + direct cost (actual units must be greater
than 0) 3 = Direct cost only (actual units must be greater than
0) • Type Y in the READY TO ADD? field. • Press Enter.
The provider has 95 days from the end of the month of service to enter claims information into C22.
42 - Quick Reference June 2010 Revised HCS
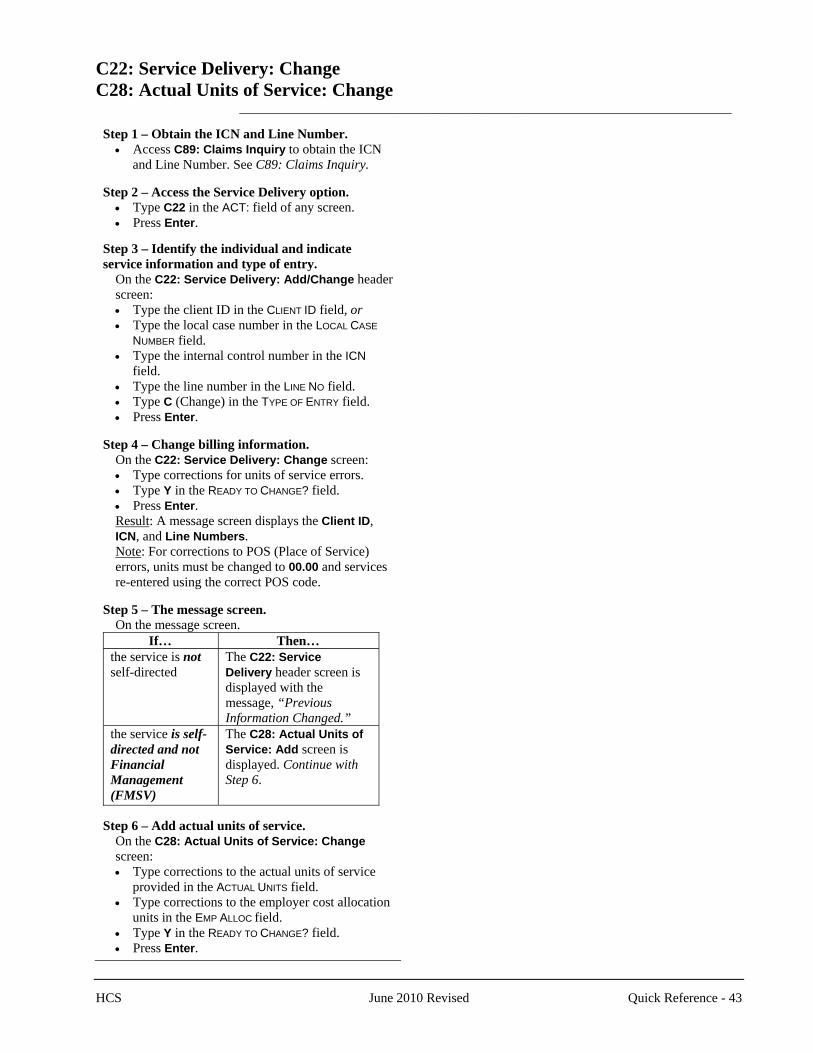
C22: Service Delivery: Change C28: Actual Units of Service: Change __________________________________________________________________________
Step 1 – Obtain the ICN and Line Number. • Access C89: Claims Inquiry to obtain the ICN
and Line Number. See C89: Claims Inquiry. Step 2 – Access the Service Delivery option.
• Type C22 in the ACT: field of any screen. • Press Enter.
Step 3 – Identify the individual and indicate service information and type of entry.
On the C22: Service Delivery: Add/Change header screen: • Type the client ID in the CLIENT ID field, or • Type the local case number in the LOCAL CASE
NUMBER field. • Type the internal control number in the ICN
field. • Type the line number in the LINE NO field. • Type C (Change) in the TYPE OF ENTRY field. • Press Enter.
Step 4 – Change billing information. On the C22: Service Delivery: Change screen: • Type corrections for units of service errors. • Type Y in the READY TO CHANGE? field. • Press Enter. Result: A message screen displays the Client ID, ICN, and Line Numbers. Note: For corrections to POS (Place of Service) errors, units must be changed to 00.00 and services re-entered using the correct POS code.
Step 5 – The message screen. On the message screen.
If… Then… the service is not self-directed
The C22: Service Delivery header screen is displayed with the message, “Previous Information Changed.”
the service is self-directed and not Financial Management (FMSV)
The C28: Actual Units of Service: Add screen is displayed. Continue with Step 6.
Step 6 – Add actual units of service.
On the C28: Actual Units of Service: Change screen: • Type corrections to the actual units of service
provided in the ACTUAL UNITS field. • Type corrections to the employer cost allocation
units in the EMP ALLOC field. • Type Y in the READY TO CHANGE? field. • Press Enter.
HCS June 2010 Revised Quick Reference - 43
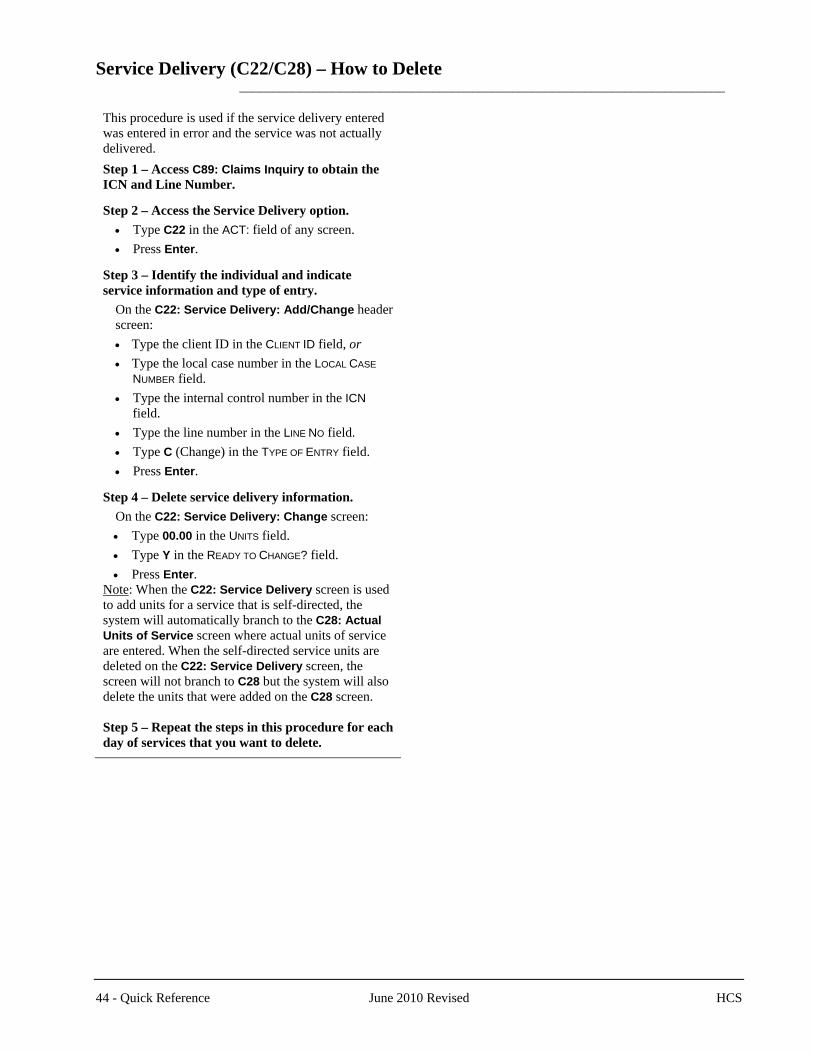
Service Delivery (C22/C28) – How to Delete _________________________________________________________________________
This procedure is used if the service delivery entered was entered in error and the service was not actually delivered. Step 1 – Access C89: Claims Inquiry to obtain the ICN and Line Number. Step 2 – Access the Service Delivery option.
• Type C22 in the ACT: field of any screen. • Press Enter.
Step 3 – Identify the individual and indicate service information and type of entry.
On the C22: Service Delivery: Add/Change header screen: • Type the client ID in the CLIENT ID field, or • Type the local case number in the LOCAL CASE
NUMBER field. • Type the internal control number in the ICN
field. • Type the line number in the LINE NO field. • Type C (Change) in the TYPE OF ENTRY field. • Press Enter.
Step 4 – Delete service delivery information.
On the C22: Service Delivery: Change screen: • Type 00.00 in the UNITS field. • Type Y in the READY TO CHANGE? field. • Press Enter.
Note: When the C22: Service Delivery screen is used to add units for a service that is self-directed, the system will automatically branch to the C28: Actual Units of Service screen where actual units of service are entered. When the self-directed service units are deleted on the C22: Service Delivery screen, the screen will not branch to C28 but the system will also delete the units that were added on the C28 screen. Step 5 – Repeat the steps in this procedure for each day of services that you want to delete.
44 - Quick Reference June 2010 Revised HCS
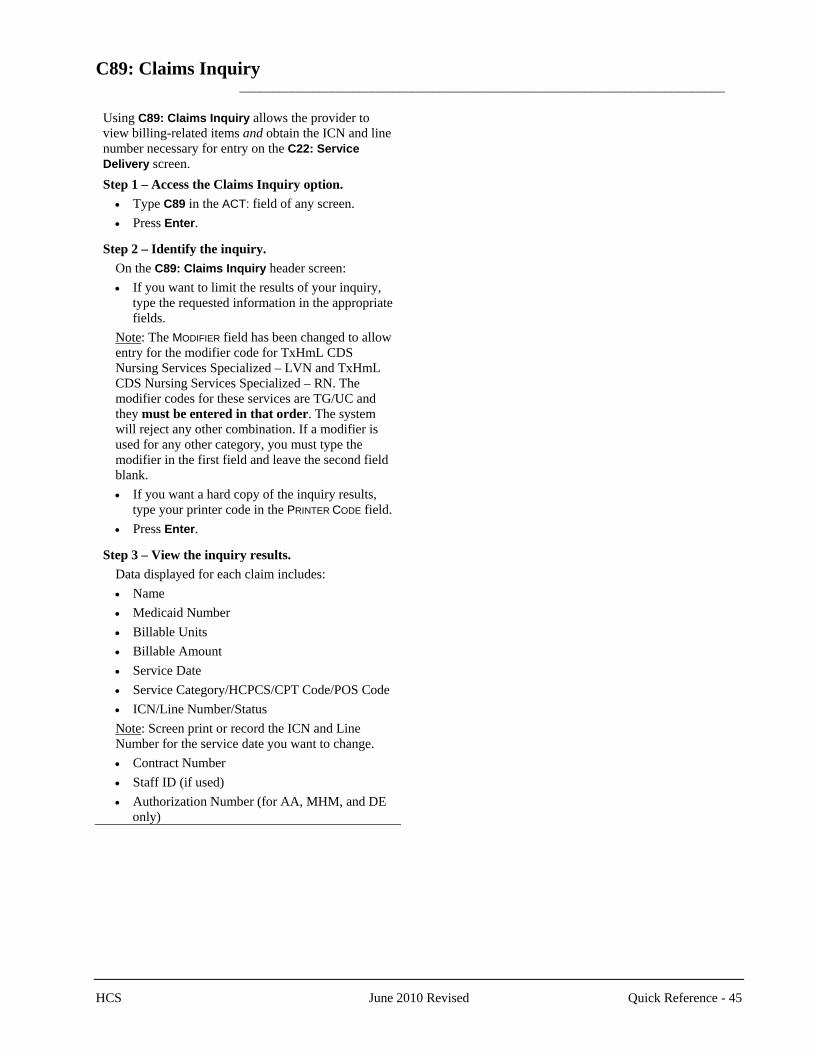
C89: Claims Inquiry _________________________________________________________________________
Using C89: Claims Inquiry allows the provider to view billing-related items and obtain the ICN and line number necessary for entry on the C22: Service Delivery screen. Step 1 – Access the Claims Inquiry option.
• Type C89 in the ACT: field of any screen. • Press Enter.
Step 2 – Identify the inquiry.
On the C89: Claims Inquiry header screen: • If you want to limit the results of your inquiry,
type the requested information in the appropriate fields.
Note: The MODIFIER field has been changed to allow entry for the modifier code for TxHmL CDS Nursing Services Specialized – LVN and TxHmL CDS Nursing Services Specialized – RN. The modifier codes for these services are TG/UC and they must be entered in that order. The system will reject any other combination. If a modifier is used for any other category, you must type the modifier in the first field and leave the second field blank. • If you want a hard copy of the inquiry results,
type your printer code in the PRINTER CODE field. • Press Enter.
Step 3 – View the inquiry results.
Data displayed for each claim includes: • Name • Medicaid Number • Billable Units • Billable Amount • Service Date • Service Category/HCPCS/CPT Code/POS Code • ICN/Line Number/Status Note: Screen print or record the ICN and Line Number for the service date you want to change. • Contract Number • Staff ID (if used) • Authorization Number (for AA, MHM, and DE
only)
HCS June 2010 Revised Quick Reference - 45
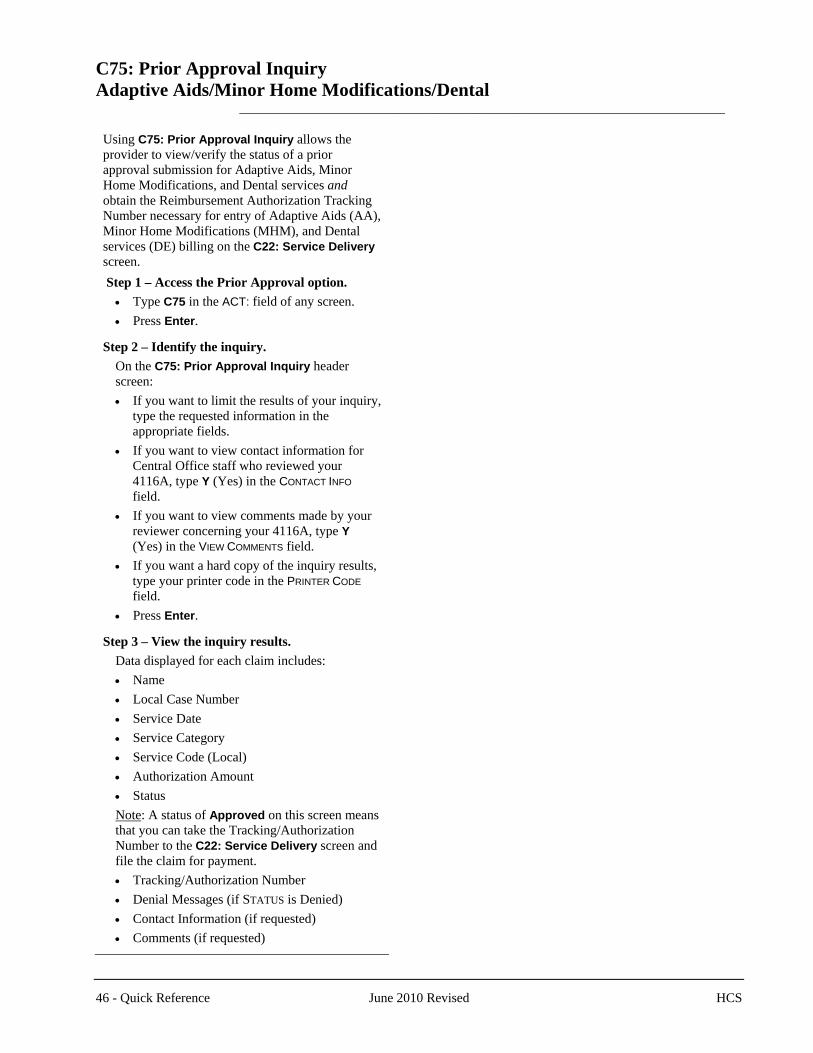
C75: Prior Approval Inquiry Adaptive Aids/Minor Home Modifications/Dental _________________________________________________________________________
Using C75: Prior Approval Inquiry allows the provider to view/verify the status of a prior approval submission for Adaptive Aids, Minor Home Modifications, and Dental services and obtain the Reimbursement Authorization Tracking Number necessary for entry of Adaptive Aids (AA), Minor Home Modifications (MHM), and Dental services (DE) billing on the C22: Service Delivery screen. Step 1 – Access the Prior Approval option.
• Type C75 in the ACT: field of any screen. • Press Enter.
Step 2 – Identify the inquiry.
On the C75: Prior Approval Inquiry header screen: • If you want to limit the results of your inquiry,
type the requested information in the appropriate fields.
• If you want to view contact information for Central Office staff who reviewed your 4116A, type Y (Yes) in the CONTACT INFO field.
• If you want to view comments made by your reviewer concerning your 4116A, type Y (Yes) in the VIEW COMMENTS field.
• If you want a hard copy of the inquiry results, type your printer code in the PRINTER CODE field.
• Press Enter. Step 3 – View the inquiry results.
Data displayed for each claim includes: • Name • Local Case Number • Service Date • Service Category • Service Code (Local) • Authorization Amount • Status Note: A status of Approved on this screen means that you can take the Tracking/Authorization Number to the C22: Service Delivery screen and file the claim for payment. • Tracking/Authorization Number • Denial Messages (if STATUS is Denied) • Contact Information (if requested) • Comments (if requested)
46 - Quick Reference June 2010 Revised HCS
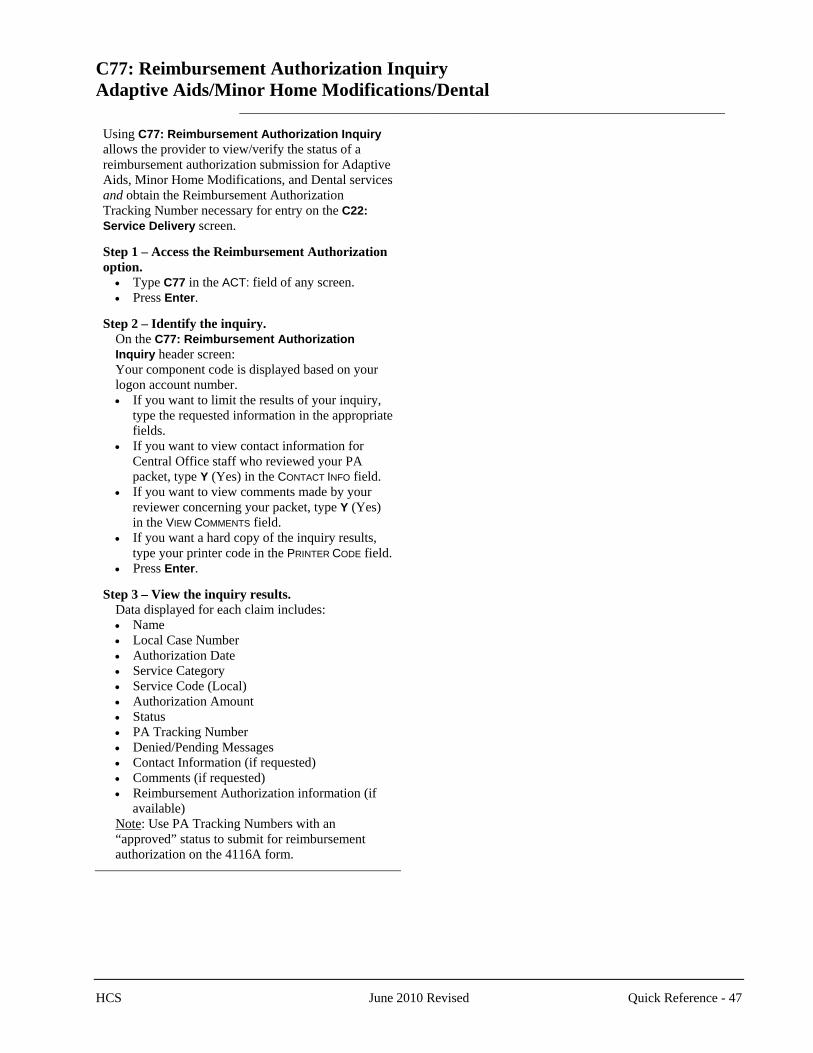
C77: Reimbursement Authorization Inquiry Adaptive Aids/Minor Home Modifications/Dental _________________________________________________________________________
Using C77: Reimbursement Authorization Inquiry allows the provider to view/verify the status of a reimbursement authorization submission for Adaptive Aids, Minor Home Modifications, and Dental services and obtain the Reimbursement Authorization Tracking Number necessary for entry on the C22: Service Delivery screen. Step 1 – Access the Reimbursement Authorization option.
• Type C77 in the ACT: field of any screen. • Press Enter.
Step 2 – Identify the inquiry.
On the C77: Reimbursement Authorization Inquiry header screen: Your component code is displayed based on your logon account number. • If you want to limit the results of your inquiry,
type the requested information in the appropriate fields.
• If you want to view contact information for Central Office staff who reviewed your PA packet, type Y (Yes) in the CONTACT INFO field.
• If you want to view comments made by your reviewer concerning your packet, type Y (Yes) in the VIEW COMMENTS field.
• If you want a hard copy of the inquiry results, type your printer code in the PRINTER CODE field.
• Press Enter. Step 3 – View the inquiry results.
Data displayed for each claim includes: • Name • Local Case Number • Authorization Date • Service Category • Service Code (Local) • Authorization Amount • Status • PA Tracking Number • Denied/Pending Messages • Contact Information (if requested) • Comments (if requested) • Reimbursement Authorization information (if
available) Note: Use PA Tracking Numbers with an “approved” status to submit for reimbursement authorization on the 4116A form.
HCS June 2010 Revised Quick Reference - 47
Waiver MR/RC Assessment Purpose Code 3 (C23): Add ___________________________________________________________________________
Step 1 – Access the Waiver MR/RC Assessment option.
• Type C23 in the ACT: field of any screen. • Press Enter.
Step 2 – Identify the individual and indicate the contract number, purpose code, type of entry, and requested begin date.
On the C23: Waiver MR/RC Assessment: Add/Chg/Del header screen: • Type the requested identifying information in
the appropriate fields. Rule: You must enter the Client ID, the local case number, or the Medicaid Number. • Type the contract number under which services
are provided to this individual in the CONTRACT NO field.
• Type 3 (Continued Stay Assessment) in the PURPOSE CODE field.
• Type A (Add) in the TYPE OF ENTRY field. • Type the requested begin date in the REQUESTED
BEGIN DATE field. Notes:
- Within 45 days prior to the expiration, the begin date can be the day after the expiration date. Other than during this 45-day window, the begin date must be the date of data entry.
- Within 45 days of expiration of the current LOC/LON, the requested begin date may be any date from the date of data entry to the day after the current LOC/LON expires.
• Press Enter. Step 3 – Add an MR/RC continued stay assessment (Purpose Code 3).
On the C23: Waiver MR/RC Assessment Purpose Code 3: Add screen: • Type the date the MR/RC Assessment was
completed in the COMPLETED DATE field. • Type additional information in the appropriate
fields. Note: The LEGAL STATUS and PREV. RES. fields are required. • Press Enter. Note: All data entered into the CARE system should be entered from a paper copy (a hard copy) and match exactly.
Step 4 – View client and MR/RC information.
On the C23: Waiver MR/RC Assessment Purpose Code 3: Add (Screen 2): • View the client and MR/RC record information. • Press Enter to continue.
Step 5 – Add the cognitive functioning, ICAP data, behavioral status, and nursing information.
On the C23: Waiver MR/RC Assessment Purpose Code 3: Add (Screen 3): • Type information in the appropriate fields. Note 1: Required fields on this screen are IQ, ABL (Adaptive Behavior Level), BROAD INDEPENDENCE, GEN. MALADAPTIVE, ICAP SERVICE LEVEL, BEHAVIOR PROGRAM, SELF-INJURY BEHAVIOR, SERIOUS DISRUP BEH, AGGRESSIVE BEHAVIOR, and SEX. AGGRESS. BEH. Note 2: For the 32. GEN. MALADAPTIVE field, if the number is negative, you must use the – (minus) sign just above the alpha section of the keyboard, not the – sign on the 10-key pad. • Press Enter.
Step 6 – Add the day services and functional assessment information.
On the C23: Waiver MR/RC Assessment Purpose Code 3: Add (Screen 4): • Type information in the appropriate fields. Note: All of the fields on this screen are required. • Press Enter.
Step 7 – Add the physician’s evaluation and recommendation information.
On the C23: Waiver MR/RC Assessment Purpose Code 3: Add (Screen 5): • Type information in the appropriate fields. Note: The fields (48-55) on this screen are not required to be completed. If any information is contained in the fields, they must all be filled out completely and accurately. • Press Enter.
Step 8 – Add the provider certification and provider comments.
On the C23: Waiver MR/RC Assessment Purpose Code 3: Add (Screen 6): • Type information in the appropriate fields. Note: The title of the person listed on the FULL NAME OF field (field 57) must be on the list displayed on this screen.
• Type Y (Yes) or N (No) in the READY TO SEND TO MRA FOR REVIEW: field to indicate whether or not you are ready to send the MR/RC Assessment to the MRA Service Coordinator for review.
• Type Y (Yes) or N (No) in the READY TO ADD? field to indicate whether or not you are ready to add the record. You may want to add the record pending further modifications even if you are not ready to send it for review. • Press Enter.
48 - Quick Reference June 2010 Revised HCS
Waiver MR/RC Assessment Purpose Code 4 (C23): Add _________________________________________________________________________
Step 1 – Access the Waiver MR/RC Assessment option.
• Type C23 in the ACT: field of any screen. • Press Enter.
Step 2 – Identify the individual and indicate the purpose code and type of entry.
On the C23: Waiver MR/RC Assessment: Add/Change/Delete header screen: • Type the requested identifying information in
the appropriate fields. Rule: You must enter the Client ID, the local case number, or the Medicaid Number. • Type the contract number under which
services are provided to this individual in the CONTRACT NO field.
• Type 4 (Change LON on Existing Assessment) in the PURPOSE CODE field.
• Type A (Add) in the TYPE OF ENTRY field. • Type the requested begin date in the
REQUESTED BEGIN DATE field. Note: For a Purpose Code 4, the begin date must equal the date of data entry. The end date will be the date that the current LOC/LON expires. • Press Enter.
Step 3 – Add a change LON on an existing MR/RC assessment (Purpose Code 4) for a TxHmL individual.
On the C23: Waiver MR/RC Assessment Purpose Code 4: Add screen: • Type the date the MR/RC Assessment was
completed in the COMPLETED DATE field. • Type the recommended Level of Need in the
REC. LON field. • Type additional information in the
appropriate fields. • Press Enter.
Step 4 – Continue the MR/RC Assessment entry.
On the C23: Waiver MR/RC Assessment Purpose Code 4: Add (Screen 2): • Type information in the appropriate fields. • Press Enter.
Step 5 – Continue the MR/RC Assessment entry. On the C23: Waiver MR/RC Assessment Purpose Code 4: Add (Screen 3): • Type information in the appropriate fields. • Press Enter.
Step 6 – Continue the MR/RC Assessment entry.
On the C23: Waiver MR/RC Assessment Purpose Code 4: Add (Screen 4): • Type information in the appropriate fields. Note: The fields (48-55) on this screen are not required to be completed. If any information is entered in the fields, they must be entered completely and accurately. • Press Enter.
Step 7 – Continue the MR/RC Assessment entry.
On the C23: Waiver MR/RC Assessment Purpose Code 4: Add (Screen 5): • Type information in the appropriate fields. Note: The title of the person listed on the FULL NAME OF field (field 57) must be on the list displayed on this screen. • Type Y (Yes) or N (No) in the READY TO SEND TO
MRA FOR REVIEW: field to indicate whether or not you are ready to send the MR/RC Assessment to the MRA Service Coordinator for review.
• Type Y (Yes) or N (No) in the READY TO ADD? field to indicate whether or not you are ready to add the record. You may want to add the record pending further modifications even if you are not ready to send it for review.
Note: All data entered into the CARE system should be entered from a paper copy (a hard copy) and match exactly. • Press Enter.
HCS June 2010 Revised Quick Reference - 49
50 - Quick Reference June 2010 Revised HCS
Waiver MR/RC Assessment Purpose Code E (L23): Add _________________________________________________________________________
The begin date of the gap is the day after the previous LOC/LON expired, and the end date is the day before the current LOC/LON begins. Step 1 – Access the MR/RC Assessment Summary
• Type C68 in the ACT: field of any screen. • Press Enter.
Step 2 – Identify the gap dates
• Review information from the two most recent MR/RC Assessments to determine the gap dates.
Note: The gap begin and end dates are obtained from the C68: MR/RC Assessments – Summary screen.
Step 3 – Access the Waiver MR/RC Assessment option.
• Type C23 in the ACT: field of any screen. • Press Enter.
Step 4 – Identify the individual and indicate the purpose code and type of entry.
On the C23: Waiver MR/RC Assessment: Add/Change/Delete header screen: • Type the requested identifying information in the
appropriate fields. Rule: You must enter the Client ID, the local case number, or the Medicaid Number. • Type the contract number under which services
are provided to this individual in the CONTRACT NO field.
• Type E (Gaps in Assessment) in the PURPOSE CODE field.
• Type A (Add) in the TYPE OF ENTRY field. • Type the requested begin date in the REQUESTED
BEGIN DATE field. • Type the requested end date in the REQUESTED
END DATE field. Note: For Purpose Code E, REQUESTED BEGIN DATE and REQUESTED END DATE are required fields. • Press Enter.
Step 5 – Add an MR/RC gaps in assessment (Purpose Code E) for a TxHmL individual.
On the C23: Waiver MR/RC Assessment Purpose Code E: Add screen: • Type the date the MR/RC Assessment was
completed in COMPLETED DATE field. Note: The date must be on or after the gap end date. • Type the recommended Level of Need in the REC.
LON field. • Type additional information in the appropriate
fields. • Press Enter.
Note: An LON increase cannot be authorized on a Purpose Code E.
Step 6 – View the client and MR/RC record information.
On the C23: Waiver MR/RC Assessment Purpose Code E: Add (Screen 2): This screen allows you to view client information and available MR/RC record information. • Press Enter.
Step 7 – Continue the MR/RC Assessment entry. On the C23: Waiver MR/RC Assessment Purpose Code E: Add (Screen 3): • Type information in the appropriate fields. • Press Enter.
Step 8 – Continue the MR/RC Assessment entry. On the C23: Waiver MR/RC Assessment Purpose Code E: Add (Screen 4): • Type information in the appropriate fields. • Press Enter to continue.
Step 9 – Continue the MR/RC Assessment entry.
On the C23: Waiver MR/RC Assessment Purpose Code E: Add (Screen 5): • Type information in the appropriate fields. Note: The fields (48-55) on this screen are not required to be completed. If any information is contained in the fields, they must all be entered completely and accurately. • Press Enter.
Step 10 – Continue the MR/RC Assessment entry.
On the C23: Waiver MR/RC Assessment Purpose Code E: Add (Screen 6): • Type information in the appropriate fields. Note 1: The title of the person listed in the FULL NAME OF field (field 57) must be on the list displayed on this screen. Note 2: The signature date must be on or after the gap end date. • Type Y (Yes) or N (No) in the READY TO SEND TO
MRA FOR REVIEW: field to indicate whether or not you are ready to send the MR/RC Assessment to the MRA Service Coordinator for review.
• Type Y (Yes) or N (No) in the READY TO ADD? field to indicate whether or not you are ready to add the record. You may want to add the record pending further modifications even if you are not ready to send it for review.
Note: All data entered into the CARE system should be entered from a paper copy (a hard copy) and match exactly. • Press Enter.