home healthcare *smith&nephew user manual renasys™ go - renasys go... · if your wound shows...
TRANSCRIPT

Home Healthcare User Manual
200ml
100ml
50ml
300ml
RENASYS™ GONegative Pressure WoundTherapy
*smith&nephew
*smith&nephewRENASYS™ GONegative Pressure Wound TherapyRENASYS GO device 66801496 only

Healthcare provider's name:
Healthcare provider's telephone number:
Healthcare provider's mobile number:

Home Healthcare User Manual
EN
Table of Contents1. Introduction page 4
2. When the device should or should not be used 7
Indications for use 7Contraindications 7Warnings 8Precautions 9
3. RENASYS GO system features 12
Device overview 12Canisters 13Proper use/orientation 14Power 15
4. RENASYS GO device operation 16
How do I know if the device is working? 17Battery operation 18
*smith&nephewRENASYS™ GONegative Pressure WoundTherapy
5. System setup 19Device setup 19Connecting your dressing 20Attaching a new canister 21Reconnecting your dressing 22
6. Alarms and troubleshooting 23
7. Accessories 40Cary strap 40Shoulder and extension straps 40Carry bag 41
8. Cleaning, maintenance and expected life of device 42
9. Technical specifications 42
10. Caution statements 43
11. Contact information 4424 hour clinical hotlines 44Customer Care contacts 45

4
EN
1. IntroductionThis RENASYS™ GO Home Healthcare User Manual will provide you with important information regarding the Smith & Nephew RENASYS GO Negative Pressure Wound Therapy (NPWT) System.
This system is prescribed to you by a trained and licensed healthcare provider. This Home Healthcare User Manual will help you operate and monitor your device.
The RENASYS GO device should only be used with compatible Smith & Nephew RENASYS products.
*smith&nephewRENASYS™GO
Negative Pressure WoundTherapy

5
EN
What is RENASYS™ GO Negative Pressure Wound Therapy (NPWT)?RENASYS GO is a therapy system that is applied to your wound and may promote wound healing by removing fluid, including wound exudates and infectious materials. This form of treatment is being widely used in both hospitals and the home.
How does it work?RENASYS NPWT systems consist of a device, a canister and a wound dressing kit.
The dressing is applied to the wound bed and covered with a clear film. Once sealed, it is attached to the device through tubing and a canister. The device then draws fluid from the wound into the canister while the clear film helps to prevent bacteria from entering the dressing. Use of this system may also improve blood flow to help the wound heal.
The RENASYS GO device is electrical and can be plugged into an electrical outlet or can operate on its internal battery.
How many hours a day do you need to use the therapy?To receive the full benefit of the therapy, we recommend that the device be powered on at all times or as prescribed by your healthcare provider.
How long will it take to improve your wound?The length of time that the therapy takes to improve a wound is different for every patient. It will depend on your general condition, the size and type of wound that you have and your prescribed treatment. In many cases, an improvement in the wound can be seen with the first dressing change, but in some cases, it may take several weeks. The therapy may be used to close the wound completely or may be stopped before this and replaced with a different type of dressing. If your wound shows no improvement, the therapy may be stopped. Your healthcare provider will discuss when and why use of this device will be stopped based on assessment of your wound.

6
EN
Will it be painful? The first time therapy is turned on, you may feel a slight pulling sensation, but it should not be painful.
If you experience any pain, speak to your healthcare provider. They may recommend changing the settings on your device or prescribe pain relief medication.
How often will the dressings be changed?The dressings will usually be changed 2–3 times a week, in some cases it may be more often. This will depend on your wound’s size, type, position and drainage amount. Your healthcare provider will determine how often your dressings needs to be changed.
All dressing changes must be performed by a trained healthcare provider.
Will the dressing changes hurt?Some people may experience slight discomfort during dressing changes, specifically during the cleaning of the wound. If you feel any discomfort, tell your healthcare provider. They may change your device’s pressure setting or prescribe pain relief medication to help ease the discomfort.
Can you move around while on the therapy?Usually, patients using the therapy can move around, but this will depend on the position of the wound and recommendations provided by your healthcare provider. If you are able to move around, the device can be unplugged and operate on its internal battery for up to 20 hours.

7
EN
2. When this device should or should not be used
When this device can be used (Indications for use) RENASYS™ GO is indicated for patients who would benefit from a suction device (Negative Pressure Wound Therapy), as it may promote wound healing by removing fluid, including wound exudates and infectious materials.
Examples of appropriate wound types include:
• Chronic
• Acute
• Traumatic
• Sub-Acute and dehisced wounds
• Ulcers (such as pressure or diabetic)
• Partial-thickness burns
• Flaps and grafts
When the device should not be used (Contraindications)RENASYS GO should not be used if you have:
• Untreated osteomyelitis
• Exposed arteries, veins, organs or nerves
• Necrotic tissue with eschar present
• Malignancy in wound (with exception of palliative care to enhance quality of life)
• Non-enteric and unexplored fistulas
• Anastomotic sites

8
EN
Warnings 1. This product should only be used as prescribed by your healthcare
provider. Do not use it on anyone other than the prescribed patient.
2. Monitor your dressing and device during operation. If there is increased bleeding, a change in fluid color or pain, contact your healthcare provider.
3. If you see blood within the canister, power off the device and contact your healthcare provider immediately.
4. The canister is sealed shut and contains a solidifier packet that will gel the wound fluid. The device and canister should be kept out of reach of children and pets.
5. If you are unable to turn off the alarms, consult the Alarms and Troubleshooting section of this Home Healthcare User Manual.
6. If the dressing feels or appears to be loose, consult the system setup section of this Home Healthcare Use Manual or contact your healthcare provider.
7. If your wound looks more red than usual, has a foul smell or the skin around your wound looks red or irritated, contact your healthcare provider.
8. Place device at or below the level of the wound to ensure the prescribed level of therapy is delivered.
9. Do not use the device near an oxygen tank or oxygen gernerator due to danger of explosion.
10. Do not try to remove or change the dressing yourself. Your healthcare provider must do this for you.
200ml
100ml
50ml
300ml
RENASYS™ GONegative Pressure WoundTherapy
*smith&nephew
200ml
100ml
50ml
300ml
RENASYS™ GONegative Pressure WoundTherapy
*smith&nephew
Level of the wound
9
EN
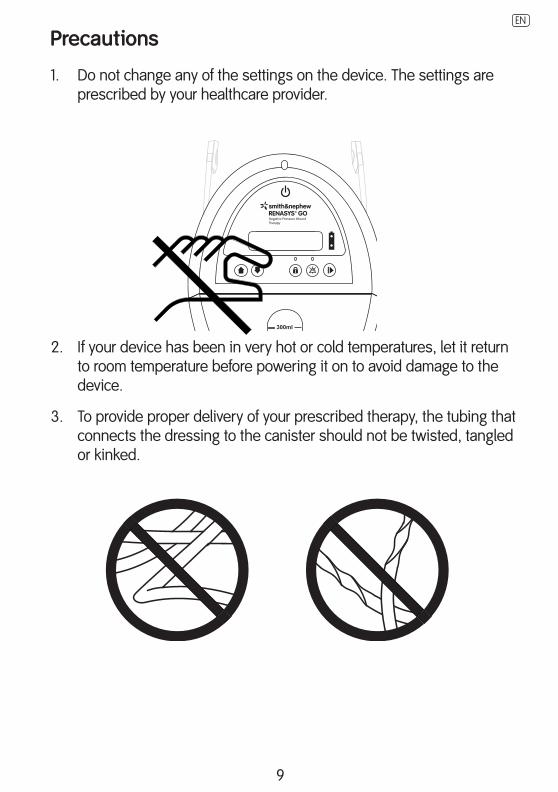
Precautions
1. Do not change any of the settings on the device. The settings are prescribed by your healthcare provider.
2. If your device has been in very hot or cold temperatures, let it return to room temperature before powering it on to avoid damage to the device.
3. To provide proper delivery of your prescribed therapy, the tubing that connects the dressing to the canister should not be twisted, tangled or kinked.
200ml
100ml
50ml
300ml
RENASYS™ GONegative Pressure WoundTherapy
*smith&nephew

10
EN
4. When showering or bathing, power off your device, then disconnect the tubing and cap the ends of the quick click connectors with the attached end caps. The device is electronic and cannot be exposed to water. If water or other liquids get into the device, turn it off and contact your healthcare provider.
5. The cords and tubing could cause strangulation. Keep away from your head and neck and be aware of tubing placement around children and animals.
6. This device has been tested for use in hospital and home settings regarding interference with other devices. Your cell phone and other electronics that transmit signals may affect this device if placed in close proximity. Keep your cell phone and other electronics that transmit signals at least 2 feet away from the device at all times.
200ml
100ml
50ml
300ml
RENASYS™ GONegative Pressure WoundTherapy
*smith&nephew
200ml
100ml
50ml
300ml
RENASYS™ GONegative Pressure WoundTherapy
*smith&nephew
2 Feet

11
EN
7. Do not use the power suppy or power cord if they are damaged, wires are frayed or exposed; you must run the device on it's internal battery power. Contact your heathcare provider for a replacement power supply and cord.
8. The RENASYS™ GO device is only to be used with Smith & Nephew authorized components. Use of any other products have not been proven safe and effective with the RENASYS GO device.

12
EN
3. RENASYS™ GO system features
Device overview
Status/Alarm indicator
Power button
DisplayBattery status indicatorStart/pause therapy
Audio pauseInlet port
Keypad lock
Up and Down selectors
O-ring
Note: When the device is powered on, the Status/Alarm indicator will illuminate green to indicate therapy is being provided. If an alarm occurs, the Status/Alarm indicator will illuminate yellow.

13
EN
200ml
100ml
50ml
300ml
!
Canister clips
Viewing window
White quick click connector
End caps
T-connector
200ml
100ml
50ml
300ml
!Canisters – 300ml and 750ml
(300ml canister is shown)
Canister tube
Orange quick click connector
Note: There are two types of dressing and canister connectors: One with white quick click connectors and one with orange quick click connectors. Both types are shown here.
Note: Do not place tubing or end caps over the T-connector on the canister tubing with white quick click connectors.

14
EN
✓✓ X X*smith&nephew
RENASYS™GONegative Pressure Wound
Therapy
*smith&nephew
RENASYS™GONegative Pressure Wound
Therapy
*smith&nephewRENASYS™GO
Negative Pressure Wound
Therapy
*smith
&nephe
w
RENASY
S™GO
Negative
Pressur
e Woun
d
Therapy
✓✓ X X*smith&nephew
RENASYS™GONegative Pressure Wound
Therapy
*smith&nephew
RENASYS™GONegative Pressure Wound
Therapy
*smith&nephewRENASYS™GO
Negative Pressure Wound
Therapy
*smith
&nephe
w
RENASY
S™GO
Negative
Pressur
e Woun
d
Therapy
Proper use/correct orientation
Incorrect orientation

15
EN
*smith&nephew
RENASYS™GONegative Pressure Wound
Therapy
Power jack
Power
Power cord inlet
DC cord
Power supply

16
EN
4. RENASYS™ GO device operationYour healthcare provider will set the device pressure setting based on your prescribed therapy. You will be instructed on how often to run the device and when to notify your healthcare provider.
Your healthcare provider will setup the device based on the RENASYS GO Negative Pressure Wound Therapy Instructions for Use.
There is a lock on the device that will be set by your healthcare provider to avoid changes to your prescribed therapy. All buttons will be locked except the Power and Audio Pause buttons. Do not change the therapy settings prescribed by your healthcare provider.
Power ON the RENASYS GO device by pressing and holding the Power button for 2 seconds. Powering ON the device will start therapy.
Power OFF the RENASYS GO device by pressing and holding the Power button for 2 seconds. Powering OFF the device will stop therapy.
dapyeK dekcoLm001► ***gHm

17
EN
How do I know if the RENASYS™ GO device is working?While RENASYS GO is Powered on:
1. The Status/Alarm indicator will illuminate green.
2. The display will read either CONTINUOUS or INTERMITTENT on the top line of the display based on prescribed therapy. The second line on the display will indicate the therapy setting.
• In CONTINUOUS mode, the device will deliver therapy constantly.
• In INTERMITTENT mode, the device will provide therapy for 5 minutes and then pause therapy for 2 minutes. This will repeat as long as your device is set to INTERMITTENT mode.
Note: Even if fluid is not actively moving though the tubing, negative pressure is still being delivered.
unitnoC suom001► ***gHm

18
EN
Dressing compressed and firm to the touch
Dressing decompressed and soft to the touch
It is important to monitor the activity of the device while you are using the therapy.
IMPORTANT: Items to monitor include:
• The dressing.
It should have a raisin-like appearance and be firm to the touch.
If your dressing is not compressed, press down around the edges of your dressing. If your dressing begins to draw down and compress, you have resealed your dressing. If the dressing remains decompressed, contact your healthcare provider.
• The amount of fluid in the canister.
If the canister is 2/3 full of fluid or greater, it needs to be replaced.
• The device display and indicator lights on the front of the device.
For an explanation of any device display messages, indicator lights or audio signals, refer to the Alarms and Troubleshooting section of this Home Healthcare User Manual.
Battery operationThe RENASYS™ GO device runs when plugged into an electrical outlet, or can be run using its internal battery for up to 20 hours. If the bottom battery status indicator light illuminates yellow, plug the device into an electrical outlet to avoid the device turning off during therapy. The device will operate while the battery charges.

19
EN
5. System setupThere are times when you will need to disconnect from your device, such as when you shower or wash, or when your canister needs to be replaced.
Your device is electrical and cannot come into contact with water. To avoid exposure, power off the device and disconnect the dressing tubing from the canister tubing before showering or washing. You will need to reconnect your dressing tubing to the canister tubing and power on the device as soon as you finish showering or washing.
The clear film placed on top of the wound and the dressing tubing are water resistant. You can shower or wash with dressings in place, as long as you do not soak them.
The following sections walk you through the steps to setting up various components of the system:
Device setupPower the device on. If the device is set to the CONTINUOUS mode, you should have constant therapy delivered.
If the device is set to INTERMITTENT therapy, your therapy will cycle on for 5 minutes and off for 2 minutes.
Note: Your device will be set to Home Healthcare Use mode by your healthcare provider, and the therapy settings cannot be changed. The device may be Powered off to temporarily stop therapy (e.g. patient shower, dressing change, etc). When re-started, the device will operate using the settings set up by the healthcare provider.

20
EN
Disconnecting your dressing1. Hold the quick click connectors above the wound to allow gravity to
help ensure exudate does not leak from the tubing.
2. Power off the device.
3. Disconnect the canister tubing from the dressing tubing by applying pressure to the connectors as shown:
4. Close the tethered caps on both of the quick click connector to seal the tubing.
RENASYS Soft Port orange quick click connector
White connector

21
EN
RENASYS™ GONegative Pressure WoundTherapy
*smith&nephew
200ml
100ml
50ml
300ml
RENASYS™ GONegative Pressure WoundTherapy
*smith&nephew
200ml
100ml
50ml
300ml
RENASYS™ GONegative Pressure WoundTherapy
*smith&nephew
200ml
100ml
50ml
300ml
RENASYS™ GONegative Pressure WoundTherapy
*smith&nephew
Attaching a new canister1. Power off the device.
2. Disconnect the dressing from the canister as described in the Disconnecting Your Dressing section.
3. Open the orange canister clips on either side of the canister and gently pull the canister away from the device.
4. Disposal of used canisters should follow facility protocols or local guidelines relating to the handling of potentially infected or bio-hazardous materials. Please contact your healthcare provider for details about disposal.
5. Remove paper tape around the new canister tubing to release tubing to the full length.
6. Open both orange clips.
7. Align the canister so that the viewing window is facing forward.
8. Push the canister gently over the inlet port of the device.
9. Engage both canister clips. Clips will click when they are properly engaged.

22
EN
Reconnecting your dressing1. Connect the dressing to the canister tubing by pushing the quick click
connectors together.
RENASYS Soft Port orange quick click connector
White connector
Note: If you have orange quick click connectors – Do not cover the aeration disc located near the orange connector on your dressing tubing.
X
Note: If you have white quick click connectors – Do not cover or connect dressing tubing to the open end of the t-connector that is inserted in the canister tubing.

23
EN
6. Alarms and troubleshootingA description of the device alarms and indicators is provided below.
Use this section as a reference in the case your device alarms.
If the alarm does not stop, contact your healthcare provider to inform them of the alarm condition.
PowerTurns the device on and off.
Battery status indicatorShows the status of battery life.
Up selectorAllows the pressure setting to be increased and scroll through menu options.
Down selectorAllows the pressure setting to be decreased and scroll through menu options.
Keypad lockLocks the keypad to restrict accidental adjustment of therapy. When activated the light will illuminate.
Audio pauseSilences the alarm for approximately 2-3 minutes. When activated the light will illuminate.
If a new alarm occurs, the Audio Pause will cancel.
Start/pause therapy Not available when locked for homecare use.
Allows therapy to be started or paused by clinician while device is unlocked.

24
EN
Alarm/Indicator: Device status: Indicator light/audio: Impact to therapy: Steps to remedy:
Display will show the prescribed therapy Device is Powered On in Continuous Mode.
Status/Alarm Indicator: Solid Green
Device is operating normally.
N/A
Device is Powered On in Intermittent Mode.
Status/Alarm Indicator: Solid Green
Device is operating normally.
N/A
Battery
The battery is fully charged and has up to 20 hours therapy time remaining.
Battery Status Top Indicator: Solid Green
Device is operating normally.
N/A
Device is not plugged into an electrical outlet and battery has up to 10 hours therapy time remaining.
Battery Status Top Indicator: Flash Green
Device is operating normally.
N/A
Device is not plugged into an electrical outlet and battery has up to 6 hours therapy time remaining.
Battery Status Top Indicator: Flash Green
Battery Status Bottom Indicator: Solid yellow
Device is operating normally.
N/A
Device is plugged into an electrical outlet and battery is charging.
Battery Status Top Indicator: Flash Green
Device is operating normally.
N/A
yrettaB lluFm001► ***gHm
nigrahC gm001► ***gHm

25
EN
Alarm/Indicator: Device status: Indicator light/audio: Impact to therapy: Steps to remedy:
Display will show the prescribed therapy Device is Powered On in Continuous Mode.
Status/Alarm Indicator: Solid Green
Device is operating normally.
N/A
Device is Powered On in Intermittent Mode.
Status/Alarm Indicator: Solid Green
Device is operating normally.
N/A
Battery
The battery is fully charged and has up to 20 hours therapy time remaining.
Battery Status Top Indicator: Solid Green
Device is operating normally.
N/A
Device is not plugged into an electrical outlet and battery has up to 10 hours therapy time remaining.
Battery Status Top Indicator: Flash Green
Device is operating normally.
N/A
Device is not plugged into an electrical outlet and battery has up to 6 hours therapy time remaining.
Battery Status Top Indicator: Flash Green
Battery Status Bottom Indicator: Solid yellow
Device is operating normally.
N/A
Device is plugged into an electrical outlet and battery is charging.
Battery Status Top Indicator: Flash Green
Device is operating normally.
N/A

26
EN
Alarm/Indicator: Device status: Indicator light/audio: Impact to therapy: Steps to remedy:
Device is not plugged into an electrical outlet and battery is low.
Status/Indicator: Solid Yellow
The audible alarm will sound
Battery Status Bottom Indicator: Solid Yellow
The audible alarm can be paused by pressing the Audio Pause button. When pressed the light above the button will illuminate.
Device will continue to operate normally for 3 hours and will stop operating once the battery is fully discharged.
Plug the device into an electrical outlet.
Therapy will continue to be delivered while the device battery is charging.
Device is not plugged into an electrical outlet and battery is very low.
Status/Indicator: Solid Yellow
Battery Status Bottom Indicator: Solid Yellow
The audible alarm will sound.
The audible alarm cannot be paused.
Device will continue to operate normally for 1 hour and will stop operating once the battery is fully discharged.
Plug the device into an electrical outlet.
Therapy will continue to be delivered while the device battery is charging.
yRAHCER! EG
woL.V! rettaB
tnettA! noiaBwoL! yrett

27
EN
Alarm/Indicator: Device status: Indicator light/audio: Impact to therapy: Steps to remedy:
Device is not plugged into an electrical outlet and battery is low.
Status/Indicator: Solid Yellow
The audible alarm will sound
Battery Status Bottom Indicator: Solid Yellow
The audible alarm can be paused by pressing the Audio Pause button. When pressed the light above the button will illuminate.
Device will continue to operate normally for 3 hours and will stop operating once the battery is fully discharged.
Plug the device into an electrical outlet.
Therapy will continue to be delivered while the device battery is charging.
Device is not plugged into an electrical outlet and battery is very low.
Status/Indicator: Solid Yellow
Battery Status Bottom Indicator: Solid Yellow
The audible alarm will sound.
The audible alarm cannot be paused.
Device will continue to operate normally for 1 hour and will stop operating once the battery is fully discharged.
Plug the device into an electrical outlet.
Therapy will continue to be delivered while the device battery is charging.

28
EN
Alarm/Indicator: Device status: Indicator light/audio: Impact to therapy: Steps to remedy:
Device is not plugged into an electrical outlet and battery is extremely low.
Status/Indicator: Solid Yellow
Battery Status Bottom Indicator: Solid Yellow
The audible alarm will sound.
The audible alarm cannot be paused.
The battery has only 2 minutes of therapy times remaining. Device must be plugged into electrical outlet to continue therapy. If it is not plugged into an electrical outlet it will stop operating once the battery is fully discharged.
Plug the device into an electrical outlet.
Therapy will continue to be delivered while the device battery is charging.
Device is not plugged into an electrical outlet and device battery is extremely low. After 2 minutes in an extremely low charge state, the device will power off.
Status/Indicator: Solid Yellow
Battery Status Bottom Indicator: Solid Yellow
The audible alarm will sound.
The audible alarm cannot be paused.
Device must be plugged into an electrical outlet to continue therapy.
Plug the device into an electrical outlet.
Therapy will continue to be delivered while the device battery is charging.
Device is plugged into an electrical outlet and battery is not charging.
Note: Device display and indicator lights will only present the alarm state when the device is plugged into an electrical outlet.
Status/Indicator: Solid Yellow
Battery Status Bottom Indicator: Solid Yellow
Device must be plugged into an electrical outlet to continue therapy.
If it is not plugged into an electrical outlet it will stop operating once the battery is fully discharged.
Contact your healthcare provider if the use of a battery is preferred.
DYRETTAB! ELIAFm001► ***gHm
YRRAHCER! EGWOL.XE! ETTAB
!RAHCER! WONEGRETTAB! LIAFY

29
EN
Alarm/Indicator: Device status: Indicator light/audio: Impact to therapy: Steps to remedy:
Device is not plugged into an electrical outlet and battery is extremely low.
Status/Indicator: Solid Yellow
Battery Status Bottom Indicator: Solid Yellow
The audible alarm will sound.
The audible alarm cannot be paused.
The battery has only 2 minutes of therapy times remaining. Device must be plugged into electrical outlet to continue therapy. If it is not plugged into an electrical outlet it will stop operating once the battery is fully discharged.
Plug the device into an electrical outlet.
Therapy will continue to be delivered while the device battery is charging.
Device is not plugged into an electrical outlet and device battery is extremely low. After 2 minutes in an extremely low charge state, the device will power off.
Status/Indicator: Solid Yellow
Battery Status Bottom Indicator: Solid Yellow
The audible alarm will sound.
The audible alarm cannot be paused.
Device must be plugged into an electrical outlet to continue therapy.
Plug the device into an electrical outlet.
Therapy will continue to be delivered while the device battery is charging.
Device is plugged into an electrical outlet and battery is not charging.
Note: Device display and indicator lights will only present the alarm state when the device is plugged into an electrical outlet.
Status/Indicator: Solid Yellow
Battery Status Bottom Indicator: Solid Yellow
Device must be plugged into an electrical outlet to continue therapy.
If it is not plugged into an electrical outlet it will stop operating once the battery is fully discharged.
Contact your healthcare provider if the use of a battery is preferred.

30
EN
Alarm/Indicator: Device status: Indicator light/audio: Impact to therapy: Steps to remedy:
High Vacuum Alarm
Device vacuum level is higher than the prescribed therapy and device has stopped delivering therapy.
Status/Alarm Indicator: Solid Yellow
The audible alarm will sound.
The audible alarm cannot be paused.
Device will stop delivering therapy.
Contact your healthcare provider.
Over Vacuum Alarm
Device vacuum exceeds a pressure of 235mmHg and device has stopped delivering therapy.
Status/Alarm Indicator: Solid Yellow
The audible alarm will sound.
The audible alarm cannot be paused.
Device will stop delivering therapy.
Contact your healthcare provider.
PAREHT! POTSYVHGIH! MUUCA
PAREHT! POTSYVREVO! MUUCA

31
EN
Alarm/Indicator: Device status: Indicator light/audio: Impact to therapy: Steps to remedy:
High Vacuum Alarm
Device vacuum level is higher than the prescribed therapy and device has stopped delivering therapy.
Status/Alarm Indicator: Solid Yellow
The audible alarm will sound.
The audible alarm cannot be paused.
Device will stop delivering therapy.
Contact your healthcare provider.
Over Vacuum Alarm
Device vacuum exceeds a pressure of 235mmHg and device has stopped delivering therapy.
Status/Alarm Indicator: Solid Yellow
The audible alarm will sound.
The audible alarm cannot be paused.
Device will stop delivering therapy.
Contact your healthcare provider.

32
EN
Alarm/Indicator: Device status: Indicator light/audio: Impact to therapy: Steps to remedy:
High Flow / Leak Alarm
Device detects a significant air leak.
Status/Alarm Indicator: Solid Yellow
The audible alarm will sound.
The audible alarm can be paused by pressing the Audio Pause button. When pressed the light above the button will illuminate.
Device will continue to operate, but may not provide the prescribed therapy.
• Press down around the edges of your dressing. If your dressing begins to recompress, you have resealed your dressing and addressed the air leak.
• Check the connectors on the tubing between your dressing and the canister. Ensure the connection is secure (see images on pages 20 and 22.)
• Disconnect the quick click connectors and close the tethered caps to seal the tubing. If the alarm continues, replace the canister.
• If you cannot locate the source of your air leak, contact your healthcare provider.
NINRAW! GKAEL!
OIDUA! DESUAPKAEL!

33
EN
Alarm/Indicator: Device status: Indicator light/audio: Impact to therapy: Steps to remedy:
High Flow / Leak Alarm
Device detects a significant air leak.
Status/Alarm Indicator: Solid Yellow
The audible alarm will sound.
The audible alarm can be paused by pressing the Audio Pause button. When pressed the light above the button will illuminate.
Device will continue to operate, but may not provide the prescribed therapy.
• Press down around the edges of your dressing. If your dressing begins to recompress, you have resealed your dressing and addressed the air leak.
• Check the connectors on the tubing between your dressing and the canister. Ensure the connection is secure (see images on pages 20 and 22.)
• Disconnect the quick click connectors and close the tethered caps to seal the tubing. If the alarm continues, replace the canister.
• If you cannot locate the source of your air leak, contact your healthcare provider.

34
EN
Alarm/Indicator: Device status: Indicator light/audio: Impact to therapy: Steps to remedy:
Low Vacuum Alarm
Device vacuum level is lower than the prescribed therapy.
Status/Alarm Indicator: Solid Yellow
The audible alarm will sound.
The audible alarm can be paused by pressing the Audio Pause button. When pressed the light above the button will illuminate.
Device will continue to operate, but may not provide the prescribed therapy.
Contact your healthcare provider if the alarm status persists.
NINRAW! GAVWOL! MUUC
OIDUA! DESUAPAVWOL! MUUC

35
EN
Alarm/Indicator: Device status: Indicator light/audio: Impact to therapy: Steps to remedy:
Low Vacuum Alarm
Device vacuum level is lower than the prescribed therapy.
Status/Alarm Indicator: Solid Yellow
The audible alarm will sound.
The audible alarm can be paused by pressing the Audio Pause button. When pressed the light above the button will illuminate.
Device will continue to operate, but may not provide the prescribed therapy.
Contact your healthcare provider if the alarm status persists.

36
EN
Alarm/Indicator: Device status: Indicator light/audio: Impact to therapy: Steps to remedy:
Blockage/Canister Full Alarm
The canister is full or there is a blockage in the system.
Status/Alarm Indicator: Solid Yellow
The audible alarm will sound.
The audible alarm can be paused by pressing the Audio Pause button. When pressed the light above the button will illuminate.
Device will continue to operate, but may not provide the prescribed therapy.
• Check your canister. If it is full, replace the canister (see image on page 21).
• If you have white quick click connectors on the tubing between your dressing and the canister ensure that no connector has been capped off and the T-connector is not blocked (see images on pages 20 and 22).
• If you have orange quick click connectors, check the aeration disk on your dressing tubing, located close to the connectors. Ensure that your aeration disc is not blocked (see image on pages 20 and 22).
• If you cannot locate the source of your blockage, contact your healthcare provider.
LNINRAW! GAKCOLB! LUF/EG
LOIDUA! DESUAP
AKCOLB! LUF/EG

37
EN
Alarm/Indicator: Device status: Indicator light/audio: Impact to therapy: Steps to remedy:
Blockage/Canister Full Alarm
The canister is full or there is a blockage in the system.
Status/Alarm Indicator: Solid Yellow
The audible alarm will sound.
The audible alarm can be paused by pressing the Audio Pause button. When pressed the light above the button will illuminate.
Device will continue to operate, but may not provide the prescribed therapy.
• Check your canister. If it is full, replace the canister (see image on page 21).
• If you have white quick click connectors on the tubing between your dressing and the canister ensure that no connector has been capped off and the T-connector is not blocked (see images on pages 20 and 22).
• If you have orange quick click connectors, check the aeration disk on your dressing tubing, located close to the connectors. Ensure that your aeration disc is not blocked (see image on pages 20 and 22).
• If you cannot locate the source of your blockage, contact your healthcare provider.

38
EN
Alarm/Indicator: Device status: Indicator light/audio: Impact to therapy: Steps to remedy:
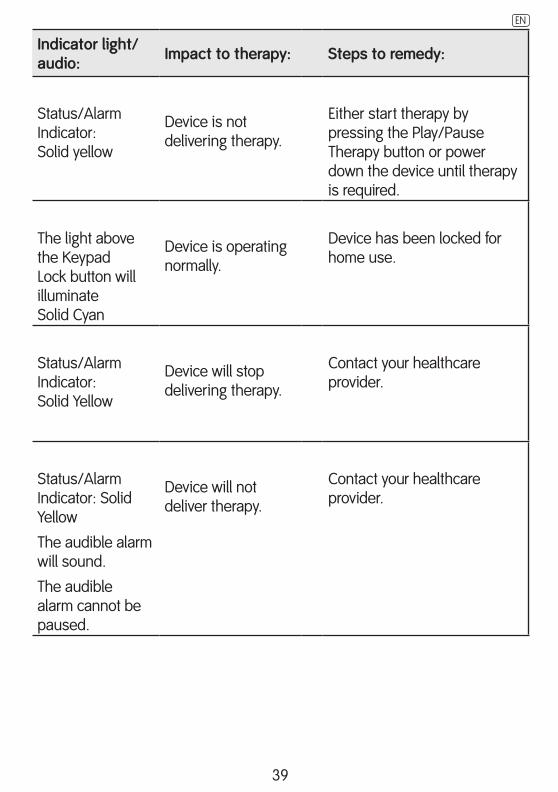
Inactive Alarm
Device has been in standby mode for 15 minutes.
Status/Alarm Indicator: Solid yellow
Device is not delivering therapy.
Either start therapy by pressing the Play/Pause Therapy button or power down the device until therapy is required.
Keypad Lock On
Device user interface has been placed in Home Healthcare Mode.
The light above the Keypad Lock button will illuminate Solid Cyan
Device is operating normally.
Device has been locked for home use.
Device Failed Alarm
Device will not operate. Status/Alarm Indicator: Solid Yellow
Device will stop delivering therapy.
Contact your healthcare provider.
Device Not Calibrated Alarm
Device will not operate. Status/Alarm Indicator: Solid Yellow
The audible alarm will sound.
The audible alarm cannot be paused.
Device will not deliver therapy.
Contact your healthcare provider.
dapyeK dekcoLm001► ***gHm
E CIVED! TONRBILAC! DETA
Dn
E CIVED! ELIAFesaelP! ruteR
tnettA! noiITCANI! EV
39
EN
Alarm/Indicator: Device status: Indicator light/audio: Impact to therapy: Steps to remedy:
Inactive Alarm
Device has been in standby mode for 15 minutes.
Status/Alarm Indicator: Solid yellow
Device is not delivering therapy.
Either start therapy by pressing the Play/Pause Therapy button or power down the device until therapy is required.
Keypad Lock On
Device user interface has been placed in Home Healthcare Mode.
The light above the Keypad Lock button will illuminate Solid Cyan
Device is operating normally.
Device has been locked for home use.
Device Failed Alarm
Device will not operate. Status/Alarm Indicator: Solid Yellow
Device will stop delivering therapy.
Contact your healthcare provider.
Device Not Calibrated Alarm
Device will not operate. Status/Alarm Indicator: Solid Yellow
The audible alarm will sound.
The audible alarm cannot be paused.
Device will not deliver therapy.
Contact your healthcare provider.

40
EN
7. Accessories
Carry strapYour device may be equipped with a carry strap.
To attach the carry strap to the device:1. Feed the end of the open strap behind the small metal bar on the side
of the device.
2. Pull the strap through and feed the end behind the clip.
3. Close the clip to secure the strap.
4. Repeat steps 1-3 on the other side of the device.
Once both sides are connected to the device they can be joined together to make the short carry strap.
The short carry strap can be used to attach the device to a wheelchair or IV pole.
Shoulder and extension straps
The strap can be extended to allow the device to be carried on the shoulder or across the body.
Place the padded section of the shoulder strap against the shoulder for maximum comfort when carrying device.
*smith&nephew
RENASYS™GONegative Pressure Wound
Therapy
*smith&nephew
RENASYS™GONegative Pressure Wound
Therapy
*smith&nephew
RENASYS™GONegative Pressure Wound
Therapy
*smith&nephew
RENASYS™GONegative Pressure Wound
Therapy

41
EN
Carry bag (available for 300ml canister)Your device may be equipped with a carry bag. To place the device in the bag:
1. Open the zipper on both sides of the bag and place on a flat surface with viewing flaps on top.
2. Place the device on top of the open section of the bag.
3. Pull the front of the bag over the top of the device and feed both parts of one zipper together.
4. Close the zipper on the other side of the bag.
5. Once fitted ensure the canister tubing can move freely.
6. Excess tubing can be coiled and placed in the pouch on the back of the bag.
7. Flaps on the top of the bag are for the privacy of the user. On the rear of the bag there is a belt loop should you wish to wear RENASYS™ GO around your waist.
*smith&nephew
RENASYS™GONegative Pressure Wound
Therapy
RENASYS™ GONegative Pressure WoundTherapy
*smith&nephew
Belt Loop
Tubing Pouch
42
EN
8. Cleaning, maintenance and expected life
CleaningAs you use the RENASYS™ GO device, your healthcare provider should clean it on a regular basis to ensure good hygiene. The device may be wiped clean with a diluted bleach solution (5mL bleach: 1L water), wiped again with a damp cloth using clean water, and dried with a clean cloth to ensure the device does not remain wet.
Maintenance and expected lifeYour healthcare provider will ensure the device has been properly maintained prior to use. Your device should last the duration of your therapy. If a replacement is needed, your healthcare provider will provide the items needed.
9. Technical specifications
Environmental conditionsStorage and Transport 14 to 131°F / -10 to 55°C
Operational Temperature 41 to 95°F / 5 to 35°C
Relative Humidity 30% to 70% RH
Atmospheric Pressure 700 mbar to 1,060 mbar
Ingress protection: IP 22The device housing is designed to protect its internal components from a moderate level of external debris or small objects and falling water (e.g. light rain).

43
EN
10. Caution statementsIn order to ensure safe and proper performance, the following conditions must be met:
• All assembly, operation, adjustment, maintenance and/or repair should be carried out by qualified personnel.
• No modification of this equipment is allowed.
• If the device is damaged, the performance could be affected. Do not use the device. Contact your healthcare provider.
• Use only the AC power cord provided with the device to prevent the potential for electrical shock hazard.
• If the power supply or power cord is damaged, wires are frayed or exposed, do not use the power supply or power cord; use the device's battery power. Contact your healthcare provider.
• When necessary, the device may be isolated from AC supply mains by removing the detachable AC power supply and power cord.
• The product must be used in accordance with this Home Healthcare User Manual and all applicable labeling.

44
EN
11. Contact informationIf you need assistance with your RENASYS™ GO device, please contact your healthcare provider. If you have experienced a problem with your device, please feel free to send this information through your healthcare provider or report the issue directly to Smith & Nephew.
24 hour Smith & Nephew clinical hotlines:
Australia Tel: 1800 068 840
New Zealand Tel: 0800 807 019
Smith & Nephew Pty Ltd Healthcare DivisionAustralia New Zealand315 Ferntree Gully Road (PO Box 242) 621 Rosebank RoadMount Waverley 3149 Avondale 1026 New ZealandVictoria Australia PO Box 442 Shortland StreetT 61 3 8540 6777 Auckland 1140 New ZealandF 61 3 9544 5086 T 64 9 828 4059www.smith-nephew.com/australia F 64 9 820 2867
24 Hour Emergency Support T 1800 068 840 F 1800 671 000
www.smith-nephew.com/new-zealand 24 Hour Emergency Support T 0800 807 019 F 0800 263 222
©2014 Smith & Nephew ™Trademark of Smith & Nephew SN11735 (11/14)