hortonworks data platform - workflow … data platform: workflow management ... training and...
TRANSCRIPT
Hortonworks Data Platform
(December 15, 2017)
Workflow Management
docs.hortonworks.com

Hortonworks Data Platform December 15, 2017
ii
Hortonworks Data Platform: Workflow ManagementCopyright © 2012-2017 Hortonworks, Inc. Some rights reserved.
The Hortonworks Data Platform, powered by Apache Hadoop, is a massively scalable and 100% opensource platform for storing, processing and analyzing large volumes of data. It is designed to deal withdata from many sources and formats in a very quick, easy and cost-effective manner. The HortonworksData Platform consists of the essential set of Apache Hadoop projects including MapReduce, HadoopDistributed File System (HDFS), HCatalog, Pig, Hive, HBase, ZooKeeper and Ambari. Hortonworks is themajor contributor of code and patches to many of these projects. These projects have been integrated andtested as part of the Hortonworks Data Platform release process and installation and configuration toolshave also been included.
Unlike other providers of platforms built using Apache Hadoop, Hortonworks contributes 100% of ourcode back to the Apache Software Foundation. The Hortonworks Data Platform is Apache-licensed andcompletely open source. We sell only expert technical support, training and partner-enablement services.All of our technology is, and will remain, free and open source.
Please visit the Hortonworks Data Platform page for more information on Hortonworks technology. Formore information on Hortonworks services, please visit either the Support or Training page. You cancontact us directly to discuss your specific needs.
Except where otherwise noted, this document is licensed underCreative Commons Attribution ShareAlike 4.0 License.http://creativecommons.org/licenses/by-sa/4.0/legalcode

Hortonworks Data Platform December 15, 2017
iii
Table of Contents1. Workflow Manager Basics ............................................................................................ 1
1.1. Workflow Manager Design Component ............................................................ 11.2. Workflow Manager Dashboard Component ...................................................... 21.3. Workflow Action Types ..................................................................................... 3
2. Content Roadmap for Workflow Manager ................................................................... 53. Quick Start ................................................................................................................... 7
3.1. Configuring a Workflow Manager Ambari View ................................................ 73.2. UI Elements of Workflow Manager ................................................................... 73.3. Understanding the Design Component ............................................................. 83.4. Using the Design Component ............................................................................ 93.5. Using the Dashboard Component ................................................................... 123.6. Dashboard Job Details Tabs ............................................................................ 13
3.6.1. Details Available for Workflow, Coordinator, and Bundle Jobs .............. 143.6.2. Details Available Only for Workflow Jobs .............................................. 143.6.3. Details Available Only for Coordinator Jobs .......................................... 153.6.4. Details Available Only for Bundle Jobs .................................................. 15
4. Designing Workflows Using the Design Component ................................................... 164.1. Create a Workflow .......................................................................................... 164.2. Add Nodes to a Workflow .............................................................................. 17
4.2.1. Add Action Nodes ................................................................................ 174.2.2. Add Fork Control Nodes ....................................................................... 204.2.3. Add Decision Control Nodes ................................................................. 21
4.3. Save a Workflow Draft .................................................................................... 234.4. Validate and Save a Workflow ........................................................................ 254.5. Import an Existing Workflow .......................................................................... 274.6. Export a Workflow .......................................................................................... 284.7. Submitting and Executing a Workflow ............................................................ 28
4.7.1. Submit and Execute an Existing Workflow ............................................ 294.7.2. Submit and Execute a New Workflow ................................................... 304.7.3. Execute a Submitted Workflow ............................................................ 31
4.8. Modifying Workflows ...................................................................................... 314.8.1. Copy or Move Nodes on a Workflow Graph ......................................... 314.8.2. Remove Nodes from a Workflow Graph ............................................... 334.8.3. Resize and Move Graph Images ............................................................ 33
4.9. Reusing Node Configurations as Assets ........................................................... 354.9.1. Save an Ambari Database Asset to Use Within the WFM Instance .......... 354.9.2. Save an Asset to Shared Storage to Use Across WFM Instances .............. 364.9.3. Import an Asset from the Ambari Database Linked to a Single WFMInstance ......................................................................................................... 374.9.4. Import a Shared Asset File from Shared Storage ................................... 384.9.5. Managing Assets .................................................................................. 40
4.10. Creating Coordinators and Bundles ............................................................... 424.10.1. Create a Coordinator .......................................................................... 424.10.2. Create a Bundle .................................................................................. 43
4.11. View the XML Code ...................................................................................... 455. Monitoring Jobs Using the Dashboard ....................................................................... 47
5.1. Verify the Status of a Job ................................................................................ 475.2. View Job Details and Logs .............................................................................. 49

Hortonworks Data Platform December 15, 2017
iv
5.3. Identify the Location of a Job XML File ........................................................... 495.4. Troubleshooting Job Errors ............................................................................. 50
5.4.1. Basic Job Troubleshooting .................................................................... 505.4.2. Search the Log Output ......................................................................... 515.4.3. Open an Existing Workflow to Edit ....................................................... 52
6. Sample ETL Use Case ................................................................................................. 536.1. Configure the Cluster ...................................................................................... 53
6.1.1. Create an HDFS Directory for Each New User ........................................ 546.1.2. Create a Proxy User .............................................................................. 546.1.3. Copy Files ............................................................................................. 55
6.2. Create and Submit the Workflow .................................................................... 566.2.1. Access the Workflow Manager View .................................................... 566.2.2. Create the Sqoop Action to Extract Data .............................................. 576.2.3. Create the Hive Action to Transform the Data ...................................... 586.2.4. Create the Sqoop Action to Load the Data ........................................... 596.2.5. Submit and Execute the Workflow Job ................................................. 61
6.3. Monitor the Workflow Job .............................................................................. 627. Workflow Parameters ................................................................................................ 64
7.1. Hive Action Parameters ................................................................................... 647.2. Hive2 Action Parameters ................................................................................. 667.3. Sqoop Action Parameters ................................................................................ 677.4. Pig Action Parameters ..................................................................................... 697.5. Sub-Workflow Action Parameters .................................................................... 707.6. Java Action Parameters ................................................................................... 717.7. Shell Action Parameters ................................................................................... 727.8. DistCp Action Parameters ................................................................................ 737.9. Map-Reduce (MR) Action Parameters .............................................................. 757.10. SSH Action Parameters .................................................................................. 767.11. Spark Action Parameters ............................................................................... 777.12. File System (FS) Action Parameters ................................................................ 787.13. Submit Dialog Parameters ............................................................................. 79
8. Settings Menu Parameters ......................................................................................... 818.1. Global Configuration Parameters ..................................................................... 818.2. Workflow Credentials Parameters ................................................................... 828.3. SLA for Workflow Parameters ......................................................................... 838.4. Workflow Parameters ..................................................................................... 848.5. Workflow and Action Versions ........................................................................ 858.6. How SLA Works .............................................................................................. 85
9. Job States .................................................................................................................. 8610. Workflow Manager Files .......................................................................................... 87

Hortonworks Data Platform December 15, 2017
v
List of Figures1.1. Relationship of Workflows, Coordinators, and Bundles .............................................. 23.1. Workflow Manager Design Component .................................................................... 83.2. Workflow Manager Dashboard Component .............................................................. 83.3. Design Workspace, Labeled 1-4 ............................................................................... 103.4. Design Workspace, Labeled 5-8 ............................................................................... 113.5. Design Workspace, Labeled 9-14 ............................................................................. 123.6. Dashboard Jobs Table, Labeled 1-6 ......................................................................... 134.1. Access the Add Node dialog box ............................................................................. 184.2. Rename an action node .......................................................................................... 184.3. Rename a control node ........................................................................................... 194.4. Access the Action Settings ....................................................................................... 194.5. Example of a Fork Node ......................................................................................... 214.6. Example of saving a workflow to a new directory ................................................... 244.7. Example of saving a workflow to a new directory ................................................... 264.8. Scaling the workflow .............................................................................................. 344.9. Repositioning the workflow .................................................................................... 344.10. Creating a Coordinator ......................................................................................... 424.11. Creating a Bundle ................................................................................................. 445.1. Workflow Manager Dashboard ............................................................................... 478.1. Settings menu ......................................................................................................... 81

Hortonworks Data Platform December 15, 2017
vi
List of Tables2.1. Workflow Manager Content roadmap ...................................................................... 57.1. Hive Action, General Parameters ............................................................................. 647.2. Hive Action, Transition Parameters .......................................................................... 657.3. Hive Action, Advanced Properties Parameters ......................................................... 657.4. Hive Action, Configuration Parameters .................................................................... 667.5. Hive2 Action, General Parameters ........................................................................... 667.6. Hive2 Action, Transition Parameters ........................................................................ 677.7. Hive2 Action, Advanced Properties Parameters ........................................................ 677.8. Hive2 Action, Configuration Parameters .................................................................. 677.9. Sqoop Action, General Parameters .......................................................................... 687.10. Sqoop Action, Transition Parameters ..................................................................... 687.11. Sqoop Action, Advanced Properties Parameters ..................................................... 687.12. Sqoop Action, Configuration Parameters ............................................................... 697.13. Pig Action, General Parameters ............................................................................. 697.14. Pig Action, Transition Parameters .......................................................................... 697.15. Pig Action, Advanced Properties Parameters .......................................................... 697.16. Pig Action, Configuration Parameters .................................................................... 707.17. Sub-Workflow Action, General Parameters ............................................................ 707.18. Sub-Workflow Action, Configuration Parameters ................................................... 707.19. Sub-Workflow Action, Transition Parameters ......................................................... 707.20. Java Action, General Parameters ........................................................................... 717.21. Java Action, Transition Parameters ........................................................................ 717.22. Java Action, Advanced Properties Parameters ........................................................ 717.23. Java Action, Configuration Parameters .................................................................. 727.24. Shell Action, General Parameters ........................................................................... 727.25. Shell Action, Transition Parameters ........................................................................ 727.26. Shell Action, Advanced Properties Parameters ....................................................... 737.27. Shell Action, Configuration Parameters .................................................................. 737.28. DistCp Action, General Parameters ........................................................................ 737.29. DistCp Action, Transition Parameters ..................................................................... 747.30. DistCp Action, Advanced Properties Parameters .................................................... 747.31. DistCp Action, Configuration Parameters ............................................................... 757.32. MR Action, General Parameters ............................................................................. 757.33. MR Action, Transition Parameters ......................................................................... 757.34. MR Action, Advanced Properties Parameters ......................................................... 757.35. MR Action, Configuration Parameters ................................................................... 767.36. SSH Action, General Parameters ............................................................................ 767.37. SSH Action, Transition Parameters ......................................................................... 777.38. Spark Action, General Parameters ......................................................................... 777.39. Spark Action, Transition Parameters ...................................................................... 787.40. Spark Action, Advanced Properties Parameters ...................................................... 787.41. Spark Action, Configuration Parameters ................................................................ 787.42. FS Action, General Parameters .............................................................................. 797.43. FS Action, Transition Parameters ........................................................................... 797.44. FS Action, Advanced Properties Parameters ........................................................... 797.45. FS Action, Configuration Parameters ..................................................................... 797.46. Submit Dialog, Configuration Parameters .............................................................. 798.1. Global Configuration Parameters ............................................................................. 81

Hortonworks Data Platform December 15, 2017
vii
8.2. HCat Workflow Credentials Parameters ................................................................... 828.3. Hive2 Workflow Credentials Parameters .................................................................. 828.4. HBase Workflow Credentials Parameters ................................................................. 838.5. SLA for Workflows Parameters ................................................................................ 848.6. Workflow Configuration Parameters ....................................................................... 85

Hortonworks Data Platform December 15, 2017
1
1. Workflow Manager BasicsWorkflow Manager, which can be accessed as a View in Ambari, allows you to easilycreate and schedule workflows and monitor workflow jobs. It is based on the ApacheOozie workflow engine that allows users to connect and automate the execution ofbig data processing tasks into a defined workflow. Workflow Manager integrates withthe Hortonworks Data Platform (HDP) and supports Hadoop jobs for Hive, Sqoop, Pig,MapReduce, Spark, and more. In addition, it can be used to perform Java, Linux shell,distcp, SSH, email, and other operations.
The following content describes the design component and the dashboard component thatare included with Workflow Manager.
Workflow Manager Design Component [1]
Workflow Manager Dashboard Component [2]
Workflow Action Types [3]
1.1. Workflow Manager Design ComponentYou can use the design component of Workflow Manager to create and graphically layout your workflow. You can select action nodes and control nodes and implement themin a defined sequence to ingest, transform, and analyze data. Action nodes trigger acomputation or processing task. Control nodes control the workflow execution path. Youcan add Oozie actions and other operations as action nodes on the workflow, and youcan add fork and decision points as control nodes to your workflow. You can include amaximum of 400 nodes in a workflow.
From the designer, you can also schedule workflows using coordinators, and group multiplecoordinators into bundles. A coordinator enables you to automate the recurring executionof a workflow based on time, an external event, or the availability of specific data files. Thecoordinator can define parameters only around a single workflow. Coordinators make iteasy to manage concurrency and keep track of the completion of each workflow instance.The coordinator controls how many instances of a workflow can execute in parallel, aswell as controlling how many instances are brought into a waiting state before the nextworkflow instance can run.
Coordinator jobs can be combined to create a chain of jobs that can be managed asa single entity. This logical chaining together of multiple, interdependent coordinatorjobs is referred to as a bundle, also called a data application pipeline. By using bundledcoordinator jobs, the output of one workflow that runs at one frequency can be used asthe initial input for another job that runs at a different frequency. You can even bundlethe same workflow with different coordinator schedules. To create a bundle, you mustconfigure one or more workflows as coordinator jobs, then configure the coordinator jobsas part of a bundle.

Hortonworks Data Platform December 15, 2017
2
Figure 1.1. Relationship of Workflows, Coordinators, and Bundles
More Information
You can read further details about workflows, coordinators, and bundles in the followingApache documentation:
• Apache Oozie Workflow Functional Specification
• Apache Oozie Coordinator Functional Specification
• Apache Oozie Bundle Functional Specification
1.2. Workflow Manager Dashboard ComponentThe dashboard provides monitoring capabilities for jobs submitted to Workflow Manager.There are three types of jobs in Workflow Manager: Workflow jobs, coordinator jobs, andbundle jobs. Each job type is viewed in a separate table in the dashboard.
You can perform actions such as run, kill, suspend, and resume on individual jobs, or youcan select multiple jobs of a single type and perform these actions on several jobs at once.
From the dashboard, you can access details about a job, view job logs, and view the XMLstructure of the job.

Hortonworks Data Platform December 15, 2017
3
Workflow jobs are launched from a client and run on the server engine. The Ooziemetadata database contains the workflow definitions, variables, state information, andother data required to run the workflow jobs.
1.3. Workflow Action TypesEach action in a workflow represents a job to be run. For example, a Hive action runs aHive job. Most actions in a workflow are executed asynchronously, so they have to waituntil the previous action completes. However, file system operations on HDFS are executedsynchronously.
Identical workflows can be run concurrently when properly parameterized. The workflowengine can detect completion of computation and processing actions. Each action is givena unique callback URL. The action invokes the URL when its task is complete. The workflowengine also has a mechanism to poll actions for completion, for cases in which the actionfails to invoke the callback URL or the type of task cannot invoke the callback URL uponcompletion.
Workflow action types
Hive Action Used for asynchronously executing Hive andHive2 scripts and Sqoop jobs. The workflowjob waits until the Hive job completes beforecontinuing to the next action.
To run the Hive job, you have to configurethe Hive action with the resourceManager,nameNode, and Hive script elements,as well as other necessary parameters andconfiguration.
Hive2 Action The Hive2 action runs Beeline to connect to HiveServer 2. The workflow job will wait until theHive Server 2 job completes before continuing tothe next action.
To run the Hive Server 2 job, you haveto configure the Hive2 action with theresourceManager, nameNode, jdbc-url,and password elements, and either Hivescript or query elements, as well as othernecessary parameters and configuration.
Sqoop Action The workflow job waits until the Sqoop jobcompletes before continuing to the next action.
The Sqoop action requires Apache Hadoop 0.23.To run the Sqoop job, you have to configurethe Sqoop action with the resourceManager,nameNode, and Sqoop command or argelements, as well as configuration.
Pig Action The workflow job waits until the Pig jobcompletes before continuing to the next action.
The Pig action has to be configured with theresourceManager, nameNode, Pig script, andother necessary parameters and configuration torun the Pig job.
Sub-workflow(Sub-wf) Action
The sub-workflow action runs a child workflowjob. The parent workflow job waits until thechild workflow job has completed.
The child workflow job can be in the same Ooziesystem or in another Oozie system.
Java Action Java applications are executed in the Hadoopcluster as map-reduce jobs with a single Mappertask. The workflow job waits until the Javaapplication completes its execution beforecontinuing to the next action.
The Java action has to be configured with theresourceManager, nameNode, main Javaclass, JVM options, and arguments.
Shell Action Shell commands must complete before going tothe next action.
The standard output of the shell command canbe used to make decisions.
DistCp (distcp)Action
The DistCp action uses Hadoop "distributedcopy" to copy files from one cluster to another orwithin the same cluster.
Both Hadoop clusters have to be configured withproxyuser for the Oozie process. IMPORTANT:The DistCp action may not work properly with allconfigurations (secure, insecure) in all versions ofHadoop.
MapReduce (MR)Action
The workflow job waits until the HadoopMapReduce job completes before continuing tothe next action in the workflow.
Hortonworks Data Platform December 15, 2017
4
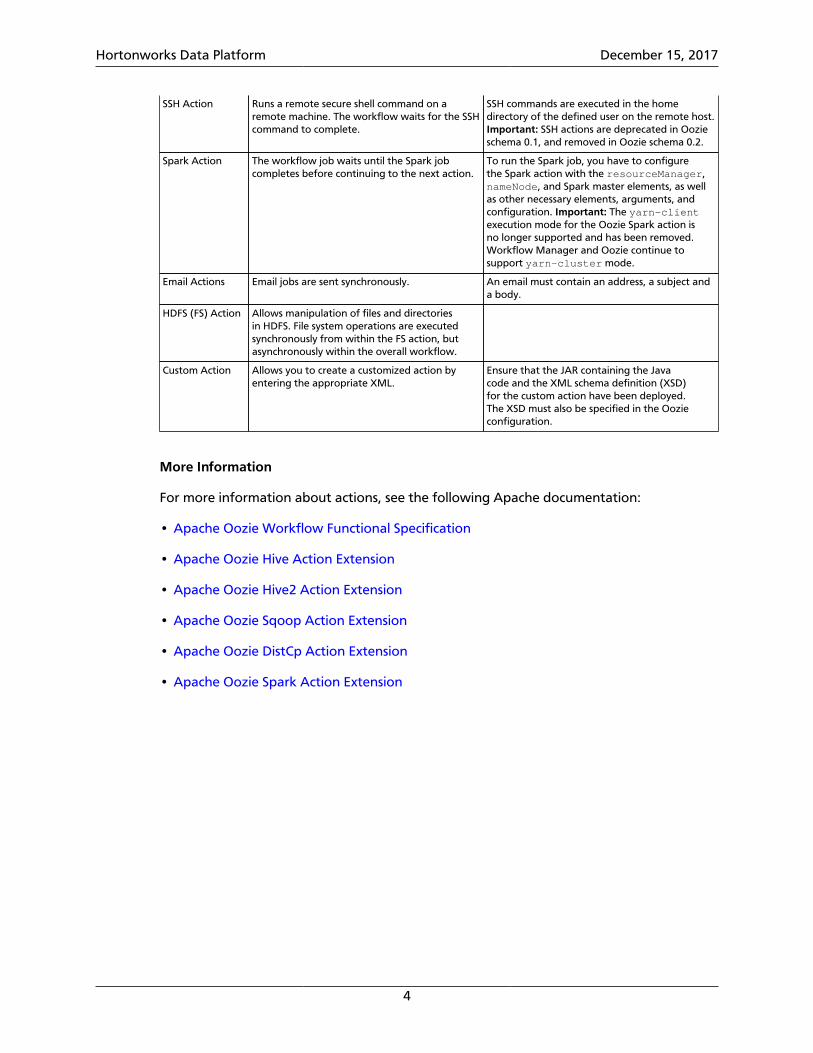
SSH Action Runs a remote secure shell command on aremote machine. The workflow waits for the SSHcommand to complete.
SSH commands are executed in the homedirectory of the defined user on the remote host.Important: SSH actions are deprecated in Oozieschema 0.1, and removed in Oozie schema 0.2.
Spark Action The workflow job waits until the Spark jobcompletes before continuing to the next action.
To run the Spark job, you have to configurethe Spark action with the resourceManager,nameNode, and Spark master elements, as wellas other necessary elements, arguments, andconfiguration. Important: The yarn-clientexecution mode for the Oozie Spark action isno longer supported and has been removed.Workflow Manager and Oozie continue tosupport yarn-cluster mode.
Email Actions Email jobs are sent synchronously. An email must contain an address, a subject anda body.
HDFS (FS) Action Allows manipulation of files and directoriesin HDFS. File system operations are executedsynchronously from within the FS action, butasynchronously within the overall workflow.
Custom Action Allows you to create a customized action byentering the appropriate XML.
Ensure that the JAR containing the Javacode and the XML schema definition (XSD)for the custom action have been deployed.The XSD must also be specified in the Oozieconfiguration.
More Information
For more information about actions, see the following Apache documentation:
• Apache Oozie Workflow Functional Specification
• Apache Oozie Hive Action Extension
• Apache Oozie Hive2 Action Extension
• Apache Oozie Sqoop Action Extension
• Apache Oozie DistCp Action Extension
• Apache Oozie Spark Action Extension

Hortonworks Data Platform December 15, 2017
5
2. Content Roadmap for WorkflowManager
The following resources provide additional information that can be useful when usingWorkflow Manager and associated Apache components.
Table 2.1. Workflow Manager Content roadmap
Task Resources Source Description
Understanding Apache Oozie Specification Apache wiki Apache Oozie is the engine behindWorkflow Manager. Understanding howOozie works can help you understandhow to use Workflow Manager.
Ambari Automated Install Guide Hortonworks Ambari provides an end-to-endmanagement and monitoring solutionfor your HDP cluster. Using the AmbariWeb UI and REST APIs, you can deploy,operate, manage configuration changes,and monitor services for all nodes in yourcluster from a central point.
Non-Ambari Cluster InstallationGuide
Hortonworks Describes the information and materialsyou need to get ready to install theHortonworks Data Platform (HDP)manually.
Ambari Upgrade Guide Hortonworks Ambari and the HDP Stack beingmanaged by Ambari can be upgradedindependently. This guide providesinformation on: Getting ready to upgradeAmbari and HDP, Upgrading Ambari, andUpgrading HDP.
Installing andUpgrading
Non-Ambari Cluster UpgradeGuide
Hortonworks These instructions cover the upgradebetween two minor releases. If you needto upgrade between two maintenancereleases, follow the upgrade instructionsin the HDP Release Notes.
Administering Configuring Workflow ManagerView
Hortonworks Describes how to set up and create theWorkflow Manager instance in Ambari.
Apache Ambari WorkflowManager View for Apache Oozie
Hortonworks Hortonworks Community Connection(HCC) articles that provide an exampleof each of the node actions available inWorkflow Manager.
Apache Hive Action Apache wiki Provides information about the Hiveaction extension that can be helpfulwhen configuring a Hive node in WFM.
Apache Hive2 Action Apache wiki Provides information about the Hive2action extension that can be helpfulwhen configuring a Hive2 node in WFM.
Apache Sqoop Action Apache wiki Provides information about the Sqoopaction extension that can be helpfulwhen configuring a Sqoop node in WFM.
Apache Shell Action Apache wiki Provides information about the Shellaction extension that can be helpfulwhen configuring a Shell node in WFM.
Developing
Apache Spark Action Apache wiki Provides information about the Sparkaction extension that can be helpfulwhen configuring a Spark node in WFM.
Hortonworks Data Platform December 15, 2017
6
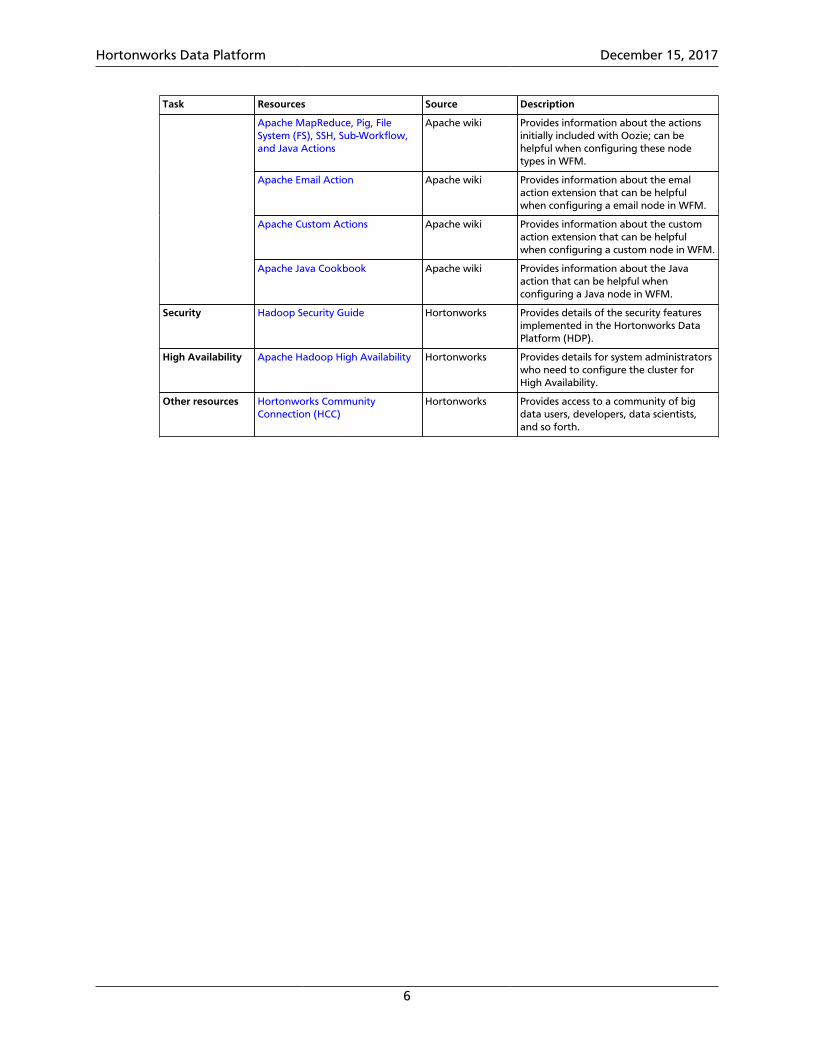
Task Resources Source Description
Apache MapReduce, Pig, FileSystem (FS), SSH, Sub-Workflow,and Java Actions
Apache wiki Provides information about the actionsinitially included with Oozie; can behelpful when configuring these nodetypes in WFM.
Apache Email Action Apache wiki Provides information about the emalaction extension that can be helpfulwhen configuring a email node in WFM.
Apache Custom Actions Apache wiki Provides information about the customaction extension that can be helpfulwhen configuring a custom node in WFM.
Apache Java Cookbook Apache wiki Provides information about the Javaaction that can be helpful whenconfiguring a Java node in WFM.
Security Hadoop Security Guide Hortonworks Provides details of the security featuresimplemented in the Hortonworks DataPlatform (HDP).
High Availability Apache Hadoop High Availability Hortonworks Provides details for system administratorswho need to configure the cluster forHigh Availability.
Other resources Hortonworks CommunityConnection (HCC)
Hortonworks Provides access to a community of bigdata users, developers, data scientists,and so forth.
Hortonworks Data Platform December 15, 2017
7
3. Quick StartFor an overview of the features and functionality available as part of Workflow Manager,see the following content:
Configuring a Workflow Manager Ambari View [7]
UI Elements of Workflow Manager [7]
Understanding the Design Component [8]
Using the Design Component [9]
Using the Dashboard Component [12]
Dashboard Job Details Tabs [13]
3.1. Configuring a Workflow Manager AmbariView
You access Workflow Manager (WFM) as an Ambari View. You create an instance of theWFM View from the Ambari web UI. You can create multiple instances of a View and youcan assign different users to different Views.
Instructions for creating a WFM View are included in the Apache Ambari Views guide:
• Configuring Your Cluster for Workflow Manager View
• If using Kerberos: Kerberos Setup for Workflow Manager
• Creating and Configuring a Workflow Manager View Instance
More Information
Configuring Views for Kerberos in the Apache Ambari Views guide
Managing Cluster Roles in the Apache Ambari Administration guide
3.2. UI Elements of Workflow ManagerThere are two components that make up Workflow Manager: The designer and thedashboard.
Below are the primary elements of the design component.

Hortonworks Data Platform December 15, 2017
8
Figure 3.1. Workflow Manager Design Component
Below are the primary elements of the dashboard.
Figure 3.2. Workflow Manager Dashboard Component
3.3. Understanding the Design ComponentYou can create and run workflows, coordinators, and bundles from Workflow Manager.
You create a workflow in Workflow Manager using a graphing flow tool. The type ofgraph you create is known as a directed acyclic graph (DAG). This type of graph has a singledirection and can never be cyclic, so a particular action node can never be referenced bymore than one other node in a graph. A workflow must begin with a start node, followedby one or more action nodes, and end with an end node. Other control nodes or actionnodes can be included.

Hortonworks Data Platform December 15, 2017
9
An action node represents an Oozie action in the workflow, such as a Hive, Sqoop, Spark,Pig, or Java action, among others. Control nodes direct the execution flow in the workflow.Control nodes include the start and end nodes, as well as the fork and decision nodes. InWorkflow Manager, the start and end nodes are preconfigured and cannot be modified.
A workflow succeeds when it reaches the end node. If a workflow fails, it transitions toa kill node and stops. The workflow reports the error message that you specify in themessage element in the workflow definition.
Using a coordinator, you can assign a schedule and frequency to a workflow. You can alsoidentify specific events that trigger start and end actions in the workflow. If you want tomanage multiple recurring workflow jobs as a group, you must add each workflow to acoordinator, then add the coordinators to a bundle.
When you save, validate, or submit a workflow, coordinator, or bundle, they are eachsaved in their own XML file, also called an application file.
Before a workflow, coordinator, or bundle job can be executed, as a first step the job XMLfile and all other files necessary to run components of the workflow must be deployed toHDFS. This might include JAR files for Map/Reduce jobs, shells for streaming Map/Reducejobs, native libraries, Pig scripts, and other resource files. These files are often packagedtogether as a ZIP file and referred to as a workflow application.
For a practical example of using Workflow Manager to create and monitor a simple Extract-Transform-Load workflow, see "Sample ETL Use Case".
More Information
See "Workflow Manager Design Component" in Workflow Manager Basics.
3.4. Using the Design ComponentThe following information steps you through some of the functionality available in theWorkflow Manager design component.
Design Component Functionality

Hortonworks Data Platform December 15, 2017
10
Figure 3.3. Design Workspace, Labeled 1-4
1. Open recently viewed workflows by clicking Recent and double-clicking on a workflowname.
The design workspace opens with the selected workflow displayed.
2. Create a new workflow, coordinator, or bundle from the Create menu.
3. Access the list of Action or Control Nodes to add to the workflow by clicking theconnecting arrow on the workflow, then clicking the green + icon.
4. Add a node or import an existing asset by clicking one of the items in the Add Nodepopup.
5. Perform various actions on the node you added by clicking any of the icons on theNode Action Bar. Configure the Action Node or Decision Node by clicking on the ActionSettings icon to open the configuration dialog box.
If you rename the node, note that spaces are not allowed in node names.
Hortonworks Data Platform December 15, 2017
11
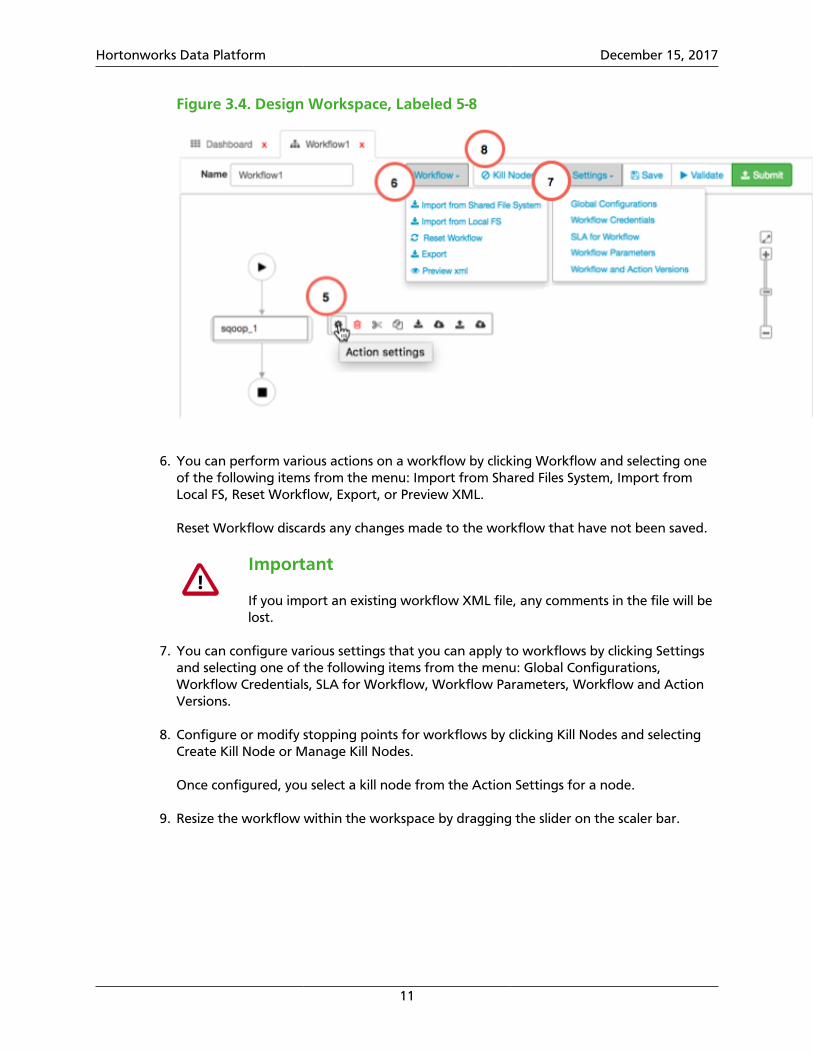
Figure 3.4. Design Workspace, Labeled 5-8
6. You can perform various actions on a workflow by clicking Workflow and selecting oneof the following items from the menu: Import from Shared Files System, Import fromLocal FS, Reset Workflow, Export, or Preview XML.
Reset Workflow discards any changes made to the workflow that have not been saved.
Important
If you import an existing workflow XML file, any comments in the file will belost.
7. You can configure various settings that you can apply to workflows by clicking Settingsand selecting one of the following items from the menu: Global Configurations,Workflow Credentials, SLA for Workflow, Workflow Parameters, Workflow and ActionVersions.
8. Configure or modify stopping points for workflows by clicking Kill Nodes and selectingCreate Kill Node or Manage Kill Nodes.
Once configured, you select a kill node from the Action Settings for a node.
9. Resize the workflow within the workspace by dragging the slider on the scaler bar.

Hortonworks Data Platform December 15, 2017
12
Figure 3.5. Design Workspace, Labeled 9-14
10.Reposition the workflow to the center of the workspace by clicking the (Reposition)icon.
11.Save a nonvalidated draft or a validated version of the workflow by clicking Save.
You can save the workflow to any location in HDFS for which you have writepermissions.
12.Verify that the XML code in your workflow is correct by clicking Validate.
Validation only confirms that the XML is properly structured. It does not verify if theworkflow will succeed when run.
13.Pass the valid workflow to the job engine in preparation for running the job by clickingSubmit.
When submitting, you can choose whether or not to start the job. If you do not startthe job when you submit it, you can start the job from the dashboard. Submitting aworkflow results in the workflow displaying in the dashboard.
14.View or delete assets you created by clicking Manage Assets.
Only the user who created an asset can view or delete the asset in Asset Manager.
3.5. Using the Dashboard ComponentFrom the dashboard jobs table you can view workflow, coordinator, and bundle jobs, andperform actions on the jobs. You can also access details about each job by clicking thename of a job.
The following information steps you through some of the functionality available in theWorkflow Manager dashboard component.
Hortonworks Data Platform December 15, 2017
13
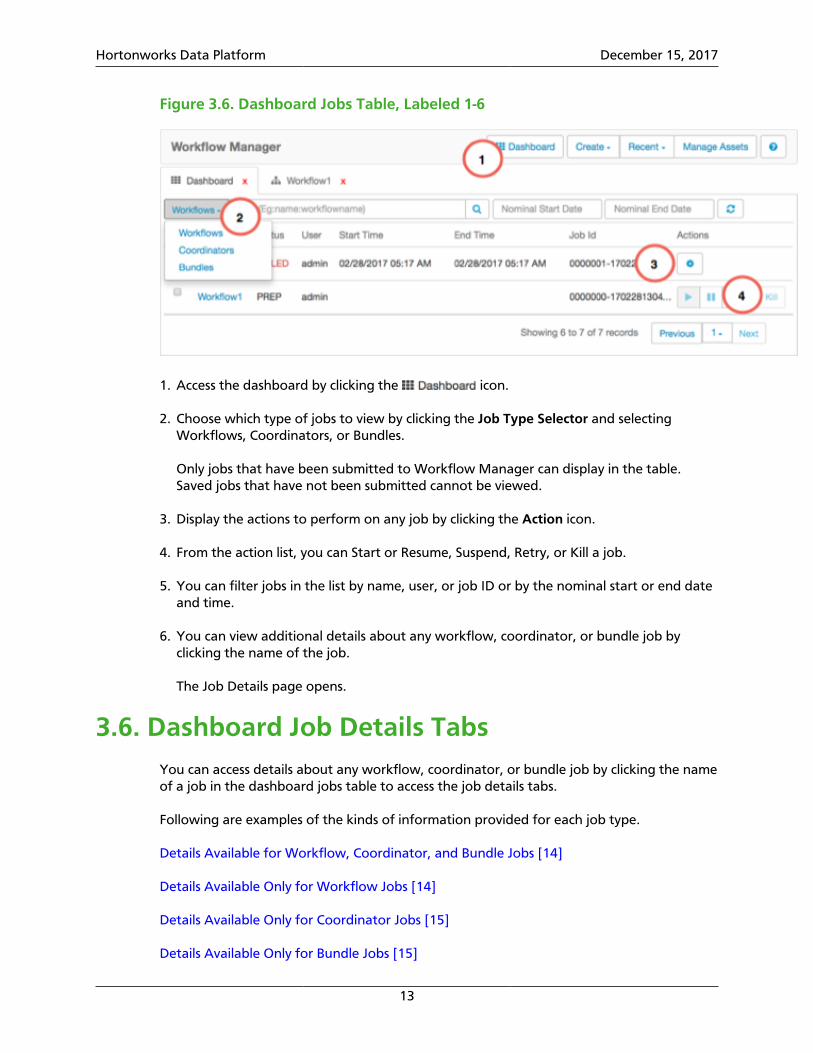
Figure 3.6. Dashboard Jobs Table, Labeled 1-6
1. Access the dashboard by clicking the icon.
2. Choose which type of jobs to view by clicking the Job Type Selector and selectingWorkflows, Coordinators, or Bundles.
Only jobs that have been submitted to Workflow Manager can display in the table.Saved jobs that have not been submitted cannot be viewed.
3. Display the actions to perform on any job by clicking the Action icon.
4. From the action list, you can Start or Resume, Suspend, Retry, or Kill a job.
5. You can filter jobs in the list by name, user, or job ID or by the nominal start or end dateand time.
6. You can view additional details about any workflow, coordinator, or bundle job byclicking the name of the job.
The Job Details page opens.
3.6. Dashboard Job Details TabsYou can access details about any workflow, coordinator, or bundle job by clicking the nameof a job in the dashboard jobs table to access the job details tabs.
Following are examples of the kinds of information provided for each job type.
Details Available for Workflow, Coordinator, and Bundle Jobs [14]
Details Available Only for Workflow Jobs [14]
Details Available Only for Coordinator Jobs [15]
Details Available Only for Bundle Jobs [15]

Hortonworks Data Platform December 15, 2017
14
3.6.1. Details Available for Workflow, Coordinator, andBundle Jobs
Info Tab The content of this tab is similar for workflow, coordinator, andbundle jobs.
The Info tab provides all of the information available on the jobstable, plus some additional details.
Log Tab The content of this tab is similar for workflow, coordinator, andbundle jobs.
The Log tab displays the WFM log details for workflow,coordinator, and bundle jobs.
You can scroll through the log or filter the log using the SearchFilter. See the Apache documentation for details about how touse the filter.
For coordinator jobs, you can also filter by actions.
Error Log Tab The content of this tab is similar workflow, coordinator, andbundle jobs.
Displays details about any errors encountered when executingthe job.
Audit Log Tab The content of this tab is similar for workflow, coordinator, andbundle jobs.
Provides audit details for the job.
Configuration Tab The content of this tab is similar for workflow, coordinator, andbundle jobs.
Displays Oozie configuration information.
Definition Tab The content of this tab is similar for workflow, coordinator, andbundle jobs.
The Definition tab displays the XML definition for the job. Thecontent corresponds to the parameters set when creating theworkflow, coordinator, or bundle.
3.6.2. Details Available Only for Workflow Jobs
Action Tab The content of this tab is available only for workflow jobs.
From the Action tab you can view information about each actionin the workflow.
Hortonworks Data Platform December 15, 2017
15
You can view further details about each action by clicking thename of the action node in the Name column of the table. Detailsdisplay in the Info and Configuration tabs below the table.
Tip
You can access the Resource Manager (YARN) logfiles by clicking the icon in the Job URL column of thetable.
Flow Graph Tab The content of this tab is only available for workflow jobs.
The Flow Graph tab displays the workflow graph. You can viewdetails about any node by clicking on the node. You can modifythe workflow by clicking Edit Workflow in the tab bar, whichdisplays the workflow in the workspace of the design component.
Edit Workflow Tab This function is accessible only from the workflow details.
Clicking Edit Workflow opens the workflow graph in the designcomponent so that you can edit the workflow.
3.6.3. Details Available Only for Coordinator Jobs
Workflow Jobs The content of this tab is only available for coordinator jobs.
Displays information about the workflow job that is scheduled throughthe coordinator. By clicking the workflow name in the ID column,you can access details about the workflow that is associated with thecoordinator.
Action Reruns Tab The content of this tab is only available for coordinator jobs.
Provides details about any terminated coordinator actions thatwere rerun.
3.6.4. Details Available Only for Bundle Jobs
Coordinator Jobs Tab The content of this tab is only available for bundle jobs.
Displays information about the coordinator jobs that areincluded in the bundle.
Hortonworks Data Platform December 15, 2017
16
4. Designing Workflows Using the DesignComponent
See the following content to learn how to use the Workflow Manager design componentto create, modify, save, and submit workflows, coordinators, and bundles.
Create a Workflow [16]
Add Nodes to a Workflow [17]
Save a Workflow Draft [23]
Validate and Save a Workflow [25]
Import an Existing Workflow [27]
Export a Workflow [28]
Submitting and Executing a Workflow [28]
Modifying Workflows [31]
Reusing Node Configurations as Assets [35]
Creating Coordinators and Bundles [42]
View the XML Code [45]
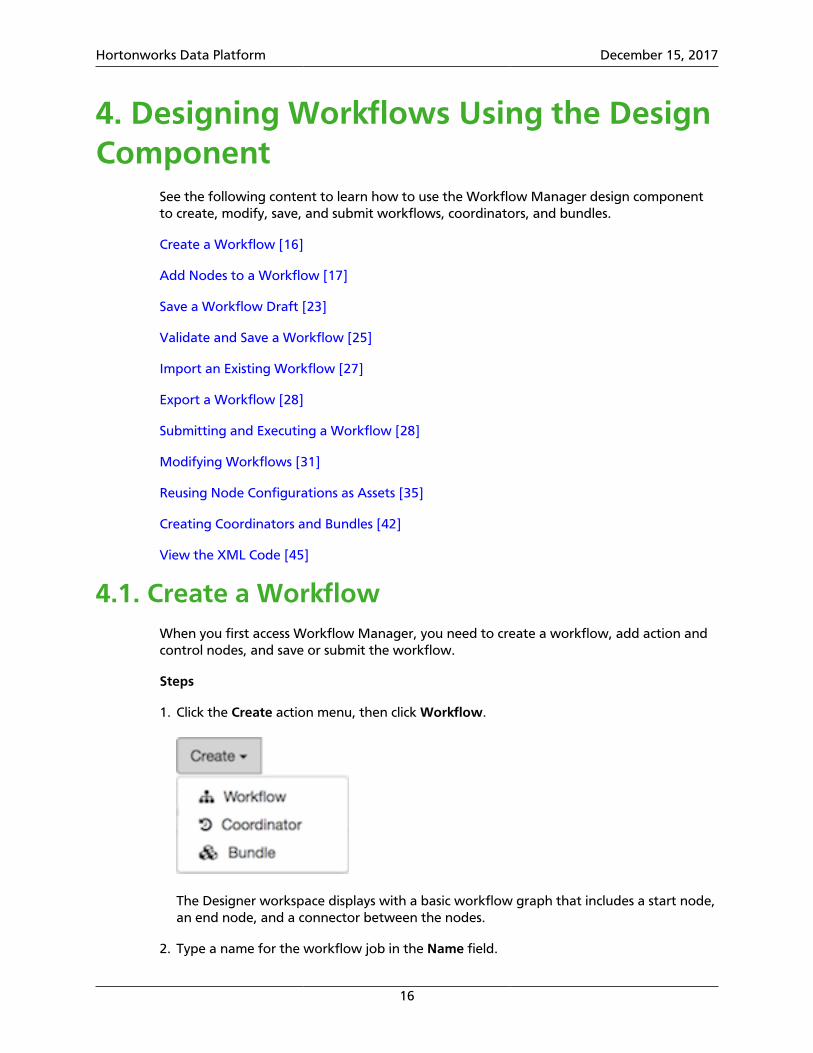
4.1. Create a WorkflowWhen you first access Workflow Manager, you need to create a workflow, add action andcontrol nodes, and save or submit the workflow.
Steps
1. Click the Create action menu, then click Workflow.
The Designer workspace displays with a basic workflow graph that includes a start node,an end node, and a connector between the nodes.
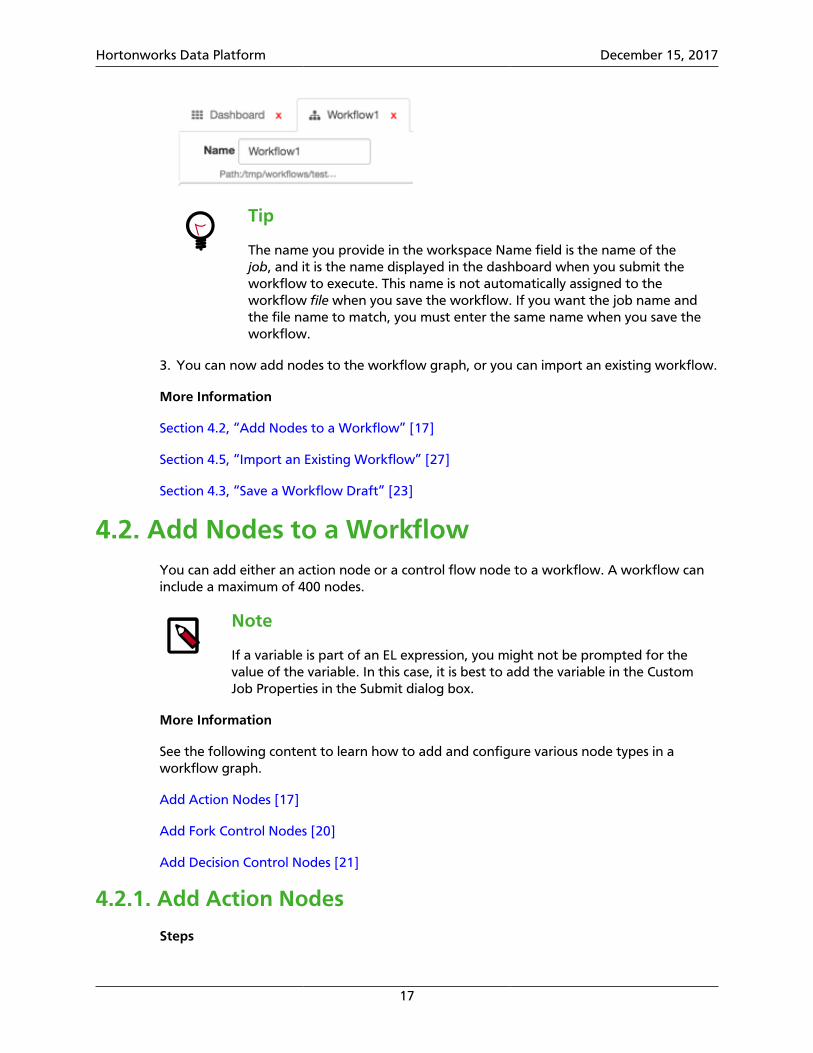
2. Type a name for the workflow job in the Name field.
Hortonworks Data Platform December 15, 2017
17
Tip
The name you provide in the workspace Name field is the name of thejob, and it is the name displayed in the dashboard when you submit theworkflow to execute. This name is not automatically assigned to theworkflow file when you save the workflow. If you want the job name andthe file name to match, you must enter the same name when you save theworkflow.
3. You can now add nodes to the workflow graph, or you can import an existing workflow.
More Information
Section 4.2, “Add Nodes to a Workflow” [17]
Section 4.5, “Import an Existing Workflow” [27]
Section 4.3, “Save a Workflow Draft” [23]
4.2. Add Nodes to a WorkflowYou can add either an action node or a control flow node to a workflow. A workflow caninclude a maximum of 400 nodes.
Note
If a variable is part of an EL expression, you might not be prompted for thevalue of the variable. In this case, it is best to add the variable in the CustomJob Properties in the Submit dialog box.
More Information
See the following content to learn how to add and configure various node types in aworkflow graph.
Add Action Nodes [17]
Add Fork Control Nodes [20]
Add Decision Control Nodes [21]
4.2.1. Add Action Nodes
Steps
Hortonworks Data Platform December 15, 2017
18
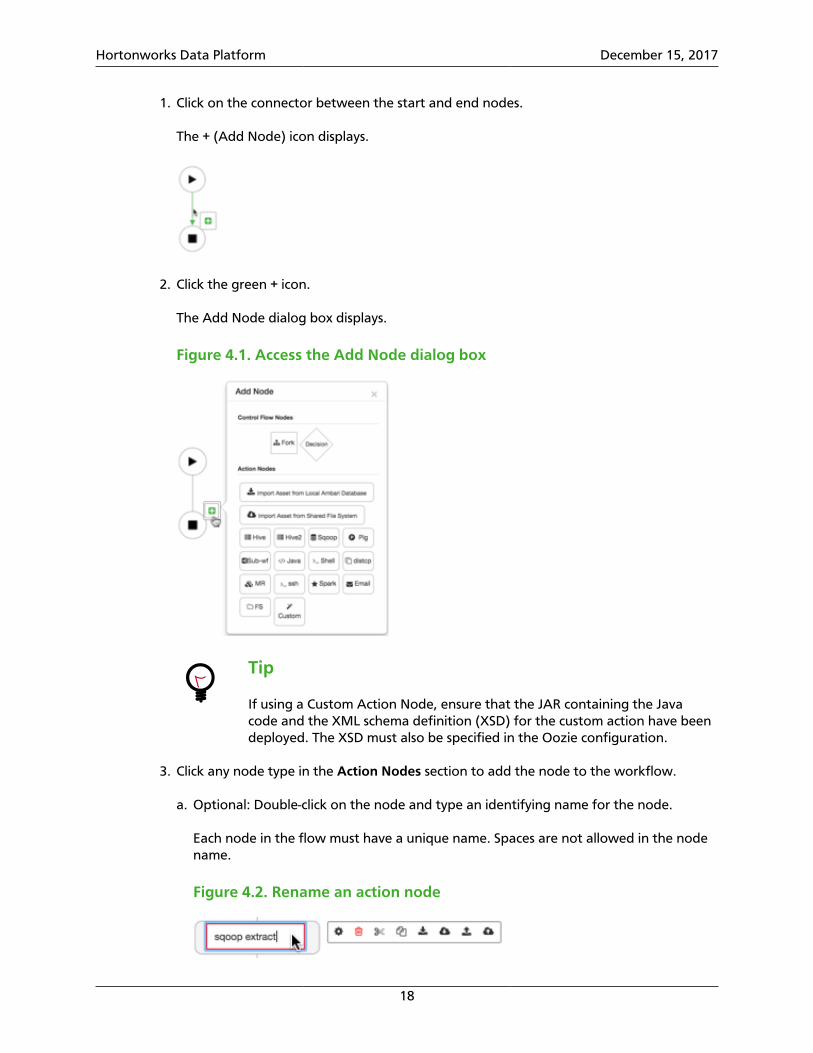
1. Click on the connector between the start and end nodes.
The + (Add Node) icon displays.
2. Click the green + icon.
The Add Node dialog box displays.
Figure 4.1. Access the Add Node dialog box
Tip
If using a Custom Action Node, ensure that the JAR containing the Javacode and the XML schema definition (XSD) for the custom action have beendeployed. The XSD must also be specified in the Oozie configuration.
3. Click any node type in the Action Nodes section to add the node to the workflow.
a. Optional: Double-click on the node and type an identifying name for the node.
Each node in the flow must have a unique name. Spaces are not allowed in the nodename.
Figure 4.2. Rename an action node
Hortonworks Data Platform December 15, 2017
19
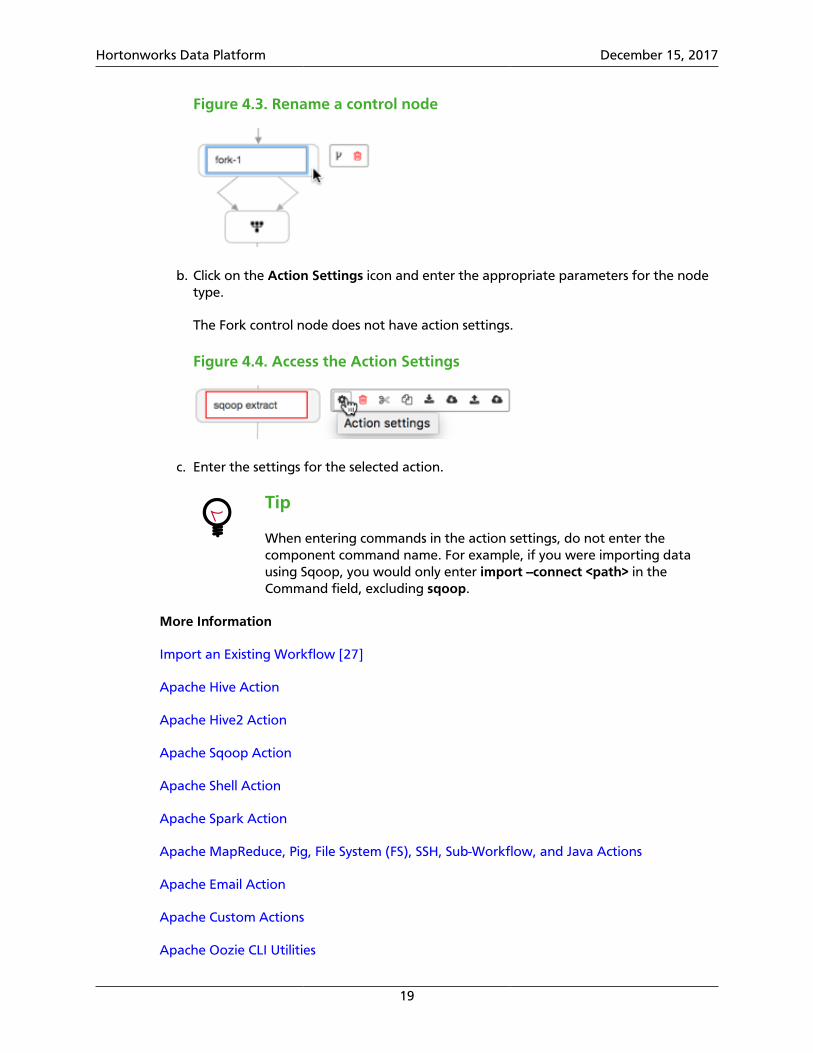
Figure 4.3. Rename a control node
b. Click on the Action Settings icon and enter the appropriate parameters for the nodetype.
The Fork control node does not have action settings.
Figure 4.4. Access the Action Settings
c. Enter the settings for the selected action.
Tip
When entering commands in the action settings, do not enter thecomponent command name. For example, if you were importing datausing Sqoop, you would only enter import --connect <path> in theCommand field, excluding sqoop.
More Information
Import an Existing Workflow [27]
Apache Hive Action
Apache Hive2 Action
Apache Sqoop Action
Apache Shell Action
Apache Spark Action
Apache MapReduce, Pig, File System (FS), SSH, Sub-Workflow, and Java Actions
Apache Email Action
Apache Custom Actions
Apache Oozie CLI Utilities
Hortonworks Data Platform December 15, 2017
20
4.2.2. Add Fork Control Nodes
You can use Fork control nodes to direct the flow of actions in the workflow. A forkallows you to create multiple concurrent execution paths that branch from a single action.The paths rejoin at a common point called the join node. A join node waits until everyconcurrent execution path of a previous fork node arrives to it.
The fork and join nodes must be used in pairs. The join node assumes concurrent executionpaths are children of the same fork node.
Steps
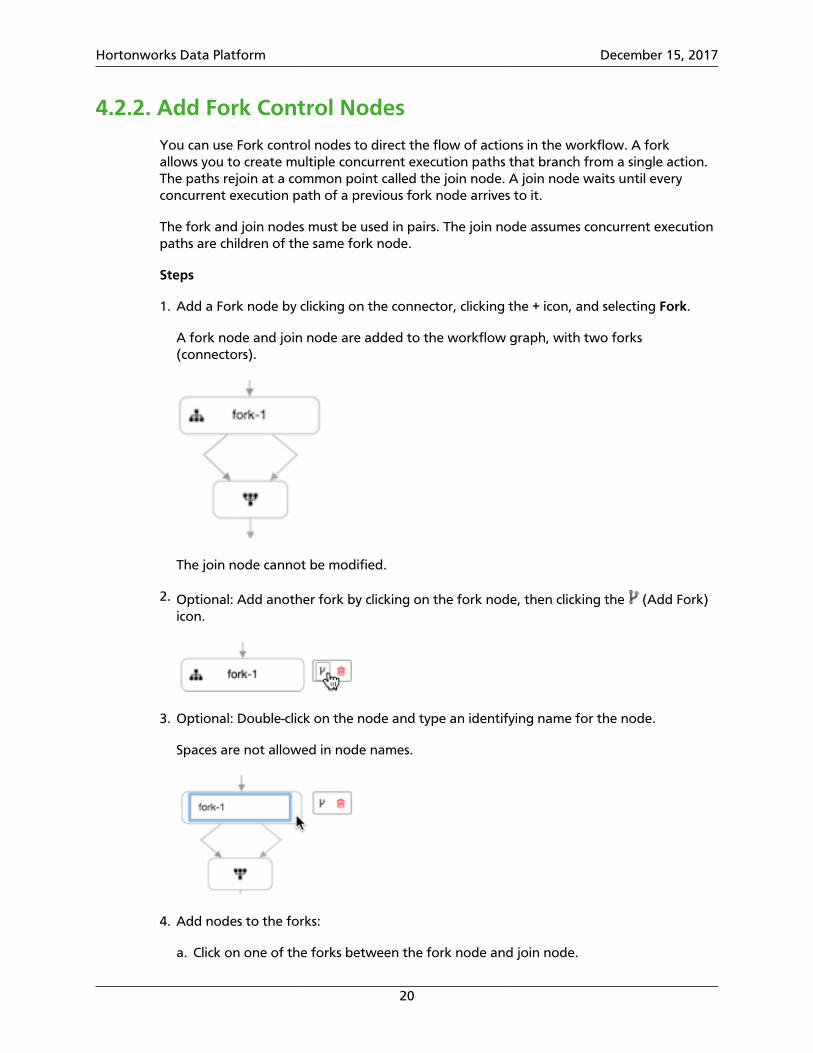
1. Add a Fork node by clicking on the connector, clicking the + icon, and selecting Fork.
A fork node and join node are added to the workflow graph, with two forks(connectors).
The join node cannot be modified.
2. Optional: Add another fork by clicking on the fork node, then clicking the (Add Fork)icon.
3. Optional: Double-click on the node and type an identifying name for the node.
Spaces are not allowed in node names.
4. Add nodes to the forks:
a. Click on one of the forks between the fork node and join node.

Hortonworks Data Platform December 15, 2017
21
b. Click the + icon and select a node.
c. Repeat steps 2a and 2b for the other forks.
Each fork must have at least one node associated with it. You can have multiplenodes for each fork.
Figure 4.5. Example of a Fork Node
4.2.3. Add Decision Control Nodes
You can use the Decision control nodes to direct the flow of actions in the workflow basedon specific circumstances.
Note
If a variable is part of an EL expression, such as in a decision node, you mightnot be prompted for the value of the variable. In this case, it is best to add thevariable in the Custom Job Properties in the Submit dialog box.
Steps
1. Add a Decision node by clicking on the connector in the graph, clicking the + icon, andselecting Decision.
A decision node is added to the workflow graph, with two decision branches(connectors).
Hortonworks Data Platform December 15, 2017
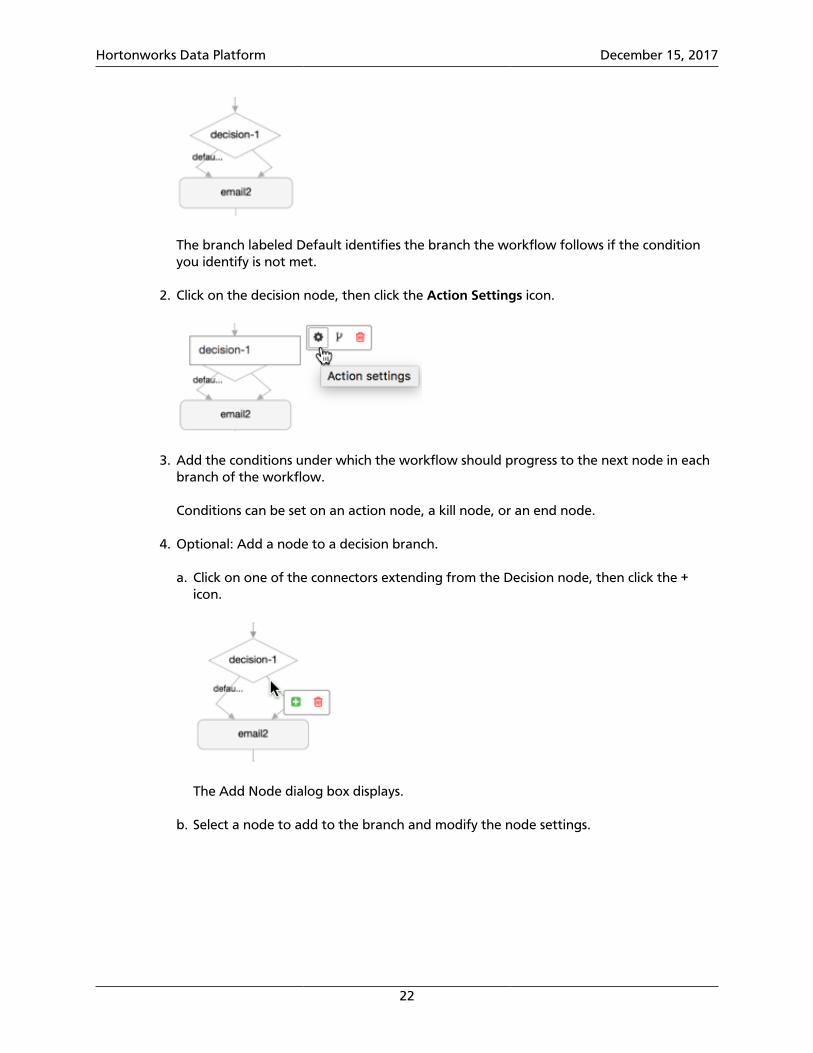
22
The branch labeled Default identifies the branch the workflow follows if the conditionyou identify is not met.
2. Click on the decision node, then click the Action Settings icon.
3. Add the conditions under which the workflow should progress to the next node in eachbranch of the workflow.
Conditions can be set on an action node, a kill node, or an end node.
4. Optional: Add a node to a decision branch.
a. Click on one of the connectors extending from the Decision node, then click the +icon.
The Add Node dialog box displays.
b. Select a node to add to the branch and modify the node settings.

Hortonworks Data Platform December 15, 2017
23
5. Optional: Add a node to the other branch.
Tip
You can nest decision nodes inside of decision nodes and can add forks todecision branches.
6. Optional: Delete a connector.
You cannot delete the connector that contains the Default setting.
4.3. Save a Workflow DraftYou can save a workflow, whether valid or invalid, to any location on HDFS to which youhave access permissions. You can save an invalid draft of your workflow and access it laterto complete it.
About This Task
Each workflow file must have a unique name within a single directory. If you want to savea workflow into a directory that already contains a workflow of the same name, you musteither rename the existing workflow, add the file to a subdirectory, or overwrite the fileduring the save procedure.
Tip
When you save a workflow, the name you assign is given only to the workflowapplication file. It does not automatically match the name displayed for theworkflow job in the dashboard. WFM assigns to the workflow job the nameyou enter in the Name field in the design workspace. If you want the job nameand the application file name to match, you must assign the same name in theName field and to the application file.
You can save valid workflows or invalid workflows as drafts. The default name for a savedworkflow is always workflow.xml.draft for a draft workflow that is not validated or
Hortonworks Data Platform December 15, 2017
24
workflow.xml for a valid workflow. You can change the workflow file name during thesave operation.
Steps
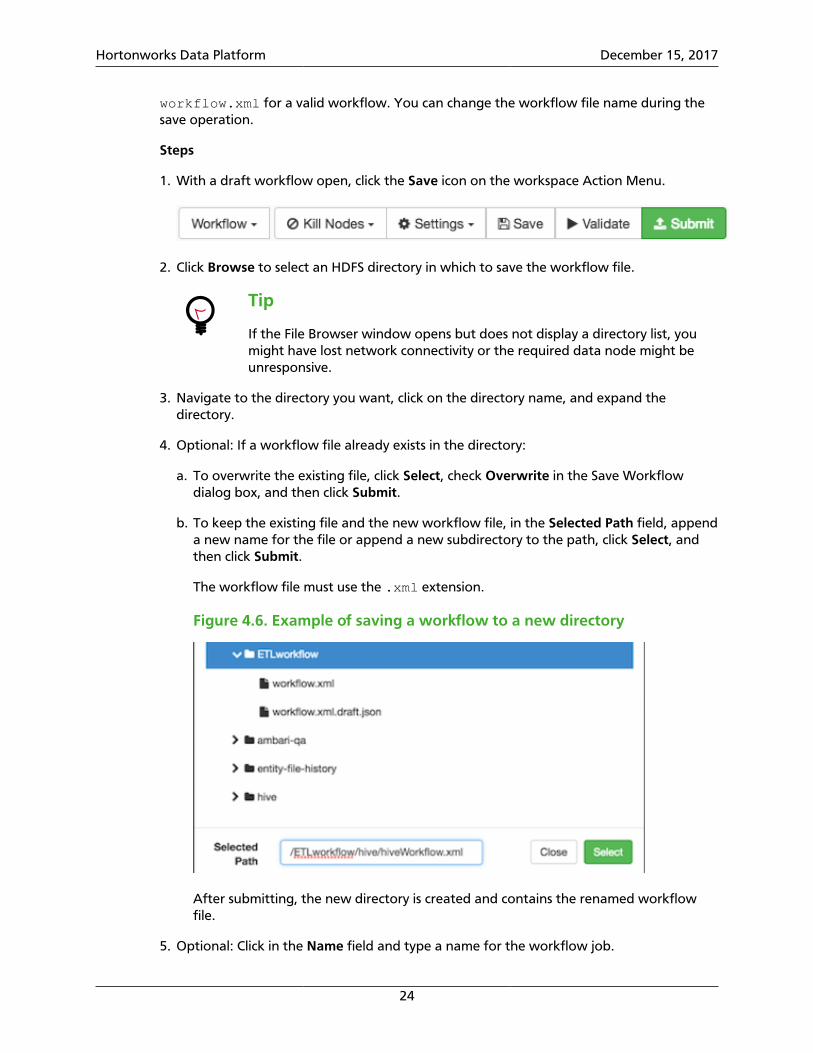
1. With a draft workflow open, click the Save icon on the workspace Action Menu.
2. Click Browse to select an HDFS directory in which to save the workflow file.
Tip
If the File Browser window opens but does not display a directory list, youmight have lost network connectivity or the required data node might beunresponsive.
3. Navigate to the directory you want, click on the directory name, and expand thedirectory.
4. Optional: If a workflow file already exists in the directory:
a. To overwrite the existing file, click Select, check Overwrite in the Save Workflowdialog box, and then click Submit.
b. To keep the existing file and the new workflow file, in the Selected Path field, appenda new name for the file or append a new subdirectory to the path, click Select, andthen click Submit.
The workflow file must use the .xml extension.
Figure 4.6. Example of saving a workflow to a new directory
After submitting, the new directory is created and contains the renamed workflowfile.
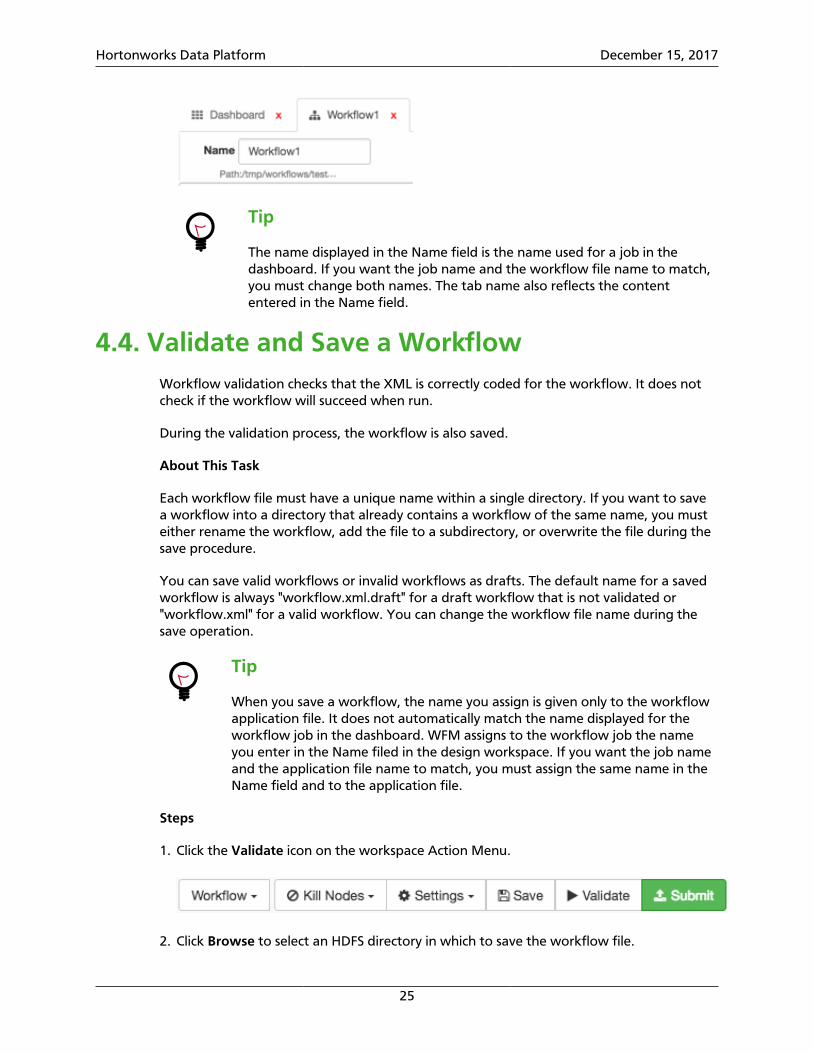
5. Optional: Click in the Name field and type a name for the workflow job.
Hortonworks Data Platform December 15, 2017
25
Tip
The name displayed in the Name field is the name used for a job in thedashboard. If you want the job name and the workflow file name to match,you must change both names. The tab name also reflects the contententered in the Name field.
4.4. Validate and Save a WorkflowWorkflow validation checks that the XML is correctly coded for the workflow. It does notcheck if the workflow will succeed when run.
During the validation process, the workflow is also saved.
About This Task
Each workflow file must have a unique name within a single directory. If you want to savea workflow into a directory that already contains a workflow of the same name, you musteither rename the workflow, add the file to a subdirectory, or overwrite the file during thesave procedure.
You can save valid workflows or invalid workflows as drafts. The default name for a savedworkflow is always "workflow.xml.draft" for a draft workflow that is not validated or"workflow.xml" for a valid workflow. You can change the workflow file name during thesave operation.
Tip
When you save a workflow, the name you assign is given only to the workflowapplication file. It does not automatically match the name displayed for theworkflow job in the dashboard. WFM assigns to the workflow job the nameyou enter in the Name filed in the design workspace. If you want the job nameand the application file name to match, you must assign the same name in theName field and to the application file.
Steps
1. Click the Validate icon on the workspace Action Menu.
2. Click Browse to select an HDFS directory in which to save the workflow file.

Hortonworks Data Platform December 15, 2017
26
Tip
If the File Browser window opens but does not display a directory list, youmight have lost network connectivity or the required data node might beunresponsive.
3. Navigate to the directory you want, click on the directory name, and expand thedirectory.
4. Optional: If a workflow file already exists in the directory:
a. To overwrite the existing file, click Select, check Overwrite in the Save Workflowdialog box, and then click Validate.
b. To keep the existing file and the new workflow file, in the Selected Path field, appenda new name for the file or append a new subdirectory to the path, click Select, andthen click Validate.
Important
The workflow file must use the .xml extension.
Figure 4.7. Example of saving a workflow to a new directory
After validation, the new directory is created and contains the renamed workflow.
5. Select the Execution Settings you want to use.
6. Enter any Custom Job Properties you want to use.
7. Click Validate.
More Information
Apache Workflow Job Properties

Hortonworks Data Platform December 15, 2017
27
4.5. Import an Existing WorkflowYou can import workflows created external to Workflow Manager, or save and importto another WFM View instance any workflows you create within WFM. You can importworkflows from within HDFS or from a local file system.
Prerequisite
If you are importing a workflow that was created external to Workflow Manager, ensurethat the workflow definition is valid. Workflows created in Workflow Manager arevalidated, but there is no validation for externally-created workflows. Therefore, WorkflowManager does not provide an error message for an invalid external workflow, nor will aninvalid workflow display in the workspace.
Important
If you import an existing workflow XML file, any comments in the file will belost.
Steps
1. Click Create > Workflow.
A new workspace displays with a basic workflow graph.
2. Click the workspace Workflow menu and do one of the following.
• Import from the Hadoop file system:
a. Click Import from Shared File System.
b. Navigate to the directory that contains the workflow definition file that you want,click on the directory name, and expand the directory.
c. Verify that a workflow.xml definition file exists in the directory.
Tip
Do not click on the file name. The import action must be performed atthe directory level.
d. Verify that the directory you want is displayed in the Selected Path field.
e. Click Select.
• Import from your local file system:
a. Click Import from Local FS.
b. Navigate to the local directory that contains the workflow.xml definition file thatyou want and open the file.
The workflow graph displays in the workspace.

Hortonworks Data Platform December 15, 2017
28
Tip
If the workflow definition is invalid, it does not display in the workspace, andno error message is provided.
More Information
Save a Workflow Draft [23]
4.6. Export a WorkflowYou can use the export feature to download a workflow to your local file system.
Steps
1. Create or import a workflow in the workspace.
2. Click Validate to ensure that the workflow you want to download has no errors.
3. Click the workspace Workflow menu, then click Export.
4. The workflow is exported to the default download location on your local file system.
5. Navigate to the download location and verify that the workflow.xml file is available.
4.7. Submitting and Executing a WorkflowWhen you submit a workflow, a validation is performed on the workflow. You cannotsubmit an invalid workflow.
Prerequisites
A workflow must be valid before you can submit it.
About This Task
When you submit a workflow, the workflow is first saved. You can save workflows to anew directory or overwrite an existing workflow.
Tip
When you save a workflow, the name you assign is given only to the workflowapplication file. It does not automatically match the name displayed for theworkflow job in the dashboard. WFM assigns to the workflow job the nameyou enter in the Name filed in the design workspace. If you want the job nameand the application file name to match, you must assign the same name in theName field and to the application file.
Once it is saved, the workflow is available to execute as a job; the job does notautomatically execute when the workflow is submitted. You must execute a job separately.
Hortonworks Data Platform December 15, 2017
29
See the following content to learn how to submit and execute workflows.
Submit and Execute an Existing Workflow [29]Submit and Execute a New Workflow [30]Execute a Submitted Workflow [31]
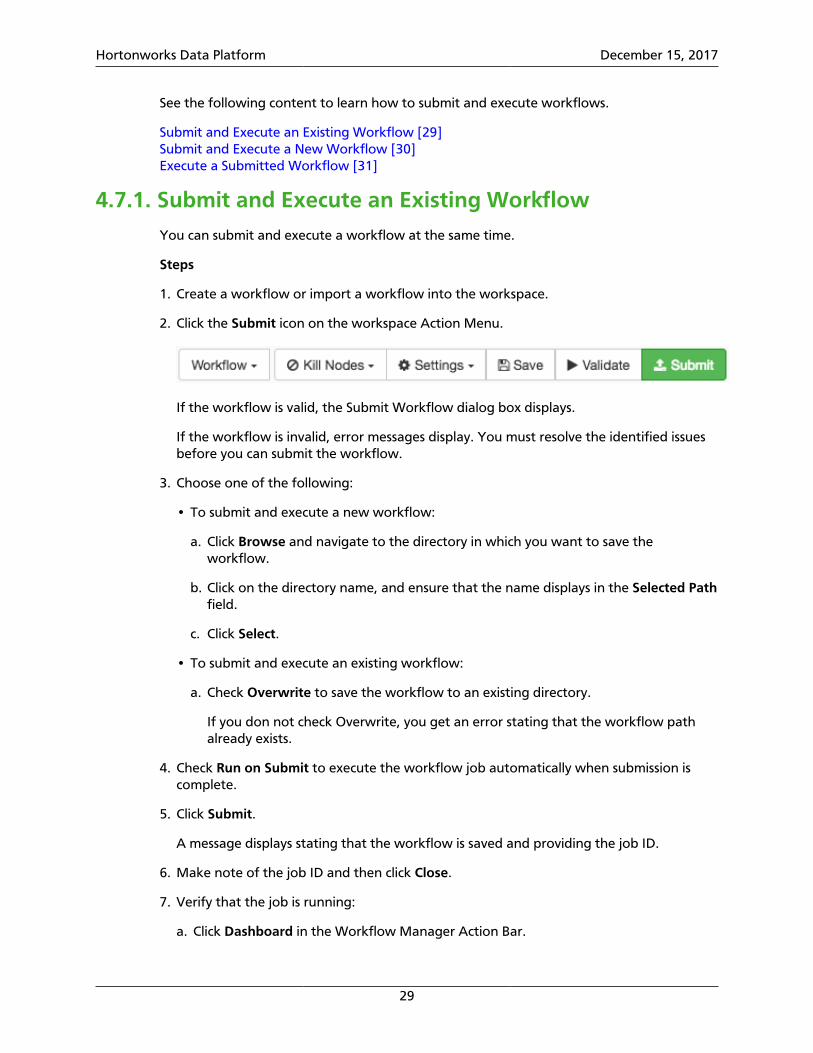
4.7.1. Submit and Execute an Existing WorkflowYou can submit and execute a workflow at the same time.
Steps
1. Create a workflow or import a workflow into the workspace.
2. Click the Submit icon on the workspace Action Menu.
If the workflow is valid, the Submit Workflow dialog box displays.
If the workflow is invalid, error messages display. You must resolve the identified issuesbefore you can submit the workflow.
3. Choose one of the following:
• To submit and execute a new workflow:
a. Click Browse and navigate to the directory in which you want to save theworkflow.
b. Click on the directory name, and ensure that the name displays in the Selected Pathfield.
c. Click Select.
• To submit and execute an existing workflow:
a. Check Overwrite to save the workflow to an existing directory.
If you don not check Overwrite, you get an error stating that the workflow pathalready exists.
4. Check Run on Submit to execute the workflow job automatically when submission iscomplete.
5. Click Submit.
A message displays stating that the workflow is saved and providing the job ID.
6. Make note of the job ID and then click Close.
7. Verify that the job is running:
a. Click Dashboard in the Workflow Manager Action Bar.
Hortonworks Data Platform December 15, 2017
30
b. In the Dashboard, locate the job and verify that the Status is Running.
4.7.2. Submit and Execute a New WorkflowYou can submit and execute a workflow at the same time. The workflow must be validbefore you can submit it. When you submit the workflow, the workflow file is saved in alocation you select. You can save workflow files to any location for which you have accesspermissions.
Prerequisites
Ensure you have access permissions to the location in which you want to save theworkflow.
Steps
1. Create a workflow or import a workflow into the workspace.
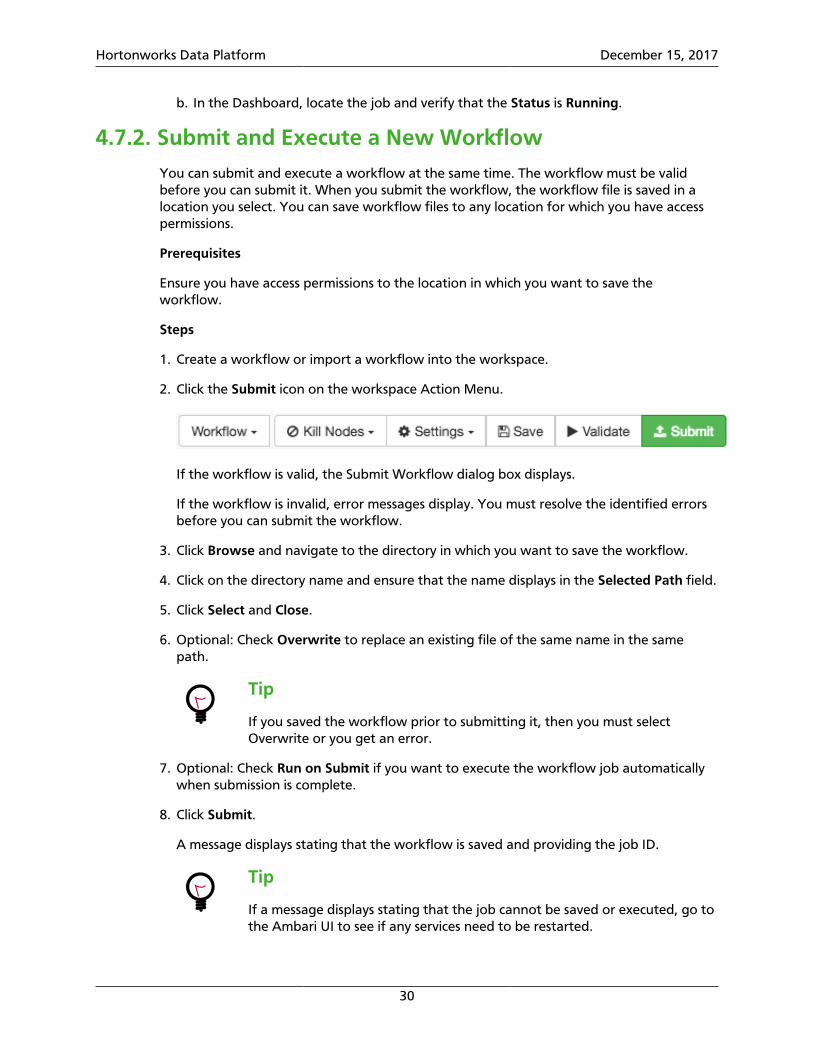
2. Click the Submit icon on the workspace Action Menu.
If the workflow is valid, the Submit Workflow dialog box displays.
If the workflow is invalid, error messages display. You must resolve the identified errorsbefore you can submit the workflow.
3. Click Browse and navigate to the directory in which you want to save the workflow.
4. Click on the directory name and ensure that the name displays in the Selected Path field.
5. Click Select and Close.
6. Optional: Check Overwrite to replace an existing file of the same name in the samepath.
Tip
If you saved the workflow prior to submitting it, then you must selectOverwrite or you get an error.
7. Optional: Check Run on Submit if you want to execute the workflow job automaticallywhen submission is complete.
8. Click Submit.
A message displays stating that the workflow is saved and providing the job ID.
Tip
If a message displays stating that the job cannot be saved or executed, go tothe Ambari UI to see if any services need to be restarted.

Hortonworks Data Platform December 15, 2017
31
9. Make note of the job ID and then click Close.
10.Verify that the job is running:
a. Click Dashboard in the Workflow Manager Action Bar.
b. In the Dashboard, locate the job and verify that the Status is Running.
You can locate the job by name or by job ID.
4.7.3. Execute a Submitted Workflow
If you submit a workflow without executing it, you can execute the workflow job any timefrom the Dashboard.
Steps
1. Click Dashboard in the Workflow Manager Action Bar.
2. In the Dashboard, locate the job you want to execute, click the (Action) icon, andthen click the (Start) icon.
The Status changes from Prep to Running.
4.8. Modifying WorkflowsYou can copy, cut, and paste nodes. You can also resize and reposition the workflow graphin the workspace.
See the following content to learn how to copy, move, and delete nodes, and to resizeworkflow graphs.
Copy or Move Nodes on a Workflow Graph [31]Remove Nodes from a Workflow Graph [33]Resize and Move Graph Images [33]
4.8.1. Copy or Move Nodes on a Workflow Graph
You can duplicate an action node by copying and pasting it into the same workflow or adifferent workflow. You can move an action node by cutting the node and pasting it to anew location on the same workflow or a different workflow.
Steps
1. Click on the node you want to duplicate.

Hortonworks Data Platform December 15, 2017
32
The node action bar displays.
2. Click either Cut Node or Copy Node.
3. To replace an existing action node, click on the node and select Replace Node fromClipboard.
Important
The node is replaced immediately and the action cannot be undone.
When pasting a copied node, "-copy" is appended to the name of the pasted node.
4. To paste a new node into the workflow:
a. Click the connector line on the workflow where you want to add the node.
b. Click the green + icon.
c. Click the Paste From Clipboard icon.
When pasting a copied node, "-copy" is appended to the name of the pasted node.
Hortonworks Data Platform December 15, 2017
33
4.8.2. Remove Nodes from a Workflow Graph
You can remove nodes permanently by using the delete function, or cut the node and haveit available on the clipboard.
Steps
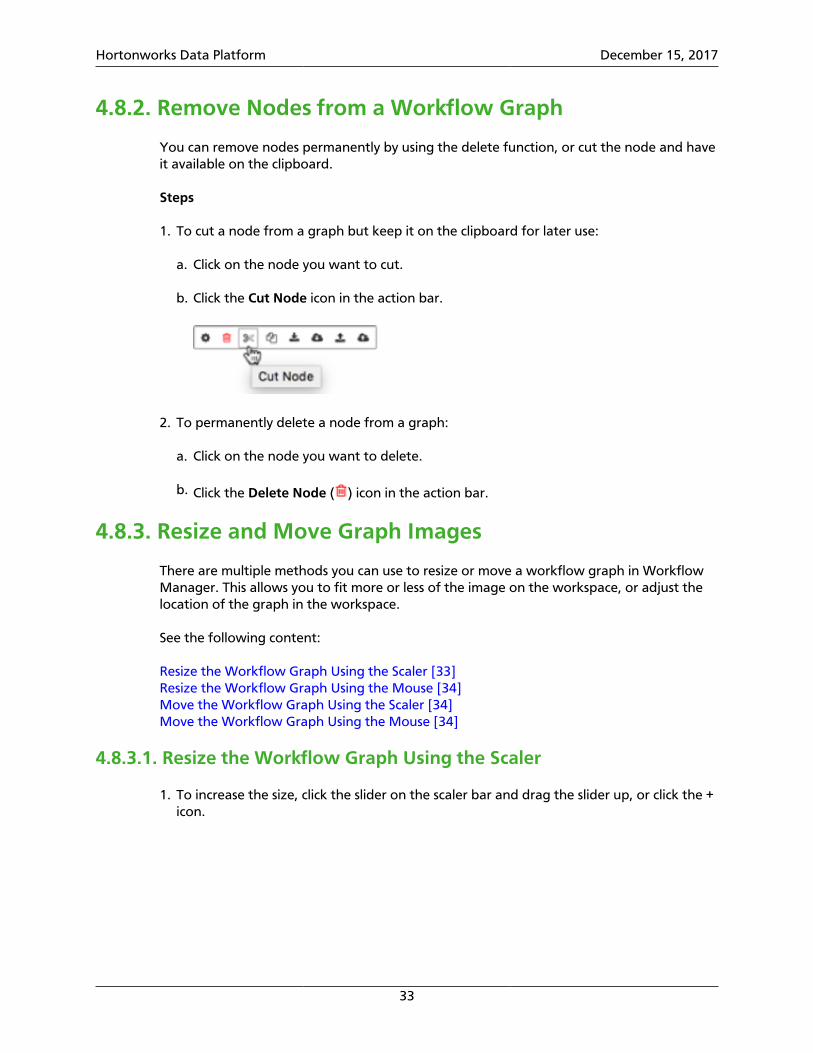
1. To cut a node from a graph but keep it on the clipboard for later use:
a. Click on the node you want to cut.
b. Click the Cut Node icon in the action bar.
2. To permanently delete a node from a graph:
a. Click on the node you want to delete.
b. Click the Delete Node ( ) icon in the action bar.
4.8.3. Resize and Move Graph Images
There are multiple methods you can use to resize or move a workflow graph in WorkflowManager. This allows you to fit more or less of the image on the workspace, or adjust thelocation of the graph in the workspace.
See the following content:
Resize the Workflow Graph Using the Scaler [33]Resize the Workflow Graph Using the Mouse [34]Move the Workflow Graph Using the Scaler [34]Move the Workflow Graph Using the Mouse [34]
4.8.3.1. Resize the Workflow Graph Using the Scaler
1. To increase the size, click the slider on the scaler bar and drag the slider up, or click the +icon.

Hortonworks Data Platform December 15, 2017
34
Figure 4.8. Scaling the workflow
2. To decrease the size, drag the slider down, or click the – icon.
3. To resize and center the graph to fit the workspace, click the icon above the scalerbar.
4.8.3.2. Resize the Workflow Graph Using the Mouse
If your mouse had a scroll function, you can use it to enlarge or reduce the size of thegraph.
1. Using the mouse scroll wheel, scroll up to reduce the graph image.
2. Scroll down to enlarge the size of the image.
4.8.3.3. Move the Workflow Graph Using the Scaler
1. To center and resize the graph to fit the workspace, click the icon above the scalerbar.
Figure 4.9. Repositioning the workflow
4.8.3.4. Move the Workflow Graph Using the Mouse
1. Click and hold a connector on the graph or a blank area of the workspace to drag theentire workflow to a new location.

Hortonworks Data Platform December 15, 2017
35
Tip
To scroll the window using the mouse, you must move the cursor outside ofthe workspace area.
2. Click and hold on any node to drag the node within the workspace.
The connectors attached to the node move with the node, so dragging a node changesthe shape of the graph. Dragging a node cannot be used move the node to a newlocation within the graph. You can move a node using copy or cut and paste functions.
4.9. Reusing Node Configurations as AssetsYou can import or save individual node configurations as assets in Workflow Manager(WFM). Assets can be imported or saved to HDFS paths or to an Ambari database. Thisallows you or others to share and reuse existing or new asset configurations for Hive,Sqoop, Spark, and other workflow actions.
See the following content to learn how to use assets:
Save an Ambari Database Asset to Use Within the WFM Instance [35]Save an Asset to Shared Storage to Use Across WFM Instances [36]Import an Asset from the Ambari Database Linked to a Single WFM Instance [37]Import a Shared Asset File from Shared Storage [38]Managing Assets [40]
4.9.1. Save an Ambari Database Asset to Use Within theWFM Instance
One way you can save an action node configuration is as an asset in an asset database. Thisallows you to reuse and share the configuration with multiple users within a single instanceof Workflow Manager (WFM) in Ambari. For example, you can share assets among users ina department, who are all using a single instance of WFM.
About This Task
You cannot save an asset with a name that is already being used. Each asset must have aunique name.
Steps
1. Click on the node in the graph that you want to save as an asset.
2. Click Save Asset to Local Ambari Database in the Action Bar.
3. Enter a Name and Description, and then click Save.

Hortonworks Data Platform December 15, 2017
36
The asset name must be unique for each Workflow Manager instance.
Tip
Since assets can be shared, providing a clear name and description can helpusers choose the correct asset quickly.
The asset is now available to be imported into any workflow created within the specificWFM instance. You can manage the asset from the Manage Assets dialog box.
More Information
Section 4.9.3, “Import an Asset from the Ambari Database Linked to a Single WFMInstance” [37]
4.9.2. Save an Asset to Shared Storage to Use Across WFMInstances
You can save an action node configuration as an asset file to reuse and share within andacross Workflow Manager (WFM) instances in Ambari. The asset file can be saved to anylocation on HDFS for which you have access permissions. Anyone using the asset mustalso have access permissions to the file. For example, you can share assets with multipledepartments who are using separate instances of WFM.
Prerequisites
If you want to share the asset file with others, ensure you save the asset to a location withthe proper permissions.
About This Task
You cannot save an asset into a directory that already contains an asset of the same name.You must either save the asset with a new name or save it to a uniquely-named location.
If you do not provide a name for an asset file when you publish the asset, the default namegiven to the asset file is "asset.xml".
Steps
1. Click on the connector in the workflow graph where you want to add the node, andthen click the green + icon.
2. Click Save Asset to Shared File System.
3. Navigate to the directory you want, click on the directory name, and expand thedirectory.
Hortonworks Data Platform December 15, 2017
37
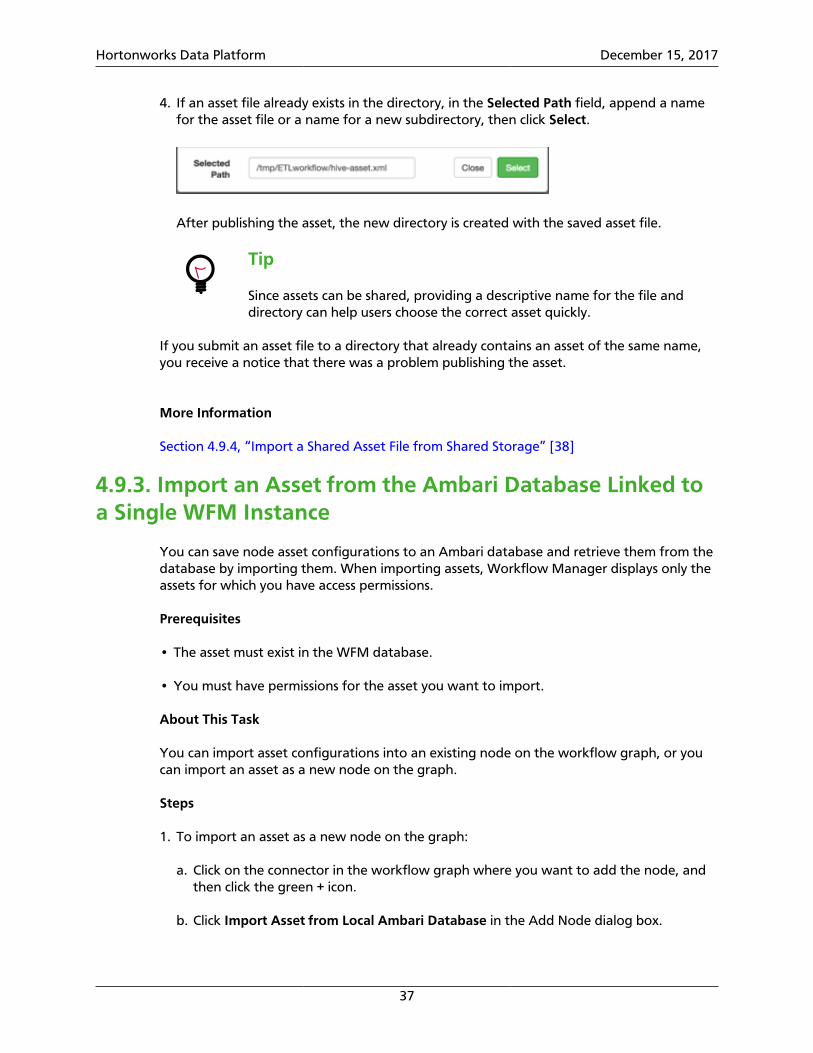
4. If an asset file already exists in the directory, in the Selected Path field, append a namefor the asset file or a name for a new subdirectory, then click Select.
After publishing the asset, the new directory is created with the saved asset file.
Tip
Since assets can be shared, providing a descriptive name for the file anddirectory can help users choose the correct asset quickly.
If you submit an asset file to a directory that already contains an asset of the same name,you receive a notice that there was a problem publishing the asset.
More Information
Section 4.9.4, “Import a Shared Asset File from Shared Storage” [38]
4.9.3. Import an Asset from the Ambari Database Linked toa Single WFM Instance
You can save node asset configurations to an Ambari database and retrieve them from thedatabase by importing them. When importing assets, Workflow Manager displays only theassets for which you have access permissions.
Prerequisites
• The asset must exist in the WFM database.
• You must have permissions for the asset you want to import.
About This Task
You can import asset configurations into an existing node on the workflow graph, or youcan import an asset as a new node on the graph.
Steps
1. To import an asset as a new node on the graph:
a. Click on the connector in the workflow graph where you want to add the node, andthen click the green + icon.
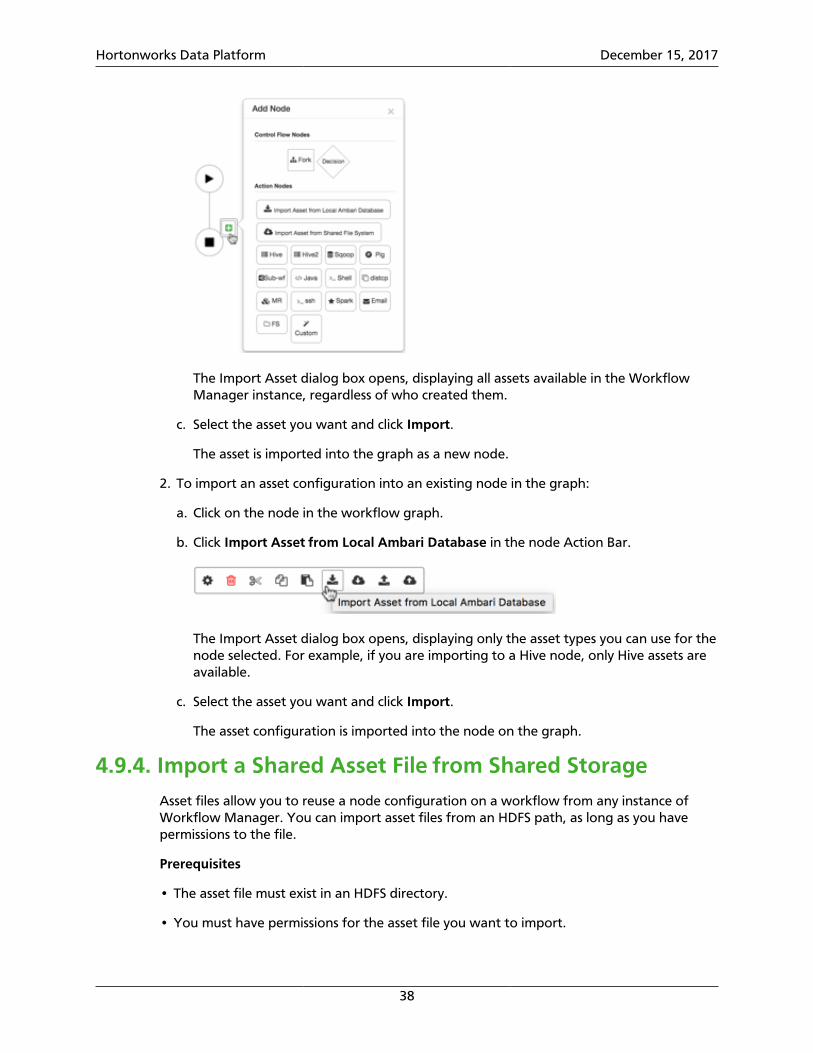
b. Click Import Asset from Local Ambari Database in the Add Node dialog box.
Hortonworks Data Platform December 15, 2017
38
The Import Asset dialog box opens, displaying all assets available in the WorkflowManager instance, regardless of who created them.
c. Select the asset you want and click Import.
The asset is imported into the graph as a new node.
2. To import an asset configuration into an existing node in the graph:
a. Click on the node in the workflow graph.
b. Click Import Asset from Local Ambari Database in the node Action Bar.
The Import Asset dialog box opens, displaying only the asset types you can use for thenode selected. For example, if you are importing to a Hive node, only Hive assets areavailable.
c. Select the asset you want and click Import.
The asset configuration is imported into the node on the graph.
4.9.4. Import a Shared Asset File from Shared StorageAsset files allow you to reuse a node configuration on a workflow from any instance ofWorkflow Manager. You can import asset files from an HDFS path, as long as you havepermissions to the file.
Prerequisites
• The asset file must exist in an HDFS directory.
• You must have permissions for the asset file you want to import.

Hortonworks Data Platform December 15, 2017
39
Steps
1. To import an asset as a new node on the graph:
a. Click on the connector in the workflow graph where you want to add the node, andthen click the green + icon.
b. Click Import Asset from Shared File System in the Add Node dialog box.
The Import Asset dialog box opens, displaying all assets available in the WorkflowManager instance, regardless of who created them.
c. Select the asset you want and click Import.
The asset is imported into the graph as a new node.
A new node is added to the workflow graph with the configuration parameters fromthe imported asset.
2. To import a shared HDFS asset into an existing node in the workflow graph:
a. Click on the node in the workflow graph.
b. Click Import Asset from Shared File System.
c. Navigate to the location of the asset file.
d. Select the file, ensure it displays in the Selected Path, and click Select.
The asset configuration is imported into the node on the graph.

Hortonworks Data Platform December 15, 2017
40
4.9.5. Managing Assets
You can view, modify, delete, and edit assets that you created, whether they are databaseassets or HDFS assets. You must have access permissions to modify or delete an asset.However, how you manage assets and what you can do to them depends on the type ofasset you are working with.
See the following content about managing assets:
View or Delete Assets in the Ambari Database [40]Edit Assets in the Ambari Database [40]Delete Shared Assets from Shared Storage [41]Edit Assets in Shared Storage [41]
4.9.5.1. View or Delete Assets in the Ambari Database
From Manage Assets, you can view a list of assets or delete assets that were saved to theAmbari database. Only the user who created a database asset can view or delete that assetin the Asset Manager dialog box.
Steps
1. Click Manage Assets in the Workflow Manager Action Bar.
Asset Manager opens.
2. Filter the list of assets by entering a search term in the Asset Search field.
The search will filter results to match any characters that are part of the name, type, ordescription of an asset.
3. Delete an asset by clicking the trash icon, and then clicking Continue.
4. Click Cancel to close the dialog box.
4.9.5.2. Edit Assets in the Ambari Database
You can edit assets by using the Save Asset to Local Ambari Database function. If you wantto save the modified asset using the original file name, you must delete the existing assetafter importing it into the workflow.
Steps
1. Import a database asset into the workflow.
2. Click the Action Settings icon, modify the configuration, and click Save.
3. Save the modified asset by doing one of the following:
• Save using the original asset file name.
a. Click Manage Assets.

Hortonworks Data Platform December 15, 2017
41
b. Locate the name of asset you are modifying and click the (delete) icon.
c. Click the node you want to save and click Save Asset to Local Ambari Database.
d. Enter the asset name and description and click Save.
• Save using a new asset file name.
a. Click the node you want to save and click Save Asset to Local Ambari Database.
b. Enter the new name and description for the asset and click Save.
4.9.5.3. Delete Shared Assets from Shared Storage
You can view or edit shared HDFS assets in Workflow Manager.
If you want to delete an asset from HDFS, you must do so from the Ambari UI.
Steps
1. Click the (Ambari Views) icon, and then click Files View.
Ambari displays the HDFS files and directories.
2. Navigate to the file you want to delete.
3. Click on the row for the file you want to delete.
An action bar displays above the list of files.
4. Click Delete in the action bar, then click Delete in the confirmation message.
5. Click , then click the Workflow Manager instance name to return to WorkflowManager.
4.9.5.4. Edit Assets in Shared Storage
You can edit shared HDFS assets in Workflow Manager. If you want to save the modifiedasset using the original file name, you must delete the existing asset after importing it intothe workflow.
Steps
1. Import the asset as a node in the workflow graph.
2. Click the node containing the asset configuration.
3. Click Action Settings, modify the configuration, and click Save.
Clicking Save only saves the changes in the dialog box, it does not save the asset.
4. Optional: Delete the asset file from HDFS using the Ambari Files View.
Complete this step only if you intend to save the asset file using the original file name.

Hortonworks Data Platform December 15, 2017
42
5. Click the Save Asset to Shared File System icon.
6. Browse to the directory in which you want to save the asset.
7. Optional: Append a name for the asset file in the Selected Path field.
If you do not append a name, the default name given to the file is asset.wfasset.
8. Click Select.
4.10. Creating Coordinators and BundlesYou can use a coordinator to schedule a workflow, and you can group coordinators(scheduled workflows) into a bundle to manage the scheduled workflows as a single unit.
See the following content:
Create a Coordinator [42]Create a Bundle [43]
4.10.1. Create a Coordinator
Use the coordinator to schedule recurring jobs for a workflow, and to identify any eventsthat you want to trigger the workflow job.
Figure 4.10. Creating a Coordinator

Hortonworks Data Platform December 15, 2017
43
Steps
1. Click Create Coordinator on the Workflow Manager Action Bar.
2. Enter a name for the coordinator in the Name field.
Tip
When you save a workflow, the name you assign is given only to theworkflow application file. It does not automatically match the namedisplayed for the workflow job in the dashboard. WFM assigns to theworkflow job the name you enter in the Name filed in the design workspace.If you want the job name and the application file name to match, you mustassign the same name in the Name field and to the application file.
3. Choose one of the following:
• Enter the values for the coordinator parameters.
See the Apache Coordinator documentation for details about the parameters.
Important
If entering Frequency in Minutes, the value must be a minimum of 5minutes.
• Click Coordinator > Import to retrieve the parameters from an existing coordinator.
Tip
If the File Browser window opens but does not display a directory list, youmight have lost network connectivity or the required data node might beunresponsive.
a. Navigate to the coordinator you want, click on the coordinator file name, andensure the correct file name is displayed in the Selected Path.
b. Click Select.
The configuration parameters of the selected coordinator display in the fields of theCreate Coordinator window. You can modify the parameters as needed.
4. Click Save, Validate, or Submit in the Action Bar.
More Information
Apache Coordinator Specification
Coordinator Use Case Examples
4.10.2. Create a BundleBundles allow you to group multiple workflows to provide better operational control.You can perform actions such as start, stop, resume, suspend and so forth on the entire

Hortonworks Data Platform December 15, 2017
44
bundle of workflows. To be included in a bundle, workflows must first be associated witha coordinator schedule or event. Schedule each workflow in a coordinator, then group thecoordinators (scheduled workflows) in a bundle.
Figure 4.11. Creating a Bundle
Steps
1. Click Create > Bundle in the Workflow Manager Action Bar.
2. Enter a name for the bundle in the Name field.
Tip
When you save a workflow, the name you assign is given only to theworkflow application file. It does not automatically match the namedisplayed for the workflow job in the dashboard. WFM assigns to theworkflow job the name you enter in the Name filed in the design workspace.
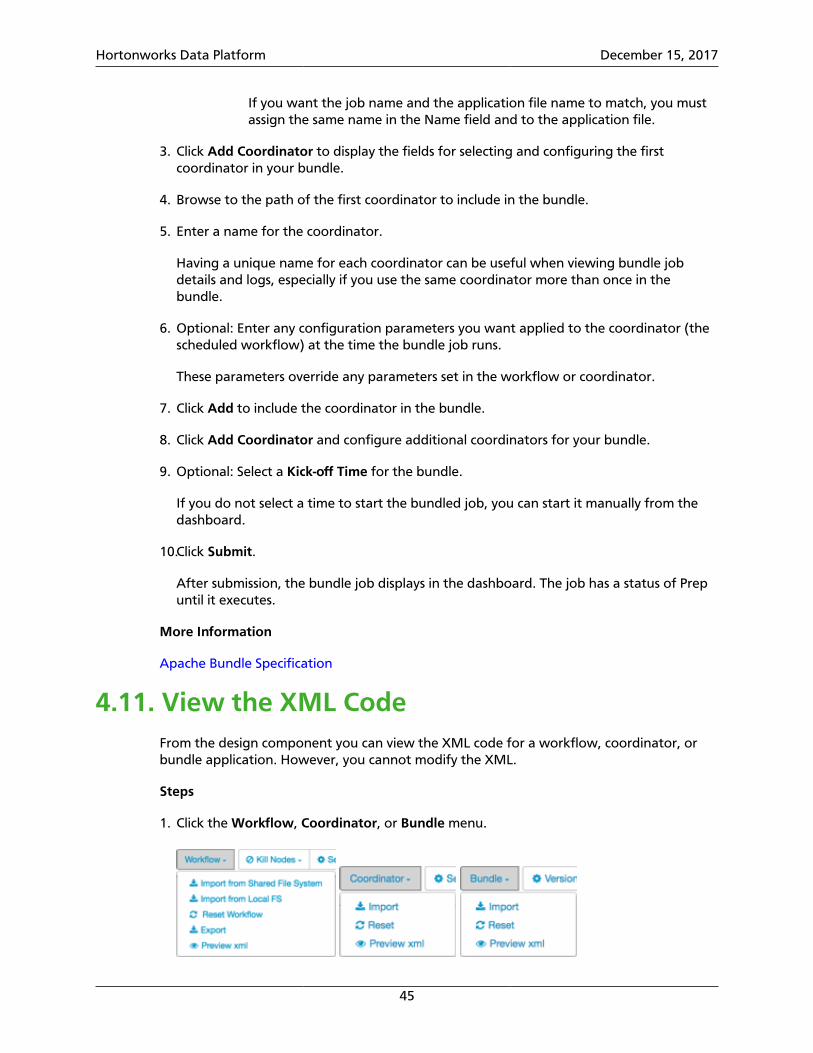
Hortonworks Data Platform December 15, 2017
45
If you want the job name and the application file name to match, you mustassign the same name in the Name field and to the application file.
3. Click Add Coordinator to display the fields for selecting and configuring the firstcoordinator in your bundle.
4. Browse to the path of the first coordinator to include in the bundle.
5. Enter a name for the coordinator.
Having a unique name for each coordinator can be useful when viewing bundle jobdetails and logs, especially if you use the same coordinator more than once in thebundle.
6. Optional: Enter any configuration parameters you want applied to the coordinator (thescheduled workflow) at the time the bundle job runs.
These parameters override any parameters set in the workflow or coordinator.
7. Click Add to include the coordinator in the bundle.
8. Click Add Coordinator and configure additional coordinators for your bundle.
9. Optional: Select a Kick-off Time for the bundle.
If you do not select a time to start the bundled job, you can start it manually from thedashboard.
10.Click Submit.
After submission, the bundle job displays in the dashboard. The job has a status of Prepuntil it executes.
More Information
Apache Bundle Specification
4.11. View the XML CodeFrom the design component you can view the XML code for a workflow, coordinator, orbundle application. However, you cannot modify the XML.
Steps
1. Click the Workflow, Coordinator, or Bundle menu.

Hortonworks Data Platform December 15, 2017
46
2. Click Preview XML.
The XML for the workflow, coordinator, or bundle application displays.
You cannot edit the XML code from Workflow Manager.

Hortonworks Data Platform December 15, 2017
47
5. Monitoring Jobs Using the DashboardAfter you submit a workflow, coordinator, or bundle in Workflow Manager, the job can beviewed in the dashboard.
For a practical example of using Workflow Manager to create and monitor a simple Extract-Transform-Load workflow, see "Sample ETL Use Case".
Figure 5.1. Workflow Manager Dashboard
See the following content to learn about the dashboard:
Verify the Status of a Job [47]
Identify the Location of a Job XML File [49]
Troubleshooting Job Errors [50]
5.1. Verify the Status of a JobYou can display lists of workflow, coordinator, or bundle jobs from which you can verifythe current state of any job. You can filter the list of jobs to make it easier to locate theinformation you need.
About This Task
After displaying the list of jobs, you can filter the jobs by querying the name, status, user, orID of a job, or you can filter by start and end dates. You can use the search filter and datefilter together.
Following are tips for using the search filter:
• Only whole terms are filtered.
Example: Searching on the name "work" displays any job named "work", but it would notdisplay a job named "workflow".
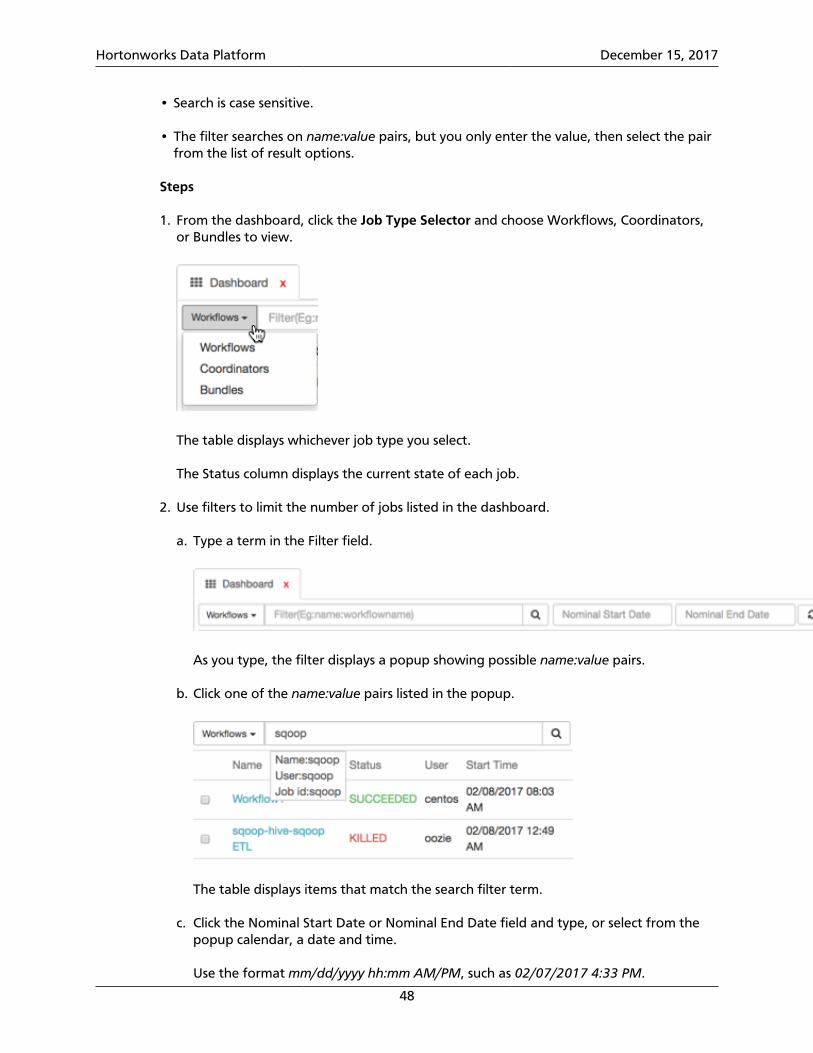
Hortonworks Data Platform December 15, 2017
48
• Search is case sensitive.
• The filter searches on name:value pairs, but you only enter the value, then select the pairfrom the list of result options.
Steps
1. From the dashboard, click the Job Type Selector and choose Workflows, Coordinators,or Bundles to view.
The table displays whichever job type you select.
The Status column displays the current state of each job.
2. Use filters to limit the number of jobs listed in the dashboard.
a. Type a term in the Filter field.
As you type, the filter displays a popup showing possible name:value pairs.
b. Click one of the name:value pairs listed in the popup.
The table displays items that match the search filter term.
c. Click the Nominal Start Date or Nominal End Date field and type, or select from thepopup calendar, a date and time.
Use the format mm/dd/yyyy hh:mm AM/PM, such as 02/07/2017 4:33 PM.
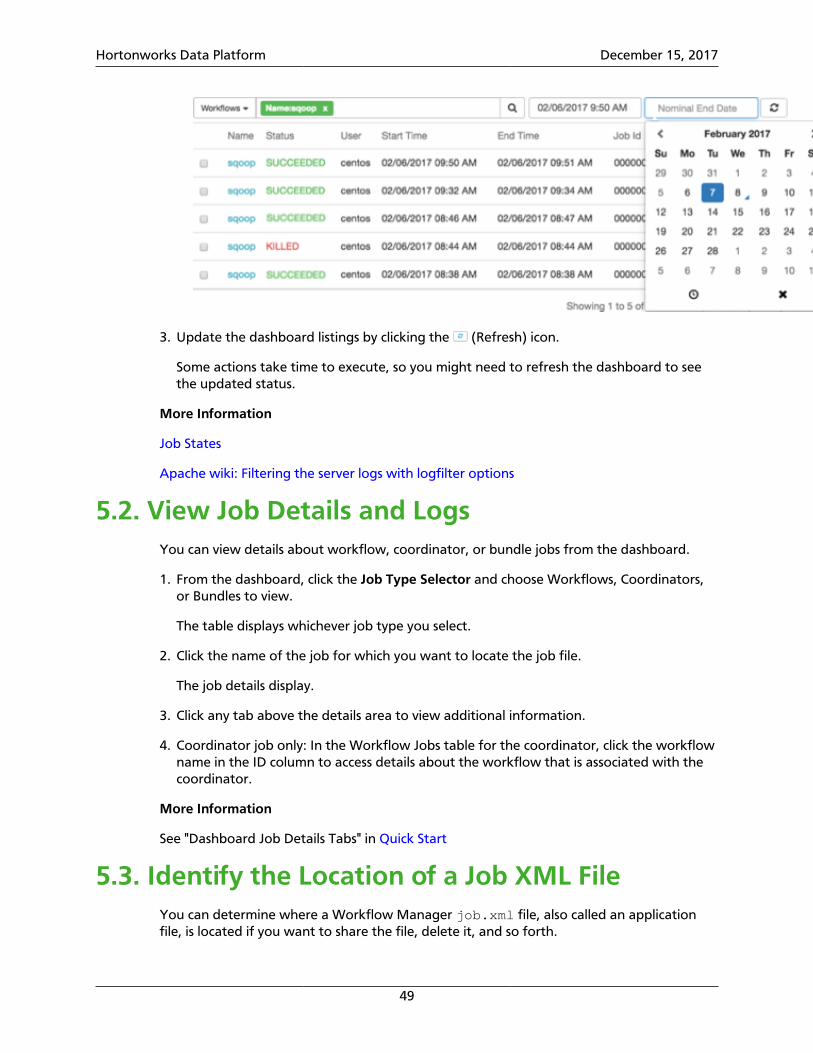
Hortonworks Data Platform December 15, 2017
49
3. Update the dashboard listings by clicking the (Refresh) icon.
Some actions take time to execute, so you might need to refresh the dashboard to seethe updated status.
More Information
Job States
Apache wiki: Filtering the server logs with logfilter options
5.2. View Job Details and LogsYou can view details about workflow, coordinator, or bundle jobs from the dashboard.
1. From the dashboard, click the Job Type Selector and choose Workflows, Coordinators,or Bundles to view.
The table displays whichever job type you select.
2. Click the name of the job for which you want to locate the job file.
The job details display.
3. Click any tab above the details area to view additional information.
4. Coordinator job only: In the Workflow Jobs table for the coordinator, click the workflowname in the ID column to access details about the workflow that is associated with thecoordinator.
More Information
See "Dashboard Job Details Tabs" in Quick Start
5.3. Identify the Location of a Job XML FileYou can determine where a Workflow Manager job.xml file, also called an applicationfile, is located if you want to share the file, delete it, and so forth.

Hortonworks Data Platform December 15, 2017
50
1. From the dashboard, click the Job Type Selector and choose Workflows, Coordinators,or Bundles to view.
The table displays whichever job type you select.
2. Click the name of the job for which you want to locate the job file.
The job details display.
3. Choose one of the following:
• Click the Info tab and scroll to the App Path entry.
• Click the Configuration tab and scroll to the oozie.<job-type>.application.path entry.
Both entries show the full path to the job application file.
5.4. Troubleshooting Job ErrorsYou can access details about any job. When a job does not succeed, you can use the detailsto do some basic troubleshooting. You can also access MapReduce (YARN) logs and theAmbari Files View from Workflow Manager.
Tip
When viewing jobs in the dashboard, ensure that you have selected theappropriate job type (workflow, coordinator, or bundle) from the Job TypeSelector.
Basic Job Troubleshooting [50]
Search the Log Output [51]
Open an Existing Workflow to Edit [52]
5.4.1. Basic Job Troubleshooting
You can do some basic troubleshooting from the dashboard, including the following:
• Verify that you are logged in as the correct user.
View the username displayed on the Sign Out button.
Hortonworks Data Platform December 15, 2017
51
• Verify ownership of the directory and file.
Click the Views icon and select Files View, navigate to the directory or file you want toverify, and verify the content in the Owner column.
• View the Error Message & Error Code.
Click the Action tab, click the name of the action node for which you want further detail,then click the Action Details Info tab for the node.
• View the Error Log.
Click the Error Log tab in the job details area.
• Check for typos or misconfigurations in the job file.
Click the Definition tab to view the XML for the job (app) file.
• Access the MapReduce YARN logs.
Click the Action tab, and then click the icon in the Job URL column.
5.4.2. Search the Log Output
You can search the content of the Log tab for any workflow, coordinator, or bundle. Youcan also search the actions listed in the Action Reruns tab.
About This Task
Following are tips for using the Search Filter:
• Searches are done only on text strings within the log.
• Search is case sensitive.
• Only one word can be searched at a time.
• Can search partial terms.
• You can search using the following optioins: recent, start, end, loglevel, text, limit, anddebug.
• You can search more than one term at a time.
• Enter terms using the structure option=value.
Example: limit=4;recent=2h;loglevel=ERROR
The above example displays the oldest four log entries that were written within the pasttwo hours that have a status of ERROR.
Following are tips for using the Action List filter:
• Action IDs are the same as the IDs listed on the Workflow Jobs tab.

Hortonworks Data Platform December 15, 2017
52
• Enter a single digit, a range, or a comma-separated list of numbers.
• The Action ID is the final number following the ACTION entry.
For example, the action ID in the following entry is 8:ACTION[0000092-170206174330753-oozie-oozi-C@8]
1. In the dashboard table, click a job name.
The details tabs for the job display.
2. Click the Log tab.
3. Click the Search Filter field and enter a term to search.
4. Click Get Logs.
The filtered list displays.
5. To retrieve the full log file, delete the search term and then click Get Logs again.
6. Coordinators only:
a. Click the Action List field and enter the number of a coordinator action.
b. Click Get Logs.
The filtered list displays.
c. To retrieve the full log file, delete the search term and then click Get Logs again.
5.4.3. Open an Existing Workflow to Edit
Steps
1. In the dashboard table, access the workflow jobs table.
2. Click on the workflow name to access the job details.
The Edit Workflow button is available to the right of the tab names.
3. Click the Edit Workflow button.
The workflow graph displays in the design workspace.
Click on Edit Workflow to the left of tab names

Hortonworks Data Platform December 15, 2017
53
6. Sample ETL Use CaseYou can use Sqoop and Hive actions in a workflow to perform a common ETL flow: extractdata from a relational database using Sqoop, transform the data in a Hive table, and loadthe data into a data warehouse using Sqoop.
Following is an example of a common simple Sqoop>Hive>Sqoop ETL workflow createdin Workflow Manager. In this example, we extract customer data from a MySQLdatabase, select specific data to include in a Hive table, and then load the data into a datawarehouse.
Prerequisites
To successfully execute the example Sqoop>Hive>Sqoop ETL workflow defined below, thefollowing prerequisites must be met.
• Apache Hive and Apache Sqoop have been successfully installed and configured.
• You successfully completed the tasks in "Configuring WorkFlow Manager View" in theAmbari Views guide.
• All node managers must be able to communicate with the MySQL server.
Workflow Tasks
The sample workflow consists of the following:
• Configure the Cluster [53]
Create an HDFS Directory for Each New UserCreate a Proxy UserCopy JAR Files
• Create and Submit the Workflow [56]
Create the Sqoop Action to Extract DataCreate the Hive Action to Transform DataCreate the Sqoop Action to Load Data
• Monitor the Workflow Job [62]
6.1. Configure the ClusterYou must complete several tasks at the command line or in the Ambari web UI prior tocreating the workflow in Workflow Manager.
See the following tasks to configure the cluster.
Create an HDFS Directory for Each New User [54]
Create a Proxy User [54]
Copy Files [55]

Hortonworks Data Platform December 15, 2017
54
6.1.1. Create an HDFS Directory for Each New User
Each user who is allowed access to Workflow Manager must have a user home directory inHDFS.
Steps
1. Log in as the HDFS user.
2. Create a directory for the user.
hdfs dfs -mkdir -p /user/$USERNAME
In the example above, replace $USERNAME with the user name of the new user.
3. Change ownership on the directory to the new user.
hdfs dfs -chown $USERNAME:$HDFS_USER /user/$USERNAME
4. Change the permissions on the directory to read/write/execute for the new user and thegroups the user belongs to.
hdfs dfs -chmod -R 770 /user/$USERNAME
6.1.2. Create a Proxy User
You must specify the proxy user properties for groups and hosts for the Oozie process inthe Hadoop core-site.xml file.
Steps
1. In Ambari, select the HDFS component.
2. Click Configs>Advanced.
3. Scroll to the Custom core-site section and expand the section.
4. Specify the following properties:

Hortonworks Data Platform December 15, 2017
55
Field name: hadoop.proxyuser.oozie.groupsValue: $USER_GROUPS_THAT_ALLOW_IMPERSONATIONDescription: A comma-separated list of the groups that the impersonated user belongsto.
Field name: hadoop.proxyuser.oozie.hostsValue: $OOZIE_SERVER_HOSTNAMEDescription: A comma-separated list of the hosts from which the user can connect toimpersonate a user in the specified groups.
6.1.3. Copy Files
All required configuration files for the workflows you intend to create must be installedprior to running the workflow job. For this ETL use case example, you need the MySQL JARfile, and the configuration files for Hive and Tez.
Prerequisites
Ensure that you have the latest supported MySQL version for your environment, accordingto the Support Matrices.
In this example workflow, the MySQL driver JAR file is shared across the cluster, rather thanidentifying the file in each workflow. So the file must be copied to a shared location.
Steps
1. Login to the HDFS server as the Oozie user. For example:
su - oozie
Identify and copy the name of the timestamped subdirectory of the Oozie /share/libdirectory.
2. oozie admin -shareliblistoozie admin -sharelibupdate
The output of the -sharelibupdate command shows the lib_$TIMESTAMP directory.You use the timestamp directory name in the following steps.
3. Copy the mysql-connector*.jar file to the Sqoop lib directory so Sqoop canaccess MySQL.
Example:
hdfs dfs -put /$PATH/mysql-connector-java-5.1.37.jar /user/oozie/share/lib/lib_$TIMESTAMP/sqoop
Check the Support Matrices for latest supported MySQL version for your environment.
4. Copy the configuration files hive-site.xml and tez-site.xml to the Hive libdirectory and rename them.
Example:

Hortonworks Data Platform December 15, 2017
56
hdfs dfs -put /$PATH/hive-site.xml /user/oozie/share/lib/lib_$TIMESTAMP/hive/hive-conf.xmlhdfs dfs -put /$PATH/hive-site.xml /user/oozie/share/lib/lib_$TIMESTAMP/tez/tez-conf.xml
Important
There can be only one configuration file named $COMPONENT-site.xml in a/lib directory in HDFS for each Apache component. Therefore, you musteither rename any copied $COMPONENT-site.xml file or put it in a directoryother than a /lib directory.
5. Update the server to use the newer version of the /share/lib directory.
oozie admin -sharelibupdate
More Information
Support Matrices
6.2. Create and Submit the WorkflowAfter the required directories are created and permissions set, and the requiredconfiguration and JAR files are copied to the proper locations, you are ready to create theSqoop>Hive>Sqoop ETL workflow in the Workflow Manager Ambari View.
See the following content to create and submit the ETL workflow:
Access the Workflow Manager View [56]
Create the Sqoop Action to Extract Data [57]
Create the Hive Action to Transform the Data [58]
Create the Sqoop Action to Load the Data [59]
Submit and Execute the Workflow Job [61]
6.2.1. Access the Workflow Manager View
You access the Workflow Manager View from Ambari.
Steps
1. Access the Ambari UI.
2. Click the (Ambari Views) icon.
3. Click the name of the Workflow Manager View.
The name of the view depends on the name assigned when the WFM instance wascreated.

Hortonworks Data Platform December 15, 2017
57
Workflow Manager View opens.
6.2.2. Create the Sqoop Action to Extract Data
You must add a Sqoop action to the ETL workflow to extract the data from the database.
Steps
1. Click Create>Workflow.
2. Click the connector between the Start and End nodes, then click the + icon.
3. With the workflow graph displayed in the workspace, click the Name field and enter adescriptive name for the workflow.
For example, ETL workflow.
The name in this field is the name that displays for the workflow job in the WFMdashboard.
4. Click the Sqoop icon to add an action node to the workflow.
This Sqoop action will extract data from the MySQL database.
5. Click the Sqoop node in the workflow graph and rename it using a descriptive name.
For example, name the node sqoop-extract. Spaces are not allowed in node names.
This is necessary because there will be two Sqoop actions in this workflow, and eachnode in a workflow must have a unique name. Having descriptive node names is alsohelpful when identifying what a node is intended to do, especially in more complicatedworkflows.
Tip
Spaces are not allowed in action node names.
6. Click the Sqoop node again and then click the Action Settings gear icon.
7. In the Sqoop action dialog box, select Command.
In the Sqoop action settings, you can choose to use commands or arguments with ajob-XML element to run the job. This example uses a command.
8. In the Command field, enter a command to extract data.
For example:
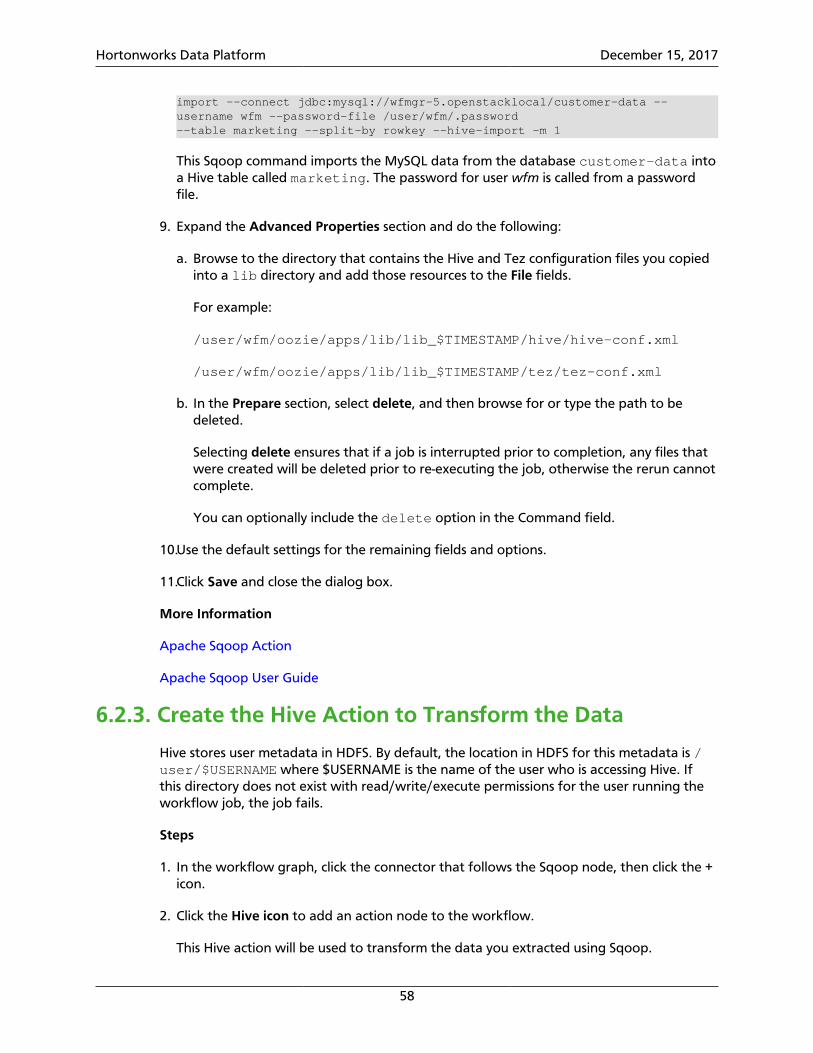
Hortonworks Data Platform December 15, 2017
58
import --connect jdbc:mysql://wfmgr-5.openstacklocal/customer-data --username wfm --password-file /user/wfm/.password--table marketing --split-by rowkey --hive-import -m 1
This Sqoop command imports the MySQL data from the database customer-data intoa Hive table called marketing. The password for user wfm is called from a passwordfile.
9. Expand the Advanced Properties section and do the following:
a. Browse to the directory that contains the Hive and Tez configuration files you copiedinto a lib directory and add those resources to the File fields.
For example:
/user/wfm/oozie/apps/lib/lib_$TIMESTAMP/hive/hive-conf.xml
/user/wfm/oozie/apps/lib/lib_$TIMESTAMP/tez/tez-conf.xml
b. In the Prepare section, select delete, and then browse for or type the path to bedeleted.
Selecting delete ensures that if a job is interrupted prior to completion, any files thatwere created will be deleted prior to re-executing the job, otherwise the rerun cannotcomplete.
You can optionally include the delete option in the Command field.
10.Use the default settings for the remaining fields and options.
11.Click Save and close the dialog box.
More Information
Apache Sqoop Action
Apache Sqoop User Guide
6.2.3. Create the Hive Action to Transform the Data
Hive stores user metadata in HDFS. By default, the location in HDFS for this metadata is /user/$USERNAME where $USERNAME is the name of the user who is accessing Hive. Ifthis directory does not exist with read/write/execute permissions for the user running theworkflow job, the job fails.
Steps
1. In the workflow graph, click the connector that follows the Sqoop node, then click the +icon.
2. Click the Hive icon to add an action node to the workflow.
This Hive action will be used to transform the data you extracted using Sqoop.
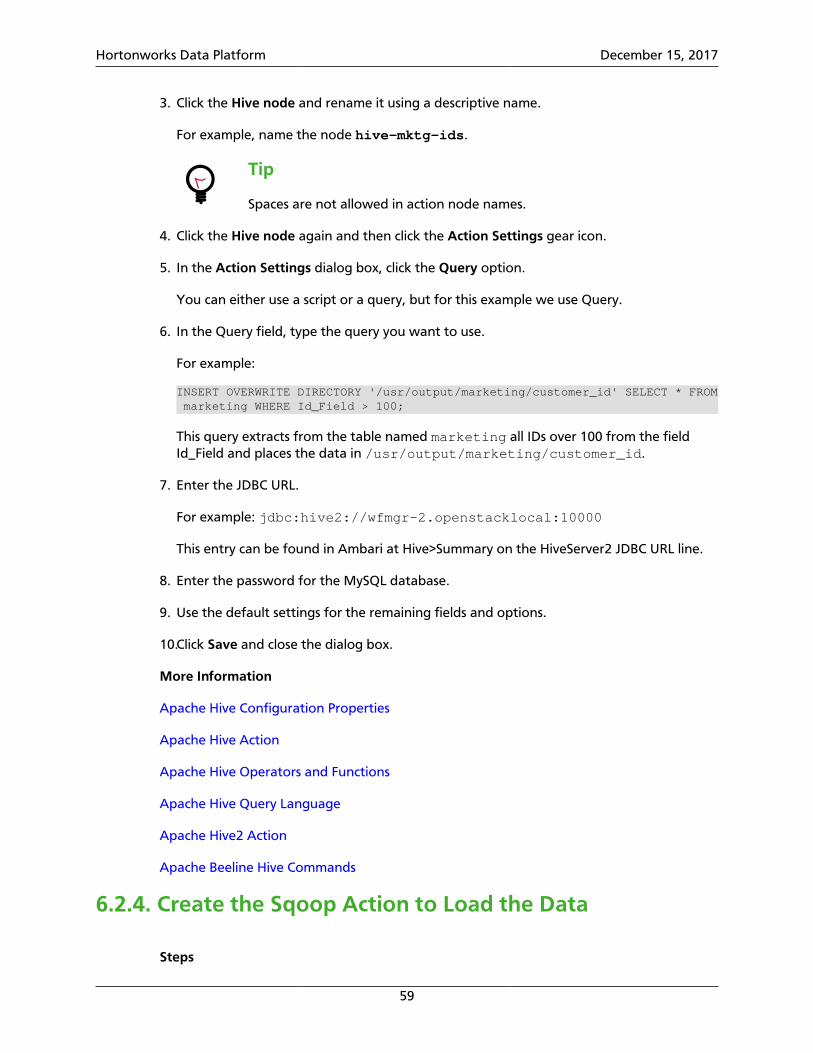
Hortonworks Data Platform December 15, 2017
59
3. Click the Hive node and rename it using a descriptive name.
For example, name the node hive-mktg-ids.
Tip
Spaces are not allowed in action node names.
4. Click the Hive node again and then click the Action Settings gear icon.
5. In the Action Settings dialog box, click the Query option.
You can either use a script or a query, but for this example we use Query.
6. In the Query field, type the query you want to use.
For example:
INSERT OVERWRITE DIRECTORY '/usr/output/marketing/customer_id' SELECT * FROM marketing WHERE Id_Field > 100;
This query extracts from the table named marketing all IDs over 100 from the fieldId_Field and places the data in /usr/output/marketing/customer_id.
7. Enter the JDBC URL.
For example: jdbc:hive2://wfmgr-2.openstacklocal:10000
This entry can be found in Ambari at Hive>Summary on the HiveServer2 JDBC URL line.
8. Enter the password for the MySQL database.
9. Use the default settings for the remaining fields and options.
10.Click Save and close the dialog box.
More Information
Apache Hive Configuration Properties
Apache Hive Action
Apache Hive Operators and Functions
Apache Hive Query Language
Apache Hive2 Action
Apache Beeline Hive Commands
6.2.4. Create the Sqoop Action to Load the Data
Steps

Hortonworks Data Platform December 15, 2017
60
1. In the workflow graph, click the connector between the Start and End nodes, then clickthe + icon.
2. Click the Sqoop icon to add another Sqoop action node to the workflow.
This Sqoop action will be used to load the transformed data to a specified location.
3. Click the Sqoop node in the workflow graph and rename it using a descriptive name.
For example, name the node sqoop-load.
This is necessary because there will be two Sqoop actions in this workflow, and eachnode in a workflow must have a unique name. Having descriptive node names is alsohelpful when identifying what a node is intended to do, especially in more complicatedworkflows.
4. Click the Sqoop node again and then click the Action Settings gear icon.
5. In the Sqoop action dialog box, select Command.
6. In the Command field, enter a command to extract data.
For example:
export --connect jdbc:mysql://wfmgr-5.openstacklocal/customer-data --username wfm --password-file /user/wfm/.password--table exported --input-fields-terminated-by "\001" --export-dir /usr/output/marketing/customer_id
The password for user wfm is called from a password file.
7. In the Advanced Properties section, browse to the directory that contains the Hive andTez configuration files you copied into a lib directory and add those resources to theFile fields.
For example:
/user/wfm/oozie/apps/lib/lib_$TIMESTAMP/hive/hive-conf.xml
/user/wfm/oozie/apps/lib/lib_$TIMESTAMP/tez/tez-conf.xml
8. In the Prepare section, select delete, and then browse for or type the path to bedeleted.
Selecting delete ensures that if a job is interrupted prior to completion, any files thatwere created will be deleted prior to re-executing the job, otherwise the rerun cannotcomplete.
You can optionally include the delete option in the Command field.
9. Use the default settings for the remaining fields and options.
10.Click Save and close the dialog box.
More Information
Apache Sqoop Action

Hortonworks Data Platform December 15, 2017
61
Apache Sqoop User Guide
6.2.5. Submit and Execute the Workflow Job
From the Workflow Manager workspace, you can submit a workflow, which saves andvalidates the XML of the workflow. You can choose to submit the job without runningit, so you can run it at a later time, or you can run the job on submission. If you choose tosubmit without running the job, the workflow job displays in the WFM dashboard withstatus of PREP.
Steps
1. With the workflow graph displayed in the WFM workspace, click Submit on theWorkspace Action Bar.
A validation check is run. If the workflow XML is valid, the Submit Workflow dialog boxdisplays.
The validation check does not determine whether or not the workflow will succeed.
2. In Workflow Path, browse to the location where you want to save the workflow.
3. Select the directory name and ensure it displays in the Selected Path field.
For example: /user/wfm/oozie/apps/
4. In the Selected Path field, append a subdirectory name and the name of the workflowfile.
The workflow file must end in .xml.
For example: /user/wfm/oozie/apps/workflows/etl-workflow.xml
Both the subdirectory and file are created.
5. Click Select.
6. In the Custom Job Properties section, add the following:
Name: oozie.action.sharelib.for.sqoop
Value: sqoop,hive,hcatalog
7. Check Overwrite.
This replaces any existing file of the same name in the same path.
Tip
If you saved the workflow prior to submitting it, then you must selectOverwrite or you get an error.
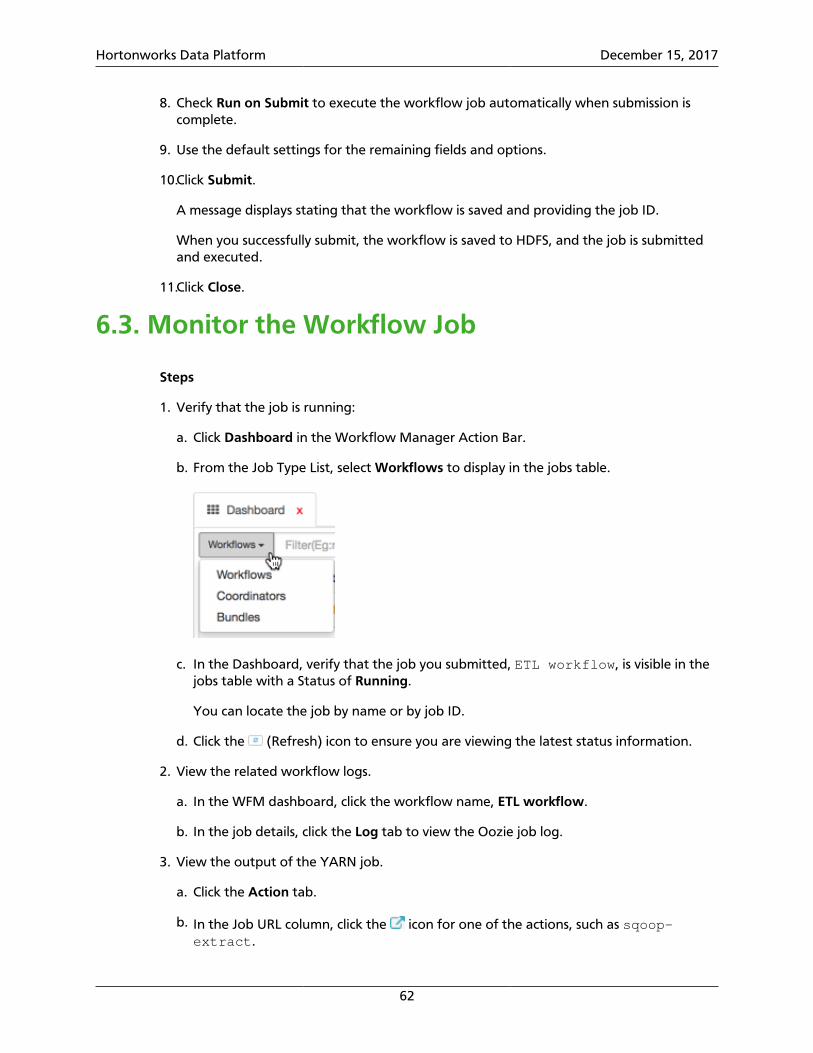
Hortonworks Data Platform December 15, 2017
62
8. Check Run on Submit to execute the workflow job automatically when submission iscomplete.
9. Use the default settings for the remaining fields and options.
10.Click Submit.
A message displays stating that the workflow is saved and providing the job ID.
When you successfully submit, the workflow is saved to HDFS, and the job is submittedand executed.
11.Click Close.
6.3. Monitor the Workflow Job
Steps
1. Verify that the job is running:
a. Click Dashboard in the Workflow Manager Action Bar.
b. From the Job Type List, select Workflows to display in the jobs table.
c. In the Dashboard, verify that the job you submitted, ETL workflow, is visible in thejobs table with a Status of Running.
You can locate the job by name or by job ID.
d. Click the (Refresh) icon to ensure you are viewing the latest status information.
2. View the related workflow logs.
a. In the WFM dashboard, click the workflow name, ETL workflow.
b. In the job details, click the Log tab to view the Oozie job log.
3. View the output of the YARN job.
a. Click the Action tab.
b. In the Job URL column, click the icon for one of the actions, such as sqoop-extract.

Hortonworks Data Platform December 15, 2017
63
The Map-Reduce YARN logs display.
More Information
HCC articles on implementing WFM nodes: Apache Ambari Workflow Manager View forApache Oozie
Apache Hive Action
Apache Hive Commands
Apache Hive2 Action
Apache Beeline Hive Commands
Apache Sqoop Action
Apache Sqoop User Guide

Hortonworks Data Platform December 15, 2017
64
7. Workflow ParametersYou enter required and optional parameters in the nodes on a workflow graph in thedesign component. The available action types and their associated parameters aredescribed in the following:
Hive Action Parameters [64]
Hive2 Action Parameters [66]
Sqoop Action Parameters [67]
Pig Action Parameters [69]
Sub-Workflow Action Parameters [70]
Java Action Parameters [71]
Shell Action Parameters [72]
DistCp Action Parameters [73]
Map-Reduce (MR) Action Parameters [75]
SSH Action Parameters [76]
Spark Action Parameters [77]
File System (FS) Action Parameters [78]
Submit Dialog Parameters [79]
7.1. Hive Action ParametersFollowing are descriptions and examples for the parameters you can set in the Hive actionnode.
Use of Credentials and SLA can be set in the Hive action, but the configuration for them isdone from the global Settings menu.
Table 7.1. Hive Action, General Parameters
Parameter Name Description Additional Information Example
Hive Option The options are Script or Query. You can run the Hive action usinga script or by entering a query inHiveQL.
Script Navigate to the HDFS locationof the script containing the Hivequeries.
You can bundle Hive queries togetherin a script for faster execution.
/user/ambari-qa/processworkflow/queries/create_drivers.hql
Query You can enter HiveQL commandsinstead of using a script to requestand retrieve data.
See the Apache documentation formore information.
create tabletemp_drivers (col_valueSTRING);

Hortonworks Data Platform December 15, 2017
65
Parameter Name Description Additional Information Example
LOAD DATA INPATH
Job XML You can select one or morejob.xml files to pass Hiveconfiguration details.
The configuration file that specifiesthe variables used in the workflowthat allow Hive to communicate withthe metastore. Can be overwrittenor replaced by entries under theConfiguration section.
hive-conf.xml
Param Use to pass the values of variablesreferenced in the script or HiveQL.
See the Apache documentation formore information.
If hive query is:
select * from tablewhere joindate=${joinDate}
Param should be:
<param>joinDate=13-11-15</param>
Table 7.2. Hive Action, Transition Parameters
Parameter Name Description Additional Information Default Setting
Error To Indicates what action to take ifthe action errors out.
You can modify this setting in thedialog box or by modifying theworkflow graph.
Defaults to kill node,but can be changed.
OK To Indicates what node to transitionto if the action succeeds.
You can modify this setting in thedialog box or by modifying theworkflow graph.
Defaults to the nextnode in the workflow.
Table 7.3. Hive Action, Advanced Properties Parameters
Parameter Name Description Additional Information Example
ResourceManager
Master node that arbitrates all theavailable cluster resources amongthe competing applications.
The default setting is discovered fromthe cluster configuration.
${resourceManager}
Name Node Manages the file systemmetadata.
Keeps the directory tree of all filesin the file system, and tracks whereacross the cluster the file data is kept.Clients contact NameNode for filemetadata or file modifications.
${nameNode}
File Select any files that you want tomake available to the Hive actionwhen the workflow runs.
MySQL data files
Archive Select any archives that you wantto make available to the Hiveaction when the workflow runs.
archived data files
Prepare Select mkdir or delete and identifyany HDFS paths to create or deletebefore starting the job.
Use delete to do file cleanup priorto job execution. Enables Oozie toretry a job if there is a transient failure(the job output directory must notexist prior to job start). If the pathis to a directory: delete deletes allcontent recursively and then deletesthe directory. mkdir creates all missingdirectories in the path.
Arg Identify any arguments to bepassed to the Hive script.

Hortonworks Data Platform December 15, 2017
66
Table 7.4. Hive Action, Configuration Parameters
Parameter Name Description Additional Information Example
Name and Value The name/value pair can be usedinstead of a job.xml file or canoverride parameters set in thejob.xml file.
Used to specify formal parameters.If the name and value are specified,the user can override the valuesfrom the Submit dialog box. Can beparameterized (templatized) using ELexpressions.
See the Apache documentation formore information.
7.2. Hive2 Action ParametersFollowing are descriptions and examples for the parameters you can set in the Hive2 actionnode.
Use of Credentials and SLA can be set in the Hive action, but the configuration for them isdone from the global Settings menu.
Table 7.5. Hive2 Action, General Parameters
Parameter Name Description Additional Information Example
Hive Option The options are Script or Query. You can run the Hive action usinga script or by entering a query inHiveQL.
Script Navigate to the HDFS locationof the script containing the Hivequeries.
You can bundle Hive queries togetherin a script for faster execution.
/user/home/ambari-user/hive-queries/hive_query.hql
Query You can enter HiveQL commandsinstead of using a script to requestand retrieve data.
See the Apache documentation formore information.
select * fromdefault.wfm;
jdbc-url The JDBC user name, to provideremote access to the JDBC driver.
This entry is discovered and auto-completed, but can be changed.
jdbc:hive2://servername:10000
Password The password for the JDBC username, to provide remote access tothe JDBC driver.
This entry is discovered and auto-completed, but can be changed.
Job XML You can select one or morejob.xml files to pass Hive2configuration details.
The configuration file that specifiesthe variables used in a workflow thatallow Hive2 to communicate withthe metastore. Can be overwrittenor replaced by entries under theConfiguration section.
hive-conf.xml
Param Use to pass the values of variablesreferenced in the script or HiveQL.
See the Apache documentation formore information.
If hive query is:
select * from tablewhere joindate=${joinDate}
Param should be:
<param>joinDate=13-11-15</param>

Hortonworks Data Platform December 15, 2017
67
Table 7.6. Hive2 Action, Transition Parameters
Parameter Name Description Additional Information Default Setting
Error To Indicates what action to take ifthe action errors out.
You can modify this setting in thedialog box or by modifying theworkflow graph.
Defaults to kill node,but can be changed.
OK To Indicates what node to transitionto if the action succeeds.
You can modify this setting in thedialog box or by modifying theworkflow graph.
Defaults to the nextnode in the workflow.
Table 7.7. Hive2 Action, Advanced Properties Parameters
Parameter Name Description Additional Information Example
ResourceManager
Master node that arbitrates all theavailable cluster resources amongthe competing applications.
The default setting is discovered fromthe cluster configuration.
${resourceManager}
Name Node Manages the file systemmetadata.
Keeps the directory tree of all filesin the file system, and tracks whereacross the cluster the file data is kept.Clients contact NameNode for filemetadata or file modifications.
${nameNode}
File Select any files that you want tomake available to the Hive2 actionwhen the workflow runs.
MySQL data files
Archive Select any archives that you wantto make available to the Hive2action when the workflow runs.
archived data files
Prepare Select mkdir or delete and identifyany HDFS paths to create or deletebefore starting the job.
Use delete to do file cleanup priorto job execution. Enables Oozie toretry a job if there is a transient failure(the job output directory must notexist prior to job start). If the pathis to a directory: delete deletes allcontent recursively and then deletesthe directory. mkdir creates all missingdirectories in the path.
Arg Identify any arguments to bepassed to the Hive script.
Table 7.8. Hive2 Action, Configuration Parameters
Parameter Name Description Additional Information Example
Name and Value The name/value pair can be usedinstead of a job.xml file or canoverride parameters set in thejob.xml file.
Used to specify formal parameters.If the name and value are specified,the user can override the valuesfrom the Submit dialog box. Can beparameterized (templatized) using ELexpressions.
See the Apache documentation formore information.
7.3. Sqoop Action ParametersYou can use the Apache Sqoop action to move structured data between Apache Hadoopand relational databases. You can import data into files in a specified location in yourHadoop cluster. You can also use Sqoop to extract data from Hadoop and export it torelational databases outside of Hadoop. Sqoop works with several databases, includingTeradata, Netezza, Oracle, MySQL, and Postgres.

Hortonworks Data Platform December 15, 2017
68
Table 7.9. Sqoop Action, General Parameters
Parameter Name Description Additional Information Example
Send As Options are Command and Args(arguments).
Command You can enter a valid Sqoopcommand.
See the Apache Sqoopdocumentation for availablecommands.
import --connectjdbc:mysql://wfm.openstacklocal/test --username centos--password-file /user/centos/.password --table wfm --split-byrowkey --hive-import -m 1
Args You can enter one or more validSqoop arguments.
See the Apache Sqoopdocumentation for availablearguments.
--connect
jdbc:mysql://wfm.openstacklocal/test
--username
Job XML You can select one or morejob.xml files to pass Sqoopconfiguration details.
The configuration file that specifiesthe variables used for the Sqoopaction in the workflow. Can beoverwritten or replaced by entriesunder the Configuration section.
Table 7.10. Sqoop Action, Transition Parameters
Parameter Name Description Additional Information Default Setting
Error To Indicates what action to take ifthe action errors out.
You can modify this setting in thedialog box or by modifying theworkflow graph.
Defaults to kill node,but can be changed.
OK To Indicates what node to transitionto if the action succeeds.
You can modify this setting in thedialog box or by modifying theworkflow graph.
Defaults to the nextnode in the workflow.
Table 7.11. Sqoop Action, Advanced Properties Parameters
Parameter Name Description Additional Information Example
ResourceManager
Master node that arbitrates all theavailable cluster resources amongthe competing applications.
The default setting is discovered fromthe cluster configuration.
${resourceManager}
Name Node Manages the file systemmetadata.
Keeps the directory tree of all filesin the file system, and tracks whereacross the cluster the file data is kept.Clients contact NameNode for filemetadata or file modifications.
${nameNode}
File Select any files that you wantto make available to the Sqoopaction when the workflow runs.
/user/centos/oozie/apps/sqoop/lib/hive-site.xml
Archive Select any archives that you wantto make available to the Sqoopaction when the workflow runs.
archived data files
Prepare Select mkdir or delete and identifyany HDFS paths to create or deletebefore starting the job.
Use delete to do file cleanup priorto job execution. Enables Oozie toretry a job if there is a transient failure(the job output directory must notexist prior to job start). If the pathis to a directory: delete deletes all

Hortonworks Data Platform December 15, 2017
69
Parameter Name Description Additional Information Example
content recursively and then deletesthe directory. mkdir creates all missingdirectories in the path.
Arg Identify any arguments to bepassed to Sqoop.
Table 7.12. Sqoop Action, Configuration Parameters
Parameter Name Description Additional Information Example
Name and Value The name/value pair can be usedinstead of a job.xml file or canoverride parameters set in thejob.xml file.
Used to specify formal parameters.If the name and value are specified,the user can override the valuesfrom the Submit dialog box. Can beparameterized (templatized) using ELexpressions.
See the Apache Sqoopdocumentation for more information.
7.4. Pig Action ParametersTable 7.13. Pig Action, General Parameters
Parameter Name Description Additional Information Example
Script Navigate to the HDFS location ofthe Pig script.
/user/ambari/scripts/testreport.pig
Job XML You can select one or morejob.xml files to pass Pigconfiguration elements.
The configuration file that specifiesthe variables used for the Pig actionin the workflow. Can be overwrittenor replaced by entries under theConfiguration section.
Table 7.14. Pig Action, Transition Parameters
Parameter Name Description Additional Information Default Setting
Error To Indicates what action to take ifthe action errors out.
You can modify this setting in thedialog box or by modifying theworkflow graph.
Defaults to kill node,but can be changed.
OK To Indicates what node to transitionto if the action succeeds.
You can modify this setting in thedialog box or by modifying theworkflow graph.
Defaults to the nextnode in the workflow.
Table 7.15. Pig Action, Advanced Properties Parameters
Parameter Name Description Additional Information Example
ResourceManager
Master node that arbitrates all theavailable cluster resources amongthe competing applications.
The default setting is discovered fromthe cluster configuration.
${resourceManager}
Name Node Manages the file systemmetadata.
Keeps the directory tree of all filesin the file system, and tracks whereacross the cluster the file data is kept.Clients contact NameNode for filemetadata or file modifications.
${nameNode}
File Select any files that you want tomake available to the Hive actionwhen the workflow runs.
MySQL data files
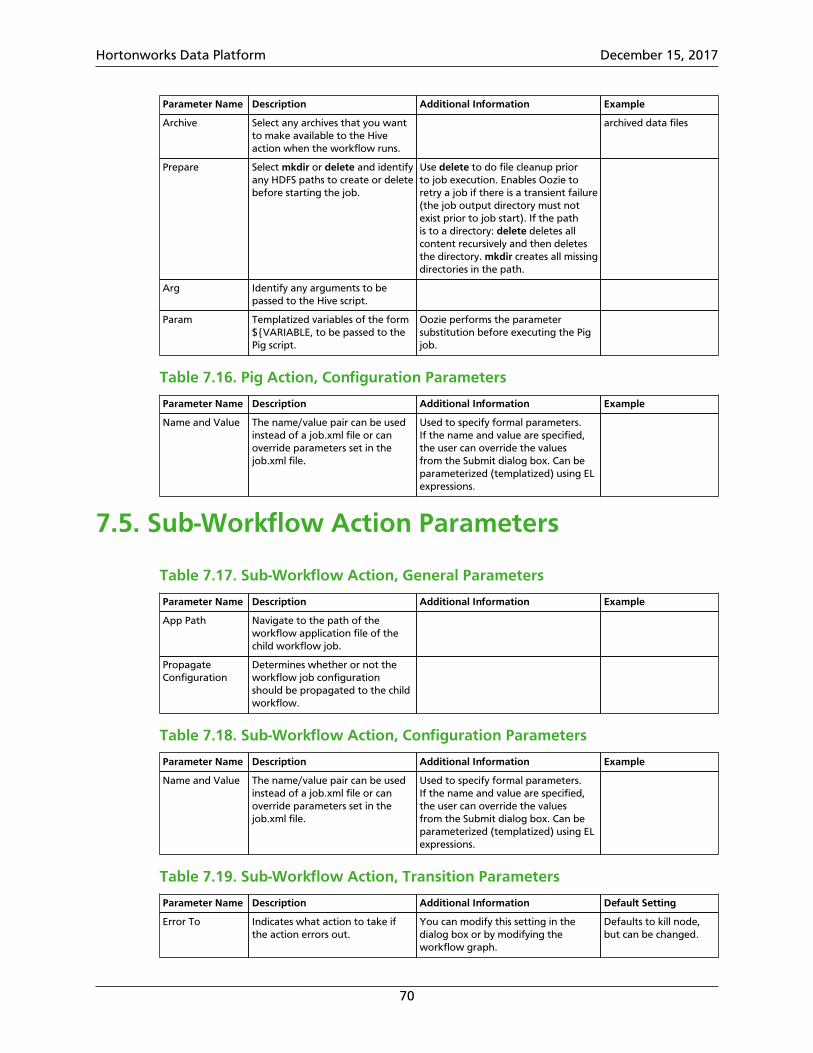
Hortonworks Data Platform December 15, 2017
70
Parameter Name Description Additional Information Example
Archive Select any archives that you wantto make available to the Hiveaction when the workflow runs.
archived data files
Prepare Select mkdir or delete and identifyany HDFS paths to create or deletebefore starting the job.
Use delete to do file cleanup priorto job execution. Enables Oozie toretry a job if there is a transient failure(the job output directory must notexist prior to job start). If the pathis to a directory: delete deletes allcontent recursively and then deletesthe directory. mkdir creates all missingdirectories in the path.
Arg Identify any arguments to bepassed to the Hive script.
Param Templatized variables of the form${VARIABLE, to be passed to thePig script.
Oozie performs the parametersubstitution before executing the Pigjob.
Table 7.16. Pig Action, Configuration Parameters
Parameter Name Description Additional Information Example
Name and Value The name/value pair can be usedinstead of a job.xml file or canoverride parameters set in thejob.xml file.
Used to specify formal parameters.If the name and value are specified,the user can override the valuesfrom the Submit dialog box. Can beparameterized (templatized) using ELexpressions.
7.5. Sub-Workflow Action Parameters
Table 7.17. Sub-Workflow Action, General Parameters
Parameter Name Description Additional Information Example
App Path Navigate to the path of theworkflow application file of thechild workflow job.
PropagateConfiguration
Determines whether or not theworkflow job configurationshould be propagated to the childworkflow.
Table 7.18. Sub-Workflow Action, Configuration Parameters
Parameter Name Description Additional Information Example
Name and Value The name/value pair can be usedinstead of a job.xml file or canoverride parameters set in thejob.xml file.
Used to specify formal parameters.If the name and value are specified,the user can override the valuesfrom the Submit dialog box. Can beparameterized (templatized) using ELexpressions.
Table 7.19. Sub-Workflow Action, Transition Parameters
Parameter Name Description Additional Information Default Setting
Error To Indicates what action to take ifthe action errors out.
You can modify this setting in thedialog box or by modifying theworkflow graph.
Defaults to kill node,but can be changed.

Hortonworks Data Platform December 15, 2017
71
Parameter Name Description Additional Information Default Setting
OK To Indicates what node to transitionto if the action succeeds.
You can modify this setting in thedialog box or by modifying theworkflow graph.
Defaults to the nextnode in the workflow.
7.6. Java Action ParametersThe Java action executes the public static void main(String[] args) method of the specifiedmain Java class.
Table 7.20. Java Action, General Parameters
Parameter Name Description Additional Information Example
Main Class
Java Options Select either Java Option List orJava Optioins.
Job XML You can select one or morejob.xml files to pass Javaconfiguration elements.
The configuration file that specifiesthe variables used for the Java actionin the workflow. Can be overwrittenor replaced by entries under theConfiguration section.
Capture Output Indicates whether or not Ooziewill capture output of the STDOUTof the Java action execution.Command output must be in JavaProperties file format if anotheraction will pick it up.
Useful if the output of the Java actionneeds to be used from within decisionnodes.
Table 7.21. Java Action, Transition Parameters
Parameter Name Description Additional Information Default Setting
Error To Indicates what action to take ifthe action errors out.
You can modify this setting in thedialog box or by modifying theworkflow graph.
Defaults to kill node,but can be changed.
OK To Indicates what node to transitionto if the action succeeds.
You can modify this setting in thedialog box or by modifying theworkflow graph.
Defaults to the nextnode in the workflow.
Table 7.22. Java Action, Advanced Properties Parameters
Parameter Name Description Additional Information Example
ResourceManager
Master node that arbitrates all theavailable cluster resources amongthe competing applications.
The default setting is discovered fromthe cluster configuration.
${resourceManager}
Name Node Manages the file systemmetadata.
Keeps the directory tree of all filesin the file system, and tracks whereacross the cluster the file data is kept.Clients contact NameNode for filemetadata or file modifications.
${nameNode}
File Select any files that you want tomake available to the Java actionwhen the workflow runs.
/path/file
Archive Select any archives that you wantto make available to the Javaaction when the workflow runs.
/path/archived-data-files
Prepare Select mkdir or delete and identifyany HDFS paths to create or deletebefore starting the job.
Use delete to do file cleanup priorto job execution. Enables Oozie toretry a job if there is a transient failure
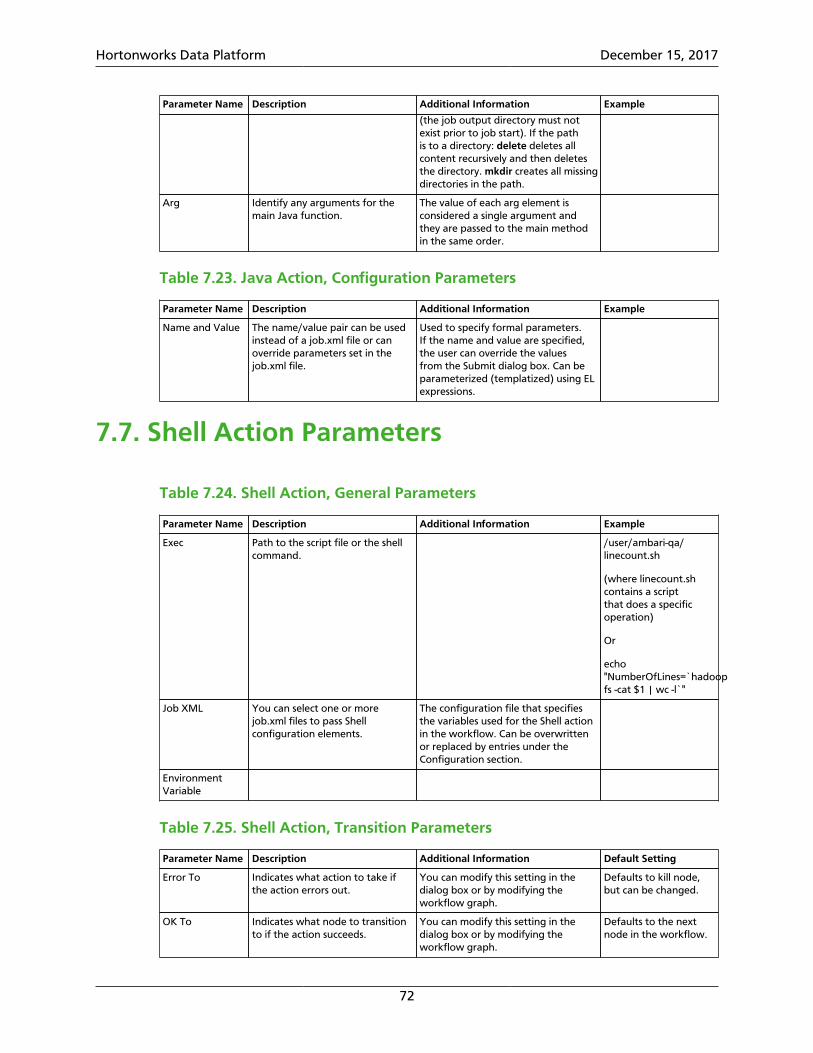
Hortonworks Data Platform December 15, 2017
72
Parameter Name Description Additional Information Example
(the job output directory must notexist prior to job start). If the pathis to a directory: delete deletes allcontent recursively and then deletesthe directory. mkdir creates all missingdirectories in the path.
Arg Identify any arguments for themain Java function.
The value of each arg element isconsidered a single argument andthey are passed to the main methodin the same order.
Table 7.23. Java Action, Configuration Parameters
Parameter Name Description Additional Information Example
Name and Value The name/value pair can be usedinstead of a job.xml file or canoverride parameters set in thejob.xml file.
Used to specify formal parameters.If the name and value are specified,the user can override the valuesfrom the Submit dialog box. Can beparameterized (templatized) using ELexpressions.
7.7. Shell Action Parameters
Table 7.24. Shell Action, General Parameters
Parameter Name Description Additional Information Example
Exec Path to the script file or the shellcommand.
/user/ambari-qa/linecount.sh
(where linecount.shcontains a scriptthat does a specificoperation)
Or
echo"NumberOfLines=`hadoopfs -cat $1 | wc -l`"
Job XML You can select one or morejob.xml files to pass Shellconfiguration elements.
The configuration file that specifiesthe variables used for the Shell actionin the workflow. Can be overwrittenor replaced by entries under theConfiguration section.
EnvironmentVariable
Table 7.25. Shell Action, Transition Parameters
Parameter Name Description Additional Information Default Setting
Error To Indicates what action to take ifthe action errors out.
You can modify this setting in thedialog box or by modifying theworkflow graph.
Defaults to kill node,but can be changed.
OK To Indicates what node to transitionto if the action succeeds.
You can modify this setting in thedialog box or by modifying theworkflow graph.
Defaults to the nextnode in the workflow.

Hortonworks Data Platform December 15, 2017
73
Table 7.26. Shell Action, Advanced Properties Parameters
Parameter Name Description Additional Information Example
ResourceManager
Master node that arbitrates all theavailable cluster resources amongthe competing applications.
The default setting is discovered fromthe cluster configuration.
${resourceManager}
Name Node Manages the file systemmetadata.
Keeps the directory tree of all filesin the file system, and tracks whereacross the cluster the file data is kept.Clients contact NameNode for filemetadata or file modifications.
${nameNode}
File Select any files that you want tomake available to the Java actionwhen the workflow runs.
/path/file
Archive Select any archives that you wantto make available to the Javaaction when the workflow runs.
/path/archived-data-files
Prepare Select mkdir or delete and identifyany HDFS paths to create or deletebefore starting the job.
Use delete to do file cleanup priorto job execution. Enables Oozie toretry a job if there is a transient failure(the job output directory must notexist prior to job start). If the pathis to a directory: delete deletes allcontent recursively and then deletesthe directory. mkdir creates all missingdirectories in the path.
Arg Identify any arguments to bepassed to the shell script.
The value of each arg element istreated as a single argument, even ifthere are white spaces, and the valuesare passed to the main method inorder.
Table 7.27. Shell Action, Configuration Parameters
Parameter Name Description Additional Information Example
Name and Value The name/value pair can be usedinstead of a job.xml file or canoverride parameters set in thejob.xml file.
Used to specify formal parameters.If the name and value are specified,the user can override the valuesfrom the Submit dialog box. Can beparameterized (templatized) using ELexpressions.
Capture Output Indicates whether or not Ooziewill capture output of the STDOUTof the shell command execution.Command output must be in JavaProperties file format if anotheraction will pick it up.
Useful if the output of the shellcommand needs to be used fromwithin decision nodes.
7.8. DistCp Action ParametersDistCp is used for copying files from one cluster to another, or copying files within a singlecluster.
Table 7.28. DistCp Action, General Parameters
Parameter Name Description Additional Information Example
Arg Arguments to the distcpcommands.
Copy a file/directoryfrom source to target:
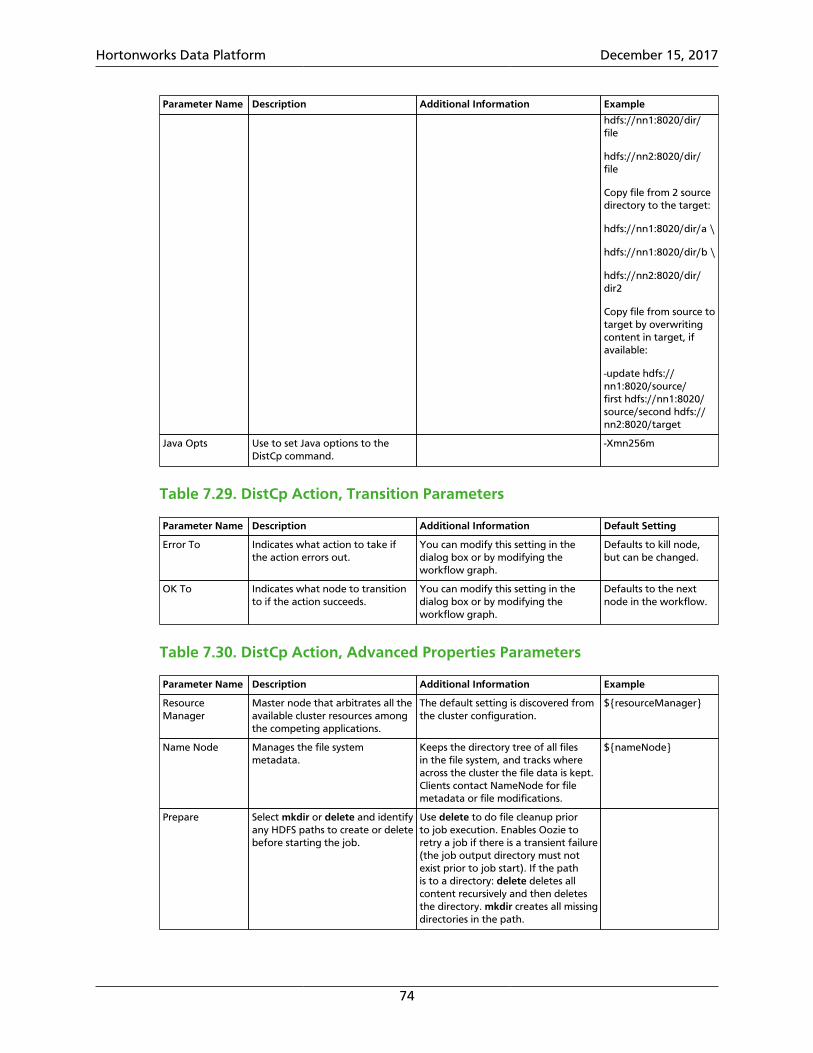
Hortonworks Data Platform December 15, 2017
74
Parameter Name Description Additional Information Example
hdfs://nn1:8020/dir/file
hdfs://nn2:8020/dir/file
Copy file from 2 sourcedirectory to the target:
hdfs://nn1:8020/dir/a \
hdfs://nn1:8020/dir/b \
hdfs://nn2:8020/dir/dir2
Copy file from source totarget by overwritingcontent in target, ifavailable:
-update hdfs://nn1:8020/source/first hdfs://nn1:8020/source/second hdfs://nn2:8020/target
Java Opts Use to set Java options to theDistCp command.
-Xmn256m
Table 7.29. DistCp Action, Transition Parameters
Parameter Name Description Additional Information Default Setting
Error To Indicates what action to take ifthe action errors out.
You can modify this setting in thedialog box or by modifying theworkflow graph.
Defaults to kill node,but can be changed.
OK To Indicates what node to transitionto if the action succeeds.
You can modify this setting in thedialog box or by modifying theworkflow graph.
Defaults to the nextnode in the workflow.
Table 7.30. DistCp Action, Advanced Properties Parameters
Parameter Name Description Additional Information Example
ResourceManager
Master node that arbitrates all theavailable cluster resources amongthe competing applications.
The default setting is discovered fromthe cluster configuration.
${resourceManager}
Name Node Manages the file systemmetadata.
Keeps the directory tree of all filesin the file system, and tracks whereacross the cluster the file data is kept.Clients contact NameNode for filemetadata or file modifications.
${nameNode}
Prepare Select mkdir or delete and identifyany HDFS paths to create or deletebefore starting the job.
Use delete to do file cleanup priorto job execution. Enables Oozie toretry a job if there is a transient failure(the job output directory must notexist prior to job start). If the pathis to a directory: delete deletes allcontent recursively and then deletesthe directory. mkdir creates all missingdirectories in the path.

Hortonworks Data Platform December 15, 2017
75
Table 7.31. DistCp Action, Configuration Parameters
Parameter Name Description Additional Information Example
Name and Value The name/value pair can be usedinstead of a job.xml file or canoverride parameters set in thejob.xml file.
Used to specify formal parameters.If the name and value are specified,the user can override the valuesfrom the Submit dialog box. Can beparameterized (templatized) using ELexpressions.
7.9. Map-Reduce (MR) Action Parameters
Table 7.32. MR Action, General Parameters
Parameter Name Description Additional Information Example
Mapper Class Specifies the Java class that shouldbe used as mapper.
The JAR containing the class must beavailable in the Oozie classpath or inthe lib directory.
Reducer Class Specifies the Java class that shouldbe used as reducer.
The JAR containing the class must beavailable in the Oozie classpath or inthe lib directory.
No of Tasks The default number of map tasksper job.
This setting is ignored if themapred.job.tracker parameter is setto "local".
Input Dir
Output Dir The directory to contain the joboutput.
Hadoop verifies that the job outputdirectory does not exist, and thencreates it when the job starts.
Job XML You can select one or morejob.xml files to pass Map-Reduceconfiguration details.
The configuration file that specifiesthe variables used for the Map-Reduce action in the workflow. Canbe overwritten or replaced by entriesunder the Configuration section.
Table 7.33. MR Action, Transition Parameters
Parameter Name Description Additional Information Default Setting
Error To Indicates what action to take ifthe action errors out.
You can modify this setting in thedialog box or by modifying theworkflow graph.
Defaults to kill node,but can be changed.
OK To Indicates what node to transitionto if the action succeeds.
You can modify this setting in thedialog box or by modifying theworkflow graph.
Defaults to the nextnode in the workflow.
Table 7.34. MR Action, Advanced Properties Parameters
Parameter Name Description Additional Information Example
ResourceManager
Master node that arbitrates all theavailable cluster resources amongthe competing applications.
The default setting is discovered fromthe cluster configuration.
${resourceManager}
Name Node Manages the file systemmetadata.
Keeps the directory tree of all filesin the file system, and tracks whereacross the cluster the file data is kept.Clients contact NameNode for filemetadata or file modifications.
${nameNode}

Hortonworks Data Platform December 15, 2017
76
Parameter Name Description Additional Information Example
File Select any files that you want tomake available to the Map-Reduceaction when the workflow runs.
Commonly used for streaming jobsthat require files in HDFS to beavailable to the mapper/reducerscripts.
/path/file
Archive Select any archives that you wantto make available to the Map-Reduce action when the workflowruns.
Commonly used for streaming jobsthat require files in HDFS to beavailable to the mapper/reducerscripts.
/path/archived-data-files
Prepare Select mkdir or delete and identifyany HDFS paths to create or deletebefore starting the job.
Use delete to do file cleanup priorto job execution. Enables Oozie toretry a job if there is a transient failure(the job output directory must notexist prior to job start). If the pathis to a directory: delete deletes allcontent recursively and then deletesthe directory. mkdir creates all missingdirectories in the path.
Table 7.35. MR Action, Configuration Parameters
Parameter Name Description Additional Information Example
Name and Value The name/value pair can be usedinstead of a job.xml file or canoverride parameters set in thejob.xml file.
Used to specify formal parameters.If the name and value are specified,the user can override the valuesfrom the Submit dialog box. Can beparameterized (templatized) using ELexpressions.
The configuration properties areloaded in the following order:streaming, job-xml, and configuration.Later values override earlier values.
7.10. SSH Action ParametersStarts a shell command on a remote machine as a remote secure shell running in thebackground.
Table 7.36. SSH Action, General Parameters
Parameter Name Description Additional Information Example
Host The user and the remote hostcontaining the home directory inwhich the shell command will run.
user@host
Command The shell command to execute. Should be available on the remotemachine and is executed in the user'shome directory.
Args Identify any argument parametersto be passed to the shell script.
In arguments that contain whitespace, each entry is handled as aseparate argument.
jdbc:mysql://wfm.openstacklocal/test
Arg Identify any argument parametersto be passed to the shell script.
Used to handle arguments thatinclude white space. Each value ishandled as one argument.
Capture Output Indicates whether or not Ooziewill capture output of the STDOUTof the SSH action execution.
Useful if the output of the SSH actionneeds to be available to the workflowjob, such as for decision nodes.
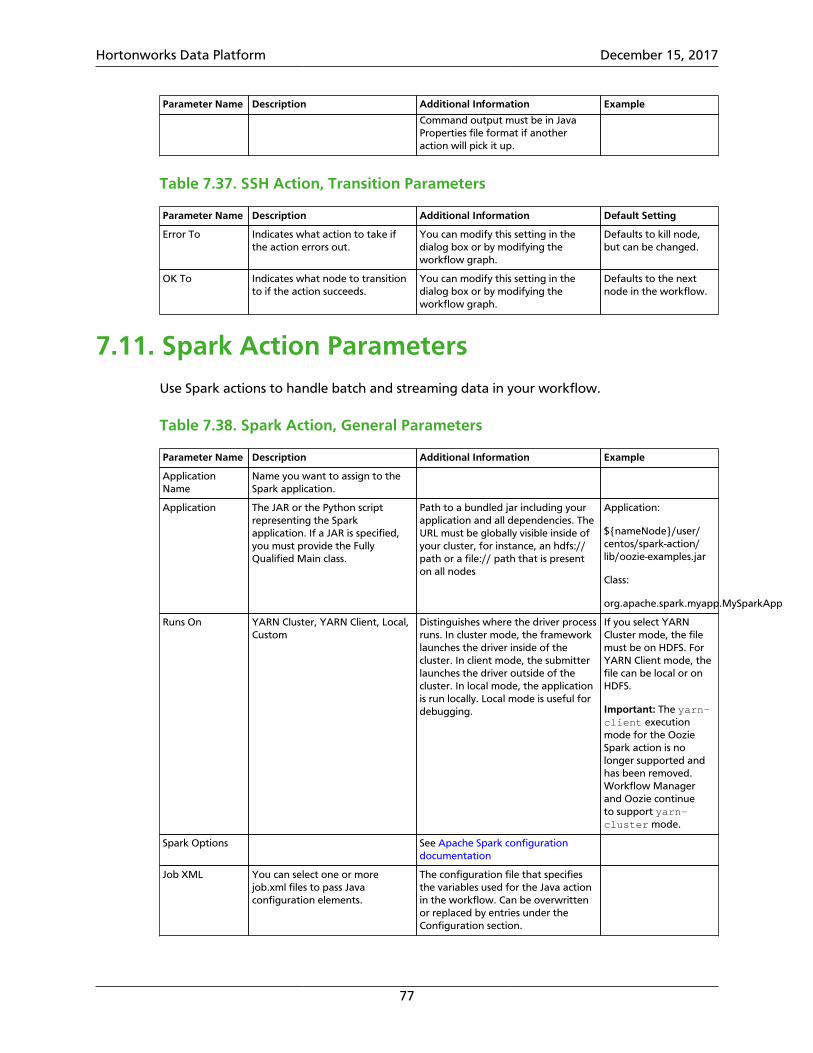
Hortonworks Data Platform December 15, 2017
77
Parameter Name Description Additional Information Example
Command output must be in JavaProperties file format if anotheraction will pick it up.
Table 7.37. SSH Action, Transition Parameters
Parameter Name Description Additional Information Default Setting
Error To Indicates what action to take ifthe action errors out.
You can modify this setting in thedialog box or by modifying theworkflow graph.
Defaults to kill node,but can be changed.
OK To Indicates what node to transitionto if the action succeeds.
You can modify this setting in thedialog box or by modifying theworkflow graph.
Defaults to the nextnode in the workflow.
7.11. Spark Action ParametersUse Spark actions to handle batch and streaming data in your workflow.
Table 7.38. Spark Action, General Parameters
Parameter Name Description Additional Information Example
ApplicationName
Name you want to assign to theSpark application.
Application The JAR or the Python scriptrepresenting the Sparkapplication. If a JAR is specified,you must provide the FullyQualified Main class.
Path to a bundled jar including yourapplication and all dependencies. TheURL must be globally visible inside ofyour cluster, for instance, an hdfs://path or a file:// path that is presenton all nodes
Application:
${nameNode}/user/centos/spark-action/lib/oozie-examples.jar
Class:
org.apache.spark.myapp.MySparkApp
Runs On YARN Cluster, YARN Client, Local,Custom
Distinguishes where the driver processruns. In cluster mode, the frameworklaunches the driver inside of thecluster. In client mode, the submitterlaunches the driver outside of thecluster. In local mode, the applicationis run locally. Local mode is useful fordebugging.
If you select YARNCluster mode, the filemust be on HDFS. ForYARN Client mode, thefile can be local or onHDFS.
Important: The yarn-client executionmode for the OozieSpark action is nolonger supported andhas been removed.Workflow Managerand Oozie continueto support yarn-cluster mode.
Spark Options See Apache Spark configurationdocumentation
Job XML You can select one or morejob.xml files to pass Javaconfiguration elements.
The configuration file that specifiesthe variables used for the Java actionin the workflow. Can be overwrittenor replaced by entries under theConfiguration section.
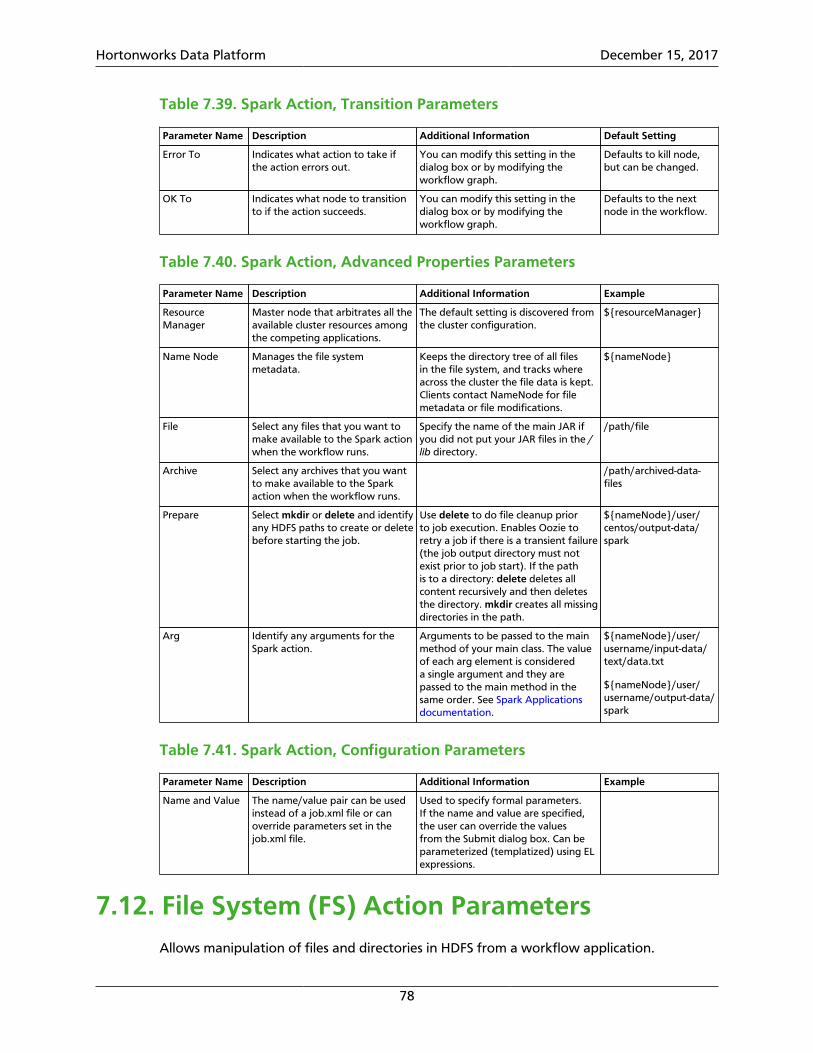
Hortonworks Data Platform December 15, 2017
78
Table 7.39. Spark Action, Transition Parameters
Parameter Name Description Additional Information Default Setting
Error To Indicates what action to take ifthe action errors out.
You can modify this setting in thedialog box or by modifying theworkflow graph.
Defaults to kill node,but can be changed.
OK To Indicates what node to transitionto if the action succeeds.
You can modify this setting in thedialog box or by modifying theworkflow graph.
Defaults to the nextnode in the workflow.
Table 7.40. Spark Action, Advanced Properties Parameters
Parameter Name Description Additional Information Example
ResourceManager
Master node that arbitrates all theavailable cluster resources amongthe competing applications.
The default setting is discovered fromthe cluster configuration.
${resourceManager}
Name Node Manages the file systemmetadata.
Keeps the directory tree of all filesin the file system, and tracks whereacross the cluster the file data is kept.Clients contact NameNode for filemetadata or file modifications.
${nameNode}
File Select any files that you want tomake available to the Spark actionwhen the workflow runs.
Specify the name of the main JAR ifyou did not put your JAR files in the /lib directory.
/path/file
Archive Select any archives that you wantto make available to the Sparkaction when the workflow runs.
/path/archived-data-files
Prepare Select mkdir or delete and identifyany HDFS paths to create or deletebefore starting the job.
Use delete to do file cleanup priorto job execution. Enables Oozie toretry a job if there is a transient failure(the job output directory must notexist prior to job start). If the pathis to a directory: delete deletes allcontent recursively and then deletesthe directory. mkdir creates all missingdirectories in the path.
${nameNode}/user/centos/output-data/spark
Arg Identify any arguments for theSpark action.
Arguments to be passed to the mainmethod of your main class. The valueof each arg element is considereda single argument and they arepassed to the main method in thesame order. See Spark Applicationsdocumentation.
${nameNode}/user/username/input-data/text/data.txt
${nameNode}/user/username/output-data/spark
Table 7.41. Spark Action, Configuration Parameters
Parameter Name Description Additional Information Example
Name and Value The name/value pair can be usedinstead of a job.xml file or canoverride parameters set in thejob.xml file.
Used to specify formal parameters.If the name and value are specified,the user can override the valuesfrom the Submit dialog box. Can beparameterized (templatized) using ELexpressions.
7.12. File System (FS) Action ParametersAllows manipulation of files and directories in HDFS from a workflow application.

Hortonworks Data Platform December 15, 2017
79
Table 7.42. FS Action, General Parameters
Parameter Name Description Additional Information Example
Command Options are mkdir, delete, move,chmod, touchz, chgrp
Commands are executedsynchronously within the FS action,but the workflow job waits until thecommands are completed beforecontinuing to the next action.
delete
Path The path to which the commandwill be applied.
hdfs://wfm.openstacklocal/user/test
Job XML You can select one or morejob.xml files to pass Javaconfiguration elements.
The configuration file that specifiesthe variables used for the Java actionin the workflow. Can be overwrittenor replaced by entries under theConfiguration section.
Table 7.43. FS Action, Transition Parameters
Parameter Name Description Additional Information Default Setting
Error To Indicates what action to take ifthe action errors out.
You can modify this setting in thedialog box or by modifying theworkflow graph.
Defaults to kill node,but can be changed.
OK To Indicates what node to transitionto if the action succeeds.
You can modify this setting in thedialog box or by modifying theworkflow graph.
Defaults to the nextnode in the workflow.
Table 7.44. FS Action, Advanced Properties Parameters
Parameter Name Description Additional Information Example
Name Node Manages the file systemmetadata.
Keeps the directory tree of all filesin the file system, and tracks whereacross the cluster the file data is kept.Clients contact NameNode for filemetadata or file modifications.
${nameNode}
Table 7.45. FS Action, Configuration Parameters
Parameter Name Description Additional Information Example
Name and Value The name/value pair can be usedinstead of a job.xml file or canoverride parameters set in thejob.xml file.
Used to specify formal parameters.If the name and value are specified,the user can override the valuesfrom the Submit dialog box. Can beparameterized (templatized) using ELexpressions.
7.13. Submit Dialog ParametersThe Submit tab opens a dialog box that allows you to submit a workflow, a coordinator,or a bundle definition as a job. Once submitted, a job displays in the Workflow Managerdashboard.
Table 7.46. Submit Dialog, Configuration Parameters
Parameter Name Description Additional Information Example
Workflow Path The HDFS location in which theworkflow definition is stored.
/user/ambari-qa/ooziewfs/sqoop/workflow.xml
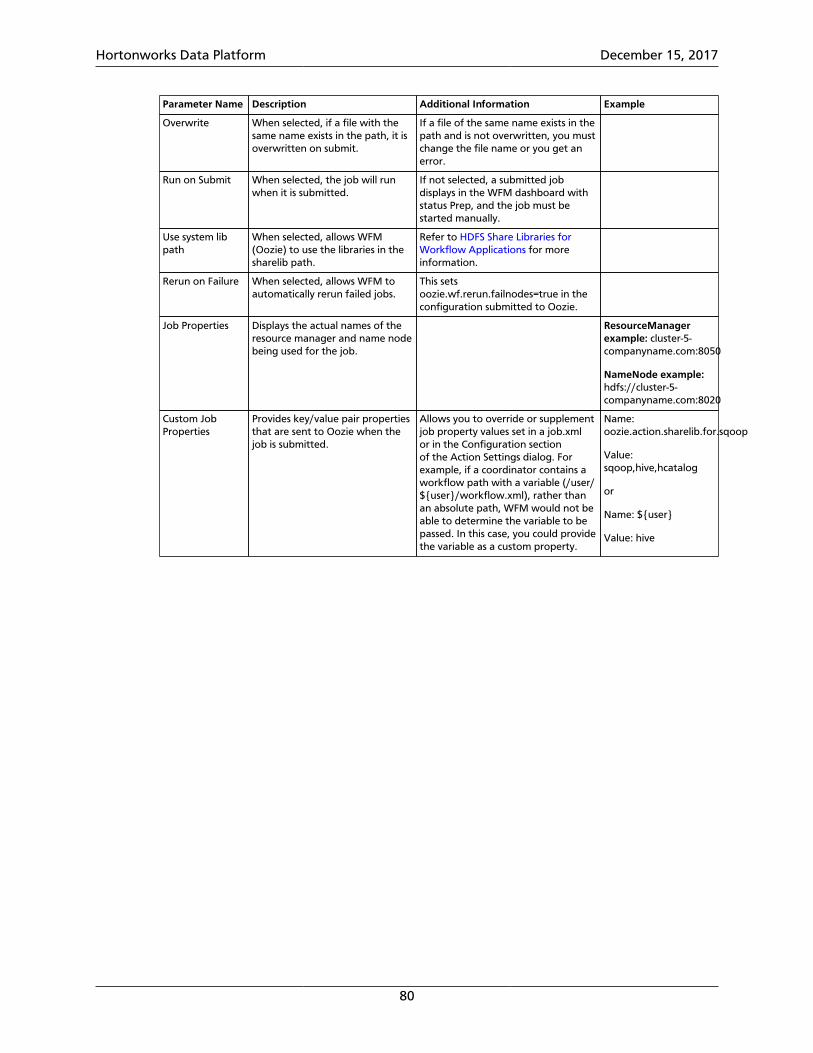
Hortonworks Data Platform December 15, 2017
80
Parameter Name Description Additional Information Example
Overwrite When selected, if a file with thesame name exists in the path, it isoverwritten on submit.
If a file of the same name exists in thepath and is not overwritten, you mustchange the file name or you get anerror.
Run on Submit When selected, the job will runwhen it is submitted.
If not selected, a submitted jobdisplays in the WFM dashboard withstatus Prep, and the job must bestarted manually.
Use system libpath
When selected, allows WFM(Oozie) to use the libraries in thesharelib path.
Refer to HDFS Share Libraries forWorkflow Applications for moreinformation.
Rerun on Failure When selected, allows WFM toautomatically rerun failed jobs.
This setsoozie.wf.rerun.failnodes=true in theconfiguration submitted to Oozie.
Job Properties Displays the actual names of theresource manager and name nodebeing used for the job.
ResourceManagerexample: cluster-5-companyname.com:8050
NameNode example:hdfs://cluster-5-companyname.com:8020
Custom JobProperties
Provides key/value pair propertiesthat are sent to Oozie when thejob is submitted.
Allows you to override or supplementjob property values set in a job.xmlor in the Configuration sectionof the Action Settings dialog. Forexample, if a coordinator contains aworkflow path with a variable (/user/${user}/workflow.xml), rather thanan absolute path, WFM would not beable to determine the variable to bepassed. In this case, you could providethe variable as a custom property.
Name:oozie.action.sharelib.for.sqoop
Value:sqoop,hive,hcatalog
or
Name: ${user}
Value: hive

Hortonworks Data Platform December 15, 2017
81
8. Settings Menu ParametersFrom the Settings menu, you can set various parameters related to the overall workflow orset parameters that can be applied as global settings across action nodes.
Figure 8.1. Settings menu
The available action types and their associated parameters for the Settings menu aredescribed in the following:
Global Configuration Parameters [81]
Workflow Credentials Parameters [82]
SLA for Workflow Parameters [83]
Workflow Parameters [84]
Workflow and Action Versions [85]
8.1. Global Configuration ParametersUse the Global Configuration settings to apply a common set of parameters to all theaction nodes in the workflow. You can override the global settings for any node bychanging the values in the node Action Settings dialog box.
Table 8.1. Global Configuration Parameters
Parameter Name Description Additional Information Example
ResourceManager
Points to the YARN ResourceManager.
If the variable ${resourceManager}is used, WFM substitutes with theproper resource manager discoveredfrom Ambari configurations.
${resourceManager}
or
http://sandbox.hortonworks.com:8050
Name Node Points to the YARN name node. If the variable ${nameNode} is used,WFM substitutes with the properresource manager discovered fromAmbari configurations.
Job XML Location of the job XML filethat contains name/valuecombinations for the workflow.
Using a job XML file is useful whenthe same settings need to be used bymultiple workflows.

Hortonworks Data Platform December 15, 2017
82
Parameter Name Description Additional Information Example
Properties Name/Value
Use to declare a variable andassociated value for workflows.
Use when you need a specific settingto change for each job submission orwhen you need to configure the samevalue multiple times. The variabledefined could be used in a workflowwith the syntax ${variable1}.
Name: ${user}
Value: hive
8.2. Workflow Credentials ParametersYou must set workflow credentials if you are running actions in a secured cluster. You setthe credentials at the global level, then select the user when you create or edit an actionnode.
Some action types talk to external services such as HCatalog, HBase Region Server, and HiveServer 2. In these circumstances, extra configuration is required to authenticate. Kerberoscredentials are used to obtain delegation tokens on behalf of the user from the externalservice.
Table 8.2. HCat Workflow Credentials Parameters
Parameter Name Description Additional Information Example
Name The name used to identify thecredentials.
hive-cred
Type Options are HCat, Hive2, andHBase.
HCat MetastorePrincipal
The name of the Kerberosprincipal to be used for HCatalog.
HCat MetastoreURL
This is a Thrift URI used to makemetadata requests to a remoteMetastore, allowing multiple Hiveclients to connect to a remoteservice.
The same value asthe Ambari setting:Hive service>Configstab>Advancedtab>Generalsection>hive.metastore.urisfield
CustomProperties Name/Value
Table 8.3. Hive2 Workflow Credentials Parameters
Parameter Name Description Additional Information Example
Name The name used to identify thecredentials.
hive-cred
Type Options are HCat, Hive2, andHBase.
Hive2 JDBC URL The JDBC connection location forinteracting with the database.
Hive>Configs>Advanced>HiveMetastore>DatabaseURL
Hive2 ServerPrincipal
The name of the Kerberosprincipal to be used for HiveServer 2.
CustomProperties Name/Value
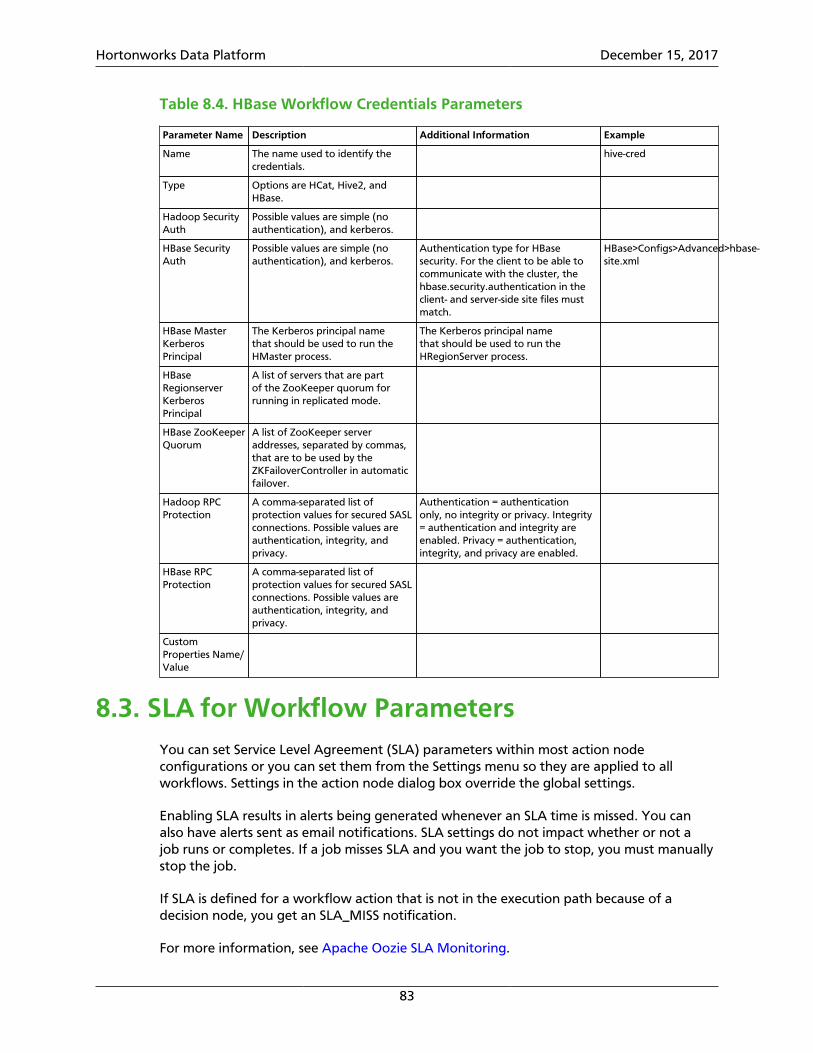
Hortonworks Data Platform December 15, 2017
83
Table 8.4. HBase Workflow Credentials Parameters
Parameter Name Description Additional Information Example
Name The name used to identify thecredentials.
hive-cred
Type Options are HCat, Hive2, andHBase.
Hadoop SecurityAuth
Possible values are simple (noauthentication), and kerberos.
HBase SecurityAuth
Possible values are simple (noauthentication), and kerberos.
Authentication type for HBasesecurity. For the client to be able tocommunicate with the cluster, thehbase.security.authentication in theclient- and server-side site files mustmatch.
HBase>Configs>Advanced>hbase-site.xml
HBase MasterKerberosPrincipal
The Kerberos principal namethat should be used to run theHMaster process.
The Kerberos principal namethat should be used to run theHRegionServer process.
HBaseRegionserverKerberosPrincipal
A list of servers that are partof the ZooKeeper quorum forrunning in replicated mode.
HBase ZooKeeperQuorum
A list of ZooKeeper serveraddresses, separated by commas,that are to be used by theZKFailoverController in automaticfailover.
Hadoop RPCProtection
A comma-separated list ofprotection values for secured SASLconnections. Possible values areauthentication, integrity, andprivacy.
Authentication = authenticationonly, no integrity or privacy. Integrity= authentication and integrity areenabled. Privacy = authentication,integrity, and privacy are enabled.
HBase RPCProtection
A comma-separated list ofprotection values for secured SASLconnections. Possible values areauthentication, integrity, andprivacy.
CustomProperties Name/Value
8.3. SLA for Workflow ParametersYou can set Service Level Agreement (SLA) parameters within most action nodeconfigurations or you can set them from the Settings menu so they are applied to allworkflows. Settings in the action node dialog box override the global settings.
Enabling SLA results in alerts being generated whenever an SLA time is missed. You canalso have alerts sent as email notifications. SLA settings do not impact whether or not ajob runs or completes. If a job misses SLA and you want the job to stop, you must manuallystop the job.
If SLA is defined for a workflow action that is not in the execution path because of adecision node, you get an SLA_MISS notification.
For more information, see Apache Oozie SLA Monitoring.

Hortonworks Data Platform December 15, 2017
84
Table 8.5. SLA for Workflows Parameters
Parameter Name Description Additional Information Example
Enabled Enables or disables the SLAsettings.
After enabling SLA, you must, atminimum, set the Nominal Time andthe Should End time to receive emailnotifications if those times are missedby the job.
Nominal Time The ideal time you want the job tostart.
This is the time relative to which yourjobs' SLAs are calculated. Must be setto a future time or date.
The date and time fan be set by usingthe calendar feature or by using ELexpressions.
Calendar date: 3:00 AMon 22 August 2017, ISTtimezone.
Should Start The amount of time (in minutes,hours, or days) within which a jobshould start to meet SLA.
"Should Start" time is relative to thenominal time. Optional setting.
The date and time fan be set by usingthe calendar feature or by using avariable. Can also be set as a cron job.
If the nominal starttime is 3:00 AM ISTon 22 August 2017and the job shouldstart within 20 minutesof the nominal starttime to meet SLA, set"Should Start" to 3:20AM, 22 August.
Should End The amount of time (in minutes,hours, or days) within which a jobshould finish to meet SLA.
"Should End" time is relative to thenominal time.
The date and time fan be set by usingthe calendar feature or by using avariable. Can also be set as a cron job.
If the nominal starttime is 3:00 AM IST on22 August 2017 andthe job should endwithin 90 minutes ofthe ideal start time tomeet SLA, set "ShouldEnd" to 4:30 AM, 22August.
Max Duration The maximum amount of time (inminutes, hours, or days) that youexpect the job to run.
Optional setting. The date and timefan be set by using the calendarfeature or by using a variable. Canalso be set as a cron job.
If the nominal starttime is 3:00 AM IST on22 August 2017 andyou expect the job toend within 90 minutesof the ideal start time,set "Max Duration" to4:30 AM, 22 August.
Alert Events You can select to have alerts sentif the job misses its start, end, orduration times.
Optional setting.
Alert Emails The email addresses to whichalerts should be sent.
Optional setting.
8.4. Workflow ParametersFrom the Workflow Parameters dialog box, you can define a common set of variables at aglobal level, that you can reference from action nodes in the workflow. The parameters areentered as a key/value pair.
You can set workflow parameters within most action node configurations or you can setthem from the Settings menu so they are applied to all workflows. Settings in the actionnode dialog box override the global settings.
To create global parameters, you must enter a name (key), but a value is optional.However, if the value is not set at the global level, it must be entered at the node level.

Hortonworks Data Platform December 15, 2017
85
Table 8.6. Workflow Configuration Parameters
Parameter Name Description Additional Information Example
Name and Value The name/value pair can be usedinstead of a job.xml file or canoverride parameters set in thejob.xml file.
Used to specify formal parameters.If the name and value are specified,the user can override the valuesfrom the Submit dialog box. Can beparameterized (templatized) using ELexpressions.
See the Apache documentation formore information.
8.5. Workflow and Action VersionsYou can set or change the schema version for each action or workflow from the Workflowand Action Versions dialog box. By default, the latest version is used. However, you mightneed to select an earlier software version if you import workflows that use earlier software.
You can select versions for the following components:
HiveHive2SqoopShellSparkDistCpEmail
8.6. How SLA WorksNominal time: The nominal time specifies the time when something should happen. Intheory the nominal time and the actual time should mach, however, in practice due todelays the actual time may occur later than the nominal time.
Hortonworks Data Platform December 15, 2017
86
9. Job StatesYou can view the state of any job from the Workflow Manager dashboard, to determinewhether the job started, succeeded, failed, and so forth.
A workflow, coordinator, or bundle job can be in any of the following states:
Prep When a workflow, coordinator, or bundle job is first submitted, it is in the Prepstate, meaning the job is defined and saved, and a unique ID is assigned to it,but the job is not running.
Jobs can transition from Prep to Running or Killed states.
Running When a workflow, coordinator, or bundle job is executed, it goes into theRunning state. A job remains in the Running state as long as it does not reachits end state, does not end in error, or is not suspended.
Jobs can transition from Running to Succeeded, Suspended, Killed, or Failedstates.
Suspended A running workflow, coordinator, or bundle job can be suspended. The jobremains in Suspended state until the job is resumed or is killed.
Jobs can transition from Suspended to Running or Killed states.
Succeeded A running workflow, coordinator, or bundle job transitions to the Succeededstate when it reaches the end node. it final state.
Succeeded is a final state, so it does not transition to other states.
Killed When a workflow, coordinator, or bundle job is killed manually or by reaching akill node in the workflow, the job transitions to the Killed state.
Killed is a final state, so it does not transition to other states.
Failed When a running workflow, coordinator, or bundle job fails due to anunexpected error, it transitions to the Failed state.
Failed is a final state, so it does not transition to other states.
More Information
Monitoring Jobs Using the Dashboard
Hortonworks Data Platform December 15, 2017
87
10. Workflow Manager FilesSeveral files are created during the process of designing a workflow. Other files must becreated and available in a specified path in order to run a workflow job.
The following files are associated with workflow jobs:
• workflow.xml
This file is the definition of the workflow application. It is created when you input andsave the workflow parameters. The file is saved to whatever location you specify in HDFS.The default file name is workflow.xml, but you can provide an alternative name whenyou initially save the file.
• workflow.wfdraft
This is a draft file created when you save a non-validated workflow. The file is saved tothe same location in HDFS as the associated workflow.xml file. The default file name isworkflow.wfdraft, but you can provide an alternative name when you initially savethe file.
• /appdir/config-default.xml
This file is in HDFS. It is optional and contains properties shared by all workflows.
• /appdir/lib/files.jar
In HDFS
• Each workflow can also have a job.properties file (not put into HDFS) for job-specific properties.
The following files are associated with coordinator jobs:
• coordinator.xml
This file is the definition of the coordinator application. It is created when you input andsave the coordinator parameters. The file is saved to whatever location you specify inHDFS. The default file name is coordinator.xml, but you can provide an alternativename when you initially save the file.
• coordinator.wfdraft
This is a draft file created when you save a non-validated coordinator. The file is savedto the same location in HDFS as the associated coordinator.xml file. The default filename is coordinator.wfdraft, but you can provide an alternative name when youinitially save the file.
• coordinator.properties
For defining the job’s properties.
The following files are associated with bundle jobs:
Hortonworks Data Platform December 15, 2017
88
• bundle.xml
This file is the definition of the bundle application. It is created when you input and savethe bundle parameters. The file is saved to whatever location you specify in HDFS. Thedefault file name is bundle.xml, but you can provide an alternative name when youinitially save the file.
• bundle.wfdraft
This is a draft file created when you save a non-validated bundle. The file is saved tothe same location in HDFS as the associated bundle.xml file. The default file name isbundle.wfdraft, but you can provide an alternative name when you initially save thefile.
The following log files can assist with troubleshooting issues:
• The wfmanager-view.log found under the ambari-server log directory.
Jobs successfully submitted to WFM so they have a job ID will have logs displayed in theWFM details tabs. The wfmanager-view.log provides additional information.
• Oozie logs, which are located at /var/log/oozie by default.
The location of the log file can be changed. If an exception occurs before successfullysubmitting a workflow, coordinator, or bundle job, a good place to debug is the Oozielogs.