hospitality cruise dining management system meal count system l count... · 2019. 2. 15. ·...
TRANSCRIPT

Oracle® Hospitality Cruise Dining
Management System Meal Count System User Guide
Release 8.0 F13572-02 February 2019

Oracle Hospitality Cruise Dining Management System Meal Count System User Guide, Release 8.0
F13572-02
Copyright © 2015, 2019, Oracle and/or its affiliates. All rights reserved.
This software and related documentation are provided under a license agreement containing restrictions on use and disclosure and are protected by intellectual property laws. Except as expressly permitted in your license agreement or allowed by law, you may not use, copy, reproduce, translate, broadcast, modify, license, transmit, distribute, exhibit, perform, publish, or display any part, in any form, or by any means. Reverse engineering, disassembly, or decompilation of this software, unless required by law for interoperability, is prohibited.
The information contained herein is subject to change without notice and is not warranted to be error-free. If you find any errors, please report them to us in writing.
If this software or related documentation is delivered to the U.S. Government or anyone licensing it on behalf of the U.S. Government, then the following notice is applicable:
U.S. GOVERNMENT END USERS: Oracle programs, including any operating system, integrated software, any programs installed on the hardware, and/or documentation, delivered to U.S. Government end users are "commercial computer software" pursuant to the applicable Federal Acquisition Regulation and agency-specific supplemental regulations. As such, use, duplication, disclosure, modification, and adaptation of the programs, including any operating system, integrated software, any programs installed on the hardware, and/or documentation, shall be subject to license terms and license restrictions applicable to the programs. No other rights are granted to the U.S. Government.
This software or hardware is developed for general use in a variety of information management applications. It is not developed or intended for use in any inherently dangerous applications, including applications that may create a risk of personal injury. If you use this software or hardware in dangerous applications, then you shall be responsible to take all appropriate fail-safe, backup, redundancy, and other measures to ensure its safe use. Oracle Corporation and its affiliates disclaim any liability for any damages caused by use of this software or hardware in dangerous applications.
Oracle and Java are registered trademarks of Oracle and/or its affiliates. Other names may be trademarks of their respective owners.
Intel and Intel Xeon are trademarks or registered trademarks of Intel Corporation. All SPARC trademarks are used under license and are trademarks or registered trademarks of SPARC International, Inc. AMD, Opteron, the AMD logo, and the AMD Opteron logo are trademarks or registered trademarks of Advanced Micro Devices. UNIX is a registered trademark of The Open Group.
This software or hardware and documentation may provide access to or information about content, products, and services from third parties. Oracle Corporation and its affiliates are not responsible for and expressly disclaim all warranties of any kind with respect to third-party content, products, and services unless otherwise set forth in an applicable agreement between you and Oracle. Oracle Corporation and its affiliates will not be responsible for any loss, costs, or damages incurred due to your access to or use of third-party content, products, or services, except as set forth in an applicable agreement between you and Oracle.

iii
Contents
Preface iv
1 Welcome 1-5
2 Operations 2-7
Display 2-7 Meals 2-7 Menus 2-13 MICROS and Check Printing 2-21 Reports 2-25 Scanning Station 2-30 Starting The Modules 2-31 Today 2-33
Preface
iv
Preface
Purpose
The purpose of this document is to provide an overview of the operations of Cruise
Dining Management Meal Count System (MCS).
Audience
This document is intended for application specialist and end-users of Oracle Hospitality
Cruise Dining Management MCS.
Customer Support
To contact Oracle Customer Support, access My Oracle Support at the following URL:
https://support.oracle.com
When contacting Customer Support, please provide the following:
Product version and program/module name
Functional and technical description of the problem (include business impact)
Detailed step-by-step instructions to re-create
Exact error message received and any associated log files
Screenshots of each step you take
Documentation
Oracle Hospitality product documentation is available on the Oracle Help Center at
http://docs.oracle.com/en/industries/hospitality/
Revision History
Date Description of Change
January 2019 February 2019
Initial publication. Revised version number

Chapter 1 Welcome
1-5
1
Welcome
The Oracle Hospitality Cruise Dining Management System (MCS) is a graphical order-
display and reporting system designed to streamline operations and maximize yield by
boosting operational efficiency. It is ideal for any customer looking to reduce costs,
increase service levels and maximize revenues through efficient kitchen operations and
optimized staff communication.
MCS provides Galley staff with a complete overview that includes the current stock on
hand of prepared meals, quantity ordered per current meal period, quantity already
prepared, and quantity pending preparation. In addition, the system provides visual
warnings when the prepared stock runs low or is insufficient to meet the ordered
quantities during the meal time.
MCS may be run as a stand-alone suite of applications, or be seamlessly integrated with
MICROS and Oracle Hospitality Cruise Shipboard Property Management System
(SPMS).
The system allows users to view the cur8.3rent status of all orders in a single glance,
compare orders to historical consumption patterns, view special requests and expected/
served Guest counts. All information can be distributed to different displays in different
locations.
In addition to the in-service operations, MCS has comprehensive reporting tools that
allows management to review service performance of waiters, and various service
outlets, which will helps, maximize performance and ensures that Guests are given the
best possible service and dining experience.
Using the MICROS Point-of-Sales (POS) system integration, waiters can place orders
directly to the Galley without the need to leave their stations from a MICROS POS
workstation. The various departments in the Galley can receive prep-checks printed at
remote printers strategically dispersed throughout the Galley. Each prep-check details
the items ordered including additional preparation instructions. The check also contains
a barcode so that when the check items have been prepared, the expediter, for example,
scans it to complete the cycle. Upon immediate completion of this cycle, the MCS will
update its associate display monitors located throughout the Galley with the latest meal
counts.
On-screen and reports information on Guest-ordering trends based on age, gender,
frequent cruiser status designation, VIP status, nationality or any other descriptive
information existing within the SPMS system is available. Tracking of Guests onboard or

Chapter 1 Welcome
1-6
ashore provides Galley personnel up-to-the-minute information to assess dining traffic
throughput.
Below diagram illustrates a typical MCS set up with all its hardware components.
Figure 1-1 - MCS Hardware Components

Chapter 2 Operations
2-7
2
Operations
The following sections explains the operations of MCS.
Display
The Display station is located in the kitchen and does not need any maintenance during
the MCS operations.
Between the actual events, the display can be configured to show other valuable ships
data like shore excursions or gangway status, or meal pictures of the upcoming event.
The kitchen display should be constantly observed by the kitchen staff to receive
information and status of all the meals.
In case major changes have been done to the display configuration inside the Meal
Count Configurator, the displays need to be re-loaded via the check box in the display
station configuration section.
Figure 2-1 - Display
Meals
Chapter 2 Operations
2-8
The Meals section is where the management enters all dishes for the different menus per
itinerary. The meals are listed alphabetically and can be organized by category in the
various sub folders. The Meals section offers several convenient functions.
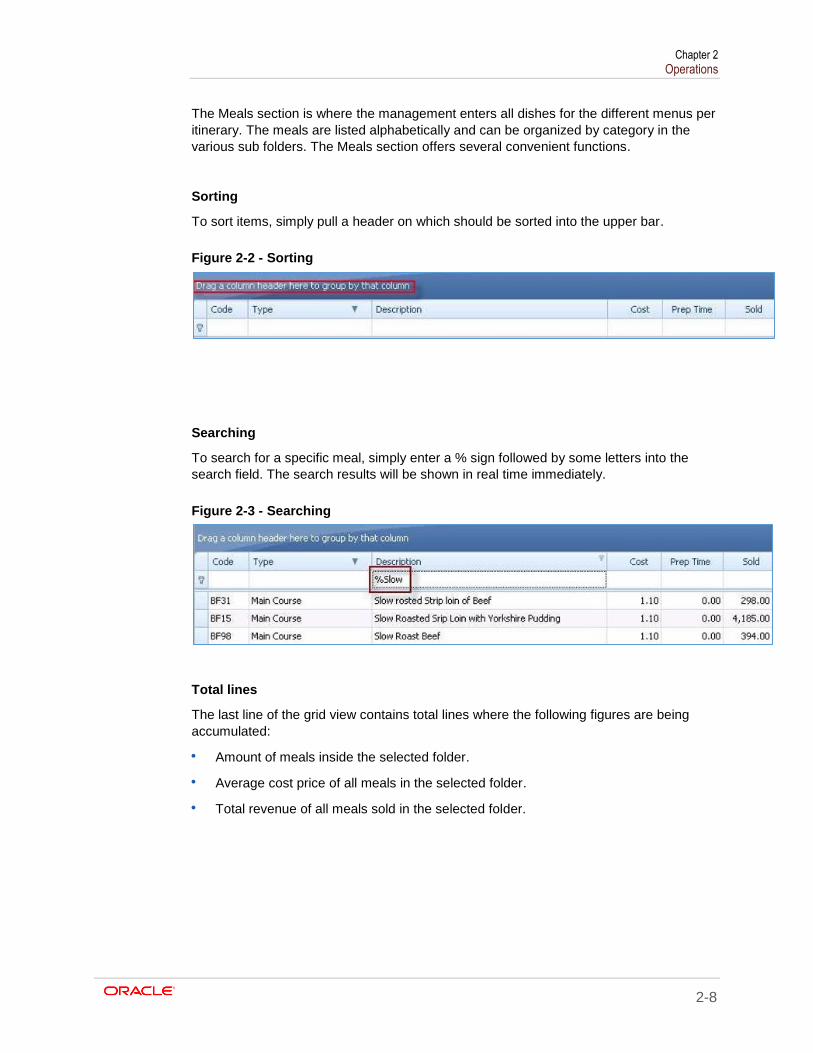
Sorting
To sort items, simply pull a header on which should be sorted into the upper bar.
Figure 2-2 - Sorting
Searching
To search for a specific meal, simply enter a % sign followed by some letters into the
search field. The search results will be shown in real time immediately.
Figure 2-3 - Searching
Total lines
The last line of the grid view contains total lines where the following figures are being
accumulated:
Amount of meals inside the selected folder.
Average cost price of all meals in the selected folder.
Total revenue of all meals sold in the selected folder.

Chapter 2 Operations
2-9
Figure 2-4 - Total Lines
A right-mouse click inside the total field, shows this menu:
Figure 2-5 - Functions
Sum: The sum of all figures above.
Min: The lowest figure of all lines above.
Max: The highest figure of all lines above.
Count: The count of all lines above.
Average: The average of all lines above.
None: Will remove the total field completely.
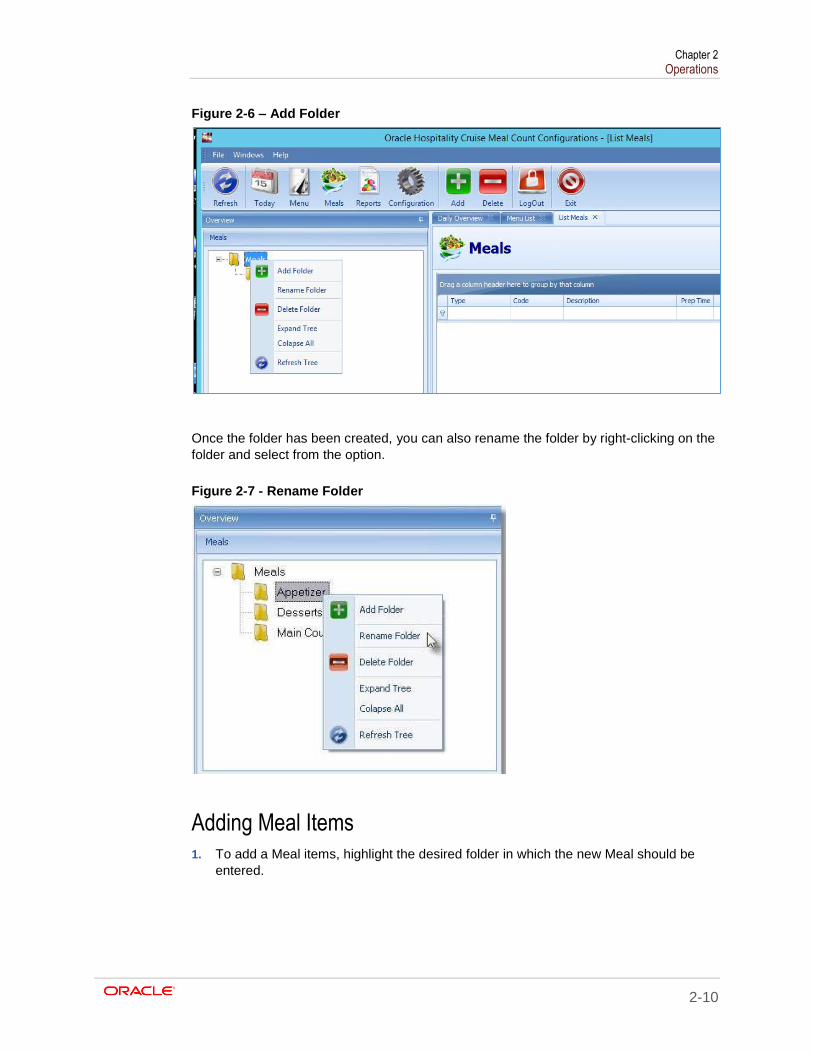
Adding a folder Highlighting the Meals tab and right-click on it will allow you to add a new folder. If you
already have a folder for the type of menu item you want to add, you can highlight the
folder and then proceed to the next step.
Chapter 2 Operations
2-10
Figure 2-6 – Add Folder
Once the folder has been created, you can also rename the folder by right-clicking on the
folder and select from the option.
Figure 2-7 - Rename Folder
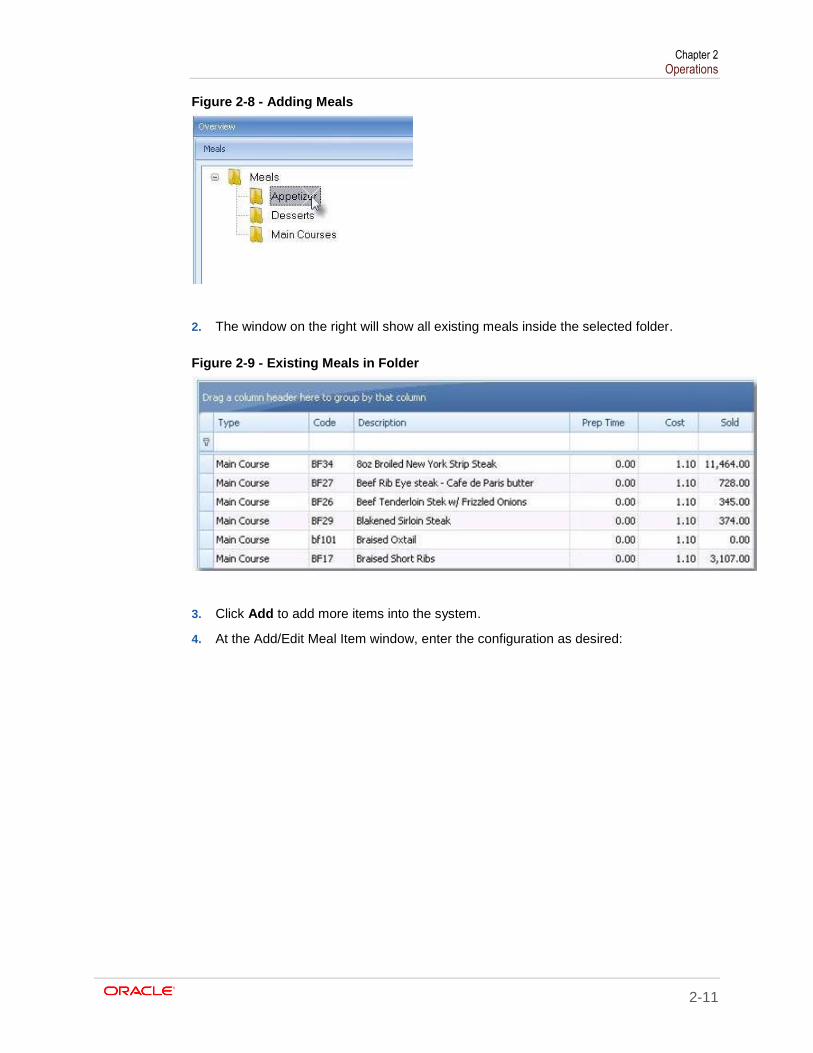
Adding Meal Items 1. To add a Meal items, highlight the desired folder in which the new Meal should be
entered.
Chapter 2 Operations
2-11
Figure 2-8 - Adding Meals
2. The window on the right will show all existing meals inside the selected folder.
Figure 2-9 - Existing Meals in Folder
3. Click Add to add more items into the system.
4. At the Add/Edit Meal Item window, enter the configuration as desired:
Chapter 2 Operations
2-12
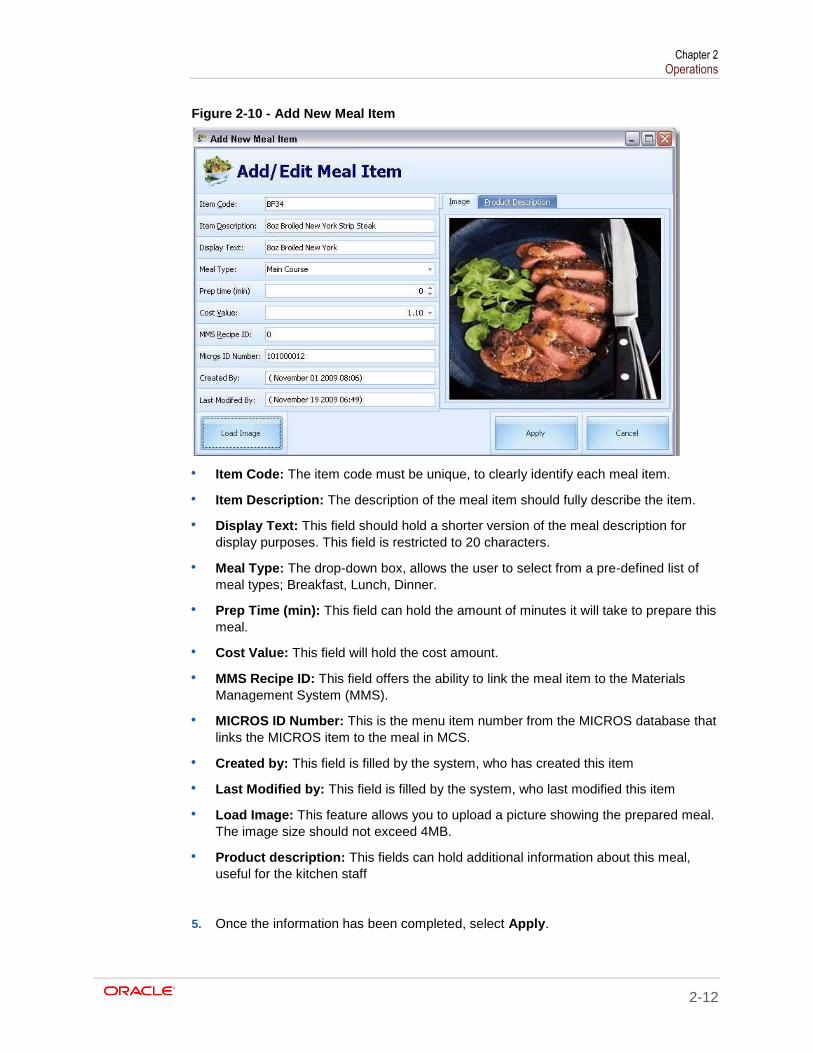
Figure 2-10 - Add New Meal Item
Item Code: The item code must be unique, to clearly identify each meal item.
Item Description: The description of the meal item should fully describe the item.
Display Text: This field should hold a shorter version of the meal description for
display purposes. This field is restricted to 20 characters.
Meal Type: The drop-down box, allows the user to select from a pre-defined list of
meal types; Breakfast, Lunch, Dinner.
Prep Time (min): This field can hold the amount of minutes it will take to prepare this
meal.
Cost Value: This field will hold the cost amount.
MMS Recipe ID: This field offers the ability to link the meal item to the Materials
Management System (MMS).
MICROS ID Number: This is the menu item number from the MICROS database that
links the MICROS item to the meal in MCS.
Created by: This field is filled by the system, who has created this item
Last Modified by: This field is filled by the system, who last modified this item
Load Image: This feature allows you to upload a picture showing the prepared meal.
The image size should not exceed 4MB.
Product description: This fields can hold additional information about this meal,
useful for the kitchen staff
5. Once the information has been completed, select Apply.

Chapter 2 Operations
2-13
Figure 2-11 - Product Description
Menus
The Menu option is where management assigns all meals/dishes to the menus.
Adding A folder Highlighting the MENUS tab and right-clicking on it allows you to add a new folder. If you
already have a folder for the type of menu you want to add, you can highlight the folder
and then proceed to the next step.
Once the folder has been created, you can also rename the folder.
Adding Meals to Menus In case changes need to be made to individual meals, the meal configuration section can
be directly access through the menu set up section. There is no need to exit the menu
section and access the meal section.

Chapter 2 Operations
2-14
1. To add a new Menu, click the + sign at the upper taskbar.
Menu Code: Enter a unique code for this Menu.
Meal Name: Enter a unique name for this Menu.
Number of Courses: Enter the amount of courses this menu will contain.
Menu Type: Select from the drop-down list what kind of menu this will be.
Created by: This field is filled by the system, who has created this menu.
Last Modified by: This field is filled by the system, the person whom last modified
this menu.
Figure 2-12 - Menu Details
2. Once you click the Add New Menu, the Meal buttons will become available. Now
Meals can be assigned to this new menu.
3. Click the Insert Meal, located at the bottom of the screen to insert the meal item in
the menu.
4. At the Add New Menu window, update the Properties, Display Locations and
Options tab as described below.
5. Click Add New when finished.
Chapter 2 Operations
2-15
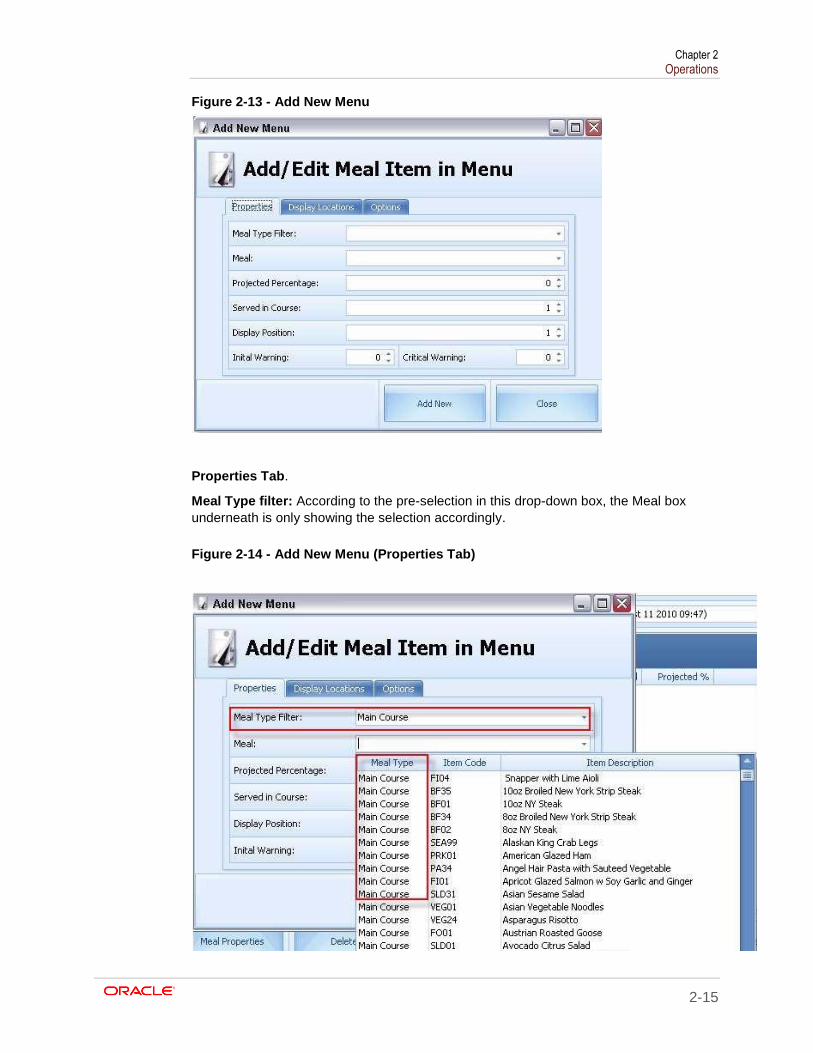
Figure 2-13 - Add New Menu
Properties Tab.
Meal Type filter: According to the pre-selection in this drop-down box, the Meal box
underneath is only showing the selection accordingly.
Figure 2-14 - Add New Menu (Properties Tab)
Chapter 2 Operations
2-16
Meal: Select the desired meal from the drop-down box.
Projected Percentage: Enter the estimated amount which will be served.
Served in Course: Enter the number of course in which this meal will be served.
Display Position: Enter the display position in which this meal should be displayed.
Initial Warning: The initial warning makes the "boarding lights" flash in orange if the
amount prepared goes below the figure entered in this field. The Initial warning will only
display if the meal page has been set up using the box configuration.
The traditional grid view does not feature the "boarding light" function.
Critical Warning: The critical warning is making the "boarding lights" flash in red if the
amount prepared goes below the figure entered in this field. The Critical warning will only
display if the meal page has been set up using the box configuration.
The traditional grid view does not feature the "boarding light" function.
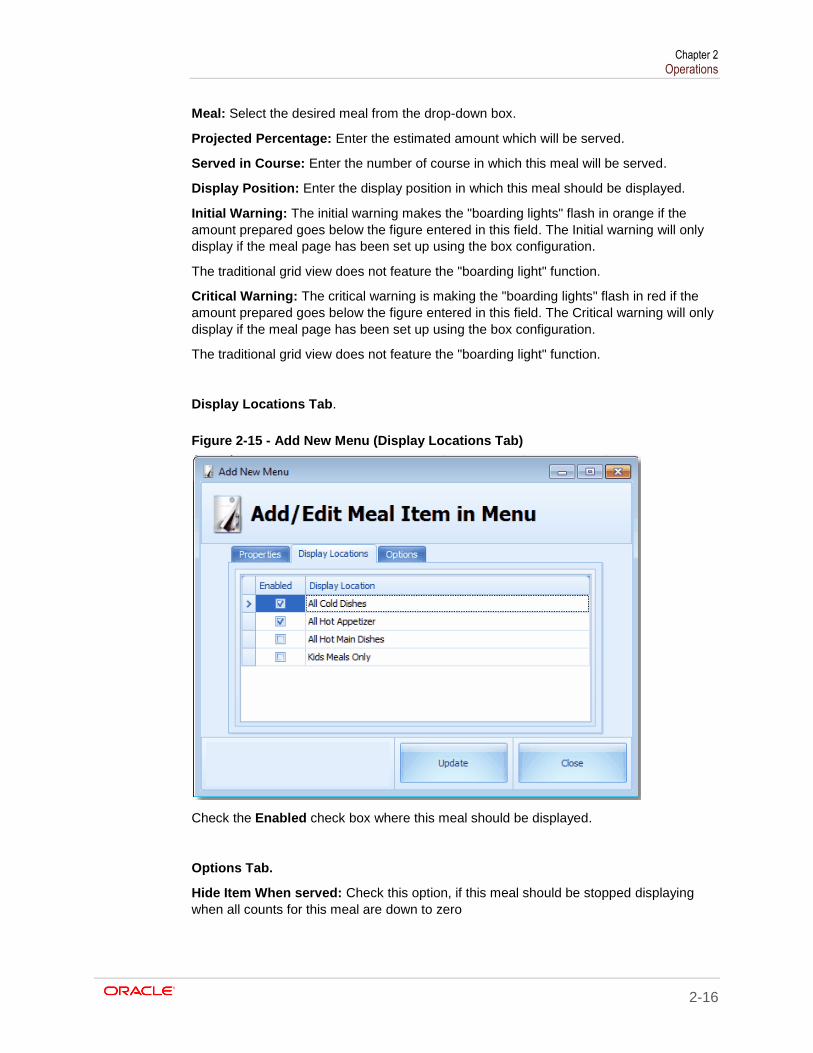
Display Locations Tab.
Figure 2-15 - Add New Menu (Display Locations Tab)
Check the Enabled check box where this meal should be displayed.
Options Tab.
Hide Item When served: Check this option, if this meal should be stopped displaying
when all counts for this meal are down to zero

Chapter 2 Operations
2-17
Flash Color Initial Warning: Select the color for the warning lights when the count for
this meal goes below the configured amount. Box view Display only.
Flash Color Critical Warning: Select the color for the warning lights when the count for
this meal goes below the configured amount. Box view Display only.
Figure 2-16 - Options Tab
It is also possible to change some data fields while in grid view: The following fields can
be modified while in grid view:
Position
MICROS ID
Initial Warning meal count
Critical Warning meal count
Projected
The following fields will be filled by the system:
Historical
QTY sold
When leaving a field, the changes are being saved automatically.

Chapter 2 Operations
2-18
To change the Position number, access the field and use the up and down arrows to
move the meal to the desired position.
If the desired position is occupied by another meal, that meal will be moved one position
up.
Figure 2-17 - Position
To sort items, simply pull a header on which should be sorted into the upper bar.
Figure 2-18 - Sort Item
To search for a specific menu, simply enter a % sign followed by some letters into the
search field. The search results will be shown in real time immediately.
Figure 2-19 - Search Function
Branching A Folder The Branch Folder feature will branch the selected folder and all its sub folder including
all the menus inside the folder. All menus inside the new folder will not have an ID since
IDs must be unique. IDs must be set up manually for all items in the new folder.
1. Right-click on the folder to copy and select Branch from the option.

Chapter 2 Operations
2-19
Figure 2-20 - Branching A Folder
2. Enter a unique name for this new folder. Click OK.
Figure 2-21 - Branch Folders
3. The new folder will now be shown.
Figure 2-22 - New Folder
As stated above, the menu codes are not being copied, because codes need to be
unique. Below diagram further illustrate the Branch Menu codes.

Chapter 2 Operations
2-20
Figure 2-23 - Original Folder
Figure 2-24 - Branched Folder
Editing Menus This chapter shows how to edit the meals which have been added to a menu and how to
edit the meal properties.
1. Enter the Menu Configuration section and select the desired menu from the folders
Figure 2-25 - Editing Menus
Some menu specific settings can be edited in grid view.

Chapter 2 Operations
2-21
Figure 2-26 - Menu Details (Grid View)
The available buttons on the bottom offer more options.
Figure 2-27 - Buttons For More Options
To insert a Meal, see chapter Adding Meals to Menus.
Figure 2-28 - Add/Edit Meal Item in Menu (Properties)
The Edit Meal allows modifying the meal settings in regards to this menu.
The Meal Properties allows modifying the meal global settings
MICROS and Check Printing
Chapter 2 Operations
2-22
The first Meal Count station of the entire circle would be the MICROS POS.
In General, there are two operational ways to use the MICROS side with the Meal Count
System. The decision which way should be used must be taken before the
implementation of the meal count system starts.
Option A:
The MICROS system only contains numeric items (e.g. Appetizer 1, Appetizer 2,
Appetizer 3 etc)
Advantage: Almost no MICROS menu item set up needed on a daily basis.
Disadvantage: The waiters only see global names on the MICROS screens, like
Appetizer1, Appetizer2, Main, Main2, etc
Option B:
All meals are set up with real names in MICROS and the waiter see the real names on
the MICROS buttons when posting.
Advantage: The waiters can use the real buttons in MICROS, showing the real name of
the meals
Disadvantage: This set up requires a lot of menu item maintenance on the MICROS side,
because every day a different menu must be configured or activated.
Option A: Numeric Items in MICROS
Posting a Check The first Meal Count station of the entire circle would be the MICROS POS. Below are
the steps to Posting a Check.
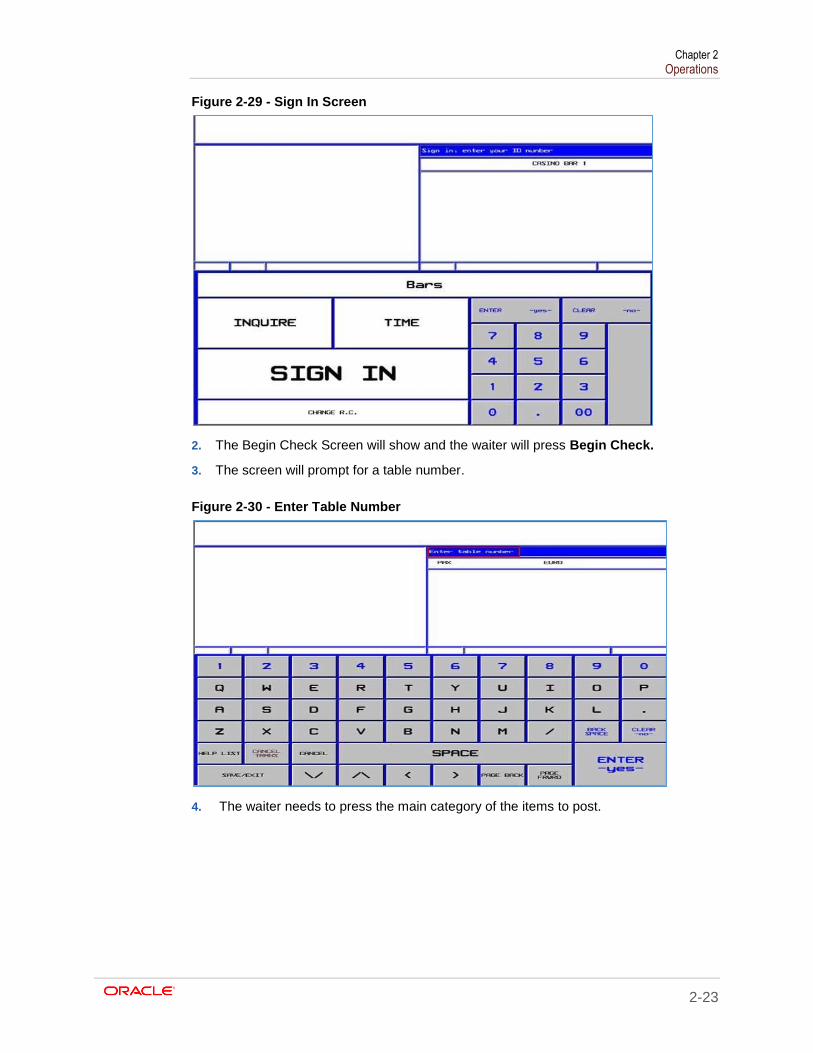
1. User sign in to UWS by swiping the MICROS employee card or entering the ID.
Chapter 2 Operations
2-23
Figure 2-29 - Sign In Screen
2. The Begin Check Screen will show and the waiter will press Begin Check.
3. The screen will prompt for a table number.
Figure 2-30 - Enter Table Number
4. The waiter needs to press the main category of the items to post.

Chapter 2 Operations
2-24
Figure 2-31 - Main Categories
5. The items are being posted accordingly. The touched items will appear in the upper
left hand corner. All items are 0.00 priced.
Figure 2-32 - Items Chosen Listing
6. Once all items for the table have been posted, the waiter can press Print. This will
execute the print out of all meal count checks sorted by course. Once completed the
workstation will sign out and the next waiter can post the next table.
7. The printed checks should be kept with the waiter until the meals are being picked up
from the kitchen and the dishes are being scanned at the scanning station at the
restaurant exit.

Chapter 2 Operations
2-25
Voiding a check
This following steps shows how an item is voided in MICROS.
1. User sign in to UWS by swiping the MICROS employee card or entering the ID.
2. The Begin Check Screen will show and the waiter will press Begin Check. The
screen will prompt for a table number.
3. In order to post the next item as negative, the waiter needs to press the Void.
4. The word VOID will appear on the screen, indicating that the next item posted will be
negative.
Figure 2-33 - Void
5. Now the waiter navigates to the item which should be voided via the main categories.
The item posted will appear in red.
Figure 2-34 - Voided Item (in red)
6. By pressing Print, the check will be closed and the negative quantity will be
registered and deducted from the meal count accordingly.
Reports
The Reports option shows all available Meal Count Reports that are set up and can be
very useful on a daily basis.
To generate a report,
1. Highlight the desired report and press the Select Report button located at the bottom
right of the screen.

Chapter 2 Operations
2-26
Figure 2-35 - Select Report
2. Select desired report criteria and click Refresh to generate the report.
Figure 2-36 - Refresh
3. The selected Report will preview on screen per below example and can be exported
in various formats or printed on paper.

Chapter 2 Operations
2-27
Figure 2-37 - Reports Format
4. In some reports the second (2nd) or third (3rd) page will display in graphics for ease of
reading.
Figure 2-38 - Graphics
Chapter 2 Operations
2-28
List and description of all available Reports in MCS:
MC001 Multiple Item Sales Overview
This report allows you to select a number of meals during a selected date range and then
show the breakdown of these meals with the number anticipated versus
served/remaining and the variance. This information is broken down by revenue center.
MC002 Menu Sales Overview
This report shows the total count of dishes served as part of a selected menu and include
every time this menu has been served in the selected date range in MCS history and list
the dates when it was served. This information is also captured in several graphs on
page 2 of this report.
MC003 Prepared to Sales Comparison
This report shows the total entrees anticipated versus total entrees served and the
variance, as part of a selected menu during a selected date range. This will show under
and over production for entrée items per menu. This information is also captured in
several graphs on page 2 of this report.
MC004 Item Sales Overview
This report shows the breakdown of one selected meal with the number of total dishes
anticipated versus total dishes served and the variance, during a selected date range.
This information is broken down by Revenue Center.
MC005 Menu Items List All
This report lists all the current menu items in alphabetical order in the database and also
shows in how many different menus it appears and how many of these meals in total
have been sold in the MCS history.
MC006 Meal Items List by Menu
This report lists all the current menu items in alphabetical order per selected menu and
also shows how many times/days it has been used, in how many menus the meal
appears and how many of each meal have been sold in the MCS history.
MC007 Check Overview by Day
This report gives an overview of all checks entered during a selected day and shows the
information by Revenue Center. The overview displays the table number, check ID, print
ID, time opened, time closed, how many minutes passed between opening and closing
and how many meals were ordered on the check.
Chapter 2 Operations
2-29
MC008 Check Details
This report allows you to pull up a check by its check ID and review the order.
MC009 Check Details by Date and Table
This report shows the check information entered on a specified date and table number.
MC010 Modifiers Overview by Date Range
This report shows the breakdown of modifiers ordered and their totals. This information is
also captured in several graphs.
MC011 Menu Overview with Averages
This report shows the total amount of dishes served during a selected date range as part
of a selected menu and it’s percentage of the total served meal mix. The report will list
every time this menu has been served in the MCS history and the date when it was
served. The report calculates the average served based on history, as well as a weighted
average based on the total of meals served in that menu. This information is also
captured in several graphs on page 2 and 3 of this report.
MC012 Meal Items by Groups
This report lists all the current menu items broken down by meal groups and also shows
in how many different menus it appears and how many of these entrees in total have
been sold in the MCS history.
MC013 Items per Menu with Assigned MICROS ID
This report shows per selected menu what the MICROS ID (screen buttons) is per item in
this menu.
MC014 Meal Items by Single Groups
This report lists the current menu items of one selected meal group and how many of
these meals in total have been sold in the MCS history.
MC015 Menu Popularity Overview with Averages per Menu and Selected Meals
This report shows a “popularity” breakdown of a selected menu, during a selected date
range. The criteria List allows you to exclude certain meals if so desired. The “popularity”
of the dishes is shown as a percentage based on passenger counts as well as a
percentage based on meal counts. These percentages are also displayed in two graphs
on page 2.
MC016 Menu Overview with Averages split by Location and Seating

Chapter 2 Operations
2-30
This report shows the total entrees served during a selected date range as part of a
selected menu and it’s percentage of the total served entrée mix. The report shows the
breakdown per lower and upper level and per seating. The report calculates the average
served based on history, as well as a weighted average based on the total of entrees
served in that menu.
MC017 Check Details not closed
This report lists all the checks that have not been closed in the MCS history. This should
be reviewed on a daily basis by the DR Manager and he/she should follow up with the
steward involved.
MC018 Daily Sales Summary
This report shows the total dishes served on any date and a breakdown by Lower and
Upper Dining Room and by seating. This information is also captured in several graphs
on page 2 of this report.
MC019 Menu Overview with Averages by Location
This report shows the total meals served during a selected date range as part of a
selected menu and it’s percentage of the total served meal mix. The report allows you to
select the revenue center. The report calculates the average served based on history, as
well as a weighted average based on the total of entrees served in that menu.
MC020 Prepared to Sales Comparison (Small)
This report is the same report as MC003, but in a condensed format for printing
purposes.
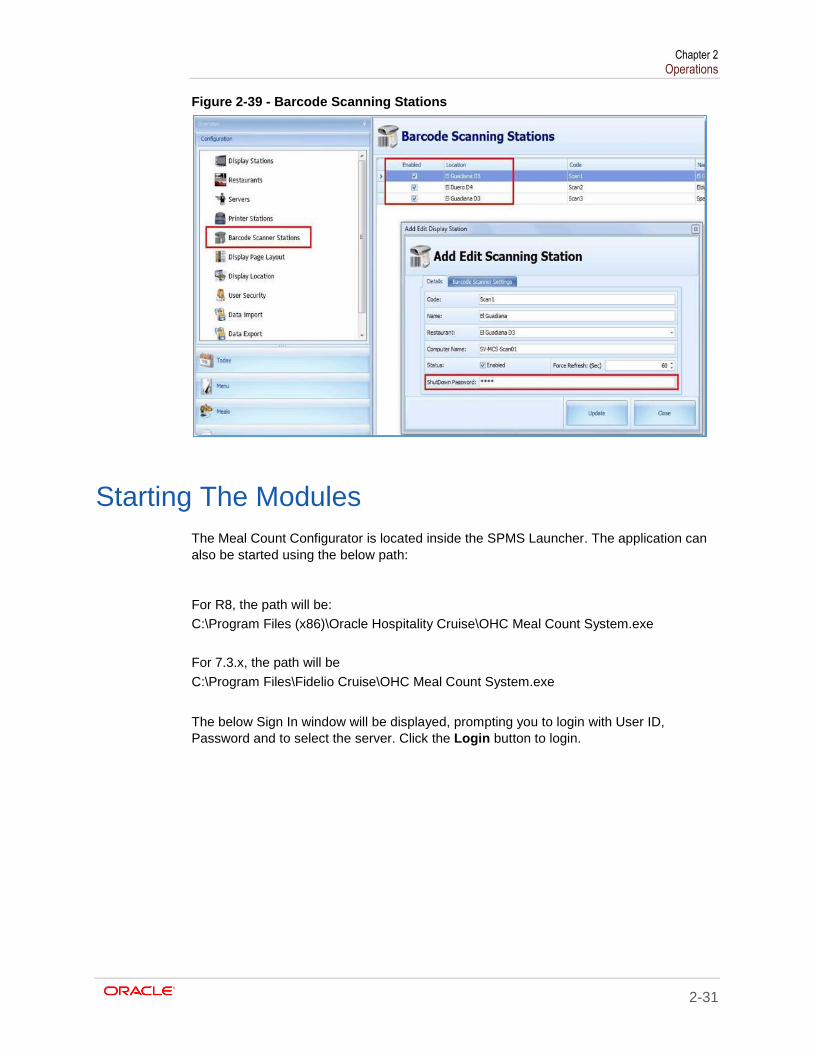
Scanning Station
The scanning station is being used to close the Meal Count Circle as a last step.
The waiter scans the previously printed check and the Meal Count System now counts
the contained dishes as "served"
Each meal leaving the kitchen must be scanned out for correct reporting and check
duration time capture.
The scanning station application is configured to run in full screen mode. If for any reason
the user needs access to the windows surface of that small pc, the user needs to know
the exit password which is configured in the scanning station configuration section. Only
numeric passwords can be used.
Chapter 2 Operations
2-31
Figure 2-39 - Barcode Scanning Stations
Starting The Modules
The Meal Count Configurator is located inside the SPMS Launcher. The application can
also be started using the below path:
For R8, the path will be:
C:\Program Files (x86)\Oracle Hospitality Cruise\OHC Meal Count System.exe
For 7.3.x, the path will be
C:\Program Files\Fidelio Cruise\OHC Meal Count System.exe
The below Sign In window will be displayed, prompting you to login with User ID,
Password and to select the server. Click the Login button to login.

Chapter 2 Operations
2-32
Figure 2-40 - Login
The Meal Count System can also be accessed via the SPMS Launcher as shown below.
The below Sign In window will be displayed. Login with User and Password, then click
Login.
Figure 2-41 - Login via Launcher

Chapter 2 Operations
2-33
To start the MCS Display, on the client side, which has the display connected, start the
OHC Meal Count Display.exe using the shortcut on the desktop or the following path:
For version 7.3.x, path will be c:\Program Files (x86)\Fidelio Cruise\OHC Meal
Count Display.exe
For version 8.0.x, path will be c:\Program Files (x86)\Oracle Cruise
Hospitality\OHC Meal Count Display.exe
The client to which the Display is connected to should have the OHC Meal Count Display.exe inside the Autostart. After double-clicked the exe, the Meal Count Splash Screen will show and start the Display application. The loading process may take a little while according to the amount of pages, which have been configured, for this display.
To start the MCS Scanning Station, on the client side, which has the bar code scanner connected, start the OHC Meal Count Station.exe using the shortcut on the desktop or the following path:
For version 7.3.x, path will be c:\Program Files (x86)\Fidelio Cruise\OHC Meal Count Station.exe
For version 8.0.x, path will be c:\Program Files (x86)\Oracle Cruise Hospitality\OHC Meal Count Station.exe
To start MCS Interface, on the client side, which has the interface installed, start OHC MCS Interface.exe using the shortcut on the desktop or the following path:
For version 7.3.x, path will be c:\Program Files (x86)\Fidelio Cruise\OHC Meal Count Interface.exe
For version 8.0.x, path will be c:\Program Files (x86)\Oracle Cruise Hospitality\OHC Meal Count Interface.exe
Today
The Today section contains several tabs.
Figure 2-42 - Today Screen
Overview: This section displays all events and also is the place to configure new events
or edit existing event.
Meal Preparation: This tab displays all meals according to the menu which has been
linked to today’s event. Meal preparation figures are being added here.

Chapter 2 Operations
2-34
Today: This tab displays the same kind of overview than a MCS display screen
Checks: This tab displays all check details for the selected date
Statistics: This tab overs some interactive reporting functions
Figure 2-43 - Overview Tab
On the left hand side, a calendar is shown for easy date selection.
Figure 2-44 - Calendar
Overview & Events The Meal Count System is based on events. Every dinner time/seating must be set as
event.
An event usually starts 15 to 30 minutes prior to the actual dinner start.
Events should always be set up at least one day in advance, so that when an event ends
and the meal pictures for the next day is shown. Meal pictures are taken from the menu
set up which is linked to the upcoming event. If no event has been set up for the next
day, the system does not know which images to display.

Chapter 2 Operations
2-35
Events Tab
This section displays all events and also is the place to configure new events or edit
existing event. The total amount of events for the day and the total amount of expected
pax are being shown at the bottom of the grid view.
Figure 2-45 - Events Tab
Adding an Event
Without an active event, the system does not work. Every seating or dinner/lunch event
must be configured as Event.
To add and event, cClick on Add New Event, update the require information and click
Add New when finish.
Date: Select the date on which this event should be active
Location: Select the location/restaurant where this event will be active
Meal Type: Select the meal type for this new event
Seating: Enter the seating number, for which this event will be used
Time Start: Enter the start time for this event
End Time: Enter the time when this event should end
Next day: Check this box if the event ends past midnight (new in version 300)
Menu: Elect the menu which should be used for this event
Expected Passengers: Enter the amount of expected passengers for this event
Print Special courses: Enter the course number in which any special courses will be printed
Figure 2-46 - Add New

Chapter 2 Operations
2-36
The event will now be shown in grid view.
Figure 2-47 - Overview Tab (Grid View)
After the event has been saved, all meals will show in Meal Preparation tab and the
projected counts can be entered.
NOTE:
The Preparation quantities must be entered BEFORE the next event becomes active, to show correct figures.
In case a user tries to enter an Event for the same time and the same restaurant, than an
existing event, the system displays a warning.

Chapter 2 Operations
2-37
Figure 2-48 - Warning
Editing an Event
1. To edit an existing event, either double click on the desired event line or use the Edit
Event button.
2. At the Add/Edit Daily Event window, make the necessary changes and the click
Close to save and close the window.
Figure 2-49 - Editing An Event
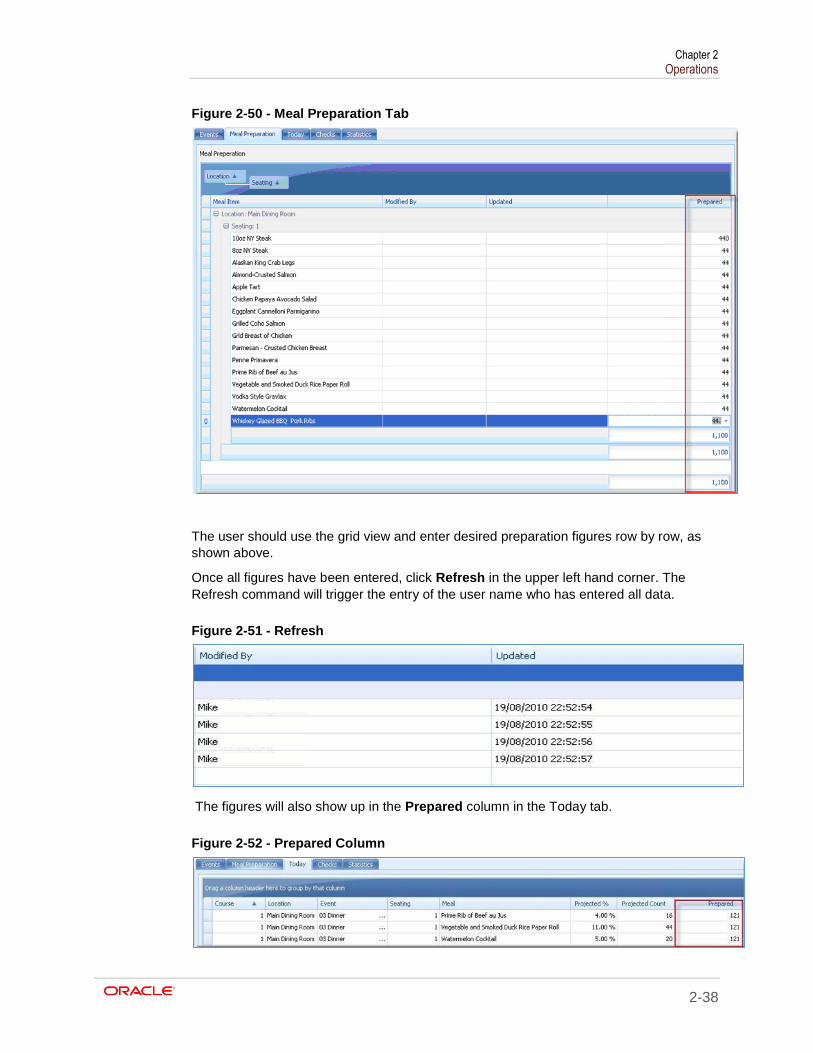
Meal Preparation After a new event has been added, preparation data must be added. The preparation tab
shows all meals of today's event. In order to show the correct figures, the Preparation
quantities must be entered before the next event becomes active.
Chapter 2 Operations
2-38
Figure 2-50 - Meal Preparation Tab
The user should use the grid view and enter desired preparation figures row by row, as
shown above.
Once all figures have been entered, click Refresh in the upper left hand corner. The
Refresh command will trigger the entry of the user name who has entered all data.
Figure 2-51 - Refresh
The figures will also show up in the Prepared column in the Today tab.
Figure 2-52 - Prepared Column
Chapter 2 Operations
2-39
Today This tab displays the same kind of overview as MCS display screen.
Figure 2-53 - Today Tab
Figure 2-54 - Meals for Today
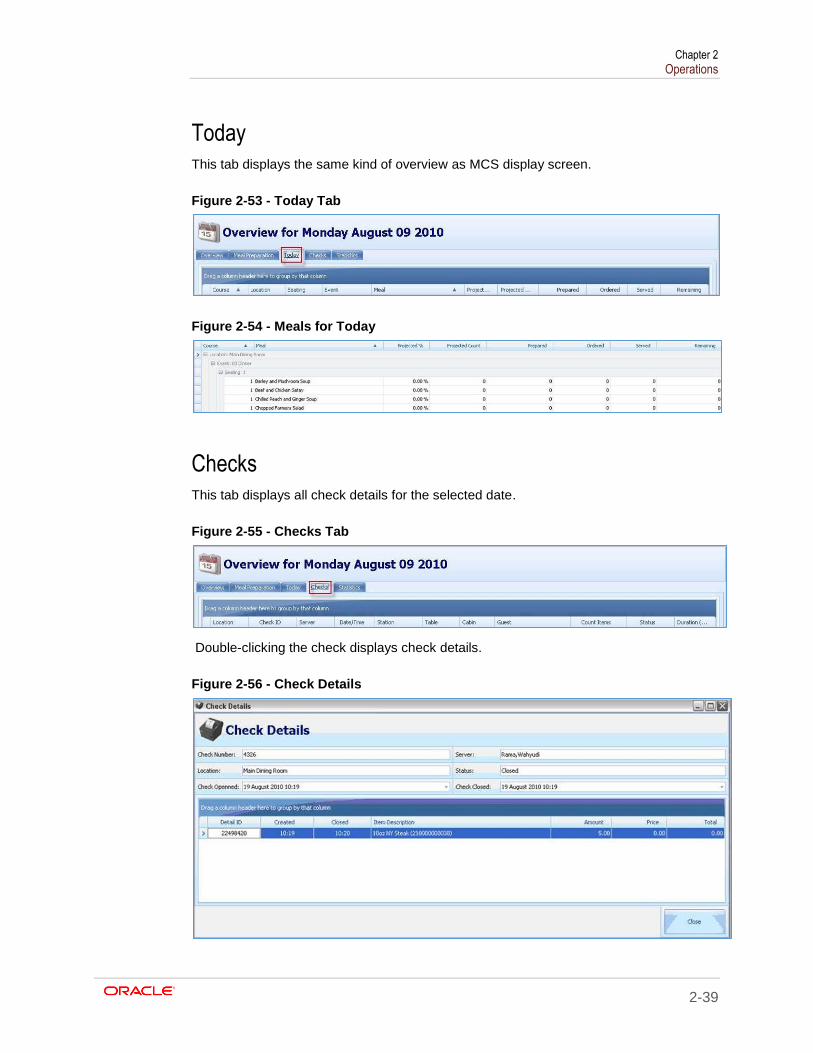
Checks This tab displays all check details for the selected date.
Figure 2-55 - Checks Tab
Double-clicking the check displays check details.
Figure 2-56 - Check Details
Chapter 2 Operations
2-40
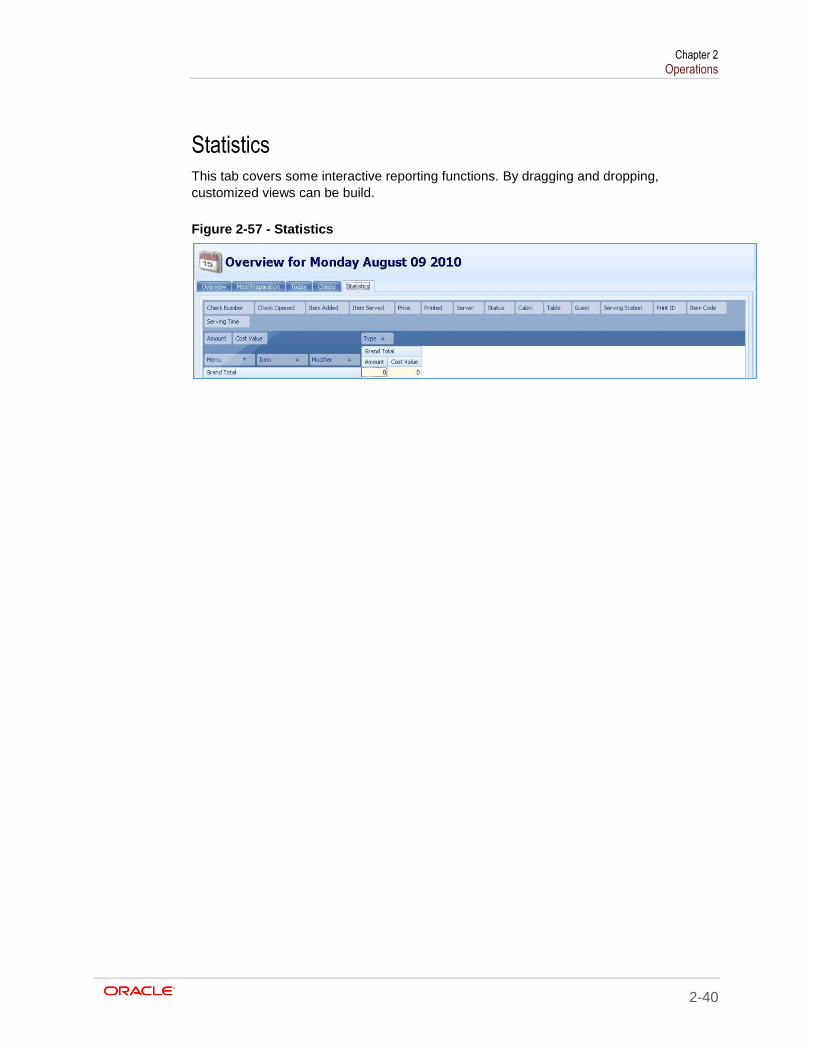
Statistics This tab covers some interactive reporting functions. By dragging and dropping,
customized views can be build.
Figure 2-57 - Statistics