how do i view and respond to support requests? · along with a box where you can enter your support...
TRANSCRIPT

How Do I View and Respond to Support Requests?
Introduction The EIS Gateway includes the functionality to allow users to send messages to the EPA concerning any number of issues. Called Support, this functionality was developed to ensure a consistent method for sending and tracking issues that relate to the Emissions Inventory System process. This section of the EIS User’s Guide addresses how to interact with your requests and requests sent by other users.

The EIS Gateway: How Do I View and Respond to Support Requests Your Entry into the EIS
Step 1: From within the EIS Gateway, you will see on the left side of the page a heading entitled “Support.” Under this heading, select the option “View Support Requests.”
2
The EIS Gateway: How Do I View and Respond to Support Requests Your Entry into the EIS
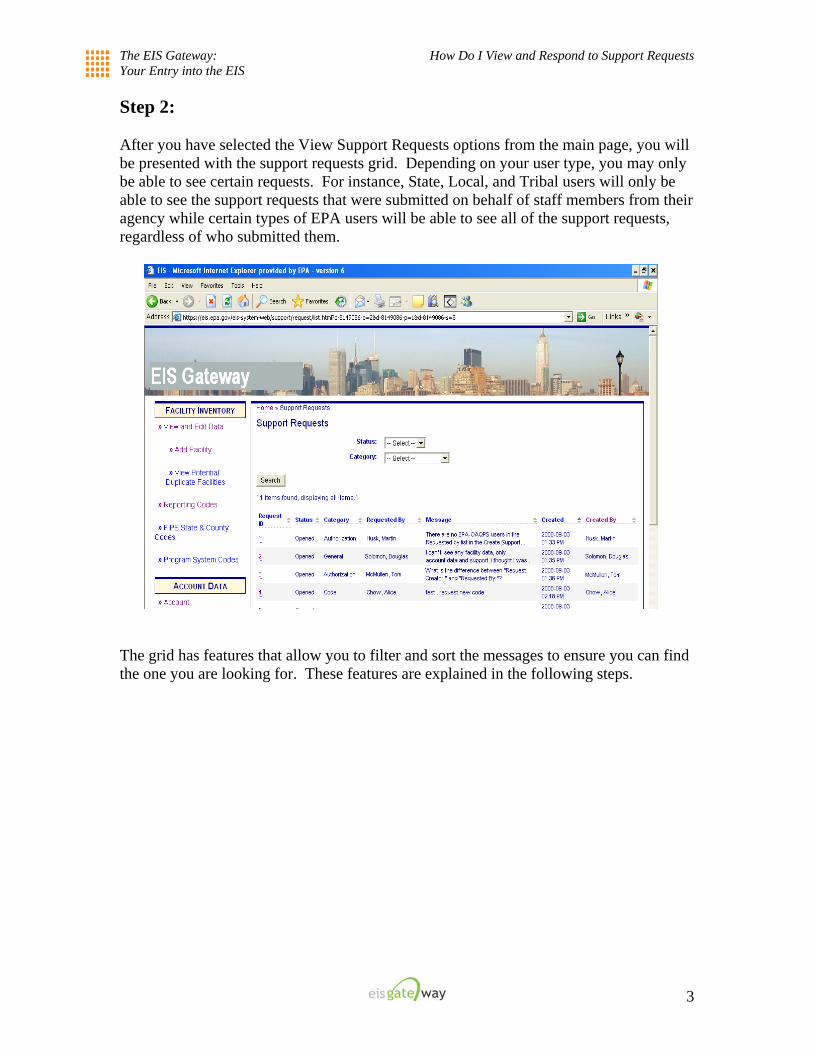
Step 2: After you have selected the View Support Requests options from the main page, you will be presented with the support requests grid. Depending on your user type, you may only be able to see certain requests. For instance, State, Local, and Tribal users will only be able to see the support requests that were submitted on behalf of staff members from their agency while certain types of EPA users will be able to see all of the support requests, regardless of who submitted them.
The grid has features that allow you to filter and sort the messages to ensure you can find the one you are looking for. These features are explained in the following steps.
3

The EIS Gateway: How Do I View and Respond to Support Requests Your Entry into the EIS
Step 3: All of the messages appear in the grid as the default. At the top of the grid are two boxes that allow you to filter on the request type. You can filter on the request status, on the request type, or on a combination of the two.
One you have selected the appropriate filters, select the Search button. The requests in the grid will appear based on your filter selection.
4

The EIS Gateway: How Do I View and Respond to Support Requests Your Entry into the EIS
Step 4: The request grid also provides you with the ability to sort each column. Next to each column is a set of double arrows. These arrows allow you to sort the column in ascending or descending order. Place your mouse over a column header and it will highlight. When you click on the highlighted column header, the column will sort in ascending order. Click on it again and the column will sort in descending order.
5

The EIS Gateway: How Do I View and Respond to Support Requests Your Entry into the EIS
Step 5: To view the details of a specific request, simply click on the Request ID. The information on that request will appear on a new screen.
6

The EIS Gateway: How Do I View and Respond to Support Requests Your Entry into the EIS
Step 6: After you have selected a Request ID from the request grid, the details of that request will appear on the screen. From this page, you will be able to view all the support messages that have been added to the original support request, listed under the View Conversation section. You will also be able to add your own support message to the original support request by selecting the link on the right side of the page entitled “Add Support Message.” Once you have added your support message, it will appear under the “View Conversation” section.
7
The EIS Gateway: How Do I View and Respond to Support Requests Your Entry into the EIS
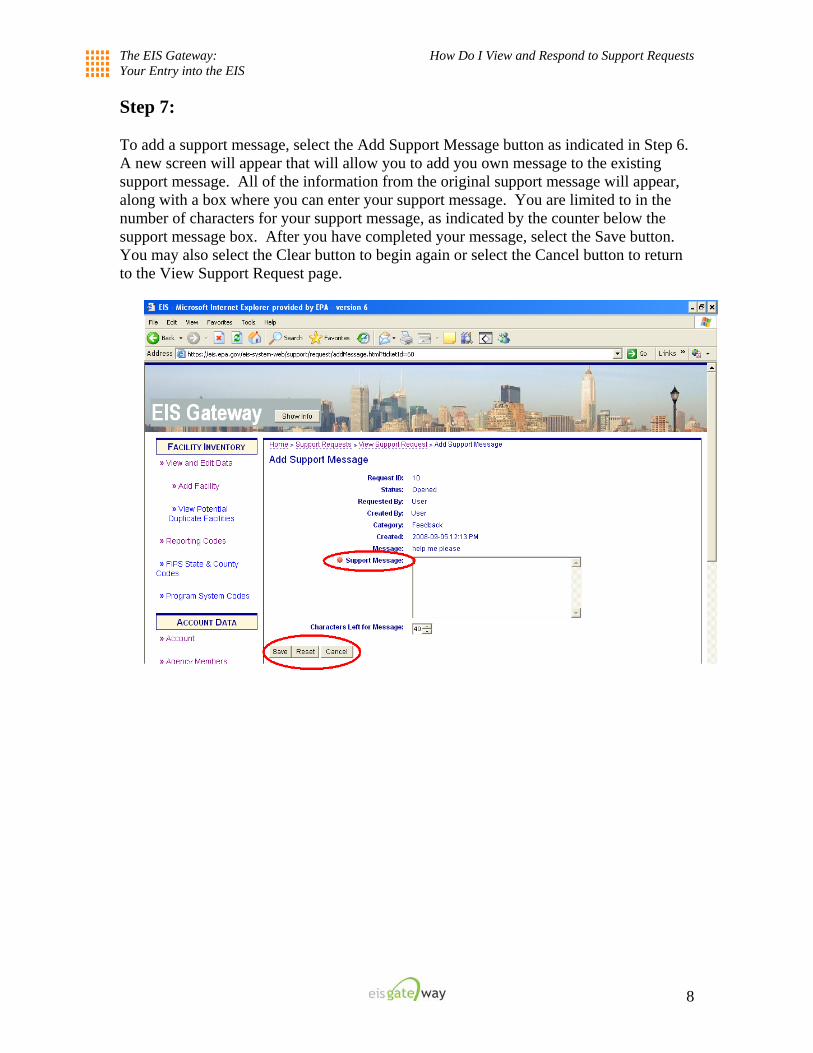
Step 7: To add a support message, select the Add Support Message button as indicated in Step 6. A new screen will appear that will allow you to add you own message to the existing support message. All of the information from the original support message will appear, along with a box where you can enter your support message. You are limited to in the number of characters for your support message, as indicated by the counter below the support message box. After you have completed your message, select the Save button. You may also select the Clear button to begin again or select the Cancel button to return to the View Support Request page.
8

The EIS Gateway: How Do I View and Respond to Support Requests Your Entry into the EIS
Step 8: If you select the Save button, you will be prompted to confirm that you want to save the support message. Selecting OK will return you to the original support request where you will see the support message you added under the View Conversation box. Additional support messages added to the support message will be included in the View Conversation box.
9

The EIS Gateway: How Do I View and Respond to Support Requests Your Entry into the EIS
Step 8: At any point in the process, you may go back to the Support Request List by clinking on the View Support Requests link located in the right corner of the page.
10