how to build a 12 volt swamp cooler - i plan to survive ...iplantosurvive.info/cooler.pdf · been...
TRANSCRIPT

How to build your own
12 volt Evaporative
(swamp) cooler for your home,
powered entirely by the sun!
With the high cost of grid power and it'sonly going higher a lot of people arelooking for ways to keep cool at low orNO cost, with maximum efficiency!
We got it - a 12 volt super low cost – (howabout FREE). And Efficiency depends on thehumidity in your area but even if you have highhumidity this still works.
This Evaporative (Swamp) Cooler works by pumpingwater up into the cooler pads and then, the water runsdown the pads while a fan pulls air through the pads

causing it to evaporate (that evaporation cools the air)and then is blown into your room to cool your home.
Evaporative coolers are very popular in homes out westwhere many people ONLY have Evaporative Coolers tocool their homes.
Through trial and error we have developed the bestwater pumps and the best 12 volt fans to move the airand water most efficiently in your system.
And with using Solar Panels you can power this systemfor FREE and we show you how to do that as well.
We show you how to build a water reservoir so youdon’t have to keep adding water every couple of hours.
By using my 12 volt swamp cooler in the summer, Ihave gotten my all electric home (with a big chestfreezer) grid power bill down to $67.00 per month.
HOW MUCH YOU PAY FOR ELECTRICITY ?
These are not plans I did up a couple of months ago - Ibuilt my first swamp cooler Spring of 2011, so I havebeen using a 12 volt swamp cooler for 2 summers, so Iknow something about 12 volt swamp coolers and I willshow you step-by-step how to build the perfect 12 voltswamp cooler and save a lot on the mistakes I made thefirst year with mine.

Step-by-step simple plans First you will need to acquire a used swamp cooler, look for a large onethat’s not to small but not a commercial one either. Look for one thatdoes not have holes in it (at least not big holes) and not to rusty, and theblower and motor does not matter as you will be removing them anyway.
1. Pull your swamp cooler apart to the frame of the thing. Remove theblower, blower housing, motor, water pump.
This is a good time to give the thing a good cleaning and paint the bottom ofthe water holding area with a water proof swamp cooler sealer that you canfind on Ebay or from a swamp cooler supply parts house, or a localhardware. This also is a good time to address any rust issues, if you have rusttake a wire brush to it and then paint it to protect it from moisture.
In removing my cooler blower housing I discovered it was welded onto thebody of the cooler and I had to take a big screw driver and a big hammer toseparate the blower housing from the cooler body. If this is your case it’sjust a little extra work but it’s still well worth the extra effort. Note in thephoto below the two black stripes below the vent opening that is industrialduck tape, I used silicone sealer to plug the holes from removing the blowerhousing and smoothed out the silicone on both sides of the holes and thenapplied the industrial or rubberized duck tape over the line of holes to give itextra strength. You can use regular duck tape but after a season you willfind it will become weather worn and will have to be replaced. So youmight as well use the good stuff.
Removed blower, blower cover, belt and motor

Gutted cooler below, you will need to leave the spider and hose attached asis. Note the rust in the bottom of the water pan of my cooler, I addressed thatissue first.

Note my industrial grade duck tape and silicone covering holes fromremoving blower housing

Side panels can be cleaned, painted and replace the pads with new pads

Some people swear by the synthetic pads and some swear by the naturalwood shavings, which ever you choose is up to you. I have used bothsynthetic pads and natural wood shaving pads and for my money the Naturalpads are much better. The Synthetic pads do not wick the water into thefibers like the Natural pads, so they Do Not evaporate the water near as wellas the natural pads. So I think the Natural pads do a much better job coolingdown more so than the synthetic pads. I do find that you can cut thesynthetic pads to fit where it’s more difficult to cut the natural woodshavings to fit your cooler frame and the Natural pads make a bigger messwhen you cut them. One of the few drawbacks to the Natural pads.
2. Next you will need a fan
We used a universal 12 volt radiator fan for several reasons, they are cheap,they blow a high volume of air, use little electricity compared to a ½ horsepower motor to operate the blower that was installed in your swamp coolerto begin with and they are easy to install. We opted for the single 16 inchfan ($26.00 on Ebay including shipping) as our opening in the vent was 22inches by 12 inches and that would fill the hole nicely with a little gap leftover, also we could wire two switches up so we could run either fan or waterpump separately. These fans have only one setting and that’s on high if youwant a speed control device to adjust the fans speed that device cost about$14 on ebay. Look under DC motor speed controls in ebay. Some people do

not like the fan running wide open full time and we don’t blame them causesometimes we would like to tone it down just a bit also. We found that whenwe blocked off the opening around the fan it increased the air output. Weused industrial duck tape (Gorilla Tape) and it worked nicely, we taped itinside and out to be sure.
We used self taping bolts for the fan installation. When you put the fan upin place you need to spin the fan to see if it hits or rubs anywhere, if so dowhat we did and take a hammer and adjust it until the fan does not rub ortouch anywhere. Also be sure to buy ONLY a reversible fan as most of thesefans push the air through the fan shroud and this is the wrong way for your12 volt swamp cooler to work. IF and only IF it’s reversible you just hookup your positive wire to the fans black wire and the negative wire to thecolored wire this way the fan will run backwards just fine and that way itwill pull air from the cooler box and push it out into your room.

3. Now you will need a water pump
We used a high volume 390 Gal. Per Hour, 12 volt brushless motor, pondpump. We recommend about 300 gallons to 500 gallons per hour flow.This will be plenty of water for your cooler to operate efficiently. You canfind tons of 12 volt water pumps on Ebay under: 12 volt pond pumps, or 12volt water pumps.

We did a search in Ebay under 12 volt pond Pumps and found a $32 pumpthat was brushless with a long service life, so that is what we are using. The

problem we were having with 12 volt bilge pumps was they were not madefor continuous use and would burn out to fast. We are very happy with the12 volt brushless Pond Pump we found on Ebay. Because of the extravolume of water this pump puts out we added a 1 inch “T” going into two½” fittings and added another hose going up to an extra “spider” to distributethe extra water to the proper places at the top of the cooler pads in the coolerand now it works great.
4. Next you will need to wire up your fan motor and your water pump.
We opted to use the clip on battery terminals so we could quick disconnectin case we had to, and to the right is our wired in 10 amp fuse and note thetwo switches in the center one is for the blower fan and the other is for thewater pump. It’s simple to wire this up you just take the negative wire andsplit it and run one wire to the water pump and the other to the fan motor.The positive wire goes from the fuse to be split into two wires, one goes tothe switch then to the water pump and the other goes to the other switch and
then to the fan motor, so that way you can shut off the water pump in case itruns low on water and you want to keep the fan on. (Our switches have an

extra ground wire as they have a LED that lights the switch up when turnedon).
5. Installing the water pump, float valve and the water supply line
Here we have the water pump hooked up to the 2 lines going to the spidersat the top and we have a new float valve also note we used undercoating tospray a liner in the rusty water pan, after we cleaned it up some. Also notethe fiberglass screen we will wrap around the bottom of the pump to act as afilter to keep trash out of the pump. You will need to do this as all kinds oftrash ends up in the bottom of this pan and you do not want it to clog upyour new pump. Also when you get water plumbed to the float valve youadjust it by bending the wire rod that goes out to the blue float. Most swampcoolers need to be about 4 inches deep with water. A little more of a little
less is fine you just don’t want it running dry or running water out the sidesof your cooler. Also note: the black box on the bottom of the pump is a
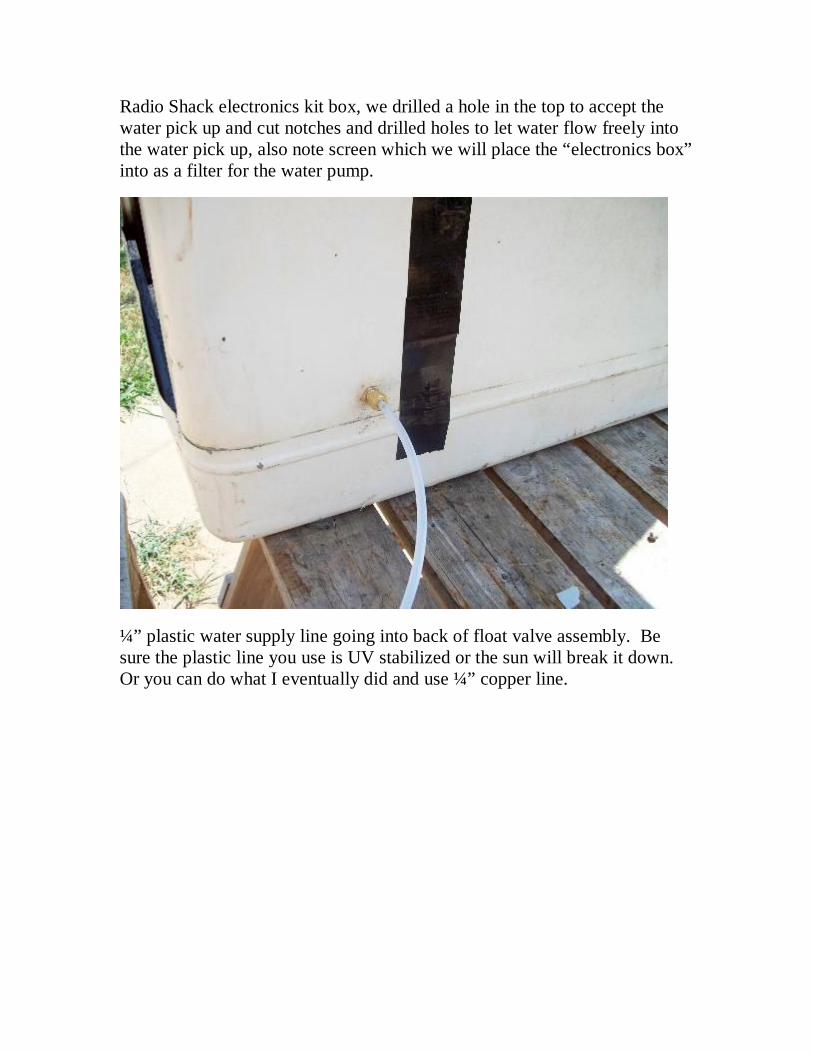
Radio Shack electronics kit box, we drilled a hole in the top to accept thewater pick up and cut notches and drilled holes to let water flow freely intothe water pick up, also note screen which we will place the “electronics box”into as a filter for the water pump.
¼” plastic water supply line going into back of float valve assembly. Besure the plastic line you use is UV stabilized or the sun will break it down.Or you can do what I eventually did and use ¼” copper line.
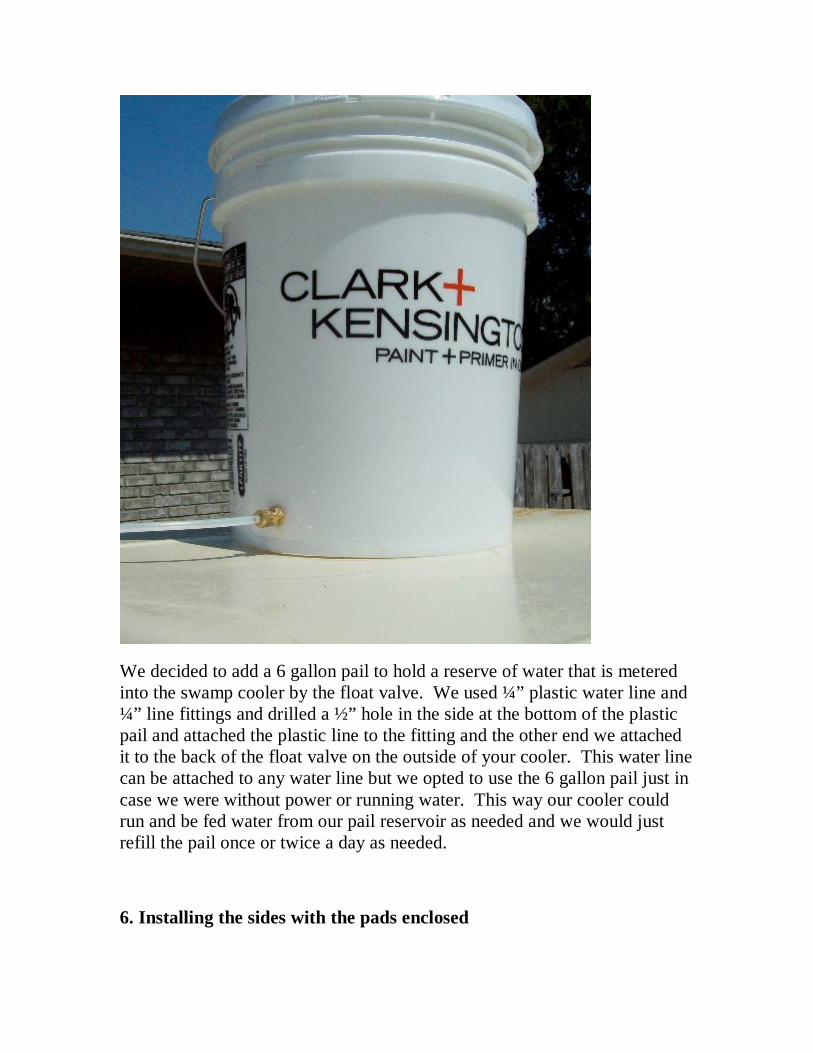
We decided to add a 6 gallon pail to hold a reserve of water that is meteredinto the swamp cooler by the float valve. We used ¼” plastic water line and¼” line fittings and drilled a ½” hole in the side at the bottom of the plasticpail and attached the plastic line to the fitting and the other end we attachedit to the back of the float valve on the outside of your cooler. This water linecan be attached to any water line but we opted to use the 6 gallon pail just incase we were without power or running water. This way our cooler couldrun and be fed water from our pail reservoir as needed and we would justrefill the pail once or twice a day as needed.
6. Installing the sides with the pads enclosed

Once you get the pads installed the sides of the swamp cooler should justsnap into place. You usually have to fit the top in first and then pick it up sothe bottom will pick up and over the bottom lip of your swamp cooler andthen it should just drop into place. The pads should be placed so cover all airholes and IF NOT you can always duck tape or silicone any openings thatare not covered by the pads inside
7. Now you need a frame or table to set the thing on and place it in yourwindow. You will notice you will have a gap around the vent in yourwindow you will only need to plug this gap if it’s a wide gap. This ismore to keep bugs out than anything else. You can tape the hole or finda piece of Styrofoam to plug the hole.

We could have used straps to strap it to the wall but we opted for a table toset the cooler on so that way we could easily pull it out of the window andshut it during the winter. Note the notch in the table top and the cross 2X4that is so the drain plug can slide onto the table without hitting anything andcausing damage. If you build one of these tables to set a swamp cooler onremember the cooler in operation is full of water and can get quite heave sokeep that in mind when building the thing. Now when the fall gets here Iwill reach under to open the drain plug and when the water has drained andlost most of it’s weight it will be much easier to pull away from the window.Also keep in mind the height of the table is critical as the vent has to fit inthe window, if not you will be re-doing the table and with my table I had aslope away from the wall of the house, so the two closer legs are ½” longerthe rear legs. You will need a level to check this, it’s not critical you justdon’t want a noticeably low side to your cooler table as all the water will runto the low side in your cooler and that will be the side that will overflow ifthat were to happen.
8. Wiring it up to your bank of batteries.
This is simple we just went to Radio Shack and bought a pair of battery clipslike on the end of a battery charger. This way we could do a quickdisconnect if it needed to be disconnected for any reason. You do NOTwant to connect this device through a cigarette lighter plug as most plugseven the heavy duty plugs will not handle the draw this motor takes, so don’tdo the cigarette lighter plug for this device.

You can wire this directly to a bank of solar panels and as long as thesun shines you can run your swamp cooler. We recommend you run 4 –100 watt solar panels to run this cooler. You can find these on Ebayfrom $100 to $150 each, including shipping.
Or you can wire it to your batteries if you have a 12 volt solar systemwith solar panels, charge controller and a bank of batteries. This is themost efficient way to go since after the sun goes down it will still takeseveral hours to cool down your home this way you can still run the 12volt cooler off your batteries as long as you want.
So the cooler used will cost you about $100 the solar panels will costyou about $600 the fan will cost you about $30 the water pump will costabout $32 another $40 for wiring. So, for about $800 and you can havetotally FREE solar cooling for your home. Not bad considering the costof a new swamp cooler can set you back $800 or more.
NOTE: Keep in mind a 13 inch fan will NOT put out as much air as an20 inch fan. Also you will need a High Output or High Volume fan toget the kind of airflow you will be happy with. Also be aware you willneed a Reversible fan (a fan that can be run in either direction bychanging the wiring around), this way if you need to change thedirection of your air flow it is a simple matter of changing your wiresaround and you are set to go.
WARNING: Swamp coolers do not work as efficient in the east as theydo in the west. The reason is humidity the dryer the air the moreefficient the cooling is. The reason is Evaporative (swamp) coolers workby cooling the air due to evaporation of the water moving through thepads while air is being drawn through it. The more moisture you havein your air the less effective the cooler will work. Sorry about this it’s afact of physics that I can not control. But if you find yourself in a long

term situation without power you will be very thankful you have a 12volt powered swamp cooler no matter the humidity. (But it seems latelyit’s been terribly hot and dry all over the country and this just mightnot be a rare random occurrence, it might just become the new normalweather). Look for more drought, more hot weather, record hightemperatures, less humidity and more crop failures and higher prices atthe grocery store.
More FREE Plans on How to build a simple 12 volt swamp cooler
Living on Solar
http://www.livingonsolar.com
12 volt Swamp Coolers for sale
http://www.backwoodssolar.com/catalog/appliances_dc.htm
copyright 2013 by Dr. T. M. Lamb