how to build site to site vpn with mikrotik - biznet gio...
TRANSCRIPT
Biznet GIO Cloud - Build Site To Site VPN With Mikrotik
How To Build Site To Site VPN With Mikrotik

© Biznet GIO all right reserved
Biznet GIO Cloud - Build Site To Site VPN With Mikrotik
2 of 13
Introduction
This document is intended to guide you through the necessary steps to build a site-to-site VPN. Please note a site-to-site VPN can only be built from a VPC therefore for the purposes of this guide it is assumed you have already built a VPC and the Remote Office site we using Mikrotik Router for example. In order to demonstrate the site-to site VPN we will show you how to build one between two VPCs. Should you wish to build a site-to-site VPN between your VPC and another location the build process and logic will be the same. The design we are going to demonstrate can be articulated as follows:
The VPC called “Cloud - VPC” has been built in the Jakarta Availability Zone and the “Cloud - VPC - Remote” is in Office The details of the VPN created are as follows:
Setting Cloud - VDC Cloud – VPC - Remote
VPC IP Address 103.44.26.52 182.253.215.84
Protected Subnet 10.1.1.0/24 192.168.1.0/24
Phase 1 AES128, SHA1, modp1024(2)
Phase 2 AES128, SHA1, none
Shared Secret VPC-S3cret
You do not need to worry about the data in the table above for now as this document has been designed to guide you through how to find this information and make the decisions necessary for a successful VPN connection.
A “Protected Subnet” is an IPSec term used to define the IP Address range of the
those devices you wish to communicate with via the
© Biznet GIO all right reserved
Biznet GIO Cloud - Build Site To Site VPN With Mikrotik
3 of 13
Getting Started
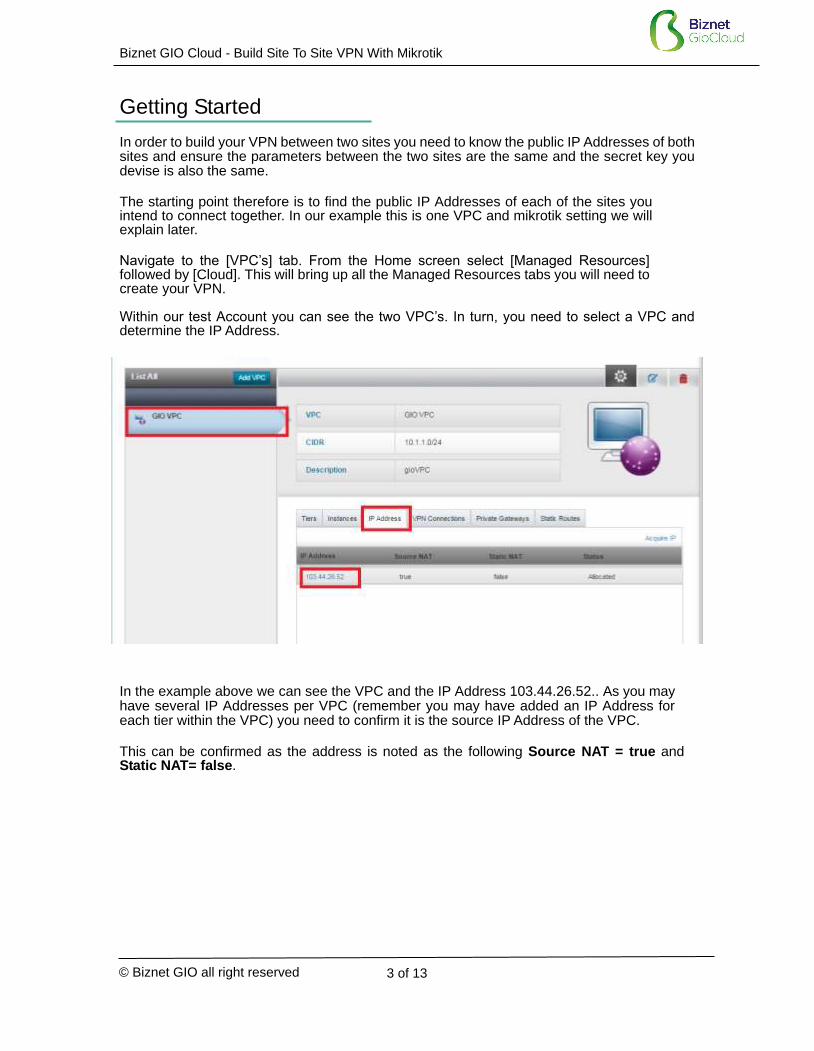
In order to build your VPN between two sites you need to know the public IP Addresses of both sites and ensure the parameters between the two sites are the same and the secret key you devise is also the same. The starting point therefore is to find the public IP Addresses of each of the sites you intend to connect together. In our example this is one VPC and mikrotik setting we will explain later. Navigate to the [VPC’s] tab. From the Home screen select [Managed Resources] followed by [Cloud]. This will bring up all the Managed Resources tabs you will need to create your VPN. Within our test Account you can see the two VPC’s. In turn, you need to select a VPC and determine the IP Address. In the example above we can see the VPC and the IP Address 103.44.26.52.. As you may have several IP Addresses per VPC (remember you may have added an IP Address for each tier within the VPC) you need to confirm it is the source IP Address of the VPC. This can be confirmed as the address is noted as the following Source NAT = true and Static NAT= false.
© Biznet GIO all right reserved
Biznet GIO Cloud - Build Site To Site VPN With Mikrotik
4 of 13
VPN Customer Gateway
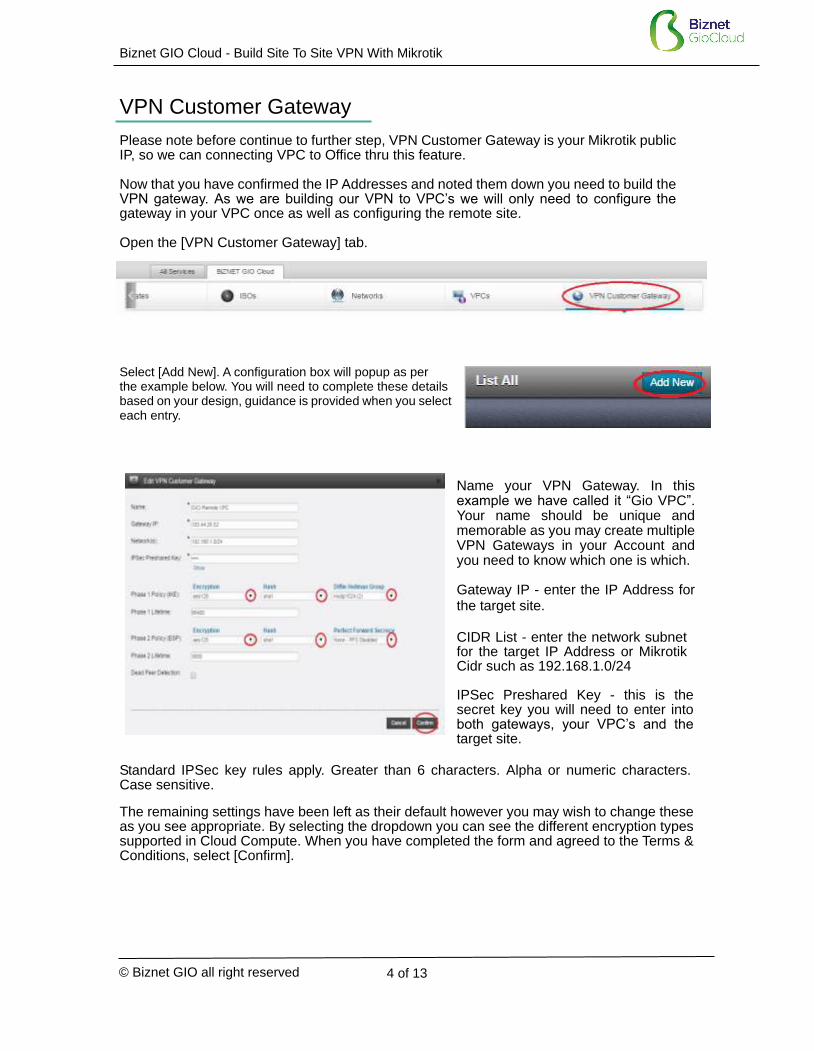
Please note before continue to further step, VPN Customer Gateway is your Mikrotik public IP, so we can connecting VPC to Office thru this feature. Now that you have confirmed the IP Addresses and noted them down you need to build the VPN gateway. As we are building our VPN to VPC’s we will only need to configure the gateway in your VPC once as well as configuring the remote site. Open the [VPN Customer Gateway] tab.
Select [Add New]. A configuration box will popup as per the example below. You will need to complete these details based on your design, guidance is provided when you select each entry.
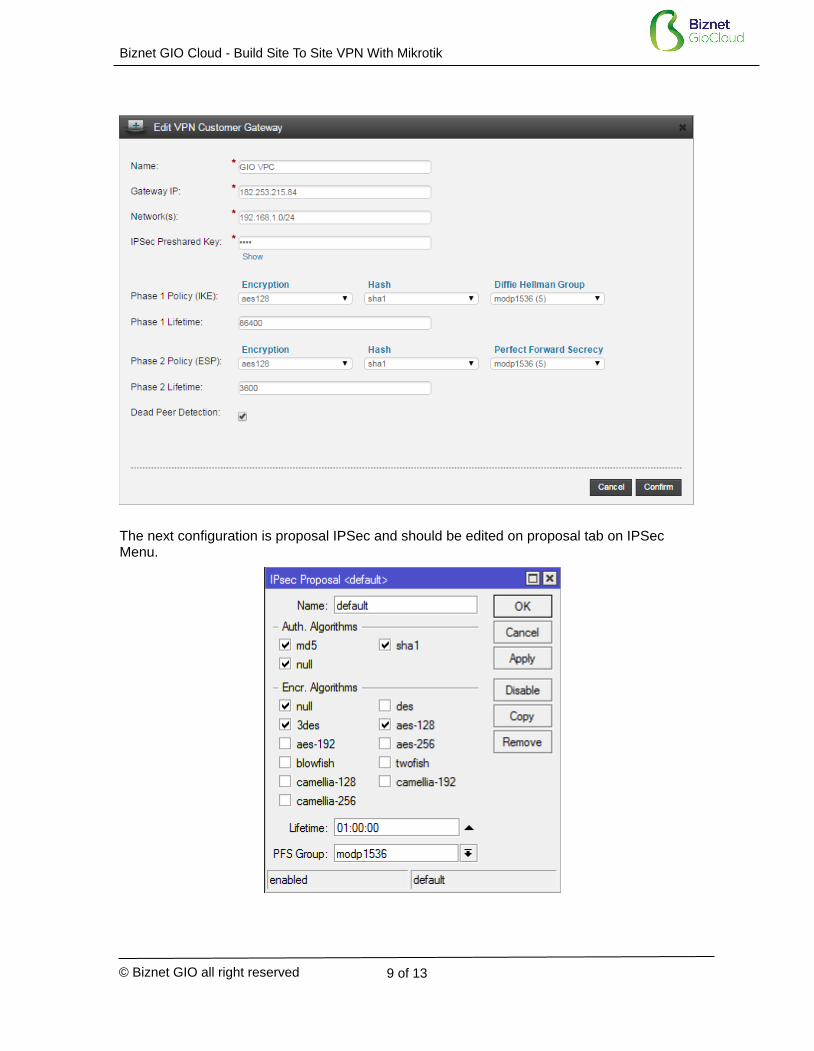
Name your VPN Gateway. In this example we have called it “Gio VPC”. Your name should be unique and memorable as you may create multiple VPN Gateways in your Account and you need to know which one is which. Gateway IP - enter the IP Address for the target site. CIDR List - enter the network subnet for the target IP Address or Mikrotik Cidr such as 192.168.1.0/24 IPSec Preshared Key - this is the secret key you will need to enter into both gateways, your VPC’s and the target site.
Standard IPSec key rules apply. Greater than 6 characters. Alpha or numeric characters. Case sensitive. The remaining settings have been left as their default however you may wish to change these as you see appropriate. By selecting the dropdown you can see the different encryption types supported in Cloud Compute. When you have completed the form and agreed to the Terms & Conditions, select [Confirm].
© Biznet GIO all right reserved
Biznet GIO Cloud - Build Site To Site VPN With Mikrotik
5 of 13
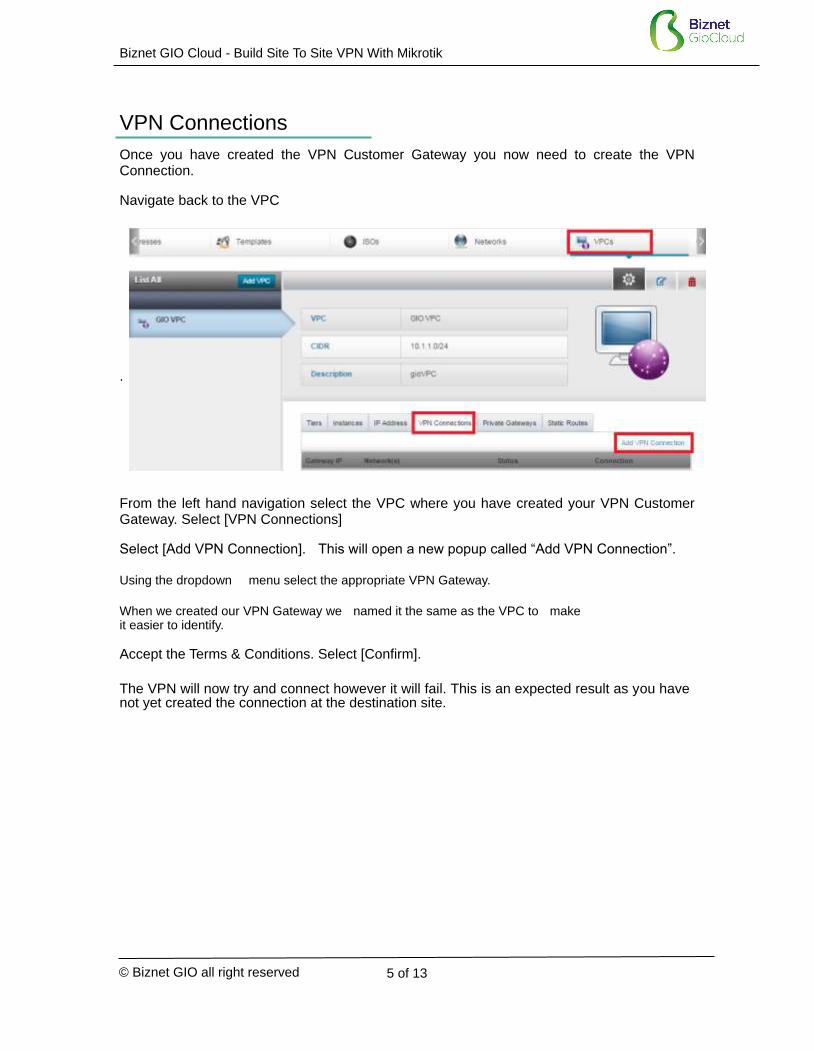
VPN Connections Once you have created the VPN Customer Gateway you now need to create the VPN Connection. Navigate back to the VPC . From the left hand navigation select the VPC where you have created your VPN Customer Gateway. Select [VPN Connections] Select [Add VPN Connection]. This will open a new popup called “Add VPN Connection”. Using the dropdown menu select the appropriate VPN Gateway.
When we created our VPN Gateway we named it the same as the VPC to make it easier to identify. Accept the Terms & Conditions. Select [Confirm].
The VPN will now try and connect however it will fail. This is an expected result as you have not yet created the connection at the destination site.

© Biznet GIO all right reserved
Biznet GIO Cloud - Build Site To Site VPN With Mikrotik
6 of 13
You will note that the Gateway and Network addresses have now been populated but you will see the “error” as the destination site is not ready. Again unless you have done this in quick succession, this will be in an “Error” state as the first connection will have timed out waiting for the other end to respond. To re-establish the connection you must reset both ends of the VPN, to do this use the [Reset] options Now we will Prepare for configuration Miktorik site, we will remind again for mikrotik detail : Public IP : 182.253.215.84 Netmask : 255.255.255.248 Gateway : 182.253.215.81 CIDR : 192.168.1.0/24 Remote Miktorik router using Winbox, and ensure that your internet connection already plug to Eth1 and your PC for configure this miktorik plug to Eth2 You can download winbox thru this link http://www.mikrotik.com/download

© Biznet GIO all right reserved
Biznet GIO Cloud - Build Site To Site VPN With Mikrotik
7 of 13
Router Configuration First at all you should setting IP address using IP menu and the choose address
And the result should be like this After that we should create IPsec configuration in mikrotik, the main function of this part is for handshake with VPC Cloud using Customer Gateway, so the setting must be same with VPN Customer Gateway configuration.

© Biznet GIO all right reserved
Biznet GIO Cloud - Build Site To Site VPN With Mikrotik
8 of 13
Create New Policy in IPSec, IPSec menu will be found on IP > IPSec, and choose policy tab Then click add new.
If the policy was created so the next step is create peers, choose peers menu beside policy tab, peers configuration must be same with VPN customer gateway, regarding encypt method
© Biznet GIO all right reserved
Biznet GIO Cloud - Build Site To Site VPN With Mikrotik
9 of 13
The next configuration is proposal IPSec and should be edited on proposal tab on IPSec Menu.
© Biznet GIO all right reserved
Biznet GIO Cloud - Build Site To Site VPN With Mikrotik
10 of 13
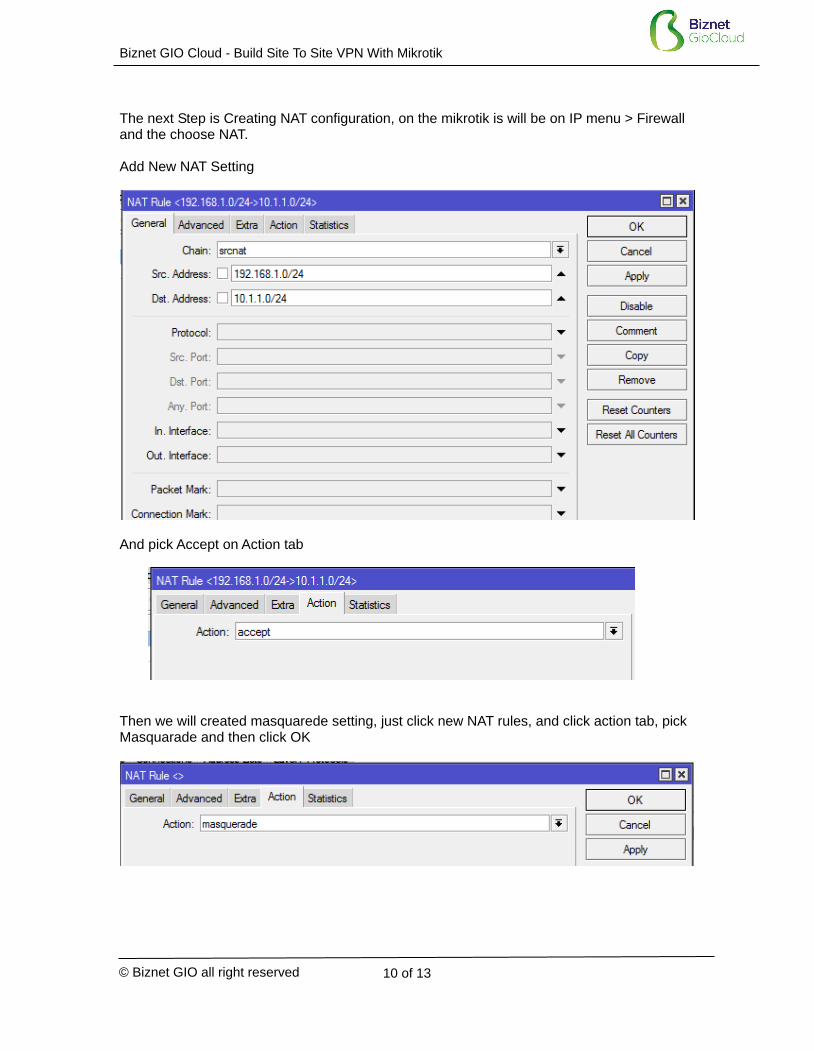
The next Step is Creating NAT configuration, on the mikrotik is will be on IP menu > Firewall and the choose NAT. Add New NAT Setting
And pick Accept on Action tab Then we will created masquarede setting, just click new NAT rules, and click action tab, pick Masquarade and then click OK
© Biznet GIO all right reserved
Biznet GIO Cloud - Build Site To Site VPN With Mikrotik
11 of 13
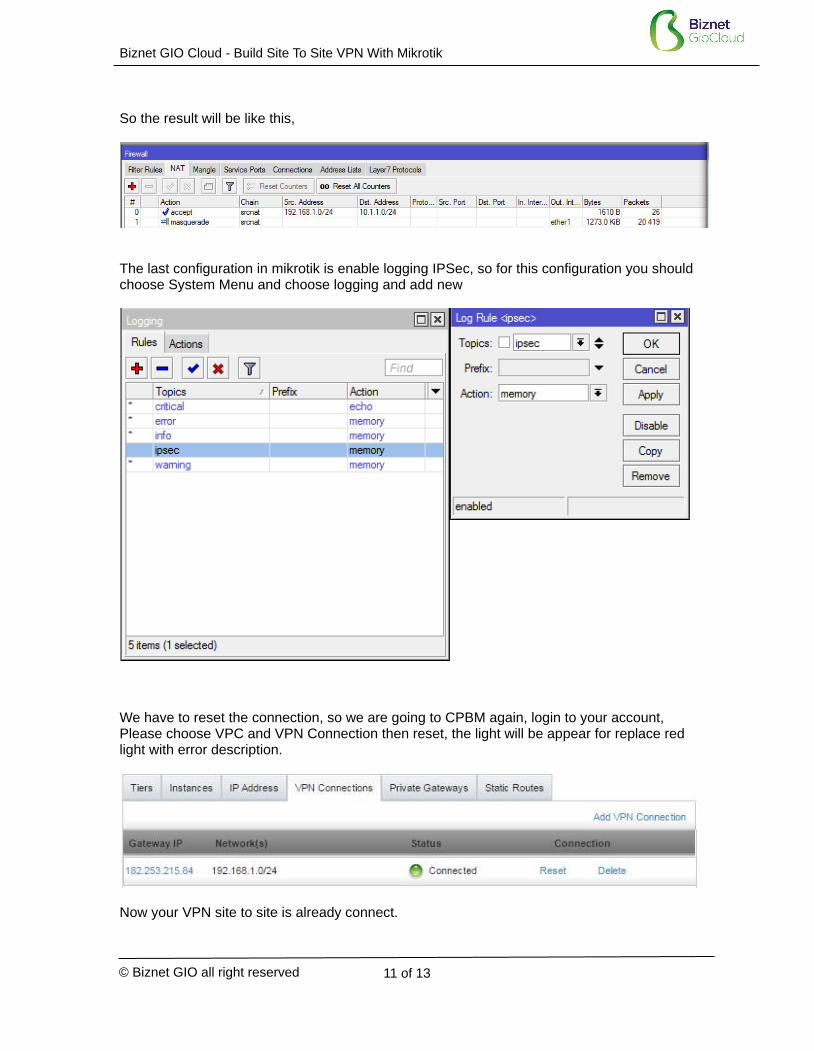
So the result will be like this,
The last configuration in mikrotik is enable logging IPSec, so for this configuration you should choose System Menu and choose logging and add new
We have to reset the connection, so we are going to CPBM again, login to your account, Please choose VPC and VPN Connection then reset, the light will be appear for replace red light with error description.
Now your VPN site to site is already connect.
© Biznet GIO all right reserved
Biznet GIO Cloud - Build Site To Site VPN With Mikrotik
12 of 13
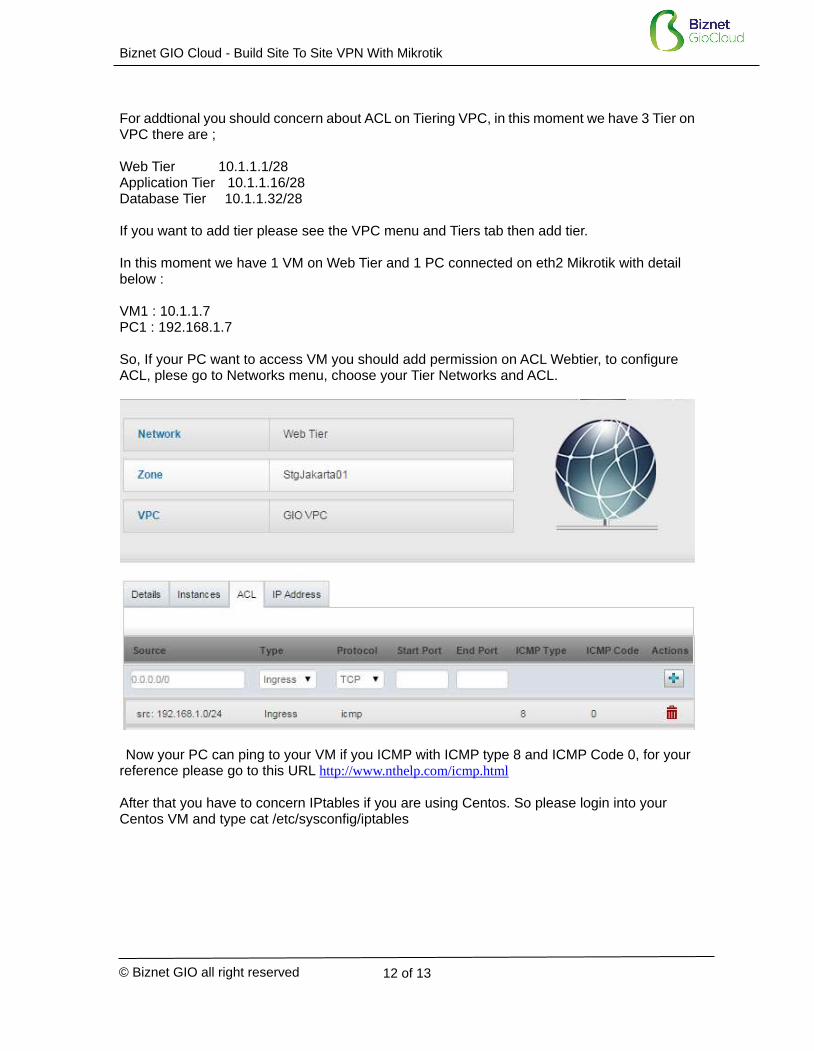
For addtional you should concern about ACL on Tiering VPC, in this moment we have 3 Tier on VPC there are ; Web Tier 10.1.1.1/28 Application Tier 10.1.1.16/28 Database Tier 10.1.1.32/28 If you want to add tier please see the VPC menu and Tiers tab then add tier. In this moment we have 1 VM on Web Tier and 1 PC connected on eth2 Mikrotik with detail below : VM1 : 10.1.1.7 PC1 : 192.168.1.7 So, If your PC want to access VM you should add permission on ACL Webtier, to configure ACL, plese go to Networks menu, choose your Tier Networks and ACL.
Now your PC can ping to your VM if you ICMP with ICMP type 8 and ICMP Code 0, for your reference please go to this URL http://www.nthelp.com/icmp.html
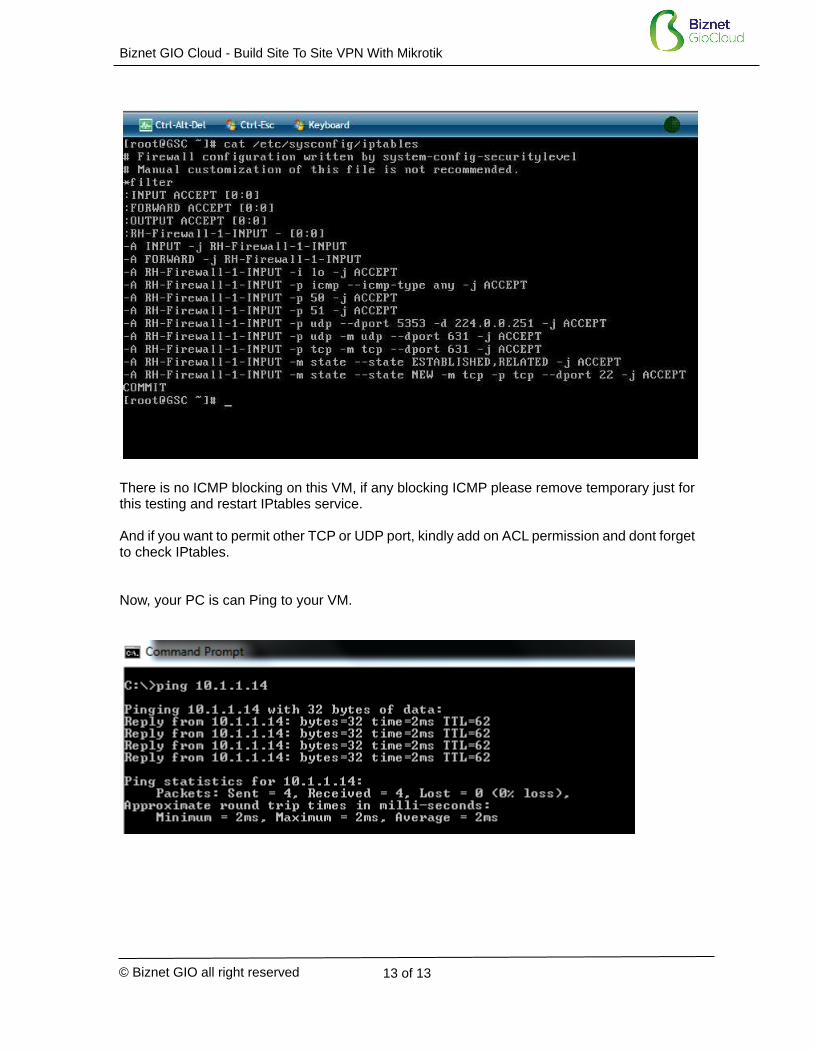
After that you have to concern IPtables if you are using Centos. So please login into your Centos VM and type cat /etc/sysconfig/iptables
© Biznet GIO all right reserved
Biznet GIO Cloud - Build Site To Site VPN With Mikrotik
13 of 13
There is no ICMP blocking on this VM, if any blocking ICMP please remove temporary just for this testing and restart IPtables service. And if you want to permit other TCP or UDP port, kindly add on ACL permission and dont forget to check IPtables. Now, your PC is can Ping to your VM.